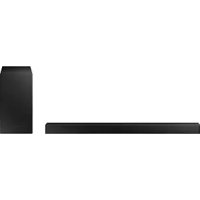
HWS40T - Soundbar SAMSUNG - Free user manual and instructions
Find the device manual for free HWS40T SAMSUNG in PDF.
Download the instructions for your Soundbar in PDF format for free! Find your manual HWS40T - SAMSUNG and take your electronic device back in hand. On this page are published all the documents necessary for the use of your device. HWS40T by SAMSUNG.
USER MANUAL HWS40T SAMSUNG
HW-S40T / S41T FULL MANUAL Imagine the possibilities Thank you for purchasing this Samsung product. To receive more complete service, please register your product at www.samsung.com/registerENG - 2 SAFETY INFORMATION SAFETY WARNINGS TO REDUCE THE RISK OF ELECTRIC SHOCK, DO NOT REMOVE THE COVER (OR BACK). NO USER-SERVICEABLE PARTS ARE INSIDE.
REFER SERVICING TO QUALIFIED SERVICE
PERSONNEL. Refer to the table below for an explanation of symbols which may be on your Samsung product. CAUTION RISK OF ELECTRIC SHOCK. DO NOT OPEN.This symbol indicates that high voltage is present inside. It is dangerous to make any kind of contact with any internal part of this product.This symbol indicates that this product has included important literature concerning operation and maintenance.Class II product : This symbol indicates that it does not require a safety connection to electrical earth (ground).If this symbol is not present on a product with a power cord, the product MUST have a reliable connection to protective earth (ground).AC voltage : This symbol indicates that the rated voltage marked with the symbol is AC voltage.DC voltage : This symbol indicates that the rated voltage marked with the symbol is DC voltage.Caution, Consult instructions for use : This symbol instructs the user to consult the user manual for further safety related information. WARNING
- To reduce the risk of re or electric shock, do not expose this appliance to rain or moisture. CAUTION
- TO PREVENT ELECTRIC SHOCK, MATCH WIDE BLADE OF PLUG TO WIDE SLOT, FULLY INSERT.
- This apparatus shall always be connected to a AC outlet with a protective grounding connection.
- To disconnect the apparatus from the mains, the plug must be pulled out from the mains socket, therefore the mains plug shall be readily operable.
- Do not expose this apparatus to dripping or splashing. Do not put objects lled with liquids, such as vases on the apparatus.
- To turn this apparatus off completely, you must pull the power plug out of the wall socket. Consequently, the power plug must be easily and readily accessible at all times.ENG - 3 PRECAUTIONS
1. Ensure that the AC power supply in your
house complies with the power requirements listed on the identication sticker located on the bottom of your product. Install your product horizontally, on a suitable base (furniture), with enough space around it for ventilation (7~10 cm). Make sure the ventilation slots are not covered. Do not place the unit on ampliers or other equipment which may become hot. This unit is designed for continuous use. To fully turn off the unit, disconnect the AC plug from the wall outlet. Unplug the unit if you intend to leave it unused for a long period of time.
2. During thunderstorms, disconnect the AC
plug from the wall outlet. Voltage peaks due to lightning could damage the unit.
3. Do not expose the unit to direct sunlight or
other heat sources. This could lead to overheating and cause the unit to malfunction.
4. Protect the product from moisture (i.e.
vases), and excess heat (e.g. a replace) or equipment creating strong magnetic or electric elds. Unplug the power cable from the AC wall socket if the unit malfunctions. Your product is not intended for industrial use. It is for personal use only. Condensation may occur if your product has been stored in cold temperatures. If transporting the unit during the winter, wait approximately 2 hours until the unit has reached room temperature before using.
5. The battery used with this product contains
chemicals that are harmful to the environment. Do not dispose of the battery in the general household trash. Do not expose the battery to excess heat, direct sunlight, or re. Do not short circuit, disassemble, or overheat the battery. Danger of explosion if the battery is replaced incorrectly. Replace only with the same or equivalent type.ENG - 4 Fabric cleaning Remove any dirt or stain on the product surface immediately. Removing and cleaning can be less effective for some substances or if left for a prolonged time. CAUTION
- Use a vacuum cleaner or an adhesive lint roller to remove dust, handprints, and the likes. – Some cleaning brushes may damage the product, depending on the materials they contain. – Towels and cleaning clothes may leave lint or dirt on the product.
- Do not use a nail or other tools to scratch the dirt off. It may damage the fabric.
- To remove oil or liquid stains, use a clean white cloth moist with water. If the stain persists, wipe it with a mixture of water and neutral detergent (such as dishwashing soaps) and a cloth. – A non-neutral detergent or cleaner may cause discolouration or fabric damage. – After cleaning, use a dry cloth or hairdryer to dry the area. – Do not use excessive force to avoid discolouration or fabric damage.ENG - 5 CONTENTS 01 Checking the Components 7 Inserting Batteries before using the Remote Control (AA batteries X 2) ------------------------- 7 02 Product Overview 8 Top Panel of the Soundbar ------------------------- 8 Bottom Panel of the Soundbar ------------------------- 9 03 Using the Remote Control 10 How to Use the Remote Control
05 Using a wired connection to the TV 15 Connecting using an Optical Cable
06 Using a wireless connection to the TV 16 Connecting via Bluetooth
07 Connecting an External Device 18 Connecting using an Optical Cable
09 Installing on a wall 24 10 Installing the Soundbar in front of TV 24 11 Software Update 25 Initialization
- For more information about the power supply and power consumption, refer to the label attached to the product. (Label: Bottom of the Soundbar Main Unit)
- To purchase additional components or optional cables, contact a Samsung Service Centre or Samsung Customer Care.
- There are two wall mount holes (M4 size) at the bottom of the Soundbar. Individually purchase a compatible bracket and mount the Soundbar on a wall to suit your preferences.
- Design, specications are subject to change without prior notice.
- The appearance of the accessories may differ slightly from the illustrations above. Inserting Batteries before using the Remote Control (AA batteries X 2) Slide the back cover in the direction of the arrow until it is completely removed. Insert 2 AA batteries (1.5V) oriented so that their polarity is correct. Slide the back cover back into position.ENG - 8 02 PRODUCT OVERVIEW Top Panel of the Soundbar Top Panel Position the product so that the SAMSUNG logo is located on the top.
LED indicatorThe LED Indicator ashes, glows, or changes colour depending on the Soundbar's current mode or status. The colour of the LED indicator and the number of lights indicate the active mode as described below.
- The Multicolour LED changes to White, Cyan, Green, Red, Yellow, Orange, Purple and Blue depending on the mode or status. Power Turns the power on and off. Volume Adjusts the volume. Source
- Press the (Source) button to change the mode. Each time you change the mode, the LED lights in white and then turns off.LED IndicatorWhite On -> Off White On -> Off“Digital Audio In” “Bluetooth”
- When you plug in the AC cord, the power button will begin working in 4 to 6 seconds.
- When you turn on this unit, there will be a 4 to 5 second delay before it produces sound.
- If you hear sounds from both the TV and Soundbar, go to the Settings menu for the TV audio and change the TV speaker to External Speaker.ENG - 9 Bottom Panel of the Soundbar SERVICEDC 24VDIGITAL AUDIO IN (OPTICAL) DC 24V SERVICEDIGITAL AUDIO IN (OPTICAL) DC 24V SERVICEDIGITAL AUDIO IN (OPTICAL) SERVICEDC 24V
DC 24V (Power Supply In) Connect the AC/DC power adapter.
DIGITAL AUDIO IN (OPTICAL) Connect to the digital (optical) output of an external device.
SERVICE Connect a USB storage device to upgrade the product's software.
- When disconnecting the power cable of the AC/DC power adaptor from a wall outlet, pull the plug. Do not pull the cable.
- Do not connect this unit or other components to an AC outlet until all connections between components are complete.ENG - 10
03 USING THE REMOTE CONTROL
How to Use the Remote Control VOL WOOFERSOUNDBARSOUND MODE PAIR
Power Turns the Soundbar on and off. LED Indicator Cyan Blinks X1
- Auto Power Down Function The unit turns off automatically in the following situations: – In “Digital Audio In” / “Bluetooth” mode if there is no audio signal for 20 minutes.
(Source) Press to select a source connected to the Soundbar.
(Mute) Press the (Mute) button to mute the sound. Press it again to unmute the sound. LED Indicator Blinks X RepeatlyENG - 11
SOUND MODE By pressing the button, you can select the desired audio mode. Each time the mode changes, the Multicolour LED blinks in white. LED Indicator White Blinks X1 “Standard” “Smart” “Music”
- Standard Outputs the original sound.
- Smart Analyzes the content in real time and automatically provides the optimal sound eld based on the characteristics of the content.
- Music Provides more natural and room lling sound for music content.
- Until pairing is complete, the Multicolour LED changes as Red → Green → Blue in turn. LED Indicator Red → Green → Blue Blinks Pairing Connection is complete Cyan Blinks X3
p (Play / Pause) You can also play or pause music by pressing the button.
- Music Skip Press the Right button to select the next music le. Press the Left button to select the previous music le.ENG - 12
(Sound Control) By pressing the button, you can select the desired audio mode. The desired item can be adjusted using the Up/Down buttons. Each time the mode changes, the Multicolour LED blinks in white. LED Indicator White Blinks X1 “Treble” “Bass” “Sync”
Push the button up or down to adjust the woofer (bass) between -6 to +6. To set the woofer (bass) volume level to 0 (Default), press the button.
VOLUME Push the button up or down to adjust the volume. LED Indicator White moves to right X1 Volume Up White moves to left X1 Volume DownENG - 13 Adjusting the Soundbar volume with a TV remote control Adjust the Soundbar volume using the TV’s remote control.
- This function can be used with IR remote controls only. Bluetooth remote controls (remote controls that require pairing) are not supported.
- Set the TV speaker to External Speaker to use this function.
2. Push up and hold the WOOFER button for 5 seconds.
Each time you push the WOOFER button up and hold it for 5 seconds, the mode switches in the following order: “Samsung-TV Remote” (Default mode), “Off-TV Remote”, “All-TV Remote”. The LED indicator status changes each time the mode is changed, as shown below. Remote Control Button LED Indicator Status SOUND MODE VOL WOOFER SOUNDBAR 5 Sec "Samsung-TV Remote" (Default mode) Blue Blinks X1 Enable a Samsung TV’s IR remote control. SOUND MODE VOL WOOFER SOUNDBAR 5 Sec "Off-TV Remote" Red Blinks X1 Disable the TV remote control. SOUND MODE VOL WOOFER SOUNDBAR 5 Sec "All-TV Remote" Green Blinks X1 Enable a third-party TV’s IR remote control.ENG - 14
04 CONNECTING THE SOUNDBAR
Connecting Electrical Power Use the power components to connect the Soundbar to an electrical outlet in the following order:
- For more information about the required electrical power and power consumption, refer to the label attached to the product. (Label: Bottom of the Soundbar Main Unit)
1. First connect the power cable to the AC/DC adapter.
Connect the AC/DC adapter (with the power cable) to the Soundbar.
2. Connect the power cord to a wall socket.
- If you unplug and reconnect the power cord when the product is turned on, the Soundbar turns on automatically.
- Make sure to rest the AC/DC Adapter at on a table or the oor. If you place the AC/DC Adapter so that it is hanging with the AC cord input facing upwards, water or other foreign substances could enter the Adapter and cause the Adapter to malfunction.ENG - 15 05 USING A WIRED CONNECTION TO THE TV Connecting using an Optical Cable When the audio in a broadcast is encoded in Dolby Digital and the “Digital Output Audio Format” on your TV is set to PCM, we recommend that you change the setting to Dolby Digital. When the setting on the TV is changed, you will experience better sound quality. (The TV menu may use different words for Dolby Digital and PCM depending on the TV manufacturer.) Pre-connection Checklist
- When you use an optical cable and the terminals have covers, be sure to remove the covers. LED IndicatorWhite On -> Off“Digital Audio In” DC 24V SERVICE
(OPTICAL) OPTICAL OUTBottom of the SoundbarOptical CableTop of the Soundbar
1. With the TV and Soundbar turned off, connect the DIGITAL AUDIO IN (OPTICAL) port on the
Soundbar and the OPTICAL output port on the TV with the optical cable, as shown in the gure.
2. Turn on the Soundbar and TV.
3. Press the (Source) button on the top panel or remote control, and then select the “Digital
4. The TV sound is output from the Soundbar.ENG - 16
06 USING A WIRELESS CONNECTION TO THE TV Connecting via Bluetooth When a Samsung TV is connected using Bluetooth, you can hear stereo sound without the hassle of cables.
- Only one Samsung TV can be connected at a time.
- Samsung TV that supports Bluetooth can be connected. Check the specications of your TV. The initial connection
Red → Green → Blue Blinks Pairing Connection is complete Cyan Blinks X3 When in “Bluetooth” mode 5 Sec
- Until pairing is complete, the Multicolor LED changes as Red → Green
- Blue in turn. “Ready to connect via Bluetooth.” “Ding” Short Sound.
An available Soundbar is indicated with “Need Pairing” or “Paired” on the TV’s Bluetooth device list. To connect the Samsung TV to the Soundbar, select the message, and then establish a connection.
4. You can now hear Samsung TV sound from the Soundbar.
- If there is a connection log between the Soundbar and Samsung TV, the Soundbar is automatically connected by changing its mode to “Bluetooth”.ENG - 17 If the device fails to connect
- If you have an existing Soundbar (e.g., [AV] Samsung Soundbar S4T-Series) on the list of speakers on the Samsung TV, delete it.
- Then repeat steps 1 through 3. Disconnecting the Soundbar from the Samsung TV Press the (Source) button on the top panel or on the remote control to select the mode other than “Bluetooth”.
- Disconnecting takes time because the Samsung TV must receive a response from the Soundbar. (The time required may differ, depending on the Samsung TV model.) Notes on Bluetooth connection
- Locate a new device within 1 m to connect via Bluetooth communication.
- If asked for a PIN code when connecting a Bluetooth device, enter <0000>.
- The Soundbar automatically turns off after 20 minutes in the Ready state.
- The Soundbar may not perform Bluetooth search or connection correctly under the following circumstances: – If there is a strong electrical eld around the Soundbar. – If several Bluetooth devices are simultaneously paired with the Soundbar. – If the Bluetooth device is turned off, not in place, or malfunctions.
- Electronic devices may cause radio interference. Devices that generate electromagnetic waves must be kept away from the Soundbar main unit - e.g., microwaves, wireless LAN devices, etc.ENG - 18
OPTICAL OUT Bottom of the Soundbar Optical Cable Top of the Soundbar BD / DVD player / Set-top box / Game console
1. With the external device and Soundbar turned off, connect the DIGITAL AUDIO IN (OPTICAL) port
on the Soundbar and the OPTICAL output port on the external device with the optical cable, as shown in the gure.
2. Turn on the Soundbar and external device.
3. Press the (Source) button on the top panel or remote control, and then select the “Digital
4. The external device sound is output from the Soundbar.ENG - 19
08 CONNECTING A MOBILE DEVICE
Connecting via Bluetooth When a mobile device is connected using Bluetooth, you can hear stereo sound without the hassle of cables.
- When you connect a paired Bluetooth device with the Soundbar off, the Soundbar automatically turns on. The initial connection
- When connecting to a new Bluetooth device, make sure the device is within 1 m distance.
Red → Green → Blue Blinks Pairing Connection is complete Cyan Blinks X3 When in “Bluetooth” mode 5 Sec
- Until pairing is complete, the Multicolor LED changes as Red → Green
- Blue in turn. “Ready to connect via Bluetooth.” “Ding” Short Sound.
2. On your device, select “[AV] Samsung Soundbar S4T-Series” from the list that appears.
3. Play music les from the device connected via Bluetooth through the Soundbar.
If the device fails to connect
- If you have an existing Soundbar (e.g., [AV] Samsung Soundbar S4T-Series) on the list of speakers on the Mobile device, delete it.
- Then repeat steps 1 and 2. mobile deviceENG - 20 Notes on Bluetooth connection
- Locate a new device within 1 m to connect via Bluetooth communication.
- If asked for a PIN code when connecting a Bluetooth device, enter <0000>.
- The Soundbar automatically turns off after 20 minutes in the Ready state.
- The Soundbar may not perform Bluetooth search or connection correctly under the following circumstances: – If there is a strong electrical eld around the Soundbar. – If several Bluetooth devices are simultaneously paired with the Soundbar. – If the Bluetooth device is turned off, not in place, or malfunctions.
- Electronic devices may cause radio interference. Devices that generate electromagnetic waves must be kept away from the Soundbar main unit - e.g., microwaves, wireless LAN devices, etc.
- The Soundbar supports SBC data (44.1kHz, 48kHz).
- Connect only to a Bluetooth device that supports the A2DP (AV) function.
- You cannot connect the Soundbar to a Bluetooth device that supports only the HF (Hands Free) function.
- When connecting the Soundbar to a Bluetooth device, place them as close to each other as possible.
- The farther the Soundbar and Bluetooth device are from each other, the lower the sound quality will become. The Bluetooth connection may break when the devices are out of the effective range.
- The Bluetooth connection may not function as intended in areas with poor reception.
- A Bluetooth device may experience noise or malfunction under in the following conditions: – When the body is in contact with the signal transceiver on the Bluetooth device or Soundbar – In corners or when there is an obstacle in proximity, such as a wall or partition, where electrical changes may occur. – When exposed to radio interferences by other products operating on the same frequency ranges, such as medical equipment, microwave ovens, and wireless LAN devices. – Obstacles such as doors and walls may still impact the sound quality even when the devices are within the effective range.
- Note that your Soundbar cannot be paired with other Bluetooth devices while using the Bluetooth option.
- This wireless device may cause electrical interference during operation.ENG - 21 Disconnecting the Bluetooth device from a Soundbar You can disconnect a Bluetooth device from the Soundbar. For instructions, see the Bluetooth device’s user manual.
- The Soundbar will be disconnected.
- If the Soundbar is disconnected from the Bluetooth device, the multicolour LED indicator on the Soundbar blinks "Red” three times. Disconnecting the Soundbar from the Bluetooth device Press the (Source) button on the top panel or on the remote control to select the mode other than “Bluetooth”.
- Disconnecting takes time because the Bluetooth device must receive a response from the Soundbar. (Disconnection time may differ, depending on the Bluetooth device)
- If the Soundbar is disconnected from the Bluetooth device, the multicolour LED indicator on the Soundbar blinks "Red” three times.ENG - 22 Bluetooth Multi connection The Soundbar can be connected to 2 Bluetooth devices at the same time. Bluetooth device A Bluetooth device B
1. Connect the Soundbar to up to two Bluetooth devices. (See page 19)
2. Play music from one of the connected Bluetooth devices while two devices are connected.
3. To play music from the Bluetooth device “B” while playing from the device “A”, pause or stop
playback on the device “A” and then start playing on the device “B”.
- The device won’t switch if playing music from the device “B” without pausing or stopping the device “A” rst. Bluetooth Multi Pairing How to pair multiple devices to the Soundbar
1. Turn on the Soundbar.
2. On any source, press and hold the (Source) button on the top of the Soundbar for more than
5 seconds for the Soundbar to go into “Bluetooth Pairing” mode, then on the Bluetooth device side, switch Bluetooth on, and select the Soundbar from the list of available devices, the Soundbar will automatically connect to the Bluetooth device.
3. A 2nd Bluetooth device can be paired and connected to the Soundbar using the same method.
If you attempt to connect a 3rd device, a connected device that is not playing audio will lose its Bluetooth connection, but will still be paired with the Soundbar.
4. Using the same method, you can pair up to 8 Bluetooth devices, but only the last 2 will stay
connected to the Soundbar at the same time. NOTES
- Only 1 Samsung TV, or 2 Bluetooth devices can be connected to the Soundbar at one time.
- The Soundbar will be disconnected from Bluetooth devices when it receives a connection request from a Samsung TV.ENG - 23 Using the Tap Sound Tap the Soundbar with your mobile device to play the sound of content on the mobile device through the Soundbar.
- This function may not be supported, depending on the mobile device.
- This function is only compatible with Samsung mobile devices with Android 8.1 or later. Mobile device SmartThings App Top of the Soundbar
1. Turn on the Tap Sound function on your mobile device.
- For details on how to turn on the function, refer to “Setting the Tap Sound function” below.
2. Tap the Soundbar with the mobile device. Select “Start now” in the displayed message window.
A connection is established between the mobile device and Soundbar via Bluetooth.
3. Play the sound of content on the mobile device through the Soundbar.
- This function connects a mobile device to the Soundbar via Bluetooth by detecting vibration that occurs when the device touches the Soundbar.
- Make sure the mobile device does not tap a sharp corner of the Soundbar. The Soundbar or mobile device may become scratched or damaged.
- It is recommended that the mobile device be covered with a case. Lightly tap the wide area in the upper portion of the Soundbar, without using excessive force.
- To use this function, update the SmartThings app to the latest version. The function may not be supported, depending on the app version. Setting the Tap Sound function Use the SmartThings app to turn on the Tap View, Tap Sound function.
1. On the mobile device, run the SmartThings app.
2. Select ( → ) in the SmartThings app screen displayed on the mobile device.
3. Set “Tap View, Tap Sound” to On to allow the function to work when a mobile device moves close to
the Soundbar. The function is turned on. NOTES
- When the mobile device is in power-saving mode, the Tap Sound function does not work.
- The Tap Sound function may not work if there are devices near the Soundbar that cause radio interference such as electric devices. Make sure devices that may cause radio interference are placed at a sufcient distance away from the Soundbar.ENG - 24
WALL Samsung do not support the wall mount. You can purchase a wall mount separately to install the speaker on a wall if you want. Considerations for purchasing
- Since Wall-mount installation is optional, you must purchase the corresponding accessories separately.
- Check the strength of the wall before you install the Wall Mount Bracket. If the strength is insufcient,make sure to reinforce the wall before installing the Wall Mount Bracket and the speaker on the wall.
- Samsung is not liable for any damage to the product due to the product being installed inappropriately.
- Please beware not to install the speaker being laid down or turned upside down. 10 INSTALLING THE SOUNDBAR IN
3cm or more Align the centre of the Soundbar to the centre of the TV as illustrated in the image. Place the Soundbar at least 3cm away from the TV. NOTES
- Make sure the Soundbar is placed on a at and solid surface.
- Insufcient gap from the TV may cause acoustic problems.ENG - 25 11 SOFTWARE UPDATE Important: The update function erases all user settings. We recommend you write down your settings so that you can easily reset them after the update. SERVICE DC 24V
(OPTICAL) Bottom of the Soundbar
1. Connect a USB thumb drive to your
computer. Important: Make sure there are no music les on the USB thumb drive. This may cause the rmware update to fail.
2. Go to the Samsung website at
select Enter Model Number and enter the model of your Soundbar. Select manuals and downloads and download the latest software le.
3. Save the downloaded software to a USB
stick and select “Extract Here” to unzip the folder.
4. Turn on the Soundbar and connect the USB
stick containing the software update to the SERVICE port.
5. Turn on the Soundbar Within 3 minutes, the
5 led cycle sequence ashing and updating begins. Then the 5 leds all is white, then 5 led cycle sequence ashing again, When the update is complete, the Soundbar will automatically restart. LED Indicator White moves from left to right and right to left
- This product has a DUAL BOOT function. If the rmware fails to update, you can update the rmware again.ENG - 26 IfLEDsequenceashingisnot displayed
1. Turn off the Soundbar, disconnect and then
reconnect the USB storage device that contains the update les to the Soundbar’s SERVICE port.
2. Disconnect the Soundbar’s power cord,
reconnect it, and then turn on the Soundbar. NOTES
- The rmware update may not work properly if audio les supported by the Soundbar are stored in the USB storage device.
- Do not disconnect the power or remove the USB device while updates are being applied. The main unit will turn off automatically after completing the rmware update.
- After the update is completed, the user setup in the Soundbar is initialised so you can reset your settings. We recommend you write down your settings so that you can easily reset them after the update. If the software update fails, check if the USB stick is defective.
- Mac OS users should use MS-DOS (FAT) as the USB format.
- Updating via USB may not be available, depending on the USB storage device manufacturer. Initialization 5 Sec With the Soundbar on, press the (Volume) buttons on the body at the same time for at least 5 seconds. The LED display changes as shown below and then the Soundbar is initialised. LED Indicator Cyan Blinks X3 White moves from left to right and right to left CAUTION
- All the settings of the Soundbar are initialised. Be sure to perform this only when initialization is required.ENG - 27 12 TROUBLESHOOTING Refer to the instructions below if this product does not function properly. In case the power is not turned on ; Make sure the power cord of the Soundbar is correctly inserted into the outlet. In case the functions do not work properly ; After removing the power cord, insert it again. ; Remote the power cord from the external device and try again. ; If there is no signal, the Soundbar automatically turns off after a certain period of time. Turn on the power. In case the remote control does not work ; Make sure the remote is within range of the soundbar. ; Replace the batteries with new ones. In case the Soundbar sound is not output ; The volume of the Soundbar is too low or muted. Adjust the volume. ; When any external device (STB, Bluetooth device, mobile device, etc.) is connected, adjust the volume of the external device. ; For sound output of the TV, select Soundbar. (Samsung TV: Home ( ) → Settings ( ) → Sound → Sound Output → Select Soundbar) ; The cable connection to the Soundbar may not be loose. Remove the cable and connect again. ; Remove the power cord completely, reconnect, and turn the power on. ; Initialise the product and try again. (See page 26.) In case Bluetooth connection is not possible ; When connecting a new device, switch to Bluetooth Pairing for connection. (Press the PAIR button on the remote control or press the (Source) button on the body for at least 5 seconds.) ; If the Soundbar is connected to another device, disconnect that device rst to switch the device. ; Reconnect it after removing the Bluetooth speaker list on the device to connect. (Samsung TV: Home ( ) → Settings ( )
- Sound → Sound Output → Bluetooth Speaker List) ; Remove and reconnect the power plug, then try again. ; Initialise the product and try again. (See page 26.)ENG - 28 In case Bluetooth sound breaking occurs ; Sounds may be breaking due to interference by radio frequency or electronic devices nearby. Keep such devices away from the Soundbar to avoid radio interference. Example: microwave ovens. ; Because the device to connect is far away from the Soundbar, sound breaking may occur. Move the device near the Soundbar. ; If a part of your body is in contact with the Bluetooth transceiver or the product is installed on metal furniture, sound breaking may occur. Check the installation environment and conditions for use. In case the Soundbar is not turned on as soon as the TV is turned on ; When you turn off the Soundbar while watching TV, power synchronization with the TV is disabled. First turn off the TV. 13 LICENCE Manufactured under license from Dolby Laboratories. Dolby, Dolby Audio, and the double-D symbol are trademarks of Dolby Laboratories. For DTS patents, see http://patents.dts.com. Manufactured under license from DTS, Inc. DTS, the Symbol, DTS in combination with the Symbol, and DTS 2.0 Channel are registered trademarks or trademarks of DTS, Inc. in the United States and/orother countries. DTS, Inc. All Rights Reserved. The Bluetooth® word mark and logos are registered trademarks owned by the Bluetooth SIG, Inc. and any use of such marks by Samsung Electronics Co., Ltd. is under license. Other trademarks and trade names are those of their respective owners.ENG - 29 14 OPEN SOURCE LICENCE NOTICE To send inquiries and requests for questions regarding open sources, contact Samsung Open Source (http://opensource.samsung.com) 15 IMPORTANT NOTES ABOUT SERVICE
- Figures and illustrations in this User Manual are provided for reference only and may differ from actual product appearance.
- An administration fee may be charged if either (a) an engineer is called out at your request and there is no defect with the product (i.e. where the user manual has not been read). (b) you bring the unit to a repair centre and there is no defect with the product (i.e. where the user manual has not been read).
- You will be informed of the administration fee amount before a technician visits.ENG - 30
16 SPECIFICATIONS AND GUIDE
Specications Model Name HW-S40T / S41T Weight 1.9 kg Dimensions (W x H x D) 680.0 x 68.0 x 115.0 mm Operating Temperature Range +5°C to +35°C Operating Humidity Range 10 % ~ 75 % AMPLIFIER Rated Output power (25W x 2) + (25W x 2) Supported play formats (DTS 2.0 sound is played in DTS format.) LPCM 2ch, Dolby Audio™ (supporting Dolby® Digital), DTS
WIRELESS DEVICE OUTPUT POWER
BT max transmitter power 100mW at 2.4GHz – 2.4835GHz Overall Standby Power Consumption (W) 2.0W Bluetooth Port deactivation method Press and hold the SOUND MODE button for more than 5 seconds to turn off Bluetooth Power function. NOTES
- Samsung Electronics Co., Ltd reserves the right to change the specications without notice.
- Weight and dimensions are approximate.ENG - 31
- Hereby, Samsung, declares that this equipment is in compliance with Directive 2014/53/EU. The full text of the EU declaration of conformity is available at the following internet address: http://www.samsung.com go to Support > Search Product Support and enter the model name. This equipment may be operated in all EU countries. [Correct disposal of batteries in this product] (Applicable in countries with separate collection systems) This marking on the battery, manual or packaging indicates that the batteries in this product should not be disposed of with other household waste at the end of their working life. Where marked, the chemical symbols Hg, Cd or Pb indicate that the battery contains mercury, cadmium or lead above the reference levels in EC Directive 2006/66. If batteries are not properly disposed of, these substances can cause harm to human health or the environment. To protect natural resources and to promote material reuse, please separate batteries from other types of waste and recycle them through your local, free battery return system. Correct Disposal of This Product (Waste Electrical & Electronic Equipment) (Applicable in countries with separate collection systems) This marking on the product, accessories or literature indicates that the product and its electronic accessories (e.g. charger, headset, USB cable) should not be disposed of with other household waste at the end of their working life. To prevent possible harm to the environment or human health from uncontrolled waste disposal, please separate these items from other types of waste and recycle them responsibly to promote the sustainable reuse of material resources. Household users should contact either the retailer where they purchased this product, or their local government ofce, for details of where and how they can take these items for environmentally safe recycling. Business users should contact their supplier and check the terms and conditions of the purchase contract. This product and its electronic accessories should not be mixed with other commercial wastes for disposal. For information on Samsung’s environmental commitments and product specic regulatory obligations e.g. REACH, WEEE, Batteries, visit: http://www.samsung.com/uk/aboutsamsung/samsungelectronics/corporatecitizenship/data_corner.html
WOOFER (BASSZUS) SZINT
12 PROBLĒMU NOVĒRŠANA
POZNÁMKA OHĽADOM SERVISU