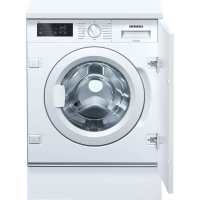
iQ500 WI14W301GB - Washing machine SIEMENS - Free user manual and instructions
Find the device manual for free iQ500 WI14W301GB SIEMENS in PDF.


Frequently Asked Questions - iQ500 WI14W301GB SIEMENS
User questions about iQ500 WI14W301GB SIEMENS
0 question about this device. Answer the ones you know or ask your own.
Ask a new question about this device
Download the instructions for your Washing machine in PDF format for free! Find your manual iQ500 WI14W301GB - SIEMENS and take your electronic device back in hand. On this page are published all the documents necessary for the use of your device. iQ500 WI14W301GB by SIEMENS.
USER MANUAL iQ500 WI14W301GB SIEMENS
CIMBOHTE3aONACHOCTCa CIMBOHNUH N3o6paXeHNA, KOHTO DaBaT INDINKAUHA 3a BnDa ONACHOCT.
BTo3n DOKyMeHCTe H3N013BaT CNEdHInTe CMBOIN 3a OnaCHOCT:
| Симboл за орасост за чужения | ОвноPre dedупраздітелно сьобсято Орасост от[elekntrочко наpopжени Риск OT[eк科研院所 |
| Орасost от[nорязвany |
OTHOCHO To3n DokyMeHT
| Симbol 3a onachoct 3начени | Опachoct ot пемарази Опachoct ot горец поьрхости |
| Опachoct ot симно магнисто полес | |
| Опachoct ot неонисяцу льчени |
Ta5nuu2: CumbOnu 3a onachocm
1.2.3 CtpyKtpa Ha npéDynpexkdeHnra
PepynpexdHnraT BTO3N DOKMeHT MMAT CTAHapTN3nPAH BbHwEN BID NCTaHdAPTN3nPAH CTpykTypa.


ONACHOCT
BnHn3ToyHKn Ha onaCHOCTTla!
Bb3mOHHnocpeHnO tNfHopapaHeHa onaHocTt/npedynpckdHeHe
Mepkn 3a6paHn 3a npDoTbpaTbaHe Ha onaChocTta.
CneHnIy nPmep NOKaBA npEynpEKeHHe, KoTo yBcOMaBA 3a TOKOB Yapd, npEeIN3BnKAn OH tAcTn NoD HanpeKeHHe. CnOmeHabe Ce MApkata 3a N36RbAbe Ha onacHOCTA.


ONACHOCT
Pnck OT TokOB yap npaH nuactn noH anpekeHne!
CmbptOT TOKOB ynap
KJNkhOteye HTeOEtEeONJIeKTHeO3aXpaHbAne HOe 60 CeHynI npDeI 3aIOuBaHaNe aPeMOHTa.
1.2.4 06uCNMBOJI
BTO3NIOKYMENTCEH3NON3BATCNEDHNTeO6UINCNMBONI:
| Оьш симвов Зачени | |
| I | Иденихицаре на спесиален сьвет (TEKCT w/ллграфика) |
| I | Иденихицаре на постс сьвет (само TEKCT) |
| I | Иденихицаре на врьзka Кьм Вideо урок |
| I | Иденихицаре на необхочимite И-стру金融市场 |
| I | Иденихицаре на необхочимite поедырпелейу沧обия |
| I | Иденихицаре на усанове (ako ..., Тогава ... ) |
| I | Иденихицаре на рezупат |
| [Стар] | Иденихицаре на Клиочни睁ь soуон |
| [00123456] | Иденихицаре на Кatableожен Homep |
| [Статус] | Иденихицаре на по��аизяп Тект/празорец (надиспега на уреда) |
Ta6nua3:06u cumeonu

IhctpymEnTu n NOMOuHcpeDCTBa
| посочае Порожасту Изображения | |
| Помошен Истру- мент [15000155] | Исттумент за разхлабва- н на пл actмов части |
| Отberека Торх T20 С OTВОР [00340764] | 100 Мm, 3a винтоve сPreдп- ан ecифт |
| Динамометрич= Клоч [15000441] | Динамометрич= Клоч 20 - 100 Nm |
| Плеса OTberека [00340854] | Врьх 3,5 mm x 0,6 mm x 100 mm, 3aшиtna Изолаця 1000 V AC |
| Плеса OTberека [00340855] | Врьх 5,5 mm x 1,0 mm x 125 mm, 3aшиtna Изолаця 1000 V AC |
| Клеси с Истовide- ни челюсти, по- ытл [00341269] | Дылжина 200 MM |
| Клеси розачки [00342182] | Дылжина: 200 MM |
Pnck OT naaun yactn npadn pa3xa6eHN BnHTOBe!
HapaHaBaHe npaui nadaun yact
3akpenete KOMNOHeHTa, TaKa Ye da He naHe.
BHIMAHHEI
Pnck OT naaun yactn nopadn pa3xna6eHN BnHTOBE!
NopeHa npTu qactn Ha ypeHa nnB Doma Ha KneHTa, Hap. bHo

3akpenete KOMnoHeHTa, Taka Ye da He naHHe.
N3nckBaHe:
YpeBt E N3KIOUeHOT 3aXpaHbHeTo.
YpeDbTe n3KIOUeH OT BDOOChA6nITeNHaT a MpeKa.
Upeinte ca CBO60HNO IOCTbHIN.
YekmejkeTo 3a npnHnnpenapat e cBaneHo.-8
3.1.1 CbanyHe Ha fapaadnnaHn
-
- Ocbbo6oTe Kpenexn enemEnT (1).
-
CbaneTe kanaKa (2).

PemOH
2.CBaJIeTe BnHTOBeTe.3.1.OcB6oDeTe KpeNexHInTe enEmeHTn(1,2).
MOnTpaaTeB06paTeHpe.

PemOH
3.3 CmHa Ha DpbkkKaTa Ha YekMeJKeTo 3a nepnneH npenapaT
N3nCKBaHe:
YpeIbTe N3KIOUeHOT 3aXpaHbHaHeTo.
YpeBt E n3KIOUeH OT BOOChA6DITENHaT MpeXa.
YekmedjeTo 3a nepunHn npenapat cBaaneHo. 8
3.3.1 CbAha Ha dpBkKaTa Ha YekMeJKeTo 3a nepnJeH npenapat
1.OcbobodTe Kpenexhnte enemHTN.
2.CBaIeTe pBxKkTaHa YekMeJKeTo 3a nepuHn npenapat.
3.3.2 MoTHnpaHe Ha DpBxKkTa Ha YekMeXdKeTo 3a nepnne npenapat
MOHTPauTe B opaTeH peI.

PemOH
3.4 CMHa Ha BpataTa

BHIMATEJIHO
OTBOpTe 0bIacTHa naHTnTe!
Ppema3BaHe/3axBaUaHHe Hn pbcTNTe
He nocaire Te KbM oBnaCTTa Ha naHTnte.
Hocete npedna3HN pKabu.
N3nCKBaHe:
YpeDbTe n3KJIoueHOT 3aXpaHbHaHeTo.
YpeBte n3KNIOueH OT BDOCHa6DITeHNHaTa Mpeka.
Bparataeotbopeha.
Me6eHnT nHaHe n cBaHe.
3.4.1 N3Baxdahe Ha BpaTaTa
1.
BHIMAHINEI
Pnck ot naaun qactn npadpa3xna6eHn BHTOBe!
NobpeDaHa npTm nactn Ha ypeDa nnB D oMa Ha KIneHTa, Hapd bHOTo.
3akpenete KOMnoHHTa, Taka ye da He naDHe.

BHIMATEHNO
Pnck ot npdaun qactn nopadnpa3xna6eHN BnHTOBe!
Hapahrahe npadn nadaaun actn.
3akpenete KOMnoHeHTa, Taka ye da He naHHe.
CbaTe BHTOBete(1).
2.ИЗвадете Бparata Harope.
3.4.2 MoHTpaHc Ha BpaTaTa
MoHTnpaTBeBobpaTeHpeI.

PemOH
3.5CMHaHa KOMNoHEnTHe Ha BpaTaTa
BHIMATEJIHO
OTBOpTe 06nactTa Ha naHTnte!
Ppema3BaHe/3axBaUaHHe Hn pbcTNTe
He nocaire Te KbM oBnaCTTa Ha naHTnte.
HocTe npednaHn pbkauu.
N3nCKBaHe:
YpeBt E N3KIOueHOT 3axpaHbAHeTo.
YpeIbTe N3KIOUeH OTOBDOChA6DNTeNHaTAtMpeXa.
Me6enHnT nHaEN e CBAeH.
Bparatae cbanenha.→10
3.5.1 CbAJIrHe Ha KOMNoHEnTHe Ha BpTaTa
Pa3rno6e Bpaata OTBH HABbTppe.
3.5.2 MoHTnpaHe Ha KOMNOHENTte Ha BpataTa
MOnTpaTBeBbpaTeHpe.

PemOH
3.6CMraHa Ha naHTata Ha BpaTaTa

BHIMATEJIHO
OTBOpTe 0bIacTHa naHTnTe!
Ppema3BaHe/3axBaUaHHe Hn pbcTNTe
He nocaire Te KbM oBnaCTTa Ha naHTnte.
HocTe npednaHn pbkauu.
N3nCKBaHe:
YpeBt E3KNIOUeOT 3axpaHbAHeTO.
YpeBt E n3KnIOueH OT BDOChA6DnTeNHaTa MpeXa.
3.6.1 CbānHe Ha nHaTata Ha BpaTata
- Pa3xla6te Dbata BnHTa.
2.ИЗБАДЕТБВРАТА. - Paarno6eTe Bpataota OTBbH HABtpe.
4.Canete naHTaHa BpataTa.
3.6.2 MoHTnpaHe Ha nHaTata Ha BpaTaTa
MOHTnpaTBeBbpaTeHpeI.

PemOH
3.7 CmHa Ha yynbTHHeHneTo Ha BpaTaTa
N3nCKBaHe:
YpeBt E N3KIOUeH OT 3axpaHbAHeto.
YpeBt e 3KIOueH OT BOOChA6DnTeHnHa MPeka.
YpeDnte ca Cbo6oHNO DocTbHNI.
YekmendkeTo3a nepunHnnpenapat e cBaneno.→8
ΦacadnHrT nahen e cbanEH.
Bpatata e cbaneha.10
DonnHnat Kanake CbaneH.→18
3.7.1 CbAHe Ha yIbTHHeHnETo Ha BpTaTa
- Paxna6eTe Kcataopa Ha OCBetneHnTo Ha 6apa6aHa.

2.
BHIMAHINE!
Pnck ot noBpeHa nobbpxHocT!
NoBpbxHocCTHa hypeJaMoKeJe ca HeaPdacka, ako n3non3BaTe HnepAnBnNInCHTpyMeTN.
H3no3BaTe cmo nactMacOBn HcTpyMeHTn 3a NOdmaHa
Ha oBraa npbCTeH.
CbaTe oBraaI npbCTeHOT yINbTHHeHHeTO C nIacTMacOB INcHTpyMeHT.
- OcbofoTe ynnbTHHeHHeTo Ha BpaTaTa ot npednnaHEn.
4.Ocbo6oTe KOHeKToPa Ha Ka6eNa ot KInouaIkaTa Ha BpaTaTa.

PemOH
5.Pa3xna6eTe BnHTOBete B yka3AHnpeD.
-
CBaIeTe npednnaHn.
-
N3KJIIOHcTe BCNCHCbeINHHTENH eIeMeHTn 3a Mapkyu.
8.ИЗbaTeTe yNtBTHeHnTo Ha BpaTaTa.
3.7.2 MoThnpaHe Ha ynnbTHeHMeTo Ha BpaTaTa
MOHTnpaTBeBobpateHpei.

PemOH
3.8CMHaHaKIOHaBpaTaTa
Kato npo3BODIeH NHE CME 3aBbJIeHN Da npoeOCTabHM Ha nOtp6bIeTIneTKe Kato
peepBa HA cact KIOUAnJa 3a Bpata, BIKIOENTENHO HcTpyKJy3a 3ePOEMHT BcBOT-
BETCTNE C PernAmEHA (EC) 2019/2023. BxMxN XcAAN DA OtBEKIXHM O6ae, 4e
CneL CMHATA Ha KIOUAnKaTA Ha Bpata, e Heo6XoIMMo DA ce H3BbpUn eneKTPO
TEXHHNECA NpOBePeka 3a BeOnaHcOHT ONBAINFmipan EneKTPOTeXHK, Pnpd ype
Bt da b6bde Ncchat B EKcIIOnaATuAor. ToBa Nlue TpRaBA Da b6de CnotBpDHeKA
BnKfHKnAuaCBIlnao CnoeUInHnHnHTe 3a CTPaHaT a KaONH, pAnopeDn B CTAHAPrN
OTIACHOCT
Pnck OT TKOB ydap npaH nuactn noHanpeKeHne!
Onachoc3aXUBOTaOTOKOByapBCnyuHa HenpaBUNeH peMOHT
EneKtpnue TaeTn Tp8Ba da ce pmoHTnpaT OT KbaHnHnPAH neneKtpoTeKHn
CnepemOnTaTp6BaJaCeN3BbPmI npOBepKa 3a 6E30NaCHOCTcBrlacHO VDE0701 mB CbOTBeTCTBHe CbC nEuHHTe 3a cTpaHata paope6M.

BHNMATEJIHO
Octpn p6oBe Ha Kopnycal HapaHaaHnO t np3BaHe Hocete npedanshpKaBn

PTEUYPTPEJDEHNE
Ppnnn3BaHa He HaknoHneH ypeDn! KocTHn fpaKtpyn/HapaHbAaBOn t npMa3BaHe Ykpenete ypeDncrepuy npnnBbae.
BHIMMATEJIHO
Pck ot nadaun qactn npadpa3xna6eHN BHTOBe! Hapanahe nopa nndaun qactn. 3akpenete KOMPOHETA, taKa ye da He naHe.
BHMAHHE!
PCKOTnadaunyactnnapnpa3xnaabeHNBHHTOBe!
NopedaHnpyruchnHa ypea HbDOMa Ha KIneHTA,HaNP.1bHO- 3akpeneteKOMnoHEHTA,Taka Ye Na He naHe.
m3nckbaHe:
YpeBt en3KNIOueHOT 3aXpaHbHaHeTO.
YpeBt e n3KnIOueH OT BOOChA6dntenHata Mpeka.
Ypeinte ca CBO6oHNO DOCTbHN.
Me6eHnHrT nHaH e cBaHc.
Фасадиет панел eCBaneH.
Bpatatae cpaneha.→10
O6TgauTnPbCTHeCBaH.
PpeHnT nHaen eCBaneH.
YnnbTHEHMeTO Ha BpaTaTa e CBaneHO.
3.8.1 CbānHe Ha KlnouaKaTa Ha BpaTaTa
1.ИЗк nullуе Te unceJa Ha KInHouAnkata Ha BpaTaTa.
2.Ocbo6oJeTe KIOHAnKaTa Ha BpaTata.
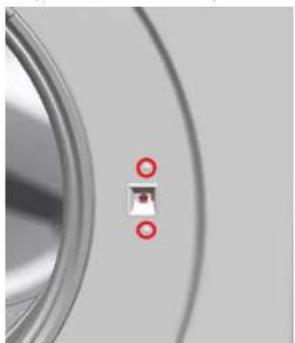
3.CbaneTe KIOHuaKata Ha BpaTata.

PemOH
3.8.2 MoHTmpeHa KJIIOUaJIkAraHa BpaTaTa
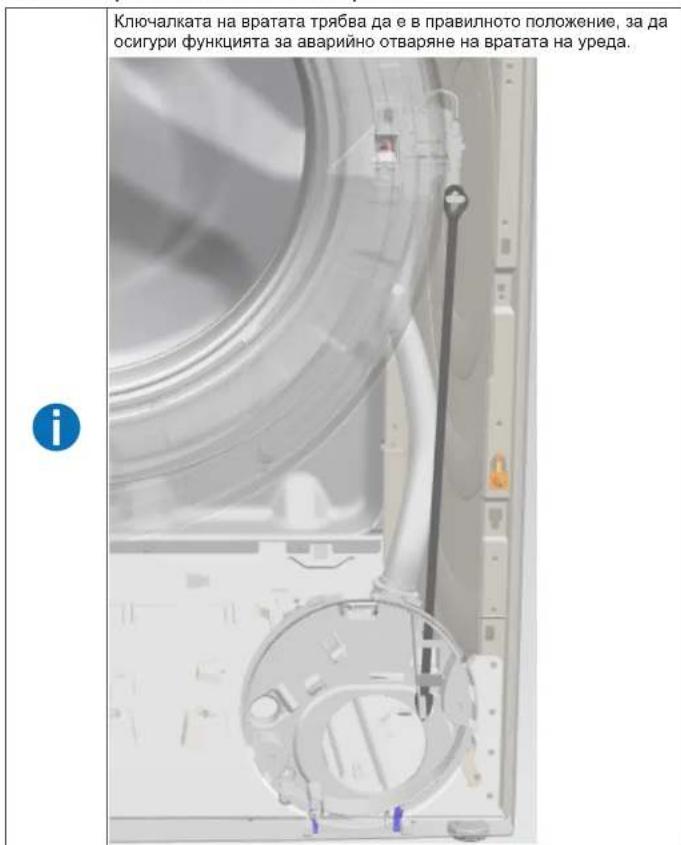
MOHTnpaTBeBobpaTeHpe.
MOnHTnpaIteB06paTeHpeI.

PemOH
3.10 CmHa Ha DonHnKa nak
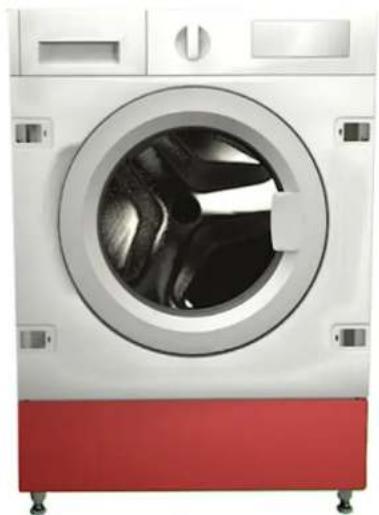
Φue.1:Kanak3a donnHa apya
N3nCKBaHe:
YpeBt E N3KIOHcHOT 3axpaHbHaHeTo.
YpeBte n3KJIoueH OT BDOcHa6dnteHaTAt MpeXa.
MeBENHnT nAhen e cBanen.
3.10.1 CbAaHe Ha Donnna Kanak
N3nCKBaHe:
YpeBte n3KNIOUeH OT 3aXpaHbAHeTo.
YpeBTe n3KIOUeH OT BOOCha6DnTeHnTa MpeKa.
1.CBaJeneTeDJIHnKanak.
- OTeJeTe Mapkya ot DbpxkaHa.
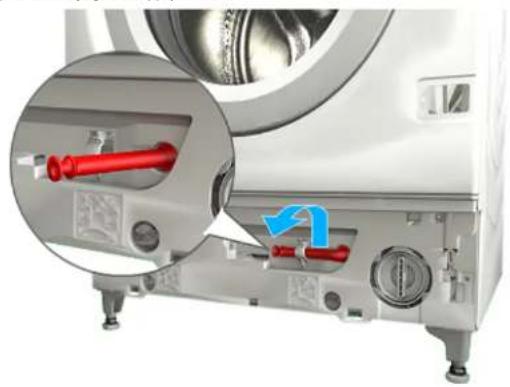

PemOH
3.1.PaBnTe BnHTa(1).
- HatncheTe 3aIbpxkaata TOkKa n CbaIeTe HADONY (2).
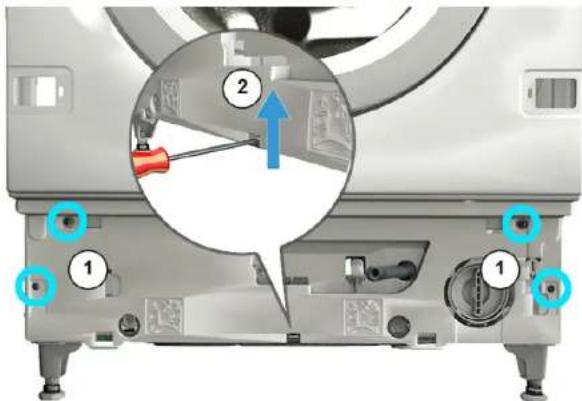
- N3dbpnaTe Kanaka Ha donHaTa rpyna n ro 3BaTe HnpeD.
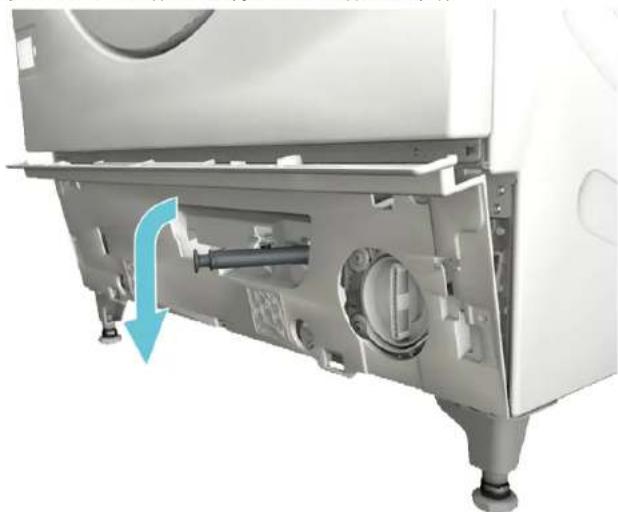
5.ИЗдрпайт МаркучоТ калка.
3.10.2 MoHTnpaHe Ha KaNaka
MoHTnpaTBeBobpaTeHpeI.

PemOH
3.11 CmHa Ha npedHnaHeI


BHNMATEJIHO
Octpn y6b0e HaopnHbAHHoT o npor3BaHe
HocTe npedna3n pbkauu.
M3nCKBaHe:
YpeBt e n3KIOueH OT 3aXpaHbAHeTO.
YpeIbTe n3KIOueHOT BOIOcHa6nITeNHaTa MPexa.
UpeDnte ca CBO6oHNO IOCTbNHN.
YekMeDpKeTo 3a nepHnHn npenapat e cBaneHo.→8
Me6eHNHnT naHEn e cBaIeH.
Bparatae cBaneha.→10
YnnbTHHeHMeTO Ha BpaTatae CBAneHO.
3.11.1 CbAaHe Ha npednnaHn
- Pa3xna6eTe fHKcatopHa hOcBETneHHeTo Ha 6apa6aHa.
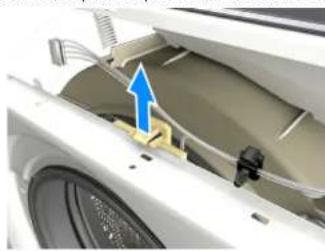
2.

BHIMATEJHO
PCK on Nadaa nuch Tn npadn paxna6benn BuHTOB! HapahBahe no npadn nadaa nuch.
3akpenete KOMNOHHTa, Taka ye da He nahe.

BHIMAHNEI
Pnck OT npaaun hactn npadpa3xna6ehn BnHOBe! Pobpea Ha npyn nactn Ha ypea mB daMa Ha KInHeHa, HAp. dbHOTo.
Pa3xna6eTe BnHTOBeTe Byka3aHmpeI.
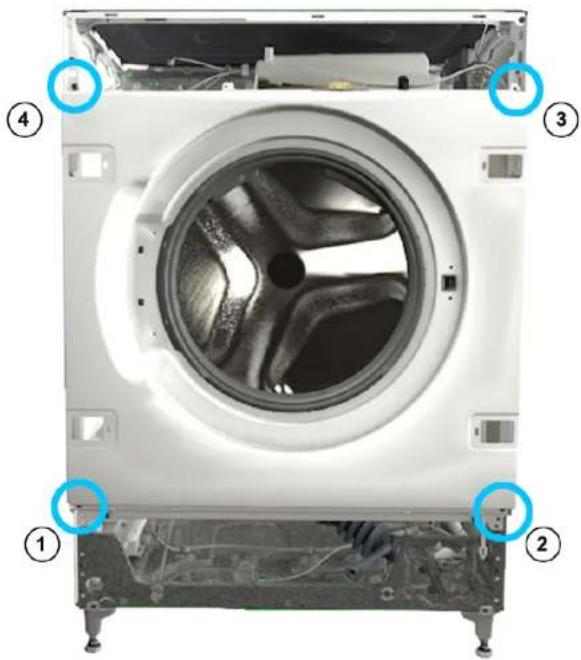
PemOH
3.Cbane npednnaen.
3.11.2 MoNTIpaHe Ha npedHnnaHn
MOHTnpaTBeB o6paTeH peI.
Poraneni padajicimi dily.
Zajistete jednotlive soucasti prd padem.


Nebezpeci padajicich dilu kvuli uvolenynm sroubum!
Poškozeni jin'ych cásti spotbrebe nebo prvku domacnosti zakaznika, napr. podlachy.
Zajistete jednotlive soucasti prd padem.
Požadavek:
Sorg for at sikre apparater mod at glide.

Fare for nedfaldende dele pga. Iosnede skruer!
Personskade pga. nedfaldende dele.
Sarg for at sikre componenten mod at falde ned.

Fare for nedfaldende dele pga. Iosnede skruer!
Sorg for at sikre componenten mod at falde ned.
Preindstilling:
Sorg for at sikre componenten mod at falde ned.

PAS PAI
Fare for nedfaldende dele pga. Iosnede skruer!
Personskade pga.nedfaldende dele.
Sorg for at sikre componenten mod at falde ned
Fjem skruerne (1).
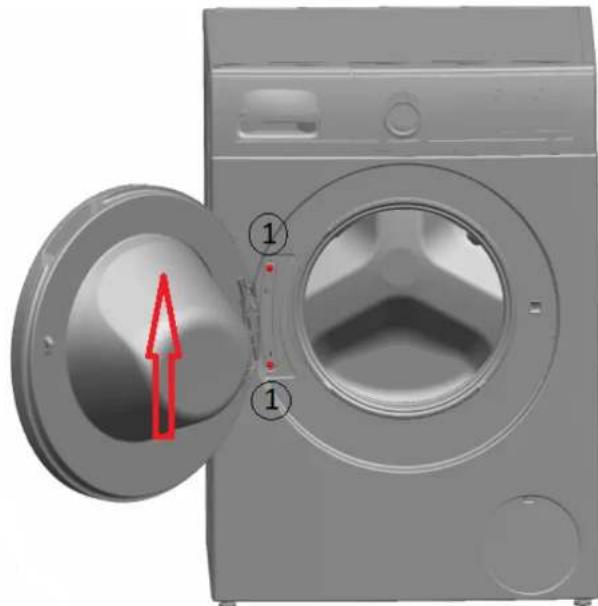
- Fjern daren opad.
3.4.2 Montering af dor
Sorg for at sikre apparater mod at glide.


Fare for nedfaldende dele pga. Iosnede skruer!
ersonskade pga. nedfaldende dele.
Sorg for at sikre componenten mod at falde ned.
Sorg for at sikre componenten mod at falde ned.
Preindstilling:
Sorg for at sikre componenten mod at falde ned.
Repair hints - Washing machine
1 Concerning this document. 103
1.1 Important information 103
1.1.1 Purpose 103
1.2 Explanation of symbols 103
1.2.1 Danger levels.. 103
1.2.2 Hazard symbols 103
1.2.3 Structure of the warnings.. 104
1.2.4 General symbols 104
Tools and aids. 105
Repair 106
3.1 Replacing fascia panel 106
3.1.1 Removing fascia panel 106
3.1.2 Installing fascia panel 107
3.2 Replacing detergent drawer 108
3.2.1 Removing detergent drawer 108
3.2.2 Installing detergent drawer 108
3.3 Replacing detergent drawer handle 109
3.3.1 Removing detergent drawer handle 109
3.3.2 Installing detergent drawer handle 109
3.4 Replacing door 110
3.4.1 Removing door 110
3.4.2 Installing door 110
3.5 Replacing door components 111
3.5.1 Removing door components 111
3.5.2 Installing door components 111
3.6 Replacing door hinge 112
3.6.1 Removing door hinge 112
3.6.2 Installing door hinge 112
3.7 Replacing door seal.. 113
3.7.1 Removing door seal 113
3.7.2 Installing door seal 114
3.8 Replacing door lock 115
3.8.1 Removing door lock 115
3.8.2 Installing door lock 116
3.9 Replacing drum light 117
3.9.1 Removing drum light 117
3.9.2 Installing drum light 117
3.10 Replacing bottom cover 118
3.10.1 Removing bottom cover 118
3.10.2 Installing the cover 119
3.11 Replacing front panel 120
3.11.1 Removing front panel 120
3.11.2 Installing front panel 121
Concerning this document
1.1 Important information
1.1.1 Purpose
These repair hints support consumer to repair appliances by himself according to the applicable eco-design regulation (as of 03/2021).
They contain information how to exchange defined spare parts including warnings and risks.
In case of questions, please contact our customer service. We will only be liable for damages if the repair hints have been followed properly.
1.2 Explanation of symbols
1.2.1 Danger levels
The warning levels consist of a symbol and a signal word. The signal word indicates the severity of the danger.
Table 1: Danger levels
| Warning level Meaning | |
| Danger | Non-observation of the warning message will result in death or serious injuries. |
| Warning | Non-observation of the warning message could result in death or serious injuries. |
| Caution | Non-observation of the warning message could result in minor injuries. |
| Notice | Non-observation of the warning message could result in damage to property. |
1.2.2 Hazard symbols
Hazard symbols are symbolic representations which give an indication of the kind of danger.
The following hazard symbols are used in this document:
| Hazard symbol Meaning | |
| ! | General warning message |
| Danger from electrical voltage | |
| Risk of explosion | |
| Danger of cuts | |
| Danger of crushing |
Concerning this document
| Hazard symbol Meaning | |
| Danger from hot surfaces | |
| Danger from strong magnetic field | |
| Danger from non-ionizing radiation |
Table 2: Hazard symbols
1.2.3 Structure of the warnings
Warnings in this document have a standardised appearance and a standardised structure.

Danger
Type and source of danger!
Possible consequences of ignoring the danger / warning.
Measures and prohibitions for preventing the danger.
The following example shows a warning that warns against electric shock due to live parts. The measure for avoiding the danger is mentioned.

Danger
Risk of electric shock due to live parts!
Death by electrocution
- Disconnect appliances from electrical supply at least 60 seconds before starting repairs.
1.2.4 General symbols
The following general symbols are used in this document:
| Gen. symbol Meaning | |
| 1 | Identification of a special tip (text and/or graphic) |
| i | Identification of a simple tip (only text) |
| Identification of a link to a video tutorial |
Table 3: General symbols
| Gen. symbol Meaning | |
| Identification of required tools | |
| Identification of required preconditions | |
| Identification of a condition (if ..., then ...) | |
| Identification of a result | |
| [Start] Identification of a key or button | |
| [00123456] Identification of a material number | |
| Status Identification of displayed text / window(in the appliance's display) | |

Tools and aids
| Designation Details Images | ||
| Auxiliary tool [15000155] | Tool for loosening out of plastic parts | |
| Screwdriver Torx T20 with bore hole [00340764] | 100 mm, for screws with safety pin | |
| Torque spanner [15000441] | Torque spanner 20 - 100 Nm | |
| Slot screwdriver [00340854] | Blade 3.5 mm x 0.6 mm x 100 mm, Protective Insulation 1000 V AC | |
| Slot screwdriver [00340855] | Blade 5.5 mm x 1.0 mm x 125 mm, Protective Insulation 1000 V AC | |
| Needle-nose pliers, angled pattern [00341269] | Length 200 mm | |
| Side-cutting pliers [00342182] | Length: 200 mm | |
| Designation Details Images | ||
| Combination wrench [00340811] | Wrench size 10°mm, M6 | |
| Combination wrench [00340814] | Wrench size 13°mm, M8 | |
| Combination wrench [00340817] | Wrench size 17 mm, M10 | |
| Combination wrench [15000459] | Wrench size 16°mm, M10 | |

Repair
3.1 Replacing fascia panel


Sharp housing edges!
Cut injuries
Wear protective gloves.


Slipping of tilted appliances!
Bone fractures / crush injuries
Secure appliances against slipping.


Risk of falling parts due to released screws!
jury because of falling parts
Secure component from falling down.


Risk of falling parts due to released screws!
Damage to other parts of the appliance or at customers home e.g. bot
tom.
Secure component from falling down.
Prerequisite:
Appliance is disconnected from power supply.
Appliance is disconnected from water supply.
Appliances is freely accessible.
Detergent drawer has been removed. Page 108
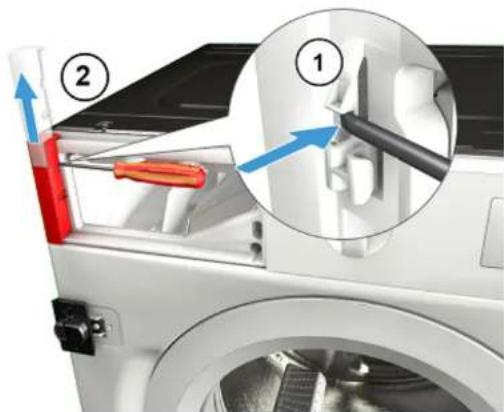
3.1.1 Removing fascia panel
-
- Release catch element (1).
- Remove cover (2).
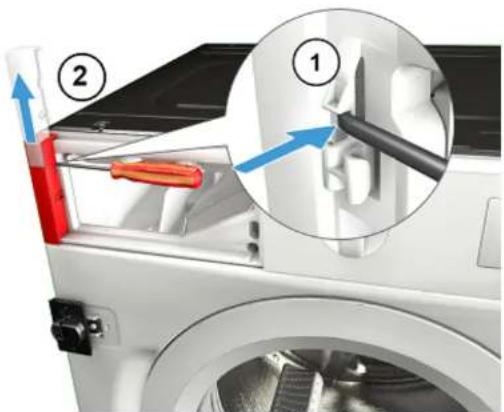

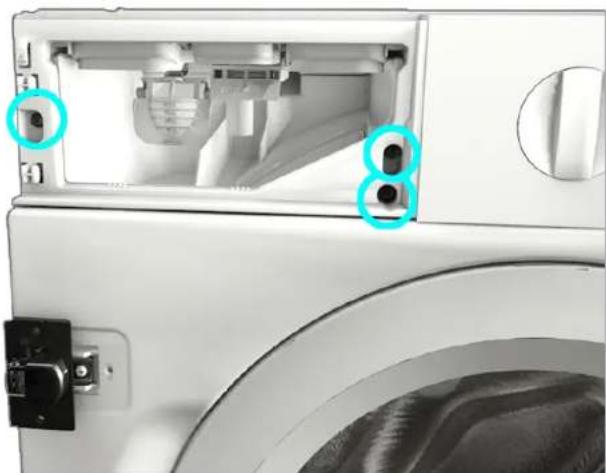
Repair
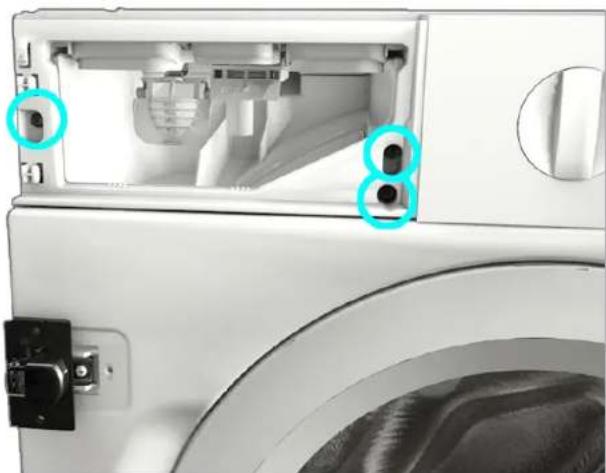
- Remove screws. 3. 1. Release catch elements (1, 2).
- Pull fascia panel to the front (3).
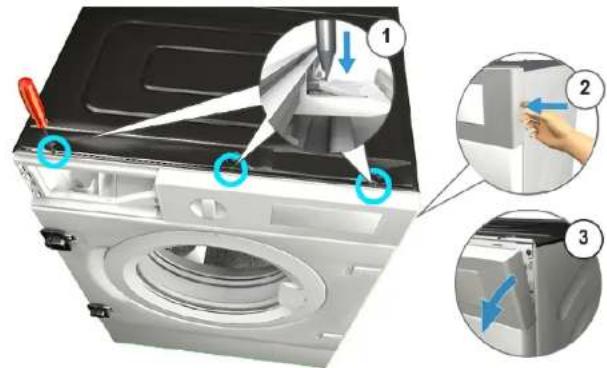
- Remove fascia panel.
3.1.2 Installing fascia panel
Install in reverse order.

Repair
3.2 Replacing detergent drawer
Prerequisite:
Appliance is disconnected from power supply.
Appliance is disconnected from water supply.
3.2.1 Removing detergent drawer
- Pull out detergent drawer.
2.1. Press down on insert (1)
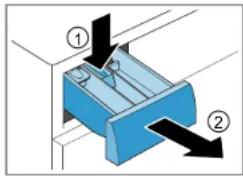
2. Remove detergent drawer (2).
3.2.2 Installing detergent drawer
Install in reverse order.

Repair
3.3 Replacing detergent drawer handle
Prerequisite:
Appliance is disconnected from power supply.
Appliance is disconnected from water supply.
Detergent drawer has been removed. Page 108
3.3.1 Removing detergent drawer handle
- Release catch elements.
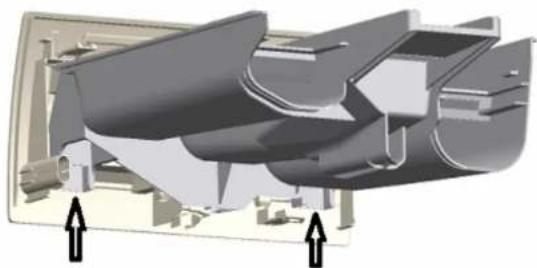
- Remove detergent drawer handle.
3.3.2 Installing detergent drawer handle
Install in reverse order.

Repair
3.4 Replacing door
Ca
Open hinge area!
Finger crushing / entrapment
Do not reach into the hinge area.
Wear protective gloves.
Prerequisite:
Appliance is disconnected from power supply.
Appliance is disconnected from water supply.
Door is opened.
Furniture panel has been removed.
3.4.1 Removing door
1.
Notice
Risk of falling parts due to released screws!
Damage to other parts of the appliance or at customers home e.g. bottom.
- Secure component from falling down.

Ca
Risk of falling parts due to released screws!
Injury because of falling parts
- Secure component from falling down.
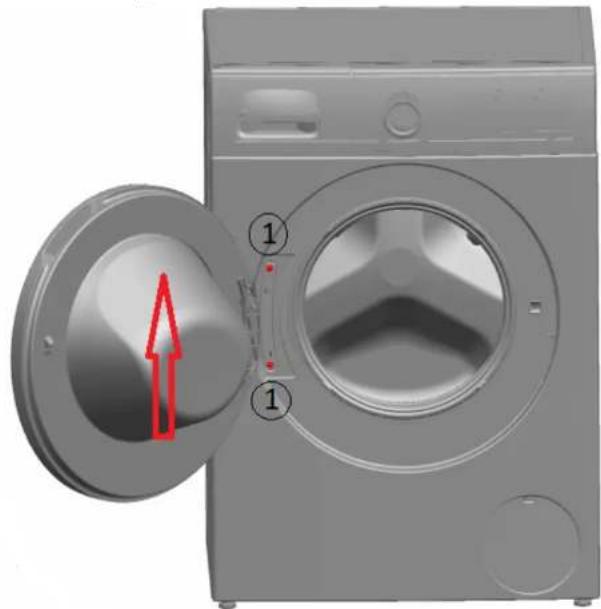
Remove screws (1).
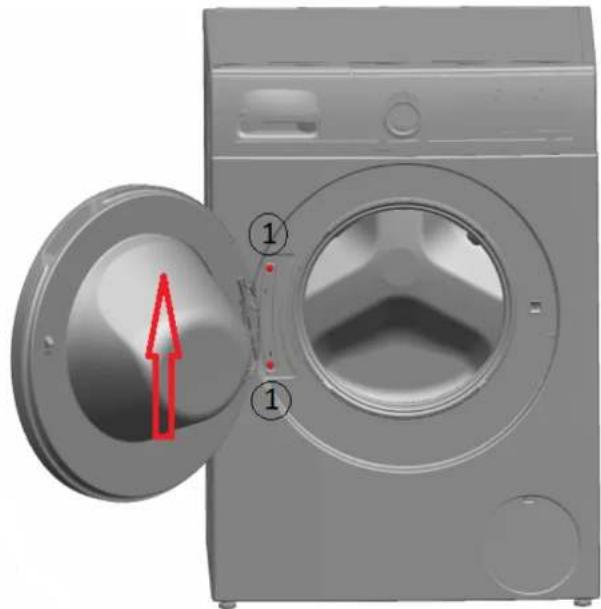
- Remove door upwards.
Install in reverse order.

Repair
3.5 Replacing door components
Caution
Open hinge area!
Finger crushing / entrapment
Do not reach into the hinge area.
Wear protective gloves.
Prerequisite:
Appliance is disconnected from power supply.
Appliance is disconnected from water supply.
Furniture panel has been removed.
Door has been removed. Page 110
3.5.1 Removing door components
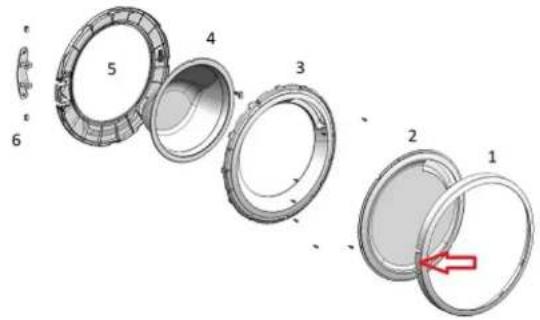
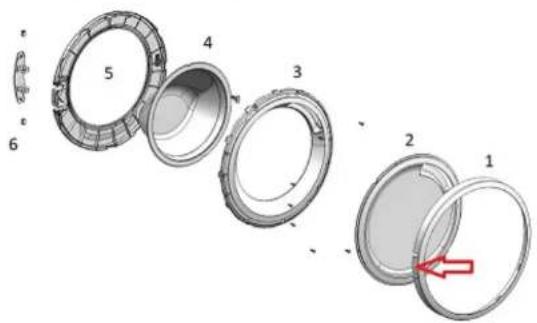
Disassemble door from outside to inside.
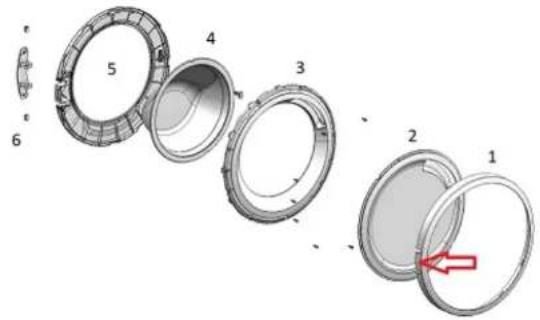
3.5.2 Installing door components
Install in reverse order.

Repair
Finger crushing / entrapment
Do not reach into the hinge area.
Wear protective gloves.
Prerequisite:
Appliance is disconnected from power supply.
Appliance is disconnected from water supply.
- Release two screws.
- Remove door.
- Disassemble door from outside to inside.
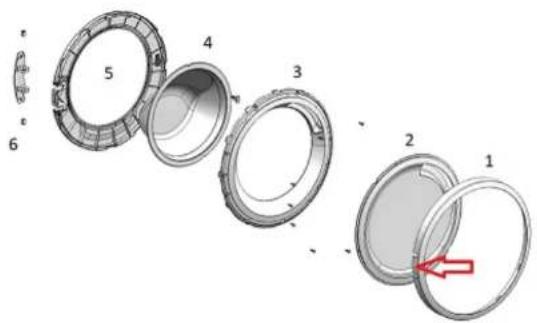
- Remove door hinge.
Install in reverse order.

Repair
3.7 Replacing door seal


Sharp housing edges!
Cut injuries
Wear protective gloves.


Risk of falling parts due to released screws!
Injury because of falling parts.
- Secure component from falling down.


Risk of falling parts due to released screws!
Damage to other parts of the appliance or at customers home e.g. bot

Secure component from falling down.
Prerequisite:
Appliance is disconnected from power supply.
Appliance is disconnected from water supply.
Appliances is freely accessible.
Detergent drawer has been removed. Page 108
Fascia panel has been removed.
Door has been removed. Page 110
Bottom cover has been removed. Page 118
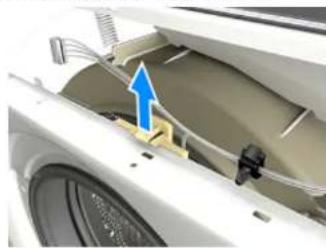
- Loosen the retainer on the drum light.


Notice
Risk of damaged surface!
Surface of appliance can be scratched by using wrong tools.
Only use plastic tools to replace the tension ring
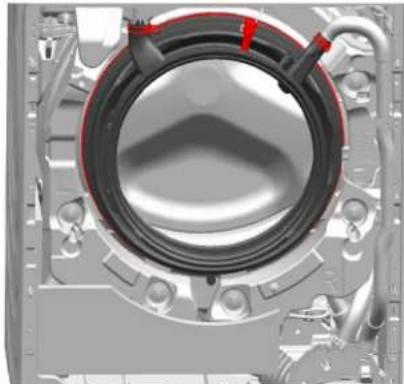
Remove tension ring from gasket with a plastic tool.
- Release door seal from front panel
- Release cable connector from door lock.

Repair
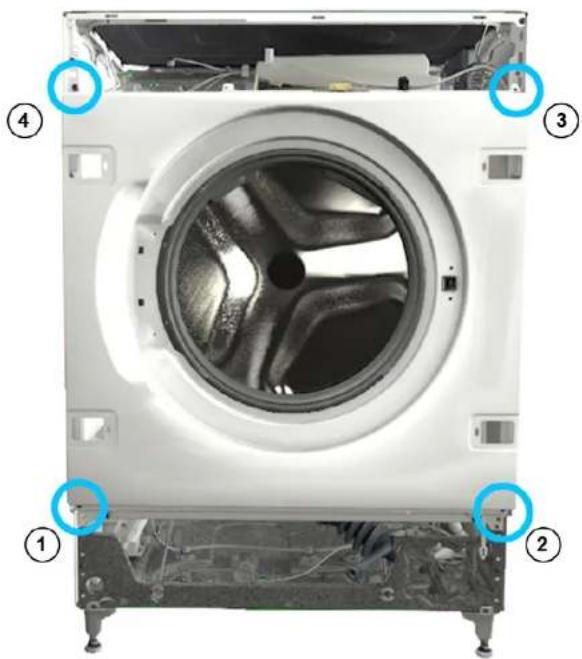
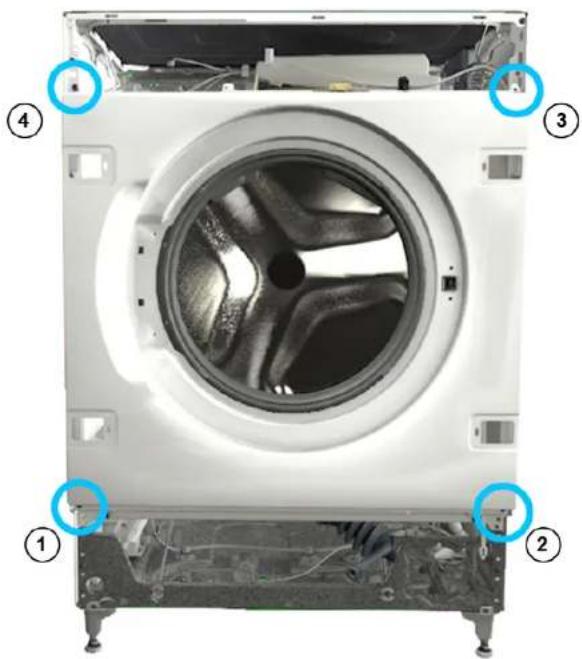
- Loosen the screws in the indicated order.
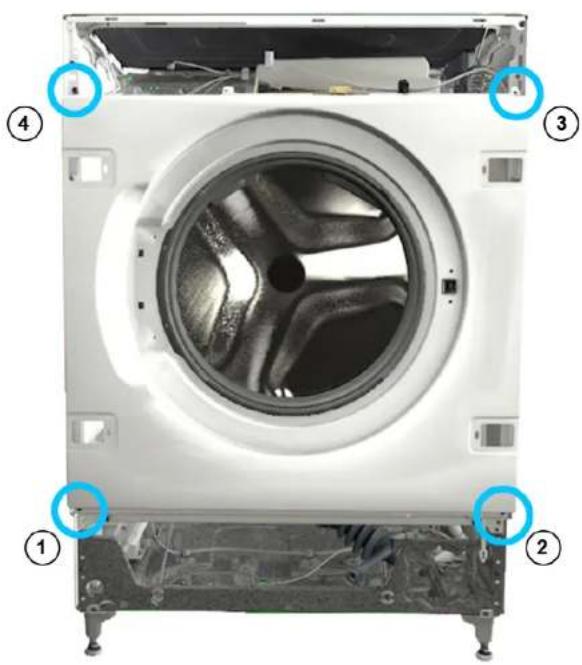
-
Remove front panel.
-
Disconnect all hose connections.
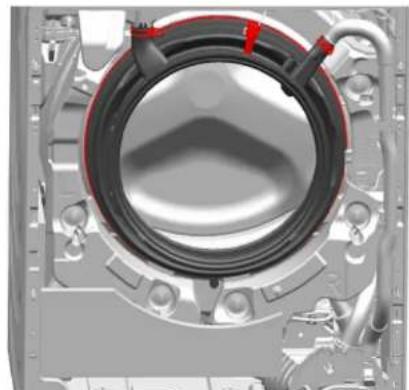
- Remove door seal.
Install in reverse order.

Repair
3.8 Replacing door lock
As a manufacturer, we are obliged to provide consumers with the spare part door lock including repair instructions in accordance with Regulation (EU) 2019/2023. However, we would like to point out that after replacing a door lock, an electrotechnical safety test by a qualified electrician is required before the device is put into operation. This person must be verifiably qualified according to the country-specific laws, regulations and standards.

Risk of electric shock due to live parts!
Danger to life through electric shock in case of improper repair
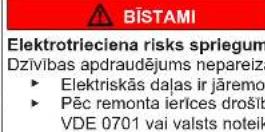
After the repair have a safety test according VDE 0701 or country-specific regulations performed.


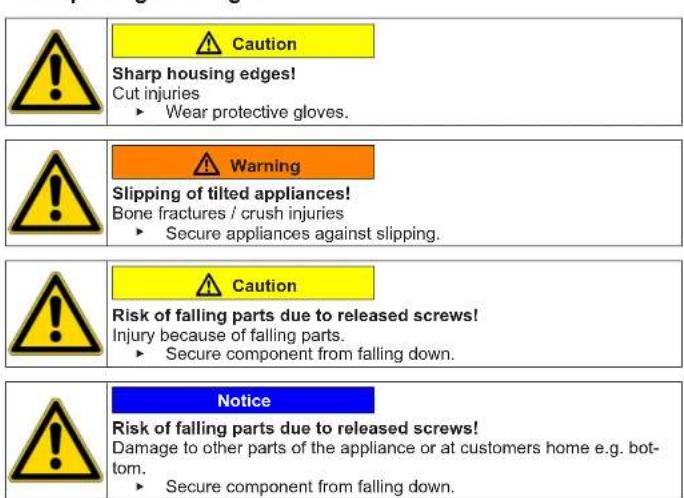
Sharp housing edges!
Cut injuries
Wear protective gloves.


Slipping of tilted appliances!
Bone fractures / crush injuries
Secure appliances against slipping.

Risk of falling parts due to released screws!
Injury because of falling parts.
- Secure component from falling down.

Risk of falling parts due to released screws!
Damage to other parts of the appliance or at customers home e.g. bottom.
- Secure component from falling down.
Prerequisite:

Appliance is disconnected from power supply.

Appliance is disconnected from water supply.
Appliances is freely accessible.
Furniture panel has been removed.
Fascia panel has been removed.
Door has been removed. Page 110
Tension ring has been removed.
Front panel has been removed.
Door seal has been removed.
- Disconnect door lock plug.
- Release door lock.
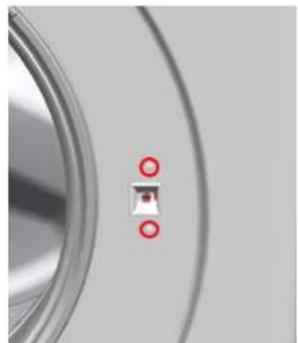
- Remove door lock.

Repair
Install in reverse order.

Repair
3.9 Replacing drum light
Prerequisite:
Appliance is disconnected from power supply.
Appliance is disconnected from water supply.
Appliances is freely accessible.
Detergent drawer has been removed. Page 108
Fascia panel has been removed.
3.9.1 Removing drum light
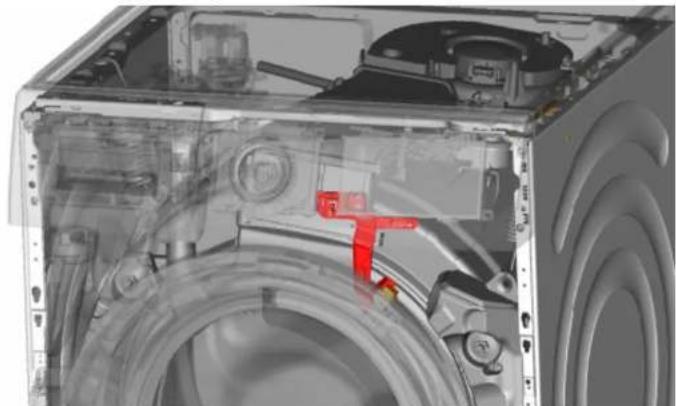
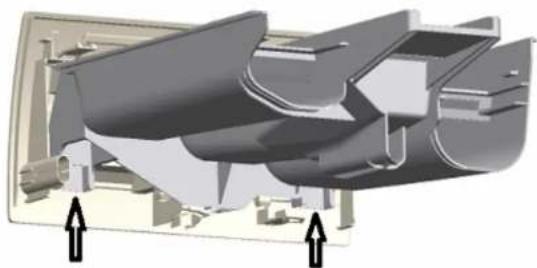
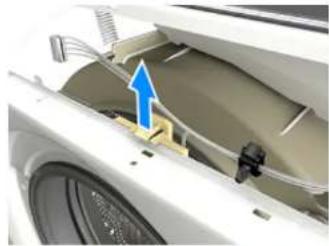
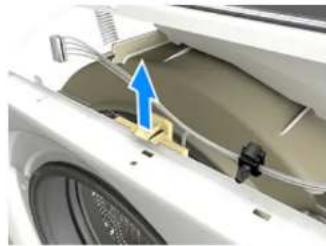
- Pull drum light holder out of appliance.
- Disconnect electrical connections.
- Remove drum light from drum light holder.
3.9.2 Installing drum light
Install in reverse order.

Repair
3.10 Replacing bottom cover
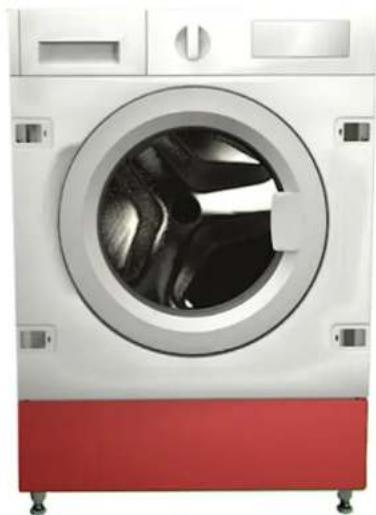
Fig. 1: Bottom group cover
Prerequisite:
Appliance is disconnected from power supply.
Appliance is disconnected from water supply.
Furniture panel has been removed.
3.10.1 Removing bottom cover
Prerequisite:
Appliance is disconnected from power supply.
Appliance is disconnected from water supply.
1. Remove bottom cover.
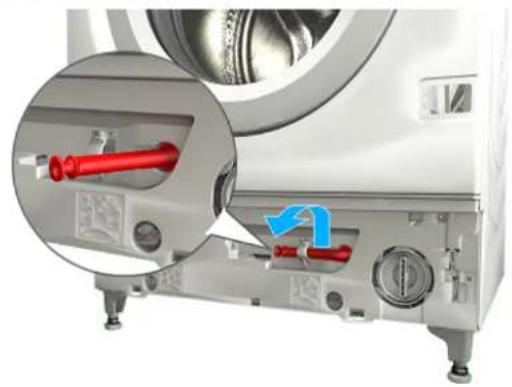
2. Detach hose from the holder.

Repair
3.1. Unscrew the screw (1).
- Press retaining point and remove downwards (2).
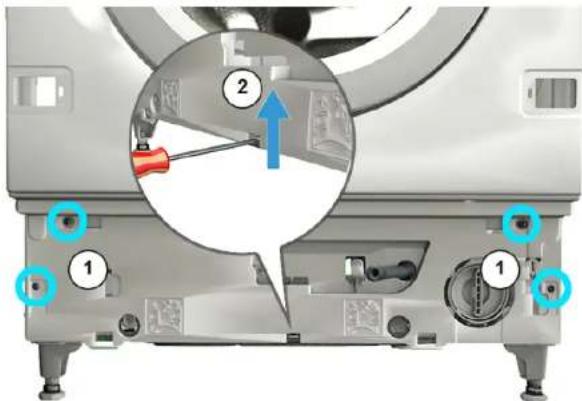
- Pull bottom group cover and remove forwards.
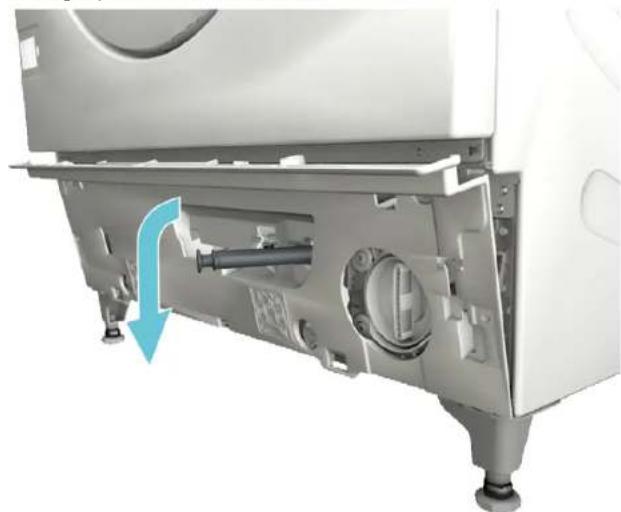
5.Pull hose out of the cover.
3.10.2 Installing the cover
Install in reverse order.

Repair
3.11 Replacing front panel

Prerequisite:
Appliance is disconnected from power supply.
Appliance is disconnected from water supply.
Appliances is freely accessible.
Detergent drawer has been removed. Page 108
Furniture panel has been removed.
Door has been removed. Page 110
Door seal has been removed.
3.11.1 Removing front panel
- Loosen the retainer on the drum light.
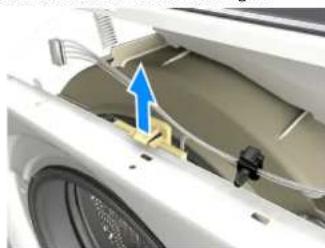
2.

Caution
Risk of falling parts due to released screws Injury because of falling parts.
- Secure component from falling down.

Notice
Risk of falling parts due to released screws! Damage to other parts of the appliance or at customers home e.g. bottom.
- Secure component from falling down.
Loosen the screws in the indicated order.
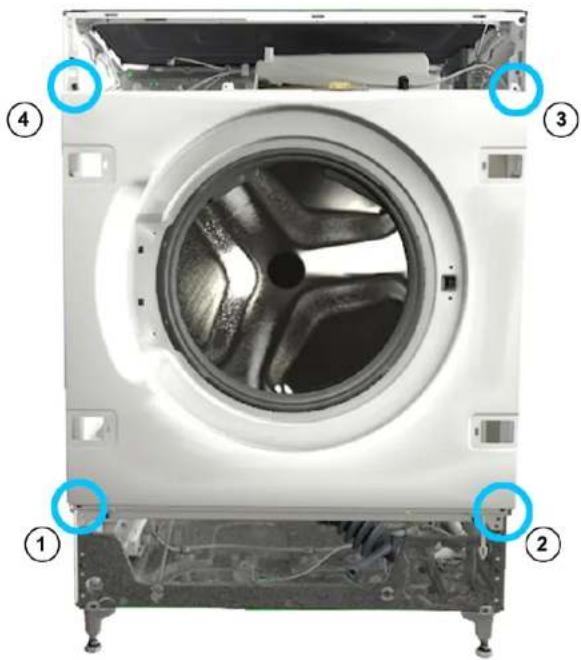

Repair
- Remove front panel.
3.11.2 Installing front panel
Install in reverse order.
Remonditeave - Pesumasin
1 Selle dokumendiga seoses 123
1.1 Tahtis teave 123
1.1.1 Eesmärk 123
1.2 Sumbolite selgitus 123
1.2.1 Ohutased 123
1.2.2 Ohusumbolid 123
1.2.3 Hoiatuste struktuur 124
1.2.4 Üldised sumbolid 124
Tabel 1: Ohutasedmed
1.2.2 Ohusumbolid
m = 311
- Nonemiet durtinu engi
3.6.2 Durtinu enges uzstadisana
Uzstadiapgrietzarktla

Remonts
3.7 Durtju blives nomina

A ESIET PIESARDZIGI
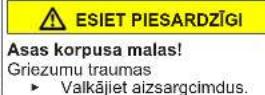
Asas korpusa malasi
Griezumu traumas
Valkajiet aizsargcimdus.
ESIET PIESARDZIGI
Kritosu detalu risks, ko izraisa valigas skruves!
Kritosu detalu izraisitas traumas.
Nostipriniet detalu, lai tnenokristu.
UZMANIBU!
Kritosu detalu risks, ko izraisa valigas skruves!
Citu iereces detalu bojajumi vai bojajumi, kas rodas clienta majas, piem., apaksejuce.
Nostipriniet detalu, la tnenokristu.
Prasiba:
Iericei ir jabut atvienotai no stravas padeves.
Iericeirjabutavtienotainudenspadeves.
Ierfcei var netrauceti pieklut.
Iznemta mazgāsanas lidzekla atvilktne.→268
Fascijas panelis ir nonemts.
Durtinas ir nonemtas.→270
Nonemts apaksejais vaks.278
3.7.1 Durtinu blives nonemsana
- Atlaidiet valfagb bundula lampinas aizturi.

2.
UZMANIBU!
Bojatu virsmu risks
Lietojatneibilostosius instrumentus, ierices virsmai var rasties skrapjumi.
Izmantojejt tikai plastmasas instrumentus, lai nomaintitu spiregotajia gredzenu.
Ar plastmasas instrumentu nonemiet spriegotaja gredzenu no blvslega.
- Nonemiet durvu blivi no prieksëjā panela.
- Atvienojiet vada savienotaju no durvu slega.

Remonts
- Atskruvejiet skruves noraditaja kartiba.
-
Nongemiet prieksejo paneli.
-
Atvienojet visus caurulu savienojumus.
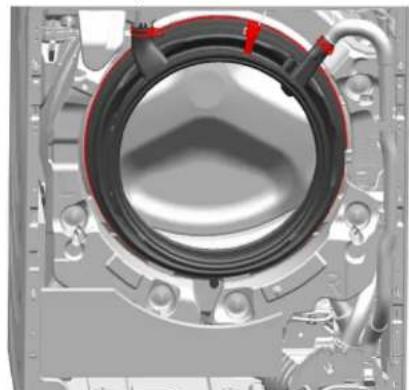
- Nonemiet durtinu blivejumu.
3.7.2 Durtu blivejuma uzstadiisana
Uzstadiet apgiezta kartiba.

Remonts
3.8 Durtiu slega nomaina
Atbilstigi Regulai (ES) 2019/2023 mums kā ražotājam ir janodrosina pateretajiem rezes durvu slezdene, ieskaitot remonta instrukcju. Tomer velamies noradit, ka pec durvu slezdenes mainas kualificetam elektrikim ir japarbauda ierices elektdrošita, pirms to sak darbinat. Elektrikim ir javar užradīt savu kualifikaciju atbilstigi valsts tiesibu aktiem, noteikumiem un prasibām.



Prasiba:
lerfceirjabutavienotainstravaspadeves.
lerfceirjabutavienotoinudenspadeves.
Fare for a knuse/sette fast fingre
m = 311 ;
PERIGO
m = 311
Risco deCHOque eltrico devidao a partes sob tensao!
- Remova o painei frontal.