Expedition TW4B17400ZA - Watch TIMEX - Free user manual and instructions
Find the device manual for free Expedition TW4B17400ZA TIMEX in PDF.
| Brand | Timex |
| Model | Expedition TW4B17400ZA |
| Product type | Analog/digital watch |
| Case diameter | Approximately 42 mm |
| Approximate weight | Approximately 50 g |
| Power source | Lithium battery (type CR2016 or equivalent) |
| Water resistance | Up to 100 m (WR100) |
| Shock resistance | ISO certified (shock) |
| Night light | Indiglo electroluminescent |
| Digital functions | Time/calendar, daily alarm, timer, chronograph (1/100s), dual time zone |
| Rotating bezel | Elapsed time, tachymeter, compass |
| Strap | Strap with sliding buckle and removable links |
| Maintenance | Rinse with fresh water after contact with seawater |
| Water resistance precautions | Do not press buttons or pull crown underwater (except 200 m models) |
| Battery | Replacement by recommended retailer; type indicated on case back |
| Warranty | Standard limited warranty (possible extension in the United States) |
| General information | Registered trademarks: TIMEX, INDIGLO, NIGHT-MODE |
Frequently Asked Questions - Expedition TW4B17400ZA TIMEX
User questions about Expedition TW4B17400ZA TIMEX
0 question about this device. Answer the ones you know or ask your own.
Ask a new question about this device
Download the instructions for your Watch in PDF format for free! Find your manual Expedition TW4B17400ZA - TIMEX and take your electronic device back in hand. On this page are published all the documents necessary for the use of your device. Expedition TW4B17400ZA by TIMEX.
USER MANUAL Expedition TW4B17400ZA TIMEX
Register your product at https://www.timex.com/product-registration.html
Registrar tu producto en www.timex.es/es ES/product-registration.html timex.com.mx/pages/registro-de-products
How to Start Your Watch 2
Water and Shock Resistance. 2
Indiglo Night-Light 2
Analog/Digital Model. 2
Elapsed Time Ring. 3
Tachymeter Ring. 3
Compass Ring. 4
How to Adjust Bracelet. 4
Bracket Link Removal 4
Battery 4
Warranty. 4
TIMEX
HOW TO START YOUR WATCH
To start your watch remove the plastic guard from under the crown, then press the crown in against the case. The second hand will begin advancing in one-second intervals.
Some deep-depth water-resistant watches require the setting crown to be screwed in to secure water-resistance. If your watch case has a protrusion with screw threads, the crown must be screwed in after setting the watch.
To screw in, push the crown firmly against the threaded protrusion and hold in while turning the crown clockwise. Continue to screw in the crown until it is tight. You will need to unscrew the crown (counter-clockwise) before pulling it out the next time you want to set your watch.
WATER AND SHOCK RESISTANCE
If your watch is water-resistant, meter marking (WR_M) is indicated.
| Water-Resistance Depth p.s.i.a. | * Water pressure Below Surface |
| 30m/98ft | 60 |
| 50m/164ft | 86 |
| 100m/328ft | 160 |
| 200m/656ft | 284 |
*rounds per square inch absolute
WARNING: TO MAINTAIN WATER-RESISTANCE, DO NOT PRESS ANY BUTTONS OR PULL OUT THE CROWN UNDER WATER UNLESS YOUR WATCH IS INDicated AS 200 METER WATER-RESISTANT.
- Watch is water-resistant only as long as crystal, crown and case remain intact.
- Watch is not a diver watch and should not be used for diving.
- Rinse watch with fresh water after exposure to salt water.
- Shock-resistance will be indicated on the watch face or caseback. Watches are designed to pass ISO test for shock-resistance. However, care should be taken to avoid damaging the crystal.
INDIGLO NIGHT-LIGHT
Press button to activate light. Electroluminescent technology used in the INDIGLO nightlight illuminates entire watch face at night and in low light conditions.
ANALOG/DIGITAL MODEL
4-PUSHER ANALOG/DIGITAL MODEL WITH INDIGLO\* NIGHT-LIGHT & NIGHT-MODE\* FEATURE
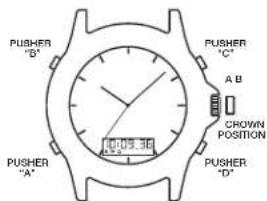
TO USE INDIGLO-NIGHT-LIGHT
- PRESSpusher"Btoilluminatetheentiredial(Bothanaloganddigital).
TO USE NIGHT-MODE\* FEATURE
- PRESS and HOLD INDIGLO® Button for 3 seconds until you hear a beep.
- Pressing any pusher will cause the INDIGLO night-light to illuminate and stay on for 3 seconds.
- NIGHT-MODE® feature will last for 8 hours.
- To deactivate NIGHT-MODE® feature PRESS and HOLD INDIGLO® Button® for 3 seconds.
ANALOG TIME
TO SET ANALOG TIME
- PULL the crown out to the "B" position.
- TURN the crown either way to the correct time.
- PUSH in the crown to the "A" position.
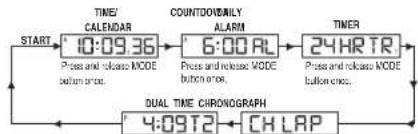
DIGITAL DISPLAY
- The Digital display changes to each function every time you PRESS pusher "A" (As illustrated below):
TIME/CALENDAR
DAILY ALARM
COUNTER TIMER
CHRONOGRAPH
DUAL TIME
TO SET TIME/CALENDAR
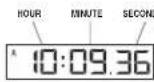
- PRESS pusher "A" to bring up TIME / CALENDAR display.
- PRESS and HOLD pusher "D". HOLD will display until hours flash.
- PRESS pusher "C" to advance hours.
- PRESS pusher "A" and "C" as above to adjust minutes, reset seconds to "00", month, date, year and 12/24 hour format.
- PRESS pusher "D" to complete setting.
NOTE: PRESS and HOLD pusher "C" for 2 seconds in setting mode, to activate fast advance.
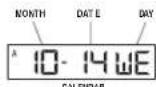
View or select the TIME orCALENDAR to appear in your digital display.
- PRESS pusher "C" to view theCALENDAR for 2 seconds.
- PRESS and HOLD pusher "C" for 3 seconds until the watch beeps and changes the display to CALENDAR.
- To view or change the display to TIME, repeat the steps above.
NOTE:
- "A" or "P" will appear when the 12-Hour format is selected.
- Set this time to coordinate with the Analog time or another time zone.
TO SET DAILY ALARM

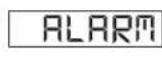

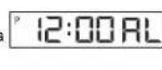
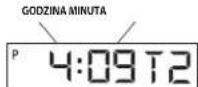
- PRESS pusher "A" to bring up DAILY ALARM display: "ALARM" will appear for 3 seconds followed by the current alarm setting time and time zone. The ALARM mode symbol "AL" and the applicable time zone symbol "T1" or "T2" alternate to give complete information.
- PRESS pusher "D" to let time zone flash.
- PRESS pusher "C" to select time zone.
- PRESS pusher "A" to let hour flash
- PRESS pusher "C" to advance hour.
- PRESS pusher "A" and "C" as above to adjust the minutes.
- PRESS pusher "D" to complete setting.
- Alarm is automatically activated after setting. (■) is displayed
NOTE: PRESS and HOLD pusher "C" for 2 seconds in setting mode, to activate fast advance.
NOTE:
- When the alarm sounds, it will beep for 20 seconds.
To stop the alarm beep, PRESS any pusher.
TIMEX
TO TURN ALARM OR CHIME ON/OFF
- PRESSpusher“A”to bring upDAILYALARMdisplay.
- PRESS pusher "C" to activate or deactivate daily alarm and chime accordingly.
NOTE:
- will appear or disappear according to daily alarm activation or deactivation.
will appear or disappear according to confirm chime activation or deactivation.
The alarm coordinates with the digital time not analog time.
The alarm will sound only if the digital time zone (T1 or T2) selected in the Alarm set mode is currently displayed, as confirmed by the alarm symbol (串)
TO SET/USE COUNTER
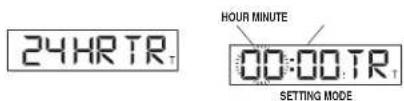
- PRESS pusher "A" to bring up COUNTDOWN TIMER display, "24 HR TR" will appear.
- PRESS pusher "D" to let hours flash.
- PRESS pusher "C" to advance hour.
- PRESS pusher "A" to set the minutes.
- PRESS pusher "A" and "C" as above to adjust minutes.
- PRESS pusher "D" to complete setting.
- PRESS pusher "C" to start the timer.
- PRESS pusher "D" to pause the timer.
- PRESS pusher "C" to re-start the timer, or PRESS pusher "D" again to reset timer to the preset time.
NOTE: PRESS and HOLD pusher "C" for 2 seconds in setting mode, to activate fast advance.
NOTE:
- When the timer counts down to zero it will beep for 20 seconds.
- To stop the timer beep, PRESS any pusher.
- "TMR" will appear to designate that the countdown timer is running.
- Countdown time runs up to 24 hours.
TO USE CHRONOGRAPH

- PRESS pusher "A" to bring up CHRONOGRAPH display; "CH LAP" or "CH SPL" will appear.
- PRESS pusher "D" to select LAP ("LAP") or SPLIT ("SPL").
- PRESS pusher "C" to start timing
- PRESS pusher "C" to record the first Lap or Split time; digits will be frozen for 10 seconds; "LAP" or "SPL" will flash to indicate that the next Lap or Split time is being recorded in the background.
- PRESS pusher "A" to view the running display while the display is frozen.
- PRESS pusher "C" to take another Lap or Split.
- PRESS pusher "D" to pause.
- PRESSpusher"C'to resume timing,or PRESSpusher"D"again to reset.
NOTE:
- CHRONOGRAPH must be reset to zero to switch between LAP and SPLIT.
- Records time up to 24 hours and shows 1/100 of seconds for the first hour.
TO SET DUAL TIME:
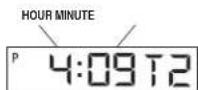
- PRESS pusher "A" to bring up DUAL TIME display. "T2" will appear beside the dual time.
- PRESS and HOLD pusher "D"; "Hold" will display until the hour flashes.
- PRESS pusher "C" to advance hours.
- PRESS pusher "A" to let month flash.
- PRESS pusher "C" to advance month.
- PRESS pusher "A" and "C" as above to adjust date, year, and to set 12/24 hour format.
- PRESS pusher "D" to complete setting.
NOTE: PRESS and hold pusher "C" for 2 seconds in setting mode to activate fast advance.
NOTE:
- While in any setting mode, if no pusher is pressed for 90 seconds the display will automatically return to TIME/CALENDAR mode.
- While in any mode other than TIME / CALENDAR mode, whenever pusher "C" or "D" is pressed, the next press of pusher "A" will automatically return the display to TIME / CALENDAR mode.
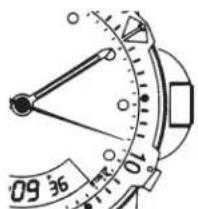
ELAPSED TIME RING
If your watch is equipped with a rotatable outer ring on the face, with numbers corresponding to minutes, you can use this Elapsed Time Ring to time an activity from the start, or to mark the ending time for the duration of an activity.
TO TIME AN ACTIVITY FROM THE START:
Set the Start/Stop triangle at the time (hour or minute) when you start the activity (As shown on the left in the illustration shown below). At completion, you can see how long the activity took.
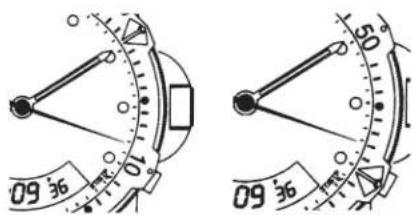
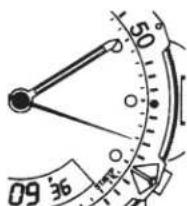
TO MEASURE THE TIME REMAINING:
Set the triangle to the hour or minute position when you wish to complete the activity, and check the watch periodically for progress towards that goal.
In the illustration shown on the right you can stop when the minute hand reaches the 20 minutes past the hour position.
TACHYMETER RING
The tachymeter feature can be used to measure speed in miles per hour (MPH), nautical miles per hour (knots) or kilometers per hour (KPH) using the sweep second hand and the scale on the wall above the watch face. You need to know the actual distance you are covering in miles or km.
Start the chronograph with the second hand at zero (the twelve o'clock position). Within the first minute, the second hand will point to the rate for a one-mile (or one kilometer) course: if it takes 45 seconds, the hand will point to 80 at that position - 80 MPH or 80 KPH.
If within the first minute, a distance greater than one mile or kilometer is covered, multiply the tachymeter number by the distance to get the actual rate; if you went 1.2 miles in 45 seconds, multiply the 80 by 1.2 - 96 MPH.
TIMEX
COMPASS RING
If your watch is equipped with a movable ring around the dial marked at the letters "N", "E", "W", "S" (for the four compass directions) or compass degrees, you can use this feature to find an approximate compass directional reading.
- Lay the watch on a flat surface, or hold it so that the face is parallel to the ground.
- Locate the sun and point the hour hand at the sun.
- In the A.M., rotate the ring until the "S" (south) marker is halfway between the hour hand and 12:00 (after the hour hand or within the shortest distance between the hour hand and 12:00).
- In the P.M., rotate the ring until "S" is before the hour hand and halfway between the hour hand and 12:00.

HOW TO ADJUST BRACELET
(Variations of the following bracelet sections apply to all watch models).
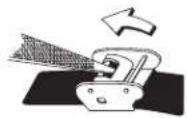
SLIDING CLASP BRACELET
- Open locking plate.
- Move clasp to desired bracelet length.
- Exert pressure while holding locking plate and slide clasp back and forth until it engages in grooves on underside of bracelet.
- Press locking plate down until it snaps closed. Clasp can be damaged if excessive force is used.
FOLDOVER CLASP BRACELET
- Find spring bar that connects bracelet to clasp.
- Using a pointed tool, push in spring bar and gently twist bracelet to disengage.
- Determine wrist size, then insert spring bar in correct bottom hole.
- Push down on spring bar, align with top hole and release to lock in place.
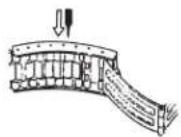
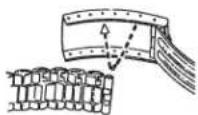
Fig. 2Fig. 1
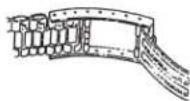
Fig. 3
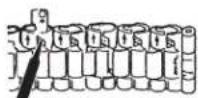
BRACELET LINK REMOVAL
REMOVING LINKS:
- Place bracelet upright and insert pointed tool in opening of link.
- Push pin forcefully in direction of arrow until link is detached (pins are designed to be difficult to remove).
- Repeat until desired number of links are removed.
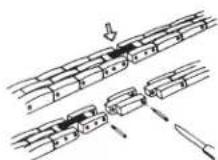
RE-ASSEMBLY:
- Rejoin bracelet parts.
- Push pin back into link in opposite direction of arrow.
- Press pin down securely into bracelet until it is flush.
BATTERY
Timex strongly recommends that a retailer or jeweler replace battery. If applicable, push reset button when replacing battery. Battery type is indicated on caseback. Battery life estimates are based on certain assumptions regarding usage; battery life may vary depending on actual usage.
DO NOT DISPOSE OF BATTERY IN FIRE. DO NOT RECHARGE. KEEP LOOSE BATTERIES AWAY FROM CHILDREN.
EXTENDED WARRANTY
Available in U.S. only. Extend your warranty for an additional 4 years from date of purchase for 5. You can pay with AMEX, Discover, Visa or MasterCard by calling 1800-448-4639 during normal business hours. Payment must be made within 30 days of purchase. Name, address, telephone number, purchase date, and 5-digit model number required. You can also mail a check for 5 to: Timex Extended Warranty, P.O. Box 1676, Dept. EF, Little Rock, AR 72203.
TIMEX INTERNATIONAL WARRANTY
http://www.limex.com/productWarranty.html
©2019 Timex Group USA, Inc. TIMEX, INDIGLO and NIGHT-MODE are registered trademarks of Timex Group B.V. and its subsidiaries.
TIMEX
ESPANOL 931-09500
INDICE
LUZ NOCTURNA INDIGLO
PARA UTILIZAR LA LUZ NOCTURNA INDIGLO
BRACELET A FERMOIR DEPLIANT
PARA USAR ALUZ NOTURNA INDIGLO
- PRESSIONe o botao "B" para illuminar todo o mostrador (analogico e digital).
PARASARORECURSO NIGHT-MODE
LUCE NOTTURNA INDIGLO
www.timex.it/it_IT/productWarranty.html
www.timexwatchjp/fs/timex/c/guide/returns
USTAWIANIE CZASU W DWOCH STREFACH:
PENTRU A SETA ORA IN FORMAT ANALOGIC
PENTRU A MASURA O ACTIVATE DE LA INCEPUT:
Fixati triunghiul Start/Stop la momentul (ora si minutul) candi incepti activitatea (asa cum se indica in stanga imaginii de mai jos). La final, putoji vedea cat a durat activitatea.