Alpha ILCA68K - Camera SONY - Free user manual and instructions
Find the device manual for free Alpha ILCA68K SONY in PDF.
User questions about Alpha ILCA68K SONY
0 question about this device. Answer the ones you know or ask your own.
Ask a new question about this device
Download the instructions for your Camera in PDF format for free! Find your manual Alpha ILCA68K - SONY and take your electronic device back in hand. On this page are published all the documents necessary for the use of your device. Alpha ILCA68K by SONY.
USER MANUAL Alpha ILCA68K SONY
http://www.sony.net/SonyInfo/Support/
SONY
4-590-091-31(1)
890
68

"Help Guide" (Web manual)
Refer to "Help Guide" for in-depth
instructions on the many functions of the camera.
Learning more about the camera ("Help Guide")
"Help Guide" is an on-line manual. You can read the "Help Guide" on your computer or smartphone. Refer to it for in-depth instructions on the many functions of the camera.
URL:
http://rd1.sony.net/help/ilc/1610/h_zz/

Owner's Record
Record the model and serial number (which are located on the product) in the space provided below. Refer to these numbers whenever you call your Sony dealer regarding this product. Model No. ILCA-Serial No.
WARNING
To reduce fire or shock hazard, do not expose the unit to rain or moisture.
IMPORTANT SAFETY INSTRUCTIONS -SAVE THESE INSTRUCTIONS DANGER TO REDUCE THE RISK OF FIRE OR ELECTRIC SHOCK, CAREFULLY FOLLOW THESE INSTRUCTIONS
If the shape of the plug does not fit the power outlet, use an attachment plug adaptor of the proper configuration for the power outlet.

CAUTION
Battery pack
If the battery pack is mishandled, the battery pack can burst, cause a fire or even chemical burns. Observe the following cautions.
- Do not disassemble.
- Do not crush and do not expose the battery pack to any shock or force such as hammering, dropping or stepping on it.
- Do not short circuit and do not allow metal objects to come into contact with the battery terminals.
- Do not expose to high temperature above 60^ (140^) such as in direct sunlight or in a car parked in the sun.
- Do not incinerate or dispose of in fire.
- Do not handle damaged or leaking lithium ion batteries.
- Be sure to charge the battery pack using a genuine Sony battery charger or a device that can charge the battery pack.
- Keep the battery pack out of the reach of small children.
- Keep the battery pack dry.
- Replace only with the same or equivalent type recommended by Sony.
- Dispose of used battery packs promptly as described in the instructions.
Use a nearby wall outlet (wall socket) when using the supplied or recommended AC Adaptor/battery charger. If any malfunction occurs while using this product, disconnect the plug from the wall outlet (wall socket) immediately to disconnect from the power source.
If you use the product with a charge lamp, note that the product is not disconnected from the power source even when the lamp turns off.
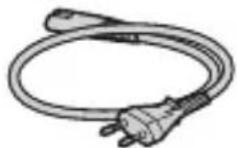
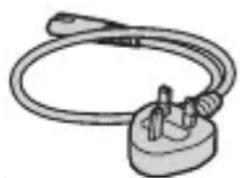
Power Cord
For the customers in the UK, Ireland, Malta, Cyprus and Saudi Arabia Use the power cord (A). For safety reasons, the power cord (B) is not intended for above countries/regions and shall therefore not be used there.
For the customers in other EU countries/ regions
Use the power cord (B).
(A) (

B)
Notice
If static electricity or electromagnetism causes data transfer to discontinue midway (fail), restart the application or disconnect and connect the communication cable (USB, etc.) again.
This product has been tested and found compliant with the limits set out in the EMC regulation for using connection cables shorter than 3 meters (9.8 feet).
The electromagnetic fields at the specific frequencies may influence the picture and sound of this unit.
For Customers in the U.S.A. and Canada
RECYCLING LITHIUM-ION BATTERIES
Lithium-Ion batteries are recyclable.
You can help preserve our environment by returning your used rechargeable batteries to the collection and recycling location nearest you.

For more information regarding recycling of rechargeable batteries, call toll free 1-800-822-8837, or visit http://www.call2recycle.org/
Caution: Do not handle damaged or leaking Lithium-Ion batteries.
For supplied accessories
This device complies with Part 15 of the FCC Rules. Operation is subject to the following two conditions:
(1) This device may not cause harmful interference, and (2) this device must accept any interference received, including interference that may cause undesired operation.
CANICES-3B/NMB-3B
For Customers in the U.S.A.
If you have any questions about this product, you may call:
Sony Customer Information Center 1-800-222-SONY (7669).
The number below is for the FCC related matters only.
Regulatory Information
Declaration of Conformity
Trade Name:SONY
Model No.: ILCA-68
Responsible Party: Sony Electronics Inc.
Address: 16535 Via Esprillo, San Diego, CA 92127 U.S.A.
Telephone No.: 858-942-2230
This device complies with Part15 of the FCC Rules. Operation is subject to the following two conditions: (1) This device may not cause harmful interference, and (2) this device must accept any interference received, including interference that may cause undesired operation.
CAUTION
You are cautioned that any changes or modifications not expressly approved in this manual could void your authority to operate this equipment.
Note:
This equipment has been tested and found to comply with the limits for a Class B digital device, pursuant to Part 15 of the FCC Rules.
These limits are designed to provide reasonable protection against harmful interference in a residential installation. This equipment generates, uses, and can radiate radio frequency energy and, if not installed and used in accordance with the instructions, may cause harmful interference to radio communications. However, there is no guarantee that interference will not occur in a particular installation. If this equipment does cause harmful interference to radio or television reception, which can be determined by turning the equipment off and on, the user is encouraged to try to correct the interference by one or more of the following measures:
- Reorient or relocate the receiving antenna.
- Increase the separation between the equipment and receiver.
- Connect the equipment into an outlet on a circuit different from that to which the receiver is connected.
- Consult the dealer or an experienced radio/TV technician for help.
The supplied interface cable must be used with the equipment in order to comply with the limits for a digital device pursuant to Subpart B of Part 15 of FCC Rules.
For Customers in Europe
Notice for the customers in the countries applying EU Directives
Manufacturer: Sony Corporation, 1-7-1
Konan Minato-ku Tokyo, 108-0075 Japan
For EU product compliance: Sony
Belgium, bijkantoor van Sony Europe
Limited, Da Vincilaan 7-D1, 1935
Zaventem, Belgium
Disposal of waste batteries and electrical and electronic equipment (applicable in the European Union and other European countries with separate collection systems)

This symbol on the product, the battery or on the packaging indicates that the product and the battery shall not be treated as household waste. On
certain batteries this symbol might be used in combination with a chemical symbol. The chemical symbols for mercury (Hg) or lead (Pb) are added if the battery contains more than 0.0005% mercury or 0.004% lead. By ensuring these products and batteries are disposed of correctly, you will help prevent potentially negative consequences for the environment and human health which could otherwise be caused by inappropriate waste handling. The recycling of the materials will help to conserve natural resources.
In case of products that for safety, performance or data integrity reasons require a permanent connection with an incorporated battery, this battery should be replaced by qualified service staff only. To ensure that the battery and the electrical and electronic equipment will be treated properly, hand over these products at end-of-life to the applicable collection point for the recycling of electrical and electronic equipment. For all other batteries, please view the section on how to remove the battery from the product safely. Hand the battery over to the applicable collection point for the recycling of waste batteries. For more detailed information about recycling of this product or battery, please contact your local Civic Office, your household waste disposal service or the shop where you purchased the product or battery.
For Customers in India
Battery Pack
Self Declaration-Conforming to
IS 16046:2012, R-41022780
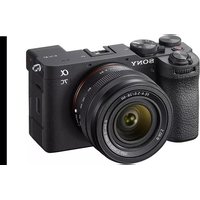
This manual covers several models supplied with different lenses.
The model name varies depending on the supplied lens. The available model varies depending on the countries/regions.
| Model name Lens | |
| ILCA-68 Not supplied | |
| ILCA-68K Supplied (DT 18-55 mm zoom lens) |
Notes on using your camera
Screen language
You can select the language displayed on the screen using the menu.
Shooting procedure
This camera has 2 modes for monitoring subjects: the monitor mode using the monitor, and the viewfinder mode using the viewfinder.
Functions built into this camera
This manual describes 1080 60i-compatible devices and 1080 50i-compatible devices.
Creating an image database file
If you insert a memory card that does not contain an image database file into the camera and turn on the power, the camera automatically creates an image database file using some of the memory card's capacity.
The process may take a long time and you cannot operate the camera until the process is completed. If a database file error occurs, export all images to your computer using PlayMemories Home™, and then format the memory card using the camera.
No compensation for damaged content or recording failure
Sony cannot compensate for failure to record or loss or damage of recorded content due to a malfunction of the camera or recording media, etc.
Back up recommendation
To avoid the data loss, always copy (backup) data to other media.
Notes on the monitor, electronic viewfinder, lens, and image sensor
- The monitor and electronic viewfinder are manufactured using extremely high-precision technology, and over 99.99% of the pixels are operational for effective use. However, there may be some small black dots and/or bright dots (white, red, blue or green in color) that constantly appear on the monitor and electronic viewfinder. These dots are normal due to the manufacturing process and do not affect the images in any way.
- Do not hold the camera by the monitor.
- Do not expose the camera to sunlight or shoot sunward for a long time. The internal mechanism may be damaged. If sunlight is focused on a nearby object, it may cause a fire.
- Do not directly expose the lens to beams such as laser beams. That may damage the image sensor and cause the camera to malfunction.
- Images may trail across on the screen in a cold location. This is not a malfunction. When turning on the camera in a cold location, the screen may become temporarily dark. When the camera warms up, the screen will function normally.
- The recorded image may be different from the image you monitored before recording.
Notes on shooting with the viewfinder
This camera is equipped with an Organic Electro-Luminescence viewfinder with high resolution and high contrast. This viewfinder achieves a wide viewing angle and a long eye relief. This camera is designed to provide an easily viewable viewfinder by appropriately balancing various elements.
- The image may be slightly distorted near the corners of the viewfinder. This is not a malfunction. When you want to see the full composition with all its details, you can also use the monitor.
- If you pan the camera while looking into the viewfinder or move your eyes around, the image in the viewfinder may be distorted or the color of the image may change. This is a characteristic of the lens or display device and is not a malfunction. When you shoot an image, we recommend that you look at the center area of the viewfinder.
- When shooting with the viewfinder, you may experience symptoms such as eyestrain, fatigue, travel sickness, or nausea. We recommend that you take a break at regular intervals when you are shooting with the viewfinder. The required length or frequency of the break may differ depending on the individuals, so you are advised to decide at your own discretion. In case you may feel uncomfortable, refrain from using the viewfinder until your condition recovers, and consult your doctor as necessary.
Notes on recording for long periods of time
- Depending on the camera and battery temperature, you may be unable to record movies or the power may turn off automatically to protect the camera. A message will be displayed on the screen before the power turns off or you can no longer record movies. In this case, leave the power off and wait until the camera and battery temperature goes down. If you turn on the power without letting the camera and battery cool enough, the power may turn off again or you may be unable to record movies.
- Under high ambient temperatures, the temperature of the camera rises quickly.
- When the temperature of the camera rises, the image quality may deteriorate. It is recommended that you wait until the temperature of the camera drops before continuing to shoot.
- The surface of the camera may get warm. This is not a malfunction.
Notes on importing XAVC S movies and AVCHD movies to a computer
When importing XAVC S movies or AVCHD movies to a computer, download and use the software PlayMemories Home from the following website: http://www.sony.net/pm/
Notes on the flash
- Do not carry the camera by the flash unit, or use excessive force on it.
- If water, dust or sand get into the open flash unit, it may cause a malfunction.
- Be sure to keep your fingers out of the way when you press the flash down.
Notes when playing movies on other devices
- Movies recorded with this camera may not be played back correctly on other devices. Also, movies recorded with other devices may not be played back correctly on this camera.
- Discs created from AVCHD movies recorded by this camera can be played back only on AVCHD-compatible devices. DVD players or recorders cannot play back discs created from AVCHD movies, as they are incompatible with the AVCHD format. Also, DVD players or recorders may fail to eject HD discs recorded in AVCHD format.
- Movies recorded in 1080 60p/1080 50p format can be played back only on 1080 60p/1080 50p-supported devices.
- Movies recorded in XAVC S format can be played back only on XAVC S-supported devices.
Warning on copyright
Television programs, films, videotapes, and other materials may be copyrighted. Unauthorized recording of such materials may be contrary to the provisions of the copyright laws.
The pictures used in this manual
The photographs used as examples of pictures in this manual are reproduced images, and are not actual images shot using this camera.
On the data specifications described in this manual
The data on performance and specifications are defined under the following conditions, except as described in this manual: at an ordinary ambient temperature of 25^ (77^) , and using a battery pack that has been fully charged until the CHARGE lamp has turned off.
Checking the supplied items
First check the model name of your camera (page 6). The accessories supplied differ depending on the model.
The number in parentheses indicates the number of pieces.
Supplied with all models:
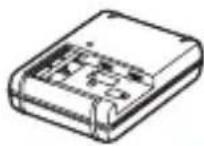
- Camera (1)
- Battery charger BC-VM10A (1)
- Power cord (mains lead) (1)^* (supplied in some countries/ regions)

- Multiple power cords may be supplied with your camera. Use the appropriate one that matches your country/region. See page 3.
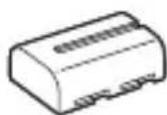
- Rechargeable battery pack NPFM500H (1)

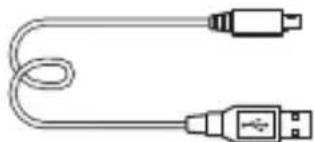
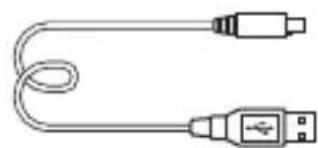
- Micro USB cable (1)
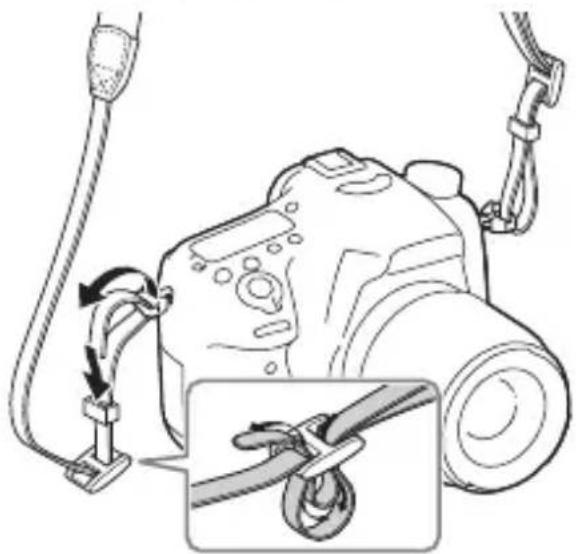
Shoulder strap (1)

For how to attach the shoulder strap to the camera, refer to page 15.
- Body cap (1) (Attached on the camera)

Eyepiece Cup (1) (Attached on the camera)
- Instruction Manual (1) (this manual)
ILCA-68K:
- DT 18-55 mm zoom lens (1)/Front lens cap (1)/Packaging lid (1)
Identifying parts
See the pages in parentheses for details on operation for the parts.
Front side
GB
1Shutter button (30)
2Power switch (28)
3Control dial (17)
4 Self-timer lamp
5 Lens contacts* 1
6 Mirror*
Preview button
8Mount
Built-in flash*
- Press the (Flash pop-up) button to use the flash.
- When not using the flash, press it back into the camera body.
10 Microphone* 2
11Mode dial lock release button (30, 35)
12Mode dial (35)
13 (Flash pop-up) button
14Mounting index (26)
15 Lens release button (27)
16 Focus mode switch
1 Do not directly touch these parts.
2 Do not cover this part during movie recording. Doing so may cause noise or lower the volume.
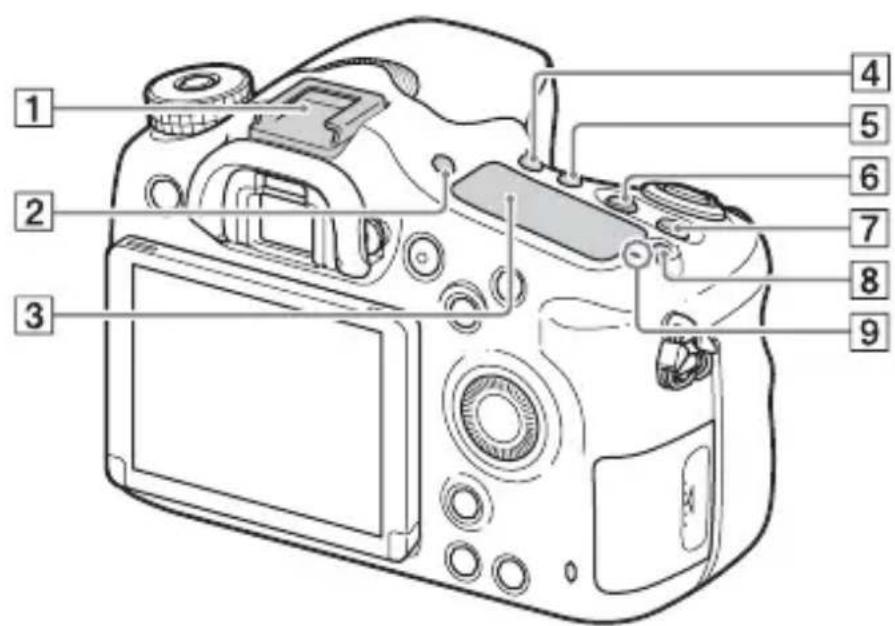
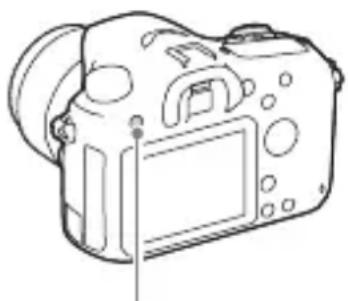
Rear side
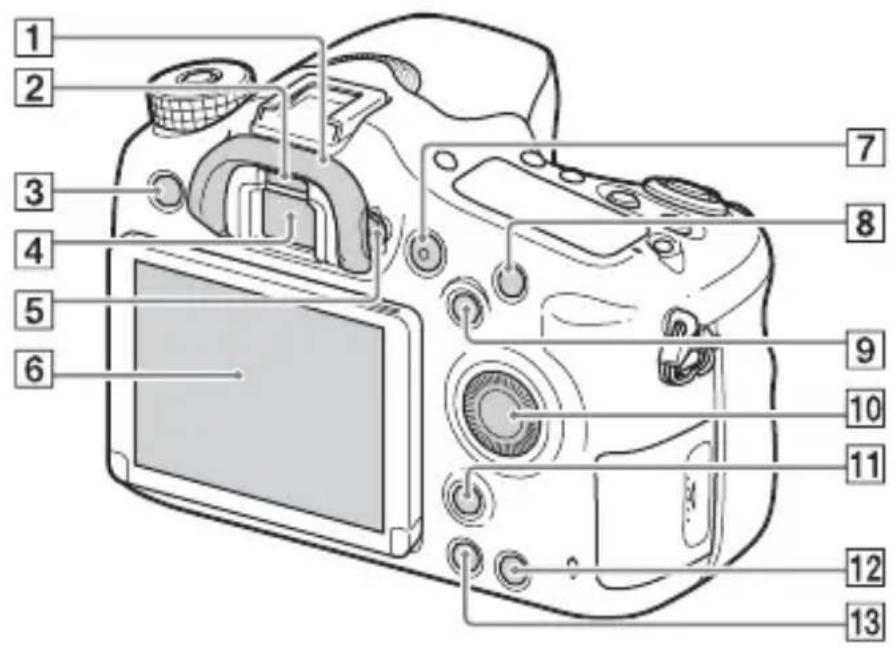
Eyepiece cup
2Eye sensor
3 MENU button (19)
Viewfinder*
- When you look into the viewfinder, the viewfinder mode is activated, and when you take your face away from the viewfinder, the screen mode returns to the monitor mode.
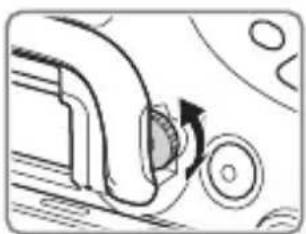
Diopter-adjustment dial
- Adjust the diopter-adjustment dial according to your eyesight until the display appears clearly in the viewfinder.
6Monitor
MOVIE button (32)
8For shooting:C1 (Custom 1) button For viewing:Enlarge) button
For shooting: AEL (AE lock) button/SLOW SYNC button For viewing: image index) button
10Control wheel (17)
For shooting: Fn (Function) button (18) For viewing: Image rotation) button
C2 (Custom 2) button For viewing: (Delete) button (34)
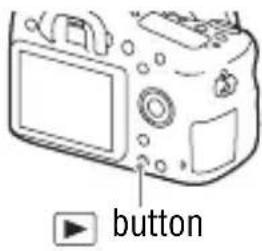
13 (Playback) button (33)
* Do not directly touch this part.
GB
Top side
1Multi interface shoe*
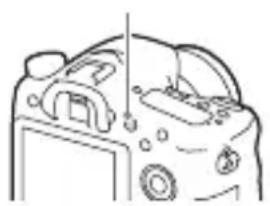
2FINDER/MONITOR button
3Display panel
4 (Drive mode) button
5WB (White balance) button
6 Exposure compensation) button
ISO button
8 Display panel illumination) button
9 Image sensor position mark
- For details on compatible accessories of the Multi interface shoe, visit the Sony website in your area, or consult your Sony dealer or local authorized Sony service facility.
Accessories for the Accessory Shoe can also be used.
Operations with other manufactures' accessories are not guaranteed.
ni Multi Interface Shoe
Accessory Shoe
Sides/Bottom
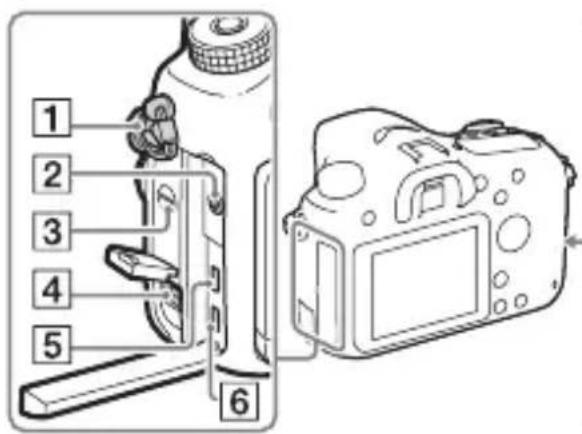

1 Hooks for shoulder strap
- Attach both ends of the strap onto the camera.
2 Microphone jack
- When an external microphone is connected, the internal microphone is turned off automatically. When the external microphone is a plug-in-power type, the power of the microphone is supplied by the camera.
3Speaker
4DC IN terminal
- When connecting the AC-PW10AM AC Adaptor (sold separately) to the camera, turn the camera off, then plug the connector of the AC Adaptor to the DC IN terminal on the camera.
5HDMI micro jack
6Multi/Micro USB Terminal*
Supports Micro USB compatible device.
7Memory card insertion slot (23)
8Memory card cover (23)
9Access lamp
10 Battery insertion slot (23)
11 Battery cover (23)
12 Tripod socket hole
-
Use a tripod with a screw less than 5.5mm (7/32 inches) long. Otherwise, you cannot firmly secure the camera, and damage to the camera may occur.
-
For details on compatible accessories for the Multi/Micro USB Terminal, visit the Sony website, or consult your Sony dealer or local authorized Sony service facility.
Lens
DT 18-55mm F3.5-5.6 SAM II (Supplied with the ILCA-68K)
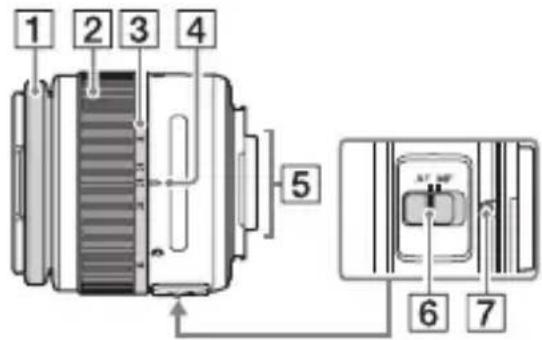
1 Focusing ring
2Zoom ring
3Focal-length scale
4Focal-length index
5 Lens contacts*
6Focusing mode switch
7Mounting index
-
Do not directly touch this part.
-
The DT 18-55mm F3.5-5.6 SAM II is designed for Sony A-mount cameras (models equipped with an APS-C sized image sensor). You cannot use these lenses on 35mm-format cameras.
- For the lenses other than DT 18-55mm F3.5-5.6 SAM II, refer to the operating instructions supplied with the lens.
Operating the camera
How to use the control wheel
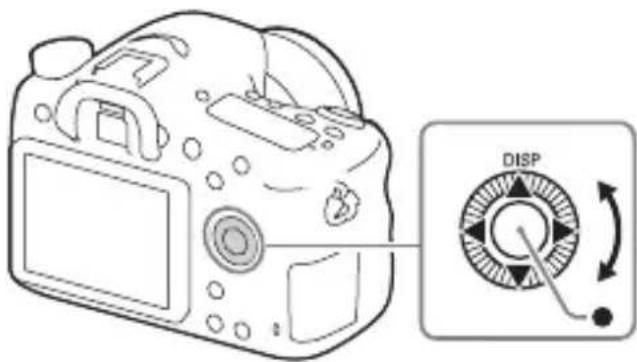
- You can turn the control wheel or press up/down/left/right on the control wheel to move the selection frame. Press in the center of the control wheel to set the selected item. In this manual, the action of pressing the up/down/left/right side of the control wheel is indicated by / / / .
- When you turn the control wheel or press on the control wheel in playback mode, you can display the previous or next image.
- DISP function is assigned to on the control wheel. You can change the screen display with this function.
- [Standard] is assigned to in the center of the control wheel in the default settings. When you press , the autofocus function is activated and the camera focuses on the subjects in the central area of the monitor.
How to use the control dial
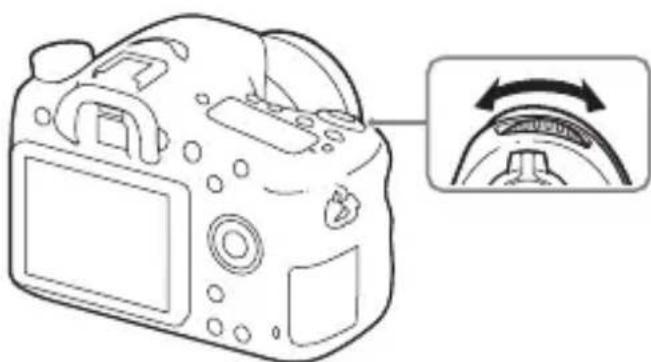
You can turn the control dial to change the settings required for each shooting mode with immediate effect.
GB
Selecting a function using the Fn (Function) button
This button is used for setting up or executing functions used frequently in shooting, except for functions from the Quick Navi screen. The displayed contents and their position shown below are just a guideline, and may differ from the actual display.
1 Press DISP on the control wheel to set the screen mode to other than [For viewfinder].
2 Press the Fn button.
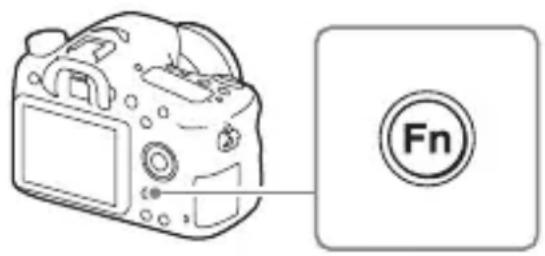
3 Select the desired item using / / / on the control wheel.
The setting screen appears.
4 Select the desired setting by turning the control wheel, then press on the control wheel.
- Some setting values can be finely adjusted by turning the control dial.

To set the individual settings in the dedicated screen
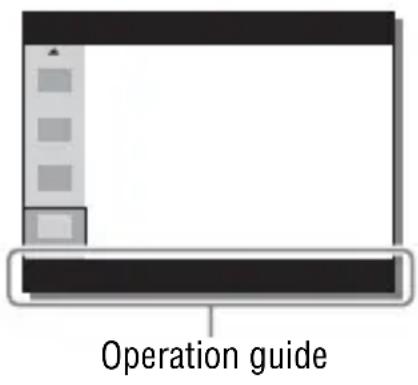
In step 3, select a setting item and press on the control wheel to switch to the dedicated screen for the setting item. Set the items according to the Operation guide.
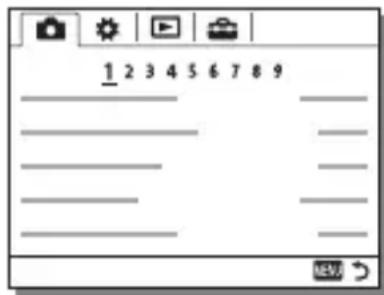
Functions that can be selected using the MENU button
You can set up the basic settings for the camera as a whole, or execute functions such as shooting, playback, or other operations.
1 Press MENU button to display the menu screen.
2 Select the desired setting item using / / / on the control wheel or by turning the control wheel, and then press on the center of the control wheel.
- Select an icon at the top of the screen and press the on the control wheel to move to another MENU item.
GB
3 Select the setting value, then press to confirm.
To display the Tile Menu
Allows you to select whether to always display the first screen of the menu when you press the MENU button.
MENU (Setup) [Tile Menu] [On]
Using the In-Camera Guide
You can use [Custom Key Settings] to assign In-Camera Guide to the desired button.
The In-Camera Guide displays explanations for the currently selected menu function or setting.
MENUButton (Custom Settings) [CustomKey Settings] Select the desired button assigned to the function. [In- Camera Guide]
Press the MENU button and use the control wheel to select a MENU item whose explanation you want to read, and then press the button to which [In-Camera Guide] is assigned.
Charging the battery pack
When using the camera for the first time, be sure to charge the NP-FM500H InfoLITHIUM™ battery pack (supplied).
The InfoLITHIUM battery pack can be charged even when it has not been fully depleted.
It can also be used when it has not been fully charged.
The charged battery pack is discharged little by little, even when you do not use it. To avoid missing an opportunity to shoot, charge the battery pack again before shooting.
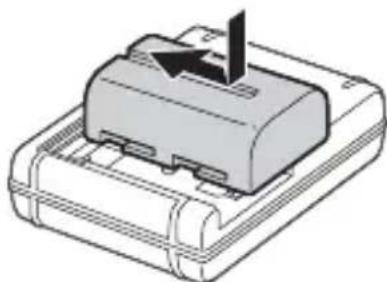
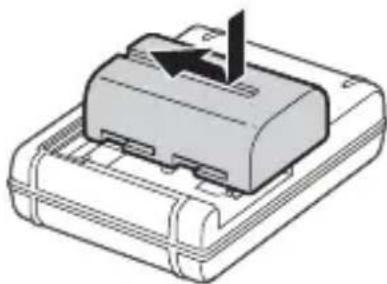
1 Insert the battery pack into the battery charger.
Push the battery pack until it clicks.
GB
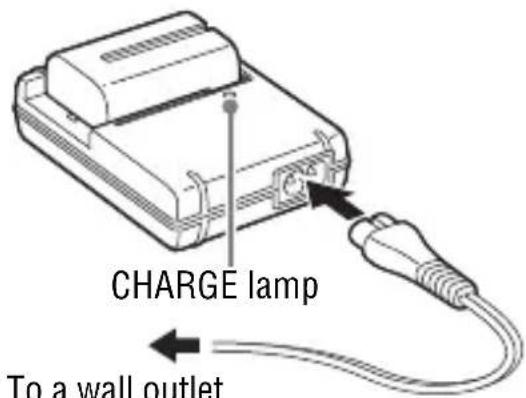
2 Connect the battery charger to the wall outlet (wall socket).
- How to connect the battery charger may differ depending on the country/region.
Light on: Charging
Light off: Charge completed
Charging time (Full charge)
Approx. 175 minutes
- When charging a fully depleted battery pack at a temperature of 25^ (77^) .
- The CHARGE lamp turns off when charging is completed.
With the battery charger that can be connected to the wall outlet (wall socket) directly
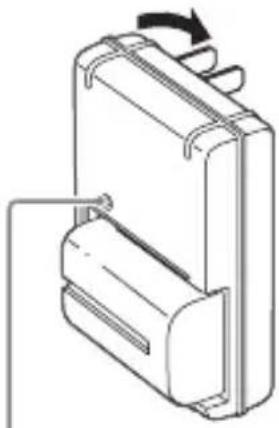
CHARGE lamp
With the battery charger that requires the power cord to connect to the wall outlet (wall socket)
- The charging time differs depending on the remaining capacity of the battery pack or charging conditions.
- Be sure to use only genuine Sony brand battery packs.
- We recommend charging the battery pack in an ambient temperature of between 10^ to 30^ ( 50^ to 86^ ). You may not be able to efficiently charge the battery pack outside this temperature range.
- Connect the battery charger to the nearest wall outlet (wall socket).
Inserting the battery pack/memory card (sold separately)
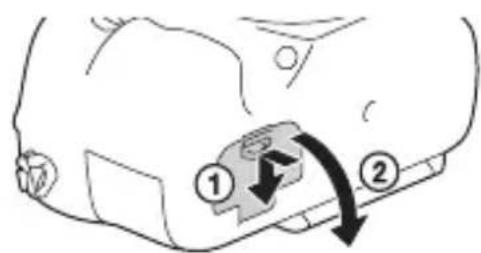
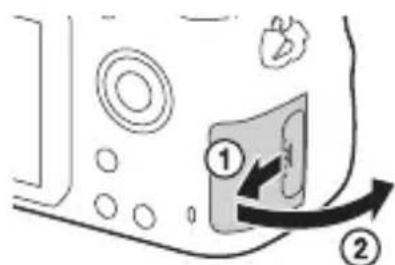
1 While sliding the battery cover open lever, open the cover.
2 Firmly insert the battery pack all the way while pressing the lock lever with the tip of the battery.
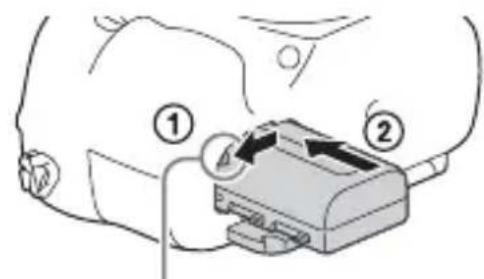
Lock lever
GB
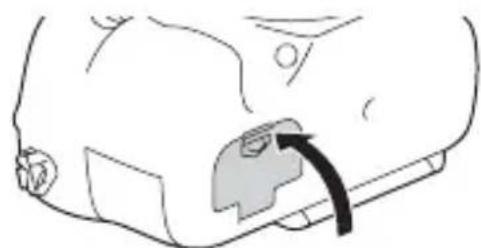
3 Close the cover.
4 Slide the memory card cover to open it.
5 Insert a memory card.
- With the notched corner facing as illustrated, insert the memory card until it clicks into place.
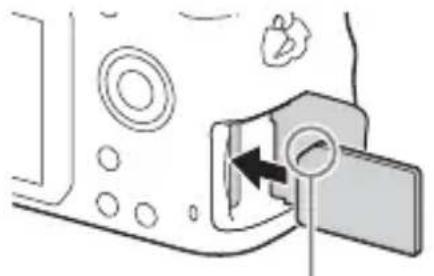
Ensure the notched corner faces correctly
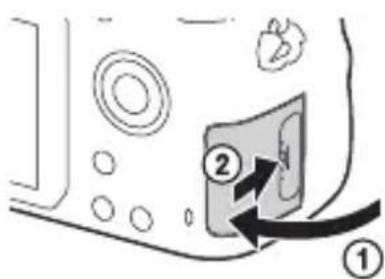
6 Close the cover.
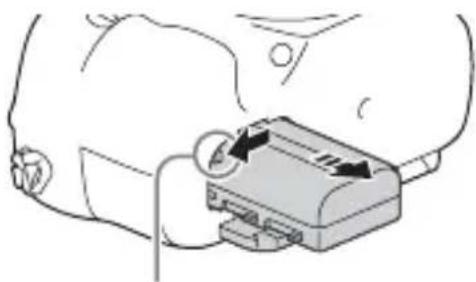
To remove the battery pack
Turn off the camera and slide the lock lever in the direction of the arrow. Be careful not to drop the battery pack.
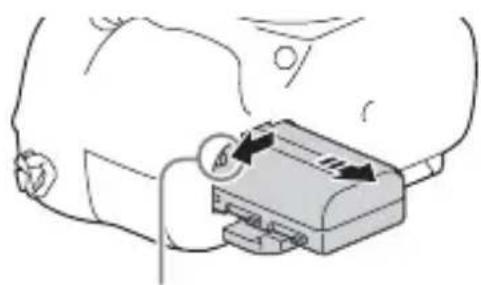
Lock lever
To remove the memory card
Check that the access lamp (page 15) is not lit, then open the cover, and push the memory card once.
To check the remaining battery level
The supplied battery pack is a lithium-ion battery pack that has functions for exchanging information related to operating conditions with your camera. The percentage of the remaining battery life is displayed according to the operating conditions of your camera.
| Battery level | “Battery exhausted.” | ||||
| High | You cannot shoot any more pictures. | ||||
Memory cards that can be used
| Memory card | For still images | For movies | ||
| MP4 AVCHD XAVC S | ||||
| Memory Stick PRO Duo | ✓ | ✓(Mark2 only) | ✓(Mark2 only) | — |
| Memory Stick PRO-HG Duo™ | ✓ | ✓ | ✓ | ✓ |
| Memory Stick Micro™ (M2) | ✓ | ✓(Mark2 only) | ✓(Mark2 only) | — |
| SD memory card | ✓ | ✓*1 *1 | ✓ | — |
| SDHC memory card | ✓ | ✓*1 *1 *2 | ✓ | ✓ |
| SDXC memory card | ✓ | ✓*1 *1 *2 | ✓ | ✓ |
| microSD memory card | ✓ | ✓*1 *1 | ✓ | — |
| microSDHC memory card | ✓ | ✓*1 *1 *2 | ✓ | ✓ |
| microSDXC memory card | ✓ | ✓*1 *1 *2 | ✓ | ✓ |
1 SD Speed Class 4: or faster, or UHS Speed Class 1: or faster
2 Memory cards that fulfill all of the following conditions:
- Capacity of 4 GB or more
-SD Speed Class 10: or UHS Speed Class 1: or faster
- For details on the number of recordable still images and recordable duration of movies, refer to pages 41 to 43. Check the tables to select a memory card with the desired capacity.
Notes
- When an SDHC memory card is used to record XAVC S movies over extended periods of time, the recorded movies will be divided into files of 4 GB. The divided files can be integrated into a single file using PlayMemories Home.
- Not all memory cards are guaranteed to operate correctly. For memory cards produced by manufacturers other than Sony, consult the manufacturers of the products.
- When using Memory Stick Micro media or microSD memory cards with this camera, make sure to use with the appropriate adaptor.
Attaching a lens
Set the power switch of the camera to OFF before you attach or remove the lens.
1 Remove the body cap from the camera and the packaging lid from the rear of the lens.
- When changing the lens, change the lens quickly somewhere away from dusty locations to keep dust or debris from getting inside the camera.
- When shooting, remove the front lens cap from the front of the lens.
Front lens cap
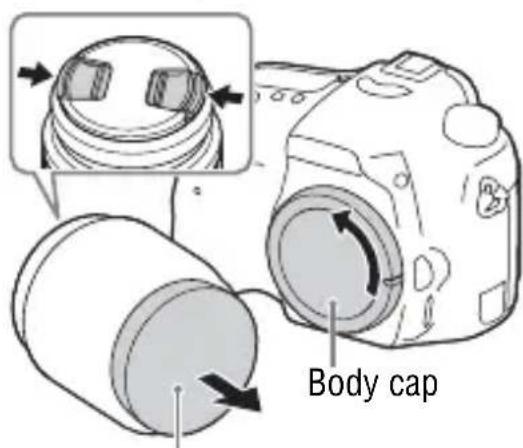
Packaging lid
2 Mount the lens by aligning the orange index marks (mounting indexes) on the lens and camera.
- Hold the camera with the lens facing down to prevent dust from entering into the camera.
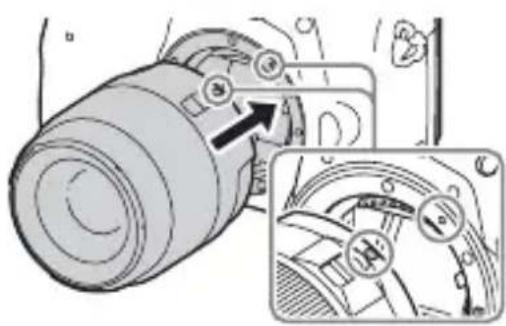
Orange index marks
3 While pushing the lens lightly toward the camera, turn the lens clockwise until it clicks into the locked position.
- Be sure to put the lens on straight.
Notes
- When attaching a lens, do not press the lens release button.
- Do not use force when attaching a lens.
- E-mount lenses are not compatible with this camera.
- When you use a lens for which a tripod socket is provided, attach the lens onto the tripod using the tripod socket provided to help balance the weight of the lens.
- When carrying the camera with a lens attached, hold both the camera and the lens firmly.
- Do not hold the part of the lens that is extended for the zoom or focus adjustment.
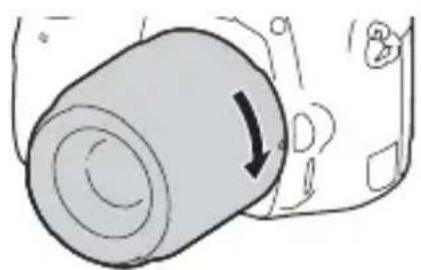
To remove the lens
1 Press the lens release button all the way in and turn the lens counterclockwise until it stops.
Lens release button
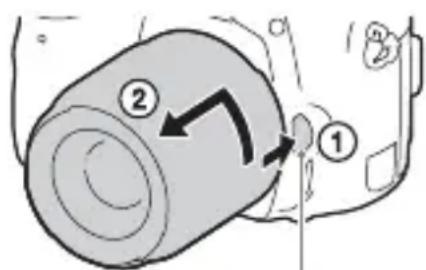
2 Attach the caps to the front and rear of the lens and the body cap to the camera.
- Before you attach them, remove any dust from them.
- A rear lens cap is not supplied with the DT 18-55mm F3.5-5.6 SAM II Lens Kit. If storing the lens without attaching it to the camera, purchase Rear Lens Cap ALC-R55.
Notes on changing the lens
When changing the lens, if dust or debris gets inside the camera and adheres to the surface of the image sensor (the part that converts the light to an electric signal), it may appear as dark spots on the image, depending on the shooting environment.
The camera is equipped with an anti-dust function to prevent dust from landing on the image sensor. However, always make sure to change the lens quickly somewhere away from dusty locations when attaching/ removing a lens.
Setting the date and time
When you turn on the camera for the first time or after you initialize the functions, the screen to set the date and time appears.
1 Set the power switch to ON to turn on the camera.
The screen to set the date and time appears.
- To turn the camera off, set the power switch to OFF.

2 Check that [Enter] is selected on the screen, then press on the control wheel.
![SONY Alpha ILCA68K - Check that [Enter] is selected on the screen, then press on the control wheel. - 1](/content/2026/03/464006/images/439ce5ccf9a33dfc0184d059b1394eb913c93911cb3b80b2ac622efe4786ed43.jpg)
3 Select a desired geographic location, and then press .
4 Select a setting item by using / on the control wheel, then press .
5 Select a desired setting by using / / , then press .
6 Repeat steps 4 and 5 to set other items, then select [Enter] and press .
To cancel the date and time setting operation Press the MENU button.
Checking or resetting the date/time and area
The date and time setup screen appears automatically when the power is turned on for the first time or when the internal rechargeable backup battery has been discharged. To reset the date and time, use the menu.
MENUButton (Setup) [Date/Time Setup] or [Area Setting]
MENUButton
GB
Maintaining the date and time setting
This camera has an internal rechargeable battery for maintaining the date and time and other settings regardless of whether the power is on or off, or the battery is installed or not.
Shooting still images
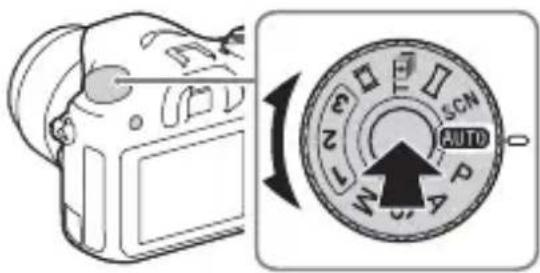
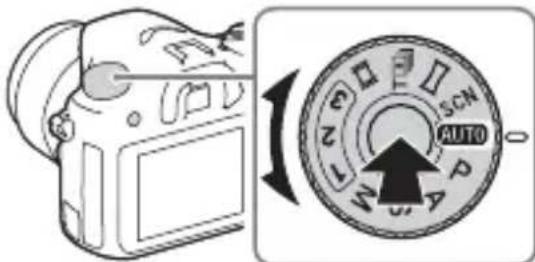
In auto mode, the camera analyzes the subject and allows you to shoot with the appropriate settings.
1 Set the power switch to ON to turn on the camera.
2 Set the mode dial to Auto Mode).
- Turn the mode dial while pressing the mode dial lock release button on the center of the mode dial.
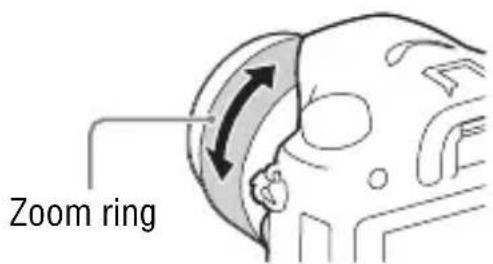
3 Look into the viewfinder and hold the camera.
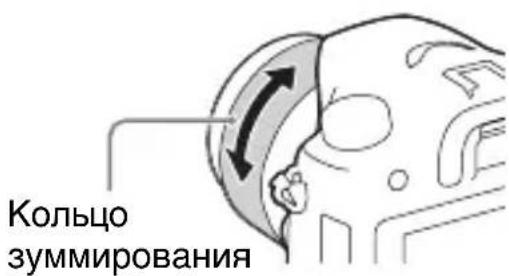
When using a zoom lens, adjust the zoom ring to the proper size of the subject.
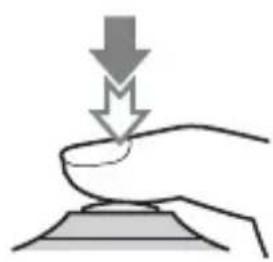
4 Press the shutter button halfway down to focus.
- When the image is in focus, a beep sounds and the or indicator lights.
5 Press the shutter button fully down to shoot an image.
- If [Auto Obj. Framing] is set to [Auto], when shooting faces, close-up (macro) subjects, or subjects tracked by [Lock-on AF], the camera analyzes the scene and automatically trims the captured image into a suitable composition. Both the original and the trimmed images will be saved.
To shoot in dark environments
Use the flash to light up the subject while shooting and to prevent camera-shake.
Press the Flash pop-up) button to pop up the flash, then press the shutter button fully down.
You can select an appropriate flash mode to suit your purposes. For details on flash mode, refer to "Help Guide."
On the number of focus area points
While the camera uses a maximum of 79 focus points for the autofocus functions, the number of focus points will be limited when the following lenses are attached.
| Lens Number of focus points | |
| SAL75300, SAL1118, SAL55200, SAL1855, SAL18552 (Supplied with ILCA-68K), SAL55200-2, SAL30M28, SAL55300 | 61 points |
| SAL500F80 One single point at the center |
- This information is current as of the day the model was released. Some of the lenses above are not available in some countries or regions.
GB
1 Set the mode dial to Movie).
- When the [MOVIE Button] is set to [Always], the movie recording can be started from any shooting mode.
2 Press the MOVIE button to start recording.
MOVIE button
3 Press the MOVIE button again to stop recording.
Notes
- The sound of the camera in operation may be recorded while recording a movie. You can disable the sound recording by setting [Audio Recording] to [Off].
- The continuous recording time of a movie depends on the ambient temperature or the condition of the camera. See "Notes on continuous movie recording" (page 44).
- When the icon appears, the temperature of the camera is too high. Turn the camera off and wait until the temperature of the camera decreases.
- When you are recording continuously for a long time, you may feel that the camera is warm. This is normal. Also, "Internal temp. high. Allow it to cool." may appear. In such cases, turn the camera off and wait until the camera is ready to shoot again.
Playing back images
1 Press the button.
2 Select an image by pressing the on the control wheel.
- To play back movies, press on the control wheel.
If you press on the control wheel while playing back a movie, the control panel will be displayed.
GB
| Control panel Action during movie playback | |
| ▶Playback | |
| ■Pause | |
| ▶Fast forward | |
| ▲Fast rewind | |
| ■Forward slow playback | |
| ▲Rewind slow playback | |
| ▶Next movie | |
| ▲Previous movie | |
| ■Frame advance | |
| ▲■Frame rewind | |
| Volume settings | |
| Closes the control panel | |
Notes
- Movies recorded using other devices may not play back on this camera.
Deleting images
Once you have deleted an image, you cannot restore it. Be sure that you want to delete the image before proceeding.
1 While displaying the image you want to delete, press the (Delete) button.
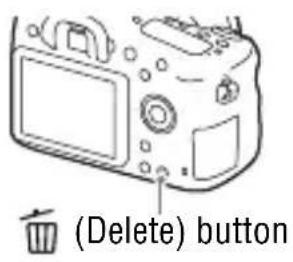
2 Select [Delete] with / on the control wheel, then press .
- To delete several images at a time, select MENU button (Playback) [Delete].
Notes
- Protected images cannot be deleted.
Selecting a shooting mode
Turn the mode dial while pressing the mode dial lock release button on the center of the mode dial.
The following shooting modes are available.
| AUTO (Auto Mode) A | Allows you to shoot still images with the settings adjusted automatically. |
| P (Program Auto) All | ows you to shoot with the exposure (the shutter speed and the aperture value) adjusted automatically. The other settings can be adjusted manually. |
| A (Aperture Priority) | Shoots by adjusting the aperture and changing the focus range, or by defocus the background. |
| S (Shutter Priority) A | adjusts the shutter speed to show the movement of the subject. |
| M (Manual Exposure) | Allows you to shoot after manually adjusting the exposure (the shutter speed and the aperture value) using the control dial and the control wheel. |
| 1/2/3 (Memory recall) | Calls up settings pre-registered in [Memory] in the (Camera Settings). |
| (Movie) Allows you to change shooting settings and shoot a movie. | |
| (Tele-zoom Cont. AE) | Allows continuous shooting while the shutter button is fully depressed. The center area of the image is cropped and the camera records the images continuously at a maximum of about 8 images per second. The number of focus area points is set to a maximum of 25 points. |
| (Sweep Panorama) | Allows you to shoot panoramic images by combining multiple images. |
| SCN (Scene Selection) | Allows you to shoot with preset settings according to the scene. |
Using the software
Use the following applications to optimize use of the images shot with your camera.
- Image Data Converter
- PlayMemories Home
- Remote Camera Control
For details on installation, see pages 37 to 40.
System requirements
You can find the system requirements for the software at the following URL:
http://www.sony.net/pcenv/

Using Image Data Converter
With Image Data Converter, you can do the following:
- You can play back and edit images recorded in RAW format with various corrections, such as tone curve and sharpness.
- You can adjust images with white balance, exposure, and [Creative Style], etc.
- You can save the images displayed and edited on a computer.
- You can either save the image as RAW format or save it in a general file format.
- You can display and compare the RAW images and JPEG images recorded by this camera.
- You can rank images in 5 grades.
- You can apply color labels.
To use Image Data Converter, refer to Help.
Click [Start] [All Programs] [Image Data Converter] [Help] [Image Data Converter Ver.4].
Image Data Converter support page (English only)
http://www.sony.co.jp/ids-se/
Installing Image Data Converter
1 Download the software from the following URL and install it on your computer.
Windows:
http://www.sony.co.jp/imsoft/Win/
Mac:
- Log on as Administrator.
Using PlayMemories Home
The software PlayMemories Home allows you to import still images and movies to your computer and use them. PlayMemories Home is required for importing XAVC S movies or AVCHD movies to your computer.
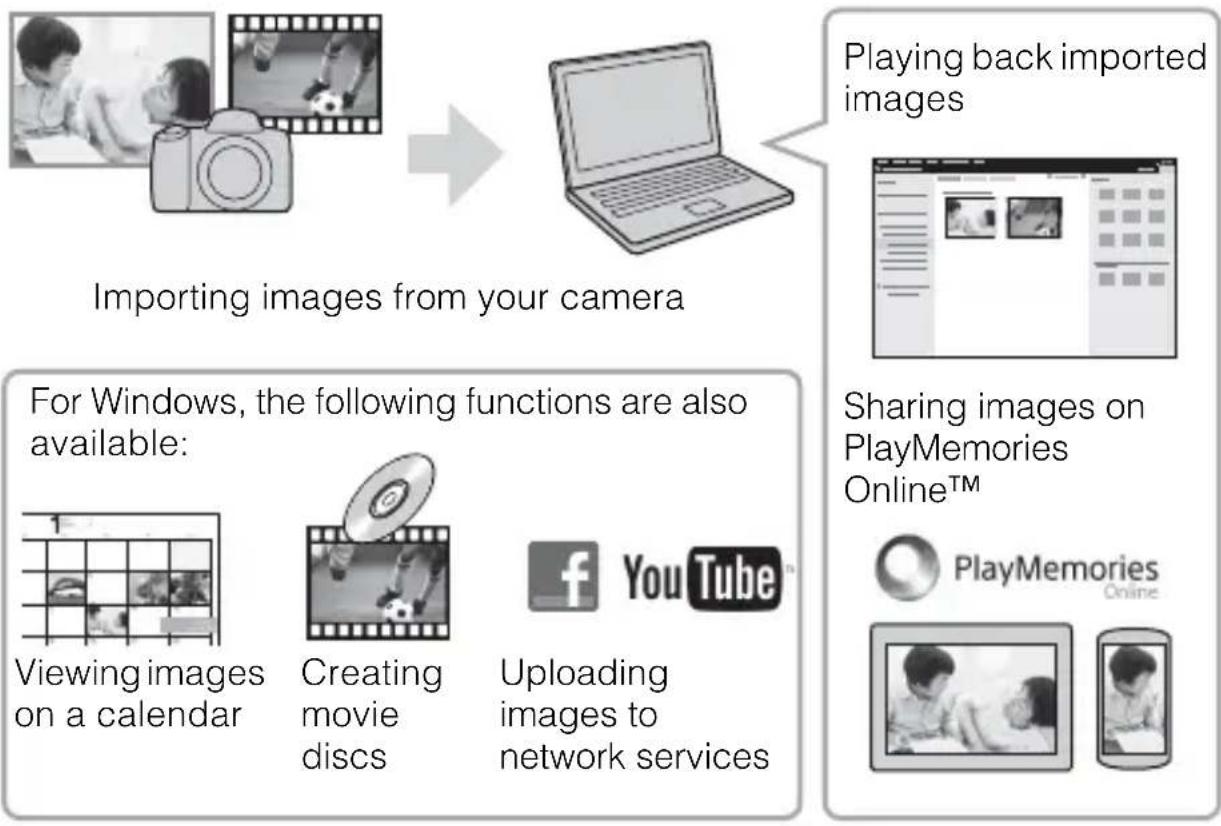
- You can download Image Data Converter or Remote Camera Control, etc. by performing the following procedure: Connect the camera to your computer launch PlayMemories Home click [Notifications].
Notes
- An Internet connection is required to install PlayMemories Home.
- An Internet connection is required to use PlayMemories Online or other network services. PlayMemories Online or other network services may not be available in some countries or regions.
Refer to the following URL for Mac software: http://www.sony.co.jp/imsoft/Mac/ -
If the software PMB (Picture Motion Browser), supplied with models released before 2011, has already been installed on your computer, it will be overwritten by PlayMemories Home during the installation. Use PlayMemories Home, the successor software of PMB.
-
Movies recorded using the [60p 28M(PS)]/[50p 28M(PS)], [60i 24M(FX)]/[50i 24M(FX)] or [24p 24M(FX)]/[25p 24M(FX)] setting in [ Record Setting] are converted by PlayMemories Home to create an AVCHD recording disc. This conversion can take a long time. Also, you cannot create a disc with the original image quality. If you want to keep the original image quality, store your movies on a Blu-ray Disc.
Installing PlayMemories Home
1 Using the Internet browser on your computer, go to the following URL, then click [Install] [Run].
http://www.sony.net/pm/
GB
2 Follow the instructions on the screen to complete the installation.
Using Remote Camera Control
Connect the camera to your computer. With Remote Camera Control you can:
- Set up the camera or record an image from the computer.
- Record an image directly to the computer.
- Perform an Interval Timer Shooting.
Set up the following before use: MENU Setup [USB Connection] [PC Remote]
Installing Remote Camera Control
1 Using the Internet browser on your computer, go to the following URL.
Windows:
http://www.sony.co.jp/imsoft/Win/
Mac:
2 Follow the instructions on the screen to download and install Remote Camera Control.
Notes
- An Internet connection is required to install Remote Camera Control.
Checking the number of images and recordable time of movies
When you insert a memory card into the camera and set the power switch to ON, the number of images that can be recorded (should you continue to shoot using the current settings) is displayed on the screen.
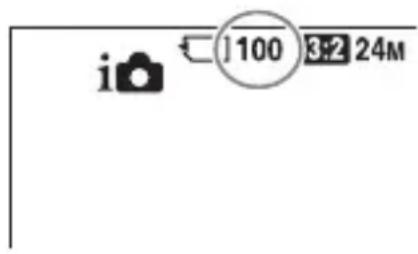
Notes
- When "0" (the number of recordable images) flashes in yellow, the memory card is full. Replace the memory card with another one, or delete images from the current memory card (page 34).
- When "NO CARD" (the number of recordable images) flashes in yellow, it means no memory card has been inserted. Insert a memory card.
The number of images that can be recorded on a memory card
The table below shows the approximate number of images that can be recorded on a memory card formatted with this camera. The values are defined using Sony standard memory cards for testing. The values may vary depending on the shooting conditions and the type of memory card used.
Image Size: L: 24M
Aspect Ratio: 3:2*
Memory card formatted with this camera (Units: Images)
| Capacity Quality | 2 GB | 4 GB | 8 GB | 16 GB | 32 GB | 64 GB |
| Standard 330 660 1 | 300 2700 5 | 400 10500 | ||||
| Fine 200 405 820 1 | 650 3300 6 | 600 | ||||
| Extra fine 100 200 | 405 810 16 | 00 3250 | ||||
| RAW & JPEG | 53 | 105 215 | 435 880 | 1 | 750 | |
| RAW | 73 | 145 295 | 600 1200 | 2 | 2400 |
- When [Aspect Ratio] is set to [16:9], you can record more images than the numbers shown in the table above (except when [RAW] is selected).
The number of images that can be recorded using a battery pack
Note that the actual numbers may differ depending on the conditions of use.
| Battery life Number of images | |||
| Shooting (still images) | Monitor — Approx. 580 images | ||
| Viewfinder — Approx. 540 images | |||
| Actual shooting (movies) | Monitor Approx. 130 min. — | ||
| Viewfinder Approx. 130 min. — | |||
| Continuous shooting (movies) | Monitor Approx. 220 min. — | ||
| Viewfinder Approx. 220 min. — | |||
| Viewing (still images) | Monitor Approx. 410 min. Approx. 8200 images | ||
| Viewfinder Approx. 410 min. Approx. 8200 images | |||
Notes
- The above number of images applies when the battery pack is fully charged. The number of images may decrease depending on the conditions of use.
-
The number of images that can be recorded is for shooting under the following conditions:
-
The battery pack is used at an ambient temperature of 25^ (77^) .
Using the lens DT 18-55mm F3.5-5.6 SAM II - Using Sony Memory Stick PRO Duo (Mark2) media (sold separately)
- [Viewfinder Bright.] is set to [Manual] [± 0] .
-
[Monitor Brightness] is set to [Manual] [± 0] .
-
The number for "Shooting (still images)" is based on the CIPA standard, and is for shooting under the following conditions:
(CIPA: Camera & Imaging Products Association)
DISP is set to [Display All Info].
- [Focus Mode] is set to [AF-S].
- Shooting once every 30 seconds.
- The flash is used once every two times.
- The power turns on and off once every ten times.
-
The number of minutes for movie shooting is based on the CIPA standard, and are for shooting under the following conditions:
-
[Record Setting] is set to [30p 50M]/[25p 50M].
- Typical movie shooting: Battery life based on repeatedly shooting, zooming, shooting stand-by, turning on/off, etc.
- Continuous movie shooting: Battery life based on non-stop shooting until the limit (29 minutes) has been reached, and then continued by pressing the MOVIE button again. Other functions, such as zooming, are not operated.
Available recording time for a movie
The table below shows the approximate total recording times using a memory card formatted with this camera.
GB
Memory card formatted with this camera
| File Format Record Setting | Recordable time (h (hour), m (minute)) | |||
| 8 G B 32 GB 64 GB | ||||
| XAVC S | 60p 50M/50p 50M | 15 m 1 h 15 | m 2 h 35 m | |
| 30p 50M/25p 50M | 15 m 1 h 15 | m 2 h 35 m | ||
| 24p 50M*/- 15 | m 1 h 15 m 2 h 35 m | |||
| AVCHD | 60p 28M(PS)/50p 28M(PS) | 35 m 2 h 30 | m 5 h 5 m | |
| 60i 24M(FX)/50i 24M(FX) | 40 m 3 h 6 h | |||
| 60i 17M(FH)/50i 17M(FH) | 1 h | 4 h 5 m 8 h 15 m | ||
| 24p 24M(FX)/25p 24M(FX) | 40 m 3 h 6 h | |||
| 24p 17M(FH)/25p 17M(FH) | 1 h | 4 h 5 m 8 h 15 m | ||
| MP4 | 1440×108012M | 1 h 20 m 5 h | 30 m 11 h 5 m | |
| VGA 3M | 4 h 55 m | 20 h 40 h 10 m | ||
- Only when [PAL/NTSC Selector] is set to NTSC
- Continuous shooting is possible for approximately 29 minutes (a product specification limit).
Notes
- The recordable time of movies varies because the camera is equipped with VBR (Variable Bit-Rate), which automatically adjusts image quality depending on the shooting scene. When you record a fast-moving subject, the image is clearer but the recordable time is shorter because more memory is required for recording. The recordable time also varies depending on the shooting conditions, the subject or the image quality/size settings.
- The values shown are not for continuous recording time.
- The recording time may differ depending on shooting conditions and the memory card used.
- For details on movie playback, see page 33.
Notes on continuous movie recording
- It requires a lot of power to perform high quality movie recording or continuous shooting using the image sensor. Therefore, if you continue to shoot, the temperature inside the camera will rise, especially that of the image sensor. In such cases, the camera turns off automatically since higher temperatures affect the quality of the images or affect the internal mechanism of the camera.
- The duration of time available for movie recording is as follows when the camera starts recording after the power of the camera has been turned off for a while. (The following values indicate the continuous time from when the camera starts recording until the camera stops recording.)
| Ambient temperature Continuous recording time for movies | |
| 20°C (68°F) About 29 minutes | |
| 30°C (86°F) About 29 minutes | |
| 40°C (104°F) About 25 minutes |
- The duration of time available for movie recording varies with the temperature or condition of the camera before you start recording. If you frequently recompose or shoot images after the power is turned on, the temperature inside the camera will rise and the recording time available will be shorter.
- When indicated, stop recording the movie. The temperature inside the camera has increased to an unacceptable level.
-
If the camera stops recording due to the temperature, leave it for several minutes with the power turned off. Start recording after the temperature inside the camera drops fully.
-
If you observe the following points, the recording time will be longer.
- Keep the camera out of direct sunlight.
- Turn the camera off when it is not being used.
- The maximum size of a movie file is about 2 GB, when [File Format] is set to [AVCHD]. When the file size is about 2 GB, a new movie file is created automatically.
The maximum continuous recording time is 29 minutes.
GB
Specifications
Camera
[System]
Camera Type: Built-In-Flash Interchangeable Lens Digital Camera
Lens: Sony A-mount lens
[Image sensor]
Image format: 23.5mm× 15.6mm (APS-C format) CMOS image sensor
Effective pixel number of camera: Approx. 24 160 000 pixels
Total pixel number of image sensor: Approx. 24780000 pixels
[SteadyShot]
For still images: System: Image sensor-shift mechanism
For movies: System: Electronic
[Anti-Dust]
System: Anti-dust coating on image sensor and image sensor shift mechanism
[Auto focus system]
System: TTL phase-detection system (with center F2.8 sensor), 79 points (15 points cross type)
Sensitivity Range: -2EV to 18EV (at ISO 100 equivalent)
AF illuminator: Approx. 1m to 5m (3.3 ft. to 16.4 ft.)
[Electronic viewfinder]
Type: Electronic viewfinder (Organic Electro-Luminescence)
Screen size: 1.0cm (0.39 type)
Total number of dots: 1440000 dots
Frame coverage: 100%
Magnification: Approx. 0.88×
Approx. 0.57 × (35mm -format equivalent) with 50~mm lens at infinity, -1m^-1
Eye Point: Approximately 26.5mm from the eyepiece and approximately 23mm from the eyepiece frame at -1m^-1 (CIPA standard compliant)
Diopter Adjustment: -4.0m^-1 to +3.0m^-1
[Monitor]
LCD monitor: 6.7cm (2.7 type) TFT drive/Clear Photo LCD screen
Total number of dots: 460 800 dots
[Exposure control]
Metering Cell: "Exmor" CMOS sensor
Metering method: 1200-zone evaluative metering
Metering Range: -2EV to +17EV on Multi segment, Center weighted, Spot modes (at ISO 100 equivalent with F1.4 lens)
ISO sensitivity (Recommended exposure index):
Still images: AUTO, ISO 100 to 25 600 (1/3 EV step)
Movies: AUTO, ISO 100 to 12 800 (1/3 EV step)
Exposure compensation: ± 5.0 EV (switchable between 1/3 EV and 1/2 EV steps)
[Shutter]
Type: Electronically-controlled, vertical-traverse, focal-plane type
Speed range:
Still images: 1/4 000 second to 30 seconds, BULB
Movies: 1/4 000 second to 1/4 second (1/3 EV step)
- 1080 60i-compatible device up to 1/60 second in AUTO mode (up to 1/30 second in Auto slow shutter mode)
- 1080 50i-compatible device up to 1/50 second in AUTO mode (up to 1/25 second in Auto slow shutter mode)
Flash sync speed: 1/160 second
[Built-In-Flash]
Flash G.No.: GN 12 (in meters at ISO 100)
Recycling time: Approx. 3 seconds
Flash coverage: Covering 16mm lens (focal length that the lens indicates)
Flash compensation: ± 3.0 EV (switchable between 1/3 EV and 1/2 EV steps)
Flash range:
| Aperture | F2.8 F4.0 | F5.6 | ||
| ISO setting | 100 1 | m - 4.3 m (3.3 ft. - 14.1 ft.) | 1 m - 3 m (3.3 ft. - 9.8 ft.) | 1 m - 2.1 m (3.3 ft. - 7.0 ft.) |
| 200 1 | m - 6.1 m (3.3 ft. - 19.9 ft.) | 1 m - 4.2 m (3.3 ft. - 13.9 ft.) | 1 m - 3 m (3.3 ft. - 9.9 ft.) | |
| 400 1 | .4 m - 8.6 m (4.7 ft. - 28.1 ft.) | 1 m - 6 m (3.3 ft. - 19.7 ft.) | 1 m - 4.3 m (3.3 ft. - 14.1 ft.) | |
| 800 2 | m - 12 m (6.6 ft. - 39.8 ft.) | 1.4 m - 8.5 m (4.6 ft. - 27.8 ft.) | 1 m - 6.1 m (3.3 ft. - 19.9 ft.) | |
[Continuous shooting]
Continuous shooting speed:
[Tele-zoom Cont. AE]:
Maximum 8 images per second/
Hi:Maximum 5 images per
second/Maximum
2.5 images per second
- Based on our measurement conditions. The speed of continuous shooting can be slower, depending on the shooting conditions.
The maximum number of continuous shots:
In [Tele-zoom Cont. AE] mode
Extra fine: 34 images/
Fine: 63 images/
Standard: 112 images/
In Continuous shooting
Extra fine: 21 images/
Fine: 32 images/
Standard: 35 images/
RAW & JPEG: 8 images/
RAW: 8 images
[Image zooming playback]
Scaling range:
Image size:
L: Approx. × 1.0 - × 18.75/
M: Approx. × 1.0 - × 13.25/
S: Approx. × 1.0 - × 9.4
[Recording format]
File format: JPEG (DCF Ver. 2.0,
Exif Ver. 2.3, MPF Baseline)
compliant, RAW (Sony ARW 2.3
format)
Movie (XAVC S format): MPEG-4
AVC/H.264 XAVCS ver.1.0
format compliant
Video: MPEG-4 AVC/H.264
Audio: LPCM 2ch (48 kHz)
16 bit)
Movie (AVCHD format): AVCHD
format Ver. 2.0 compatible
Video: MPEG-4 AVC/H.264
Audio: Dolby Digital 2ch,
equipped with Dolby Digital
Stereo Creator
Manufactured under license
from Dolby Laboratories.
Movie (MP4 format):
Video: MPEG-4 AVC/H.264
Audio: MPEG-4 AAC-LC 2ch
[Recording media]
Memory Stick PRO Duo media, SD
card
[Input/output terminals]
Multi/Micro USB Terminal*:
USB communication, Hi-Speed
USB (USB 2.0)
- Supports Micro USB compatible
devices.
HDMI: HDMI type D micro jack
Mic Terminal: 3.5 ~mm Stereo
mini jack
[Power, general]
Battery pack: Rechargeable battery
pack NP-FM500H
[Power consumption (while shooting)]
When using a DT 18-55mm F3.5-5.6 SAM II*
When using the viewfinder:
Approx. 2.7 W
When using the screen:
Approx. 2.5 W
- Supplied with ILCA-68K.
[Others]
Microphone: Stereo
Speaker: Monaural
Exif Print: Compatible
DPOF: Compatible
PRINT Image Matching III: Compatible
Dimensions (Approx.): 142.6 ~mm × 104.2 ~mm ×
82.8 mm (5 5/8 inches ×
4 1/8 inches × 3 3/8 inches)
(W/H/D, excluding protrusions)
Mass:
Approx. 675g (1 lb 7.8 oz) (with
battery and Memory Stick PRO
Duo media)
Approx. 596g (1 lb 5 oz) (body only)
Operating temperature: 0^ to 40^ (32^ to 104^)
Storage temperature:
-20^ to +60^ (-4^ to +140^)
Design and specifications are subject to change without notice.
Battery charger/Battery
Battery charger BC-VM10A
Input rating: AC 100 V - 240 V, 50 Hz/60 Hz, 9 W
Output rating: DC 8.4 V, 0.75 A
Rechargeable battery pack NP-FM500H
Battery type: Lithium-ion battery
Maximum voltage: DC 8.4 V
Nominal voltage: DC 7.2 V
Maximum charge voltage: DC 8.4 V
Maximum charge current: 2.0A
Capacity: 11.5 Wh (1600 mAh)
Lens DT 18-55mm F3.5-5.6 SAM II (Supplied with ILCA-68K)
Focal length: Equivalent 35mm format focal length*: 27mm - 82.5mm
Lens groups/elements: 7/8
Angle of view: 76^ - 29^
Minimum focus: 0.25 m (0.82 ft.)
Maximum magnification: 0.34
Minimum f-stop: f / 22 - f / 36
Filter diameter: 55mm
Dimensions (max. diameter × height): Approx. 71.6mm× 69~mm (Approx. 2 7/8 inches × 2 3/4 inches)
Mass: Approx. 222g (Approx. 7 7/8 oz.)
1 The values for equivalent 35mm-format focal length and angle of view are based on Interchangeable Lens Digital Camera equipped with an APS-C sized image sensor.
2 Minimum focus is the shortest distance from the image sensor to the subject.
- This lens is equipped with a distance encoder. The distance encoder allows more accurate measurement (ADI) by using a flash with ADI functionality.
Depending on the lens mechanism, the focal length may change with any change of the shooting distance. The focal length assumes the lens is focused at infinity.
- The infinity position provides for some adjustment to compensate for focus shift caused by change in temperature. To shoot a subject at infinite distance in MF mode, use the viewfinder and set focus.
On focal length
The picture angle of this camera is narrower than that of a 35mm format camera. You can find the approximate equivalent of the focal length of a 35mm -format camera, and shoot with the same picture angle, by increasing the focal length of your lens by half.
For example, by using a 50~mm lens, you can get the approximate equivalent of a 75~mm lens of a 35~mm -format camera.
On image data compatibility
- This camera conforms with DCF (Design rule for Camera File system) universal standard established by JEITA (Japan Electronics and Information Technology Industries Association).
- Playback of images recorded with your camera on other equipment and playback of images recorded or edited with other equipment on your camera are not guaranteed.
Trademarks
Memory Stick and are trademarks or registered trademarks of Sony Corporation.
XAVC S and XAVC gistered trademarks of Sony Corporation.
- "AVCHD Progressive" and the "AVCHD Progressive" logotype are trademarks of Panasonic Corporation and Sony Corporation.
- Dolby and the double-D symbol are trademarks of Dolby Laboratories.
- The terms HDMI and HDMI High-Definition Multimedia Interface, and the HDMI Logo are trademarks or registered trademarks of HDMI Licensing LLC in the United States and other countries.
- Windows is a registered trademark of Microsoft Corporation in the United States and/or other countries.
Mac is a registered trademark of Apple Inc. in the United States and other countries.
- SDXC logo is a trademark of SD-3C, LLC.
- Facebook and the "f" logo are trademarks or registered trademarks of Facebook, Inc.
YouTube and the YouTube logo are trademarks or registered trademarks of Google Inc.
- Eye-Fi is a trademark of Eye-Fi, Inc.
- In addition, system and product names used in this manual are, in general, trademarks or registered trademarks of their respective developers or manufacturers. However, the ^TM or ⑧ marks may not be used in all cases in this manual.

InfoLITHIUM


GB
Additional information on this product and answers to frequently asked questions can be found at our Customer Support Website.
http://www.sony.net/
François
Monture A
Temps de charge (charge complete)
Env. 175 minutes
(CIPA: Camera & Imaging Products Association)
Batterie : Batterie rechargeable NP-FM500H
Batterie rechargeable NP-FM500H
(CIPA: Camera & Imaging Products Association)
LCD-Monitor: 6,7-cm-(2,7-Zoll)-
M E W O R Y S T I C K

CLASS


Progressive

(CIPA: Camera & Imaging Products Association)
H.264 XAVC S ver.1,0
Video: MPEG-4 AVC/H.264
Audio: LPCM 2 canales (48 kHz)
16 bit)
Dimensiones (Aprox.):
142,6mm× 104,2mm×
82,8 mm
(CIPA: Camera & Imaging Products Association)
L: Da circa × 1,0 a × 18,75/
M: Da circa × 1,0 a × 13,25/
S: Da circa × 1,0 a × 9,4
Instalar Remote Camera Control
(CIPA: Camera & Imaging Products Association)
Characteristicas techniques
Câmara
[Sistema]
(DCF Ver. 2.0, Exif Ver. 2.3,
MPF Baseline), RAW (Formato
ARW 2.3 da Sony)
Áudio: MPEG-4 AAC-LC
2 canais
F-stop minimo: f/22 - f/36
Diametro do filtro: 55mm
Dimensoes (diametro × alta max.): Aprox. 71,6mm× 69mm
Peso: Aprox. 222g
[Tele-zoom cont. AE]:
Maximale laadstroom: 2,0 A
Capaciteit: 11,5 Wh (1600 mAh)
Elementary apparatus
Akumulator: Akumulator NP-FM500H
Ładowarka/Akumulator
Ladowarka BC-VM10A
Akumulator NP-FM500H
IaTa H3rOToBJIeHnJAHTn-HOHHO 6aTapeHOro 6JOKa yKa3aHbI Ha 6OKOBcTOPOHe HJIN Ha IIOBepXHOCTN c HaKJIeIKoI.
56yKBeHHO-ⅢuΦpoBbIX CHMBOJIOB
A:YHbapb
B:ΦEBpaJIb
C:Mapr
D: AIIpeJIb
E: Man
F: IIOHB
G: HIOJIb
H: ABryct
I: Centa6pb
J: OKTЯбрь
K: Hoi6pb
L:ДeKa6pb
IprnHcIOJIb3OBaHHnIprNJlaRaemOroHJN peKOMeHNyEMOraaNTepa IepemeHHOROToka/3apraHOro ycTPONCBa aKKyMyJIaTopa BOCIOJIb3yInTeCb 6JIN3JIeKaIIeN ceTeBOH p03eTKo. EcJIN IIpH NcIOJIb3OBaHHn DaHHORO IN3JeJIIN BO3HNKHeT HeHCIIpaBHOCTb, HeMeJIeHNO BbIHbTe IIITeINCeJIbHyIO BNJKy IN3 ceTeBOH p03eTKH, YTO6bI OTKJIIOuHTb HCTOCHNK HINTaHH.
EcIIHcIOJIb3YeTcI H3JeJIHe c
HHINKaTOPOM 3apJIKN, IMeHTe B BVHy,
YTO I3JeJIHe HE OTKJIIOHTcR OT
HCTOuHHKa IIITaHnJaXe IIpH
BbIKJIIOUeHHN INHINKaTOPa.
Ceteboi shyp
IIyIOkyIaTeJIeBBeJIHKo6pHTaHHN,
HpJaan, MaJIbTe, KnIpe n
CayIOBcKoI ApaBHH
HcIOJIb3yIte ceTeBOI IHHyp (A). H3 COO6paXeHN 6e30IaChOCTN ceTeBOI IHHyp (B) He npEJa3HaueH IJIy KAc3aHHbIX BbIIIE cTpaH/peRHOHOB IN IO3TOMy He IOJIKeH TaM HCIOJIb3OBaTbcra.
IIyIOkyIaTeJIeB IpyrIcx cTpaHax/ pernohax EC
HcnoJIb3yIte ceTeBOI INHyp (B).
(A)(
B)
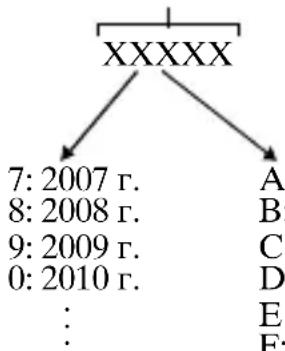
Data n3ROTOBHeHn u3dennr.
IaTa H3rTOBJIeHnYka3aHa Ha
yIaKOBKe Ha 3TNKeTKe CO IIItpHX-KoIOM B cJIeJyIOIeM fOpMaTe:
MM-YYYY, rIe MM-MecaII, YYYYY- FOI H3ROTOBJIeHnA.
IIpon3BOJNTeJIb: CoHn KopnopeHH, 1-7-1 KoHaH, MnHaTo-Ky, TokNo 108-0075, JIOHnIa
CtpaHa-ppoH3BOJnteJIb: TaHJaH
YBeDomJIeHne
EcJIN cTaTHueCKoe 3JIeKTPnueCTBO HIN 3JIeKTPOMaHHTHBIE CJIbI IIpNBOJrT K c6oIO B IpeJaue JaHHbIX, Ipee3aIyCTHTe IIpNJIOXKeHne HIN OTKJIIOHTe N CHOBA IIOJKIIIOHTe KOMMyHnKaIHOHHbI Ka6eJIb (USB n T.I.).
IaHHoe n3JeJHe 6bJIIO hCIIbTaHO I
Iipn3HaHO COOTBeTCTBYOIM
IIaIIa3OHy, yCTaHOBJIeHHOMy
HhCTpyKIIneE EMC, IO hCIOJIb3OBaHHIO
coeHNHTeJIbHbIX Ka6JIeN KOpOe
3 MeTpOB.
3JIeKtpomarHHTbIe IOJIa
OIIpeJeJIeHHbIX YacTOT MOrY TBINrTb Ha H3O6paXeHne H 3ByK DaHHoro aannapata.
ToIbKOДЯ MОdJeN IpeDHa3HaueHbIXДЯ pblHKOB PocCnN n cTpaH CHΓ
EAC
HmnpTepeHa TeppHTopnCtpaH
TamoxeHHoro co103a AO «CoHH
OpraHn3auiyIIOJIHOMOeHHa IpiHIMMaTb IIpeTeH3Hn OT
IOTpe6HTeJIeHa TeppHTOpn Ka3axCTaHa
BДaHHOMpyKOBOJCTBeIprHBeJeHo OINcAHHe 108060i-COBMeCTHMbIXN1080 50i-COBMeCTHMbIXycTpoIcTB.
C03dahne faaJa 6a3bI daHHbIX n3o6paXeHn
EcHn BCTaBHTb B KaMepy KapTy IaMaTn, Ha KOTopoH HeT aJla 6a3bI JaHHbIX H3O6paXeHn, IN BKJIIOuHTb IIITaHne, KaMepa aBTOMaTHueCKn CO3Jaact aJl 6a3bI DaHHbIX H3O6paXeHn, INCIOJIb3yI HeKOTOpYEO mKoCTb KapTb IaMaTn. IpoUecc MoXeT 3aHrTb DJIHTeJIbHOe BpEmr H pa6OtaTB c KaMepo6yTe HeBO3MOxHNO eoero 3aBePHeHn. EcJH IIPOH3OJET OIN6Ka aJla 6a3bl DaHHbIX, 9KcIopTpPyIte BCE CHIMKn B KOMIIbIOTep C NOMOIIbIO PlayMemories HomeTM, a 3aTeM OTfOpMaTHpyIte KapTy IaMaTn C NOMOIIbIO KaMepbl.
3a NOBpeKdEHne INHΦopMaцn nIe c6oI npI 3aIncn He IpeDyscMOtpeHO HnKaKoI KOMpeHcaZn
ΦHpMa Sony He KOMIeHcHpyeT y6bITKn, BbI3BaHHbIe c6oem IIpi 3aIIINCH, IOTepe HJIN IOBpeKJeHNEm 3aIIINCAHHOHNΦOpMaIIN BCJIeIDCTBHe HEnCIIpaBHOCTN KaMEpbI HJIN HOCHTEJIANΦOpMaIIN N T.II.
Pekomendaцna pe3epBhoro KOpnpobAHn
IIЯпpeIoTOBpaIeHnI IOTePn IaHHbIX BcERda cJIeIyET BbIIOJIHrTb KOINpOBaHHe (pe3epBnpoBaHne) IaHHbIX Ha IpyroH HocHTeJIb.
He IepKHTe KaMepy 3a MOHITop.
HeIOBepraTe KaMepy BO3JeIcTBnIO COJIHeuHOrO CBeTa H He CHIMaIte B HaIIpaBJIeHNN COJIHua B TeYeHne IPOJOJXHTeJIbHOro BpeMeHH. 3TO MOKeT IIpNBecTH K IOBpeKJdeHnIO BHyTpEHHero MexaHN3Ma.EcJIn COJIHeuHbI CBeT 6yIeT cΦOKycnPoBaH Ha 6JIIN3JIeKaIiN O6BeKT, 3TO MOKeT BB13BaTb BO3rOpaHHe.
He HaIIpaBJIaIte O6BeKTHB HeIOcpeIcTBeHHo Ha JIyH,HaIIpIMep Ja3epHBie JIyH. To MoKeT IOBpeINtB IaTnK H3O6paXeHHa II pINbEcTH K HeICPpaBHOCTN KaMepbl.
-Пи Hn3KoI TeMIIepaType Ha 3KpaHe MoKet 6bITb OCTaTOUHoe H3O6paJxHne.3To He YBJIeTcH HeHCIIpaBHOCTbIO. Ipi BkJIIOueHH KAmepbI B XOJOHOM MeTe 3KpaH MoKet BpeMeHHO IOTemHeTb.IocJIe TOrO, KaK KaMepa IIporpeETc, 3KpaH 6yJeT cyHKINOHIpOBaTb HOpMaJIbHo.
3aHcaHHbI CHMOK MOKeT OTJIuHaTbcr OT H3O6paXeHnHa 3KpaHe Ipei 3aHcBIO.
Приимechи OTHOCHTeIbHo CbeMKC BnOncKaTeJIeM
PpnilaraetcKo Bcem MoedJamM:
Kamepa (1)
3apnHoe yctpoNCTBO BC-VM10A (1)
- IIHyp IIITaHn (1)* (IIpIJIaIaETcB HeKOTOpbIX cTpaHax/perNoHax)

*B KOMJIeKT IIOCTaBKn KaMepbI MOXET BXOJNTb HeCKOJIbKO ceTeBbIX IIHypOB. HcIOJIb3yIte IIHyp, COOTBeTCTByIOIIu cTpAHe/ peTNOHy IIpe6bIbAHn. Cm. cTp. 4.
- Ipe3apjaembIaKKymyJrTop NP-FM500H (1)
Ka6eJb micro USB (1)
-Плесьов ременb (1)

HOpMaun O Tom, KaK
IprkpeINTb IIeueBOI peMeHb K
KaMepe, IprHeJeHa Ha cTp. 15.
KpbIIka 6aHOneta (1) (HaIeBaETcHa KaMepy)
HaIa3HnK OkyJaPa (1) (HaIeBaetcHa KaMepy)
- HctpyKIIaIO 3KcIIyaTaIIN (1) (aHHoe pyKOBOCTBO)
ILCA-68K:
3ym-06beKTNBDT18-55mm (1)/PipeHnKa KpbIIka 06beKTnBa(1)/YnakOBOHnKa KpbIIka(1)
KomnoHeTbI KaMepbl
cIyuae,ecJIN OH He 6bJI IOJIHOCTbIO pa3pJKeH.
Ero MoXHO TaKKe HcIOJIb3OBaTb, ecJH OH He IIOJIHOCTbIO 3apJKeH.
3apjxHbI aKKyMyJrTOp 6yJeT IOHeMHOry pa3pJxKaTbCra,JaXe ecJIH BbI He IIOJIb3YeTeEc b KaMePo. YTo6bI He yIyCTHTb
BO3MOJXHOCTb CbeMKn, CHOBA 3apIaHTe aKKyMyJIaTOp IpePeD CbeMKoI.
1BcTaBbTe aKKymyIaTOp B 3apAidHoe yCTpOiCtBO.
HaKMnte Ha aKKyMyJIaTOp IO IeJIYka.
2ПоДсоeДиНITEЗapДhoe yCTpoIcTBOKceTeBOI po3eTke.
CIOOC6 IOIKJIOUeHn 3apIINHO yCTPOcTBA MOxKET OTJIuHaTbcB 3aBHCIMOCTNOT cTpaHbI/perHOHa. JAmIOUka rOpHT: BblIOJIHeTcA 3apIKA JAmIOUka He rOpHT: 3apIka 3aBepeHa
BbIKJIIOHTe KaMepy I cIbINHbTe pIyauKOK fHKcaTopa B HaIIpaBJIeHNcTpeJKN. ByIbTe oCTOpOxHbI, YTO6bI He ypoHnTB aKKymyJIaTOp.
PbIaKoKΦnKcauIN
3CMOTPNTe B BnDOnCKaTeJIb n ydepxkBaIte KaMepy.
Ipn HcnoJb3OBaHH 3ym-06beKTHBa OTpeYJnpyTe KOJIbIO 3yMMnpOBaHH B COOTBeTCTBHN C pa3MepamN O6beKTa.
4HaXMMTe KHONky 3aTBopa HanoJIOBHy dIy BbINOJIHeHЯ ФOKycnpoBKn.
- EcJH n3o6paXeHHe haxoJIHTcBΦOKyCe, pa3JaETc8 3ByKOBoH cnHaj N BbICBeYHBAeTc8 HnIKKaTOP ● JIN
RU
5ДЯ BыЮнHeHЯ CьeMKNaЖмITE KHonky 3aTBopaNoJIHOCTbIO BHN3.
- EcJIN [ABTO KaIrpnoB.] yCTaHOBJIeHO B [ABTO], IIpi NBIIIOJIHeHNN CbEmKN JINi, O6BeKTOB KpyIHbIM IJIaHOM (MaKPO) INIIN O6BeKTOB, OTcJIeJXnBaembIX φyHKInei [CJIeJNII AF], KaMepa aHaJIIN3IpyeT cIeHy i ABToMaTHUeCKN O6pe3aeT 3axBaueHHoe N3O6paJxHne I0 IOJXoJNIIe' KOMIO3NIHN. CoXpaHЯIOTcKaK opuRHaJIbHbIe, TAK N O6pe3aHHbIe N3O6paJxHnY.
3aIIHHe oTOCHmKn He MOryT 6bITb yJaJIeHbI.
Bыбор ржима съемки
YcTaHOBKa npIloJxEHHa Remote Camera Control
1C nOmoIbI O IHTepHET-6pay3epa Ha KOMNbITope nepeiDnte K cJeDuOuSeMy URL-aDpecy.
Windows:
http://www.sony.co.jp/imsoft/Win/
Mac:
- KoJIInueCTBO, yKa3aHHoe B "CbEMKa (ΦOTOCHIMKn)", OCHOBaHO Ha cTaHДapTe CIPA H IIpNBBeIeHO IJIa CbEMKn IIprn CJIeIyIOIInx YcJIOBHX: (CIPA: Camera & Imaging Products Association)
-ΠapametpDISP yctaHOBJeH Ha [Ioka3. BcIO HΦ].
-Параметр [Реким Фокуснив. ] установлесн ha [AF-S].
- CbemkaYepe3KaJkbIe 30 cekyH.
- BcIIbIIka nCIOJIb3yeTcKaKJbI BTOPO pa3.
-Питане BKЛIOчaETсЯ И BBIKJIIOчaETся чepe3 kaЖдьe DecЯТb pa3.
- KoJIInueCTBO MmHyT IJIa BnIeOcBeMKn cOrJaacHO cTaHApTy CIPA n cBeMKN BCJIeJyIOIIx ycJIOBHX:
-Паразметр [тразаметрь 3aII.] установлеси [30p 50M]/[25p 50M].
-TINHnBnDeocbEMKa:BpeMa pa6oTbI aKKyMyJrTopa 6a3npyeTcHa IOBTOPOJIeNCsCBemKe,3yMMnPoBAHH,OxNJaHH CbEmKN,BKJIIOUeHHN/ BBIKJIIOUeHHN I T.II.
- HeIIpepbIBHna BnIeocbEmKa: BpeMa pa6oTbI aKKyMylTopa 6a3npyeTcRa HneIIpepbIBHOcBEmKe IIO IOCTHXKeHHa IIpeJIa (29 MInHyT), a 3aTeM IIpoJIOJIkaIOSeIcR IOBTOPbIM HaKATHeM KHOIIKN MOVIE. JpyrHe yHKIIHN, KaK 3yMMNPOBaHHe, He NcIOJIb3YOTcR.
Obuee KoJnueCTBO ToyeK: 460800ToyeK
[УпраВленье эКсpoЗицей]
ΦOTOMeTpHuecKaЯYeIka: CMOS-ⅡaTnK "Exmor"
MeToI 3aMepa:1200-3oHHbI OIOeHOuHbI 3KcIIo3aMep
IIaIa3OH 3KcIO3aMepa:OT -2 EV IO +17 EV B MYJIbTINCeIrmEHTHOM, IeHTpaJIbHO-B3BeIIIEHHOM IN TOUeyHOM peJIMax (IprN 3KBINBaJIeHTe ISO 100 c o6BeKTINBOM F1,4)
UyBCTBHTeJIbHocTb ISO (peKOMeHnyeMaJ BeJIuHa 3KcIO3nI):
ΦOTOCHMKn: AUTO,ISO oT 100do25600(IIar1/3EV) BndeO3aIINcN: AUTO,ISO oT 100do12800(IIar1/3EV)
KOMIIeHcaIIINaE KcIO3NIIN: ± 5,0EV (IpeekJIIOuaemam MeJy IHaRAM1/3 EVn 1/2 EV)
[3aTBop]
TnI: C əJIeKToHbIM yIpaBJIeHNHeM, BepTHKaJIbHOro XOJa, IITOPHO-ⅢeJIeBOrO TnIIa
[Bctpoehna BcnpbIwka]
BeIyIeee YIscIIO BCIIbIIIKN: GN 12 (B MeTpax IIprN ISO 100)
BpeMa Iape3apAikn: Pnp6JIn3. 3ceKyuHdbI
IIaIIa3OH JeCTBnB BCIIbIiIKN: IOKpbIbAeT yROJI OXBaTa 16 MM O6BeKTHBOB (ΦOKyCHOe paCCTOHHe, yKa3aHHoe Ha o6BeKTHBe)
KoppeKIIaBIIuKn: ± 3,0 EV (IepeKJIIOuaEmaM MeJNy IIIaRamn 1/3 EV n 1/2 EV)
IIhaIa3OH JeIcTBnB BCIIIIIKN:
| Диафрагма | F2.8 F4.0 F5.6 | ||
| YctahOBka ISO | 100 1 M | 4,3 M | 1 M-3 M |
| 200 1 M | 6,1 M | 1 M-4,2 M | |
| 400 1,4 | M-8,6 M | 1 M-6 M | |
| 800 2 M | 12 M | 1,4 M-8,5 M | |
[HenpepbIBHa cbeMa]
CkopocTb HeIpepbIBHOcbeMKn: [Heip.AE c TeJIeKoH.]:
MaKcHym8 H3o6paXeHNB ceKyHny/ MaKcHymy
5 n3o6paXeHnB cekyHny/
MakcHMym
2,5 n3o6paXeHnBceKynIy
Ha ochoBaHHn co6CTBeHHbIX KpHTepHeB H3MepeHn.
CkopocTb HeIpepbIBHOcBeMKMOxET 6bITb HxKe B3aBnCmOCTN OT ycIOBn CbeMKH.
MaKcHMaJIbHOe KOJInYeCTBO HeIpepbIBhIX CHIMKOB:
BpeKnme [HeIp.AEc TeJIeKOH.]
CBepxBbICOKoe:34CHIMKOB/
BbICOKoe: 63 cHIMKOB/
CtanhapTHoe:112CHHMKOB/
Pn HeepbIBHOcbeMke
CBepxBbICOKoe:21 CHIMKOB/
BbICOKoe:32CHIMKOB/
CtahapTHoe:35 cHIMKOB/
RAWиJPEG:8CHIMKOB/
RAW: 8 CHINMKOB
[Bocnpo3BeDeHne cHmKOB KpynHbIM nlaHOM]
Iina3OH maciTa6npoBaHna:
Pa3Mep n3o6paJxHnHa:
L:Прнблз. × 1,0 - × 18,75 /
M:Приблз. × 1,0 - × 13,25/
S: prn6JIn3. × 1,0 - × 9,4
[ΦopMaT 3aIncn]
ΦopMaT ΦaɪJIa: B coOTBeTCTBnI c JPEG (DCF Bep. 2.0, Exif Bep. 2.3, MPF Baseline), RAW (ΦopMaT Sony ARW 2.3)
BnIeO3aIIHcB (ΦopMaT XAVC S): CoBmecTHM cΦopMaTOM MPEG-4AVC/H.264XAVCS Bep.1.0
BnJeo: MPEG-4AVC/H.264
Aydno: LPCM 2 kaHaJa (48 KI 16 6nT)
BnIeO3aIIncb (ΦopMaT AVCHD): ΠoⅡeρЖka ΦopMaTa AVCHD BepcH 2.0
Bündjeo: MPEG-4 AVC/H.264
Aydno: Dolby Digital 2 kana lo co BCtroeHNo TeXHOJOrnei Dolby Digital Stereo Creator
- I3rTOBJIeHO IIJINHeH3HH KOMnHaHH Dolby Laboratories.
BnIeO3aIIncb (ΦopMaT MP4): BnIeO: MPEG-4 AVC/H.264
Aydno: MPEG-4 AAC-LC 2 kaHaJa
[Hocntel 3aIncn]
Memory Stick PRO Duo, Kapra SD
[Pa3beMbI BBOJa/BbIBOJa]
Pazbem Multi/Micro USB*: USB-coeINHeHne, Hi-Speed USB (USB 2.0)
*PiOpIepeKnBaet Micro USBCOBMeCTHMbIe ycTePoIcTBA.
AkkymyJIaTOp: Ipe3apJxJaembI aKKymyJIaTOp NP-FM500H
[Notpe6IeMaMoUHocTb (BO BpeMa CbeMkn)]
ΓρOMKOrOBOpHTeJIb: MoHOΦoHnUeCKn
Exif Print: COBmecTHMa
DPOF: CoBmecTHMa
PRINT Image Matching III: COBmecTHMa
Pa3MepbI (PpH6JIIN3.): 142,6 MM × 104,2 MM × 82,8 MM (III/B/T, He BKJIIOUaYa BBICTyIIbI)
Macca:
Приблз.675 r (c
akKуЛЯТОРМИMemory
Stick PRO Duo)
Приблз.596 r (TOJIbKO
kopnyc)
TeMIIepaTypa əKcIIIyaTaIIN: oT 0^ do 40^
TeMIIepaTpya xpaHHeHHa: OTo-20 ^ C Ito +60^
KoHcTpPyKIII IN TexHnueckNEXapaKTePncTnKN MOrYT 6bITbH3MeHeHbI 6e3 yBeJOMJIeHnI.
3apЯнhoe yctpoiCtBO/AKKymyIaTOp
3apraHoe yctpoNCTBO BC-VM10A
HOMHaJIbHbIe IapaMeTpbl Ha BxoJe:100B-240B IepemeHHoro ToKa,50Tt/ 60Tt,9BT
HOMHaJIbHbIe IapaMeTpbl Ha BbIXOJe:8,4BIOcTOaHHoTo Ka,0,75A
Ipe3apjkaembiakkymyJTop NP-FM500H
TnI aKKymJyTopa:JIHTN HOHHbI aKKymJyTop
MaKcHMaJIbHoe HaIIpyKeHH 8,4 B IocToHHoro ToKa
HomHaJIbHoe HaIpyKeHne: 7,2 B IOCTOaHHoTOKa
MaKcHMaJIbHoe HaIpyKeHne 3apIa:8,4B IocToaHHoro TOKa
MaKcHMaJIbHbI TOK 3apJIKN: 2,0 A
EMKocTb: 11,5 BTu (1600 mAu)
He po36npaTe akyMylTOpHy 6aTapeI.
He po3aBIOHTe, He 6HITe Ta He npKJaAaHTe cnJy Do aKymJrTOpHOI 6aTapei. He 6HITe II MOJOTKOM, He KnaHTe Ta He HAcTyIaHTe Ha Hei.
He 3aMkaIte KOHTaKTn aKymJIaTOpHOi 6aTaapeiT a3aIO6IraIte IOTpaIIJIHHIO MIX HMM MeTaJIeBHX IIpeIMeTiB.
He IIaBaTe aKymyTOpHy 6aTapeH IOI TeMIIepaTyprn IIOHaI 60^, HApNkJIaI IN BIIINBOM IpIMNX COHAnHIX IpPomeHiB y IpnIapKObaHomy aBTOMoBiJI.
He iIIIaJIIOHTe aKymyJIaTOpHy 6aTapeIO Ta He KIJaAIte ii y BOrOhb.
He TopkaTecraIOIkoJKeHOJIiTiH -ioHoo6aTaPeiaabo TaKoi,3AkoBHTiKaepiHa.
- 3apjaKaIte aKymyJIaTOpHy 6aTapeIO, JINIIe BHKOpHCTOByUOuN opHInaJIbHN 3apJHn IIpncTpIi Sony a6o IIpncTpIi, kN MoKe 3apJXaTH aKymyJIaTOpHi 6aTapei.
- TpHMaIe aKymyJIaTOpHy 6aTapeIO IO3a IOcXHicTHO MaJIeHbKnx IiTeN.
- TpmaTe aKymyJIaTOpHy 6aTapeIO cyXOIO.
3amHIOHTe aKymyIaTOpHy 6aTapeIO JINIIe Ha Taky camy a6o eKBiBaJIeHTHy, Kky peKOMeHdye KOMnHaHia Sony.
- IIIBniko yTHJI3yIte BHKOpHCTaHi akymjTOpHi 6aTapei, Jk OIIncHo B iHCTpyKuix.
Дя 3acTocyBaHnA aIaITepa 3MiHHOrO cTpmy/3apJHO rPncTPOIO, IIO IOCTaHaεTbC A6o peKOMeHnyE TbCry, BHKOpNCTOByIte po3ETKy, Jka 3HaxOHTbcr IIO6JIu3y. HeraiHo Bi'edHaIte 3apJHnI IIpncTpiB iD PO3eTKN, kIIO III qac BHKOpNCtAHnB Hpo6y BHHKJa 6yNb-jaKa HeeppaBHicTb.
KIO BIKOPnCTOByeTbcBnpi6 i3 iHnKaTOPOM 3apJxKaHHaMaTe Ha yBa3i,IO Bnpi6 He Bi'EnHyEeTbcB iI JKepeJa KINBJeHHaHbTIyKIO iHnKaTOP BmNkaeTbcra.
UHyp XnBneHHA
JIa KJIeHTiB y BeJHKo6pHTaHii, IpJaan, MaJIbTi, KiPi Ta CayIbcki ApaBii
BHKOPNCTOByTe IIHyp KINBJIeHHA (A). 3aJIa 6e3IeKN IIHyp KINBJIeHHA (B) He IpiH3HaueHn IJIa HabeJeHNX BIIue KpaIH/perioHIB, i TOMy IHO He cJIiD BHKOPNCTOByBaTH TaM.
BnKOpncToByTe IHHyp KHBJIeHHra (B).
(A) (B)

Data BnroTOBneHHBnpo6y.
IaTa BnroTOBJIeHHa 3a3HaueHa Ha yIaKOBiHa eTKeTci 3i IIITpHX-KoIOMy HacTyHOMy fOpMaTi:MM-YYYY,Je MM-MicIb,YYYY-pik BnroTOBJIeHHa.
Bnpo6Hnk: CoHi KopnopeHIN, 1-7-1 KoHaH, MiHaTo-Ky, Tokio 108-0075, IIOHia
KpaɪHa-Bɪpɒbɪŋk: TaiJIaɪnɪ
Ppimtka
KIO II BIIINBOM cTaTHHOI eJEKTpKN a6o eJIeKTPomarHITHOI IOJI pOICIpeJaChi JaHIX 6yJe pepeBaHN,pepe3aNcyTb npHcTpi a6o BiEHaHTe Ta IOBTOPO HnEHaHTe Ka6eJIb,IO BHKOPHCTOBYETbcra JIA PepeJaChi JaHNX (USB,ToIO).
Pe3yJIbTaTn TecTyBaHb IbOro BInpO6y
IeMOHCTpyIOTb IIORO BiINOBiINHicTb
BIMOram IIOIO O6MeJKeHb, 3a3NaueHnx
y InpEKTnBi EMC, kci CTocyIOTbcra
BnKOpNCTaHHa 3'EnHyBaJIbHnx Ka6eJIiB,
KOPOTIIHX 3a 3 MeTpH.
Ha BiIIOBIDHIX YacTOTax eJIeKTPOMaRHiTHI IOJIa MOxKyTB BIIINBaTH Ha JIKCTb 3O6paJKeHHia i 3Byka, BiITBOPIOBAHNX BInpO6OM.
Ipepeo6ka BnKOpncTaHnx eIementiB XnBJIeHHa, CTaporo eJektpnUHO rTa eJekTpOHHORO 6bnaDHaHHa (3aCTOCOByETbCra B CBponecBkOMy coIO3i Ta iHux CBponecBkNX KpaIHax i3 cnCTeMaMn po3dIJIbHorO 3bnpaHHa CmITT)

MoxHa Bn6paTH MoBy, Ka BiO6paKaATmEtbc8 Ha ekpaHi, 3a IIOIOMOROIO MeHIO.
PpOec 3mOMKn
IeH foToaIapat IIITprnMye 2 peXHMcTeXeHHra 3a 06'EKTaMn:peXHMMOHITopa,BЯKOMy 3O6paXeHHBbBOINTBcRa Ha MOHITop,i peXHMBbIOIIyKaHa,BЯKOMy 3O6paXeHHBbBOINTBcRa Ha BnIOIIyKaU.
B6ydoBaHi yHKuii foToanapaTa
Y Ibomy Noci6Hnky oHncaHi npHcTpoi, cymChi 3i cTaHapTaMn 1080 60i Ta 1080 50i.
CTbOpENHaФaIy6a3n daHnx 3o6paXKeHb
KIO BCTaHTy y fOToaIapat KapTy
Pam'ATi,Ha kIi HeMae faiNy 6a3n
DAnHx 3o6paKeHb,Ta yBIMKHyTH
KNBJeHHa, fOToaIapat aBTOMaTHUHO
CTBOpHTb faJI 6a3n DaHnx 3o6paKeHb,
BNKOpHCTOBYIOuN YacTHHy 06'emy
KapTN PAM'ATi.
IeN Ipouec MoKe TpNBaTH IOBRO,i
KOpHCTyBaTHcA fOToaIapaTOM Do Ioro
3aBepIIeHHaHEMOXJIINBO.Y pa3i
PiOMNI KI N faiJy 6a3n DaHNx
EKCIOPTyIte Bci 3o6paKeHHa
KOMI'IOTep 3a IOnOMOrOIO IIporpamH
PlayMemories HomeTM i
BiΦopMaTyIte KapTu PAM'ATi Ha
fOToaIapati.
BicytHicTb KOMpeHcauii 3a noWKoJxehnBmicty a60 HEMOXJIWBiCtB BVKOHHaHHaNcCy
KOMnHia Sony He npe6aaye HaanHH KOMHeHcaii y BnHaKy HeMOxJInBOcTi BnKOHaHHaIIHCy HbTpaTH a6o IIOHKoJKeHHaIIHCaHO BRMcTy BHaclIOK HeCpabHocTi oToaIapata, Hocia iHopMaII TOIO.
PekomeHdaaii 0doCTBOpENHa pe3epBnX KOni
JIЯ 3aIIO6iraHnRA BtpaTI JaHnx 3aBKn KOnIOHTe ix (CTBOPIOHTe pe3epBHi KOII) Ha iHnn Hocii.
Iprimitkn zuo moHitopa, eJeKtpOHnO BVIOwUkau, 06'ekTnBa Ta daTUnKa 3O6paJxHnHa
- MoHiTOP Ta eJIeKTPoHnBnIOIyKaU BnROTOBJIeHO 3 BnKOpNCaHHaM HaI3BNUaHOBnCOKOTOuHOITexHOJOri,II0 IO3BOJIae cΦeKTINBHO BnKOpNCToBvBaTH IOnHaI99,99% IIkceJIIB. OdHaK Ha MOHItoPI Ta eJIeKTPoHHOMy BnIOIyKaUi MOKe 6yTH BnIO MaJIeHbKi YOpHi Ta/a6o JCKpaBI IYTKN (6IIOrO, YepBOHOrO, CnHBOrO a6o 3eJIeHOrO KOJIbOpY). HaABHicTb TaKHX IqTOK e HopMaJIbHOIO IJIa IpoIecCy BnROTOBJIeHHa i HiaK He BIIJINBaE Ha 3O6paJxehHra.
He TpMaIte foToaIapat 3a MOHiTOP.
- OsepiraTe foToaIapat BiJ i
coHnHex IpomehiB i He 3HimaTe,
cIpMaYBaBn HOrO Jo COHnA,
TPBaJIu Yac. MoKHa IOnKoIHTN
BHyTpiiHmexaHI3M foToaIapata.
JaIO coHyaHe cBiTJO cfoKycyETbcra
Ha o6'ekTi, IIIO 3HaxOITbCn IO6JIu3y,
MOKe BHHKNHYTH IIOKeJka. - YHnKaIte 6e3IOcepeHbOro
HOTpaJIJIaHHHa O6'EKTHB IpOMeHiB,
3OKpeMa Ja3epHnx. Ie MoKe
IIpH3BeCTN IO IIOIIKOJKeHHaTcHKa
3o6paJKeHHa Ta cIpHuHHHTn
HeCIIpaBHicTh b foTOaIapaTa. - Y xOJIIOHOMy cepeIOBnIi 3O6paJKeHHa ekpaHI MOxTyb BiITBOpIOBaTHcra 3 eΦeKToM «IIJIeHΦy».Ie He e O3HaKOIO HeCIIpaBHOCTi. Y pa3i yBIMKHeHHa FOToaIapata B XOJOIHOMy MicIeKpaH MoKe TImuacOBO IIOTemHi. KoJIn FOToaIapat HaRpiEtbc, ekpaH IpaIIIOBAthme HaJIeXHHM YINHOM.
3HrTe 3o6paXeHHa MoKe Biipi3HraTncB iI 3o6paXeHHa,Ke BN 6aHJIIN Iepd 3HOMKOIO.
Iopadn 0do 3HOMKn 3 BNDoukykaem
IeH fOToaapanat O6HaHaHO
opraHiYHM eJIeKTPoJIOMiHeCiHTHM
BnIOuKyCaem 3 XapaKTepnCTnKaMn
BnCOKoi PO3IIbHocTi Ta
KOHTpactHocti. IeH BnIOuKyau
3a6e3Neyu E IIIPOKn Kyt ORJy Ta
BeJHKy fOkcHy BiCTaHB.
BnIOuKyCaem y IbOMy fOToaapanati
JIeTKO KopNCtUbaTncs, aIXe B HbOMy
HaJIeXHIM YHHOM BpiBHOBaJKeHO pI3Hi
eJIeMeHTN.
3o6paXeHHa MoKe 6yTH 3JIeRka BnKpNBJIeHMM IO KyTaX BnIOuYKaaya. Ie He e O3HaKOIO HecIpaBHOCTi. KIO Tpe6a IIpeBipHTN ycO KOMIO3HIO 3 HaIIpiOHiIMM IIeTaJMyM, MOxHa TaKoK KOpNCtYBaTncb MOHITOPOM.
-ПиДчacпанHopamHoi3нOMKn uepe3 BnIOUyKaa a60ПiДчac 3OpOBOrO orJMy 3O6paJxHЯ y BnIOUyKaYi MoJKe 6yTH BnKpNBJIeHIM, a6o Jx MoJKe 3MInHTncs KaJIip 3O6paJxHЯ. IeЯBnIe IIpyTaMaHHe po6Ot i O6'ekTnBa Ch IIprHcTpOIO BiO6paJxHЯ i He BBaxKaETbCra HeCIIpaBHiCtIO. ПiДчac 3NOMKn paIIMO INBHTncs y IeHTp BnIOUyKaHa.
-ПиДчacЗHOMKn3BHKOpHCTaHHaM BINOUIyKaayaBNMOKeTe BiIyBaTH NeBHnДИСКOMΦOPT,HaIPNKJIaI IepeHaIIpyJxKeHЯ3Opy,BTOMy, 3aKaUyBaHЯЧИ hydOTy.ПиДчac 3HOMKn3BINOUIyKaYe m peKOMeHnyETbCЯ PeryJIaRHOpoBHTN IepePBn.
PeKOMeHIOBaHa TpHBaJIicTb IpepeB a6o ix YacToTa e iHNiVBiIyaJIbHMN IIJ KOKHO, a TOMy BnpiIiyBaTHcme Bam. JIKIO BN BiIyBaTe INCKOMΦOpT, IIpIHINHiTb KOpNCtYBaTHcR BIIIOIlyKaUeM, IOKH Bam He cTaHe KpaIe, i 3a IOTpe6OIO IPOKOHcyJBtYHTecs3 JIkapem.
PpIMiTkn 0do TpBaIoi 3HOMKn
3 MeTOIO 3axHcTy, 3aJIeJxHO BiTemIIepaTpIu foToaIapata i 6aTaapei, Bam MoXe He BIIaTHcra 3aIIncatn BiJeO, a6o KINBJIeHHa MOXe BIMKHyTncb ABTomATNHO. IpeTtHM, RaBbIMKHeTBcra KINBJIeHHa a6o BiIEo3aIINC 6iJIbIe He 6yIe MOXJIINBM, Ha ekpaHI 3'ABHTbcr IOBIOMJIeHHa. Y TaKOMy pa3i BIMKHiTb foToaIapata i 3aueKaHTe, IOKH BIIaIe TemIIepaTypa foToaIapata i 6aTaapei. RaIIO yBIMKHyTH foToaIapata, He JaBIII HOMy Ta 6aTaapei IOCTaTHBO OXJOHOHT, XINBJIeHHa MOXe 3HOBY BIMKHyTncs, i BN He 3MOXeTe 3aIINCyBaTH BiJeO.
- 3a BncoKoi TemepaTpyn 3OBHIINHbO rcepeIOBnIa TemepaTpya foToaIapata IIIBNcYETbcra IIBNko.
- Y pa3i IIIBHIIeHHa TeMIIepaTpyn
φOTOaIAPAta MoJKe IORipIHTncb
ЯкICTb 3O6paKHeHHa. ПepeI
ПpoIOBKeHHaM 3HOMKn
peKOMeHdYeTBcAaYeKaTH, IOKN He
3HN3HTbcA TeMIIePaTpya
φOTOaIAPAta.
-Поверхя соToaIapata MoKe Harpitncr. He e O3HaKoIO HeCIIpaBHOcTi.
Приитkin садоIMнортувань Bideo Формату XAVC S Ta AVCHD Ha kom'tep
Y pa3i imnoptybaHHa Bideo foOpMaTy XAVCS a6o AVCHD ha KOMIIOTe 3aBaHTaXTe i BnKOpHcTObyIte nporpaMy PlayMemories Home 3 Be6caHTy:
http://www.sony.net/pm/
Ppimitkn 0oDo cnaaxy
He TpMaTe foToaIapat 3a cnaJax i He IprNKJaIaIe HaIMipHOi cHJIN IO HbOro.
- YKIIIO Yepe3 BiIKNpHTn CIIaJIax ycepeINHy IIOTpAINTb BOJa, IIJI a6o IIICOK, Ie MoJKe cTaTH IIprHNOHO HeCIIpaBHOcTi.
3aKpHbAIOUcIaJIax,6yIbTe o6epeXHi,IO6 He IpiHIIeMHTn IIJIbIi.
Ppimitkn 0oOo BiTbOpenhB iDeo Ha iHux npnctpox
-
BiTe, 3HrTe 3a IOnOMoTOIO IIbOTo FOToaIapata, MoKe He BiTbOPIOBaTHcI PrABNJIbHO Ha iHIIINx IIpncTPOx. TaKox, BiTe, 3HrTe 3a IOnOMoTOIO IHINX IIpNCtPoIB, MoKe He BiTbOPIOBaTHcI PrABNJIbHO Ha IIbOMy FOToaIapati.
-ДиSCN,ПОMiCTaTb BiIeO AVCHD, 3HЯTe 3aДОПOMOTOIbOro ΦOToAIIapaTa,MOxHa BiITBOpIOBaTH IINIIe Ha IIpNCrpoIx,IIO IIITprMHyOTbΦOpMaT AVCHD. DVD-ПрограВaHi a60 3aIncyUoi IprcTpoI He BiITBOpIOToB IInCKn i3 BiJeO AVCHD,OscJIbKN BOHn He IIITprMHyOTbΦOpMaT AVCHD. KpIMTOrO,ПiI qac cIpo6H BmMaHHa IInckiB HD i3 BiIeOΦOpMaTy AVCHD i3 IIporpaBaiv a6o 3aIncyUoynx IIprcTpoIB DVD MoXe cTaTnC8iH. -
BiJeO, 3aIIncahi y fOpMaTi 1080 60p/ 1080 50p, MoJHa BiITBOPIOBaTH JInIe Ha IIpNcTpoAx i3 IIITpHMKOIO fOpMaTy 1080 60p/1080 50p.
- BiJeO, 3HrTe y φopMaTi XAVC S, MoXHa BiITBOpIOBaTH JInIe Ha IIpncTpoAx i3 IiTpIMKoIO XAVC S.
PonepeJxHnI zoDo aBTopcbKnx npaB
Ha TeJIeBi3iHHi IpoIpaMn, fIJIbMn, BiJeocTpIcKn Ta iHIIi MaTepiAJIIM MoKe PO3IOBcIOJxKyBaTHcA BTOpcbKe IIpaBO. HecaHKUIOHOBAHNIpe3aIInc TaKHX MaTepiAJIIB MOKe cyIpeuHTN IOJIOXeHHaM 3aKOHy IPO aBTOpcbKi IIpaBa.
3o6paXeHHa, 10 BnKOpNCTOBYIOTBcB V cIbOMy noci6Hnky
ΦOTOrpaΦii, ΠΟ BnKOpHCTOBYIOTBcR B IIpyKJIaIax ΒbOro IIOci6HnKa, - Ιe peIIpOdyKOBaHI 3O6paXKeHH, iix He 6yIIO 3HrTO 3a IOnOMoTO ΒbOro ΦOToapanapaTa.
IpoTexHi DaHI,HaBeDeHi y Icbomy noci6Hnky
Po6oHi xapaKTepeHCTnKn Ta TexHicHi daHi BN3HaueHi 3a OIIncAHHN HIXe yMOB, OKpIM BnIaIKiB, Bka3aHHX y IIbOMy IIOci6HNU: 3a 3BVuaHoi TeMIIepaTpyn cepEOBnIa 25°C i BHKOpNCtAHNIOBHiCTIO 3apJXKeHOI 6aTapei, Jka 3apJxJaIacr, IOKn He 3rac iHNKaTop CHARGE.
Ipebipka npnaand, 0o doaTbcra
CnoaTky IpeBipTe Ha3By MoJeIi fOToaIapata (cTOp.4). KomJIeKr IIpHJaIIaI, 1IO IOJaETbC, 3aJIeXHTb BiIM MoJeJI. YnCJIO B DyKkax Bka3ye Ha KJIbKicTB IIITyK.
Noctaactb3 ycima MoJeMaM:
- Φοτοapanapat (1)
- 3apянйприсстг BC-VM10A (1)
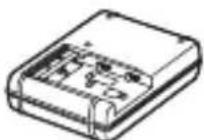
IIIHyp KINBJIeHHa (1)* (IOcTaHaEcTbCya Y IeBHnX KpaIHax aOpeRioHax)

*Ito foToaapanapaTa MoKe 6yTu IOnaHO IekiIbKa IIHHypIB KINBJIeHHra. BHKOpHCTOBuYTe ToI IHHyp, IIO BiIIIOBidae yMOBaM ekCIIlyaataii y BaIIi KpaHi a6o perioHi. IINB. cTOp.3.
- AkymyJIaTOpHn 6JIOK NP-FM500H (1)

Ka6eJIb Micro USB (1)
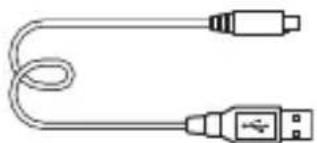
-ПлесовпpeMHb(1)

IHCtpyKuio 3 npkpiJIeHHa IIeYOBOro peMeHa IO foToaIapaTa IINBiTbcra Ha cTOp.15.
Kpnika Kopnyca (1) (BCTaHOBJeHa Ha foToaapanapati)

HaouHnK okyJaPa (1) (BCTaHOBJIeHN Ha foToaIapati)
- Ioci6HnK 3 ekCnIyataa (1) (eH noci6HnK)
ILCA-68K:
- O6'ekTnB 3i 3MiHHOIO OKycHO BicTaHHIO DT 18-55 mm (1)/IpeepnKa o6'ekTnBa (1)/PaKyBaJIbHa KpnIIka (1)
UA
Elenentn foToanapata
IokJIaIHy iHΦopMaIIO Ipo BnKOpIcTaHHЯ YacTHN IINBiTbcHa cToPIHKax, 30 3a3NaYeHi y JyKkax.
Переднасторoga
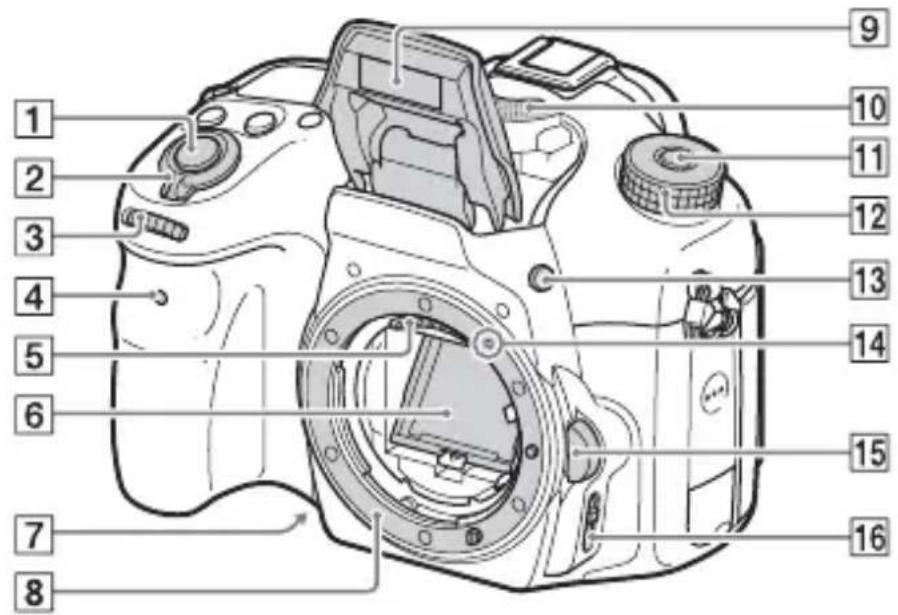
1KhoIIka cIycky 3aTbopa (35)
2IpeemkaJxNBJIeHHn (33)
3KoJIiTkoKepyBaHn(19)
4IHHkaTOp aBTOcNysKy
5KoHTaKTn 06'ekTnBa*1
6Дзеркалo*
7KHOIIKa IIOIpeHbOro IepeJIaIy
8BaioHcT
B6yIOBaHn cnaJax* 1
HaTnCHiTB KHOJIky
(IIINHHTcnaJaxy),IO6 IIHNHTCnajax.
- KIIO cIIaJax He IOTpi6Hn, IOTINCHITb IORO Ha3aJy KOpIyc BInpo6y.
10Mikpooh* 2
11KHOIIKa po36JIOkyBaHHa INsKa IepeMnKaHHa peXIMiB (35,41)
12ДиСКпepeМИKaHHЯ ржIMiB (41)
13KhoIka (iHraTcnaJaxy)
14ПОЗначka BCTaHOBJeHHa (30)
15KhoIkaΦikcaTopa o6'ekTnBa (31)
16IepeMnKaU peKmMy _OKycyBaHHa
*1 He TopkaɪTecs 6e3IIOcepeɪnboιnx yacTHN.
^*2 He 3aKpNBaIte IeI eJIeMeHT IIJ
Yac 3aIIncyBaHHB BIEo.
HeIOTpImaHnI IieI BIMOrn
MOKe cIIpNCHHTI IOABy IIyMIB
HN 3MeHIIeHHaPiBHa ryHocTi.
UA
3aHnCTOpOHa

1HaouHnK okyJpa
2Cencopoka
3KhoIIKa MENU (22)
4BnOuKa*
- KIIO IINBHTncb y BINOIIyKaU, BMNKaETbcra peKIM BINOIIyKaUa, a KIIO BiBeCTN O6JIuYr BiB NIOIIyKaUa, 6yJe BCTaHOBJeHo peKIM IIpeTJMy Chepe3 MOHiTOP.
5ДиСКHaJIaIITyBaHHЯДIOПТПI
- IpokpyyTe nck HajaITyBaHHnIoiITpi, NOKN 3O6paXeHHy BINOIIyKaHi He 6yJe BnHOn YITKO.
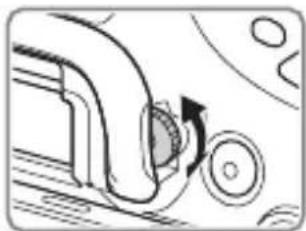
6 MoHiTop
7KhoIIka MOVIE (38)
8IIJ3HOMKn:KHOIIKa C1 (KOpncTyBaIbka 1) IJIa IIpeIgIy: KHOIIKa (36iJIbIeHHa)
9IIJ3HOMKn:KHOJIKA AEL (6JIOKYBaHHaBToMaTHUHOi ekCIO3Nii)/KHOJIKA SLOW SYNC IIJpeRJIy:KHOJIKA (IpeRJIaMiHiatIop)
10ДиСК КерУВаHHa (18)
11ДлЯЗИOMКИ:KHOПКa Fn (Функця) (20) ⅡIЯпергл Any:KHOПКa (O6eptaHHa 3o6paJxHnA)
12KhoIIka C2 (kopncTyBaIbKa 2) IJIy IpepeJIy: KHOIIka (BnJaJIeHHa) (40)
13KhoIIka (BiTbopeHn) (39)
- He topkaɪntecər iεi qactnn.
UA
BnД 3rOpN

1BaTaToiHTeppeHcHn po3'EM*
2KHOIIKa FINDER/MONITOR
3IhOpMaHHa HaeJIb
4KhoIIka /pO6OTn IITOpKn)
5KHOIIKa WB (6aJIaHc 6iJIoRo)
6KhoIIka (kopekiyeKcno3nii)
7KhoIIka ISO
8KhoIIka (iicbiyuBaHHn iHopMauiHoiPiHeJIi)
9I03HaUka IIOJIOKeHHaTUnKa 3O6paJKeHHa
*IJIa OTpIMaHHaJeTaJIbHOi
IHΦopMaIII Ipo IIpNJIAJIA, cyMICHe 3 6araToiHTepΦeHcHm po3'EMOM,
BiBiaaTe Be6-caNT KOMHaHII Sony
y cBOEmy perioHi a60 3BepHITbcra Io
dJIepa Sony yu MicceBOrO
aBTOpH3OBaHOrO ueHTpy
o6ClyTOBvBaHHaSony.
MoXHa TaKox BnKOpNCTOBvBaTH
IIpNJaIaIg IAJIpaO3'Emy IJIa
IIpNJaIaIg.
Cymicha po6ota 3 npJiaqIaIy m iHnIX Bnpo6HnKiB He rapaHTyETbcra.
Multi Interface Shoe
Accessory Shoe
BnrgIa360ky/3Hn3y

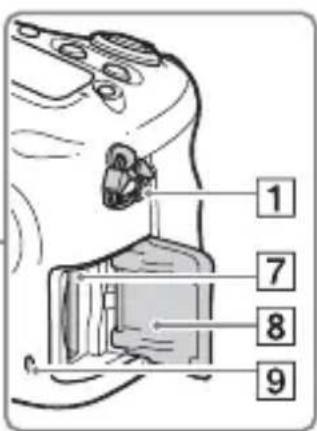
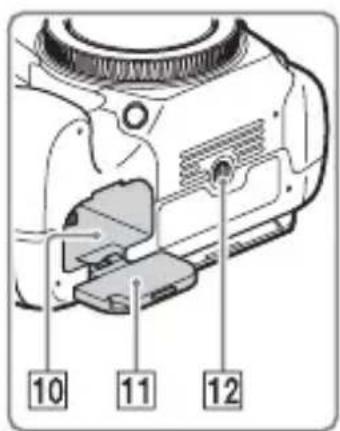
1 Tauchn JJIa IIeYOBOro peMeHra
- PnKpiiTb 6nIbKaHi peMeHaIO foToaIapaTa.
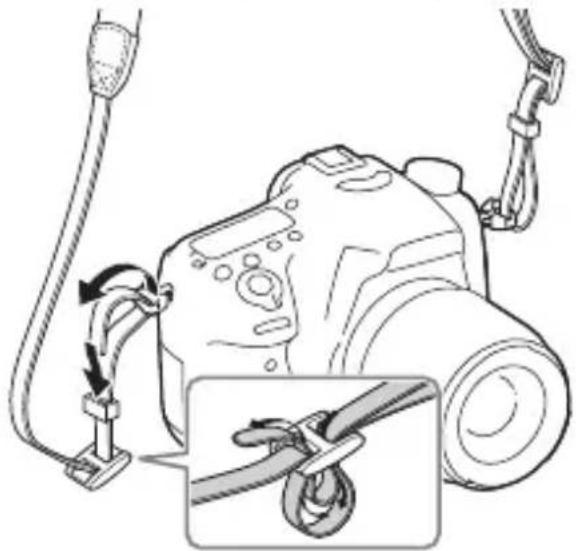
2Po3'EmIJIaMiKpOΦoHa
Ypa3iPiEHaHHa 3OBHIINHbOroMiKpOfoHa BHyTpIINHIMIKpOFOB HIMHKaETbcraABTOMaTHUHO. IIKIOIIIKJIIOyeHO 3OBHIINHIMIKpOfoH,AKNIITpMMye MOXJIIBICTb KNBJIeHHJ, KNBJIeHHN O MiKpOfoHa IOCTaayATmETbCra IIM φOTOaIIapaTom.
3rHOMOBeB
4Po3'EMDCIN
IIo6 nIeHaTu aanTep 3miHHoro ctpmy ACPW10AM (npoaetbca OKpeMo) no foToaapanata, BnMKHiTb foToaapanat, TOni II'eHnTe po3'em aanaTepa 3miHHoro ctpmy Io po3'emy DC IN foToaapanata.
5Mikpopo3'emHDMI
6Po3'em Multi/Micro USB*
PiTpHMyIOTbcI npIcTpoi, cymicHi 3 po3'EMOM Micro USB.
7IHI3IO JIA KapTN NaM'ATi (26)
8Kpnika rHi3da IJIa KapTN nam'ayti (26)
9IHHaTOp IOCTuNy
10Biicik JJIa BCtAHOBJIeHHaTaapei (26)
11Kpnika 6aTaapeHoro Biiciky (26)
12H3IOДЛЯПТАТИВА
BnKOpNCToBvIe IITaTnB i3 IOBXHIOI GBHTa MeHIIe 5,5 MM. Ha IIITaTnBi 3 IOBIIM TBHITOM HeMOXJIIBO HAIiHO 3aikcyBaTH φoToaapanapT, IIO MOKe IIpN3BecTH Do IHO YIKOJKeHHA.
*IJIa OTpIMaHHaTeTaJIbHOi IHOpMauII Ipo cyMicHe IIpNJaIIaIJaIaIpa03'Emy Multi/Micro USB BiBiaIaIte Be6-caNT KOMIIaHIb Sony a6o 3BepHiTbcra IO dHJIepa Sony uB MicIeBn ABTOPn3OBaHHIeHTp O6cJIyROByBaHHaSony.
O6'ekTnB
DT 18-55mm F3.5-5.6 SAM II (ДодастбяdoesILCA-68K)

1KijbIeΦOKycBaHHa
2Kilbue TpaHcfokaui
3IIkaJaΦokycHOI BiIcTaHI
4Пиэнчkaфokychoi BiicTaHi
5KoHTaKTn 06'ekTnBa*
6IepeMnKaU peXnMy okycyBaHHa
7ПиЗнayka BCTaHOBJeHHЯ
BnKopncTaHnB6yDoBaHoI DoBikn
3a IOnOMOIOI napametpa [Iapam. KJIIOU.KOpnc.] MoJHa IIpn3NaHTN B6yIOBaHy IOBiIKy IIeBHiKHOIIi.
B6yIOBaHa IOBIka BiIOobpaKae IIOJcHHeHHa BIOpaHOi Ha daHm MOMENT yHKii a6o npaMeTp a MeHIO.
KhoNka MENU (HaJaSTyBaH. KopnCTyBaa) [Iapam. KIOu.KOpnc.] Bn6epiTb noTpioHy KHOInKy, np3NaYeH yUnKci. [B6yDoBaHa DoBidKa]
HaTnchItb KhoNky MENU i 3a DoIOMOIOU DnCKa KepyBaHnBn6epiTB NyKt MENU, IOncHeHHa IO koro IOTpio6HO IOuHTaTH, IOTIM HaTnCHiTb KhoNky, KaI IIpn3NaueHo [B6yIDoBaHa IOBiJa].
UA
3apяДжаннayakymyЛТOPHOrO 6лoka
KoJiBikpNaBeTe KpnuKy, IpeBipTe, Hn He CbiTbCyaHInKaTop IOocTyIy (cTOp. 15), a ToDi OAnH pa3 HaTncHiTb Ha KapTu NaM'arTi.
UA
Ipebeipka 3aIIshkoBOrO 3apAdy 6aTapei
BaTape,ka IoIaETbC- ige JITiHIOHH aKymyJIaTOpHn 6JIOK,
KIM MoKe O6MInHOBaTncs3 fOTOaIapaTOM JaHIMN IIOIO yMOB
eKcIIyataii. BiICOTOK Yacy po6OTn 6aTapei, IIO 3aJIINIBcR,
BiO6paKaETbCByIIOBIINO IO yMOB ekCIyataii BaIIOrO
fOTOanapaTa.
BctaHOBJIeHHaTnIyacy
IicJyBIMKHeHHa oToaapanapaTa Bnepiie a6o iHiiiaJIi3auii cyHKiin 3'YBJIeTbc8 eKpaH IJIaBcTAHOBJeHHaATN H acy.
1uob yBimKHytn foToanapaT, BCTaHOBITb nepemkauch KnBJeHHa Y noJoxeHHa ON.
3'YBNTbcEkpaH IJIa BCTaHOBJeHHaIaTN N acy.
- IIo6 BnMKHyTN foToaIapat, BCTaHOBIb IepeMHKaU XHBJIeHHB IIOJIOKeHHA OFF.
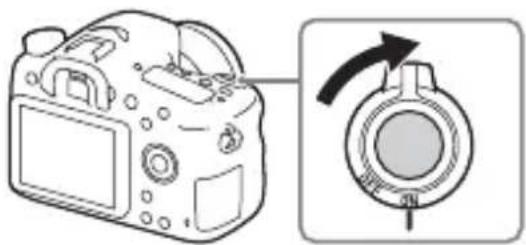
2IpeBipTe,Ha ha ekpani Bn6paHo [Bxid],i HATncHITb Ha dNcKy KepyBaHHa.
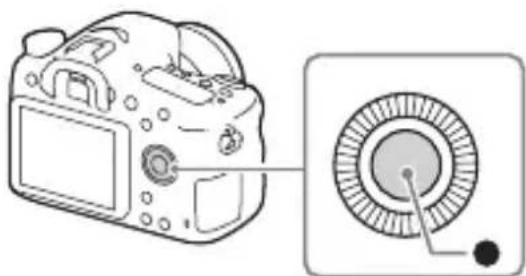
3Bn6epiTb noTpbi6He reorpaΦiUHe po3TaUyBaHnHaTnCHiTb ●.
4Bn6epiTb noTpbiHn nyHKT haJaStyBaHHa, HATNCKaIOUH △/▼ Ha DnCKy KepyBaHHa, a ToDi HATNCHiTb ●.
5ВиберпьnotрибHe haJaштуваннЯ, haTиСkaюч △/▼/▲/▶, a TODi haTиСhiТь Ⓒ.
UA
6о6 haiaTuBaTu iHwi napametpn, nobtopitb diKpokiv 4i5,a todi Bn6epitb [Bxi] iHaTuschItb KhoNky.
CkacyBaHHBCTaHOBJIeHHaDatN Yuacy
HaTnchItb KhoNky MENU.
Ipebipka a6o ckndaHnJaTn/acy Ta perioHy
EkpaH BCTaHOBJIeHHЯДaTHI Yacy 3'YABJIeTbcra ABTOMaTHUHO IIcJIa IepIIO rYbIMKHeHHЯ JKNBJIeHHa6o B pa3i po3prJxKeHHa BHyTpiriSHboi pe3epBHOi akymyJIaTOPHOi 6aTaapei. IIo6 cKnHyTuHaJIaITyBaHHЯДaTHI Yacy, BnKOpNCTOByTe MeHIO.
Khoonga MENU
(HaJaTuBaH.) [HaJaT. dAtn/acy] a6o [Yacobn nOraC]
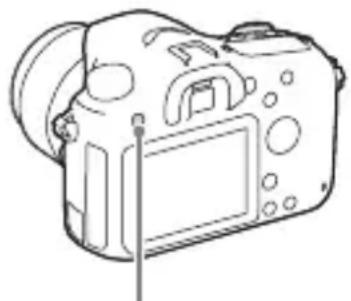
Khonka MENU
36epiraHHaHaawTyBaHb dAtn chacy
IeJ foToaIapaT MaE BHyTpiiHIO aKymyJIaTOpy 6aTaapeIo,
IIpH3NaYeHu IJIa 36epeKeHHaTn, Yacy Ta iHINx HaJIaITyBaHb
He3aJIeXHO BiT TOrO, yBIMKHYTo KINBJIeHHa N Hi, a6o BCTaHOBJeHo
6aTaapeIo Chn Hi.
3himannhofoTorpaipi
B aBTOMaTHUHOMy pexnmi foToaIapat aHaJI3ye 06'ekT i Jae 3Mory 3HIMATN 3 BiINIOBIDHMn HaJaITyBaHHaMn.
1u6 yBimkhytn foToanapaT, BCTaHOBITb nepemkaJxNBHeHHy noloxeHHaON.
2BcTaHOBiTb DnCK nepemKahHpaXmIB y NOJoxeHHA AUTO ( ABTO).
- IOBepTaIe IINCK IepeMnKaHHa peKHMiB,HaTNCHyBIIH Ta yTpIMyIOUH IIpN IbOMy IIO IeHTpy IINCKa KHOIIKY IORo PO36JIOkyBaHHa.
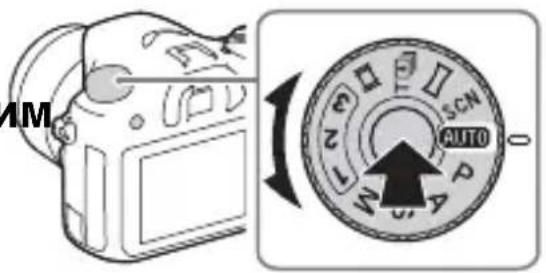
3ДиВITьСЯЧepeЗ ВИdoшукaч iТримаite Фотоanapat.
YKIO BIKOPnCTOByETbC8 O6'ekTINB 3i 3MIHHOIO QOKyCHOIO BiCTaHHIO, HajaITyIte KJIbIe TpaHcQokaii BiIOBIDHO IO p03Mipy 06'ekTa.

4HaTnchItb KHONky 3aTBopa HanoJIOBHy, 06 BnKoHaTuФOKycyBaHHa.
- KoJIH 3O6paXeHHaHO, JIyHaE 3ByKOBn cHrHaJI, i 3acBiYyeTbcra HnKaTop a6o
UA
5ПовнICTЮ haTиСhiТь KHONky cnYcKy, 万多 3рОБИТN 3HIMOK.
-ЯкioДлЯпарametpa [AВТ.КаIp. IopTp.] BCTaHOBJIeHO 3NaueHnRA [ABTO],у pa3i 3IOMKn O6Iu, 6'ekTIB KpyINHM IIaHOM (MaKpO3IOMKa)ЧИ O6'ekTIB,якi BiIcTeJyOTbcS aYHKIIeIO [CJIikKyUOn AF],фOTOanapat aHaJIi3ye cIeHy Ta aBTOMaTHNo KaIpyE 3HAre TE 3O6paJxHnRA y BiIIOBIHy KOMIO3NIO. 36epiraIoTBcЯK opNiHaJIbHe,Tak i BiIkaIPOBaHe 3O6paJxHnRA.
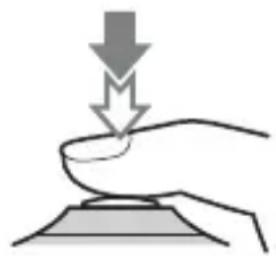
3yomka 3a yMOB HeoCTaTHbOro OCBiTJIeHHA
BnKOpHCTOByIe cIIaJIax IJIa OCBiTJIeHHa 6'ekTa 3HOMKn Ta 3aIO6iRaHHa TpeMTiHHIO KaMepn.
HaTnchItb KHOnKy (PiHraTTcnaJaxy), IIO6 IIINrTaCnJaX, a ToDi HaTnchItb KHOInKy cIpycky IO KInz.
Mozha Bn6paTH peKHM cIIaIaxy, IIO BiINOBiJaE BaIIHM iJIaM.
2p03noatn 3aHnc, HATNCITb KhoNky MOVIE.
Khoonka MOVIE
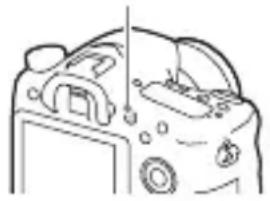
3Uo6 3yHHTN 3aHcYBaHHa, HATNCHiTb KHOkky MOVIE ue pa3.
Ppimitkn
-ПидчасВideO3HOMKMOKe 3aINcYBaTHSCy 3ByKpo6OTnФOTOaIIapapa.T. MoxHa 3aIO6IrTH 3aINcy 3ByKy,BN6paBIIIДЯпapameTp a [3aINc 3ByKy] 3NaueHHa[BIMK].
- TpIbJIcTb 6e3IIepePBHOrO 3aIINcy BiJeO 3aJIeJXHTb BiI TeMIIepaTypn OToUyIOHO cepEOBmIa a6o cTaHy fOtoaIapata. YHTaITe «IprIMiTKn IIOIo HeIIepePBHOi BiJeO3HOMKN» (cTOp. 51).
- Пява пiktогами [cbiuHTb IIpo NaITOBHcOKy TeMIIepaTpy foToaIapata. BmKHiTb fOToaIapat i 3aueKaITe, IOKn He 3HN3HTbcra HOro TeMIIepaTpa.
-Пид уас Трпвалоюбeзперевною мсоToапараз може harpiTня.Ие HopmaЛьно.TaКоЖ може 3'ЯВHTSCЯ ПОБДOMJIeHHЯ «Висokeda BHyTpiiHЯ TeMПЕраТура.ДаНTe Камepi OXOJOHyTH.».Y TaKOMy BnIaNky ВIMKNiTb ФоToaПаразТаЗаЧЕКайTe,ДOKN BiH He 6Bye rOTOBиДО ПОДАЛьшоI 3mOMKn.
(CIPA: Camera & Imaging Products Association)
-Для параз DISP BCtaHOBJeHо 3haueHHa [BiIO6p. BcIO iHΦ.]
-Для паMeТpa [PexIM ФokycBaH.] BCtaHOBJeHo 3HaueHHa [AF-S];
-3HOMKa KOKHI 30ceKyH;
- cπaJIax cπpaIbOBye KokeH npyrr pa3;
-KNBJIeHHRA BMnKaeTbCra i BmMnKaeTbCra KOxHnI DecrTaPa3.
- TpNBaJIicTb BiIeO3HOMKn y XBNIHHax 6ChcJIeHO 3a cTaHJIapTOM CIPA nJIA 3HOMKn 3a IIOJaHHX HIXKYe yMOB:
-якioДЛЯпарaMeТpa [ ]JIaIIT.3aIINcy ] BCTaHOBJeHO 3HaueHn [30p 50M]/[25p 50M]; - 3BnuaHa BideO3HOMKa: TpNBaJIicTb po6OTn BiJ 6aTaapei 3aJIeKHTb BiJ YAcTOTN 3HOMKn, MacIITa6yBaHHra, yBIMKHeHHr/BHMKHeHHr TOIO;
- HepeBHa BiJeO3HOMKa: TpBaJIicTb po6OTn 6aTapei y peKmI HepeBHOI 3HOMKn IIO IOcRHeHHa IMity (29 XBNIIN), kNl NOTIM 6yJIO IIpoOBKeHO HaTNCHeHHaM KHOIIKN MOVIE. IHIIΦyHKii, 3OKpeMa MacITa6yBaHHa, He BHKOpHCTOBYIOTBcra.
HaIaIITyBaHnI IOIITpi: Bi -4,0 M-1 I0 +3,0 M-1
[Mohitop]
PK-MOHITOP:IIaHeJIb TFT 6,7 cm (TIN2,7)/PK-eKpaH Clear Photo
3araJIbHa KIJIbKicTb TOUOK: 460800TOUOK
[KepyBaHHeKcNo3nciE]
KJIITINHka BImipIOBaHHaekcno3nii: naTtHK «Exmor» CMOS
MeToI eKcIOBmIpIOBaHHa: 1200-3OHaJIbHe OiHIOBaJIbHe BIMipIOBaHHa
IIaIa3OH BnMipIOBaHHa: Bi -2 EV Io +17 EV, 6aRaTOCerMeHTHn, IeHTPO3BaJKeHn, TOyKOBn peJHMn (3a eKBiBaJIeHTa ISO 100 3 o6'ekTINbOM F1,4)
UyTJIINBicTB ISO (peKOMeHIOBaHn iHdEKe cekno3nii):
ΦoToIpaΦi: AUTO, BiI ISO 100 do 25600 (i3 KpOKom peRyJIIOBaHH eKcNo3nii 1/3 EV)
BiJeO: AUTO, BiI ISO 100 do 12800 (i3 KpOKom peRyJIIOBaHH eKcNo3nii 1/3 EV)
Kopekui eKcno3nii: ± 5,0 EV (MOxJIINBicTb IepeMkaHn KpOKiB mix 1/3 EV Ta 1/2 EV)
[3aTBop]
TnI:3eJIeKtpoHHm KepyBaHHaM, BepTKKaJIbHOrO XOy, IITOPHOIIiJINHHOrO TnIy
Iiapa3OH BHTpIMKn:
ΦOTOrpaΦii:
Bi 1/4 000 cekyHn I0
30 cekyn, a TaKoJ pyHa
BHTpIMKa
BiJeO: Bi 1/4 000 cekyHn I0
1/4 cekyn (Kpok 1/3 EV)
-Ппсстрииз пдтримковocstандарту 108060ido 1/60 cekyниу peжимiAUTO(do 1/30cekyнiypeжимiaBTOMaTHHoiIOBROIВИТРIMКИ)
-Ппсстрииз пдтримкою ctaндарту 108050ido1/50cekyниуpeжимi AUTO(do1/25cekyнiypeжимiaBTOMaTHUHOIIOBROI BHTPIMKN)
IIIBnIckicTb cHxpoHi3auii 3i cHaJaxom:1/160ceKyHIN
[B6ydoBaHn cnaJax]
CπaJIax (BéIyue YIscIIO): GN 12 (y MeTpax 3a ISO 100)
UacIpe3apJxKaHnHa: Ipr6JI.3cekyHn
Kyt OXONJIeHHcIIaJIaxy:JI 16 MM o6'ekTnBa (okycha BiCTaHb,IO3HaueHa Ha o6'ekTnBi)
Kopekii eKcno3nii cnaJiaxy: ± 3,0EV (MOxJIHBicTb IepemHKaHHKpOKiB MIX 1/3 EV Ta 1/2 EV)
IIaIa3oH cnaJaxy:
| Дiaфparma | F2.8 F4.0 | F5.6 | ||
| OSI BHKHANIIH | 100 1 M | -4,3 M | 1 M -3 M | 1 M -2,1 M |
| 200 1 M | -6,1 M | 1 M -4,2 M | 1 M -3 M | |
| 400 1,4 | M -8,6 M | 1 M -6 M | 1 M -4,3 M | |
| 800 2 M | -12 M | 1,4 M -8,5 M | 1 M -6,1 M | |
[HepepeBha 3mOMka]
IIbNikicTb HepepeBHOi 3HOMKn:
[Be3π. AE 3 TeJIeKoH.]: MaKcIMyM 8 3o6paXKeHb 3a ceKyHdY/ MaKcIMyM
5 3o6paXeHb 3a ceKyuHny/
MaKcHMyM
2,5 306paXeHHa 3a ceKyHny
- Bn3HaueHo 3a HaIIHX yMOB BnMipIOBaHHa. IIIBnKicTb HeIepePBHOI 3HOMKn MOKe 6yTN IOBIJIbHIiHa 3aJIeXHO BiI yMOB 3HOMKN.
MaKcHMaJIbHa KIJIbKicTb KaIpiB HeIIepepBHOi 3IOMKN:
YpeKmI [Be3π.AE 3 TeJIeKOH.]
HaBnua: 34 3o6paKeHb/
BncoKa:63 3o6paXeHb/
CtanhapTHH:1123o6paKeHb/
YpeKIMi HeIepepBHOI 3HOMKIN
HaBnua: 21 3o6paKeHb/
(DCF Ver. 2.0, Exif Ver. 2.3,
MPF Baseline),RAW
(φopmat Sony ARW 2.3)
BiJeo (ΦopMaT XAVCS):
cymichictb i3 opmatom
MPEG-4 AVC/H.264 XAVCS
Ver. 1.0
Bideo: MPEG-4AVC/H.264
3ByK: LPCM 2 kaHaJI (48 KΓι
16 6iTHn)
BiJeo (ΦopMaT AVCHD):
cymichn i3 opmatom
AVCHD Ver. 2.0
Bideo: MPEG-4AVC/H.264
3ByK: 2-kaHaJIbHnDolby
Digital, ochaichiH
TexhoJorieo Dolby Digital
Stereo Creator
CTBOpeHo IIO JIiueH3ii
KOMII Dolby
Laboratories.
BiJeo (ΦopMaT MP4):
Bideo: MPEG-4AVC/H.264
3ByK: 2-kaHaJIbHnMPEG-4
AAC-LC
[Hocii daHnx]
Memory Stick PRO Duo,
kapTKa SD
[Bxidhi/BnxiDiHipo3'Emn]
Po3'em Multi/Micro USB*:
USB-3'\'eɪnHaɪnɪ, Hi-Speed
USB (USB 2.0)
*PiITpIMyIOb8 npHcTpoi,
cymichi 3 po3'emom Micro USB.
HDMI: mikpopo3'em HDMI Tnny
D
Po3'emДлЯ mikpofoHa: 35 MM
CTepeo MiHi-po3'EM
[ЖиBsHeHЯ,ЗагаьHe]
AkymyJIaTOpHn6JIOK:
AkymyJIaTOpHn 6JIOK NP-
FM500H
[CnoKbAHn eJeKtpoeHeprii (piJ yac 3mOMKn)]
Y pa3i BnKOpncTaHHa DT 18-
55mm F3.5-5.6 SAM II*
Y pa3i BnKOpncTaHHa
BnIOuKaa:PiN6JI.2,7BT
Y pa3i BnKOpncTaHHa ekpaHa:
Прибл. 2,5Вт
- Постачaelься i3 ILCA-68K.
[Inhe]
Mikpofoh: Ctepeo
EMHicTb:11,5BT/ro(1600mA/ roI)
UA
O6'ekTnB DT 18-55mm F3.5-5.6 SAM II
MiHimaJIbHa OINHHIIaIaΦpaRMn: f/22-f/36
IiameTp IJbTp:55 MM
Pozmipn (MaKc. iameTp x Bncota): np6JI. 71,6 MM × 69 MM
Bara: npn6JI. 222 r
^*1 3HaueHnEeKBiBaJIeHTHOi OKychoI BiIcTaHi 35-MM oToaIapata i KyTa 3opy Bn3HaueHi IJIuΦpOBn oToaIapat 3i 3MiHHM O6'EKTHBOM, O6JaIHaHIX DaTtHKOM 3O6paJKeHHn Po3Mipy APS-C.
^*2 MihimaJIbHa BiIcTaHb OOKycyBaHHa -Ie HaMeHIIa BiCTaHb MIX IaTtIKOM 3o6paKeHHa Ta o6'ekTom.
- O6'ekTnB o6JaHaHo JaTnKOM BiIcTaHi. IeH JaTnK JaE 3MOry 3iInCHIOBaTH ToHnii 3aMipN (ADI) i3 BnKOpNCtAHHm cIIaJaxy ADI.
3aJIeJxHO BiIMexaHl3My 06'ekTnBa 3i 3MiHOIO BiIcTaHI 3IOMKn MoKe 3MIHOBAtncb OKycha BiIcTaHb. OKycha BiIcTaHb IpeIb6aHae, IIIO 06'ekTnB cOKycObaHo Ha 6e3KiHeuHicTb.
HaJIaITyBaHH6e3KiHeuHocTi IpeIb6aHae IIeBHi KopnryBaHH Ja KOMIIeHcaii 3MiueHHa OKyCa 3i 3MIHO TeMIIepaTypn. JIA 3IOHMKn O6'ekTa 3 HaJIaITyBaHHaM 6e3KiHeuHocTi y peXmIpyuHoro OKycBaHHa BHKOpHcTObYHTe BINOUIyKaU i BCtAHOBiTb OKyc.
IpoΦokycHy BiDCTaHb
Kyt 3o6paJxHnIbOTo
fOTOaIapataeByxuHm,HIX
Kyt 3o6paJxHnI fOTOaIapata
35-MM fOpMaTy. MoxHa
IIpNo3HO Bn3NaHTn
eKBiBaJIeHT fOKychoi BiIcTaHi
fOTOaIapata 35-MM fOpMaTy
Ta 3HIMATN 3 TaKHM CaMM
KYtOM 3o6paJxHnI,
36IJIbIIINBIIIN fOKyChy BiIcTaHb
06'ekTnBa HAnIOJIOBHy.
HaipNKJa, y pa3i
BnKOpNCtAHn4 50 MM o6'ekTnBa
MOxHa OTPMaTHn IIprNo3Hnn
eKBiBaJIeHT-75 MM o6'ekTnB
fOTOaIapata 35-MM fOpMaTy.
ПрocуmichiCTb Даннх 306paЖeHB
- Κέη φοτοαπαρατ BιДПΟΒΙДае універсаЛьнOMу станДарту DCF (Design rule for Camera File system), визnaчehOMу acоцiaцile JO JEITA (Japan Electronics and Information Technology Industries Association).
- BiTbOpEnH3O6paXeHb, 3HrTHx 3a IOnOMoTOIOIbOTo foToaIapata, Ha iHIOMy 0bJaHaHHi, a TaKoJX BiTbOpEHnF fOToaIapatom 3O6paXeHb, 3aIIncAHnx a6o BiPeJaROBaHNx Ha iHIOMy 0bJaHaHHi, He rapaHTyETbcra.
Toprobi mapkn
Memory Stick i TopROBmMapKaMa a6o 3apecTpoBaHmTopROBm MapKaMa Sony Corporation.
XAVCS XAVC5
3apeecTpoBaHMMTOBapHMM 3HaKaMNSonyCorporation.
- «AVCHD Progressive» i Логоти
- «AVCHD Progressive» ε
- Товарни Знakам Panasonic
- Corporation Та Sony Corporation.
Dolby i cHMBOJI i3 IIOBbIHIM D e TOBAPHMN 3HaKaMn KOMIIaHIi Dolby Laboratories. - Ha3BnHDMI Ta HDMI High-Definition Multimedia Interface, a TaKoJ JIoToTHn HDMI e TOBapHMn 3HaKaMn a6o 3apeeCTpOBAHmN TOBapHMn 3HaKaMn HDMI Licensing LLC y CIOJIyueHnx IITaTax Ta iHInx KpaIHax.
Windows 3apeecTpoBaHIM TOBAPHM 3HaKOM KOpIopaII Microsoft Corporation y CnoJyuHeHX IITaTax Ta/a6o iHINX kpaIHax.
Mac 3apeecTpoBaHIM TOBapHM 3HaKOM KOpIopaII Apple Inc. y CIOJIyueHIX IIITaTax Ta iHINX KpaIHax. - JIoROTHI SDXC e ToBapHIM 3HaKOM SD-3C,LLC.
- Facebook i Логоти «f» ∈ TOPROBIMN MapKaMn a60 3apeecTpOBAHIMN TOPROBIMN MapKaMn Facebook, Inc.
YouTube i Jorotn YouTube e TopROBm MapKaMa a6o 3apeecTpoBaHIM TopROBm MapKaMa Google Inc.
- Eye-Fi e TOPROBOI O MapKOIO Eye-Fi, Inc.
- Okpim IIbOTo, Ha3Bn CnCTeM Ta BInpo6iB, BInKOpHcTaHi y IIbOMy IIOci6HNKy, B3aRaJI i E TopROBMn MapKaMn a6o 3apeCtpoBaHMN TopROBMn MapKaMn ix BiINOBiINx po3po6HKnIB a6o BInpo6HNkIB. IIpoTe 3HaKn TM a6o MoKytB BInKOpHcTOBvBaTHcra y IIbOMy IIOci6HNKy He B ycix BIIaIKax.

InfoLITHIUM


MEMORY STICK

CLASS


Progressive


IOnaTKOBy IHOpMaIIIO CTOCOBHO IbOro Bnpo6y Ta BiINOBiHa YacTi 3aHTaHHa MoKHa 3HaHTHa Be6caTITcJyXoN IIITpHMKn cIOxHBaivB KOMHaHii Sony.
http://www.sony.net/
UA
Svenska
A-fattning