
EY37C5 - Screwdriver PANASONIC - Free user manual and instructions
Find the device manual for free EY37C5 PANASONIC in PDF.
| Product type | Cordless screwdriver with Bluetooth speaker and LED lamp |
| Brand | Panasonic |
| Model | EY37C5 |
| Power supply | Interchangeable Li-ion battery 14.4 V / 18 V / 21.6 V |
| Dimensions (L × H × D) | 162 mm × 70 mm × 99 mm (main unit only) |
| Weight | 420 g (main unit only) |
| Audio output power | 5 W |
| Bluetooth | Version 4.2, class 2 (2.5 mW), range approx. 10 m |
| Compatible Bluetooth profiles | A2DP, AVRCP |
| Number of pairable devices | 8 |
| USB ports | 2 USB type A ports (DC 5 V, 2 A total) |
| Lighting function | LED lamp with battery level indicator |
| Compatible battery type | EY9L45, EY9L47, EY9L51, EY9L52, EY9L53, EY9L54, EY9L62 |
| Compatible charger | EY0L82 |
| Maintenance and cleaning | Clean with a dry, clean cloth. Do not use water, solvent, or volatile cleaner. |
| Low battery alarm | LED flashing 10 minutes before depletion |
| Overheat protection | Automatic LED brightness reduction in case of high temperature |
| Outdoor use | For indoor use only, not waterproof |
| Included accessories | Not specified in the manual |
| Warranty and repairability | Repair by authorized center only |
Frequently Asked Questions - EY37C5 PANASONIC
User questions about EY37C5 PANASONIC
0 question about this device. Answer the ones you know or ask your own.
Ask a new question about this device
Download the instructions for your Screwdriver in PDF format for free! Find your manual EY37C5 - PANASONIC and take your electronic device back in hand. On this page are published all the documents necessary for the use of your device. EY37C5 by PANASONIC.
USER MANUAL EY37C5 PANASONIC
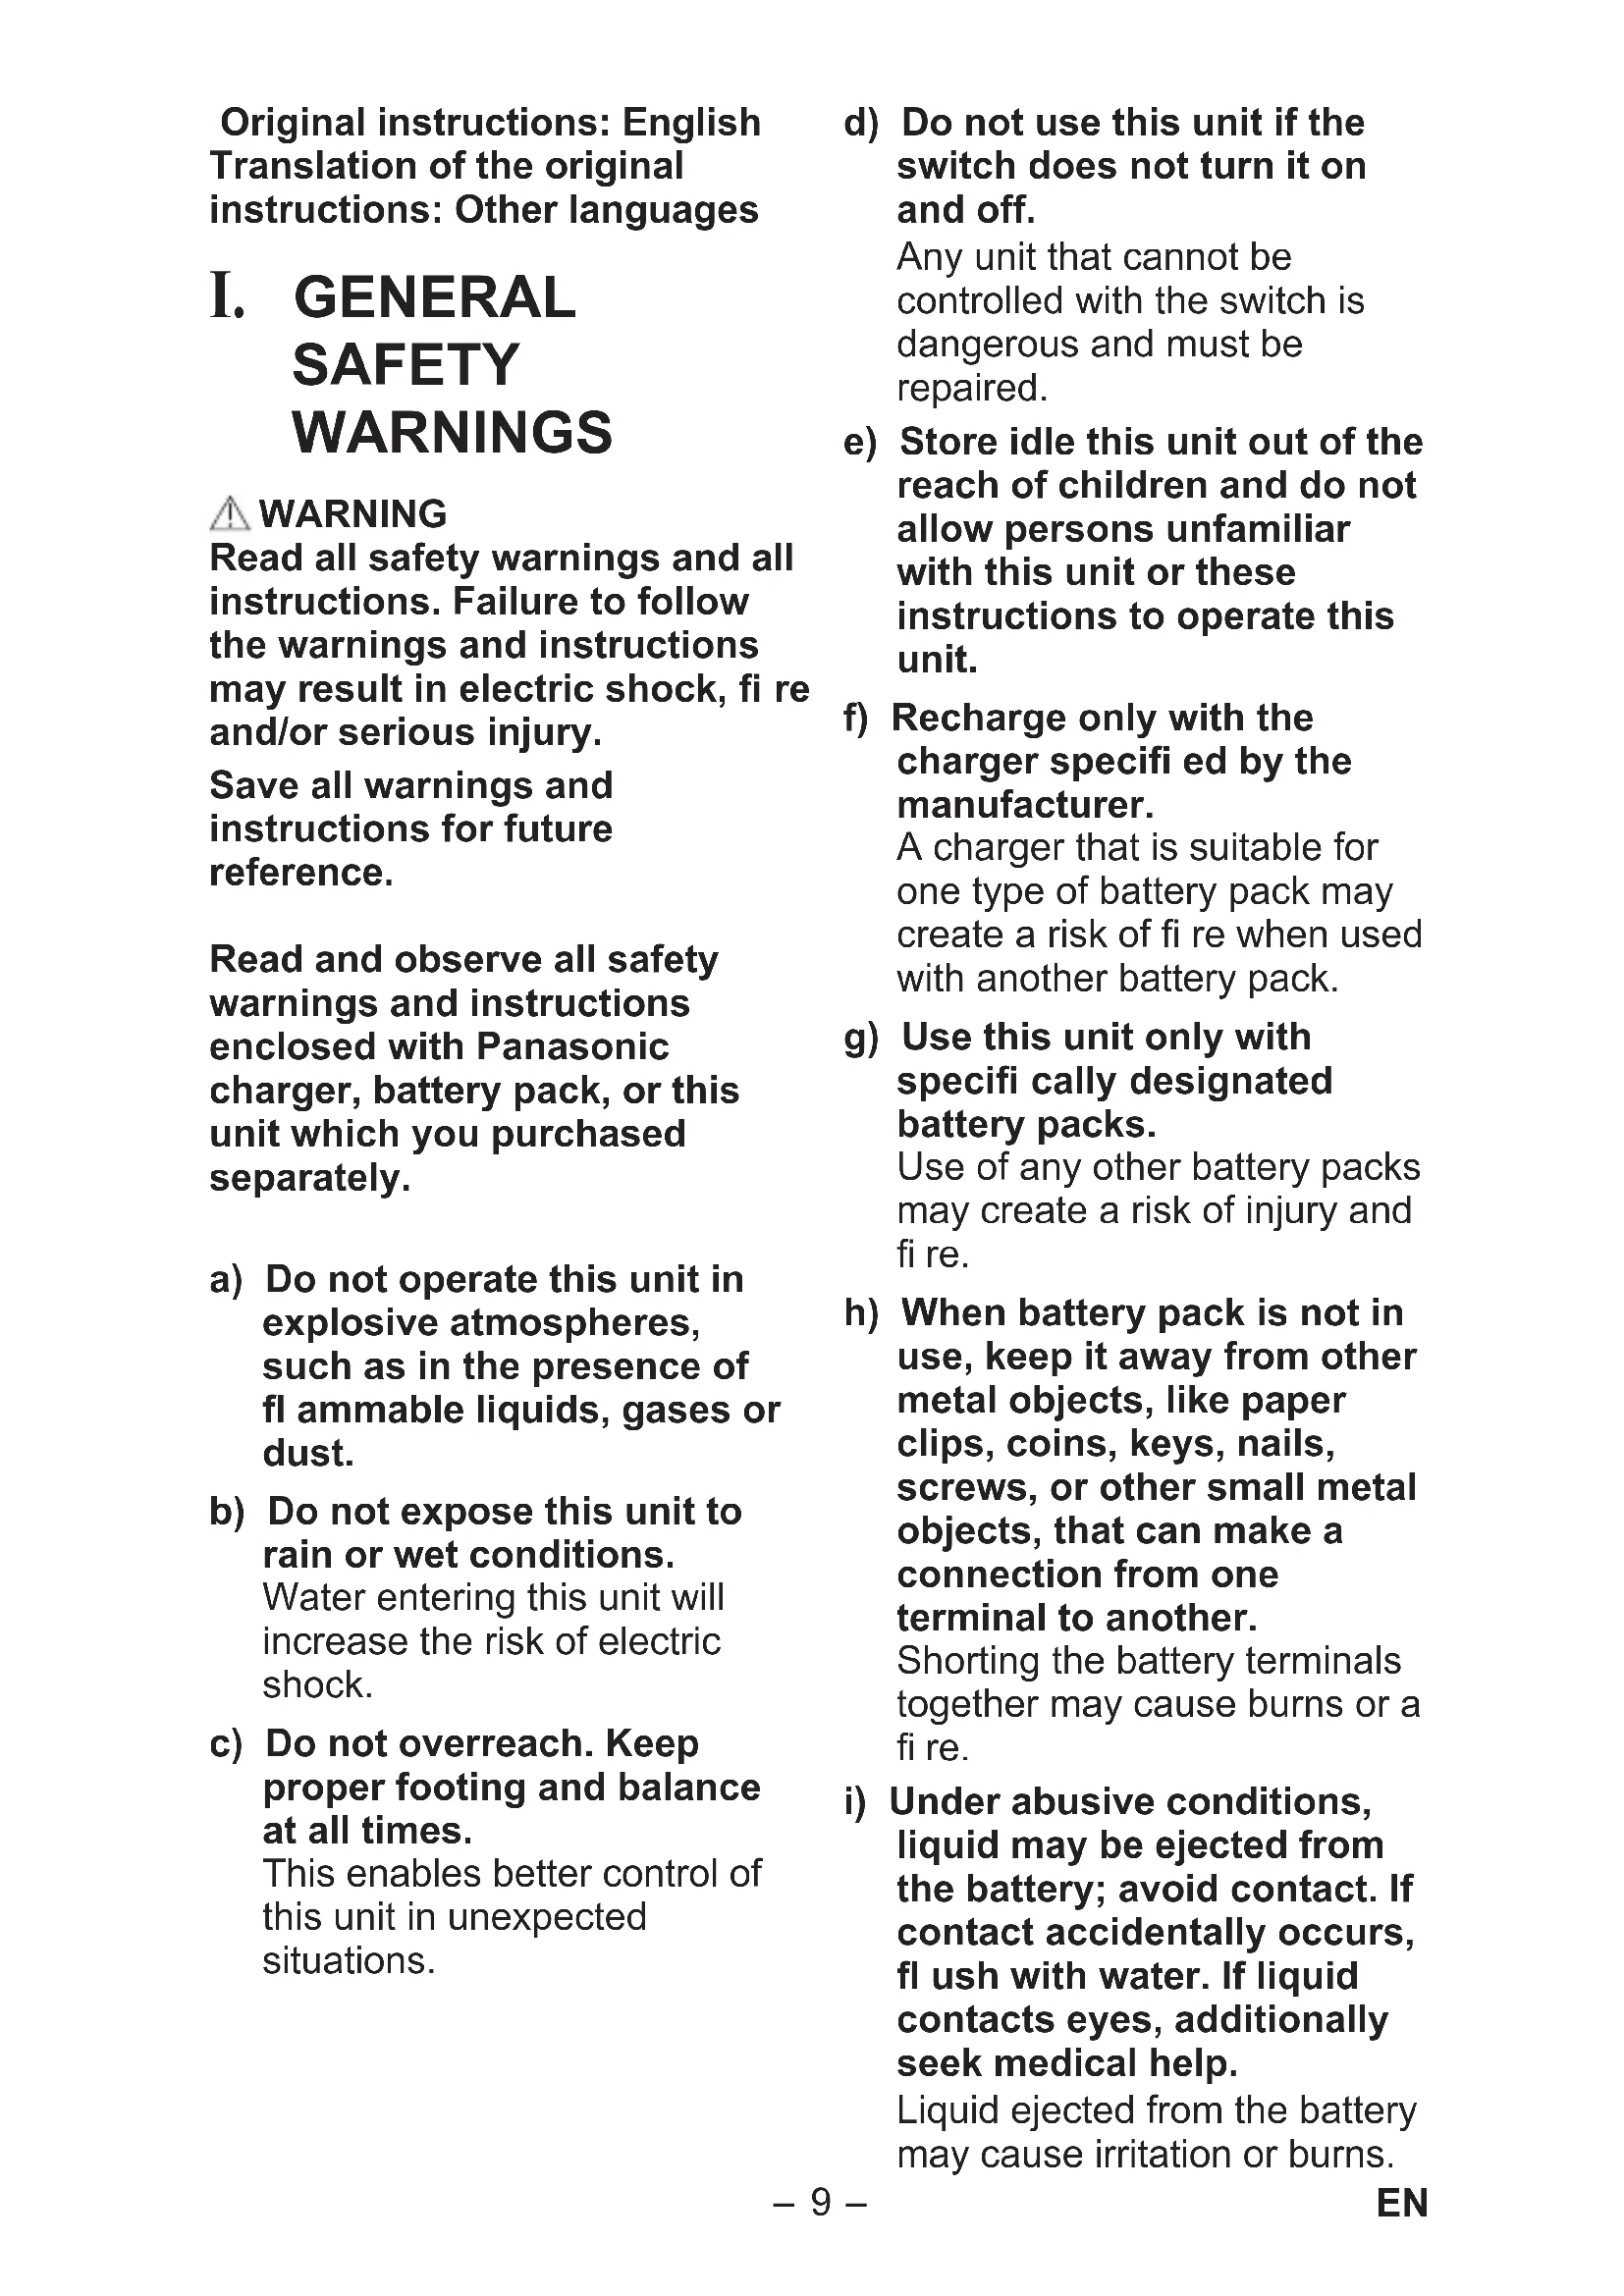
Original instructions: English Translation of the original instructions: Other languages
I. GENERAL SAFETY WARNINGS
WARNING
Read all safety warnings and all instructions. Failure to follow the warnings and instructions may result in electric shock, fire and/or serious injury.
Save all warnings and instructions for future reference.
Read and observe all safety warnings and instructions enclosed with Panasonic charger, battery pack, or this unit which you purchased separately.
a) Do not operate this unit in explosive atmospheres, such as in the presence of flammable liquids, gases or dust.
b) Do not expose this unit to rain or wet conditions.
Water entering this unit will increase the risk of electric shock.
c) Do not overreach. Keep proper footing and balance at all times.
This enables better control of this unit in unexpected situations.
d) Do not use this unit if the switch does not turn it on and off.
Any unit that cannot be controlled with the switch is dangerous and must be repaired.
e) Store idle this unit out of the reach of children and do not allow persons unfamiliar with this unit or these instructions to operate this unit.
f) Recharge only with the charger specified by the manufacturer.
A charger that is suitable for one type of battery pack may create a risk of fire when used with another battery pack.
g) Use this unit only with specifically designated battery packs.
Use of any other battery packs may create a risk of injury and fire.
h) When battery pack is not in use, keep it away from other metal objects, like paper clips, coins, keys, nails, screws, or other small metal objects, that can make a connection from one terminal to another.
Shorting the battery terminals together may cause burns or a fire.
i) Under abusive conditions, liquid may be ejected from the battery; avoid contact. If contact accidentally occurs, fl ush with water. If liquid contacts eyes, additionally seek medical help.
Liquid ejected from the battery may cause irritation or burns.
j) Have your unit serviced by a qualifi ed repair person using only identical replacement parts.
This will ensure that the safety of this unit is maintained.
II. ADDITIONAL SAFETY INSTRUCTIONS

WARNING
- Be careful not to raise the volume as your hearing adapts.
- Do not use this product over a long period of time, and always take a break to rest your ears.
If you experience any discomfort to your ears, discontinue use and contact your physician. - Do not place heavy objects on this unit or climb on top of it.
- Do not place this unit on an unstable surface or in an unstable position.
Children shall not play with the appliance.
- Do not hang on places where hooks do not hang, or places where hooks do not hang completely.
- When hanging in high places, fix with a string or the like so as not to drop.
- Do not expose this product and battery pack to rain or snow or use in damp location.
- Use of an attachment not recommended may result in a risk of fire, electric shock, or injury to persons.
| Symbol | Meaning |
| To reduce the risk of injury, user must read and understand instruction manual. | |
| For indoor use only. |

CAUTION
-
This unit is not waterproof.
-
Do not use it in damp or wet locations.
- Do not wash it in water.
-
Keep it in a safe, dry, and clean area when it is not in use.
-
Do not disassemble this unit. Servicing should be performed by an authorized service centre.

WARNING for charger and battery pack
- Do not use other than the Panasonic battery packs that are designed for use with this unit.
- Panasonic is not responsible for any damage or accident caused by the use of the recycled battery pack and the counterfeit battery pack.
- Do not dispose of the battery pack in a fire, or expose it to excessive heat.
- Do not drive the likes of nails into the battery pack, subject it to shocks, dismantle it, or attempt to modify it.
- Do not allow metal objects to touch the battery pack terminals.
- Do not carry or store the battery pack in the same container as nails or similar metal objects.
- Do not charge the battery pack in a high-temperature location, such as next to a fire or in direct sunlight. Otherwise, the battery may overheat, catch fire, or explode.
-
Never use other than the dedicated charger to charge the battery pack. Otherwise, the battery may leak, overheat, or explode.
-
After removing the battery pack from this product or the charger, always reattach the pack cover. Otherwise, the battery contacts could be shorted, leading to a risk of fire.
- When the battery pack has deteriorated, replace it with a new one.
Continued use of a damaged battery pack may result in heat generation, ignition or battery rupture. - If you detect any abnormalities, discontinue use immediately and contact the retailer from which you purchased this product.
- Do not use the Li-ion battery pack with its temperature below 0^ or above 40^ . It may lead to the cause of malfunction of main unit. Leave the battery pack at room temperature for more than one hour for adjusting its temperature.
- Do not store the tool and battery pack in locations where the temperature may reach or exceed 50^ (122°F) (such as a metal tool shed, or a car in the summer), which can lead to deterioration of the storage battery.
III. ASSEMBLY
Attaching or Removing Battery pack
- To attach the battery pack:
[Fig.1]
Align the highlighted marker points and attach battery pack.
Slide the battery pack until it locks into position.
- To remove the battery pack:
[Fig.1]
Push the button and slide the battery pack forward.
CAUTION
Do not use the 28.8 V battery pack.
It cannot be attached properly and may fall out.
IV. OPERATION
Example of use [Fig.2]
- When hooking and using, take out the hook (C) stored in the handle (D). [Fig.3]
Pairing your Bluetooth® device for the first time
- Press the ON/OFF switch (H).
- Press and hold the ON/OFF switch (H) while the power is on.
When you press and hold the power button, the lamp blinks and you are in pairing mode.
- Activate Bluetooth on your device according to the device's user manual to allow the pairing procedure.
-
Select the device name "EZ37C5" in the connection settings on the Bluetooth device side.
-
Pairing is complete. As soon as the pairing is complete, it will be connected and the Bluetooth® mode indicator (F) will be illuminated.
- When adding a pairing device, start over from step 2 again.
< When the Bluetooth mode indicator (F) is on and it is already connected to another device. >
- Turn off the Bluetooth connection or turn off the power on the connected device. Alternatively, press and hold the ON/OFF switch (H) to cancel the current connection and pair again.
Bluetooth® mode indicator
| Indicator Status | |
| Flashing (4 times a second) | Pairing mode (Registration standby state) • If no connection is established in 15 minutes, it will turn off. |
| Illuminated | Connection complete status • If there is no signal for 30 minutes, the power is turned off. |
| 3 times short Flashing | Maximum volume, minimum volume reached. |
| Flashing slowly (Once per second) | Connection waiting status • If connection is not established in 10 minutes, the power is turned off. |
IV-1. Listening to music
- Attach the battery pack to the main unit.
-
Press the ON/OFF switch (H).
-
It will automatically connect to the most recently connected device and the Bluetooth® will be illuminated. ---- Auto connection.
-
If it can not be connected, select "EZ37C5" on the device.
-
Adjust volume (K).
- Adjust the speaker surface angle. [Fig.4]

CAUTION
Do not open and close or rotate this unit for more than its range of motion.
-
Open and close: 0^ to 90^
Rotation: 0^ to 270^ -
Finish use and store. [Fig.5]
NOTE:
- If the cap (M) is removed, reinstall it. [Fig.6]
IV-2. USB power output
This unit can be used for charging USB devices such as smartphones.
NOTE:
- Power supply to connected devices only. (Rating DC 5 V, total two sockets 2 A)
- Do not connect devices with a rating of 5V and 2 sockets exceeding 2 A in total to this unit. It may cause damage.
- Depending on the USB device or USB cable, charging may not be possible.
- Some devices may prohibit other than the specified charging methods.
- The total output current of the 2 sockets is 2 A. Depending on the combination of devices when charging two units simultaneously, the charging time may be longer than usual, or in rare cases the two units may not be charged simultaneously.
-
Charging may not be possible depending on the USB device and/or USB cable.
-
Remove the USB sockets cover (E) and connect a commercially available USB cable. [Fig.7]
- Press the USB power output button (I) and start power supply.
- After use, press the USB power output button (I) to turn off power supply.
NOTE:
The auto-OFF function automatically turns USB
power delivery off after approximately 6 hrs. from the time the button is pressed if it remains turned on.
- Attach the socket cover (E).
IV-3. Battery level indication function
- When you press the USB power output button (I), the battery indication lamp will be displayed in 3 levels.
- Battery indication lamp (G) always lights and displays during USB power supply.
| Indicator Battery status |
| Charged enough. |
| Approx. 50% remaining. |
| Battery level is low. The battery pack will need to be charged soon. |
| Empty. The battery pack needs to be charged. |
V. ALERT FUNCTION
(1) Low battery alert
10 minutes before running out of battery, the LED light blinks three times and switches to "Low mode", and the USB power output indicator (J) and the battery level indicator lamp (3 segments) blink.
- When in "Low mode", the LED light does not dim further. It only blinks.
(2) LED Overheat alert
When the temperature around the LED element becomes high, the LED light switches to "Low mode" gradually to prevent the main unit from malfunctioning, or from shortening the LED element life.
Recycling
ATTENTION:
For environmental protection and recycling of materials, be sure that it is disposed of at an officially assigned location, if there is one in your country.
Information for Users on Collection and Disposal of Old Equipment and used Batteries

These symbols on the products, packaging, and/or accompanying documents mean that used electrical and electronic products and batteries should not be mixed with general household waste.
For proper treatment, recovery and recycling of old products and used batteries, please take them to applicable collection points, in accordance with your national legislation and the Directives 2012/19/EU and 2006/66/EC.
By disposing of these products and batteries correctly, you will help to save valuable resources and prevent any potential negative effects on human health and the environment which could otherwise arise from inappropriate waste handling.
For more information about collection and recycling of old products and batteries, please contact your local municipality, your waste disposal service or the point of sale where you purchased the items.
Penalties may be applicable for incorrect disposal of this waste, in accordance with national legislation.
[For business users in the European Union]
If you wish to discard electrical and electronic equipment, please contact your dealer or supplier for further information.
[Information on Disposal in other Countries outside the European Union]
These symbols are only valid in the European Union. If you wish to discard these items, please contact your local authorities or dealer and ask for the correct method of disposal.
VI. SPECIFICATIONS
[Main unit]
| Model No. EY37C5 | |||
| Voltage DC 14.4 V / DC 18 V / DC 21.6 V | |||
| Bluetooth® | Version: Ver. 4.2 | ||
| Transmission power: Bluetooth® specifi cation power Class 2 (2.5 mW) | |||
| Compatible profi le: A2DP / AVRCP | |||
| Number of pairing: 8 | |||
| Transmission range: Estimated range ca 10 m | |||
| Output Power | 5 W | ||
| USB socket | 2 × type A USB (DC 5 V) sockets for total 2 A output | ||
| Weight 420 g (main unit only) | |||
| Dimension (W × H × D) | 162 mm × 70 mm × 99 mm (with handle fl at to body) | ||
| Battery pack | Li-ion battery pack | ||
| EY9L45 EY9L47 EY9L51 EY9L52 | |||
| EY9L53 EY9L54 EY9L62 | |||
[Battery pack]
| Model No. EY9L45 | EY9L47 EY9L51 EY9L52 | |||
| Storage battery Li-ion Battery | ||||
| Voltage | DC 14.4 V DC 18 V | |||
| (3.6 V × 8 cells) | (3.6 V × 4 cells) | (3.6 V × 10 cells) | (3.6 V × 5 cells) | |
[Battery pack]
| Model No. EY9L5 | 3 EY9L54 EY19L62 | ||
| Storage battery Li-ion Battery | |||
| Voltage | DC 18 V DC 21.6 | V | |
| (3.6 V × 5 cells) | (3.6 V × 10 cells) | (3.6 V × 12 cells) | |
[Battery Charger]
| Model No. EY0L82 | ||||
| Electrical rating See the rating plate on the bottom of the charger | ||||
| Weight 0.93 kg | ||||
| Charging time | EY9L45 EY9L47 EY9L51 EY9L52 | |||
| Usable: 50 min. | Usable: 35 min. | Usable: 55 min. | Usable: 35 min. | |
| Full: 60 min. | Full: 40 min. | Full: 70 min. | Full: 40 min. | |
| Model No. EY0L82 | |||
| Electrical rating | See the rating plate on the bottom of the charger | ||
| Weight 0.93 kg | |||
| Charging time | EY9L53 EY9L54 EY9L62 | ||
| Usable: 45 min. | Usable: 65 min. | Usable: 65 min. | |
| Full: 60 min. | Full: 80 min. | Full: 85 min. | |
NOTE:
This chart may include models that are not available in your area. Please refer to the latest general catalogue.
For the dealer name and address, please see the included warranty card.
VII. MAINTENANCE
Use only a dry, soft cloth for wiping the unit. Do not use a damp cloth, thinner, benzine, or other volatile solvents for cleaning.
In the event that the inside of the unit or battery pack is exposed to water, drain and allow to dry as soon as possible. Carefully remove any dust or iron filings that collect inside the unit. If you experience any problems operating the unit, consult with a repair shop.
VIII. ACCESSORIES
Battery Pack
See the Specification.
Battery Charger
EY0L82
See the Specification.
NOTE:
- Battery pack and charger are not included in this kit.
IX. LICENSE
- The Bluetooth® word mark and logos are registered trademarks owned by Bluetooth SIG, Inc. and any use of such marks by Panasonic Corporation is under license. Other trademarks and trade names are those of their respective owners.
- The various names, company names and product names presented in this manual are the trademarks or registered trademarks of their respective
companies. Please note that some TM or symbols are omitted in this document.
About Bluetooth®
Panasonic bears no responsibility for data and/or information that is compromised during a wireless transmission.
Frequency band used
This system uses the 2.4 GHz frequency band.
Certification of this device
- This system conforms to frequency restrictions and has received certificatior based on frequency laws. Thus, a wireless permit is not necessary.
-
The action below are punishable by law in some countries:
-
Taking apart or modifying the unit.
- Removing specific cation indications.
Restrictions of use
- Wireless transmission and/or usage with all Bluetooth equipped devices is not guaranteed.
- All devices must conform to standards set by Bluetooth SIG, Inc.
- Depending on the specific cations and settings of a device, it can fail to connect or some operations can be different.
- This system supports Bluetooth® security features. But depending on the operating environment and/or settings, this security is possibly not suffcient. Transmit
data wirelessly to this system with caution.
- This system cannot transmit data to a Bluetooth device.
Range of use
Use this device at a maximum range of 10m . The range can decrease depending on the environment, obstacles or interference.
■ Interference from other devices
- This system may not function properly and troubles such as noise and sound jumps may arise due to radio wave interference if the main unit is located too close to other Bluetooth® devices or the devices that use the 2.4 GHz band.
- This system may not function properly if radio waves from a nearby broadcasting station, etc. are too strong.
Intended usage
- This system is for normal, general use only.
- Do not use this system near equipment or in an environment that is sensitive to radio frequency interference (example: airports, hospitals, laboratories, etc.).
Declaration of Conformity (DoC)
Hereby, "Panasonic Corporation" declares that this product is in compliance with the

essential requirements and other relevant provisions of Directive 2014/53/EU.
Customers can download a copy of the original DoC to our RED products from our DoC server: https://www.ptc.panasonic.eu/
Contact to Authorised Representative:
Panasonic Testing Centre,
Panasonic Marketing Europe GmbH.
Winsberging 15,
22525 Hamburg, Germany
ONLY FOR U.K.
X. CAUTION FOR AC MAINS LEAD
FOR YOUR SAFETY, PLEASE READ
THE FOLLOWING TEXT CAREFULLY
This appliance is supplied with a moulded three pin mains plug for your safety and convenience. A 5 amp fuse is fitted in this plug.
Should the fuse need to be replaced please ensure that the replacement fuse has a rating of 5 amp and that it is approved by ASTA or BSI to BS1362.
Check for the ASTA mark or the BSI mark on the body of the fuse.
If the plug contains a removable fuse cover you must ensure that it is refitted when the fuse is replaced.
If you lose the fuse cover the plug must not be used until a replacement cover is obtained.
A replacement fuse cover can be purchased from your local Panasonic Dealer.
CAUTION:
IF THE FITTED MOULDED PLUG IS UNSUITABLE FOR THE SOCKET OUTLET IN YOUR HOME THEN THE FUSE SHOULD BE REMOVED AND THE PLUG CUT OFF AND DISPOSED OF SAFELY. THERE IS A DANGER OF SEVERE ELECTRICAL SHOCK IF THE CUT OFF PLUG IS INSERTED INTO ANY 13 AMP SOCKET.
How to replace the fuse
The location of the fuse differs according to the type of AC mains plug (fi gures A and B).
Confirm the AC mains plug fitted and follow the instructions below.
Illustrations may differ from actual AC mains plug.
Open the fuse cover with a screwdriver and replace the fuse and close or attach the fuse cover.


22525 Hamburg, Germany
https://www.ptc.panasonic.eu/
22525 Hamburg, Germany
VEILIGHEIDSWAARSCHUWINGEN
WAARSCHUWING
Lees alle
Winsberging 15, 22525 Hamburg, Germany
22525 Hamburg, Germany
https://www.ptc.panasonic.eu/
Kontakt til autoriseret representant:
Panasonic Testing Centre, Panasonic Marketing Europe GmbH.
Winsberging 15, 22525 Hamburg, Germany
Denna enchets certifi ering
22525 Hamburg, Germany

https://www.ptc.panasonic.eu/
Kontakt var autoriserte representant:
Panasonic Testing Centre, Panasonic Marketing Europe GmbH.
Winsberging 15,
22525 Hamburg, Germany
https://www.ptc.panasonic.eu/
Yetkili Temsilci ile temasa setzen:
Panasonic Testing Centre, Panasonic Marketing Europe GmbH.
Winsbergring 15,
22525 Hamburg, Germany
[For Turkey only]
Manufacturer:
Panasonic Corporation
1006, Kadoma, Osaka 571-8501, Japonya
Importer for Turkey:
Panasonic Life Solutions Elektrik Sanayi ve Ticaret Anonim
Sirketi
Abdurrahmangazi Mah. Ebubekir Cad. No: 44
34887 Sancaktepe Istanbul/Turkiye
Declaration of Conformity (DoC)
Panasonic
EU Declaration of Conformity Document Number: ESPT-ED0042-01
Manufacturer
| Name | : Panasonic Corporation |
| Address | : 1006 Kadoma, Osaka 571-8501, Japan |
| Object of Declaration | |
| Product Name | : Cordless Wireless Speaker |
| Trade Name | : Panasonic |
| Model Number | : EY37C5 |
| Serial Number | : <y+mm+0001> ~ <y+mm+9998> |
CE Requirements
Additional Information
| This declaration of conformity is issued under the sole responsibility of manufacturer. The object of the declaration described above is in conformity with the requirements of the following EU legislation and harmonized standards: | |||
| Council | 2014/53/EU | RED | < B > |
| Directive(s) | 2011/65/EU | RoHS | |
| Council | 1999/519/EC | ||
| Recommendation(s) | |||
| Applicable Standard(s) : | < C > | ||
| EN 62368-1:2014 +A11:2017; EN 62479:2010; EN 50663:2017; EN 55032:2015; EN 55035:2017 | |||
| EN 61000-3-2:2014; EN 61000-3-3:2013; EN 301 489-1 V2.2.0; EN 301 489-17 V3.2.0 | |||
| EN 300 328 V2.1.1; EN 50581:2012 | |||
(D)
(The two first digits of the year when the CE marking was affixed at the first time): RoHS: 2011/65/EU as amended by (EU)2015/863
07.08.2019 74.Watanabe,
Hirotoshi Watanabe / General Manager Printed Name/ Title

Wolfram Kuhl
Authorized Representative
Panasonic Testing Centre
Panasonic Marketing Europe GmbH
Winsbergeng 15, 22525 Hamburg, Germany
German
Panasonic Testing Centre
Panasonic Marketing Europe GmbH
Winsberging 15,
22525 Hamburg,
Germany
Panasonic Corporation 1006, Kadoma, Osaka 571-8501, Japan http://www.panasonic.com


- GENERAL SAFETY WARNINGS
- WARNING
- ADDITIONAL SAFETY INSTRUCTIONS
- WARNING
- CAUTION
- WARNING for charger and battery pack
- ASSEMBLY
- Attaching or Removing Battery pack
- OPERATION
- Example of use [Fig.2]
- Pairing your Bluetooth® device for the first time
- Bluetooth® mode indicator
- IV-1. Listening to music
- NOTE:
- IV-2. USB power output
- IV-3. Battery level indication function
- ALERT FUNCTION
- Low battery alert
- LED Overheat alert
- Recycling
- ATTENTION:
- Information for Users on Collection and Disposal of Old Equipment and used Batteries
- [For business users in the European Union]
- [Information on Disposal in other Countries outside the European Union]
- SPECIFICATIONS
- [Battery pack]
- [Battery Charger]
- MAINTENANCE
- ACCESSORIES
- Battery Pack
- Battery Charger
- LICENSE
- About Bluetooth®
- Frequency band used
- Certification of this device
- Restrictions of use
- Range of use
- ■ Interference from other devices
- Intended usage
- Declaration of Conformity (DoC)
- CAUTION FOR AC MAINS LEAD
- FOR YOUR SAFETY, PLEASE READ
- THE FOLLOWING TEXT CAREFULLY
- CAUTION:
- How to replace the fuse
- VEILIGHEIDSWAARSCHUWINGEN
- WAARSCHUWING
- Denna enchets certifi ering
- [For Turkey only]
- Panasonic
- German
Brand : PANASONIC
Model : EY37C5
Category : Screwdriver