
iSensys LBP621Cw - Printer CANON - Free user manual and instructions
Find the device manual for free iSensys LBP621Cw CANON in PDF.
User questions about iSensys LBP621Cw CANON
0 question about this device. Answer the ones you know or ask your own.
Ask a new question about this device
Download the instructions for your Printer in PDF format for free! Find your manual iSensys LBP621Cw - CANON and take your electronic device back in hand. On this page are published all the documents necessary for the use of your device. iSensys LBP621Cw by CANON.
USER MANUAL iSensys LBP621Cw CANON
Please read "Important Safety Instructions" before operating this product.
After you finish reading this guide, store it in a safe place for future reference.
The information in this document is subject to change without notice.


canonical/oip-manual
Quick Setup
Getting Started
Please read "Important Safety Instructions" before operating this product.
P.132
After you finish reading this guide, store it in a safe place for future
reference.
The information in this document is subject to change without notice.
Mise en route
```bash canon.com/oip-manual to read the User's Guide that describes all functions of this machine.
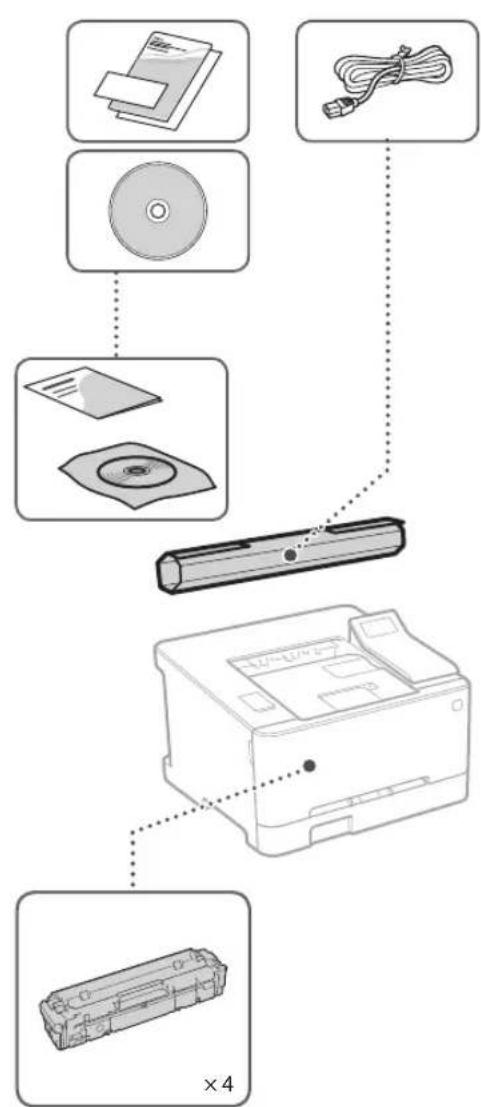
Starter toner cartridges are included.
Installing the Machineltems Included wit
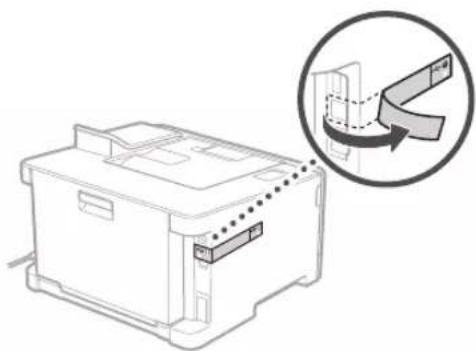
Before starting the installation
- Remove all of the tape.

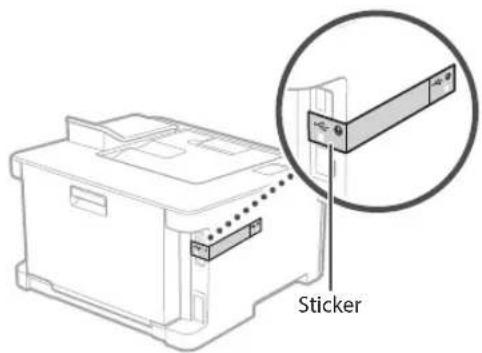
- Do not remove the sticker that covers the USB port.
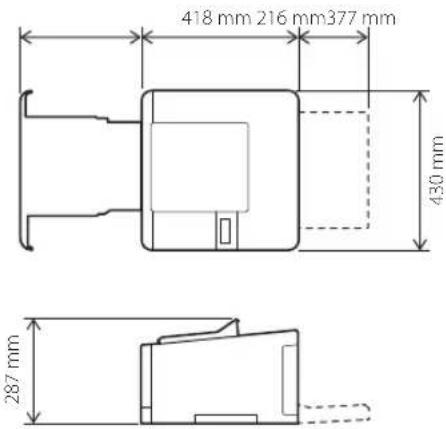
Installation Requirements
Provide a space of 100mm or more around the machine.
2
6
3
7
4
8
5
Next, proceed to configure the machine.
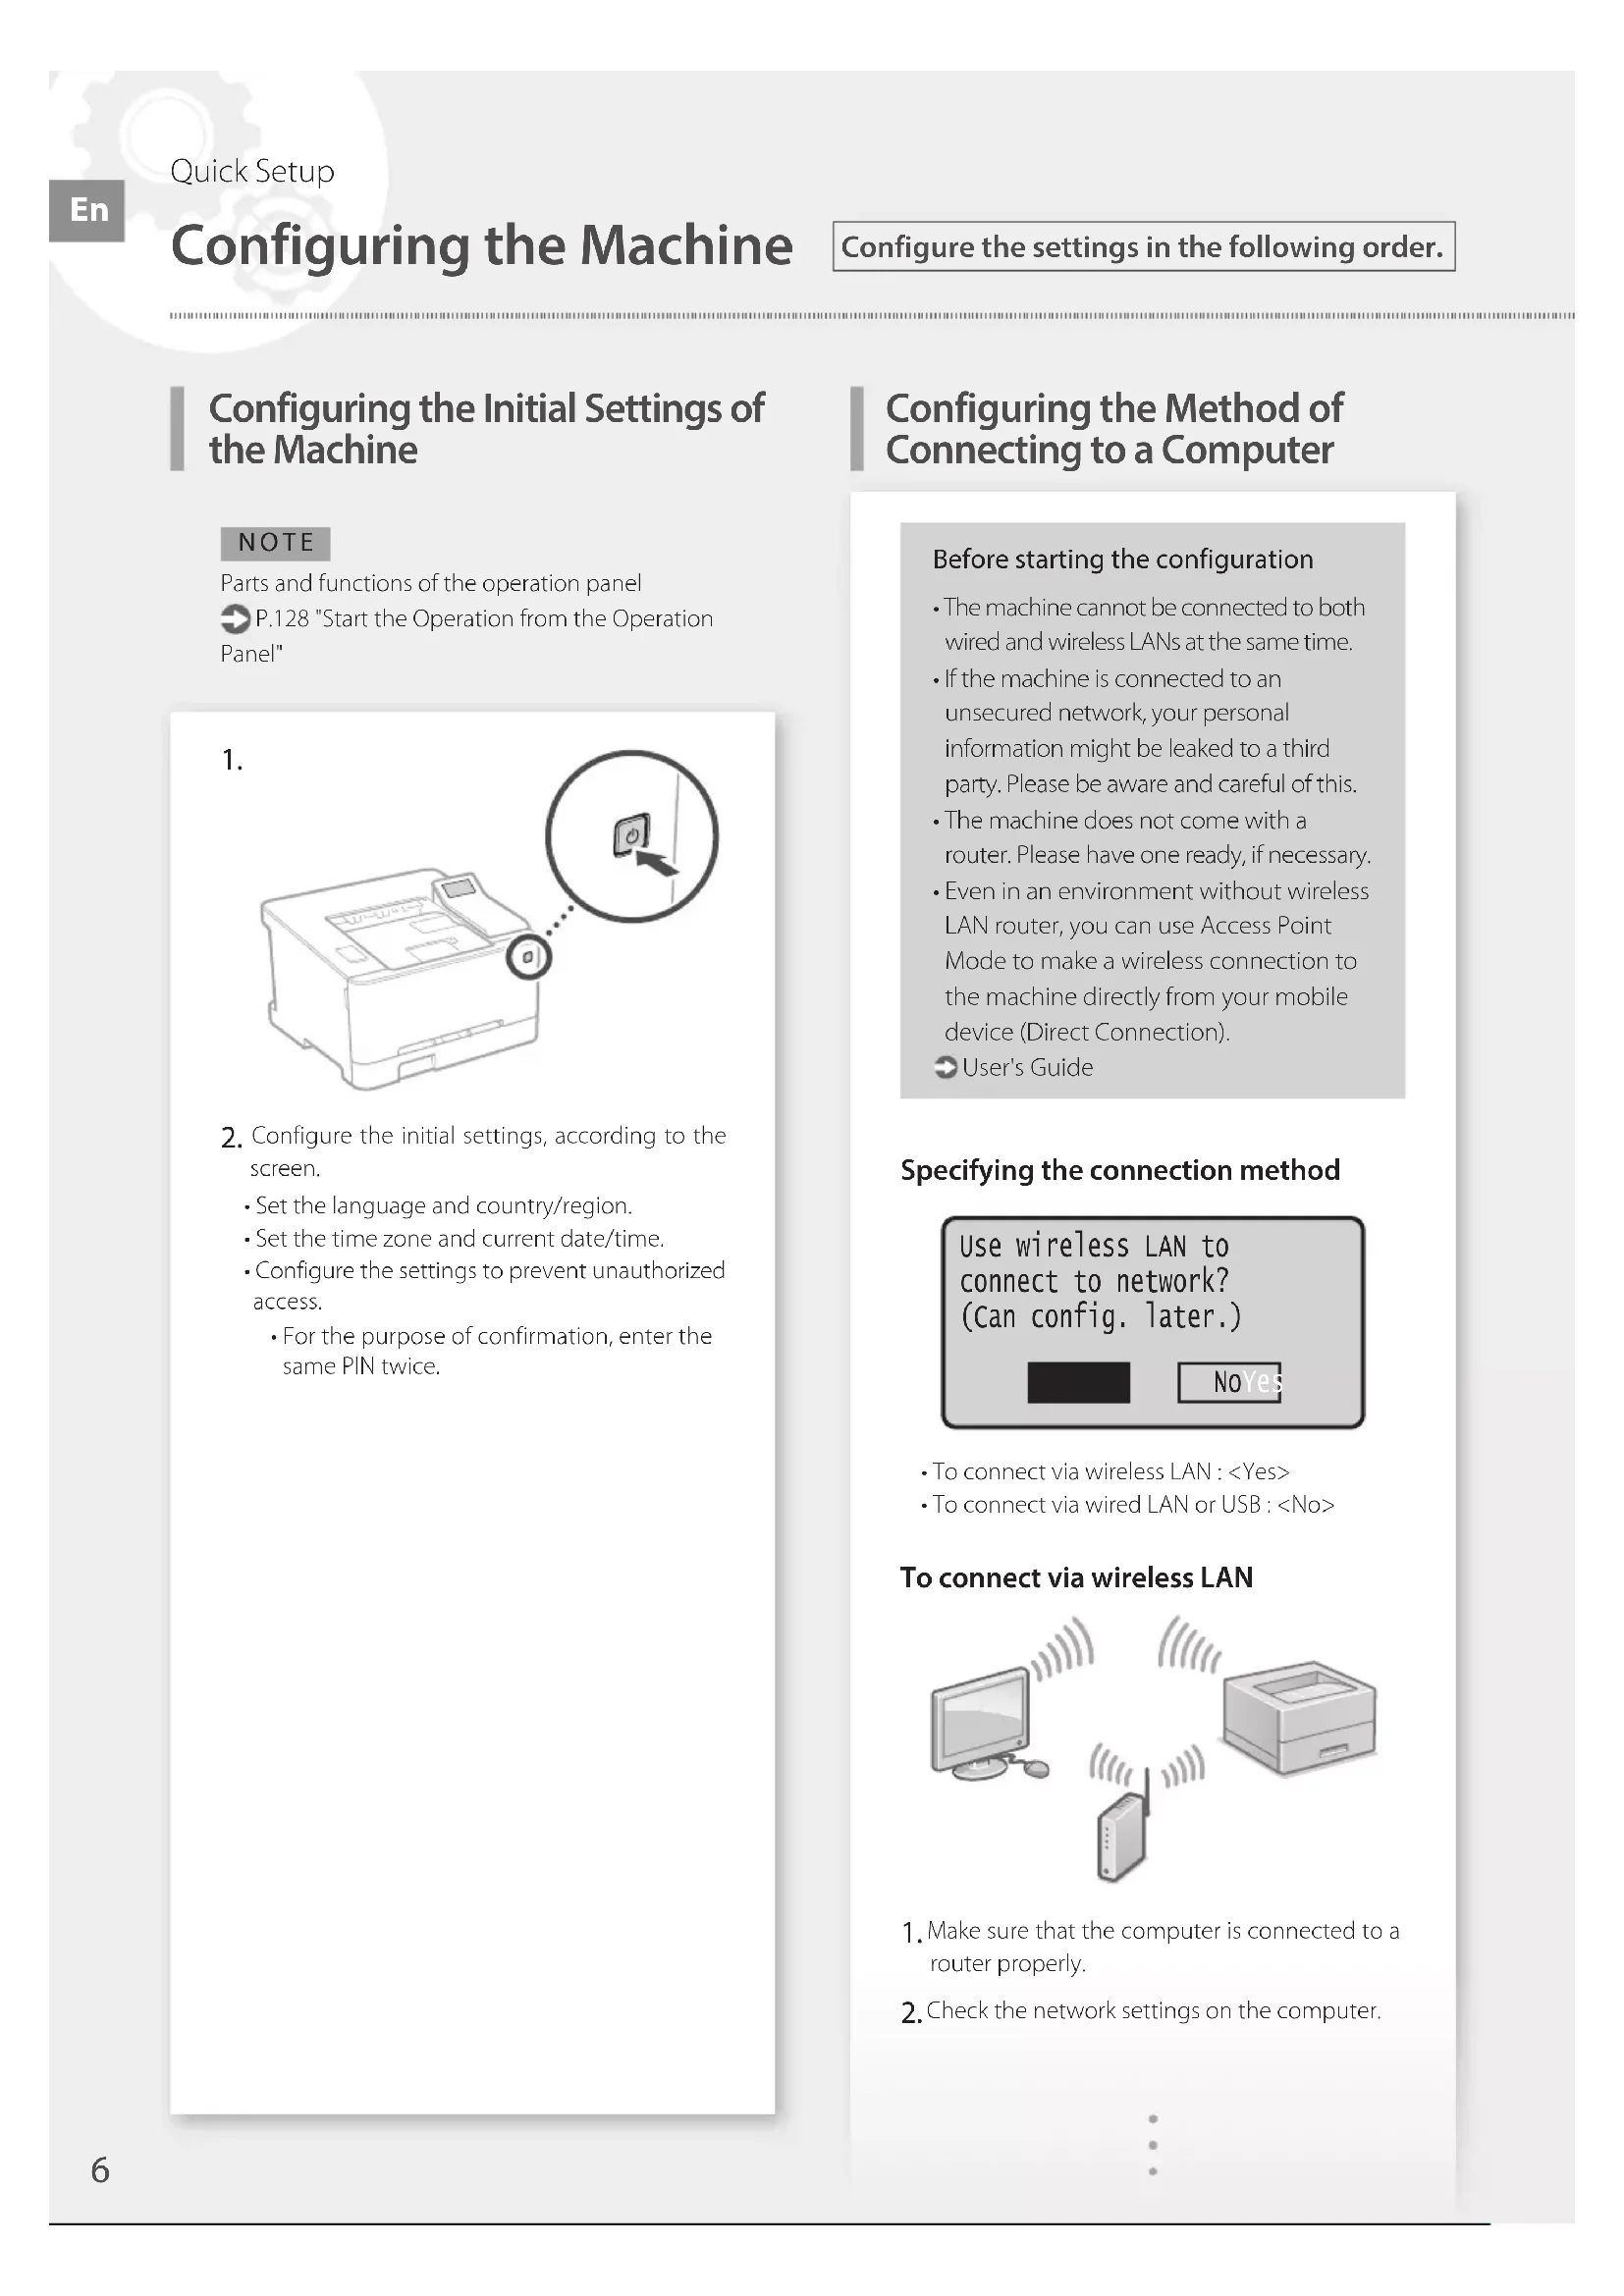
Configuring the Initial Settings of the Machine
NOTE
Parts and functions of the operation panel
P.128 "Start the Operation from the Operation
Panel"
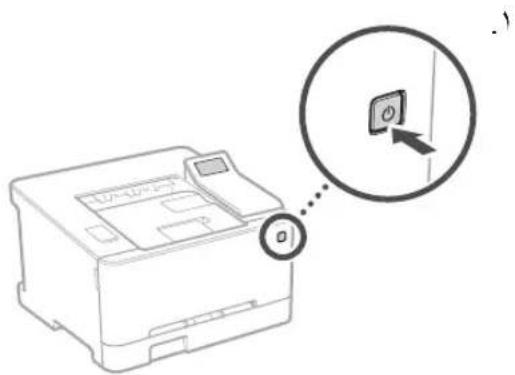
1.
-
Configure the initial settings, according to the screen.
-
Set the language and country/region.
- Set the time zone and current date/time.
- Configure the settings to prevent unauthorized access.
For the purpose of confirmation, enter the same PIN twice.
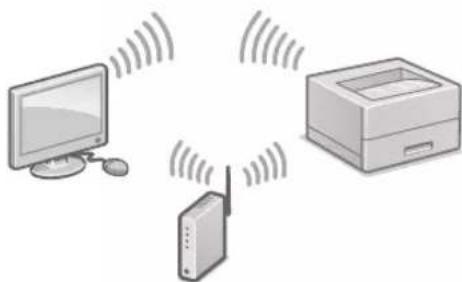
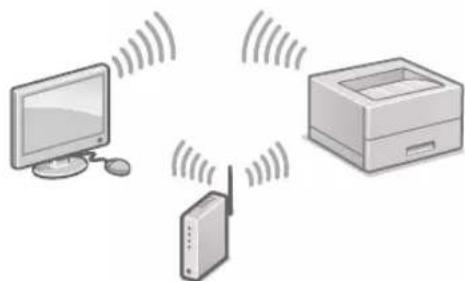
Configuring the Method of Connecting to a Computer
Before starting the configuration
The machine cannot be connected to both wired and wireless LANs at the same time.
If the machine is connected to an unsecured network, your personal information might be leaked to a third party. Please be aware and careful of this.
The machine does not come with a router. Please have one ready, if necessary.
- Even in an environment without wireless LAN router, you can use Access Point Mode to make a wireless connection to the machine directly from your mobile device (Direct Connection).
User's Guide
**Specifying the connection method**
Use wireless LAN to connect to network? (Can config. later.)

NO Yes
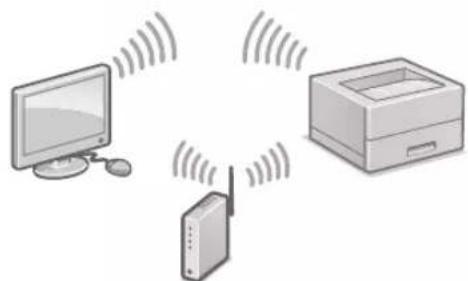
To connect via wireless LAN:
- To connect via wired LAN or USB:
To connect via wireless LAN

- Make sure that the computer is connected to a router properly.
-
Check the network settings on the computer.
-
Take note of the SSID and network key.
Check the label on the router. 品 User's Guide
- The setting operation is easier if the router is provided with a WPS mark. User's Guide
- Set the access point and network key according to the screen below.
For more information, refer to the manual.
OK
- Select OK>
- Select
. - Select
- Select the access point (SSID).
- Enter a WEP key (network key), and select
. -
Select
. -
Wait until message
is displayed. -
Select
The IP address will be automatically configured in a few minutes. -
Install the driver and software.
P.8 "Installing the software"
Now you are finished with the configuration of the initial settings.
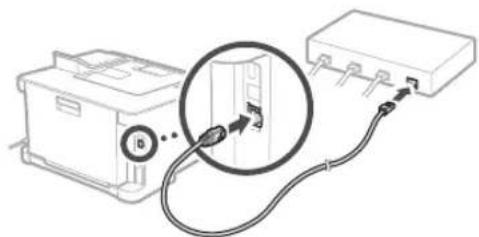
To connect via wired LAN

The machine does not come with a LAN cable. Please have one ready, if necessary.
- Make sure that the computer is connected to a router properly.
- Check the network settings on the computer.
- Connect the LAN cable.
After connecting the cable, wait a few minutes (until the IP address is set automatically).
- If a static IP address has been set on the computer, set the machine's IP address manually.
- Install the driver and software.
P.8 "Installing the software"
Now you are finished with the configuration of the initial settings.
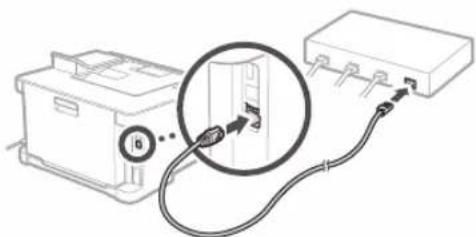
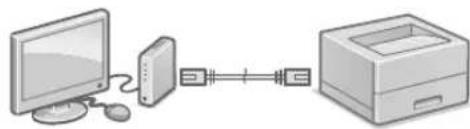
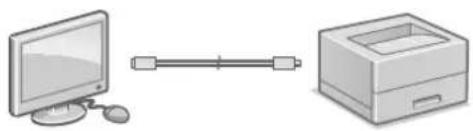
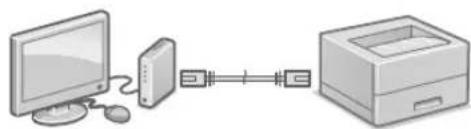
To connect via USB
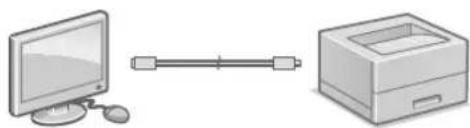
The machine does not come with a USB cable. Please have one ready, if necessary.
Make sure that the USB cable you use has the following mark.
- Do not connect the USB cable before installing the driver. If you did, disconnect the USB cable from the computer, close the dialog box, and then perform the following procedure from step 1.
- Install the driver and software.
P.8 "Installing the software"
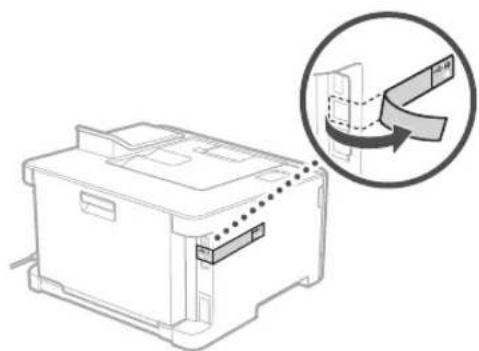
- When a screen with instructions for connecting the USB cable to the machine is displayed, remove the sticker that covers the USB port.
Now you are finished with the configuration of the initial settings.
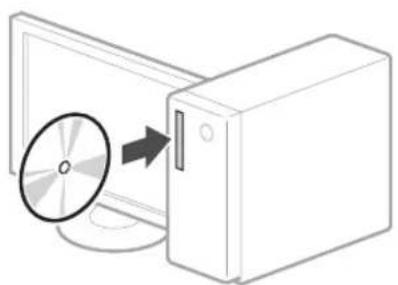
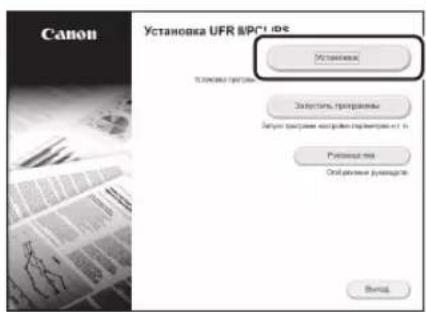
Installing the software
The procedure described here is only applicable when your computer runs on the Windows OS. For more details on the software installation procedure, see the driver's manual.
- For the installation when your computer runs on the macOS, see the driver's manual.
- Your machine may not come with the driver for the macOS, depending on the time of purchase. New drivers are uploaded to the Canon website, and you can download and use the latest one.
1.

2.
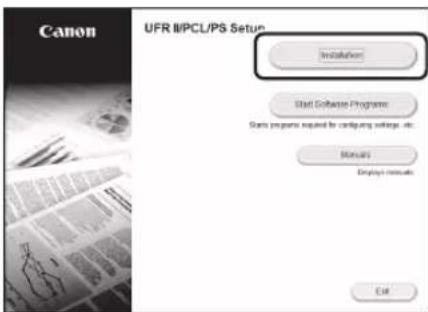
If the screen is not displayed properly, reinsert the CD-ROM/DVD-ROM or search for "D:\MInst.exe" on the Windows platform (This description assumes that "D:" is the CD-ROM/DVD-ROM drive name).
Memo
S.44 "Installation of softwaren"
S.44 "Installation af softwaren"
Installation of softwares
Verbinding makes via bedraad LAN

Icn.6ecnpoBOnHyO ceTb? (MoxHo HaCTp. no3dHee.)

HeT
-ДяpoNKluOeHnNo6ecnpoBOHOJIOKJIbHOcTn;
-Длг�юкlioquehnno npobodhoi cnokaibHOI CETN UIN USB:
PoiKJIoueHne no 6ecnpoBODHOcTn
1.Y6eNTecbBTOM,HTO KOMNbIOTep npabINbHO NOKJIoueH K MapuPyTHaTOpY.
2.Поверпьтейнадсюки сети на KMнь�уpe.
- 3aunuTe ndeHnФkaTop SSID n KIOU cETN.
PpOBepeTe 3TuKeTky Ha MapuPyTu3aTope.
PykoBODCTBO nIb3OBaTeJIa
Pa6ota no HactpoKe ynpoaaetc,ecnHa MapuPyTu3aTope NMeeTc 3Haouk WPS.
PykoBODCTBO noIb3OBaTeJIa
4.3aaiTeTOkyIOCTyNA KIOUc CEINB COOTBECTBUN C 3KpaHOM, pNBeEHbIM HIXe.
DOnOHnTeIbHbIe CBeDeHn CM.B pyKoBOdCTBe.
OK
- BbIepePte OK>
- BbI6epuTe
. - BbIepeHte
- Bb6epnte toky doctyna (SSID).
5.BBeINTE KIOH WEP (KIOH cETn) IN BbIeepNTe. - BbIbepeTe [Ja].
-IOxntTeCb OTo6paKeHn coo6ueHn
7. Bb6epnte<3aKpbTb>.
- IP-aDPEC HAcTpaNbaETcA BAtOMaTnuecknB TeHeHHe HeCKOJIbKIN MInHyT.
5.YctaHOBInTe npaINbporpaMMHoe oecneueHie.
CTp.64《YCTaHOBKa nporpaMMHOrO 06ecneheHn
Tenepb 3aDaanHe NcXoHbIX HaCTpoek 3aBepseHo.
PoiKJIoueHne no npoBOHOcTn
Ka6eB nokalbHOI cETn He BXOJNT B KOMnJIeKTI annapata.
Pn Heo6xOJIMOCTN NOIgrotOBbTe Ka6enb.
- Y6eHNTecb B TOM, qTO KOMNbIOTep npabINbHO NOKIIIOueH K MapuPyTu3aTOpY.
2.ПоверьтЕ HabtponKcETnHa KOMNbItepe. - NpoknOHTe Ka6enb NOKaHOBcTm.

-ПодклочьКабь,поджнгte HeckолькOMnHyT (нoka IP-aДPEC He 6yДeТ 3aДaH abTomaTnueCKn).
- Ecnn Ha KOMNBIOTEpe 3aJH CTaTnueckn IP-aDpec, 3aJaTe IP-aDpec annapata BpyHyIO.
4.YCTAHOBITeIpaaBepNnporpaMMHoe oecneueHne.
CTp.64《YctaHOBKa nporpaMMHOrO 06ecneueHH
Tenepb 3aHaHne nCXoHbIX HAcTpoek 3aBepSeHo.
PoiKJIoueHne no USB
Ka6eNb USB He BXoNIT B KOMnNeKT annapata. Pn Hc06xOUMOCNT NOrTOOBt Ka6eNb.
- Y6eIITecbBTOM,TO nCnOJIb3yEmbKab6eB USB mMeET cNeDuOuSyIO MapKnipOBKy.

- He noqknouaTe ka6eB USB Do yctanobKn dpaBepa. EcnB BTo cEnaIn, otcoeHNHte ka6eB USB OT KOMbIOTepa, zakpoTte dnaIorOBe OKHO N BbINONHTE npNBedeHHyo Hnke npoeDpy C wara 1.
1.YctaHOBInTeIpaainBepnnpoPpAMMHOe o6ecneueHne.
CTp.64《YctaHOBKa nporpaMMHOrO 06ecneueHn
- Ecnn OTo6paKaTaC8KpaH cyKa3aHHe m noKnIouHTb Ka6eB USB K annapaty, cHmnte HakneKy, 3akpbBaIOOyIO npT USB.

Tenepb 3aDaHnne NcXoDhbIX HaCTpoek 3aBepseHo.
YctaHOBka nporpamMhoro oecneueHna
-ПибveHнЯ 3дecb npоeура npimehma TOnbKOДIЯ KOMNBIOTepOB,HaKOTOpbie yctahOBnEHa OC Windows.Порбee O npoueType yCTaHOBKn pOprpaMMHOrO obecneHnM.BpykoBODCTBe KdpaBebpy.
-TopaOK yCTaHOBKn Ha KOMbIbTepbI cOC macOS cm. B pyKOBOdCTBe K dpaHbpy.
B3abncmocnOT BpeMeHH npno6peHnnaapapa, OH MoKeT NOCTABnTBc 6e3 dpaNBepaDn OC macOS.HOBBe DpaNBepb paMaeeauoTcHa Be6-caTe Canon, no3tOMy MOxHO 3aRpy3uTbN nCnONb3OBA Tb HOBeMn dpaNBep.
1.
2.
Ecnn Ekapan He OTo6paKaetc HauNekkaum
O6pa3OM, 3aHOBO yCTaHOBNTe Nsck
CD-ROM/DVD-ROM nnn BbINONHInTe
nonck faINa «D:MInst.exe» Ha
nlatphiOpme Windows (8 ATOM ONCaHn
npednonaraTc, YTO «D» — TTO nMn
dNCKOBOna CD-ROM/DVD-ROM).

HanaштуваимаnapaTa
Hanaштуваши поаTKOBnx napametpiB anapata
PIMITKA
IoknlaHIIe npo enemEn nHaeni kepyBaHHa Taix fyHKuii DVB. B po3ini
CTop.248IINB.po3in «PouaTOKpo60Tu 3 naHeniKepyBaHHN»
1.
- HanauTyIe noaTkoBni napamTpri BijnobiHNO do iHCTpyKui Ha ekpaHi.
YCTaHObitb MOBy Ta kpaIHy/perioH.
- YCTaHObit yacOBm noC i nOTOHy DaTy/acy.
HanaHTyTe npaMetpnIraNo6iraHH HecaHKUIOHObaHOMy DOCTny.
-Дя nIITBcPdKcHn BBeiTb TOn cAmu PINKOJ DbiYi.
HanaStyBaHHcNoco6y nikloueHHdoKOMn'tepa
IpeepnoaTkoHnHaawTyBaHH
AnapaT He MoXHa BoDHOaC nIKIOHTN Do IpOTOBOI Ta 6e3IpOTOBI JOKaJIbHOI Mepexi.
KuO anapat niknueHo do HeaxnueHoi Mepeksi, Bawa ocobncta inphiopmaiz MOKe noTpanNTI do cToPOHHix oci6. BybTe yBaXHi Ta 0epekhi.
Anapat noctaacb63 Mapuynatopa. Niroto neo 3a Heo6xHocti.
Habitb kuoBcepeoBnuiHemae Mapuyn3atopa6e3npotoboi IokaibHOI Mepeki,MOXHa BkOpNCtAtnPexMMTOCKNIOCTyNy Dna 6e3npOTOBOrO nIKKNUOeyHn DO anapata 6e3nocepEnhbo 3 MOiNbHOr npictpoIO (pPame nIKNIOUeHHA).
Noci6HnK KopncTyBaHa
Bka3aHHcno6y niknoueHH
Use wireless LAN to connect to network? (Can config. later.)

Плдкlioуеня черes6e3dpoTObY lokaIbHy mepexy:
-Плкюechнушипдотову lokaNBHy
Мерекуabo3a ДОПOMOROU USB-Ka6eHIO:
PiknouenHnepe3 6e3poToBy IokaIbHy Mepexy

- NpekoHaITeC, 0KOMNIOTEp nIKNIOeHO D0 MapuTy3aTOpA HaleXHM YHOM.
-
Npebipte npametpu mepexi Ha komn'ioTepi.
-
3aHHITb SSID Ta KJIIOH Mepeksi.
-
NpepeBipTe eTnkeTkHa MapuTyNaToPi.
日 Noci6HnK KopncTyBaHa - PpOeDypa HAcTpoIbAHn8 6yE npocTiio, RaH OHa MauPpyTu3Atopi c no3HaUka WPS.
Noci6HnK KopncTByBaHa
4.HanaTnyTe TOnKy DoCTyny Ta KInOu MepeKi BIDNOBIDHO Do IHCTpyKui Ha ekpaHI, HABeDEHIX HIXKHe.
For more information, refer to the manual.
OK
1.Bu6epitb nyHKT
2. Bn6epitb
3. Bn6epitb
3auekaTe,doKHe 3'ABNTbCnIOBIDOMnEHHA
7. BnBepiTb
-IP-aPeca 6ynde aBtOMaTnHo HanaTbObaHa uepe3 KInbKa XBNH.
5.YcTaHOBITbIpaNBeP i nporpamHe 3a6e3neueHH.
CTOP.68ДИВ.pO3ДIN«YCTaHOBKa nporpaMHoro 3a6e3neueHHI
Tenep Bn 3aBepuHn HanaTuBaHHa noaTKOBnx napameTpib.
KoHfIgypnpaHe Ha nbpBOHaayanHnte NaCTpOiKn Ha MaunHaTa
3A6EJIeKKA
YacnNfHKuHHa pa6oTHnaHen
CTp.336,CTapTnpaHe Ha deIcTBnETo ot pa6oTHnaHen

1.
- KoHpynpaTe nbpBOHaanHnTe HAcTpoKn B CbOTBeCTBne C ekpaHa.
3aainTe eNka nIbpxkabata/pernoHa.
3aJaIteHacOBnI NOcN TEKyuataData/AC.
KoHpynpaTe HacptpoKnte,3a da npedotbpatnte HeynHOMOueHIOCTbI.
Cen notBbpxJeHHe BBeTe Da bTne eHH ncbu PIN Homep.
KoHfNpypnaHe Ha MeToDa 3a CBbP3BaHe C KOMnIOTbP
Ppei Da 3aOnuHete KOHpynpaHaTe
MaunHata He moKe da ce cBbpxe eHOBpeMeHHo C Ka6enHa n 6e3KnHa LANmpexa.
AkoMaHHaTcBbP3HaCHe3aHTeHa MpeKa,BAaTaIINHnIHOpMaunMOKe Da n3Teue Do Tpea CtpaHa.Mon,6bTeBHNMaTeHnIOOTHOSeHne Ha TOBa.
MaunHata He ce doCTaBcMapuPyTu3aTOp, 3aTOBa NIOdTBTe TaKbB, aKe eHeo6xOIMo.
-ДориВсрда6e36e3xueH LAN MapшуTN3aTOp MOKTeДаИЗПОЛЗВATE peXIMHaTOUka3aIOCTbI,3aДa OcBüECTBNTe 6e3xuHa Bp3Ka C MaUNHaTaДиpeKTHOOTBaIeTOMO6nH0 YcTPOINCTBO(DInpeKTHaBp3Ka).
PbKOBOCTBOHaNoTpe6uTeMa
IocouBaHe Ha MeToDa 3a Cbbp3BaHe
CB. KbM MpeX. No 6e3X. LAN? (MoXe da ce KoHΦ. nOcIe.)
He
-3a da ce cBbpxKeTe uepe3 6e3KuEN LAN:
- 3a da ce cabpke te ue3 kaebeneh LAN mnn USB:
3a da ce cBbpxTe uepe 6e3xuueH LAN
-
YBepete ce, Ye KOMNIObpbTe npabINHO CBbp3aH C MapuPyTu3aTop.
2.ПpoepeTeМржOBHTeHactpoiKNHaKOMNIObpa. -
Ot6eJExKeTe SSID nmpexKOBn KIOH.
-Поверете eTNKeTa Ha МаршутuaTopa.
PbKOBOCTBOHaNOTpe6nteJIa
HactpoKaTa e no-Necha, aKO MapuTy3aTopbTe cHa6eH CMapKupOBka 3a WPS. PkoBoOCTBO Ha nOtpe6nten
4.3aJaTe TOUkTa 3a DOCTbN mpeKOBn KIOU B CbOTBETCTBNE C EKpaHa NO-DOJY.
3aNoBueHΦ.BX. pkoBOCTBOTO.
OK
- N36epete OK>
2.ИЗбете - N36epeTe
4.ИЗбете точа за дocтб (SSID).
5.BbBeTe WEP KIOU (MpeKOB KIOU) n36epete.
6.ИЗбете<Дa>.
-ИЗчakайт,ДOKATOce nOKахе cьбшснeTo<СврзаHo.>.
7.136epete<3atbopn>
-IPaepcBtue6bdeABTomuHOKOHpypapnCneJHKoKMOHyTN.
5.Инсташираи Te dpaиВера n coФуера.
Ctp.112,InHCTaIIpaHe Ha coΦTyepa"
CTOBA3aBbPwBA KOHnpynpaHeToHa nbpBOHaayanHHTe HAcTpoKn.
jia jia jia jia jia jia jia jia jia jia jia jia jia jia jia jia jia jia jia jia jia jia jia jia jia jia jia jia jia jia jia jia jia jia jia jia jia jia jia jia jia jia jia jia jia jia jia jia jia jia jia
"Jaiill aol jao Jaiill ooyor aanall
aaii 13g, aiai 13i 13i
Aabial, Ayal, Aalil
.
Jaiia jyssllipipipipipipipipipipipipipipipipipipipipipipipipipipipipipipipipipipipipipipipipipipipipipipipipipipipipipipipipipipipipipipipipipipipipipipipipipipipipipipipipipipipipipipipipipipipipip
yaballipj
ailll 8
"calal
a 1
A. g all S SSID
WPS
aaii aii iia 111
j0
1
#
1ai,ai^2 - a_i - 1
<1y>
.(SSID)
<2y> 22,:(25z)WEP zla
1,2,3
<.Jaij#> aill jy #
< 0 0 > > > >
1 1
aai jy
"calil
1JL JIJI JIJS USB JSL JIIS JIIS JIIS JIIS JIIS JIIS JIIS JIIS JIIS JIIS JIIS JIIS JIIS JIIS JIIS JIIS JIIS JIIS JIIS JIIS JIIS JIIS JIIS JIIS JIIS JIIS JIIS JIIS JIIS JIIS JIIS JIIS JIIS JIIS
A1y 1
i 1
Culjli jieji
LAN 1Joo
.
1
jial 100
49j 1
A
i01000000000000000000000000000
1
LAN 1
A) Access Point Mode
paaa aee
(ajuaa laj j) jol olaal jol jol jol
JSS
J
Use wireless LAN to connect to network?
(Can config. later.)

No Yes
(山)
LAN 1
()
LAN 1
j 1
A
m = 311
J 1
"1i jie iie 1jij jieiee"

yai jie jia 1a Jaa
A
aS aaiil 1 jai/2j
1j 1j j j j j j j j
j j 1
2022年全国卷1
PIN
LAN
Cui 1000000000000000000000000000000000000000000000000
1
J 1
.
S LBC = S COD + S_ BOC
i 1
()
10 11
1111111111111111111111111111111
S ACD = S COD + S BDO - S CDA
"jbjj juaa" 14.
44 44gl cagglg
.
SSID
4
y^2x^2
WPS
yJSL slaljLgC.2y2alj jJlal
(5a Jaa Jaa Jaa Jaa Jaa Jaa Jaa Jaa Jaa Jaa Jaa Jaa Jaa Jaa Jaa Jaa Jaa Jaa Jaa Jaa Jaa Jaa Jaa Jaa Jaa Jaa Jaa Jaa Jaa
jai jz jz jz jz jz
For more information, refer to the manual.
OK
.()
(SSID
5 = 120^
1
(SSID)
21 (WEP WEP key
( 1,2) < ( 1,2) < ( 1,3) ( 1,2) < ( 1,3) < ( 1,4)
a.s.s. (a)
P
221
ii 1
"Jjj j J 14
444g1 5
2
jai jui
45 100
W
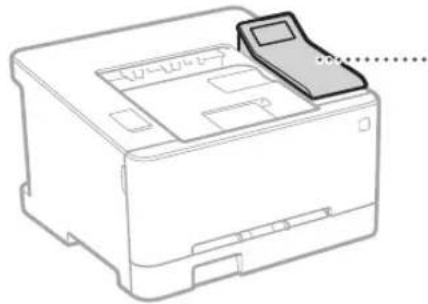
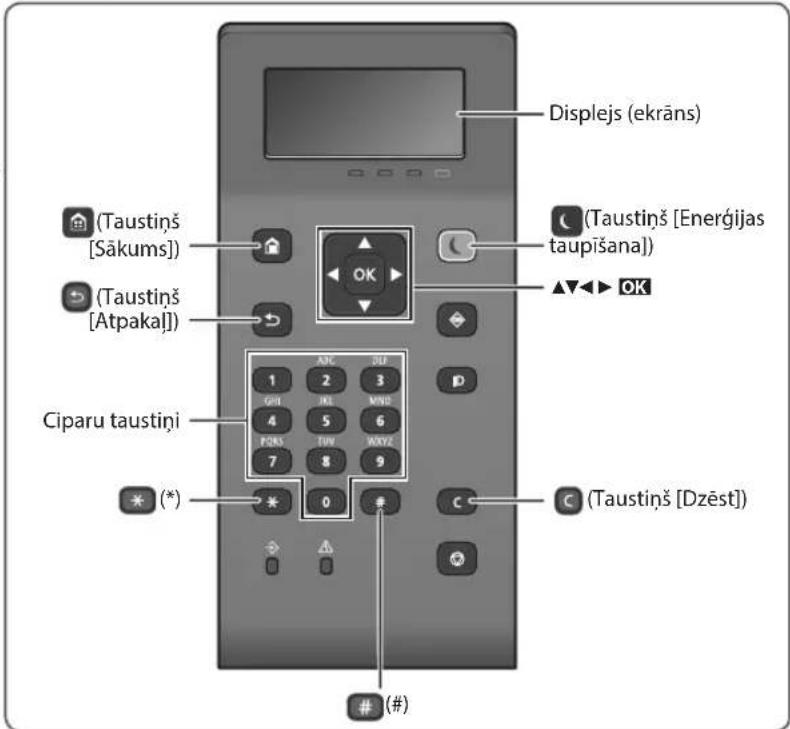
Start the Operation from the Operation Panel

Machine
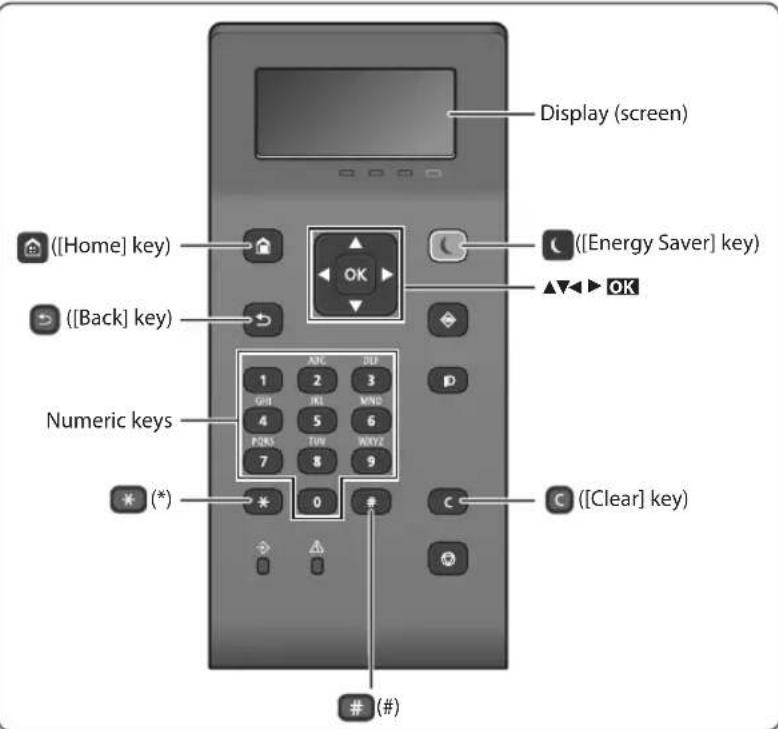
Operation Panel
Navigating the Menu
Item selection or moving the cursor among the menu items
Select an item with [▲] or [▼].
Press OK or [▶] to proceed to the next hierarchy.
Press or [ ] to return to the previous hierarchy.
Setting confirmation
Press OK However, when
Text Input Method
Changing entry mode
To change the entry mode, press
Entry mode Available text
Uppercase alphabetic letters and symbols
< a> Lowercase alphabetic letters and symbols
<12> Numbers
Entering text, symbols, and numbers
Enter with the numeric keys or #
Moving the cursor (Entering a space)
Press [<] or [>, to move the cursor. To enter a space, move the cursor to the end of the text, and press [>.
Deleting characters
Press Pressing and holding deletes all characters.
| Entry mode: <A> Entry mode: <a> Entry mode: <12> | |||
| 1 | @,-/1 | ||
| 2 | ABC abc 2 | ||
| 3 | DEF def | 3 | |
| 4 | GHI | ghi | 4 |
| 5 | JKI | jd | 5 |
| 6 | MNO | mno | 6 |
| 7 | PQRS | pqrs | 7 |
| 8 | TUV tuv | 8 | |
| 9 | WXYZ | wxyz | 9 |
| 0 | (Not available) | 0 | |
| # | (space) @ ./ - [? & $ % i ( ) ]{ }< >+ = " ,","^"]" | (Not available) | |

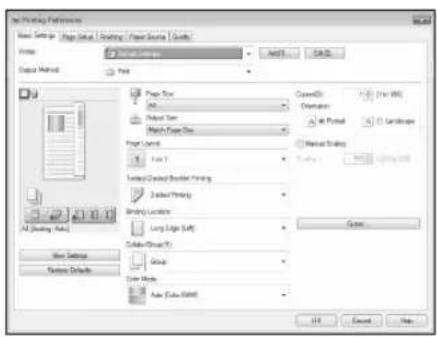
Printing
- Open the document to print, and select the print function of the application.
- Select the printer driver for the machine, and select [Preferences] or [Properties].
- Specify the paper size.
- Specify the paper source and paper type.
- Specify the print settings, as necessary.
- Select [OK].
- Select [Print] or [OK].
Useful print settings
2-sided
Non 1
■ Booklet Printing
- This function may not be available depending on the model of the machine.

For details
"Printing" in the User's Guide
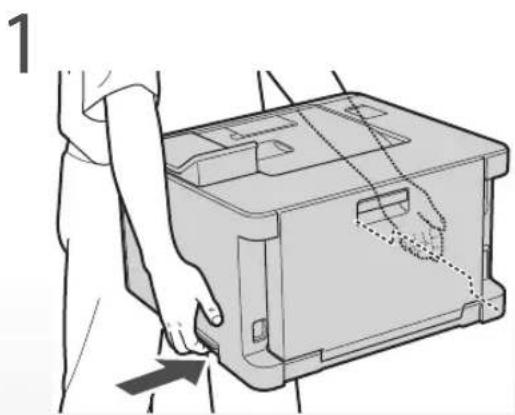
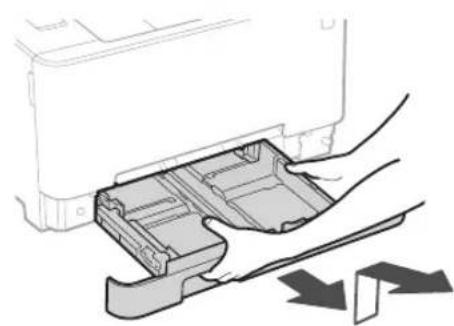
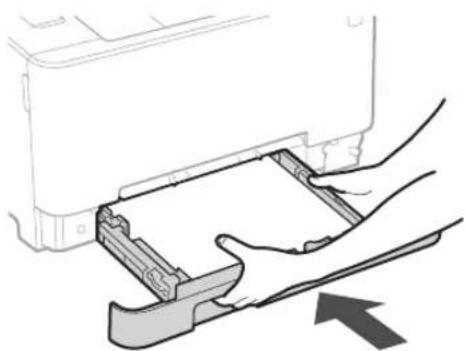
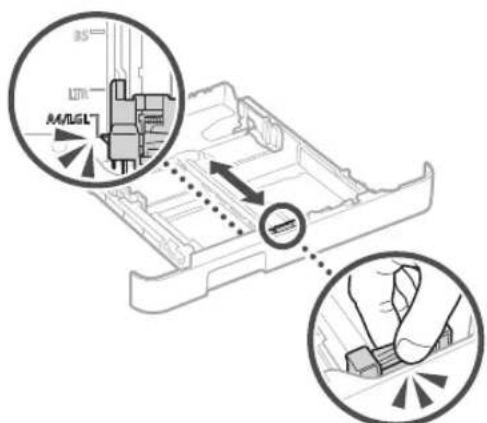
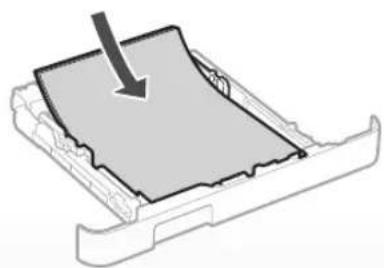
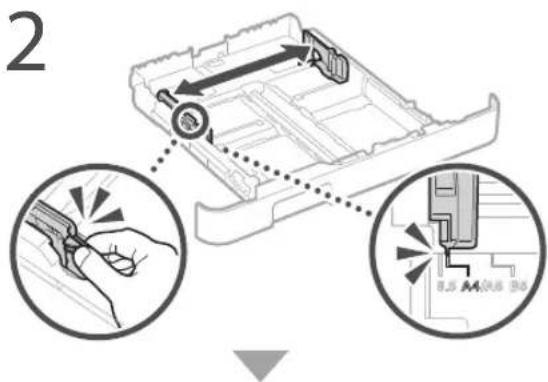
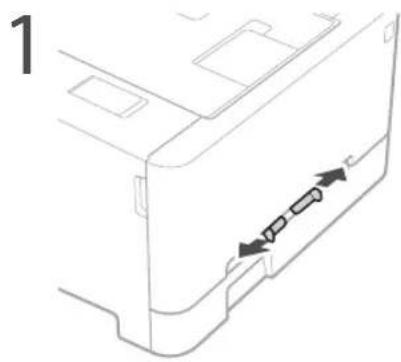
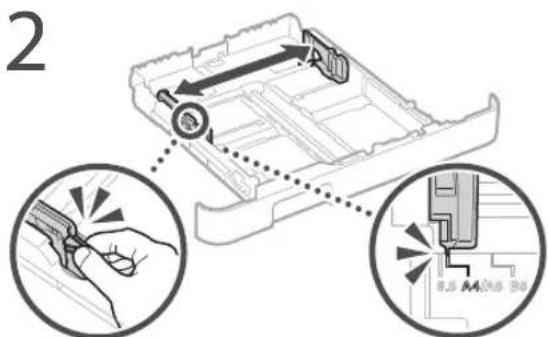
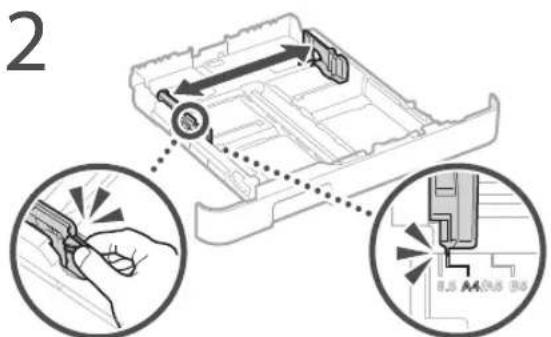
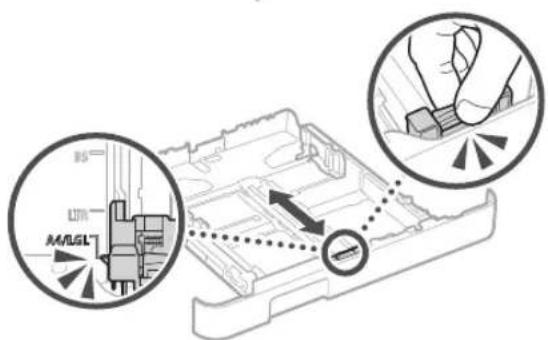
Pull out the paper drawer.
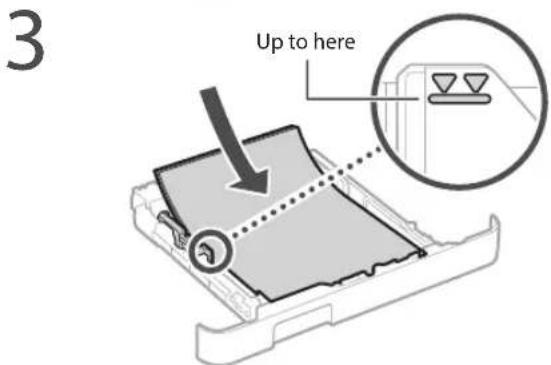
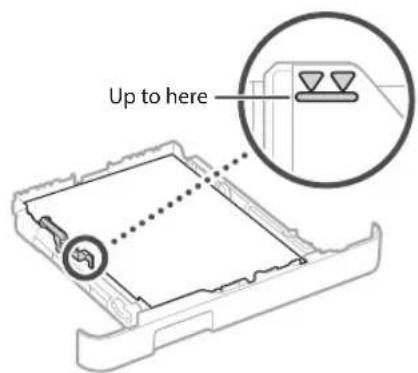
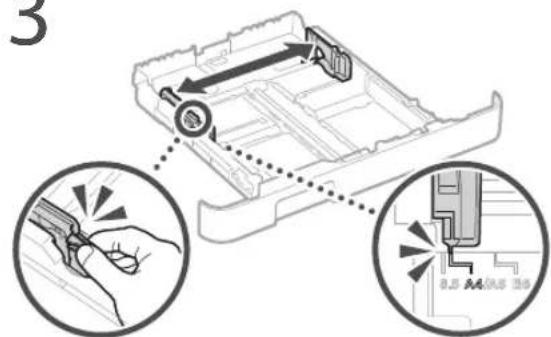
4 Insert the paper drawer into the machine.
If you load a different size or type of paper from the one before, make sure to change the settings.
Press nd select
6 Specify the size and type of paper, according to the screen.
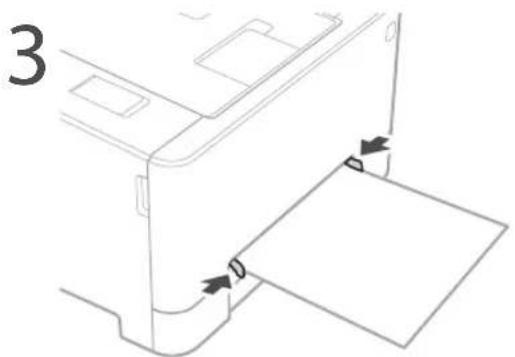
Loading in the Manual Feed SlotLoading


4 Insert the paper slowly into the manual feed slot until it reaches the back of the slot.
5 Specify the size and type of paper, according to the screen.
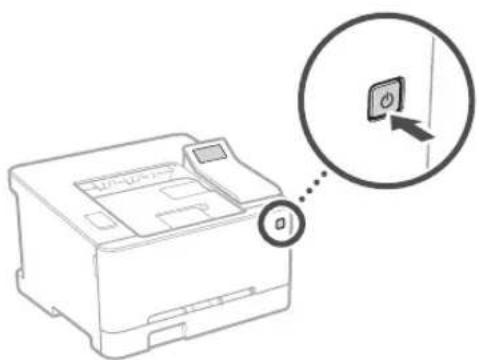
The Machine Does Not Seem to Work
Check the following.
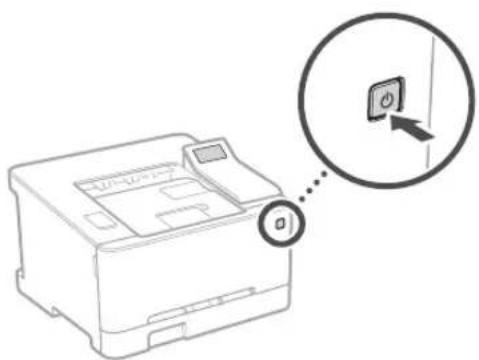
Is the power turned ON?
Is the machine out of sleep mode?
If both the display and are not lit, press the power switch.
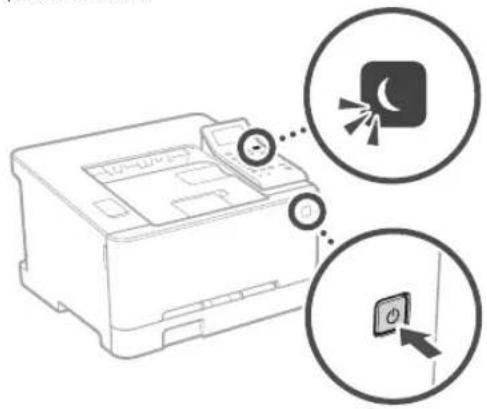
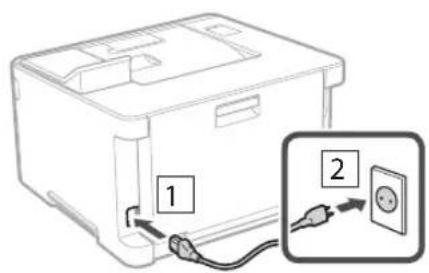
Is the power cord connected correctly?
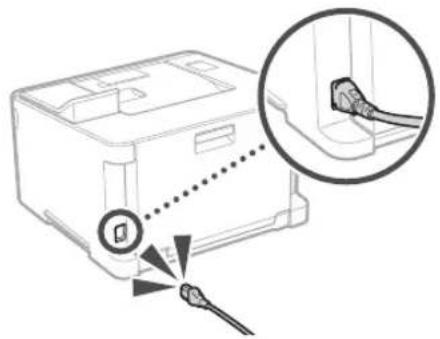
If the problem persists, see the User's Guide.
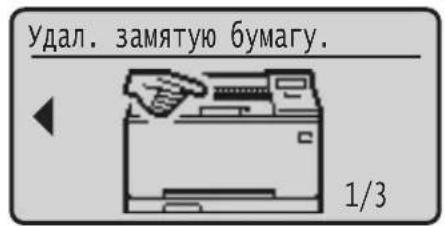
Paper Jams Have Occurred
Clear the paper jams, according to the on-screen instructions.

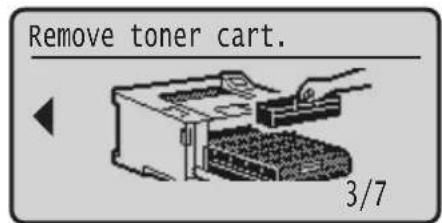
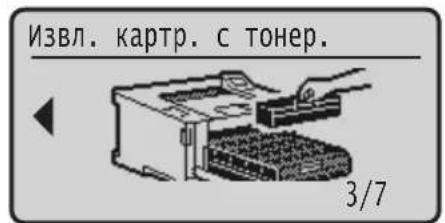
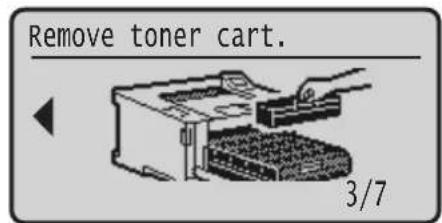
Replacing the Toner Cartridge
Replace the toner cartridge, according to the onscreen instructions.
Model number of replacement toner cartridge
- Canon Cartridge 054 Black
- Canon Cartridge 054 Cyan
- Canon Cartridge 054 Magenta
-
Canon Cartridge 054 Yellow
-
Canon Cartridge 054 H Black
- Canon Cartridge 054 H Cyan
- Canon Cartridge 054 H Magenta
- Canon Cartridge 054 H Yellow
Important Safety Instructions
This manual describes only warnings and cautions for the installation and the power supply. Be sure to read 'Important Safety Instructions' described in the User's Guide also.
WARNING
Indicates a warning concerning operations that may lead to death or injury to persons if not performed correctly. To use the machine safely, always pay attention to these warnings.
CAUTION
Indicates a caution concerning operations that may lead to injury to persons if not performed correctly. To use the machine safely, always pay attention to these cautions.
OIMPORTANT
Indicates operational requirements and restrictions. Be sure to read these items carefully to operate the machine correctly and avoid damage to the machine or property.
Installation
To use this machine safely and comfortably, carefully read the following precautions and install the machine in an appropriate location.
WARNING
Do not install in a location that may result in a fire or electrical shock
- A location where the ventilation slots are blocked (too close to walls, beds, sofas, rugs, or similar objects)
- A damp or dusty location
A location exposed to direct sunlight or outdoors
A location subject to high temperatures
A location exposed to open flames
Near alcohol, paint thinners or other flammable substances
Other warnings
- Do not connect unapproved cables to this machine. Doing so may result in a fire or electrical shock.
- Do not place necklaces and other metal objects or containers filled with liquid on the machine. If foreign substances come in contact with electrical parts inside the machine, it may result in a fire or electrical shock.
- If any foreign substance falls into this machine, unplug the power plug from the AC power outlet and contact your local authorized Canon dealer.
CAUTION
Do not install in the following locations
The machine may drop or fall, resulting in injury.
An unstable location
A location exposed to vibrations
Other cautions
- When carrying this machine, follow the instructions in this manual. If carried improperly, it may fall, resulting in injury.
- When installing this machine, be careful not to get your hands caught between the machine and the floor or walls. Doing so may result in injury.
Avoid poorly ventilated locations
This machine generates a slight amount of ozone and other emissions during normal use. These emissions are not harmful to health. However, they may be noticeable during extended use or long production runs in poorly ventilated rooms. To maintain a comfortable working environment, it is recommended that the room where the machine operates be appropriately ventilated. Also avoid locations where people would be exposed to emissions from the machine.
Power Supply
WARNING
Use only a power supply that meets the specified voltage requirements. Failure to do so may result in a fire or electrical shock.
The machine must be connected to a socket outlet with grounding connection by the provided power cord.
Do not use power cords other than the one provided, as this may result in a fire or electrical shock.
The provided power cord is intended for use with this machine. Do not connect the power cord to other devices.
- Do not modify, pull, forcibly bend, or perform any other act that may damage the power cord. Do not place heavy objects on the power cord. Damaging the power cord may result in a fire or electrical shock.
Do not plug in or unplug the power plug with wet hands, as this may result in an electrical shock. - Do not use extension cords or multi-plug power strips with the machine. Doing so may result in a fire or electrical shock.
Do not wrap the power cord or tie it in a knot, as this may result in a fire or electrical shock. - Insert the power plug completely into the AC power outlet. Failure to do so may result in a fire or electrical shock.
- Remove the power plug completely from the AC power outlet during a thunder storm. Failure to do so may result in a fire, electrical shock, or damage to the machine.
Make sure that the power supply for the machine is safe, and has a steady voltage. - Keep the power cord away from a heat source; failure to do this may cause the power cord coating to melt, resulting in a fire or electrical shock.
Avoid the following situations:
If excessive stress is applied to the connection part of the power cord, it may damage the power cord or the wires inside the machine may disconnect. This could result in a fire.
- Connecting and disconnecting the power cord frequently.
- Tripping over the power cord.
- The power cord is bent near the connection part, and continuous stress is being applied to the power outlet or the connection part.
Applying excessive force on the power plug.
CAUTION
Install this machine near the power outlet and leave sufficient space around the power plug so that it can be unplugged easily in an emergency.
Handling
CAUTION
Laser Safety
This product is confirmed as a Class 1 laser product in IFC60825-1:2014 and FN60825-1:2014.
CLASS 1 LASER PRODUCT
LASER KLASSE 1
APPAREL A LASER DE CLASSE 1
APPARECCHIO LASER DISCLASSE 1
PRODUCTO LASER DE CLASE 1
APARELHO ALASER DE CLASSE 1
LUOKAN 1 LASER-TUOTE
LASERPRODUKT KCLASS 1
The laser beam can be harmful to human bodies. Since radiation emitted inside the product is completely confined within protective housings and external covers, the laser beam cannot escape from the machine during any phase of user operation. Read the following remarks and instructions for safety.
- Never open covers other than those instructed in the manuals for this machine.
If the laser beam should escape and enter your eyes, exposure may cause damage to your eyes.
Use of controls, adjustments, or performance of procedures other than those specified in this manual may result in hazardous radiation exposure.

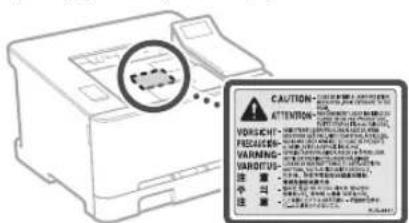
Laser Safety Caution
Safety-Related Symbols
Power switch: ON" position
Power switch: "OFF" position
Power switch:"STAND-BY"position
Push-push switch "ON" "OFF"
Protective carthing terminal
Dangerous voltage inside. Do not open covers other than instructed.
CAUTION: Hot surface. Do not touch.
Class equipment
Moving parts:Keep body parts away from moving parts
CAUTION: An electrical shock may occur. Remove all the power plugs from the power outlet.
There are sharp edges. Keep body parts away from sharp edges.
[NOTE]
Some of symbols shown above may not be affixed depending on the product.
Consumables
WARNING
Do not dispose of used toner cartridges in open flames. Also, do not store toner cartridges or paper in a location exposed to open flames. This may cause the toner or paper to ignite, and result in burns or fire.
Notice
Product Name
Safety regulations require the product's name to be registered.
In some regions where this product is sold, the following name(s) in parentheses () may be registered instead.
LBP623Cdw/LBP621Cw(F174900)
EMC requirements of EC Directive
This equipment conforms with the essential EMC requirements of EC Directive. We declare that this product conforms with the EMC requirements of EC Directive at nominal mains input 230V 50Hz although the rated input of the product is 220 to 240V 50 / 60Hz . Use of shielded cable is necessary to comply with the technical EMC requirements of EC Directive.
EU WEEE and Battery Directives
You can see the WEEE and Battery Directives information in the latest User's Guide (HTML manual) from the Canon website (canon.com/ oip-manual).
Wireless LAN Regulatory Information
Regulatory information for users in Jordan LBP623Cdw / LBP621Cw includes approved Wireless LAN Module (Model name: Type1KA)
Contains Wireless LAN Module approved by TRC/LPD/2017/19
Regulatory information for users in UAE LBP623Cdw / LBP621Cw includes approved Wireless LAN Module (Model name: Type1KA).
TRA
REGISTERED No: ER51217/17
DEALER No: DA0073692/11
RE Directive
(Only for European radio equipment)
RE Declaration of Conformity
English (EN) Hereby, Canon Inc. declares that this equipment is in compliance with Directive 2014/53/EU.
The full text of the EU declaration of conformity is available at the following internet address: http://www.canon-europe.com/ce-documentation Wireless LAN Specifications Frequency band(s):2412-2472MHz Maximum radio-frequency power: 15.9 dBm
The information in this document is subject to change without notice.
CANON INC. MAKES NO WARRANTY OF ANY KIND WITH REGARD TO THIS MATERIAL, Either EXPRESS OR IMPLIED, EXCEPT AS PROVIDED HEREIN, INCLUDING WITHOUT LIMITATION, THEREOF, WARRANTY AS TO MARKETABILITY, MERCHANTABILITY, FITNESS FOR A PARTICULAR PURPOSE OF USE, OR NON-INFRINGEMENT. CANON INC. SHALL NOT BE LIABLE FOR ANY DIRECT, INCIDENTAL, OR CONSEQUENTIAL DAMAGES OF ANY NATURE, OR LOSSES OR EXPENSES RESULTING FROM THE USE OF THIS MATERIAL.
Illustrations and Displays Used in This Manual Illustrations and displays used in this manual are which of LBP623Cdw unless specified.
Trademarks
Mac is a trademark of Apple Inc.
Microsoft, Windows, Windows Vista, Windows Server, Internet Explorer, Excel, and PowerPoint are either registered trademarks or trademarks of Microsoft Corporation in the United States and/or other countries.
Other product and company names herein may be the trademarks of their respective owners.
Third Party Software
This Canon product (the "PRODUCT") includes third-party software modules. Use and distribution of these software modules, including any updates of such software modules (collectively, the "SOFTWARE") are subject to license conditions (1) through (9) below.
(1) You agree that you will comply with any applicable export control laws, restrictions or regulations of the countries involved in the event that this PRODUCT including the SOFTWARE is shipped, transferred or exported into any country.
(2) Rights holders of the SOFTWARE retain in all respects the title, ownership and intellectual property rights in and to the SOFTWARE. Except as expressly provided herein, no license or right, expressed or implied, is hereby conveyed or granted by rights holders of the SOFTWARE to you for any intellectual property of rights holders of the SOFTWARE.
(3) You may use the SOFTWARE solely for use with the PRODUCT.
(4) You may not assign, sub license, market, distribute, or transfer the SOFTWARE to any third party without prior written consent of rights holders of the SOFTWARE.
(5) Notwithstanding the foregoing, you may transfer the SOFTWARE only when (a) you assign all of your rights to the PRODUCT and all rights and obligations under the license conditions to transferee and (b) such transferee agrees to be bound by all these conditions.
(6) You may not decompile, reverse engineer, disassemble or otherwise reduce the code of the SOFTWARE to human readable form.
(7) You may not modify, adapt, translate, rent, lease or loan the SOFTWARE or create derivative works based on the SOFTWARE.
(8) You are not entitled to remove or make separate copies of the SOFTWARE from the PRODUCT.
(9) The human-readable portion (the source code) of the SOFTWARE is not licensed to you.
Notwithstanding (1) through (9) above, the PRODUCT includes third-party software modules accompanying the other license conditions, and these software modules are subject to the other license conditions.
Please refer to the other license conditions of third-party software modules described in Appendix of Manual for the corresponding the PRODUCT. This Manual is available at http://canon.com/olp-manual.
By using the PRODUCT, you shall be deemed to have agreed to all applicable license conditions. If you do not agree to these license conditions, please contact your service representative.
V_180517
Memo

En
CLASS 1 LASER PRODUCT
LASER KLASSE 1
APPAREL ALASER DE CLASSE 1
APPARECCHIO LASER DI CLASSE 1
PRODUCTO LASER DE CLASE 1
APARELHO ALASER DE CLASSE 1
LUOKAN1LASER-TUOTE
LASERPRODUKT KCLASS 1
Regulatory information for users in Jordan
LBP623Cdw / LBP621Cw includes approved Wireless LAN Module (Model name: Type1KA). Contains Wireless LAN Module approved by TRC/ LPD/2017/19
Regulatory information for users in UAE LBP623Cw / LBP621Cw includes approved Wireless LAN Module (Model name: Type1KA).
TRA
REGISTERED No: ER51217/17
DEALER No: DA0073692/11
RE Directive
(Only for European radio equipment)
RE Declaration of Conformity
English (EN) Hereby, Canon Inc. declares that this equipment is in compliance with Directive 2014/53/EU.
The full text of the EU declaration of conformity is available at the following internet address: http://www.canon-europe.com/ce-documentation Wireless LAN Specifications
Frequency band(s):2412-2472MHz
Maximum radio-frequency power: 15.9 dBm
CLASS 1 LASER PRODUCT
LASER KLASSE
APPAREL ALASER DE CLASSE 1
APPARECCHIO LASER DI CLASSE 1
PRODUCTO LASER DE CLASE
APARELHO A LASER DE CLASSE 1
LUOKAN 1 LASER- TUOTE
LASERPRODUKT KCLASS
Regulatory information for users in Jordan
LBP623Cdw / LBP621Cw includes approved Wireless LAN Module (Model name: Type1KA). Contains Wireless LAN Module approved by TRC/ LPD/2017/19
Regulatory information for users in UAE
LBP623Cdw / LBP621Cw includes approved Wireless LAN Module (Model name: Type1KA)
TRA
REGISTERED No: ER51217/17
DEALER No: DA0073692/11
RE Directive
(Only for European radio equipment)
RE Declaration of Conformity
English (EN) Hereby, Canon Inc. declares that this equipment is in compliance with Directive 2014/53/EU.
The full text of the EU declaration of conformity is available at the following internet address: http://www.canon-europe.com/ce-documentation/Wireless LAN Specifications
Frequency band(s):2412-2472MHz
Maximum radio-frequency power: 15.9 dBm
CLASS 1 LASER PRODUCT
LASER KLASSE 1
APPAREL ALASER DE CLASSE 1
APPARECCHIO LASER DI CLASSE 1
PRODUCTO LASER DE CLASE 1
APARELHO ALASER DE CLASSE 1
LUOKAN1 LASER-TUOTE
LASERPRODUKT KCLASS 1
Regulatory information for users in Jordan
LBP623Cw / LBP621Cw includes approved Wireless LAN Module (Model name: Type 1KA).
Contains Wireless LAN Module approved by TRC/LPD/2017/19
Regulatory information for users in UAE
LBP623Cdw / LBP621Cw includes approved
Wireless LAN Module (Model name: Type1KA)
TRA
REGISTERED No: ER51217/17
DEALER No: DA0073692/11
RE Directive
(Only for European radio equipment)
RE Declaration of Conformity
English (EN) Hereby, Canon Inc. declares that this equipment is in compliance with Directive 2014/53/EU.
The full text of the EU declaration of conformity is available at the following internet address: http://www.canon-europe.com/ce-documentation/Wireless LAN Specifications
Frequency band(s):2412-2472MHz
Maximum radio-frequency power: 15.9 dBm
CLASS 1 LASER PRODUCT
LASER KLASSE
APPAREL ALASER DE CLASSE 1
APPARECCHIO LASER DI CLASSE 1
PRODUCTO LASER DE CLASE
APARELHO A LASER DE CLASSE 1
LUOKAN 1 LASER- TUOTE
LASERPRODUKT KCLASS
Regulatory information for users in Jordan
LBP623Cdw / LBP621Cw includes approved Wireless LAN Module (Model name: Type1KA). Contains Wireless LAN Module approved by TRC/ LPD/2017/19
Regulatory information for users in UAE
LBP623Cdw / LBP621Cw includes approved Wireless LAN Module (Model name: Type1KA)
TRA
REGISTERED No: ER51217/17
DEALER No: DA0073692/11
RE Directive
(Only for European radio equipment)
RE Declaration of Conformity
English (EN) Hereby, Canon Inc. declares that this equipment is in compliance with Directive 2014/53/EU.
The full text of the EU declaration of conformity is available at the following internet address: http://www.canon-europe.com/ce-documentation/Wireless LAN Specifications
Frequency band(s):2412-2472MHz
Maximum radio-frequency power: 15.9 dBm
CLASS 1 LASER PRODUCT
LASER KLASSE 1
APPAREL A LASER DE CLASSE
APPARECCHIO LASER DI CLASSE 1
PRODUCTO LASER DE CLASE 1
APARELHO ALASER DE CLASSE 1
LUOKAN1 LASER-TUOTE
LASERPRODUKT KCLASS 1
Regulatory information for users in Jordan
LBP623Cdw / LBP621Cw includes approved Wireless LAN Module (Model name: Type1KA). Contains Wireless LAN Module approved by TRC/ LPD/2017/19
Regulatory information for users in UAE LBP623Cw / LBP621Cw includes approved Wireless LAN Module (Model name: Type1KA).
TRA
REGISTERED No: ER51217/17
DEALER No: DA0073692/11
RE Directive
(Only for European radio equipment)
RE Declaration of Conformity
English (EN) Hereby, Canon Inc. declares that this equipment is in compliance with Directive 2014/53/EU.
The full text of the EU declaration of conformity is available at the following internet address: http://www.canon-europe.com/ce-documentation/Wireless LAN Specifications
Frequency band(s):2412-2472MHz
Maximum radio-frequency power: 15.9 dBm
Czech (CS) Timto spelecnost Canon Inc. prohlasej, ze toto zafrzeni je v souladu se smemici 2014/53/FU.
Uplne zneni FU prohlasei o shode je k dispozici na teo internetové adrese:
http://www.canon-europe.com/ce-documentation Technické udaje bezdrátov LAN
Pásmo(a) frekvence: 2412-2472 MHz
LASERPRODUKT KCLASS 1
Regulatory information for users in Jordan
LBP623Cdw / LBP621Cw includes approved Wireless LAN Module (Model name: Type1KA). Contains Wireless LAN Module approved by TRC/ LPD/2017/19
Regulatory information for users in UAE
LBP623Cdw / LBP621Cw includes approved Wireless LAN Module (Model name: Type1KA).
TRA
REGISTERED No: ER51217/17
DEALER No: DA0073692/11
RE Directive
(Only for European radio equipment)
RE Declaration of Conformity
English (EN) Hereby, Canon Inc. declares that this equipment is in compliance with Directive 2014/53/EU.
The full text of the EU declaration of conformity is available at the following internet address: http://www.canon-europe.com/ce-documentation/Wireless LAN Specifications
Frequency band(s):2412-2472MHz
Maximum radio-frequency power: 15.9 dBm
Czech (CS) Timto spelecnost Canon Inc. prohlasej, ze toto zafrzeni je v souladu se smemici 2014/53/FU.
Uplne zneni FU prohlasei o shode je k dispozici na teo internetové adrese:
http://www.canon-europe.com/cedocumentation Technické udaje bezdrátov LAN
Pásmo(a) frekvence: 2412-2472 MHz
Maximánlí ykon rádiove frevence: 15.9 dBm
Regulatory information for users in Jordan
LBP623Cdw / LBP621Cw includes approved Wireless LAN Module (Model name: Type1KA). Contains Wireless LAN Module approved by TRC/ LPD/2017/19
Regulatory information for users in UAE
LBP623Cw/LBP621Cw includes approved Wireless LAN Module (Model name: Type1KA)
TRA
REGISTERED No: ER51217/17
DEALER No: DA0073692/11
RE Directive
(Only for European radio equipment)
RE Declaration of Conformity
English (EN) Hereby, Canon Inc. declares that this equipment is in compliance with Directive 2014/53/EU.
The full text of the EU declaration of conformity is available at the following internet address: http://www.canon-europe.com/ce-documentation/Wireless LAN Specifications
Frequency band(s):2412-2472MHz
Maximum radio-frequency power: 15.9 dBm
CLASS 1 LASER PRODUCT
LASER KLASSE 1
APPAREL A LASER DE CLASSE 1
APPARECCHIO LASER DI CLASSE 1
PRODUCTO LASER DE CLASE 1
APARELIO A LASER DE CLASSET
LUOKAN 1 LASER-TUOTF
LASERPRODUKT KCLASSI
I kactva Ieepipov va eva emiBnycia To
ovapinu oupa. Fepooov n kactvoBoiAou kauetai
OTo Boutepko Tou npov, nepiopkai Tevt, Tuv
TpoocotteKv npEbnatow Kai Tuv eEotepkiv
kaunutw, n aktivoBoiA kep cek dev npoei va eEeBc
toTn oukeun KATA nn diakceia Trc Aenoupykic, ta Tnv
oepaia oia, diaBaoTe iK, kdoBec napayppaou, Ka
koAokDgnte ic obnyie.
Iot e unvoiyete kaAupata dAa ano auta nou npBxenovtai oAeyepiaia yua autn tn oukeur
Fovn kAIOVA KAEQED BIKPOVJEK EEPBEOE ETOOJPEIa
muo aoc, n Aekoeon auty ESExetan va npokaeo
Baoiou ou taiaoc.
Hypn xepntpiv kai pubdow n n eKTEsEevyiv dappostikov and aouc nov pnyopovotarto npovexipio, evxetra vo oynei oEeBocn de EIKVUUM KIOVBOIA.
Ppoooxn-AktiooiaaIcεp
Aakontnc evaaayrnpyponan (ON) Anepepyonan (OF)
Akoepektnpooataeukcveiow
2to 0eaeio kuaepnKivouy taq. Mny aovneta kauuupaa ektoc anda tno npBaeovrtn cnsryties.
A NPOSOXH:Kaunrmpovcia.MnyayCte.
EconAioocKantyopicII
KwovjvEgApTtA: MnynAioTe TpeA ToouoJoiOc oA KwovjvEgApTtA.
PPOOXH:Mnpoei v npokui nAektpomEia
Anouvse 0a ta pKaawbiupeuata
TnV npca.
Yraptxuy axunpaoka. MnyanidcTe taEAn Tou apouoac oae ataynupaoka
[ZHMEIΩ∑H]
Opiaeva ana ta auboLa nau napouadovar npanapavvEvEeTeA va nuiv evai enkooAneva avdoyoe tpoiov.
Avaawoua
IPOEIOIHAGN
Mny anoppintete tic xpanoantinvec kaoetec ypaqtn ae yuuec φayoc. Emion, mny
anonkeute kaotec ypaqtn n xapti o pepoc
tou eivai ektebevoe ae yuuec φayoc.Auto
muopei va ptpokae de avqaleen Tou ypaqtn n Tou
xapitou kai va odnyoe ie npkayia nykaquata.
Σημειωση
Ovoopa npoiovtroc
O kavovipoi aopaleac anatouv tvy
kataxwnon tou ovopatoc tou npodvtoc.
Se apojeve necipoxc nlaonc autou tou npodvtoc.
evextal va exoukataxwnepa napakatw
ovogatau uupavicvatua meapeveon.
LBP623Cdw/LBP621Cw(F174900)
Anatnneic nKektpoaywnikc oubetaotntac (EMC) tnc Ondyias E.K.
Autoc o eonlouoc uupopovetai me tiaokac anatnoeic nepi nkeptpouayvntiknc oubaototnac TcO OndywaE.K.Anwovoue otuto npoiov kauntei taanatneic nkeptpoyavntikc oubaototnac (EMC)TcOndyloc E.K. stav n ovuaotik Taon Tou n keptpikoou peuataoc elva1 230V,50 Hz,av kai n ovuaotik Taon aeitoupyiac Tou npoiotoc elva220Ec240V,50/60 Hz. AnatiteaI npianb wpaiaevou kaawdiou npokeivou autn n ouakeur va Kauntei Tc Tevikec anatnoeic nepi nkeptpoyavntiknc oubaototnac (EMC)TcOndyloc E.K.
Obnieyic yia ta AnoBlaeta HAEktpiko kai HAEktpovikou Eonliou (AHHE) kai yia tic natapiec
Minaeie va paeite nmpopoeic oxekiaue tnc Ondyiec yio AtoAbaHnA HApikou kai HApikovko Eonlou (AHHE) kai yia HApikipke cTneC oTav TeAevia Ondyo xphoyn (eyxapioh HTML) any ivtoaEla TaCannon (http://canon.com/cjo-manual).
Kavoviotke, npopopie caupatou TOnikou diktou
Regulatory information for users in Jordan LBP623Cdw / LBP621Cw includes approved Wireless LAN Module (Model name: Type1KA). Contains Wireless LAN Module approved by TRC/ LPD/2017/19
Regulatory information for users in UAE LBP623Cdw/LBP621Cw includes approved Wireless LAN Module (Model name: Type1KA).
TRA
REGISTERED No: ER51217/17
DEALER No: DA0073692/11
RE Directive
(Only for European radio equipment)
RE Declaration of Conformity
English (EN) Hereby, Canon Inc. declares that this equipment is in compliance with Directive 2014/53/EU.
The full text of the EU declaration of conformity is available at the following internet address: http://www.canon-europe.com/ce-documentation/Wireless LAN Specifications
Frequency band(s):2412-2472MHz
Maximum radio-frequency power: 15.9 dBm
Czech (CS) Timto spelecnost Canon Inc. prohlasej, ze toto zafrzeni je v souladu se smemici 2014/53/FU.
Uplne zneni FU prohlasei o shode je k dispozici na teo internetové adrese:
http://www.canon-europe.com/cedocumentation Technicke udaje bezdratov LAN
Pásmo(a) frekvence: 2412-2472 MHz
Maximánlí ykon rádiove frevence: 15.9 dBm
Regulatory information for users in Jordan
LBP623Cdw / LBP621Cw includes approved Wireless LAN Module (Model name: Type1KA). Contains Wireless LAN Module approved by TRC/ LPD/2017/19
Regulatory information for users in UAE
LBP623Cdw / LBP621Cw includes approved Wireless LAN Module (Model name: Type1KA)
TRA
REGISTERED No: ER51217/17
DEALER No: DA0073692/11
RE Directive
(Only for European radio equipment)
RE Declaration of Conformity
English (EN) Hereby, Canon Inc. declares that this equipment is in compliance with Directive 2014/53/EU.
The full text of the EU declaration of conformity is available at the following internet address: http://www.canon-europe.com/ce-documentation Wireless LAN Specifications
Frequency band(s):2412-2472MHz
Maximum radio-frequency power: 15.9 dBm
PRODUCTOLASERDECLASE
APARELIO A LASER DE CLASSET
LUOKAN 1 LASER-TUOTE
LASERPRODUKT KLIASS
Regulatory information for users in Jordan
LBP623Cdw / LBP621Cw includes approved Wireless LAN Module (Model name: Type1KA). Contains Wireless LAN Module approved by TRC/ LPD/2017/19
Regulatory information for users in UAE
LBP623Cw/LBP621Cw includes approved Wireless LAN Module (Model name: Type1KA).
TRA
REGISTERED No: ER51217/17
DEALER No: DA0073692/11
RE Directive
(Only for European radio equipment)
RE Declaration of Conformity
English (EN) Hereby, Canon Inc. declares that this equipment is in compliance with Directive 2014/53/EU.
The full text of the EU declaration of conformity is available at the following internet address: http://www.canon-europe.com/ce-documentation/Wireless LAN Specifications
Frequency band(s):2412-2472MHz
Maximum radio-frequency power: 15.9 dBm
Bulgarian (BG) C HACTOto Canon
CLASS 1 LASER PRODUCT
LASER KLASSEI
APPAREL A LASER DE CLASSE
APPARECCHIO LASFR DI CLASSE1
PRODUCTOSFERDECLASF1
APARELHO ALASER DE CLASSE 1
LUOKAN1 LASER TUOTE
LASERPRODUKT KCLASS 1
Laserslken kan vare skadelig for mennesker. Da strling som strales inni produkt skier innenfor et beskyttet cabinett og eksterne desker, kan ilke laserstralen komme ut fra maskinen mens brukeren benyfter den. Les folgende merknader og instruksjor fer sikkerhet.
Regulatory information for users in Jordan LBP623Cdw / LBP621Cw includes approved Wireless LAN Module (Model name: Type1KA). Contains Wireless LAN Module approved by TRC/ LPD/2017/19
Regulatory information for users in UAE LBP623Cw / LBP621Cw includes approved Wireless LAN Module (Model name: Type1KA).
TRA
REGISTERED No: ER51217/17
DEALER No: DA0073692/11
RE Directive
(Only for European radio equipment)
RE Declaration of Conformity
English (EN) Hereby, Canon Inc. declares that this equipment is in compliance with Directive 2014/53/EU.
The full text of the EU declaration of conformity is available at the following internet address: http://www.canon-europe.com/ce-documentation/Wireless LAN Specifications
Frequency band(s):2412-2472MHz
Maximum radio-frequency power: 15.9 dBm
LASERPRODUKT KCLASS 1
Regulatory information for users in Jordan
LBP623Cdw / LBP621Cw includes approved Wireless LAN Module (Model name: Type1KA). Contains Wireless LAN Module approved by TRC/ LPD/2017/19
Regulatory information for users in UAE
LBP623Cdw / LBP621Cw includes approved Wireless LAN Module (Model name: Type1KA)
TRA
REGISTERED No: ER51217/17
DEALER No: DA0073692/11
RE Directive
(Only for European radio equipment)
RE Declaration of Conformity
English (EN) Hereby, Canon Inc. declares that this equipment is in compliance with Directive 2014/53/EU.
The full text of the EU declaration of conformity is available at the following internet address: http://www.canon-europe.com/ce-documentation/Wireless LAN Specifications
Frequency band(s):2412-2472MHz
Maximum radio-frequency power: 15.9 dBm
Czech (CS) Timto spelecnost Canon Inc. prohlasej, ze toto zafrzeni je v souladu se smernici 2014/53/FU.
Uplne zneni FU prohlasei o shode je k dispozici na teto internetové adrese:
http://www.canon-europe.com/ce-documentation Technické udaje bezdrátov LAN
Pásmo(a) frekvence: 2412-2472 MHz
Maximánlí ykon rádiove frevence: 15.9 dBm
CLASS 1 LASER PRODUCT
LASER KLASSE 1
APPARF ALASFR DE CLASSF 1
APPARECCHIO LASER DI CLASSE 1
PRODUCTO LASER DE CLASE 1
APARELHO ALASER DE CLASSE 1
LUOKAN1LASER-TUOTE
LASERPRODUKT KIASS 1
Regulatory information for users in Jordan
LBP623Cdw / LBP621Cw includes approved Wireless LAN Module (Model name: Type1KA). Contains Wireless LAN Module approved by TRC/ LPD/2017/19
Regulatory information for users in UAE
LBP623Cw/LBP621Cw includes approved Wireless LAN Module (Model name: Type1KA)
TRA
REGISTERED No: ER51217/17
DEALER No: DA0073692/11
RE Directive
(Only for European radio equipment)
RE Declaration of Conformity
English (EN) Hereby, Canon Inc. declares that this equipment is in compliance with Directive 2014/53/EU.
The full text of the EU declaration of conformity is available at the following internet address: http://www.canon-europe.com/ce-documentation/Wireless LAN Specifications
Frequency band(s):2412-2472MHz
Maximum radio-frequency power: 15.9 dBm
BBOJ TEKCTA, CMMBOJIOB uHp
BBeINTe c nOMOuIIO uIcnpOBbIX KJIaBnN nn
2-CTOpOHnY*
NHa1
Ieaub6pouHOp*
HaHnue 3toi yHKuIN 3aBNCUTOT Moen annapata.
3arpy3ka B kaccety dny 6ymarn
1 BbBnHbTe Kaccety nn 6ymn.


4 YcTaHOBtKe Kaccety Jn8 6ymn B annapa.
Ecnn fopmat nnn Tn 6ymarn OTnnuaOTcOT
fOpmata nn Tnna pahee NcNoB3OBaBweeCA
6ymarn, o83aTeIbHO n3MeHInTe HaCTpOKn.
5 Haxmte n Bb6epnte
6 ykaxnte fopmat n TnBymarB COOTBETCTBN CekpaHOM.
3a rgy3ka B loTOK ryHoi noDaun


4 MeHHeHHo BCTabnIte 6yMaRy B OTBepCTne Dn pyHcN IOaH, nKa OHa He DOCTNRHT bIbHO CTOpOHbI OTBepCTna.
5 Ykaxnte fopmat n tyn 6ymarn B COOTBETCBN CekpaHOM.
Annapat He pa6otaet 3amrae 6ymara
PpOBepeTcIeIyIOoee.
BkHIOUeHOIINITAHHe?
- Bbien nn annapat n3 cnaeero pexkma?
Ecn nucnneu HndkaTop BBKIOUHeHbI, HaxMNTe BblkNOaTeNb NITAHIA.

Ecn npo6nema He yctpaheHa, cm. PykoBoDCTBO noJIb3ObaTeIa.
YcTpaHnTe 3aMaTne 6yMaTn B COOTBETCTBn C INCHTpkyKUAMN Ha kPaHe.
3aMeHa KapTpIa cToHepom
3aMeHHeKapTpIck C ToHepOM B COOTBeTCTBnC INCHpKUAM Ha kpaHe.
Homep moe nn 3anachoro kaptnpka c Tohepom
-Canon Cartridge 054 Black (Hepnby)
-Canon Cartridge 054 Cyan (Biplo30b)
-Canon Cartridge 054 Magenta (MannHOBbI)
-Canon Cartridge 054 Yellow (Ken'tb)
-Canon Cartridge 054 H Black (UcpHb)
-Canon Cartridge 054H Cyan (BupuOboB)
-Canon Cartridge 054 H Magenta (MannHOBBI)
-Canon Cartridge 054 H Yellow (XenTbui)
Приложения
Baxhblc yka3aHnnoTexHnke 6e3oNaCHOCTn
BDAHHOMpyko0oCTBeOnmHaHToNIOKPOyPCKCHINNA NPOO0DcTcPOKCHINPAYCTHOHOOKNIOPOKHOHNPIKTHAHNO 0683aTeNoHPOpHHTAE TaKKe BkHbue yKaahAAH NO TEKHXIE BcONACHOHnPy KPOyoJIcI HcNIOB0BaTeHn
OCTOPXHO
Coeepnipnppeepnepnepnepnepnepnepnepnepnepnepnepnepnepnepnepnepnepnepnepnepnepnepnepnepnepnepnepnepnepnepnepnepnepnepnepnepnepnepnepnepnepnepnepnepnepnepnepnepnepnepnppepnppepnppepnppepnppepnppepnppepnppepnppepnppepnppepnppepnppepnppepnppepnppepnppepnppepnppepnppepnppepnppepnppepnppepnppepnppe
BHUMAHNE
CodopmnpnepnnpeHnO60nepaHbKOTOPB B CTNAC HIOAeBHOrHO BnCHINCHMOY TNPcCCTN KTPaMAHIOE, DnB EoBnachnckrKcNpyataa annapata BCERda oobpaaiare BnMnHHeHa STn nppeypeKeHHH.
OBAXHO
CedeepxptcboaHnOxckytaaunmOrpahnncn. BHIMATBIOO3HbKMBcB CINMMNPOKEMHBM 10eHN HNDNEAeEckytaaunmAnnpata in BO N6eKaHHe NOSPEKJHMAI Annpata KINMMyueCTBa.
YCTaHOBKa
Ib0Bc0aHCHN y06b0A EKc0yraBnAnpnpTa CteyEeRbWAtenbHo
ABc0bMnCBnC Pc98eHbHMn HReEepmApTpeTocPbHOCTN
yeBc0bHbNTanpTa ePmPmEoNnD1FHeOMeCt
A OCTOPXHO
YeCTAHABINBHTAEYTOPTOBDBE MCECTBBCIKIM PCHKOM BO3OPAHINI NPOPAKENHIJIEKTPIVCKEMTOKOM.
MeTO, IJIe BAKPBI BEHUNIUYIOHOHHBE OIEBPCTH (CJMIUKOM BIMAKO KCTEHAM,KPOBATM JIBAHM, KOIPAM INTOXMOIN OUBKTAM).
BnaxHoe Hn 3anbineHHoe nomeeHne.
Meio,IOIIEepeKHHHOEOCBPOCB1NIMPOAO COHHeHCOBHA,NNHNAOTOKPNOXBOOXXy
- McTo, nOgBcPckCHHOC BO3aCnCTBnIO BbCOKx TcMnepaTpy.
MCCTO 60n3NOTKpBtTOCRHA
POMCCHI CPM, PACTCBPIHIMNIMJLIPYMMN DCKKOBQCNAMXCHRIIMMNCBCCCTBAMN
Ipoyne npedynpejdeHn
He ncoocooHAtcKdHmmyaHpyoHnccpHnHIpnoBaHnKabHn. HecobHneIeIIOIpeBoaHmIKOWtIPnBcckN KTOKAPyKINIOPENKINIOKINKIPKINCKM10KOW.
He nmeuue Hn annapet 6pactn H npytne MetanHHNECKNcnpdMTHINMKOCTCN BODIO.KHOaKT NTOPOHNNBCCUeC3NtCPNIMKOMMOHCHTAMBIHYTPYCTPOE1BA MOKET CTbI INPNIHOBBOPTARH NIIIOPAENHIOBIOPTEPNECKN TOKOM.
ECN BYCTPOB NOJADKOT HNOOPDHE BIEECTBA, OTKIOHTMEI HIOHNTAHN DNEKPTPHCKOPOEETKN OPaPNTTEK M ECHTHGY NFOHOMOCHYM FIMCQY Canon.
BHIMAHVE
YcHTAHANHIMATEyCUTXPCTBOB YK0A3AHHHNX HIXME CMeCTAX. XcTPOCTBOO KOTETYACTb, YoPNDJEBTK T PBeAE.
IeYcTOnH3A3roBepxHOCTb. MiTeO, noDBepeKHeIOE BApBaPOM.
PpOueMepb nppeoctopoxhoCTN
PnpepeeHnHnHnHOYcPOAHTaCNEyHnHCTpyKHMn PnpepeHHmB HACOTeepyKpO3oTBe. Pn HnpepaBHOM PnppeaeHHmYcPOTHcNNOeYiOJIOI.
PpyctyHOBHOYcCIOB1EBAeIaTeAeBnAeBnAeKmJy YcTOCIOB1EOVIOLOM MmTHREAA.3O NOEOMI INPNEETKIRPAVA
HseraeMeCtYCTAHOBKCNIOXOBENTINHnne.
BoPnEHNCHNBOBTHIOYcPOHOCTBOHeTIPyETO3OH N
IpyWbBPOCSBNMBOBEXaON. OHn He HABHOTCHOBHHMM
DnBDOOOB. TcHNCMOHC BUBOOOCCMOPTCTb8oUHTMHMM
BCTOHCIMDPITOTBHOHOCTNOB3OBAAHBM BIOXO TPOCBCTPAVBACMBX
NOMOCHAX. DnNDOPDCPKHM KOWOPHTHXYCOBBHPOBOT
PEKOMEHUYEC OBEChENBV BEBHUMNOMHEMHH, H KOUPCM
YCTAHOBHnHnHPAT. TaKke CIEyET HEBHnAHE, K BOUPK
NoiHaHBOCC NoDBPCPKHb BOSIOCTEHBOBPOOCB YTOOHTBA.
UcTouHnK nTaHnA
OCTOPXHO
PCHOBAYOTKOTOKTOKHNNKHTAHAI.KOTCBCTBCTAEPTepebHHHKNHPKHeHHeCecOaHnEEToPpAEBNA MOKTcTaBHPOHHOZOPOBHNIINPPOPAKHNAKNANKNTKPOK
Ampati Pankaj Keshbik Nangkohne C HOMOLOPENPOCTAMBERHIOI IYUPOIITABIK PAATBAYA 3AEEAMINPOPTOK.
Hcnnnneyepny nynpnynnpknpckn npyp,EXPOIIEK 3 KOMNKT PnHTePA,TAKK 3TO MOKETCTbPnHNOH0BOPAPHNNPNPONHPENNTKPHENPKHNIJKTOK
BxOaHnA aKOMNtJHNPHTAHINPpeIbHaEN DIN NIOJIb3oAHNAH TOnBOCdHbIMAnTAPATOM,He NOJIKHOaRte AOTIhHPNTAHN KDPyTNM yCTPOCTBaM.
He HmHnHTe, He TAHHTe, He CnBnAte H He Deapmpynte KAKM-NH60 NHMA BEDyIMK NIOLOME CNOOCOM UHP nIaHn. He CTABSE TOKENBE PpeJMeBA H uHyp nIaHn. NoPexEeN HUpa NIA MOKET PnBeCTK NnKApky nIINPOPAKCHNO 3NCKPNKCKM TOKOM
HBCCTAETIOIOTIOIOTIOIOTIOIOTIOIOTIOIOTIOIOTIOIOTIOIOTIOIOTIOIOTIOIOTIOIOTIOIOTIOIOTIOIOTIOIOTIOIOTIOIOTIOIOTIOIOTIOIOTIOIOTIOIOTIOIOTIOIOTIOIOTIOI
HeHcHbHcyte yuHnHnBHe HpyaHm yHnnHtnn C HCCOKNkMMK P03CTKM A DaHHM YCTPOYCTOB. HccO6IOoCHMC 3TOrTOp6oBaAHMOK MTnPbBCNT K HOAPy NnIPOBaeNnEeNEePHEKIM TOKOM
He CbopnabaeI IYP ININH, He 3aBnBaIae IEO ByEe, TAK KKTTO MOKJI PIMBEcN KIOBcPAnHIO NIN NOPACXCHMIO EIKCTNOICKIM TOKOM.
BCTAANIE TOTCENI Hpya NHTAHN B PO3K TY CETNIPEHMIIO KTOI NOCTBO.HecOBIOJENIE ITOIPOPAHMAOKEI CTb PnHNO BOHOOPAHNINOPAPCKHNEKTPVNCKM TOKOM
PONHOCTBOOTCOEINHNEHTIITENCEILIHHPaNTHAHNRPO3KTHCETNPNEVCHORTOKOBEPVAIRPO3B. HEBNOHNHEVESTOROPAIMMOKETCTAT PPNIOI BOIROPAHN,TOPAKIEHNIETKTPNECKAM TOKOMNNOBPEKDEHNNYCTPOINCTBA
YbD19eC, tOt HcNtHnK nTnAnpAa npaaer 3ctBbHnNo He NcBprKe npenepdAmhnpKeHH.
He ngdepeaie hyp nntan Harpby. Hecobnepnne ITOI TpebOAnH MOKET npBecn K TOMy,HTO NOKpBtme UHPaNtANHOnnabTc.3To MOKET CTbI pNnHO BTOropAHm ININ POpAkeHn ENKTONCNCIM TOKOM
M36eraIte cneDyioux cuTyauu:
EINPIMENHHTIeepMepHyKcN Kcbactn COJIENHEHN HHPaNTAHNI,ATO MOKET PNOBECTK ERO NOBPOXCHHO NKOTCOEOHHO NPOBOODE BHYTCN 3AAGACSA,TOMOKETCTBTNDNHOBOCPADNA
- 9400100000000000000000000000000000000000000000
BaBbHHe HHypaTnHaHn;
CINBAHHe HHPa HHTAHH BOSHE eO qactu, KO10pa
BCTABACTCRPO3CTK,NPDCONKTCHB-HC NPMHCNCBCNTBLKANTCKPONCKOPO3CTKHN HACHTUHPAOTAMAI,KOTOPARBCTABUEHCHPO3ETK, TINMPEHEHNEIHHNCHNIEHUNENENHHPAITAN
BHIMAHHE
PaMecNTe annapat paoC cctcBpoaTko,ocTABnB
DOCTOHO MCTA BOKpy UncencoH W-hya nHTAHIN
YTOEIO MOKIO BOIIO NKO BApepyTB B Cnyae
anapin koi cyaiy.
06paueHnncannapataom
BHIMAHNE
Be30nachocObTb npaBoTe cna3epaMn
JaHoeN KIaJIe N CepTnHINPOBHO KAK NaePHeO H3dEne KNaCAt I COOTETCTBNI CO TAHdpTAMI IEC60825-1:2014 INEN60825-1:2014.
CLASS 1 LASER PRODUCT
LASERKLASSE1
APPAREL A LASER DE CLASSE 1
APPARECCHIO LASER DI CLASSE1
PRODUCTOLASERDECLASE
APAR-1FO A LASER DE CLASSE 1
LOOKAN T LASER-TOOT
LASERPRODUKT KCLASS
NaepehnyynynxovotyoeBHyPnAeHApalpaTFOCHIOBIOPOBBOO BILTHHHKNOKAMYINBCHUIMMPKKNHMAEHOHBYH MORYT PCTOOPaHTIRI KANONOTBA HAKOMIHOO STNE 0E KNTITAYTAIAHNIbOSOTENC.NCYEETNHNKIPBCDHBV YKSEHMMNCOIOJIIEHNNKTEKHNHBOEHCIOH.
Hb KcOe MuChy He OKtBaeMaKaKHe NkUoBcKpIiINu annapato, NOXIMNO YK2A3HNBX B DSHHOM DYKOBDCCTBC.
IIOCHIKHOBCHIO NACCHOHO HNAYHCHIAH HAOHYX I OROKHTIK CITIBAMMOKE TIEHCTA YUPEK SPHEIKIO.
HIOJIbHOBnAe HINCPyMeHrOYpIaJIeHIMRA HACPOKNAHJXCHNAYAIJAHNIAPARACHAPYHMeM NPHOBHEH B HACTOAMPYKOBODCTBCNHCPTpyMI MORYT PIPHBCCTHKBOBDCTBNOONCHOTNATYCHIN.
IpeynpejckJeHne NO Texnke 6e3onacHOCT npo6paueHNcna3epom

3haKn, CBA3aHHbIe C CO6NIODeHHeM TexHKn 6e3oNaCHOCTn
IpeeknnoatncnntaHna:nnoKeHee"BKU
IpecknHaeTne nHaTaHn: noJooKeHe "Bbl"
IeckKHeHtBnNTaTHA:NOJOKHeNQXIIAHIL
KHOHnHbnepecknOHTeB BIKI
KJEMMa 3aHIOHO BaeMn
Bnytnonacnoe nanpexkeHne. Sanpenaet
AOKPBbBaTbNooBBe KpIINK, KpOMe YKBAHINHbX B NCHPTyKJm.
BHIMMAHIEFOUPAHNOBepxHOCTb.He npikacaiTec.
O60pyoBaHnKnaCaC
DxKyUINCnCTaTnHnPnKbNkAeTcB K
BHIMAHHEBoaMOKHOncpaeHne
ENKETNCHKM TOKOM.OTCOEHNITHE BCE MNNKSHApya NITANNAOTOPEKTH.
He npnbnaaTecb KoctpbM KpaM.
[ПРИМЕЧАНОВ]
HekoTopbIe N3 yka3aHHbx BblIe CmBONOB McyT OTCyTCTBOBaTb Ha onpeJeENHHbx ycTpoJCTBAx.
PacxoHbIeMaTePnAnbl
AOCTOPXHO
He 6pocainr OtpabotAHHbKe KapTpaJnC TohePOM BOTKpbTbN OTOHb.KpOme TOrO, He XpAnHte KApTpaJN C TOHePOM NByMByaRyB MecTaX,IOBBePjxEHbX BO3JeCTBNO OTKpbTOrO OTHA.3TO MOKeT PnBecT NBOCTJIaMeHEHIO TohePa WIM BYMaN N,KAK CNECTBNe, K IONyEHNIO OKOTOB NIN BO3HNKHOBEHIO NOkapa.
PpmeaHne
Ha3BaHne n3dennn
Bcex63oNaocnH3dneD0JxHO6bTb 3apeNCTpnpOBOHO.
BHeKToPbX cTpaHax paCpOcTaHEnHaIeHnBA BMeTO OpRTHaHbHO Ra3BaHm MOrY 5bTb3apeHCTpnpoBaHb CNeIyIOuHe Ha3BaHnya Kya3AHHbE B KpyfNx CKo6KaX LBP623CdW/LBP621Cw(F174900)
Tpe6oBaHnE MEC DnpekTnBbE C
JaHHOe 6obpyoBaHHe yOBoBETBopReT OCHOBHM Tpe6oBAHHM NO 3MC JIpuKeTNNB EC. MByTBepJdAm,TO DaHHOe N3Jenne COOTBETCTBYET Tpe6oBAHHM No 3MC, Yka3aHHBM B JIpuKeTNNE EC, pno HOMHaJIbHOM BXOJIHOM HanpKkeHN 230 B nactote 50 T, xotra dana3OH pa6oHX xapaKTePnCTIK daHORO 3NdiEN coCTABHnEOT 220 Do 240 B,50/60 T. Dna ObecneHc HcoBTCTNB TexHnecKIM Tpe6oBAHHM NO 3MC JIpuKeTNNB EC Tpe6yetcN NCNoJIb3oBAHHe 3kPaHINPOBAHHO KA6eJIa.
HopMaTHBnA INΦOpMaZnI NO NcNoB3OBAHIO 6ecnpoBOHOH NOKaJIbHOI CETN
Regulatory information for users in Jordan
LBP623Cdw / LBP621Cw includes approved Wireless LAN Module (Model name: Type1KA). Contains Wireless LAN Module approved by TRC/ LPD/2017/19
Regulatory information for users in UAE
LBP623Cdw / LBP621Cw includes approved Wireless LAN Module (Model name: Type1KA)
TRA
REGISTERED No: ER51217/17
DEALER No: DA0073692/11
RE Directive
(Only for European radio equipment)
RE Declaration of Conformity
English (EN) Hereby, Canon Inc. declares that this equipment is in compliance with Directive 2014/53/EU.
The full text of the EU declaration of conformity is available at the following internet address: http://www.canon-europe.com/ce-documentation Wireless LAN Specifications
Frequency band(s):2412-2472MHz
Maximum radio-frequency power: 15.9 dBm
O3HaKoMbTeBc C npyMM NmueH3NOHHIMN yOBnAMM Mdyne NpOgPamHOrO o6eCneHHe HCTPOHNHX NOCTaBNIKOB, nPiBHeHHBM B pInnoJKeHm K pyKOBoCTBy COOTBeTcByuOero IPOJYTA. DAnHoe pyKOBOCTBO JOctTyHNo aPncy http://canon.com/op-manual
NcnoB3y daHbI NPOyKT, Bbl npHmMaete BCE npMHeMbIe HcH3HOHbIe ycNoBn. EcnBb He cOrNaChbC nueH3HOHbIMy CNOBnMnCBKInTeCb CnpedctabntEm NoCTabuNKa yCnyr
V_180517
HaCtpoIOBaHHn iTBepeKHeHH
HaTnCHiB KHONky OK ONgKaRkUO HaDnCnnei 3'ABHReTBcR NOBIDOMNeHHRAckly> (3actocyBaTu), Bn6epiB
Cnoci6 BbOy TeKcTy
3mHa pexnMy BbOy
1063mHHTnPeKIMBBOy,HaTCHiTBKHONKy
1 BnTnHITb IOTOK nIaI npepy.

4 BCTABTe nOTOK dIa nanepy aanapat.
Kaio 3aBaHTaKyεTbCαIHπu po3Mip a6o Tnπ panepy, HIX paHiue, o6OB'8KOB0 3miHtB napametpu.
5 Hattnchitb knabiuy i BnBepiB
6 Bkajtbp03mip i Tn nanepy BiinobiDHO do IHCTpyKui Ha ekpani.
3aBaHTaJKeHHB npicTpipyHOro nOdaBaHHa


4 Nobibho BCTabe nanip y npictpi pyHoro noDaBAHHa,doKn BiH He doCyrHe noro 3aHbO 60ky.
Bkaixtb po3mip i tnn nanepy biinobiHdo IHctpykui Ha ekpaHi.
Y pa3i BnHnKHeHЯ npo6JIeMn
IOnaTkoByIHΦopMaJIO DN.B.Bo3dini
Anapat He npaioe 3actpraHHn panepy
IpepeBipTe HactynHe.
UyBIMKHeHO XINBnEHn?
- Yu BUBCENO anapat 3 peximy cHy?
Akuo ducnne Ta iHdkaTOp He cBtTaCBA, HATNCHTb nepemukau XNBHeHH.

- Yu npabunbHO nijkIoucheo HHyp XINBneHHa?

JaKpO npo6nema 3aIIuwaCTbca,INB. Noci6HKn KopNCTyBa4a.
Ycyhhe 3actpraHHnanepy BiinobiHNO do IHCTpykui Ha ekpaHi.

3amHa KapTpndka i3 TohepOM
3amHItb KapTpIaX i3 TohepOM BiIIOBIdHO do IHCTpyKuI Ha ekpaHi.
Homep mojeni kaptpnja i3 Tohepom Ha 3amiHy
-Canon Cartridge 054 Black (чорни)
-Canon Cartridge 054Cyan (6JIaknTHn)
-Canon Cartridge 054 Magenta (nypnypobu)
-Canon Cartridge 054 Yellow (xobTni)
-Canon Cartridge 054 H Black (chopnii)
-Canon Cartridge 054 H Cyan (6laKTHn)
-Canon Cartridge 054 H Magenta (nypnpovni)
-Canon Cartridge 054 H Yellow (KobTni)
ДодаТOK
BaxnBi iHcTpukii 3Texhik6e3neKn
YbmynocihkyoncaHNOJNNEOePCKHHa 3aTcpeckhHLOOyTOAHOBKnTcCKPOKHNCHH. O6bKaBOPOponHTaTPEoqdiBakmkiIITckpyi3 EekhiKBeEKN,ONAHCNHAKTOKyPiocNkNKOPACIyBaH.
AIOPEEDKEHH
PnBHeHnepEeKHHCTIOOHO HonepaI,IKMOKyTH
pNMBcctnTO TaBMyAHHa BaxiHXHOABNbHORO
BHKoHaHH.3MOToKcENHO BHKoVCTHa anapara
38kXbBAkaiTc HA UI nonCPckxHHa
AYBARA
103HnAae 3actepckcnHr CTcOeHO onepaui, nki MOxyTb npB3ctnDo TaBMyBaHHaB B4i XHCnpABuHBO H BOKOHII.3METoEbeNlIoro BNKOpCTIHIN apata 336kynI 336kynI HUI 336kynI
BAJNBO
NIOIJIAC JOIJIACIOB BUMBOI TA O6MEKHNH. YABIKO IIOPOCHHTAIE LI NIOJOKHEH IAOI ZABESNEKHOPIPNIHIO HOBOTI ANAPATA TAYIKHKHEH IYOI HCRPAHNOCTI ABO NIOIJKDJOHN MAIHA.
YcTaHOBHeHH
Dn 13eaneHoro TaepyHoro EaKpXtAHn anapata yBxHcO aohaiMeTcb 3aactepekHHMn HmNte Ta BCTahOBIn anapat y biOnsioHy MucI.
IIOPEJXEHH
HeBCTAHOBIOHTe anapaty MiCi,Je Horo po6Ota MoKe npN3BcTdoNoJoxKAboBpaXeHHEnEKeTPHMMCTpyMOM,3OKpeMa:
yMCJIJIeBCHKHTCBEHTINHUIHITOBOPn(HAITIO BNAKJOTOCTJIKOKJINBAHIBKUNIMIBTaIHIXI NDHIXNPOCDMTB)
yBonornxab03annenHmicqax;
yMICJI,kyHIOIPOUBEIPOWHECOHHHEIPOOMHHAEOHBOO
yMICUXIBINCOKOIOTEMINEPAIPOHO;
10pyi3BijkpnHMBHEM
NODY13 AnKOFONC,PO3HINHHKAMIMIHINHMN NOKO3KIMCTMAHPMCHOBHNMM
Hni nonepdkeHH
He niiikouitie do tioo o anapata hepekomehjohaihi Kaobei. Lie moke np3bectn do no kokoi abo ypaakchHn cncKTPNHIM CTPYMOM.
He kaini hna anapn nannct, hiui metane i npemtn a60 MICKOT3 pHIOHO. KOHAKI CTOPOHIX peohAH 3 eETKTHNMMeTANMAE BCEPCDH ANAPAT MOCN NBOCTCN DO NOKOKI ADO yOaKHN HNEKTONHIM CTQYMOM
JAPU B anapat nontpina STOPONHOCOBHA,BAIMtB 1WNTeKINbIbPAaBcHbE3P08ETKNMPEX2MHIHO TcPTMy 133eHIOcIOoDIOOIOIOIOIOIOIOIOIOI OIOIOIOI OIOIOI OIOIOI OIOIOI OIOIOI OIOIOI OIOIOI OIOIOI OIOIOI OIOIOI OIOIOI OIOIOI OIOIOI OIOIOI OIOIOI OIOIOI OIOIOI OIOIOI OIOIOI OIOIOI OIOIOI OIOIOI OIOIOI OIOIOI OIOIOI OIOIOI
YBARA
He BCTAHOBNIte Anapat y 3a3aHcEHN HIXe MICINX Anapat Moke bIaTn AIO nepeKInyTCN, cnpNHINIBIL TpBMyBHNH, NKIOPOgTOCTAHOBNTN:
HaHecTikn nobepxhi;
yMicui nig dieio cnbHHX Bipaui
IHwi3aTepeKeHHA
PIN YAC NEPEHCEH HUO ANAPATAOTOWYMECTI HCTpykU ybuoy noCIFHNY. y pasi HEANKHO rpeHECEHHN APATAPMOKE ANACTI TIPBSECTNI DO TPAWBYAHNA
IipnBCTAHOBNENHIIpOIOAnApota6bIbe OepePEXHI, IIo6 HeBaJIeMMNpyKMIgANApATcMnI pIIOIOIOAO BCTAHMI. IeMOKE PIPINCEBCTIOJTOPAIRVBAHHAI.
He BCTAOHBOIe anapat y noraho npoBITPOBAHIX npMiuHENHX
PiHcBbHIO BIKOPCCTAHNI HnaiapnIHNIE
HesNaHy KINKbcTcOHO HnIXxpeoNN. UU pOeONH
630NCHy IaDoo8. ITOPO BHKINZLHX PCOBHNO WOKC 6yTN
OCOHNBO NOMIHIO NUC TPOBNOTBO BIKOPCCTAHNI AApATA
abo HOcKcTtAuaJI BnoraHO npOBITpBOBAHH PPMJCNHAX.
[1]Ob 3aeBneuE aepyue pOboe cepoyouane
peKoJIeIIOJIaHO HaeXeHcN YHOM IOBISIOIaI PIMINIIHHeHH, DC BCTHOHOHOHOAnapat. Taokoi CngyHnKaT MUCb, DC Ha IIOOc MOKO NIOHOIOKOBaTHA DIOIOV/H, AKI BVIDInae anapat.
JKepeNo KnBHeHHa
AIOIPEJIXEHH
BIMKHOCTBOYI NIIIE TIKDIOPOH KINHEHNNHANHYA JAKOTIO BIDIOEAE EKA3AHIM BMNOMAI. JAKIO CUBO Hc 3pOHTM, MOKTE CTATNCA NIOKEXA OBO YAPDKHNI HNEKETPNDHM CTQDM
Ampat Mar Sa Bynti NkIOHcOe 33 DoIOMoIO RoHaHO IuHpya JxKHeJIHnD OqO36M'zA3MeHNOH oTeKTK.
He BUKOPKOCYTOBYATEIHIUHUPy3AMcIbUHYPaJIMBREHHK 3 KOMNNTKETY NOCTABK, OCKINbK LIO MEOJI PNI3ECTD NIO NKEXIKY UPOAKENHNEJEKTPMHNCTPOMN.
Hadaa uH yKzAeBn HnO hHeBIOy BvKoPcHbT3 3uMn anatopm. He npEyJyH uH yKzAeBn JoIhuxn pRcptCps.
He MoDnOkiKyte, He TAnHb,CnBbHo He 3nHaIae HUHP
JHbEHHa The AHKohyTe 3 Hm 6by-aki HIIi DIKAKoMyTB HOIIOKOJIHTe He CTAE HAUY
JHbEHHa BAKNI PEPIMETn. POIKOJIKeHHA IIHYpa
JHbEHHa MOXe PnV3BcTn DO NOKeKI aBO ypKaCHHH
EENKTPNHMMCTYOMN
HeBCTAIBIHTaHEBIMAIIEIIICENbIPOSEKIMMpykAMOCKILKIELIOKEEPIINBBECTYIOyPAKSEHIEEKIPUHYHMCIPTYVOM.
HcBVKOPMCBOByT3ZIMAnapatOMUHyPMIOIOOBKBYANIPOgAryKBYANIKBCHN3KILbKOaP0e3IKAMLLEMOEIIpVBECTINIOIPOKEJIABOypaekHHIEKIPAHNCTCPYMN.
He3a3b3yHbIeHypKJbHnHHyBzOJI,0ckIiJIbJIie MoKcPiN3BcTNOIOXeKHiYpKaehHH CNTKTPVHMCTDVOM
P0BHTIOCTABINIEIITENCEIBIUPAJIINHIIIBI HPOBETKMEPEKIMHIOTIOCPYNY.IAKUIOIOHO BPOBHTNMOKECTAMNCNOKEXAaOypaKeHHNEKTDPVHMCTOYVOM
IⅡdacrpo3N NOBHCIO BIMMAe UTeCenb Hypa KJHNEHH 3POETK, RIKUO UBO He 3PO6HTM,MOKE CTATNIOKeka, ypaKeHH ENEKTPNH MCTPOM AoNOCHQKHeHN aapata.
IpeKoHaTIEc, IIO JIeKepeO JIeBtEnH anapata 6BeNeChE Ta MaE TabiNHynpyr.
TpMaHte Hyp KINBHeNHOaIaI dKpePena Tnna; RIO CIO BMMOTIO 3HexyBaTaN, CE MOKe pN43BCTN PO3nAIBeHNH I0BuiHORO NOKPHTTA WHPa, IO MOKe CTaN PnVHNO NOKeki YpKaHeHH ENEKTPNHIM CTyPMOM.
3anobiraaiTe HabeHn HxKc cTuayaJm.
KUIO JO a3'EDHyBaBbHOI cactHHH Hhypa KABNEHNBACTOCYBATN HAMIMHE yCINITRI, CE MOKE OyMOBNTNI NOKODKHeHH WHPa KABNEHNHO abo npOeOu BcepeNDI ANAPATA NOXYb PO3'EHaTNC. CE MOKE pnp3BcTn DO nIOXeki.
- 3acte npieJHaHH Ta BID'EnHn HnHpya XnBnHeHH.
- PpeeyinIOBAHHa Ypeep HpyxNBIeHHA.
3HINAHHA Hpya KnBCHHH No6NTHy 3EHNbHOI TACHH Ta TpHbAaTI Ntck Ha po3ctKy a60 3cHbAblbYactHy.
3actocysbaHbHdmpiroCnDIOIeHcEHHHPa
A yBATA
YcTaHbKIOIe aIapat no6n3y cncKtpuHOT po3cTKN, BANUIOIOIOCTAIIIOO BCRI BUNHOIOPOCTOpy,IOo3 3 IOpeBUNIOKO BUNHTINITEKEBI Iypa KINHEH H3 PO3cTKN.
NoBOKKeHH
A yBATA
3axnueHcTB naepnnpncTpoB
3rdio 3cTnaptmIIEC60825-1:2014EN60825-1:2014
ceBip63aHneHOKNaepHHBip6Knacy1.
CLASS 1 LASER PRODUCT
LASER KLASSE 1
APPAREL A LASER DE CLASSE 1
APPARECCIO LASER DI CLASSE 1
PRODUCTO LASER DE CLASE
APARELHO ALASER DE CLASSE 1
LUOKAN1LASER-TUOT
LASERPRODUKT KCLASS
IaepHNIPOXMBOKEABATNIIOKIOIIOCKOYOMO
opraHbIMy.OCKINIKBNIUPOMHOOBAHBCEpeDJIHBIPO6y
OBHCTIOTOPTNKHAECTCA3XCHIMKOPNYCMTOBHILHM
OKPRTM,LaeDHHNIPOMHbHEMOEPOHYTH
HAoBHNIiADc6ybi-AKOITcAdjPOOTi.IPOHHTAE
HabeJeHnHKNEPIPMNKHICHTPKJ31EKHNKSEENK
HIOJIHOHEBJKDAIIEIJIHJI,JIJIIOJEHEBKAHO B NOCHIKAKAOLOO AO anapata.
JAKIO HAZCRHIN POMMHN BINIc HAZOBHI NOTPAMNTB B CQI, OJILO DMOKIE IOOJOKINI 3D.
BnKopCTAHNOpAIB KepyBaHH,perYHtOpinAB60 BnKoBHnOERpAIN,HE OHmCAHNX yIPOV NocBHKNY, MOKc Pn3BcCTn DO Hc6c3eHOrHO NaepHOrO ORPOMCHHH.
3acTepeXeHHN 70do npabn6e3neKn iD cac po6oTn 3 na3epom

CmboJn, noB'ra3aHI 3 TexHikoO 6e3neKu
IpeemkaKJxNBHeHHNtNoKeHHy"YbIMK
IpePemikauXnBteHHNPOIOKCHHBNIMK
IpcnKANHXMIEHHNIOXKHHPckmOIKyBaHHA
KHOIKOBINPCOMMKAI "YBMK."BAMK.
30xNC3KNCMa 3a3CmTCHH
Hc63nHa Hanpyra acpcviHi. Hc 8ikpmbaiKcPmuk, kUo Ha HC 6yno BkaibCK.
YBAI!Tapaua noepcxHn.Hc TopkaTnC.
回06nagHaHHKnacy II
PyXOMI YACTHIN: TIPMAIEYCTAHINIINA
YBAIAMoxNBCypaKeHHeKTePHHmCTpyMOM.BHIMtbycuiTEnC13poTeKN.
Tocpi kpaI. Tpmae TaactHn Tiia noanai BID HIX.
[IPMUMITKA]
JaKi 33aHaueHnX BnIe CmBONIB MoKyTb He BkayBaTuCn3aJIeXHO BiD BuPO6y.
BntpaTHi MaTepiAn
IIONEPEIXEHH
He KnaaTe BnKopnCTaHi KapTpndki 3 ToHepom y BIKPKTNI BORHO. TAKOK HE 36epiraute KapTpndki 3 ToHepom Yn napiy Muciax NoNbany BIKPKTOrO BORHO. Lc MoKe cnpnnHnHtazmaHH H npnBecn do oniik abo nokeix.
Ppumitka
Ha3Ba npOdyKty
BIDNOBIDHO Do npabn TexHK6e3neKn nOtpiHO 3apeCCTpyBaTn H38y npOdykTy.
Y deKaHX perioHax npoDakny npOykyHaTOMictb MoKe 6yTn 3apeCtpoBaHO TaKi Ha3Bn (B DyKkax): LBP623CdW / LBP621Cw (F174900)
BIMORn do eneKtpomarHITHOcymicho BIDNOIBHO do DnpeKtNBn EC
Lle npctpi Bldnoiae roOBHM BMORAMdo enektpomarHIO CYMICHOI DpekTnE C.Mo oioiHO nIDTBepdkyEMO, 00 ueBnIO BIDNOIAEC BNMORAM IOI OENO eKTPomarHIO CYMICHOI BIDNOIAEO HO DO NpekTnBE C,yAki 3a3aHeHO, 10 3aHaehHH HOMIHANHOI BXIDHOI HanpyMaE CTAHOBITN 230B,aactOTn-50T UOa HOMIHANBI NOKa3HNKCI CTpyM Ha BXODI DII bOro BnOby CTAHOBITb 220-240B,50/60T BuKOpCTAHRA EKPahOBaHOrO KaBenIO E Heo6xIDHO yMOBOIO 3rINO 3 BVMORAM Do enektpomarHIO CYMICHOI, BKNAdENHMIB DupeKTHBI EC.
HopmatNBHa iHphiMauiy oOo 6e3npOTBOI JOKaJIbHOI Mepexi
Regulatory information for users in Jordan
LBP623Cdw / LBP621Cw includes approved Wireless LAN Module (Model name: Type1KA). Contains Wireless LAN Module approved by TRC/ LPD/2017/19
Regulatory information for users in UAE LBP623Cdw / LBP621Cw includes approved Wireless LAN Module (Model name: Type1KA).
TRA
REGISTERED No: ER51217/17
DEALER No: DA0073692/11
RE Directive
(Only for European radio equipment)
RE Declaration of Conformity
English (EN) Hereby, Canon Inc. declares that this equipment is in compliance with Directive 2014/53/EU.
The full text of the EU declaration of conformity is available at the following internet address: http://www.canon-europe.com/ce-documentation/Wireless LAN Specifications
Frequency band(s):2412-2472MHz
Maximum radio-frequency power: 15.9 dBm
HOPMaiy H UOBMYOKMEHTMOKe 3MHOBATCHB3NOREEPDHBOTOBJOMKHEHA
KOMIaHrCANONINC.HEHADAEKOJHIX
FAPAHITULOBOTO BINOPOBY (TPRIMVXH HETPRIMX),OKPIMTAX,PTPOKINETCBLbOMY DOKYMHTO3OKPENAIEBEIKIOHO
FAPAHITUoTOPIADATHOCTIJIPLPODAKY TOBAPHOOTCTAHY,PTNDATHOCTIJI
BVKOPAICTAHHA3 KOHPETHOQ METO ABO
FAPAHITUoTOBIOYTHOCTIPOPYUEHHRA
KOMIaHrCANONINC.HEHECEBIIOABAFBHOCTI 3XAODHIPIPMI,POEBHI ABOOTOCPEKDOKAHI 35/TKN,A TAKOXYBPTATMHNBTPATN,OB3A31 BVKOPAICTAHHMLbOToBIP06Y
JIOCTpaJI Ta 3O6paKEnHn Ekpana, BIKOPaCTAHBcMbOny Noci6Hnky
PnKnJnIIOCTpaJIaTbO6pKeHbEkpHa,10BKNOPCTOByIOBcBbOMyNocIHMy,BINOBiAIOBbMOnEL LBp623COW,KKHOe 3a3HaHeOHIIIE.
ToprobHIMapK
Mac e ToproBEnbHO MapKo KOMnHaH Apple Inc. Microsoft, Windows, Windows Vista, Windows Server, Internet Explorer, Excel i PowerPoint e 3apeeCTpOBAHMM ToproBEnbHM MapKAMn a60 ToproBEnbHM MapKAMn Kopnpaui MaHkpocody Cy CnoyuEHN XITATAx Ta/a60 b HINX KpaIIax. 3aHaHei B cboW DcOpMnIH IHI HasBn npOyKTiB KOMnAH e ToproBmM MapKAMn BiJNoBdHIX BnAChNKIB.
IporpamHe 3a6e3neueHHc Tc0POHHix Bnpo6HnKIB
LleBnBip6Canon(BnIPb)BKnIOaMOnyI nporpamHoro 3abe3neehnCTopOHHX po3po6hNkBkoPcTAnHaTa pO3NOBCKJKeHHA nIXMOyUIB nporpamHoro 3abe3neehHH,30Kpema 6bybIKXoOBHeHbTAKxMoYINB nporpamHoro 3abe3neehHH (pa3OM「PnOPAMHE 3AE3NEEHH),BmHAeTbCAyMOBaAMn HabeEHMM BnyKtax 3(1)no(9)HxKHe.
(1)Bn norodjkyTeCe DaTpyMaBATNC Bcix YHHHx 3aKOHIBIeOIO KOTPOIO 3a EKCPOTOM,0MeKeHb I Hopm KpAH,Ha TepoITOPiX HBNIP5 i3 IPTPAMHM 3A6E3NHOHIM aBdBaHTKaYETcb, nepeo3nBcraaboeknpoyTcBo Do HIOJ kpaHm.
(2)Bnachnki npab Ha IPOPTPAMHE 3AEB3NEHHH B yicb iDhoueHHx abepiraotb npaba MaHBOoT TaIteneKtyaBHOIbnACOcHt Ha IPOPTPAMHE 3AEB3NEHHH. Bnachnki npab Ha HApokob KdoHnix niehen a60 npab, BnCIOBHe He baocepeHb6o aoOncepeKBOAO,Ha XoJHy IINTeKryaBHy bnachti Ha IPOPTPAMHE 3AEB3NEHHH,ckpim TIK, ppo kbiEkpnt OneBcY u LbOMy DOKMENTI.
(3)ПОТРAMHE 3A5E3NEUEHHMAKHA BHKOPACTOBByBATNIMHe 3 BVPOBOM.
(4)POTPAMHE3A5E3NEEHHHa6opohnctb
BiyjyBaHnHaabatnHa hbor cy6niuehii,
npdaBnnoepobatnaopepaBn
cstopoHimoc06amBea nonepeHboi
NcMbOBI 3IOIN BnACHKIB npab Ha
POTPAMHE3A5E3NEEHHH.
(5) He3BaKaOuHa 3a3aHaeHe Bnue, IPOPTAMHE 3AEB3NEEHHO MoXHa nepepabatn, nIeJe KOni (a) yci npaba H a BIPi6 i bci npaba Ta 3oob'3aHaHH nepepaKbCn paPBOHaCTyTHNKy, i (6) 3a3aHaeHH Bnue npbaOHaCTyTHNK 3roEh npHHTn Taki 3oob'3aHaHH.
(6) He do3bONaCTbC3dIiChIOBaTn DEKOMNIaLIIO, peKOHCTpyoBAHH, DeaeeMEOBHOH H a0I HUMm CHOOM CCKPOyBaTH KOI POTPAMHOrO 3AEB3NEeEHn Do pOPMY y ARII NORO MOKe IPOUHTN TIOINHA.
(7) Heo3BONAEbC3MIHObATn, aanTByBaTn, nepeKnaDAtn, 3aDaBn B opEny Hnpokat abo no3uHnIPOIPAMHE3Ae3EIEEHHH, abo CTbOPKBaNTOxINH TBOpN, 106 b3aYbTCbHa IPOIPAMHOMY 3AE3IEEHHH.
(8) He do3B0nnctbnapehocnnt a6o po6nTn OKMI konl IPOPTPAMHO 3AEB3NEEHHRA BINPOY.
(9)JIueH3I He po3noBcIOJkyEytBaHa HaactHy IPOPTPAMHO 3A6E3NEUeHHn,doctynHy dnnipocHTaHHnIOOHO (BxIDHN KO).
He3BaKaOuHa HnyHKn (1)-(9) BnIe, BnPI5
BknIOaC MOnyNI npOrpAMHO 3abe3neueHHA
CToPOHHIX PO3PbOHNiK, Kc cyIpOBdXyIObTa
ymoBAMn IHnx NlueH3N, I BVKnOpCTAHn LHX
MOynIB npOrpAMHO 3abe3neueHHA
peYnHOETCB CmM yMoBAMn IHnx NlueH3N.
YM0BN IHnx NlueH3N 10do BVKnOpCTAHN
MOynIB npOrpAMHO 3abe3neueHHCTOPOHHIX
po3PbOHNk OBncAH B DoAtky Do Noc6HnKa
BIDNoBIDHO BVPOBY. CJe Noc6HKn DocTyHH
Ha Be6-caini
http://canon.com/op-manual
BukopncToByouHue BnroOkyTeec3 yCima 3acTOcoBHmM yMOBAMnIiueH3ii. RkUo Bu Hne rnoKyTeec3 mmmyMOBAMnIiueH3ii, 3eepHtbcdo CBOrnpedCTABHnKa cnybKn TexHIHO O6cNryTObyaHHN.
V_180517
Darbinasana no vadibas panela
lerice
Vadibas panelis
Navigacija izvelné
Elementu atlase vai kursora parvietosana starp izvelnes elementiem
Atlasiet elementu ar [▲] vai [▼].
Nospiediet OK vai [▶], lai parietu uz nakamo
hierarhiju. Nospiediet vai [ ], lai atgrietztos
Ieprieksejia hierarhija.
lestatijumu apstiprinasana
Nospiediet OK Tomér, ja displejejaradās < Lietot>, atlasiet < Lietot> un péc tam nospiediet OK
Teksta ivades metode
levades rezima maina
Lai mainitu ivades rezimu, nospiiediet
levades rezims Pieejamais teksts
Lieie alfabela burti un simboli
Mazie alfabeta burti un simboli
<12> Skaitli
Tekstu, symbolu un skaitlu ivadisana
levadiet, izmantojot cipar taustinus vai
Indicates a warning concerning operations that may lead to death or injury to persons if not performed correctly. To use the machine safely, always pay attention to these warnings:
UZMANIBUI!
Norada bridinjumu par darbibam, kuru nepareiza.
Ipido var izaisit traumas. Lai ickaras lteosana butu.
drosa, vienner pleversiet uzmanibu siem
bridinajumiem.
SVARIGI!
Norada an fince das diribu saistras prasitas un icerebezjumus. Lai ekartas darbiba buu pareiza un lai nenastos ekartas val pa'suma bojajmi, uzmanigi izisiet sos punktus.
Uzstadishana
Lai Sifiri lietotu diyi un eri, rupigi zlasiet talak noradito informaciju par piesardzibas pasakumiem un uzstadiert ieri piemrotra vita.
ABRIDINAJUMS
Neuzstädiet vieta, kuravonotit aizdegsanvai guts elektrikas stravas trieciens
Viétas, kur tiéi azisegts ventilacijas alveres (parak tuvi sienam, gultarn, divaniem, paklajern vai citiem lidzigim priekmeti)
Mitras vai puteklainas vietas
Vieta, kAs paklauta tieai saules gaismas iedaribai, vai arouselpam
Vieta, kas paklauta augstas temperaturas iedaribai Vieta, kas ir tuvu atkataluguns liesmai
Alkohola, krasu atskaiditaju vai cilu viegli uzliesmojou vielu tuvuma
Citi bridinajumi
Nopievienojiet Sai karkaiacapstiprinus kabolus.13 nkojoties, varizaisit azdegans vai elektriskas stravas treciensi.
- Nonovictojej uz ekartas kalkarotas vai citrus metala priekmetus un traukus, kas pilditi ar skidrumu. Svejas vielas, nonakot saskare ar ekartas lekspuse esosjam elektriskajdalam, var izrast iazdegsanos vai elektriskas stravas inecienu.
Ja ieknta leknd keda viola, atvienojet strvas vadu no mainstrvas kontaktidgizdas un szainietes ar vietjo pinveroto Canon zplattaju.
AUZMANIBU!
Neuzstadiet talak noraditajas vietas
lekara var nokrist var apgazties, Izraisot savaincjum. Nestabila vieta
Vieta, kas paklauta vibracijam
Citi bridinajumi
- Pärvietcjot ierici, levercjiet Saja rokasgramata dotos noradijumus. Neparelas pärvietosanas resultata t a var nokrist un radit ievainojumus.
Uzstadot erici, uzmanietyi, lai neiespiestu rokas stap erici un gridu va sienam. Las var radit levainojumus.
Neuzstadiet iekartu vaji vedinatas vietas
Siekarta normalas lietosanas laika nada netelu orzona un citu izmeu daudzumu. Siz izmei naiv bismali velsibai. Tomer tie var bot pamanam ipec igstosas lictosanas vai apjomiga uzdevuma volkanas vaji vedinatas topas. Lai nocrosinatu patkarmu darba vidi, felpu, kura darbojas ekarta, ieleirams atolitsti vidinat. Tapai neusvladii ekartu vietas, kuras cileviarevaru tik paikajuikertaras emisijam.
Strāvas padeve
ABRIDINAJUMS
- Hietojet tikai radu stravas avotu, kas albsti noraditjam spireguma prasilbam. Nieveverojot sos noradijumus, var izraist alzedeqanos vo alekriskas strvas triecion.
- lekarä in iäjövienc kontakltgzdai, kurä barosana vads nodroina zemejuymu.
Neizmanojiet citrus stravas padeves vadus,ka vien komplektacijiejeklauto,jo tao var izrasit azlegosanvai elektriskasstravas triecinu.
Komplektacdja iekjauto stravas vad ir paredzets Izmantor Sai iekartai, Nepieviencjoiet stravas vad citam icem.
Neparveidciet, nevelciet, ar speku nelokiet strvas vadu un nevelciet nekadasitas daribhas, kato varetub sabojat. Nenovietojet smagus prieksmetus uz strvas vada.Sabojol strvas vadu, var rasties azdegSanas val elektriskas strvas tricciens.
Nepiesledziet vaneatsledzt kortaktolaeku ar mitram rokam, jo las var izrasil elektriskas slravas triecienu.
- Sai tekatlai neltejoiI pagarinataju un vairaku kontaktdaksu pagarinataju. Taikojies, var iZaizit alzdoganovs alektrisks strvas trieciu.
Ncietiniet strava vadu un ncsienict to mczglj, jo tas var izraisi azdegans vai elektriskas strvas Iricienu
Piliba jevietojei kontakikdaksu mainstravas kontakligiža. Neieverojol sos nonadjumus, var izriti alzdcgans voia elektrskras stravas triccun.
Pörkona negaisa laikä atviönjict kontaktckdaknu mo
maipravas kontaktlizdgas. Preteja gadjuma var izraisi
aizdegianos, elektriskas stravas incienu vai jekartas
bojājumu.
Parielcinieits, vai lekartas stravas avots ir dross un tajir vienmenigs sproegums.
Turiet strvas vadu nost no karstuma awota: pretja gadijuma (tas var izraisi strvas vada parklajuma izku sanu, kai reztata var rasties azdegstanas va elekriskas strvas trieciens.
CLASS 1 LASER PRODUCT
LASER KLASSE1
APPAREL ALASER DE CLASSE 1
APPARECCHIO LASER DI CLASSE 1
PRODUCTOLASERDECLASE
APARELHO ALASER DE CLASSE 1
LUOKAN1 LASER-TUOTE
LASERPRODUKT KCLASS
Lzera stars var but kaitigs cilveka kermenim. Ta ka produkta iekspuse izstarotad radiacja ir pinnigieroberezata ar aizsargkorpus un ar arejem vakem, lazera stars nevar noklut arous ekartas jebkura letosanas posma Drofbas noikia iziasiet taliak dotas piezines un instrukcjas.
- Nekad neatveriet vaks, kas nav noraditi Saja lietosanas instrukcjija.
Ja laera stars toeriekust acis, tas var tikt bojatas.
Vadibas Iericu Izmanostana, pletagojumu veiksan avi proceeduro izpilde, kas atskiras no saja rokasgramata minetatas, var izirašit bistamu radiacijas starojumu.
Piesardzibas noradijumi par lazera drosibu
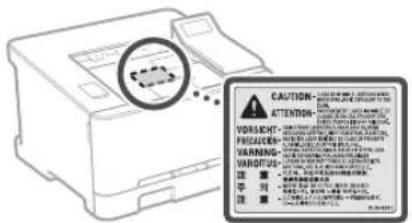
Ar drošibu saistiti symboli
Barosanas slezdzis: pozicija "leslegts"
Barosanas sledzis: pozicija "zslegt"
Barosanas sledzis: pozicija "Gaidstave"
Nospiezamais sledzis sleegt"lzLgts
Aizsargajos zemesanas terminalis
lekspuseirbstamsspiregums.Vakus drikst atvert tikai atbilostosi noradijumium.
UZMANIBUI Karsta virma. Nepieskarieties.
IIklasesaprikojums
Kustigos detalias: netuviniet kermena dalias kustigam detalam
UZMANBUI Var notkit elektriskas stravas trieciens.Visi
strava soraudni ir jaatvieno no kontaktligzdas
Asas malasi Uzmanieities, lai kermena das naealrastos aso malu tuyuma.
[PIEZIME]
Daizu ieprieks noradito simbolo nozime var but atskiriga atkaribno produkta.
Izejmateriali
ABRIDINAJUMS
Neatbrivojieties no izlietotam tonera kasetnem,
tas dedzinot atkata liesma. Turklat neglabajiet
tonera kasetnes vai papiru vietas, kas ir tuvu
atkatai uguns liesma. Tas var izraisit tonera vai
papira alzdegsanos un radit apdegumus vai
ugunsgreku.
Pazinojums
Wireless LAN Regulatory Information
Regulatory information for users in Jordan
LBP623Cdw / LBP621Cw includes approved Wireless LAN Module (Model name: Type1KA) Contains Wireless LAN Module approved by TLPD/2017/19
Regulatory information for users in UAE
LBP623Cw / LBP621Cw includes approved Wireless LAN Module (Model name: Type1KA).
TRA
REGISTERED No: ER51217/17
DEALER No: DA0073692/11
RE Directive
(Only for European radio equipment)
RE Declaration of Conformity
English (EN) Hereby, Canon Inc. declares that this equipment is in compliance with Directive 2014/53/EU.
The full text of the EU declaration of conformity is available at the following internet address: http://www.canon-europe.com/ce-documentation/Wireless LAN Specifications
Frequency band(s):2412-2472MHz
Maximum radio-frequency power: 15.9 dBm
Czech (CS) Timto spelecnost Canon Inc. prohlasej, ze toto zafrzeni je v souladu se smemici 2014/53/FU.
Uplne zneni FU prohlasei o shode je k dispozici na teo internetové adrese:
http://www.canon-europe.com/cedocumentation Technicke udaje bezdratov LAN
Pásmo(a) frekvence: 2412-2472 MHz
Maximánlí ykon rádiove frevence: 15.9 dBm
LASERPRODUKT KCLASS 1
Lazerio spindulys gali buti kenksmingas zmoniu kunui Gaminio viduje skledziamaspindulluote yra visikai apribota apsaagsinias korpusais irorinias dangiais, tol a laserio spindulys negai prasiskrbit jrgnino jokiu nomalaus jo nauodjimo etapu.De saugumo
perskaitykite zemiau pateiktas pastabas ir nurodymus.
- Niekada neatidarykite kitokiu cangciu nei nurodyata aparato instrukciöse.
- Jei lazerio spindulys pateks jums i akis, gali jas paazeisti.
Sioje instruktcjose nenurodyas valdikiu naudojmas, reguiavimas arveismu attkimas gai buti pavojingo spinulutotes nuotekio priezastis.
Lazerio saugos perspejimas
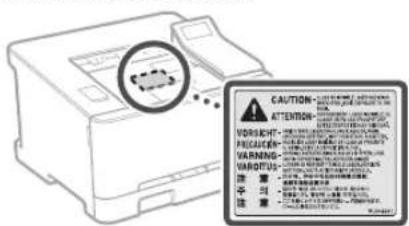
Regulatory information for users in Jordan
LBP623Cdw / LBP621Cw includes approved Wireless LAN Module (Model name: Type1KA). Contains Wireless LAN Module approved by TRC/ LPD/2017/19
Regulatory information for users in UAE
LBP623Cw / LBP621Cw includes approved Wireless LAN Module (Model name: Type1KA).
TRA
REGISTERED No: ER51217/17
DEALER No: DA0073692/11
RE Directive
(Only for European radio equipment)
RE Declaration of Conformity
English (EN) Hereby, Canon Inc. declares that this equipment is in compliance with Directive 2014/53/EU.
The full text of the EU declaration of conformity is available at the following internet address: http://www.canon-europe.com/ce-documentation Wireless LAN Specifications
Frequency band(s):2412-2472MHz Maximum radio-frequency power: 15.9 dBm
LASERPRODUKT KCLASS 1
Regulatory information for users in Jordan
LBP623Cdw / LBP621Cw includes approved Wireless LAN Module (Model name: Type1KA). Contains Wireless LAN Module approved by TRC/ LPD/2017/19
Regulatory information for users in UAE
LBP623Cw / LBP621Cw includes approved Wireless LAN Module (Model name: Type1KA).
TRA
REGISTERED No: ER51217/17
DEALER No: DA0073692/11
RE Directive
(Only for European radio equipment)
RE Declaration of Conformity
English (EN) Hereby, Canon Inc. declares that this equipment is in compliance with Directive 2014/53/EU.
The full text of the EU declaration of conformity is available at the following internet address: http://www.canon-europe.com/ce-documentation Wireless LAN Specifications
Frequency band(s):2412-2472MHz
Maximum radio-frequency power: 15.9 dBm
Regulatory information for users in Jordan LBP623Cdw / LBP621Cw includes approved Wireless LAN Module (Model name: Type1KA). Contains Wireless LAN Module approved by TRC/ LPD/2017/19
Regulatory information for users in UAE
LBP623Cdw / LBP621Cw includes approved Wireless LAN Module (Model name: Type1KA).
TRA
REGISTERED No: ER51217/17
DEALER No: DA0073692/11
RE Directive
(Only for European radio equipment)
RE Declaration of Conformity
English (EN) Hereby, Canon Inc. declares that this equipment is in compliance with Directive 2014/53/EU. The full text of the EU declaration of conformity is available at the following internet address: http://www.canon-europe.com/ce-documentation Wireless LAN Specifications Frequency band(s):2412-2472MHz Maximum radio-frequency power: 15.9 dBm
CLASS 1 LASER PRODUCT
LASER KLASSE1
APPAREL ALASER DE CLASSE 1
APPARECCHIO LASER DI CLASSE 1
PRODUCTO LASER DE CLASE 1
APARELHO ALASER DE CLASSE 1
LUOKAN 1 LASER-TUOTE
LASERPRODUKT KCLASS 1
Laserovy papsek muze byt liskemtu tlu skodlv, Vzhdemk tomu, ze zareni yvafovan neuvnt vrobku je zcela omezeno na prostor pod ochrannym krytem a vnejsimi kryty, nemuze laseryovpapsek v zadne fazi beznho uzhvatelskevo provozu unnikout ze zaffzeni. Abyste byl schopn obsluhovat stoj bezpecnie, pfcte tse naseledujci pozmarnyk instrukte.
Nikdyneotveirej ine kryt, ne ly uvedene v pukynech pro lentro pfiistro.
- Pokud k laseryovy papsek zaahl vase oci, mohlo by dojt k poskoczni zruku.
Pouzni jinyochovladacichpruknastaveni nebo provadienjinyochospudne tchkierejsu popsany vteo pifruce,muirezana slesdekysvastveni nocspcnmu zifori.
Regulatory information for users in Jordan
LBP623Cdw / LBP621Cw includes approved Wireless LAN Module (Model name: Type1KA). Contains Wireless LAN Module approved by TRC/ LPD/2017/19
Regulatory information for users in UAE
LBP623Cdw / LBP621Cw includes approved Wireless LAN Module (Model name: Type1KA).
TRA
REGISTERED No: ER51217/17
DEALER No: DA0073692/11
RE Directive
(Only for European radio equipment)
RE Declaration of Conformity
English (EN) Hereby, Canon Inc. declares that this equipment is in compliance with Directive 2014/53/EU.
The full text of the EU declaration of conformity is available at the following internet address: http://www.canon-europe.com/ce-documentation Wireless LAN Specifications Frequency band(s):2412-2472MHz Maximum radio-frequency power: 15.9 dBm
Czech (CS) Timto spelecnost Canon Inc. prohlasej, ze toto zafrzeni je v souladu se smemici 2014/53/FU. Uplne zneni FU prohlaseni o shode je k dispozici na teo internetové adrese: http://www.canon-europe.com/ce-documentation Technické udaje bezdratovi LAN Pasma(a) frekcvce:2412-2472 MHz Maximaliykon radiovcfe frekvence:15.9 dBm
Danish (DA) Hermed erklaerer Canon Inc., at dette udsty er i overensstemmelse med direktiv 2014/53/EU. EU-overensstemmelseserklaeringens fulde tekst kan findes pa folgende internetadresse: http://www.canon-europe.com/ce-documentation Trads LAN specifikationer Frekvensband:2412-2472 MHz Maks. radio-frekvenseffekt: 15.9 dBm
CLASS 1 LASER PRODUCT
LASER KLASSE
APPAREL A LASER DE CLASSE 1
APPARLCCHIO LASER DI CLASSE 1
PRODUCTO LASER DL CLASE1
APARELHO ALASER DE CLASSE1
LUOKAN 1 LASFR-TUOTF
LASERPRODUKT KLIASS 1
1 laserov luc mze byf skodlivy pre fludsk teko.Kedze Ziarerie, klore vznke vo nvtni produkte, je uplne izolovana ochrannym puzdrom a vorkajsimi krytmri. laserov luc nmez uniknut zo zariacondia v ziadnocj face jcho pouzivania pouzivatcrom. Z beczpocchestnych dcvodov si prefiajne nasledujuce pozmarnky aPokyni.
Nikdy neotivarajne iné kryt yne tie, kiore sú vutede v priručkach k totomuro zariadonji.
Ak by doso k unikani lucrovesho luca a zalaionb yase oki, mohlo by dojst k poskodenji zuaku.
Pouzitie inych ovladacich prvkov a nastavenie alebo y konvakanie inych postupov,ako je uvedene v tejto prfrucke, moze ma z nasledok vystavenie sa nebepeznemu ziareniu.
Regulatory information for users in Jordan
LBP623Cdw / LBP621Cw includes approved Wireless LAN Module (Model name: Type1KA). Contains Wireless LAN Module approved by TRC/ LPD/2017/19
Regulatory information for users in UAE
LBP623Cdw / LBP621Cw includes approved Wireless LAN Module (Model name: Type1KA).
TRA
REGISTERED No: ER51217/17
DEALER No: DA0073692/11
RE Directive
(Only for European radio equipment)
RE Declaration of Conformity
English (EN) Hereby, Canon Inc. declares that this equipment is in compliance with Directive 2014/53/EU.
The full text of the EU declaration of conformity is available at the following internet address: http://www.canon-europe.com/ce-documentation Wireless LAN Specifications
Frequency band(s):2412-2472MHz
Maximum radio-frequency power: 15.9 dBm
Czech (CS) Timto spelecnost Canon Inc. prohlaseje, ze toto zarizenji v souladusesmernici 2014/53/EU.
Uplne zneni EU prohlasei o shode je k dispozici na teo internetové adre:
http://www.canon-europe.com/ce-documentation Technicke udaje bezdratove LAN
Pásmo(a) frekvence: 2412-2472 MHz
CLASS 1 LASER PRODUCT
LASER KLASSE 1
APPAREIL A LASER DE CLASSE 1
APPARECCHIO LASER DI CLASSE 1
PRODUCTO LASER DE CLASE 1
APARELHO A LASER DE CLASSE 1
LUOKAN 1 LASER-TUOTE
LASERPRODUKT KCLASS 1
Regulatory information for users in Jordan LBP623Cdw / LBP621Cw includes approved Wireless LAN Module (Model name: Type1KA). Contains Wireless LAN Module approved by TRCP LD/P/2017/19
Regulatory information for users in UAE LBP623Cdw / LBP621Cw includes approved Wireless LAN Module (Model name: Type1KA).
TRA
REGISTERED No: ER51217/17
DEALER No: DA0073692/11
RE Directive
(Only for European radio equipment)
RE Declaration of Conformity
English (EN) Hereby, Canon Inc. declares that this equipment is in compliance with Directive 2014/53/EU.
The full text of the EU declaration of conformity is available at the following internet address: http://www.canon-europe.com/ce-documentation Wireless LAN Specifications
Frequency band(s):2412-2472MHz Maximum radio-frequency power: 15.9 dBm
CLASS 1 LASER PRODUCT
LASER KLASSE 1
APPAREL A LASER DE CLASSE
APPARECCHIO LASER DI CLASSEI
PRODUCTO LASER DE CLASE 1
APARELHO ALASER DECLASSE 1
LUOKAN1LASER-TUOTE
LASERPRODUKT KCLASS 1
Laserska zraka maybe biti stetna za ljudsko tjiebu. Buduci da je radljacja koja se emittra unutar uredaja u potpunosti zatvorena zaitnim kucistima v anjskim pokiopcima, laserska zraka ne moze izaci iz uredaja tjekom neke od faza upotrebre pisa. Proctajte sjedece napomene i upute vezane uz siuornost.
Nikada ne otvarajePoklope koji nisu navedeni u
prirncnku za oyai uredai.
Izlanje laserskoj zraci moze dovesti do ozljede ociu.
Koristenie kontrola, prilagodavanie il izvrsvanje
postupaka koji nisu u skludu s ovm uputama moze urozkovati izijadang opasnorn zreteniu.

Mjere opreza glede sigurnosti lasera
Simboli gezani uz sigurnost
Prekida napajanpa0oJukuceno"
Prekida napajan: položaj „lskjičeno"
Prekidač napajanja: položaj, Stanjepripravnosti
Gumb kliuceno" Iski ceno
Terminal za zastitu uzemijenjem
Opasnipaponunutarkudita,Nemcjoe otvarat poikoploka jekoje se to trazi.
OPREC:vrucapovrsina.Nedodirjte.
Opremaklase II
Rotirajučij dijelović nemojte bitu u biližni rotirajučij dijelović.
OPRL:moze doci do struinoq udara. Uklonite swe
utikate iz uticnica.
Uredajima oistre rubove, Nemoje biti u blizin ostrih rubova.
[NAPOMENA]
Ovisno o proizvodu, neki gore navedeni simboli nece biti prikazani na njemu.
Potrošni materijal
AUPOZORENJE
Ne zbrinjavaje rabljene spremnike tonera bacanjem u otvoreni plamen. Takoder ne cuvajte spremnike toneri ili papir na mestreu izlozenom otvorenom plamenu jer moze doci do njihovog zapaljenja, nastanka opekotina ili pozara.
Napomena
Naziv proizvoda
Regulatory information for users in Jordan
LBP623Cdw / LBP621Cw includes approved Wireless LAN Module (Model name: Type1KA). Contains Wireless LAN Module approved by TRC/ LPD/2017/19
Regulatory information for users in UAE
LBP623Cw / LBP621Cw includes approved Wireless LAN Module (Model name: Type1KA).
TRA
REGISTERED No: ER51217/17
DEALER No: DA0073692/11
RE Directive
(Only for European radio equipment)
RE Declaration of Conformity
English (EN) Hereby, Canon Inc. declares that this equipment is in compliance with Directive 2014/53/FU.
The full text of the EU declaration of conformity is available at the following internet address: http://www.canon-europe.com/ce-documentation Wireless LAN Specifications
Frequency band(s):2412-2472MHz
Maximum radio-frequency power: 15.9 dBm
CLASS 1 LASER PRODUCT
LASFRKIASSF1
APPAREL A LASER DE CLASSE
APPARECCHIO LASER DI CLASSE I
PRODUCTOLASERDECLASE1
APARELHO ALASER DE CLASSES 1
LUOKAN 1 LASER-TUOTE
LASERPRODUKT KCLASS 1
Regulatory information for users in Jordan
LBP623Cdw / LBP621Cw includes approved Wireless LAN Module (Model name: Type1KA). Contains Wireless LAN Module approved by TRC/ LPD/2017/19
Regulatory information for users in UAE
LBP623Cdw / LBP621Cw includes approved Wireless LAN Module (Model name: Type1KA).
TRA
REGISTERED No: ER51217/17
DEALER No: DA0073692/11
RE Directive
(Only for European radio equipment)
RE Declaration of Conformity
English (EN) Hereby, Canon Inc. declares that this equipment is in compliance with Directive 2014/53/FLU.
The full text of the EU declaration of conformity is available at the following internet address: http://www.canon-europe.com/ce-documentation Wireless LAN Specifications
Frequency band(s):2412-2472MHz Maximum radio frequency power: 15.9 dBm
CLASS 1 LASER PRODUCT
LASER KLASSE 1
APPAREL A LASER DE CLASSE 1
APPARECCHIO LASER DI CLASSE 1
PRODUCTO LASER DE CLASE 1
APARELIO A LASER DE CLASSET
LUOKAN 1 LASER-TUOTF
LASERPRODUKT KCLASS 1
Regulatory information for users in Jordan
LBP623Cdw / LBP621Cw includes approved Wireless LAN Module (Model name: Type1KA). Contains Wireless LAN Module approved by TRC/ LPD/2017/19
Regulatory information for users in UAE
LBP623Cdw / LBP621Cw includes approved Wireless LAN Module (Model name: Type1KA).
TRA
REGISTERED No: ER51217/17
DEALER No: DA0073692/11
RE Directive
(Only for European radio equipment)
RE Declaration of Conformity
English (EN) Hereby, Canon Inc. declares that this equipment is in compliance with Directive 2014/53/EU.
The full text of the EU declaration of conformity is available at the following internet address: http://www.canon-europe.com/ce-documentation
Wireless LAN Specifications
Frequency band(s):2412-2472MHz
Maximum radio-frequency power: 15.9 dBm
Czech (CS) Timto spelecnost Canon Inc. prohlasej, ze toto zafrzeni je v souladu se smemici 2014/53/FU. Uplne zneni FU prohlaseni o shode je k dispozici na teo internetové adrese: http://www.canon-europe.com/ce-documentation Technické udaje bezdratovi LAN Pasma(a) frekcvce:2412-2472 MHz Maximaliykon radiovcfe frekvence:15.9 dBm
Danish (DA) Hermed erkräer Canon Inc., at dette udstyr er i overensstemmelse med direktiv 2014/53/EU. EU-overensstemmelseserklaeringens fulde tekst kan findes pa ffolgende internetadresse: http://www.canon-europe.com/ce-documentation Trdlos LAN specofikationer Frekvensbänd: 2412-2472 Mlhz Maks. radio-frekvenseffekt: 15.9 dBm
MeTOg 3a BbBExKaHe Ha TeKCT
PpomHa Ha pexkma Ha BbBekdaHe
3a da npomeHnte pejKIma Ha BbBExJaHe,HaTNCHe

HaTnCHHeTe I HaTnCKaHe N 3aIbpxKaHe Ha ccN3TPnBaT BCNUKIN 3HaUN.
| Рек imm Вьбхддс: <a> | Рек imm Вьбхддс: <a> | Рек imm Вьбхддс: <12> | |
| 1 | @:_/1 | ||
| 2 | ABC abc 2 | ||
| 3 | DEF def 3 | ||
| 4 | GH glg 4 | ||
| 5 | JKI jki 5 | ||
| 6 | MNO mno | 6 | |
| 7 | PQRS pQRS / | ||
| 8 | TUV tuv 8 | ||
| 9 | WXYZ | WXYZ | 9 |
| 0 | {He e Habu-Ho} | 0 | |
| # | {нлгеля} @ .-!? & $ % # ( []) [ ] < >*+=",::'A'|" | {He e HabuHoo} | |

OTneuTaBHe
- OTBOpTe DOKymeHTa, KOITo Ie ce pa3neHaTb, IN36epete FyHKUraTa 3a NeHAT Ha npnIOKeHHeTO.
2.ИЗбете ДраиВера Н пинтета 3a Maшнота,Слд Коету ИЗбетe [Прдночтань] ИИ [Св氧псва]. - Nocoetye pa3mepa Ha xaptnya.
- Nocouete n3TouHnKa nTnHa Ha xaptnaTa.
- Nocouete Heo6xOJIMnTe HaCTpoiKu 3a neuT.
- V36epeTe [OK].
- 136epete [Print] (NeuT) nn [OK].
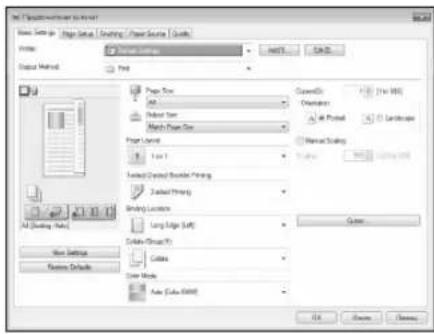
Pone3Hn HacptpoKn 3a neuT
2-CTpaHHo*
5p.81
-NeuHa 6poWypn*
Ta3nФyHKJMAOKeJaHeEHaJIHnHuBA 3aBNCIMOCCTOMoJEnHaMaIIINHaTa.

3a noDpo6HocTn
OTneaTaBeB pkoBcTBToHa notpe6nt
3apekdaheHa xapTna
3apejdahe ByeKMeJKeTo 3a xapTna
1 ⅠздьрпаиTeЧeКм endKeTo 3a xapTnA.
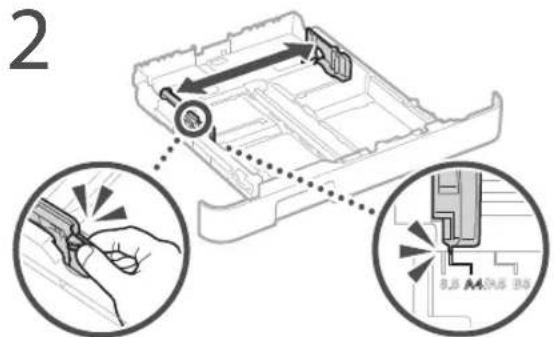
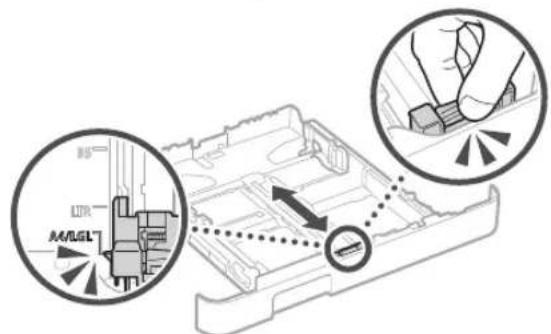
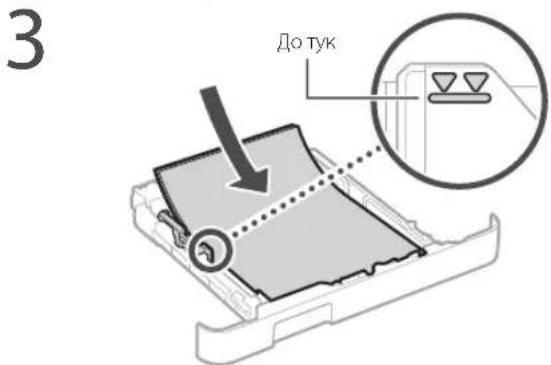
4 BkapaTe yeKMeJKeTo 3a xapTnB MaunHata.
Ako 3apekdaTe pa3nueH pa3Mep nTn xaptnoT npednHnTe, Tp6Ba Da npomeHnTe HacptpoKnTe.
5 HataheTe n n36epete
6 Iocoyete pa3mepa n Tnna Ha xaptna cnopeedkpana.
3apeKdaHe B OTBopa 3a pbyHo nodaBaHe
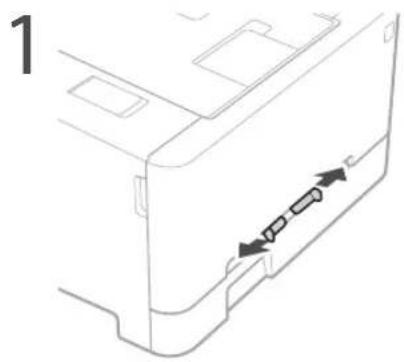
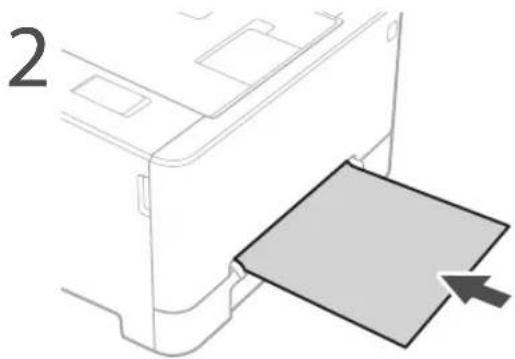
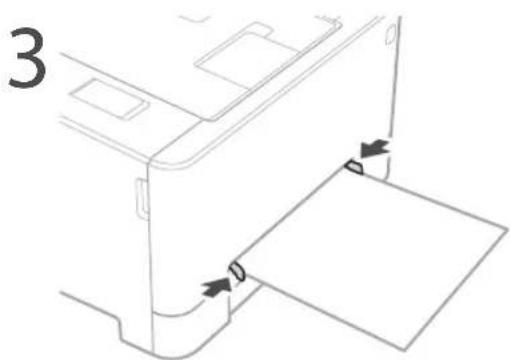
4 Nocabete xapTnTa 6abHO B rHe3dOTo 3a pbuHO nOdaBaHe,doKaTO DOCTnHHe 3aHaTa qACT Ha rHe3dOTo.
5 Nocouhe pa3mepa n Tua ha xaptna Ta cnopeed ekpaHa.
Ako Bb3HnKHe npo6JeM
3a noDpo6HocTn

OCTpaHbAhe Ha HEN3IIpABHOCTn" B pKOBODCTBOTO HAOTpeBTEJI
I3rIeKda,YeMaunHaTa He pa6OTn
PpOBepeTe CJIeHnHO.To.
- 3axpaHbHaTe BkIIOyeHO n e?
- MaunHata n3Jra3na n e oT cna pexum?
Ako dncnneT n He CBET,HaTNCHETe npEKNIOUbaTcna 3a BKNIOUBAHC.
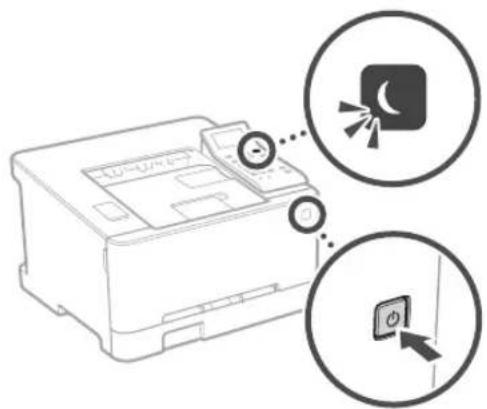
-3axpaHbauIaT Ka6e n Cbbp3aH nn e npabnHo?

Ako npo6nembT npoDbjNkaba, BnKTe pBKOBOCTBOTO Ha notpe6ntela.
Bb3HnKHaNo e 3acJaHe Ha xapTna
OCTpaHete 3aceHaIata xaptnn cnopei HCHpyKuINTe Ha ekpaHa.
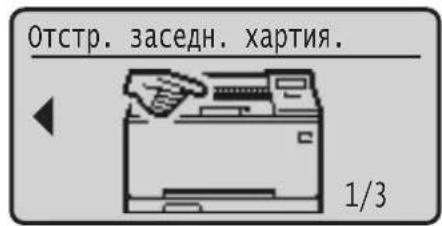
He nHCTaIIpaIte Ha MeCTaTa NO-DOy
YCTPOCTBOTO MOKe Da NaHHe N Da TpNHH HapaHbAhe,
- HectaonHa OCHOB
Macto, H3TOXeHO Ha 3N6paun
DpyrTOUKN3aBHUMAHNE
HPOHCHEHaMIMHATAChIbAHTHeHCHpyKIMTRETOBpksBOJCTHO.AKO MAMIHATACe HOHNCpaHNO.TaMOXDA NaHcV DaDCBCDOHAPAHHBAC
Prrnntiipnephe Haaannnna Bgne nnnmteinnnna Jhae Taeeanepe CTOA MOCN da oBocD no HoCnHbNC.
I36raBte MeCTa CNoa BENTnauqur
No IpeMa HOpMaHATA Cn Pabota yctpoiCtBO Tneepapma MAnKoJIeYCTBcONHJIO.Taen EIMACIN He Ca BpOHN 3a 3paAeTO. Te Ocbae MoKc Da cTahat 3b60cNn Nm npocbnknttnHa yntopc6Ba nI bnnr npocboCTBeI KkbTa Ha MeCA Cnoua BeHHuAuaa. 3a DcOnpyrhe Do6pa paoTHa Cpe, eInpenopohnienIO CTaBA, B KOHO paobto yctpoiCtBO, Da e InpOberPba BoDp6.CbTO taka INsRBaTe MeCTa, KaTeTo Xpata Bx4a BnNIOXKeHn HA EMCNOT YCTPOCICTBO.
3axpaHbAhe
APNEyPPEKDEHNE
NnnoaBae camo hONHnHa 3axpaHbAe, KOtO OT03apHT Ha ncoehnTc HnckBaHry 33 HanpekeHe, Iecna3aBeHo HToBa HnCKBaHE MoKe JI pOBepJIO NKAP mKTOK Oyjap
TAAHMAHNA TPA603a Da 6b C6Bp3Ha KaM EIEKPTN-CKN KOHtI CBC 3aeMaBAIIu Bp3KaPep npDCOCTABCHN 3axpaHbA KcFb.
He 103103103103103103103103103103103103103103103103103103103103103103103103103103103103103103103103103103
IpcocctabHnH3axpaHauKcBcnpDHaHCHa pa6oTaTOBaYcTPOeCTHo.CbepBaTe3 axpaHauKcBcNcDPyHcTPOeCTBa.
HeMouKpIapAie,HeNpIaie,HeOrBnAe CINHIO HnEINbPnBaIepyroJeCInBe,KeTOEMOeJa NOBPCDn BxpaHbAAKABKn. He NoCTABRtTe TckHN PpcMeTBA BPOXy BxApaHbAAKABKn. NOBPCEDHHAT BxAbaHbAaKabON MOKo Da pnpHNN KNOAP IN TOKOY dyap.
HeBKnKbAteH HeBKnKbAteUeicenaC MOKpn pIue 3a HnpeDnBkate ToKOB yad.
He bKIOHuaIeYcTPOaIbTOB yDykbXHTENINn PAKIOHNTENToa MoKe da DObE do NoKap Nn TOKA ydAp.
HeYbMaTe Hn He Bp3BaIte Ha B3en 3axpaHaaumKaBcEN, TB KAt TOBa MoKeJa nppeuBbKn NoXap NmTOKoB ydp.
Bkapaune npcnela daokpa B enektpnckn KOntak Ileca3BaHero Ha ToBa INCKBAHe MOKe Da DObede Do nokapnnTOKOByad.
- Pn apve Ha rpbmtBENH Cyprn kNIOVAIte IeicnEa OT KOKtA,HeCnaBaHTo H a ToBa NCKBAHc MOKe da BoBeDe Do nOkap, TOKOB ydAp NIN NOBEDA Ha YCTPOCTBO.
Yyepetce,yeeneKpO3axpaHbHaTe KbM yCPOcIIOe 6eBcONaHO HMaNIOCTORHH HOHKeJe.
IIOJIHCTO3XPAHBAUINKABcENDAEOTNTOYNHKA HOTNIHNA,AKHOHCOTHAPNBTCABcEBTMOCKaCCOTNIAJIPNEVIBNCAIOKAPKNAKEKCEBHNHE
136aBaaTe CnDHNTE CNTyaHIN:
Ako BxpOy Cbp3BaUaTn Aact Ha 3axpaHbuaN Ka6en cc npn00K FOBm HtNNC TOBA MoXe Da NOBocn Kc6pna IINI pIO3OuHnIeB MAHnIbTa MOx e Ce KKnIOHAT, TOna MoXe Ja JIOBeJe NoNkap.
Yccto BkIOBaHc MIKIOBaHc Ha 3axpaHaBauN Ka6cn.
Pepbbae Haa xpaHbuaa Kabe
O1bbaHe Haa3aepaHauuHaeK6n3oJocACTTa 3a Cb5p3aHc, KAKIO INPIMIaHae HApDCsIKHTENe HATICK KBM ENeTPTPAeCKN KOHTAKNT HaCtTa 3a Cb5p38aHc.
- YnpaxihBaHe Ha npexOeepHO rna Cnna 3bpxu
BHIMAHHE!
HCTaTnPaTe yCtPOeTBTO 6BnDo 0eEneKpueeKnA KOHTAK KATO OKOJU eIcncera TPOBa DA NIMApOCTaTbNHO pOcTpaHCTBO, 3a Da MoKe Da Ce HKnIOH NecHO pN Heo60jmmocX1.
Bopabene c yctpojCTBOTo
BHUMAHNE!
BesonacnoCT Ha na3epHo o6opydahe
Toba ycrpoBcBTO eONbTeHcKtoIaJIaepeHnIpaIKYK1 KNA 1B LC60528-1.2014pN LN60528-1.2014.
CLASS1LASLRPRODUCT
LASFRKIASSEF1
APPAREL ALASER DF CLASSF 1
APPARLCCHIO LASER DI CLASSEI
PRODUCTO LASER DE CLASE 1
APARHOLALASFRDFCLASSF 1
LUOKAN LASFR-TUOTF
LASERPRODUKT KI ASS 1
JaepHOTo NCHIO MOK Da e BpOHO 3a HOBCKO TIN. Tko KATO PAJMAIHTA, KOIO Ce HIBABA O BIpeHIOCTA HA POyDIA, Ce oPANIHBA HAIHIO TO BAITHNTe KOPYCN BHBHNIHTe KANALI, HAOHNITb HO MOK Da IABNC IEBH YCPTPOCTBO, DOKAO nopoeBNTn ABbIPBa paa POnCPAA. IpoeTete 6abeNeknne INKTpykyn 3a BezONACHOT NO-DOyTO
HnKORA HtOBAPRteDpyrKaIaIcAocAeIOIOTbICHTE BpKoSQCTBaTa 32 ToBaYCTPOIKTeB.
Ako naepnntyceOTIOHNOCBETN ONTBE TOBAMOKdIyBpD
H3nONBaaHeroHa cpeCtBa 3a ynpabEnHe, HAcTPOKn HnNNTbHHeHHe Ha npOeDyOn,pa3nnHHOT NcOcHHeHBe T OBA pKBOJcIcBO,MOKe Jda IcBepJeIO OnaCHO MaJIaAHe Ha oBbHBeA.
BHHMaHHe 3a6e3oNaChOCT npu pa6oTa c na3epHo o6OpyDbahe
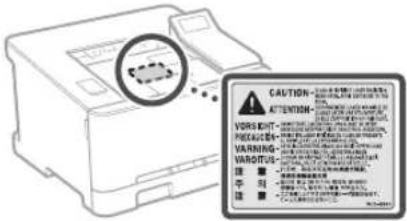
CMBON, Cbbp3aHn c6e3onacHOCTTa
KIOH H3aXpaHbAHeTo:No3uJn"BKn
KnHou Ha 3aXpaHaBaHeTo: P03uN4 "V3Kn."
KIOUHa3aXpaHbAHeTo:PiOnuY"CTeH6a"
①KnHc HATnCKaHe "BKn." "N3Kn."
3aHTCHBcMBAITepMaHAT
OnacHO HanpexHe HbB bTpeHocTa He OTBaPHTe Dpyn Kanaun OcbH NocOeHNTe.
BHIMAHVIEFopeua noBpxHocr.He doKcbAte.
06opydBaHe ot klaI
A DnVaeHc Hactn NaTe YactHr Ha TAnTo O
BnKeHtCeHaCTN
BHIMAIIVMoxe da bhaHKeTOKOByap.
3KIOHETe BcHn 3axpaHbAaIN Kaen OT KOHTaTA
Vmaocipnpb60bePi3eYacnHnIIOO 0 cpcnpepb60be.
[3A6EJIEXKA]
HKnO1nok3aHnTe noTope CmB0nMoKe da He ca NoCTabeHN CIOpeI IPOdyKTA.
KoHcyMaTHNB
APNEUYPPEKDEHNE
He 3xBpIe I3nON3BaHn ToHep KaceTn B
OTKPNIN NAMbU.OCBeH TOBA He cbXpaHbAte
TOeP KaceTN INx XAPTN HA MACTO, INIOKeHO HA
OTKPN TOBH. TOBA MOke DA HApaToHEPAuIN
XAPTNDA Ce 3aJANrN Da DOBeaTdo
INr4apHnN INn NOkap.
Belenkka
ImeHa npoDyKT
Cb6pa3Hpo pa3npoe6nte 3a 6e3oNaCHOCT IMeTO H npOyKTA TpBBA Da bJe peRnCTPpAHO. B HAOKOn OT pAOHNTE, B KONTO CE npODABA npOyKTB, E B3MOXHO CNEHOTO IMe(H) B cKOb() Ja e/ca peRnCTPpAHO(B) BmecTo TOBA. LBP623CdW/LBP621Cw(F174900)
N3NCKBaHn 3a eNeKTpOMaHTnTHa CbBmecTmOcT (EMC) Ha dIpuKeTnBaTa EC
IbOaYcTPOINCTBO OTTOBAPn HA OCHOBHnTe
3NCKBBAHN 3A ENEKTPOMAHHTHA CBBMECTMIMOCT (EMC) HaJINPEKTHATA Ha EC,DeKnapnpame,Ye
To3N npOdykT OTTOBAPn HA NCKBAAHa
3a
eNIEKTPOMAIHTHA CBBMECTMOCT (EMC) Ha
DIPKEKTHBATA Ha EC pRn HOMNHAnHO 3axpaHBAIo
HANPEKHeNE 230V,50Hz,BblpeKnYe
3xPAHAAaIOTo HANPEKHeNE No CTueuPknaue e
OT 220 Vdo 240 V,50/60 Hz.3a NOKpNaBaHa
TEXHHUECKTE HaNCKBAAHn 3a ENEKTPOMAHHTHA
CBMBEETMOCT (EMC) Ha JINPEKTHATA Ha EC e
Heo6XoMDMo H3NoJ3BaHeTo Ha ekPaHpaH Ka6eN
DInpeKTHBa NVEEO n DInpeKTHBa 3a 6atepnn Ha EC MoKeTe Da BnInte HNFOpmAua 3a DInpeKTHaTa 3a INeEO n DInpeKTHaTa 3a 6atepnn B NaHOBoTo pBkoBOcTBo Ha NotpeBnten (HTML pBkoBOcTBO) ot yeb caHa Canon (canon. com/oip-manual).
PerynaTopHa Hhopmaa 3a6e3KuHn LAN Mpexu
Regulatory information for users in Jordan LBP623Cdw / LBP621Cw includes approved Wireless LAN Module (Model name: Type1KA). Contains Wireless LAN Module approved by TRC/ LPD/2017/19
Regulatory information for users in UAE LBP623Cdw / LBP621Cw includes approved Wireless LAN Module (Model name: Type1KA).
TRA
REGISTERED No: ER51217/17
DEALER No: DA0073692/11
RE Directive
(Only for European radio equipment)
RE Declaration of Conformity
English (EN) Hereby, Canon Inc. declares that this equipment is in compliance with Directive 2014/53/EU. The full text of the EU declaration of conformity is available at the following internet address: http://www.canon-europe.com/ce-documentation Wireless LAN Specifications Frequency band(s):2412-2472MHz Maximum radio-frequency power: 15.9 dBm
HactoHnT npOyKT Ha Canon (IPOyKT) BKNIOBa COFTyePHN MOyTN OT TpeTN CPTaHN. H3NON3BHeTO n pa3npocTpaHEHHeTO Ha Te3N COFTyePHN MOyTN, BKNIOHTeIN HO BCAKBN AkyAIN3aUN HA TaKINBA COOTyePHN MOyTN (0606JIeHO-“COOTYEP") 3aBcN OYTcNOBNTAOT (1)do(9)no-dony.
(1) CbrrnachnCTa da cna3BaTe npnIOXmNITe 3aKOHn 3a KOHTPOH a HINHOCA, 3aBpaHNTe IN pa3npoe6Vte Ha 3aHtpeCobAHTE CTpaHn, B cnyaH Ye To3n IPOJYKT, BkIIOyBaU COOTyPAE, e TpahcnpotpHa, npexBpneH NIN INHeceH B Dpyra CTpaHa.
(2)PnntexkateNte Ha npabata Ha COFTYEPA 3a3a3Bt B5b BC4NO OTHOHeHMe npabata Bbpy 3aIbAIneto,OCCTBeHocCTTA HnENTeKtyAnHATA Co6CTBeHocCT BaHa COFTYEPA.Cn3KnIOueHHe Ha n3pnuHO npEOCTaBEHO TYK,NHKaKBb NcEHN HnpABo,IN3pnuHO INI NIOpa3bPaioCe,He BN Ce npEOCTaBAWn DaBa OT pNTeKATENTE Ha npabata HA COFTYEPA 3a KaKaBoTo Hn da E nHTeKATeNITE Ha npabata HA COFTYEPA.
(3) Mojete Da mnoBate CODTyEPA eHHCTBeHO 3aeHNO C PPOJYKA
(4) HamaTe npabo Da 8b3nArate, noDnueHnPaTe, npOaBate, paRIOCTpaHnBaTe nn npExbPnIe COOTYEPA Ha TpeTc pTaHn Be3 npEnBaPteHo NmCMeHO CbIaNcEoT npTeKeTneHa npBaHa COOTYEPA
(5)BbnpekropecnmeHaToTO moKeTe da npexBpnae COOTYEPA cmoKorato (a)Bb3nataE BCNUK CBOH npaBA Bpxy IPODYKA N BCNUK npaba N 3aBnKeHNIOIueHNOHHTE yCNOBNA Ha NOyauTeN I (6)NONyauTeNt Ce cblnacn Da ce O6Bpke C BCNUK yCNOBNA.
(6) Hmate npaBo da Jekomnnpate, noIarate Ha obaTHO KOHCTpyuPaHe, deaeM6bnpate nn No npyr HauHH da N3BnHate Koda Ha COOTYEPA Do npoxoJua 3a YeTeHe OT HOBK fOpMa.
(7) Hmarte npabo da npomehre, aadantnpate, npebexdate, 3aeMATE, OTdabate NaHem HnHa3aEM COXTYPEA nn Da c3daBate pOnn3BDnn npdykTN Bb3 OCHOBA Ha COXTYPEA.
(8)HMaTe npabo Da npemaxbATE COQTYEPA O T PPOyTAaMn Da My npabte OeJINKoIIIA.
(9) HAMATE JINUEH3a YACTTAOT COOTYEPAA, NOJXODHua 3a HeTeHEOT OOBK (KOHa NTOOHNKA).
Be3 TOBa Da e B yUb6 Ha NocOeHcToB ToKn (1)
D0 (9) no-rope, PPOdyKTbT bKIOHOBa coFyepHN
MOyIN OT TpETN CTpaHn 3aeHNO C dpYn
LIeEH3NOHN YCIOBn H Tea COFyepHN MOyIN
Ca o6eKt HA dpynte IINeH3NOHN YCIOBn
O6pbJauIte Ce KbM dpynte IINeH3NOHN
ycIOBn HA coCFOyepHN MoYIN HA TpET
CTPAHn OINCAHN B IIPOIOKeHEnTO Ha
pbKOBOcCTBOTo 3a CBOTBeTHNA PPOdyKT.
HaTOHsOto pbKOBOcTBo E ha pAnnoJokHeHne
Ha apec http://conor.com/bip-manual
Upe3 yonptep6ata Ha IPOyKTA ue ce npme,ue Cte CbIaHCH BCYHKn PpIIOXKMMIJIeEH3NOHH yCNOBA. Ako He Cte CbTnaH CTeu NHeEH3NOHH yCNOBA. Ce CbPkeTe CBaWnA cepBnEh npeCTabNTen.
V_180517
Белеки

Bg
Calismayi Isletim Panelinden Başlatin
Makine

Isletim Paneli
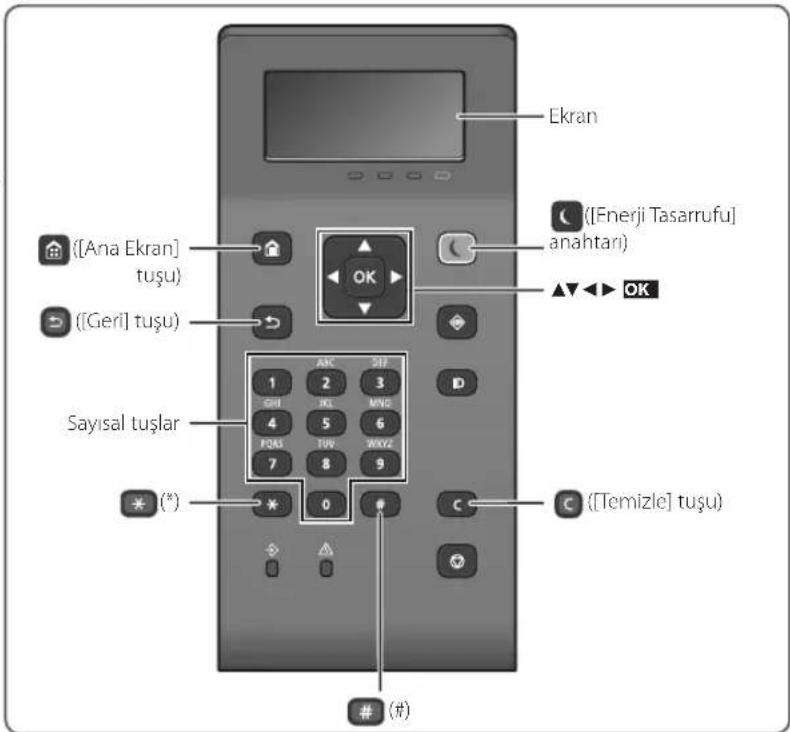
Menüde Gezinme
DikkAT: Sicak yizey. Dokunmayin
- sinf ekipman
Regulatory information for users in Jordan
LBP623Cdw / LBP621Cw includes approved Wireless LAN Module (Model name: Type1KA). Contains Wireless LAN Module approved by TRC/ LPD/2017/19
Regulatory information for users in UAE
LBP623Cw / LBP621Cw includes approved Wireless LAN Module (Model name: Type1KA).
TRA
REGISTERED No: ER51217/17
DEALER No: DA0073692/11
RE Directive
(Only for European radio equipment)
RE Declaration of Conformity
English (EN) Hereby, Canon Inc. declares that this equipment is in compliance with Directive 2014/53/EU.
The full text of the EU declaration of conformity is available at the following internet address: http://www.canon-europe.com/ce-documentation Wireless LAN Specifications
Frequency band(s):2412-2472MHz
Maximum radio frequency power: 15.9 dBm

aalal aalal alal alal alal alal alal
[1ai] 1 [1]
4.2
14c gjg 8jgl juaa 2
aill 1
34,50 = 2
( 12j) ,14j = ( 12j,14j)

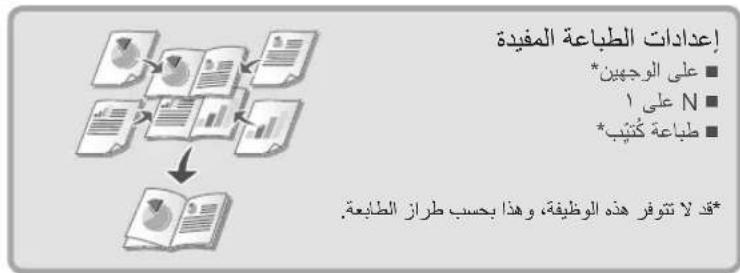

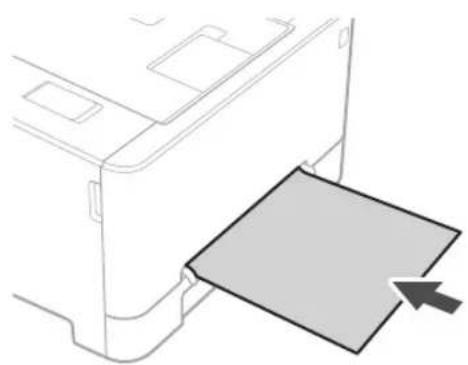
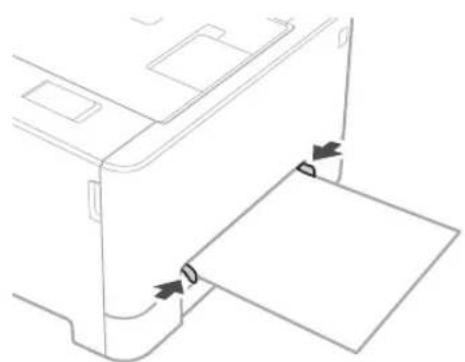
1 1
a
1
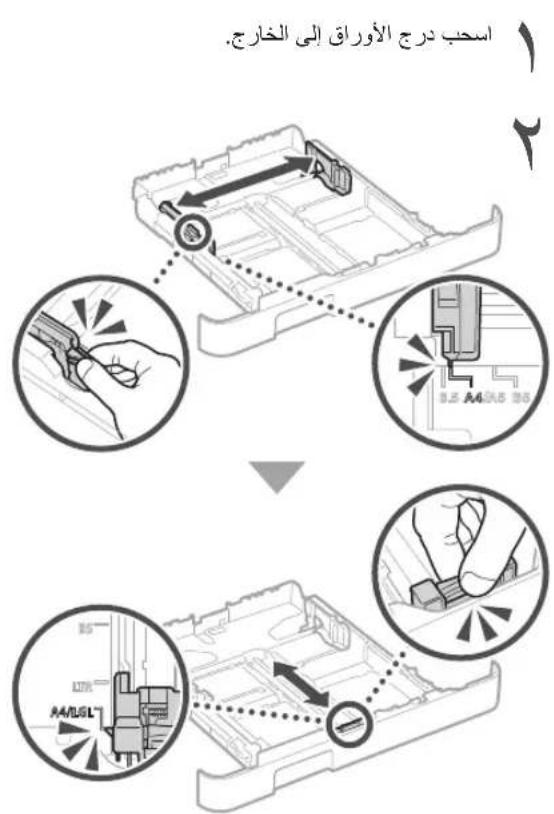
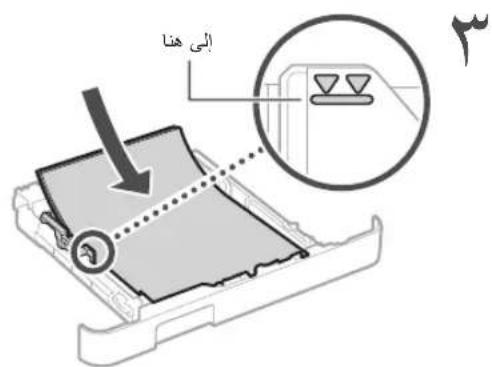
aalal

J 1

a

aaiie 1e jaii aiiaai iaiii g, jaiiaai all j
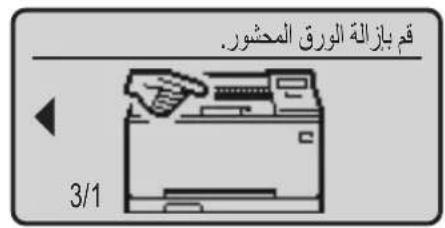
J
aiee eae eae eae eae eae eae
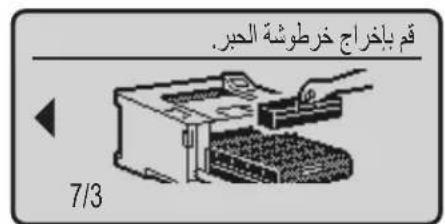
ydl
(2) Canon Cartridge 054 Black
(ω) Canon Cartridge 054 Cyan
(Canon Cartridge 054 Magenta
A 1
A
A
A
A
A
A
A
A
A
A
A
A
A
A
A
A
A
A
A
A
A
A
A
A
A
A
A
A
A
A
A
A
A
A
A
A
A
A
A
A
A
A
A
A
A
A
A
A
A
A
B
LBP623Cdw/LBP621Cw(F174900)
Regulatory information for users in Jordan
LBP623Cdw / LBP621Cw includes approved Wireless LAN Module (Model name: Type1KA). Contains Wireless LAN Module approved by TRC/LPD/2017/19
Regulatory information for users in UAE LBP623Cdw / LBP621Cw includes approved Wireless LAN Module (Model name: Type1KA).
TRA
REGISTERED No: ER51217/17
DEALER No: DA0073692/11
RE Directive (Only for European radio equipment)
RE Declaration of Conformity
English (EN) Hereby, Canon Inc.
declares that this equipment is in compliance with Directive 2014/53/EU.
The full text of the EU declaration of conformity is available at the following internet address:
http://www.canon-europe.com/ce-documentation
Wireless LAN Specifications
Frequency band(s):2412-2472MHz
Maximum radio-frequency power: 15.9 dBm
jia jia jia jia jia jia jia jia jia jia jia jia jia jia jia jia jia jia jia jia jia jia jia jia jia jia jia jia jia jia jia jia jia jia jia jia jia jia jia jia jia jia jia jia jia jia jia jia jia jia jia
Lae aai jai jai oJg: Lao pJI 0
jJg, jiiu g Jjuiu
aJgai jll jill bjjj jilj j
a a a a a a a a a a a a a a a a a a a
aaii aaiiaai
5j11 1
1
gall gale gaaagall yal aal al
y 1
http://canon.com/oip-manual
jrrnne nne nee eae aee gaae aen ene ae
J 1
aaii jia jia jia jia jia jia jia jia
V_180517
Irish (GA) Dearbhaionn Canon Inc.,
leisseo,go bhfuil antrealamhseo i
Norwegian (NO) Herved erklærer
jall 1d jaaaannn aaii aag gill
jlll 1a aaiinell ciil l aag jill cag
y LBP623Cdw
A
Apple Inc is a Mac
Windows Vista, Windows, Microsoft
Excel,Internet Explorer,Windows Server
yjbjcuiie jbjcuiie lPowerPoint
Microsoft Corporation
.5j21 j031 j/3 a4y 5a2
136 5
y
2
"(giall)glaally
p 1
aaii aai iiaai
pduy Lg (j) jal) y yll lgl s
.()(1)
(1)
aaii i 1
gol jol jn jil jil jil
()
a
a 1
15
Lal "al jll" 8joo Joo joo aol gl
"zol jll" 321 1000
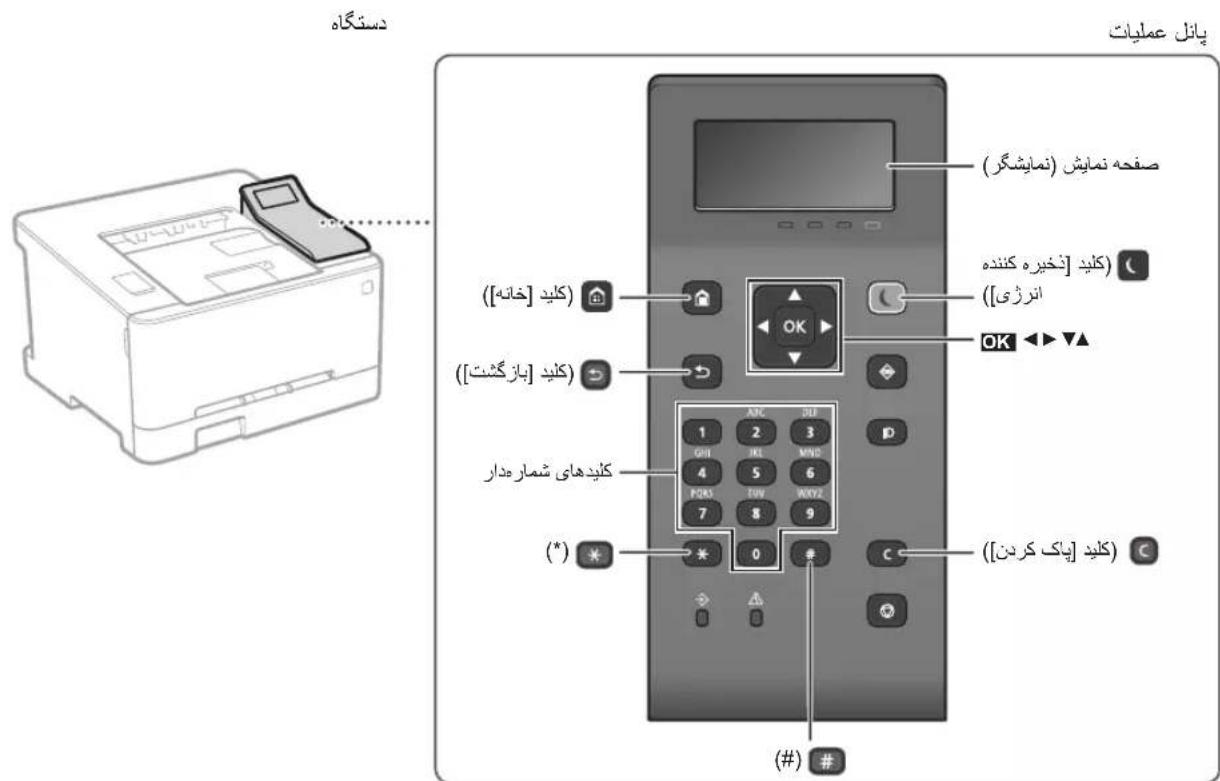
1is jiei ciLac Jilj 1JcLac
gai j gaij
CLABO
1516 =
[1] [1]
. 1
- iS 1, 1. 15 S e g 1, 15 S
1.35 2.36
4.4.1.1.2. [200]
y[1]
1 1
gialj qaiis j "q" C
S ACD = S COD + S_ DCE


12
N
A
2500 25 J 15 150150000000000
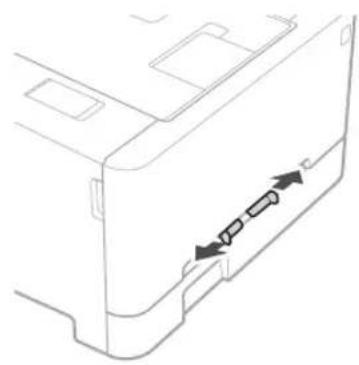
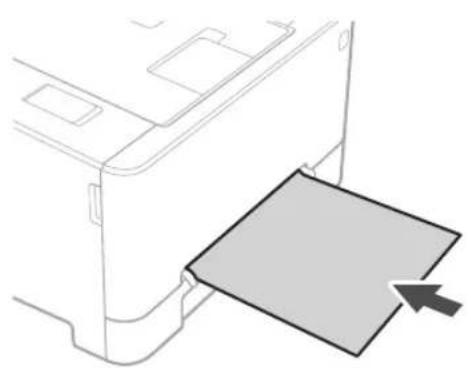
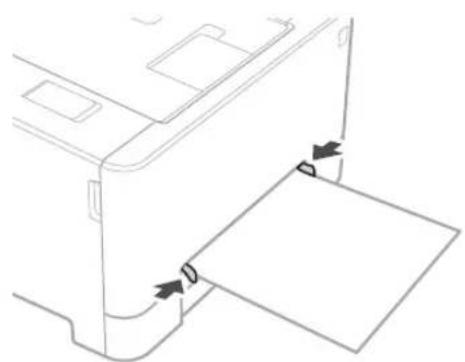
12 12
1

S ACD = S COD + S BDO - S DCA

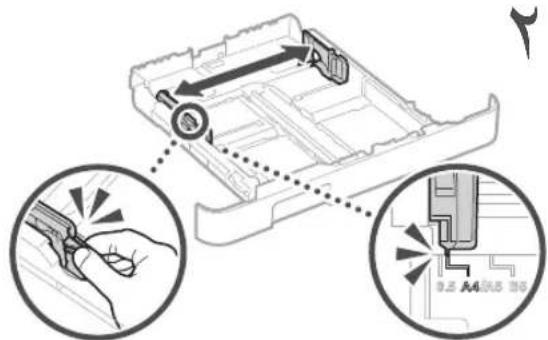
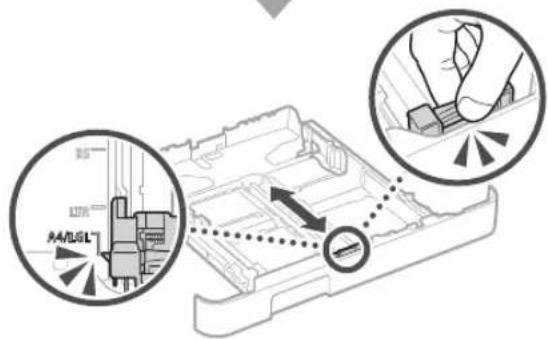

Regulatory information for users in Jordan
LBP623Cdw / LBP621Cw includes approved Wireless LAN Module (Model name: Type1KA). Contains Wireless LAN Module approved by TRC/LPD/2017/19
Regulatory information for users in UAE LBP623Cdw / LBP621Cw includes approved Wireless LAN Module (Model name: Type1KA).
TRA
REGISTERED No: ER51217/17
DEALER No: DA0073692/11
RE Directive (Only for European radio equipment)
RE Declaration of Conformity
English (EN) Hereby, Canon Inc. declares that this equipment is in compliance with Directive 2014/53/EU. The full text of the EU declaration of conformity is available at the following internet address:
http://www.canon-europe.com/ce-documentation
Wireless LAN Specifications
Frequency band(s):2412-2472MHz
Maximum radio-frequency power: 15.9 dBm
Czech (CS) Timto spolecnost Canon Inc. prohlasej, ze toto zaizeni je v souladuse smernici 2014/53/EU. Uplne zneni EU prohlaseni o shod je k disposici na teo internetove adrese: http://www.canon-europe.com/ce-documentation Technické udaje bezdratove LAN Pásmo(a) frekvence: 2412-2472 MHz Maximálni vykon radiové frekvence: 15.9 dBm
s j 1
L
2
3y 1
s 1
j 1 j 1 j 1 j 1 j 1 j 1 j 1 j 1 j 1 j 1 j 1 j 1 j 1 j 1 j 1 j 1 j 1 j 1 j 1 j 1 j 1 j 1 j 1 j 1 j 1 j 1 j 1 j 1 j 1 j 1 j 1 j 1 j 1 j 1 j
J 1
y
1
-12014
PRODUCT 1234567890
LASSE 1 234567890
LASSE 1 234567890
la jda
i j 1
01 24
IEC60825-1:2014 1
jia 1
PRODUCT 2
KLASSE 1 3
CLASSE 1
aai aai ai jai jai jai jai jai jai jai jai jai jai jai jai jai jai jai jai jai jai jai jai jai jai jai jai jai jai jai jai jai jai jai jai jai jai jai jai jai jai jai jai jai jai jai jai jai jai jai jai jai jai jali
J 1 1 1 1 1 1 1 1 1 1 1 1 1 1 1 1 1 1 1 1 1 1 1 1 1 1 1 1 1 1 1 1 1 1 1 1 1 1 1 1 1 1 1 1 1 1 1 1 1
CLASS 1 LASER PRODUCT
LASER KLASSE 1
APPAREIL À LASER DE CLASSE 1
APPARECCHIO LASER DI CLASSE 1
PRODUCTO LASER DE CLASE 1
APARELHO A LASER DE CLASSE 1
LUOKAN 1 LASER-TUOTE
LASERPRODUKT KLASS 1
y 1 y
1

30-2, Shimomaruko 3-chome, Ohta-ku, Tokyo 146-8501, Japan
One Canon Park, Melville, NY 11747, U.S.A.
CANON EUROPA N.V.
Bovenkerwerweg 59, 1185 XB Amstelveen, The Netherlands
Printed on non-chlorine bleached paper.
2F Jinbao Building No.89, Jinbao Street,
Dongcheng District, Beijing 100005, PRC
CANON SINGAPORE PTE LTD
1 Fusionopolis Place, #15-10, Galaxis, Singapore
138522
CANON AUSTRALIA PTY LTD
Building A, The Park Estate, 5 Talavera Road,
Macquarie Park, NSW 2113, Australia
CANON GLOBAL WORLDWIDE SITES
http://www.canon.com/