Caldorad 9TT - Heating OLIMPIA SPLENDID - Free user manual and instructions
Find the device manual for free Caldorad 9TT OLIMPIA SPLENDID in PDF.
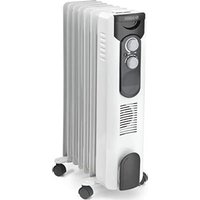
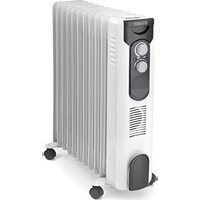
| Product type | Oil-filled electric radiator |
| Brand | Olimpia Splendid |
| Model | Caldorad 9TT |
| Nominal thermal power | 2.0 kW |
| Minimum thermal power | 1.0 kW |
| Maximum continuous thermal power | 2.0 kW |
| Supply voltage | 220-240 V ~ |
| Frequency | 50-60 Hz |
| Control type | Mechanical thermostat |
| Operating modes | ECO, Medium power, Maximum power, Turbo, 24-hour timer, Ventilation (Turbo Timer model) |
| Overheat protection | Yes (automatic shut-off) |
| Anti-tip switch | Yes |
| Operating light indicator | Yes |
| Casters | 4 casters (assembly required) |
| Built-in humidifier | Yes (water tank) |
| Intended use | Domestic only, floor-standing |
| Maintenance | Clean with a dry cloth or vacuum; do not immerse |
| Repairability | Repairs by qualified professional only |
| Standby power consumption | 0.00025 kW (Timer model) |
| Material | Steel (radiating fins) |
Frequently Asked Questions - Caldorad 9TT OLIMPIA SPLENDID
User questions about Caldorad 9TT OLIMPIA SPLENDID
0 question about this device. Answer the ones you know or ask your own.
Ask a new question about this device
Download the instructions for your Heating in PDF format for free! Find your manual Caldorad 9TT - OLIMPIA SPLENDID and take your electronic device back in hand. On this page are published all the documents necessary for the use of your device. Caldorad 9TT by OLIMPIA SPLENDID.
USER MANUAL Caldorad 9TT OLIMPIA SPLENDID
INSTRUÇÉS PARA O USO E MANUTENÇÃO PT
The illustrations are grouped on the initial pages of the manual
0 - WARNINGS
0.1 - GENERAL INFORMATION
First of all, we would like to thank you for choosing our appliance.
0.2 - SYMBOLS
The pictograms in the next chapter provide the necessary information for correct, safe use of the machine in a rapid, unmistakable way.
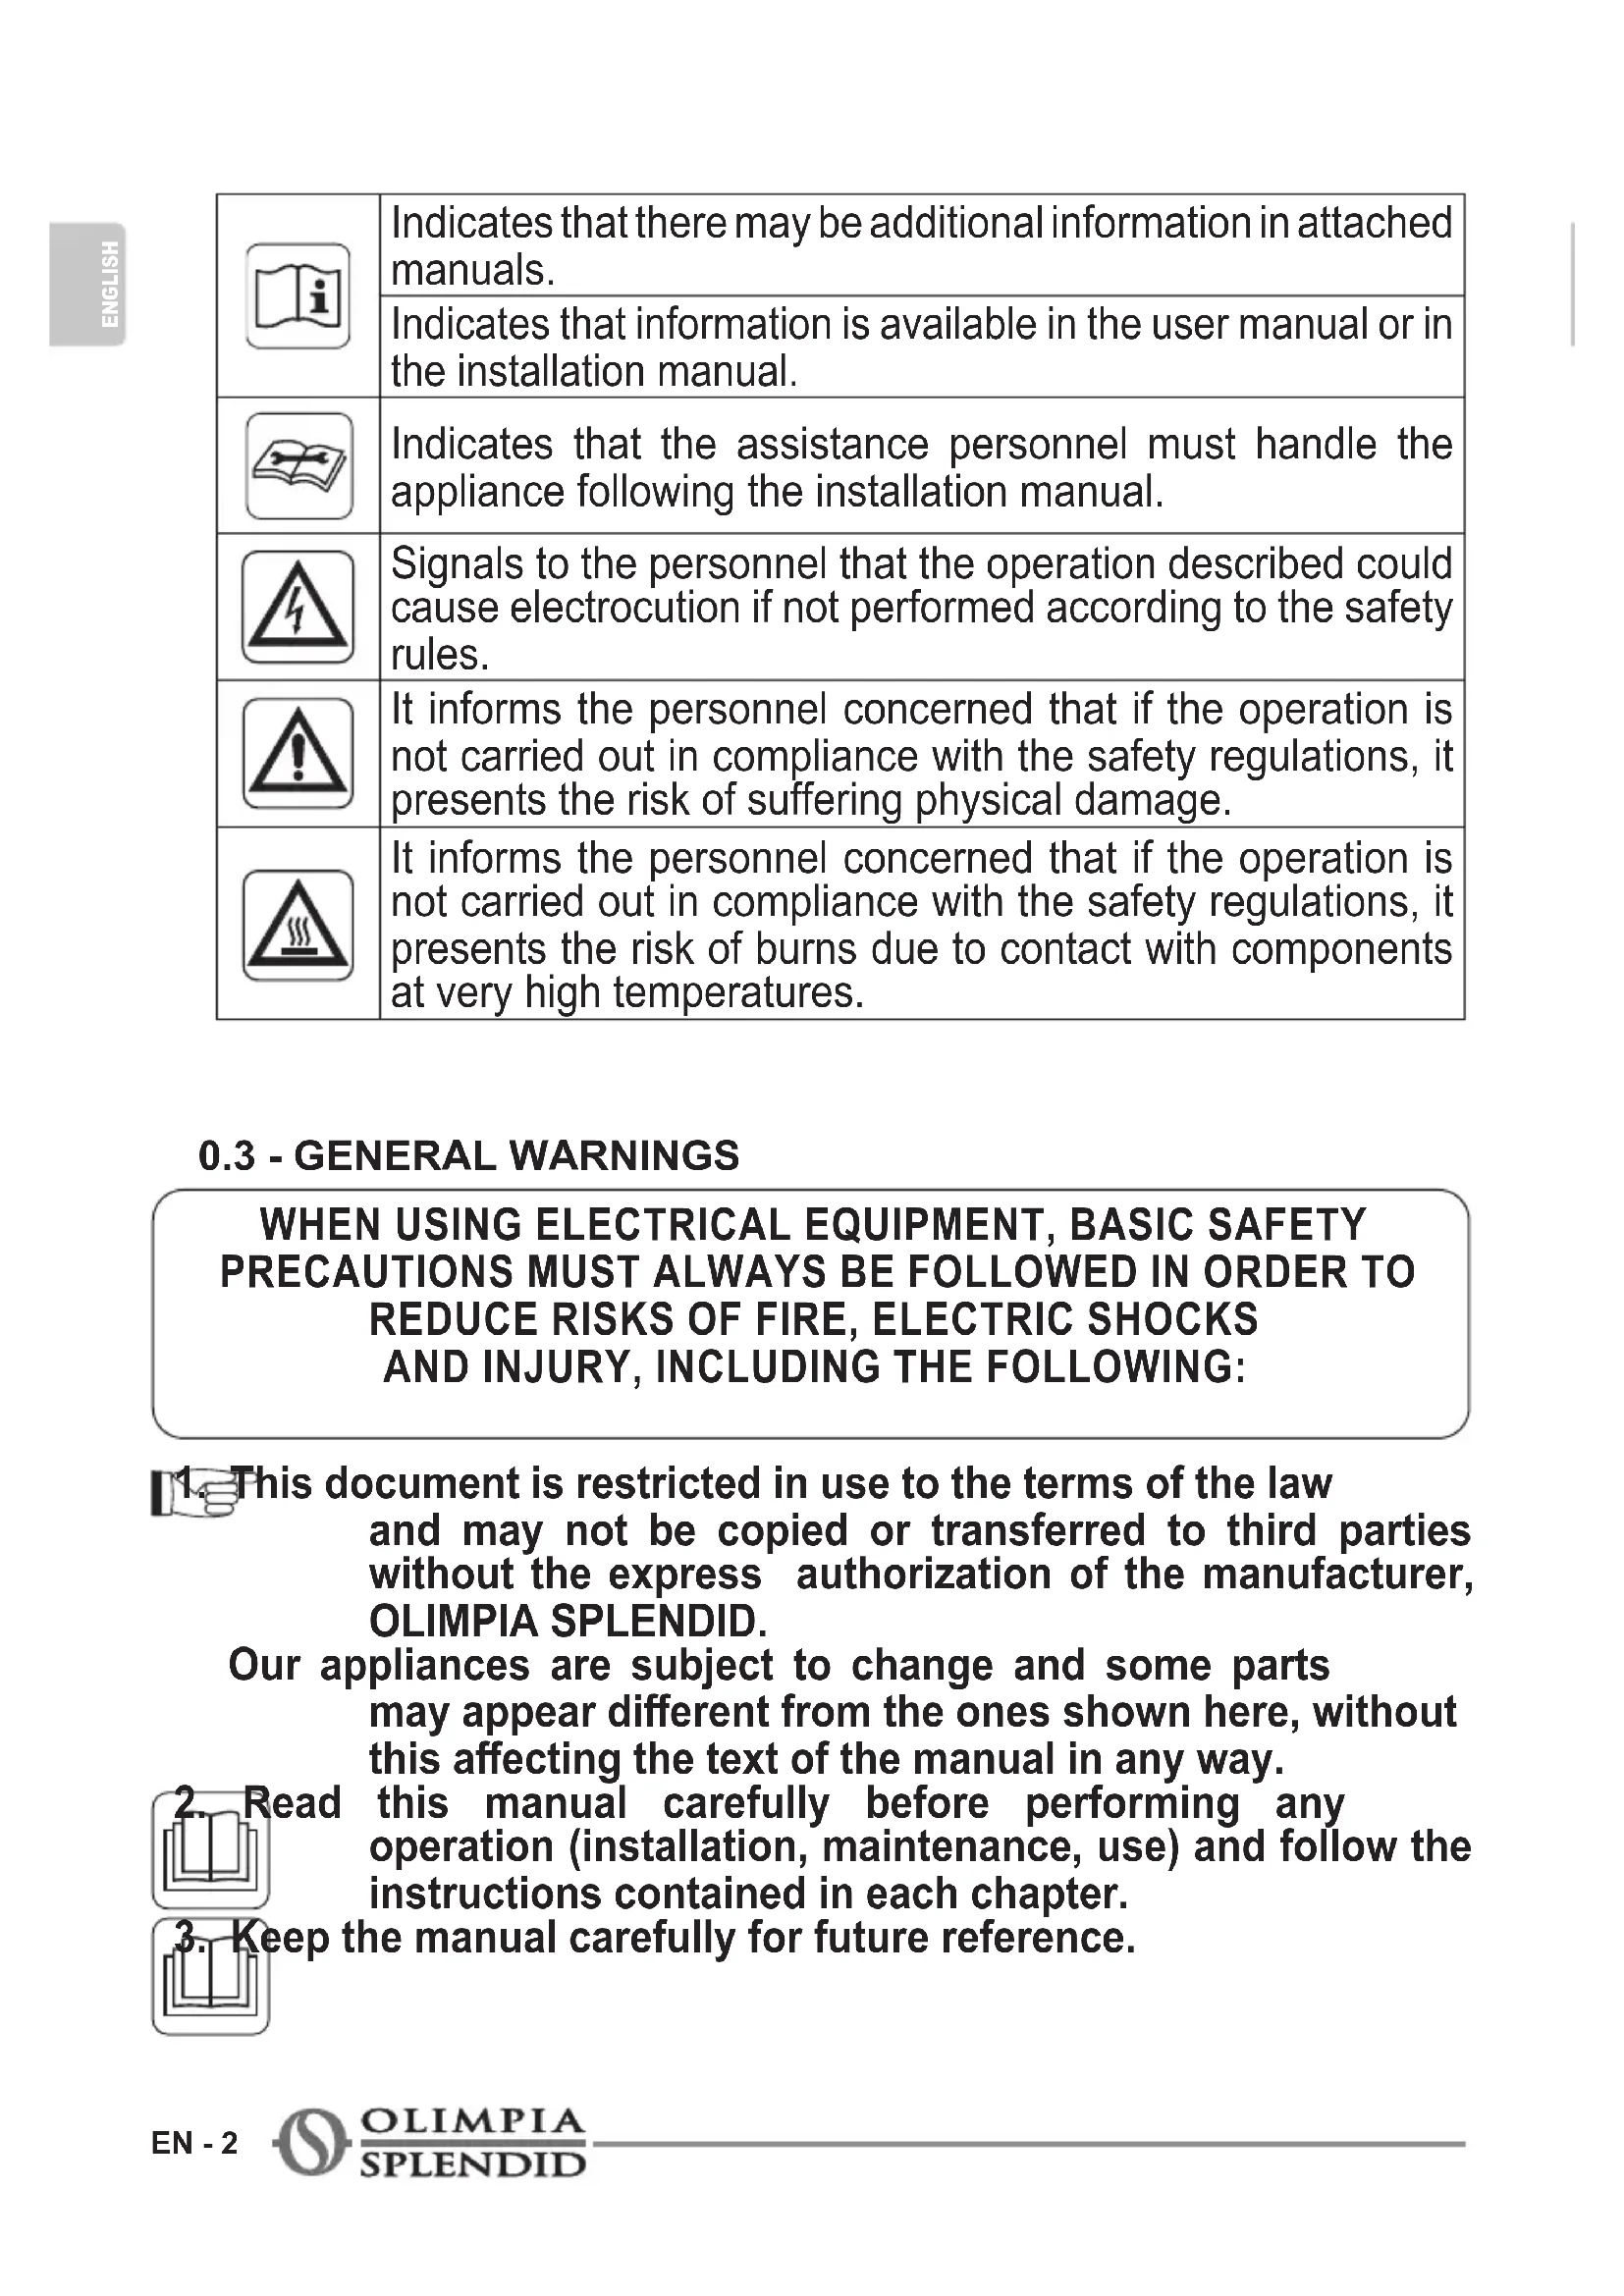
0.2.1 - Editorial pictograms
| Indicates that this document must be read carefully before installing and/or using the appliance. | |
| Indicates that this document must be read carefully before any maintenance and/or cleaning operation. | |
| i | Indicates that there may be additional information in attached manuals. |
| Indicates that information is available in the user manual or in the installation manual. | |
| Indicates that the assistance personnel must handle the appliance following the installation manual. | |
| 4 | Signals to the personnel that the operation described could cause electrocution if not performed according to the safety rules. |
| ! | It informs the personnel concerned that if the operation is not carried out in compliance with the safety regulations, it presents the risk of suffering physical damage. |
| It informs the personnel concerned that if the operation is not carried out in compliance with the safety regulations, it presents the risk of burns due to contact with components at very high temperatures. |
0.3 - GENERAL WARNINGS
WHEN USING ELECTRICAL EQUIPMENT, BASIC SAFETY PRECAUTIONS MUST ALWAYS BE FOLLOWED IN ORDER TO REDUCE RISKS OF FIRE, ELECTRIC SHOCKS AND INJURY, INCLUDING THE FOLLOWING:

This document is restricted in use to the terms of the law
and may not be copied or transferred to third parties without the express authorization of the manufacturer, OLIMPIA SPLENDID.
Our appliances are subject to change and some parts may appear different from the ones shown here, without this affecting the text of the manual in any way.
Read this manual carefully before performing any
operation (installation, maintenance, use) and follow the instructions contained in each chapter.
Keep the manual carefully for future reference.
-
After removing the packaging, check that the appliance is in perfect condition. The packaging materials must not be left within reach of children as they can be dangerous.
-
THE MANUFACTURER IS NOT RESPONSIBLE FOR DAMAGES TO PERSONS OR PROPERTY CAUSED BY FAILURE TO FOLLOW THE INSTRUCTIONS IN THIS MANUAL.
-
The manufacturer reserves the right to make any changes it deems advisable to its models, although the essential features described in this manual remain the same.

Before connecting, make sure that the plate data corresponds with the mains electrical supply. Connect the appliance to a single-phase power supply in AC at the voltage indicated on the nameplate located on the appliance.

-
Install it according to the manufacturer's instructions An incorrect installation can cause damage to people, animals or property for which the manufacturer accepts no responsibility.
-
Always and only use it in a vertical position . Position the appliance in an appropriate environment and on a stable and plane surface.
- Always unreel the cable completely during use.
- The appliance is equipped with a power cord with plug (Y-type connection). If the power cord is damaged, it must be replaced by the manufacturer, his technical service or a similarly qualified person in order to eliminate all possible risks.
-
Install it in such a way that the switches and other controls cannot be reached by persons using the bath or shower.
-
Do not use extensions, if not with particular care.
-
Keep the appliance at a distance of at least 1m from other objects (fig. 1).
14a. To avoid the risk of fire, keep the outlets and air intakes of the appliance at a distance of at least 1m from any object, curtains, tissues or flammable materials.
- Do not place appliance close to a radiant heat source.
- Do not use the appliance to dry clothes.

-
Do not insert or allow foreign objects to enter any ventilation or exhaust opening, as this may cause an electric shock, fire or damage to the appliance.
-
Do not allow cord to come in contact with heated surfaces during operation.
- Do not run cord under carpeting, throw rugs or runners etc. Arrange cord away from traffic areas so that it will not be tripped over.
- Do not twist, kink or wrap the cord around the appliance, as this may cause the insulation to weaken and split.
- Do not store appliance while it is still hot.
-
Do not use this appliance outdoors, or on wet surfaces.
not use this heater with programmer, timer or any other device that switches the heater on automatically since a fire risk exists if the heater is covered or positioned incorrectly. -
This heater is intended for floor use only. Do not mount on ceiling or walls.
- Do not operate the heater near curtains, as the material could be sucked into the air vents. (fig. 3).
-
Avoid spilling liquid on the appliance.
-
Children must not play with equipment.

- The appliance may be used by children over 8 years of age and by persons with reduced physical, sensory or mental capacities, or without the required experience or knowledge, provided they are supervised or have been instructed in the safe use of the appliance and understand the hazards involved.
- Children must not play with equipment. Children must not be allowed to clean the appliance or perform user maintenance without proper supervision.
- Children of less than 3 years should be kept away unless continuously supervised.
- Children aged from 3 years and less than 8 years shall only switch on/off the appliance provided that it has been placed or installed in its intended normal operating position and they have been given supervision or instruction concerning the use of the appliance in a safe way and understand the hazards involved.

Children aged from 3 years and less than 8 years shall not plug in, regulate and clean the appliance or perform user maintenance.
- Do not use this heater in the immediate surroundings of a bath, a shower or a swimming pool.
-
Some parts of this product may become very hot and could cause burns. Be very careful when children or vulnerable adults are nearby.
-
Always remove plug from the mains supply before cleaning.
-
For correct use of the appliance NEVER:
a. Place it immediately underneath a mains wall socket.
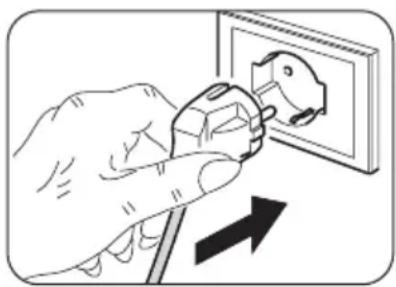
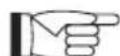
b. Pull the power cable or the appliance itself to remove the plug from the mains socket.
c. Leave it expose to atmospheric agents (rain, sun, etc.).
d. Leave it plugged in when not in use.
e. Touch it with wet or damp hands.
- Use this appliance only as described in this manual. Any other use is not recommended by the manufacturer and may cause fire, electric shock or injury.

- The most common cause of overheating is deposits of dust or fluff in the appliance. Ensure these deposits are removed regularly by unplugging the appliance and vacuum cleaning air vents and grilles.
- Do not use abrasive cleaning products on this appliance. Clean with a damp cloth (not wet) rinsed in hot soapy water only.
- Do not connect the appliance to the mains voltage until completely assembled and adjusted.
- Switch off and use handles where provided when moving (fig. 2).
- Do not immerse the appliance in water or in other liquids. Short circuits or fires may occur.
Do not let the appliance work in enclosed areas such as a cabinet since it could cause a fire.
-
If the appliance's plug is incompatible with the socket, have the socket replaced with a suitable one by a qualified technician, who must ascertain that the section of the socket cables is compatible with the power absorbed by the appliance. We do not recommend using adaptors and/or extension cables. If they cannot be avoided, however, they must comply with current safety regulations and their ampacity (A) must not be below the maximum ampacity of the appliance.
-
Do not use the appliance in case of malfunctioning or faults, if the cord or plug are damaged, or if it has been dropped or damaged in any manner. Turn the appliance off, disconnect the plug from the socket and let it be checked by professionally qualified personnel.
-
Disassembly, repair or reconversion performed by an unauthorized person could cause heavy damages and will cancel the manufacturer warranty.
-
Neither disassemble nor modify the appliance.
- Repairing the appliance by yourself is extremely dangerous.
-
In the presence of gas leaks from other equipment, ventilate the room well before activating the appliance.
-
Do not remove plug from power socket until the appliance has been switched off.
-
If you no longer wish to use this appliance, it must be made inoperative by cutting the power supply cable after removing the plug from the power socket.
-
WARNING - In order to avoid overheating, do not cover the heater (fig. 4).
-
Hazardous parts of the appliance must be rendered harmless, especially as there is a risk of children playing with it.
- At first use and after a long period of inactivity of the appliance, a slight noise may be heard and a slight odour may be smelled. It is a normal phenomenon which will disappear after a few minutes of operation.
- The appliance is filled with a precise quantity of special oil.
-
Repair requiring opening of the oil container are only to be made by the manufacturer or his service agent who should be contacted if there is an oil leakage.
-
Regulations concerning the disposal of oil when scrapping the appliance have to be followed.
0.4 - PROPER USE
58. The appliance must be used exclusively as an electrical radiator with the only purpose of making the room where you are staying comfortable.
59. This appliance is only designed for domestic use or similar, not for commercial or industrial use.
60. An improper use of the appliance with possible damages caused to people, things or animals releases OLIMPIA SPLENDID from any responsibility.
0.5 - UNINTENDED AND POTENTIALLY DANGEROUS USE
61. Do not use the appliance in areas in which are used or stored petrol, varnishes or other flammable liquids or in environments with the presence of flammable or explosive gases.
62. Do not use the appliance if insecticide gas has just been sprayed in the room or in the presence of burning incenses, chemical vapours or oily residues.
63. Do not use this appliance in small rooms occupied by persons which are not able to leave it autonomously unless constant supervision is supplied.
This product must be used exclusively according to the specifications indicated in this manual. Use different to that specified, could cause serious injuries.
THE MANUFACTURER IS NOT LIABLE FOR INJURY/Damage TO PERSONS/OBJECTS DERIVING FROM FAILURE TO COMPLY WITH THE REGULATIONS CONTAINED IN THIS MANUAL.
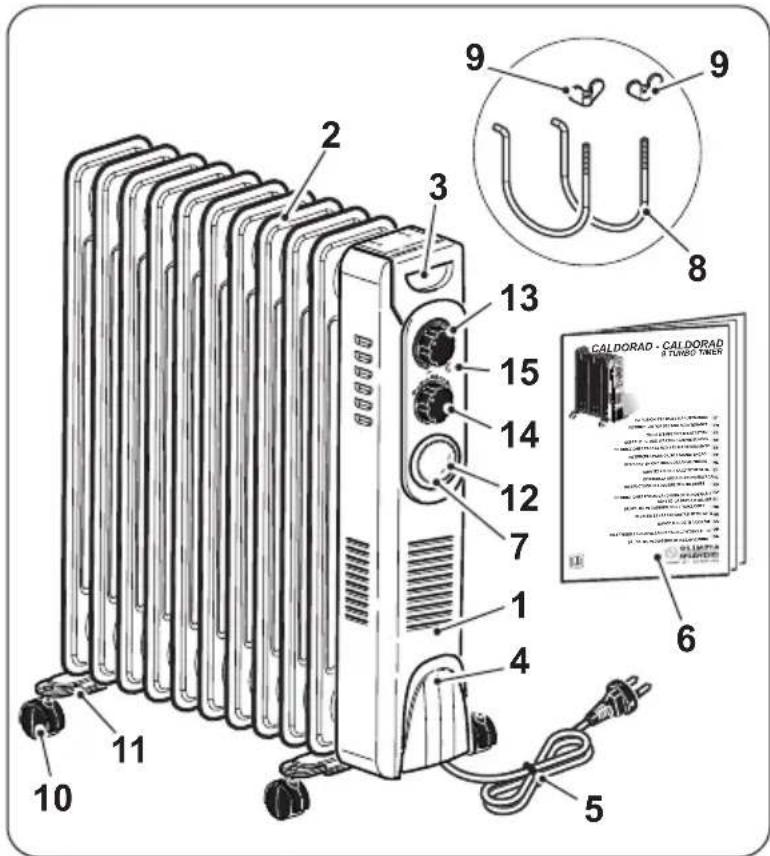
1 - DESCRIPTION OF THE APPLIANCE AND OF THE COMMANDS
- Appliance body
- Radiator fin
- Handle
- Cable plate
- Power cord
- Use and maintenance booklet
- Mode selection knob
- "U" bracket (2 pieces)
- Wing nut (2 pieces)
10.Wheel (4 pieces) - Wheel support (2 pieces)
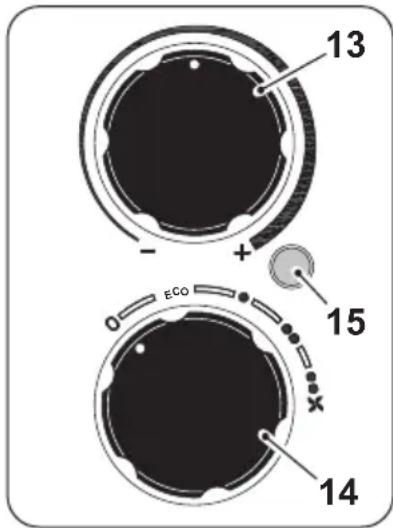
- Mode switch
- Room temperature adjustment knob
- ON/OFF and outgoing air temperature adjustment knob
- Indicator light for appliance operational
2 - INSTALLATION
- After removing the packaging, check that the appliance is in perfect condition; in case of doubts do not use it and refer to professionally qualified personnel.
- Rotate the appliance upside down.

Place the appliance on a flat and stable surface, making sure it cannot be damaged or fall. Protect the support surface.
- Insert the brackets (8) in the supports (11) as shown in figure "5".
- Position the supports (11) between the most external radiant wings (2) of the appliance (1) (fig. 6a).
- On model CALDORAD 7, lock the supports (11b) by screwing the screws (9b) (fig. 6b).
- Rotate the brackets (8) upwards (fig. 7).
- Lock the supports (11) by screwing the wing nuts (9) (fig. 8). Do not tighten the wing nuts (9) excessively.
- Rotate the appliance to a vertical position (fig. 9).

-
Do not use the appliance without having mounted the supports and the wheels first.
-
Only use the appliance in vertical position (handle "3" above); every other position may create a dangerous situation.
-
Entirely straighten the power cord.
- Place the appliance in an appropriate environment and on a stable and flat surface.
- Make sure that curtains or other objects do not obstruct the air flow (fig. 3).
- Leave at least 1m of free space on the sides, behind the appliance and above it (fig. 1).
- Make sure the knob (14) is set to "O" and the knob (13) is set to "MIN".
- Connect the plug to the power socket.

-
Make sure the mains data correspond to what is described on the data plate of the appliance.
-
Arrange cord away from traffic areas so that it will not be tripped over.
3 - USE
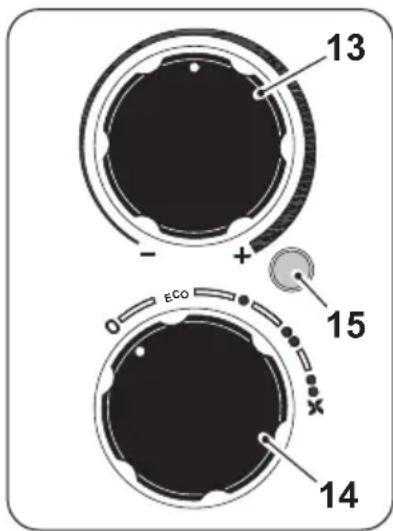
Knob "14"
- Knob set to "O": appliance OFF
- "ECO-MODULATING": rotate the knob to "ECO" position.
- "MEDIUM POWER" function : rotate the knob to " " position.
- MAXIMUM POWER" function: rotate the knob to "●●" position.
- "TURBO" () : rotate the knob to "●●★" position. () Only for 9 Turbo Timer
Knob "13" - Thermostat
-
Start the appliance by rotating the knob (14) to the desired power position; the indicator (15) lights up.
-
To set the room temperature to a specific value (thermostatation), rotate the knob "13" clockwise until it stops (position "MAX").
- Once the desired temperature of the room has been reached, slowly rotate the knob "13" anticlockwise until the appliance switches off.
- At this point, the appliance will reactivate automatically when the room temperature lowers beyond the set limit and will switch off again once the room temperature reaches the set value.
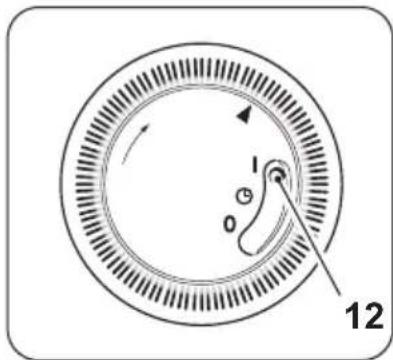
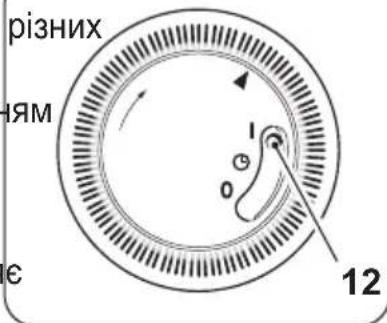
Knob "7" - Mode
By means of the switch (12) it is possible to select three different modes:
Continuous mode "I", it is possible to select the desired room temperature.
- Timer mode " ", it is possible to set a timer for switching off of the appliance.
- Continuous mode "0", it is possible to switch off the appliance.
To completely switch off the appliance:
- place the knob (14) yo position "0"; the LED (15) switches off. Disconnect the plug from the power socket.
4 - OPERATION
4.1 - "FAN" MODE (Only for 9 Turbo Timer)
- It is possible to select this mode by rotating the knob (14) up to symbol “ ”
4.2 - "TIMER" MODE
-
This appliance is equipped with an interval timer (24h), the knob (7) is composed of 96 segments and each segment represents 15 minutes.
Before proceeding with setting of the timer, current time MUST be set: -
Rotate the knob (7) clockwise by aligning the arrow with the current time.
-
To set timer mode, proceed as described below:
-
Push outwards the segments which represent the time in which the appliance must stay on.
- Push inwards the segments which represent the time in which the appliance must switch off.
Example:
To set the switching on at 5 a.m. and switching off at 6 a segments between 5 and 6 outwards.
- Set the switch (12) to “” to enable the timer.
-
If the switch (12) is moved to the symbol "I", the appliance starts to work continuous function deactivating the "Timer" mode.
-
The settings of the "Timer" mode remain saved up to switching off of the appliance. If the plug is disconnected from the power socket, the current time does not update automatically.
-
When the power plug is reconnected, current time MUST be set again as described above.
5 - OVERHEAT PROTECTION
- This heater is protected with overheat protection that switches off the appliance automatically in case of severe overheating
In this case:
- unplug the appliance;
- wait about 30 minutes for it to cool;
- remove any possible cause of overheating, eg. something covering the heater;
- check for damage to the appliance, the cord and the plug.
If there is no damage:
- plug the unit back in;
- switch it on as described above.
If the heater still does not turn on, please contact Customer Service for assistance.
6 - SAFETY CONTROL (anti-overturning switch)
- If the appliance falls or overturns, the anti-overturning switch is activated and automatically turns it off.
- It is necessary to place the appliance in vertical position to resume normal operation.
7 - MAINTENANCE AND CLEANING

Before performing any cleaning or maintenance intervention on the appliance, disconnect the plug from the power socket and wait for the fan to stop completely.
- Use a dry cloth to clean the appliance.
- If the appliance is very dirty, it is possible to use a cloth dampened with warm water (max 50^ ) and a mild detergent to clean its external parts. Dry with a dry cloth.
- Use a brush or a vacuum cleaner to remove dust from the radiant wings (2) (fig. 10).

-
Make sure the appliance is completely dry before reconnecting the plug to the power socket.
-
Do not use a chemically treated or antistatic cloth to clean the appliance.
-
Do not use petrol, solvents, polishing pastes or similar. These products could break or deform the plastic surface.
- Do not use oils, chemical substances or abrasive products to clean the appliance.
- Neither wash nor immerse the appliance with/in water.

- In case of an appliance malfunction, do not try to disassemble it but instead refer to the retailer or to the technical assistance service.
8 - PRESERVATION OF THE APPLIANCE
- If you do not intend to use the appliance for a particularly long period of time or if operations which could produce a lot of dust must be performed, it is advised to store the appliance as follows:
- Switch the appliance off and disconnect the plug from the power socket.
- Wrap the power cord (5) around the support (4).
- Store in a fresh and dry place away from humidity.
9 - TECHNICAL DATA
See the table in the following page.
| CALDORAD TIMER | Item Symbol | Value Unit | ||
| Heat output | ||||
| Nominal heat output | Pnom | 2,4 kW | ||
| Minimum heat output (indicative) | Pmin | 0,4 kW | ||
| Maximum continuous heat output | Pmax,c | 2,4 kW | ||
| Auxiliary electricity consumption | ||||
| At nominal heat output | eI max | - | kW | |
| At minimum heat output | eI min | - | kW | |
| In standby mode | eI SB | 0,00025 kW | ||
| Type of heat output/room temperature control | Yes | No |
| Single stage heat output and no room temperature control | □ | ☑ |
| Two or more manual stages, no room temperature control | □ | ☑ |
| With mechanic thermostat room temperature control | ☑ | □ |
| Electronic room temperature control plus day timer | □ | ☑ |
| Electronic room temperature control plus week timer | □ | ☑ |
| Other control options | ||
| Room temperature control, with presence detection | □ | ☑ |
| Room temperature control, with open window detection | □ | ☑ |
| With distance control option | □ | ☑ |
| With adaptive start control | □ | ☑ |
| With working time limitation | ☑ | □ |
| With black bulb sensor | □ | ☑ |
| info@olimpiasplendid.it | Olimpia Splendid SpA Via Industriale 1/3, 25060 Cellatica, Brescia, Italy | ||
| CALDORAD 7/9/11 | Item Symbol Value Unit | ||
| Heat output | |||
| Nominal heat output | Pnom | 1,5/2,0/2,5 | kW |
| Minimum heat output (indicative) | Pmin | 0,7/1,0/1,2 | kW |
| Maximum continuous heat output | Pmax,c | 1,5/2,0/2,5 | kW |
| Auxiliary electricity consumption | |||
| At nominal heat output | eI max | - | kW |
| At minimum heat output | eI min | - | kW |
| In standby mode | eI SB | 0 | kW |
| Type of heat output/room temperature control | Yes | No |
| Single stage heat output and no room temperature control | ☐ | ☑ |
| Two or more manual stages, no room temperature control | ☐ | ☑ |
| With mechanic thermostat room temperature control | ☑ | ☐ |
| Electronic room temperature control plus day timer | ☐ | ☑ |
| Electronic room temperature control plus week timer | ☐ | ☑ |
| Other control options | ||
| Room temperature control, with presence detection | ☐ | ☑ |
| Room temperature control, with open window detection | ☐ | ☑ |
| With distance control option | ☐ | ☑ |
| With adaptive start control | ☐ | ☑ |
| With working time limitation | ☐ | ☑ |
| With black bulb sensor | ☐ | ☑ |
| info@olimpiasplendid.it | Olimpia Splendid SpA Via Industriale 1/3, 25060 Cellatica, Brescia, Italy |
0-MISES EN GARDE 1
0.1 - INFORMATIONS GÉNÉRALES......1
0.2 - SYMBOLES 1
5 - BESCHERMING TEGEN
OVERVERHITTING 11
6 - VEILIGHEIDSCONTROLE
8 - FÖRVARING AV APPARATEN
4.2 - "AJASTIN" TOIMINTATAPA
7 - VEDLIKEHOLD OG RENGJØRING

IInoctpaui 3i6paHHa nepsiHa octahnHcTOpIHkax iHcTpyKci
0 - NOPEДЖЕHHЯ
0.1 - 3AΓΑΠbHA IHΦOPMALIЯ
Iepsh 3a BCE xOuyemno NOJkyBaTN Bam 3a Te, IIO BN BnPiuNn BiDnTn IpeBaIy npnilady HauoTO Bnpo6HnTBA.
0.2-CNMBOJI
CnmboJI,HaBeJeHi y cIbOMy po3dIIny,IO3BOJIAOTb WBNIDKO I OJHO3NaHNO HadaTn IHOpMaciIO,HeO6xIDHy dIy npaBnIbHOrO BnKOpNCtAHNpynJaDy B 6e3peuHnx yMOBaX.
0.2.1 - 3actocobahi niktorpamn
Bka3ye Ha Te, 0u cey DOKyMeH TcIy yBaXHo IpoHTaTn nepeyCTaHO Ta/a6o BnKOpNCTaHHaM npHaNy.
Bka3ye Ha Te, 0u cey DOKyMeH C1iD yBaXHo IpoHTaTn nepeObCnyroByBaHHaTa/a6o OChUeHHaM npHaNy.
He BnKOpNCTOByBaTn npIaD, nonepeHbO He BCTaHOBbU NKopnyc3 Konecamn.
BukopncToBbTn npnaJ nnwe y BepTKaIbHomy noLoXeHHi (pyka «3» Bropi); 6yNb-Ke iHwe noLoXeHHa MoXe CTBOpHTn He6e3neuHy cnTuauio.
- NobHicTIO pO3MOTaTI uHyp JKNBneHHra.
- Po3mictnHa pBHi Ta ctiKi noBepxHi y BiIDnoBIDHomy npMiuHHi.
- PepekoHaTnca, 0o 7Topu nn iHwi npedmetn He 6nokyIb nobitpr (Pnc. 3).
3aIIuHTn npHaMHi 1 M BInbHoro npocTopy 3 60kIB, 33aNy Ta na Hnd npnaDom (Pnc. 1). - Перевіп,在и, ручka (14) 3нaxодипась y пооженни «O» a nepeminko noLOженHi «MIN».
BcTaNITN BnIky do po3eTKn.

-
IpepeBipTN BiIDNoBIDHicTb XapakTepcNTK eIeKtpnHoi MepeXi Ta xapakTepcNTK, Bka3aHnx Ha IIaCTnHi Ha npJaladi.
-
Po3miuByaTu Ka6eIb daJeko BiD npoxoDIB, 06 yHnKHyTu CNOTnKaHHa.

3 - BUKOPUCTAHHЯ
Pyka «14»
- Pучka y пооженни «О»: пилад ВIMКнedo
«ECO-PEGYIIOUOHy»: NOBepHyTn IepeMnKau B NpOJKeHnA «ECO». - Pexim «CEPEDHЯ NOTXHICTb»: noBepHyTn pyKy B noIoxeHn «● »
- Pexim《MAKcIMAlbHA NOTXHICTb》: noBepHyTn pyuKy B nOIOxehnA «●.
·《TURBO》 (^) : NOBepHyTu pyuKv B NpOJxHnA « 》. ()nue dIy moJIe 9 Turbo Timer
PyuKa «13» - TepMoctaT
3anyctntn npnilad, noBepHyBwn pyky (14) B noJoxeHHa 6axaHOi notyXHocTi; BMnKaCTbcra iHdNkATOp (15).
- Дя наштуваня Temnéратуп npиMiцень (TePMocstat) NOBepHyTN pyky «13» 3a roDNHHKOBOIO cTpiIkoHdo ynpy (noLoxeHnRA «MAX»).
- Iicna doceHHaHoI temepatypn npmiueHn noBbNo nobepHytn pyky 13> npotn rOuHHNKoBoi cTpiKn dOKn npuaH He BmKHeTbcra.
-Писяцьог�прлад 3нов увimкгетбяnicя toro,як Temnéратура пимішени CTане Meншою,нix BCTa-HOBNeHe 3наченя,a NOTIM BUMKhetbCЯ KOЛn Tempe-paTypa nДнИмETbcSdo BCTaHOBJIeHOrO 3наченя.
PyuKa «7» - PeXkIM
3a donomoro npu (12) moxha o6paTn 3 peKIMN:
pekmnoiHOpoBToI 3 HanaTByBaHnM baxaHOI TemnepaTyPi cepedOBu.
pekm «Timer» « »Lякнdo3BOJnE HanaTuBaTn 6axaHnYac BnKNoUeHnI npnaIaNy.
pekm noctiHoi po60n «O», kN D03BOJNE BKNJIOHTn npnila.
Для NOBHorO BnKJIIOUeHHe NpNJaNy
- po3mictn nepemkau (14) B noJooKeHHi «0»; cBITnoIoi (15) BnKJIouv BnHrTn BnIky 3 po3eTKn.
4 - POBOTA
4.1 - PEXKIM «BEHTUNLAICIA» (niwe dIra modeni 9 Turbo Timer)
- Pexm Moxha opaTn, kso noBepHytn nepemkau (14) Ha cMBOJ «.
4.2 - PEXNIM «TIMER»
- Cey npnnaMa e iHTepBaIbHn TaImep (24 roDHH). Puyka (7) cKnadaeTbc3 96 cerMeNTiB, KoxHn 3 knx BiIOBiae iHTepBaany B 15 XBUNH.
- Ipeed hanaaHTyBaHnM TaImepy HEOBXIDHO BiDperyJIOBAtn noToHn quac: - NobepHyTn pyk (7) B rOdnHHNKOBOMy HaprMky Ta BnpIBHrTn cTrpioouky 3 nTOUHM qacom.
- ьб haiaTyBaTn TaMep, BkoHaTn HactynHi di:
BnTyrHyTu 3OBHi cerMeHTu, kI BiIDNoBIaHb Yacy, npOTrOM kKOrO npuaMa6 ByTu BKnIOUeHm.
HaTnchutyHa cerMeHTn, kI BiIOBiaIoTb yacy, npotraom koro npi Ma6 byTu BnKJIIOUeHIM.
PnKnaIaI:
Дя моzo, уоб заюразуаму вкюунь o 05:00 ma buknioунь o 06:00 Heobxioho bumaymu 4 ce2meHmu, po3miuehi mix 5 ma 6.
-ДяakTnBauci TaMepy po3mictu nepemkau (12)ВпложehнI « »
- RaKuo nepemukay (12) 3haxodumbc8 noJoxeHHI «I» npuaad nouHaec npauObamu e nocmiHomy pekumi ma de3akmueye pekum «Timer».
- HanaumybaHHpekumy «Timer» 3aunuombcg 3anpoaspamobHumo do buKIOueHn npunady. Y pa3i eIDKIOueHn bUNku 3 po3emku nomouhu yac He noHOeIOcMbsc aemomamuHo.
- Picn HOB020 NiokluoyenHdo po3emku HEO5XIDHO 3HO haJauymyeamu nomouHu yac, k OnucHo b nonepeDhbomy ceZMeHmi.
5-3AXNCT BID INEPEPIBAHNIA
- Zei npnilad Mae 3axnct BiD neperpiBaHHa, kIn aBTOMaTnUHO BmKAc NOro Ha pa3i TpBAnoro neperpiBaHHa. Y cboMy pa3i:
BnHrTN BnIKy 3 po3eTKN;
- 3auekata npn6n3no 30 xBnH dna oxoJxHn npnJa;
- 3HaHTN MOxJIbBy npuHny nepeRpiBaHHa (HaPnKJaI: ppeMeT, kNk 6JokyE oxoJDKeHHa npnaNy);
- nepeBipTN HaABHicTB MOxJINBnX NOsKoJKeHb npnaDy, Ka6eIIO XnBHeHHa Ta BnKn.
JaKuo Hemae nowkoDxKeHb:
BCTaBHTN BNIKky DO PO3eTKN;
3HOVBiIMKHyTnpNJa.
KIO npnaH He BMnKaetbCra 3B'raTncra 3 aBTOpN3OBaHIM ceHTpOM o6cnyroByBaHHa.
- Y pa3i HecnpaBHOCTI npnady He HamaraTncr po3i6paTn Ioro, a 3BepHyTnCSrdo DnJIepa abo cnyKbTexHicHoI niIDTpIMKn.
8-3БЕРIGAHня ПИЛаду
JaKuo BN He 3bnpaTeCBAKOpNCTOBvBaTN npnlaD npOTrOM OcO6JINBO Tp nepioy yacy a6o notpi6Ho BkOHaTHpo6Ty, kA MoKe npn3BeCTN do BeNkoi KInbkocti Nnny, Mn peKomeHdyEmo 3eepiratn npnlaD taKIM YHOM:
BnMkHyTn npJna i BnHrTn BNJKy 3 PO3eTKN.
3aΦikCyBaTn Ka6eJb XuBJIeHHra (5) Ha ochobi (4).
36epiratn B npoxoJHOmy Ta cyxomy micui noaJI BiD BOJorH.
9 - TEXHIYHA IHΦOPMALIЯ
-ДиВИТСЯТаБЛицHaHаCTуПиHiCTOPIHci.
This symbol on the product or its packaging indicates that the appliance cannot be treated as normal domestic trash, but must be handed in at a collection point for recycling electric and electronic appliances. Your contribution to the correct disposal of this product protects the environment and the health of your fellow men. Health and the environment are endangered by incorrect disposal. Further information about the recycling of this product can be obtained from your local town hall, your refuse collection service, or in the store at which you bought the product. This regulation is valid only in EU member states.