
ER2201 - Beard trimmer PANASONIC - Free user manual and instructions
Find the device manual for free ER2201 PANASONIC in PDF.
| Product Type | Beard Trimmer |
| Brand | Panasonic |
| Model | ER2201 |
| Power Supply | AC adapter RE9-36, automatic voltage conversion |
| Motor Voltage | 1.2 V DC |
| Charging Time | 8 hours |
| Runtime | Approximately 10 uses (5 minutes of trimming per use) |
| Cutting Range | 1 mm to 20 mm (adjustable comb) |
| Functions | Beard, mustache, hair trimming |
| Included Accessories | Beard and hair comb, cleaning brush, lubrication oil, AC adapter |
| Blades | Stainless steel, lifespan approximately 3 years |
| Battery | Rechargeable nickel-metal hydride built-in, lifespan approximately 6 years |
| Cleaning | Blades and body washable under running water |
| Maintenance | Regular lubrication of blades with supplied oil |
| Safety | Automatic shut-off not mentioned; turn off before changing comb; do not use on animals |
| Repairability | Blades and battery replaceable by an authorized service center |
| Weight | Approximately 200 g (estimate) |
| Dimensions | Approximately 15 x 4 x 4 cm (estimate) |
| Usage | Household use only |
| Warranty | Not specified in the manual |
Frequently Asked Questions - ER2201 PANASONIC
User questions about ER2201 PANASONIC
0 question about this device. Answer the ones you know or ask your own.
Ask a new question about this device
Download the instructions for your Beard trimmer in PDF format for free! Find your manual ER2201 - PANASONIC and take your electronic device back in hand. On this page are published all the documents necessary for the use of your device. ER2201 by PANASONIC.
USER MANUAL ER2201 PANASONIC
Operating Instructions AC/Rechargeable Beard/Hair Trimmer Model No. ER2201/ER2211
English 2 Dansk 38 Cesky 74
Deutsch 8 Portuguès 44 Slovensky 80
François 14 Norsk 50 Magyar 86
Italiano 20 Svenska 56 Romana 92
Before operating this unit, please read these instructions completely.
Important
Cautions for charging
- Dry the appliance completely before charging it.
- Use the ER2201/ER2211 Beard/Hair Trimmer with the RE9-36 adaptor only.
- Charge the appliance at temperatures between 5^ and 35^ where it will not be exposed to direct sunlight or other heat sources.
- Charging should not be continued for more than 48 hours as it may damage the battery.
The appliance may become warm during operation and charging. This is normal. - Charge the trimmer for at least 16 hours when charging it for the first time or when it has not been used for more than 6 months.
ER2201
- Charge the trimmer for at least 8 hours when charging it for the first time or when it has not been used for more than 6 months.
ER2211
- The supply cord cannot be replaced. If the cord is damaged, the appliance should be scrapped.
Cautions for use and storage
- Turn off the appliance before changing the trimming length or removing the comb attachment.
- This appliance is not intended for use by persons (including children) with reduced physical, sensory or mental capabilities, or lack of experience and knowledge, unless they have been given supervision or instruction concerning use of the appliance by a person responsible for their safety. Children should be supervised to ensure that they do not play with the appliance.
- Moving parts should not be tampered with.
- Do not pick up the appliance by the cord. It may become detached, causing damage or injury.
-
The appliance should not be used on animals.
-
The appliance should not be disassembled. Take it to a qualified serviceperson when service or repair is required.
- The appliance should be stored in a place that is not exposed to direct sunlight or near a heater or other source of heat.
- Keep the adaptor away from water and handle it only with dry hands.
- Store the adaptor in a dry area where it is protected from damage.
Cautions for cleaning
- The housing should not be taken apart as this can affect the watertight construction of the appliance.
- Wash the appliance in tap water. Salt water, boiling water and cleaning products that are designed for toilets, bathrooms or kitchen appliances should not be used. The appliance should be submerged in tap water for a short time only.
- Clean the housing only with a soft cloth slightly dampened with tap water or soapy tap water. Caustic cleaners such as benzine or bleach should not be used.
Specifications
Power source: See the name plate on the product.
(Automatic voltage conversion)
Motor voltage: 1.2 V DC
Charging time: 8 hours ER2201
1 hour ER2211
This product is intended for household use only.
Airborne Acoustical Noise: 61 (dB (A) re 1 pW)
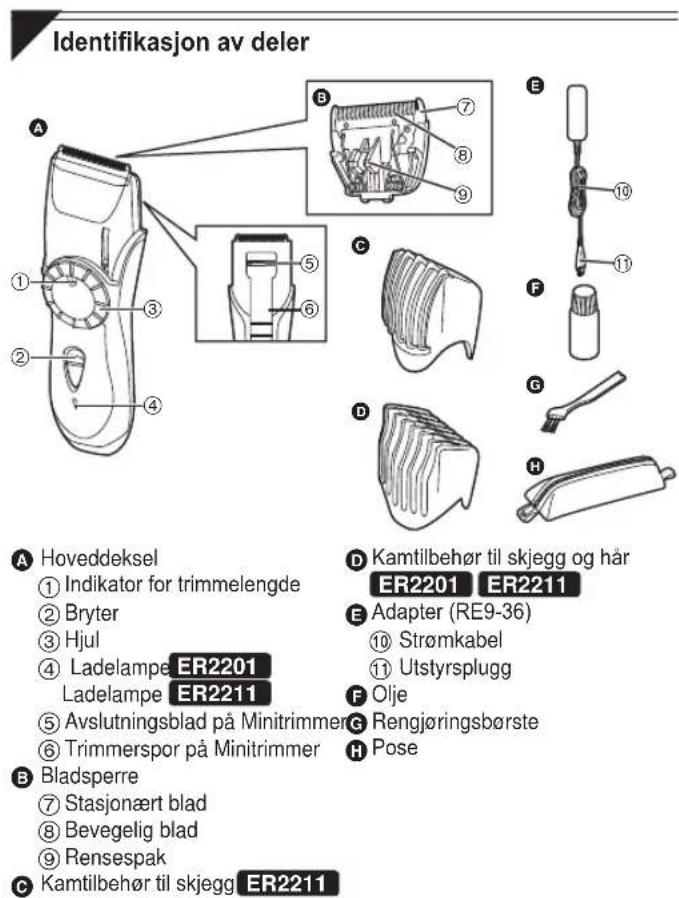
Parts identification
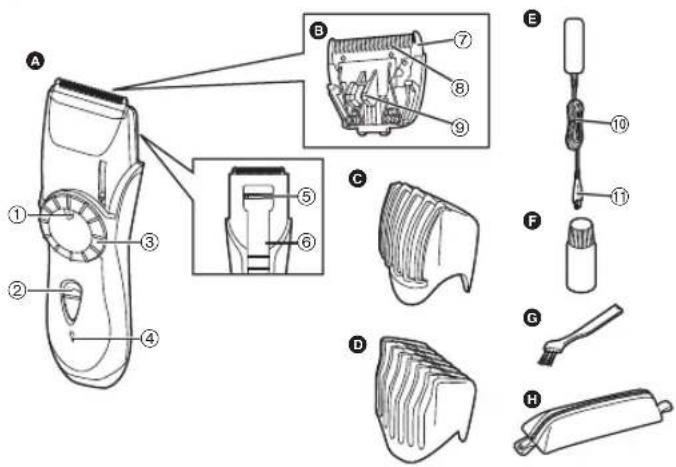
A Main body
① Trimming length indicator
② Switch
③ Dial
(4) Charge indicator lamp
ER2201
Charge status lamp
ER2211
⑤ Finishing blade of Mini trimmer
⑥ Trimmer guide of Mini trimmer
Blade block
⑦ Stationary blade
⑧ Movingblade
⑨ Cleaning lever
Comb attachment for beard ER2211
Comb attachment for beard and hair ER2201 ER2211
Adaptor (RE9-36)
10 Power cord
① Appliance plug
Oil
6 Cleaning brush
Pouch
| Attachments ER2201 ER2211 | ||
| Comb attachment for beard | - | ✓ |
| Comb attachment for beard and hair | ✓ | ✓ |

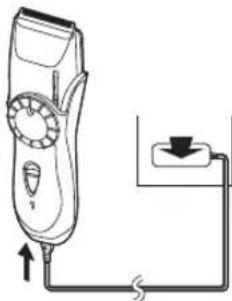
Charging the trimmer
ER2201
You can fully charge the trimmer in 8 hours if it is losing speed.
ER2211
You can fully charge the trimmer in 1 hour if it is losing speed.
A full charge supplies enough power for approximately 10 trims
(5 minutes per trim for a normal beard).
1. Insert the appliance plug into the trimmer.
2. Plug in the adaptor into a household outlet.
The charge indicator lamp lights and stays on until the adaptor is removed from a household outlet. ER2201
The charge status lamp lights and it flashed when charging is completed.
ER2211
Cord Trimming
If you insert the appliance plug to the trimmer and plug in the adaptor into a household outlet, you can use it even if the battery capacity is low.
- If the trimmer does not work, continue charging it for approx. 1 minute.

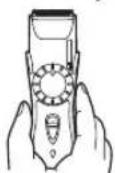
Using the trimmer
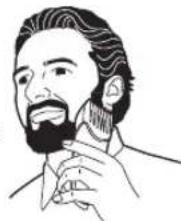
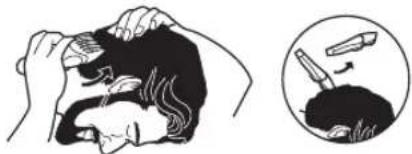
Trimming your beard and moustache
-
Apply a few drops of the oil to the blades. (See page 6.)
-
Turn the dial to move the comb attachment to the desired trimming length (between 1 mm and 20 mm).
| Indicator | Trimming length | Indicator | Trimming length |
| 1 1.0 | mm 11 | 11.0 mm | |
| 2 2.0 | mm · 1 | 2.5 mm | |
| · 3.5 | mm 14 | 14.0 mm | |
| 5 5.0 | mm · 1 | 5.5 mm | |
| · 6.5 | mm 17 | 17.0 mm | |
| 8 8.0 | mm · 1 | 8.5 mm | |
| · 9.5 | mm 20 | 20.0 mm |

-
Slide the switch on the main body upwards to turn on the trimmer.
-
Place the angled face of the comb against the skin and cut the beard by moving the trimmer in all directions to obtain a uniform cut.
With curly facial hair, the comb attachment may not cut all of the hair. In this case, remove the comb attachment and use a conventional comb to draw out the remaining uncut hair.
Shaping your moustache
- Remove the comb attachment.
- Place the angled edge against the skin and make the border of the beard even.
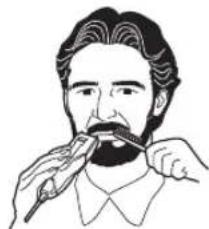
Finishing the edges and Trimming the moustache
- Slide the trimmer guide for Mini trimmer up and turn on the trimmer.
- Run the blade lightly over the surface to smooth off a beard surface.

Cutting of hair
Cut hair to the correct height by moving the trimmer back against the flow of the hair.
- Do not use the trimmer in an inverted position. This can cut hair too deeply.
Cutting around the ears
Cut a little, and then gently separate the trimmer from the hair.
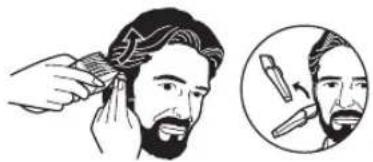
Cutting the nape of the neck
Bring the trimmer gently away from the hair to finish.
- Brush off any hair trimmings from the main body and from around the blade.
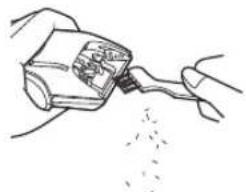
- Brush any hair trimmings out from between the stationary blade and the moving blade while pressing down the cleaning lever to raise the moving blade.
Clean
Cleaning the trimmer
Using the cleaning brush
1. Remove the comb attachment.
2. Hold the main body, place your thumb against the blades and then push them away from the main body.
If washing in water
The following is the symbol of washable trimmer. The symbol means that hand-held part may be cleaned under water.

Warning - Detach the hand held part from the power cord before cleaning it in water.
- Disconnect the power cord from the trimmer.
- Remove the blade.
- Rinse off any hair trimmings that are sticking to the blades with running water.
- Rinse out any hair trimmings that are inside the trimmer with running water.
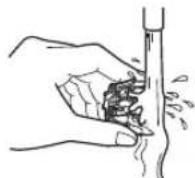
- Gently shake the trimmer 4 or 5 times and then wipe off any water drops from the trimmer and the blade.
- Place the trimmer on a towel with the switch on the main body facing downwards to let it dry fully.
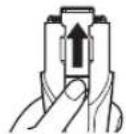
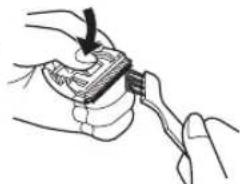
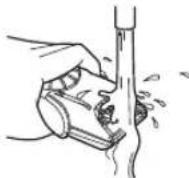
Lubrication
Lubricate the blades before using them or after cleaning them.
- Apply a drop of the oil to the points indicated by the arrows.
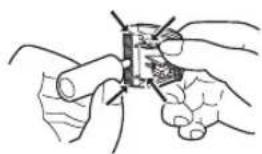
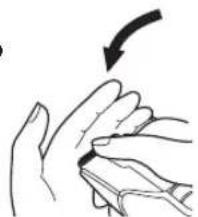
Remounting the blade
Fit the mounting hook into the blade mounting on the trimmer and then push in until it clicks.
Blade life
Blade life varies according to the frequency and length of use of the trimmer.
For example, the blade life is approximately 3 years when using the trimmer for 10 minutes every 3 days. Replace the blades if cutting efficiency reduces substantially despite proper maintenance.
Battery life
Battery life varies according to the frequency and length of use of the appliance.
For example, the battery life is approximately 6 years when the battery is charged 3 times a month.
The appliance should not be left for more than 6 months without charging it. The charge drains from the battery and the battery life may be shortened.
Removing the built-in rechargeable battery
The battery in this trimmer is not intended to be replaced by consumers. However, the battery may be replaced at an authorized service center.
The procedure described below is intended only for removal of the rechargeable battery for the purpose of proper disposal.
- Disconnect the power cord from the trimmer.
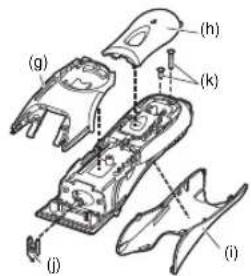
- Remove the blade from the trimmer. Remove the screw (a) and detach the bottom cover (b).
- Detach the dial cover (c), remove the screw (d) and disconnect the dial (e).
- Remove the 2 screws (f).
- Detach the housing (g), front panel (h) and side panel (i), then remove the trimmer drive rod (j).
- Remove the 2 screws (k).
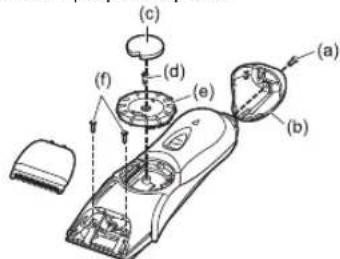
- Remove the 2 screws (l) and disconnect the rubber push plate (m).
- Remove the screws (n) and disconnect housing (o).
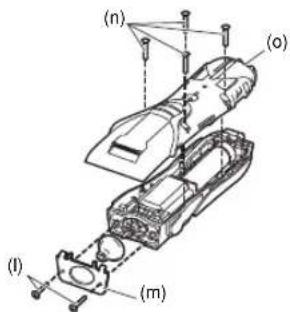
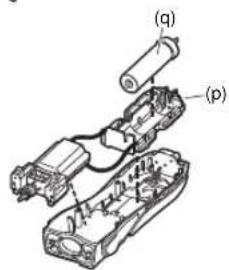
- Disconnect the battery chamber (p) and remove the battery (q).
- Discharge the battery completely before removing it.
- Be careful not to short the + and - terminals of the battery after removing it.
For environmental protection and recycling of materials
This trimmer contains a Nickel-Metal Hydride battery. Please make sure that the battery is disposed of at an officially assigned location, if there is one in your country.
Please read "Information for Users on Collection and Disposal of Old Equipment and used Batteries" on page 104.
Wichtig
Precautions concerning la recharge
Identification of dele

Apparatets krop
① Indikator for trimmelaengde
(2) Taend/sluk-kontakt
③ Drejeknap
④ Opladningsindikatorlampe
ER2201
Lampe for opladningsstatus
ER221
⑤ Mini-trimmerens afslutningsskaer
⑥ Skyder til mini-trimmer
B Skareenhed
Lubrifique as laminas antes de as usar ou depuis de as limpar.
Advarsler for rengjoring
- Hoveddelen ma ikke demonteres, da dette kan skade apparatets vanntette konstrujsjon.
Vask apparatet i kranvann. Det ma ikke brukes saltvann, kokende vann og rengjøringsmidler som er beregnet på toaletter, baderom aller kjokkenutstyr. Apparatet ma kun senkes i vann et kort øyeblikk.
Rengjor apparatusets hoveddel med en myk klut som er fuktet med vann ell er sapevann. Ikke bruk alkaliske rengjoringsmidler som bensin ell blekemidler.
Spesifikasjoner
Motorspenning: 1,2 V likestrom
Ladetid: 8 timer ER2201
1 time ER2211
Dette Produktet er kun beregnet til husholdningsbruk.
Akustisk stoy: 61 (dB (A) re 1 pW)
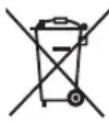
Information for Users on Collection and Disposal of Old Equipment and used Batteries
These symbols on the products, packaging, and/or accompanying documents mean that used electrical and electronic products and batteries should not be mixed with general household waste.
For proper treatment, recovery and recycling of old products and used batteries, please take them to applicable collection points, in accordance with your national legislation and the Directives 2002/96/EC and 2006/66/EC.
By disposing of these products and batteries correctly, you will help to save valuable resources and prevent any potential negative effects on human health and the environment which could otherwise arise from inappropriate waste handling.
For more information about collection and recycling of old products and batteries, please contact your local municipality, your waste disposal service or the point of sale where you purchased the items.
Penalties may be applicable for incorrect disposal of this waste, in accordance with national legislation.
For business users in the European Union If you wish to discard electrical and electronic equipment, please contact your dealer or supplier for further information.
[Information on Disposal in other Countries outside the European Union]
These symbols are only valid in the European Union. If you wish to discard these items, please contact your local authorities or dealer and ask for the correct method of disposal.
![PANASONIC ER2201 - [Information on Disposal in other Countries outside the European Union] - 1](/content/2026/03/449305/images/ba40d40fd364250fb78795989c59acd2552fe36645404e0b9e1eb925418f7160.jpg)
Note for the battery symbol (bottom two symbol examples):
This symbol might be used in combination with a chemical symbol. In this case it complies with the requirement set by the Directive for the chemical involved.
Deutsch
m = 311 ;
m = 311 ;
m = 311 ;
Tieto symboly na pristrojoch, batériach a baleniach alebo v prilozenych navodoch na pouzitie znamenaju, ze pouzité elektrické a elektronické zariadenia a batérié sa nesmú miesat so vseobecným domacim opadom.
Pre správne zaobchodanie, obnovu a recykláciu, odovzdajte prosim tieto produkty na urçene zberné miesta, kde budú prijate bez poplatku v sulade so Smernicami 2002/96/ES a 2006/66/ES. V niedtorych krajinach je mozné tieto produkty vrátit priamo miestnemu maloobchodu v pripade, ak si objednate
F. No.1 EN, GE, FR, IT, DU, SP, DA, PT, NW, SW, FI, PL, CZ, SK, HU, RO, TK Printed in China