
ER-GK20 - Beard trimmer PANASONIC - Free user manual and instructions
Find the device manual for free ER-GK20 PANASONIC in PDF.


| Product Type | Beard Trimmer |
| Brand | Panasonic |
| Model | ER-GK20 |
| Dimensions (approx) | 1.5 x 2 x 8 in |
| Weight (approx) | 0.2 lbs |
| Power Source | Rechargeable battery |
| Charging Time | 8 hours |
| Operating Time | 40 minutes |
| Blade Material | Stainless steel |
| Cutting Length Settings | Adjustable 1-10 mm |
| Adjustable Comb | Yes, included |
| Washable | Yes, under running water |
| Waterproof | Water-resistant design |
| Safety Lock | Travel lock function |
| Included Accessories | Comb attachment, cleaning brush |
| Replacement Blade | Model: WER-21 |
| Warranty | 1 year limited |
| Country of Origin | China |
| Recommended for | Beard and stubble trimming |
Frequently Asked Questions - ER-GK20 PANASONIC
User questions about ER-GK20 PANASONIC
0 question about this device. Answer the ones you know or ask your own.
Ask a new question about this device
Download the instructions for your Beard trimmer in PDF format for free! Find your manual ER-GK20 - PANASONIC and take your electronic device back in hand. On this page are published all the documents necessary for the use of your device. ER-GK20 by PANASONIC.
USER MANUAL ER-GK20 PANASONIC
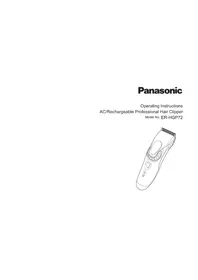
Operating Instructions
(Household use) Body Hair Trimmer
Model No. ER-GK20
English......3
Chinese 23

Panasonic
English
Operating Instructions
(Household use) Body Hair Trimmer
Model No. ER-GK20
Contents
Safety precautions...... 4
Parts identification 8
Installing the battery 9
Read before use.... 10
How to use 12
Maintenance.... 15
Troubleshooting 20
Specifications 21
Thank you for purchasing this Panasonic product. Before operating this unit, please read these instructions completely and save them for future use.
Safety precautions
To reduce the risk of injury, loss of life, electric shock, fire, and damage to property, always observe the following safety precautions.
Explanation of symbols
The following symbols are used to classify and describe the level of hazard, injury, and property damage caused when the denotation is disregarded and improper use is performed.
| WARNING | Denotes a potential hazard that could result in serious injury or death. |
| CAUTION | Denotes a hazard that could result in minor injury or property damage. |
The following symbols are used to classify and describe the type of instructions to be observed.
| This symbol is used to alert users to a specific operating procedure that must not be performed. | |
| This symbol is used to alert users to a specific operating procedure that must be followed in order to operate the unit safely. |

WARNING
▶ Preventing accidents
Do not store within the reach of children or infants. Do not let them use it.

- Putting parts or accessories in the mouth may cause an accident or injury.

Immediately stop using if there is an abnormality or malfunction.
- Failure to do so may cause fire or injury.

If the oil is consumed accidentally, do not induce vomiting, drink a large amount of water, and contact a physician.
If the oil comes into contact with eyes, immediately wash thoroughly with running water, and contact a physician.
- Failure to do so may result in physical problems.

This appliance is not intended for use by persons (including children) with reduced physical, sensory or mental capabilities, or lack of experience and knowledge, unless they have
been given supervision or instruction concerning use of the appliance by a person responsible for their safety.
Children should be supervised to ensure that they do not play with the appliance.
- Failure to do so may cause an accident or injury.

CAUTION
▶ To protect your skin
Do not press the blade strongly on the skin.
Do not use this product for any purpose other than trimming body hair.
Do not use this product without an attachment to trim hair in the following areas: sensitive zones, buttocks, anus, and surrounding areas.

Do not use in the following body area:
- Face or head (hair, beard, etc.)
- Areas with rough or bumpy skin (swollen areas, cuts, hemorrhoids, and other protuberances; nipples and surrounding areas) • Moles, bruises, etc.
- Doing so may cause skin injury.

Do not press the blade with excessive force. Also, do not touch blade with nails.
Do not bring the blade into contact with hard objects.
- Doing so may cause the blade to become damaged and injure the skin as the blade is very thin. Be careful when using it.

Check the blade for deformation or damage before use.
- Failure to do so may cause skin injury.

When storing or carrying, always attach the attachment.
- Failure to do so may cause injury to the skin or reduce the life of the blade.

CAUTION
This product

Do not share with your family or others.
- Doing so may result in infection or inflammation.

Do not drop or subject to shock.
- Doing so may cause injury.

Do not modify, disassemble or repair.
- Doing so may cause an accident or injury.
→Contact an authorized service center for repair.
The battery

Do not throw into fire or disassemble.
The supply terminals are not to be short-circuited.
- Doing so may cause a burn or injury.
Always follow the cautions printed on the battery. Check the polarity of the battery (+ and -) and install it correctly.
Remove the battery immediately and dispose of it safely when it is discharged.

Remove the battery when not using the appliance for an extended period of time.
Use the battery by the recommended use-by date. Non-rechargeable battery is not to be recharged.
- Failure to do so may cause overheating or explosion of the battery, injury or contamination of surroundings due to leakage.
Parts identification
A
B
C
D E

A Main body
① Blade ② Power switch [O/I] ③ Battery cover
B Attachment for groin
© Length adjustment comb attachment (3 mm)
Accessories
D Cleaning brush
E Oil
Alkaline battery is not enclosed.
Installing the battery

• Make sure that the main body is turned off.
1. Remove the battery cover.
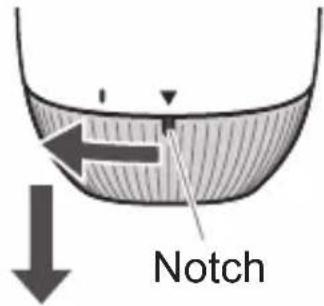
Turn the notch on the battery cover in the direction of the arrow until the battery cover is removed.
2. Check the polarity (+ and -) and install the battery.
Thoroughly wipe the main body to prevent water droplets from getting inside when installing the battery.
3. Attach the battery cover.
(1) Align the notch on the battery cover with the “!” mark and insert the battery cover.
(2) Rotate the battery cover until the notch is aligned with the “▼” mark on the main body.

Notes
- You can use the appliance for approximately 3 months with one Panasonic LR6 (AA alkaline battery). (When used for approx. 5 minutes at one time, once a week in a room temperature of 20°C.)
- Be sure to use LR6 (AA alkaline battery).
Read before use
Areas of use
√ OK Do not use
| Area | When used with an attachment | When used without an attachment | |
| Sensitive zones | |||
• Genitalia  | √ | ✕ | |
| • Genital area | |||
| • Crotch | |||
| • Buttocks | |||
• Anus  | √ | ✕ | |
| • Perianal region | |||
| Armpits |  | √ | √ |
| Chest |  | √ | √ |
| Navel area |  | √ | √ |
| Arms, hands |  | √ | √ |
| Legs |  | √ | √ |
- Using this appliance to trim hair in areas that are not visually accessible may result in cuts or injury. Please use with care.
- Using the main body to trim hair in the shaded areas (☐) below may result in cuts or injury. Be sure to use an attachment.
Sensitive zones Buttocks


Notes
- Stretch the skin on the areas with loose or flabby skin, or with wrinkles, and lightly apply the edge of the blade or attachment.
- Do not use the attachment on wet hair.
Wet hair might clump or stick to the skin, becoming hard to trim.
If you use the attachment to trim wet hair, you may not be able to achieve a uniform trim.
- For areas with thick or dense hair growth, trim a bit at a time. Hair sometimes gets caught or builds up in the attachment. When this happens, clean the attachment. (See pages 15~17)
How to use
Lightly apply the main body to your skin and shave while trying it out if you are using it for the first time.
Preparations
- Check that the blades are not damaged or deformed before use.
- Apply the oil to the blade before and after each use. (See page 18)

Trimming dry hair
- Use the appropriate attachment as needed. (See pages 13~14)
Trimming wet hair
- Do not use the attachment when trimming wet hair.
- Wet and apply soap beforehand to the area to be shaved.
- Apply less pressure than you would when trimming dry hair, and move the main body in a gliding motion.
- Slide the power switch to turn on the appliance.
Applying to the skin and moving the main body. (See pages 13-14)
- Slide the power switch to turn off the appliance after use.
- Clean the appliance after each use.
- Failure to do so may cause the blade to lose sharpness. (See pages 15-17)
Without attachment

Apply light pressure and slowly move the main body against the direction of hair growth.

• To trim navel hair, lay the blade flat against your skin and then move the main body in a gliding motion. This allows you to trim hair down to a length of approximately 0.1 mm. - It does not matter which side of the blade you lay against your skin. (See page 10)
Attachment for groin

Lightly apply the edge of the attachment for groin against your skin and then slowly move the main body.
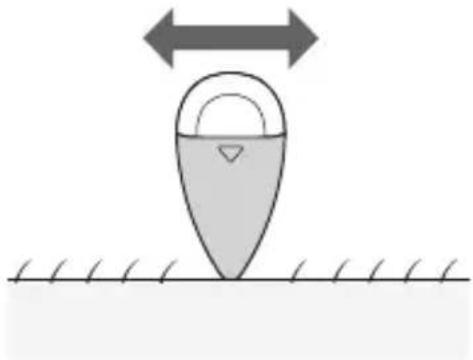

This allows you to safely trim hair down to a length of approximately 2 mm.
Length adjustment comb attachment
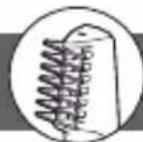
Lightly apply the edge (flat part) of the length adjustment comb attachment against your skin and then slowly move the main body.
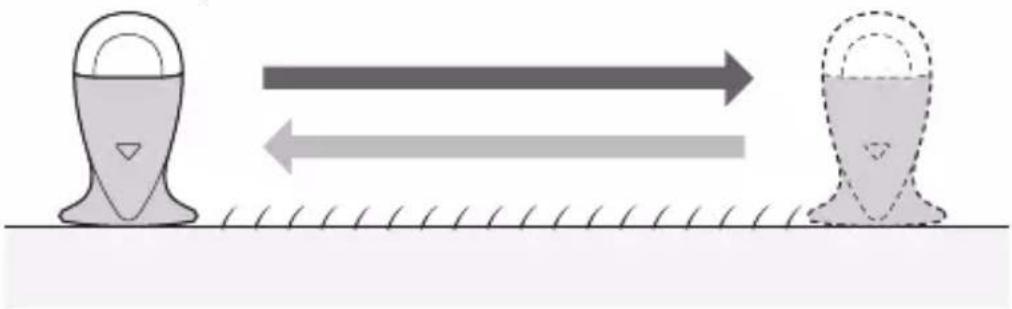
This allows you to trim hair down to a length of approximately 3 mm.
Removing and mounting the attachment
• Make sure that the main body is turned off.
How to remove
Holding the main body as shown in the figure, remove the attachment while pressing with your index finger and thumb.

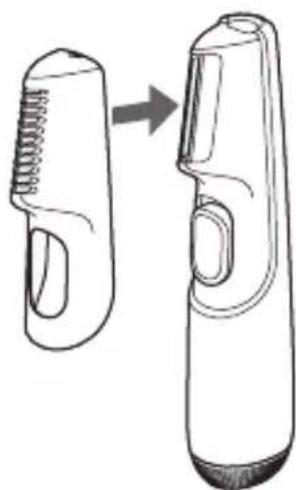
How to mount
Put the attachment on as indicated by the arrow.
• Make sure that the attachment does not come off.

- The illustration shows the attachment for groin.
- All the attachments have the same method of removing and mounting.
Maintenance
Cleaning
- Clean the main body and the blade after each use. (If left uncleaned, it will affect the blade sharpness and overall performance.)
• Make sure that the main body is turned off.
- Be sure to clean the appliance with the battery cover attached.
- Do not use thinner, benzine, alcohol or other chemicals. Doing so may cause failure, cracking or discoloration of the main body. Wipe the main body only with a soft cloth slightly dampened with tap water or soapy tap water.
- Store the main body in a place with low humidity after use. Failure to do so may cause malfunction due to condensation or rust.
• After cleaning, mount the attachment for storage.
▶ With water
To remove light dirt (Water-through cleaning)
- Remove the attachment.
- Turn on the power, and run water down the water inlet at the back of the main body to rinse thoroughly (for approximately 20 seconds).
- Turn the trimmer off.

To remove heavy dirt
- Remove the attachment and blade.
- Rinse with running water.

- Shake up and down several times to remove the water.
- Be careful not to hit the main body on the sink or any other object while draining the water. Failure to do so may cause malfunction.
- Wipe off the water with a towel and let it dry naturally.
- It will dry faster with the blade removed.
- Apply the oil to the blade after drying. (See page 18)

▶ With the brush
- Brush off hair trimmings if any.

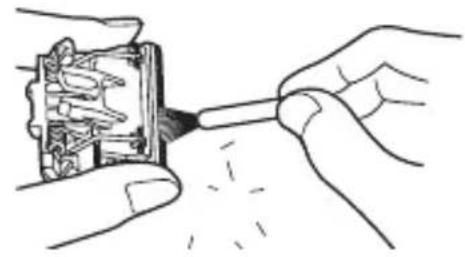
- Clean between the blades while pressing down the cleaning lever.

- Apply the oil to the blade after cleaning.
(See page 18)
Lubrication
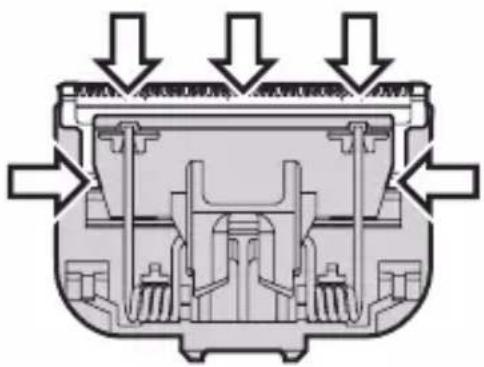
Apply the oil to the blade before and after each use.
- Remove the blade. (See page 19)
- Apply a drop of the oil to each indicated point.
- Attach the blade to the main body, turn on the power and allow to run for approximately 5 seconds.
▶ Replacement part
Replacement part is available at your dealer or Service Center.
| Replacement part for ER-GK20 | Blade WER9500 |
Removing and mounting the blade
- Please check if the blade is deformed or damaged before removing and mounting it. • Make sure the main body is turned off.
Removing the blade
- Hold the main body, as illustrated.
- Push the metal part of the blade to the left with the thumb's belly.
• It is no problem when touching the blade with fingers. - Be careful not to let the blade fall.
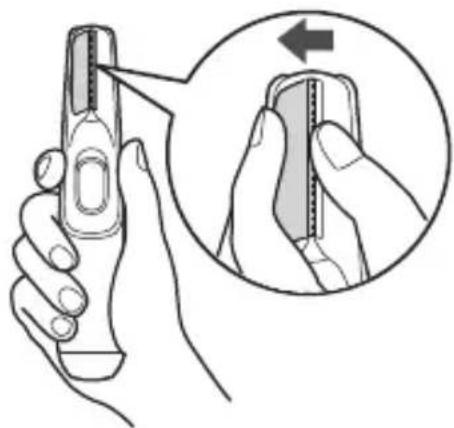
Mounting the blade
- Fit the mounting hook (B) into the blade mounting (A) on the main body and then push in until you hear a click.

Troubleshooting
| Problem Action | |
| The cutting performance has reduced. | Replace the blade.(See page 19) |
| Replace the alkaline battery.(See page 9) | |
| Apply oil. (See page 18) | |
| Clean the inner blade.(See pages 15~17) | |
| The appliance is not turned on. | Place the alkaline battery correctly. (See page 9) |
| Replace the alkaline battery.(See page 9) | |
| Confirm that the blade is properly attached. | |
| Makes a loud sound. | Apply oil. (See page 18) |
| Confirm that the blade is properly attached. |
If the problems still cannot be solved, contact the store where you purchased the appliance or a service center authorized by Panasonic for repair.
Specifications
| Power supply Dry-cell battery | |
| Battery type | One LR6 (AA alkaline battery) (Sold separately) |
This product is intended for household use only.
Panasonic
Instruction Manual
(Household) Hair Trimmer
Model ER-GK20
Table of Contents
Safety Precautions....24
Part Names 27
Installing the Battery 28
Read Before Use 29
Usage Instructions 31
Maintenance 34
Troubleshooting 38
Specifications 38
Thank you for purchasing this Panasonic product.
B
C
D E

A Main Unit
- Make sure the main unit is turned off.
1. Remove the battery cover.
Trimming dry hair

Installation method
Push the comb in the direction indicated by the arrow.
- Make sure the comb does not fall off.

- The figure shows the comb for the intergluteal cleft.
- The removal and installation method is the same for all combs.
Maintenance
Cleaning
▶ Rinse with water

▶ Use the cleaning brush
1. Brush away trimmed hair.


2. After cleaning, apply lubricating oil to the blades.
(See this page)
Lubrication
Apply lubricating oil to the blade before and after each use.
▶ Replacing Parts
Installing the Blade

Troubleshooting
- PANASONIC
- CONTENTS
- SAFETY PRECAUTIONS
- EXPLANATION OF SYMBOLS
- WARNING
- PREVENTING ACCIDENTS
- CAUTION
- TO PROTECT YOUR SKIN
- THIS PRODUCT
- THE BATTERY
- PARTS IDENTIFICATION
- A MAIN BODY
- B ATTACHMENT FOR GROIN
- © LENGTH ADJUSTMENT COMB ATTACHMENT (3 MM)
- ACCESSORIES
- D CLEANING BRUSH
- E OIL
- INSTALLING THE BATTERY
- REMOVE THE BATTERY COVER
- CHECK THE POLARITY (+ AND -) AND INSTALL THE BATTERY
- ATTACH THE BATTERY COVER
- NOTES
- READ BEFORE USE
- AREAS OF USE
- HOW TO USE
- PREPARATIONS
- TRIMMING DRY HAIR
- TRIMMING WET HAIR
- WITHOUT ATTACHMENT
- ATTACHMENT FOR GROIN
- LENGTH ADJUSTMENT COMB ATTACHMENT
- REMOVING AND MOUNTING THE ATTACHMENT
- HOW TO REMOVE
- HOW TO MOUNT
- MAINTENANCE
- CLEANING
- WITH WATER
- TO REMOVE LIGHT DIRT (WATER-THROUGH CLEANING)
- TO REMOVE HEAVY DIRT
- WITH THE BRUSH
- LUBRICATION
- REPLACEMENT PART
- REMOVING AND MOUNTING THE BLADE
- REMOVING THE BLADE
- MOUNTING THE BLADE
- TROUBLESHOOTING
- SPECIFICATIONS
- TABLE OF CONTENTS
- A MAIN UNIT
- INSTALLATION METHOD
- RINSE WITH WATER
- USE THE CLEANING BRUSH
- BRUSH AWAY TRIMMED HAIR
- AFTER CLEANING, APPLY LUBRICATING OIL TO THE BLADES
- REPLACING PARTS
- INSTALLING THE BLADE
Brand : PANASONIC
Model : ER-GK20
Category : Beard trimmer