
DHD789X - Basket DE DIETRICH - Free user manual and instructions
Find the device manual for free DHD789X DE DIETRICH in PDF.
User questions about DHD789X DE DIETRICH
0 question about this device. Answer the ones you know or ask your own.
Ask a new question about this device
Download the instructions for your Basket in PDF format for free! Find your manual DHD789X - DE DIETRICH and take your electronic device back in hand. On this page are published all the documents necessary for the use of your device. DHD789X by DE DIETRICH.
USER MANUAL DHD789X DE DIETRICH
ENGUIDETO INSTALLATION
EN The symbol on the product or on its packaging indicates that this product may not be treated as household waste. Instead it shall be handed over to the applicable collection point for the recycling of electrical and electronic equipment. By ensuring this product is disposed of correctly, you will help prevent potential negative consequences for the environment and human health, which could otherwise be caused by inappropriate waste handling of this product. For more detailed information about recycling of this product, please contact your local city office, your household waste disposal service or the shop where you purchased the product. This appliance is marked according to the European directive 2002/96/EC on waste electrical and electronic equipment (WEEE).
Touchedurgence fig.3B
You have just purchased a DE DIETRICH range ventilation hood, and we thank you for your purchase.
Our research and development teams have designed a new generation of appliances for you, which, because of their aesthetics, functionality, and technological evolution, are truly exceptional products representative of our design experience.
Your new DE DIETRICH range ventilation hood will harmoniously suit your kitchen and will perfectly combine ventilation performance and ease of use. We simply want to offer you an excellent product.
Within the DE DIETRICH product line you will find a wide range of ovens, microwave ovens, cookers, washing machines, and fitted refrigerators that can be freely coordinated with your new DE DIETRICH range ventilation hood.
Naturally, since our objective is the satisfaction of our clients towards our products, our customer service is at your total disposition to respond to any request and receive any useful suggestion (reference details at the end of the booklet).
Visit our web site www.dedietrich-electromanager.com where you will find our latest innovations as well as all useful information.
DE DIETRICH The new objects of value
Constantly seeking to improve our products, we reserve the right to modify their technical, functional, or aesthetic characteristics as they evolve.
Important: Before activating the appliance, read the installation and usage manual carefully to familiarise yourself more quickly with its operation.
1/ FOR THE ATTENTION OF THE USER
Safety instructions 27
- Description of the appliance 28
2 / INSTALLING THE HOOD
- Mounting the hood
- Installation 29
- Connecting the hood 30
29
3 / HOW THE HOOD WORKS 31
4 / CLEANING THE HOOD 32
5/OPERATIONAL ANOMALIES
- Changing the light bulb 33
6/ AFTER SALES SERVICE 33
1/ FOR THE ATTENTION OF THE USER
EN

Important: keep these instructions for use with the appliance. If the appliance should be left or passed on to others, make sure that the instructions are passed on with it. We thank you for taking note of these suggestions before installing and using the appliance. They have been written for your personal safety and the safety of others.
The manufacturer cannot accept any liability for problems, damage, or fire caused on or by the appliance due to failure to follow the instructions in this manual.
- SAFTEY INSTRUCTIONS
These hoods have been designed for personal use in the home. The appliance must be used by adults. Take care that children do not touch the appliance and do not use it as a toy. Make sure that children do not operate the controls.
- Upon delivery of the appliance, remove the packing material yourself or have it removed immediately. Check the overall condition of the appliance. Note any observations on the delivery bill and keep a copy. Your appliance is designed for normal use in the home. It is not designed for commercial or industrial use, or for purposes other than those for which it was designed.
- Do not ever modify, or attempt to modify, the design characteristics of this appliance. This could result in danger.
Repairs must be performed only by an authorised specialist.
Always disconnect the hood before carrying out cleaning or maintenance operations.
- Adequately ventilate the area in case the hood is activated simultaneously with other appliances powered from non-electrical sources so that the hood does not ventilate these combustion fumes.
- It is prohibited to cook food over open flames or operate gas hobs without pots or pans on them under the hood itself (the flames sucked into the hood might damage the appliance).
- Deep frying under the appliance must be done under constant supervision as hot oils and fats may ignite.
Respect the guidelines for cleaning and replacement of the filters. Accumulated deposits of grease are a fire hazard
- The use of combustible materials (wood, charcoal, etc...) on the hobs is not permitted. Never use steam or high-pressure devices for cleaning your hood (regulations regarding electrical safety).
Constantly seeking to improve our products, we reserve the right to modify their technical, functional, or aesthetic characteristics as they evolve.
In order to find the notes regarding your appliance easily in the future, we advise you to collect them on the page "After sales service and customer relations". (This page also explains where to find them on your appliance).

Attention: If your kitchen is heated by a device hooked up to a chimney (i.e., a wood oven), you should install the recirculation mode of the hood. Never use the hood without the other cartridges. Furthermore, you must province adequate ventilation to the area when your oven hood is used at the same time as devices that operate with gas or other combustible materials.
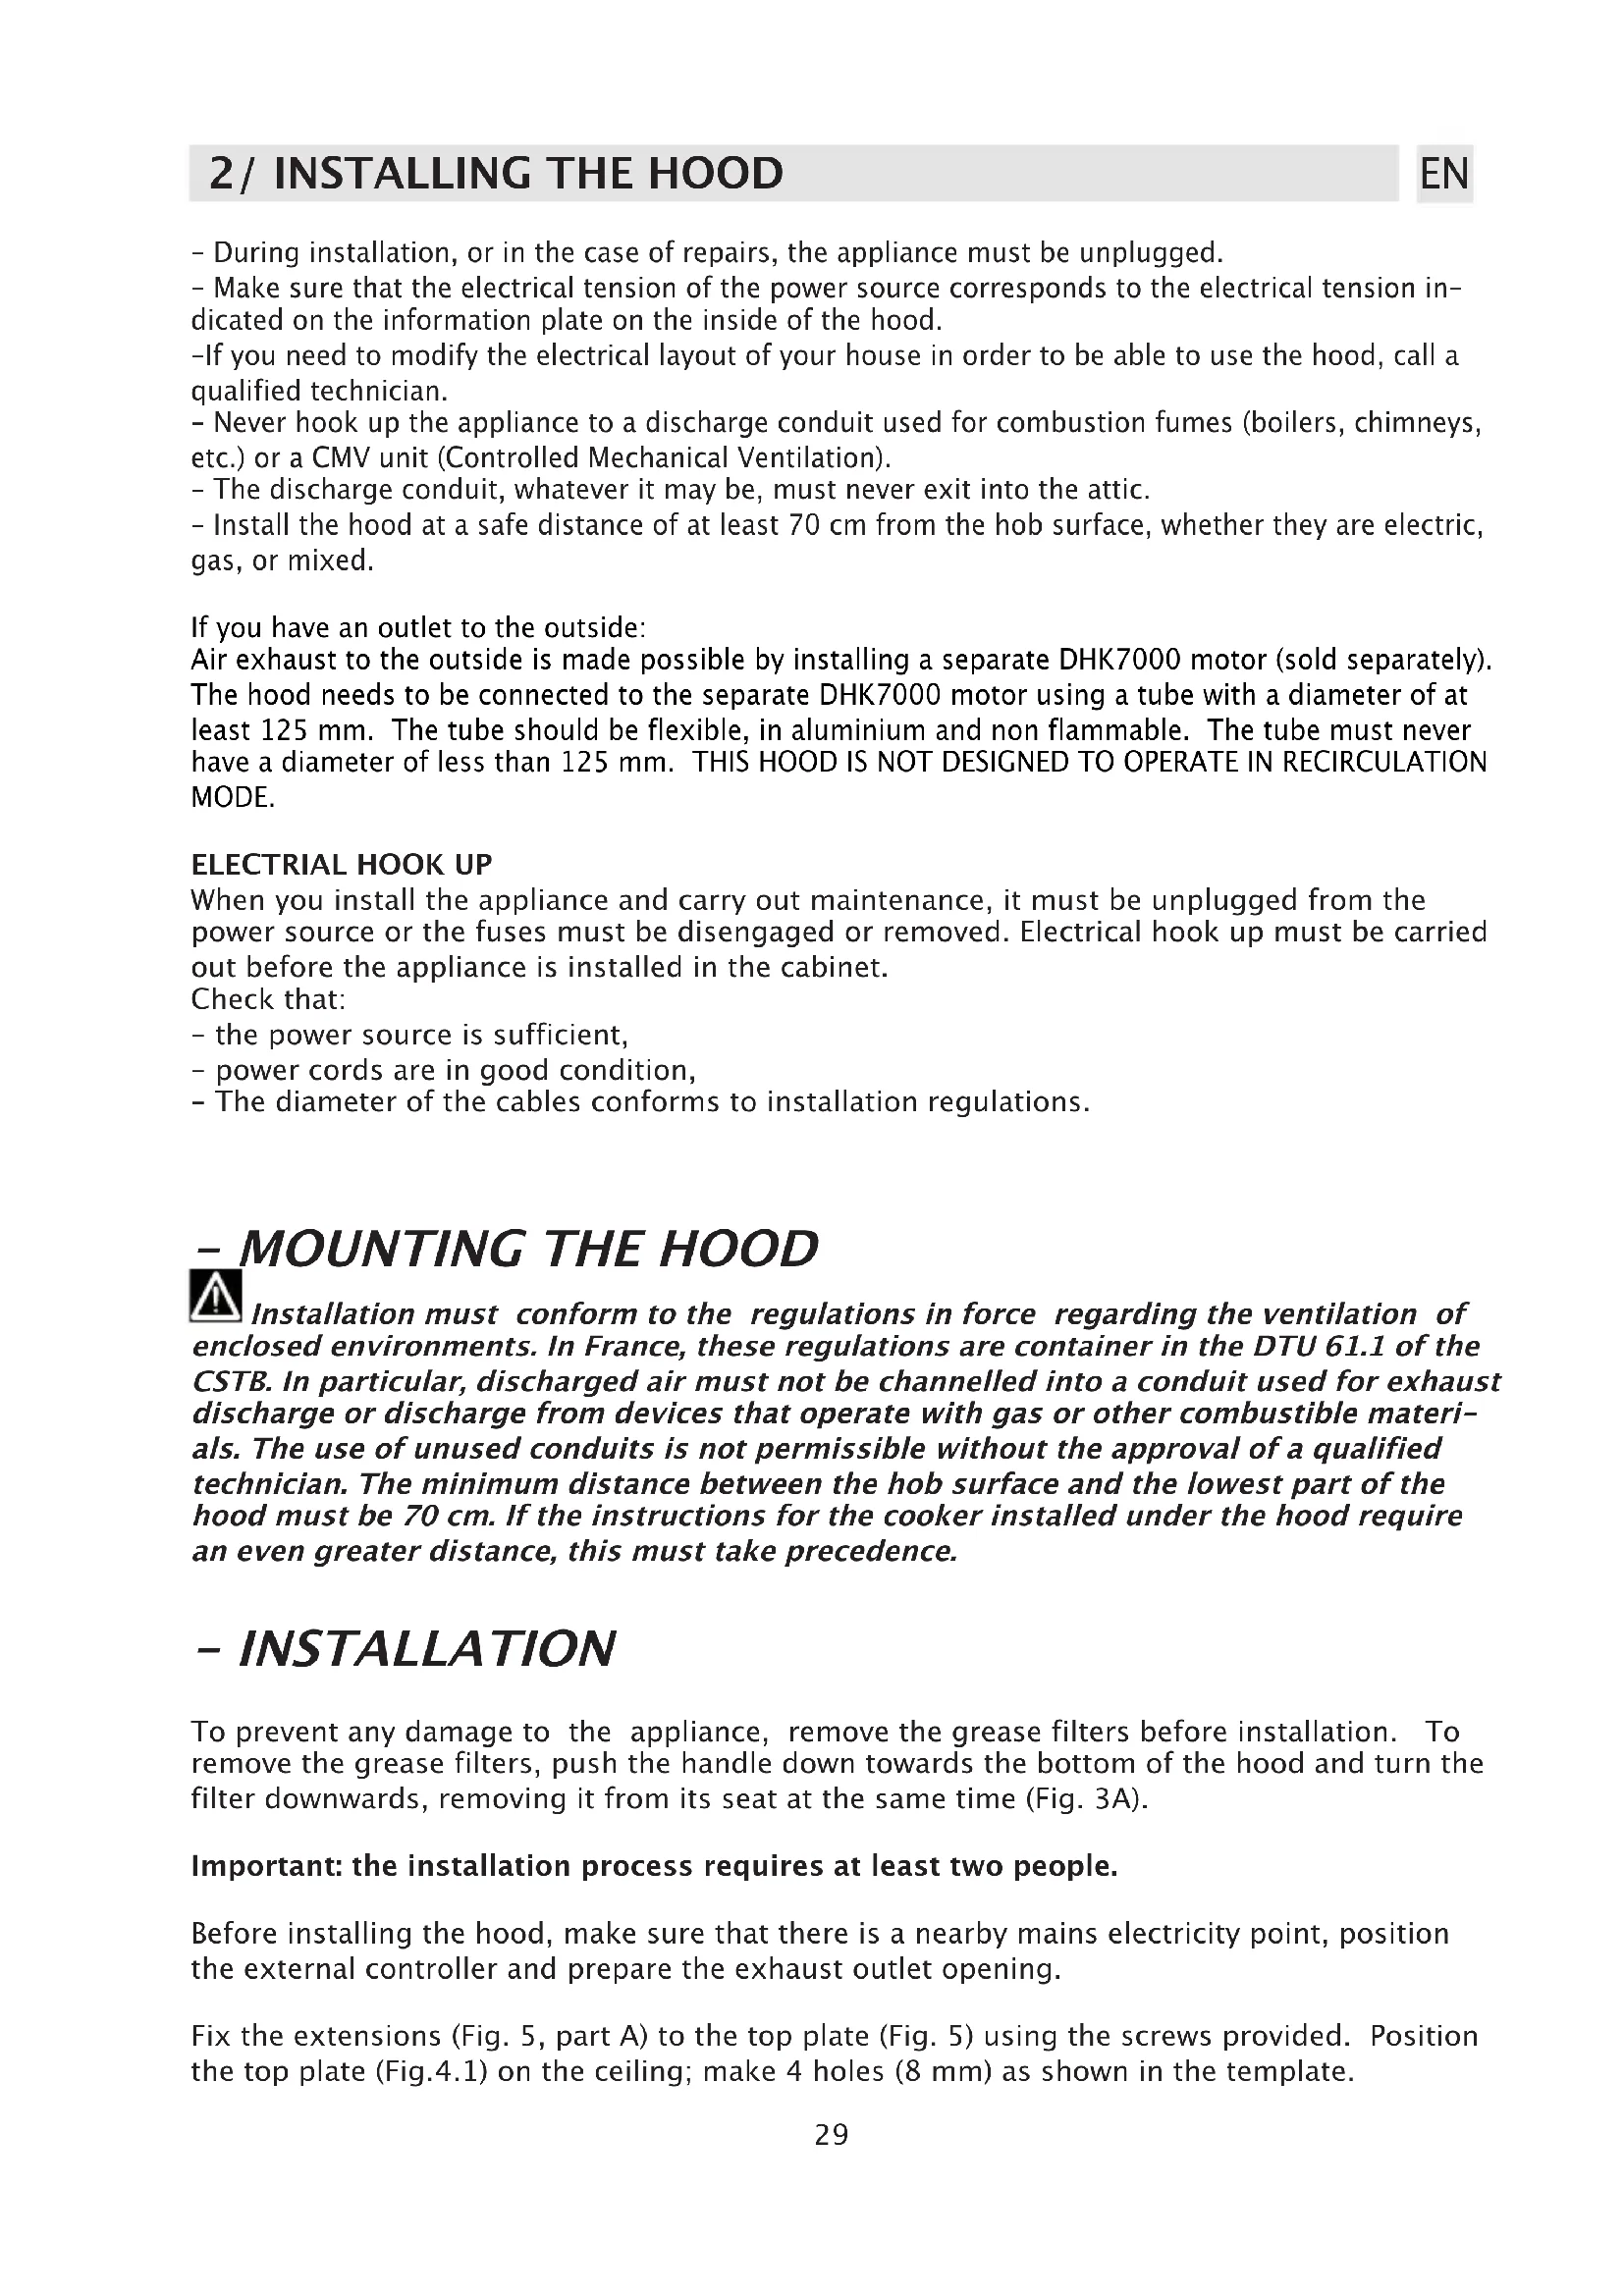
- DESCRIPTION OF THE APPLIANCE
flue

air exhaust pipe (sold separately)
external motor
(B) (DHK7000) (sold separately)
connection cable
2/ INSTALLING THE HOOD
EN
- During installation, or in the case of repairs, the appliance must be unplugged.
- Make sure that the electrical tension of the power source corresponds to the electrical tension indicated on the information plate on the inside of the hood.
-If you need to modify the electrical layout of your house in order to be able to use the hood, call a qualified technician. - Never hook up the appliance to a discharge conduit used for combustion fumes (boilers, chimneys, etc.) or a CMV unit (Controlled Mechanical Ventilation).
- The discharge conduit, whatever it may be, must never exit into the attic.
- Install the hood at a safe distance of at least 70~cm from the hob surface, whether they are electric, gas, or mixed.
If you have an outlet to the outside:
Air exhaust to the outside is made possible by installing a separate DHK7000 motor (sold separately). The hood needs to be connected to the separate DHK7000 motor using a tube with a diameter of at least 125mm . The tube should be flexible, in aluminium and non flammable. The tube must never have a diameter of less than 125mm . THIS HOOD IS NOT DESIGNED TO OPERATE IN RECIRCULATION MODE.
ELECTRIAL HOOK UP
When you install the appliance and carry out maintenance, it must be unplugged from the power source or the fuses must be disengaged or removed. Electrical hook up must be carried out before the appliance is installed in the cabinet.
Check that:
- the power source is sufficient,
- power cords are in good condition,
- The diameter of the cables conforms to installation regulations.
- MOUNTING THE HOOD

Installation must conform to the regulations in force regarding the ventilation of closed environments. In France, these regulations are container in the DTU 61.1 of the TB. In particular, discharged air must not be channelled into a conduit used for exhaust discharge or discharge from devices that operate with gas or other combustible materials. The use of unused conduits is not permissible without the approval of a qualified technician. The minimum distance between the hob surface and the lowest part of the hood must be 70~cm . If the instructions for the cooker installed under the hood require even greater distance, this must take precedence.
- INSTALLATION
To prevent any damage to the appliance, remove the grease filters before installation. To remove the grease filters, push the handle down towards the bottom of the hood and turn the filter downwards, removing it from its seat at the same time (Fig. 3A).
Important: the installation process requires at least two people.
Before installing the hood, make sure that there is a nearby mains electricity point, position the external controller and prepare the exhaust outlet opening.
Fix the extensions (Fig. 5, part A) to the top plate (Fig. 5) using the screws provided. Position the top plate (Fig.4.1) on the ceiling; make 4 holes (8mm) as shown in the template.
Insert the pins into the holes (Fig. 4.1 - A) and screw the plate to the ceiling (Fig. 4.1 - B). Then fix the lower structure (Fig. 6.2) to the hood so that the holes meet up with the metric screws welded to the fan support (Fig. 6.1). Insert the washers and nuts provided (Fig. 6.2-A) and tighten them using a suitable tool.
Join the air outlet pipe to the motor unit using a collar. Fit the top structure (Fig. 6.3) into the bottom structure and at the same time, adjust its position according to the required height and above all to the minimum height necessary between the cook top and the hood. Secure the two structures with screws (Fig. 6.3 B).
Then lift the hood with the structure and pipes already inserted until the four screws (Fig. 6.6 -E) hook onto the bottom structure (Fig. 6.3C). Once the two parts have connected, fasten them into place (Fig. 5.1, Fig. 5.2) using the lock screws (Fig. 5.2A).
Connect the hood pipe to the air exhaust opening.
Then insert the two telescopic pipes (Fig. 6.4 and 6.5) into the bottom part of the hood; lift the pipe completely and secure it to the hood with the screws provided (Fig. 10)- Raise the top pipe as far as the ceiling and screw it into place (Fig. 6.6 -D).
- ELECTRICAL HOOK UP OF THE HOOD
This appliance is fitted with an H05 VVF 3 conductor, 0.75mm^2 (neutral, phase, and ground) power cable. This can be hooked up to a 220 - 240V mono-phase electrical network by way of a CEI 60083 regulation power socket that must remain accessible after installation, in conformity to installation regulations.
We decline all responsibility in case of accident caused by a lack of ground connection or incorrect ground connection. The fuse used must be 10 or 16 A. If the power cable is damaged, call the after-sales service to avoid any risk.
Attention:
If the hood presents some form of anomaly, unplug the appliance or remove the fuse corresponding to the appliance's power line.
3/ HOW THE HOOD WORKS
EN
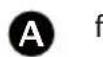
The remote control has 6 buttons to control the hood. When you use the timer function button (D), the hood will operate for 10 minutes before stopping automatically.
Remote control technical characteristics:
- Battery power : 12V
- Operating frequency : 433,92 Mhz
- Max. absorbed power: 25mA
-Operating temperature : -20 + 70 °C - Dimensions : 45 × 75 × 14 ~mm
Operating description:
It has the following 6 buttons to control the appliance:
lighting ON/OFF switch
01 : motor ON (first speed) OFF switch
2 : second speed switch
3 : third speed switch
4 : fourth speed switch
:10-minute timer
Standard configuration
The factory settings for the transmission code of all "hood remote controls" is the same (dipswitch no. 6-7-8-9-10 to ON).
If two hoods are installed in the same area or in any case, one hood is installed in close proximity to another, this could affect operation and therefore, it will be necessary to change the code on one of the remote controls.
Changing the code
To change the transmission code for the remote control, proceed as follows: open the cover and remove the battery then set one of the dipswitches 7-8-9-10 to OFF (dipswitch 6 must remain set to ON).
Initialising the new code
Once the code on the remote control has been changed, proceed as follows:
Press the main stop button for the hood (Fig. 3B), then restore the electrical connection by pressing the same button again (Fig. 3B); from this moment, you have 15 seconds to push the ON/OFF button to synchronise the hood with the new code number.
Emergency stop button Fig 3B
If the remote control does not work, press the emergency stop button, which is located next to the light. After any necessary repairs have been made, reset the emergency stop button.
These appliances are fitted with an electronic device that causes them to switch off automatically 4 hours from the last control operation.
4/ CLEANING THE HOOD
EN
Careful maintenance helps guarantee proper operation and good results from an appliance over time.

The hood must be unplugged from the electrical power source, both by unplugging
the appliance from the socket as well as de-activating the breaker, before removing the metal filters. After cleaning, you must replace the metal filters as outlined in the instru-tions.
| MAINTENANCE HOW TO PROCEED? | ACCESSORY PRODUCTS TO USE | |
| External surfaces and accessories | Do not use metallic scrubbers, abrasive products, or hard brushes. | To clean the external surfaces of the hood and the light housing screen use only commercially available household detergents diluted in water. Then rinse with clean water and dry with a soft cloth. |
| Filter cartridge | After 30 h of operation the keypad will signal that the filter is saturated by lighting up all of the but-tons. Shut off this message by pressing the timer switch. To remove the anti-grease grill push the handle toward the back of the hood and rotate the grill downward, removing it from its housing. To replace the grill, do the reverse. | To clean the grill, wash it by hand or in the washing machine. Clean it at least every two months. |
To preserve the appliance we advise you to use Clearit maintenance products.
cleanit
Clearit The experience of professionals at your service.
Clearit offers appropriate professional products and solutions for the day-to-day maintenance of your household appliances and kitchens.
You will find these products on sale at your usual retailer together with an entire line of accessories and complementary products.
| SYMPTOM SOLUTION | |
| The hood does not work... | Check that: • there is not a power outage. • a specific speed has actually been selected. • The connector of the external controller (DHK7000) needs to be securely connected. |
| The hood has low output... | Check that: • the motor speed selected is sufficient for the quantity of fumes from steam present. • the kitchen is ventilated well enough to allow for air intake. |
| The hood stops in the middle of operation | Check that: • there is not a power outage. • the omnipolar device has not tripped |
- CHANGING THE LIGHT BULB

Before any maintenance, the hood must be disconnected from the power source, either by unplugging the power cord from the wall socket or by deactivating the switch.
Dichroic light bulb:
To replace the halogen lamp, remove it using a small screwdriver or pointed tool that fits between the lamp and its housing. Replace the lamp with one that has the same characteristics (Fig. 7).
6/ AFTER SALES SERVICE
EN
Any maintenance on your equipment should be undertaken by:
- either your dealer,
- or another qualified mechanic who is an authorized agent for the brand appliances.
When making an appointment, state the full reference of your equipment (model, type and serial number). This information appears on the manufacturer's nameplate attached to your equipment.
Estimado cliente,
6/SERVICIO POSTVENTA 43

Technical specifications of the remote control:
- BESCHRIJVING VAN HET APPARAAT

A schoorsteen
2/ERKATAZTAH TOY ANOPPOHTHPA
EL
- TILSLUTNING AF EMHAETTEN
