
SodaStream - Other kitchen appliances KITCHENAID - Free user manual and instructions
Find the device manual for free SodaStream KITCHENAID in PDF.
| Product type | Stand mixer |
| Brand | KitchenAid |
| Model | SodaStream (Artisan 5KSM150PS / 5KSM156 / 5K45SS / 5KSM45) |
| Dimensions (approx.) | 39 x 35 x 25 cm |
| Weight (approx.) | 12 kg |
| Power supply | 220-240 V, 50/60 Hz, 250-300 W depending on model |
| Bowl capacity | 4,28 L or 4,8 L depending on model |
| Bowl material | Stainless steel or glass depending on model |
| Main functions | Mix, whip, knead, fold, beat, cream |
| Speeds | 10 speeds with Soft Start |
| Included accessories | Flat beater, wire whip, dough hook, pouring shield (depending on model) |
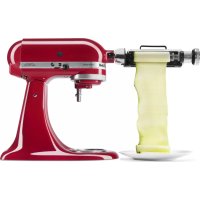
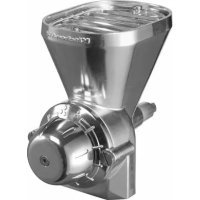
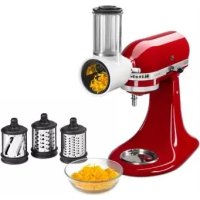
| Optional accessories | Food grinder, pasta maker, etc. (attach to the hub) |
| Care and cleaning | Bowl, flat beater, and dough hook are dishwasher safe; wire whip hand wash only; body wipe with damp cloth |
| Safety | Grounded outlet required; do not immerse; unplug before cleaning; head lock |
| Warranty | 5 years Artisan models, 2 years other models |
| Customer service | France: 0800 600120; Belgium: 0800 93285; Luxembourg: 800 23122 |
| Repairability | Repairs by KitchenAid authorized centers; parts available |
| Usage | Household use only |
Frequently Asked Questions - SodaStream KITCHENAID
User questions about SodaStream KITCHENAID
0 question about this device. Answer the ones you know or ask your own.
Ask a new question about this device
Download the instructions for your Other kitchen appliances in PDF format for free! Find your manual SodaStream - KITCHENAID and take your electronic device back in hand. On this page are published all the documents necessary for the use of your device. SodaStream by KITCHENAID.
USER MANUAL SodaStream KITCHENAID
Important safeguards 6
Electrical requirements 7
Electrical equipment waste disposal 7
PARTS AND FEATURES
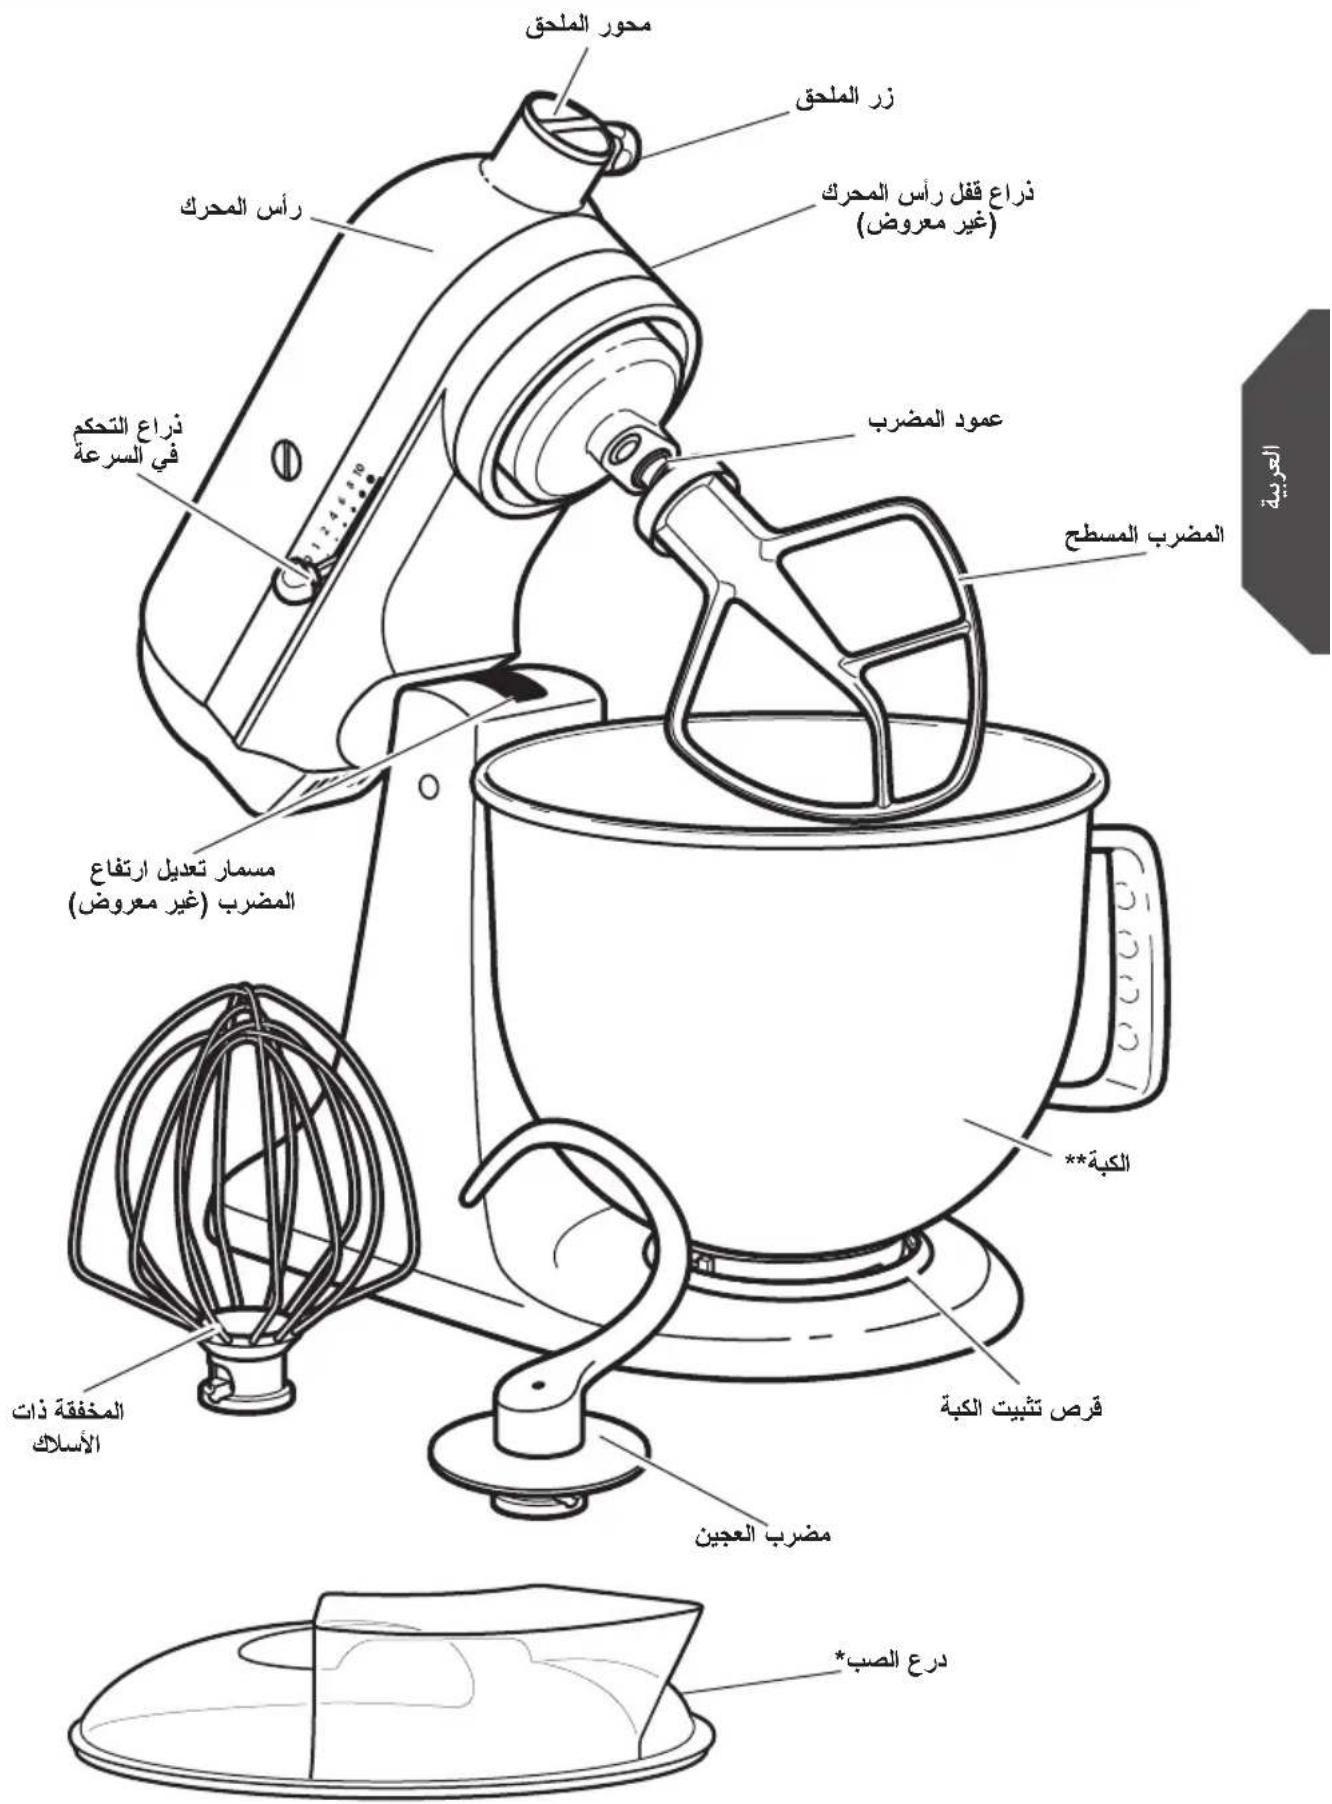
Parts and features 8
Accessory guide 9
ASSEMBLING THE STAND MIXER
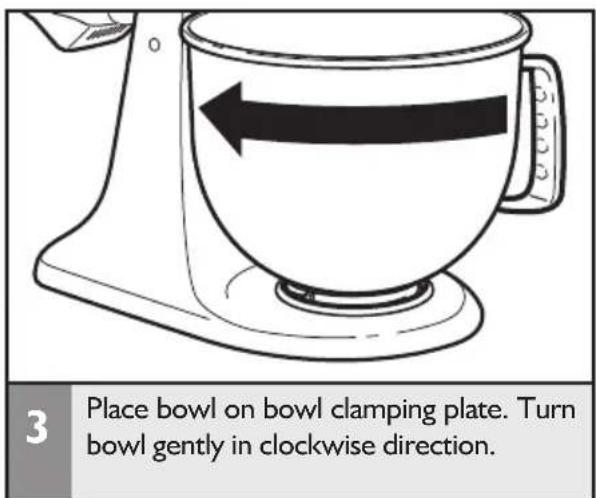
Attaching/removing the bowl 9
Lifting/lowering the motor head. 10
Attaching/removing the flat beater, wire whip, or dough hook. 10
Beater to bowl clearance 11
Placing/removing the pouring shield 12
Using the pouring shield 12
Operating the speed control 13
Speed control guide. 13
Optional attachments 14
TIPS FOR GREAT RESULTS
Mixing tips 15
Egg whites 16
Whipped cream 16
CARE AND CLEANING
Cleaning the Stand Mixer 16
Cleaning the accessories. 17
TROUBLESHOOTING 17
WARRANTY AND SERVICE
KitchenAid Stand Mixer warranty 18
Customer service 18
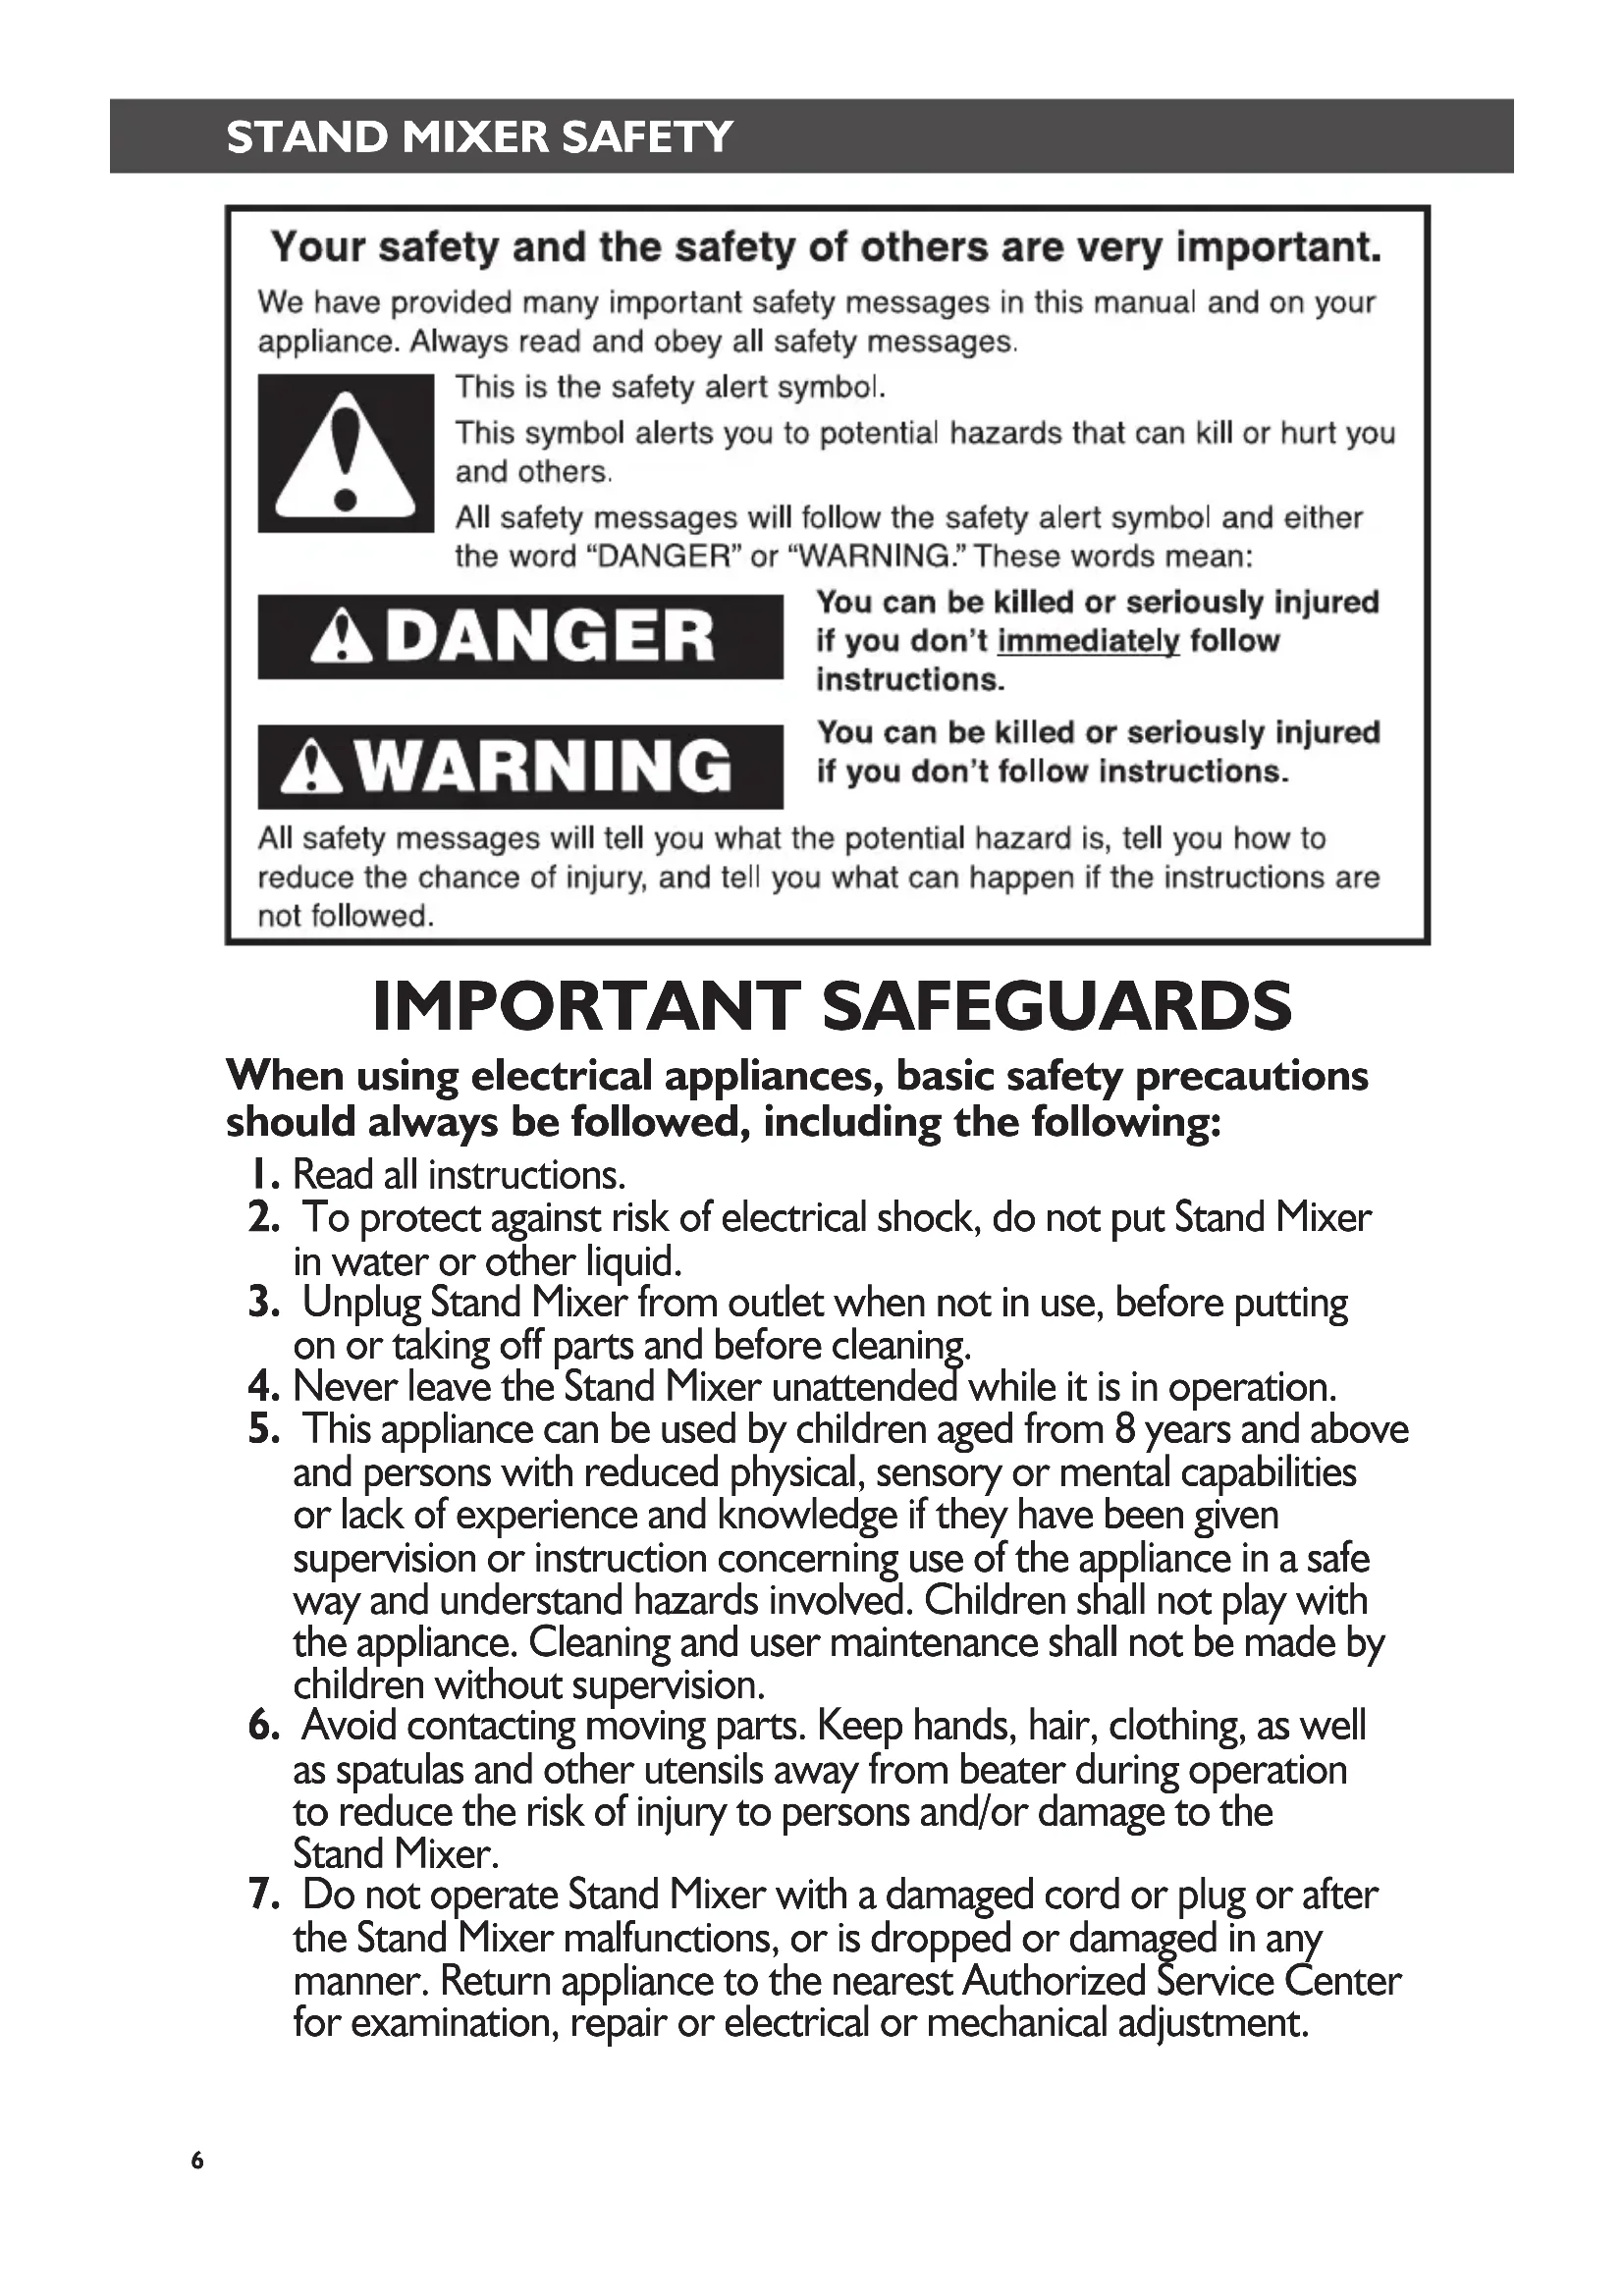
Your safety and the safety of others are very important.
We have provided many important safety messages in this manual and on your appliance. Always read and obey all safety messages.

This is the safety alert symbol.
This symbol alerts you to potential hazards that can kill or hurt you and others.
All safety messages will follow the safety alert symbol and either the word "DANGER" or "WARNING." These words mean:
DANGER
You can be killed or seriously injured if you don't immediately follow instructions.
WARNING
You can be killed or seriously injured if you don't follow instructions.
All safety messages will tell you what the potential hazard is, tell you how to reduce the chance of injury, and tell you what can happen if the instructions are not followed.
IMPORTANT SAFEGUARDS
When using electrical appliances, basic safety precautions should always be followed, including the following:
- Read all instructions.
- To protect against risk of electrical shock, do not put Stand Mixer in water or other liquid.
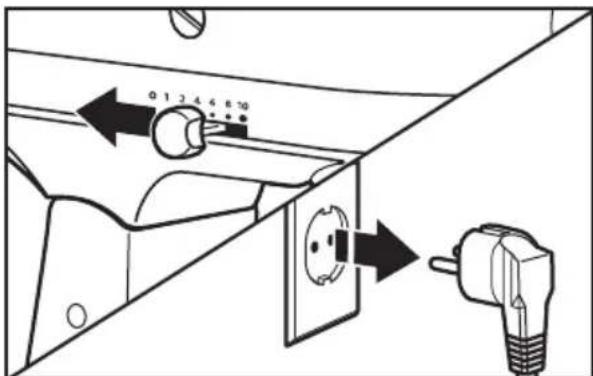
- Unplug Stand Mixer from outlet when not in use, before putting on or taking off parts and before cleaning.
- Never leave the Stand Mixer unattended while it is in operation.
- This appliance can be used by children aged from 8 years and above and persons with reduced physical, sensory or mental capabilities or lack of experience and knowledge if they have been given supervision or instruction concerning use of the appliance in a safe way and understand hazards involved. Children shall not play with the appliance. Cleaning and user maintenance shall not be made by children without supervision.
- Avoid contacting moving parts. Keep hands, hair, clothing, as well as spatulas and other utensils away from beater during operation to reduce the risk of injury to persons and/or damage to the Stand Mixer.
- Do not operate Stand Mixer with a damaged cord or plug or after the Stand Mixer malfunctions, or is dropped or damaged in any manner. Return appliance to the nearest Authorized Service Center for examination, repair or electrical or mechanical adjustment.
STAND MIXER SAFETY
- The use of attachments not recommended or sold by KitchenAid may cause fire, electric shock, or injury.
- Do not use the Stand Mixer outdoors.
- Do not let the cord hang over edge of table or counter.
- Remove flat beater, wire whip or dough hook from Stand Mixer before washing.
- This product is designed for household use only.
SAVE THESE INSTRUCTIONS
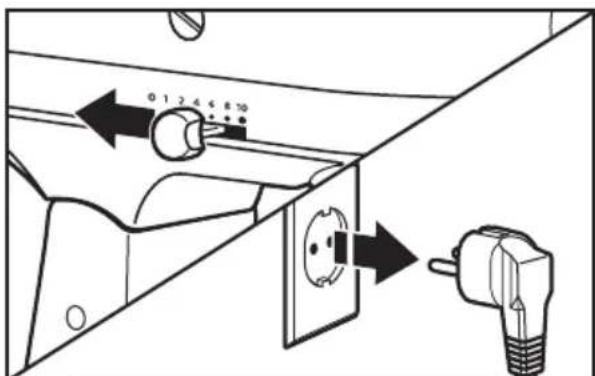
Electrical requirements
Wattage: 300 W for models 5KSM150PS and 5KSM156 250 W for models 5K45SS and 5KSM45
Voltage: 220-240 V
Hertz: 50/60 Hz
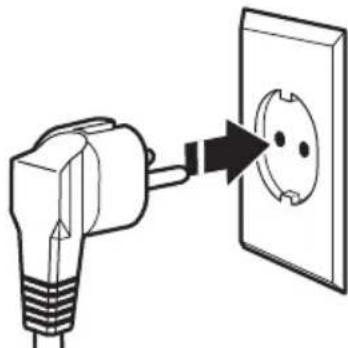
NOTE: If the plug does not fit in the outlet, contact a qualified electrician. Do not modify the plug in any way. Do not use an adapter.
Do not use an extension cord. If the power supply cord is too short, have a qualified electrician or serviceman install an outlet near the appliance.
WARNING

Electrical Shock Hazard Plug into a grounded outlet. Do not remove ground prong. Do not use an adapter. Do not use an extension cord.
Failure to follow these instructions can result in death, fire, or electrical shock.
Electrical equipment waste disposal
Disposal of packing material
The packing material is 100% recyclable and is marked with the recycle symbol . The various parts of the packing must therefore be disposed of responsibly and in full compliance with local authority regulations governing waste disposal.
Scrapping the product
-
This appliance is marked in compliance with European Directive 2002/96/EC, Waste Electrical and Electronic Equipment (WEEE).
-
By ensuring this product is disposed of correctly, you will help prevent potential
negative consequences for the environment and human health, which could otherwise be caused by inappropriate waste handling of this product.
- The symbol on the product or on the accompanying documentation indicates that it should not be treated as domestic waste but must be taken to an appropriate collection centre for the recycling of electrical and electronic equipment.
For more detailed information about treatment, recovery and recycling of this product, please contact your local city office, your household waste disposal service or the shop where you purchased the product.
Parts and features
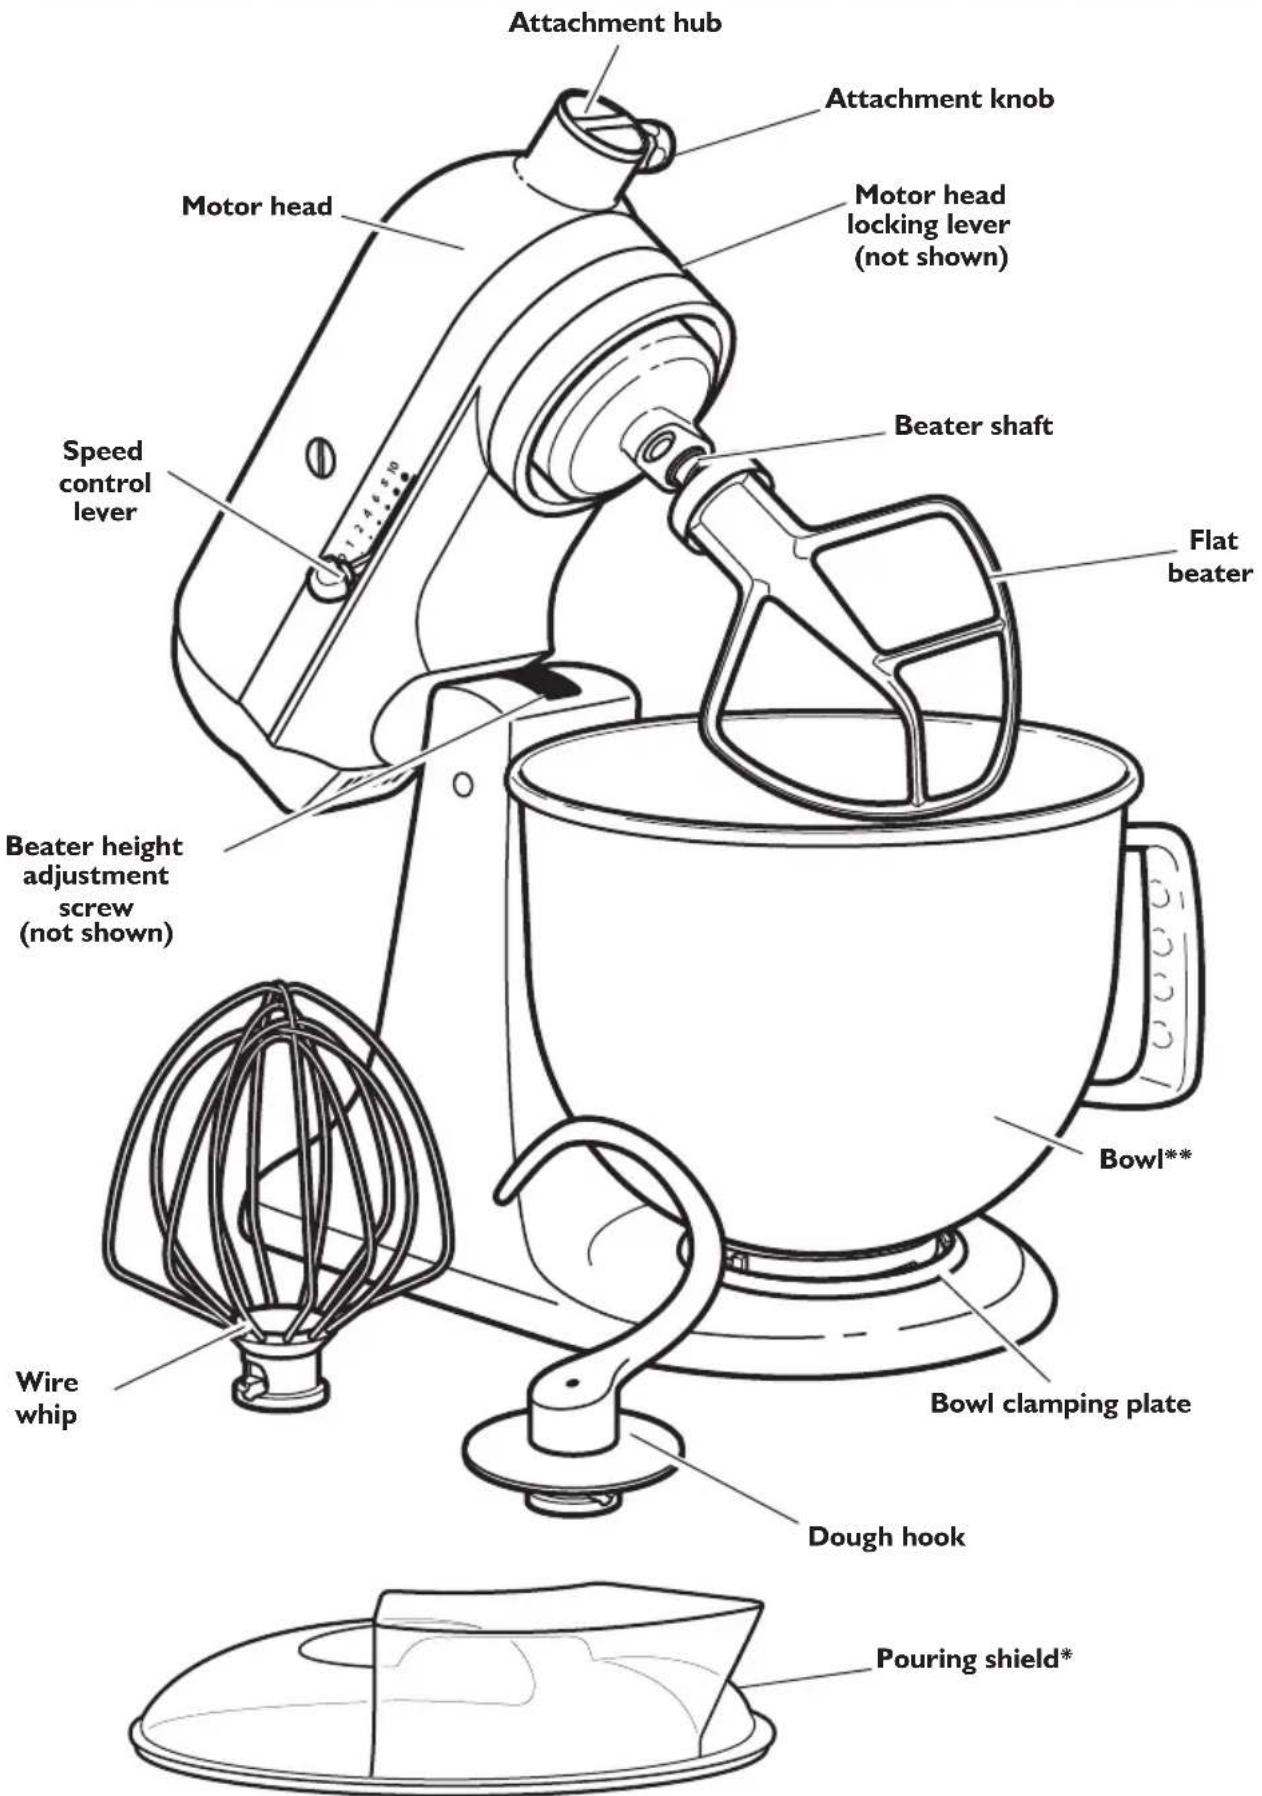
Included only in models 5KSM150PS and 5KSM45. Also available as optional accessory.
* The bowl design and material depend on the Stand Mixer model.
Accessory guide
| Accessory Uses | |
| Flat beater for normal to heavy mixtures: | Cakes,creamed frostings,candies,cookies, pie pastry,biscuits,meat loaf,mashed potatoes |
| Wire whip for mixtures that need air incorporated: | Eggs,egg whites,heavy cream,boiled frostings,sponge cakes,mayonnaise,some candies |
| Dough hook for mixing and kneading yeast doughs: | Breads,rolls,pizza dough,buns |
ASSEMBLING THE STAND MIXER
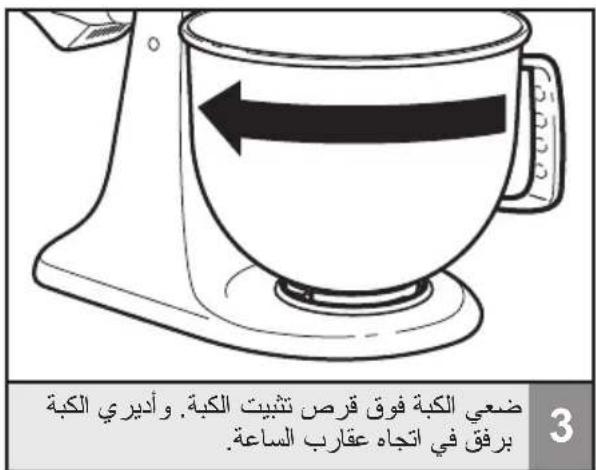
Attaching/removing the bowl

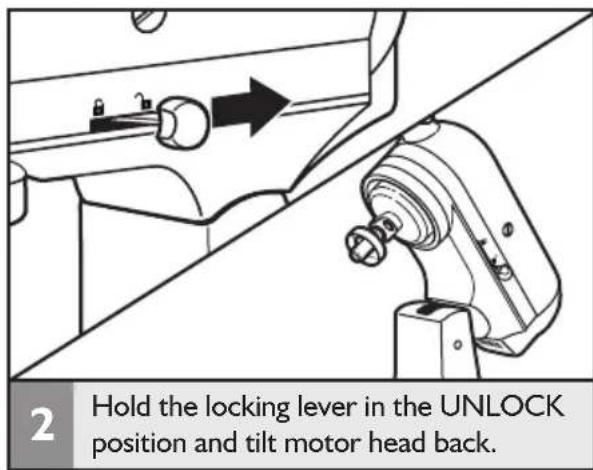
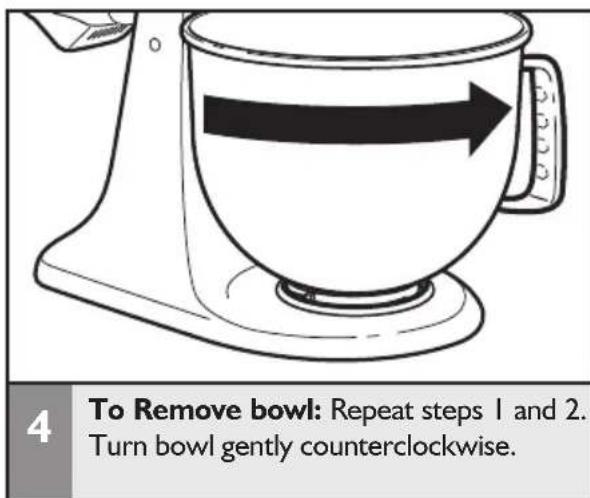
Lifting/lowering the motor head
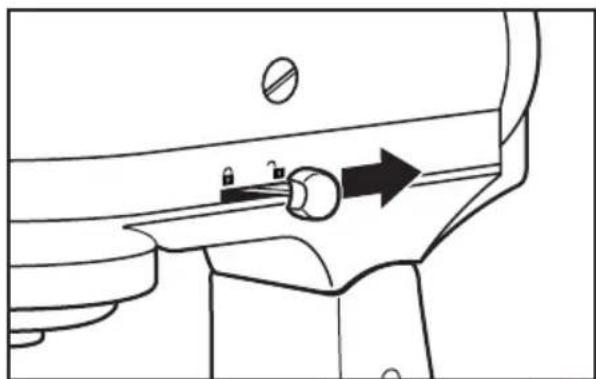
To lift motor head: Push the locking lever to the UNLOCK position and lift the head. Once lifted, the lever will automatically go back in LOCK position to keep the head lifted.
2 To put down motor head: Push the locking lever to UNLOCK and gently bring the head down. The locking lever will automatically go back in LOCK position when the head is down. Before mixing, test lock by attempting to raise motor head.
NOTE: Motor head should always be in LOCK position when using the Stand Mixer.
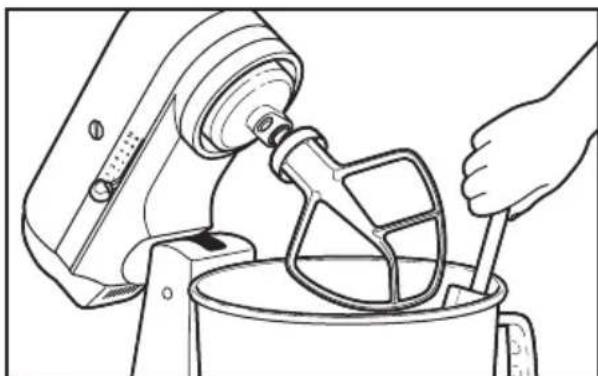
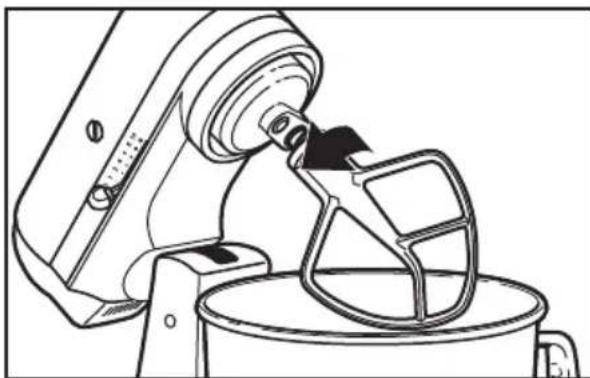
Attaching/removing the flat beater, wire whip, or dough hook
WARNING
Injury Hazard
Unplug mixer before touching beaters.
Failure to do so can result in broken bones, cuts, or bruises.
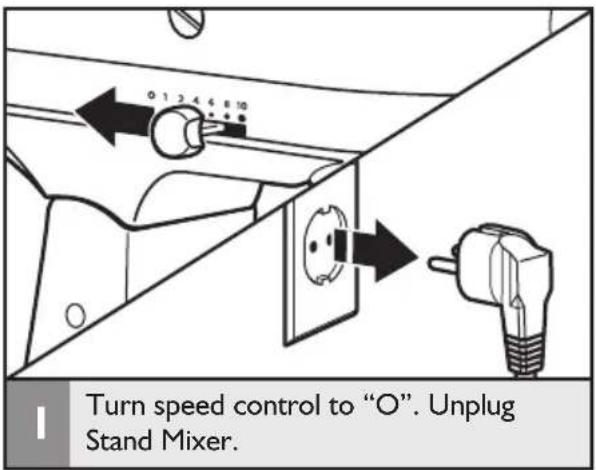
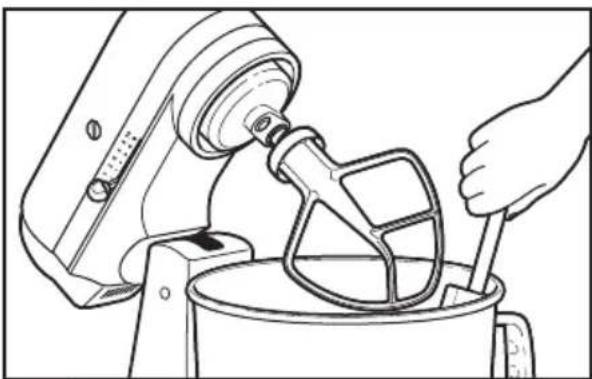
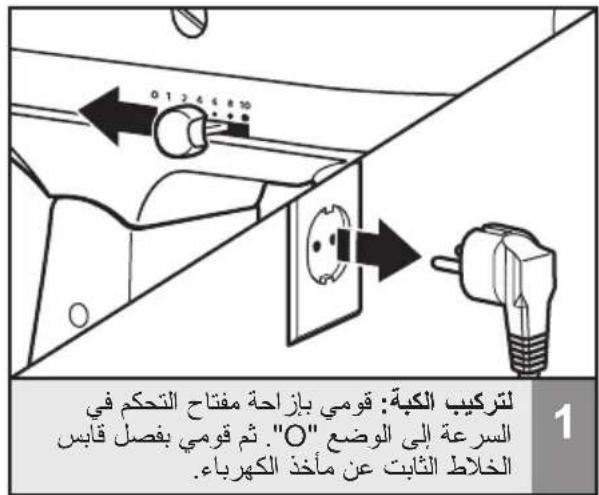
To attach accessory: Turn speed control to "O". Unplug Stand Mixer.
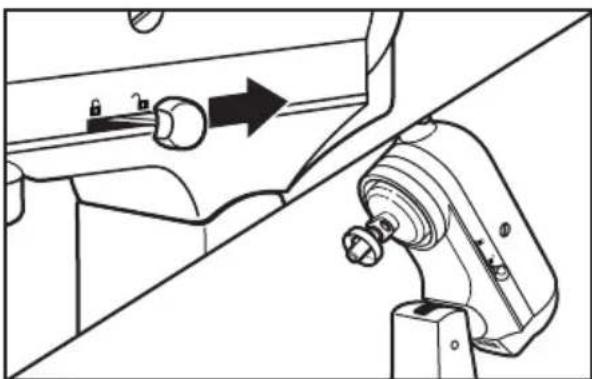
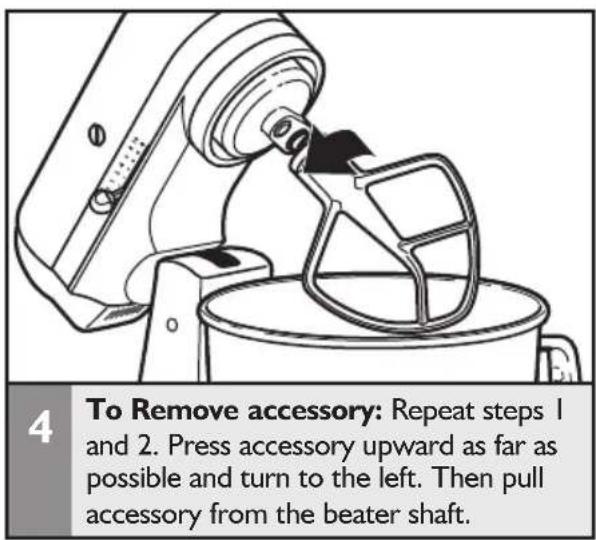
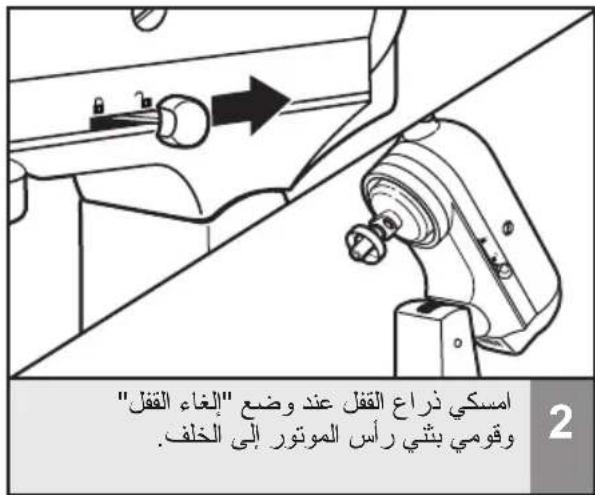
2 Hold the locking lever in the UNLOCK position and tilt motor head back.
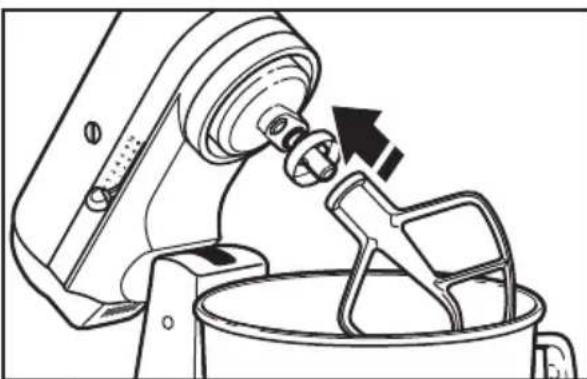
3 Slip accessory onto beater shaft and press upward as far as possible. Then, turn accessory to the right, hooking accessory over the pin on the shaft.
Attaching/removing the flat beater, wire whip, or dough hook
Beater to bowl clearance
Your Stand Mixer is adjusted at the factory so the flat beater just clears the bottom of the bowl. If, for any reason, the flat beater hits the bottom of the bowl or is too far away from the bowl, you can correct clearance easily.
NOTE: When properly adjusted, the flat beater will not strike on the bottom or side of the bowl. If the flat beater or the wire whip is so close that it strikes the bottom of the bowl, coating may wear off the beater or wires on whip may wear.

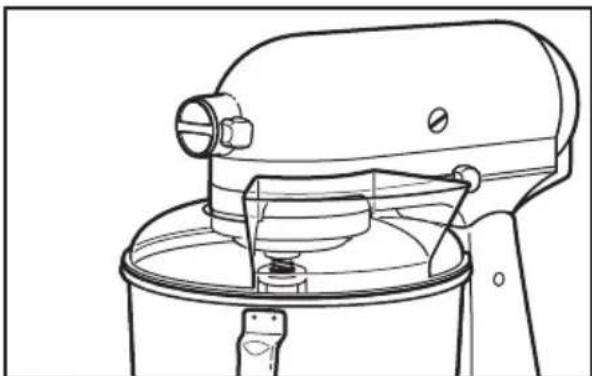
Placing/removing the pouring shield*
To place pouring shield: Turn speed control to "O". Unplug Stand Mixer. Attach your chosen accessory, see "Attaching/removing the flat beater, wire whip, or dough hook" section.
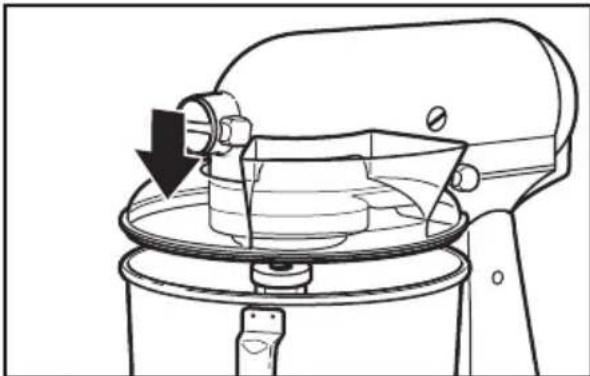
From the front of the Stand Mixer, slide the pouring shield over the bowl until the shield is centered. The bottom rim of the shield should fit within the bowl.
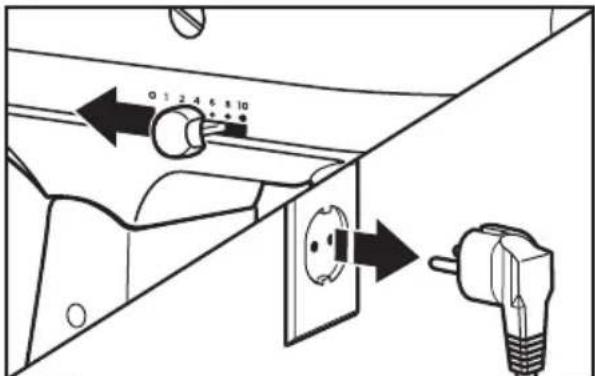
3 To Remove pouring shield: Turn speed control to "O". Unplug Stand Mixer.
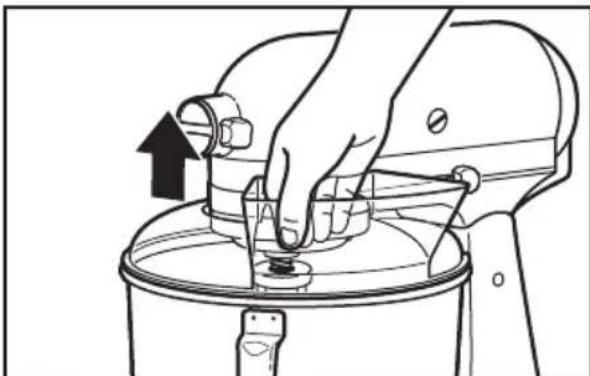
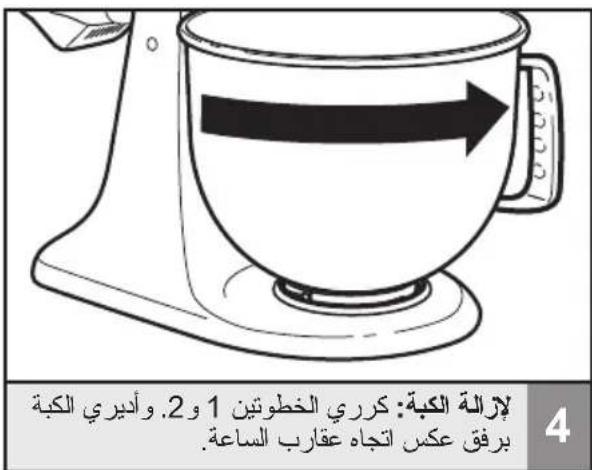
4 Lift the front of the pouring shield clear of the bowl rim and pull forward. Remove attachment and bowl.
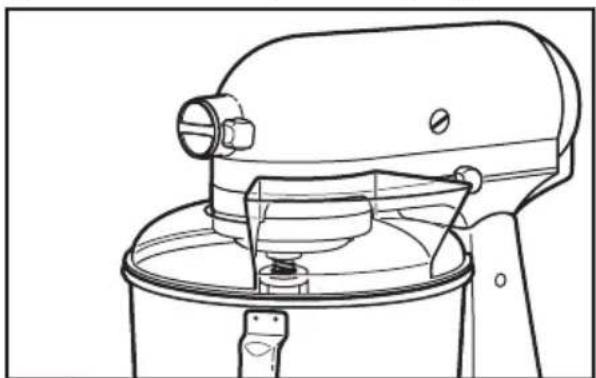
Using the pouring shield*
Use the pouring shield to avoid having ingredients splashing out of the bowl when mixing, as well as to easily pour ingredients in the bowl while mixing.
For best results, rotate the shield so the motor head covers the U-shaped gap in the shield. The pouring chute will be just to the right of the attachment hub as you face the Stand Mixer.
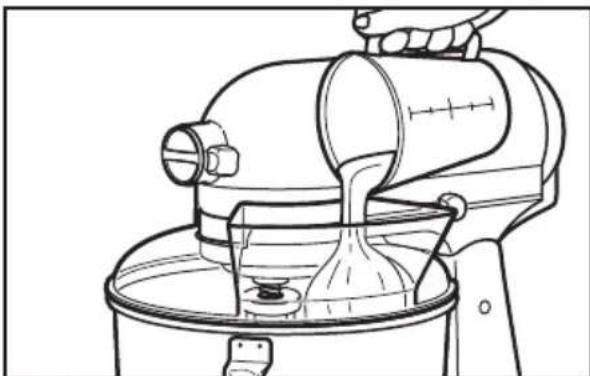
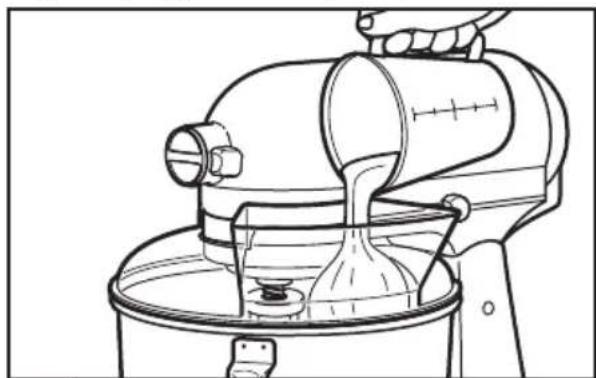
Pour the ingredients into the bowl through the pouring chute.
- Included only in models 5KSM150PS and 5KSM45. Also available as optional accessory.
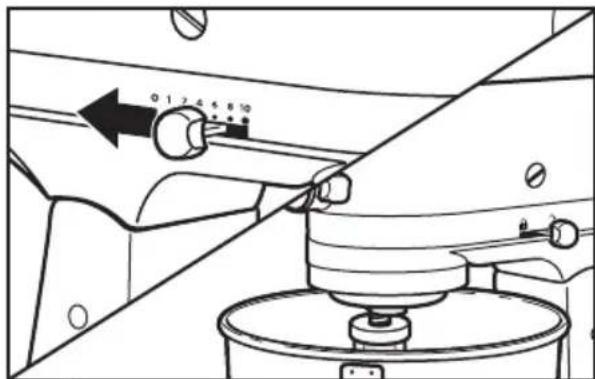
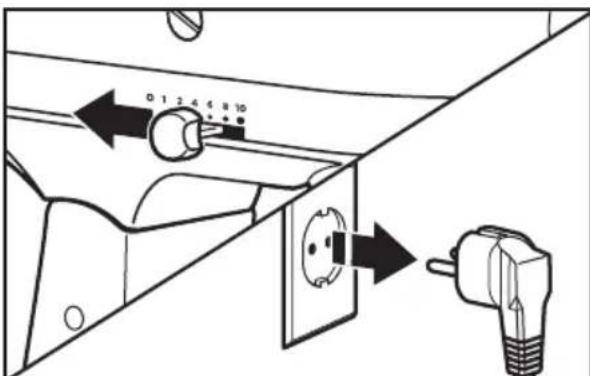
Operating the speed control
NOTE: The Stand Mixer may warm up during use. Under heavy loads with extended mixing time, the top of the unit may become hot. This is normal.
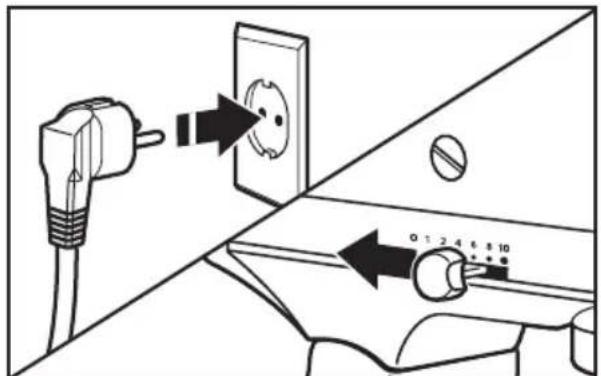
Plug Stand Mixer in proper electrical outlet. Always set speed control lever on lowest speed to start, then gradually increase speed to avoid splashing ingredients. See chart below.
2 Do not scrape bowl while Stand Mixer is operating. The bowl and beater are designed to provide thorough mixing without frequent scraping. Scraping the bowl once or twice during mixing is usually sufficient.
Speed control guide
All speeds have the Soft start feature which automatically starts the Stand Mixer at a lower speed to help avoid ingredient splash-out and "flour puff" at start-up then quickly increases to the selected speed for optimal performance.
| Speed | Action Attachment | Description | |
| 1 | STIR | For slow stirring, combining, mashng, starting all mixing procedures. Use to add flour and dry ingredients to batter, and to add liquids to dry ingredients. Do not use Speed I to mix or knead yeast doughs. | |
| 2 | SLOW MIXING | For slow mixing, mashng, faster stirring. Use to mix and knead yeast doughs, heavy batters and candies, start mashng potatoes or other vegetables, cut shortening into flour, mix thin or splashy batters. | |
| 4 | MIXING, BEATING | For mixing semi-heavy batters, such as cookies. Use to combine sugar and shortening and to add sugar to egg whites for meringues. Medium speed for cake mixes. | |
| 6 | BEATING, CREAMING | For medium fast beating (creaming) or whipping. Use to finish mixing cake, doughnut, and other batters. High speed for cake mixes. | |
| 8 | FAST BEATING, WHIPPING | For whipping cream, egg whites, and boiled frostings. | |
| 10 | FAST WHIPPING | For whipping small amounts of cream, egg whites or for final whipping of mashed potatoes. |
NOTE: The speed control lever can be set between the speeds listed in the above chart to obtain speeds 3, 5, 7, and 9 if a finer adjustment is required. Do not exceed Speed 2 when preparing yeast doughs as this may cause damage to the Stand Mixer.
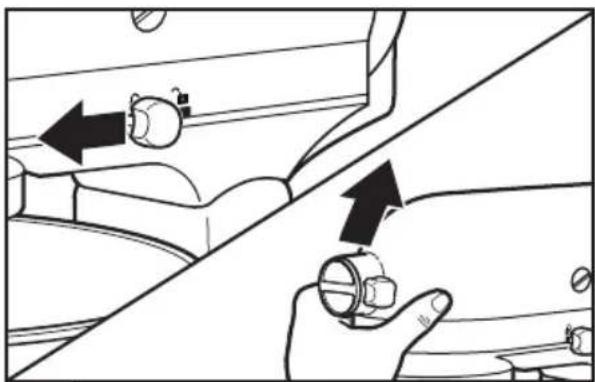
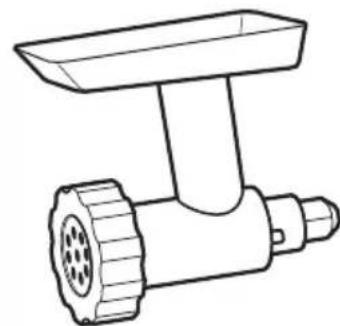
Optional attachments
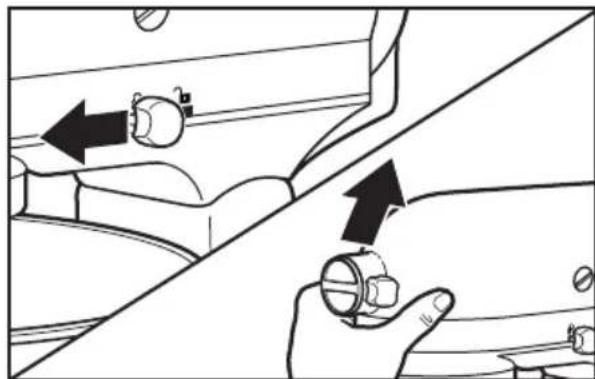
KitchenAid offers a wide range of optional attachments such as food grinders or pasta makers. They may be attached to the Stand Mixer attachment power shaft, as shown here.
To attach: Turn speed control to "O". Unplug Stand Mixer.
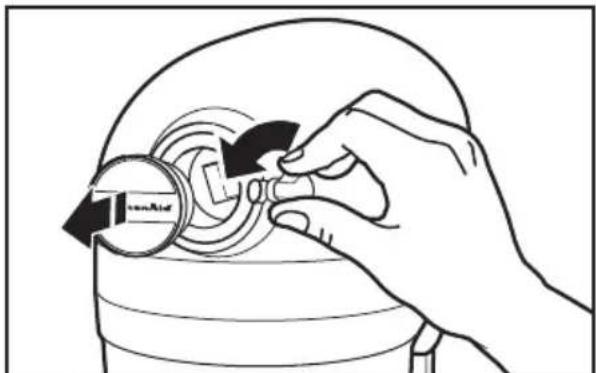
2 Loosen attachment knob by turning it counterclockwise. Remove attachment hub cover.
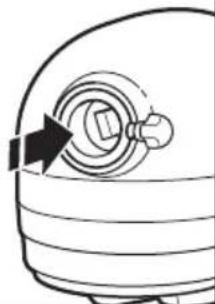
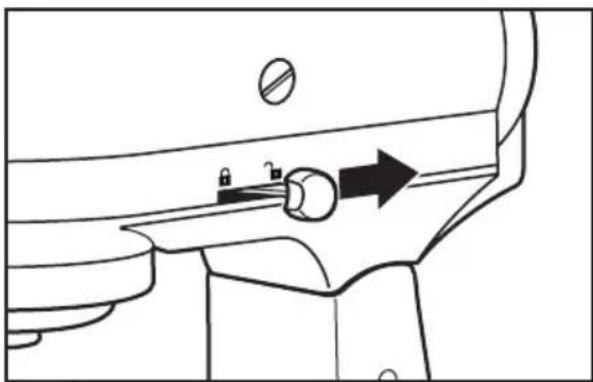
3 Insert attachment shaft housing into attachment hub, making certain that attachment power shaft fits into square attachment hub socket. It may be necessary to rotate attachment back and forth. When attachment is in proper position, the pin on the attachment will fit into the notch on the hub rim.
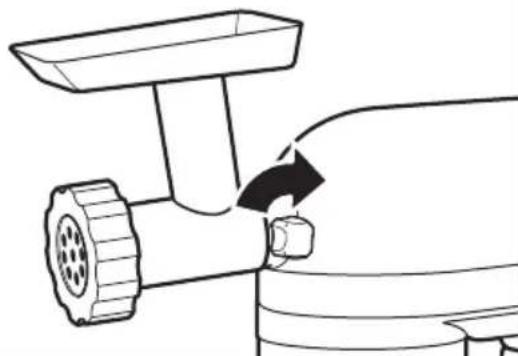
4 Tighten attachment knob by turning clockwise until attachment is completely secured to Stand Mixer.
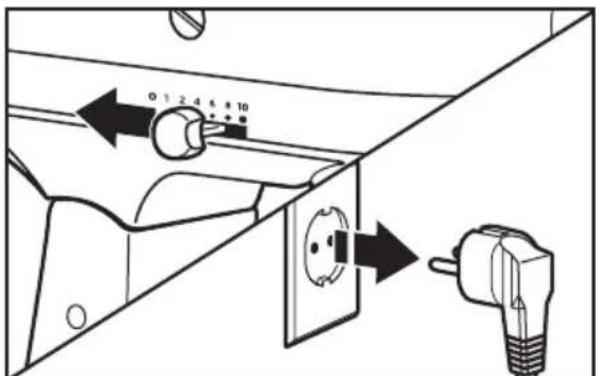
5 Plug into proper electrical outlet.
To remove: Turn speed control to "O". Unplug Stand Mixer.
NOTE: See the Use and Care Guide of each specific attachment for recommended speed settings and operating times.
TIPS FOR GREAT RESULTS
Mixing tips
Mixing time
Your KitchenAid Stand Mixer will mix faster and more thoroughly than most other electric mixers. Therefore, the mixing time in most recipes must be adjusted to avoid overbeating.
To help determine the ideal mixing time, observe the batter or dough and mix only until it has the desired appearance described in your recipe, such as "smooth and creamy." To select the best mixing speeds, use the "Speed control guide" section.
Adding Ingredients
The standard procedure to follow when mixing most batters, especially cake and cookie batters, is to add:
1/3 dry ingredients
1/2 liquid ingredients
1/3 dry ingredients
1/2 liquid ingredients
1/3 dry ingredients
Use Speed I until ingredients have been blended. Then gradually increase to desired speed.
Always add ingredients as close to side of bowl as possible, not directly into moving beater. The pouring shield can be used to simplify adding ingredients.
NOTE: If ingredients in very bottom of bowl are not thoroughly mixed, the beater is not far enough into the bowl. See the "Beater to bowl clearance" section.
Cake Mixes
When preparing packaged cake mixes, use Speed 4 for medium speed and Speed 6 for high speed. For best results, mix for the time stated on the package directions.
Adding Nuts, Raisins, or Candied Fruits
Solid materials should be folded in the last few seconds of mixing on Speed I. The batter should be thick enough to keep the fruit or nuts from sinking to the bottom of the pan during baking. Sticky fruits should be dusted with flour for better distribution in the batter.
Liquid Mixtures
Mixtures containing large amounts of liquid ingredients should be mixed at lower speeds to avoid splashing. Increase speed only after mixture has thickened.
Kneading Yeast Doughs
ALWAYS use the dough hook to mix and knead yeast doughs. Use Speed 2 to mix or knead yeast doughs. Use of any other speed creates high potential for unit failure.
Do not use recipes calling for more than 900g (7 cups) all-purpose flour or 800g (6 cups) whole wheat flour when making dough in a 4.28 L bowl.
Do not use recipes calling for more than 1kg (8 cups) all-purpose flour or 800g (6 cups) whole wheat flour when making dough in a 4.8 L bowl.
TIPS FOR GREAT RESULTS
Egg whites Whipped cream
Place room temperature egg whites in clean, dry bowl. Attach bowl and wire whip. To avoid splashing, gradually turn to designated speed and whip to desired stage.
AMOUNT SPEED
I egg white.. GRADUALLY to 10
2 or more egg whites....GRADUALLY to 8
Whipping Stages
With your KitchenAid Stand Mixer, egg whites whip quickly. Avoid overwhipping.
Pour cold whipping cream into chilled bowl. Attach bowl and wire whip. To avoid splashing, gradually turn to designated speed and whip to desired stage.
AMOUNT SPEED
less than 200 ml (3/4 cup)
GRADUALLY to 10
more than 200 ml (3/4 cup)
GRADUALLY to 8
Whipping Stages
Watch cream closely during whipping. Because your KitchenAid Stand Mixer whips so quickly, there are just a few seconds between whipping stages.
CARE AND CLEANING
Cleaning the Stand Mixer
WARNING

Electrical Shock Hazard
Plug into a grounded outlet.
Do not remove ground prong.
Do not use an adapter.
Do not use an extension cord.
Failure to follow these instructions can result in death, fire, or electrical shock.
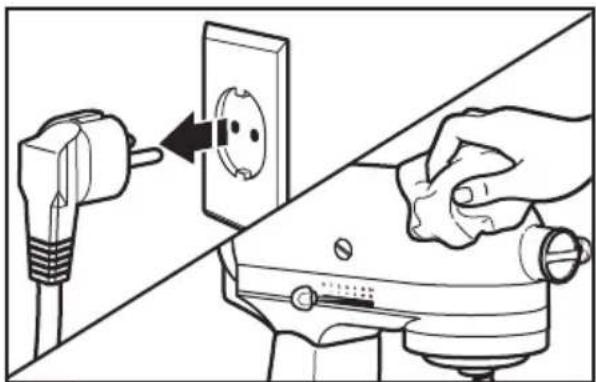
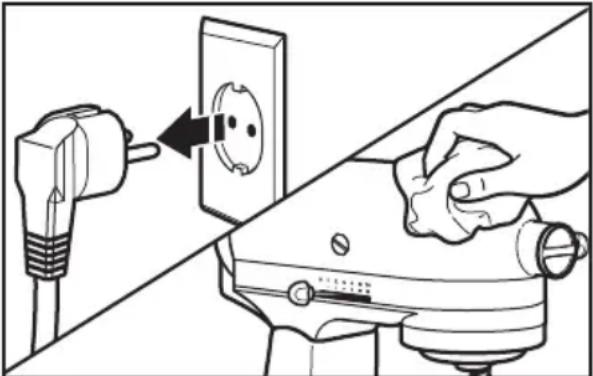
Always be sure to unplug Stand Mixer before cleaning. Wipe Stand Mixer with a soft, damp cloth. Do not use household/commercial cleaners. Wipe off beater shaft frequently, removing any residue that may accumulate. Do not immerse in water.
Cleaning the accessories
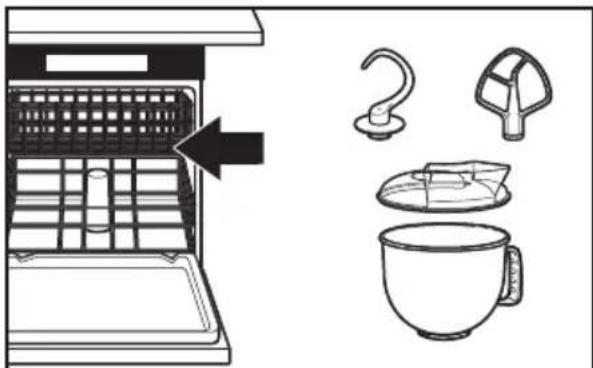
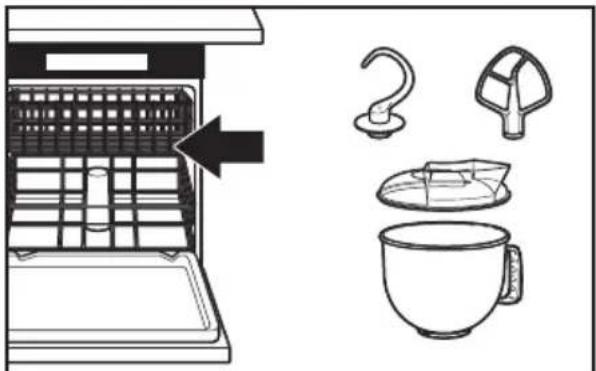
2 Bowl, pouring shield*, white flat beater, and white dough hook may be washed in a dishwasher. Or, clean them thoroughly in hot sudsy water and rinse completely before drying. Do not store beaters on shaft.
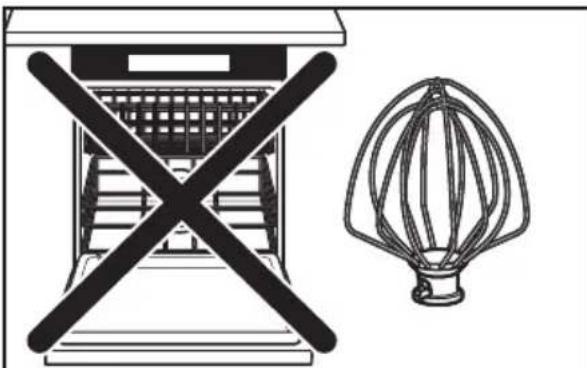
3 IMPORTANT: The wire whip is not dishwasher safe. Clean it thoroughly in hot sudsy water and rinse completely before drying. Do not store wire whip on shaft.
- Included only in models 5KSM150PS and 5KSM45. Also available as optional accessory.
TROUBLESHOOTING
WARNING

Electrical Shock Hazard
Plug into a grounded outlet.
Do not remove ground prong.
Do not use an adapter.
Do not use an extension cord.
Failure to follow these instructions can result in death, fire, or electrical shock.
Please read the following before calling your service center.
- The Stand Mixer may warm up during use. Under heavy loads with extended mixing time periods, you may not be able to comfortably touch the top of the unit. This is normal.
- The Stand Mixer may emit a pungent odor, especially when new. This is common with electric motors.
- If the flat beater hits the bowl, stop the Stand Mixer. See the "Beater to bowl clearance" section.
If your Stand Mixer should malfunction or fail to operate, please check the following:
- Is the Stand Mixer plugged in?
- Is the fuse in the circuit to the Stand Mixer in working order? If you have a circuit breaker box, be sure the circuit is closed.
- Turn off the Stand Mixer for 10-15 seconds, then turn it back on. If the Stand Mixer still does not start, allow it to cool for 30 minutes before turning it back on.
- If the problem is not due to one of the above items, see the "Warranty and service" section.
KitchenAid Stand Mixer warranty
| Length of Warranty: | KitchenAid Will Pay For: | KitchenAid Will Not Pay For: |
| Europe, Middle East and Africa:For Artisan models5KSM150PS and 5KSM156:five years full warrantyfrom date of purchase.For models 5K45SS and5KSM45: two years fullwarranty from date of purchase. | The replacement parts and repair labor costs to correct defects in materials or workmanship. Service must be provided by an Authorized KitchenAid Service Center. | A. Repairs when Stand Mixer is used for operations other than normal household food preparation.B. Damage resulting from accident, alterations, misuse, abuse, or installation/operation not in accordance with local electrical codes. |
KITCHENAID DOES NOT ASSUME ANY RESPONSIBILITY FOR INDIRECT DAMAGES.
Customer service
In U.K. and Ireland:
For any questions, or to find the nearest KitchenAid Authorized Service Center, please find our contact details below.
NOTE: All service should be handled locally by an Authorized KitchenAid Service Center.
Contact number for U.K. and Northern Ireland:
Tollfree number 0800 988 1266 (calls from mobile phones are charged standard network rate)
Contact number for Ireland:
Tollfree number +44 02086165148
E-mail contact for U.K. and Ireland:
Go to www.kitchenaid.co.uk, and click on the link "Contact Us" at the bottom of the page.
Address for U.K. and Ireland:
KitchenAid Europa, Inc.
POBOX19
B-2018 ANTWERP II
BELGIUM
In other countries:
For all product related questions and after sales matters, please contact your dealer to obtain the name of the nearest Authorized KitchenAid Service/Customer Center.
www.KitchenAid.eu
INHALTSVERZEICHNIS
1/3 Ingredients secs
1/2 Ingredients liquids
1/3 ingredients secs
1/2 Ingredients liquids
1/3 ingredients secs
GARANTIA E ASSISTÊNCIA
Garantia da batedeira KitchenAid 102
Centros de assistencia 102
Servico de assistencia 102
MANUTENÇÂO E LIMPEZA
Limpar a batedeira
AVISO

Perigo deCHOQUEelectrico
KoIawvaki, IaTp. IwakEiμ 33
+30 210 7237615
o i k_n ToiioKn 26
+30 2310 220933,231388
www.KitchenAid.eu
INNEHÄLLSFORTECKNING
SÄKER ANVÄNDNING AV KÖKSMASKINEN
VEDLIKEHOLD OG RENGJØRING
VEDLIKEHOLD OG RENGJØRING
Rengjore kjokkenmaskinen
ADVARSEL

Fare for elektrisk stot
john@servicecompaniet.no
Kundeservice
Norsk Importør:
HOWARD AS:
Hansteensgate 12
0253 OSLO
Tel: 23084130
www.KitchenAid.eu
SISÄLLYSLUETTELO
YLEISKONEEN TURVALLISUUS
Malleille 5K45SS and 5KSM45:
Garanti for KitchenAid Mixer
1/3 burrum efnum
1/2 vokva
1/3 burrum efnum
1/2 vokva
1/3 purrum efnum
MEPbI INPEdoCTOPOXKHOCTN
Bo n36eXaHne pIcka noJapa, nopaxKeHnE 3JIeKTpUYeCKnM TOKOM nII NOBpeXdEHN npN nCNoIb3OBAHm BaIeRo npN6Opa Heo6xOAnMo cO6JIouaTb OCHOBHbIe MEPbl IpeIoCTOpOXHOCTn, BKJIouyAra CLeDyUoUne:
I.ПочтITE Bce Инстукции.
2.Bo n36eXaHne pncKa nopaxKeHnra TOKOM KaTeOpnueckn 3aIpeSeHO NOrpyKb MmKcep B Body IIN dpyrJIO XnIDKOCTb.
3. OToCoeHnHTe Mnkcep OT po3eTKn, KOrJa Bbl erO He nCNoJb3yeTe, nepeJ yCTaHOBkoN nn CHrTneM HaCaIOK, a TaKKe nepeJ uNCTKOJ.
4. He octablan Te hactoIbHbIM MUKcep 6e3 npncMOtpa BO BpeMa erop a60Tbl.
5. ΘTOT npi6op moKet nCnOJb3OBaTbCra DeTbMn CTapWe 8 let nIuamn C OrpaHnueHHbIMN fN3UeCKIMN, ceHCOPHbIMN IIN yMCTBeHHbIMN BO3MOxHOCTaMn, He NmEIOUImN OnblTa o6paUeHNr C TexHkoN; ecIn OHn HaxoJrTcra NOD KOHTPOEm IINca OTBETCTBEHHORo 3a INX 6e3OpacHOCTb, INN O3HaKOMJIeHbIC nPaBUNAMn erO 6e3OnaCHOJ EKcPlyatauN. He nO3BOJRAte DeTram nIgPaTb c UcTpoiCTBOM. YnCTKa n ObcnykIBAHHe He DOJXHbI BblONHARbCra DeTbMn 6e3 npncMOtpa.
6.ИЗberай Te KOHTaKTa C DBNkUcIMnCЯ DeTaNm.ДЯ npeodTbpaueHn TpaBM n/nn NOBpeJdeHn Mnkcepa npi erO nCNoIb3OBaHn He DOnyckaIte COpNIKOCHOBeHn HaCaIKn C pyKaMn, BOLOCAm, OdEJKoJ, a TaKKe C npi6Opamn I dpyrIMn KxOHbIMn ppiHaJIeXHOCTaMn.
7. He nCnoJb3yIte MmKcep c NOBpeJdEHHbIM ShHypOM NITaHnA INI nOcNe NaJeHnA Pnp6op, INI KaKOro-lN60 NOBpeJdEHNr. OTHeCnTe yCTpoiCTBO B 6NIkaMn ABTopu3OBaHHbI UeHTp OScnyKINBaHnA INI OCMOTpa, peMOHTa INI OCyUeCTBJIeHnA 3JIeKTPnueCKnx INI MExaHnueCKNX HaCTpoEk.
COXPAHNTE DAHHOE PYKOBOCTBO
3JIeKtpnueckne Tpe6ObaHna
MoHOCb:
300BtДЯ moJenéu 5KSM150PS u 5KSM156
250 Bт дя модень 5K45SS n 5KSM45
Hanpxxhe:
220-240B
Tepu:
50-60Γ
PIMMEYAHNE: Ecnn wTeNCeJIb He
BCTaBnIeTcB pO3eTKy, 06paNTeTcB 3aw
NOMOüK NpOeCCNoHaJIbHOMy əJIeKTpIky.
He nbitaTaeCb noDorHaTb wTeNceIb
K pa3Mepy po3eTKn cAmOCToRteNbHO.
He nCnoJb3yIte aIaIaTep.
Ecnn shHyp nHTaHnCnNtKOM KOpOTKn, Heo6xOAnMo yCTaHOBnTb PO3eTKy BO3ne np6opa. O6paTntecb
K KBaIIHnIuIPOBaHHOMy 3JIeKTpNkY
IIN pa60THnky cepBnC zENTpa
3a NOMOUIIO.
BHUMAHNE

Onachoctb nopaxeHna
3JIeKTpNueccknM TOKOM
IopKluOHTe K3a3emHeHHo p03eTke.
He ydaIaIte 3a3eMIAIOUoN 3JeKToPd.
He nCnoJb3yIte aanTep.
IcnoIb3OBaHnE 3aunTHoro o6oDa\*
IcnoB3ynte 3aunthbI OoD nI npedotBpaueHna pa36pb13rNaBaHn IHRpeJeHTOB BO BpeM CMeuBaHn, a TaKke dIra DoabneHn Kndknx npOdyKTOB BO BpeM pa60TbI.
1 DnI DoCTNKeHnHaUNyUHXpe3yJbTaTOB BpaaTe 3auNTbHIO6O TaK, YTO6bI MOTOPHb 6LOK 3aKpbU-06pa3Hoe OTBepCTne 6oDa. Pa3INBOuHb HOCNK 6yJeT KaK pa3 CnpabaOTfHKcTopa HacaIOK,ecNN CMOTpeTB pRMAHO MKNcep.
2 206abIyTe HrpeJeNHTbI B aSy uepe3 pa3nBOUHbI HOCNK.
Pa6ota co CKopoCThbIMM pexkUmaMn
PIMMEAHHE: MmKcep MoKeT HarpeBaTbC npn pa6oTe. Pnp dIInTeJbHOM nCIOJIb3OBAHN BepxHry cactb yCTpOnCTBa MoKeT HarpeBaTbC. 3To HOpMaJIbHO.
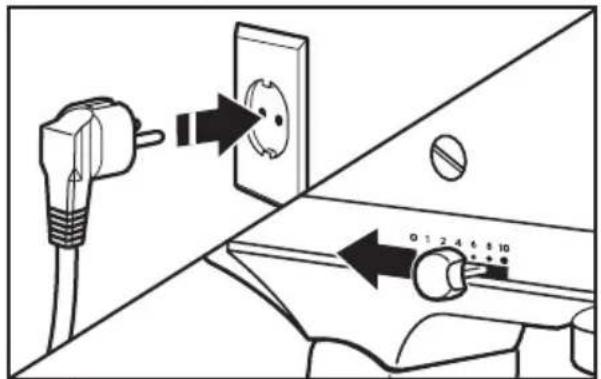
1 PnpcoeHNHte HaCTOBHbMnKcep K COOTBeTCTByIOUeepo3eTKe. Npeed HauJOM pa6OtBI Bcerda yCTaHaBnBaIte pbIar KOHTPOJIaCKOPoCTNa MHHMaJIbHbIyPOBeHb; BO BpeMpa6OtBI NOCTeNEHHO YBEJIuNBAIte CKOpOCTBo n36EkaHne pa36pbI3rNBaHn INHrpEJaHETOB.CmOTPnTe Ta6NIcy Bn3y.
2 He qnctnte yaw npka hactoBhmi Mnkcep pa6oTaet. Yawa n nonatka pa3pa6oTaHb Ira oecneueHn TuaTeNbHO CMeunBaHn 6e3 qactoI OuNCTKn 60KObbIX CTOpOH aUIN. OJHO nn DByX OUnCTOK npn CMeunBaHn OBiuHO 6bIBaET DOCTaTOHIO.
PykoBODCTBOdpeRyIINpOBKnYacTObI BpaueHn
Bce ckopoctn Imeot fynkcuio nlaabHoro nycka, KOtopa npn 3anycke aBTOMaTneckn HauHnaet pa6oTaB Ha HxKHeck CKOpOCTN, 3aTeM 6bIcTpo Bo3paCTaeT Do Bbl6paHHoek CKOpOCTn Ira oecneueHn ONTmamalbHOJ PpON3BODnteJIbHOCTN. FyHKuH Heo6XODIma Ira ppeDoTBpaueHn BblnleCKnBaHn INHrpeJeHTOB IN "paccnoEHHa Tecta".
He nCnoJb3yIte aIaIaTeP.
He nCnOlb3yIte ydNIMHHTeIb.
HecobioeHne 3nX HNCTpyKuIM MOKeT npNBecTN K CmepTu, NOkApy IIN NopaxHeHIO 3JNEKTpuueckm TOKOM.
1 Bcerda o63aTeJbHO OTKIOUOaIte MUKcep nepeoNCTKO. Ipotpnte MUKcep MRAKO BlaXHO TKAHbIO.He NCNoJIb3yIte 6bITOBbl / KOMMepueckne MOUOpie cpeiCTBa.IpoTnpaTe BaI HacaIKKaK MoXHO YaIe, ydAJIra OCTaTOK, KOtOpbi MoKeT hakApINBaTcR. He norpykaIte MUKcep B BODY.
Ynctka akceccyapob
2 2a7y,3aunTHbIobd*,6eynIO nonaTky IIN CMeUNBaHnN IN 6eynIO HacaNk dy TecTa MOXHO MbITB B NOCyDHomoeuHOn MaunHe. Kpome TORO IN MoXHO TuaTeNbHO npOMbITb B rOpayeMblbHO BoJe IN NOHocTB OONIOChTy b nepei cykoB. BeHnKn He cneDeYet xpaHntb Ha BAny.
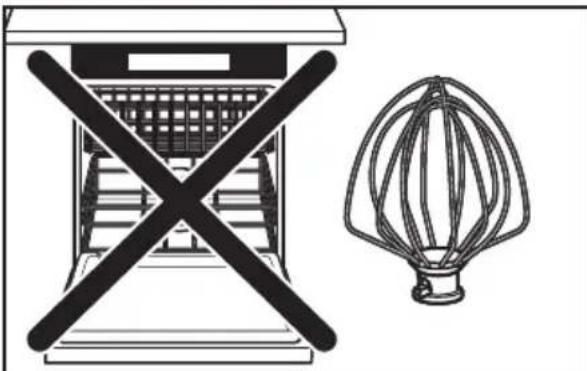
3 BHIMAHHE: IpoBOnoHbIN BeHcNk He npirodeH dIy MoKN B nocydomoeuHoi MaunHe. BblOHTe erO B ropayeMblbHOI BOJe, TuaTeNbHO CnOLOCHNTe neped TEM, KaK cyuHTb. He xpaHnte BeHcNK Ha BaNy HacaNKn.
BxOHTBCTAHdAPTHyIO KOMNJIeKTAuIIO MOJeIe 5KSM150PS n 5KSM45. TaKxe npncytCTByet B KaueCTBe ONUHOJIbHOro akceccyapa.
BbIaJIeHnE N UcTpaHEHnE HEnCIIpABHOCTeN
BHUMAHNE

Onachoctb npaKeHnA 3JIeKTPnueCKM TOKOM
IopknIOHTe K 3a3emHeHHo p03Te.
He ydaanthe 3aemnoi 3neKtpo.
He ncoNob3yIte aadantep.
He nCnoB3yIte yDnHnHTenb.
Heco6IIODeHne 3TNX MHTpyKuIM MoKeT npNBcTeN K CMePtn, NoKApy IIN NopaxKeHHIO 3NeKTpueckm TOKOM.
IpoTuTe cNeDuOuN pa3JeN nepeo6paueHnem C cepBnchbI ueHTp.
- Mrukcep moKet HArpeBaTbCn npu pa6ote. PnB BicOKnx HArpy3kax nДINTEbHOM CMeUWBAHn npNKOCHOBeHne K BepXHeN YaCTn np6opa MoKet 6bITb HEnpNtHBIM. 3TO HopMaIbHo.
- Minkcep MoKet BbIeJrpe3Kn 3aJax, OcO6eHNO eCn OHOBbl. 3To o6bIuHoe ABHeHne dJa 3JIeKTpOMOTOpOB.
- EcnBHeuHK nHn IonoTka dna CMeunBaHnK KOHTaKTpyIOT cHaWe, OCTaHOBIne MmKcep. CmOTpIne pa3dEn "PacctoHne mexdy HacaIKoN nCTeHKamn YauN".
EcnB Baw HactoBhBmMKcep Bbiwei n3 cTpo nn He pa6oTaet, npOBepbTe cnedyuooee:
-ПодсоeДинен Ли МИКсер К розтke?
-He cropen nn ceTeBOI npedoxpaHnteB? Ecnn B dome yctaHOBneH aBTOMaTueckn BbIKIOuOaTeNb, OH dONKeH 6bIT bKIIIOUeH.
- BbIKIOUHTe HAcTOJIbHbIM MKNCEP Ha 10-15 cekyHd, 3aTeM CHOBA BKIOUHTe. EcnHacToJIbHbIM MKNCEP He pa6Otae, OCTaBBte erO octbITb Ha 30 MNHyT, 3aTeM BKIOUHTe MKNCEP CHOBA.
- Ecnn npo6nemy peuNTb He ydaNoCb, 6paTntecb K pa3dJeNy «IapaHTnHoe n cepBnCHOe 6cnjxNbAHne».
TapaHTnHoe 6cnyxmbaHne hactoIbHoro MMKcepa KitchenAid
TYTO POKNY USCHOVEJTE
Prikon:
300 W pro modely 5KSM150PS a 5KSM156
250 W pro modely 5K45SS a 5KSM45
Napeti: 220-240 V
Frekvence: 50/60 Hz
Aaiy Aiy: Aaii Ciiie joi jaiil xai
eaii jia
jlll jiee 1
2002/96/EC
.(WEEE)
a a a a a a a a a a a a a a a a a a a a
ailll lalaisall aullll gall yjusluu
Ji j 1
aill lla cylai co zanll yolll
aaii aagaae 1 1
Lai. jgall lall 1s agll aolll Jn
Jy jll JlJ
aXll 1 j0 g8 l28
y
Sla 1
"DANGER" aks lal y 1000
"WARNING"

aagai 1
aaiy aay y g 1

a
A

| الترجمة الحرفية | |
| الإستعمال完毕的所有权利均归SISLAll rights reserved. All rights reserved. All rights reserved. All rights reserved. All rights reserved. All rights reserved. All rights reserved. All rights reserved. All rights reserved. All rights reserved. All rights reserved. All rights reserved. All rights reserved. All rights reserved. All rights reserved. All rights reserved. All rights reserved. All rights reserved. All rights reserved. All rights reserved. All rights reserved. All rights reserved. All rights reserved. All rights reserved. All rights reserved. All rights reserved. ALL RIGHTS RESERVED. | الترجمة الحرفية |
| الإستعمال完毕的所有权利均归SISLAll rights reserved. All rights reserved. All rights reserved. All rights reserved. All rights reserved. All rights reserved. All rights reserved. All rights reserved. All rights reserved. All rights reserved. All rights reserved. All rights reserved. All rights reserved. All rights reserved. All rights reserved. All rights reserved. All rights reserved. All rights reserved. All rights reserved. All rights Reserved. | الترجمة الح令牌ية |
| الإستعمال完毕的所有权利均归SISLAll rights reserved. All rights reserved. All rights reserved. All rights reserved. All rights reserved. All rights reserved. All rights reserved. All rights reserved. All rights reserved. All rights reserved. All rights reserved. All rights reserved. All rights reserved. All rights reserved. All rights reserved. All rights reserved. All rights reserved. All rights reserved. All rights reserved. All rights reserved. All rights reserved. ALL RIGHTS RESERVED. | الترجمة الح令牌ية |
#
4
1 1
.5KSM45,5KSM150PS j
ylll bll j1 j8 6e pall loll glll paaii iay
J 1
21 1 5 1 1 1 1 1 1 1 1 1 1 1 1 1 1 1 1 1 1 1 1 1 1 1
4
aL
J 1 J 1 J 1 J 1 J 1 J 1 J 1 J 1 J 1 J 1 J 1 J 1 J 1 J 1 J 1 J 1 J 1 J 1 J 1 J 1 J 1 J 1 J 1 J 1 J 1 J 1 J 1 J 1 J 1 J 1 J 1 J 1 J 1 J 1 J
2
g 11 a 11 11 11 11 11 11 11 11 11
1
Kbll bll bll Ldc:
Lg jy g ll g y ll y 1
Dl w l dl aall gl bll all 1
Jy dgl g ll g y ll y 1
Jl l l aall d
1
Jai 1 Jai j 1 Jai j 1 Jai j 1 Jai j 1 Jai j 1 Jai j 1 Jai j 1 Jai j 1 Jai j 1 Jai j 1 Jai j 1 Jai j 1 Jai j 1 Jai j 1 Jai j 1 Jai j 1 Jai j 1
KichenAid 12000000000000000000000000000000000000000000000000000000000000000
blal y 1111 1111 1111 1111 1111 1111 1111 1111 1111 1111 1111 1111 1111 1111 11
Li gai
a 1 a
1/3
1/2
1/3
1/2
1/3
1 a c jll gaii i 1
© 2013. All rights reserved.
Specifications subject to change without notice.
- PARTS AND FEATURES
- ASSEMBLING THE STAND MIXER
- TIPS FOR GREAT RESULTS
- CARE AND CLEANING
- WARRANTY AND SERVICE
- Your safety and the safety of others are very important.
- DANGER
- WARNING
- IMPORTANT SAFEGUARDS
- When using electrical appliances, basic safety precautions should always be followed, including the following:
- STAND MIXER SAFETY
- SAVE THESE INSTRUCTIONS
- Electrical requirements
- Electrical equipment waste disposal
- Disposal of packing material
- Scrapping the product
- Accessory guide
- Attaching/removing the bowl
- Lifting/lowering the motor head
- Attaching/removing the flat beater, wire whip, or dough hook
- Beater to bowl clearance
- Placing/removing the pouring shield*
- Using the pouring shield*
- Operating the speed control
- Speed control guide
- Optional attachments
- Mixing tips
- Mixing time
- Adding Ingredients
- Cake Mixes
- Adding Nuts, Raisins, or Candied Fruits
- Liquid Mixtures
- Kneading Yeast Doughs
- Egg whites Whipped cream
- Whipping Stages
- Cleaning the Stand Mixer
- Cleaning the accessories
- TROUBLESHOOTING
- If your Stand Mixer should malfunction or fail to operate, please check the following:
- KitchenAid Stand Mixer warranty
- KITCHENAID DOES NOT ASSUME ANY RESPONSIBILITY FOR INDIRECT DAMAGES.
- Customer service
- INHALTSVERZEICHNIS
- GARANTIA E ASSISTÊNCIA
- MANUTENÇÂO E LIMPEZA
- Limpar a batedeira
- AVISO
- INNEHÄLLSFORTECKNING
- SÄKER ANVÄNDNING AV KÖKSMASKINEN
- VEDLIKEHOLD OG RENGJØRING
- Rengjore kjokkenmaskinen
- ADVARSEL
- Kundeservice
- SISÄLLYSLUETTELO
- YLEISKONEEN TURVALLISUUS
- Garanti for KitchenAid Mixer
- MEPbI INPEdoCTOPOXKHOCTN
- Bo n36eXaHne pIcka noJapa, nopaxKeHnE 3JIeKTpUYeCKnM TOKOM nII NOBpeXdEHN npN nCNoIb3OBAHm BaIeRo npN6Opa Heo6xOAnMo cO6JIouaTb OCHOBHbIe MEPbl IpeIoCTOpOXHOCTn, BKJIouyAra CLeDyUoUne:
- COXPAHNTE DAHHOE PYKOBOCTBO
- 3JIeKtpnueckne Tpe6ObaHna
- BHUMAHNE
- IcnoIb3OBaHnE 3aunTHoro o6oDa\*
- Pa6ota co CKopoCThbIMM pexkUmaMn
- PykoBODCTBOdpeRyIINpOBKnYacTObI BpaueHn
- Ynctka akceccyapob
- BbIaJIeHnE N UcTpaHEHnE HEnCIIpABHOCTeN
- EcnB Baw HactoBhBmMKcep Bbiwei n3 cTpo nn He pa6oTaet, npOBepbTe cnedyuooee:
- TapaHTnHoe 6cnyxmbaHne hactoIbHoro MMKcepa KitchenAid
- TYTO POKNY USCHOVEJTE
- aaii aagaae 1 1
- #
- 4
- Li gai
Brand : KITCHENAID
Model : SodaStream
Category : Other kitchen appliances