
ER508 - Electric mower PANASONIC - Free user manual and instructions
Find the device manual for free ER508 PANASONIC in PDF.
| Product type | Rechargeable electric trimmer |
| Brand | Panasonic |
| Model | ER508 |
| Power supply | 230 V AC, 50 Hz |
| Motor voltage | 1.2 V DC |
| Charging time | 12 hours |
| Battery life | Approx. 60 minutes |
| Usage | Beard and mustache trimming (household use) |
| Cutting heights | 1 mm (without comb); 3, 6, 9, 12, 10, 20, 30, 40 mm with combs |
| Combs included | 3/6 mm, 9/12 mm, 10/20/30/40 mm, thinning attachment (1/3) |
| Blade | Movable blade and fixed blade |
| Cleaning | Water washable (blade); brush cleaning |
| Lubrication | Oil provided, apply before each use |
| Safety | Switch locked if attachment is incorrectly positioned; disconnect before cleaning |
| Battery | Rechargeable, lifespan approx. 6 years (recharge at least every 6 months) |
| AC adapter | Model RE5-79 |
| Charging indicator | LED indicator |
Frequently Asked Questions - ER508 PANASONIC
User questions about ER508 PANASONIC
0 question about this device. Answer the ones you know or ask your own.
Ask a new question about this device
Download the instructions for your Electric mower in PDF format for free! Find your manual ER508 - PANASONIC and take your electronic device back in hand. On this page are published all the documents necessary for the use of your device. ER508 by PANASONIC.
USER MANUAL ER508 PANASONIC
AC/Rechargeable Hair Clipper
Operating Instructions
Model No. ER508
Matsushita Electric Works Wanbao (Guangzhou) Ltd.
Wanbao Base, Zhong Cun Pan Yu, GuangDong 511495, China
No.2 EN, GR, FR, IT, NE, SP, DN, PO, NR, SW, FN, Po, Cz, Hu, Ru, Russi Printed in China
Please read these instructions completely before use. Always keep these instructions in a safe place.
INDEX
ENGLISH Page 4
DEUTSCHSeite 9
FRANCAIS Page 14
ITALIANO Pagina 20
NEDERLANDS Pgina 26
ESPANOL Pagina 32
DANSK Side 38
PORTUGES Pagina 43
NORSK Side 49
SVENSKA Sid 54
SUOMI
POLSKI
CESKY
MAG
ROMANA Pagina 82
PYCCKM
Sivu 59
Strona 64
Strona 70
Oldal 76
CtpaHua 88
2


Thank you for purchasing the Panasonic Hair Clipper Model No.ER508.
Important safety instructions
Basic safety instructions, including those listed below, must be observed when using electrical appliances.
Failure to observe the following may result in death or serious injury.
1) Do not use the clipper with AC operation in locations subject to high humidity, such as in bathrooms and shower rooms.
- Failure to observe this may result in electric shocks, fires or malfunctions.
2) Disconnect the AC adaptor from the wall socket when cleaning the clipper.
- Failure to observe this may result in electric shocks.
3) Do not plug in or disconnect the AC adaptor with wet hands.
- Failure to observe this may result in electric shocks.
4) Do not place the AC adaptor in water. Never wash it in water or allow it to get wet.
Do not wipe it with thinner, benzine or alcohol.
- Failure to observe this may result in electric shocks.
5) Do not disassemble the clipper.
Do not modify the clipper.
Do not attempt repairs.
- Failure to observe this may result in fires, electric shocks or other injuries. Repairs must always be requested to your dealer.
6) Do not use the clipper if the electric cord or the AC adaptor is worn, or if the AC adaptor does not fit snugly in the wall socket. - Failure to observe this may result in electric shocks, short circuits or fires.
7) Do not damage, cut, modify, twist, forcibly bend or pull the electric cord. Do not place heavy objects on the electric cord or trap it between objects. - Failure to observe this may result in electric shocks or fires.
8) Only use the clipper with 230V AC power supplies. - Failure to observe this may result in electric shocks or fires.
9) Clean the electric plug regularly to remove any dust or dirt. - Dust or dirt adhering to the electric plug may reduce insulation capabilities owing to moisture in the air, resulting in fires.
Failure to observe the following may result in injuries or physical damage.
Do not use force to press the blade against the skin, and do not apply excessive pressure to the outer blade.
- Failure to observe this may result in injuries to the skin or damage to the blades.
2) Do not use the clipper for any purpose other than trimming. Do not use to trim the hair of a pet.
- Failure to observe this may result in injuries to the skin.
3) Check that the blades are not damaged or deformed before use.
- Failure to observe this may result in injuries to the skin.
1) When disconnecting the AC adaptor from the wall socket, always grip the AC adaptor and not the electric cord.
- Failure to observe this may result in electric shocks or short circuits.
2) Do not store or charge the clipper in a place exposed to direct sunlight or near a heater or other source of heat.
- Failure to observe this may result in malfunctions or deformations.
3) Lubricate the clipper before use.
- Failure to observe this may result in the blades becoming dull or abnormal noises.
- Failure to observe this may result in the blades becoming hot and the deterioration of cutting performance.
4) Never allow charging to continue for longer than 48 hours.
- Failure to observe this may result in shorting the life of the rechargeable battery.
5)The hair clipper may become warm during operation and/or
charging.
This is normal.
6) Keep out of the reach of children.
7Do not attempt to charge the clipper at temperatures below 0^ or above 40^ . Charging cannot be done correctly under such conditions.
This clipper is indoor use only.
8) Do not attempt to use any power cord or adaptor other than one specifically designed for this model. Use only adaptor RE5-79.
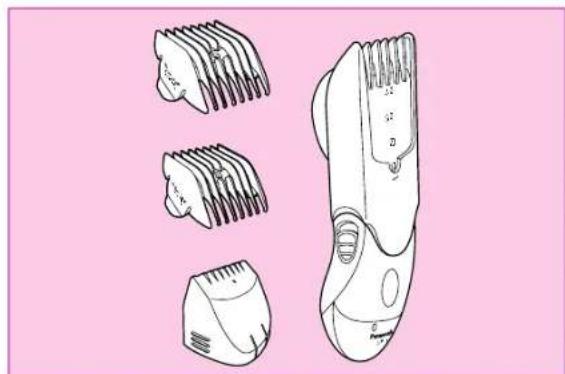
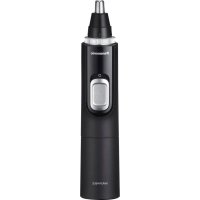
Parts identification
Blade
Attachment mounting
Switch
Body
Indicator lamp
10/20/30/40mm comb attachment
3/6mm comb attachment
9/12mm comb attachment
① Thinning (1/3) attachment
①Movingblade
Fixedblade
Lever for cleaning
MAC adaptor
Electric cord
Oil
Cleaning brush
Before use
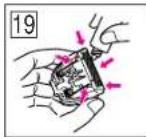
Before using each time, apply oil at the places marked with arrows in Fig.19.
How to use
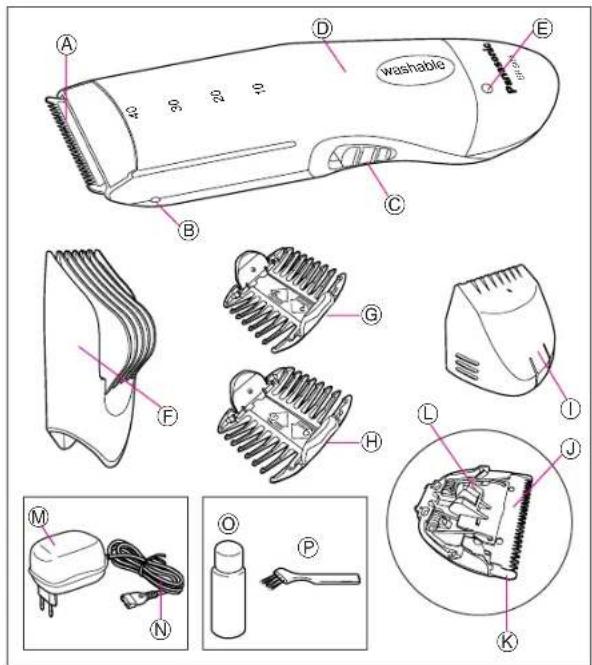
1) Set the switch to "0-charge", and plug the cord into the clipper body. (Fig.1)
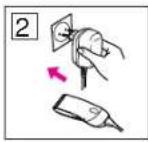
2) Plug the AC adaptor into an AC outlet. The charging indicator lamp will light up. (Fig.2)
3) When charging is completed unplug the AC adaptor from an AC outlet. The charging time is 12 hours; 1 full charge will provide approximately 60 minutes of continuous operation.
1) Connect the AC adaptor to the body in the same way as for charging, and set the switch to "1" to use the clipper.
2) If the AC adaptor is connected while the switch is in the "1" position, the clipper may not operate. If this occurs, set the switch to the "0-charge" position, wait about 1 minute and then set it back to the "1" position.
3) Be sure to set the switch "0-charge" to when finished using the clipper. If the switch is left in the "1" position, the rechargeable battery will become completely discharged, shortening the life of the battery.
<10/20/30/40mm 4-Step Comb Attachment>
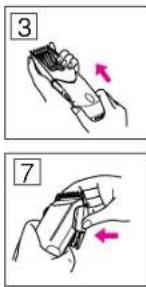
1) With the power switch turned off ("O-charge"), adjust the attachment to the desired trimming height by sliding it until a click is felt at one of the 4 steps. (Fig. 3)
Moving the switch to "1" will lock the attachment so that it cannot slide. The switch is designed not to work if the attachment is not in the correct position.
If the switch will not work, move the attachment up or down to make fine adjustments to its position, while operating the switch.
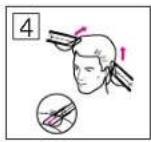
2) Cut hair to the correct height by moving the clipper back against the flow of the hair.
Actual hair length will be a little longer than the height you set.) (Fig. 4) (Do not use the clipper in an inverted position. This can cut hair too deeply.) (Fig. 5)
3) Turn off the clipper ("O-charge") before changing the trim height or removing the attachment.
<3/6mm, 9/12mm comb attachments>
1) The cutting heights are indicated on the insides and sides of the attachments, so be sure to look for the height indication in order to mount the attachment correctly for the desired cutting height. (Fig.6)
2) To mount the comb attachment to the clipper, place one side of the hooks of the comb attachment into the attachment mounting B, then slide the other side to another mounting in the direction indicated with the arrow. (Fig.7)
3) To remove the comb attachment from the clipper, slide one side of
the attachment off the mounting 5 in the direction indicated with the arrow. (Fig.8)
1) To thin hair (1/3 of hair), install the thinning attachment over the trimming blades in the direction of the arrow. (Fig.9) (Push in until a click is heard.)
2) To remove the attachment, push both sides in the directions of the arrow while pulling the attachment. (Fig.10)
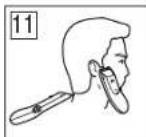
1) Cut hair by placing the clipper head directly on the scalp. (Fig.11)
Cutting without an attachment will trim hair length to 1mm or less.
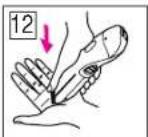
1) Hold the clipper body with the "Panasonic" mark facing upward and push the blade with your thumb in the direction indicated by the arrow. When doing this, catch the blade in your other hand. Be sure the switch is set to "0-charge" before attempting to remove the blade. (Fig.12)
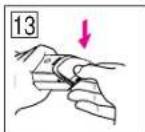
2) To remount the blade, fit the mounting hook into the blade mounting on the clipper body and push in until it "clicks". (Fig.13)
Life of the blade and battery
Blade life will vary according to the frequency and length of use. The life of the blades is expected to be about 6 years when using the clipper twice a month for 20 minutes each time. If cutting efficiency is reduced substantially despite proper maintenance, the blades have exceeded their service life and should be changed.
Battery life will vary according to the frequency and length of use. If the batteries are charged 3 times a month, the service life will be approximately 6 years. If the unit is left without being charged for more than 6 months, the charge will drain from the batteries and their service life may be shortened. Therefore, even when not in regular use, it is recommended that the unit be recharged at least every 6 months.
Blade Maintenance
- If washing in water
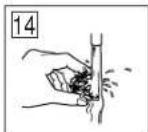
1) Rinse off any hairs that are sticking to the blade in running water. (Fig.14)
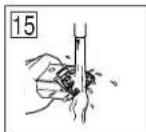
2) Rinse out any hairs that are inside the clipper with running water. (Fig.15)
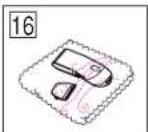
3)Shake the clipper 4 - 5 times gently, wipe off any water drops from the clipper and blade, and then place it onto a towel with the "Washable" indicator facing
upward to let it fully dry. (Fig.16)
4) Apply a few drops of the oil to the points indicated by the arrows. (Fig.19)
5) Remount the blade on the clipper body.
WARNING: Detach the clipper from the AC adaptor before cleaning it in water.
If cleaning with brush
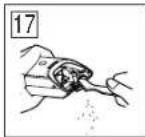
1) Use the cleaning brush to brush off the cut hairs from the clipper body and from around the blade. (Fig.17)
2) Remove the blade and brush off the cut hairs from the blade edge.
3) Brush the cut hairs out from between the fixed blade and the moving blade. Press down on the lever for cleaning in order to raise the moving blade, and brush the cut hairs out from between the blades. (Fig.18)
4) Apply a few drops of the oil to the points indicated by the arrows. (Fig.19)
5) Remount the blade on the clipper body.
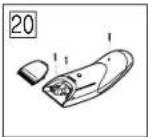
Disconnect the clipper from the outlet when removing the battery. Fully discharge the battery.
1) Remove the blade and then remove the three screws. (Fig.20)
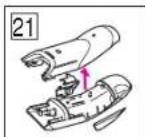
2) Remove the bodycorner (housing). (Fig.21)
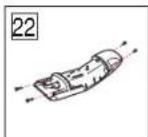
3) Remove the four screws. (Fig.22)
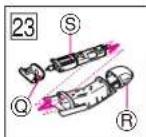
4) Remove the blade attachment mounting and the lower cover R, and then pull out the motor S. (Fig.23)
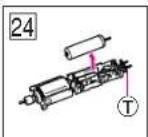
5) Remove the plug mounting ① , and then take out the nickel metal hydride battery. (Fig.24)
Be careful not to short the + and - terminals of the battery after removing it.
Specifications
Power source: 230V AC, 50Hz
Motor voltage:1.2V DC
Charging time: 12hours
Important notice regarding environmental protection
The built-in rechargeable Nickel-Metal Hydride battery contains substances which may be environmentally harmful. Before discarding your electric hair clipper please remove the battery and be sure that it is disposed of in an environmentally friendly way.
Kammansatz 4-stufig 10/20/30/40 mm
<10/20/30/40mm-4-standing-kam>
Specifications Specifications
Sursa de alimentare: 230V AC, 50Hz
Voltaj motor: 1,2V DC
Timp de incarcare: 12ore
Blaoradapm Bac 3a npno6peterne
3eKTPnuecko MaunHKn DnA
ctpnkBoNoc/tpmmepa
Panasonic ER508.
HnctpyKnn no 6e3oNaChomy nCNoJb3OBAHnK
Pn nCnoIb3ObaHnn 3neKtponpnsBopOB Heo6xoJIMo CO5IOaTb OChOBHbe INcTpyKuIN NO 6e3nACHOy McNoJIb3ObaHNIO, npNBeHeHbE HnKe.
Hec6bIIOeHHe NHexepnBeDeHHbIX HcHTpyKzI MoKTe pNBeCTn K Cepe3bHM TpaBMAH UIN CMePTN.
1)3anpeaaetcnoKIOHOTb 6pntby K pO3ETkam nepeMeHHoro TOKa B NOMeueHEHX C BbICOKO BnJXHOCTbIO (BaHHble KOMHaTbI).
HecobnOeHne daHoro npDynpExdHn MoKeT npBecn K nopaxHeHIO 3NEKTPnuCeckm TOKOM nn BbXoY dAnnapa n3 cTPO.
2)Pn YNCTKe 6pNTBbl OTKIOUaHTe Pn6Op OT NTOUYHka NITAHNEPEMEHHOR TOKA.
HecobnOeHne daHoro npdeynpeXdHn MoKet npBecn K nopaxKeHIO 3NEKTPnueckm TKOM Nn BbXoY dAnnapaTa n3CTPO.
3) He noiknouaTe aanTep npnbopa BnaXhbIMpykam.
HecobnIOeHne daHHoro npedynpexdHn MoXeT
npuBecTu K npaKeHIO 3NeKTPuYeCKM TOKOM.
4)N36eraTe KOHTAKTOB aAnTepa c BDOi. HanuHne NOBbIeHNHO BAAxKoCTn pINBOIT K BbIXOy Annapata n3 CTPOB. He npToPapte aAnTep pactBoPnteAMM, 6EH3HOM IIN CNPTOM.
HecobnOeHne daHHoro npdeynpeJxHnM oKet npBBeCTN K npaxKeHIO 3NEKTpUeCKIM TOKOM.
5) He pa36npaTte 6pntby. He nbTaTaeTcb N3MeHnTb KOHCTpyKuMo 6pntbbl. He peKoMeHdyETcA mOcToaTeIbHo pemOHtnpOBaTb 6pntby.
HecobJIOeHne DaHOROpnpdynpexdHn MoKetPnBeCTN K NOxApy,napaxEHNO 3NEkTPnuCeckmTOKOM nTpaBMam.PemOHTCBcda Heo6OaMOnCOrnaocBBaTb C npDoaUM
6) He noIb3yntecb 6pntBo, ecn npOBo nn aanTep n3HOweHbl, n6o npn HENNOTHOM npMBAHH KOHTaKTHbIX wTbpeBnIKK KOHTaKTAM po3eTKN.
Heco6nOeHne DaHOro npEnynpeKdEHN MoKeT npInBeCTN K NOpAkeHHIO 3NeKTKPueckm TOKOM, KopOTkOMy 3aMbIkaHIO mN noXapy.
N36eraaTe nobpeXdHn,
06pe3oB, N3MeHeHn,
ype3mepbIbx n3rNoB oHnn
HaTaeHHn npOboA. He
nomeuante npoBOID noTAXKeJIbIMn PnpdMetamn.
HecobnIOeHne DaHHoro npdynpExdeHn MOKeT npBecTN K nopaxKeHIO 3NEKTPueckm TOKOM nNoxkapy.
8) NcnoIb3yIte MaunHky dnn CTNKKN TOnkOIC NCTOCHKAMNIITAHIN NEpeMeHHORo TOKa 230V.
HecobnDHe HeaHoro npdynpexHMOxET npBecTN K npaoKeHN0 3neKTPueckm TOKOM nnokapy.
9)PeryyIpho YnCTnTe 3eKtpnueckyo Bnky np6bopa dnydaneHnBnn nRp3n.
-Пьингрз,нанлар
HA 3нЕКТРУСЕСКУ BUNKY,
MOKET NOHINtB
N0JIЯцИОнные CBОЛCTBA BO
BlnaЖнБХ NOMU6EHNX,TO
MOKET pINBEcTN K NOXAPy.
Hec6bIIOJeHMe HIXeJIpBHeDEHHbIX npEuyPpeXeHm MOKeT pNBeCTn K TpaBMe.
1)PnKnaBbIaTeJe3BnK KOKe 6e3 oc06bIy cynnn. He npKnlaBbIaTe ycnnn K BHeuHemy ne3BnIO.
HecobnDHe DaHHoro npEynpeXeHN MoKeT npBcTeK T TaPMe NnN noBpeXeHNIO ne3Bn.
2) He noIb3yITeB MaIINKoI dIa CTPNJK B INbIX CEJIAX, HKeEJI B TEX, IJRA KOTOpBX OH npedHa3aueH.
HeCNoB3yIteMaunHkyIa nCTpIXKnIaIIO nOCTpRHaHNOMaOHNXJXNBOThbIX.
HecobJIOeHne DaHHOrOpnepdynpexdHn MoKTe npBECTN K TpaBMc.
3) NcNoB3OBAHnEM y6eNTecb, qTO Ne3BnHe 3aTynpHe Hnn DeOpnpoBaHbI.
HecobnDeyHe nDaHHOro npdynpeKdHn MoKET npBcTeN K TpaMbE.
1)Пи OTknIOUeHn aANTepa nepemEHORo TOKa OTo pOstekn He TAnHTe 3a npOBOD.
HecobnIOeHHe DaHHOro npEduynpeKdHnMoKet npBecTu KnopaxKeHN 3JekTpuCeckm TokOMnn KOPOTKOMy 3aMbkaHNO.
2) He xpaHnte MaunHKy dna CTPRKKN BOJIN3 NCTOCHKOB TENNA IN 36eRaeTne NOaDAHnnpAmbx CONHEbHx Nyei.
HecobnloDHe nDaHHoro npedynpexdEHHa MoXeT npnbEcTN KHeKOppeKTHoH pa6ote np6opaa HnI deFopmaun.
3)MaKaBTe MaunHky dNnCTpnKNe nepeINCNOJb3OBAHnEM.
HecobnIOeHne daHHOro npEynpeJxHnMoKET npBectn K 3aTynnIeHIO ne3bn nHn HeOpMaIbHbIM Wymam.
HecobnIOeHne DaHHOro npedynpexdHn MoXeT
nIbEeTNI KpepeBey N3Bn IIN3HOcy peKyuSeI NOBepXHOCTN.
4)He3apxKaIteMaunHkydnn CTpNkKnBTeueHne6oonee 48 YacoB.
Heco6nIOeHne DaHHOro npEyDnpEckDeHn MoKcET npBecTe K N3HOcy aKKyMnIrTopa.
5) Bo Bpem 3apAkn pa6oTb MaMHKa IaI CTpKMOxET HarpeBaC.
3To -obiiHbI peKIM pa60TbI.
6) XpanHe npinbop B HeNOCTyHOM DnI DneteMeTc.
7) He 3apxkaIte MaunHKy dna CTPNKn npn Temnepatye HNKe 0^ nnn BbIe 40^. 3apKa npn TaK nx ycNoBNx He 6ydt KoppeKTHO. MaunHKy dna CTPNKn cneDyET NCNOB3OBaTb TOnbKO B NOMUEHHX.
8)I36e9aIte IcN0Nb3ObaHnIHbIX WHyPOb NITaHnI aAnTepOB,KpOMyK3aHaHbIX dAaHHo MoDenI. IOnb3yITeCb aAnTepOM MapKn RE5-79.
06o3naeHnHaCTeN
npn6opa
Ane3Bne
HacaKn dJa cTpNkN
BbiknioateIb
Kopnyc
ENamnaHnDnKaTopa
⑤KoMbHnPoBaHbHHe HacaKn 10/20/30/40 MM
KoM6HnHPOBaHHoe HacAdKn 3/6 MM
KoM6HnHPOBaHHoe HacaKn 9/12 MM
①Hacadkn dna "npopekmbaHa" (1/3)
NoBnKHOeNe3Bne
3aФнКсUpOBaHHoe JIe3BnE
PbHar npa pa3B0a ne3Bn
AanTep nepemehnHO ToKa
NCHYPNTAHNA
Macno
PHTAaH TaK
IpeedHaayalom mCNOJb3OBAHm
Ipeep nCnoB3ObaHnem annapaTa Cma3bBaute MacJOM Mecta, 06o3HaueHHbe CTpeKNkAMn (pnc. 19).
IcnoJb3ObaHne annapaTa
1) UctahOBInTe nepeKlnHouAtenb B nOIOXeHnE "O·charge" IN OIOKIIHOHTe WUnp K KopnyCy 6PmTBbl (pnc.1).
2) NpoknOHTe aanTep nepemEHORo TOKa K POzETKe npemEHORo TOKa.3aorPITcN INdKATOP 3apkKn (PNC, 2).
3)No 3aBepweHn 3apAKn OTKIOUHTe aadntep nepemehHoro TOKa oT pOstKn nepemehHoro TOKa. BpEma 3apAKn -12 YacOB;1 nonHaa 3apAka o6cneuBaET BpEMa pa0bTI B TeueHHe npImepHO 60 MNH.
1)PnKIOUHTe aanTep
nepemehhoro ToKa K Kopnyc TaK Je, KaK JnA 3apJKn, IN nepeBeDTe nepeKInOuAteB b NonoXeHHe "1" dN paBoTb c 6pntBoi.
2) Ecnn aanTep nepemennHoro TOKA noKIOUeH B no3uINI nepeKIOUaTeNA "1, To 6pNTBa MOKeT He paOtaTB. B 30m Cnyae yCTaHOBtenepeKIOUaTeHB nOIOXeHne "O+charge",noDOxJInTe 1 MmHTy, Nocne Yero nepeBeDInTe nepeKIOUaTeNB noNOXeHne "1
3)O6raTeNbno nepeBedeHne nepeKnOHTeNb B noONxKeHne "0-charge" no OKOHuaHN nCnONb3OBaHH 6PnTBbl. EcnnepeKNoHTeNb OCTabH eN NOxKeHn "1",3TO MoXeT npBcETn K NnHOH pApaNdke aKKyMylrTopa, yTO 3HAUYHBO COKpaaet cPOK NCNOB3OBAHN AKKMyrToPA.
1)Pn OTKHIOeHHOM nepeKIOUATENE NITAHN (O·charge) yCTaHOBtE HacdKy HxHNO BbICOTb TpMMHRA DO UENHKA (OHO N3 HTHHHTT
Tepex Hohkien (pmc.5) NepemeseHne nepeKIOUaTeHa "1" 3aФнСИpyET HacAdky n npedOTbPAMT CKOLbXeHne. KOHCTpyKcIy nepeKIOUaTeA He no3BOJnEIT ICNOJIb3OBAHne
npmbopa npn Hnpabnblhoi yctahOBKe hacaKn.
Ecn nepeknioateIb He pabotaeT, npeMeCTte HacaKy BBepx IIN BHN3 dI npabnHOB yCTaHOBKn.
2)NopeXbTe BONcBdo HyxHoi DnHHb NytEm NepemueHn 6pntBbl npOTnb HnpanBaJIeHn poCTa BONc.
(AkTuYeckaДинHa BOnoc 6yDeT HEmHoroДиHHee 3aAHHoB bICOTb) (pnc.4).
(He nonb3yItecb 6pntBoB B HapnabneHm no pocty BONOC. B 3TOM Cnyae cyueCTbyET ONaCHOCTb CNIKKOM CNBHorO cpe3aHHNBOONc) (Pnc.5)
3) BbIKIOUHTe 6pNTBy (noIooKeHne "O-charge") nepeI INMHeHnEM BbICOTbI TpIMMnHra INN 3aMeHOH HacaKn.
1) BbICOTcpe3a BONOC yka3aHa H bHTpeHHx CTOpOHAX HacaDOK, NO3OMy PnP yCTAHOBKe HacaKn CneDNTe 3a yCTAHOBKOn HyXHO BbICOTbl cpe3a BONOC (pnc.6).
2)Диу yctahOBkn Hacakn Ha 6pHTbY BCTaBbTeФнkaTOpblc ODHN CTOPObH By CTPoNCTBO DnHACaKn B,3ATEm BCTaBbTeФнkaTOpblc nPOTINBOIOnOXHON CTOPObH yCTPOINCTBa B HAnpaBHeHn, yKa3aHHOM CTpeKKn (PMC.7).
3)JINHCHATNHAACKaHc6PNTBbCDBHNbTeOHDyCTOPOHYHacaKn cYCTpOnCTBa B
HanpaBneHH, yKa3aHHOM CTpeKoI (pnc. 8).
"npopexKuBaHnA">
1)ДЯnpо佩克иВаньBOLOC(1/3 BONOCA)yCTAHOBITEyCTPOIcTBO 4nnpoepKuBnHaJIe3BnB 6pNTbblHapnabNeHH, yka3aHHOMCTpeKoi(pnc.9). (HaxmTeDoUeNka.)
2)ДЯСHTYH HAcAДN HAXMITE Ha 06e CTopoHbI B HAnpaBHeHnx, yKa3aHHbIX CTpeJIkAMn, npN OHOBPEMeHHom CHATN HacaJKN (pnc.10).
1) Noppe3aIte BonoCbl nytem nOmeuHn rONOBKn 6pNTbbl NO npMbIm yrIOnm K KOKe rONOBbl (Pnc. 11).
O6pe3aHne BOLOc 6e3 HacaKo OcyueCTBnRETCa Ha dINHHy Do 1 MM.
1)Depxnte Kopnyc 6pntBbl c Hnncbno"Panasonic"cexyu BbyTnne Ne3Bne 60nbHmN nablem pyKn B hampabNeHn, ykazahHom ctpenKo. Pn NTOM npddepxnaBate Ne3Bne dpyroyn pyKo. Neped CHATnem ne3Bn y6eHTncB TOM, YTO nepeKlnOyateNb yctAHOBnE B NOLOXHe H "0-charge"(pnc.12).
2)ДИ NOBTOPHO YCTAHOBKNIe3BnY BCTABTe ΦNkCATOP BMETO YCTAHOBKNIe3BnHa KOpNyCe 6pNTbbl HAnKmTE Do
zennka (pnc.13).
CpOK nCNoB3OBAHnJIe3BnI nAkkymyIaTopa
CpOK nCnONb3OBAHNA Ne3BnB BapbpyeTcB 3abNCMOCNT OT qACTOTBI N pOdoJNtEBHOCTn n Cn ONb 3OBaHn. PpeDnONoXtBeBnBc npCK nCnONb3OBAHNA BcOCTaBnEET 6 let npN cNOnB3OBAHn 6pNTbI bDa pa3a B MeCAu B TeHeHne 20 MnHT. Ecn 3ΦΦeKTHBoc T cpe3AHn 3aHuTBeHo CHNXeHa, HecMOTPn Ha npAunbHOe 0cbnykBaHne, TO 3TO O3HaAet, YTO CpOK nCnONb3OBAHNA Ne3Bn 3AKOHnCn, IN Xe Heo6xOdmo 3AMHNTb.
Cpok nCnOJb3OBaHnA
aKKymyIaTopa BapbpyetcB 3aBNCMOnCT O TAcTObI N
npoJOnKInTeNbHOCTm
ncN0JIb3OBaHnA np6Ba.Ecn
aKKymyIaTOp 3pa3aB MEcR,TO CpOK eRnONcNb3OBaHnA COCTABnEePn6Ln3ntEnbHo 6 Net. Ecn annapat He nepe3apXaeTCa
6Oone 6 MeCAeB, TO aKKymyIaTOp
nonHOCTbHO pa3pXaeTC, YTO
CHMaET CpOK eRnONcNb3OBaHnA.
PoTOMy, Daxe Pn HeperynAPHom
ncN0JIb3OBaHnA, AKKymyIaTOp
peKoMeHdyetc Pepe3apXaTb
kKaJds 6 MeCAeB.
yXoJ3aJIe3BnA M
Pn npombIBKe BOIO
1)CMoTeBOLocbI,npHnHaIOuHeN KJIe3BnIO,npToCHNO BODoI (pnc.14).
2) CMouTe BonoCbI, OCTaBuaNEcH BNYTpN 6pTuTBbI, npOToCHoB BOIo (Pc.15).
3) Cnerka BCTPAXHnTE 6pNTBy 4~5 pa3, npOTpIne KANIN BObl, OCTABWneC h KOpNcye n neBnn, n NOLOXnTE ero H noONTeHue INDnKATOpOM "Washable" BBepx n daTe nNOHOCTbO BbICOXHYb (pnc.16).
4) CmXbTe MacnOM MecTa, yKa3aHbIe CTpeKAMn (Pnc.19).
5) UctahOBnTE Ie3Bne Ha Kopnyc 6pIITbI.
PENDEYUNPEKDEHNE:OTcOeHNHTe 6nPTBTO aadantepa nepemehHOTo TOKa nepei npoMblKOBoDIO.
- PnOuNTKe 电Tko
1) NlB3yTeCb CneuAnbHoi 电KoJ DnCHrTHOCTABWxcx B0NOC C KopnyCa BpNTbI IN BOKpyIe3Bn (pnc.17).
2) CHMNTe ne3Bne u ydaNTe BONOCbI cero KpaEB.
3)YdaJIte BOJocbln npocTpaHCTBa MEXd y 3aФИКСИРОВАБПIM NOBbXbHm KpAMn JIe3Bn. IaNoIHATn NOBuXHOr Oe3Bn HaxMITE Ha pbYuar n
ydaJIHTe BONOCbI n3 npocTpaHCTBa Mekdy Ne3BnAMM (pnc.18).
4) CMaBxte MaCmO MeCA, yKa3aAHbHe CTpeKAMn (PMC.19).
5)YcTaHOBnTeJe3BHeHaKOpnyc 6pNTBbl.
BaxkHoe 3ameuHne no oxpaHe okpykaOuSei cpebl
BCTpoeHHbI aKKymyIaTOp n3 CnnaBa HmKeN C dpyrnnM metanlAmo CoepKNT BeueCTBa, KOtOpe MOrY 6bItb BPeHbIMn DnQkpyKaIOeI cpebl. Ipepe yTNImaMeB6pnTBbAkkymyIaTOp Heo6xmoMo ydaNt b yTNImnroPobAtb OTdEnbHO.
Ipei CHTHeM aKKymyIaTopa OTKJIOHHTe 6pntBbOT cTeN. Pa3Pnnte aKKymyIaTOp.
1) CHMIMTE NéB3E (A), NOCE YERO OTBNIHTTE TPN BINTHA (PNC. 20).
2) CHIMMTE yron kopnyca (kopnyc) (pnc. 21).
3) OTBHNTTE YETbIpe BHTa (pnc. 22).
4) CHMNTE HACAxyIeJ3BVE ⑥ HNKKH yron ⑧, nocne Yero CHMNTE DIBRATenb (pnc.23)
5) CHMME BINLOHYIO HACADky ①, NOCNE YERO BBHbTe AKKYMnTOp (Pnc. 24).
Pocne CHATNAKKyMnyToppa CNEHNTe 3aTEM, YTObblNONOCA ^+ "n"He cOpNKacANCb.
YCTAHOBNEHHB npOn3BODHTENEM B
npRn4Ke n.2 cT5 FepDepanbHORO
3aKaHOA PΦ "O 3aunTe npab
npOTpe6HTENe" cPCK cnJyBbI dny
daHHO r3dEINPAPBEN 7 roDam C
DaTb npONBOCTBaPN yCNOBm,
yTO n3dEINe NcNOLb3yETCB A
CTporOM COOTBETCTBUN C
HactoTae HnCTpyKUnei No
3KcNlPyatauN npIMMeHMbIMN
TEXHHECKMn CTAnDAPTMn

BZ02
CdaHOBKtae
3TOT npn6op npedha3aueH TOnbko DnAOMaWHeRo NcNoJIb3OBAHnR.
TexHnueckne
XapaKTePncTnKN
NCTOCHIK NITAHNI 230V AC,50Hz HAnPRAKHEME DBIRATENA:1.2V DC
(NoCToHHbI TOK)
Bpem3apn:12acob
CpOK nCNoB3OBAHnJIe3BnI nAkkymyIaTopa
yXoJ3aJIe3BnA M
BaxkHoe 3ameuHne no oxpaHe okpykaOuSei cpebl
BCTpoeHHbI aKKymyIaTOp n3 CnnaBa HmKeN C dpyrnnM metanlAmo CoepKNT BeueCTBa, KOtOpe MOrY 6bItb BPeHbIMn DnQkpyKaIOeI cpebl. Ipepe yTNImaMeB6pnTBbAkkymyIaTOp Heo6xmoMo ydaNt b yTNImnroPobAtb OTdEnbHO.BZ02
CdaHOBKtae
3TOT npn6op npedha3aueH TOnbko DnAOMaWHeRo NcNoJIb3OBAHnR.TexHnueckne
XapaKTePncTnKN
NCTOCHIK NITAHNI 230V AC,50Hz HAnPRAKHEME DBIRATENA:1.2V DC (NoCToHHbI TOK) Bpem3apn:12acob
- AC/Rechargeable Hair Clipper
- Operating Instructions
- INDEX
- Important safety instructions
- Parts identification
- Before use
- How to use
- <10/20/30/40mm 4-Step Comb Attachment>
- <3/6mm, 9/12mm comb attachments>
- Life of the blade and battery
- Blade Maintenance
- Specifications
- Important notice regarding environmental protection
- Kammansatz 4-stufig 10/20/30/40 mm
- <10/20/30/40mm-4-standing-kam>
- Specifications Specifications
- HnctpyKnn no 6e3oNaChomy nCNoJb3OBAHnK
- 06o3naeHnHaCTeN
- IpeedHaayalom mCNOJb3OBAHm
- IcnoJb3ObaHne annapaTa
- CpOK nCNoB3OBAHnJIe3BnI nAkkymyIaTopa
- yXoJ3aJIe3BnA M
- BaxkHoe 3ameuHne no oxpaHe okpykaOuSei cpebl
- BZ02
- CdaHOBKtae
- TexHnueckne
- XapaKTePncTnKN
Brand : PANASONIC
Model : ER508
Category : Electric mower