
EGS0101 - Thermometer Emos - Free user manual and instructions
Find the device manual for free EGS0101 Emos in PDF.
| Product type | Connected thermo-hygrometer |
| Brand | Emos |
| Model | EGS0101 |
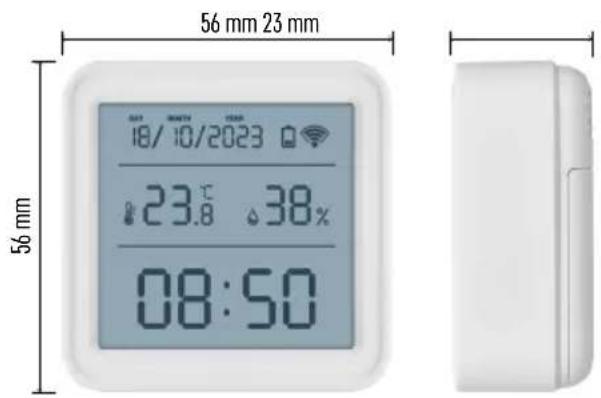
| Dimensions | 56 × 23 × 56 mm |
| Power supply | 3 AAA 1.5 V alkaline batteries (not included) |
| Indoor temperature measurement range | -10 °C to +60 °C (resolution 0.1 °C, accuracy ±1 °C) |
| Indoor humidity measurement range | 0 % to 99 % RH (resolution 1 %, accuracy ±5 %) |
| Connectivity | Wi-Fi 2.4 GHz (IEEE 802.11 b/g/n) and Zigbee (2402-2480 MHz) |
| Main functions | Temperature and humidity measurement, Wi-Fi controlled clock, temperature and humidity alarms via app, calibration, data export |
| Mobile app | EMOS GoSmart (iOS and Android) |
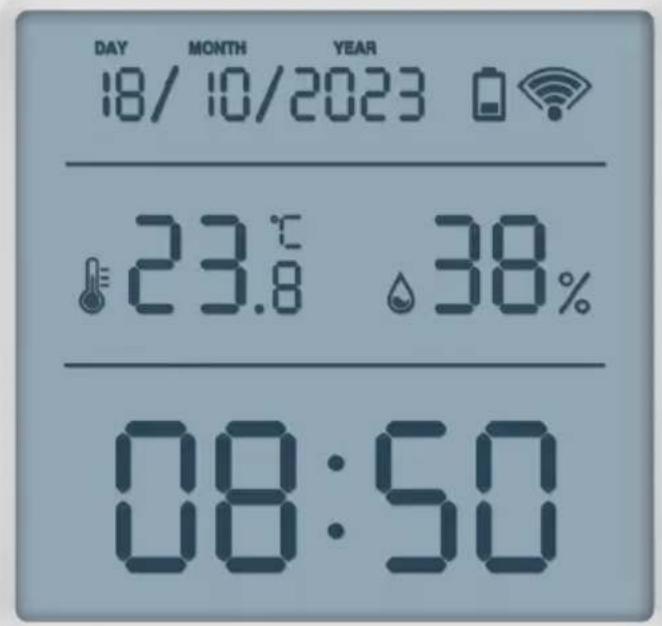
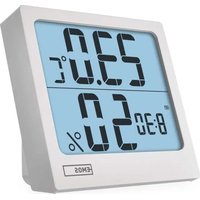
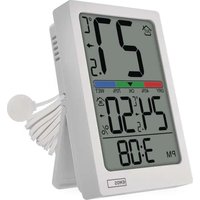
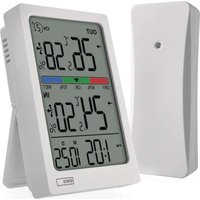
| Display | Time, date, temperature, humidity, Wi-Fi and battery icons |
| Cleaning and maintenance | Soft cloth slightly damp; do not use solvents |
| Safety | Do not immerse in water, do not expose to shocks, dust, high temperatures or excessive humidity; repair by qualified professional only |
| Repairability | Replaceable batteries; no spare parts provided by manufacturer |
| General information | Connected thermometer for indoor use, compatible with Zigbee gateway (not included) for smart home integration |
Frequently Asked Questions - EGS0101 Emos
User questions about EGS0101 Emos
0 question about this device. Answer the ones you know or ask your own.
Ask a new question about this device
Download the instructions for your Thermometer in PDF format for free! Find your manual EGS0101 - Emos and take your electronic device back in hand. On this page are published all the documents necessary for the use of your device. EGS0101 by Emos.
USER MANUAL EGS0101 Emos
Technical Specifications 3
Description of Icons and Buttons 4
Getting Started 5
Mobile Application 6
Controls and Functions 9
Troubleshooting FAQ 12
Safety Instructions andWarnings

Read the user manual before using the device.
Follow the safety instructions in the manual.
- Do not tamper with the internal electrical circuits of the product - doing so may damage the product and will automatically void the warranty. The product should only be repaired by a qualified professional.
- To clean the product, use a soft damp cloth. Do not use solvents or detergents - they could scratch the plastic parts and cause corrosion of the electric circuits.
- Do not use the device in the proximity of devices that generate electromagnetic fields.
- Do not expose the product to excessive force, impact, dust, high temperatures or humidity – these may cause the product to malfunction or deform its plastic parts.
- Do not insert any objects into the openings on the device.
- Do not submerge the device in water.
- Protect the device from falls or impacts.
- Only use the device in accordance with the instructions provided in this manual.
- The manufacturer is not liable for damage caused by improper use of the device.
- The appliance is not intended for use by persons (including children) whose physical, sensory or mental disability or lack of experience and expertise prevents safe use, unless they are supervised or instructed in the use of the appliance by a person responsible for their safety. Children must always be supervised to ensure they do not play with the appliance.

Technical Specifications
Wi-Fi controlled clock
Time format: 12/24 h
Indoor temperature: -10^ to +60^ , 0.1^ increments
Temperature measurement accuracy: ± 1^
Indoor humidity: 0% to 99% RH, 1% increments
Humidity measurement accuracy: ± 5%
Connection: 2.4 GHz Wi-Fi (IEEE802.11b/g/n)/ Zigbee 2402 ~ 2,480 MHz
Frequency band: 2.400-2.4835 GHz
Power supply: 3 × 1.5V AAA batteries (not included)
Dimensions: 56 × 23 × 56 mm


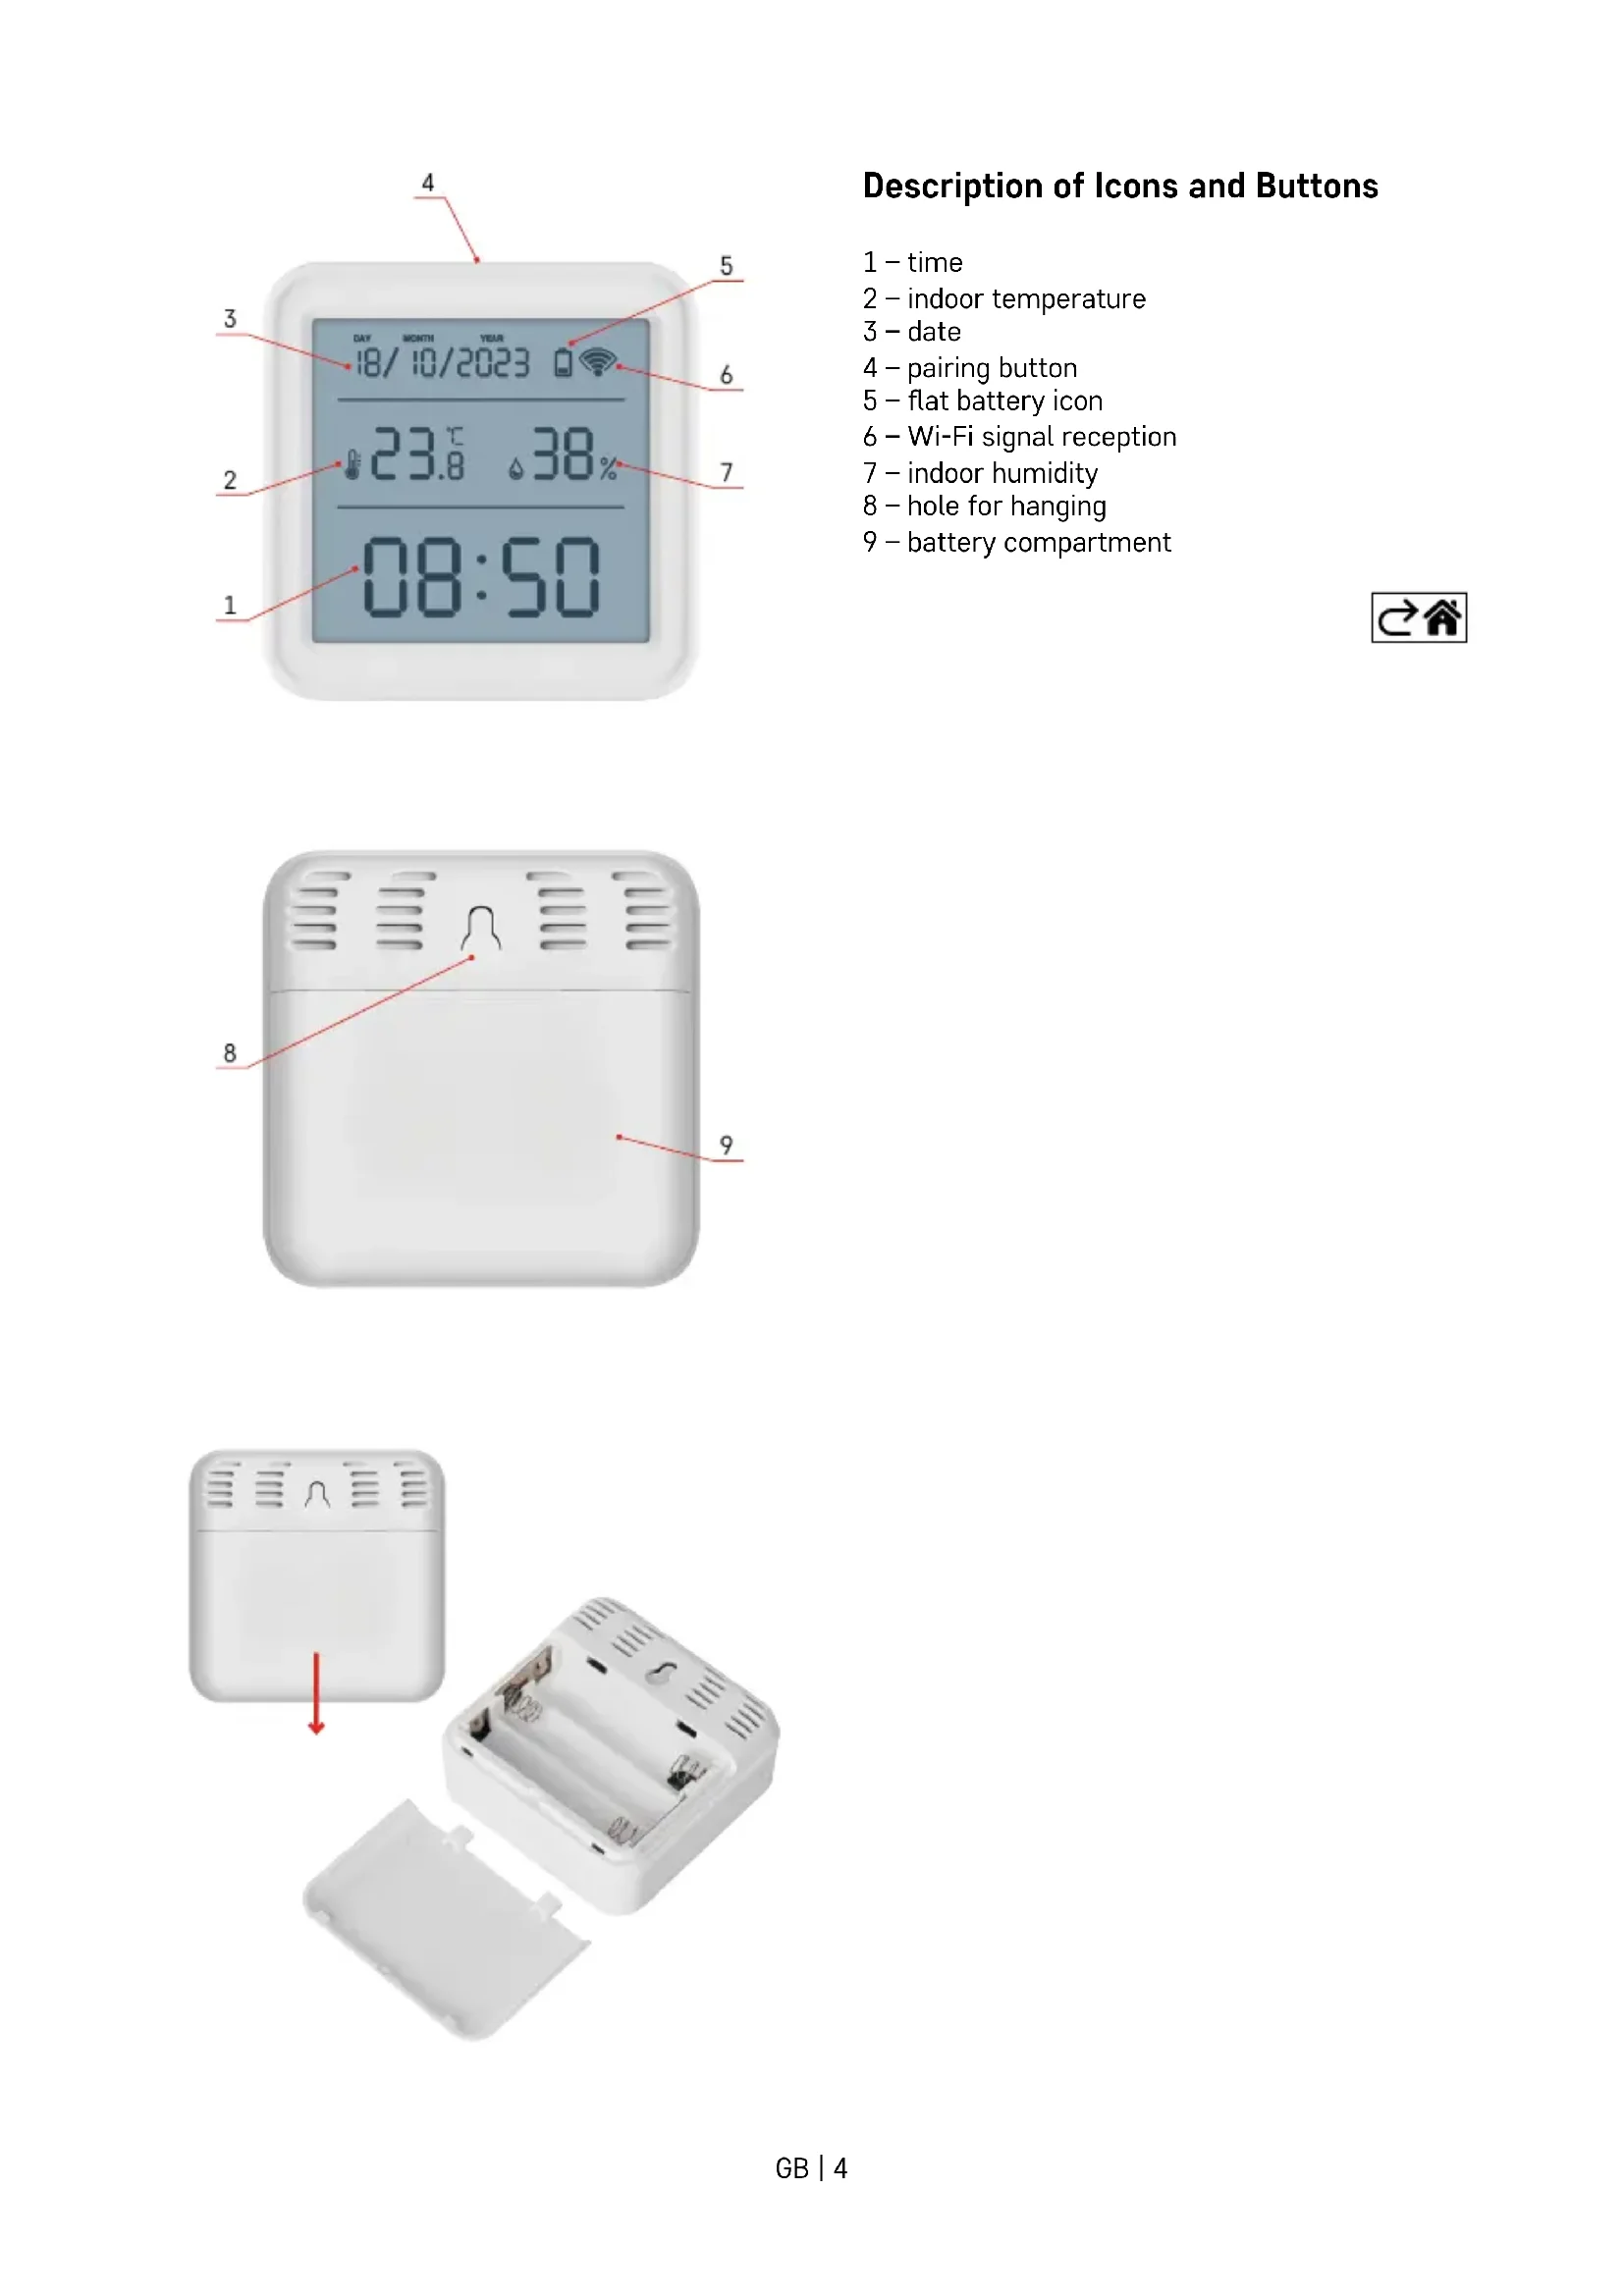
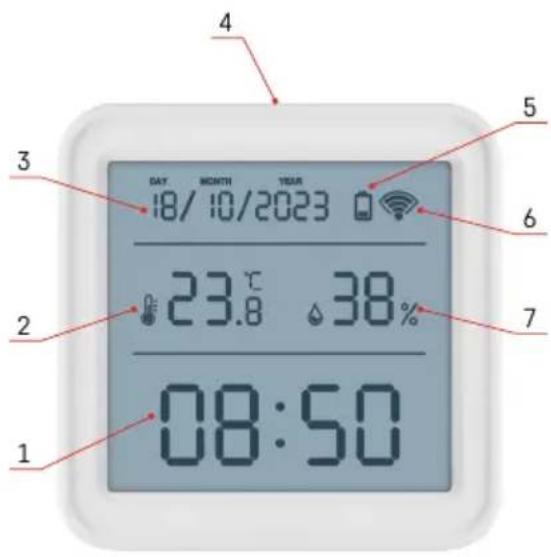
Description of Icons and Buttons
1-time
2 - indoor temperature
3-date
4 - pairing button
5-flatbatteryicon
6-Wi-Fi signal reception
7 - indoor humidity
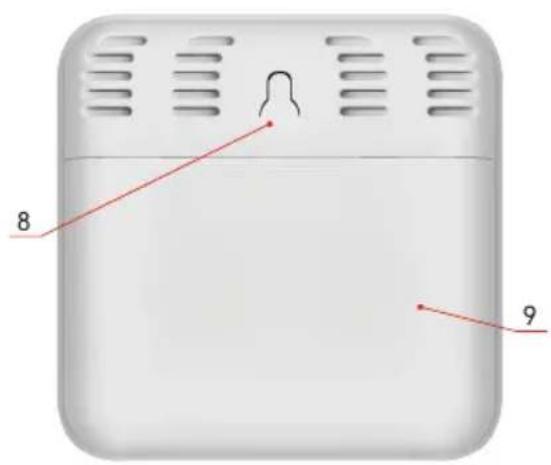
8 - hole for hanging
9 - battery compartment


Getting Started
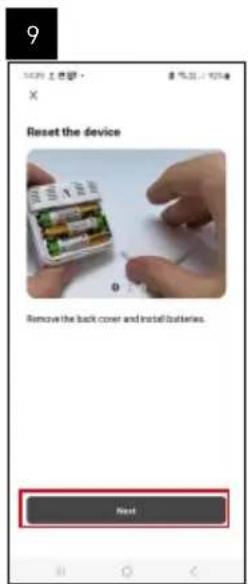
- Insert three batteries (1.5V AAA) into the thermometer. When inserting the batteries, make sure the polarity is correct to avoid damaging the thermometer.
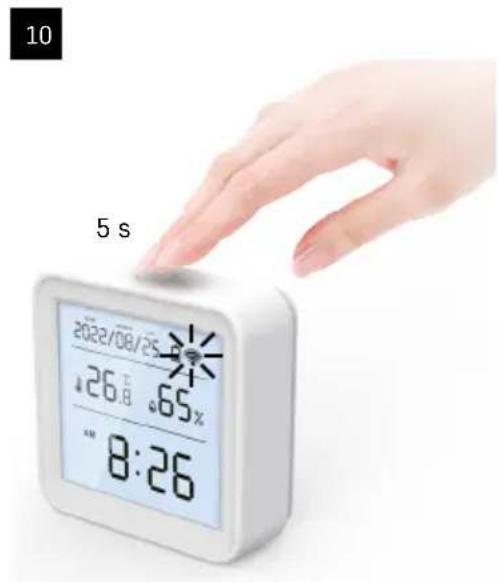
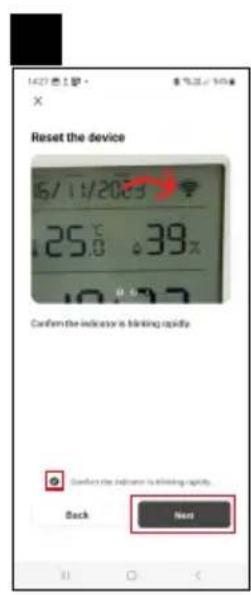
- The Wi-Fi signal reception icon will start flashing.
- If the Wi-Fi icon does not flash, long-press the pairing button and complete the pairing process with the app.
If the screen shows the low battery icon in field no. 5, replace the batteries.
Thermometer RESET
If the thermometer displays incorrect values or does not respond to button presses, remove the batteries, then reinsert them.

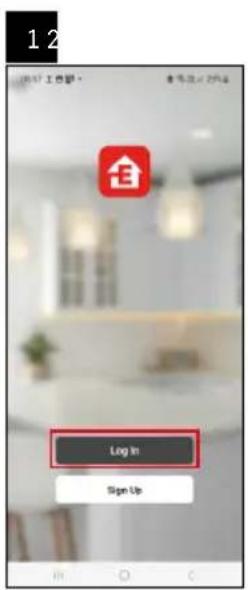
Mobile Application


The thermometer can be controlled using a mobile app for iOS or Android.
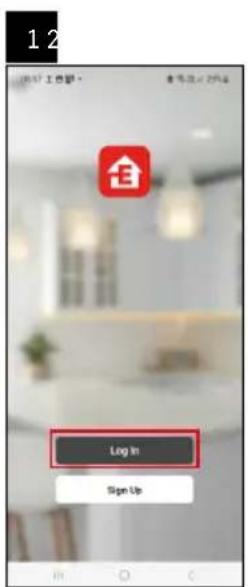
Download the EMOS GoSmart app for your device.
Tap the Log In button if you've used the app before.
Otherwise, tap the Sign Up button and register.
Pairing with the App


Pairing the Zigbee Gateway with the App
(If you're already using the gateway, skip this step)
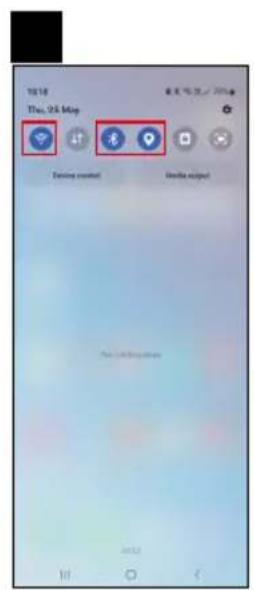
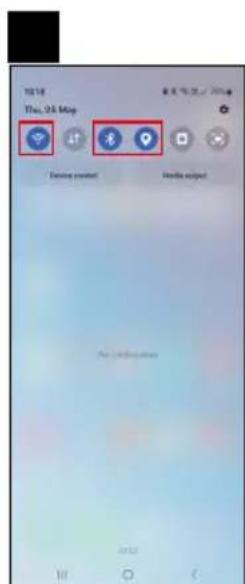
Plug a power cable into the gateway and enable GPS and Bluetooth connection on your mobile device.
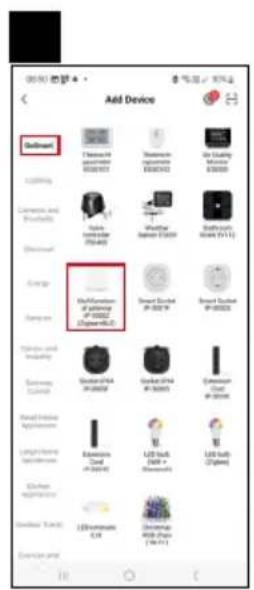
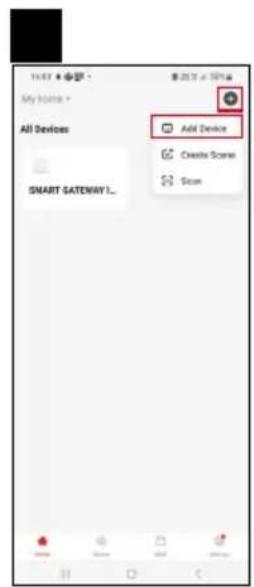
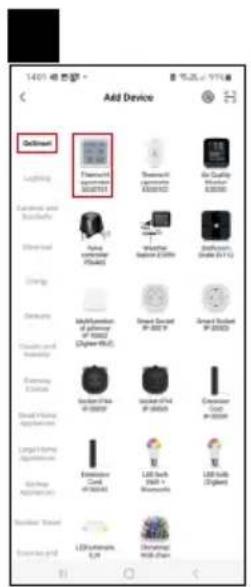
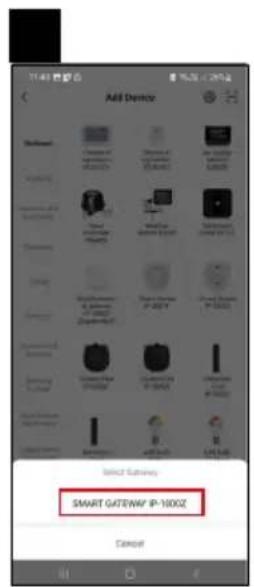
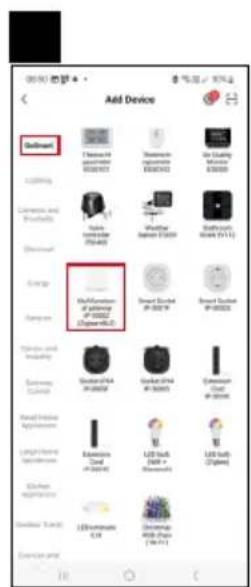
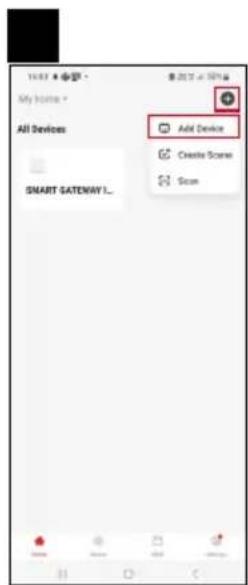
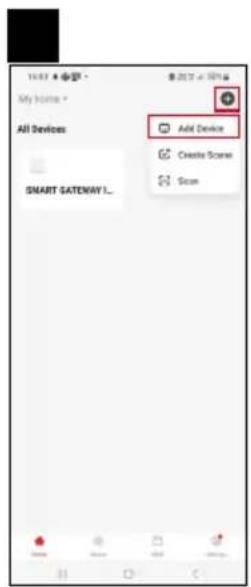
Tap Add Device in the app.
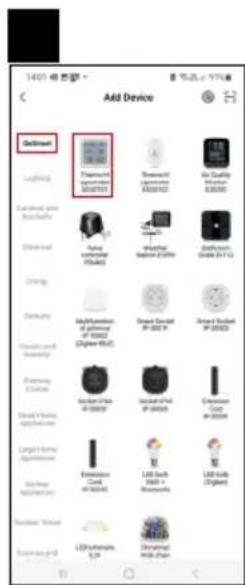
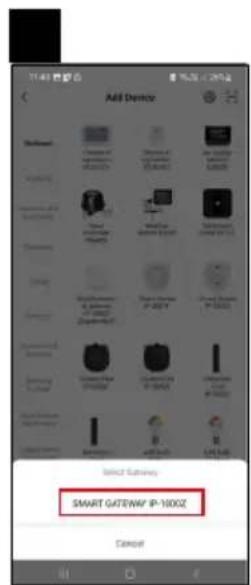
Tap the GoSmart list on the left and tap the Smart Multi Gateway IP-1000Z icon.
Follow the instructions in the app and enter the name and password for your 2.4 GHz Wi-Fi network.
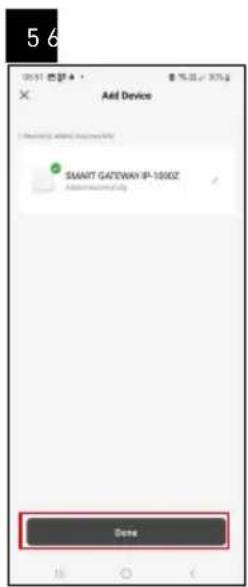
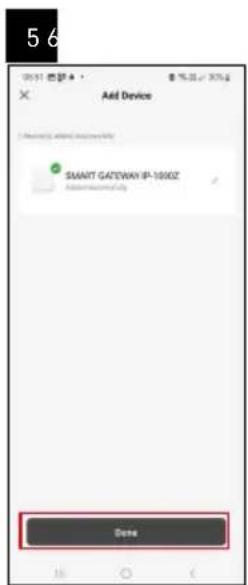
The gateway will pair with the app within 2 minutes.
Note: If the gateway fails to pair, repeat the process and check the settings using the manual for the gateway. 5 GHz Wi-Fi networks are not supported.
Pairing a device with an app
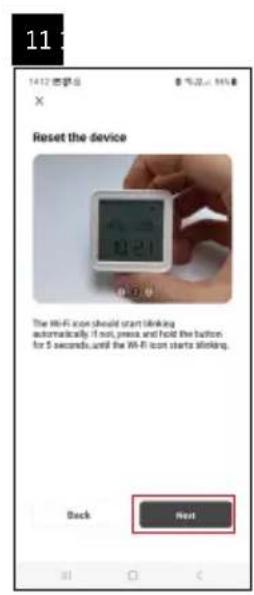
When you insert batteries into the thermometer, the Wi-Fi icon will start flashing.
If the Wi-Fi icon does not flash, press the pairing button for 5 seconds.
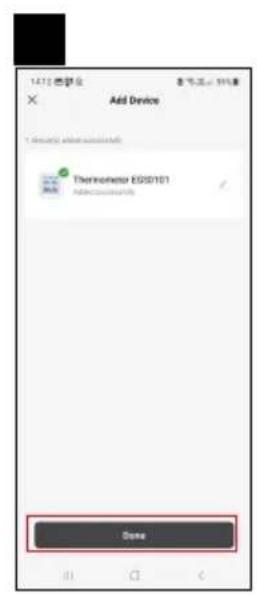
Tap Add Device in the app.
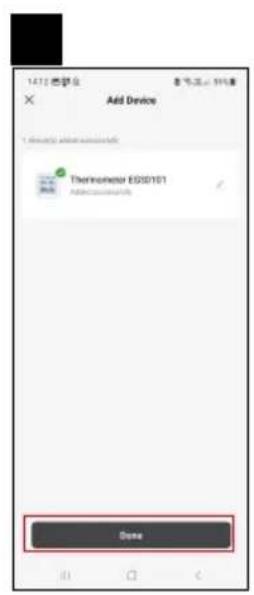
Tap the GoSmart list on the left and then the Thermo-Hygrometer EGS0101 icon.
Follow the instructions in the app and enter the name and password for your 2.4 GHz Wi-Fi network.
The pairing with the app will be completed within 2 minutes; the Wi-Fi icon will be permanently shown on the thermometer display.
Note: If the device fails to pair, repeat the process. 5 GHz Wi-Fi networks are not supported.
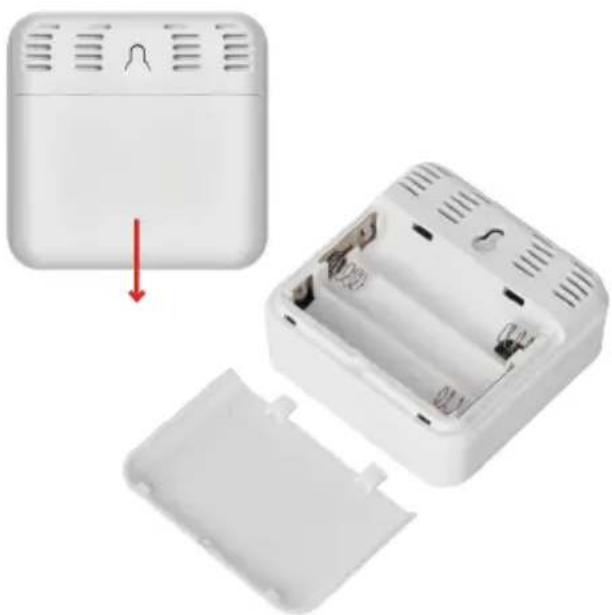
Inserting/Replacing Batteries
- Open the battery compartment cover on the backside of the thermometer.
- Remove the depleted batteries.
- Insert new 3 × 1.5V AAA batteries. Make sure you observe the correct polarity.
- Close the cover.
If batteries are protected by a safety film, remove it first.
Only use alkaline batteries of the same type; do not use old and new batteries at the same time; do not use
1.2V rechargeable batteries.


Controls and Functions
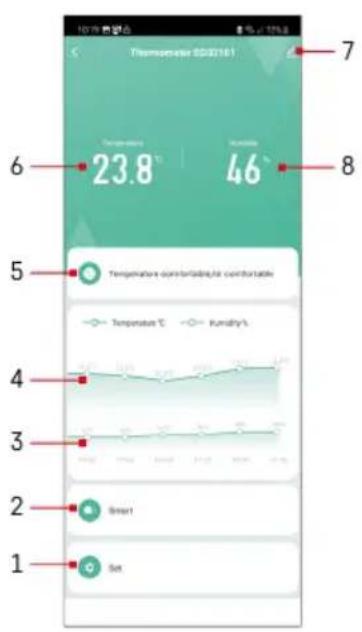
Application Menu
1 - settings
2 - setting the scene and automation assigned to the device
3 - humidity history chart
4 - temperature history chart
5 - current temperature and humidity index
6 - current temperature
7 - advanced settings
8 - current humidity

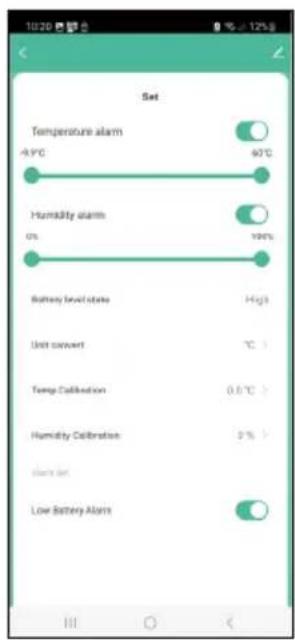
Settings
Temperature alarm
Temperature alert.
Move the slider to the left/right to set the desired temperature.
The app will display a notification when the set temperature is reached.
Function activation - O Function deactivation -
Humidity alarm
Humidity alert.
Move the slider to the left/right to set the desired humidity.
The app will display a notification when the set temperature is reached.
Function activation - Function deactivation
Battery level state
The status of the batteries in the device.
Unit convert
^ C / ^ F temperature unit setting.
Temp calibration
Calibration of room temperature is used, for example, if the thermometer shows 21^ but you want it to show 20^ . In that case, the calibration value should be set to -1^ .
Setting from -2.0^ to +2.0^ , in 0.1^ increments.
Humidity calibration
Calibration of room humidity is used, for example, if the thermometer shows 20% but you want it to show 21% . In that case, the calibration value should be set to -1% .
Setting from -10% to +10%, in 1% increments.
Low battery alarm
If the batteries in the device are flat, the app will display a notification.
Function activation - O Function deactivation -
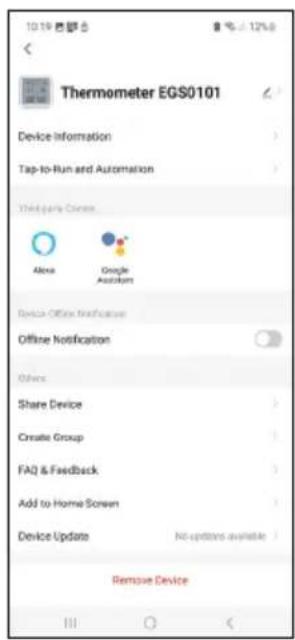
Advanced Settings
Device information - basic information about the device
- Tap-To-Run and Automation - scenes and automations assigned to the device
- Offline notification - notifies when the device is offline for over 8 hours (e.g. power outage)
- Share Device - shares control of the device with another person
- Create Group - creates a group of similar devices
- Faq and Feedback - frequently asked questions and feedback
- Add to Home screen - adds an icon for the device on the phone's home screen
Device Update - updates the device
- Remove Device - unpairs the device
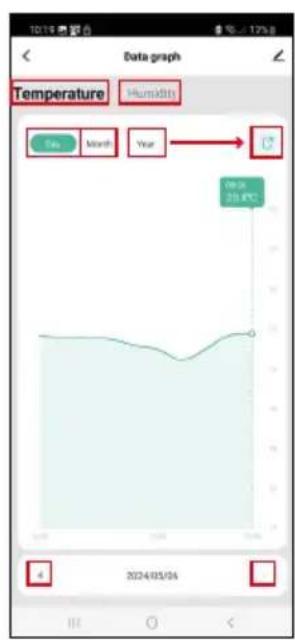
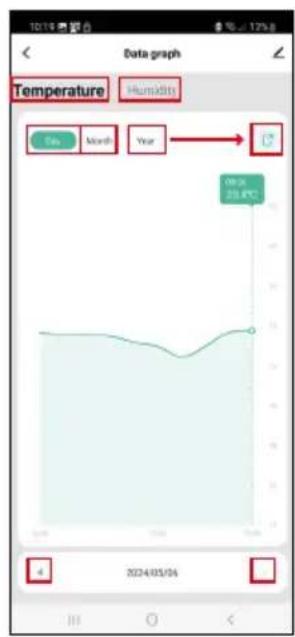
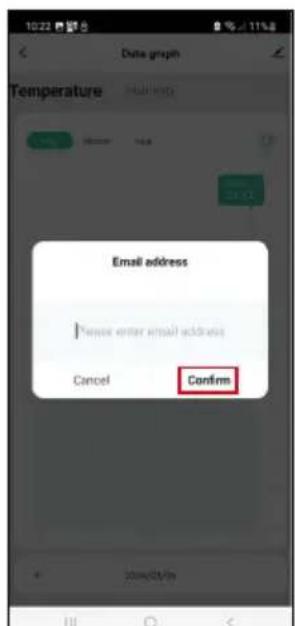
Export of Measured Data
Tap the temperature/humidity history chart in the app's main menu.
Select a temperature or humidity measurement.
Select measurements within a day/month/year.
Use the left/right arrow at the bottom to select the exact date/month/year.
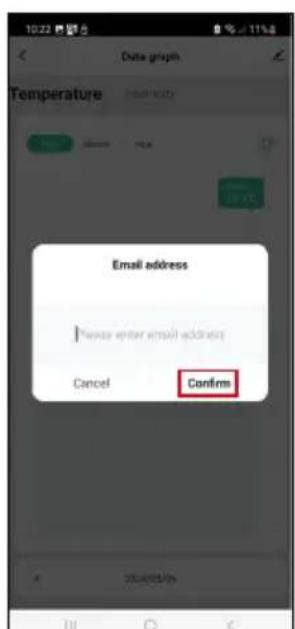
Tap the icon, enter your e-mail address and tap Confirm.
You will receive an email with a link to download the xlsx file; the link is valid for 7 days.

Troubleshooting FAQ
In place of temperature/humidity, the screen displays:
- E1 - the measured value is outside the lower/upper measurement range
- Move the device to a more suitable spot.
The screen is difficult to read
- Replace the batteries.
The Wi-Fi icon is flashing
- The thermometer is not paired with the app, repeat the pairing process.
- The thermometer is not connected to the Wi-Fi network, check the functionality of the network.

CZ | Teplomer

Obsah
Zigbee 2402 2480 MHz
YacToTHn diana3oH: 2,400-2,4835 T
KnBHeHH:36aTapeuKn1,5B AAA (He BXOJrB B KOMNKeT)
Pozmipn: 56 x 23 x 56 MM


Onnc iKOHOK Ta KHONOK
1-4ac
2-BHyTpIiWnTeMnepaTypa
3-ata
4-KHONKa CnoJyueHHA
5-3haokpo3paJkeHH6baTapeNoK
6- npniom cnrhany wifi
7-BONORICTB BYTPIHRA
8-otbipnnaiibbiybaHHa
9-6atapeHnBicik


OnncanHn BBeDeHHB eKcnnyataciio
- BCTaTe 6aTapeKn B TePmOMeTp (3× 1,5 B AAA). BCTaBJIouCh 6aTapeKn, 3BepHiTb yBary Ha npaBnIbHy nOJIaRHiCTb, 0o6 He NOUKOJITN TepMOMeTp.
2.Почимаьблматиikонк苹пшуWi-Fiсгнану
3.Якwo ioknka Wi-Fi He 6JIMaE,HaTNCHTb i npntpmaTe KhoNky cnoJyueHHa,06 3abepuHTn npoec CnoJyueHHa 3 nporpaMOIO.
JaKIO Ha dinCnIeBido6paKaεTbcra IKOHKa Hn3bKOro 3apA dy 6aTapeKn B noJI No5 , 3amHiTb 6aTapeKn.
CKIaHHa TepMometpa
JaKIO TepMometp noka3yEc HnnpabunbHi noka3HnKn a6o He pearyc Ha haTnCKaHHa KHONOK, BnMIb i 3HOBy BCTABTe batapeyn.

Mobilha nporpama


TepMometpom Moxha KepyBaTu 3a DonomoroIO MobiIbHoI nporpaMn Ira iOS a6o Android.
3aabaTae nporpaMy EMOS GoSmart> nra cBOro npucpoio.
Ha KONky YbiTn》,KIO Bn BKe BkOpncOBye nporpaMy.
B iHwOmy BnnaKny HaTnCHiB KhONKy «PeecTpaui》,L06 3aBepuHTn peecTpauio.
CnoIyueHHa 3doaTkom


CnoIyueHnHa 7uO3y Zigbee i3 nporpaMoIO
(KIO Bn BKe BNKOpNCTOBye TIO3, npOnyCTIb ue HanaWtBuHna
PikKlouitb KaebIe KINBLeHnry Do WJIO3y, YbIMKHiTb Ha Mo6IbHomy npncTrooi nIKJIoueHHa GPS i Bluetooth.
Y nporpamHaTncHItb Doatn npncptpi.
Y libi yacTHi KlaHiTb Ha GoSmart cncocik klaHiTb Ha ikOHky Smart Multi Gateway IP-1000Z.
Dotpmyntecb iHCTpykui y nporpaami, 06 BBectni m'ra napoIb Mepeki Wi-Fi 2,4 T.
PpTgrom 2 xBnHn BIDbyeTbcN iDkNoeHO nIporpaMn.
PpIMitka. Kaio 0u3y He Baaetbca CnoIuyntn, NobTopitb Becb npouec 3HOby, nepebiTe HanaHTyBaHHB iDnOBiHIO do noocibNkA u3y. Mepexa Wi-Fi 5 THe nItpmUyTbcra.
CnoJyueHn npncTpoIO 3doaTkoM
BCTaBte 6atapeKn B TepMoMeTp, iKoHka Wi-Fi noUHe 6JImMaTn.
Ikoikka Wi-Fi He 6nMaC, HATNCHTb KHOKNy 3'EDHaHn npOTaROM 5ceKHyd.
Y nporpaMi HATNCHTb Ha Doatn npicTpi.
Y libi yacthi Hatahichb Ha GoSmart cncoc i knahtb ha ikonky Thermo-Hygrometer EGS0101.
Dotpmyntecb hctpykuiy nporpaami, o6 BBectni m'ra napoIb Mepeki Wi-Fi 2,4 Tt.
PpOraRm 2 XbUInh 6yIe cnoJyuHc H i3 npoPamOIO, IKOHka Wi-Fi 6yIe noCTiHb BIDobpaXaTnC H a DnCnJIeI TepMometpa.
Ppimitka. JaKIO He Bdaetbcra cnoJyHTn npicTpi, nobTopitb Becb npocec ue pa3. Mepexa Wi-Fi 5 THe NiItpmMyETbcra.
BctabJIeHHa/3amHa 6atapeiok
- Biikpnite Kpnsky 6aTapeHoro BiCiky Ha 3aHni CTOPOHi TepMometpa.
- BnMItb BnKOpncTaHi 6aTapeyni.
- BCTaBTe 3 HObi 6atapei1,5 B AAA. 06OB'raKoBO DoTpmyIeTcE npabunbHoI noJrpHocTi.
4.3aKpniTe KpiuKy
JaKIO 6aTapeuKn 3axUeHi 3axNCHOIO nnIBKOIO, II Heo6xIDHO CNOaTky 3HATN.
BukopncToByuTe Nnue JyKHi BaTapeKn OndHoro Tnny, He 3MiUyIe CTapi Ta HOBI baTapeKn, He BUKOpncToByuTe
6aTaapeiKn 1,2 B3apAHi 6bTaapeiKn.

KepyBaHHa Ta cyHKcii
MeHIO nporpamn
1-HaJauTsyBaHHH
2-HaIauTByBaHHcueHn Ta aBTOMaTH3aui, npi- 3HaueHi IJRA CBOMy pncToPO
3- rpadik ictopii Bonoorocti
4-rpaikictopiTeMnepaTyPn
5-akTyajbHn NOKa3HnK Tempepatyp Ta BOJorOCTI
6-akTyaIbHa TemnepePaTpa
7 po3wnpehe HanaWtYBaHHa
8-akTyaIbHa BOJorictb
HajawtybaHHa
Temperature alarm
Cunhanaia Temnepaotyp.
BctaHOBiB 6aKaHy TempeAtpy 3a donomoroIO nob3yHka BnIBO/BnpaBO.
PnDocrHHeHHI BCTaHOBJeHOro 3NaueHHN 306pa3ntbCnporpMa cNoBIuaHH.
AKTINBaIg cyHKuII
DeaktnBauiqyHkuii
Humidity alarm
CunHaniaizyBolorocti.
BidperuyIoute nob3yHok libopyu/npabopuy do notpi6hoi BOLOROCTi.
PnDocrHHeHHI BCTAHOBJeHOro 3HaueHHN 306pa3ntbCnporpMa cnOBIuaHHa.
AKTINBaIaI cyHkuii
DeaktnBauiqyHkuii
Battery level state
CTaHaTepeKnB npncTpoi.
Unit convert
HanaHTyBaHHoDHHuTeMnepaTpyn ^ / ^
Temp calibration
Kani6pyBaHHaMHaTHoI TeMnepaTyPi BnKOpNCToByEcBcA, HApNklaI, KOJI TepMoMeTp noka3ye 21 ^ C , aJe MxOueMo, 0b BiH noka3yBaB 20 ^ C . Ucbomy Bnpanky 3HaueHHaKani6pyBaHHa BCTaHOBNeHo Ha -1 ^ C
HanaHTyBaHHB-2,0°C no +2,0°C no 0,1°C.
Humidity calibration
Kani6pyBaHHBONORCTI BnpMiiueHHi BnKOpNCTOByeTbCra,HaPnKnaI,KOJI TepMometp noka3ye 20%,a MN XoYeMo,io6 BiN noka3yBaB 21%.U cybomy BnPaKnY 3NaueHnKaI6pyBaHHBcTaHO H -1%.
HanaHTyBaHHaB-10%do+10%no1%.
Low battery alarm
Y pa3i po3r4xJHHe 6aTapeNOK y npncTroPnporpama BIO6pa3ntbcnOBIuaHHa.
ФункцяakTиBaцii
Функця ДаakTиBaцii

Pozupeni HanaTbyBaHHa
Device information - OCHOBHI BiIDOMOCTI npo npnCTpi
Tap-To-Run and Automation-cuHn Ta aBtOMaTn3aui, npn3HaueHi IJy CboI npncTroIO
- Offline notification - cnoBiuueHH, KOJI npucpii nepe6yBaC B peKmI oJnH 6jIbwe 8 roHN (HaepNKlaad, BiKluoyehn XKIBneHH)
Share Device-cnIbHe KepyBaHH npncTpoEM 3 IInoIO OcOboIO
- Create Group - CTBOpENHrpynn CXOXnX npncTpoIB
- Faq and Feedback -Часту Доггеля Та Вдгкн
Add to Home screen - CTBOpEHH IOKHN npNCPTPOIO B rOIOBHOMy MeHIO Te- nefohy
Device Update - OHOBJIeHHI npicTpOIO
- Remove Device -po3'eHaHHn npncTpO
EknpT daHnx BmipioBaHb
HaTnCHiB y rOIOBHOmy MeHIO npOrpAMn Ha rpaΦik icToPi BBmipIOBaHb Temnepa-Typu/BOIoroCTi.
BubepiB BmipioBaHHa TempeaTpy a6o BOIorocti.
Bn6epitb BmipioBaHHB Mexkax HnA/Micra/poky.
BnKOpncToByIe CTrpIKy BJIIO/BnPaBO Bn3y, Lio6 Bn6paTu ToHy daTy/Micra/biK.
HaTnchItb Ha iKoHky , BBeiItb aDpecy eJeKtpoHoiI NOHTa HaTnCHITbPiTBePdntn.
Ha eNeKtpoHny noTu bye HapicnaHo nocnnaHHa nra cKaUyBaHHa fay y opMati xlsx, nocnnaHHa diiChe 7 dHIB.

BnpiuBaHn npo6neM FAQ
Ha dncnnei 3amictb temepatypn/BoIorOcti BIO6paKaetbc:
E1-BMipIeH3NaueHH3HaOHTbc3aMeKamHnKhboro/BepxHboroDiana3oHy BmipIOBaHH
-Перемicitтbpictpiуb6ibu3pyuHecmicue
Baxko uHTaetbcnIe
- 3amihitb6aTapeiKu
Блима ecokha Wi-Fi
Temperaturas signals.
Lai iestatitu velamo temperaturu, parvietojiet slidni pa kreisi/pa labi.
Sasniedzot iestatito temperaturu, lietotne tiks paradits pazinojums.
Mitruma bridinajuma signals
Mitruma signals.
Lai iestatitu velamo mitrumu, parviietojiet slidni pa kreisi/pa labi.
Sasniedzot iestatito temperaturu, lietotne tiks pardits pazinojums.
BbtpeUHa BnaJHOCCT: OTHOCHTeJIHa BnAaHOCCTOT 0%do99%,CTbNkaHa npomraHa1%
TouhoCT Ha n3MepBaHe Ha BnaXHoCTTa: ±5%
Cbbp3BaHe: 2,4 GHz Wi-Fi (IEEE802.11b/g/n) / Zigbee 2402 ~ 2,480 MHz
YecToTHaJeHTa:2,400-2,4835GHz
3axpaHbahe: 3 6p. 6aTeepn 1,5 V Tn AAA (He ca BKNIOUeHN B KOMNJIeKTA)
Pa3mepn: 56× 23× 56mm

Oncsahne Ha IKOHnte N 6yToHnTe
1-4ac
2-BbTpewHa TempepaTypa
3-ata
4-6yToH 3a CDbOBAHe
5-нкona 3a pa3peeHa 6aTePnA
6- npnemane Ha Wi-Fi cnrhana
7-BbTpewHaBJaXHOCT
8-OTBOP3aOKaYBaHe
9-otdeleHne 3a batepnn


Hauano
- NocTabete Tpr 6por 6atepn (1,5 V AAA) B tepMometbpa. Korato noctabte 6atepnte, ce ybepte, ue npJrHOCCTTA mE npabunHa, 3a da n36berHeTe nobpeDa Ha TepMometbpa.
2.ИконатаЗа пиемане на Wi-Fi сигнада щe започе дa мига. - Ako nkoHaTa Wi-Fi He Mira, HATnCHHe 3aApbXte 6yToHa 3a CdbOraBaHe n 3aBbPse Te npoceHa cdbOraBaHe C npuIOxKeHneTO.
AkoB nolne No 5 Ha ekpaHa ce nokae IKoHaTa 3a N3ToUeHa 6aTePnI, CmeHete 6atepntte.
Pectaptnpahe Ha TepMometbpa
Ako TepMometbptn oka3Ba HnpaBnHn CTOnHOCTn nHn He peaHnpa Ha HATNCKaHn Ha byTOHnTe, N3BaTe6baTepeHnTe n CneT TOBA rN NOCTaBeTe OTHOBO.

Mobilno npiloxeHne


TepMoMeTbPbT MoKe Ja ce ynpablaBa C Mo6nHNo npuioJeHne 3a iOS nn Android.
I3TerIeTe npInoKeHneTo EMOS GoSmart 3a BaWeTo ycTpoCTBO.
Dokochete 6yToHa Log In (BxoI), ako Beue cTe n3non3Baan npnOKeHneTo.
B npotnbEN cIyuaIdoKocheTe 6byToHa Sign Up (PereNcTpaun) n ce perncTpnpaIte.
CdboBaHec npnIOxehneTo


CdboBaHe Ha 7JIO3a Zigbee c npJNOKeHneTo
(Ako Beue n3noN3BaTe npTana, nponycheTe Ta3n CTbNka)
BkIIOUeTe 3axpaHbauK ka6en B npTaHa n aKTbHpaIte GPS n Bluetooth bPb3ka Ha BaSeTo Mo6nH0 yCTpoIcTBO.
Дokochete Добаяне Ha yctpoIcTBO B npJIOxKeHNeTO.
Дokochete спсьka GoSmart вяво и дokochete Икона Т Smart Multi Gateway IP-1000Z.
CneBaTe INCTpyKunTe B npIIOKeHneTo n BBBeJeTe IMeTo n napOlaTa 3a BaWata 2,4 GHz Wi-Fi mpeka.
IopTaJIbT ue ce cBON C npNJIOKeHneTo B paMKIne Ha 2 MNHyTN.
3a6eKka: Ako npTaJIbT He ycnee da ce cIbOu, noBTope Te npOceca n npOBepTe hAcToKnTe, KaTO n3non3- BATE pKoBOcTBOTO 3a npTana.5 GHz Wi-Fi mpeKn He ce npDlbpxkat.
CdboBaHe Ha yctpoiCTBO C npnloXeHne
Korato noctabnte 6atepnte B Tepmometbpa, IKoHaTa Wi-Fi 3anaOHe da mira.
Ako nkoHaTa 3a Wi-Fi He npemirHe, HATNCHE 6yToHa 3a cDBoRABaHe 3a 5 cekyHn.
Specifications techniques 3
Application mobile 6
Specifications techniques
- Safety Instructions andWarnings
- Technical Specifications
- Description of Icons and Buttons
- Getting Started
- Thermometer RESET
- Mobile Application
- Pairing with the App
- Pairing the Zigbee Gateway with the App
- Pairing a device with an app
- Inserting/Replacing Batteries
- Controls and Functions
- Application Menu
- Settings
- Temperature alarm
- Humidity alarm
- Battery level state
- Unit convert
- Temp calibration
- Humidity calibration
- Low battery alarm
- Advanced Settings
- Export of Measured Data
- Troubleshooting FAQ
- The screen is difficult to read
- The Wi-Fi icon is flashing
- CZ | Teplomer
- Obsah
- Onnc iKOHOK Ta KHONOK
- OnncanHn BBeDeHHB eKcnnyataciio
- CKIaHHa TepMometpa
- Mobilha nporpama
- CnoIyueHHa 3doaTkom
- CnoIyueHnHa 7uO3y Zigbee i3 nporpaMoIO
- CnoJyueHn npncTpoIO 3doaTkoM
- BctabJIeHHa/3amHa 6atapeiok
- KepyBaHHa Ta cyHKcii
- MeHIO nporpamn
- HajawtybaHHa
- Pozupeni HanaTbyBaHHa
- EknpT daHnx BmipioBaHb
- BnpiuBaHn npo6neM FAQ
- Baxko uHTaetbcnIe
- Блима ecokha Wi-Fi
- Mitruma bridinajuma signals
- Oncsahne Ha IKOHnte N 6yToHnTe
- Hauano
- Pectaptnpahe Ha TepMometbpa
- Mobilno npiloxeHne
- CdboBaHec npnIOxehneTo
- CdboBaHe Ha 7JIO3a Zigbee c npJNOKeHneTo
- CdboBaHe Ha yctpoiCTBO C npnloXeHne
- Specifications techniques
Brand : Emos
Model : EGS0101
Category : Thermometer