
E0558P - Thermometer Emos - Free user manual and instructions
Find the device manual for free E0558P Emos in PDF.

| Product Type | Thermometer with clock, hygrometer and alarm |
| Brand | Emos |
| Model | E0558P |
| Power Supply | 2 AAA 1.5 V batteries (alkaline) |
| Indoor Temperature Range | -10 °C to +50 °C (resolution 0.1 °C) |
| Outdoor Temperature Range (wired probe) | -50 °C to +70 °C (resolution 0.1 °C) |
| Indoor Humidity Range | 1% to 99% RH (resolution 1%) |
| Temperature Accuracy | ±1 °C (0 to +50 °C), ±1.5 °C (other ranges) |
| Humidity Accuracy | ±5% (30-80%), ±8% (20-29% and 81-95%), ±12% (1-19% and 96-99%) |
| External Probe Length | 1.9 m |
| Main Functions | Clock (12/24 h), alarm, SNOOZE (8 min), comfort indicator (dry/comfortable/wet), temperature and humidity trends, min/max display |
| Temperature Unit | °C or °F (selectable) |
| Dimensions | Approximately 110 × 70 × 20 mm (estimated) |
| Weight (with batteries) | Approximately 120 g (estimated) |
| Maintenance and Cleaning | Soft cloth slightly damp; do not use solvents |
| Safety | Do not immerse, do not open, keep batteries out of reach of children |
| Spare Parts and Repairability | Repair by qualified specialist only; contact Emos after-sales service |
Frequently Asked Questions - E0558P Emos
User questions about E0558P Emos
0 question about this device. Answer the ones you know or ask your own.
Ask a new question about this device
Download the instructions for your Thermometer in PDF format for free! Find your manual E0558P - Emos and take your electronic device back in hand. On this page are published all the documents necessary for the use of your device. E0558P by Emos.
USER MANUAL E0558P Emos
Safety Instructions and Warnings

Read the user manual before using the device.

Follow the safety instructions in the manual.
- Do not tamper with the internal electrical circuits of the product – doing so may damage the product and will automatically void the warranty. The product should only be repaired by a qualified professional.
- Clean the product using a soft, slightly damp cloth. Do not use solvents or detergents – they could scratch the plastic parts and cause corrosion of the electrical circuits.
- Do not use the device in the proximity of devices that generate electromagnetic fields.
- Do not expose the product to excessive force, impact, dust, high temperatures or humidity – these may cause the product to malfunction or may deform its plastic parts.
- Do not insert any objects into the openings on the device.
- Do not submerge the device in water.
- Protect the device from falls or impacts.
- Do not throw batteries into a fire and do not disassemble or short-circuit them.
- Keep the batteries out of reach of children. Ingestion may result in poisoning by chemicals, perforation of soft tissues and death.
- Severe poisoning may occur within two hours of first issues appearing. Seek medical attention immediately.
- Only use the device in accordance with the instructions provided in this manual.
- The manufacturer is not liable for damage caused by improper use of the device.
- The appliance is not intended for use by persons (including children) whose physical, sensory or mental disability, or lack of experience and expertise prevents safe use, unless they are supervised or instructed in the use of the appliance by a person responsible for
their safety. Children must always be supervised to ensure they do not play with the appliance.
The full wording of the EU declaration of conformity is available at http://www.emos.eu/download.
Technical Specifications
Technical Specifications
Quartz clock
Indoor temperature: -10 °C to +50 °C, 0.1 °C resolution
Outdoor temperature: -50 °C to +70 °C, 0.1 °C resolution
Indoor humidity: 1 % to 99 % RH, 1 % resolution
Temperature measurement accuracy: ±1 °C for the range 0 to +50 °C, ±1.5 °C for other ranges
Accuracy of humidity measurement: ±5 % for the range 30 % to 80 %, ±8 % for the ranges 20 % to 29 % and 81 % to 95 %, ±12 % for the ranges 1 % to 19 % and 96 % to 99 %
Temperature display unit: ^ C/ ^ F
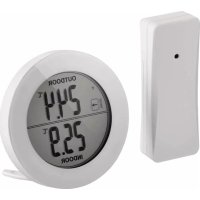
Wire probe length: 1.9 m, ∅ 14 mm
Power supply: 2× 1.5 V AAA batteries
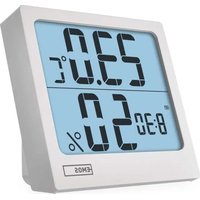
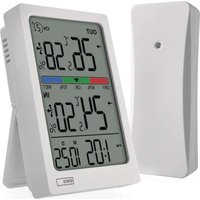
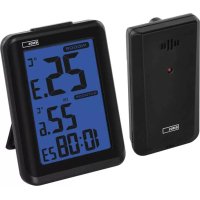
Description of Icons and Buttons (See Fig. 1)
1 – outdoor temperature, outdoor temperature trend
2 – indoor temperature, indoor temperature trend
3 – indoor humidity, indoor humidity trend
4 - time
5 – 12 hour time format
6 - comfort indicator
7 - batteries low
8 - SET button
9 - „+“ button
10 - -|°C/°F button
11 - MIN|MAX button
12 - ALM button
13 – stand/battery compartment cover
14-wired probe, 1.9 m
15 - SN00ZE button
16 – hole for hanging
Getting Started
- Remove the battery cover on the back of the device.
- Insert 2× 1.5V AAA batteries into the thermometer. Make sure to insert the batteries with the correct polarity.
Only use 1.5 V alkaline batteries of the same type; do not use rechargeable 1.2 V batteries.
Lower voltage may cause the device to not function.
- Replace the battery cover.
- To measure outdoor temperature, pull the wired probe underneath a window which is not frequently used.
requent opening may damage or destroy the probe. The outdoor portion of the wired temperature probe must be anchored so as to prevent its tearing off in the wind.
- If the screen is difficult to read or displays the low battery icon, change the batteries in the thermometer.
Setting the Clock
- Long-press the SET button. The time format information will start flashing.
- Press the + or - button repeatedly to set values: 12/24 h format – hours – minutes.
- Move between the values by short-pressing the SET button.
- Holding the +/- button adjusts values faster.
Temperature Unit, Time Format
Repeatedly pressing the -l°C/°F button switches between °C and °F unit. Press the SET button repeatedly to switch between 12/24 h time format.
Maximum and Minimum Temperature and Humidity
Press the MIN|MAX button repeatedly to display the maximum and minimum readings of outdoor and indoor temperature and humidity.
To manually erase the memory of measured values, long press the MIN|MAX button.
Setting an Alarm
- Long-press the ALM button; the hour value will start flashing.
-
Press the + or - button repeatedly to set the desired hour, confirm by pressing ALM.
-
Press the + or - button repeatedly to set the desired minute, confirm by pressing ALM.
Then press the ALM button; the alarm activation icon will be displayed. Pressing the ALM button again cancels alarm activation, the alarm icon will disappear.
Snooze Function
- Use the SNOOZE button to delay alarm ringing by 8 minutes.
Press the button when the alarm starts ringing. The icon will start flashing.
- To cancel the SNOOZE function, press any button on the back except for SNOOZE – the zicon will not be displayed.
The alarm will be re-activated the next day.
- If you do not press any button while the alarm is ringing, the ringing will stop automatically after 2 minutes.
The alarm will ring again the next day.
Comfort Indicator
Displays the level and perceived level of indoor humidity.
| Indicator DRY – dry environment | OK – comfortable environment | WET – humid environment | |
| Humidity <40 % 40–70 % >70 % | |||
Temperature and Humidity Trend
| Trend indicator |  |  |  |
| Trend falling constant rising |
Troubleshooting FAQ
In place of temperature/humidity, the screen displays:
LL.L – the measured value is below the lower boundary of the measurement range
HH – the measured value is beyond the upper boundary of the measurement range
Move the device to a more suitable spot.
The screen is difficult to read
The batteries are low – replace them!
CZ | Teploměr
| Indikators | “SAUSS” (DRY)– sausa vide | “OK” – komfortabla vide | “MITRS” (WET)– mitra vide |
| Mitrums < 40% 40–70 % > 70% | |||
Temperatūras un gaisa mitruma tendencies
11 - MIN|MAX-painike
12 - ALM-painike
13 – teline/paristokotelon kansi
14 – langallinen anturi, 1,9 m
15 - SN00ZE-painike
- Safety Instructions and Warnings
- Technical Specifications
- Description of Icons and Buttons (See Fig. 1)
- Getting Started
- Setting the Clock
- Temperature Unit, Time Format
- Maximum and Minimum Temperature and Humidity
- Setting an Alarm
- Snooze Function
- Comfort Indicator
- Temperature and Humidity Trend
- Troubleshooting FAQ
- The screen is difficult to read
- CZ | Teploměr
- Temperatūras un gaisa mitruma tendencies
Brand : Emos
Model : E0558P
Category : Thermometer