EGS0102 - Thermometer Emos - Free user manual and instructions
Find the device manual for free EGS0102 Emos in PDF.

User questions about EGS0102 Emos
0 question about this device. Answer the ones you know or ask your own.
Ask a new question about this device
Download the instructions for your Thermometer in PDF format for free! Find your manual EGS0102 - Emos and take your electronic device back in hand. On this page are published all the documents necessary for the use of your device. EGS0102 by Emos.
USER MANUAL EGS0102 Emos
natural_image
White 3D-rendered electronic device with a small port and a thermometer symbol on top (no text or labels)
Contents
Safety Instructions and Warnings 2
Technical Specifications....3
Description of the Thermometer....4
Getting Started....5
Mobile Application....6
Controls and Functions 9
Troubleshooting FAQ....12
Safety Instructions and Warnings
Read the user manual before using the device.
Follow the safety instructions in the manual.
- Do not tamper with the internal electrical circuits of the product – doing so may damage the product and will automatically void the warranty. The product should only be repaired by a qualified professional.
- To clean the product, use a soft damp cloth. Do not use solvents or detergents – they could scratch the plastic parts and cause corrosion of the electric circuits.
- Do not use the device in the proximity of devices that generate electromagnetic fields.
- Do not expose the product to excessive force, impact, dust, high temperatures or humidity – these may cause the product to malfunction or deform its plastic parts.
- Do not insert any objects into the openings on the device.
- Do not submerge the device in water.
- Protect the device from falls or impacts.
- Only use the device in accordance with the instructions provided in this manual.
- The manufacturer is not liable for damage caused by improper use of the device.
- The appliance is not intended for use by persons (including children) whose physical, sensory or mental disability or lack of experience and expertise prevents safe use, unless they are supervised or instructed in the use of the appliance by a person responsible for their safety. Children must always be supervised to ensure they do not play with the appliance.

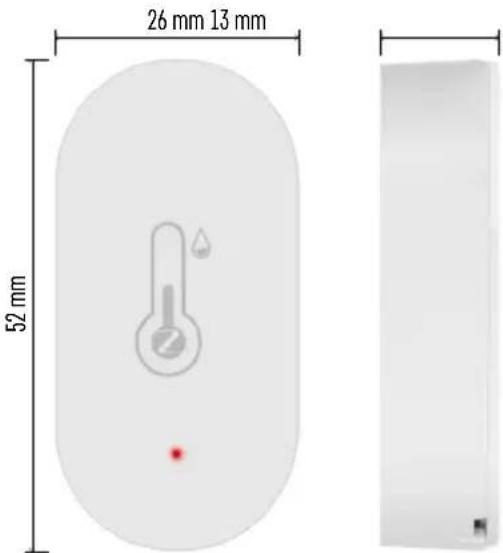
Technical Specifications
Wi-Fi controlled clock
Time format: 12/24 h
Indoor temperature: -10 °C to +60 °C, 0.1 °C increments
Temperature measurement accuracy: ±1 °C
Indoor humidity: 0 % to 99 % RH, 1 % increments
Humidity measurement accuracy: ±5 %
Connection: 2.4 GHz Wi-Fi (IEEE802.11b/g/n) / Zigbee 2402 \~ 2,480 MHz
Frequency band: 2.400–2.4835 GHz
Power supply: 1×3 V CR2032 battery (included)
Dimensions: 26 × 13 × 52 mm

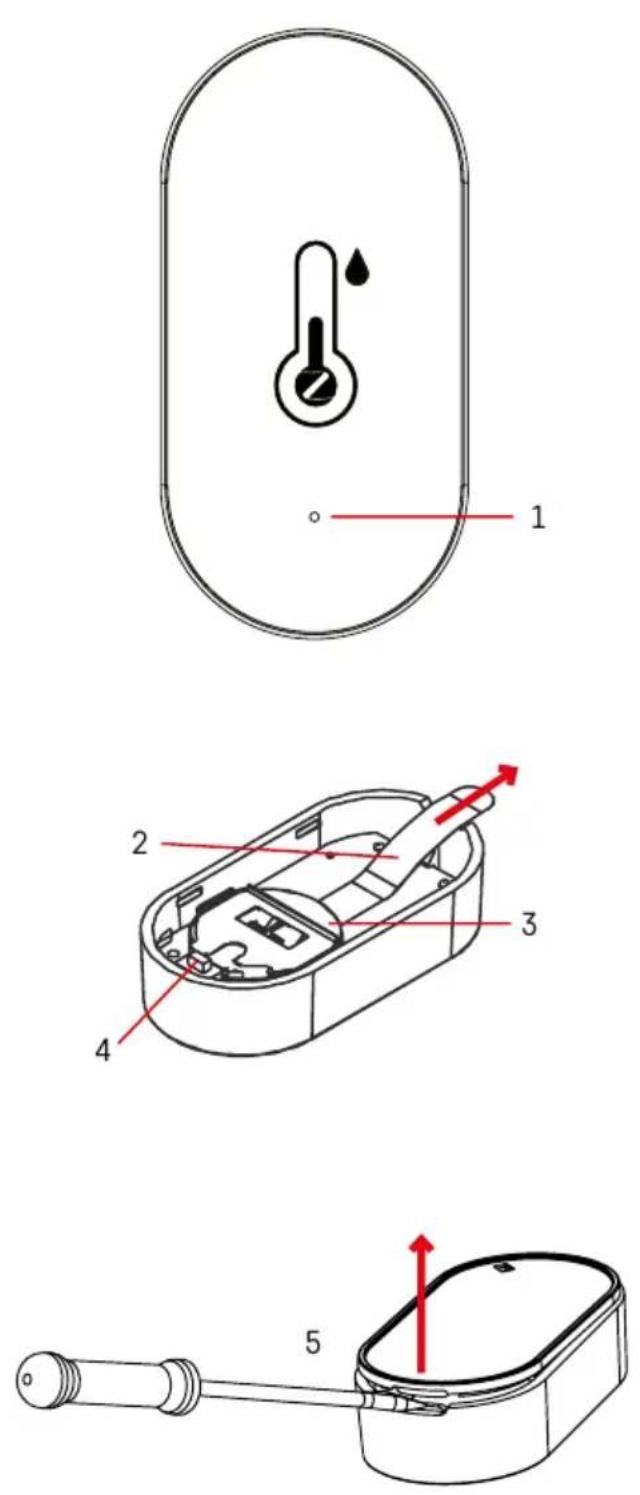
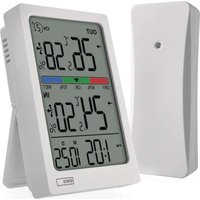
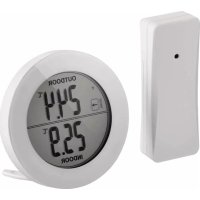
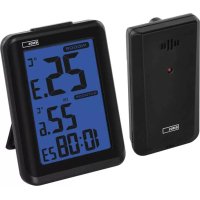
Description of the Thermometer
1-red LED
2 - battery insulation tape
3-battery
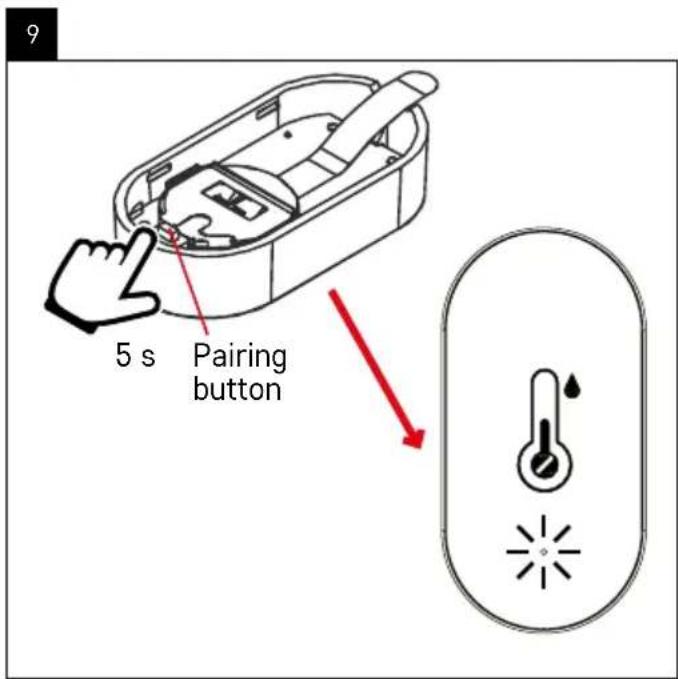
4 - pairing button
5 - how to remove the back cover

Getting Started
- Remove the battery insulation tape and insert one battery into the thermometer (1× 3 V CR2032). When inserting the battery, make sure the polarity is correct to avoid damaging the thermometer.
- The red LED light will start flashing.
- If the LED light does not flash, long-press the pairing button and complete the pairing process with the app.
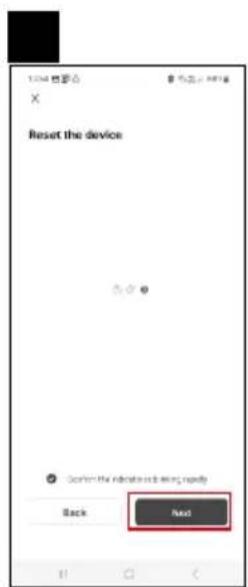
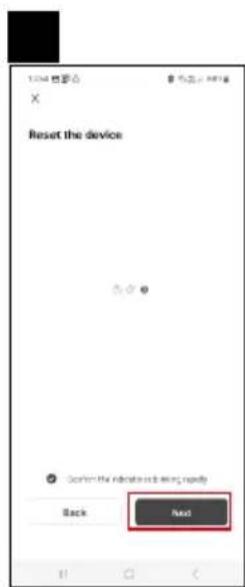
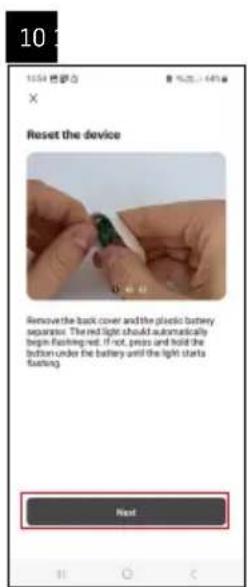
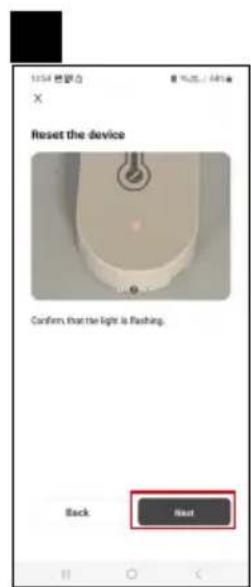
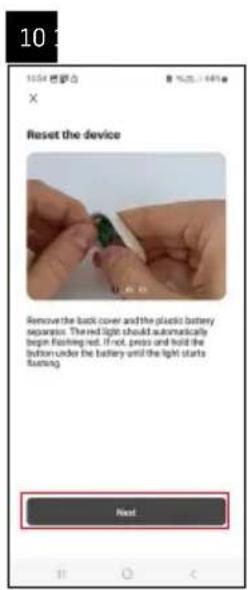
Thermometer RESET
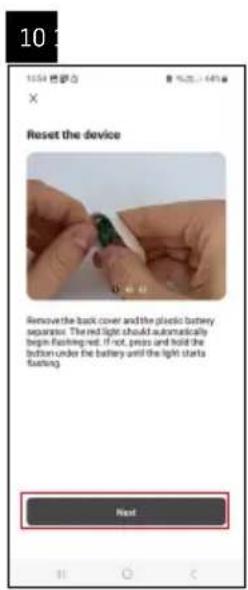
If the thermometer displays incorrect values or does not respond to button presses, remove the battery, then reinsert it.

Mobile Application


The thermometer can be controlled using a mobile app for iOS or Android.
Download the EMOS GoSmart app for your device.
Tap the Log In button if you've used the app before.
Otherwise, tap the Sign Up button and register.
Pairing with the App


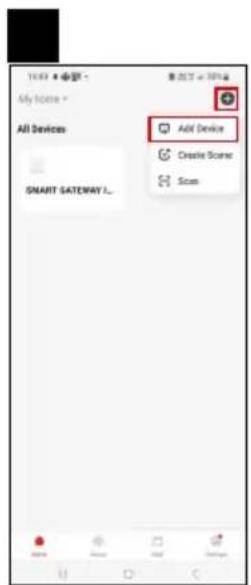


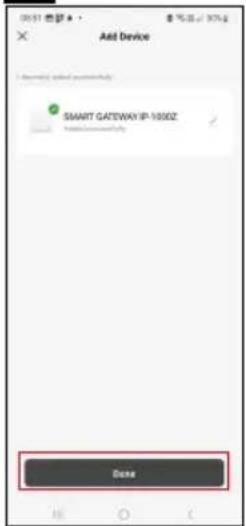
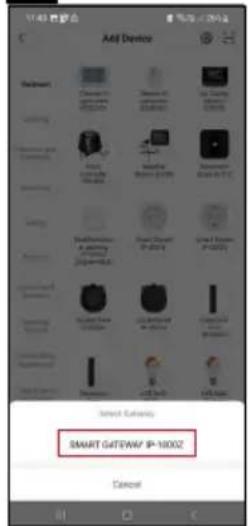
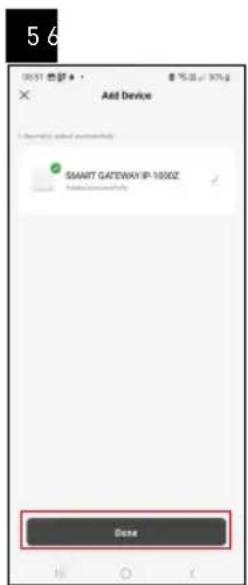
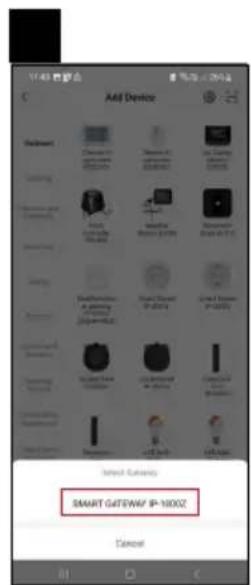
Pairing the Zigbee Gateway with the App
(If you're already using the gateway, skip this step)
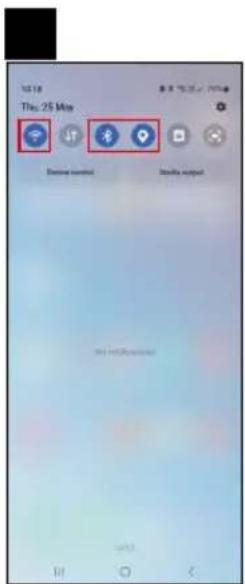
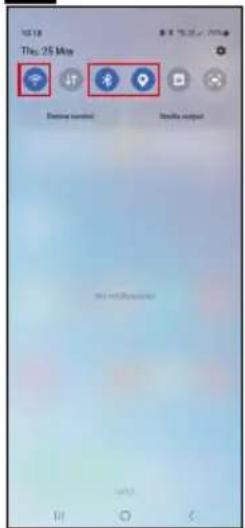
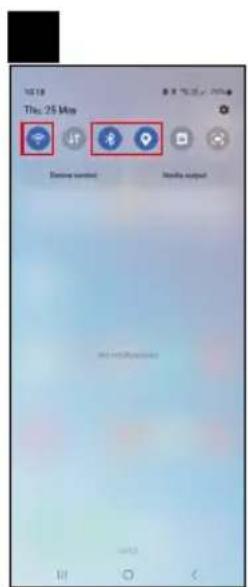
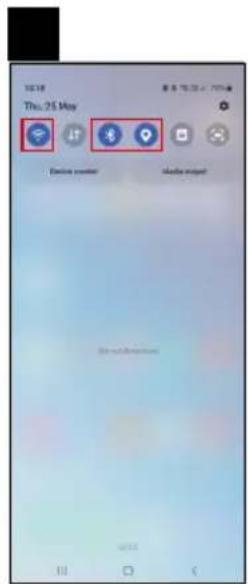
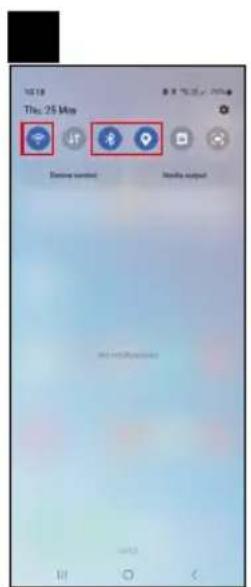
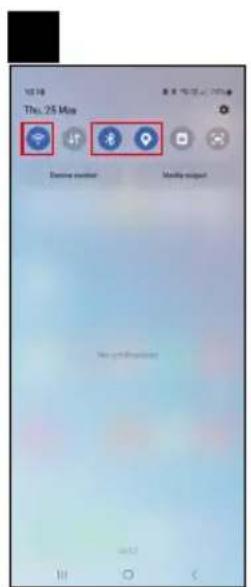
Plug a power cable into the gateway and enable GPS and Bluetooth connection on your mobile device.
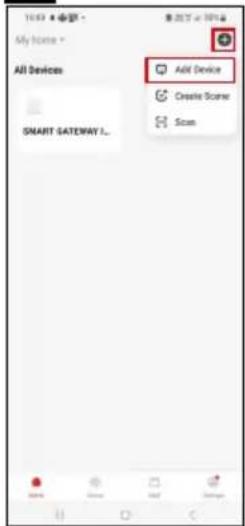
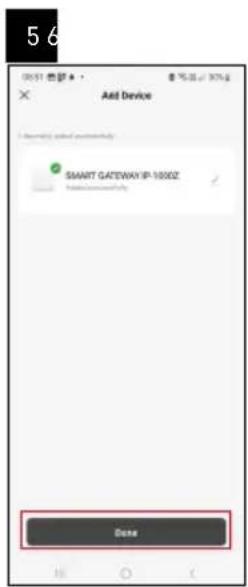
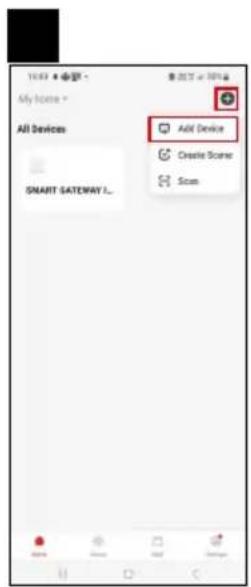
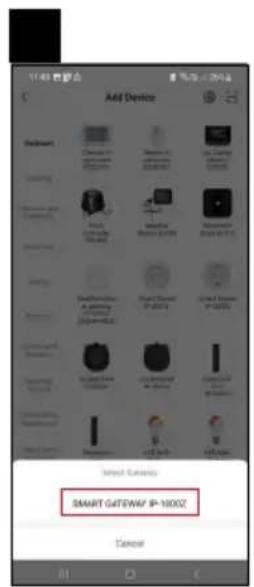
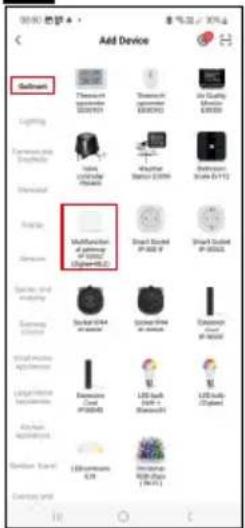
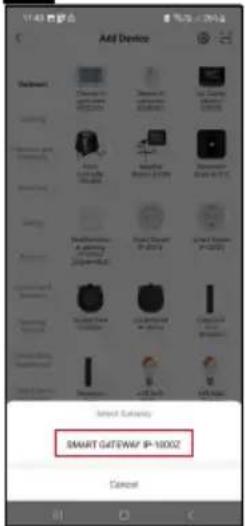
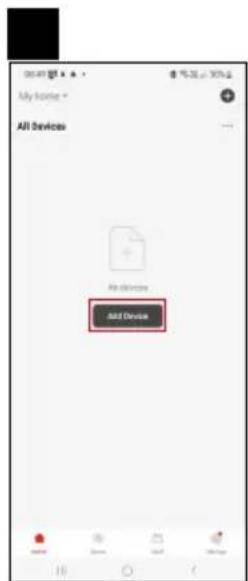
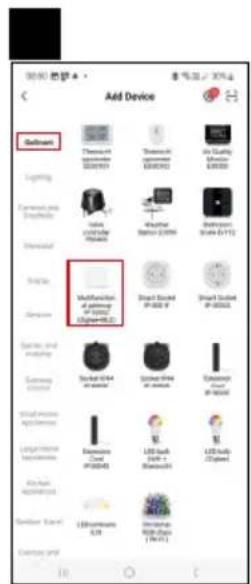
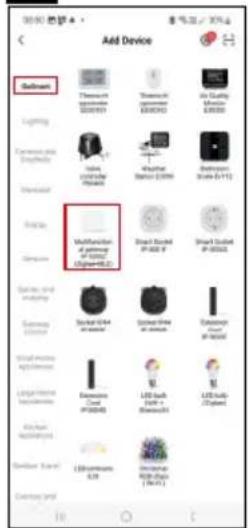
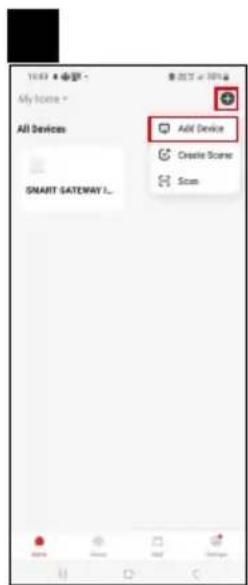
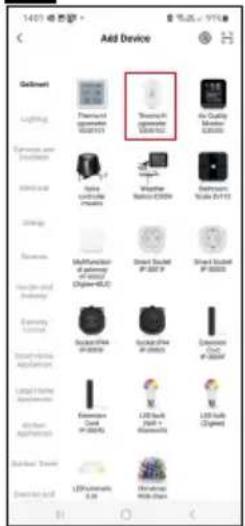
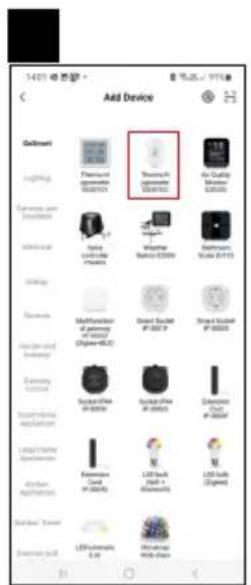
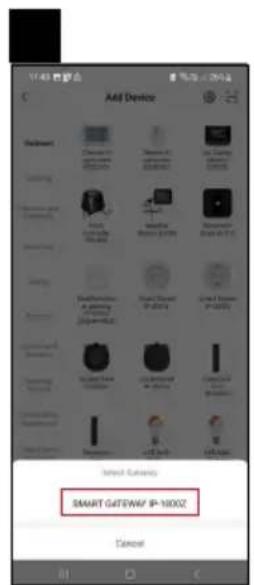
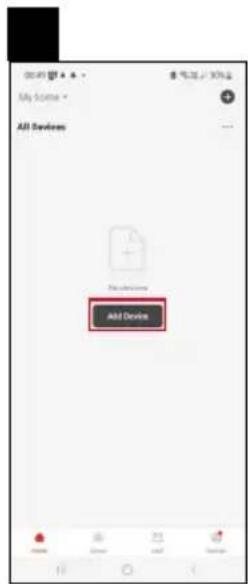
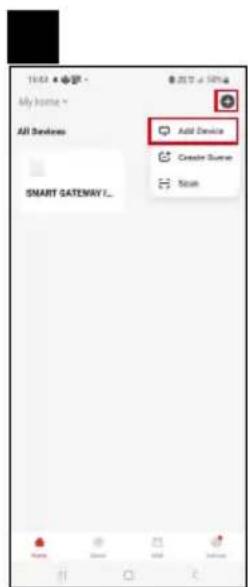
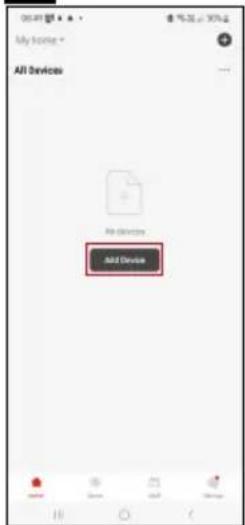
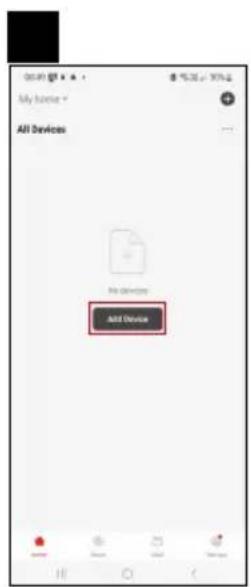
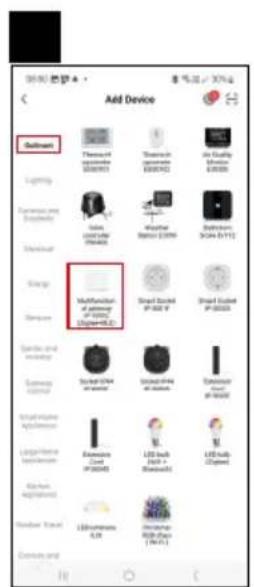
Tap Add Device in the app.
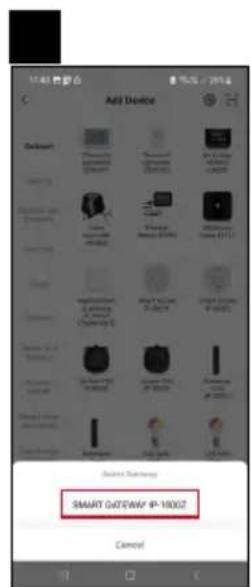
Tap the GoSmart list on the left and tap the Smart Multi Gateway IP-1000Z icon.
Follow the instructions in the app and enter the name and password for your 2.4 GHz Wi-Fi network.
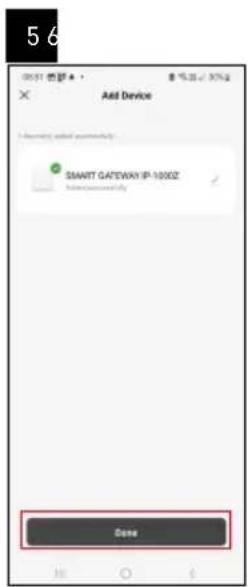
The gateway will pair with the app within 2 minutes.
Note: If the gateway fails to pair, repeat the process and check the settings using the manual for the gateway. 5 GHz Wi-Fi networks are not supported.
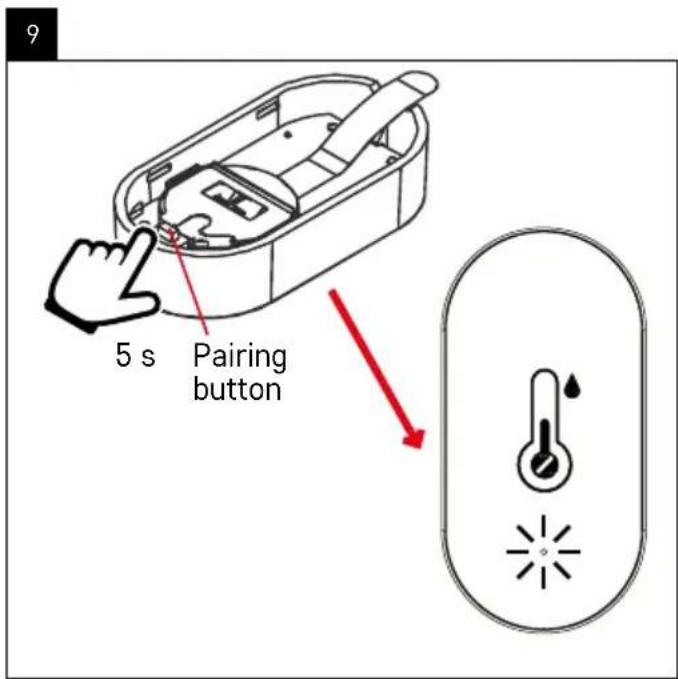
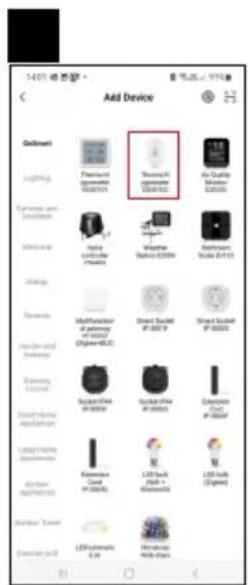
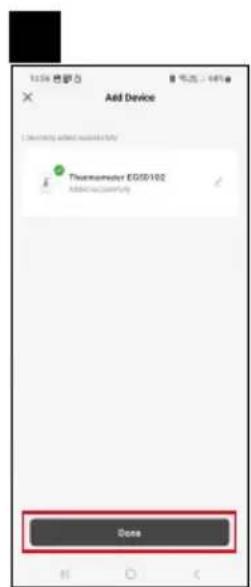
Pairing a device with an app
When you insert a battery into the thermometer, the red LED light will start flashing.
If the LED light does not flash, press the pairing button for 5 seconds.
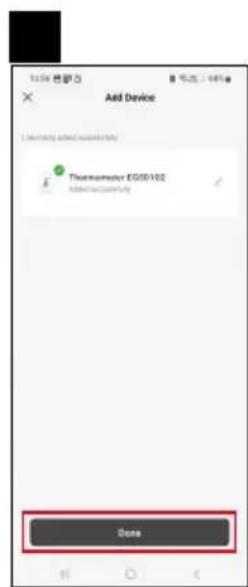
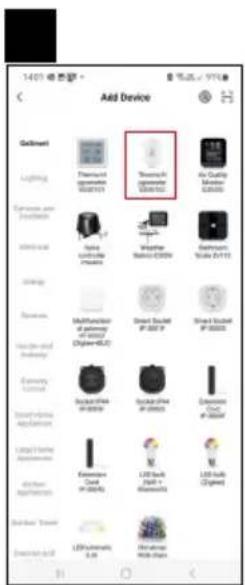
Tap Add Device in the app.
Tap the GoSmart list on the left and then the Thermo-Hygrometer EGS0102 icon.
Follow the instructions in the app and enter the name and password for your 2.4 GHz Wi-Fi network.
The pairing with the app will be completed within 2 minutes; the LED light will stop flashing.
Note: If the device fails to pair, repeat the process. 5 GHz Wi-Fi networks are not supported.
Inserting/Replacing Batteries
- Remove the back cover of the thermometer, e.g. using a screwdriver.
- Remove the used battery.
- Insert a new 3V CR2032 battery. Make sure you observe the correct polarity.
- Close the cover.
If the battery is protected by a safety film, remove it first.
Use only alkaline batteries, do not use 1.2V rechargeable batteries.

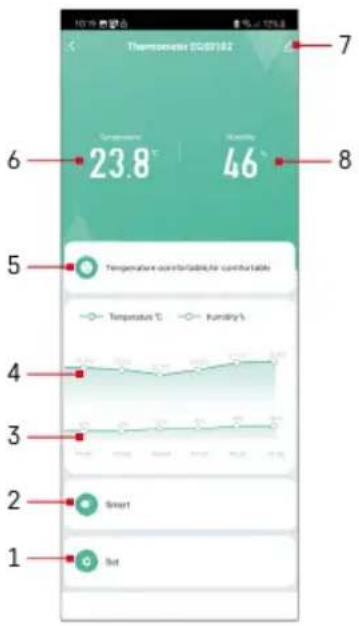
Controls and Functions
Application Menu
1 - settings
2 - setting the scene and automation assigned to the device
3 – humidity history chart
4 - temperature history chart
5 – current temperature and humidity index
6 - current temperature
7 - advanced settings
8 - current humidity
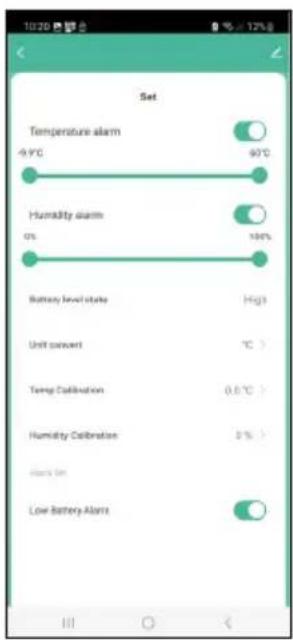
Settings
Temperature alarm
Temperature alert.
Move the slider to the left/right to set the desired temperature.
The app will display a notification when the set temperature is reached.
Function activation -
Function deactivation -

Humidity alarm
Humidity alert.
Move the slider to the left/right to set the desired humidity.
The app will display a notification when the set temperature is reached.
Function activation -
Function deactivation -
Battery level state
The status of the battery in the device.
Unit convert
°C/°F temperature unit setting.
Temp calibration
Calibration of room temperature is used, for example, if the thermometer shows 21 °C but you want it to show 20 °C. In that case, the calibration value should be set to -1 °C.
Setting from -2.0 °C to +2.0 °C, in 0.1 °C increments.
Humidity calibration
Calibration of room humidity is used, for example, if the thermometer shows 20 % but you want it to show 21 %. In that case, the calibration value should be set to -1 %.
Setting from -10 % to +10 %, in 1 % increments.
Low battery alarm
If the battery in the device is flat, the app will display a notification.
Function activation -

Function deactivation
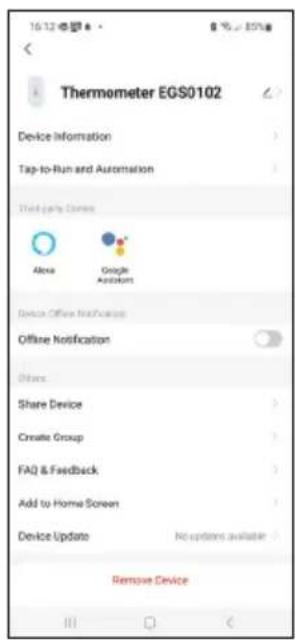

Advanced Settings
- Device information – basic information about the device
- Tap-To-Run and Automation – scenes and automations assigned to the device
- Offline notification – notifies when the device is offline for over 8 hours (e.g. power outage)
- Share Device – shares control of the device with another person
- Create Group – creates a group of similar devices
- Faq and Feedback – frequently asked questions and feedback
- Add to Home screen – adds an icon for the device on the phone's home screen
- Device Update – updates the device
- Remove Device – unpairs the device
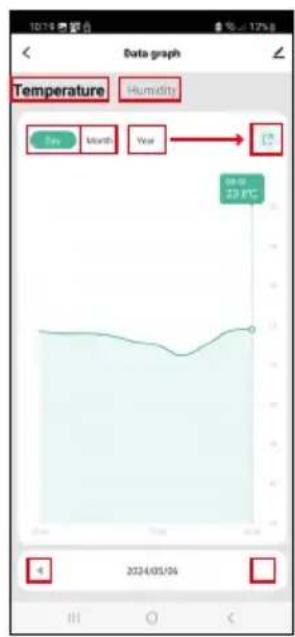
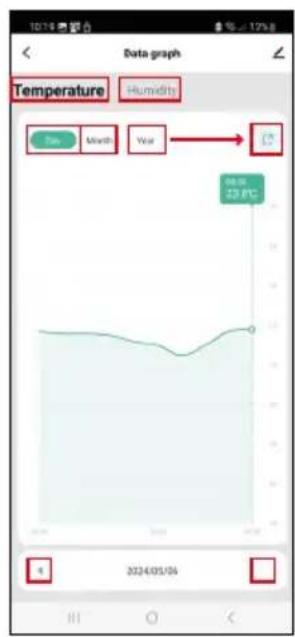
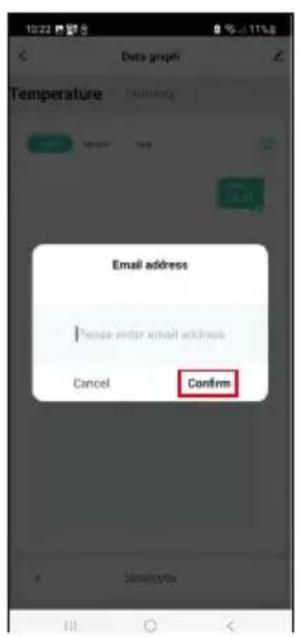
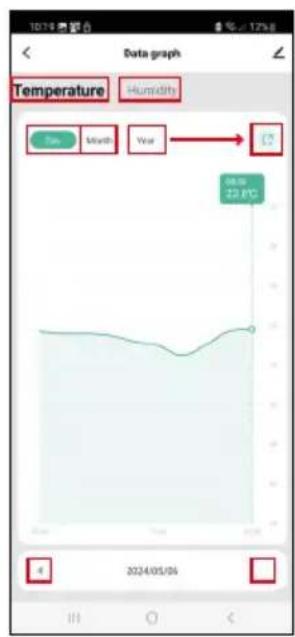
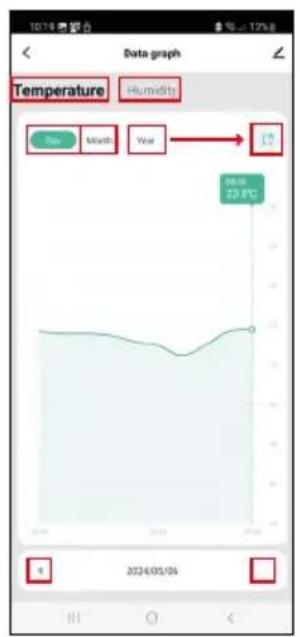
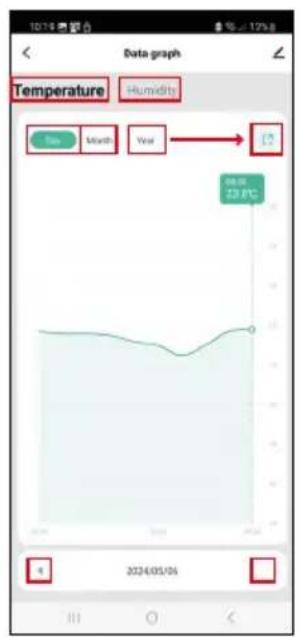
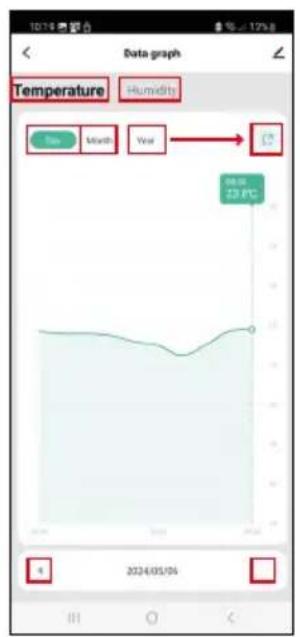
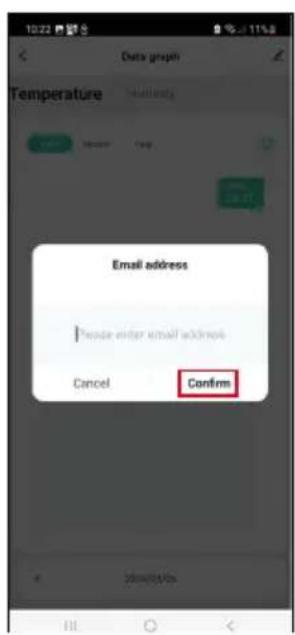
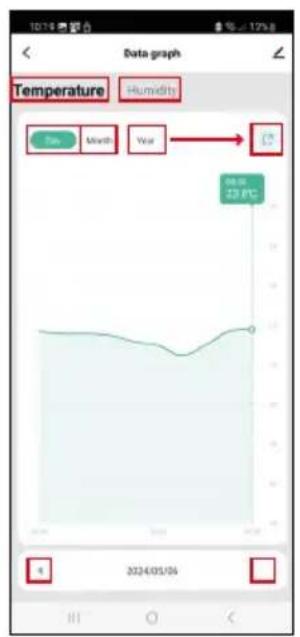
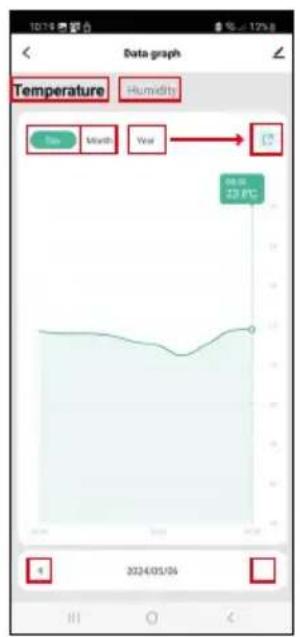
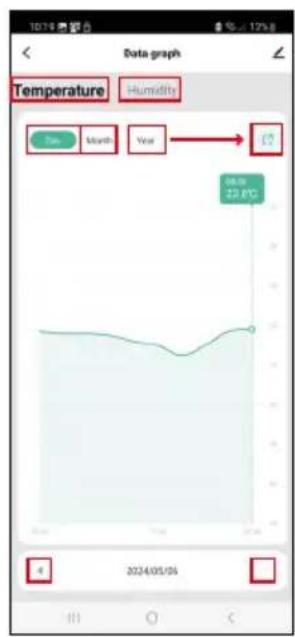
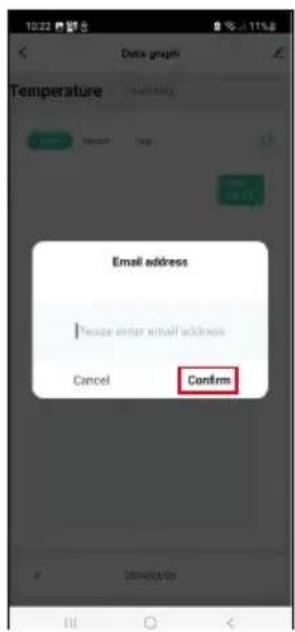
Export of Measured Data
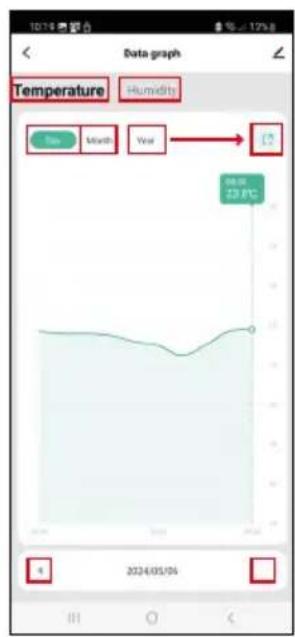
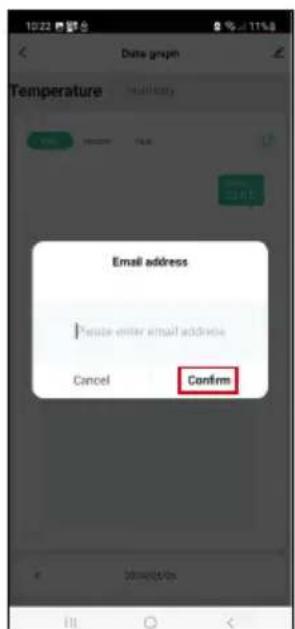
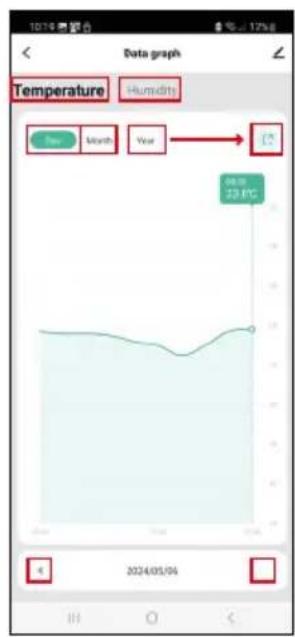
Tap the temperature/humidity history chart in the app's main menu.
Select a temperature or humidity measurement.
Select measurements within a day/month/year.
Use the left/right arrow at the bottom to select the exact date/month/year.
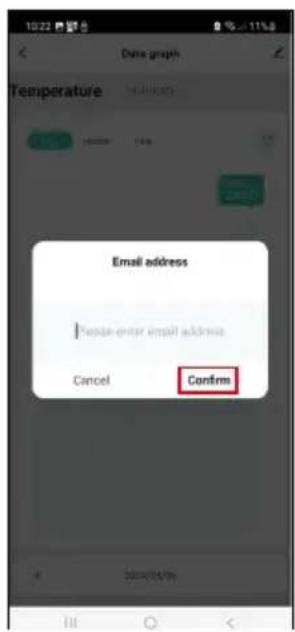
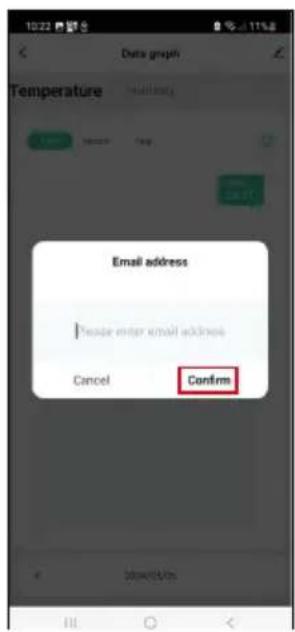
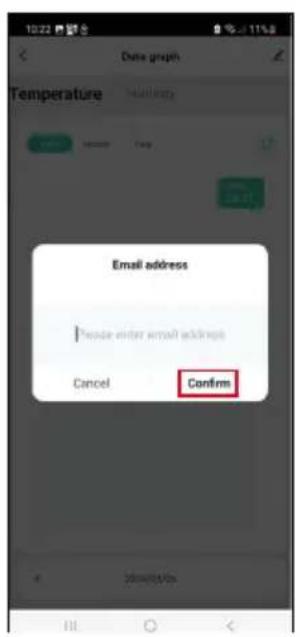
Tap the ↗ icon, enter your e-mail address and tap Confirm.
You will receive an email with a link to download the xlsx file; the link is valid for 7 days.

Troubleshooting FAQ
The LED light is flashing
- The thermometer is not paired with the app, repeat the pairing process.
- The thermometer is not connected to the Wi-Fi network, check the functionality of the network.

CZ | Teploměr

natural_image
White 3D-rendered electronic device with a thermometer and droplet symbol on top (no text or labels)
Obsah


The image is too blurry to recognize any text content.

m = 311

The image is too blurry to recognize any text content.

56

The image is too blurry to recognize any text content.
m = 311

The image is too blurry to recognize any text content.


Ovládání a funkce
Menu aplikace
Nastavení
Temperature alarm
Teplotní alarm.

natural_image
White 3D-rendered electronic device with a small port and a thermometer symbol on its side (no text or labels)
Obsah


The image is too blurry to recognize any text content.

m = 311

The image is too blurry to recognize any text content.

56

The image is too blurry to recognize any text content.

m = 311

The image is too blurry to recognize any text content.


Ovládanie a funkcie
Menu aplikácie
Nastavenie
Temperature alarm
Teplotný alarm.


natural_image
White 3D-rendered electronic device with a small port and a thermometer symbol on its side (no text or labels)
Spis treści


Ustawienia
Temperature alarm
natural_image
White 3D-rendered electronic device with a small port and a thermometer symbol on its side (no text or labels)
Tartalom


The image is too blurry to recognize any text content.

m = 311

The image is too blurry to recognize any text content.
56

The image is too blurry to recognize any text content.

m = 311

The image is too blurry to recognize any text content.


Beállítások
Temperature alarm

natural_image
White 3D-rendered electronic device with a small port and a thermometer symbol on top (no text or labels)
Kazalo
Varnostna navodila in opozorila 2
Tehnična specifikacija ....3
Opis termometra 4


The image is too blurry to recognize any text content.

m = 311

The image is too blurry to recognize any text content.

56

The image is too blurry to recognize any text content.

m = 311

m = 311


Upravljanje in funkcije
Meni aplikacije
Nastavitve
Temperature alarm
Temperaturni alarm.
Z drsnikom levo/desno nastavite želeno temperaturo.

Napredne nastavitve
natural_image
White 3D-rendered electronic device with a thermometer and droplet symbol on top (no text or labels)
Sadržaj
Sigurnosne upute i upozorenja ....2


The image is too blurry to recognize any text content.

m = 311

The image is too blurry to recognize any text content.

56
The image is too blurry to recognize any text content.

m = 311

m = 311


Uparivanje Zigbee Gateway s aplikacijom
(Ako već koristite pristupnik, preskočite ovaj korak)
Priključite kabel za napajanje u pristupnik i omogućite GPS i Bluetooth vezu na svom mobilnom uređaju.
Dodirnite Dodaj uređaj u aplikaciji.
Dodirnite popis GoSmart na lijevoj strani i dodirnite ikonu Smart Multi Gateway IP-1000Z.
Slijedite upute u aplikaciji i upišite naziv i lozinku za svoju Wi-Fi mrežu 2,4 GHz.
Kontrole i funkcije
Izbornik aplikacije
1 - Postavke
2 – Postavljanje scene i automatizacija dodijeljena uređaju
3 – Dijagram povijesti vlažnosti
4 – Dijagram povijesti temperature
5 – Indeks trenutne temperature i vlažnosti
6 - Trenutna temperatura
7 - Napredne postavke
8 - Trenutna vlažnost

Postavke
Alarm temperature
Upozorenje temperature.
Pomaknite klizač lijevo/desno za postavljanje željene temperature.

Napredne postavke
- Informacije o uređaju – Osnovne informacije o uređaju
- Pokretanje na dodir i automatizacija – Prizori i automatizacije dodijeljene uređaju
- Izvanmrežna obavijest – Obavještava kada je uređaj izvan mreže više od 8 sati (npr. nestanak struje)
- Dijeli uredaj – Dijeli kontrolu nad uređajem s drugom osobom
- Stvori grupu – Stvara grupu sličnih uređaja
- Najčešća pitanja i povratne informacije – Najčešća pitanja i povratne informacije
- Dodaj na početni zaslon – Dodaje ikonu za uređaj na početni zaslon telefona
- Ažuriranje uređaja – Ažurira uređaj
- Ukloni uređaj – Poništava uparivanje uređaja
natural_image
White 3D-rendered electronic device with a small port and a thermometer symbol on its side (no text or labels)
Inhalt


Einstellungen
Temperature alarm
Temperaturalarm.

natural_image
White 3D-rendered electronic device with a small port and a thermometer symbol on its side (no text or labels)
Зміст


Налаштування
Temperature alarm

natural_image
White 3D-rendered electronic device with a small port and a thermometer symbol on top (no text or labels)
Cuprins


The image is too blurry to recognize any text content.

m = 311

The image is too blurry to recognize any text content.
56

The image is too blurry to recognize any text content.

m = 311

m = 311


Comanda și funcții
Meniul aplicatiei
Setare
Temperature alarm
Alarmă termică.


Setare avansată
natural_image
White 3D-rendered electronic device with a thermometer and droplet symbol on top (no text or labels)
Turinys


Nuostatos

natural_image
White 3D-rendered electronic device with a thermometer and water droplet symbol on top (no text or labels)
Saturs


Vadība un funkcijas
Lietotnes izvēlne
lestatījumi


natural_image
White 3D-rendered electronic device with a small port and a thermometer symbol on its side (no text or labels)
Sisukord


Seaded
Temperature alarm
Täpsemad seaded
natural_image
White 3D-rendered electronic device with a small port and a thermometer symbol on its side (no text or labels)
Съдържание

The image is too blurry to recognize any text content.

m = 311
The image is too blurry to recognize any text content.

56

The image is too blurry to recognize any text content.

m = 311

The image is too blurry to recognize any text content.


Настройки
Аларма за температура
Аларма за температура.


Разширени настройки
natural_image
White 3D-rendered electronic device with a thermometer icon and water droplet symbol on top (no text or labels)
Sommaire
Application mobile....6


Options
Temperature alarm
Alarme thermique.


Options avancées
natural_image
White 3D-rendered electronic device with a thermometer icon and water droplet symbol on top (no text or labels)
Inhoud


Instelling
Temperature alarm
Temperatuuralarm.

natural_image
White 3D-rendered electronic device with a small port and a thermometer symbol on its side (no text or labels)
Indice

The image is too blurry to recognize any text content.

The image is too blurry to recognize any text content.

The image is too blurry to recognize any text content.

56

The image is too blurry to recognize any text content.

m = 311
The image is too blurry to recognize any text content.


Impostazioni
Temperature alarm
Allarme temperatura.

natural_image
White 3D-rendered electronic device with a thermometer icon and water droplet symbol on top (no text or labels)
Contenido

The image is too blurry to recognize any text content.

m = 311

The image is too blurry to recognize any text content.

56

The image is too blurry to recognize any text content.

m = 311

m = 311


Control y funciones
Ajustes
Temperature alarm

natural_image
White 3D-rendered electronic device with a small port and a thermometer symbol on its side (no text or labels)
Conteúdo


Controlos e funções
Menu Aplicação
Definições
Temperature alarm
Alerta de temperatura.


natural_image
White 3D-rendered electronic device with a small port and a thermometer symbol on its side (no text or labels)
Περιεχόμενα


Ρυθμίσεις
Temperature alarm


Σύνθετες ρυθμίσεις
natural_image
White 3D-rendered electronic device with a thermometer icon and water droplet symbol on top (no text or labels)
Innehåll


Inställningar
Temperaturlarm
Temperaturnotifikation.


natural_image
White 3D-rendered electronic device with a small port and a thermometer symbol on its side (no text or labels)
Sisällys

The image is too blurry to recognize any text content.
m = 311

The image is too blurry to recognize any text content.

56

The image is too blurry to recognize any text content.

m = 311

m = 311


Asetukset
Lämpötilahälytin
Lämpötilahälytys.

natural_image
White 3D-rendered electronic device with a thermometer icon and water droplet symbol on top (no text or labels)
Indhold


Termometeret kan styres med en mobilapp til iOS eller Android.


Parring af Zigbee-gatewayen med appen
Indstillinger
Alarm om temperatur