
E0114N - Thermometer Emos - Free user manual and instructions
Find the device manual for free E0114N Emos in PDF.

User questions about E0114N Emos
0 question about this device. Answer the ones you know or ask your own.
Ask a new question about this device
Download the instructions for your Thermometer in PDF format for free! Find your manual E0114N - Emos and take your electronic device back in hand. On this page are published all the documents necessary for the use of your device. E0114N by Emos.
USER MANUAL E0114N Emos
GB | Thermometer with Humidity Meter
Safety Instructions and Warnings

Read the user manual before using the device.

Follow the safety instructions in the manual.
- Do not tamper with the internal electrical circuits of the product – doing so may damage the product and will automatically void the warranty. The product should only be repaired by a qualified professional.
- Clean the product using a soft, slightly damp cloth. Do not use solvents or detergents – they could scratch the plastic parts and cause corrosion of the electrical circuits.
- Do not use the device in the proximity of devices that generate electromagnetic fields.
- Do not expose the product to excessive force, impact, dust, high temperatures or humidity – these may cause the product to malfunction or may deform its plastic parts.
- Do not insert any objects into the openings on the device.
- Do not submerge the device in water.
- Protect the device from falls or impacts.
- Do not throw batteries into a fire and do not disassemble or short-circuit them.
- Keep the batteries out of reach of children. Ingestion may result in poisoning by chemicals, perforation of soft tissues and death.
- Severe poisoning may occur within two hours of first issues appearing. Seek medical attention immediately.
-
Only use the device in accordance with the instructions provided in this manual.
-
The manufacturer is not liable for damage caused by improper use of the device.
- The appliance is not intended for use by persons (including children) whose physical, sensory or mental disability, or lack of experience and expertise prevents safe use, unless they are supervised or instructed in the use of the appliance by a person responsible for their safety. Children must always be supervised to ensure they do not play with the appliance.
The full wording of the EU declaration of conformity is available at http://www.emos.eu/download.
Technical Specifications
Quartz clock
Indoor temperature: -10 °C to +50 °C, 0.1 °C resolution
Indoor humidity: 10 % to 95 % RH, 1 % resolution
Temperature measurement accuracy: ±1 °C for the range 0 to +50 °C, ±1.5 °C for other ranges
Accuracy of humidity measurement: ±5 % for 30 % to 80 % RH range, ±8 % for 20 % to 29 % and for 8 % to 95 % RH
Temperature display unit: ^ C/ ^ F
Power supply: 1× 1.5 V AA battery
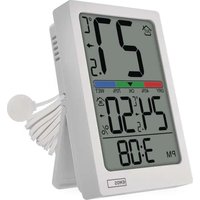
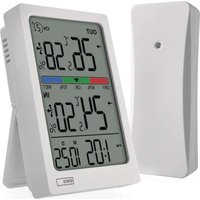
Description of Icons and Buttons (See Fig. 1)
1 - time/date
2 - temperature
3 – humidity
4 - SN00ZE button
5 - MODE button
6 - UP button
7 - MEM button
8 - °C/°F button
9 – battery compartment
Getting Started
- Remove the battery cover on the back of the device.
- Insert 1× 1.5 V AA battery into the thermometer. Make sure to insert the batteries with the correct polarity.
Only use 1.5 V alkaline batteries of the same type; do not use rechargeable 1.2 V batteries.
Lower voltage may cause the device to not function.
- Close the battery compartment.
Setting the Clock
- Long-press the MODE button. The hour value starts flashing.
- Press the UP button repeatedly to set values: minutes – hours – 12/24 h format – year – month - day.
- Short-pressing MODE navigates between the values.
- Holding the UP button adjusts values faster.
Indoor Temperature and Humidity, Unit of Temperature
Indoor temperature is displayed in field 2.
Indoor humidity is displayed in field 3.
Repeatedly pressing the °C/°F button switches between °C and °F unit.
Maximum and Minimum Temperature and Humidity
Repeatedly pressing the MEM button displays the maximum and minimum temperature and humidity readings. Long-pressing the MEM button erases the memory of measured values.
Date Display
When in time display mode, press the UP button – the current date will be displayed for 3 seconds.
Alarm Setting/Alert at the Top of the Hour
- Press the MODE button to switch to alarm settings mode.
- Hold the MODE button for 2 seconds. The minute value will start flashing.
- Press the UP button repeatedly to set the minutes, confirm by pressing MODE.
- Press the UP button repeatedly to set the minutes, confirm by pressing MODE.
Then press the UP button repeatedly, which displays icons:
alarm active alert at the t
Pressing the UP button again cancels alarm activation or top of the hour alert.
The icons will not be displayed.
Snooze Function
-
Use the SNOOZE button to delay alarm ringing by 8 minutes.
Press the button when the alarm starts ringing. The 📄.icon will start flashing. -
To cancel SN00ZE mode, press any other button on the back except SN00ZE – the 🔔 icon will stop flashing and will remain on the screen.
The alarm will be re-activated the next day.
- If you do not press any button while the alarm is ringing, the ringing will stop automatically after 1 minute.
The alarm will ring again the next day.
Screen Illumination
Pressing the SN00ZE button activates screen illumination for 5 seconds.
Troubleshooting FAQ
- In place of temperature/humidity, the screen displays:
- LL.L – the measured value is below the lower boundary of the measurement range
- HH – the measured value is beyond the upper boundary of the measurement range
- Move the device to a more suitable spot.
• The screen is difficult to read
- Battery low – replace it
• Use 1.5 V alkaline batteries only
natural_image
Pure horizontal and vertical lines forming a symmetrical pattern (no text or symbols)GARANCIJSKA IZJAVA
- GB | Thermometer with Humidity Meter
- Safety Instructions and Warnings
- Technical Specifications
- Description of Icons and Buttons (See Fig. 1)
- Getting Started
- Setting the Clock
- Indoor Temperature and Humidity, Unit of Temperature
- Maximum and Minimum Temperature and Humidity
- Date Display
- Alarm Setting/Alert at the Top of the Hour
- Snooze Function
- Screen Illumination
- Troubleshooting FAQ
- GARANCIJSKA IZJAVA
Brand : Emos
Model : E0114N
Category : Thermometer