TH10 - Thermometer HAMA - Free user manual and instructions
Find the device manual for free TH10 HAMA in PDF.
| Technical Specifications | HAMA TH10 digital thermometer with LCD display |
|---|---|
| Measurement Range | 0°C to 50°C |
| Accuracy | ±0.1°C |
| Usage | Measurement of ambient and surface temperature |
| Power Supply | 1 x 1.5V AAA battery included |
| Dimensions | 150 mm x 30 mm x 20 mm |
| Weight | 150 g |
| Maintenance | Clean with a soft cloth, do not immerse in water |
| Safety | Do not use near heat sources or excessive humidity |
| General Information | 2-year warranty, user manual included |
Frequently Asked Questions - TH10 HAMA
User questions about TH10 HAMA
0 question about this device. Answer the ones you know or ask your own.
Ask a new question about this device
Download the instructions for your Thermometer in PDF format for free! Find your manual TH10 - HAMA and take your electronic device back in hand. On this page are published all the documents necessary for the use of your device. TH10 by HAMA.
USER MANUAL TH10 HAMA
Operatinginstruction
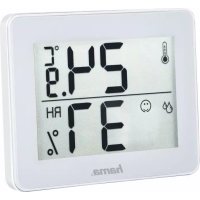
ControlsandDisplays
1.Display
2.Temperaturetrenddisplay (h / ^)
3.-/ON/OFFbutton(decreasesettingvalue)
4.+/MAX/MINbutton(increasesettingvalue)
5. SET/MODE button (settingthealarmtime)
6.Indoortemperaturedisplay
7.Humiditydisplay
8. Symbolformouldrisk (displayedwhentheupperlimit valueisexceeded)
9.Time
10.DayofthewEEK
11.Date
12. Symbolformouldalarm(alarmsoundswhentheupper limitvalueisexceeded)
13. Recessforwallmounting
14.Base
15.Batterycompartmentcover
1.ExplanationofWarningSymbolsandNotes
Warning
Thissymbolisusedtoindicatesafetyinstructionsordrawyourattentionospecifichazardsandrisks.

Note
Thissymbolisusedtoindicateadditionalinformationor importantnotes.

2. Packagecontents
Thermometer/hygrometerwithmouldalarm
-2AAAbattery
Theseoperatinginstructions
3. Safetyinstructions
The product is intended for private, non-commercial use only.
- Protect the product from dirt, moisture and overheating, and only use it in adry environment.
- Donotusetheproductinareaswheretheuseof electronicdevicesisnotpermitted.
- Donotusetheproductintheimmediatevicinityof heatersortherheatsourcesorindirectsunlight.
- Donotdroptheproductanddonotexposeittoany majorshocks.
- Donotomodifytheproductinyway.Doingsovoids thewarranty.
- Keep the packaging material out of thereach of children duetotheriskofsuffocation.
- Disposefpackagingmaterialimmediatelyaccordingto locallyapplicableregulations.
- Use the product for its intended purpose only.
- Donotoperatetheproductoutsidethepowerlimitsgiven inthespecifications.
- Donotopenthedeviceorcontinuetooperateititifit becomesdamaged.
- Donotattempttoserviceorrepairtheproductyourself. Leaveanyandallserviceworktoqualifiedexperts.
- Keepthisproduct,asallelectricalproducts,outofthereachofchildren!
- Usetheitemonlyinmoderateclimaticconditions.
Warning-Batteries
- When inserting batteries, notethe correct polarity (+ and -) and markings) and insert the batteries accordingly. Failure to do so could result in the batteries leaking or exploding.
-Onlyusebatteries(orrechargeablebatteries)that matchthespecifiedtype. - Beforeyouinsertthebatteries,cleanthebattery contactsandthepolarcontacts.
- Donotallowchildrentochangebatterieswithout supervision.
- Donotmixoldandnewbatteriesorbatteriesofafifferenttypeormake.
- Removethebatteriesfromproductsthatarenotbeing usedforanextendedperiod(unlessthesesearebeing keptreadyforanemergency).

Warning-Batteries

- Donotshort-circuitbatteries.
- Donotchargebatteries.
- Donotthrowbatteriesinafire.
- Keepbatteriesoutofthereachofchildren.
- Neveropen, damageorswallowbatteriesorallow themtoentertheenvironment. They can containtoxic, environmentallyharmfulheavymetals.
- Immediately remove and dispose of dead batteries from the product.
- Avoidstoring, charging or using the device in extreme temperatures and extremely low atmospheric pressure (forexample, at high altitudes).
4. Gettingstarted
4.1.Insertingthebatteries
- Openthebatterycompartment(15),inserttthebattery/ batteries,ensuringthatthebatteriesareinserted correctlyintermsofpolarity,andthenclosethebattery compartment(15).Thethermometerisnowreadyforuse.
4.2.Replacingthebatteries
- Openthebatterycompartmentcover(15),removeand properlydisposeofthedepletedbatteries,andinserttwo newAAAbatterieswiththecorrectpolarity.Thenclose thebatterycompartmentcover.
5. Mounting
Youcaneeitherstandthethermometeronanevensurface usingthefold-outstand(14)onthebackoftheddevice,or attachittoawallusingtheopening(13)onthebackof thedevice.
Warning

- Beforemounting, check that the newly you have chosen issuable fortheweighttobemounted Alsomake surethattherearenoelectric, water, gasotherlines running through the wall attemountingsite.
- Donotmounttheproductabovelocationswhere personsmightlinger.
6. Operation
6.1.Manuallysettingthedate/time
Time/date
- Pressandholdthe

button(5)forapproximately2
secondsuntiltheyearflashes.
Pressthe

(4)or(3)buttonselectthe
individualvalues.
- Settethefollowinginformationintheorderlisted:
year, month, day, languagefordayoftheweek, displayin ^ Cor^ F, 12 or 24-hourformat,time - PresstheSETbutton(5)toadoptthesetvaluedisplayed andgotothenextitem.
Note
Holdthe

button(4)ortho button(3)toselect
thevaluesfaster.

Note
- Theweekdayissetautomaticallywhensingthe datemanually.
- If you don't make an entry for several minutes, you automatically exit the setup mode. Thesettingsthat were made up to that point are not saved!

Note-DayofthewEEK.
- Forthedayoftheweekdisplay,youcanchoosefrom thefollowinglanguages:German(GER),English(Eng), Dutch(NET),Italian(ITA),Spanish(ESP),Danish(DAM) or French(FRE).
Note-12or24-hourformat
- Inthe12-hourformat,AMorPMisdisplayedbefore the time.
6.2.Maximumandminimumtemperature and humidityvalues
- Themouldalarmautomaticallystoresthemaximumand minimumindoortemperaturevalues.
- Repeatedlypressthe button switch between the current temperature, maximum temperature (MAX) and minimum temperature (MIN).
Settingthealarmtime
- Pressthe SET button(5) until the alarmsign is displayed.
- Pressandthenholdthe SE1 button(5)for3seconds untilthehoursdisplaybeginstoflash.
Pressthe button(4)orbutton(3)toselect theindividualvalues. - Pressthe SET button(5)toconfirmthesettings.
- If youdonotpress the SET button within 30 seconds, theweatherstation automatically switchestonormal mode.
Activating/deactivatingthealarm
- Pressthe SET button(5)toactivateordeactivate thealarm.
- Thealarmtimenowappearsonthedisplayandflashes.
- Pressthe button(4).Thealarmssymbolisdisplayed, meaningthatthealarmisnowactivated.
- Pressingthe + button(4)oncemorewilldeactivate thealarm.
- Pressanybuttontoswitchthearalarmsound.
Temperaturetrenddisplay
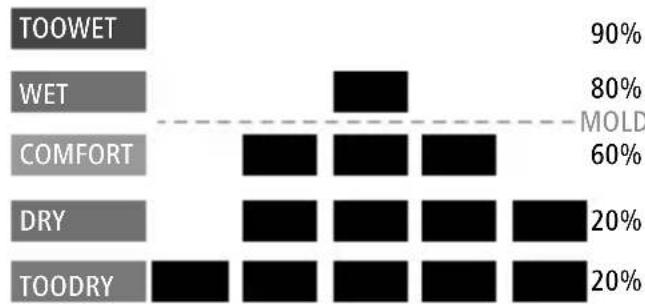
This display showsthemperaturetrendoverthelast12,9, 6,3,0hour(s), withinamax.rangedof 20% -90% .Itisonly forinformational purposes;youcannotmakeanysettings onthisdisplay.
Graphicrepresentationofhumiditywithinthelast 12hours
| Levelfelt(comfort index) | Relativehumidity |
| Toowet81%to90% | |
| Wet61%to80% | |
| Comfortable41%to60% | |
| Dry31%to40% | |
| Toodry20%to30% |

7.Alarmfunctioninthecaseofbacteria
Pressthe button(3)toactivatethemouldriskalarm Assoonashumidityexceedsthesetvalueforthemould alarm,thereisariskofmouldforming.lfhetemperatureis between25°Cand40°Candhumidityisgreaterthan70%, theflashingsymbol MOLD (8)forbacteria isshownonthedisplayandthemouldalarm (12)is triggered.Pressthe button(3)todeactivatethealarm. Whenyoudeactivatethemouldalarm,onlytheflashing symbol MOLD (8)isshownonthedisplay untilthemeasuredhumidityfallsbackbelowthemouldlimit valueentered.
8.Important information concerning health
Excessiveindoorhumiditypromotesthegrowth of undesirableorganisms. Beinginaroomwithmould infestationcandamagepeople'simmunesystems,leadto respiratorydiseasesandallergies,andisrelatedtoinfections. Verydryindooraircandrytheskin,irritatethethroatand paranasalsinuses,andincreasetheriskofinfections.In adryclimate,orifheatinginthehomedriesouttheair,a humidifiercanbeusedtoincreaseerelativehumidity. Activeheatingandventilationpromotesacomfortableand healthyindoorclimate.
9. CareandMaintenance
Onlycleanthisproductwithaslightlydamp,lint-freecloth anddonotuseaggressivecleaningagents. Makesurethatwaterdoesnotgetintotheproduct.
10.WarrantyDisclaimer
HamaGmbH&CoKGassumesnoliabilityandprovidesnowarrantyfordamageresultingfromimproperinstallation/ mounting,improperuseoftheproductormfromfailureto observetheoperatingsnand/orsafetynotes.
11. Technical Data

| Weatherstation | |
| Powersupply2xAAAbatteries | |
| Temperature measuringrange | Indoors:0°C-50°C |
| Humiditymeasuringrange20%-90% | |
D
Bedienungsanleitung
- Appuyezsurlatouche selection.

(5)afindeconfirmervotre
Activation/désactivationdureveil
- Appuyezsurla

touche(5)afind'activer/désactiver
lafonctionderéveil.
Activeren/deactiverenwekker
8.BaxHbIeyKa3aHnO3OpOBbe
Upe3MepnaBbIaxHOCTbBO3dyxABNOMeHn cnoc6cTByeTpOCTyHexeJIaTeIbHbIXopraH3MOB. Ipe6bIbAHneBnOMeIeHnx,3apaxeHHbIXnIceHbIO, MOXeTHaHeCTNBpeIMMyHNOcNTMeJeLOBekAn npIBoNTK3a60JIeBAHnAMdbIxATEJIbHbIXnyTe,aIIneprnnpacnpoCTpaHEnHOnHfekuO.OeHbcxOuB03dYXB NOMeHmMOKeTBbICyUHTbKOxy;OHTAKKePa3DpaxaETROPJIOINpNDatoHbIEa3yXnUYBeHNuBaETPnCK HfekuN.KpometOro,B3mMHeEBPemrInlBperNohax CCyHXMKNIMAtOM,KORdaHaFpeBAHnEBiCyUHBAeTBO3dYx, DJIyBEJIueHNEOTHCnTEbHOHBaJXHOCTmMOxHo NCNoIb3OBaTbyBlaJXHTeJIb.
AKnBHOoeOTOnJIeHHeUNPObETpNbAHnecNocO6CTByET KOMΦopTHOMyI3IOpOBMyDOMaUHEmyKlUmAty
9.YxOaHTexHnueckOoeo6cnyKbAHne
UcKyn3dJIeIINpOIN3BOJNTbTOnbKO6e3BOPCBOI cnERkabJaxHoJcAnfTeKoJ.3anpeuaTeCnPmHRe TaRpeccNBbIeUHCTaUneCpeJeCTBa.CJeInTe3aTeM,HTo6bIByCTPOINCTBOHeNoJaIABOa.
10.0Tka3oTapaHTnHbIXo6aTeJIbCTB
KomnaHamaGmbH&CoKGheHeceTobetCTBeHHocb 3ayep6,BO3NKwBcneDCTBnEHe npabNbHOr MOHTaKa,NOKluOeHnMNCNoJIb3OBaHnN3DeJIHn He nOHa3NaueHnO,ataKxVeCneDCTBnEHeco6JIOJeHn HnCTpyKuINNO3KnIyataunNTexHKn6e30NaCHOCTn.
11.TexHuecknexapakTepncTkn
n3bnpaTeCTOnHOctNTeNo-6bp30
3a6eJexKa-DeHOTceMnuaTa.
HactpoikataHaJaHeNOrTeMnUaTacEn3BbPwBa aBTOMaTHuOHUpe3pBuHaTahAcTPOKaHaJaTaTA.
-AKOBpOIObIJIeHHeHaHRAKOJOMHyTINHeOpCJeBa BbBExJaHe,pexIMbT3aHaCTpoIBaHeceHaNcKa aBTOMaTuHO.

3a6eJexKa-DeHOTceMnuaTata.
- BcunkpneepnpnetoToBaHactpoKnce 3anametra!

3a6eJexKa-DeHOTceMnuaTata.
aHnDnkaTnHaHnHTeOTcEIMuCaTaMoxTeJa n3bnpateoTe3nUHTeHemCKn(GER),aHrnnckn(Eng), HndepnaHnCKn (NET),ntaJnAHCKn (ITA),ncnAHCKn (ESP),DatCKn(DAM)nInΦpehckn(FRE).

Yka3aHne-12-ycobunn24-ycobopmat
B 12-acaob fopmat npedu cace noka3Ba AM nn PM.
6.2.HaB-BnCOKUNHaH-HNCKNCTOHOCTNaTeMnepaTpyaTaunBnaJXHOCTTaHaBb3dyxa
-Алармata3apuCKOTnIeCEHaBTOMaTHUHOCbXpaHЯBa Hau-BnCOKNTeHau-HnCKNTECTOHNHOCTINHBbTpEWHATA Tempeatypa.
HaNTNCKaIeTMHOrOKpaTHo6yToH 3aJaIpeMnHaBaTe MExNy NOKa3BaHeTo Ha aKtYaJIHATA, Hau-BuCokata (MAX) n Hau-HnCKata(MIN)Temnepatypa.
HactpoiKaHaucac3ac6yKdaHe
- HatnckaTe6yToH SET (5),DOKaTOcENOKaKe3HaKbT 3aaJapMaTa.
CneIToBaHaTnChTeu3aPbXTe6yTOH 5)3aOKoNo 3ceyni,doKaTo HnKauNtHa yaca 3anoHe da Mira.
-3aun36bopaHTeHNHTeCTOHOCTnHaTnCHTe6yTOH (4)nN6yTOH 0 - Hatnche6ytoh SET (5),3aanaoTbbpntHeactpoynke.
Aokcned30cekyHnHeHaHTNChe6byTOH MODE MeTeOpOIOrHuHaTAcTaHcIaBtOMaTHOppeMnHaBaH HopMaJIeHpexKm.
AktBupane/daekTbupaHa6yDnHnka
HaTnCHeteoTHOB6yToH SET-5,3aJaakTNBpuATE/ MODE daekTNBpuate6yDnHnKa.
CerahaundcnpeacenOBBAaMmraacbThaaJapMaTa.
·HaTnchete6yToH (4).CeraanapMaataeakTbnpaHa, TbBkaTOCeNOKa3BaCUMBOJbT3aJaPMA
-ПиюВОТРΗΟΗТИСΚΑΗΕΗБΥΤΟH (4)aIapMaTa cepeakTbupa.
- HatncheTe npoun3B0JeH6yToH,3aAnpeKbChete3BbHeHeto HaajapMaTa.
HnDnKaun3axpOHOJOnrTaHaTeMnePaTpaTa
-TaunHnDnkaunHnΦopMnpa3axpOHOOnrTaHa TemnepaypataBpaamKnteHaNoCneJHnTe12,9,6, 3,0yaca,Bduana3oHaOT20%-90%.TaeCaMo3a HnΦopMaun6E3Bb3MOxHocHTn3aHaCTpoKa.
IpaHOn306paXeHHeHaBnaXHoCTTaHaBb3Dyxa npE3nocJeHnTe12aca
| Инbosанусан (идессakомфорт) | Оtmосителна Влajхочпавьдуна |
| МноговлajхhoоT81%do9 | 0% |
| ВлajхhoоT61%do80% | |
| ПрятынооT41%do60% | |
| СухооT31%do40% | |
| МногocухоT20%do30% |
-12h-9h-6h-3h0h
7.ФункцянhaajapMaTanpnpa3BtneHa6akTeprn
HaTnCHTe6yToH (3),3aJaakTbNpaTeaJapMaTa3a pncKoTnIeceH.10mbLnaxHoCTTaHaBb3dyXaHaDnBnIu 3aJaHeHaTAcToHocTHaJIapMaTa,eHaJIupePcKOT o6pa3yBaHeHaJIpeCeH.KoratoTEMepaTypaTaemexNy25°C n40CnBnaXHoCTTaHaBb3dyXaEHaJ70%,HaINcIIeA ceNOKa3BaMnRaUaTcUMBOI MOLD SCHIMNEL (8) 3a6aKtepnnncce3aJeCTBaaJapMaTa3apNCkOITnIeCEH
(12).HaTnCHTe6bToH(3)3aHaTaekTbBpaTe aIapMaTApIpiEakTbBpaHeHaanapMaTApNCKOTnIeCen HaINcPJIeOCTaBaIacEnoKa3BaCaMOMrAaIITCMBOI MOLD SCHWMEL (8),DOKaTOIN3MepBaHaTaTeMnepaTypa OTHOBONaIHHeNOIBbBeIeHaTaIgPaHnUHaCTOnHOC3apNCK OTnIeCEH.
8.BaxKnyuKa3aHnna3a3paBeto
IpekomepnataBnaJxHOCTHaBb3dyXaNOJNOMaRapa3BnTneTo
HaHexeJahnOpraHn3Mn.Ipe6nBaBaHeTOBnOmeUeHn
chAJIHyHeHAnJIeCEHMOKeJaayBpeDnIMyHHaTACNTema
HaOHBeKa,BODINo3a6oJIbAHnHaJINxHaTeJIHtENbTuCa,
aJIeprnnncScBbP3BaCnOBaTaHaHnHΦekUm.TbbpDe
CyHXaTBb3dYxBnOMEuEHNrTaMOXeDaN3cUYNKoXaTa,
Ipa3HnFpIoTOONOBuABapNCaOTnHΦekUm.OCBeh
TOBaIpe33ImMaTaUNIHAMECTacBCCyKJImMat,KORATO
IpopaNDIOToNHeHNeTOBb3dYxbTceN3cUwBa,3aONBuBaHahe
HAOTHOCHTeHLHaTMyBnAXHOCTMOXeDaCen3No3Ba
OBJaxKnHteJ3abB3dYx.AkTNBHOtO3aTOnJIHeuNpOBetPBAHe
CNOMaRaT3aPnIaTHnI3dPaBOCLOBeHKJImMaTBKJInLlTeTo.
9.TexHnueckoo6cnyKbaHeuNoDpBxka
NouchBaIteO3nnpOdyKTcMocNeKoHaBlaJxHeHaKbPna, KOrToHEnyckaBlnCnKn,HNen3NoJ3BaItearpeCnBn NouchBaUInpepanpatn.BHmAbaiTeaHenoJaBoDa BnpOdykTa.
10.N3KNIOyBaHeHarapaHn
XamaFm6X&Ko.KHHeNoeMaHHaKaBaoTROBOpHOCTnI rapaHun3aNoBpeDnBpe3yNTaTHaHeNpBaUNHaHnCTaNaU, MOHTaxHHeNpBaUNHayNOTppe6aHApOyKTAuINHeCnA3BaHe HayNbTBaHETo3a06cLnyXbaHeuNnHCTpyKUnTe3a 6e3OnacHOCT.
11.TexHHuecknDaHHN
| Meteopolonnya STAHÇA ЕLEKTPO3axpaHbAne26aTePmAAA | |
| Диапазоннанзмервае Натемпера taxa | Вътеш NazоHa:0°C -50°C |
| Диапазоннанзмервае НавлajхноCTаHаВьЗдуха | 20%-90% |
GR Oδnyiεçxρnông
Teixiaexiptooukatevseic
1.0θóvŋ
2.EvdsEiTeaonCepuokpaiaich/oC
Alllisted brands are trademarks of the corresponding companies. Errorsandomissionsexcepted, and subject to technical changes. Our general terms of delivery and payment are applied.