
BGS41PRO - Vacuum Cleaner BOSCH - Free user manual and instructions
Find the device manual for free BGS41PRO BOSCH in PDF.
| Vacuum type | Bagless vacuum cleaner |
| Suction power | 650 W |
| Tank capacity | 2.5 liters |
| Filtration | HEPA filtration system |
| Weight | 4.5 kg |
| Cord length | 8 meters |
| Noise level | 78 dB |
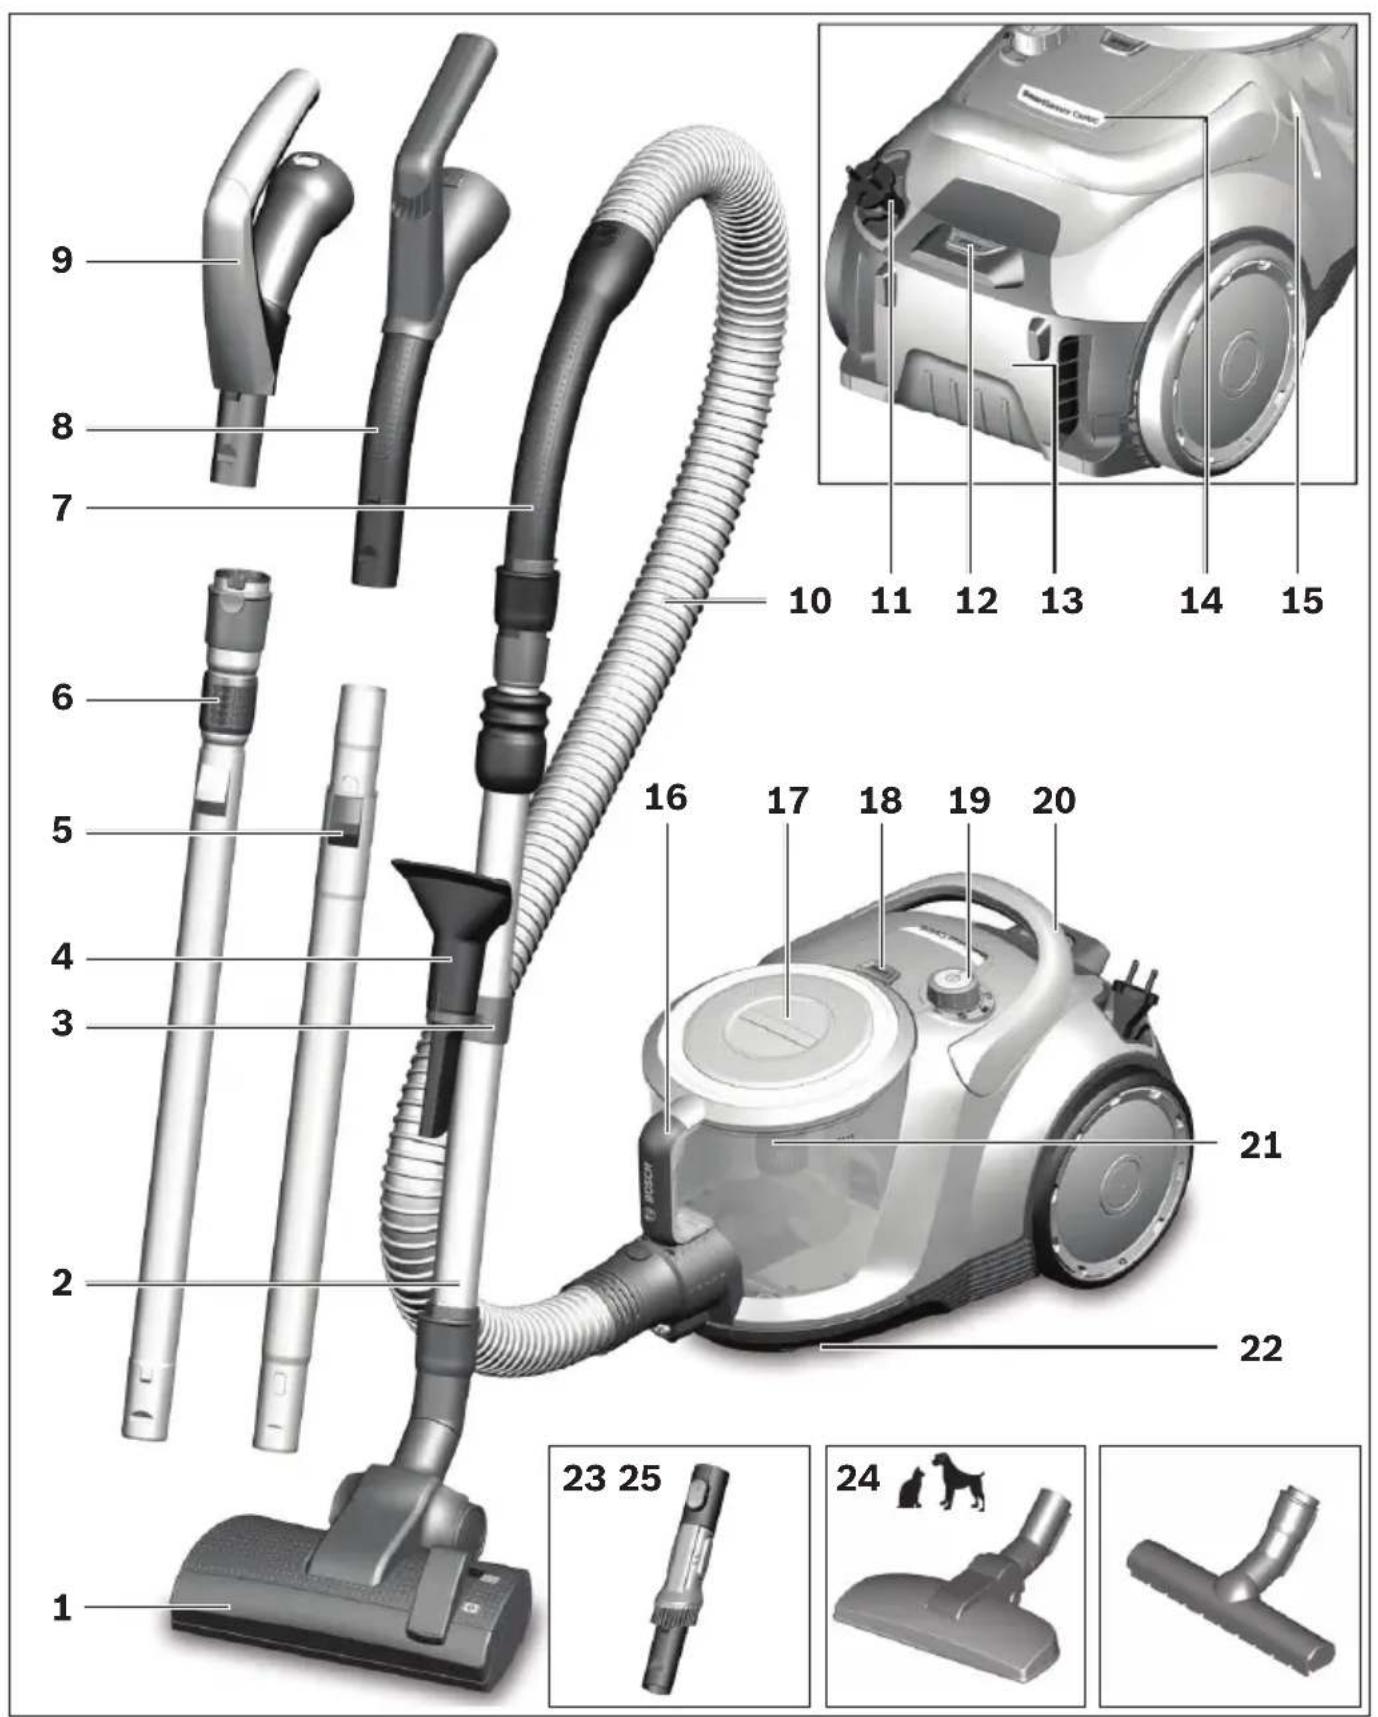
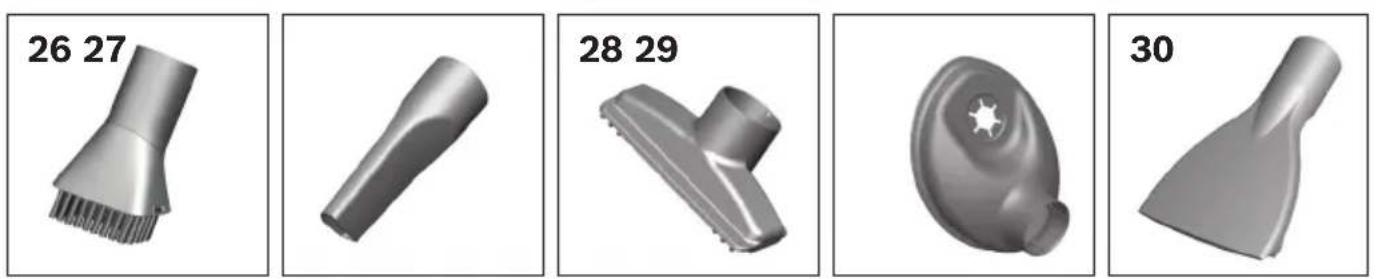
| Included accessories | Hard floor brush, carpet brush, flat nozzle |
| Usage | Suitable for hard surfaces and carpets |
| Maintenance | Washable tank, washable HEPA filter |
| Safety | Overheat protection |
| Warranty | 2 years |
Frequently Asked Questions - BGS41PRO BOSCH
User questions about BGS41PRO BOSCH
0 question about this device. Answer the ones you know or ask your own.
Ask a new question about this device
Download the instructions for your Vacuum Cleaner in PDF format for free! Find your manual BGS41PRO - BOSCH and take your electronic device back in hand. On this page are published all the documents necessary for the use of your device. BGS41PRO by BOSCH.
USER MANUAL BGS41PRO BOSCH
Register your new device on MyBosch now and get free benefits.
bosch-home.com/ welcome

BGS41.../BGC41...
[de] Gebrauchsanleitung 42
[en] Instruction manual 45
[fr] Mode d'emploi 49
[ital] Istruzioni per l'uso 53
[nl] Gebruiksaanwijzing 56
[es] Instrucciones de uso 60
[pt] Instruções de serviços 63
[el] O8nyieXpnon67
[tr] Kullanim kilavuzu 71
[p] Instrukcja uzytkowania 74
[hu] Hasznalatiutasitas 78
[kk] Ci3diH wahc0pfbIbIbIbI 81
[ru] Ounncanne npnbopa 85
[bg] CTpyKzna 3a HauHa Ha nol3BaHe 89
[uk] CekuJaad nIIOococa 93
[az] telimat 97
[ka] 6uGyj800 100
[zh] 使用說明 104
[th] 107
[ar] 112


Sicherheit 9
bg ctpyKzna 3a HanuHa Ha non3BaHe .89
exhika 6e3nekn 32
uk Cekunaad nnilococa. 93
tohlukesizlik 34
az təlimat. 97
yuguangbmonu 35
Ka 05u@yj3080 100
安全信息 37
zh 使用說明 104
38
th 107
41 1
112.
de
Please keep this instruction manual. When passing the vacuum cleaner on to a third party, please also pass on this instruction manual.
Intended use
This appliance is intended for domestic use only. This appliance is intended for use up to a maximum height of 2000 metres above sea level. Only use this vacuum cleaner in accordance with the instructions in this instruction manual.
In order to prevent injuries and damage, the vacuum cleaner must not be used for:
Vacuum-cleaning persons or animals
Vacuuming up:
- hazardous, sharp-edged, hot or glowing substances.
-damp or liquid substances. - highly flammable or explosive substances and gases.
- ash, soot from tiled stoves and central heating systems.
- toner dust from printers and copiers.
Spare parts, accessories
Our original spare parts and original (special) accessories are designed to work with the features and requirements of our vacuum cleaners. We therefore recommend that you only use our original spare parts, original (special) accessories. This will ensure that your vacuum cleaner has a long service life and that the quality of its cleaning performance will remain consistently high throughout.
Please note:
Using unsuitable or inferior-quality spare parts and (special) accessories can damage your vacuum cleaner. Damage caused by the use of such products is not covered by our guarantee.
Safety information
This vacuum cleaner complies with the recognised rules of technology and the relevant safety regulations.
The appliance may be used by children over the age of 8 years and by persons with reduced physical, sensory or mental capacity or by persons with a lack of experience or knowledge if they are supervised or have been
instructed on the safe use of the appliance and the have understood the potential dangers of using the appliance.
Children must never play with the appliance.
- Cleaning and user maintenance must never be carried out by children without supervision.
- Plastic bags and films must be kept out of the reach of children before disposal.
Risk of suffocation.
Proper use
■Only connect and use the vacuum cleaner in accordance with the specifications on the rating plate.
- Never vacuum without the dust container, motor protection or exhaust filter.
>= This may damage the vacuum cleaner.
Always keep the vacuum cleaner away from your head when using nozzles and tubes.
> This could cause injury!
■When vacuuming stairs, the appliance must always be positioned below the user.
- Do not use the power cord or the hose to carry or transport the vacuum cleaner.
For safety reasons, if this appliance's mains power cable becomes damaged, it must be replaced by the manufacturer, their after-sales service department or a similarly qualified person.
If using the appliance for longer than 30 minutes, pull out the power cord completely.
- When disconnecting the appliance from the mains, pull on the plug itself to remove it; do not pull on the power cord.
- Do not pull the power cord over sharp edges or allow it to become trapped.
■When the cable is being automatically rewound, ensure that the mains plug is not thrown towards persons, body parts, animals or objects.
>= Use the mains plug to guide the power cord.
Pull out the mains plug before carrying out any work on the vacuum cleaner.
- Do not operate the vacuum cleaner if it is damaged. Unplug the appliance from the mains if a fault is detected.
For safety reasons, only authorised after-sales service personnel are permitted to carry out repairs and fit replacement parts to the vacuum cleaner.
- Protect the vacuum cleaner from the weather, moisture and sources of heat.
- Do not pour flammable substances or substances containing alcohol onto the filters (motor protection filter, exhaust filter, etc.).
The vacuum cleaner is not suitable for use on construction sites.
>= Vacuuming up building rubble could damage the appliance.
■When not in use, switch off the appliance and pull out the mains plug.
At the end of its life, the appliance should immediately be rendered unusable, then disposed of in an appropriate manner.
Please note
The mains socket must be protected by at least a 16 amp circuit breaker.
If a circuit breaker is tripped when you switch on the vacuum cleaner, this may be because other electrical appliances which have a high current draw are connected to the same power circuit.
To prevent the circuit breaker from tripping, select the lowest power setting before switching the appliance on, and increase the power only once it is running.
Disposal information
■ Packaging
The packaging is designed to protect the vacuum cleaner from being damaged during transportation. It is made of environmentally friendly materials and can therefore be recycled. Dispose of packaging that is no longer required at an appropriate recycling point.
Old appliance
Old appliances still contain many valuable materials. Therefore, please take appliances that have reached the end of their service life to your retailer or recycling centre so that they can be recycled. For current disposal methods, please enquire at a retailer or your local council.
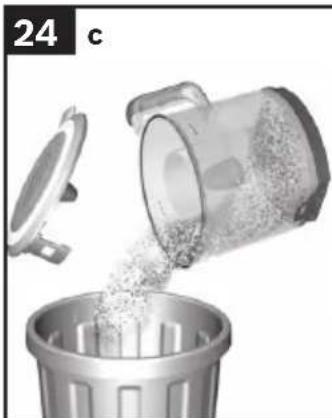
Disposal of dust bags
Filters are manufactured from environmentally friendly materials. Provided they do not contain substances that are not permitted in household waste, you can dispose of them with your normal household waste.
fr
Xpnon ouuwa me to okono npooipoo
Autn n oukeun npooipzetai mov yia tnv oikiakn xpon kai to oikiako nepibetaaov. Autn n oukeun npooipzetai via xpon mexpi eva meyio to uwoc 2.000 metpwv naaw ano tnv enipaveia tnc thaalaaoc. Xpnojtonote nvy nalektoikn okouna anokkoiotika oupomega va ta otoi- xieia autec tic odnyiec xphoc.
TnV anopuyi Tpaupatoukai nmuov,dev emtpeneta va xnoiounoine i n nektpikn okouna yia:
Tn xpon oe avOpwouc n Zwa.
TnV anoppoΦnon:
Ynoeicic yia nvy anoupon
Σuokεuaia
H oukeuaia npoateuei tnv nAektpikn okouna ano znui kata tn metapopda. Anoteelra i ano pIka npoc to nepiBaalov uika kai y' auto eivai avakukawuim. Napadote ta uika ouakeuaiaacou de xpeiaqovtaa,ota oneia oukyevtpwnc twv ulikov avakukawonc.
πaλiδσοκει
Oi naiec oukeue nepieoxouv noa akopa xpnia uika. I' auto napadibete tny axpnoTn ouakeun oac o' eva eiko kataoTma n o' eva keVpo avakukwoc. Tou c npouc anoouponc mnpoeite va touc nnpopopntheta eota iki kataoTmuata n otic unpeiec tou denou oc.
Anoupon tou piaTPOU kai TnC oakoulaoc tou piAtpou
aamap MeH xayanapbl wahcopy.
TemeHderineepdi wanhcopy.
- DeHcayIbIKKa 3nAHHbI, eTKip KblpIbI, bICTbIK XHe Kbl3bIN TypraH 3aTKeTepdi.
-binfaNdbHemeceCybIK3aTKeTepdi.
-Ohai KaHbIN KeTeTih Hemece KApblbIN KeTeTIH 3aTTeKTepe MeH ra3dap.
-ПиNTKanbIK neWTePdIH XaHe opTaNbIK KblbIbTy KynepiHEn Kyn, Kyne. - Bacin mbirapy Meh KeiipyuDen ToHep WaHbI.
KocankbI 6eNeKTeP, KepeK-JapaKTap, WaH Ka6bl
Bi3iH TynHyckanbIK KocaknbI 6eJWeKTePi3, 6i3iH TynHyCKaBik KepeK-xapakTapbIMbI3 NeH apHaBI KepeK-xapakTap 6i3iH TynHyKcAIBk WAn Ka6bi CnAKTbI 6i3iH WaHcopfbl CNaTTapbi MeH TaIaTAPbHa CaKeCTeHdiipinre. Bi3 TEK 6i3iH TynHyCKaBik KocaknbI 6eJWeKTePi3di, 6i3iH TynHyCKaBik KepeK-xapakTapbIMbI3bl XHe apHaBI KepeK-xapakTapbIMbI3bl XHe 6i3iH TynHyCKaBik WaHcopfbl TBI NaDanaHydbI YcbIHAmbl. Ocb JoklmH waHcopfblbIB13bl H y3Ak YaKaBt JyMbIC icTeYiH XHe Kyy KymblcIBHbIH KOFapbi CanacBH KaTMaMacbl Ety MyMKIH.
Hyckay:
AnDpybIC 60nMaFaH HeMece CanacbI TeMeH KocaKnBb 6bnweKTeepdi,KepeK-XapakTapdb/ apHaNbl KepeKXapakTapdb JxHe WAn KaTApbH naDaNaHy WaHCOPfbiW 3aKbIMdaybHa anbIn KenyI MymKIn,Onap 6iDiH Keninirim3 apkbl KanTaH6aNbI,erep on 3nHdAp ocb eHIMdepni naiDaNaHy ce6eBiHen naDa 6oJFaH 6anca.
Kayinci3dk HyckaapanbI
OcbI ShaHcOpfblIbTexHnKa TaHbInFaH KaFnDaIapbHa JHe dAn Kayinci3dk KaFnDaIapbHa cai.
■Бул Курьлфынblжacbl 8-deri xhe OdaH yIKeH 6aIapdbH,cohImeH kaTap
Ko3fany, ce3y JxHe OINaHy MymkHdiKTepi WeKeTEnReH JxHe/ Hemece JxTeKlIikTi 6iImi JxO K TyIFaJapDbIn NaJaIaNHybHa TeK OJapDbI bipey KaJaFalaFahn KaFdainDa Hemece OcbI KypbIJIbHbI Kayinci3 NaJaIaNHy HycKayJapbIMeH TaHbIC 60anca XHe Dypbc NaJaIaNbBay caJapbIHan KaHdai KayintepDiH opbIn aJaTbIHbIH TyciHeTIH 60anca fAna NaJaIaNaHJapbIHa 60JaDbI.
BaJanaIapfaOcbI6yNbIMMeH O'HayFa pyKcAT eTneHi3.
■БаларраеpeceKTeprin KaandaflaybHcbl3 Ta3aIay XəHe aIdbiH any Kbl3MeTI ywiH opbIHdaIaNtbiH epeKeTTepdi OpbIHdayfapkcat etneHi3.
■Пл actнкkanтap MeH
Пленкалардыбалалap колы
Жетпгітін жа'dа caKТаfl3
ЖэHe KOKbICKa TactaHbI3.
= TУншыIFy kayni 6ap!
Tnicti peTte naJaIaIaNy
IuaHcOpfblIbI TeK 3ayblTbIK TaKaTaNwA BoNbIHwa KocblI CKe KocBnB13.
Eukaan Ka6bHemece KOHTHepi3 MToOpbl Kopray Hemece ypney cy3ricn WaHCOPMaHb3. Kip xyfbl MaunHa 6y3bnk KeTyi MymKiH!
Eukaanb6acbl anbHda fopcyHa MeH Kybipbl
waHcopMaHbI3. Kapakat any kayni 6ap!
CaTbInapda WAnHcopFaHda KypblbIfbl āpdaibIM naDanaHywblactbHda Tpybl Kepek.
■ Kenire kocy kaBeni MeH IaHaHTbI WaHCOPfblTbI Tacy / TacbImaJday ywiH naDaanHa6aHb3.
OcbI 6yIbIMHbIH Keni Ka6eni 6y3blbn 3aKbIMdaHaR Kynde 60nca, Kayintepin naina 6onybH 6ondbipmay ywiH, OHbH WbIFapuBHeMece TexHNKaBik KbI3Met KepcTeOpTaNbIfbHbH MAmHbApKblb, Hemece OcbInapfa YKcac apHaNb 6iNiMi 6ap aam Tapa6bHaH aybcTbPbInybi KaKeT.
Kymbc aqi30 MHyTTaH y3ak 6oNca, xenire kocy ka6eniH TOIbIFbIMeH TapTbIN anblHbI3.
Kocy ka6eniHe emec, po3eTKaJaH TapTbIn KypblfblHbI Xenideh aXbipaTbHbI3.
Kenire Kocy Ka6enin etKip KbipnapaH TapTnHa3 XHe 6acbin KOIMaHbI3.
Keni aawacb Ka6eBb ABTOMaTTb TapTBImaca aamap, deHe Mywenepi, Xayahnap Hemece 3aTAP MeHem TapTBJbIN KetneyiHe Ke3 KeTki3iHi3.
> = K Jeire kocy ka6eniH aHa KaemerimH anapbHb3.
IaHcOpfbIIta eTki3iTeiH jyMbICTapdbIH 6apbIbIH eTki3y aIbIHAN JeJI aIbIPbIH WbIFapbIN aIbIHbI3.
3aBImdAnfah WAnCOPfbWtI icKe KocNaHbI3. AkaynbIk naJa 6oNca aWahbI TapTbIN KoibHbI3.
KayinTeprin andbn any yuih wahcnpfbuTb TEK ekinetTkBImET KepceTy opTaIbFbI fHa XeHdeyi HEmec6enweKepti aybcTbipyb Kepek.
WanCOPbIWTbIaya paBbI ecepHeH, bINFaIbIKTaH XaHe Kblny Ke3depiHeH KopFaHb3.
KahatbH Hemece KpambHa aankorolb 6ap 3aTKeTpdi cy3ire naDanaHbaHbI (wah Ka6bl, MoTopbl Kopray cy3rci, yPney cy3rici T.6.).
HaHcopFbIUtBkypbJIbIcTa naJaAnaHy MyMkiH emec.
=>Kypblnbic KOkbICTapbIH copy Kypblnfb3aKbIMdaHybHa anbIN KeNyi MYMkiH.
Erep wahcopmacaHb3 ToHa3blKbIUtbl eWipin aWahb1 p03eTKaDah WlrFapblHb3.
Eckipren Kypblfblapbl naaanaHbIn 60nMaTbH Kblhbl3, COcbH KypblfblHbI Tnicti pette KeDere XapaTyfa anapblbl3.
(ckepiH3
JXeni po3eKacbHda keMiHne 16A caKaTHdbIpfbIbBb6oynbTnic.
ErepcaTahdbipfblkypbnfnkbocbnfnaHaicnKaIcA, OHda6ybn6aca3neKtp Kpybnfnnapda6ipdeu TK jeniciHe kofapbl Kocy mAHImeH KOcblnfah cebe6iHeb 6onybl MymkiH.
CaKaTaHdbipfbIw icTeN KaNybiH KpybIrfbHbI KocyaHa anDbH eH TeMeHi 6acBbWka petten COcbIH fHa KaKofapbipak Kyat 6acBbWbHa etiH3.
Kedere kapaTy 6oBbIHwa HycKaynap
Opama
KanTama WaHcOpfbIbTI TaCbIMaJdayda 3aKbIMaHydAn CakTaNbl. On KopwafAH optfA 3nH KeNTipMeiTIn MatpnaIapDAn H XacanFAN CoN yuHn OHbI KdEre Xkapaty MymkIH.KeperiXoK opam MaTePnAnApBn H>>Grner PunktKedere Xkapaty KyneciHxHny XaInapbHa anapbHb3.
(ckipreH Kypbnfbnap
EckkypbinfbnapiHne ane JekapbMehdik 3aTKeTp6ap.Con ywiH eckypbInfbHbCaTywbifa Hemece KadererXkapay opTaNbfbHa bepiH3. AfbIMdkKkadere Xkapaty KOndapby TypanbaknapaTbI caTydbHaH Hemece KOFamDbIK YbIMHaH CypaHb3.
, y3ri MeH wan Ka6bH Kdere Xapaty
Cy3ri MeH raH Ka6bI KopwaH opTara 3nH KeNTipMeTINH MaTePnAaDapAn XacanraH. Erep OHda YN KoEBicbl YWIn H TbIM CaBHaH 3aTTeKTeP KOK 6oJca, OHb KaJIbINTbY N KOkbICbHa Tactay MyMKIH.
ru
CoxpaHnte HnctpyKuIO NO 3KnnyatauN. Pn nepe Daue NbIneocOa HOBOMy BnaJeIbCy He 3a6yIbTe nepe DaTb TaKke HnctpyKuIO NO 3KnnyatauN.
Yka3aHHNo HcNoJIb3OBaHHIO
3TOT npn6op npedha3HaueH TOnbKO nIa DOMaHHeo HcNoB3OBaHn H B 6bITOBbIX ycNOBnX. DaHHbI npn6op npedha3HaueH nIcNoB3OBaHn Ha BbICote He 6Oone 2000 m Hnd ypOBhem MOpra.
Bo n36exkanHe TpaBM n nobpeXdeHn nbinecoc HEnb3nCnObn30BaTb dIa:
UHCTKINIOJENIKINBOTHBIX;
BCaCbBaHHa:
-BpeHbIXIJI3IOPOBByBeIeCTB,OCTpbIX,ROPAuNX HINpackaJIeHHbIXIpeMeTOB;
-MOKpbIXIpeDMeTOB INKnDKoCTeN;
-NeKOBOCnMaMeHJIOUHXCn HnB3pblB4aTbIXBe-
- nePNa, caKn n3 KaFepbHbIX Neuei N CnCTeM cEHtpaIbHOrO OToPnHeH;
- Tohepa n3 npnTepOB nnN KOnnpoBaIbHbIX annapaTOB.
3aapanachbIe yacTH, npHnHaJIeXHoCTN
Haun opnHnHbHbe 3anachbIe qactn n npnaJnEJXHOCTn, a TaKKe opnHnHbHbe DoONHHTebHbIe npnHaJIeXHOCTn, KaN OpiRnHaJIbHbIe MeuKn dIa NblIn, ONTImaHbHO NOxOJaT K CBOJcTBaM N Tpe6oBaHN HaNX nbIeCOCOB. NoTOMy Mbl peKOMeHdyem Bam HcNoB3OBA Tb NCKIoUHTeNbHO opnrHaNbHbIe 3anachbIe qactn n npnaJnEJXHOCTn, a TaKKe IINbOpnrHaNbHbIe DOONHHTeNbIbe pnpnaJdEJXHOCTn IMeKKn dIa NblIn. ToIbKO TaKIM o6pa3OM oBeceNeuBaETcdoJrncpOK cnjXbI rapaHTnpyeTcB blicKNI pe3yIbTaT y60pKn c NOMOsbu BaWero nbineCoca.
Yka3aHHe:
HcnoB3OBAHne HenoXoJnx HnHeKaueCTBeHbIX 3anaChbIX qacte, npHaJNeKHOCTe/DOonHnTeIbHbIX npHaJnEKeHOCTe HnMeIKOB DnA NbInMOKeT BblBaTb NOBpeKDeHne NbIeCoca. Hawa rapaHTn He pacnpocTpahReTc H aycTaPaeHne NOBpeKdHn, BblBaHHbIX nCNoB3OBAHHe M noD6hIx N3deHn.
ПразвILA.texнки6e3oNachoCTN
ДаHHьи Пылесoc COOTBeTCTByeT O6шeпрн3HaHHbIMTexHnueckm Tpe6ObaHnЯm ИСпeциальньIM пpaBnIaM TexHnKn 6e3oNaChOCTN.
HcnoIb3OBAHne nbIeCocadetbMn cTapwe 8 letn Inua-MN C OrpaHnueHHbIMN cH3NuYeCKHMn Hn yMCTBeHHbIMNCNoCo6HoCTaMn, a TaKKeIuCaMn, He nMeUoIHMn OblTa oBpaSeHnra C NODobHMObOpyDoBaHnem, DOnyckaTeCra Toblko NOD npncmOTpOMnn Nocne HHCTpykTaJka N06e3Opanachomy nCNoIb3OBAHNIO pnp6opa n Oco3HaHnJaHHbIMN InuaMn ONaCHOCTeN, CBaHHbIX C eRO 3KcPnyatauNe.
■Детям 3апецень ИграТь с пибором.
UHCTKa n yXoJ He dOJIKHbI pON3BOIDtbcr DeTbMn 6e3 npHcMOtpa.
■Пл actNKOBbIe MeShKn I noJIIMepHyO PIIeHky XpaHnte N yTINN3HpyTe B HeNoctynHOM DnIa DeTei MeCTe.
> = OnacHOCTb ydyuBja!
PpaBnIbHoe nCNoJb3OBaHne
IOnKlnHoueHne K3JIeKTPocetn IN BkHIOueHne Nblncoca DOJXHO IPOIN3BOIDNTbcra TOnbKO C yUETOM DaHHbIX TNIOB0r TabInuKn.
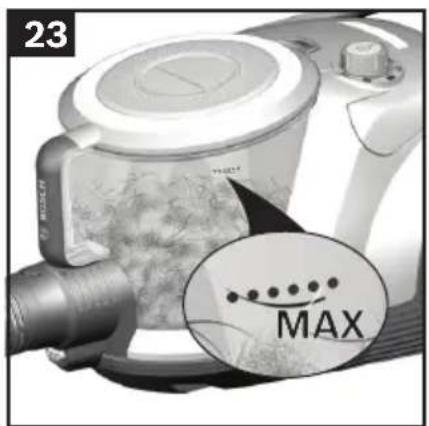
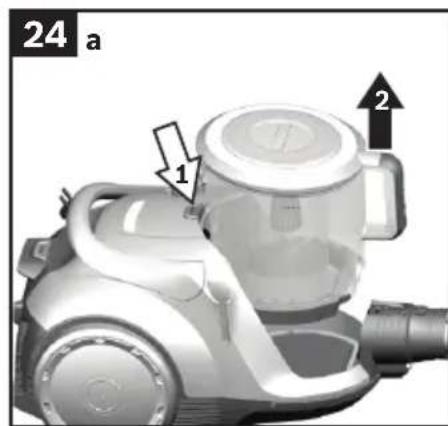
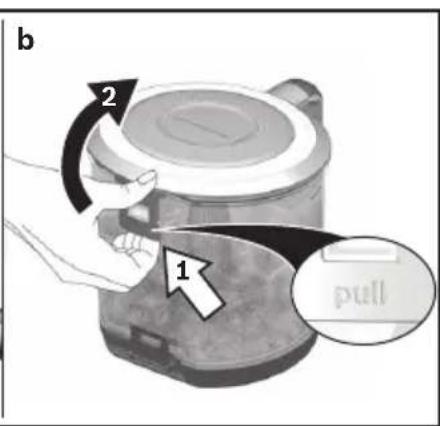
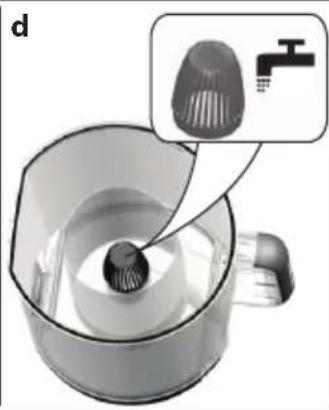
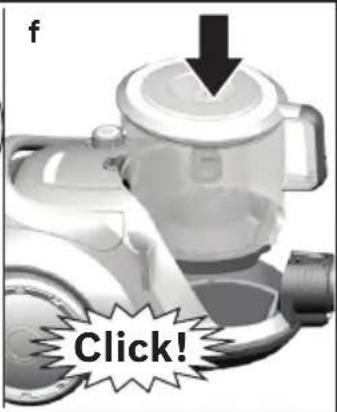
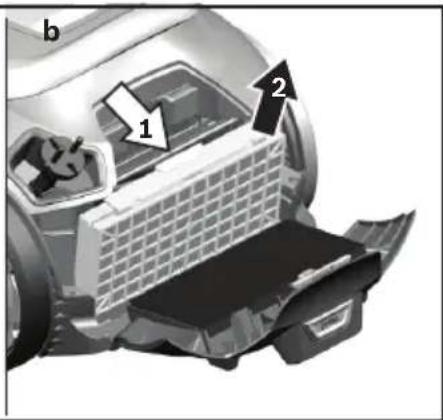
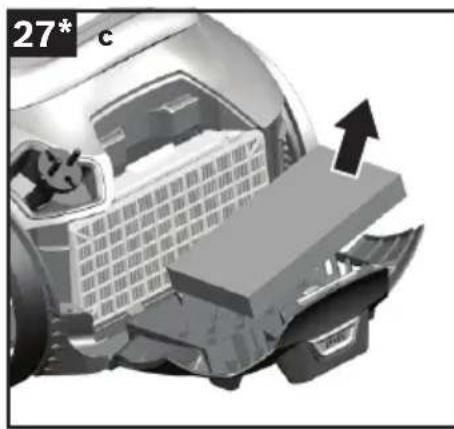
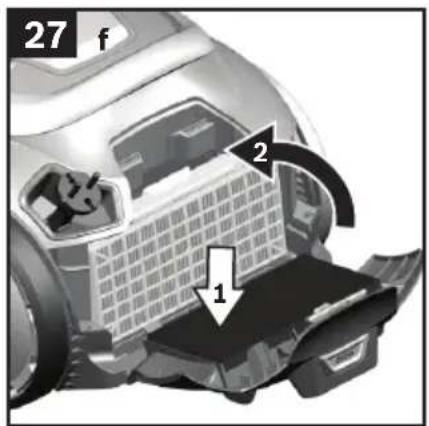
HnKorda He nCnoB3yIe nbIecoc 6e3 CMeHHoro nbI-nc6OpHka nn6o KOHTeHepa dIra c6opa nbIIN, MoTOPHO N BbIyckHOrO qNbTpOB.
=Пылесoc moKet 6bITnOBpeKdEH!
He noHocHTe BCacbIBaIOUyHO HacaIky N Tpy6Ky K roJIOBE.
=TO MoKTe IpnBecTn K TpaBMe!
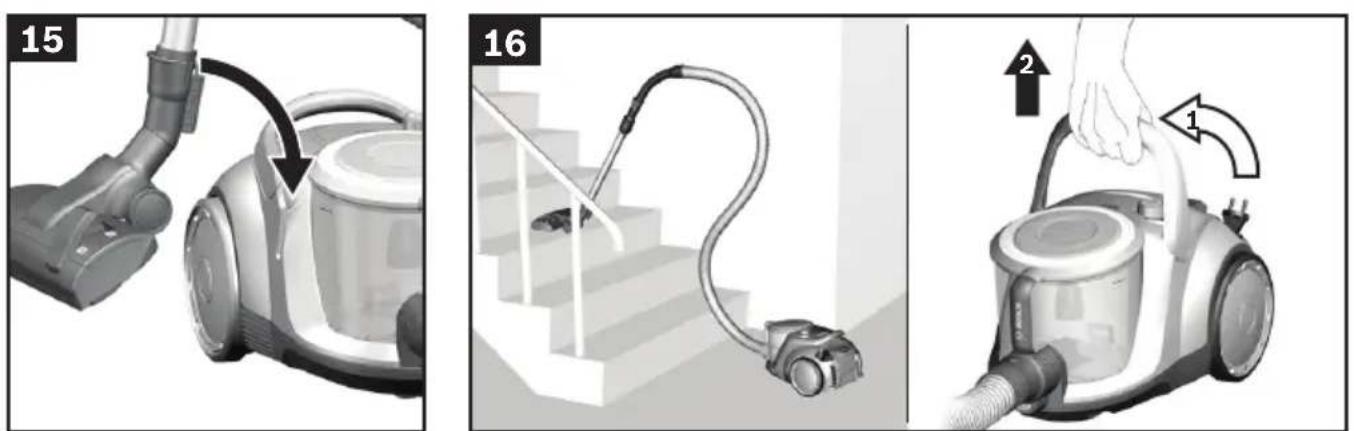
Ipn y6bOpke neCTHnCbl nbinecoc Bcerda DonJKeHN HaxoDHTbcra HnKe NOB3OBaTeJI.
He nCnonb3yIte cTeBOI Ka6enb I WnHaH dIe nepe-HOCKN /TpaHCnOpTnPOBKn nbInecoca.
■Bo n36exhaHne onaHocTH 3aMeHa NOBpeXdeHHoro ceTeBOrKa6eIg DaHHoro np6opao MoKet 6bItb BblONHeHa TOnbKO pOnu3BoDnTeNeM HnA BTOpN3OBaHHOHm cepBnCHOH cnYk6o N6o NtOm, MeHOUM aHaONuHyKBAInΦnKaunHO.
Pn npoOnKntenbHocTn 3Knpyataun 6Oone 30 MNHyT cTeBOJ Ka6eB Heo6xOIMo NnHOCTBIO Bbl- TAHyTb.
PnOTcoeHHeHH np6opa OT 3neKtpocetN Bcerda 6epntecb pykO 3a BNky, a He 3a cTeBOI Ka6ebIb.
CneIte 3a Tem, yTo6bI cTeBoH Ka6eB He 6bln 3axaT H He nonaHa Ha ocTpble Kpa npedMeTOB.
Ipea aTOMaTnueckm CMaTbIbAHnem CeTeBOro Ka6eYb6eHNTecb B TOM, yTo erO wTeKepe He cennnreTc3a HIOeJ, qactn TeNa, KINBOTbIX nnn dpyrne o6BeKtbl.
> = OTcoeHInHte cTeBOI KaBEnb OT 3NeKtpocEtN, noTnHyB 3a WTEKeP.
He noIb3yI TeCb HeIcnpaBHBIM nbinecocom. Ipn Bo3HnKHOBeHHn HeIcnpaBHOCTN BblHMaTe BnKy n3po3eTKn.
Bo n36eKaHne onaChocTu Bce pa60Tb no peMoHTy 3aMeHe DeTaIe NblncocA CNe dyET BblIOJIHHr ToJbKO B aBtOpN3OBAHHo cepBnCHo cnjX6e.
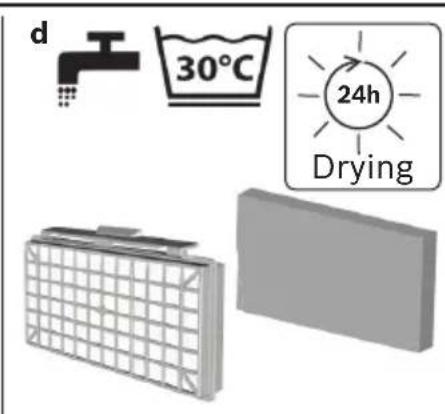
3aunuata Te nbcoc ot BO3eJcTBn He6naornpnRTHbIX MeTeOpOIOruecknx ycNoBn, BnaXHOCTN NTOUHNKOB Tennla.
He noDBepraTe fHbtpBc (MeHHbI nbIEnc6OpHNK, MOTOPHb HnblTp, BbInyckHOJ hNbTp nT. d.) BO3-DeiCTBnIO BOCnJaMeHJOUxxCn INn CnInpTOcoDEpKaaux X BeueCTB.
■IbIeCoc He npedHa3HaueH dIa 3KcNpyaTuH HCTpOHTbHbIX 06BeKtax.
> = Pn3acacbBAHnCTpOHTeBHOrO Mycopa NblneocMOKET BbIHTN 3 CTPOJ.
■Oncne OKOHuaHnE 3KcPnyataunn BbIKNoHTe np6op nCMoTaIte CeTeBOk Ka6enb.
OtcykBwne np6opblcenaTe HnprnoHbIMn dJaIbHeHJeIOHCNOb3OBaHHa, a 3aTEM yTHIN3NpyTe B COOTBETCTBNN C DeICTBYUOMN PpaBnAmN.
BHMaHHe:
CetBaJpo3eTkaDolXHa6bIb3aunueHa npedoxpaHHTenEM He MeHee yem Ha 16A.
PnB BkIIOUeHHN np6opa npeOxpaHntb MoKet cpa3y cpa6oTaTb, ecnn OndHOBpeMeHHo B daHHyo 3neKtpueckyU cenb BkIIOUeHbl DpyrHe np6Opblc 60nbwo o6uienOTpe6bnemmoMouHocTbIO.
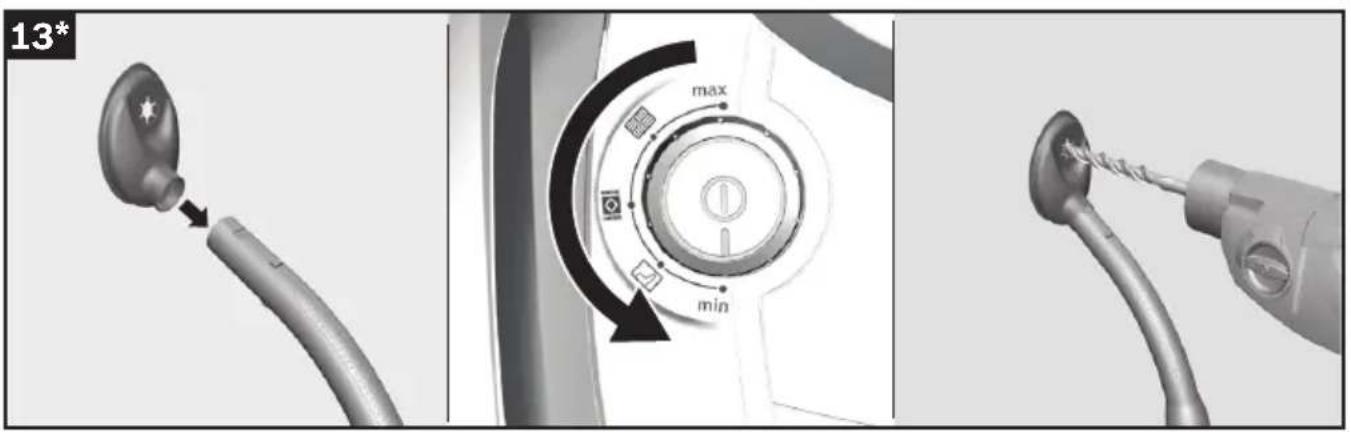
Cpa6aTbIbAHne npedeoxpahntenM MoKHO npedOTBpaNTb,ecn nepeB BKIOUeHHeM np60pa yCTaHOBTb MHHMaJIbHyO MOUHOCTb,a 3aTeM NOCTeNEHNO yBeINuHTb e.
Hnctpykunno yTnnnaaenn
ynaKOBka
YnakobKa cnjxnt dna 3auntbI nbinecoca ot nobpekdeHnn npn TpaHcnpTnpOBke. OHa n3rotOBHeHa n3 3KOJorHueCKn YnCTbIX MaTePnAIOB, NO-OTomy eE MOXHO NcONb3OBA TbI BTOpHOn IpepebaOTkn. NcONb3OBAHHble yNaKOBouHbIe MaTePnAJIbI OTHCNTB INyHKTBI pNEma BTOpcbIpBa.
YTHIN3aHnA HnBtpOB n CMeHHoro nbinec6OpHN Ka
HnbltpbI n Cmehhbl Nblne6bOpHN K3roTOBHeHb I3 3KoNOrnueckn 6e3BpeHbIX MaTePnaNoB. Ecn Hn He coepkata B ce6e HnKaKnx BeueCTB, 3anpe- Hhhbx K yTnIn3aunC 6bITOBbIM MycopOM, TO Bbl MoKeTe yTnIn3HPOBaTb IN BMeCe C 6bITOBbIM MycopOM.
bg
Mona yka3aHnra 3a ynoTpe6a da 6bDaT cbxpaHaBAAH.
Pn npdaBaHe Ha npaxocMykaKkata Ha TpeTn Nua MoJa 6bDaT npdaBaan yKa3aHnraTa 3a non3BaHe.
I3noI3BaHe no npedHa3NaueHne
To3n ypeE npedHa3HaueH cAmo 3a 6ntoBa ynoTpe6a BDOMaHNyCNOBn. To3n ypeE npedHa3HaueH 3a n3- non3BaHe Ha BncoUnHa Do MaKcImym 2000 metpa Hd MopckOTO paBHnIe.
H3non3BaIte npaxocmykaUkKaTa cMo B cBoTBeTcTBHe C daHHnte Ha ToBa yka3aHne 3a HaunHa ynoTpe6a.
3a da ce npedotbpaTn HapaHbAHn n nobpeu, npaxocmykaKata He Tp6Ba da ce n3non3Ba 3a:
H3cMyKBaHe Ha npax OT Xopa nn JKNBOTHN.
BCMyKBaHe Ha:
- BpeHn 3a 3dpaBeTo, npeMteN c ocTp np6oBe, ropeu nn ropau cy6ctanu.
- BnaxHHHn TeuHn BeuecTbA.
- necHO 3aapanIMN INB3pNBn BeueCTBa Ira3OBe.
- Penei, caKdN OT KaxneHn neuKn n HcTanaun 3a ceHTpaHNO OToPJIeHne.
- npax OT ToHep OT npnHTepn KOnpHn MaunHH.
Pe3epBn qactn, npHnaIeXHoCTn
HaunTe opnHnHaHn pe3epBn qactn, haunTe opnHnHaHn npnaJnxKHOCTn n CneuaHn npnaJnxHocTn, KaTO HaunTe opnHaHaHn Top6uKn 3a npax, ca cbo6pa3eHN c xapaKtepncTKnte n 3nckBaHnra Ta Ha HaUNe npaxOCMykaUKN. NopAn ToBa BN npenOpbUame eHNCTBeHO ynotpe6ata Ha HaunTe opnHaHaHn pe3epBn qactn, HaunTe opnHaHaHn npnaJnxKHOCTn n CneuaHn npnaJnxKHOCTn HaunTe opnHaHaHn Top6uKn 3a npax. No To3n Haun MoKeTe da Ocnryptne Dblr NONeEH XNBOT, KaTo HEnpeKbchaTO BnCOKO KauecTBO Ha NOUYCTBaHeTo Ha BaWata npaxOCMykaKa.
yka3aHHe:
H3noJ3BaHeTo Ha HenacBaUHn HnckokauecTBeHn pe3epBn qactn, npHaJneJxHoCTn / cneuaHn npHaJneJxHoCTn Hn Top6uKn 3a npax MoKe da DOBeDe Do NOBpeDn Ha BaWata npaxocMyKaUka, KOtO He Ce NOKpNBat OT HaWata rapaHzra, aKO Te3N NOBpeDn Ca npuHHeHn ToH O T H3NoJ3BaHeTo Ha TaKNa BnpOdyKTn.
Yka3aHn8 3a 6e3oNaChOCT
Ta3n npaxocmykaqka OTROBa- pHa npn3HaTHe npaBnla Ha TexHnKaTa H Ha cbOTBeTHnte npaBnla Ha TexHnKaTa 3a 6e3- ONaCHOCT.
UpebT MoKe Da Ce NOn3Ba OT Deca Ha Nobeue ot 8 rOdHH n OT lNcA C HamaJIeHN cH3N-ueCKn, CetHBn IIN yMCTBeHN cNoCo6HOCTn IIN IINCa Ha ONHT N / IIN 3HaHnA, aKO Te 6NBaT KOHTPOInpaHn IIN Ca HHCTpyKTHpAHN OTHOCHO6eONacHata ynoTpe6a Haypea n ca pa36paII npoH3TNuaIte BCJeCDTBHe Ha TOBa ONaCHOCTn.
■Дeца He Tp8Ba Da nrgpaTc ypeDa.
■Почистваши И подрьжka OTnotpeбntеля He Tpr6BaДa ce n3BbPWBaT ot Deça, ako He ce haMnpaT noI Ha6IIOdeHne.
■Пл actmacobnte ПИNKOBe HФолna Tpr6BaДa ce cbypaHЯВaT ИЗБвн OбXBbTaHa MaIKN Deca И Дa ce ИЗXBbpIaT.
> = CbueCTByBa ONaCHOCT OT 3aDywaBaHe!
KomneteHTha ynotpe6a
■BknHouBaIte KbM eIeKtpnueckKa t MpeKa n paBoTeC npaxocMykaKaTa cMo cbrnaCHO hnpMeHa Ta6enKa.
■Hikora He cmyuTe 6e3 Top6a 3a npax, pecn. KOHTeHep 3a npax, fntbP 3a 3aunTa Ha MOTopa n N3dyxBaufntbp.
YpeT MoKe Da ce noBpeN!
■Hikora He cmyute c IHO3aTa N Tpb6ata B 6IIN3OCT Do rnaBata.
> = IMa onaCHOCT OT HapaHBAHe!
IpnH3cMycBaHeHa npaxoOT cTbI6nue ypeBt Tp6Ba BnHarn da ce HAMnpa No-HNcKO O Tpa6OeUHc Hero.
He n3non3BaTe Ka6eNa 3a MpeXkoBO 3axpaHbAne mApkya 3a HocHe / TpaHCnOpTnpaHe Ha npaxocMyKaUkata. Korato Ka6eBt 3a CBbp3BaHe KbM eNeKTPnueckata MpeXa Ha To3N ypeI ce NOBpeIn, ToT Tp8Ba Da 6bDe NoDMeHEn OT pOn3BOJNTeIN nn Cnyx6ata 06cLyXBAHe Ha KIneHTn Nn ot Dpyro Lnue c PNO6Ha KBaIIINΦKauN, 3a da CE n36erHat PnCKOBe.
I3TeTnTe DOKpa eNekTpueckna Ka6e npn pa6oTa 3a noBeue ot 30 MNHyTu.
He terneTe 3a 3axpaHbau nka6en, a 3a uencena, 3a Da H3KIOUHTe ypeDa OT MpeKaTa.
He npekapbaTe Ka6ena 3a MpekoBO 3axpaHbHe npes octpn pb6oBe H He ro npntncKaTe.
BHHMaBaIte 电eNcIbT da He ydpx xopa, qactn oT TAnOTO, KINBOTHn IIN npedMeTN npn aBTOMaTHUHOTo npn6bpaneHa Ka6ena.
Bodete eneKtpnuecknaKa6en c nOmoaTaHa uencela.
■PpeiBcNqKn pa60T no npaxocMykaKaTa n3BaTe ⅢeCeta oT MpeKaTa.
He pa6oTe c nobpeDeHa npaxocMykaKa. Pn noBBAHe Ha HEn3npaBHocTH n3BaTe UeNcena oT MpeKOBn KOHTaKT.
3a n36raBaHe Ha onachocHT, peMOHTne H CMHaTa Ha pe3epBHN qactn Ha npaxOcMykaKaTAtp8Ba Da ce H3- BbpWBat cAmO OTOpHnpaH cepBn3.
Na3eTe npaxocMykaKaTa OT BbHsHKnMaTHuHN BnHa, BnaI H3TOUHnHa TOJIHa.
He nodaBaiTe Bb3nnaMeHernm Hnn CbIbpkaa ankoXoN BeuecTba Ha qntpnte (Top6a 3a npax, 3aunTeH qntbP Ha MOTopa, n3dyXBaU qntTp, n T.H.).
IpxaxocmykaKaTa He e noxOJa 3a pa6ota Ha cTpo-ntenHn nlouaDKN.
> = 3acMykBaHe Ha cTPOHTENH OTNaIbU MoKe Da DoBede Do nobpeHa ypea.
N3KIOUeTe ypea H N3TerIe Te Iencena, KOrato He cmyueTe.
I3ne3nnte ot ynoTpe6a ypeu Tp86Ba BeHara da cHaHAT Heu3non3Baem, CneT TOBA ypeBb Tp86Ba da ce npede 3a yHnOxKaBaHe Cbo6pa3Ho H3NCKBaHnraTa.
MOna,06bPheBHHMaHHe
MpeKOBnT KOHTaKT TpA6Ba Da e OcnrypeH c nped- Na3nteHa-NaMKo 16A.
Ako npn BkIIOUBaHe Ha ypeHa npedna3ntenrT ce 3aJeCTBa,To npuHATA 3a TOBa MoKe da 6bJe,ue B CbuaTe eNEKTPnuCecka Bepura edHOBpeMeHHo Ca BkIOUeHN Ipyr HneEeKTPnuCeKn ypeN C rOJMa 06ua KOHCympaHa MOsHocT.
3aeneTbaHeTo Ha npedna3nten MoKe da ce n3-6erHe, KaTo npEn BkIIOuBaHe Ha ypeDa HAcTpOnTe Han-HnCKata CTeHn HA MoUHOCT n eDBA CneT TOBa n36epete No-BnCOKa CTeHn HA MOUHOCT.
Yka3aHn3a n3XBpPnHeTo
OnakOBka
OnakOBkata Na3n npaxocmykaKaTAt O nobpeHn NO Bpeme Ha TpaHcnpOpTupaHe. Ta e HappaBeHa OT 6naorponpHTHN 3a OKoHATA cpea MaTePnAHH N npaHn TOBa MoKe Da 6bJe peuKlnpHa. N3xBbpJrIe HeHyXHnTE Bn Beue onakOBbHn MaTePnAHH Ha MecTaTa 3a cb6HpaHe 3a CnCTeMaT a 3a NobTOpho n3no3BaHe "3eNeHa ToUka".
CTap ypeI
CTapnte ypeiuecTo cbIbpxaT BCE oSe ueHn MaTe pHaAn. 3a ToBa npdaTe Baata cTaapanpaxocMykaKa Ha BaunnaPoaBau nn B eHNOT CEHTPOBeTe 3a peuKnnpaHe 3a noBtOpHo n3-non3BaHe. HOpMaun 3a akTuAnHnte Haunn 3ayHnOxKaBaHe Bne moKeTe da nonyUte ot Baunn TbproBeu nn BB Baunna O6uHckn CbBet.
N3xBpnaHe HaΦnTbpa n Top6ata 3a npax
ΦHnTpnte n Top6nte 3a npax ca npo3BeDenO t ekoloruHH Maepnann. B cnuyan, ye Te He cbdbpKxat cy6ctahnn, 3a6paehn 3a 6ntOBnTe OTnabu, MoKeTe da rH yHnOxoBaTe 3aeHc HOpMaHnTe 6ntOBn OTnAbu.
uk
Будласka,36epiRteIIO IHctpykuio 3 ekcnnyataii. 阿KIO nIIIOOC npepaetbocn HOBOMy BnaCHNKy,MyCnID nepepatn TakOx IIO IHctpykuio 3 ekcnnyataii.
3actocybaHHa npn3HaueHHAM
Ley npnla nd npn3hauehen Tilbkn Dny no6yToBoro BHKOpncTaHHa. Ley npna nd npn3hauehen DnBnKOpncTahnn Ha BnCoTi 0oHaai6iNbwe 2000 M NaD pIBhem Mopra.
BnKOpncToByTe nHococ BiNobiHa Do ciiei iHctpykuii 3 ekcnnyataui.
Uo6 yHnKHyTN TpaBM Ta noxkoJXeHb, HnNooc He MoXHa 3actOCOByBaTH dIa:
UHENHJIIODeIu TBapIN;
BCMOKTyBaHHr:
-ikiINBxIy3IOPOB'peoOBH,ROCTPH,rapaHX a6o po3kapeHx npedmetIB;
-BONornx a6o piiknx peuOBnH;
- nergko3aMnCTnx a6o Bn6yxoHe6e3neuHnx MaTepiA-niB, 30kpeMa ra3iB;
-
noneny 3 neey a6o npncptpoB ueHtpaIbHoro onaJIeHHra;
-
Tohephoro nopouky 3 npntepib a6o kcepokcib.
3anachi yactnHn, npnaand
Hawi opnirihbhi 3anuactHH, opnrinahhe npnilaT Ta cneuaibhe 6laadhaHH a Takox Hawi opnrihbHI MiWK dNny y3roJxehi 3 BnactHBocTAMn Ta BmOramn HaNX nINOCOCIB. Tomy peKomeHdyEM BOkOpncTOByBaTHn BKNIOUHO HaWI opnrirAHbi 3anuactHH, opnrIHbHe npnilaTa cneuaIbHe 6bnHaHH i HaWI opnrirAhbiMiknDnNHy.TakmHnHOMMOxHarapaHTyBaTH TpNBAnH Tepmin CnyX6n IBUCOKY notyxHicTB BaWOro nnococa.
Bka3iBka:
3actocybaHH HeBIDIOIBHx 3anachnx qactn h a6o npnaI / cneiaIbHoro 06laHaHH iMiKIB dny H3bKOIKoTMOKe np3BeCTn Do N0wkoJKeH BaWOrO NNOCoca, Ha KI He NoWpHO tbcra papaTHi, kTO Take N0wkoJKeHH BKNlKaHO 3actocyBaHHM NOIDHIN npOdykTIB.
Bka3iBkn 3 texhikn 6e3nekn
Cey nllococ BiDnoBidae 3aaraIbHo npHHTHM npaBnIam oDo texHiuHx 3acO6iB Ta cTaHdapTam 3 npaBnI 6e3-NeKN.
■ДiTn Do 8 pOKiB, ocO6n 3 Фi3nUHmN Chn PO3yMOBmN BaIaMn a6o ocO6n,Як He MaIOTb DOCTaTHbOro DOcBiDy Ta 3HaHb, MoJxTy- BaTnCra PrnlaDom LnWe NiD HaRJaDom a6o RaKIo BOHn HaBueHi npabInbHomy KOpNCTyBaHHIO NIIocOCOM Ta yCbIqOMlHOtB MOJINBi pN3nKn.
■ДiTЯМ 3a6bOpOHeNo rpaTnC8 3 npHaJOM.
IITaM 3a6bOpOHaTeBc8 6e3 HaTMy npoBODHTn OUn- uHnAboOcbnyroByBaHHn npnaDy.
■Пл actNKOBi NaKeTn Ta Фольгу Heo6xIDNo 36epiratNиУтNiI3OByBaTn NO3aДОСЯЖHICTU MaJIeHbKnx Di-TeN.
> He6e3peKa 3aHxHyTncb!
PpaBnIbHe BnKOpNCTaHH
■IiKnHoueHHnNoocca do eNeKtpomepeXi Ta Noro ekCnnyataqir NOBHHa 3dInCHIOBaTncb TiNbKN BiNObiDHO Do daHnx nacnopThoi TaBnUKN.
■HikonHe BnKOpNCTOByIe Pnnococ 6e3 Nnno36ipNka nn KOHTeHepa Iny, 3axnCHoro Ta BnynCKHoro fInbtpa.
> = PpnilaM MoKe 6yTu n oWkoDxKeHo!
He nioHocbTe BCMOKTyBaIbHy HacaKy i Tpy6Ky do roJIOBN.
> = LcMe MoKeI npu3BecTn Do TpaBMyBaHHa!
■Pn6paOuCNxOuN,3aBKnpo3TaOByTe npnaHnxKye BiD ce6e.
3a6boponeho nepenocHTn abo nepecyBaTH nHnococ 3a Ka6eB JINBHeHH qH uHaHr. KKIO nnKIOueHH Do MepeXi cIbO npuJaNy noWKoJKeHe, Ioro noBHN H 3amIHn T Bnpo6HnK, cepBicHa cnYk6a a60 KBaIipikOBaHa oco6a.
IpnTpnbanoctieekcnnyataaii 6bnwe 30 XBnHn Ka6enb eneKtpoxkNBneHHn Heo6xIDHO NOBHCIO BNTARHyTN.
■Pn BiJ'eHaHHi BiMpeXi HIKOnH He TaRHiTb 3a Ka-6enb KINBneHH, TpMaIte NOro TinbkN 3a BUNKy.
CniKnyTe,io6 Ka6enb KnBHeHH He nepeHnBaCn. uepe3 roctpi KpaI Ta He 3aTnCKaBCn.
■Npea aTOMaTHHm 3MOTyBaHHMaKa6eI0 eEnKtpoKnBHeHNepekoHaTeCBA Tomy, IIO NOro WTeKepe He qinIeTbc 3a IIOde, qactHnTiTa, TBapIn nn iHwi 06'ektn.
Ipnoknaiitb ka6enb XNBneHHa 3a donomoroH uTeNceBhoBnKn.
Ipeep6ydb-akmnpo6otam3TexhiuHoro 06cnyroByBaHHnIOOCa BiEeHyte Horo Bi eNEKtpomepexi.
He BnKOpNcToBMyTe HecnpaBnHnnlococ. Ppr BnRbNeHHi HecnpaBHOCTI Bi'EnHaHTe NnOOC BiEneKTpomepeksi.
Длгзанбогнг можиь He6e3neci,peMOHT Ta 3amHy 3anuactIN NINOLOCA NOBHeH 3dIChIOBaTH nIwe ceptnphiKOBaHN TexHiHn nepcoHaN.
■Hnococ cnid 3axuatau BiD BnHBy HecnpaTnBnx KImaTnHuNX yMOB,BOIOnr,IxKepeN tenna.
■Φinbtpn Ta nno36ipHnKn (Miok dny nany, 3axnchn
ΦinbTp DnryHa, Bnnyckn HnBtp Too) He NOBHHi
BCTynatn B KOHTaKT i3 NERKO3aMnCTHMn a60 CnnpTOB-MICHMN cNoIyKaMn.
■Hnococ He npn3HaueHn IJn BnKOpncTaHHn npn 6y- dIbeBnHex po6tox.
=36npaHH6yDIBeNBHOcMIITMAOKe npH3BecTNO NOKoJKeHH NINOcoCa.
■nicra 3akihueHH eKcnnyataui BmHKHtbpnpnai3MotaTe ka6enb eneKTpOKNBneHH.
Ppnaad, 0B BIDnpaIOBaB CBI CTPOK ekcnnyatauii, npBeiTb B Hepo6ouh cTaH i nepedaTe dHaIeKHOJ yTnI3auiii.
YBara!
HINOCOC cnID BMHKaTH TiNbKN B po3eKy 3i BCTaHOBHeHM 3an06ixHHNKOM He MeHs Ka Ha 16 A. Kaio 3an06ixHHK CnpaOboByc Opa3y nicn yBIMKHeHH HINOCoca, ce MoKe O3HaCuATn, 1o Do 1eMepeKi npneJHaHI JeKicb eEKeTpOpnpHaDi 3 BnCOKOIO cNoXHBaHOIO NOTxHICTO.
Ioo6 nonepaCpauBoyBaHH 3ao6ixHnka, BMKAte npnaHa MinImaBHy NotyxKHiCTb, aNotim NoctynoBO 36InbWynte ii.
PekomeHdaaui 3 yTuNlIaui
NaKyBaHHa
NakyBaHH 3axuae nnooc BID noKoJKeHH Nid uac TpaHcnpTyBaHH.BoHa BnroTOBneHa 3 ekO-noriuHO uHCTnx MaTepiAniB Ta MoKe nepepo6nIOBaTnc. Henotpi6Hi nakyBaIbHI MaTepiAni 3daIte B NyHKT npMamHH BTOpCnPOBuHH.
■BipnpaocboBaHipnna
CTapi npnanaMICTb 6e 6araTo cHHnx MaTepiA nIB. Tomy npnaad, cTPOK ekcnnyataaII kKOro 3akIH YNBcra, cnid 3daTH Ha CneuaIbHn nyHK T pNIMAH H dnnnoanbwoi nepepo6Kn. 3a po3'ac-heHHMa M yOdo ytnl3aui 3BeptaTecb do MiueBx KOMneteHTnX opraHIB.
Iytni3aui jinbtpib Ta miikib dna nny
Φinbtpn Ta Miikn Dnny BurotoBneHi 3 ekonoriuho ucnx Matepianib.BoHn moKytb yTNI3OByBaTncb Rk nobyTOBe cmITRA, RkIO B Hnx HeMiCTaBcH HeOpyCTmI dna zuBOrpeuobHH.
az
Telifat kitabcasini zehmət olmasa qoruyun. Tozsovrani üncu terfe vererken telimat kitabcasini da verin.


