
PAS15-220 - Vacuum Cleaner BOSCH - Free user manual and instructions
Find the device manual for free PAS15-220 BOSCH in PDF.

| Product type | Wet and dry vacuum cleaner |
| Brand | Bosch |
| Model | PAS15-220 |
| Rated power input | 1200 W |
| Voltage / Frequency | 220–240 V, 50–60 Hz |
| Gross tank capacity | 15 L |
| Net capacity (liquids) | 6 L |
| Non-woven filter bag volume | 14 L |
| Vacuum pressure (with hose) | 220 hPa |
| Air flow (with hose) | 34 L/s (122 m³/h) |
| Weight | 7.2 kg |
| Protection class | II (double insulation) |
| Protection rating | IPX4 |
| Sound level (LpA) | 73 dB(A) (K=3 dB) |
| Functions | Dry and wet vacuuming, blowing |
| Filter type | Washable filter (foam) |
| Included accessories | Suction hose, suction tube, floor nozzle, crevice nozzle, suction adapter, suction elbow, non-woven filter bag |
| Safety | Automatic shut-off in case of overheating, fill level sensor for liquids |
| Recommended maintenance | Regular filter cleaning (water and brush), sensor cleaning |
| Intended use | Private use, dry and wet materials, no hazardous or explosive substances |
Frequently Asked Questions - PAS15-220 BOSCH
User questions about PAS15-220 BOSCH
0 question about this device. Answer the ones you know or ask your own.
Ask a new question about this device
Download the instructions for your Vacuum Cleaner in PDF format for free! Find your manual PAS15-220 - BOSCH and take your electronic device back in hand. On this page are published all the documents necessary for the use of your device. PAS15-220 by BOSCH.
USER MANUAL PAS15-220 BOSCH
natural_image
Two identical black industrial vacuum cleaner units with articulated arms (no visible text or symbols)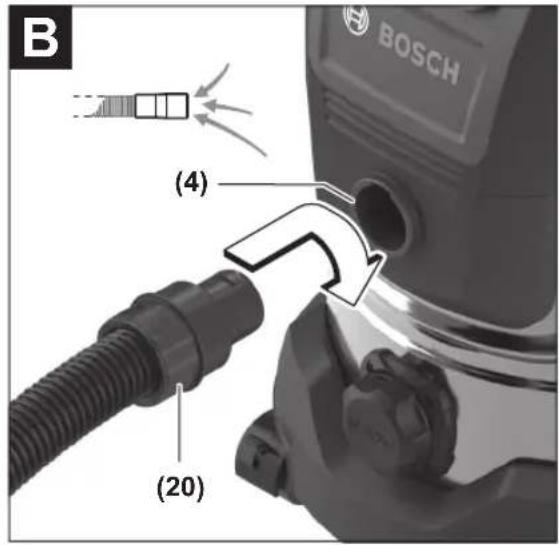
6

1 609 92A DOJ | (22.08.2025) Bosch Power Tools

natural_image
Close-up of a Bosch air purifier with labeled component (41), no visible text or symbols beyond branding and label8
N
Deutsch
Safety instructions for dust extractors
Read all the safety information and instructions. Failure to observe the safety information and follow instructions may result in electric shock, fire and/or serious injury.
Save all warnings and instructions for future reference.
This dust extractor is not intended for use by children or persons with physical, sensory or mental impairments. It should not be used by persons who have in-
sufficient experience and knowledge. Otherwise, there is a risk of operating errors and injuries.
▶ Supervise children. This will ensure that children do not play with the dust extractor.
WARNING
Do not vacuum any harmful substances, e.g. beech or oak wood
dust, rock dust or asbestos. These substances are considered carcinogenic. Make sure you inform yourself about the applicable regulations/laws on how to handle harmful types of dust in your country.
▶ Only use the dust extractor if you have been adequately informed about how to use it. Thorough instruction on how to use the equipment prevents accidental misuse and injuries.
WARNING
The dust extractor is suitable for vacuuming dry substances, and
can also be used to vacuum liquids when taking appropriate measures. The penetration of liquids increases the risk of an electric shock.
▶ Do not use the dust extractor to vacuum combustible or explosive liquids, such as petrol, oil, alcohol or solvents. Do not vacuum hot, burning or explosive dust. Do not operate the dust extractor in areas subject to explosion hazards. Dust, vapours and liquids can ignite or explode.
WARNING
Only use the socket for the purpose stipulated in the operating
manual.
WARNING
If you notice a foam or water leak, switch off the dust extractor im-
mediately and empty the container. Otherwise, the dust extractor can become damaged.
NOTE: The dust extractor must only be stored indoors.
NOTE: Clean the liquid fill level sensors regularly and check whether they are damaged. Otherwise, the equipment may not function properly.
▶ If operating the dust extractor in a damp location is unavoidable, use a residual current device (RCD). Use of an RCD reduces the risk of electric shock.
▶ Always check the dust extractor, cable and plug before use. Do not use the dust extractor if you discover any damage. Do not open the dust extractor yourself. It should be repaired exclusively by a qualified professional using only genuine spare parts. Damaged dust extractors, cables and plugs increase the risk of electric shock.
Do not crush the cable or run the device over it. Do not pull on the power cable to pull the plug out of the socket or to move the dust extractor. Damaged cables increase the risk of an electric shock.
▶ Pull the plug out of the socket before cleaning or performing maintenance on the dust extractor, making tool adjustments, changing accessories or putting away the dust extractor. This safety measure prevents the dust extractor from being started accidentally.
▶ Ensure that the workplace is well ventilated.
16 | English
The dust extractor should be repaired exclusively by a qualified professional using only genuine spare parts.
This will ensure that the safety of the dust extractor is maintained.
Before using the equipment for the first time, check that the vacuum hose is in perfect condition. Leave the vacuum hose fitted to the dust extractor while doing this so that no dust escapes accidentally. Otherwise, you may end up inhaling dust particles.
▶ Do not sit on the dust extractor. You can damage the dust extractor this way.
▶ Take care when using the power cable and the vacuum hose. Improper use of these can put other people at risk.
▶ Do not clean the dust extractor by spraying a jet of water directly at it. Water entering the top of the dust extractor will increase the risk of electric shock.
▶ Connect the dust extractor to a properly earthed power supply system. The plug socket and extension cable must have a fully functioning protective conductor.
▶ Products sold in GB only:
Your product is fitted with an BS 1363/A approved electric plug with internal fuse (ASTA approved to BS 1362). If the plug is not suitable for your socket outlets, it should be cut off and an appropriate plug fitted in its place by an authorised customer service agent. The replacement plug should have the same fuse rating as the original plug. The severed plug must be disposed of to avoid a possible shock hazard and should never be inserted into a mains socket elsewhere.
▶ Do not leave the dust extractor running permanently; it is not designed to be used as an extraction unit.
Additional Safety Information (PAS20-220P)
WARNING
Only use the socket for the purpose stipulated in the operating
manual.
The dust extractor has a plug socket with a protective earth contact (6) that can be used to connect an external power tool. Observe the maximum permitted connected load of the connected power tool.
Symbols
The following symbols may provide you with important information pertaining to the use of your dust extractor. Please take note of these symbols and their meaning. Knowing what these symbols mean will help you to use your extractor more effectively and more safely.
Symbols and their meaning
| AUTO-START | Automatic start/stop function(PAS20-220P) |
| Extracts dust that accumulates from working power tools;the dust extractor switches on automatically and off again with a time delay. |

Switching Off
Symbols and their meaning
| 1 | ExtractionExtracting dust deposits |
| max.2000 Wmin.100 W | Permitted connected load of the connected power tool (country-specific) |
Product Description and Specifications
Please observe the illustrations at the beginning of this operating manual.
Intended use
The wet/dry dust extractor is suitable for extracting dry and damp materials as well as aqueous liquids in standard household quantities and compositions. The blowing function is suitable for blowing out but not fur dedusting.
The dust extractor is intended exclusively for private use in mixed operation.
Long-term vacuuming of homogeneous, harmful substances and the extraction of ash are not permitted. Specialised dust extractors or extraction systems of the corresponding suitability must be used for this.
The plug socket must only be used in dry conditions during operation.
Product Features
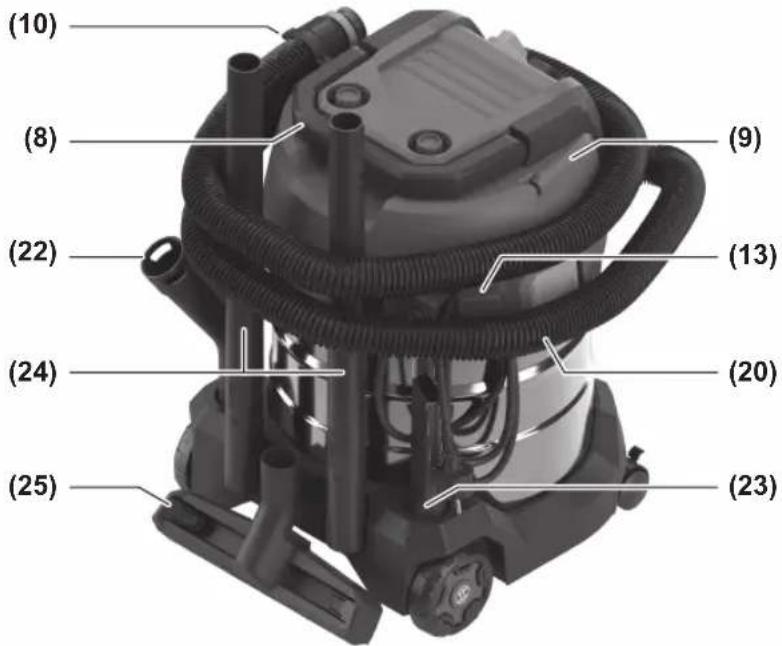
The numbering of the product features refers to the representation of the dust extractor on the graphic pages.
(1) Castor
(2) Drainage opening for liquids (PAS20-220P)
(3) Container
(4) Hose socket for extraction function
(5) Mode selector switch (PAS20-220P)
(6) Socket for power tool (PAS20-220P)
(7) Holder for extraction accessories
(8) Carrying handle
(9) Top part of dust extractor
(10) Holder for vacuum hose
(11) Catch for top part of dust extractor
(12) Wheel
(13) Cable holder
(14) Hose socket for blowing function
(15) Holder for floor nozzle
(16) Holder for suction tubes
(17) Earthing chain
(18) Castor brake
(19) On/off switch (PAS15-220)
English | 17
(20) Vacuum hose (31) Fastening pin for castor
(21) Dust extraction adapter (32) Wheel mount
(22) Curved nozzle (33) Fastening pin for wheel
(23) Crevice nozzle (34) Washer
(24) Suction tube (35) Fleece filter bag
(25) Floor nozzle (36) Connection flange
(26) Floor nozzle insert (37) False air intake
(27) Adapter for vacuum hose holder (38) Filter holder handle
(28) Snap fastener (39) Filter holder
(29) Release buttons for floor nozzle insert (40) Filter
(30) Castor holder (41) Fill level sensor
Technical data
| Wet/dry dust extractor PAS15-220 PAS20-220P | |||
| Article number | 3 603 CE7 1.. | 3 603 CE7 2.. | |
| Rated power input W 1200 1200 | |||
| Frequency Hz 50–60 50–60 | |||
| Container volume (gross) I 15 20 | |||
| Net volume (liquid) I 6 10 | |||
| Volume of fleece filter bag I 14 16 | |||
| Vacuum pressure | |||
| – Dust extractor A) | hPa 220 220 | ||
| – Turbine hPa 240 240 | |||
| Flow rate | |||
| – Dust extractor A) | l/s | 34 | 34 |
| m3/h | 122 | 122 | |
| – Turbine l/s | 65 | 65 | |
| m3/h | 234 | 234 | |
| Automatic start/stop | - | ● | |
| WeightB) | kg | 7.2 | 8.0 |
| Protection class | ☐/II | ⊕/I | |
| Protection rating | IPX4 | IPX4 | |
| Mains plug Switzerland protection rating | - | IP20 | |
A) Measured with vacuum hose (20)
B) Measured with mains connection cable, vacuum hose, curved nozzle and mounted wheels
The specifications apply to a rated voltage [U] of 230 V. These specifications may vary at different voltages and in country-specific models.
Automatic start/stop ^4
| Rated voltage | Maximum power | Minimum power |
| 220-240 V | 2000 W | 100 W |
A) Permitted connected load of the connected power tool (country-specific)
Noise/Vibration Information
Noise emission values determined according to EN 60335-2-69.
Typically the A-weighted sound pressure level of the dust extractor is 73 dB(A). Uncertainty K = 3 dB. The noise level
when working can exceed the volume stated. Wear hearing protection!
Vibration values a_h (continuous vibrations), p_F (repeated shock vibrations) and uncertainty K determined according to EN 60335-2-69:
18 | English
PAS15-220:
$$ a _ {n} = 0. 2 \mathrm{m} / \mathrm{s} ^ {2} (K = 0. 5 \mathrm{m} / \mathrm{s} ^ {2}), p _ {F} = 1 0 \mathrm{m} / \mathrm{s} ^ {2} (K = 5 \mathrm{m} / \mathrm{s} ^ {2}) $$
PAS20-220P:
$$ a _ {n} = 0. 3 \mathrm{m} / \mathrm{s} ^ {2} (K = 0. 5 \mathrm{m} / \mathrm{s} ^ {2}), p _ {F} = 1 3 \mathrm{m} / \mathrm{s} ^ {2} (K = 6 \mathrm{m} / \mathrm{s} ^ {2}) $$
Assembly
▶ Pull the plug out of the socket before cleaning or performing maintenance on the dust extractor, making tool adjustments, changing accessories or putting away the dust extractor. This safety measure prevents the dust extractor from being started accidentally.
Fitting the Holder for the Vacuum Hose (see figure A)
Push the holder (10) for the vacuum hose all the way into the corresponding adapter (27).
Fitting the Vacuum Hose
Extraction Function (see figure B)
Insert the vacuum hose (20) into the hose adapter (4) and turn it clockwise as far as possible.
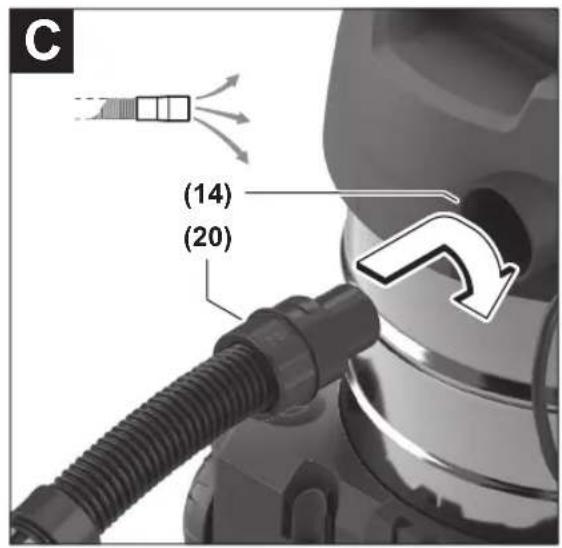
Blowing Function (see figure C)
- The dust extractor has a blowing function. Do not blow exhaust air out into the open air. Only use the blowing function with a clean hose. Dust can be hazardous to health. - Before using the blow-out function, check whether there are any deposits in the hose. Avoid stirring up deposited dust. Use safety goggles and a dust mask if there is a risk of dust being stirred up.
The blowing function is suitable for tasks where extraction is not possible due to excessive suction power, e.g. to remove small quantities of dried-out leaves from a flower bed. Switch on the dust extractor for at least 5 seconds (on/off switch (19)/mode selector switch (5) to position 1) to clean the vacuum hose (20) of dust deposits.
Turn the vacuum hose (20) anticlockwise as far as it will go and pull it out of the hose socket for the extraction function (4).
Insert the vacuum hose (20) into the hose socket for the blowing function (14) and turn it clockwise as far as it will go.
Fitting the Extraction Accessories
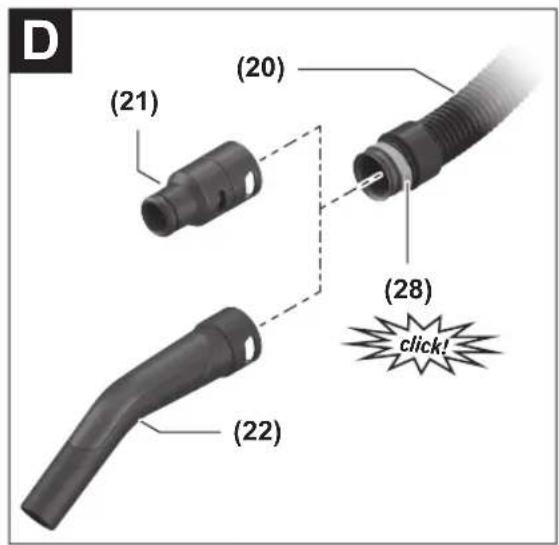
The vacuum hose (20) is equipped with a clip system which can be used to connect extraction accessories (dust extraction adapter (21), curved nozzle (22)).
Fitting the Dust Extraction Adapter or Curved Nozzle (see figure D)
- Fit the dust extraction adapter (21) or the curved nozzle (22) to the vacuum hose (20) until the two snap fasteners (28) on the vacuum hose audibly click into place.
- To remove it, press the snap fasteners (28) inwards and pull apart the components.
Fitting the Nozzles and Tubes
- Then attach the required extraction accessory (floor nozzle, crevice nozzle, suction tube, etc.) firmly to the curved nozzle (22) or to the dust extraction adapter (21).
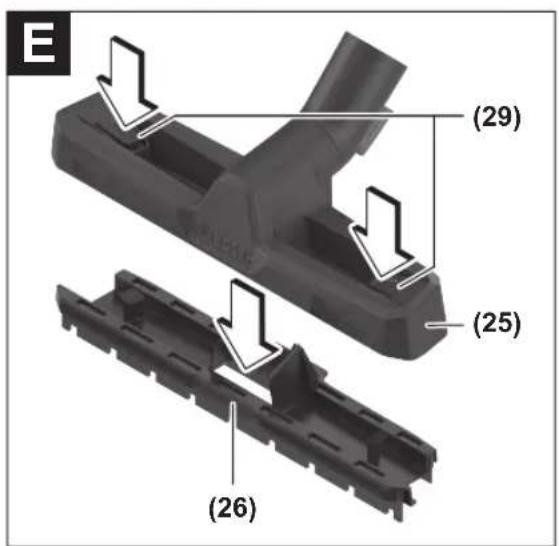
Removing/Inserting the Insert for the Floor Nozzle (see figure E)
To remove, press the release buttons (29) on the floor nozzle (25). The insert (26) is released from the floor nozzle.
To insert, clamp a new insert into the floor nozzle (25).
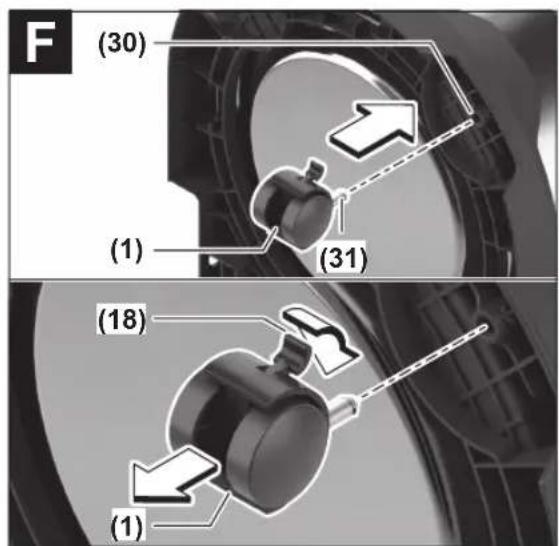
Inserting/Removing Castors (see figure F)
▶ Check the functionality of the roller brakes before using the dust extractor.
To insert, push the fastening pins (31) of the castors (1) all the way into the castor mounts (30).
To remove, release the castor brake (18) and pull the castors (1) out of the castor mounts (30).
Attaching/Removing Wheel (see figure G)
To attach, slide the washers (34) onto the fastening pins (33) and push the fastening pins (33) into the wheel mount (32) until they click into place.
To remove, squeeze the fastening pins (33) together and pull out the wheels (12).
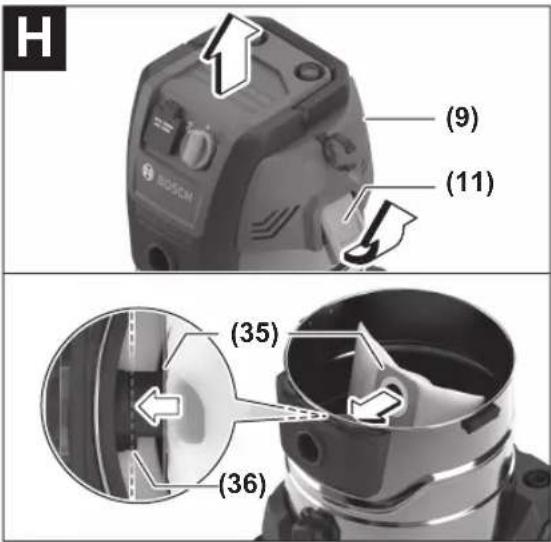
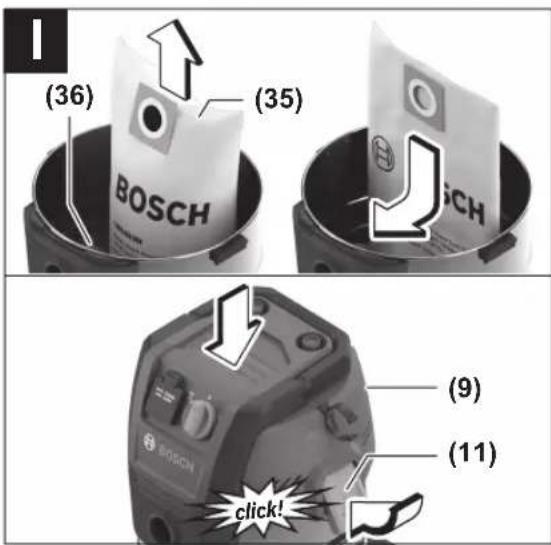
Inserting/Changing the Fleece Filter Bag (dry extraction) (see figures H-I)
You can use a fleece filter bag (35) for dry extraction. This makes the dust easier to dispose of.
Open the catches (11) and remove the top part of the dust extractor (9).
To insert the fleece filter bag (35), position the bag over the connection flange (36) of the dust extractor.
To change the fleece filter bag (35), pull the full bag off the connection flange (36), remove it from the dust extractor and insert a new fleece filter bag.
Hold the top part of the dust extractor (9) open and close both catches (11) until you hear them click into place.
Change a full fleece filter bag (35) in good time. Remove the fleece filter bag (35) before wet extraction.
Operation
▶ Pull the plug out of the socket before cleaning or performing maintenance on the dust extractor, making tool adjustments, changing accessories or putting away the dust extractor. This safety measure prevents the dust extractor from being started accidentally.
Starting Operation
▶ Check the mains voltage! The voltage of the power source must correspond with the information on the type plate of the dust extractor.
▶ Products that are only sold in AUS and NZ: Use a residual current device (RCD) with a nominal residual current of 30 mA or less.
The dust extractor must categorically not be used in potentially explosive areas.
To ensure optimum suction power, you must always fully unwind the vacuum hose (20) from the top part of the dust extractor (9).
▶ Do not use damaged filters (e.g. no cracks, small holes, etc.). Replace any damaged filters immediately.
Switching On and Off
To switch on the dust extractor, turn the on/off switch (19)/mode selector switch (5) to position 1.
To switch off the dust extractor, turn the on/off switch (19)/mode selector switch (5) to position 0.
Dry vacuuming
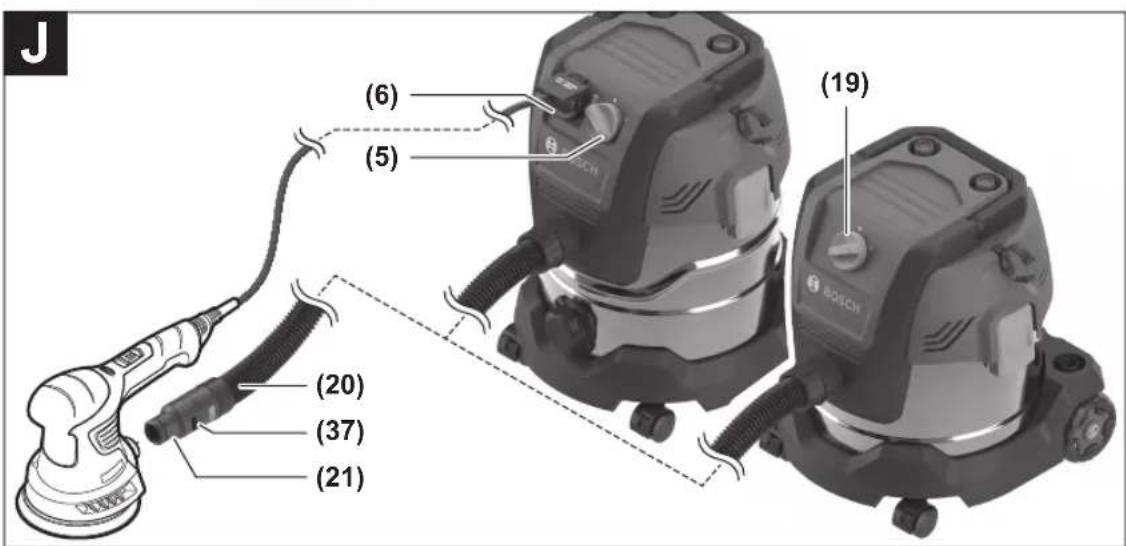
Extracting Dust that Accumulates from Working Power Tools (see figure J)
- Fit the dust extraction adapter (21).
- Insert the dust extraction adapter (21) into the extraction outlet of the power tool.
Note: When working with power tools that have a low air feed into the vacuum hose (e.g. jigsaws, sanders, etc.), the false air intake (37) of the vacuum hose (20) must be opened. This will improve the total output of the dust extractor and the power tool.
To do this, turn the ring above the false air intake (37) until the opening is at its maximum size.
PAS20-220P
The dust extractor has a plug socket with a protective earth contact (6) that can be used to connect an external power tool. Observe the maximum permitted connected load of the connected power tool.
To start the automatic start/stop feature of the dust extractor, turn the mode selector switch (5) to the AUTO-START position.
To start the dust extractor, switch on the power tool connected to the plug socket (6). The dust extractor will start automatically.
To stop dust extraction, switch the power tool off. The automatic start/stop run-on function will run for up to 6 seconds longer in order to extract the remaining dust from the vacuum hose.
To switch off the dust extractor, turn the mode selector switch (5) to position 0.
Wet vacuuming
▶ Do not use the dust extractor to vacuum combustible or explosive liquids, such as petrol, oil, alcohol or solvents. Do not vacuum hot, burning or explosive dust. Do not operate the dust extractor in areas subject to explosion hazards. Dust, vapours and liquids can ignite or explode.
The dust extractor must not be used as a water pump. The dust extractor is designed for vacuuming air and vacuuming water mixtures.
▶ Before wet extraction, make sure that the drainage opening for liquids (2) is firmly closed.
▶ Pull the plug out of the socket before carrying out any work on the dust extractor.
Steps to Take before Wet Extraction
Open the catches (11) and remove the top part of the dust extractor (9).
Before wet extraction, remove the fleece filter bag (35).
PAS15-220: Empty the container (3).
PAS20-220P: Turn the catch of the drainage opening for liquids (2) anti-clockwise. Empty the container (3) via the drainage opening for liquids (2) and turn the catch clockwise until it is firmly secured.
Clean the filter (40).
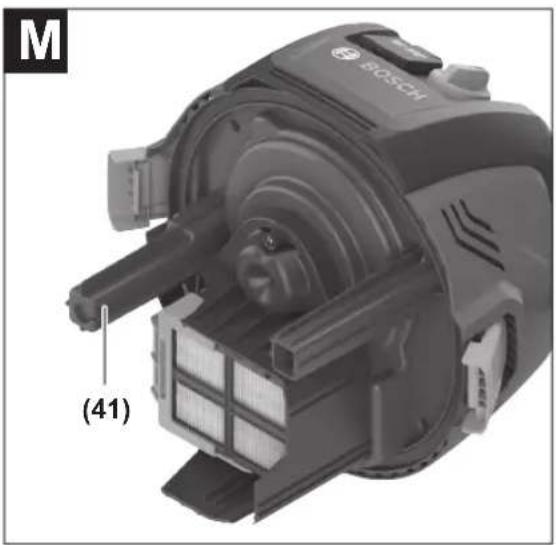
Make sure that the fill level sensor (41) is clean.
Replace the top part of the dust extractor (9) and close the catches (11).
During and After Wet Extraction
The dust extractor is equipped with a fill level sensor (41). Extraction is stopped when the maximum filling level is reached.
PAS15-220: Empty the container (3).
PAS20-220P: Turn the catch of the drainage opening for liquids (2) anti-clockwise. Empty the container (3) via the drainage opening for liquids (2) and turn the catch clockwise until it is firmly secured.
Once the work is complete, remove the top part of the dust extractor (9) and leave it to dry thoroughly to prevent mould from forming.
Clean the fill level sensor (41) with a soft cloth.
Maintenance and Service
Maintenance and Cleaning
▶ Pull the plug out of the socket before cleaning or performing maintenance on the dust extractor, making tool adjustments, changing accessories or putting away the dust extractor. This safety measure prevents the dust extractor from being started accidentally.
▶ To ensure safe and efficient operation, always keep the dust extractor and the ventilation slots clean.
In order to avoid safety hazards, if the power supply cord needs to be replaced, this must be done by Bosch or by an
20 | English
after-sales service centre that is authorised to repair Bosch power tools.
▶ Wear a dust mask when servicing and cleaning the dust extractor.
Clean the housing of the dust extractor occasionally with a damp cloth.
▶ Do not use compressed air to clean the dust extractor. The filter or other components may become damaged.
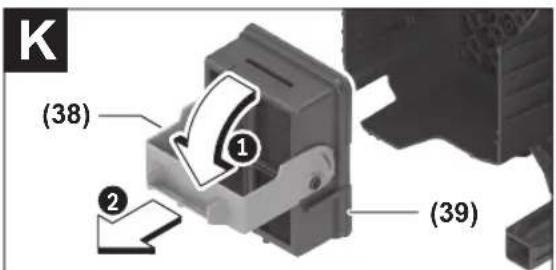
Cleaning/Changing the Filter (see figures K-L)
The suction power is dependent on the condition of the filter. Therefore, the filter (40) should be cleaned regularly. Replace any damaged filters immediately.
- Open the catches (11) and remove the top part of the dust extractor (9).
- Open the handle (38) of the filter holder (39) ① and pull out the filter holder (39) ②.
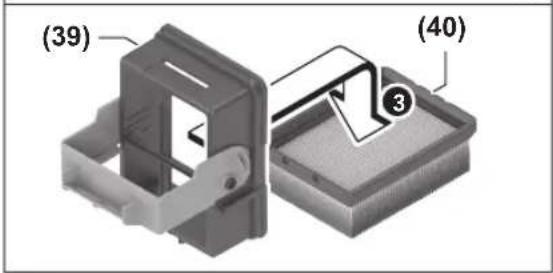
- Remove the filter (40) from the filter holder (39) Ⓤ.
- If the filter is dry: Tap the filter (40) on the side of a suitable waste bin. When doing so, ensure that you do not damage the flaps on the filter.
If the filter is very dirty, brush the flaps of the filter with water and a soft brush.
or If the filter is wet:
Rinse the filter (40) under running water and then leave it to dry thoroughly.
or Replace the filter (40) if it is damaged.
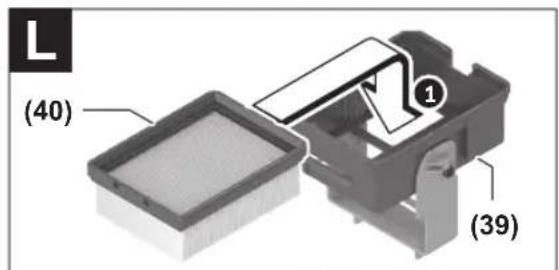
- Place the clean and dry filter (40) into the filter holder (39) ①.
- Insert the filter holder (39) into the top part of the dust extractor ② and close the handle (38) of the filter holder (39) ③ until it engages.
- Check that the filter (40) and filter holder (39) are fitted correctly and securely.
- Put the top part of the dust extractor (9) back on and close both catches (11) until you hear them click into place.
Cleaning the container
Wipe the container (3) from time to time using a non-abrasive off-the-shelf cleaning product and leave it to dry.
Cleaning the Fill Level Sensor (see figure M)
Clean the fill level sensor occasionally (41).
Open the catches (11) and remove the top part of the dust extractor (9).
Clean the fill level sensor (41) with a soft cloth.
Put the top part of the dust extractor (9) back on and close the catches (11).
Faults
Regularly emptying the container (3) will ensure optimum suction power.
If the suction power is insufficient, check:
- Is the top part of the dust extractor (9) positioned correctly?
- Is the hose system blocked?
- Are the suction tubes (24) firmly joined together?
- Is the container (3) full?
- Is the fleece filter bag (35) full?
- Is the filter (40) clogged with dust?
If sufficient suction power is not achieved after following these steps, please contact a Bosch customer service agent.
If the dust extractor overheats, it will automatically turn off. Proceed as follows:
- Turn the on/off button (19)/mode selector switch (5) to position 0.
- Make sure that the container (3) and fleece filter bag (35) are empty and that the vacuum hose (20) and the filter (40) are not clogged.
- Leave the dust extractor to cool down for 60 mins.
- Remove the mains plug from the plug socket and insert it back into the plug socket.
If the dust extractor cannot be switched on afterwards, the fuse protecting the dust extractor may have melted. Contact a Bosch customer service agent to have the fuse replaced.
Storage and Transport (see figure N)
- Wrap the vacuum hose (20) around the top part of the dust extractor (9) and push the vacuum hose into the holder (10).
- Wrap the power cable around the cable holder (13).
- Insert the suction tubes (24) into the holder for suction tubes (16), the curved nozzle (22), the dust extraction adapter (21) and the crevice nozzle (23) into the brackets for extraction accessories (7).
- Insert the floor nozzle (25) into the holder (15).
- Carry the dust extractor by the carrying handle (8).
- Store the dust extractor in a dry room and secure it so that it cannot be used by unauthorised persons.
- Apply the castor brake (18) to hold the castors (1) in place.
After-Sales Service and Application Service
Great Britain
Tel. Service: (0344) 7360109
You can find the link to our service addresses and warranty conditions on the last page.
In all correspondence and spare parts orders, please always include the 10-digit article number given on the nameplate of the product.
Disposal
The dust extractor, its accessories and packaging should be recycled in an environmentally friendly manner.
Do not dispose of the dust extractor along with household waste.
Only for EU countries and United Kingdom:
Electrical and electronic equipment that is no longer suitable for use must be collected separately and disposed of in an environmentally friendly manner. Use the designated collection systems. Incorrect disposal may cause harmful effects on the environment and human health, due to the potential presence of hazardous substances.
Français
(28) Bouton-poussoir
Tlf. Service Center: 44898855
56 | Svensk
https://www.bosch-pt.com/serviceaddresses
Garantiebedingungen Guarantee Conditions Conditions de Garantie Condiciones de Garantía

https://www.bosch-pt.com/guarantee/202507