SD9364EH - Surveillance Camera Vivotek - Free user manual and instructions
Find the device manual for free SD9364EH Vivotek in PDF.
Frequently Asked Questions - SD9364EH Vivotek
User questions about SD9364EH Vivotek
0 question about this device. Answer the ones you know or ask your own.
Ask a new question about this device
Download the instructions for your Surveillance Camera in PDF format for free! Find your manual SD9364EH - Vivotek and take your electronic device back in hand. On this page are published all the documents necessary for the use of your device. SD9364EH by Vivotek.
USER MANUAL SD9364EH Vivotek
natural_image
Technical line drawing of a security camera with mounted components (no text or symbols)SUPREME

Warning Before Installation
Power off the Network Camera as soon as smoke or unusual odors are detected.
Do not disassemble the Network Camera.
Do not insert sharp or tiny objects into the Network Camera.
Do not manually pan and tilt the Network Camera when the power is on.
Refer to your user's manual for the operating temperature.
Do not touch the Network Camera during a lightning storm.
Do not drop the Network Camera.
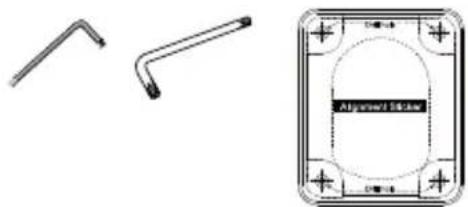
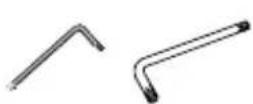
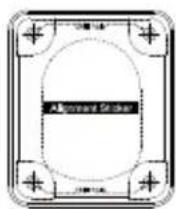
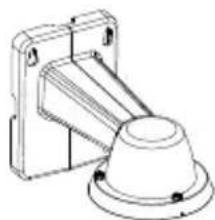
1 Package Contents


Screws / Alignment Sticker / T20 and T25 L-wrench
natural_image
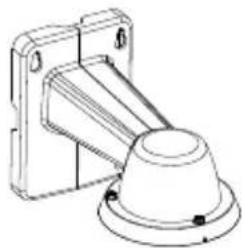
Technical line drawings of two mechanical components and a square component with circular cutout (no text or symbols)Wall Mount Bracket / ScrewsSD9363/9364
natural_image
Technical line drawing of a mechanical component with mounting bracket and base (no text or symbols)
Software CD

Quick Installation Guide


IMPORTANT:
Below are the requirements for powering the the speed dome:
| Power source Power Consumption |
| DC 48V Max. 106W (heater and fan on); Max. 39W (heater and fan off) |
| High power PoE Max. 87W (heater and fan on); Max. 39W (heater and fan off), using VIVOTEK's AW-IHU-0101 & AW-IHU-0201 |
2 Physical Description
Outer View
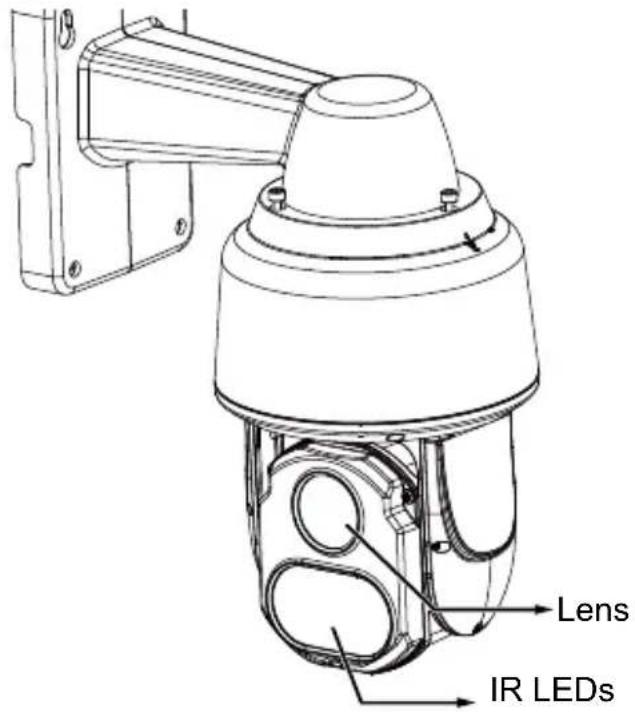
text_image
Lens IR LEDsReset button
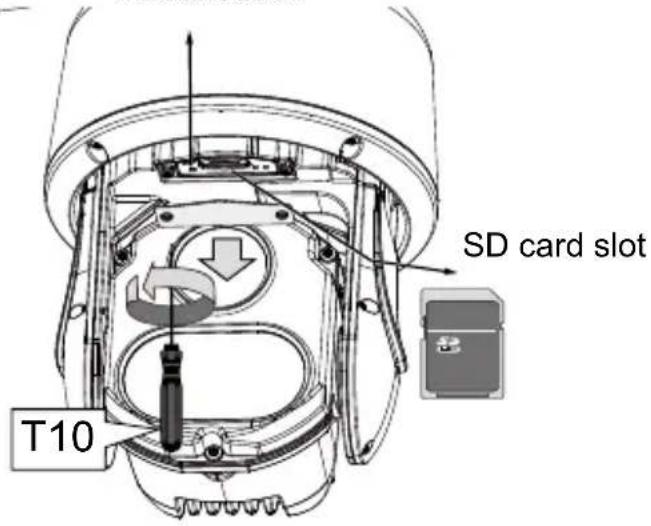
text_image
SD card slot T10Top View
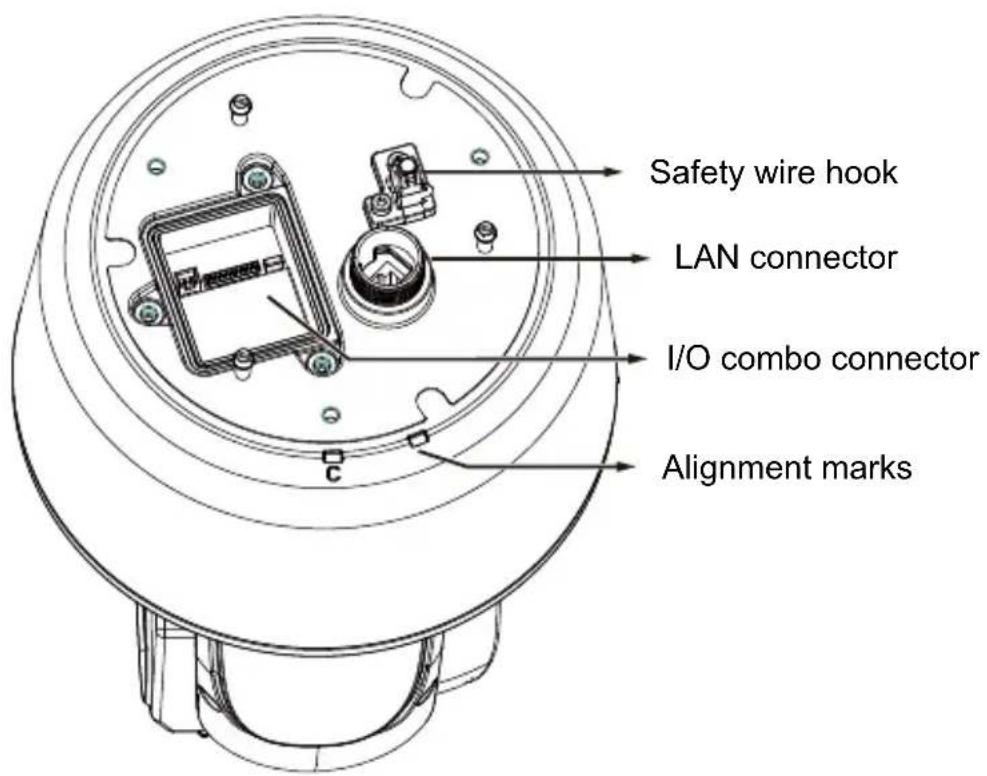
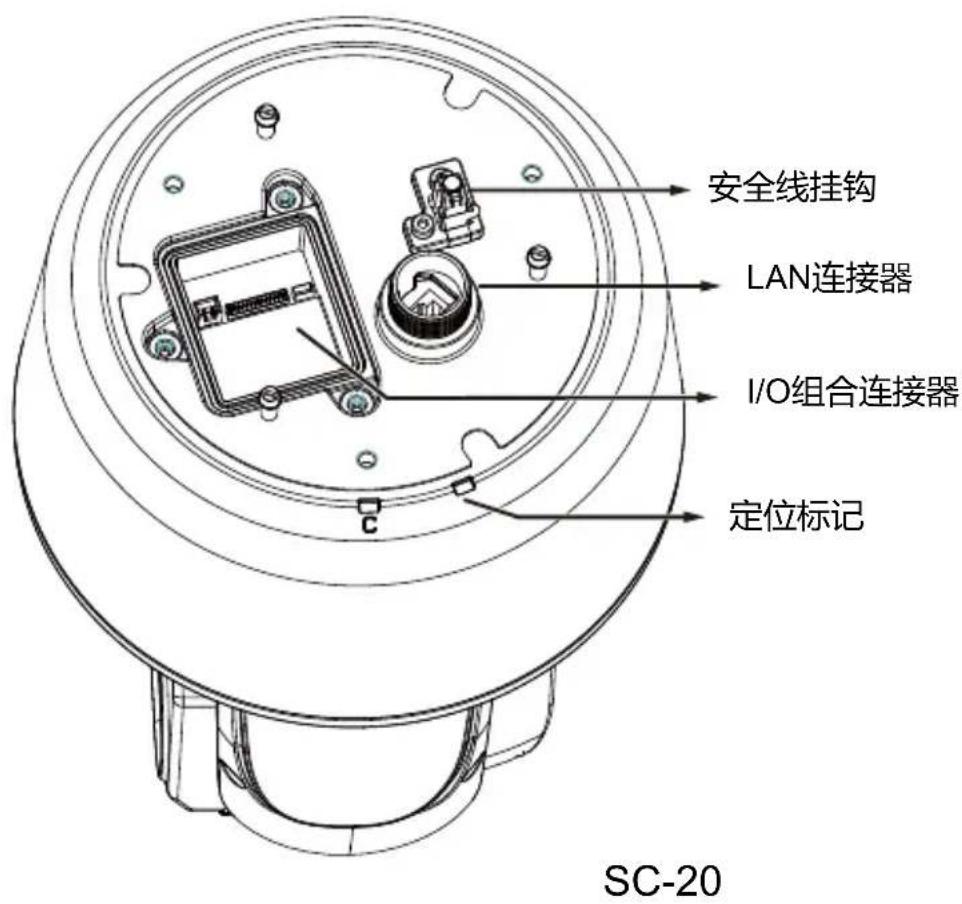
text_image
Safety wire hook LAN connector I/O combo connector Alignment marksEN-2
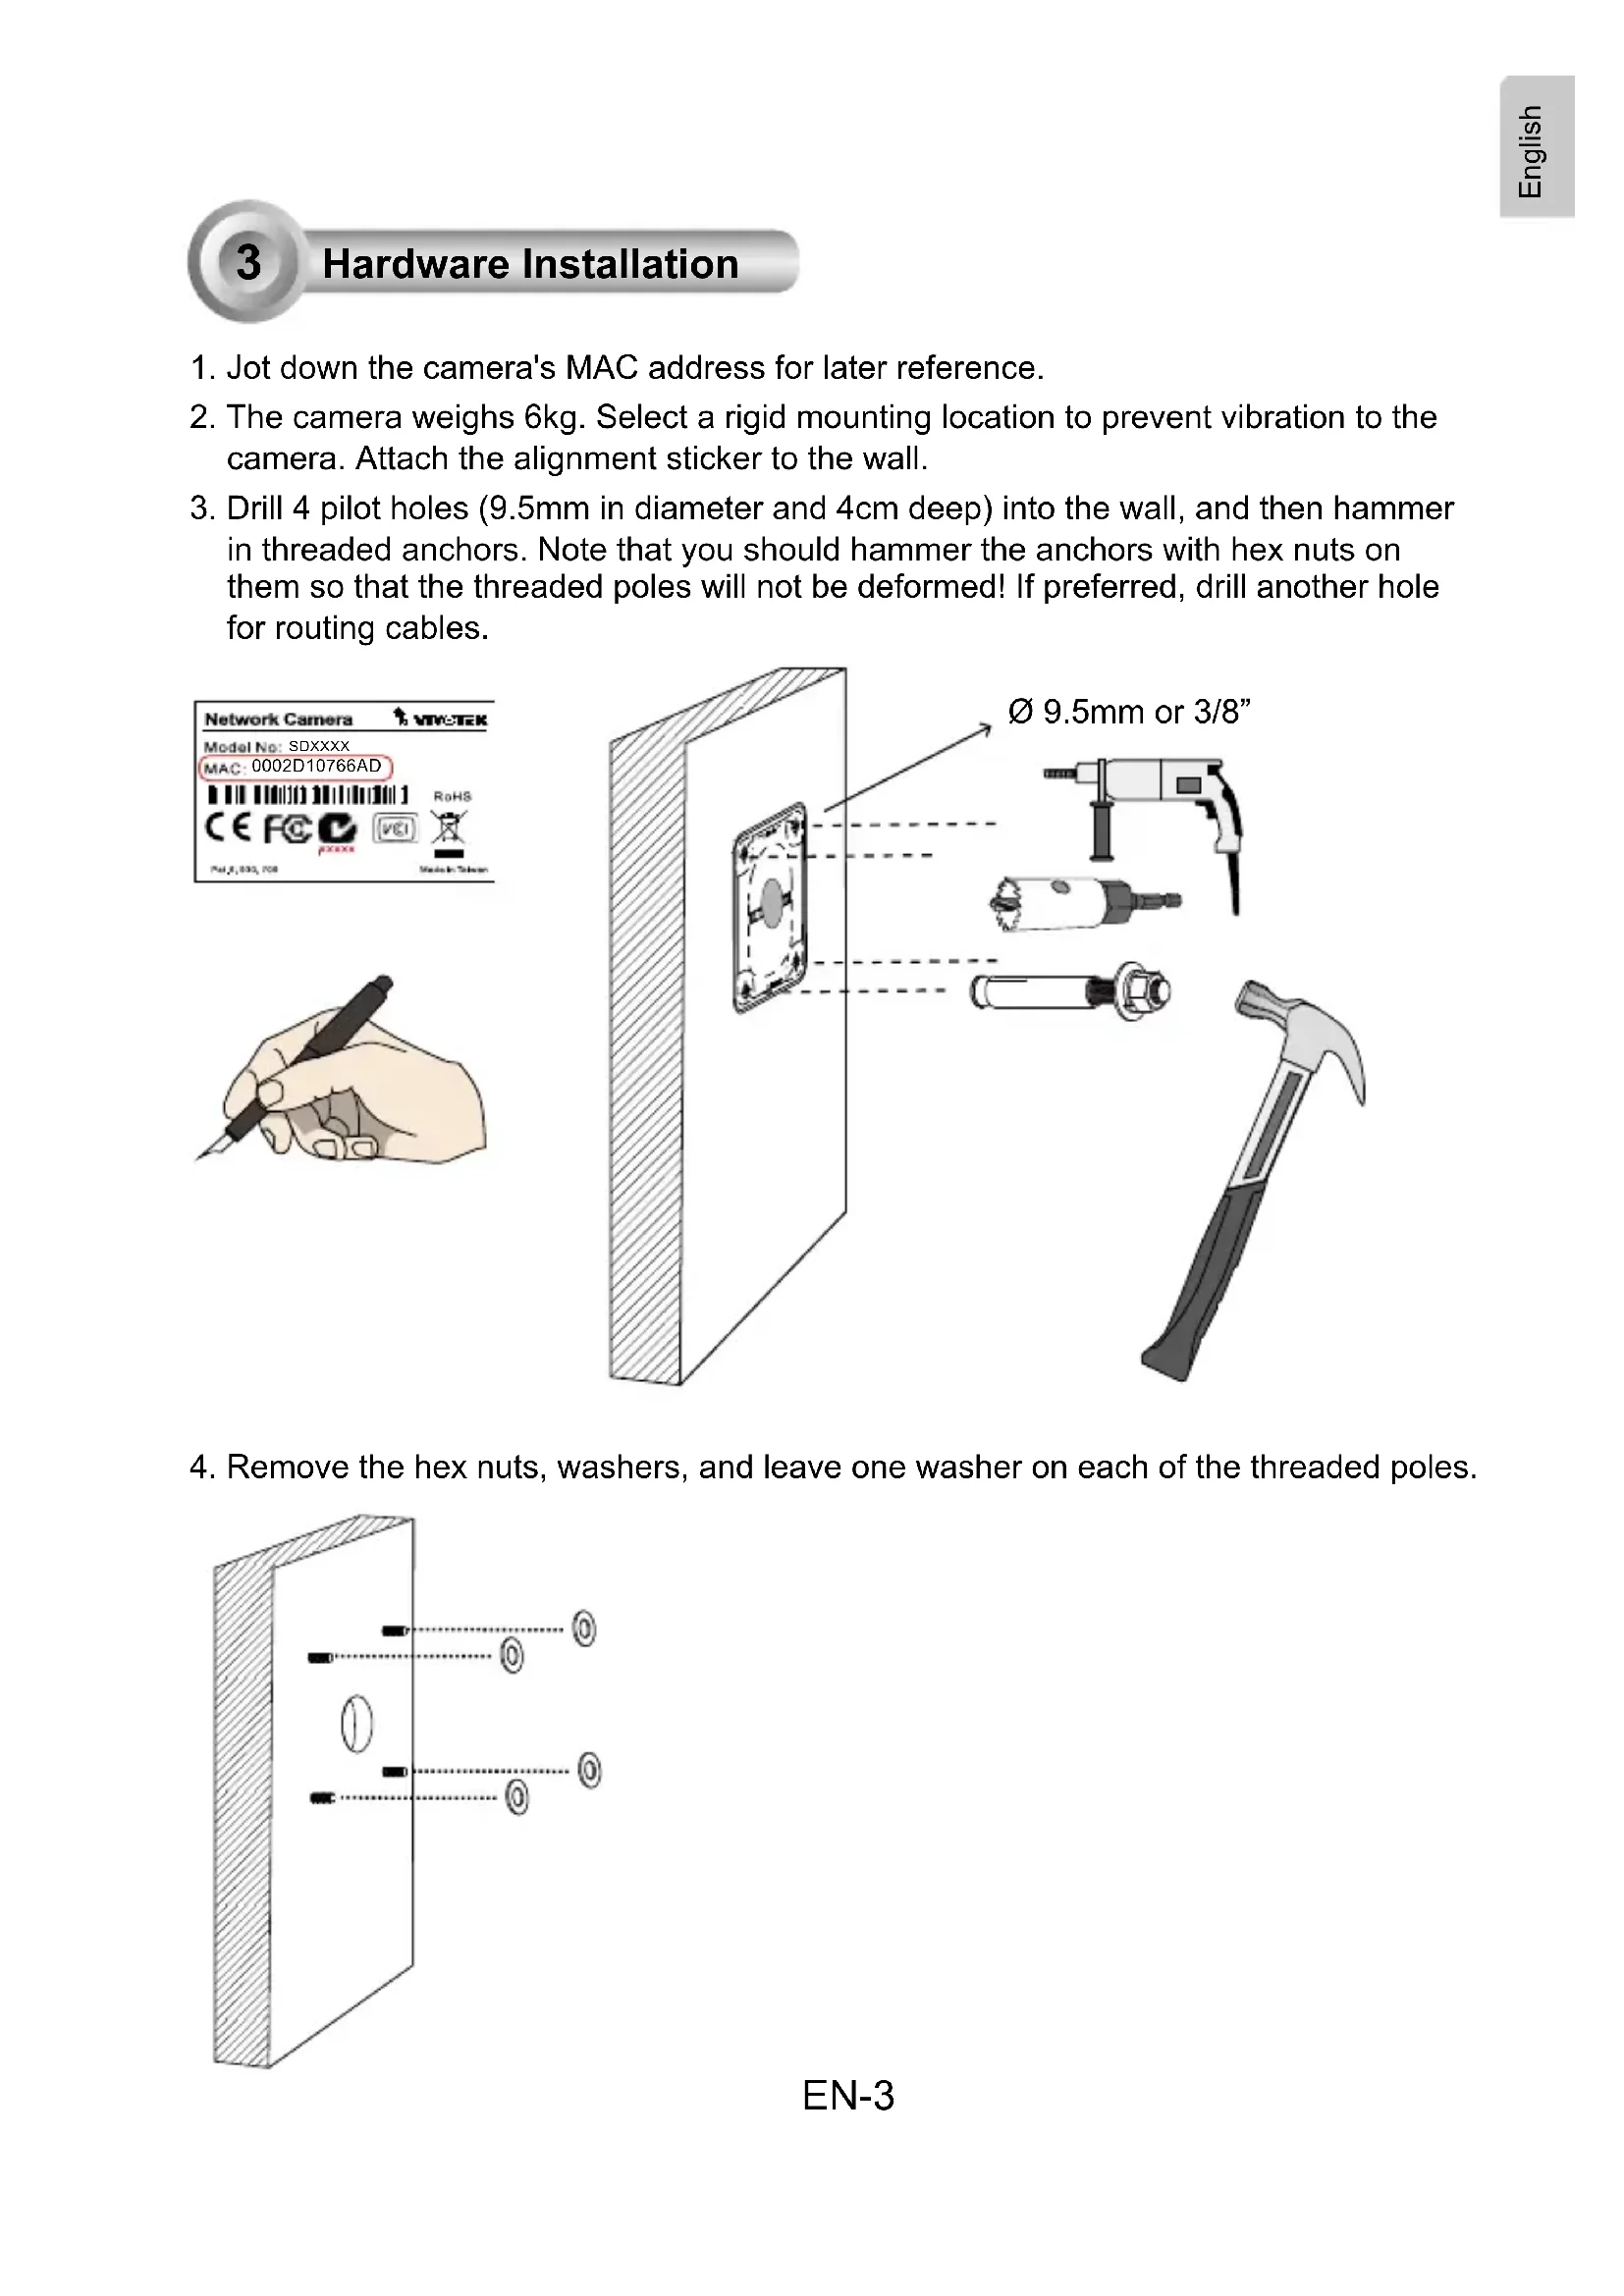
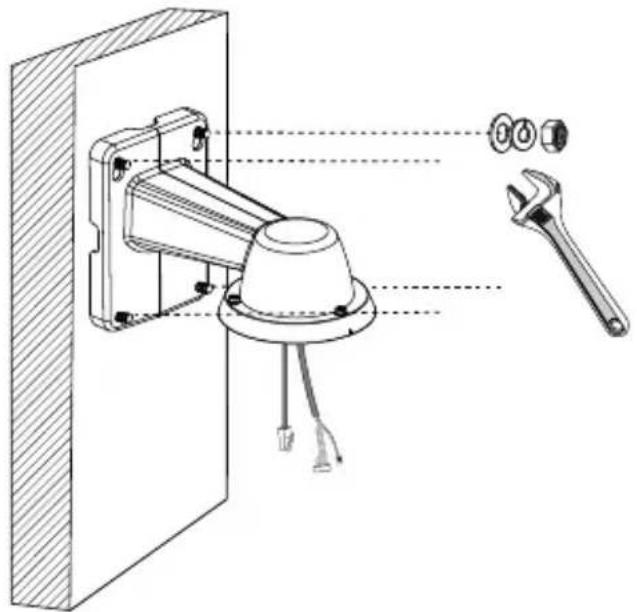
3 Hardware Installation
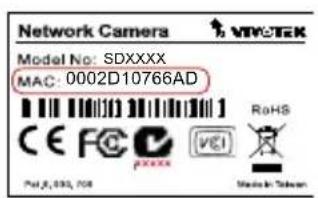
- Jot down the camera's MAC address for later reference.
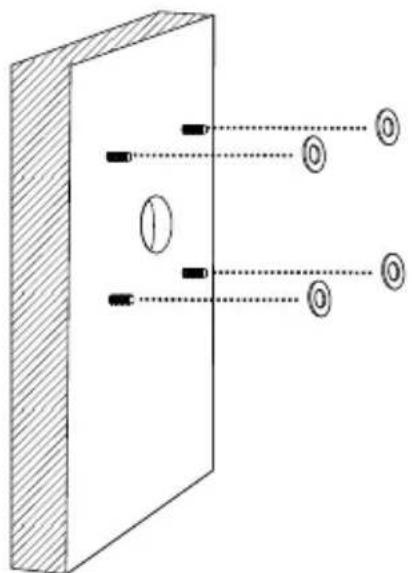
- The camera weighs 6kg. Select a rigid mounting location to prevent vibration to the camera. Attach the alignment sticker to the wall.
- Drill 4 pilot holes (9.5mm in diameter and 4cm deep) into the wall, and then hammer in threaded anchors. Note that you should hammer the anchors with hex nuts on them so that the threaded poles will not be deformed! If preferred, drill another hole for routing cables.
text_image
Network Camera Model No: SDXXXX MAC: 0002D10766AD CE FC pxxx RoHS Pul.8, 035, 708 Made in Taiwan
natural_image
Illustration of a hand holding a pen, no text or symbols present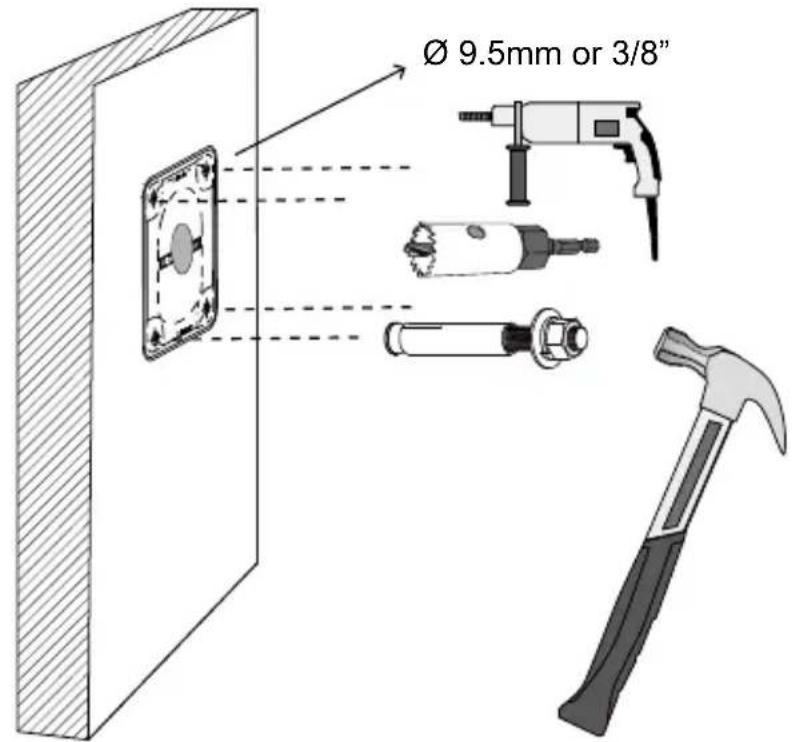
text_image
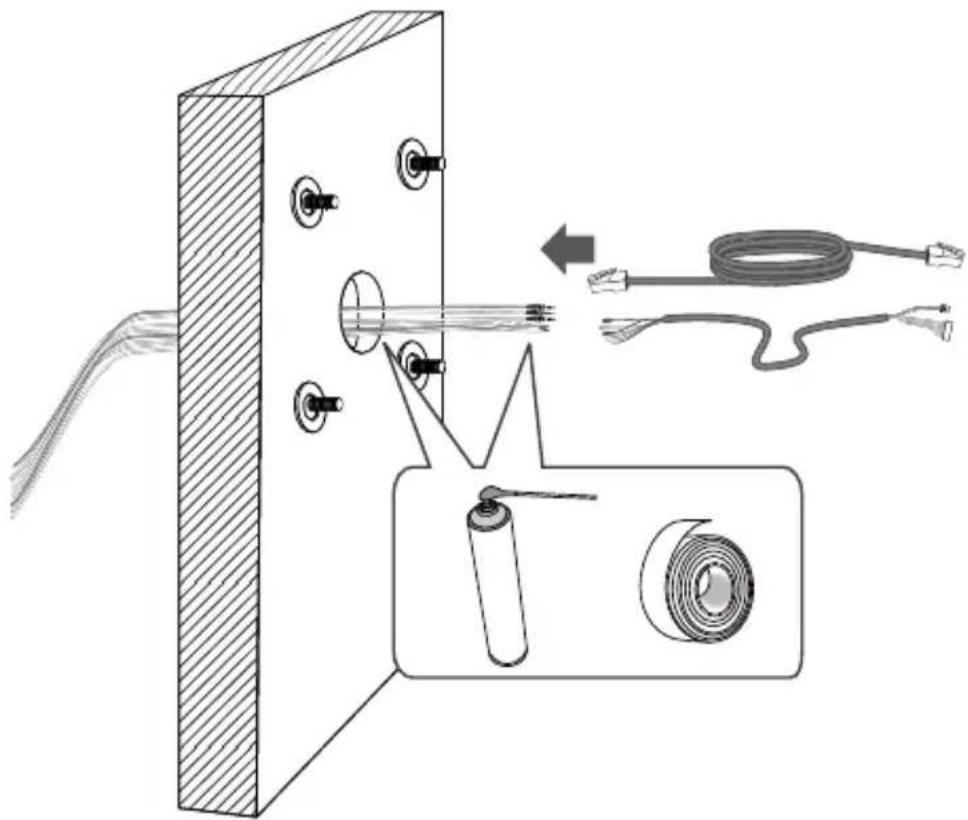
Ø 9.5mm or 3/8"- Remove the hex nuts, washers, and leave one washer on each of the threaded poles.
natural_image
Diagram of a vertical barrier with two parallel lines passing through it, showing optical or signal paths (no text or symbols)EN-3
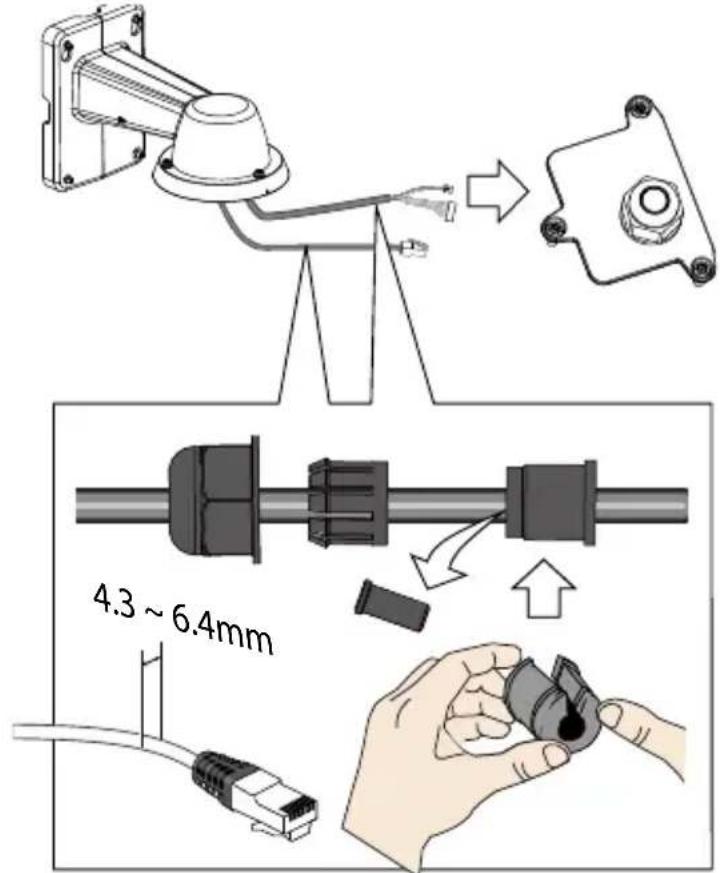
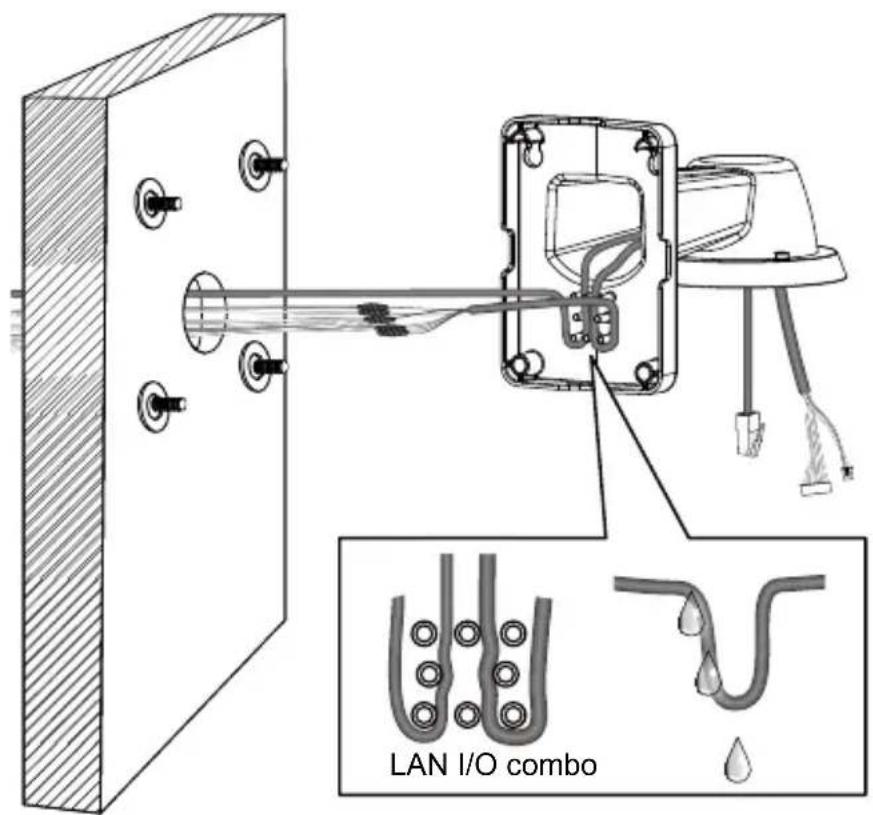
- Connect power or I/O wires, and use foam tapes or seal foam to ensure the back-end connection is waterproof.
natural_image
Technical diagram showing a mechanical assembly with labeled components and a magnified inset of a cable and ring (no text or symbols present)- Route your I/O combo and Ethernet cables along the routing guide poles to form drip loops.

text_image
LAN I/O comboEN-4
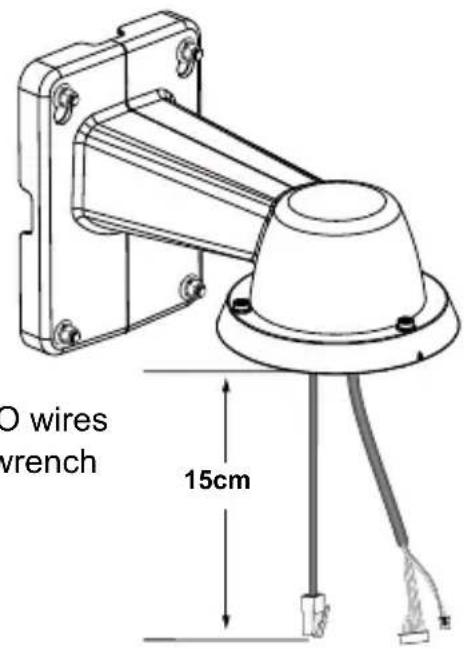
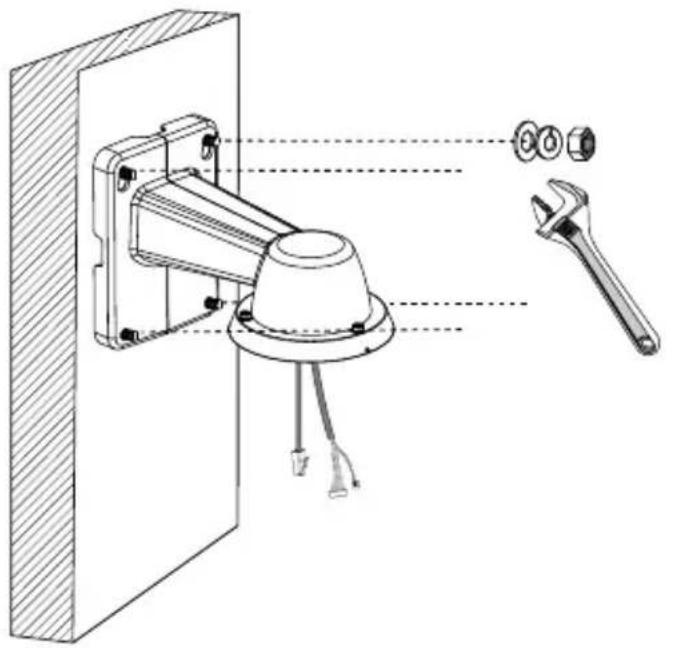
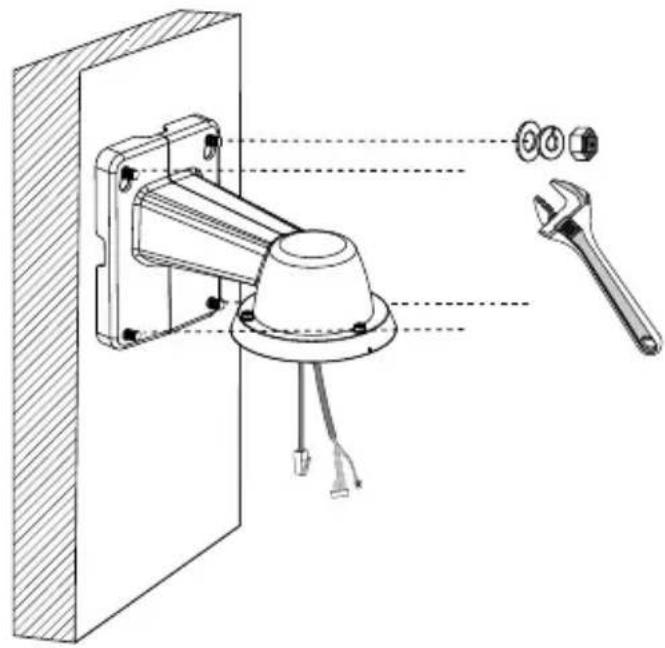
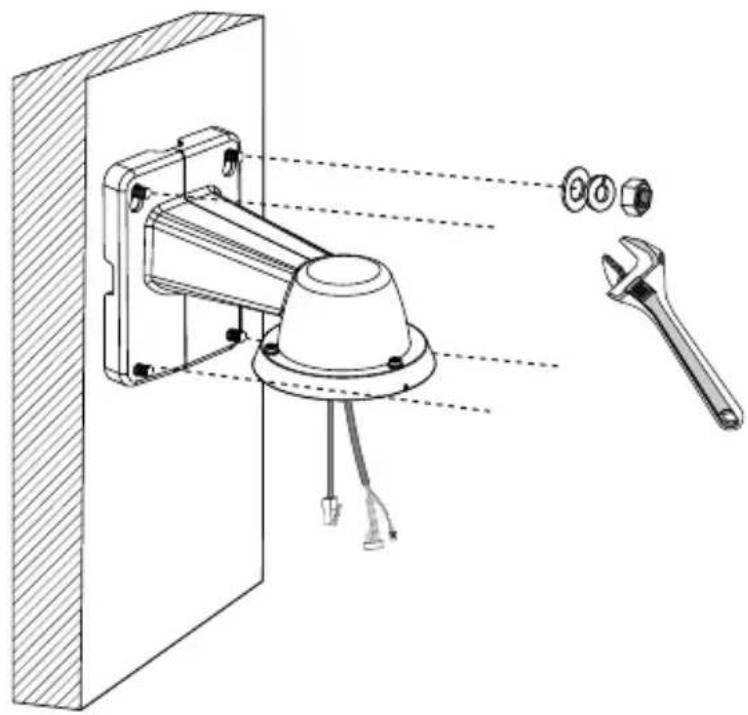
- Secure the bracket to wall.

natural_image
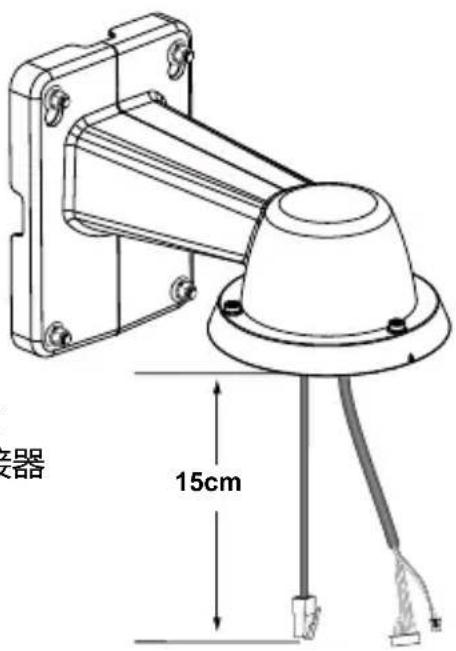
Technical line drawing of a mechanical assembly with labeled components (no text or symbols present)The cable length hanging on the outside of the bracket should be 15cm
text_image
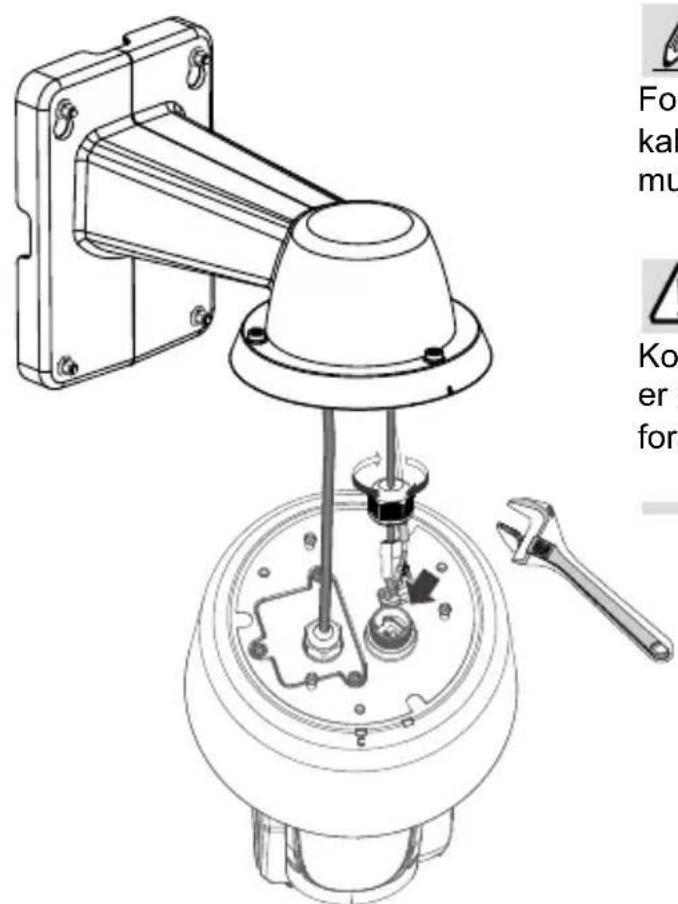
O wires wrench 15cm- Remove the cable gland from the LAN port. If I/O wires or DC 48V power are preferred, use the T20 L-wrench to remove the top cover on the I/O connectors.
text_image
T20 CEN-5
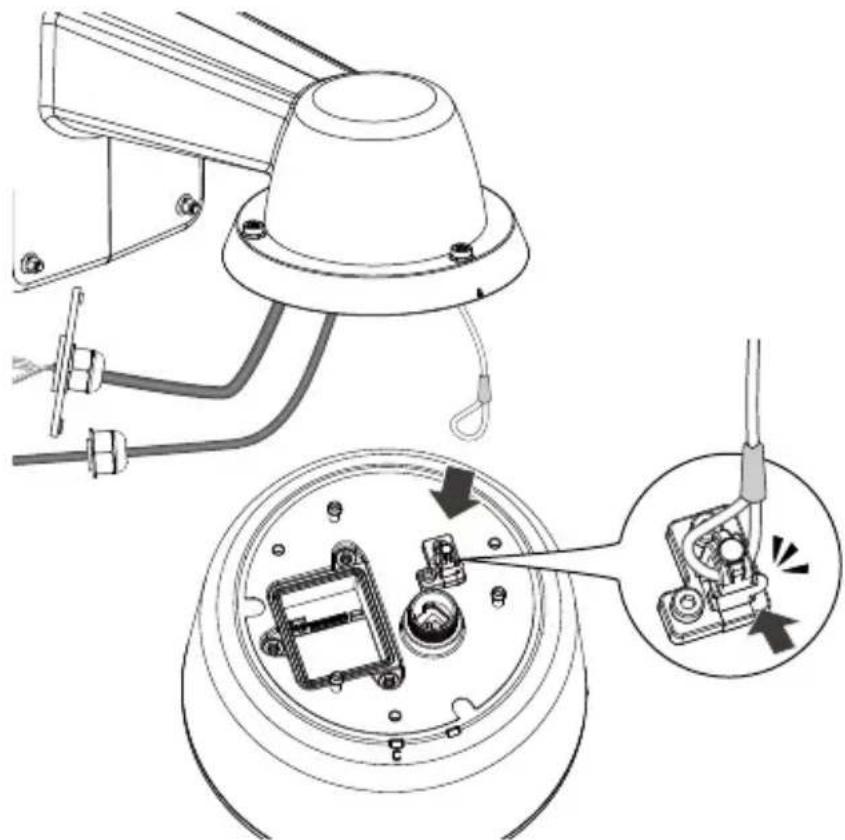
- Hook up the safety wire between the bracket and the camera.
natural_image
Technical diagram of a mechanical assembly with labeled parts, showing connections and components without any readable text or symbols.- Install the components of the waterproof cable gland to the Ethernet and I/O combo cables.
text_image
4.3 ~ 6.4mm
natural_image
Mechanical assembly diagram showing a pipe connection with a cable and attached components (no text or symbols)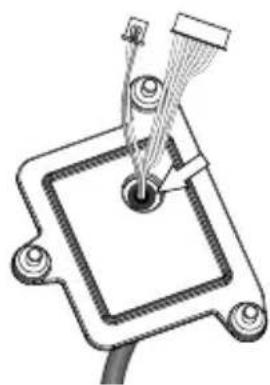
natural_image
Technical line drawing of a mechanical component with a central pin and threaded rod (no text or symbols)The outer jacket of the combo cable is flush with cabling hole.
EN-6
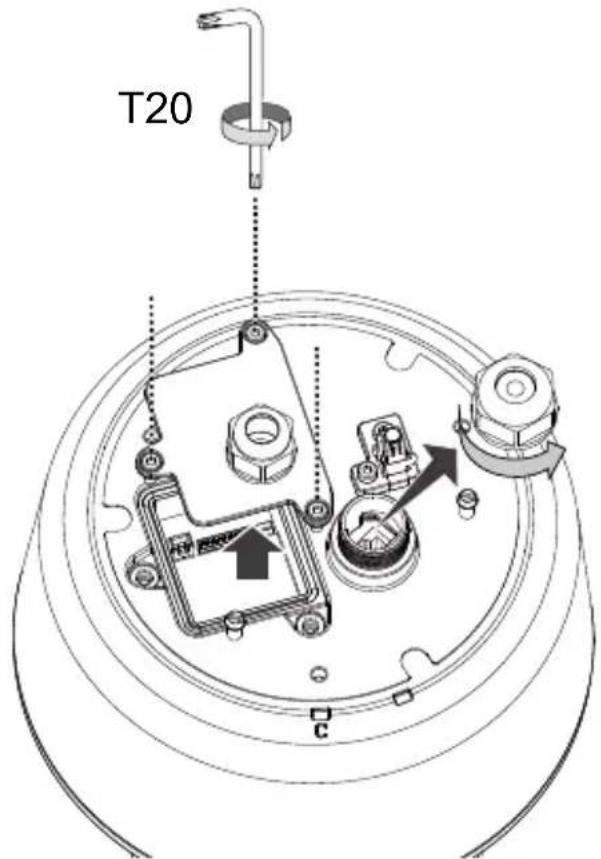
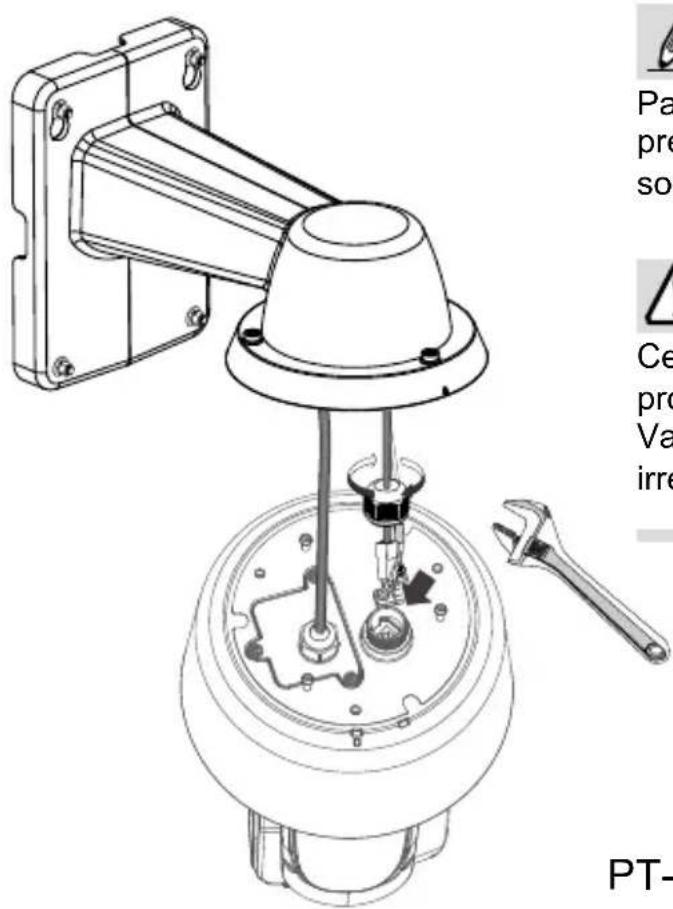
- Connect the I/O wire headers to camera and then secure the top cover.

natural_image
Technical line drawing of a mechanical device with exploded view and close-up insets (no text or symbols)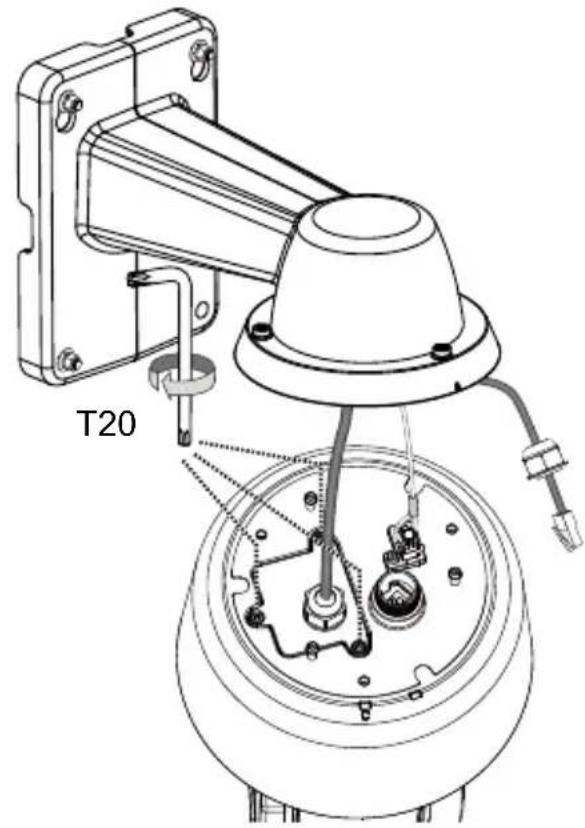
text_image
T20- Connect the Ethernet cable (along with its cable gland) to the camera.
text_image
To gla wa Ma be ca EN
NOTE:
To disconnect a LAN cable, loosen the cable gland and pull the cable against the socket wall towards the side of the locking tab.

IMPORTANT:
Make sure all waterproof cable glands have been properly installed. Water leakage will cause irrepairable damage to the camera.
EN-7
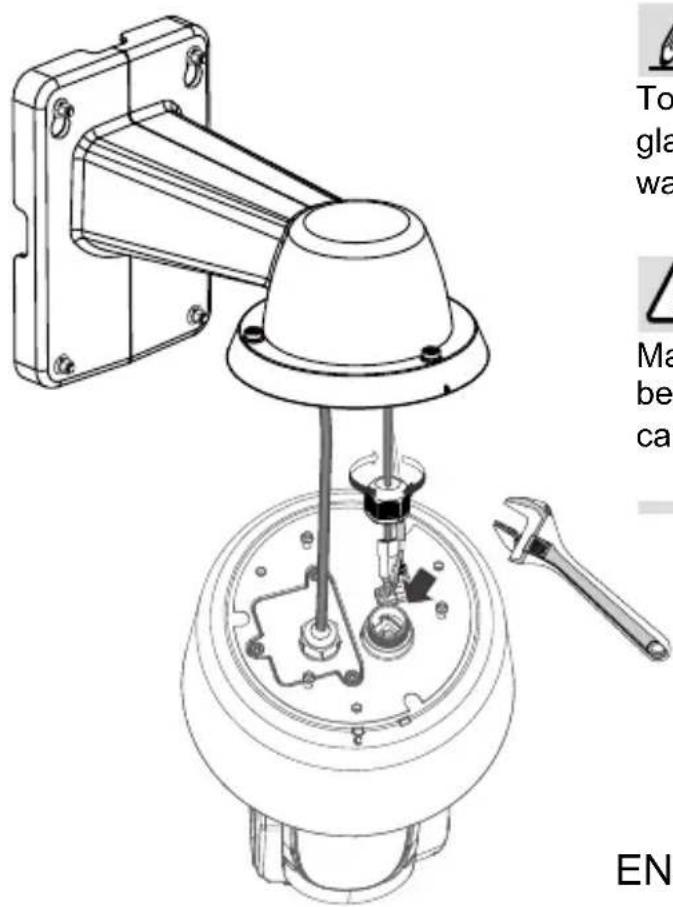
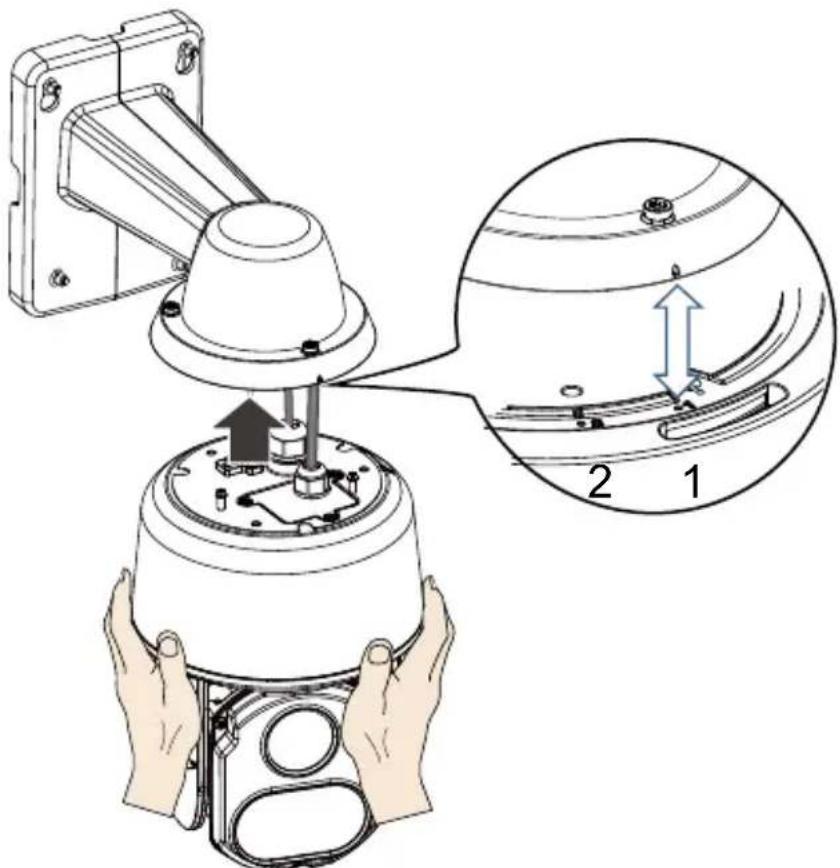
- Install the camera to bracket by aligning the mark on bracket with the #1 marking on the camera.
text_image
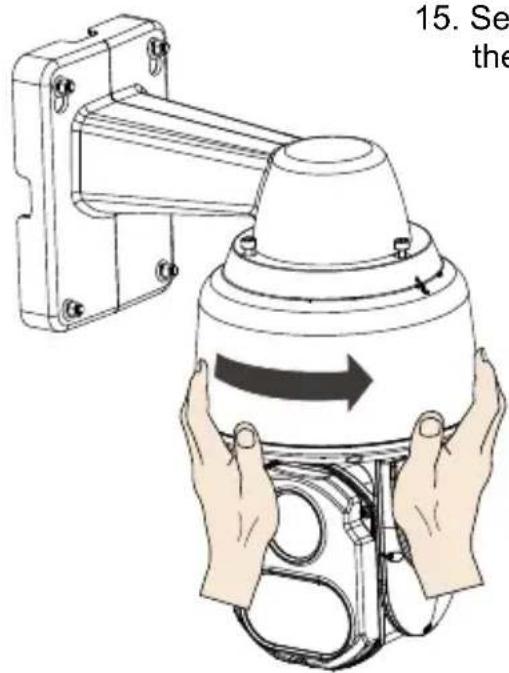
Technical diagram showing a mechanical assembly with labeled parts and an inset magnified view of a component.- Turn the camera clockwise. The camera should be locked in place.
text_image
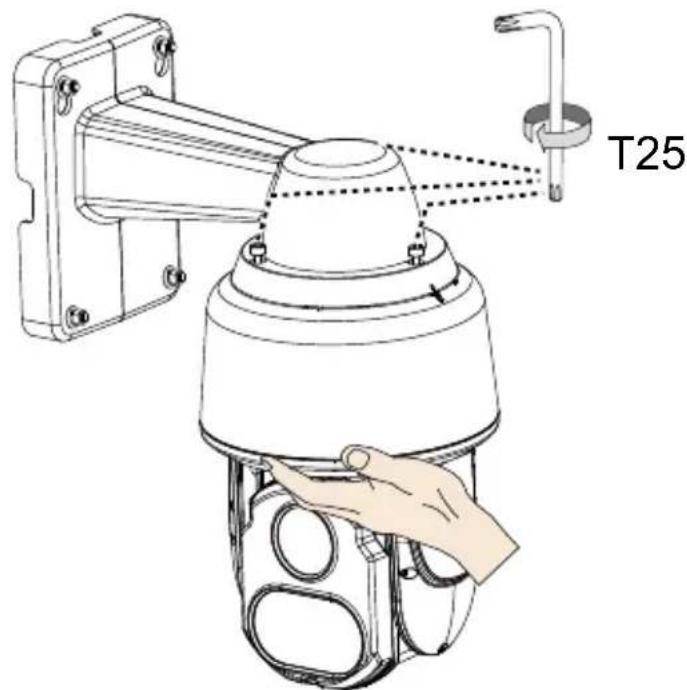
15. Se the- Secure the connection using the T25 L-wrench from the top.
text_image
T25EN-8
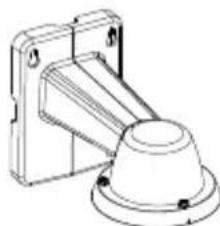
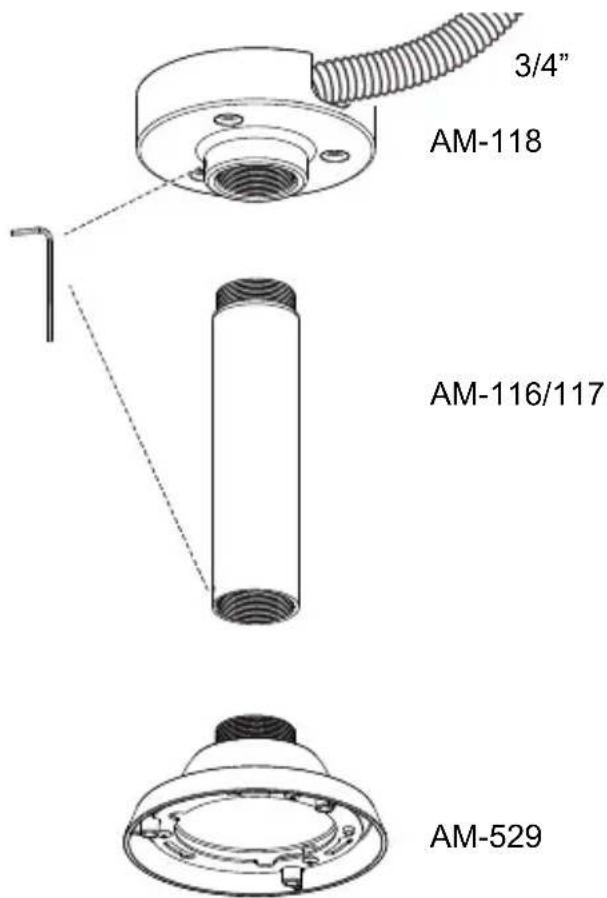
Pendant Mount
The camera can also be mounted through a pendant mount combination as shown below. The rest of the installation procedure is the same as described above.
text_image
3/4" AM-118 AM-116/117 AM-529
IMPORTANT:
These devices(IR LED) emit highly concentrated infrared light, which view angle(range) is smoothly varied depending on operation mode. To avoid risk of eye injury, please do not look directly at the LEDs at a near distance and remember to use the camera live view to check if the IR illumination is active.

安裝前應注意事項
natural_image
Technical line drawing of a mechanical bracket with mounting holes and a circular component (no text or symbols)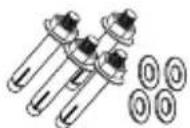
natural_image
Illustration of a hand holding a pen, no text or symbols present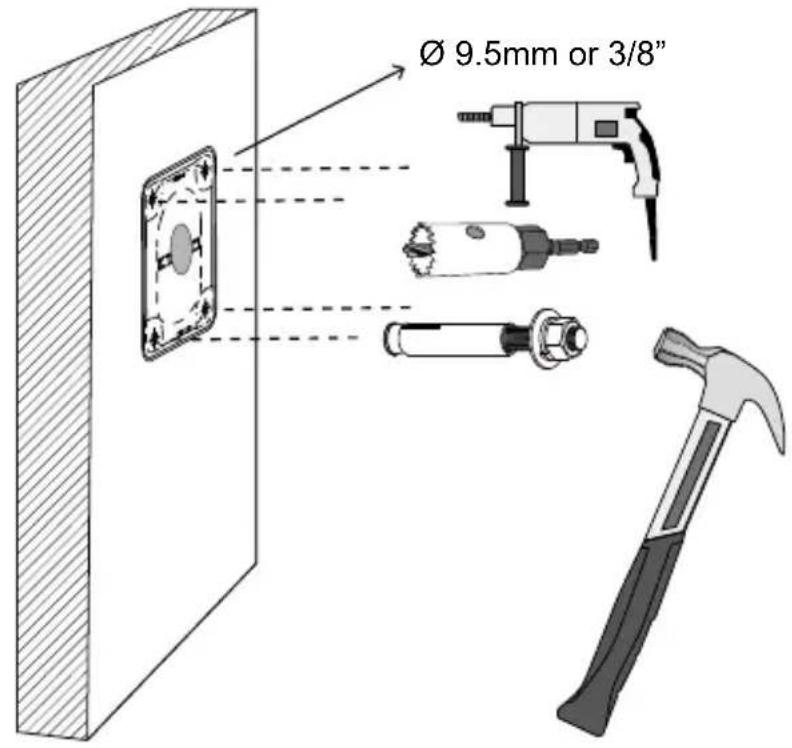
text_image
Ø 9.5mm or 3/8"natural_image
Diagram of a vertical panel with two parallel lines and circular elements, no text or symbols presenttext_image
Technical diagram showing installation of a cable and wire with labeled components and a magnified inset of the cable.text_image
LAN I/O combo- 將支架固定到牆上。

natural_image
Technical line drawing of a mechanical assembly with labeled components (no text or symbols present)垂在支架之外的傳輸線長度應為15公分

natural_image
Technical diagram of a mechanical assembly with labeled parts, showing a top view and close-up of internal components (no text or symbols present)text_image
4.3 ~ 6.4mm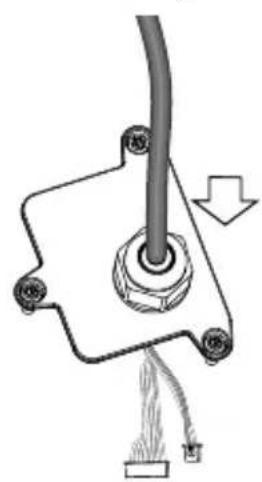
natural_image
Pure mechanical diagram showing a lever and pivot point without any text, numbers, or symbols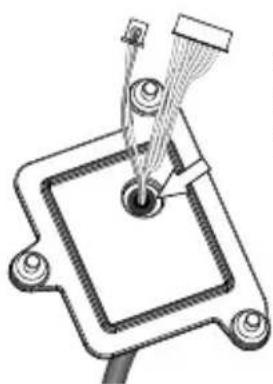
natural_image
Technical line drawing of a mechanical component with a central pin and threaded rod (no text or symbols)natural_image
Technical line drawing of a mechanical assembly with exploded view and close-up insets (no text or symbols)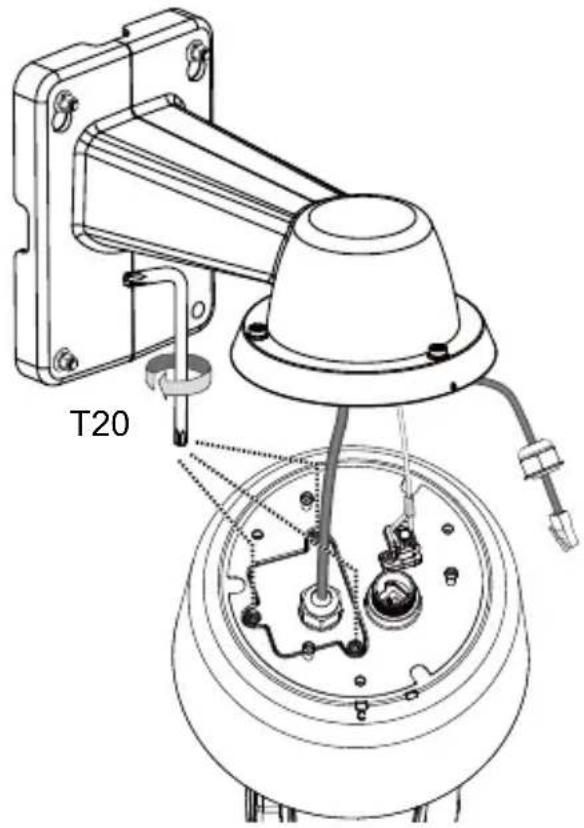
text_image
T20text_image
Technical diagram showing a mechanical assembly with labeled parts and an inset magnified view of a component.text_image
3/4" AM-118 AM-116/117 AM-529
重要:
natural_image
Technical line drawing of a mechanical component with mounting bracket and cylindrical base (no text or symbols)
软件光盘

快速安装指南

重要事项:
高速半球型摄像头供电具有以下要求:
The image is too blurry to recognize any text content.
外观
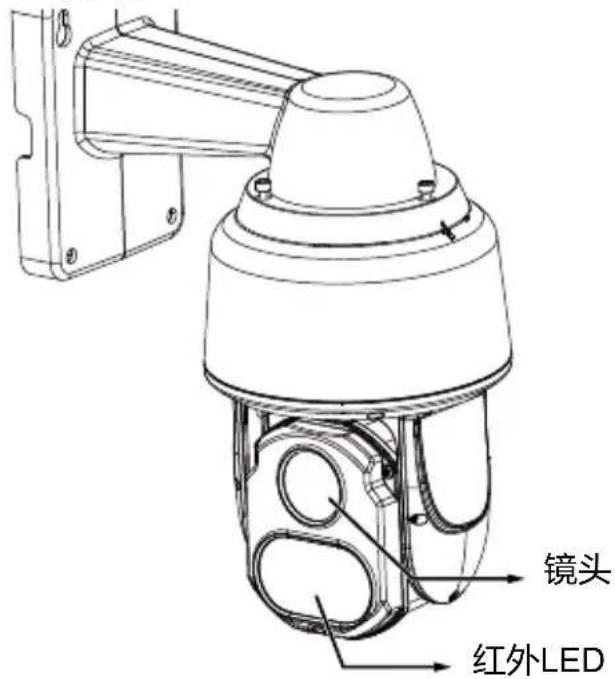
text_image
镜头 红外LED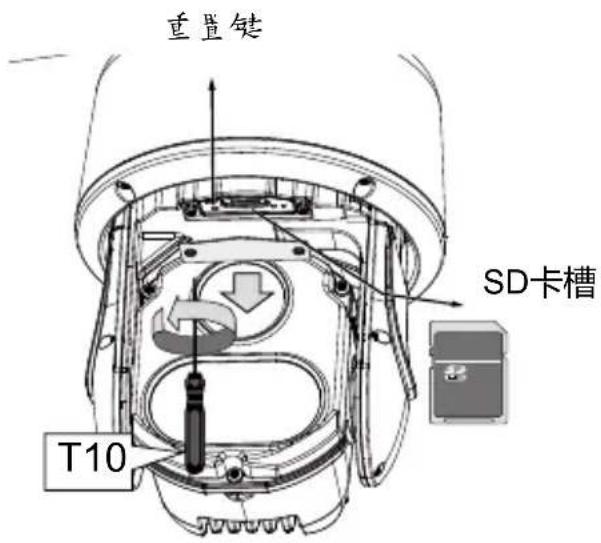
text_image
重置键 SD卡槽 T10The image is too blurry to recognize any text content.
俯视图
text_image
Network Camera Model No: SDXXXX MAC: 0002D10766AD CE FC RoHS VGI Pul J, 433, 704 Made in Taiwan Ø 9.5mm or 3/8"natural_image
Diagram of a vertical panel with two parallel lines and circular elements, no text or symbols presenttext_image
Technical diagram showing installation of a cable and wire with labeled components and a magnified inset of the cable.text_image
LAN I/O comboSC-22
- 将支架固定到墙面。
natural_image
Technical line drawing of a mechanical assembly with labeled components (no text or symbols present)支架外悬挂的线缆长度应为 15 ~cm
text_image
15cmnatural_image
Technical diagram of a mechanical assembly with labeled parts, showing internal components and a close-up view of a device (no text or symbols present)text_image
4.3 ~ 6.4mm
natural_image
Pure diagram of a mechanical or electrical component with no text, numbers, or symbols组合电缆的外部护套与电缆孔齐平。

natural_image
Technical line drawing of a mechanical component with a central pin and threaded rod (no text or symbols)SC-24
natural_image
Technical line drawing of a mechanical assembly with exploded view and close-up insets (no text or symbols)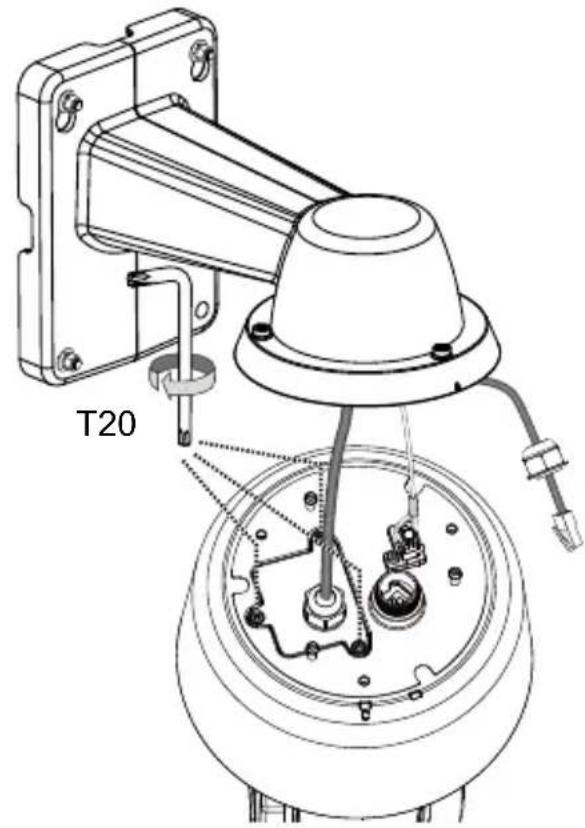
text_image
T20text_image
Technical diagram showing a mechanical assembly with labeled parts and an inset magnified view of a component detail.text_image
3/4" AM-118 AM-116/117 AM-529
重要事项:
natural_image
Technical line drawing of a mechanical bracket and a circular component (no text or symbols)
ソフトウェアCD

クイック取付けガイド


natural_image
Illustration of a hand holding a pen, writing on paper (no text or symbols visible)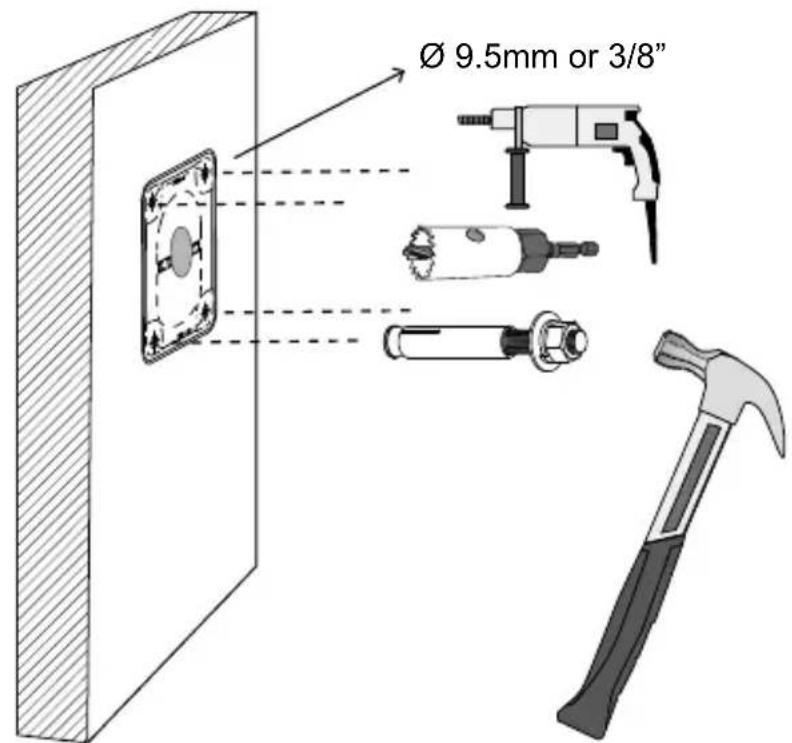
text_image
Ø 9.5mm or 3/8"natural_image
Diagram of a vertical panel with two labeled circular elements and dotted lines indicating alignment or connection points (no text or symbols present)natural_image
Technical diagram showing a mechanical assembly with labeled components and a magnified inset of a coiled cable (no text or symbols present)text_image
LAN I/O comboJP-31
- ブラケットを壁面に固定します。
natural_image
Technical line drawing of a mechanical assembly with labeled components (no text or symbols present)natural_image
Technical diagram of a mechanical assembly with labeled parts, showing a top view and close-up of internal components (no text or symbols present)text_image
4.3 ~ 6.4mm
natural_image
Pure mechanical diagram showing a cable inserted into a housing with a downward arrow indicating force or direction (no text or symbols)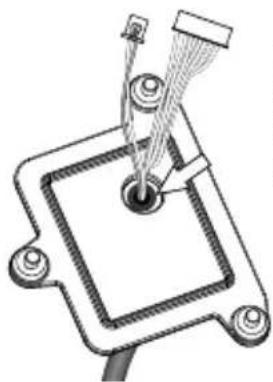
natural_image
Technical line drawing of a mechanical component with a central pin and threaded rod (no text or symbols)natural_image
Technical line drawing of a mechanical assembly with exploded view and close-up insets (no text or symbols)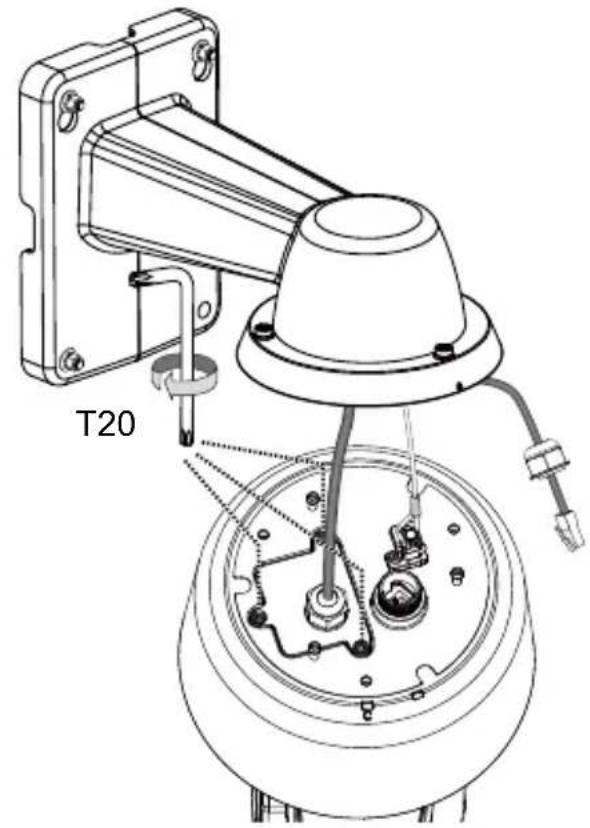
text_image
T20text_image
Technical diagram showing a mechanical assembly with labeled parts and an inset magnified view of a component.text_image
3/4" AM-118 AM-116/117 AM-529
重要事項:
natural_image
Technical line drawing of a mechanical component with no visible text or symbolsSupport mural/Dôme Cap/VisSD9363/9364
natural_image
Technical line drawing of a mechanical component with mounting flanges and a central cylindrical housing (no text or symbols)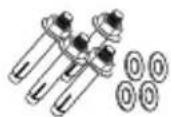
natural_image
Illustration of a hand holding a pen, no text or symbols present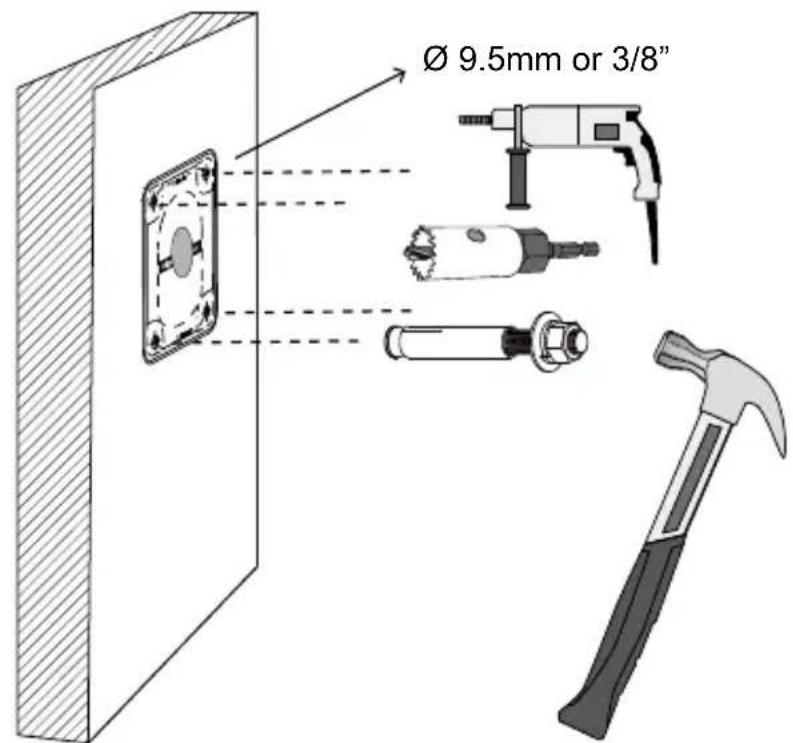
text_image
Ø 9.5mm or 3/8"natural_image
Diagram of a vertical panel with two parallel lines and three labeled points, showing alignment or measurement (no text or symbols present)text_image
Technical diagram showing installation of a cable and wire with labeled components and a magnified inset of the cable.text_image
LAN I/O comboFR-40
natural_image
Technical line drawing of a mechanical assembly with a wrench and screwdriver, showing components like a housing and mounting bracket (no text or symbols present)natural_image
Technical diagram of a mechanical assembly with labeled parts, showing a top view and close-up of internal components (no text or symbols present)text_image
4.3 ~ 6.4mm
natural_image
Mechanical assembly diagram showing a pipe connection with a cable and attached components (no text or symbols)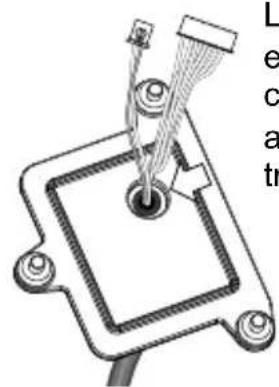
natural_image
Pure mechanical diagram showing a central component with wires and mounting holes, no text or symbols present.natural_image
Technical line drawing of a mechanical device with exploded view and close-up insets (no text or symbols)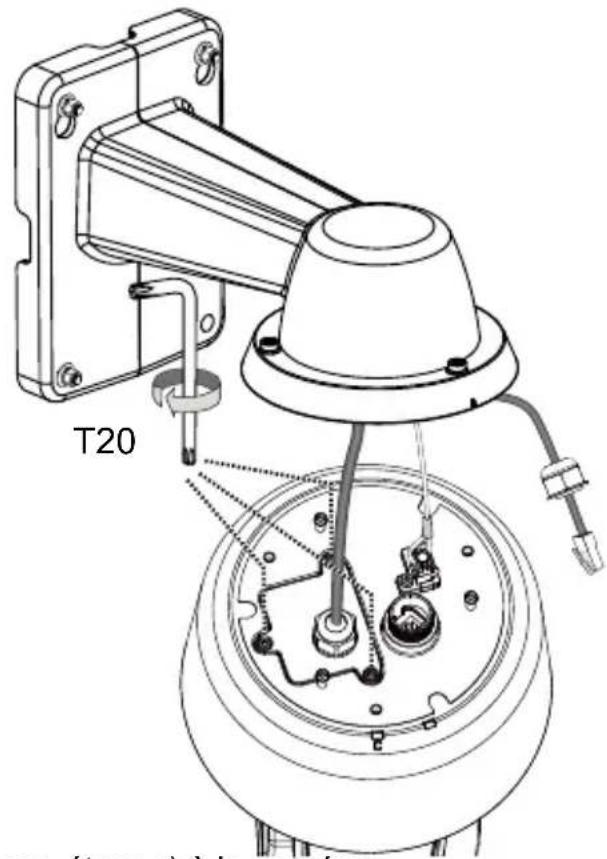
text_image
T20text_image
Technical diagram showing a mechanical assembly with labeled parts and an inset magnified view of a component detail.natural_image
Illustration of hands holding a mechanical device with an arrow indicating direction (no text or symbols)
text_image
T25FR-44
Montage suspendu
text_image
3/4" AM-118 AM-116/117 AM-529
IMPORTANT:
natural_image
Technical line drawing of a mechanical component with no visible text or symbolsnatural_image
Technical line drawing of a mechanical bracket with a circular component (no text or symbols)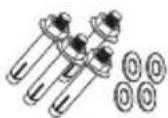
CD de software

natural_image
Illustration of a hand holding a pen, no text or symbols present
text_image
Ø 9.5mm or 3/8"natural_image
Diagram of a vertical panel with two parallel lines and circular markers, no text or symbols presenttext_image
Technical diagram showing installation of a wall-mounted cable with attached cable, including wire and component assembly.text_image
LAN I/O comboES-49
natural_image
Technical line drawing of a mechanical assembly with labeled parts (no text or symbols present)natural_image
Technical diagram of a mechanical assembly with labeled parts, showing connections and components without any readable text or symbols.text_image
4.3 ~ 6.4mm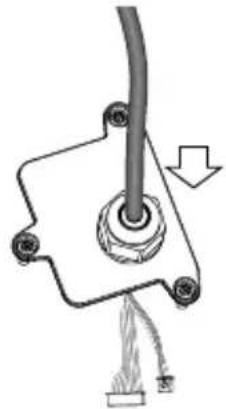
natural_image
Mechanical assembly diagram showing a cable with a knob and attached components (no text or symbols)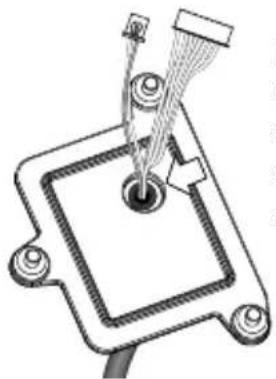
natural_image
Technical line drawing of a mechanical component with no visible text or symbolsnatural_image
Technical line drawing of a mechanical assembly with exploded view and close-up insets (no text or symbols)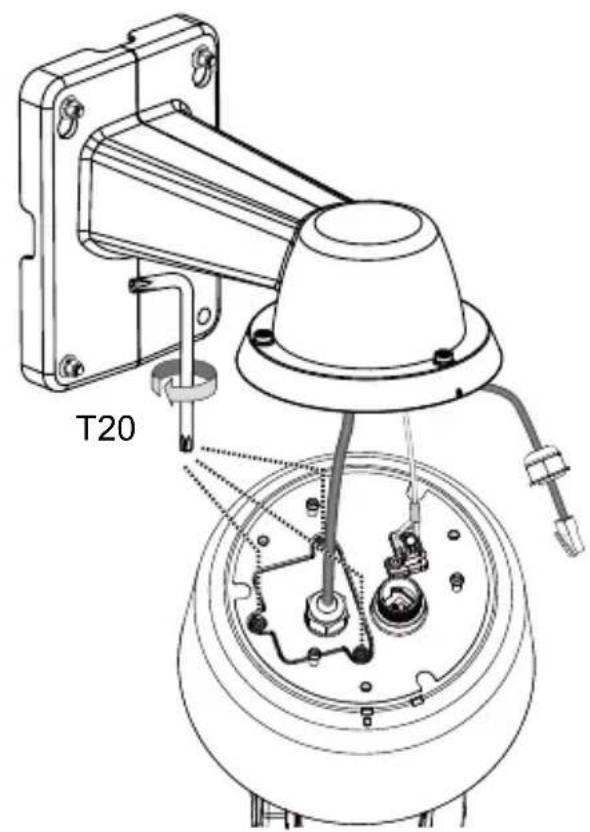
text_image
T20text_image
Technical diagram showing a mechanical assembly with labeled parts and an inset magnified view of a component detail.text_image
3/4" AM-118 AM-116/117 AM-529
IMPORTANTE:
natural_image
Technical line drawing of a mechanical component with no visible text or symbolsnatural_image
Technical line drawing of a mechanical bracket or housing component (no text or symbols)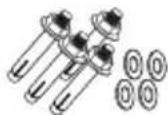
natural_image
Technical drawing of a mechanical bracket with two views and a circular inset showing a labeled section (no text or symbols present)Software-CD

Quick Installation Guide

WICHTIG:
Hardwareinstallation
text_image
Network Camera Model No: SDXXXX MAC: 0002D10766AD CE FC Polar, 033, 708 RoHS VCEI Made in Taiwan
natural_image
Illustration of a hand holding a pen, no text or symbols present
text_image
Ø 9.5mm or 3/8"natural_image
Diagram of a vertical barrier with two parallel lines passing through it, showing optical or signal paths (no text or symbols)DE-57
natural_image
Technical diagram showing a mechanical assembly with labeled components and a magnified inset of a cable and wire (no text or symbols present)text_image
LAN I/O comboDE-58
natural_image
Technical line drawing of a mechanical assembly with a wrench and screwdriver, no text or symbols presentnatural_image
Technical diagram of a mechanical assembly with labeled parts, showing connections and components (no text or symbols present)text_image
4.3 ~ 6.4mm
natural_image
Mechanical assembly diagram showing a pipe connection with a cable and attached components (no text or symbols)
natural_image
Technical line drawing of a mechanical component with wires and a central hub (no text or symbols)natural_image
Technical line drawing of a mechanical device with internal components and a close-up inset showing internal wiring (no text or symbols)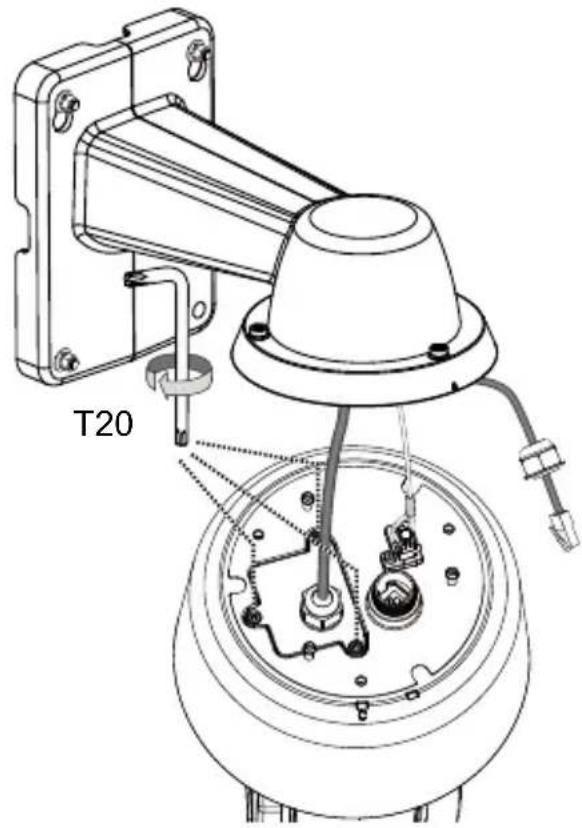
text_image
T20text_image
Un Ka ge de Ste Ka wu irre DE-
HINWEIS:
text_image
Technical diagram showing a mechanical assembly with labeled parts and an inset magnified view of a component.text_image
3/4" AM-118 AM-116/117 AM-529
WICHTIG:
natural_image
Technical line drawing of a mechanical component with no visible text or symbolsParafusos/ Alinhamento Etiqueta/Chave L T20 e T25/Sacola de dessecante
natural_image
Technical line drawing of a mechanical component with mounting bracket and cylindrical base (no text or symbols)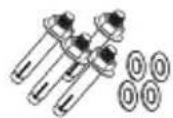
CD de Software

natural_image
Technical line drawing of a mechanical component with internal components and directional arrows (no text or symbols)text_image
Network Camera Model No: SDXXXX MAC: 0002D10766AD CE FC VEI RoHS Made in Solution Ø 9.5mm or 3/8"natural_image
Diagram of a vertical panel with two parallel lines and circular markers, no text or symbols presenttext_image
Technical diagram showing installation of a cable and wire with labeled components and a magnified inset of the cable.text_image
LAN I/O comboPT-67
natural_image
Technical line drawing of a mechanical assembly with labeled parts (no text or symbols present)natural_image
Technical diagram showing a mechanical assembly with a dome component and a close-up of internal components (no text or symbols)text_image
4.3 ~ 6.4mm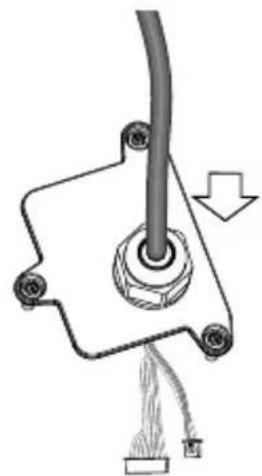
natural_image
Mechanical assembly diagram showing a pipe connection with a cable and attached components (no text or symbols)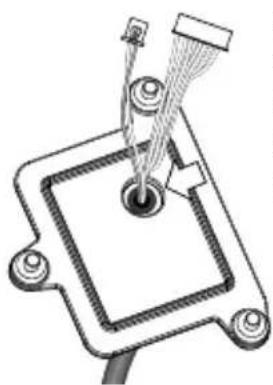
natural_image
Technical line drawing of a mechanical component with a central hub and protruding rod (no text or symbols)natural_image
Technical line drawing of a mechanical assembly with exploded view and close-up insets (no text or symbols)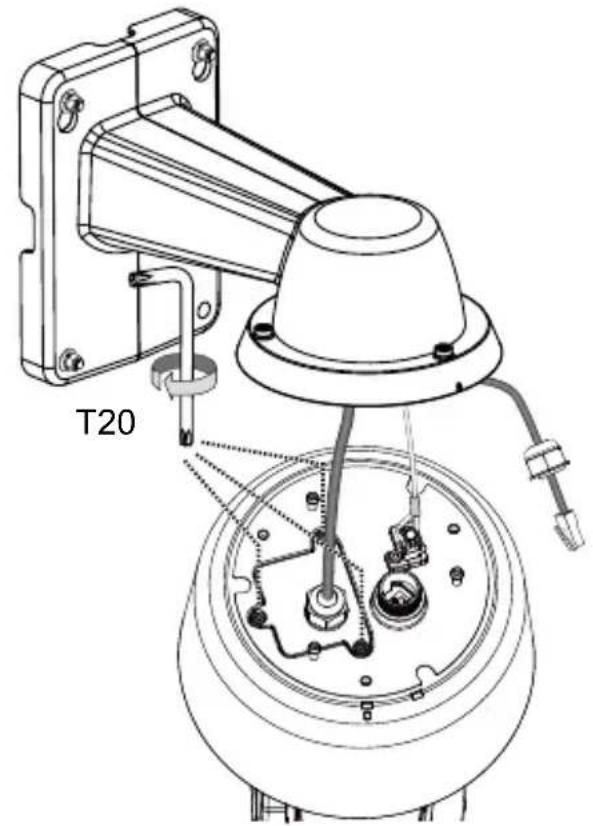
text_image
T20- Conecte o cabo Ethernet (junto com a prensa-cabo) à câmera.
text_image
Technical diagram of a mechanical device with labeled parts and annotations, including a wrench and a small inset image.
NOTA:
text_image
Technical diagram showing a mechanical assembly with labeled parts and an inset magnified view of a component.text_image
3/4" AM-118 AM-116/117 AM-529
IMPORTANTE:
natural_image
Technical line drawing of a mechanical component with no visible text or symbolsnatural_image
Technical line drawing of a mechanical component with a flanged base and circular housing (no text or symbols)
text_image
Network Camera Model No: SDXXXX MAC: 0002D10766AD CE FC RoHS VCI Made in Taiwan Ø 9.5mm or 3/8"natural_image
Diagram of a vertical panel with two parallel lines and circular markers, no text or symbols presentnatural_image
Technical diagram showing a mechanical assembly with labeled components and a magnified inset of a cable and wire (no text or symbols present)text_image
LAN I/O comboIT-76
natural_image
Technical line drawing of a mechanical assembly with a wrench and screwdriver, no text or symbols presentnatural_image
Technical diagram of a mechanical assembly with labeled parts, showing connections and components (no text or symbols present)text_image
4.3 ~ 6.4mm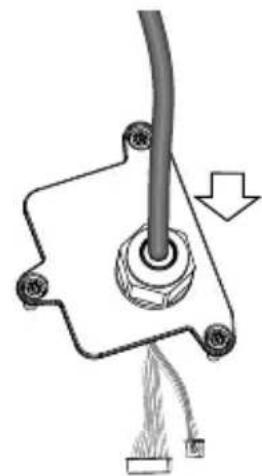
natural_image
Mechanical assembly diagram showing a pipe connection with attached components and a downward arrow indicating motion (no text or symbols)natural_image
Technical diagram of a mechanical component with wires and a central hub (no text or symbols)IT-78
natural_image
Technical line drawings of mechanical components, including a sensor and a T20 device assembly (no text or symbols present)text_image
Technical diagram showing a mechanical assembly with labeled parts and an inset magnified view of a component detail.text_image
3/4" AM-118 AM-116/117 AM-529
IMPORTANTE:
natural_image
Technical line drawing of a mechanical component with no visible text or symbolsnatural_image
Technical line drawing of a mechanical component with a flanged base and circular housing (no text or symbols)
Yazılım CD'si

natural_image
Diagram of a vertical panel with two parallel lines and circular elements, no text or symbols presentnatural_image
Technical diagram showing a mechanical assembly with labeled components and a magnified inset of a cable and ring (no text or symbols present)text_image
LAN I/O comboTU-85
natural_image
Technical line drawing of a mechanical assembly with a wrench, showing components like a bracket, screw, and housing (no text or labels)natural_image
Technical diagram showing a mechanical assembly with a dome-shaped component and a close-up of internal components (no text or symbols)text_image
4.3 ~ 6.4mm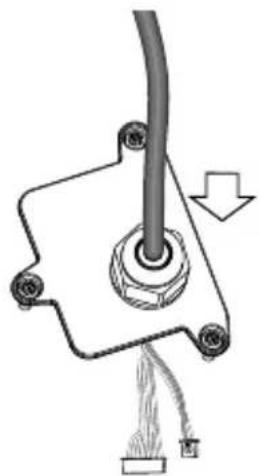
natural_image
Pure mechanical diagram showing a cable inserted into a housing with a fuse, no text or symbols present
natural_image
Technical line drawing of a mechanical component with no visible text or symbolsnatural_image
Technical line drawing of a mechanical device with internal components and an inset close-up showing wiring (no text or symbols)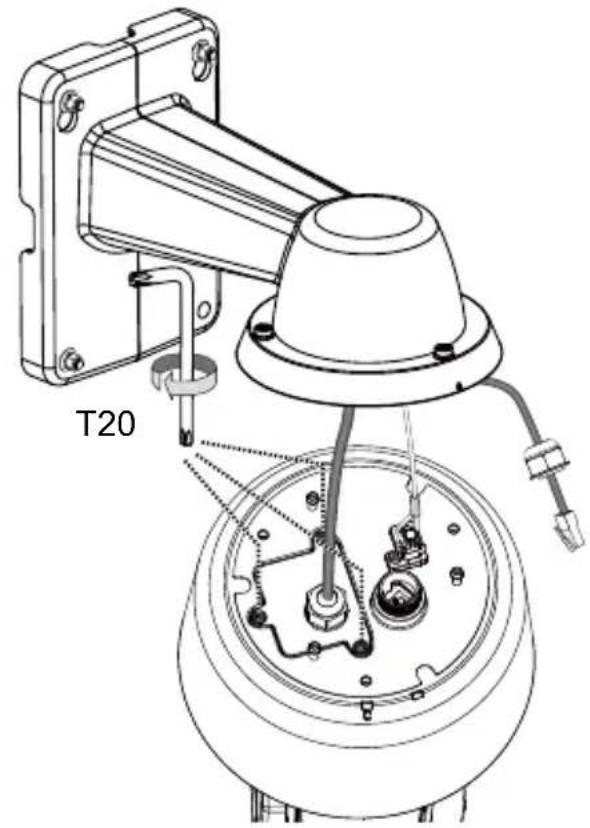
text_image
T20text_image
Technical diagram showing a mechanical assembly with labeled parts and an inset magnified view of a component detail.text_image
3/4" AM-118 AM-116/117 AM-529
ÖNEMLİ:
natural_image
Technical line drawing of a mechanical component with mounting flanges and a dome-shaped base (no text or symbols)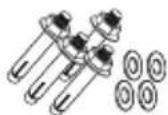
text_image
Network Camera Model No: SDXXXX MAC: 0002D10766AD KeHS VCEI Made in Taiwan
natural_image
Illustration of a hand holding a pen, no text or symbols present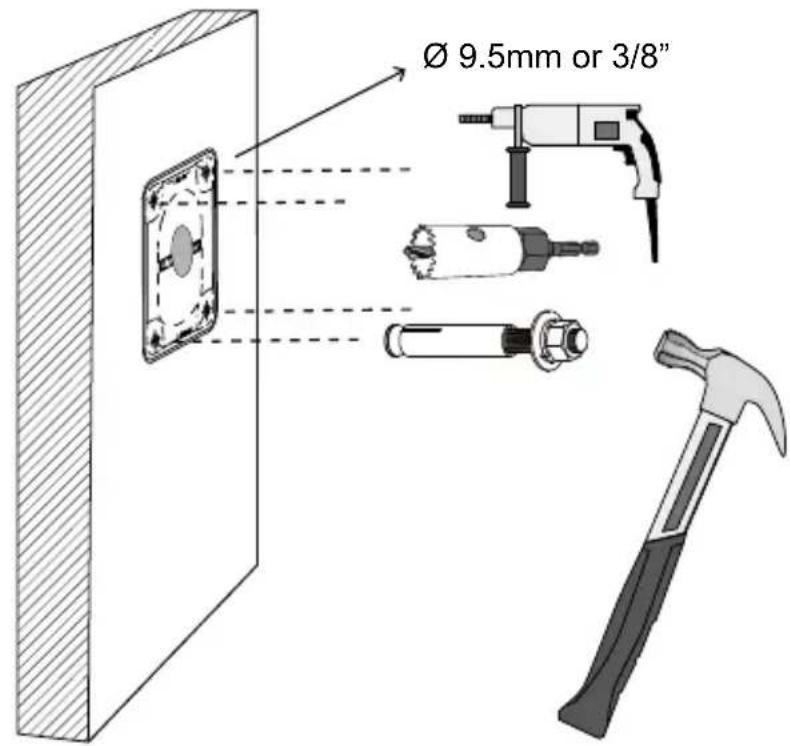
text_image
Ø 9.5mm or 3/8"natural_image
Diagram of a vertical panel with two parallel lines and circular markers, no text or symbols presentPL-93
natural_image
Technical diagram showing a mechanical assembly with labeled components and a magnified inset of a cable and wire (no text or symbols present)text_image
LAN I/O comboPL-94
natural_image
Technical line drawing of a mechanical assembly with a wrench and screwdriver, no text or symbols presentnatural_image
Technical diagram of a mechanical assembly with labeled parts, showing connections and components (no text or symbols present)text_image
4.3 ~ 6.4mm
natural_image
Mechanical assembly diagram showing a pipe connection with a cable and attached components (no text or symbols)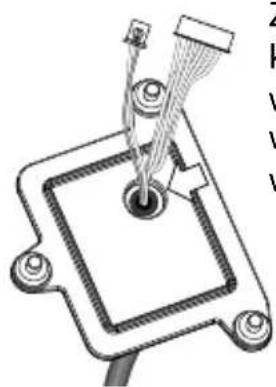
natural_image
Technical diagram of a mechanical component with wires and connectors (no text or symbols)natural_image
Technical line drawings of mechanical components, showing assembly and disassembly views (no text or symbols)text_image
Technical diagram showing a mechanical assembly with labeled parts and an inset magnified view of a component.text_image
3/4" AM-118 AM-116/117 AM-529
WAŻNE:
natural_image
Technical line drawing of a mechanical component with no visible text or symbolsnatural_image
Technical line drawing of a mechanical bracket with mounting holes and a cylindrical component (no text or symbols)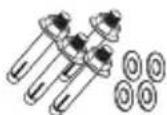
natural_image
Illustration of a hand holding a pen, no text or symbols present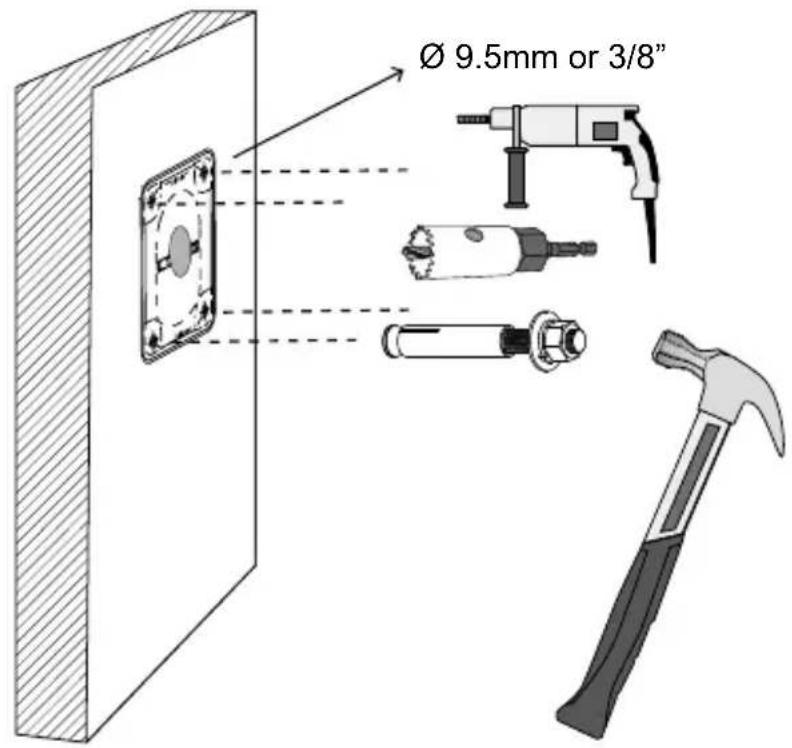
text_image
Ø 9.5mm or 3/8"natural_image
Diagram of a vertical barrier with two parallel lines passing through it, showing optical or mechanical alignment (no text or symbols)natural_image
Technical diagram showing installation of a wall-mounted cable and hose assembly with a magnified inset of the cable (no text or symbols present)text_image
LAN I/O comboRU-103
natural_image
Technical line drawing of a mechanical assembly with labeled parts (no text or symbols present)natural_image
Technical diagram of a mechanical assembly with exploded view and close-up detail (no text or symbols)text_image
4.3 ~ 6.4mm
natural_image
Mechanical assembly diagram showing a lever and base with a downward arrow indicating motion (no text or symbols)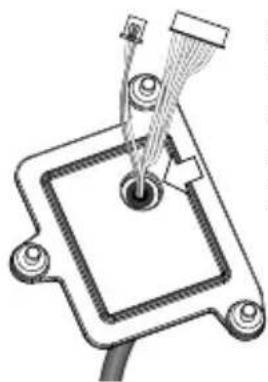
natural_image
Technical line drawing of a mechanical component with a central pin and attached wires (no text or symbols)natural_image
Technical line drawing of a mechanical device with internal components and a close-up inset showing a cable assembly (no text or symbols)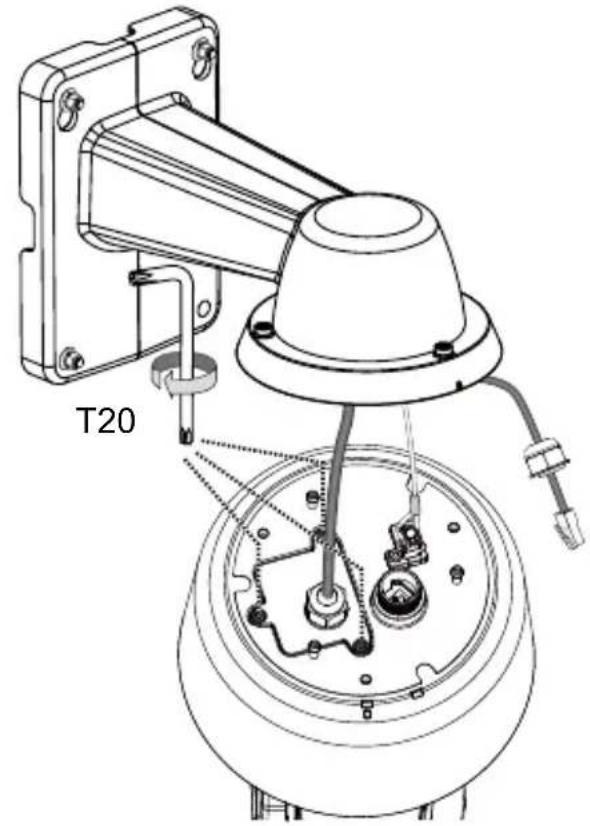
text_image
T20text_image
Technical diagram showing a mechanical assembly with labeled parts and an inset magnified view of a component detail.text_image
3/4" AM-118 AM-116/117 AM-529
ВАЖНО:
natural_image
Technical line drawing of a mechanical component with no visible text or symbolsnatural_image
Pure technical line drawing of three mechanical components without any text or symbolsnatural_image
Technical line drawing of a mechanical bracket and a circular component (no text or symbols)
CD se softwarem

natural_image
Diagram of a vertical barrier with two parallel lines passing through it, showing optical or signal paths (no text or symbols)CZ-111
natural_image
Technical diagram showing a wall-mounted cable assembly with attached wire and coiled cable, plus a magnified inset of a cylindrical component (no text or symbols)text_image
LAN I/O comboCZ-112
natural_image
Technical line drawing of a mechanical assembly with a wrench and screwdriver, showing internal components and alignment (no text or symbols)natural_image
Technical diagram of a mechanical assembly with labeled parts, showing connections and components (no text or symbols present)text_image
4.3 ~ 6.4mm
natural_image
Mechanical assembly diagram showing a pipe connection with a cable and attached components (no text or symbols)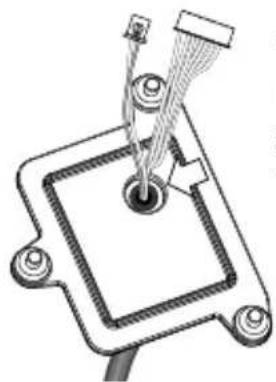
natural_image
Technical diagram of a mechanical component with wires and connectors (no text or symbols)natural_image
Technical line drawing of a mechanical assembly with exploded view and close-up insets (no text or symbols)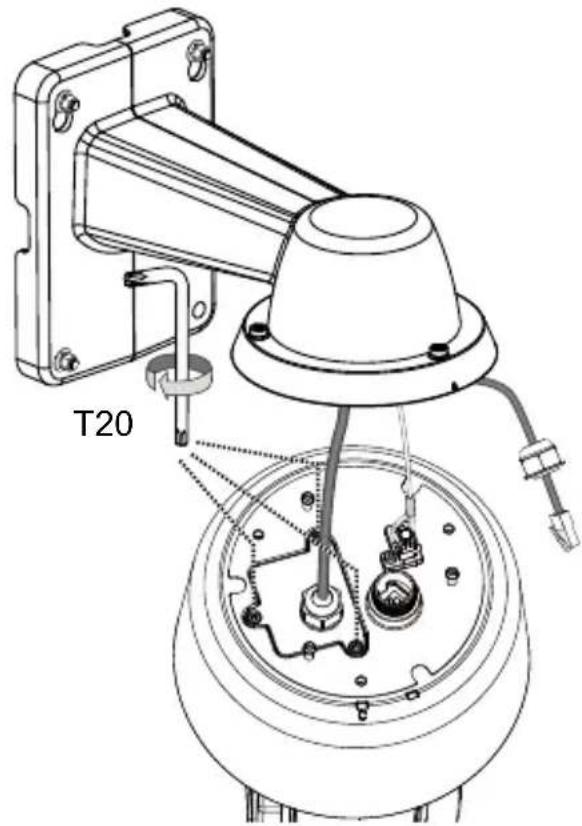
text_image
T20text_image
Technical diagram showing a mechanical assembly with labeled parts and an inset magnified view of a component.text_image
3/4" AM-118 AM-116/117 AM-529
DÜLEŽITÉ:
Varning innan installation
natural_image
Technical line drawing of a mechanical component with no visible text or symbolsnatural_image
Technical line drawing of a mechanical component with a flanged base and circular housing (no text or symbols)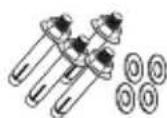
text_image
Network Camera Model No: SDXXXX MAC: 0002D10766AD CE FC PXXXX RoHS FST.A. 935, 119 Made in Taiwan Ø 9.5mm or 3/8"text_image
Diagram illustrating light ray paths through a lens system with labeled components and directional arrowsnatural_image
Technical diagram showing cable installation with a wall-mounted cable, wire, and coiled cable (no text or symbols present)text_image
LAN I/O comboSW-121
natural_image
Technical diagram of a mechanical assembly with a wrench, showing components like a bracket, screwdriver, and housing (no text or labels present)natural_image
Technical diagram of a mechanical assembly with labeled parts, showing connections and components (no text or symbols present)text_image
4.3 ~ 6.4mm
natural_image
Pure mechanical diagram showing a lever and pivot point without any text, numbers, or symbols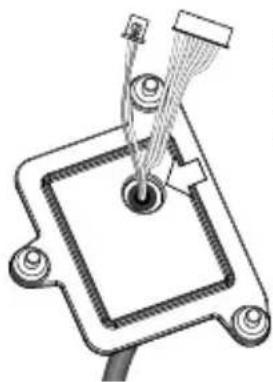
natural_image
Pure mechanical diagram showing a component with wires and connectors, no text or symbols presentnatural_image
Technical line drawing of a mechanical assembly with exploded view and close-up insets (no text or symbols)
text_image
T20text_image
Technical diagram showing a mechanical assembly with labeled parts and an inset magnified view of a component.text_image
3/4" AM-118 AM-116/117 AM-529
VIKTIGT:
natural_image
Technical line drawing of a mechanical device with no visible text or symbolsnatural_image
Technical line drawing of a mechanical component with mounting flanges and a central cylindrical housing (no text or symbols)
Software CD
Hardware Installation
text_image
Network Camera Model No: SDXXXX MAC: 0002D10766AD CE FC XXXXX RoHS PcA, 951.728 Made by Tefene Ø 9.5mm or 3/8"natural_image
Diagram of a vertical panel with two parallel lines and circular markers, no text or symbols presentNL-129
natural_image
Technical diagram showing a mechanical assembly with labeled components including a vertical panel, cable, and wire (no text or symbols present)- Leid I/O combo- en Ethernet kabels langs de leidende palen om druppellussen te vormen.
text_image
LAN I/O combonatural_image
Technical line drawing of a mechanical assembly with a wrench and screwdriver, showing components like a housing and mounting bracket (no text or symbols present)natural_image
Technical diagram showing a mechanical assembly with a dome-shaped component and a close-up of internal components (no text or symbols)text_image
4.3 ~ 6.4mm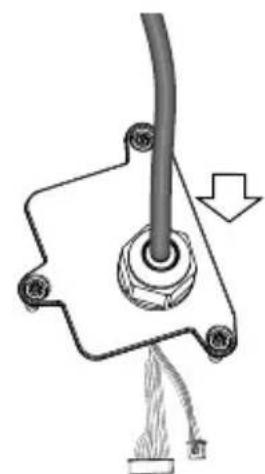
natural_image
Mechanical assembly diagram showing a pipe connection with attached components and a cable (no text or symbols)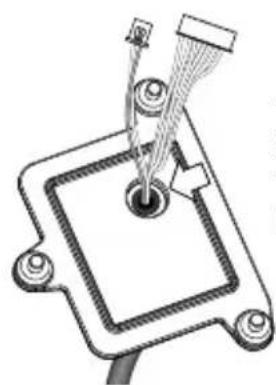
natural_image
Technical diagram of a mechanical component with a central hub and connecting rods (no text or symbols)natural_image
Technical line drawing of a mechanical device with internal components and a close-up inset showing a component detail (no text or symbols)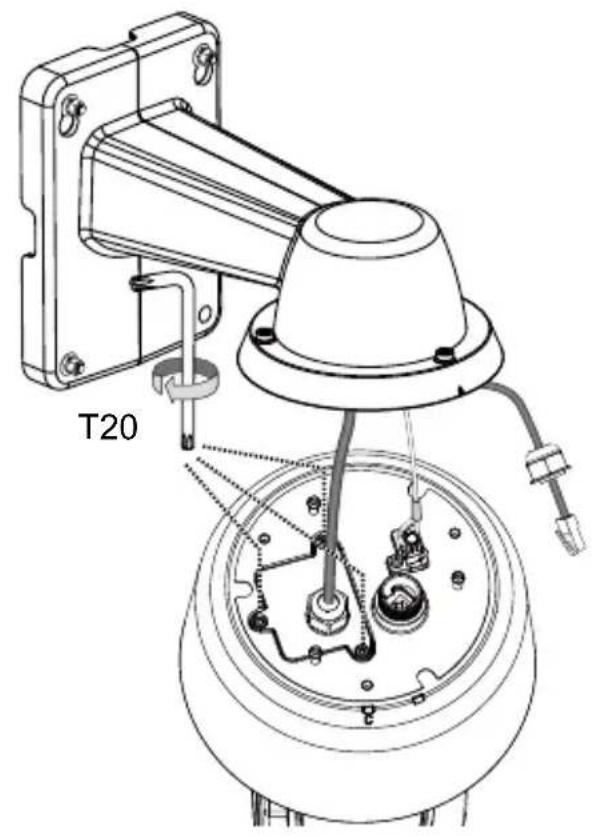
text_image
T20text_image
Technical diagram showing a mechanical assembly with labeled parts and an inset magnified view of a component.text_image
3/4" AM-118 AM-116/117 AM-529
BELANGRIJK:
natural_image
Technical line drawing of a mechanical component with no visible text or symbolsnatural_image
Pure technical diagram showing three mechanical components without any text or symbolsnatural_image
Technical line drawing of a mechanical component with mounting flange and cylindrical housing (no text or symbols)
Software-CD

Hurtig Installationsguide

VIGTIGT:
Hardware installation
text_image
Network Camera Model No: SDXXXX MAC: 0002D10766AD CE FC RoHS MAC, 955.728 Made in Tabern Ø 9.5mm or 3/8"text_image
Diagram showing a vertical barrier with labeled points (①, ②) and a central circular symbol, likely illustrating a physics or engineering concept.natural_image
Technical diagram showing a wall-mounted cable assembly with attached cable and wire, including a magnified inset of the cable (no text or symbols present)text_image
LAN I/O comboDA-139
natural_image
Technical line drawing of a mechanical assembly with a wrench and screwdriver, showing internal components and alignment (no text or symbols)natural_image
Technical diagram showing a mechanical assembly with a dome-shaped component and a close-up of internal components (no text or symbols)text_image
4.3 ~ 6.4mm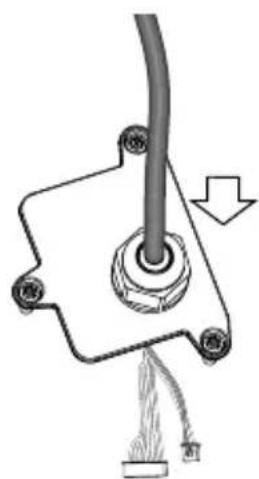
natural_image
Mechanical component diagram showing a cable with a central hub and attached wires (no text or symbols)
natural_image
Technical diagram of a mechanical component with labeled parts (no readable text or symbols)natural_image
Technical line drawing of a mechanical device with internal components and a close-up inset showing a component detail (no text or symbols)
text_image
T20- Tilslut Ethernet-kablet (sammen med dets kabelpakning) til kameraet.
natural_image
Technical line drawing of a mechanical device with a wrench and switch, no visible text or symbols
BEMÆRK:
text_image
Technical diagram showing a mechanical assembly with labeled parts and an inset magnified view of a component detail.text_image
3/4" AM-118 AM-116/117 AM-529
VIGTIGT:
natural_image
Technical line drawing of a mechanical component with no visible text or symbolsBraket Pemasangan di Dinding/Tutup Kubah/Sekrup
natural_image
Technical line drawing of a mechanical component with mounting flanges and a central cylindrical housing (no text or symbols)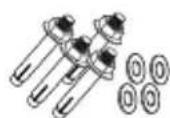
text_image
Network Camera Model No: SDXXXX MAC: 0002D10766AD CE FC XXXXX VoI RaHS XVZ-105.739 Main in Sector Ø 9.5mm or 3/8"natural_image
Diagram of a vertical panel with two parallel lines and circular markers, no text or symbols presenttext_image
Technical diagram showing installation of a cable and wire with labeled components and a magnified inset of the cable.text_image
LAN I/O comboID-148
- Pasang braket ke dinding.
natural_image
Technical line drawing of a mechanical assembly with a wrench and screwdriver, showing no text or symbols.text_image
T20 ID-149natural_image
Technical diagram of a mechanical assembly with labeled parts, showing connections and components (no text or symbols present)text_image
4.3 ~ 6.4mm
natural_image
Mechanical assembly diagram showing a pipe connection with attached components and a cable (no text or symbols)
natural_image
Technical diagram of a mechanical component with a central hub and connecting rods (no text or symbols)Pembungkus luar kabel kombo terbenam di dalam lubang kabel.
natural_image
Technical line drawing of a mechanical assembly with exploded view and close-up insets (no text or symbols)
text_image
T20text_image
Technical diagram showing a mechanical assembly with labeled parts and an inset magnified view of a component.text_image
3/4" AM-118 AM-116/117 AM-529
PENTING:
natural_image
Technical line drawing of a mechanical component with mounting bracket and base (no text or symbols)
natural_image
Technical line drawing of a mechanical component with no visible text or symbolsأسطوانة البرنامج

text_image
Network Camera Model No: SDXXXX MAC: 0002D10766AD CE FC ReHS VIE Made in Taiwan Ø 9.5mm or 3/8"natural_image
Diagram of a vertical panel with two parallel lines and circular elements, no text or symbols presenttext_image
Technical diagram showing cable installation components with labeled parts and a magnified inset of a cable with tape.text_image
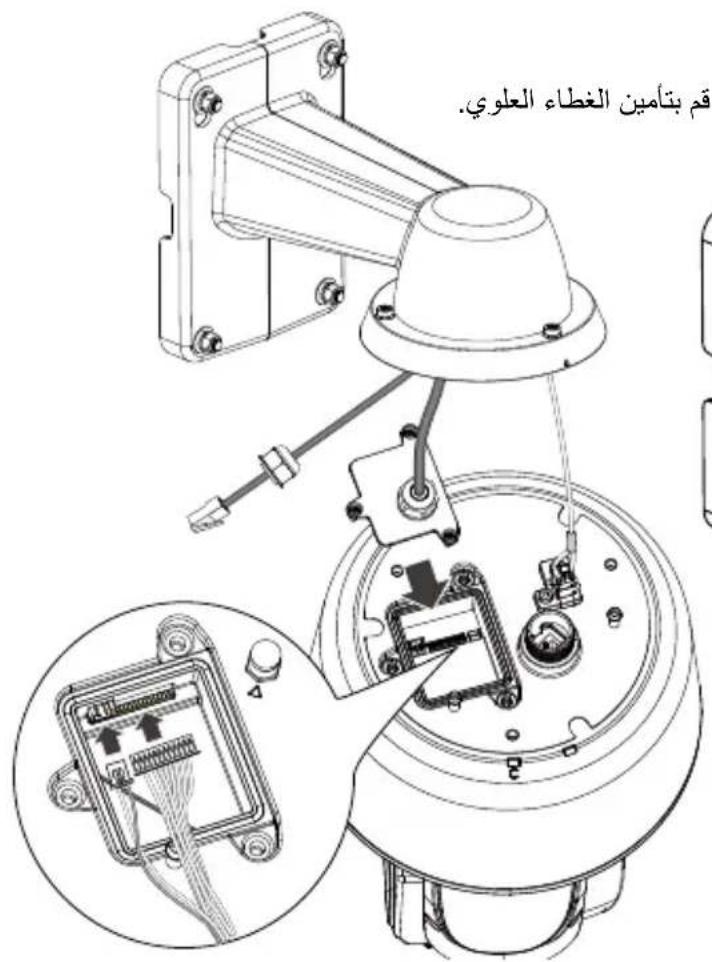
LAN I/O comboAR-157
natural_image
Technical diagram of a mechanical assembly with labeled parts, showing a component inserted into a wall and a wrench inserted (no text or symbols present)text_image
4.3 ~ 6.4mm
natural_image
Pure mechanical diagram showing a lever and cable assembly without any text, numbers, or symbolsnatural_image
Technical line drawing of a mechanical component with a central hub and internal structure (no text or symbols)AR-159
natural_image
Technical line drawing of a mechanical assembly with a wrench and switch, no visible text or symbolstext_image
Technical diagram showing a mechanical assembly with labeled parts and an inset magnified view of a component.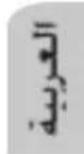
natural_image
Illustration of hands holding a mounted security camera with an arrow indicating clockwise motion (no text or symbols present)
text_image
T25AR-161
الエステ المتدلية
text_image
3/4" AM-118 AM-116/117
natural_image
Technical line drawing of a ceiling-mounted showerhead (no text or symbols)AM-529


What Is Covered: This warranty covers any hardware defects in materials or workmanship, with the exceptions stated below.
How Long Coverage Lasts: This warranty lasts for THIRTY-SIX MONTHS from the date of purchase by the original end-user customer.
What Is Not Covered: This warranty does not cover cosmetic damage or any other damage or defect caused by abuse, misuse, neglect, use in violation of instructions, repair by an unauthorized third party, or an act of God. Also, if serial numbers have been altered, defaced, or removed. Further, consequential and incidental damages are not recoverable under this warranty.
What VIVOTEK Will Do: VIVOTEK will, in our sole discretion, repair or replace any product that proves to be defective in material or workmanship. Any repair or replaced part of the product will receive a THREE-MONTH warranty extension.
How To Get Service: Contact our authorized distributors in your region. Please check our website (www.vivotek.com) for the information of an authorized distributor near you.
Your Rights: SOME STATES DO NOT ALLOW EXCLUSION OR LIMITATION OF CONSEQUENTIAL OR INCIDENTAL DAMAGES, SO THE ABOVE EXCLUSION OR LIMITATION MAY NOT APPLY TO YOU. THIS WARRANTY GIVES YOU SPECIFIC LEGAL RIGHTS, AND YOU MAY ALSO HAVE OTHER RIGHTS WHICH VARY FROM STATE TO STATE.

text_image
Year warranty 3 VIVOTEKVIVOTEK INC.
6F, No. 192, Lien-Cheng Rd., Chung-Ho, Taipei County, Taiwan.
www.vivotek.com
- Proof of the date of purchase is required. In the event you can not render such document, warranty will commence from the date of manufacture.
- Cosmetic damage will only be covered by this warranty if such damage has been existed at the time of purchase.
P/N: 625034301 Rev.: 1.1
All specifications are subject to change without notice.
Copyright ©2016 VIVOTEK INC. All rights reserved.