
T6 Walkie Talkie - Radio ZEBRA - Free user manual and instructions
Find the device manual for free T6 Walkie Talkie ZEBRA in PDF.
| Brand | Zebra |
| Model | T6 Walkie Talkie |
| Category | PMR446 Radio |
| Number of channels | 8 PMR channels |
| Sub-codes | 121 (38 CTCSS + 83 DCS) |
| Maximum range | Up to 8 km (depending on conditions) |
| Power supply | 4 AAA alkaline batteries (not included) or rechargeable NiMH battery pack |
| Battery life | Approximately 14 h with NiMH pack, 16 h with alkaline batteries |
| Dimensions (approx.) | 16 x 5 x 3 cm |
| Weight (approx.) | 100 g (without batteries) |
| Display | Backlit LCD screen |
| Main features | VOX, channel scan, dual watch, baby monitor, stopwatch, keypad lock, auto power off, energy saver, 5 call tones, key tone, confirmation beep |
| Connectivity | Audio headphone jack (optional) |
| Charge level | 3-level battery indicator |
| Frequency | 446.00625 - 446.09375 MHz (PMR band) |
| Transmission power | 500 mW (PMR regulatory limit) |
| Safety | Complies with RF exposure standards (read included brochure) |
| Included accessories | 2 radios, 2 belt clips, charger, AC adapter, 2 battery holders, 2 NiMH packs, user guide |
| Maintenance | Clean with a soft dry cloth. Do not use solvents. |
| Warranty | Standard manufacturer warranty (see manual) |
Frequently Asked Questions - T6 Walkie Talkie ZEBRA
User questions about T6 Walkie Talkie ZEBRA
0 question about this device. Answer the ones you know or ask your own.
Ask a new question about this device
Download the instructions for your Radio in PDF format for free! Find your manual T6 Walkie Talkie - ZEBRA and take your electronic device back in hand. On this page are published all the documents necessary for the use of your device. T6 Walkie Talkie by ZEBRA.
USER MANUAL T6 Walkie Talkie ZEBRA
Product Safety and RF Exposure
for Portable Two-Way Radios 2
Features 2
Control and Functions 3
Display 4
Package Contents 5
Install the Battery 5
Battery Level and Low Battery Alert . . . . . 5
Charging the Radio 51
Charging the Battery 6
Using the Radio 6
Turning the Radio on and Adjusting the
Volume 6
Adjusting the Sound (Key tone) 7
Talking on Your Radio 7
LCDBacklight 7
Navigating through the Menu 7
Select Menu 8
Choosing a Channel 8
Choosing a Sub-code 8
Dual Watch Mode 9
Stopwatch Activation. 9
Key lock Activation 9
Mode Menu 10
Channel Scan Feature 10
Monitor Mode Feature 11
Voice Operated Transmission 11
Transmitting a Call Tone 12
Key Tone. 12
Roger Beep 12
Automatic Power Save Feature 13
Auto Power Off 13
Room Monitor Feature 13
Specifications 14
FrequencyChart. 14
CTCSSChart(Hz) 15
DCS Code 16
Warranty Information 17
What is Not Covered by the Warranty 17
Copyright Information 18
Product Safety and RF Exposure for Portable Two-Way Radios

Caution
Before using this product, read the operating instructions for safe usage contained in the Product Safety and RF Exposure booklet enclosed with your radio.
ATTENTION!
Before using this product, read the RF energy awareness information and operating instructions in the Product Safety and RF Exposure booklet to ensure compliance with RF energy exposure limits.
Features
8 PMR Channels
121 Sub-Codes (38 CTCSS Codes & 83 DCS codes)
- Up to 8 km Range
- Internal VOX Circuitry
- 5 Selectable Call Tone Alerts
Backlit LCD Display
- Headset Jack for Optional Headset
- Roger Beep
Uptimer
- Room Monitor
- Battery Charger
- Battery level Meter
- Channel Monitor
- Channel Scan
Dual Watch
- Keypad Lock
- Auto Power Off function
Range may vary depending on environmental and/or topographical conditions
Controls and Functions
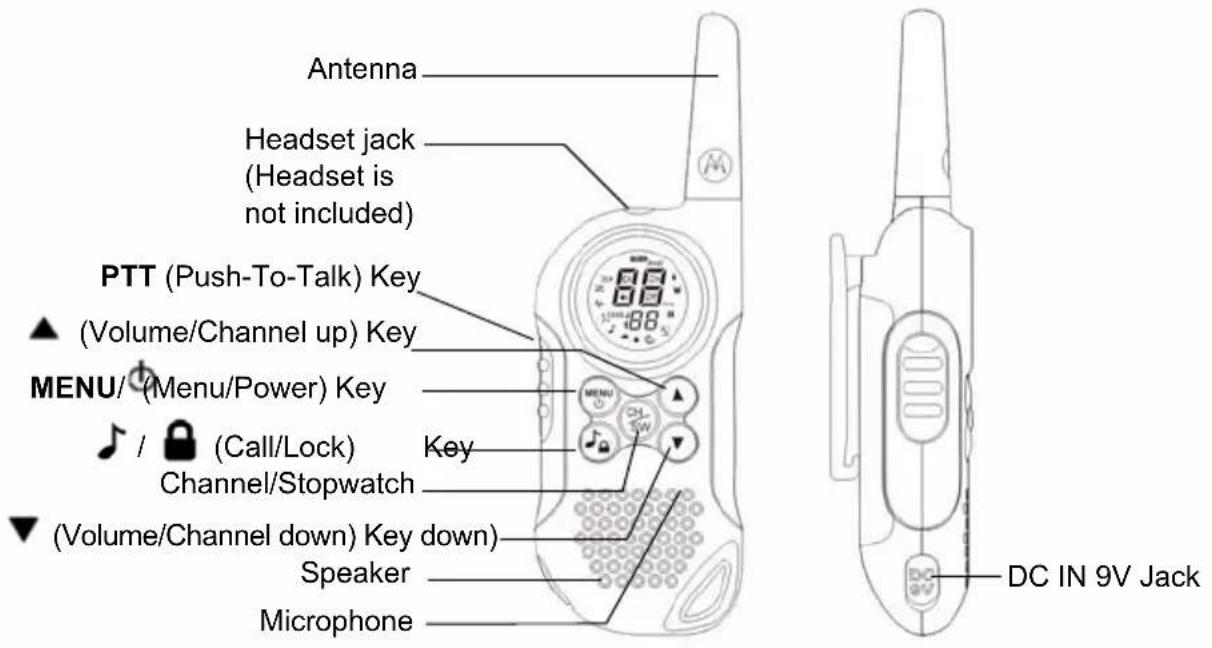
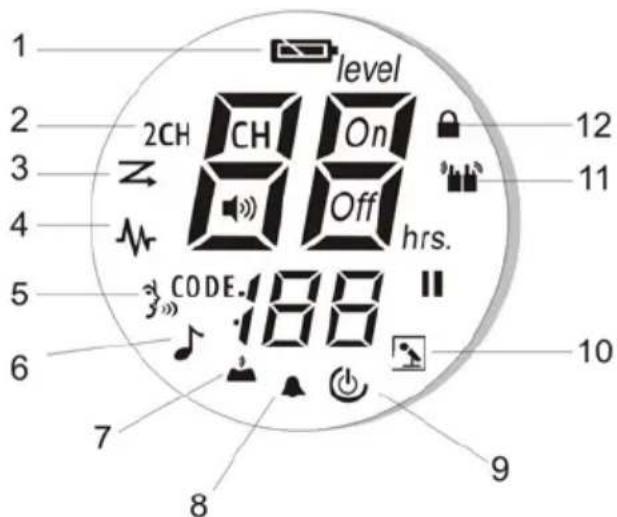
Display
- Battery Level Meter
- Dual Watch Indicator
- Scan Indicator
- Monitor Indicator
5.VOX Indicator - Sending call tone/Call tone
- Key Tone Indicator
- Roger beep tone Indicator
- APO (Auto power off) Indicator
- Room monitor Indicator
- Transmit/Receive Indicator
12.Keypad Lock Indicator
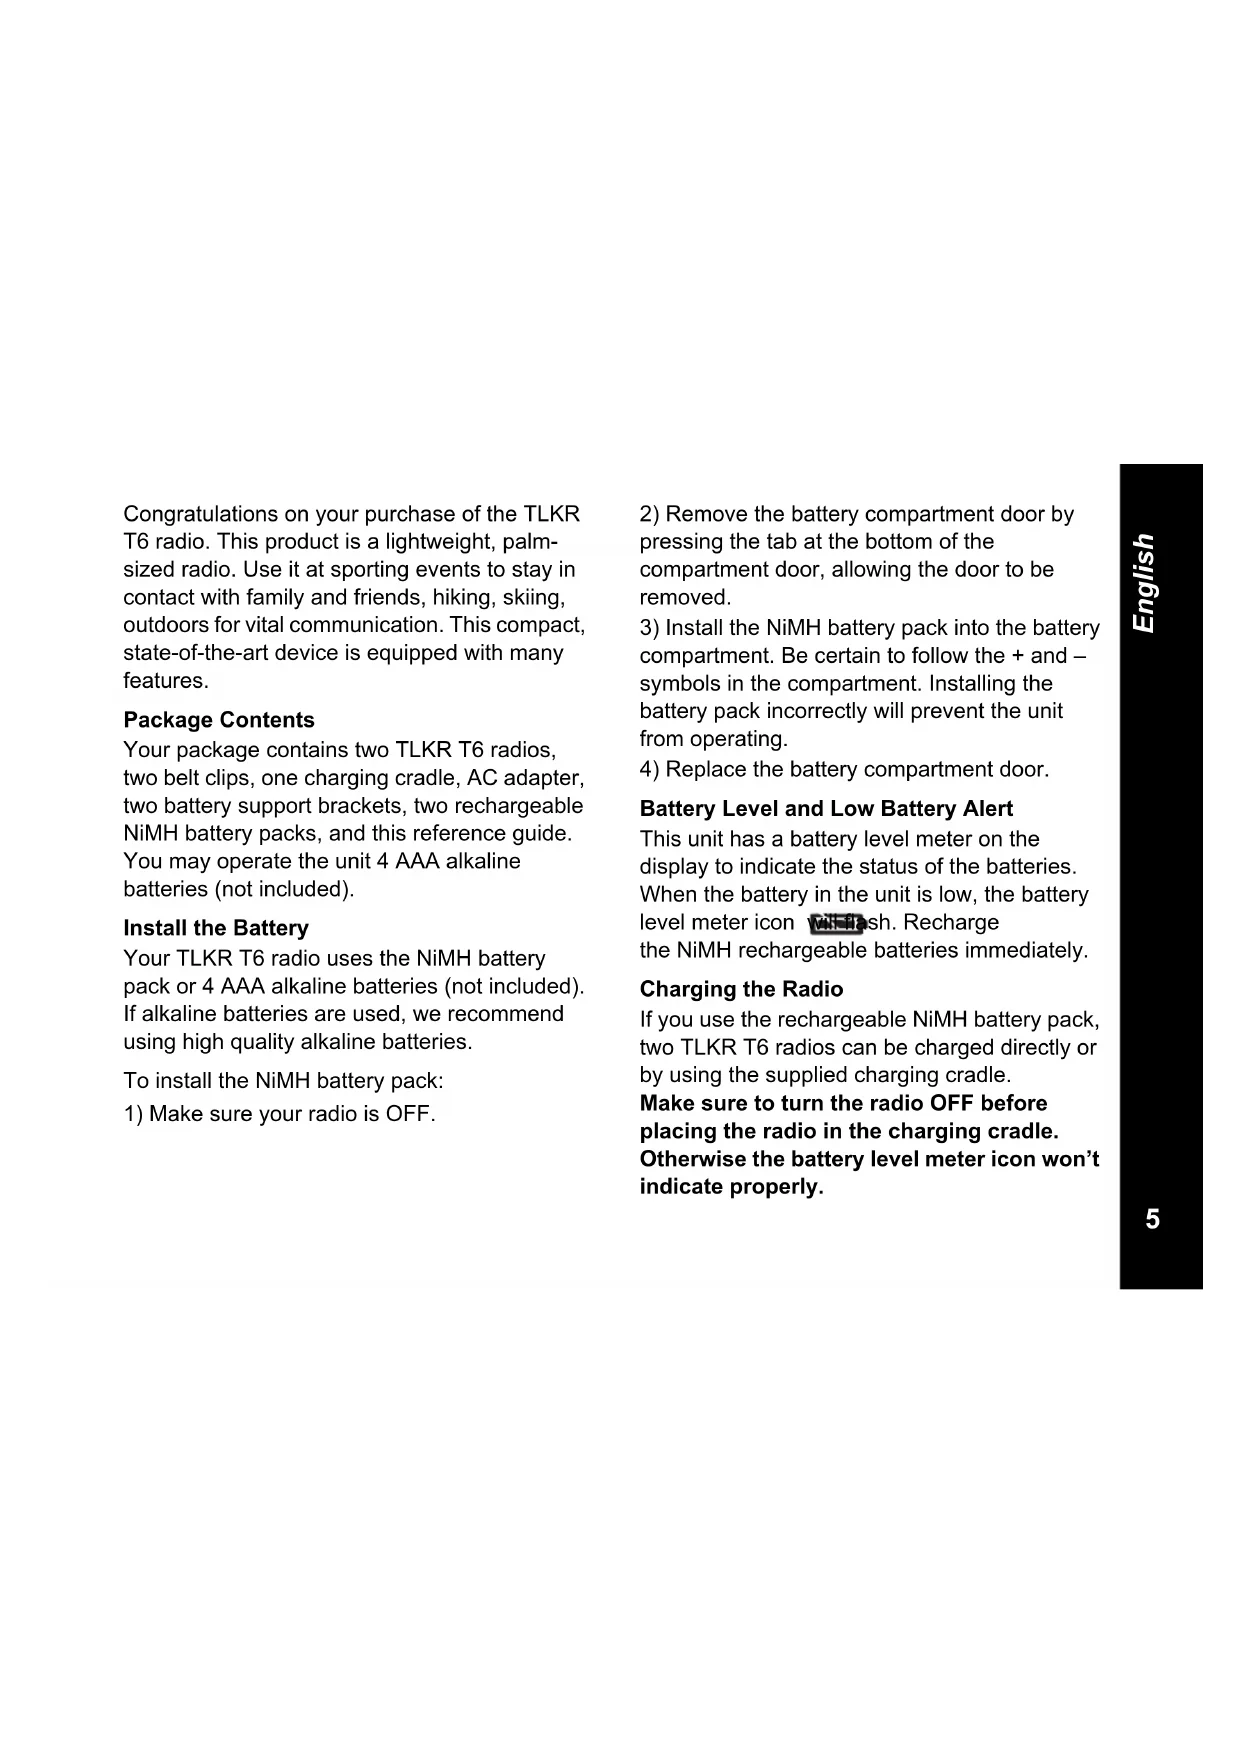
Congratulations on your purchase of the TLKR T6 radio. This product is a lightweight, palmsized radio. Use it at sporting events to stay in contact with family and friends, hiking, skiing, outdoors for vital communication. This compact, state-of-the-art device is equipped with many features.
Package Contents
Your package contains two TLKR T6 radios, two belt clips, one charging cradle, AC adapter, two battery support brackets, two rechargeable NiMH battery packs, and this reference guide. You may operate the unit 4 AAA alkaline batteries (not included).
Install the Battery
Your TLKR T6 radio uses the NiMH battery pack or 4 AAA alkaline batteries (not included). If alkaline batteries are used, we recommend using high quality alkaline batteries.
To install the NiMH battery pack:
1) Make sure your radio is OFF.
2) Remove the battery compartment door by pressing the tab at the bottom of the compartment door, allowing the door to be removed.
3) Install the NiMH battery pack into the battery compartment. Be certain to follow the + and - symbols in the compartment. Installing the battery pack incorrectly will prevent the unit from operating.
4) Replace the battery compartment door.
Battery Level and Low Battery Alert
This unit has a battery level meter on the display to indicate the status of the batteries. When the battery in the unit is low, the battery level meter icon will flash. Recharge the NiMH rechargeable batteries immediately.
Charging the Radio
If you use the rechargeable NiMH battery pack, two TLKR T6 radios can be charged directly or by using the supplied charging cradle.
Make sure to turn the radio OFF before placing the radio in the charging cradle. Otherwise the battery level meter icon won't indicate properly.
Direct Charge:
- Connect the DC adapter's plug to the radio's DC IN 9V jack and plug the other end to a vehicle's accessory power outlet.
Using the Charging Cradle:
- Connect the AC adapter to DC IN 9V and to a standard electrical outlet.
- Set the charging cradle on the desk or tabletop, and place the radio in the charging cradle with the keypad facing forward.
- Make sure that the LED illuminates. Charge the battery pack for 16 hours and remove the radio from the charging cradle after charge.
Note:The charge indicator LEDs will remain on as long as the radios are left in the charger.
Charging the battery
You can charge the NiMH battery pack itself using the included battery support bracket.
- Place the battery support bracket into the charging cradle.
- Install the NiMH battery pack applying its charging contacts to those of charging cradle. Installing the batteries incorrectly will
prevent the unit from charging.
3. Make sure that the LED illuminates. Charge the battery pack for 16 hours.
Note:The charge indicator LEDs will remain on as long as the radios are left in the charger.
Using the Radio
In order to get the most out of your new radio, read this reference guide completely before attempting to operate the unit.
Turning the Radio On and Adjusting the Volume
- Press and hold the MENU/ key to turn the radio ON, and increase the volume by pressing the key. To decrease the volume, press the key.
- Press and hold the MENU/ key again to turn the radio OFF.
Adjusting the Sound (Key tone)
Your radio emits a beep each time one of the keys (except for the PTT and key) is pressed. To turn this sound OFF or ON, press MENU button 5 times, the Key tone icon is flashing. Press the key to switch ON. Press the key to switch OFF.
Talking on Your Radio
To talk to others using the radio:
- Press and hold the PTT key and speak in a clear, normal voice about 5-8 cms away from the microphone. While you are transmitting, the icon will appear on the display. To avoid cutting off the first part of your transmission, pause slightly after pressing the PTT button before you start talking.
- When you have finished speaking, release the PTT key. You can now receive incoming calls. While receiving, the Iron will appear on the display.
Note: When you continue to transmit for 60 seconds, the radio emits a TX Time Out tone and the con flashes. The radio will stop transmitting.
LCD Backlight
The LCD backlight will automatically turn ON when any key (except for PTT) is pressed. The LCD display will illuminate for 10 seconds after the last key pressed.
Navigating through the Menu
To access the advanced features of the TLKR T6 your radio has two Menu functions.
- To enter the Menu, press the MENU/ key.
- Additional presses of the MENU/ key will advance you through the Menu until exiting to "Normal" operating mode.
Select Menu
Your radio navigates through Select Menu as follows:

Choosing a Channel
Your radio has 8 channels and 121 Sub-codes you can use to talk to others. In order to speak to someone, each of you must set to the same channel and Sub-code.
To choose a channel:
- Enter the Select Menu. Channel Indicator will blink.
- Press the key to increase or decrease the channel number displayed. If you press and hold the key, the channel number increase or decrease continuously.
- Go to Sub-code setting to choose a Sub-code.
Choosing a Sub-code
Allocating a Sub-code to your radio will help to reduce interference but remember that the radios that have different Sub-codes set will not be able to communicate with each other. Each of the channels 1-8 may have any one of the codes from 0 to 121.
- Enter the Select Menu. Advance through the Select Menu until the Sub-code indicator blinks.
- Press the key to increase or decrease the channel number displayed. If you press and hold the key, the channel number increase or decrease continuously.
3.Exit the Select Menu.
Dual Watch Mode
Your radio can scan the current channel and another channel alternately. You need to set a channel number and its Sub-code for another channel.
To set another channel and start Dual Watch:
- Navigate through the Select Menu until the 2CH CH icon blinks.
- Press the or to select the channel number, then press the key.
- Press the or to select the Sub-code, then press the key.
Note: If you set the same channel number and Sub-code as the current channel, Dual Watch doesn't work.
To turn the Dual Watch mode OFF:
Press the key then set to OFF mode.
Stopwatch Activation
You can use this radio as Stopwatch timer. It can time up to 60 minutes and 59 seconds.
Note: You can receive incoming signals during this mode.
To use the Stopwatch Timer
- Press and hold the key until Stopwatch timer will display.
- Press start Stopwatch timer. Pressing the key again will pause the timer.
- Press the key to reset the Stopwatch timer.
- Press and hold the key to exit the Stopwatch timer function
Key Lock Activation
To Lock the keypad:
Press and hold the /kəy. The icon appears.
To Unlock the keypad:
Press and hold the /kay again. The icon disappears.

Mode Menu
Your radio navigates through Select Menu as follows:

Channel Scan Feature
Your TLKR T6 radio has a channel scan feature that allows you to easily scan all 8 channels. When an active channel is detected, the radio will pause on that channel until the channel is clear. Then after a 2 second pause, the radio will continue scanning. Pressing the PTT key while the scan is paused on a channel will allow you to transmit on that channel and exit scan mode.
To turn the channel scan ON:
- Enter the Mode Menu. Advance through the menu until 20 blinks. Press the key to turn the Scan function On. Scanning channel will start and the Scan icon is displayed.
To turn the Scan OFF:
- Press the MENU/the scan icon blinks, press key to turn Off the Scan function.
Monitor Mode Feature
Your TLKR T6 allows you to listen for weak signals on the current channel at the press of a key.
To turn the Monitor mode ON:
- Enter the Mode Menu. Advance through the menu until the icon blinks. Press the key to turn the Monitor function On. Monitoring channel will start and the Monitor icon is displayed.
To turn the Monitor OFF:
- Press the MENU/ and advance through the Monitor mode. Press the key to turn Off the Monitor function.
Voice Operated Transmission
Your TLKR T6 radio is equipped with a user selectable Voice Operated Transmitter (VOX) that can be used for automatic voice transmissions. The VOX feature is designed for hands-free purposes. Transmission is initiated by speaking into the microphone of the radio or headset (headset is not included) instead of pushing the PTT key.
To select the VOX level:
- Enter the Mode Menu. Advance through the Menu until the icon blinks. The current level (OFF. 1-5) also blinks. Level Off disables VOX, while levels 1-5 set the sensitivity of the VOX circuit.
- Press the key to select the desired VOX sensitivity level. Use Level 1 in quiet environments, and use level 5 in very noisy environments. You can find the appropriate sensitivity level by speaking into the microphone. If the icon flashes, your voice is accepted.
3.Exit the Select Menu.
Note: When you continue to transmit using the VOX function for 60 seconds, the radio emits a TX Time Out tone and the con flashes for 5 seconds.
Transmitting a Call Tone
Your TLKR T6 radio is equipped with 5 selectable call tones that will be transmitted when the key is pressed.
To select a call tone:
- Enter the Mode Menu. Advance through the menu until the icon blinks. The current call tone number (1-5) also blinks.
- Press the key to increase or decrease the number to the desired call tone. Each tone will be heard through the speaker.
3.Exit the Select Menu.
To transmit the selected call tone, press the key. The selected tone will automatically be transmitted for a fixed length of time. Call tone will be cancelled when the PTT key is pressed.
Key Tone
Your radio emits a tone each time one of the keys (except for the PTT key) is pressed.
To turn the Key tone ON or OFF:
- Enter the Mode Menu. Advance through the menu until the icon blinks.
- Press the key to turn On or key to turn Off the key tone.
3.Exit the Select Menu.
Roger Beep
Roger Beep is a BEEP that is sent to notify the end of transmission (PTT and VOX transmission). Roger Beep can be heard through the speaker when Key Beep is on. It is transmitted even if Key Beep is turned off. However, Roger Beep will not be heard from the speaker.
To turn Roger Beep OFF or ON:
- Enter the Mode Menu. Advance through the menu until the icon blinks.
- Press the key to turn On or key to turn Off the Roger Beep tone.
3.Exit the Select Menu.
Automatic Power Save Feature
Your radio has a unique circuit designed to dramatically extend the life of the batteries. If there is no transmission nor an incoming call within 3 seconds, your radio switches to the Power Save mode. The radio is still able to receive transmissions in this mode.
Auto Power Off
Auto Power Off feature allows you to set the time that the radio turns off automatically.
- Enter the Mode Menu. Advance through the menu until the icon blinks.
- Press the key to select the time from Off, 60, 120 and 180 minutes.
3.Exit the Select Menu.
Room Monitor Feature
You can use one of your TLKR T6 radios as a room monitor and use the other radio to listen to and keep a check on the voice in another room. When you set the room monitor feature, the monitoring radio will detect voice/noises (according to the sensitivity level you set) and transmit back to the listening radio without pushing the PTT key. The monitoring radio is
not able to receive any transmissions in this mode.
To turn the Room Monitor ON or OFF:
- Enter the Mode Menu. Advance through the menu until the icon blinks.
- Press the key to turn On or key to turn Off the key tone.
3.Exit the Select Menu.
Note:
- Pressing the PTT key in Room Monitor mode is invalid and the radio emits PTT Error Tone.
- When the voice/noise in another room continues more than 60 seconds, the monitoring radio stops monitoring for 5 second, and resumes.
Specifications Frequency Chart (MHz)
Channels 8 PMR
Sub-Codes 121 (38 CTCSS and
83 DCS Codes)
Operating
Frequency
446.00625 - 446.09375 MHz
Power Source AAA Ni-MH battery Pack
4 AAA Alkaline Batteries (not included)
Range Up to 8 km
Battery Life 16 Hours typical
Alkaline Bateries
14 Hours typical
NiMH Battery pack
Ch. Freq.
1446.00625
2446.01875
3446.03125
4446.04375
5446.05625
6446.06875
7446.08125
8446.09375
Approved Accessories List
Please contact your dealer or retailer to purchase these accessories.
Motorola Part No.
Description
CTCSSChart (Hz)
| Code No. | Tone Frequency (HZ) | Code No. | Tone Frequency (HZ) | Code No. | Tone Frequency (HZ) |
| 0 Off 1 | 3 103.5 26 162.2 | ||||
| 1 67.0 | 14 107.2 27 167.9 | ||||
| 2 71.9 | 15 110.9 28 173.8 | ||||
| 3 74.4 | 16 114.8 29 179.9 | ||||
| 4 77.0 | 17 118.8 30 186.2 | ||||
| 5 79.7 | 18 123.0 31 192.8 | ||||
| 6 82.5 | 19 127.3 32 203.5 | ||||
| 7 85.4 | 20 131.8 33 210.7 | ||||
| 8 88.5 | 21 136.5 34 218.1 | ||||
| 9 91.5 | 22 141.3 35 225.7 | ||||
| 10 94.8 | 23 146.2 36 233.6 | ||||
| 11 97.4 | 24 151.4 37 241.8 | ||||
| 12 100. | 0 25 156.7 38 250.3 |
DCS Code
| Code No. | Code | Code No. | Code | Code No. | Code | Code No. | Code | Code No. | Code | Code No. | Code |
| 39 02 | 3 53 11 | 4 67 174 | 81 315 | 95 445 | 109 631 | ||||||
| 40 02 | 5 54 11 | 5 68 205 | 82 331 | 96 464 | 110 632 | ||||||
| 41 02 | 6 55 11 | 6 69 223 | 83 343 | 97 465 | 111 654 | ||||||
| 42 03 | 1 56 12 | 5 70 226 | 84 346 | 98 466 | 112 662 | ||||||
| 43 03 | 2 57 13 | 1 71 243 | 85 351 | 99 503 | 113 664 | ||||||
| 44 04 | 3 58 13 | 2 72 244 | 86 364 | 100 506 | 114 703 | ||||||
| 45 04 | 7 59 13 | 4 73 245 | 87 365 | 101 516 | 115 712 | ||||||
| 46 05 | 1 60 14 | 3 74 251 | 88 371 | 102 532 | 116 723 | ||||||
| 47 05 | 4 61 15 | 2 75 261 | 89 411 | 103 546 | 117 731 | ||||||
| 48 06 | 5 62 15 | 5 76 263 | 90 412 | 104 565 | 118 732 | ||||||
| 49 07 | 1 63 15 | 6 77 265 | 91 413 | 105 606 | 119 734 | ||||||
| 50 07 | 2 64 16 | 2 78 271 | 92 423 | 106 612 | 120 743 | ||||||
| 51 07 | 3 65 16 | 5 79 306 | 93 431 | 107 624 | 121 754 | ||||||
| 52 | 074 | 66 | 172 | 80 | 311 | 94 | 432 | 108 |
Warranty Information
The authorized Motorola dealer or retailer where you purchased your Motorola two-way radio and/or original accessories will honour a warranty claim and/or provide warranty service.
Please return your radio to your dealer or retailer to claim your warranty service. Do not return your radio to Motorola.
In order to be eligible to receive warranty service, you must present your receipt of purchase or a comparable substitute proof of purchase bearing the date of purchase. The two-way radio should also clearly display the serial number. The warranty will not apply if the type or serial numbers on the product have been altered, deleted, removed, or made illegible.
What Is Not Covered By The Warranty
Defects or damage resulting from use of the product in other than its normal and customary manner or by not following the instructions in this user manual.
Defects or damage from misuse, accident or neglect.
Defects or damage from improper testing, operation, maintenance, adjustment, or any alteration or modification of any kind.
Breakage or damage to aerials unless caused directly by defects in material or workmanship.
Products disassembled or repaired in such a manner as to adversely affect performance or prevent adequate inspection and testing to verify any warranty claim.
Defects or damage due to range.
Defects or damage due to moisture, liquid or spills.
All plastic surfaces and all other externally exposed parts that are scratched or damaged due to normal use.
Products rented on a temporary basis.
Periodic maintenance and repair or replacement of parts due to normal usage, wear and tear.
Copyright Information
The Motorola products described in this manual may include copyrighted Motorola programs, stored semiconductor memories or other media. Laws in the United States and other countries preserve for Motorola, certain exclusive rights for copyrighted computer programs, including the exclusive right to copy or reproduce in any form, the copyrighted Motorola programs.
Accordingly, any copyrighted Motorola computer programs contained in the Motorola products described in this manual may not be copied or reproduced in any manner without express written permission of Motorola. Furthermore, the purchase of Motorola products shall not be deemed to grant either directly or by implication, estoppel, or otherwise, any license under the copyrights, patents or patent applications of Motorola, except for the normal non-exclusive royalty free license to use that arises by operation of law in the sale of a product.
MOTOROLA, the Stylized M Logo and all other trademarks indicated as such herein are trademarks of Motorola, Inc. Reg. U.S. Pat. & Tm. Off.
© Motorola, Inc. 2010
SOMMAIRE
446.00625 - 446.09375 MHz
© Motorola, Inc. 2010
INHALT
446.00625 - 446.09375 MHz
Strom-
versorgung
AAA Ni-MH Akku
© Motorola, Inc. 2010
INDICE
446.00625 - 446.09375 MHz
Fonte de Energia Conjunto de pilhas Ni-MH AAA
4 pilhas alcalinas AAA
(não incluidas)
Alcance Até 8 km
Duração das
Pilhas
© Motorola, Inc. 2010
INHOUDSOPGAVE
Productveiligung en bloatstelling
© Motorola, Inc. 2010
ICINDEKILER
Normal kullanıma®,®,®,®,®,®,®,®,®,®,®,®,®,®,®,®,®,®,®,®,®,®,®,®,®,®,®,®,®,®,®,®,®,®,®,®,®,®,®,®,®,®,®,®,®,®,®,®,®,®,®,®,®,®,®,®,®,®,®,®,®,®,®,®,®,®,®,®,®,®,®,®,®,®,®,®,®,®,®,®,®,®,®,®,®,®,®,®,®,®,®,®,®,®,®,®,®,®,®,®,®. - Normal kullanıma,—çık"—çizilm)+ - Normal kullanıma"—çizilm"—ya"—da - hasar"—görmü"—tüm"—plastik"—parçalar"—ve"—dɪs - etkilere"—çık"—diğer"—tüm"—parçalar.
© Motorola, Inc. 2010
COIDEPXKAHNE
CBeHeHnO 6e3oNaCHOCTN BO3DeIcTBn H3nyaemOn paAnocactOTHO3HepnnpIMeHntbHo K nopTaTINBbIM
paiooctaHcym 2
XapakTepeNCTnKn 2
UnpaBJIeHneIΦyHKcII 3
Ducnnei 4
KoMnJIeKT nocTaBKn 5
YcTaHOBka 6aTapei 5
Hndkatop ypoBna 3apra da 6atapei .5
3apka 6aTapei 6e3 oTCoeINHeHnO TpaNocTaHcnn 5
3apka 6aTapei OTdIeNbHOOT padnoctaHcun 6
3Kcnnyataa npadnoctaun 6
BkIIOueHHe paAnocTaHcHn n peryIINpOBka rPOMKoCTn 7
HactpoKa 3Byka (ToN KnaBn) .7
BeHeHne paAnonepeRoBopOB. 7
POncBcTeKa DnCnIe 7
Haburaqna no MeHIO 7
MeHIO BbIbopa 8
BbI6op kaHana 8
BbI6op cy6koJa 8
Pekim DBOHOrO cKaHnpOBaHnra 9
BknHueHne cekyHdomepa. 9
Блорвк КларыТурbl 9
MeHIOpeKIMOB 10
Функця санроваяня kaHaNoB 10
ФункцЯ мониторнга кана .11
Tolocoboe ynpablenne nepedaey 11
ToHbI Bbl30Ba 12
TOH KJIaBnI 12
ToH KOHua npepaui 12
AByMaTnueckaФyHKUra 3KOHOMN6BaTapei 13
ABTomaTnueckoe BbIKJIoueHne IITaHn 13
ФункцЯ MOHITOpHHa nOmeueHn .13
TexHnueckne daHHbIe 14
Ta6nua qactot (MfU) 14
TaNua KODOBCTCSS (_) 15
KoDbDCS 16
TapaHTnHaHa HOpMaun 17
HTo He nokpbBaetcra pahTnei 17
HΦopMaunO6aBTOpCKOM npaBe .18
CBeHeHnO 6e3OpacHOCTN BO3DeIcTBn N3JyHaEMo PAAnOuaCTOTHOJ 3HEprn PpIMHeHtJIbHO K NOPTaTNBHbIM paAnocTaHcIaM

IpeepHaJOM NcNoB3OBAHnra 3TOro
n3JeNIA O3HaKOBbTeCb C
nHCTpyKUIMn PO 3KcPlyaTaunn
Texnke 6e3OnacHOCTn,
npBedeHHbIMn B 6yKJIteTe "CBeDeHnro O
6e3OnacHOCTn IN BO3dEInCTBn
n3JyuaMoI paDIOuOAcTOTHou3Heprnn"
KOTOpBI BXODNT B KOMPiKeT NOCTaBKn
BaWe pAdIOCTaHUn.
BHIMAHNE!
C ueIbIO HeOnOpUSeHn IpeBblHeHn
IpeDeIob BO3DeIcTBn I3NpyaEmoI
paNoocactOTHO Hepn NpeD HaayamO
NCNoB3OBaHn 3TOrO I3DeJnO3HaKOMbTecb C
INΦopMaun E O paNoocactOTHO Hepn IN
INCTpykUmaN IO kCpNyatauN B6yKneTe
"CBeDenHn O 6e3OpacHocTn I BO3dEICTBn
I3NpyaemO paNoocactOTHO Hepn".
XapaKTepeNCTnKn
- 8 KaHaJIOB PMR
121 cy6koD (38 kOdoB CTCSS n 83 koDa DCS)
PaDnuc DeIcTBn - Do 8 KM*
BcTpoeHHaФyHKUVA VOX - 5 onobeeauoTOHOB BbIOBa Ha BBOp
KndkokpcntaIIueckn dncnncno nOocBETKOI - Геобдю дя rapн��уры (rapidly npnoobpeTaetcЯ OTdJIbHo)
ToH KOHua nepeaun
-ФункцяТаМерра - MoHITOpINr NOMeUeHnA
- 3apraHoe yCTpoNCTBO
- INHДИКATOP ypoBn 3apra 6aTapei
- MoHHTOpINr KaHaJa
- CkaHnpOBaHnE KaHaJIOB
-ДВОИhoe cKaHIpOBaHne
-БлOkИрOBkaКЛаВиш
-ФункцЯ abTomatUeCKOTo BBIKIQUeHnI NITaHnI
*Paunyc DeiCtBnpaNocTahn3aBncnt OT okpykaIOuNX yCNOBn IN TonorpaHm MeCTHOCTN.
YnpaBneHne nФункиN
Ducnnei
1.Индикатор уровь заразада батapeste
2.ИндикаторДВОйHorOСКанроваяня
3.ИнданkaTop саанюваян.
4.Индикатор MOHITOPINHra
5. INДикaTop VOX
6. INET OTnpaBkA TOHa Bbl3OBA/TOH Bbl3OBA
7.ИндикаторToHaКлавиш
8.CnHnokOHuaHnapepaHn
9. INHДИКaTOP aBtOMaTnueCKOrO BbIKJIIOUeHINIITaHIN
10. INDINKATOP MOHITOPNHa NOMEUeHnA
11.ИндikatopnpneMa/перадун
12.Индикатop6лokировКлариш
I03dpabnem BAC C npno6peTeHnem
paiooctaun TLKR T6. Paiooctaun nmeet MaBb BEc N Ierko yMeuaeTc H a JaoHc. Ei yO6HO NOlbzOBaTbcra DnA CBra3N C POJbIMN U dpy3bAMn Ha cNoptNBbIX MeopnpraTnx, B TypncTnuecknX NoxOdaX, KaTaacb Ha Nbixax INn npocTo Ha nporylke. 3To COBpeMeHHoe, KOMNaKTHOe CpeCTBO CBra3N OCHAeHO MHOxEcTBOM Npale3HbIX FyHKuN.
KomnneKT noctabku
B KOMNJIeKT NOCTABKN BxOJaT DBe paHIOCTaHcIN TLKR T6, DBA NORChbIX 3axIma, 3apJdHoe yCTPOIcTB0, CTeBOI aDAnTEp, DBe ONOpHbIe cKo6bl Iyra 6bATEpei, DBa 6noka HKeJIb-MeTaJIrRnDprNDbIX AKKMyIaTOPbIX 6bATEpei n DaHHoe pyKOBoIDCTBO. PtTahHe paHIOCTaHcIN MoKet TaKke ocUeCTBnTbcra O7 4 9eNoUHbIX 6bATEpe AAA (He BXODT B KOMNJIeKT NOCTABKN).
YctaHObKa 6aTapei
PapnoctaHua TLKR T6 moKet pa6oTaB ot HnKeJIb-MeTann-riuPnHbIX 6aTapei (BXoJrT B KOMnIeKT nocTaBKn) nnO t4 7eIoUhbx 6aTapei AAA (npno6peTaIOCTc oTdeNbHO). PekomeHdyETcN cNoJIb30BaTb 7eIoUHbIe 6aTapeN TONbKO BBICOKOrKaueCTBa.
Блok НIKEиь-MетаП-гдрньхбатер
yctaHaBnBaETcCneDyUoUM 6pa3OM:
1.Y6eHntecb,yTOpaNIOCTAHnBbIKIHOeHa.
2. ChnMnte KpbIuKy 6aTapeHoro OTeKa, HaxKaB Ha NaKy fNkCaTopa B HxHHe YactN KpbIuKn.
3. BCTaBbTe 6aTapeHbI 6nOK NiMH B 6aTapeHoe OTdeneHne. O6ra3aTeJbHo cJeDyIte 6o3NaueHnM + n - B 6aTapeHOM OTdeneHn. B clyuae HnPaBnIbHO yCTaHOBKn 6aTapeHoro 6noka yCTpoiCTBO He 6ydet pa6oTaTb.
4. YctaHOBInTe Ha MeCTO KpbIuKy 6aTapeHoro OTceKa.
Hndkatop ypOBHa 3apJa 6aTapei
Ha dincnnee paanoctaHcunn IMeetcra HndkaTOp Tekyuero ypoBna 3apra 6batape. Pn Hn3kom 3apra de 6batape 3NaOc INDkaTopa ypoBna 3apra da 6batape Muraet. HeMeJeHno 3aMeHnte uenohbe 6batapei.
3apka 6aTapei 6e3 oTCoeHHeHnO paNocTaHn
HnkeJIb-MeTaN-riDpNDbIe 6batape
paNoctaHcNI TLKR T6 MoKHO 3apJkaTb Ka
HaNPMyU, TaK N C NOMOuBIO 3apJdHOrO
ycTroPocCTBa, BXoJaUeRo B KOMPiKeT NoCtAbKn.
063aTeIbHO BbIKIOUHTe paAnocTaHcNIOpeE yCTaHOBKO B 3apAHOe yCTPOcTBO BOn36exAHne HeKOpPeKTHoPpa6Otbl HndkaTopaypOBHa 3apJa 6atapei.
Празмая зараздka:
1.Подклочиштесерадпета пос.T.KOBxody9Bnoct.T.paiooctaHcH.N.PoДКЛчИteaanTepKrHe3dy60ptOBOcETnABTomobnIJI.
3apKaB 3apHOM yCTpoCTBe:
1.Подклочи te ceTeBOJ aanTep Ko BxOdy 9В NOCT.T.paIOcTaHcUN N K CTaHdapTHoI CEteBOJ po3eTke.
2. YctaHOBnTe 3apAHOe yCTPOINCTBO Ha CTOJ IN BCTABbTe paAnIOCTaHcNIO B 3apAHOe yCTPOINCTBO KJIaBNiAmM BInpeI.
3. Y6eIITecb, yTO BKNIOUChc CBeTOnIOHbI INDNKATOp. 3apJXaIte 6aTapeHbI 6nOK B TeueHne 16 YacOB. No 3aBepWeHn 3apJdKn BbHbTe paNIOCTaHcHIO n3 3apJdHOY cTPOIcTBa.
PpimcyeHne: CBeToDnOHDhBm HndkAToP 3apdHoro yctpoiCTBa npoDoJXaet ropeTb B TeueHne Bcero BpeMeHN, Noka paAnocTaHnna HaxoHTcB 3apdHOM yctpoiCTBe.
3apka 6aTapeoTeIbHo oT paNocTaHcN
HnkeJIb-MetaI-riDprHbIe 6aTapeM OMOHO TaKKe 3apJkaTb OTdJIbHO OT paNocTaHcU.ДЯ 3TORO Heo6xOHaMa onOpHra cKO6a, BxOJauaB KOMPJIeKT NOCTaBKn.
- YctaHOBInTe ONOpHyIO CkO6y B 3apAINDHoe yCTpOINCTBO.
- YctaHOBnTe 6aTapeHbI 6bOK B 3apdHoe yCTPOcTBO. O6ecneYbTe COBMeueHne 3apdHbIX KOHTaKTOB 6aTapeHoro 6boka C KOHTaKTAMN 3apdHoro yCTPOcTBa. Ecnn 6aTapeHbI 6bOK yCTaHOBHeH eHpabINbHO, 3apdKa HeBO3MOxHa.
- Y6eHntecb, yTO BKNIOUHnC8 CBeToNDnHbI INHdNkATOp. 3apXaTe 6aTapeHbI 6nOK B TeueHne 16 yacob.
PpimMeaHne: CBeToDnOHDhI INHdkaTOp 3apdHorO yCTpoiCTBa npoDoJkae T ropetb B TeueHne BCero BpeMeH, noka 6aTaapeHbI 6lOK haxoHTcB 3apdHOM yCTpoiCTBe.
3Kcnnyataa npaioctaun
YTo6bI o6ecneuHt npaBnJIbHoe n noJHoe
NCNoJIb3OBAHHe BO3MOxHOCTe BaWei HOBOI
paNIOCTaHcU, IpOHNTaIte DaHHOE pyKOBODCTBO
OT Hauana Do KOHua, npexJe Yem npNCTyNaTb K
3KcNlPyatauPi paNIOCTaHcU.
BkIIOeHne paAnocTaHcunn nperyIINpOBKa rpoMkoCTn
- YTo6bI BKNIOHTb paNIOCTaHcNIO, HAXMNTe N ydePknBaIte KnaBnWy MENU/ . YTo6bl yBeJIINuHTb rPOMKOCtB, HaxMNTe KNaBnWy A. YTo6bI yMeHbUHTb rPOMKOCTb, HaxMNTe KNaBnWy V.
- 4To6bI BbIKIOuHTb paAnOCTaHcNIO, HaxMnTe ydepkBaIe KnaBnWy MENU/
HactpoikKa 3Byka (ToH KJIaBm)
PapnoctaHnna n3daet 3Byk npn KaKdOm HaxKaTnN KnaBnN (KpOme TaHReHTbI PTT N KnaBnN).
YTo6bI BKIOUHTb INN BbIKIOUHTb 3ByK,5 pa3 HaxMITE KHOKNK
MENU/①,3NaOHKToHaKnabuN 3aMnIraeT.
BknoueHne 3Byka.HaxMITE KnaBnUy A,TO6bl BkIIOHTb 3ByK.HaxMITE KnaBnUy V,TO6bl BbIKIOHTb eO.
BedeHne paHoneperoBopOB
YTo6bI BCTyNTb B paAnonepeRoBOpbl C pyroPaAnocTaHnuei:
- Haxmnte TaHreHTy PTT n, ydepxuBaay ee haxaToi, roBOpTe B MmKpOfoH C pacCToHn 5-8 cm. TOBOpTe yeTko, Ho He NOBbIaJ raIocA. Bo BpeMa nepeDaun Ha dncnnee oTo6paXaETcra 3NaUOK . Bo n36eXaHne IOTepn nepBbIX cNoB nepeDaun He HauHaHTe
roBOpNTb cpa3y nocJe HaxKaTna TaHReHTbl PTT. CdenaiTe He6oJbWyo nay3y.
2.3aKOHnB ROBOpntb,OTnyCTnTe TaHReHTy PTT. 3TO DaET BO3MOxHOCTb pINHMaTb NOCTynAoUOHe Bbl3OBbl.Bo Bpem npneMa Ha DInCnIe e OTo6paXaETcra 3HaQok
Ppimechane: Pocne TOrO, KaPpaNIOCTaHcIpaBoTaIaBpeKIMe nepeDaU 60 cekyHd, OHaI3daET ToH OrpaHcHcHb BpeMeH npeJaU, INaHnHaet MraTb 3NaOcKaPaOCTaHcIpaKpaaeT nepeDaU.
Iopcbetka dncnJeA
IocBcETka DnCnIe BkNIOaETCa ABOTMaTNUeCKn npn Haxatnn IIO6oKNaBnUu (KpOme TaHReHTbl PTT).Dncnne CBETTCB TceHeNe 10 cekyHd nocne Haxatna NocneDne KNaBnUu.
Habiracny no MeHIO
ДяТOrO,TO6bIMoXHO6bIO BbIXOHTbHa pacsHpeHHbIeФyHKcN TLKR T6,B paAnocTaHcN npeDyCMOTpeHo MeHIO.
1.ДЯ BbIXOda B MeHIO HaxMnTe KnaBnUy MENU/
2.Даьншин Нжатя KnaBnH MENU/ 6удт npobodntb Bac NO nyHKTam MeHIO, Bnnotb Do BbIXOa B"HOMaJIbHbI"peXIM pa60Tbl.
MeHIO Bbl6opa
Habirataa no MeHIO BbIbopa ocuueCTBnraTeTcneDyUoMm 6pa3OM:

BbI6op kaHaJa
Для пereorobopOB C dpyrHMn paHIOCTaHcIyMaN B BaWei paHIOCTaHcIIN IMeETc8 KaHaIob N 121 cy6KOJ.ДлЯ CBra3m Mekdy paHIOCTaHcIyMaN Heo6xOdmo, YTObI OHN IcNoJIb3OBAJN ODNH I TOT JKe KaHaJ N ODNH I TOT JKe cy6KoJ. YTObI BB6paTB KaHaJ:
1.BoiTe B MeHIO BbIbOpa.IHnKaTOp KaHaJa MInraet.
2.Дя yBeJIuHEnIy mIyMeHbSeHnOTo6paKaemOrHOHomepa KaHaIa HaxmaiTeKnaBnUyAnIyV.ДЯ HenpepbIBHOrOyBeJIuHEnIy mIyMeHbSeHnHOmepa KaHaIaNaxMITE KnaBnUyAnIY uDepXnBaIteee HaxaToI.
3. Перейд范围内 К Вьбору cyбкда.
Bb6op cy6koDa
3aandahe cy6koDa nomoraet CHn3ntb nomexu, Ondako cneDyeT NOMHITb, yTO ecnny paNIOCTaHm He COBnaIaOT cy6KOdbI, CBra3b MEXdy HmH HeBO3MOXHa. JIy KaXdoRo n3 BOCbM KHaNoB MOxHO Bbl6paTb IIO6oN i3 cy6koDbO ot 0 do 121.
1.BoiHTe B MeHbBb6opa. DnurAaTeCb no MeHHo, noka He 3amraet HnDnKaTOp cy6koJa.
2.ДЯ yBENUEHnIyMeHbEHNIOTo6paKaEMoH OHomepa HAXIMaTe KNaBnUyAnN □IIN ▪Ie HEnpepbIBHOrO yBENueHnIyMeHbEHNHOmePa HaKMITE KNaBnUyAnN ▪IIN ▪IyDepKbAaTe ee HaxaToI.
3. BbIyIte n3 MeHIO BbIbopa.
Pexm DboHoro cKaHnpoBaHna
PaiooctaHnma MoKet nonepemEnHO cKaHnpoBaTb TeKuyn KaHaI N KaKoJ-Ni6o BTOPOI KaHaI. IJa 3TOO Heo6xOdmo 3aDaTb HOMeI n cy6kOd BTOPOrO KaHaJa.
YTo6bI 3aDaTb BTOPOI KaHaJI N BKJIIOUHTb DBOHoe cKaHINPOBaHne:
- NepemeuTecb no MeHb Bb6opa, noka He 3amuraet 3HaQK 2CH CH.
- Bb6epnte Homep KaHana c NOMOu bKnaBnU 3aTeM HaKMNTe KJNaBnUy
- Bb6epnte cy6koD c nOmoIbIO KnaBnU ▲ n▼, 3aTeM HaxMITE KnaBnUy
Причане: Двоиhoe сканрованe He DeиCTByeT, ecn 3aадТb Tot Jxe HOMep n cy6koJ, YTO y Tekyuero KaHana.
YTo6bI BbIKIOUHTb DBOHoe cKaHnPOBaHHe:
Hajmte KnaBnuy , 3aTeM yCTaHOBtpepeKM BbIKI (OFF).
BkIIOUeHne cekyHDoMepa
PaHIOCTaHcIHO MOxHO IcNoJIb3OBaTb B KaYeCTBe TaIMepa-ceKHyIOMepa. MoXHO BECTN OTCuET BpemeHn Do 60 MInyT 59 cekyHd.
PnmeHne:B 3tOM pexKMe moXHO npHMaTb BXOJUe CNHaJIbl.
IcnoB3OBaHne TaMepa-ceKHyDomepa:
- HenpepbIBHO haxmMaTe KnaBnuy, noka He nOraBtca TaIMeP-ceKHyDomep.
- HaxmTe KnaBnuy , YTO6bl BkHouHTb TaMep-cekyHdoMEp. NOBtOpHoe HaxaTne KnaBnU npIOCTaHaBnBaET TaMep.
- HaxaTneM KnaBnU npeyeCTaHOBNTe TaIMep.
- HenpepbIBHO HaxmMaTe KnaBnUy ,To6bI BblTN I3 cyHKuIN TaIMepa-ceKHyDomepa.
Блорва КларыТурь
YTo6bI 3a6nOknpoBaTb KnaBnAtypy:
HenpepbIBHO HaxmMaTe KnaBnSy
IorBntc3HaQOK
TTo6bI pa36nOKnpoBaTb KJIaBnaTpy:
CHOBa HenpepbBHO HaxmMaTe KnaBnSy
3NaOH Ncye3HeT.
MeHIOpeKIMOB
HabiruaIgno MeHIO pexmOB ocuueCTBnEeTcneNyUOM o6pa30M:
B paIIOCTaHcH TLKR T6 nMeetcra BbI6op 5 TOHOB Bbl3OBA, KOToPbIe IpepaOTcra npn HaxKaTmKJIaBNIJ /A. UTo6bl BB16paTb TOH Bbl3OBA:
- BoiDInTe B MeHIO pexnMOB. IepemeuaTecb no MeHIO, noka He 3aMraIOT 3HaUOK N TeKyuN HOMep ToHa BblOBA (1-5).
2.Дя yBelenueHЯ nIy yMeHbWeHnOTo6paKaemOro Homepa ToHa Bbl3ObaHaxmaiTe KnaBnUy △ nIe .CoOTBeTCTByIOuNe TOhbl 6yDt 3ByuAtb n3DINHaMnka. - BbIInTe n3 MeHIO BbIbopa.
IIa nepeDaun BbIbpaHHoro ToHa BbI3OBA HaxMITE KJIaBnUy . BbIbpaHHbI TOH 6yJeT
aBTOMaTHueCKn nepeDaBaTbcra B TeueHne
fHKcnpoBaHHoro BpemeHn. ToH Bbl3OBA
c6pacbIbAeTc npn Haxatm TaHReHTb PTT.
ToH KJIaBnI
PaHIOCTaHcIaN H3daeT ToH npK KaXdOM HaXaTNI KJIaBnI (KpOME KHOKN TaHReHTbI PTT). BKnIOUeHHe N BBIKIOUeHne ToHa KJIaBnI:
1.BoiDnte B MeHIO pexmOB.IpeMeuaTecb NO MEHIO, NOKa He 3AmuRaET 3HaOH
2. Haxmnte KnaBnuy , YTO6bI BKNIOHTb, INHaxmnte KnaBnuy , YTO6bI BbIKIOHTb TOH KnaBnU.
3. BbIuTe n3 MeHIO BbIbopa.
ToH KOHcA nepeDaun
ToH KOHua nepedaun Cnyknt dIy onOBueHnO KOHue nepedaun (KaK npu nCnoJb3oBaHn TaHreHTbI PTT, TAK N B pexKmE VOX).EcN ToHbI KNaBnB WKnUoyehbl, TO TOH KOHua nepedaun BBIOIDTCa Ha DnHAMNK. EcN ToHbI KNaBnB WBkNoUeyehbl, TO TOH KOHua nepedaun nepedaetcR, HO I3 DNHAMnKa He 3ByuNT.
YTo6bl BBkIIOUHTb INN BKIOUHTb TOH KOHca nepedau:
1.BoiDnte B MeHIO pexnMoB. IepemEuAteCb no MeHIO, NOKa He 3aMURAeT 3HaQOK
2. HaxMMTe KnaBnWy , YTO6bI BKIOHHTb, INHaxMMTe KnaBnWy , YTO6bI BbIKIOHHTb CnHaJI OKOHuaHnpepaHn.
3. BbIuTe n3 MeHIO BB6Opa.
ABTOMaTnueckaФyHKuN3KOHOMn6aTapei
3Ta yHnKaIbHaЯФyHKnIЯNo3BOJAreT 3HaHTeJIbHO pOdIITb BpeM pa6OTbl 6aTapei. PaIIOCTaHcIЯ aBTOMaTInueCKn IpeXoIITB peKIM 3KOHOOMN 6aTapei npI OTCyTCTBnI nepeDaun I pIeMa B TeueHne 3 cekHyd. B 3tOM pexIme paIOCTaHcIЯ NO-IpexHemy MoKeT npINHMaTb Bbl3OBbl.
ABTomatnueckoe BbIKJIOueHne NHTaHna
Функця abTomatueckoro BbIKIIOyeHn NITaHn
ПОЗBOЛЯET 3aДаВаТь ВрЕм, ПО ИСTeчEHN
KOTOPORO paIIOCTaHцЯ ABTomATUeCKn
BbIKIIOuYaeTc.
- Bɔŋdnte B MeHIOpeXIMMOB. IpepeMeaItec b no MeHIO, NOKa He 3aMnraeT 3HaQK.
- HaxMMTe KnaBnUy ▲ nII N, yTo6bl yCTaHOBnTb BpeMa Ha BBkN. (off), 60, 120 nIIN 180 mHyT.
- BbIaTe n3 MeHIO BbIbopa.
Функцу монторига пошени.
3TaФyHKUЯ NO3BOJRAET NcNoJIb3OBaTb DBe paNocTaHcUN TLKR T6, YTO6bl n3 Ondoro NOMeueHnCneINTb 3a 3BykAMN B npYROM NOMeueHn. PaNOCtAHcN, yCTaHOBNeHHaB Dpyrom NOMeueHn, yNaBInBaet rOnca IIN
DpyrHne Wymbl (B 3aBnCmOCTN OT 3aDaHHORo BAMN yPOBnHa YvBCTBNTeJIbHOCTn) n Npepaetnx Ha BaSy paAnocTaNCHIO 6e3 Haxatna TaHReHTbI PTT.
B pexnme MoHHTOpuHra nomeueHna paHIOCTaHcua He MOXeT PpHIMMaTb Bbl3OBbl.
YTo6bI BKIOUHTb IIN BbIKIOUHTb MOHITOPINH NOMeueHn:
1.BoiTeBMeHOpeKIMOB.PepeMaTecbNo MeHIO,POKaHe3aMnraet3HaQOK
2. Haxmte KnaBnuy , YTO6bI BKNIOHTb, INN KnaBnuy , YTO6bI BBIKHOHTb FOYHKUHOMOHITOPINHra NOMEUeHnR.
3. BbIaIte n3 MeHIO BbIbopa.
446.00625 - 446.09375 MΓ
NCTOUYHK NITAHNA
BIOK HKeJIb-MeTaNJ-ΓnDpNDbIX aKKMyIaTOPbIX 6aTapei AAA
4IeNoHbIe 6aTapeN AAA (He BXoJrT B KOMJIeK T NoCTaBKn)
PdNyc DeiCTBn
108K
Pecypc 6atapei
TINNUH0 16 yacOB UeIOUHbIe 6aTapeu
TINHHO 14 yacOB BaTapeHbI 6IOK NiMH
Ta6nua yactot(Mf)
KaH. Yact.
1446.00625
2446.01875
3446.03125
4446.04375
6446.06875
7446.08125
8446.09375
IPEUEHb OIOBPEHHbIX AKCECCYAPOB
Ipy npno6peTeHnneDyUoux akceccyapOB o6paauTecb K dInepy nnnnpdpnraTnIO po3HnHOn ToproBn
No n3deJnno kataJory Motorola
OnncanHe
Ta6nua KoDob CTCSS (Tc)
| № к OA | Частota тona(Гц) | № к OA | Частota тona(Гц) | № к OA | Частota тona(Гц) |
| 0 | Выкл. | 13 103.5 | 26 162.2 | ||
| 1 67.0 | 14 107.2 27 167.9 | ||||
| 2 71.9 | 15 110.9 28 173.8 | ||||
| 3 74.4 | 16 114.8 29 179.9 | ||||
| 4 77.0 | 17 118.8 30 186.2 | ||||
| 5 79.7 | 18 123.0 31 192.8 | ||||
| 6 82.5 | 19 127.3 32 203.5 | ||||
| 7 85.4 | 20 131.8 33 210.7 | ||||
| 8 88.5 | 21 136.5 34 218.1 | ||||
| 9 91.5 | 22 141.3 35 225.7 | ||||
| 10 94.8 | 23 146.2 36 233.6 | ||||
| 11 97.4 | 24 151.4 37 241.8 | ||||
| 12 100. | 25 156.7 38 250.3 |
KoI DCS
| № КODа | КоД | № КODa | КоД | № КODa | КоД | № КODa | КоД | № КODa | КоД | № КODa | КоД |
| 39 02 | 3 53 11 | 4 67 174 | 81 315 | 95 445 | 109 631 | ||||||
| 40 02 | 5 54 11 | 5 68 205 | 82 331 | 96 464 | 110 632 | ||||||
| 41 02 | 6 55 11 | 6 69 223 | 83 343 | 97 465 | 111 654 | ||||||
| 42 03 | 1 56 12 | 5 70 226 | 84 346 | 98 466 | 112 662 | ||||||
| 43 03 | 2 57 13 | 1 71 243 | 85 351 | 99 503 | 113 664 | ||||||
| 44 04 | 3 58 13 | 2 72 244 | 86 364 | 100 506 | 114 703 | ||||||
| 45 04 | 7 59 13 | 4 73 245 | 87 365 | 101 516 | 115 712 | ||||||
| 46 05 | 1 60 14 | 3 74 251 | 88 371 | 102 532 | 116 723 | ||||||
| 47 05 | 4 61 15 | 2 75 261 | 89 411 | 103 546 | 117 731 | ||||||
| 48 06 | 5 62 15 | 5 76 263 | 90 412 | 104 565 | 118 732 | ||||||
| 49 07 | 1 63 15 | 5 77 265 | 91 413 | 105 606 | 119 734 | ||||||
| 50 07 | 2 64 16 | 2 78 271 | 92 423 | 106 612 | 120 743 | ||||||
| 51 07 | 3 65 16 | 5 79 306 | 93 431 | 107 624 | 121 754 | ||||||
| 52 | 074 | 66 | 172 | 80 | 311 | 94 | 432 | 108 |
TapaHTnHaHa HΦopMaζη
C rapaHTnHbIMn npeTeH3nMn nДЯ BbINOJIHeHnra rapaHTnHorO obcnyKuBaHnO sbpaauTecb K OoNuaJbHOMy dInepy KomnaHn MoToPOna nHa npEepnTne po3HNoHOr TOpRbN, rDe Bbl npNo6peNi paHocTaHnO MoToPOna n/nnn fnpMeHHbe akceccyapbl.
Для получени rapaHTинHorO obcnykuaHnR
BepHnte paIoocTaHcuIIO dInlepy nII Na
npednpraTne po3HnUHOr ToproBn. He
OTnpaBnTe paIoocTaHcuIO B aDpeC pIpMb1
Motopona.
Дя noyuhenra rapaHTnHoro o6cnyJBaHna Heo6xOIMMO npeIbYBnTb DOKyMeHT O NOKynKe C DaToi NOKynK. Ha paNocTaHcuN DoJKeH 6bItb YeTKO BnDeH cepuHbH Homep. RaapTuHbIe PpeTeH3nn He npHHMaIOrC, ecNI TnI INn cepuHbH Homep Ha paNocTaHcuN 6bl IN3MeHeH, ydaJIe Hn Hepa36OpuV.
HTo He nokpbIbAeTcra paHtnei
IepeKtbi INI NOBpeXdeHnB pe3yJIbTaTe HeWtAToHO NcNoIb3OBAHnN3dEINr INI HEBbIOJHHeHn IHCTpyKU, pINBEDeHHbIX B DaHHOM pyKOBODCTBe.
IepeKbI INN NOBpeXdHn B pe3yNbTaTe HnpaBnblHO NcNOb3OBaHn, HechactHO CnyaA INN He6peXHoCTn.
DeefekblnnnoBpeJbTaTe HnnpabHbHoro TectnpoBaHn, 3KcNpyatauH, 06CnykBaHn, perylnpOBOK nIIN BHeceHHbIX N3MeHenn nn moDnФkaun IIO6oro poa.
IOnOMKn IIn NIOBpeKdEHH aHTeHH, 3a NCKJIIOUcEHnEM NOJOMOK INN NOBpeXdEHH, ABNBUXXCpRMBIM CJIeDCTBnEM DeΦeKTa MaTePnaJIOB INN N3ROTOBJIeHH.
I3dJIy,pa3o6paHHbIe IINOTpeMOHTPOBaHHbIE TaKIM 6bpa3OM, YTO BCNEcTBHe TaKO pa36OpKn IIN peMOHTa pe3KO yxuDunIOscB KaueCTBO pa60tI I3dJIy INI CTaJ HeBO3MOXHbIM HOPMaJIbHbI OCMToP IN TeCTnPOBaHne IJN IPOBepKc CnpaBeDInBOcTn rapaHTNHBIX npTeH3NI.
IepeKtblnnIOBpeXdeHnN3-3a He npabunbHoro pacctOraHnMexdy paAnocTaHnA M.
DepeKbI INI NOBpeXdEHn I3-3a nonaHaHn BnaI INI XNDKOCTN.
Bce nactkoBbIe nobepxHocTn npyrne HapyKhble OTkpblte qactN, nozaapanaHHbIe IIN NOBpeXdEHbIe B pe3yIbTaTe HopMaJIbHOro NcNoJIb3OBAHnA.
N3dJIa, B3rTbIe HApOKaT.
IepnoDnueckoe 6cnyxuBaHne n peMOHT IN3aMeHa YacteN, Tpe6yUoUncEeB pe3yJbTaTe HOpMaJIbHOro ICNoJIb3OBAHnR N3HOca.
HΦopMaζησoabTOpCKOM npaBe
OncaHbIe B DaHHOM pyKOoDCTBe n3deJIINr
fnpMb MoToPOna MOryT CoepKAtb
3aunuEHHbIe aBTOpCKMn npabAmn nporpaMMbl
fnpMb MoToPOna, XpaHraUneCn Ha
NoynpOBoDnHKOBbIX 3Y nIi npyRnx HocnteJx.
3aKoHb CoeInHeHbIX UtaTob AmepnKn I
HeKOTOpbIX dpyrNc CTpaH 3aunuAOT HeKOTOpBie
NCKLIOChTeNbHbIe npBa KOMnaHm MoToPOna B
OTHOseHN 3aunuEHHbIX aBTOpCKM npabOM
nporpaMM, BKlIOUaY npaBO Ha KOnpOBaHne I
BOcnpON3BeDeHne B JIO60 fOpMe 3aunuEHHbIX
ABTOpCKM nPaBOM KOMnbIOTepHbIX nporpaMM.
B CBA3N C 3TNM HnKaKne KOMNbIoTePbIe nporpaMMbl fnpMbIMotoPoNA, coDepeXaUneCBA n3JeNIAx MoToPOJa, ONncaHHbIX B HaCToAeM pyKOBoDCTBe, He pa3peWaeTcR KOInpOBAt b INH BOCIpON3BOJNTb KaKIM 6bl TO HN 6blIO INbIM cNoCo6om 6e3 YBHO r NcBMeHHOro pa3peWeHnA fnpMbIMotoPOJa. KpOME TOrO, NOKyNka n3JeNIM MotoPOna He daet HnKaKnx RaBbIX ININ NOpa3ymeBaemBX npab INI npab Ha IInCeH3IN, HAnpIMep He noDpa3ymeBaET OKa3a BnadeJIbceB OT CBOINx PAB IN T.I., B OTHoWEHm ABTOPCTBa, IaTEHTOB INI 3aBOK Ha IaTeHTbI KOMNaHN MToPOJa, 3a NCKIIuoyehnEM ObblhIX He NCKJIIOHTeNBbIX npab HA 6e3BO3Me3dHyIO JInCeH3NIO HA INCNOb3OBaHne 3TINX IN3DeJIIN COrJIacHO 3aKOHAM O IpOdaJxe IN3DeJIIN.
MOTOROLA, CTINN3OBaHHbI JIOrOTn "M" n Другпе yNOMaHTbIe 3decb TOBapHbIe 3HaKIn КOMпани Motorola, Inc., (3aperncTpnpoBaHO B ВededomCTBe NaTeHTOB IN TOBapHbIX 3HaKOB CUSA).
© Motorola, Inc. 2010
INDHOLD
Produktikhered og
446.00625 - 446.09375 MHz
Strömkilde AAA-NiMH-batter
Normalt 14 timer for
NiMH-batterier
Kanal Frekvens
1446.00625
2446.01875
3446.03125
4446.04375
5446.05625
6446.06875
7446.08125
8446.09375
© Motorola, Inc. 2010
INNEHÄLL
© Motorola, Inc. 2010
INNHOLD
Produktikherpet og RF-ekspondering
446.00625-446.09375 MHz
Strømkilde AAA NiMH-batteripakke
4 AAA alkaliske batterier (ikke inkludert)
Rekkevidde Optil 8 km
Batterilevetid 16 timer normal
© Motorola, Inc. 2010
SISÄLTÖ
Kannettavien radiopuhelimien
and Motorola are registered trademarks of Motorola, Inc.
© 2010 by Motorola, Inc.

Released in 06/2010. All Rights Reserved.


- Product Safety and RF Exposure for Portable Two-Way Radios
- ATTENTION!
- Features
- Controls and Functions
- Display
- Package Contents
- Install the Battery
- Battery Level and Low Battery Alert
- Charging the Radio
- Charging the battery
- Using the Radio
- Turning the Radio On and Adjusting the Volume
- Adjusting the Sound (Key tone)
- Talking on Your Radio
- LCD Backlight
- Navigating through the Menu
- Select Menu
- Choosing a Channel
- Choosing a Sub-code
- Dual Watch Mode
- Stopwatch Activation
- Key Lock Activation
- Mode Menu
- Channel Scan Feature
- Monitor Mode Feature
- Voice Operated Transmission
- Transmitting a Call Tone
- Key Tone
- Roger Beep
- Automatic Power Save Feature
- Auto Power Off
- Room Monitor Feature
- Note:
- Specifications Frequency Chart (MHz)
- Approved Accessories List
- Warranty Information
- What Is Not Covered By The Warranty
- Copyright Information
- SOMMAIRE
- INHALT
- INDICE
- INHOUDSOPGAVE
- ICINDEKILER
- COIDEPXKAHNE
- CBeHeHnO 6e3OpacHOCTN BO3DeIcTBn N3JyHaEMo PAAnOuaCTOTHOJ 3HEprn PpIMHeHtJIbHO K NOPTaTNBHbIM paAnocTaHcIaM
- BHIMAHNE!
- XapaKTepeNCTnKn
- Ducnnei
- KomnneKT noctabku
- YctaHObKa 6aTapei
- Hndkatop ypOBHa 3apJa 6aTapei
- 3apka 6aTapei 6e3 oTCoeHHeHnO paNocTaHn
- 3apka 6aTapeoTeIbHo oT paNocTaHcN
- 3Kcnnyataa npaioctaun
- BkIIOeHne paAnocTaHcunn nperyIINpOBKa rpoMkoCTn
- HactpoikKa 3Byka (ToH KJIaBm)
- BedeHne paHoneperoBopOB
- Iopcbetka dncnJeA
- Habiracny no MeHIO
- MeHIO Bbl6opa
- BbI6op kaHaJa
- Bb6op cy6koDa
- Pexm DboHoro cKaHnpoBaHna
- BkIIOUeHne cekyHDoMepa
- Блорва КларыТурь
- MeHIOpeKIMOB
- ToH KJIaBnI
- ToH KOHcA nepeDaun
- ABTOMaTnueckaФyHKuN3KOHOMn6aTapei
- ABTomatnueckoe BbIKJIOueHne NHTaHna
- Функцу монторига пошени.
- Ta6nua yactot(Mf)
- IPEUEHb OIOBPEHHbIX AKCECCYAPOB
- TapaHTnHaHa HΦopMaζη
- HTo He nokpbIbAeTcra paHtnei
- HΦopMaζησoabTOpCKOM npaBe
- INDHOLD
- Kanal Frekvens
- INNEHÄLL
- INNHOLD
- SISÄLTÖ
Brand : ZEBRA
Model : T6 Walkie Talkie
Category : Radio