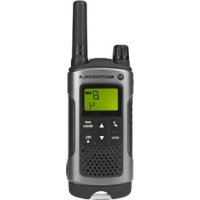
T80 Walkie Talkie Twin Pack - Radio ZEBRA - Free user manual and instructions
Find the device manual for free T80 Walkie Talkie Twin Pack ZEBRA in PDF.



| Product type | PMR446 two-way radio |
| Brand | Zebra (licensed by Motorola Solutions) |
| Model | T80 Walkie Talkie Twin Pack |
| Box contents | 2 T80/T80 Extreme radios, 2 belt clips, 1 2-position charging station, 1 mains adapter, 2 battery holders, 2 rechargeable NiMH batteries, 2 headsets (Extreme model), 2 cords (Extreme model) |
| Power supply | Rechargeable NiMH battery or 4 AAA alkaline batteries |
| Battery life | 16 hours under normal use conditions |
| Maximum range | 10 km (may vary depending on environment and topography) |
| Channels | 8 PMR channels |
| Subcodes | 121 subcodes (38 CTCSS codes + 83 DCS codes) |
| Display | Backlit LCD display |
| Main functions | VOX, 10 call tones, LED lamp, channel scanning, dual watch, keypad lock, auto power off, power save, low battery alert, silent mode, direct/group/all call, auto channel change, timer, environment monitor, confirmation tone |
| Protection | IPX2 (T80 model), IPX4 (T80 Extreme model) |
| Approximate dimensions | 160 x 55 x 30 mm (estimation) |
| Approximate weight | 200 g with battery (estimation) |
| Care and cleaning | Wipe with a soft, dry cloth. Do not use chemical or abrasive products. Avoid excessive moisture. |
| Safety | Read safety instructions before use. Respect exposure limits for radio frequencies. Do not open the housing. Use only approved accessories. |
| Warranty | Limited warranty by the reseller. Keep the proof of purchase. The warranty does not cover damage due to improper use, moisture, or dropping. |
Frequently Asked Questions - T80 Walkie Talkie Twin Pack ZEBRA
User questions about T80 Walkie Talkie Twin Pack ZEBRA
0 question about this device. Answer the ones you know or ask your own.
Ask a new question about this device
Download the instructions for your Radio in PDF format for free! Find your manual T80 Walkie Talkie Twin Pack - ZEBRA and take your electronic device back in hand. On this page are published all the documents necessary for the use of your device. T80 Walkie Talkie Twin Pack by ZEBRA.
USER MANUAL T80 Walkie Talkie Twin Pack ZEBRA
m = 311 ;

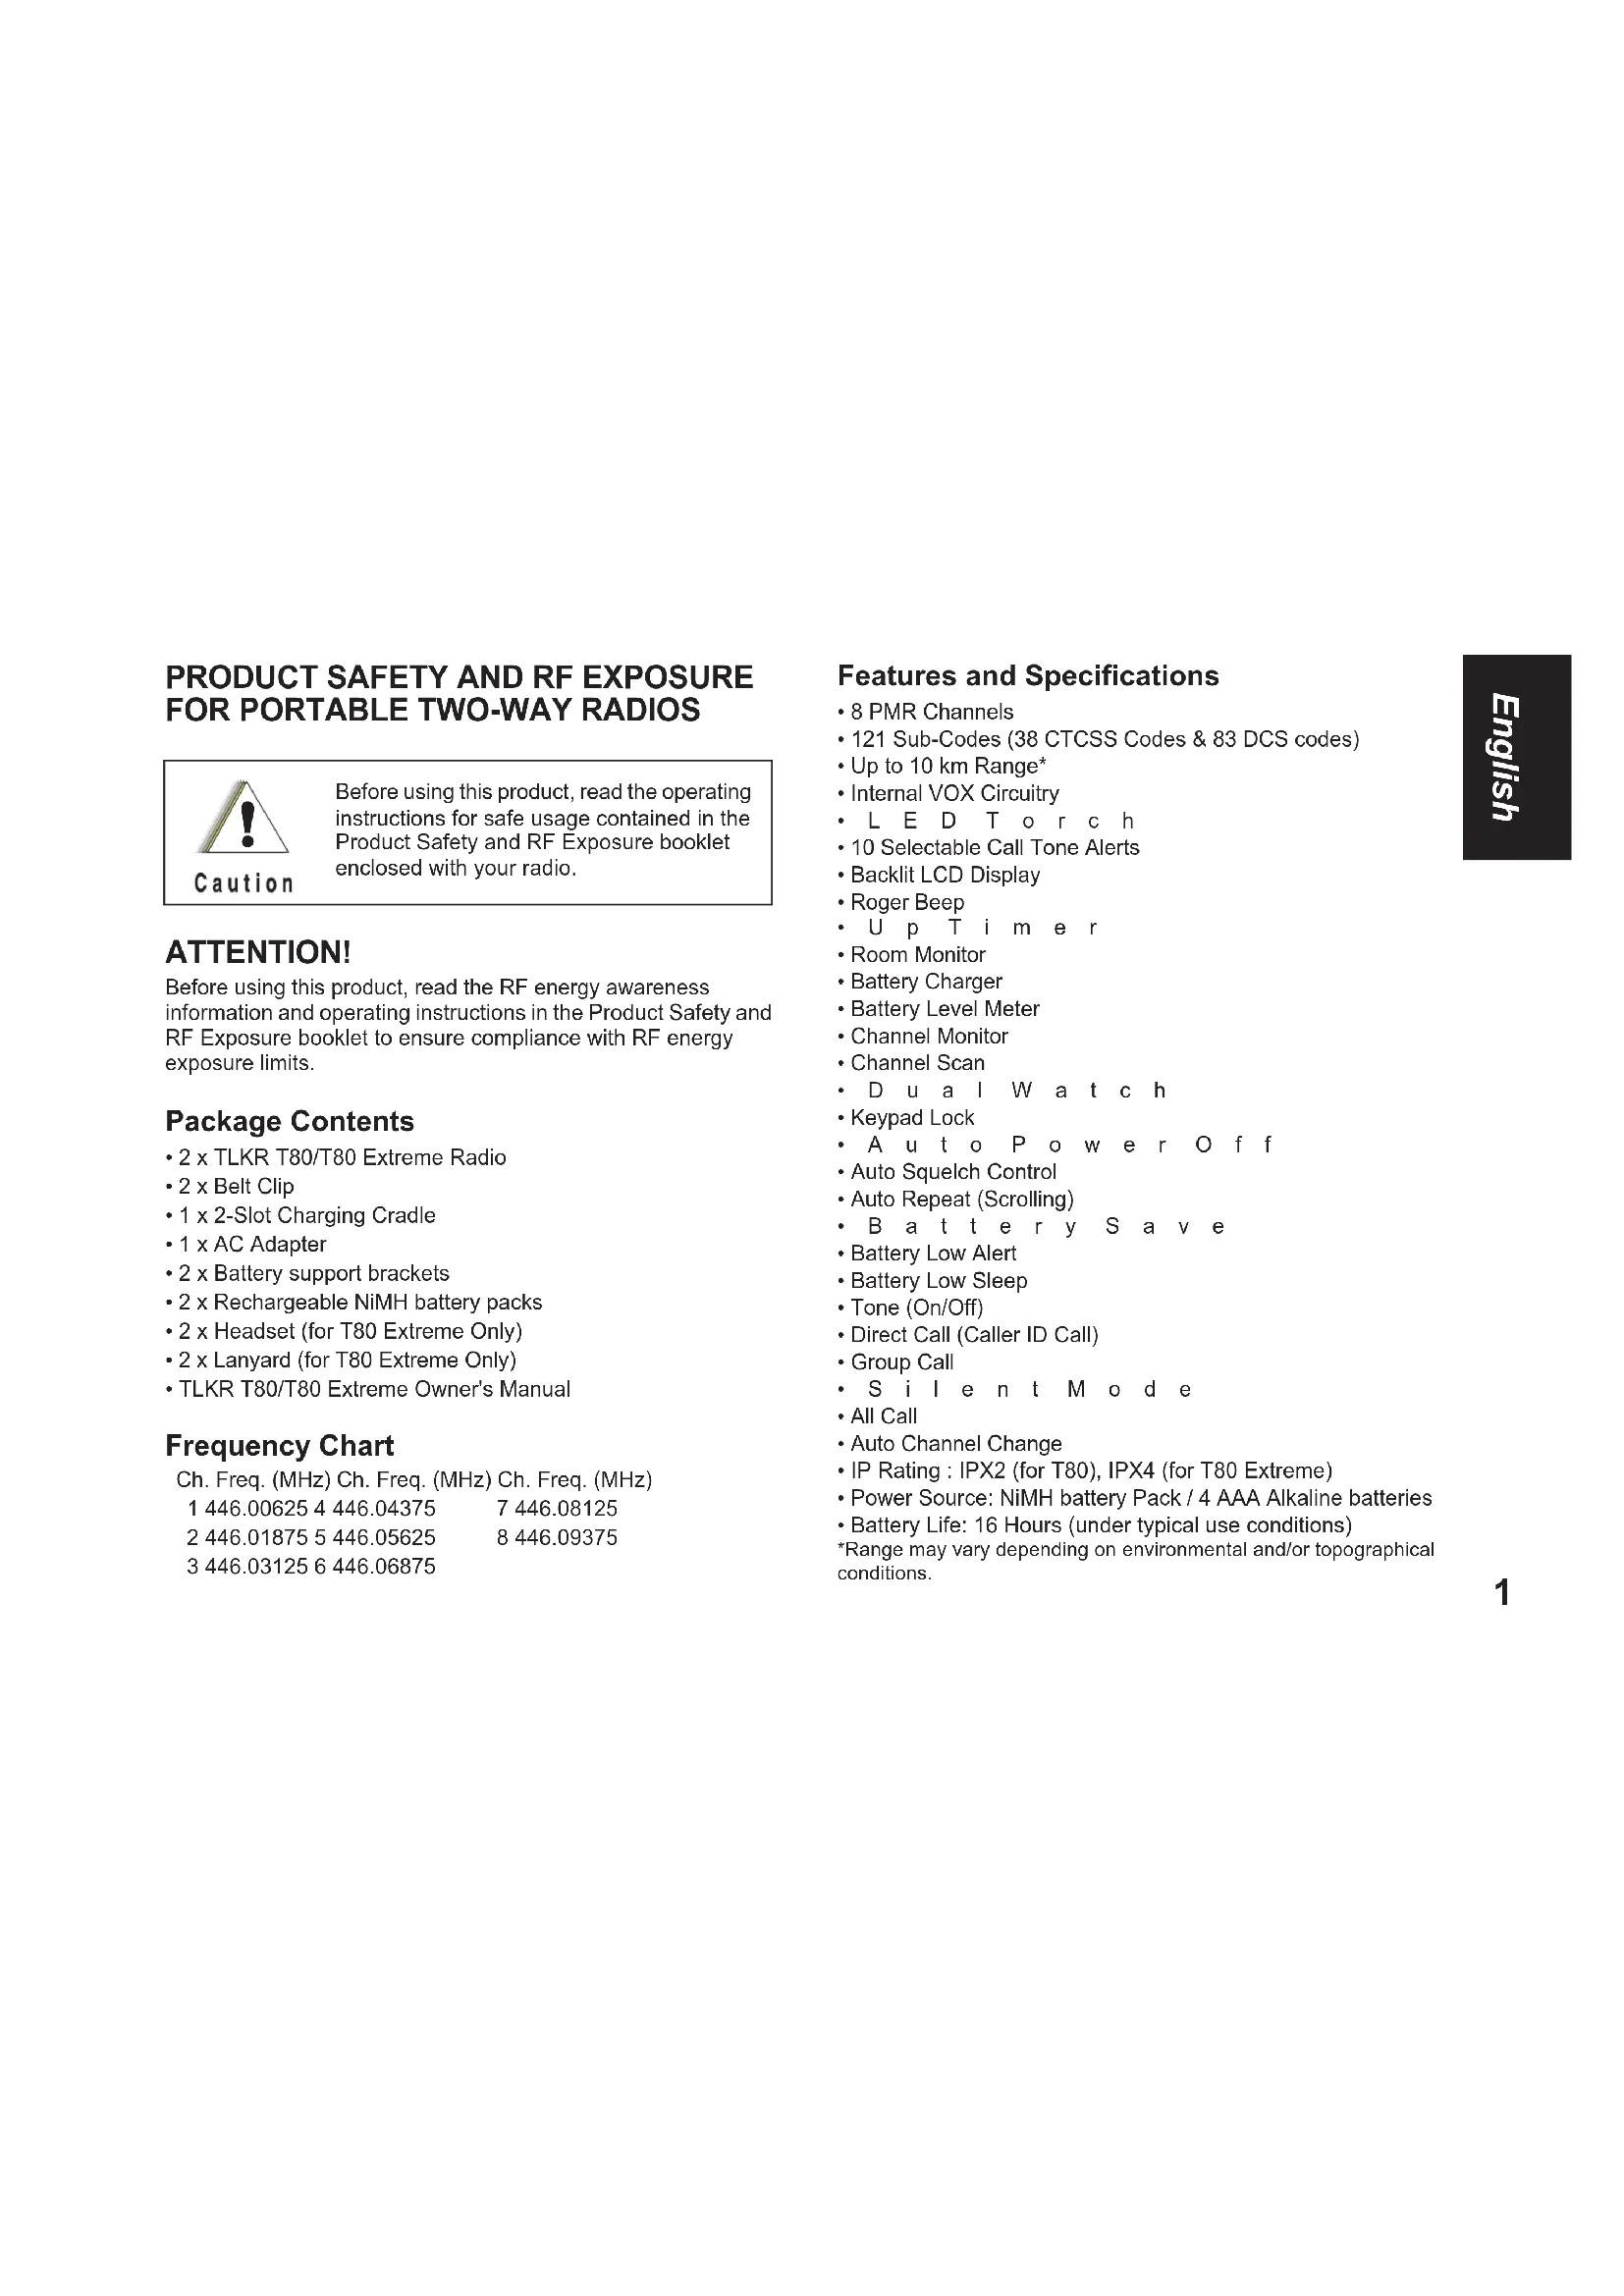
PRODUCT SAFETY AND RF EXPOSURE FOR PORTABLE TWO-WAY RADIOS

Caution
Before using this product, read the operating instructions for safe usage contained in the Product Safety and RF Exposure booklet enclosed with your radio.
ATTENTION!
Before using this product, read the RF energy awareness information and operating instructions in the Product Safety and RF Exposure booklet to ensure compliance with RF energy exposure limits.
Package Contents
- 2 x TLKR T80/T80 Extreme Radio
- 2 x Belt Clip
- 1 x 2-Slot Charging Cradle
- 1 x AC Adapter
- 2 x Battery support brackets
- 2 x Rechargeable NiMH battery packs
- 2 x Headset (for T80 Extreme Only)
- 2 x Lanyard (for T80 Extreme Only)
TLKR T80/T80 Extreme Owner's Manual
Frequency Chart
Ch. Freq. (MHz) Ch. Freq. (MHz) Ch. Freq. (MHz)
1446.00625 4446.04375
7446.08125
2446.01875 5446.05625
8446.09375
3446.031256446.06875
Features and Specifications
8 PMR Channels
121 Sub-Codes (38 CTCSS Codes & 83 DCS codes)
- Up to 10 km Range*
- Internal VOX Circuitry
- L E D T o r c h
10 Selectable Call Tone Alerts
- Backlit LCD Display
- Roger Beep
U p T i m e r
Room Monitor
- Battery Charger
- Battery Level Meter
- Channel Monitor
- Channel Scan
DuaIWatch
- Keypad Lock
·AutaToPoweROff
-
Auto Squelch Control
-
Auto Repeat (Scrolling)
· B a t t e r y S a v e
- Battery Low Alert
Battery Low Sleep
-
Tone (On/Off)
-
Direct Call (Caller ID Call)
Group Call
·S i l e n t M o d e
All Call
- Auto Channel Change
IP Rating: IPX2 (for T80), IPX4 (for T80 Extreme)
- Power Source: NiMH battery Pack / 4 AAA Alkaline batteries
- Battery Life: 16 Hours (under typical use conditions)
*Range may vary depending on environmental and/or topographical conditions.

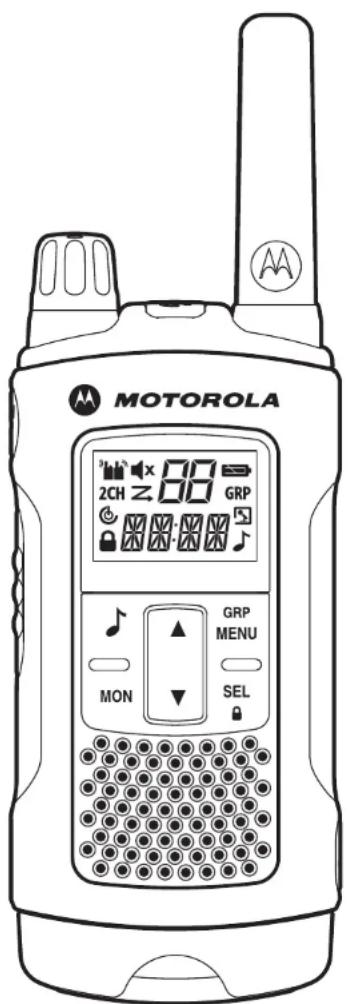
Control and Functions
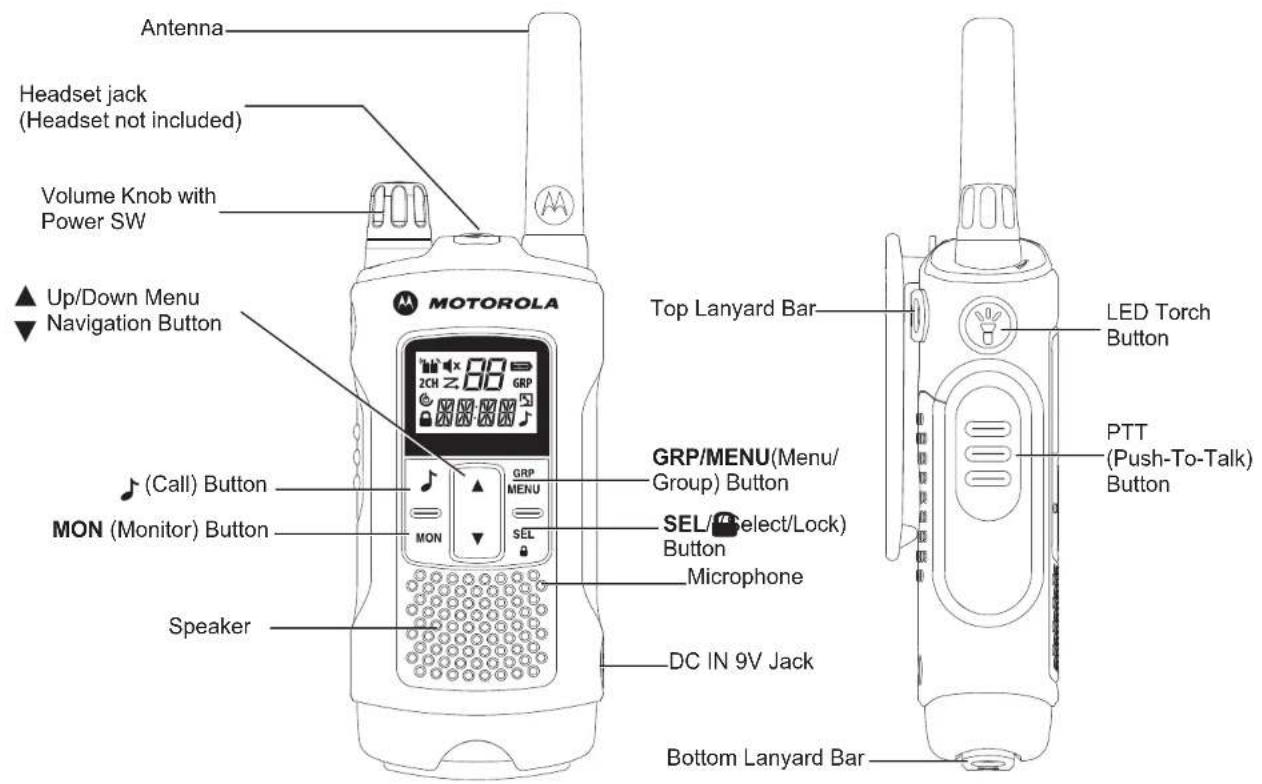
Note: Radio depicted is T80 Extreme. Also applicable for T80 radio.
Display Installing the Battery
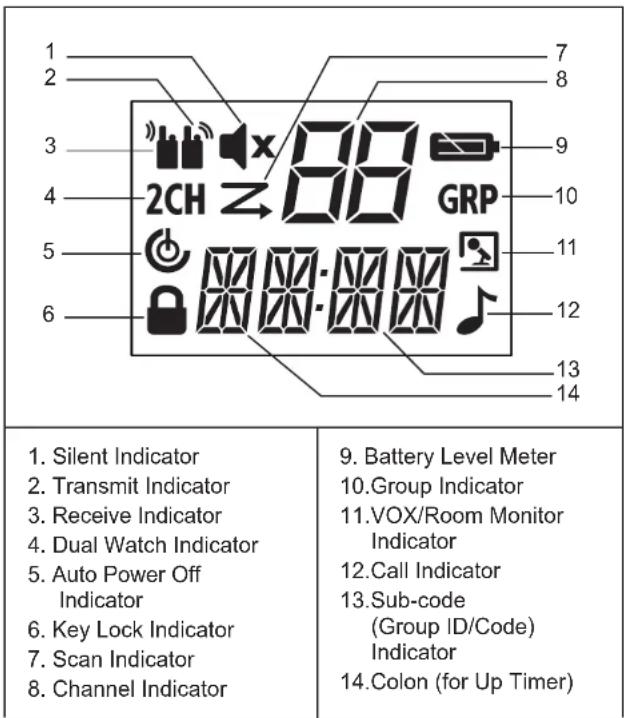
- Make sure your radio is turned OFF.
- For T80: To remove the battery compartment door, press the tab at the bottom of the compartment door.
For T80 Extreme : To remove the battery compartment door, use a coin to wedge the battery door open.
- Install the NiMH batteries into the battery compartment.
- Replace the battery compartment door.
Battery Level and Low Battery Alert
| Indicates that the battery is fully charged. | |
| Blinks when battery is low; charge the radio or replace batteries immediately. (The alert tone sounds every 5 seconds for 30 seconds when the battery is low.) |
Charging the Radio
Direct Charging :
- Make sure your radio is turned OFF.
- Connect the AC adapter to the radio's DC IN 9V. Connect the other end of the AC adapter to a vehicle accessory power outlet.
- Charge the battery pack for 14 hours.
Using the Charging Cradle :
- Make sure your radio is turned OFF.
- Connect the AC adapter to the DC IN 9V of the charging cradle.
- Place the charging cradle on a stable surface.
- Place the radio in the charging cradle with the keypad facing forward.
- LED indicator will illuminate and remain illuminated as long as the radio is in the charger.
Note: Charge the battery pack for 14 hours.
Using the Battery Support Bracket :
- Remove the rechargeable NiMH battery pack from the radio.
- Place the battery support bracket into the charging cradle.
- Install the NiMH battery pack into the charging cradle. Ensure that the charging contacts are correctly aligned.
- LED indicator will illuminate and remain illuminated as long as the radio is in the charger.
Note: Charge the battery pack for 14 hours.
Basic Radio Operations
Read this reference guide completely before attempting to operate the unit.
Turning your Radio On/Off
To turn your radio ON, turn the rotary knob clockwise.
To turn your radio OFF, turn the rotary knob counterclockwise.
Adjusting the Volume
Increase volume by turning the rotary knob clockwise. To decrease volume, turn the rotary knob counterclockwise.
Adjusting the Sound (Key Beeps)
Your radio emits a beep each time one of the buttons is pressed (except the PTT and button).
Press and hold the button while turning the radio ON to switch the sound ON/OFF.
Navigating through the Menu
Your radios has two Menu functions: Select Menu and Common Menu.
- To enter the Select Menu, press the SEL/ button.
- To enter the Common Menu, press the MENU/GRP button.
-
Additional presses of the SEL/ button or MENU/GRP button will advance you through the Menu.
-
To exit the Menu function, do one of the following:
a. Press the MENU/GRP button,
b. Press the PTT button
c. Wait 10 seconds until the unit automatically returns to "Normal" mode.
Talking on Your Radio
- Hold your radio 5-8 cm from your mouth.
- Press and hold the PTT button while speaking. The appears on the display.
- Release the PTT button. You can now receive incoming calls. When you do, the ^ 喜 appears on the display. To respond, repeat procedure from step 1.
Note: When you continue to transmit for 60 seconds, the radio emits TX Time Out tone and the icon flashes. The radio will stop transmitting.
In order to speak to someone, both your radios must be set to the same channel and Sub-Code. Refer to "Selecting a Channel and a Sub-Code" below.
Selecting a Channel and a Sub-Code
To select a Channel:
- SEL/ Button to enter Select Menu. Advance until the Channel indicator blinks.
- to the required channel.
To select a Sub-code :
- SEL/ button to enter Select Menu. Advance until the Sub-code indicator blinks.
- to the required Sub-code.
3.Exit the Select Menu.
Select Menu
Your radio navigates through the Select Menu as follows:
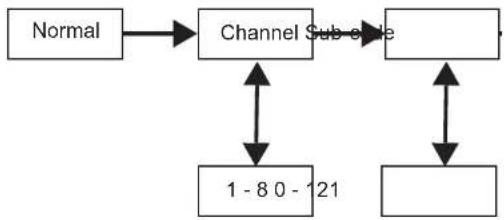
Voice Operated Transmission (VOX)
Transmission is initiated by speaking into the microphone of radio instead of the pushing the PTT button.
To select the VOX level:
-
MENU/GRP button to enter Common Menu. Advance and select "VOX".
-
SEL
to select.
- to the desired VOx sensitivity level.
4.Exit the Select Menu.
Note: Level "N"(OFF) disables VOX. Levels 1-5 set the sensitivity of the VOX circuit.Use level 1 in quiet environments, and use level 5 in very noisy environments. You can find the appropriate sensitivity level by speaking into the microphone. If the flashes, your voice is accepted.
Transmitting a Call Tone
Your radio is equipped with 10 selectable call tones .
To select a call tone:
-
MENU/GRP button to enter Common Menu. Advance to "TONE".
-
SEL/ to select.
-
to he desired call tone.
4.Exit the Common Menu.
To transmit the selected call tone :
- to transmit the selected call tone. The selected tone will automatically be transmitted for a fixed length of time.
- PTT to cancel Call Tone.
Auto Power Off
Auto Power Off feature allows you to set the time that the radio turns off automatically.
1. MENU/GRP button to enter Common Menu. Advance until "PWR" and the current Auto Power Off time blinks.
2. SEL/ to select.
3. to select the time from ON, 1H, 2H, and 3H.
4.Exit the Menu.
Common Menu
Your radio navigates through Common Menu as follows:
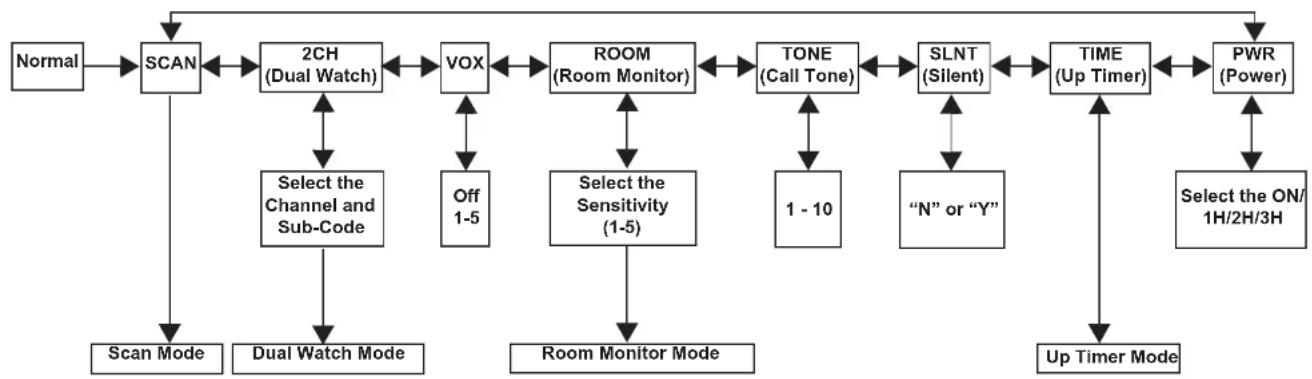
Group Menu
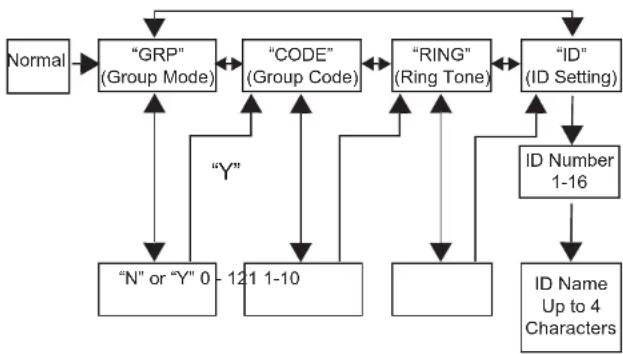
- Press and hold MENU/GRP to enter GROUP MENU.
- to proceed to each menu (GRP/CODE/RING/ID).
- SEL/ select.
- to proceed to desired condition or number.
- SEL/ select.
- MENU/GRP to exit.
Set Group Mode
- Press and hold MENU/GRP to enter GROUP MENU.
- SEL/ control Group Mode.
- toY". SEL/ to g to Group Menu and Group Code Setting.
- to▼". SEL/ to from Group Menu.
Set Group Code
- to choose the Group Code.
- SEL/ complete Group Code setting.
- The radio enters "Ring Tone Setting Menu"
- MENU/GRP to back to Group Menu.
Set Ring Tone
The user can select the Ring Tone for a Direct Call. Ring Tones are the same as Call Tones.
- to Select a Ring Tone.
- The selected Ring Tone sounds.
Set ID
Each radio in the group needs to be set with an ID. The user can set an ID name of up to four (4) characters.
- to select an ID number.
- If the ID is already taken, USED is seen. If USED is not shown, then the ID is available.
- SEL/ advance to setting ID Name.
Set ID Name
The ID Name appears on the other radio's display when you make an All Call or a Direct Call. The ID Name will also on the other radio's display when they are placing a Direct Call. When no ID name is set, the unit number appears.
- to select a character that will blink on the display.
- SEL/ select and move to the next character.
- SEL/ register the ID number and ID Name.
Note: The radio cancels selected ID Number and entered ID Name, then exits from Group Menu when MENU/GRP button is pressed.
Channel Setting in Group Mode
To set Auto Channel Change in Group Mode:
- MENU/GRP to enter Group Mode.
- SEL/ enter Channel Setting.
- to Auto Channel Change Setting".
- SEL/ to select
A channel number will blink and "ALL" is seen.
-
to select the channel.
-
SEL/ or to transmit Auto Channel Change command.
- MENU/GRP to return to Channel Setting in Group Mode.
To set Manual Channel in Group Mode:
- MENU/GRP to enter Group Mode.
- SEL/ enter Channel Setting.
- to Manual Channel Setting".
- SEL/ to select
A channel number will blink and "MY" is seen.
- to select the channel manually.
- SEL/ exit from Manual Channel setting.
- MENU/GRP to return to Channel Setting in Group Mode.
Set All Call
- MENU/GRP to enter Group Mode.
- to enter All/ Direct Call Setting.
- toSelect All Call Transmission. "SYNC" is seen.
- SEL/ to exit this setting, and transmit All Call.
All Call Tone sounds. and binks while transmitting.
- MENU/GRP to exit.
Set Direct Call
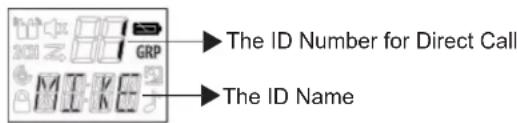
- MENU/GRP to enter Group Mode.
- Enter All/ Direct Call Setting.
- toSelect an ID Number.
- SEL/ to Transmit Direct Call Command. The selected Call Tone sounds. The display shows TX icon and CALL icon while transmitting.
- MENU/GRP to go back to All/Direct Call setting.
Features on Your Radio
Channel Scan Mode
Enables your radio to scan for active channels. When activity is detected, your radio lands (stays) on that channel for 2 seconds (5 seconds for VOX ON without headset). To transmit on that channel, press the PTT button. When activity on the landed channel ends, your radio continues scanning other channels. To turn the channel scan ON:
- MENU/GRP to enter Common Menu. Advance to "SCAN".
- SEL/ turn ON channel scan.
- MENU/GRP or PTT to turn OFF Scan mode.
Dual Watch Mode
Enables your to scan the current channel and another channel alternately.
To set another channel and start Dual Watch:
-
MENU/GRP to enter Common Menu. Advance to "2CH".
-
to select the channel, then press SEL/
-
to select the Sub-code, then press SEL/
-
The radio starts to Dual Watch.
Note: If you set the same channel and Sub-code as the current channel, Dual Watch doesn't work.
- MENU/GRP to turn the Dual Watch mode OFF.
Room Monitor
Enables your radio to detect voice/noises (according to the sensitivity level set) and transmit back to the listening radio without pushing the PTT button. The monitoring radio is not able to receive any transmissions in this mode.
To turn Room Monitor ON:
- MENU/GRP to enter Common Menu. Advance to "ROOM".
- SEL/ select.
- tothe desired room monitor sensitivity level.
Note: Use level 1 in quiet environments. Use level 5 in very noisy environments.
- SEL/ turn ON room monitor.
MENUGRP to turn OFF Room Monitor.
Note: When the voice/noise in the monitored room continues for more than 60 seconds, the monitoring radio stop monitoring for 5 seconds, and resumes.
Silent Mode
Silent mode will mute all incoming calls. The backlight of the radio blinks when there's an incoming call. If the call is not
answered, the backlight turns off and the blinks until there is no signal. The T80/T80 Extreme radio will vibrate when there is a missed call.
The silent mode will be disabled for 15 seconds when you transmit, receive or press any other buttons.
To turn silent mode ON:
- MENU/GRP to enter Common Menu.
- Select "SLNT".


- turn Silent Mode ON. "Y" is displayed on the Channel Indicator. 1pears.
- turn Silent Mode OFF. "N" is displayed on the Channel Indicator. It disappears.
Up Timer
Enables your radio to time up to 59 minutes 59 seconds. You can receive incoming calls in this mode.
To use up timer:
- MENU/GRP to enter Common Menu. Advance to "TIME".
- SEL/ select the Up Timer.
- SEL/ start the Up Timer.
- SEL/ pause the Timer.
SEL/ Go ON/OFF the Timer.
- MENU/GRP or PTT to stop or reset up timer.
Note: If a call is received, the ID Name will be indicated and then the radio will return to timer mode and the Call Icon will blink.
Key Lock
Press and hold SEL/ until /"LOCK" appears to lock the keypad.
Press and hold SEL/ until /NLK" disappears to unlock the keypad.
LCD Backlight
The LCD display will automatically illuminate for 10 seconds after any button is pressed (except for PTT).
Monitor Mode
Enables you to listen for weak signals on the current channel. To turn the Monitor Mode ON:
- Press the MON button for brief listening. The icon blinks.
- Press and hold the MON button for 2 seconds for continuous listening. The icon continues to blink.
To turn the Monitor Mode OFF:
Press the MON, MENU/GRP or SEL/ button to return to "Normal" mode. The icon stops blinking.
Roger Beep
Sounds to indicate the end of a PTT or VOX transmission. It can be heard through the speaker when Key Beep is on. It cannot be heard through the speaker if Key Beep is turned off.
Press and hold the button while turning the radio ON to turn the Roger Beep ON. Repeat the step to turn Roger Beep OFF.
LED Torch
Your radio has a built-in LED Torch.
The LED Torch indicator will remain on until the button is released.
Warranty Information
The authorized Motorola dealer or retailer where you purchased your Motorola two-way radio and/or original accessories will honour a warranty claim and/or provide warranty service. Please return your radio to your dealer or retailer to claim your warranty service. Do not return your radio to Motorola.
In order to be eligible to receive warranty service, you must present your receipt of purchase or a comparable substitute proof of purchase bearing the date of purchase. The two-way radio should also clearly display the serial number. The warranty will not apply if the type or serial numbers on the product have been altered, deleted, removed, or made illegible.
What Is Not Covered By The Warranty
- Defects or damage resulting from use of the Product in other than its normal and customary manner or by not following the instructions in this user manual.
Defects or damage from misuse, accident or neglect. - Defects of damage from improper testing, operation, maintenance, adjustment, or any alteration or modification of any kind.
- Breakage or damage to aerials unless caused directly by defects in material or workmanship.
- Products disassembled or repaired in such a manner as to adversely affect performance or prevent adequate inspection and testing to verify any warranty claim.
Defects or damage due to range. - Defects or damage due to moisture, liquid or spills.
- All plastic surfaces and all other externally exposed parts that are scratched or damaged due to normal use.
- Products rented on a temporary basis.
Periodic maintenance and repair or replacement of parts due to normal usage, wear and tear.
Copyright Information
The Motorola products described in this manual may include copyrighted Motorola programs, stored semiconductor memories or other media. Laws in the United States and other countries preserve for Motorola, certain exclusive rights for copyrighted computer programs, including the exclusive right to copy or reproduce in any form, the copyrighted Motorola programs.
Accordingly, any copyrighted Motorola computer programs contained in the Motorola products described in this manual may not be copied or reproduced in any manner without express written permission of Motorola. Furthermore, the purchase of Motorola products shall not be deemed to grant either directly or by implication, estoppel, or otherwise, any license under the copyrights, patents or patent applications of Motorola, except for the normal non-exclusive royalty free license to use that arises by operation of law in the sale of a product.
MOTOROLA, MOTO, MOTOROLA SOLUTIONS and the Stylized M logo are trademarks or registered trademarks of Motorola Trademark Holdings, LLC and are used under license. All other trademarks are the property of their respective owners.
© 2012 Motorola Solutions, Inc. All rights reserved
Kan. Freq. (MHz) Kan. Freq. (MHz) Kan. Freq. (MHz)
1446.00625 4446.04375
7446.08125
2446.01875 5446.05625
8446.09375
3446.031256446.06875
Canal Freq. (MHz) Canal Freq. (MHz) Canal Freq. (MHz)
1446.00625 4446.04375 7446.08125
2446.01875 5446.05625 8446.09375
3446.031256446.06875
Can. Freq. (MHz) Can. Freq. (MHz) Can. Freq. (MHz)
1446.00625 4446.04375 7446.08125
2446,01875 5446,05625 8446,09375
3446.031256446.06875
Funzioni specifiche
Canal Freq. (MHz) Canal Freq. (MHz) Canal Freq. (MHz)
1446,006254446,043757
446.08125
2446,018755446,056258
446,09375
3446,03125
6446,06875
Kan. freq. (MHz) Kan. freq. (MHz) Kan. freq. (MHz)
1446.00625 4446.04375 7 446.08125
2446.018755446.056258446.09375
3446.031256446.06875
VOX (Voice Operated Transmission)
Transmission initieres ved at tale ind i radioens mikrofon i stedet for at trykke pa knappen PTT.
- SEL/ or at AKTIVERE for rumovergning.
MENU/GRP for at DEAKTIVERE for rumoverganing.
Tuş takimi nii kitlemek icin SEL/ duğmesine /“LOCK” (Kilit)进展情况 - 1. The status of the development of the system in the last 20 years. - 2. The development of the system in the last 20 years.
BKNHHeOH FyHKUIN VOX 6e3 raphHTpyb).YTo6bHaayaTbepeaHu Ha daHHOM KaHane, HAKMTe KhoNky PTT. PnOCTaHOBKe AKTNBHOCTu Ha BbIbpaHHOM KaHane paHOMOynbPiOOnKNT NONCK DpyrNX KaHaoB.
BKNHueHnNONCKaKaHaJIOB
- HaxmTe MENU/GRP nIy BXOda B o6uee MeHIO. IpeuNTe K «SCAN».
- HaxmTe SEL/ 1nBkHoueHnI nonKa KaHaIOB.
- Haxmte MENU/GRP INI PTT BbIKIOHnpeXnMa noNcKa.
PexnM noncka no DBym KaHanaM
I03BONrEt NcKaTb TeKyuN KaHAn I DOnoJHnTeNbHO BTOPOI KaHAn.
Дязадиуг�ога KaHanaHaHaYaHa nonka no DByM KaHanaM:
- HaxmTe MENU/GRP nIa BxOda B o6uee MeHIO. IpeuNTe K «2CH».
- An Bb6opa KaHana, 3aTeM HaxmTe SEL/
- IINI VIIa Bb6opa cykoDa, 3aTeMa HaxMnTe SEL/
- Paɪnɒməʊŋb HauHET NOUNC NO DByM KaHaJIaM.
Примочан: ПОИСК NO ДБУМ KAHAлam He npОиВODHTcA, ecn 3aDAeTcra ToT Jxe KaHAn nnn cy6KoD, UTo n TeKUшm KAHan. - HaxmTe MENU/GRP nIy BbIKIOueHnpeKIma nocka no DBym KaHaanam.
MOHITOP NOMEUENIA
I03BONJET paHNOMOyNIO O6HApYKINBaT roJoc/uyMbI (B COOTBeTCTBn C yctAHOBHeHHbIM YPOBHEyBCNTeHbHOCTn) INpePdABaTB Nx HApOcLyINBAHOUpi paHNOMOyNb 6e3 HaxatNA KHOJIKN PT. B 3tOM pexmE npocnyuINBOUoi paHNOMOyNB He MoKeT pInHMaTb nepeDaHy.
MOTOROLA, MOTO, MOTOROLA SOLUTIONS and the Stylized M logo are trademarks or registered trademarks of Motorola Trademark Holdings, LLC and are used under license. All other trademarks are the property of their respective owners.
© 2012 Motorola Solutions, Inc. All rights reserved

68015000918-A





- PRODUCT SAFETY AND RF EXPOSURE FOR PORTABLE TWO-WAY RADIOS
- ATTENTION!
- Package Contents
- Frequency Chart
- Features and Specifications
- Display Installing the Battery
- Battery Level and Low Battery Alert
- Charging the Radio
- Basic Radio Operations
- Adjusting the Volume
- Adjusting the Sound (Key Beeps)
- Navigating through the Menu
- Talking on Your Radio
- Selecting a Channel and a Sub-Code
- Select Menu
- Voice Operated Transmission (VOX)
- Transmitting a Call Tone
- Auto Power Off
- Common Menu
- Group Menu
- Set Group Mode
- Set Group Code
- Set Ring Tone
- Set ID
- Set ID Name
- Channel Setting in Group Mode
- Set All Call
- Set Direct Call
- Features on Your Radio
- Channel Scan Mode
- Dual Watch Mode
- Room Monitor
- Silent Mode
- The silent mode will be disabled for 15 seconds when you transmit, receive or press any other buttons.
- Up Timer
- Key Lock
- LCD Backlight
- Monitor Mode
- Roger Beep
- LED Torch
- Warranty Information
- What Is Not Covered By The Warranty
- Copyright Information
- Funzioni specifiche
- VOX (Voice Operated Transmission)
- PexnM noncka no DBym KaHanaM
- MOHITOP NOMEUENIA
Brand : ZEBRA
Model : T80 Walkie Talkie Twin Pack
Category : Radio