Vitavit comfort - Saucepan Fissler - Free user manual and instructions
Find the device manual for free Vitavit comfort Fissler in PDF.
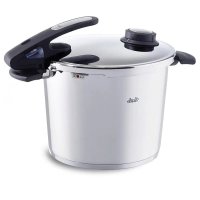
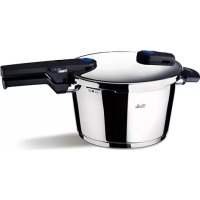
| Product type | Pressure cooker |
| Brand | Fissler |
| Model | Vitavit comfort |
| Available diameters | 18 cm, 22 cm, 26 cm |
| Pot material | 18/10 stainless steel |
| Base type | CookStar all-stove base, induction compatible |
| Operating pressure | 45 kPa (position 1) and 75 kPa (position 2) |
| Cooking temperature | Approx. 110°C (position 1) and 116°C (position 2) |
| Cooking indicator | Three-color indicator (yellow, green, red) |
| Filling capacity | Min 200 ml, max 2/3 volume, half for foaming foods |
| Main functions | Pressure cooking, steaming, braising, roasting, frying (without lid), juice extraction, sterilization |
| Safety devices | Euromatic, pressure valve, sealing ring with pressure limitation, safety catch, locking indicator |
| Handles | Removable lid handle, non-slip pot handle, secondary handle |
| Maintenance of pot and lid | Dishwasher safe (without seal or wheel) |
| Maintenance of sealing ring | Hand wash, recommended replacement after 400 uses or 2 years |
| Included accessories | Depending on version: perforated basket, non-perforated basket, tripod |
| Spare parts available | Sealing ring, wheel, membrane, gaskets, Euromatic, handles, etc. |
| Manufacturer warranty | 3 years |
| Country of manufacture | Germany |
| Manual available in | French and other languages (free PDF download) |
Frequently Asked Questions - Vitavit comfort Fissler
User questions about Vitavit comfort Fissler
0 question about this device. Answer the ones you know or ask your own.
Ask a new question about this device
Download the instructions for your Saucepan in PDF format for free! Find your manual Vitavit comfort - Fissler and take your electronic device back in hand. On this page are published all the documents necessary for the use of your device. Vitavit comfort by Fissler.
USER MANUAL Vitavit comfort Fissler
Biodiversity conservation, 205
Biodiversity of the world, 139-140
Biodiversity of the world, 141
Biodiversity of the world, 142
Biodiversity of the world, 143
Biodiversity of the world, 144
Biodiversity of the world, 145
Biodiversity of the world, 146
Ebrn Hau 127415br-0
Endings: This is a short text, not for profit. It contains some very useful information about the book and its contents. The book is written by a professional who has been trained in the field of psychology and has worked with clients in research and consulting assignments. He is also an active member of the Association for Clinical Psychology and is currently working on a research project on the role of stress in clinical practice.
The results of the 2015 and 2016 seasons are presented in Table 3. The results of the 2015 season are shown in Table 4, while the results of the 2016 season are shown in Table 5. The results of the 2015 and 2016 seasons are presented in Table 6. The results of the 2015 and 2016 seasons are presented in Table 7.
mepnnepeae nanee eae
A
y
Nannn nnnn nn nnnn nnnn nnnn nnnn nnnn nnnn nnnn nnnn nnnn nnnn nnnn nnnn nnnn nnnn nnnn nnnn nnnn nnnn nnnn nnnn nnnn nnnn nnnn nnnn nnnn nnnn nnnn nnnn nnnn nnnn nnnn nnnn nnnn nnnn
Aandrnnnne nnnnne
2016-09-27 15:00:00
= 2


Gebrauchsanleitung
Instructions for Use
Thank you for your confidence ...
and congratulations on the purchase of your new vitavit® pressure cooker. The latest generation of Fissler pressure cookers is based on more than 55 years of experience. Pressure cookers are as modern as ever when it comes to quickly preparing delicious meals while preserving nutrients – and the vitavit® sets new standards in user-friendliness and design.
Your new pressure cooker has been meticulously crafted in Germany. To ensure that you will be able to enjoy it for a very long time and that it will have a long service life, please follow these instructions carefully. We hope you will enjoy trying out everything your vitavit® has to offer. Bon appetit!
Contents
- How pressure cooking works
- Safety information
- Description and advantages of the vitavit
- Before using for the first time
- Information on using your pressure cooker
- Cooking with the vitavit
- Depressurizing the vitavit
- Ways to use your pressure cooker
- Cooking times
- Cleaning and care
II. Questions and answers - Maintenance and replacement parts
- Warranty and service
1. How pressure cooking works
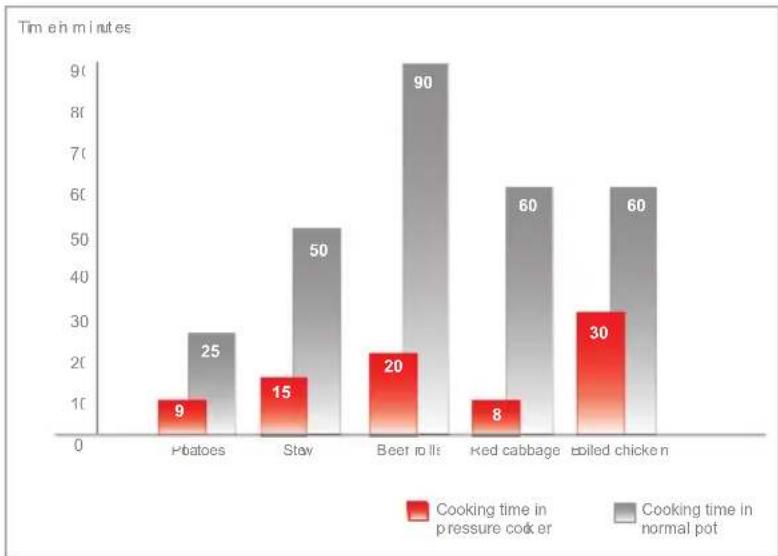
The basic principle of pressure cooking hasn't changed since the first pressure cooker was invented. Foods are cooked in a tightly closed vessel under pressure, at temperatures of over 100^ , since the high pressure that develops inside the pot raises the boiling point of water. This shortens their cooking times substantially. Cooking with a pressure cooker saves a great deal of (cooking) time - about 70 percent on average.
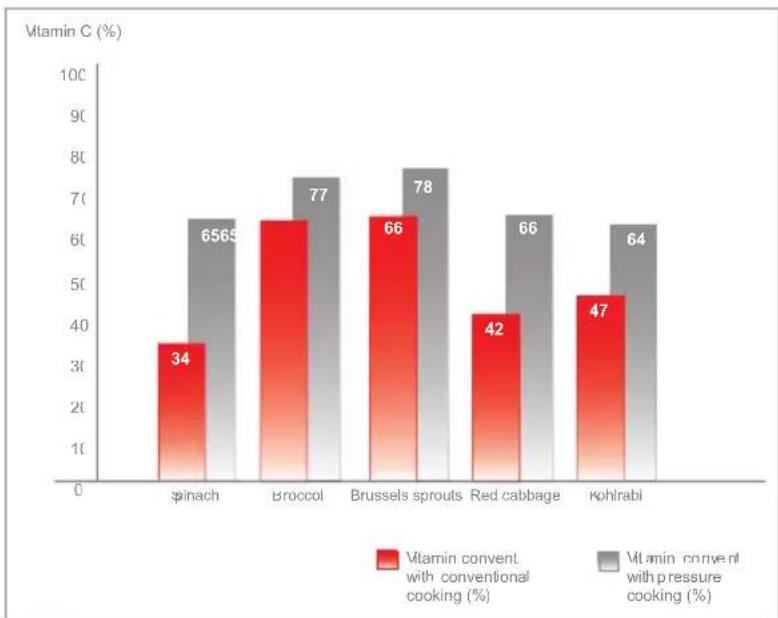
The exclusion of harmful atmospheric oxygen and the shorter cooking times also make it possible to cook the foods very gently. Vitamins, minerals and aroma are preserved to a far greater extent than with conventional cooking methods. And you can taste this, too, for the foods' own flavor is surprisingly intense.
2. Safety information
Instructions for use
- Read the Instructions for Use and all other information thoroughly before you use the vitavit. Incorrect use can be dangerous.
- Do not let anyone use the pressure cooker before reading the Instructions for Use.
- If you give your pressure cooker to anyone, make sure you also provide the Instructions for Use.
Supervision
- Never use the pressure cooker near children.
Uses for the pressure cooker
- Only use the pressure cooker for the purposes described in the Instructions for Use. (See Chapter 8)
- Never use the pressure cooker or pressure skillet in the oven. The handles, valves, and safety mechanisms would be damaged by the high temperatures.
- When deep-frying in the pressure cooker, do not cover it, and only fill it halfway with oil. Never deep-fry under pressure! (See Chapter 8)
- Pressure cookers may not be used for medical purposes - especially not as sterilizers, as pressure cookers are not designed to reach the temperatures necessary for sterilizing.
- Do not cook applesauce or stewed fruits in a pressure cooker, because pockets of steam often form that can spatter up when the cooker is opened and cause scalding.
- When meat is cooked in the pressure cooker, an overpressure develops in the meat. For this reason, after you open the pressure cooker wait a little while before you pierce or move the meat to avoid burning yourself.
Safety and maintenance
Each time you use your pressure cooker, make sure beforehand that none of the valves and safety mechanisms are damaged or dirty and that they function properly. This is the only way to guarantee that it will operate safely. You will find information on this in Chapter 5.
- Do not alter the pressure cooker - especially the safety mechanisms - in any way, other than performing the maintenance measures mentioned in the Instructions for Use. Do not oil the valves.
- Regularly replace parts that are subject to wear, such as the silicone gasket and other rubber parts, with original Fissler replacement parts after you have used the pressure cooker about 400 times or, at the latest, after 2 years. Parts that show visible damage (e.g. tears, discolorations or deformations) or that do not fit correctly must be replaced immediately. Otherwise, this could affect how well and how safely your pressure cooker works.
- Use only original Fissler replacement parts. It is especially important for you to only use pots and lids for the same model, as well as other replacement parts that are intended specifically for your cooker. (See Chapter 12)
- For your own safety, please retighten loosened screws immediately.
- For your own safety, please replace damaged plastic handles immediately with original Fissler replacement parts.
Operation of the pressure cooker
- The cooker is under pressure when in use. Incorrect use can result in burns. Make sure that the cooker is properly closed before you build pressure. You will find information on this in Chapter 4. Never use the pressure cooker with the lid placed loosely on top of it.
Only use the heat sources that are mentioned in Chapter 5. - Make sure that the pressure cooker contains liquid before you heat it up. Not doing so could result in damage to the cooker and the burner.
Safety information / Description and advantages of the vitavit
Minimum amount: 200-300 ml of water, depending on the diameter of your cooker. (See "min" marking)
In case of extreme overheating, plastic parts on the cooker or the aluminum in the base could melt and liquefy. If this should occur, turn off the heat source and do not move the cooker until it has cooled down completely. Air the room.
- Do not fill the pressure cooker to more than 13 of its volume. (See "max" marking)
For foods that foam or swell while they are cooking, such as rice, legumes, broths or dried vegetables, do not fill the pressure cooker to more than half full. (See "1/2" marking) - Never leave your pressure cooker unattended. Regulate the energy source so that the traffic light indicator does not show the red ring. If the energy source is not turned down, steam will escape through the valve and the amount of liquid in the cooker will be reduced. If all of the liquid should vaporize, the food will burn and the cooker and burner may be damaged.
- Move the pressure cooker very carefully when it is under pressure. Do not touch the hot surfaces. Use the handles and controls and, if necessary, potholders.
Opening the cooker
- Never try to force the pressure cooker open. Do not open it before you are certain that it has been fully depressurized. You will find information on this in Chapter 7.
Always shake the pressure cooker before you open it, to make sure that pockets of steam will not spatter up and scald you. This is especially important for quick depressurizing or if you cool the cooker under running water. - Always keep your hands, head and body out of the danger zone when depressurizing the pressure cooker, for the escaping steam could injure you. Be particularly careful about this when you are depressurizing quickly with the help of the release button or the control valve.
Important
- Do not use the pressure cooker if it – or any of its parts – is damaged or deformed or does not function as described in these Instructions for Use. In this case, get in touch immediately with the closest Fissler retailer or with the Customer Service Department at Fissler GmbH. (For the address, see Chapter 13.)
Please keep these Instructions for Use in a safe place.
3. Description and advantages of the vitavit
See Fig. A
I. Lid handle
-
removable for easy cleaning
-
Release button
-
for depressurizing and opening the cooker
-
Locking indicator
shows whether the cooker is properly closed
-
Openings for steam escape
-
while building pressure
- when the Euromatic is triggered
- when depressurizing with the release button
5. Control valve
- to set the cooking setting
- with the traffic light indicator
- with a vent for automatic pressure limitation (pressure guard)
- removable for easy cleaning
6. Traffic light system
- helps to regulate the energy source
7. Openings for steam release
- when the selected cooking setting is exceeded
8. Positioning aid
- for simple positioning of the lid
9. Groove for positioning aid
- for inserting the positioning aid
10. Nonslip pot handle
II. Flame guard
- protects the handles when used on gas stoves
12. Volume marking
- with "min" marking for the minimum amount of liquid
- with 12 " marking for the maximum amount of foods that rise
- with "max" marking for the maximum amount of normal foods
13. Insets for steaming (depending on model)
- elongated perforations for optimum penetration of steam
- with ridged surface for free steam flow, even with large items
- with a tripod stand
14. Conical pot bodies
- for stacking pots, even those with the same diameter
15. CookStar all-stove base
- for optimal heat properties on all types of stoves, including induction
16. Helper handle
- with deep recessed grip for safe carrying
17. Safety nubs (safety mechanism)
- prevents pressure from building if the cooker is not closed properly
18. Fissler Euromatic (safety mechanism)
- for automatic pressure building
- prevents pressure building if the cooker is not properly closed
-automatically limits pressure - prevents the cooker from being opened as long as there is pressure
19. Fastening screw for lid handle
- no tools are needed
- with a flat gasket, fixed in the lid
20. Silicone gasket (safety mechanism)
made of high-quality silicone
- with safety pockets to limit pressure
21. Bell-shaped nut for fastening the control valve
- with recessed grips, can be easily removed without tools
22. Silicone membrane
- for sealing the traffic light indicator
Description and advantages of the vitavit® / Before using for the first time
23. Molded valve seal
- for sealing the control valve
24. Valve base seal
- to seal the valve base
See Fig. B
a. CE symbol (ensures that the cooker complies with the EC directive for pressure cookers)
b. Nominal capacity (not equal to usable capacity)
c. Maximum operating pressure (maximum permissible steam release pressure of the valve)
d. Manufacturing date (calendar week/year)
4. Before using for the first time
Make sure you understand how the cooker is used before you try it out.
Opening the cooker
See Fig. C
Press the release button (Fig.A-2) on the lid handle in the direction shown by the arrow, and turn the lid to the right as far as possible. Now you can remove the lid.
Positioning aid
On the lid, there is a metal tab that says "Close" (Fig. A-8). The counterpart to it is a groove (Fig. A-9) in the pot handle. This makes it easy to place the lid in the correct position.
Closing the cooker
See Fig. D
To put the lid on the cooker, hold it slightly slanted, place the positioning aid in the groove on the pot handle, and then lower it. The correct position for the lid is also indicated by red dots on the positioning aid and the pot handle. If these dots are perfectly aligned, the lid can be put on the pot.
See Fig. E
To close, turn the lid to the left as far as possible, until the cooker locks with an audible "click."
Locking indicator
See Fig. F
The locking indicator (Fig.A-3) in the lid handle will tell you whether the cooker is correctly closed and ready to use:
Green = The cooker is properly closed and ready for use.
Red = The cooker is not properly closed, and no pressure can be built up.
Cleaning
Wash the pot, lid and silicone gasket thoroughly before using the pressure cooker for the first time. This will remove any traces of polishing dust and minor impurities.
We recommend the subsequent use of Fissler Stainless Steel Care (or another product for the care of stainless steel cookware) for the pot and lid. This will make the stainless steel more resistant to the influences of salts and acidic substances. Residues of the care product should be thoroughly washed off. Use the care product as needed or when you notice changes in the appearance of the stainless steel surface.
5. Information on using your pressure cooker
Safety mechanisms
Your vitavit pressure cooker is equipped with various mechanisms that automatically make your pressure cooker safe. Before you use the pressure cooker, and each time you use it, be sure to check that the following safety mechanisms are functioning properly. Never alter these in any way. Make sure that the control valve and the lid handle are properly and firmly attached before you begin to cook. You will find information on this in Chapter 10.
Control valve (Fig. A-5)
See Fig. G
Remove the control valve from the lid and turn it to Setting 2. Use your finger to check whether the traffic light indicator (1) and the valve body (2) can move freely and spring back.
Euromatic (Fig. A-18)
See Fig. H+1
Make sure that the Euromatic is clean and can move freely in the lid. The o-ring must lie completely in the groove provided for it.
See Fig. J
Use your finger to check whether the white ball in the Euromatic does not stick and can move freely and spring back.
Silicone gasket (Fig.A-20) and safety nubs (Fig.A-17)
See Fig. K
Make sure that the silicone gasket and the edge of the lid are clean, that the silicone gasket has not been damaged, and that the safety nubs can move freely. Insert the silicone gasket so that it lies completely flat, under the part of the edge that curves inward, on the inside of the lid. The silicone gasket must fit in front of the safety nubs, that is, pressed away from the edge of the lid.
Filling capacity
See Fig. L
Please note the following information on filling amounts. A scale found on the inside of the pot will make it easier to measure these amounts.
"min"
Depending on the diameter of the pressure cooker, at least 200-300 ml of liquid is necessary to produce steam, regardless of whether you are using an inset or not. Never use the pressure cooker without having this minimum amount of liquid (see "min" marking).
018cm:200ml
22~cm : 250~ml
The pressure cooker may only be filled up to 13 full to function safely (see "max" marking).
Information on using your pressure cooker
1/2
For foods that foam or expand during cooking, such as rice, legumes, broths, or dried vegetables, the pressure cooker may only be filled half full (see 12 marking).
Important:
Never cook without sufficient liquid, and make sure that the liquid in the pressure cooker never steams away completely. Otherwise, the food may burn and the cooker, handles and burner can be damaged (see safety instructions).
Suitable stoves
The fully encapsulated CookStar all-stove base ensures optimal heat absorption, distribution and storage and can be used on all kinds of stoves, including induction. The integrated expansion joints, seen as a star on the bottom of the cooker, ensure that the base will be absolutely stable. The proper contact between the base and the burner is thus ensured – for the best of cooking results.


Regulating the heat source
| Heat source levels | ||||
| 1-12 levels 1-9 | levels 1-6 levels 1-3 | levels | ||
| Browning (open cooker) 9-12 6 | 9 4-6 2-3 | |||
| Building steam, expelling air 12 9 | 6 3 | |||
| Continuing to cook, steaming, heating up, thawing | 1-6 1-4 1-3 | ½ - 1 ½ | ||
The indicated settings should serve as guidelines. For induction cooking, depending on the power, lower settings may be used. Please also refer to the information given in the instructions for your stove.
Whether empty or containing fat, an open pressure cooker may never be heated at the highest energy level for more than 2 minutes. If overheated, the base can turn golden. This discoloration does not affect how well the cooker functions, however.
Solid/glass ceramic (radiation/halogen): The diameter of the burner should be the same as or smaller than the diameter of the pot base.
Gas stove: Place the cooker in the center, and make sure that the flames do not extend up the sides of the cooker.
Induction: Always place the cooker in the center of the cooking zone. The base of the pot should be the same size as or larger than the cooking zone. Otherwise, it is possible that the cooking zone will not be triggered by the pot base.
Special information for induction stoves: To prevent overheating and damage to the cookware as a result of the high induction power, never heat the cooker up empty or unattended. Please also adhere to the Instructions for Use provided by the stove manufacturer. A humming sound may come from your cooker while it is in use. This sound has technical reasons and does not indicate that there is a defect in your stove or cookware.
Tips for saving energy
- When cooking at the gentle or speed setting, regulate the energy source so that the traffic light indicator does not enter the red area and the valve does not begin to release steam.
- Use a burner that is the right size. (See notes above)
- Choose cookware that is the right size for the amount of food you are preparing.
Take advantage of the heat stored in the base. Turn off the heat source even before the end of the cooking period, so that you can use the cooling off period.
6. Cooking with the vitavit®
Numerous cooking methods are possible in your pressure cooker: stewing or braising, sauteing and deep-frying (without the lid), as well as thawing, preserving, and extracting juice. You will find more information on ways to use your pressure cooker, as well as on how to use the insets, in Chapter 8.
Preparing
Place the ingredients called for in your recipe in the pressure cooker. Make sure you observe the specified filling capacities. (See Chapter 5)
Then place the lid on the cooker and close it. If the locking indicator (Fig. A-3) in the lid handle is green, the cooker is ready to start cooking. (See Chapter 4)
Selecting the cooking setting
See Fig. M
Select the desired cooking setting on the control valve (Fig.A-5). The table of cooking times (Chapter 9) will give you suggestions for this.
Setting I, approx. 110^ (Gentle Setting)
(45 kPa operating pressure)
for delicate foods, such as fish or vegetables
Setting 2, approx. 116^ (Speed Setting)
(75 kPa operating pressure)
for all other foods, such as meats or stews
Cooking with the vitavit®
Building pressure and expelling air
Set your heat source to high to heat up the pressure cooker. Steam will escape from under the lid handle (Fig. A-1), along with the atmospheric oxygen that can destroy vitamins. This process can take a few minutes. As soon as the Euromatic closes and no more steam is expelled, pressure will begin to build up. The traffic light indicator (Fig. A-6) will soon begin to rise.
Traffic light system
See Fig. N
No matter which cooking setting you select (Setting 1 or 2), the traffic light indicator will show you three different colors. Much like a traffic light, these colors tell you the temperature in the cooker and help you to regulate the energy source.
Yellow ring:
"The selected cooking setting will soon be reached. You can turn down the heat."
Depending on the kind of stove and what you are cooking, you may need to reduce the energy sooner or later. For solid burners or glass ceramic cooking surfaces at the beginning of the yellow ring, for induction or gas toward the end of the yellow ring.
Green ring:
"The selected cooking setting has been reached. The actual cooking time begins now."
Adjust the energy source so that the traffic light indicator remains in the green area during the entire cooking period.
Red ring:
"The temperature in the cooker is too high. The cooker will automatically begin to release steam to regulate the temperature. You need to turn down the heat source."
The energy source should be regulated so that the traffic light indicator does not enter the red zone. Otherwise, the cooker will lose liquid due to the release of steam.
Important:
Make sure that the liquid in the pressure cooker never completely vaporizes. (See information in Chapter 5.)
Cooking times
The actual cooking time begins once the selected cooking setting (green ring) has been reached. You will find the cooking times for various foods in Chapter 9.
Basic rules:
-
The cooking time at Setting 2 is about 12 to 13 of the normal cooking time.
-
The cooking time at Setting 1 is about 50% longer than at Setting 2.
-
Cooking times for the same food can vary, since the amount, size and consistency of the foods influence the cooking time.
For example, boiled potatoes:
| Conventional cooking time Cooking time at Setting 2 Cooking time at Setting 1 |
| About 30 min. About 12 min. About 18 min |
At the end of the cooking time, remove the pressure cooker from the heat source and depressurize it. (See information in the following chapter.) Only then can you open it.
7. Depressurizing the vitavit
Important:
Never try to force the pressure cooker open. The cooker can only be opened when the traffic light indicator has fallen into its socket completely and no more steam escapes when the release button is activated. Once the cooker has been depressurized, the release button can be easily pressed in order to open the cooker. Always gently shake the cooker before you open it, to release steam pockets that may have formed in the food. If you do not do this, you may be scalded by spattering food and steam.
There are 3 ways to depressurize your vitavit.
The way you depressurize depends on the food you are cooking. For foods that tend to foam or rise, such as legumes, soups or stews, or for foods with a delicate peel, such as jacket potatoes, do not select a method that reduces the pressure quickly, as this could cause the food to be ejected or the peel to burst.
Method I
"Quick depressurizing with the release button"
See Fig. O
Press the release button (Fig.A-2) gently in the direction shown by the arrow, and steam will escape from under the lid handle (Fig.A-4). Hold the button in until the traffic light indicator has fallen back into its socket completely and no more steam is escaping. Then release the button, shake the cooker gently, and press the release button again. Repeat this until no more steam escapes. Once the cooker is depressurized, the Euromatic will sink. The release button can now be pressed in completely to open the cooker.
Note:
As long as there is any pressure in the cooker, the release button cannot be pressed completely. This is normal, and it ensures that the cooker cannot be accidentally opened while under pressure. Do not try to force the release button!
Method 2
"Let it cool off"
If you would like to take advantage of the residual energy in the cooker, use this method. Shortly before the end of the cooking time, take the cooker off the stove and just let it gradually cool down until the traffic light indicator has sunk completely.
Depressurizing the vitavit® / Ways to use your pressure cooker
Then press the release button gently in order to release any residual pressure. When no more steam escapes, let go of the button, shake the cooker gently, and then press the release button again. Repeat this step until no more steam escapes. When the cooker is fully depressurized, the Euromatic will sink again. Then the release button can be pressed in fully to open the cooker.
This method is especially good for foods with longer cooking times.
Method 3
"Depressurize under running water"
See Fig. Q
If the escaping steam bothers you, cool off the cooker under running water. Just place the cooker in the sink and let cold water run over the side of the lid (not over the lid handle or control valve) until the traffic light indicator has sunk completely.
Then press the release button gently to release any residual pressure. When no more steam escapes, let go of the button, shake the cooker gently, and then press the release button again. Repeat this step until no more steam escapes. When the cooker is fully depressurized, the Euromatic will sink. Then the release button can be pressed down fully to open the cooker.
8. Ways to use your pressure cooker
Braising meat
Braising is a combination of searing and stewing. The meat is first browned at a high temperature and then simmered in liquid.
- Heat the pressure cooker or pressure skillet without fat at medium heat (13 of stove power).
- Sprinkle a few drops of cold water into the pot. If they form clear pearls that "dance around" in the pot, this is the right temperature for browning meat, with or without fat. Carefully remove the water from the pot, using a paper towel, for example, before adding fat or placing the meat in the pot.
- Press the meat down firmly. After a few minutes, it will loosen by itself and can then be turned. Then you can add any other ingredients needed.
- Add the liquid called for in your recipe, but at least 200-300 ml. (See Chapter 5)
- Close the cooker.
- Select the cooking setting and build pressure in the cooker. (See Chapter 6)
Note: Meat is generally cooked at Setting 2. See Chapter 9.
Soups and stews
Soups and stews are always cooked without the inset.
- The cooker must never be more than 13 full ("max" marking). In the case of foods that swell or foam a great deal, only half full ("½" marking).
-
First heat the soup in the open cooker and scoop off all of the foam that forms.
Stir. -
Close the cooker.
- Select the cooking setting and build pressure. (See Chapter 6)
Note: Soups and stews are generally cooked at Setting 2. See Chapter 9.
Vegetables and potatoes
Vegetables and other delicate foods can be steamed very gently in the perforated inset. Depending on the model, the inset may be included or else sold separately.
- Add a minimum of 200-300 ml of liquid (see "min" marking) to the pressure cooker. If desired, also add herbs, seasonings or wine.
- Place the washed vegetables in the perforated inset and put the inset on top of the tripod in the pot.
- Close the cooker.
- Select the desired cooking setting and build pressure. (See Chapter 6)
Note: Vegetables are generally cooked at Setting 1. See Chapter 9.
Cooking rice
Rice can be cooked in the pressure cooker without an inset. To prepare brown rice:
- Place rice and water in a 1:2 ratio in the pressure cooker.
- Add salt as desired.
- Add at least the minimum amount of liquid.
- Close the cooker.
- Select Setting 2 and build pressure until the proper temperature has been reached (green ring).
Cook about 7-9 minutes at Setting 2, then depressurize and open the cooker. - Or else remove the cooker from the stove, set it aside, and let the rice simmer gently for about 15 minutes. Then open the cooker.
Note: Rice can also be cooked in the unperforated inset. Pour at least the minimum amount of liquid into the cooker. Then put the unperforated inset containing rice and water (ratio about 1:1) in the cooker.
Cooking fish
Fish can be cooked in its own juice, with the minimum amount of liquid, at the bottom of the cooker or else steamed in the perforated inset.
Note: Fish is generally cooked at Setting 2. See Chapter 9.
Deep-frying
Foods can only be deep-fried in the pressure cooker without the lid!
To prevent burns caused by foaming or spattering oil, make sure that the pot you use is high enough.
- Fill the cooker at most half full ("½" marking) with fat.
- Heat the fat at medium. Do not overheat it.
- The right temperature for deep-frying has been reached if bubbles immediately form around the handle of a wooden spoon when it is dipped in the hot fat.
- Never cover the cooker!
Preparing frozen foods
Frozen foods can be very easily prepared in the pressure cooker.
- Meat: Thaw a bit before browning.
- Foods without sauce: Place in the cooker in the perforated inset.
- Foods with sauce: Place in the cooker in the unperforated inset.
- Place at least 200-300 ml of liquid (see "min" marking) in the pressure cooker.
- Close the cooker.
- Select the cooking level and build pressure. (See Chapter 6)
Preserving
The pressure cooker can also be used for preserving foods. Depending on the size of the preserving jars, you should use the 4.5 I model or larger.
- Fill the jars up to about one finger's breadth under the edge and close them.
- Place at least 200-300 ml of liquid (see "min" marking) in the pressure cooker.
- Place the preserving jars in the cooker in the perforated inset.
- Close the cooker.
- Select the cooking setting and build pressure. (See Chapter 6)
| Preserving times: | ||
| Marmelade Setting 1 1-2 min. | ||
| Fruits/pickled vegetables Setting 1 8-10 min. | ||
| Vegetables/meat Setting 2 20-25 min. | ||
Do not depressurize the cooker quickly, but let it cool off slowly, otherwise the jars could burst!
Extracting juice
Both the perforated and the unperforated insets are needed for extracting juice from small amounts of fruit.
Prepare the fruit.
- Add at least 200-300 ml of liquid (see "min" marking) to the pressure cooker.
- Place the fruit in the perforated inset.
- Put the perforated inset on the unperforated inset, and put this in the cooker.
- Close the cooker.
- Select Setting 2 and build pressure. (See Chapter 6)
| Juice extraction times: | ||
| Berries Setting 2 12 min. | ||
| Fruits with pits Setting 2 18 min. | ||
| Fruits with cores Setting 2 25 min. | ||
Do not depressurize the cooker quickly, but let it cool off slowly.
Sterilizing
Baby bottles or other items for use in the home (not for medical use) can be sterilized in the pressure cooker.
- Place at least 200 - 300ml of liquid (see "min" marking) in the pressure cooker.
- Place the bottles with their opening pointed downward in the perforated inset.
- Close the cooker.
- Select Setting 2, build pressure, and sterilize for 20 minutes.
Do not depressurize the cooker quickly, but let it cool off slowly.
Cooking a whole meal
By using the insets, you can prepare several foods at the same time, one on top of the other.
Rules:
Cook fish over vegetables.
Cook vegetables over meat.
- Foods with similar cooking times should be placed in the cooker and cooked at the same time.
- For foods with different cooking times, first place the food with the longest cooking time in the cooker and start cooking it. When the remaining cooking time of this food is the same as the cooking time of the other foods, remove the cooker from the stove, depressurize and open it, add the other foods, and then finish cooking.
- Since some steam will escape when the cooker is opened, at least 300ml of liquid should be added to begin with.
Example:
Beef roulades (20 min.) with boiled potatoes (8 min.)
First place the roulades in the cooker and cook them at Setting 2 for 12 minutes. Then remove the cooker from the burner, depressurize it, open the cooker, and place the potatoes in the cooker in the perforated inset over the roulades by using the tripod. Close the cooker, build pressure, and cook at Setting 2 for an additional 8 minutes.
9. Cooking times
The cooking times shown here should serve as guidelines and are calculated on the basis of approximately 2-3 portions.
Basic rules:
- The cooking time at Setting 2 is about 12 to 13 of the normal cooking time.
- The cooking time at Setting I is about 50% longer than at Setting 2.
- Cooking times for the same food can vary, depending on the amount, shape, size and consistency.
- The smaller the pieces of food, the shorter the cooking time will be.
- The greater the total amount of food, the longer the cooking time
Example:
Jacket potatoes (whole), approx. 12 minutes; boiled potatoes (cut in half or quarters), about 8 minutes
Use the cooking times given here to work out your own personal times.
If you are not certain about a cooking time, cook the food for a shorter period to begin with. You can always continue cooking it.
Pork
Spicy pork stew / Goulash 15-20 min. Setting 2
Pork roast 25-30 min. Setting 2
Pork shank 30-35 min. Setting 2
Pork knuckle, fresh 30-40 min. Setting 2
Veal and beef
Veal Stroganoff 5-6 min. Setting 2
Roast veal 15-20 min. Setting 2
Veal shank 15-20 min. Setting 2
Beef goulash 15-20 min. Setting 2
Beef shank (for soup) 20-25 min. Setting 2
Roulades / Roast fillet 20-25 min. Setting 2
Sauerbraten / Roast loin 25-30 min. Setting 2
Roast beef 30-40 min. Setting 2
Boiled beef 40-60 min. Setting 2
Poultry
Chicken breast/leg 10-15 min. Setting 2
Turkey breast/drumstick 20-25 min. Setting 2
Stewing/Soup chicken 25-35 min. Setting 2
depending on size and age)
Game and lamb
Saddle of deer about 15 min. Setting 2
Roast deer venison about 20 min. Setting 2
Elk venison stew 15-20 min. Setting 2
Roast elk venison about 25 min. Setting 2
Wild boar goulash 15-20 min. Setting 2
Roast wild boar about 25 min. Setting 2
Roast hare 15-20 min. Setting 2
Lamb stew 10-15 min. Setting 2
Roast lamb 15-20 min. Setting 2
Fish
Fish stew 3-4 min. Setting I
Salmon 5-6 min. Setting I
Halibut 6-7 min. Setting I
Haddock 6-7 min. Setting I
Ocean perch 7-8 min. Setting I
Soups and stews
Vegetable soup 4-6 min. Setting 2
Potato soup 6-8 min. Setting 2
Goulash soup 10-15 min. Setting 2
Beef broth 35-40 min. Setting 2
Vegetables
Artichokes (whole) 15-20 min. Setting I
Cauliflower/broccoli (florets) 2-3 min. Setting I
Cauliflower (whole) 8-10 min. Setting I
Green beans (fresh) 5-7 min. Setting I
Kohlrabi (pieces) 5-8 min. Setting I
Corn on the cob 5-6 min. Setting I
Mixed vegetables 5-6 min. Setting I
Carrots 4-6 min. Setting I
Green/red peppers 1-2 min. Setting I
Red/white cabbage (strips) 7-10 min. Setting I
White asparagus (whole) 5-7 min. Setting I
7-10 min. Setting I
Boiled potatoes (in quarters) 8-10 min. Setting 2
Jacket potatoes (whole) 12-15 min. Setting 2
Legumes and grains
Lentils (not presoaked) 10-15 min. Setting 2
Peas (shelled, not presoaked) 12-15 min. Setting 2
Barley 15-20 min. Setting 2
Millet, buckwheat 6-7 min. Setting 2
(do not leave to swell)
Brown rice 7-9 min. Setting 2
(do not leave to swell)
Oats, wheat, barley, rye, 8-9 min. Setting 2
spelt, unripe spelt grain (leave to swell)
Depressurize the cooker and allow the contents to swell after cooking in the closed pot for about 15 minutes.
10. Cleaning and care
Cleaning
Always wash the pressure cooker after you have used it.
- Remove the silicone gasket from the lid and wash it by hand.
- Remove the control valve and wipe it off with a moist cloth.
- Remove the lid handle when needed (at the latest, when it looks dirty) and rinse it under running water.
- The pot, lid (without the silicone gasket, control valve, and lid handle), and insets can also be placed in the dishwasher.
Please note:
- To clean, use clear, hot water and dishwashing liquid and a dishwashing sponge or a soft brush. Do not use pointed, rough or sharp objects. If the inside or bottom is very dirty, you can use the rough side of the sponge.
- Do not let food residues dry onto the cooker, and do not store foods in the cooker for a long time, as this could cause stains in the stainless steel and changes in the surface.
- To maintain the stainless steel surface, use Fissler Stainless Steel Care regularly. It is outstanding for removing rainbow discolorations or films.
- When cleaning the cooker parts in the dishwasher, use only conventional household dishwashing products in the amounts recommended by the manufacturer. Do not use industrial detergents or highly concentrated cleaning products.
Mounting the control valve and lid handle
Control valve (Fig. A-5)
To remove: See Fig. R
Loosen the bell-shaped nut (Fig. A-21) by turning it in a counter-clockwise direction, and remove the control valve and the nut.
To mount: See Fig. S
Insert the control valve in the proper place in the lid, from the top, screw in the bell-shaped nut in a clockwise direction from the bottom, and tighten firmly.
Lid handle (Fig. A-1)
To remove: See Fig. T
Remove the lid handle by turning the lid screw (Fig. A-19) on the inside of the lid in a counter-clockwise direction. To mount: See Fig. U
Hold the lid handle in your hand and place the lid on it in the appropriate position. Turn the lid screw in a clockwise direction and tighten it firmly.
Storage
The silicone gasket should be stored in a dark place (protected from sunlight and UV radiation), dry and clean. The silicone gasket will last longer if you place the lid upside down on top of the pot after it is cleaned, so that the ring will not be crushed.
Maintenance
The parts of the pressure cooker that are subject to wear must be replaced regularly. You will find additional information on this in Chapter 12.
11. Questions and answers
Important: Always turn off the energy source and let the pressure cooker cool off before you attempt to eliminate a problem.
| Problem Possible reason How to correct the problem | |
| When the cooker is building pressure, steam escapes longer than usual from under the lid handle (the Euromatic). | The cooker is not closed properly. (The indicator in the lid handle is red.) |
| The heat source is not high enough. | |
| The cooking zone is not the right size for the pressure cooker. | |
| The lid handle is loose. | |
| The Fissler Euromatic or its o-ring is dirty or damaged. | |
| No steam escapes when the cooker is building pressure. | Too little liquid was placed in the cooker. |
| The heat source is not set high enough. | |
| Steam and/or drops of water escape at the edge of the lid before the traffic light indicator begins to rise. | The silicone gasket is not properly in place. |
| The silicone gasket is dirty or damaged. | |
| The cooker is not closed properly. (The indicator in the lid handle is red). | |
| The traffic light indicator does not rise. | Steam is escaping near the lid handle. |
| Steam is escaping at the edge of the lid. | |
| Too little liquid was placed in the cooker. | |
| The control valve is not attached correctly and firmly. | |
| The molded valve seal, valve base seal, or silicone membrane is missing, defective, or incorrectly attached. |
| Problem Possible reason How to correct the problem | ||
| Steam is escaping near the control valve. | The temperature is too high for the selected cooking setting. (The traffic light indicator is red.) The control valve is not attached correctly and firmly. The molded valve seal, valve base seal, or silicone membrane is missing, defective, or incorrectly attached. | Turn the heat source down. Adjust the energy source so that the traffic light indicator remains green during the entire cooking period. (See Chapter 6) Attach the control valve correctly and tighten the bell-shaped nut. (See Chapter 10) Replace the seal or attach it correctly. (See Chapter 12) |
| Steam is escaping under the lid handle (near the Euromatic), although the traffic light indicator has already risen. | The lid handle is loose. The flat gasket for the fastening screw of the lid handle or the o-ring for the Eu-romatic is missing, defective, or mounted incorrectly. If a great deal of steam is released, the Euromatic may have been triggered as a safety mechanism. This happens if the valve is dirty or defective. | Tighten the fastening screw of the lid handle on the inside of the lid. Replace the gasket or o-ring or mount it correctly. (See Chapter 12) Remove the control valve and clean or replace it. (See Chapter 10 and 12) |
| A great deal of steam is escaping from the edge of the lid, although the traffic light indicator has already risen. | The silicone gasket is defective. The silicone gasket has been triggered as a safety mechanism. This happens if the valve and the Euromatic are dirty or defective. | Replace the silicone gasket. (See Chapter 5 and 12) Have the cooker checked by Fissler Customer Service. |
| Steam is escaping from under the round cover cap for the lid handle or the release button. | A seal is defective. | Replace the lid handle or have it checked by Fissler Customer Service. |
Questions and answers
| Problem Possible reason How to correct the problem | |
| The cooker is difficult to close, or the release button does not pop out when it closes. | The lid and/or pot handle are not correctly mounted. The lid handle is defective. The silicone gasket is not properly in place. The cooker is not properly closed. (The indicator in the lid handle is red.) |
| The cooker cannot be opened. | There is still pressure in the cooker. The Euromatic is jammed. |
| The lid handle is loose. The | fastening screw has not been tightened. |
| The handles on the pot are loose. | The handle screws have not been tightened. |
12. Maintenance and replacement parts
Please note
Replace parts that are subject to wear, such as the silicone gasket and other rubber parts, regularly after you have cooked with it about 400 times, or after 2 years at the latest, with original Fissler replacement parts. Parts that show visible damage (e.g. tears, discolorations or deformations) or that do not fit correctly must be replaced immediately. Otherwise, the functioning and safety of your pressure cooker could be affected.
Information on replacing parts
Silicone gasket (Fig. A-20)
See Chapter 5.
Silicone membrane (Fig. A-22)
See Fig. V
Detach the control valve from the lid and remove the old silicone membrane. Place the new silicone membrane on the plastic rod of the traffic light indicator and press the edge onto the metal push rod as far as the beginning of the thread.
Molded valve seal (Fig. A-23)
See Fig. W
Detach the control valve from the lid and remove the old seal. Select Setting 2 on the control valve, because this will make it easier to mount the seal. First place the new seal over the metal push rod, then press the other side all the way up over the tappet. Make sure that the molded valve seal is tightly placed around the control valve.
Valve base seal (Fig. A-24)
See Fig. X
Detach the control valve from the lid and remove the old seal. Put the new seal in place and make sure that the seal is perfectly flat on both sides of the lid.
O-ring for Euromatic (Fig. A-18)
See Fig.1
The o-ring is removed/mounted on the inside of the lid. Make sure that the ring lies totally in the groove provided for it.
Euromatic (Fig. A-18)
To remove/mount the Euromatic, you must first remove the lid handle. This is very simple, as you only have to loosen the screw on the inside of the lid. You can remove the Euromatic from the lid as soon as you have removed the o-ring. For mounting, guide the new Euromatic without the o-ring through the lid so that the side with the white ball is on the inside of the lid. Then you can mount the o-ring as described above.
Replacement parts
| Replacement parts Diameter Article Number | ||
| Silicone gasket (Fig. Y-1) 18 cm 600-000-18-795 | ||
| 22 cm 600-000-22-795 | ||
| 26 cm 600-000-26-795 | ||
| Pot handle for pressure skillet (Fig. Y-2) 22 cm | 610-300-02-850 | |
| 26 cm 610-700-04-850 | ||
| Pot handle for pressure cooker (Fig. Y-2) 18 | cm 610-100-02-850 | |
| 22 cm 610-300-04-850 | ||
| 26 cm 610-700-08-850 | ||
| Helper handle for pressure skillet (Fig. Y-3) 22 | cm 600-300-02-840 | |
| 26 cm 600-700-04-840 | ||
| Helper handle for pressure cooker (Fig. Y-3) | 18 cm 600-100-02-840 | |
| 22 cm 600-300-04-840 | ||
| 26 cm 600-700-08-840 | ||
| Lid handle (Fig. Y-4) all 610-000-00-770 | ||
| Control valve (Fig. Y-5) all 610-000-00-700 | ||
| Bell-shaped nut for control valve (Fig. Y-6) all | 610-000-00-734 | |
| Silicone membrane (Fig. Y-7) | all 610-000-00-711 | |
| Molded valve seal (Fig. Y-8) | all 610-000-00-706 | |
| Valve base seal (Fig. Y-9) | all 610-000-00-733 | |
| Set consisting of silicone membrane, mol-ded valves seal, valve base seal (Fig. Y-7, 8, 9) | all 610-000-01-706 | |
| Euromatic, complete (Fig. Y-10) | all 011-631-00-750 | |
| O-ring for Euromatic (Fig. Y-11) | all 011-631-00-760 | |
| Fastening screw for lid handle, with flat gasket (Fig. Y-12) | all 600-000-00-712 |
Accessories
| Accessories Diameter Article Number | ||
| Perforated inset (incl. tripod) (Fig. Z-1) 18 cm | 610-1 | 00-00-800 |
| 22 cm | 610-300-00-800 | |
| 26 cm | 610-700-00-800 | |
| Unperforated inset (incl. tripod) (Fig. Z-2) | 22 cm | 610-300-00-820 |
| 26 cm | 610-700-00-820 | |
| Additional lid, glass (Fig. Z-3) | 22 cm | 021-641-22-600 |
| Additional lid, metal (Fig. Z-4) | 22 cm | 623-000-22-700 |
| 26 cm | 623-000-26-700 | |
| Deep-frying basket (Fig. Z-5) | 26 cm | 022-656-04-600 |
All replacement parts can be purchased from your Fissler retailer or in the specialty departments of department stores. Our Customer Service Department will also be happy to help you. (For addresses, see Chapter 13).
You will find a list of dealers, as well as additional information, at www.fissler.com.
13. Warranty and service
All Fissler products are meticulously manufactured from high-quality materials. The quality of our products is checked several times during the manufacturing process. On completion, they are subjected to a stringent final check.
3-year manufacturer's warranty
This is why we provide a 3-year warranty on all of our pressure cookers beginning with the date of purchase. In the event of a complaint, please return the complete item, together with the sales receipt, to your retailer or send it, carefully packaged, directly to Fissler Customer Service (address below).
Not included in this warranty are all parts that are subject to wear, such as the:
- silicone gasket
- molded valve seal
valve base seal - silicone membrane
- o-ring for Euromatic
- flat gasket for the fastening screw of the lid handle
No warranty is granted for damage resulting from the following:
- incorrect or improper use
- faulty or negligent handling
- incorrectly executed repairs
- the use of replacement parts that are not original Fissler parts
- chemical or physical influences on the product surfaces
noncompliance with the Instructions for Use
10-year availability guarantee for replacement parts
All functional parts of your pressure cooker can be obtained for at least 10 years after the product is discontinued.
Changes in colour of the replacement parts are possible.
Customer Service address
Fissler GmbH
Customer Service Department
For additional information, go to www.fissler.com


Mode d'emploi
cf. illustrations H + I
Carottes 4-6min Degre I
Poivrons 1-2 min Degre I
Chou rouge, chou pomme (emince) 7 - 10 min Degre I
Asperges blanches (entieres) 5-7 min Degre I
Chou frise (emince) 7-10 min Degre I
Montage: cf. illustration S
Montage: cf. illustration U
Joint de soupape (ill. A-23)
cf. illustration W
Kookstand 2, ca. 116^ (snelkookstand)
(75 kPa kookdruk)
Euromatic (afb.A-18)
(ApnoTe TO OKEUOC VA KpuWoei)
Av eEeTe va eketaaaleuteite tny evpeyia Tou aToupei otn xutpa, xpooiotoinote autnv tn meofo. Etoi, mTopeiie va anopakpuveTe n xutpa anio tvn eoia liyo triv olokAnpwote to ayepema kai va tnva npoeTE va kpuwoei apya, expi O xpwpatiotoc deiktns yapeipmuos va katbei teaeiwc.
'ETEITA, PATNTE TO TANKTOAATELEUEPWONS, YIA VA ATOPAKPUVETUXOV UTOLEIMATAATPO. APNOTE TO TANKTOPO MOLIC OTAUPAHOI VA BYAIVEI ATMOS, AVAKIVNATE AITAL XUTPA KAI GAVATTNATE TO TANKTO P ATELEUEPWONS. ETTAVAABETN VIDIA DIAIDKAIOA MEXPI VA N BYAIVEI AALOCS ATOUC. Av n xUTPA aTTOOUMTIETEI TANPWS, N BAlBIIDA Euromatic kateBaivei. Twpa, MTIOPEITE VA PATNOSTE TO TANKTO ATELEUEPWONS MEXPI TEPMA, YIA VA AVOISTe TN XUTPA.
Autn n evdkutai kupic yia qaynta ta otoia aattouv eyautepo xpovayepaatoC.
Méθοδος 3
«ATooumuTieoan atoukataw an to pexouevo vepo
βλ. εικόνα Q
Av oac evoxei o atooc Tou eepxetai, tnpite va aotoumuieote n xutpa kato pexouvevo vepo.
Tia to oktto auto, atla totontheta note tn xutpa oto veopuxn kai apnoe va tpeke kpuo vepo atto tv akpn
tou kaataiou ota Taaivva Toixwmaata (oxi naov ano tn labn Tou kaataiou kai tn bala ede yxou), expi o
xpwpatiotoc deiktns maeyipmuatoc va katetei teleiwc.
ETTEITA, TATNATE ATIaTo TANKTPo ATIEAEUHEpwoG, YIA VA ATIOAPKUVETE TUXOV UTOAeIMuata ATOOU. APnote To TANKTPo MOLIC OTAPATNOEi va BYaivei atuoc, avakivnote aTAA Tn XUTpa KAI GAVATTnote To TANKTPo ATLEUHEpwoG. ETTavaALABETe TIV IIDA DIAIDKAOIA MExPI VA mByaivei alLoC aTPOc. Av n XUTPA aTTOOUPTIeOTe ITANPwS, n BAJIbEA Euromatic kateBaivei. Twpa, MTOpEITE VA TATNtETe TO TANKTPo ATIEAEUHEpwoG MExPI TEPmu, YIA VA AVOISTe Tn XUTpa.
- Pişirme进展情况
- Poincaré's theorem
PykoBOIDCTBO NO IcNoJIb3OBaHnIO
TexHnka 6e3oNaCHOCTN
IcnoJIb3OBaHne cKOpOBapKn
3To yctpoiCTBO oecneuHbAET npiroTOBHeHne nIe IaBHeHem. NcnoJIb3ObaHne He no Ha3HaueHIO MOKeT npIBeCTN K NOJyehnIO OxKOB. ObpaauTe BHMaHne Ha To, YTO6bl YcTPOCTBO 6blIO npABINbHO 3AkpytopeE nnDorpeBOM. HOpMaUHO 6tOM haidTe B rnaBe 4. HIKOrda He npImeHrTe CKOPOBAPky C HENlOTHO npNJeraIoUeKpbIkoN.
- PpimHeYTe TOnbKO Te NCTOHNHn HarpeBa, KOtOpbie yKa3aHbI B rnaBe 5.
HnkOrda He HarpeBaTe cKOpOBapKy 6e3 KndKocTn, TAK KAK OT neperpeBa Ha yCTpoiCTBe Hn PJIITE MOryT BO3HnKHyTb NOBpeXdEHH.
MnHmAbHbI o6bem: 200-300 Mn BOdbI B 3aBNCMOCTN OT dNaMeTp a yctpoiCTBa. (CMOTpn MapkpOBky, min")
B 3KCTpeMaJIbHbIX cIyUaX nepeIpeBa INaCTMaccOBle DeTaII INI aIIOMHn Ha DHe MOryt pacIaNtbcra n CtaTb KIaKIMN. B 3TOM clyuae BbIKNoHTe NcToHnK HapeBa n He nepemeuaTe kAcTpIO IO Tex nop, noka OHa nonHOCTbHO He OCTbIHET. PpOBETpIte NOMEueHne.
- HinkoRa He 3aonHnayte cKopOBapKy Ha 60nee 2/3 ee emKocTn (CMOTpn MapKnipOBky, max").
IpyKTOB NHTAHN, KOToPbIE BCNEHNBaOTcN yBeJIyHBAOTcB O6bEme BO Bpemr
TepMoO6pa6oTKn, KaK, HAp., PnC, 6o6OBbIe, 6yIbObHJIuN cyUeHbIe OBOU, 3aONJHrTe cKOpOBApKy MaKcImaJIbHO Do noNoBnHbI ee EMKOCTn (CMOTpn MapKnIpOBky ,1/2")
HnkOrda He octabnIte ckopOBapky 6e3 npncMOTpa. PerynpyTe nOauy 3heprTuK TAKIM o6pa30m, yTo6bl HndkATOp npiroTOBneHn IuH He noBbuaCn Do KpacHO nnocKn. EcnPiOaHa 3Heprn Hye MeHbAaETc, To nap ydaIaeTcyepe3 KlaanH n KaCTpOJr TepaET XnIDKoCTb. POnHaa Notepra XnIDKoCTn npNBOHT K NOIropaHIO rTOBxXcR npOdyKTOB u MoKeT CtaTB pPunHO NOBpeJeHn Ha KAcTpOJe n PlNTe. - NepemeeaTe cKOpOBApKy ouHb octOpOxHo, ecn OHa haoDITc npd daBneHHeM. He npkacaiTecb K ropaHm NOBepXHOCTaM. EcIn Heo6xoDIMO, nCNoIb3yTe pyKaBnCbI-npNxBaTkN.
OtkpbBaHne cKOpOBapKn
HnkOrda He OTKpbIbAte CkOpOBapKy c ycnnneM. He OTKpbIbAte ee, npexJe Yem He y6eIntecB TOM, yTO BHyTpehHe DabJIeHne NOJIHOCTbO c6poWeHo. INΦopMaunO 6 TOM HAIDeTe B rnaBe 7.
- Ipeed kaxdbim OTKpbIbAHiem CKOpOBapKy CneDyET BCTpXHyTb, YTO6bl N36abNTbcr OT ny3bIPbKOB npa, KOToPbIe MOJIb 6bl pa36pbI3raTbcr N OwnpITb Bac. 3TO OC06eHHO BaxHo pRn pRnroTOBJeHn NIIu Ha napy IIIN NOcNE OxJaXdEHHN NOI pPoTOUHO BODoI.
- Pn npiroTOBneHn nIe Ha napy pykn, roNoBy n TynOBuIe depKaTb BcERda 3a npedeAmaOn aacHO 30hbl. Bbl moKeTe noJyHTb TpaBMy OT BbIXoJaIero napa. 3To cJeNyET yUHTbBaTb npexDe BCero, KOrDa BB I npOecce PnpiroTOBHeHn nIe Ha napy MaHNpype Te KHOKn O npabNeHn nn peryIaTOPOM npiroTOBHeHn nIe.
Baxhoe yka3aHne:
He nOpIb3yIte cKOpOBapKy, ecn OHa nn ee DeTaNIOBpeXDeHb nn DeOpMnpoBaHb nn ecn nx yHKzna He COOTBeTCTByeT ONICAHN 3TOrO pyKOBoDCTBa NO 3KcNpyaTuN. B 3OM cnUyae o6paNTecb B 6JnxKaun CneuaJIn3npoBaHHb mara3H Fissler nn OTdEIN cepBnCHOrO 6CnykuaHn KOMnHn Fissler GmbH (adpec cmToPn B rnaBe 13).
XpaHnTe 3TO pyKOBoIDCTBO NO 3KcNlyaTaUIN B HaJeXHOM MeCte.
3. OnscaHne n npemmyeCTBa vitavit
CMOTPN pncyHOK A
1.Pyka KpbIiKn
-
CbEMHnA,ДПЯ ПОСТОУИСТКI
-
Khonka ynpaBneHna
-ДЯ OTKpbIbAHNИ N Bblnycka napa
3.ИнданkaTop 3akpbityra -
NOKa3bIbAEt, npabNJIbHO JIN 3aKpbIta CKOpOBapKa
-
OTBepTnIa BbIXoJa napa
-
npn DOBeHnn Do KInneHna
- npn cpa6aTabbAHm Euromatic
- npBbInycke napa uepe3 KhoNky ynpabHeHn
5.PeryJrTop npnroTOBJeHn nn
-ДЯнсаэркп ржима Терmoобработк
- C INHДИКаTOPOM npIroTOBJIeHn IINU
- c KπaHOM έπa ABTomatNueckOro orpaHnueHη DaBnEHH (peyIaTOp daBHeHH)
-CbEMhBIM,ДЛЯ ПОСТОМ YIUCTKIN
6.ИндкаторnpnroTOBlenna nns cФyHKneBcBeTOΦopa
- NOMORAETIpepyuipobAHnHaPeBa
7. OTBepCTnIy BbIXoJa napa
-прппpeьblшени BBiбpaHHoro peхIMa TepmoO6pa6oTkn
8.Pyka
-ДЯпocToRoпepeMeUeHnKpbIuKN
9.ПаЗдЯ ручkn
-ДЯ BCtABKpyuKIN
-
Pykota kactpHn c fHKcaTopom
-
3aunta ot HarpBaHn
-
3aunuetaeT pykN OT hargpeBaHnHa ra3OBbIX pnnITax
-
Mapknipobka ypoBHa 3aonHeHn
-MapKInpOBAKa,min"MINHmAmNbHOe KOINueCTBO XNkOCTN
-MapKIpOBka ,1/2" MaKcImaJIbHoe KOJIInueCTBO KINKOCTN IINyBENuINBaHOUxxCB O6bEme npOdyKTOB NITAHIA
-MapKInpOBKa,max"MaKcImaJIbHOe KOJIuYeCTBO XnIqKOCTn IJr O6blHbIX npOdyKTOB
-
BCTaBKn dIy npuroToBJeHnHa npay (B 3aBncmOcTn OT MoJeN)
-
C pOdoIOnroBaTbIM OTBepCTnem DnA ONTImaJIbHOro npOHnKHOBeHnna pa
-c neperopokamn dna cboodoro noToKa npa daKe npkpyhbx npoodykTx nTaHn -
C TpeHOroB KaueCTBe NOCTaBKN
-
Konhueckar φopma ckopobapkn
-ДЯудбHOrO xpaHeHnKaCTpOJb C OДиHaKOBbIM DnAmEtPOM
15.Дно CookStar ДЯ BCex TINOB ПЛNT
-ДЯ ONTUMaJIbHOI TENJIOIpOBoIDHOCTn Ha BCEx TINax PIIIT, BKJIIOUa IHNyKlUOHbIe
-
Pukka
-crrny6okon npope3bIOn HaJeXHO 3aXBaTa -
PpeOxpaHHTeIbHbI BbIcTyn (PpeOxpaHHTeIbHoe ycTpoIcTBO)
3TO NOBbICHT yCTOuHBOcTB HePKaBeIOUe CTaNN K BO3DeICTBHO COIN N KNCNOT. OCTaTKn CpeICTBa DOJXHb6bITb TuaTeJIbHO CMbITb BOIO. IcnoJIb3yIte CpeICTBO IO Heo6xOIMOCTN INN KOrDa 3aMeTNTe N3MeHeHnBHeuHero BnuDA CTaJIbHOIOBepxHOCTN.
PerylaTOp npnroToBneHna nns (pnc.A-5)
CM.pucyHOKG
YdaJIte peryIaTOp nprirotOBHeHn IuIe n3 KpbIeKn u yCTaHOBInTe erO ha peXm 2. IpOBePbTe HadaBlnBaHnem paIbua, Cbo6oJHo Iu nepemeUaetc nHdNKaTOp c cyHKneN cBeToΦopa (1) n Kopnyc peryIaTopa (2).
Euromatic (pnc.A-18)
CM. pncyHok H+I
Y6eHITecb TOM, yTO CnCTema Euromatic uHCTa H ee nocaKa B KpbIuKe He npenrTcByeT CBOOHOmy nepemueHIO.
YyIIOHTHnTeJIbHOe KOJIbO KoIgIoro CeueHn DaJIXHO paCNoIaratbcra B npEpyCMOTpeHHOM nIr Heo yIy6IeHH.
CM.PUCYHOKJ
IpoBepbTe HndabNtBaHnem nalbcem, He 3aun nn 6enbJ shapK B Euromatic n cboodno nn OH nepemeuaetcnn OTKIMaeTc.
YnIOTHNTeJIbHOe KOJIbO (pnc. A-20) n npEdoXpaHTeJIbHbI BbICTyn (pnc. A-17)
CM. pncyHok K
PpOBepbTe, YnCTbI Nn yNtOHnTeNbHO KOnbU O Kpa KpbIuK, He NOBpeXJdeHO Nn yNtOHnTeNbHO KOnbU O CBO6oJHO Nn nepemeaetc npdoxpaHnTeNbHbI BbICTyn.
BCTaBbTe yIINOTHInTeJIbHOe KOJIbOTo TAKIM O6pa3OM, YTO6bl OHO pa3MeUaNOCb POBHO, NOD BOrHyTbIMN KpaHnMn cerMeHTAMn, C BHyTpeHHeN CTOpOHb I KpbIuKN. YIIOHTHInTeJIbHOe KOJIbO DoJnxHO pa3MeUaTbcra Do npdeOxApaHInTeJIbHOro BbICTyNa, T.e. C OTBODOM OT KpA KpbIuKN.
06bEmblKnIOKCTN
CM. puncyHok L
Pn6bictpom npirotoBneHm nui co6n o6nOaTe cneDyUoIe o6bEmbl KIOKCTN. DnnpocToRo Do3nPoBaHn BHyTp nCKOpOBaR pa3MeueHa rpaDyInPOBaHHa 1ka
,min
Дяобразовая па В заимости OT Даметра ckopoварк Heobxodmo KaK MHHmym 200-300 mJ KIOCTN, He3aBcHMo OT TORO, INNoIb3yeTcR BCTaBka nHn HNKoRa He BKIoUaHte ckopoBapKy 6e3 3TOrMO MInHMaJIbHOrO KOJIuYeCTBa JxIDKOCTN. (CMOTpN MapKnpoBky ,min")
018cm:200Mn
022cm:250Mn
026cm:300Mn
max
CkopoBapka DOnJxHa 3aONHrTbCMAKcMmaNbHO Do 13 cBoero o6bema nIy o6ecneHn6e3oNaCHO FOHKUHOHPOBaHn. (CMOTpn MapKpOBky, max")
1/2
Дя npodyKTOB nHTaHn, KOTOpbIe BCneHNBaOTcR uN yBeINuHBaOTcR B OsbEme BO BpeM TePMOO6pa60TKn, KaK, HApP., Pnc, 6obOBbIe, 6yJbOHbI uN cyUeHbIe OBOU, CKOPOBapKa DOJXHa 3aONHrTBcR MaKcIMMaJIbHO Do NOIOBnHi e emKOCTn. (CMOTpN MapKnPOBky ,1/2")
BHMaHne:
HnkOrda He BbINOJIHnIe TepMoO6pa6Otky 6e3 DocTaTOUHoro KOJNUcCTBa XnIKoCTN i CJIeNTe 3a TeM, YTO6bl XnIKoCTb B KacTpIOle-CKOpOBapKe He NcnapINacb NOJHOCTbIO. HecO6JIIODeHne 3Tnx Tpe6oBaHm MOxET npVBecTN K NOdRopAHu IO pOdyKTA u K NOBpeXJeHHo CKOpOBapKN,pyeK I PnITbI (CMOTpnte yka3aHnI NO TexHnke 6e3OnacHoCTn).
PnroHOCTb NNITbI
IOnHocTbU INKcancyunpoBaHoe dHO CookStar obecneuBAe TOnTMaJIbHOe nOrloSeHne, pacnpedeJeHne IcoxpanHe HtePnA uNoXoDIT dR BceX TINOB PnIT, BKIOUaYNDyKUnOHhIE. PaCUnpTeNbHbIe 1BbI, BNIMbIe B BVide3Be3dI Ha dHe, ObecneuBAOT CTabNlBHOCTb DHa. N KOHTaKT dHa C pNtOJ - JnI DOctNXeHn HAJIyUHX Pe3yJIbTaTOB pnirotOBNeHn PnIu.


PeynpobAHne pntbI
npiroTOBneHnPiu. (CMOTpn rnaBy 4)
Bb6op pexkma npuroTOBneHna
CM. pncyHOK M
YcTaHOBtE Heo6xOaMbI pexKIM Ha peryJrTope npiroTOBHeHn Pius (pnc. A-5). Ta6nua BpeMeHN
npiroTOBnHn (rnaBa 9) daet nra 3Toro peKomeHaau.
Pexm1, npimepno 100°C (zaadny pekm)
CnoocobipnuroTOBneHna
- D06aBBTe COJIb NO BKcy.
Co6IIOdaIte MNHmMaIbHOe KOINueCTBO XNIDKoCTN.
3akpoTe ckoBapKy - Bb6epnte pexim nprirotoblenia 2 n haunhaite bapntb, noka he 6ydt doctnHyta Heo6xOImaTeMtnepaTypa (3eneHa noIoca)
- FOTOBbTe npn6n. 7-9 MInHyT Ha pexKmE 2, 3aTem BbInyCTnTe nap n OTKpOte CKOpOBapKy.
- INI: CHIMITE CKOPOBAPky C INITbI, OTCTaBBTe B CTOPHY N MeINHeHHO, OK. 15 MInHyT, TOMnTe pnc Hcna6om orHe. 3aTeM OTKpOte CKOPOBAPky.
PnmeHne: Pnc MoXHO TaKKe rTOBntb BO BCTaBKe 6e3 OTBepCTn. IInr 3TOrO BNeIte B CKOpOBapKy MNHMnAbHoE KOINueCTBO XNIDKOCTn. 3aTeM BCTaBBTe BCTaBky 6e3 OTBepCTn C pncOM N BOdO (COOTHOseHne OK.1:1).
PpuroToBneHne pbl6bl
Pb6y MoXHO rOToBnTb C Do6aBHeHem MInHMaJIbHOro KOJIueCTBa XnIkoCTn B OTBaPe Ha IHe KaCTpOJIu NJIH Na npy BO BCTaBKe C OTBepCTnAIM.
PpmeHHe: Pb6a roTOBtca Ha pexime 1. CmOtpn rnaBy 9.
O6xapnbHne Bo pnpTIOpe
O6kapnBaIe Bo pntIOpe TOnbKO 6e3 KpbIuKn!
YTo6bI npeoTbpaNTb OXKOrn, Bbl3BaHHbIe pa36pb3rNaHHeM rOpAero MaCna IIN neHbI, y6eDntecb, YTO CKopoBapKa, KOTopyu Bbl NCNoJb3yeTe, DoCTaTOUHO BbICOKa.
- 3anolHnTeCKoOBapKy MacIOM MaKcMaJIbHO HAnOIOBHy (MapKnpoBka ,1/2").
- IopOrpeIte MaCIO Ha CpeDHeM OrHe, He NepeRpeBaIte.
- PpaBnIbHra TempepaTpa Ira obKapuBaHna Bo pPHTOpe DoCTHyTa TOrda, KOrda cpa3y Je nocne norgyKeHHa BOKpyr DepeBraHHo JIOxKn O6pa3yETc KOJIbUO ny3bipei.
- He nakpbbaTKePbIkwO!
PnroTOBHeHne 6bIcTp03amOpOKeHHbIX npOdyKTOB
Быстpo3amOpoxeHHbI npOdyKtI FOToBArTcB CkopoBapKe COBcEM npocTo.
MRCO: HEMHORo pa3MOp03nTb DJIa 6xkapuBaHnA
-Блда 6e3 coya: noJoxnTe BO BCTaBKe C OTBepCTnMn B KAcTphJIO
-Бл�а c coусOM: NOLOXKIne BO BCTaBKe 6e3 OTBepCTnB KaCTpHJIIO
HaJIeIe BCKOpOBapKy KaK MUNHmym 200-300 MJI XnIDKOCTN (CMOTPN MapKnPOBky ,min"),no XeJNaHIO do6aBBTe 3eJIeHb, PnRAHOCTN HIN BUHO
3akpoTe cKopoBapKy
BbI6epnte pexnIM nprirotOBJIeHnHaunHaTe Bapntb (CM. rJaby 6)
KoHceBnpoBaHne
CKOPOBapka MoKet TaKKe IcNoIb3ObaTbcra IJI KOHceBpuOBaHn. B 3aBncMocTu OT pa3Mepa CTeKnHbIX 6aHok npimHeYte MoeIb Ha 4,5 n nn 6oJbSe.
3aONHnTe 6aHKn He Do KpaEB Ha WnpHy nlaBua, 3akpoIe
- HaneiTe BCKOpOBapKy KaK MmHmym 200-300 MЛ XnIDKOCTn (CMOTpn MapKnpoBky „min“)
- NoCTaBbTe CTEKJIHHbIe 6aHKn BO BCTaBKe C OTBepCTnMn B CKOPOBaPky
3akpoTe ckoBapKy
BbI6epnte peXIMnHaunHaTe BapNTb (CM. TnaBy 6)
Nap He BbInyckaTe, ckOpOBaPky MeIeHNo OxJaKaJaTe!
CTepnuaa
Iap He BbInyckaTe, ckOpOBaPky MeIeHNo OxJaKaIte!
PpuroToBneHHe HeCKoJIbKINX 6IIOd cpa3y
Pn NOMOUIBCTaBOK MOKHO OJHOBpeMeHHo rTOBHTb pa3NJHbIe 6JIIOda npyHaN dpyrom.
Ppavila:
Pb6y roTOBbTe HaOBOUaMn
- ObouI rTOOBtE HaMRCOM
-Блюда сангуньим Врем hem Tepmo6pa60TKI rOToBbTe OndHOBpeMeHHO
-Бл�да c pa3ичьIM BpeMeHem npiroTOBNeHn:HaunHaTe rOToBt6IJa c 6IJa dIITbHbIM BpeMeHem npiroTOBNeHn, 3aTe m ChmMte CkopoBapKy c IITbI, BblnyCTnte nap,doabBte 6IJa c 6IJa KOpOTKIM BpeMeHem npiroTOBNeHn n rTOOBtE Do KOHca.
- Nocne BbInycka napa, Heo6xoDIMO BOCIOHNTH ypoBeH b KIqKoCTn KaK MHHmym Do 300 mJ.
Приимер:
Pyrtebi (20 MNH.) cOTbapHBIM KapTopeJEM (8 MNH.).
Cnaa nnooxnpe pyneBtBCKOpOBapKy ngTOBbTe 12 MNHyT ha pexnme 2. 3aTeM cHmnte ckopOBapKy CnIITbI, BbInyCTnTE nap, OTkpoNTe KpbIshky. KapTopeJb BO BCTabke C OTBepCTnMn C NOMOuTpeHOrn NOCTaBte HaD pyNeTaMn B CKOpOBapKy. 3akpoNTe CKOpOBapKy, DOBeDnTe Do KNPeHn I BapNte eue 8 MNHyT Ha pexnme 2.
9. Bpem npuroToBneHna
Yka3aHHoe 3decb BpeM nprirotoblenia opneHTnpoBOHoe np6I. Na 2-3 npuN.
OCHOBHbIe npHHnbl:
- Bpem npuroToBJIeHnHa peXmE 2 COOTBeTCTByeT np6I. Do 1/3 obuHoro BpeMeHN
- Bpem npirotoBneHnHa pekm 1 npnb. Ha 50% doJbwe, yem Ha pekme 2
Bpem npiroTOBHeHMOXe N3MeHbCdIg OndHO rTOrO Xe IpOdyKta NHTAHn B 3aBNCIMOCTN OT KOJIueCTBa,ΦOpMbI,pa3Mepa n CBOIcTB - Yem 60nbIe npOdyKTOB, TEm 10nbIe BpEma npiroTOBJIeHnA
- Yem MeIbHe Hape3aHbI npOdyKtbl Tem Kopoye BpEm npiroTOBneHn
Празмер:
KapToΦeJIb B MyHdIpe (UeJIHKOM) OK. 12 MInHyT, OTBapHOJ KApToΦeJIb (pa3pe3aHHbI HAnOJOBHy/HaHTBePo) OK. 8 MmHyT
Yka3aHHoe Bpem npiroTOBHeHn NOMOKeT ONpeDenb Heo6xOIMoe Bpem npiroTOBHeHn 6JIQA.
EcnBbHe yBepenbO tHocntelbHO BpeMeH npuroToBJeHn, cneyET bIbpaTb cauana 6one KopoTKoe Bpem. IOBecTN Nluy Do rOTOBHOCTN MOKHO NOTOM.
CBHHHa
CbHHHa c nepcem / cbHOn rJyI 15-20 MHN. Pekm 2
Kapkoe n3 CBuHnHbI 25-30MH.Pekm2
CINHbIE HOXK 30-35MH.PexnM2
3axapeHHa CBHHa HOXKa, CBexa 30-40 MnH. Pexm2
TeTnHa nroBdHa
MraCoTeJIeHka(Menko nope3aHHoe)5-6MH.Pekm2
Kapkoe n3 TeJrTnHb1 15-20 MIn. PexkM 2
TeIyIb pyIbka 15-20 Mm. Pekm 2
Tobjmy 15-20MH.Pekm2
TolraKa npuHna (nra cyna) 20-25 MN. Pexm 2
PyneIb/kapKoe n3Φnne 20-25 MNH. Pekm 2
Kapkoe n3 MapuHOBaHHoro mca/ 25-30 MIn. Pexm 2
JapKoe N3 BbIpe3KN
Kapkoe n3 roBAnHb 30-40 MN.PexnM2
Ory3OK 40-60 MN. Pekm2
Tnua
CnHaKocyni OK.15MH.Pexm2
Kapkoe n3 Kocylin OK.20 MmH Pekm 2
IyIaHn3 OJIeHHbI 15-20 MIn. PeKIM 2
Kapkoe n3 oenHHbI OK.25 MmH. Pekm 2
IynaHn3Ka6aHa 15-20MH.PeKm2
Kapkoe n3 ka6aHa OK.25MH.Pekm 2
Kapkoe 3aua 15-20MH. Pekm 2
Pary n3 6apaa Ka 10-15 mH. Pekm 2
Kapkoe 36apaika 15-20MH. Pekm 2
Pb16a
PbI6Hoe pary 3-4 MN. Pexm 1
Iococb 5-6Mn.Pekm1
PAnrYc 6-7MnH.PeKm1
Tpeckobie 6-7MnH.Pekm1
MopckoOkyHb 7-8MH.PeKIM1
Cynbi n ryctble cynbl
OBOUHON cyn 4-6 MNH. Pexm2
KapToΦeNbHbIcyn 6-8 MmH. PexM2
Cyn-ryn 10-15 MN.Pekm2
BvIbOH n3 TOBRAINHbI 35-40 MHN. PeKIM 2
Obouni
PerynTOp npuroToBneHn nui (pnc.A-5)
CHYTN:CM.PUCYHOKR
OTkpTyIte raKy (pnc. A-21) npOTnB yacOBon cTpeJKN n CHIMITE peryIaTOP nprirotOBJIeHna n raKy. MoHTax: cm. pucyHok S
BcTaBbTe peryIaTOp npiroToBneHnA CBepxv B KpbIuKy, BBInHTnte raIKy ChN3y no YacOBoC TpeJIke n KpeNKo ee 3aTaNHe.
Pyka Kpbikn (pnc.A-1)
CHaTne:cm.pucyHOK T
OTkpTyTne pykky KpbIuKn, noBopauHbA KpeNExHbI 6oNT (pnc. A-19) Ha BHyTpEHHe CToPOHe KpbIuKn npOTNB YacOBO CTpeKN.
MOHTaK:cm.pncyHOK U
Bo3MnTe pyuKy uYcTaHOBnTe Ha KpbIuKy B 3aDaHHoe noJIOKeHne. NObepHnTe KpeNexKbI 6oT No YacBOB CTpeJIke n npOuHNo 3aTaNHe.
XpaHeHne
yNIOHTHnTeNbHoe KOJIbOo Heo6XODmO XpaHnTb B TEMHom (3aUuIeHHOM OT COJHeHORO CBeta N yIbTpapnoJeTOBOrO n3nyeHn), cyxom uYcTOM MeCTe. IJa 6epexHoro o6paueHnC yNJIoTHnTeNbHbIM KOJIbOOM KpbIiKyu IocNe MbITb KaactpHIO Ha KAcTPOHIO O6paTHO CTOpOH, YTObI He DaBnTb Ha KOJIbCuO.
TexHnueckoe 06cnyxnbAHne
Perynpho 3aemHte 6bIcTpOuHaunBaIOuece DeTaJI N CkopoBapKn.
DononHnteBhIe yka3aHnO 6TOM HainTe B rnaBe 12.
11. BonpocbI n OTBETbl
BaxHoe yka3aHHe:
OTKNIOHTe PNTy N daIte cKOpOBapKe BO3MOXHOCTb OCTbITb, IpexKeJe HEM nbITaTbca YcTpaHnTB npuHny HeCNpabHOCTn.
BcnoMoraTeIbHbIe npHaIaJIexKHOCTN
| Вспомогасыньные пониадлесност的服务а ameур Apтукун | ||
| Вставka с отberстям (вкл. труногу) (psc. Z-1) 18 cm 61 | 0-100-00-800 | |
| 22 cm 610-300-00-800 | ||
| 26 cm 610-700-00-800 | ||
| Вставka бez отberстий (вкл. труногу) (psc. Z-2) 22 cm 61 | 0-300-00-820 | |
| 26 cm 610-700-00-820 | ||
| Дожимпейьнай сөдгийнай кр岫ka (psc. Z-3) 22 cm 02 | 1-641-22-600 | |
| Дожимпейьнайmetаллү畴ая кр岫ka (psc. Z-4) 22 cm | 623-000-22-700 | |
| 26 cm 623-000-26-700 | ||
| Вставka за phетюра (psc. Z-5) 26 cm 022-656-04-600 |
Bce 3aIacHbIe qactn moXHO npno6peCTn B cneuaJIIN3npoBaHHbIX mara3nHex KomnaHn Fissler nI IN CneuaJIIN3npoBaHHbIX OTdJIax yHNBepMarOB. Hawa cepBnCHa cnJx6a OxOTHO OKaxET Bam nOMOu (aDPEC cmToPn B rnaBe 13).
Cnncok ToproBbIX opraHn3aun, a TAKKe DOnoNHTeNbHa NnΦopMaun HxOAnTcNo aDpecy www.fissler.com
13. Гашия И сервс
Bc npdykun Fissler n3roTabnBaetc n3 BbcokokaeCTbeHHbIX MaepnaIOB. KaecTBO npdykun Fissler ctporo KOHTpOINpyETc.
3 roda rapaHTn n3rTOBtTeJ
TapaHTnHa HaaHcKOpOBapKn CoCTaBnAeT 3 rOda c DaTbI NOKyNKn. PpN BO3HnKHOBeHn peKNaMaCuHn Heo6xOIMMo BepHyTB BCE yCTpoiCTBO BMeCTe C KaccOBbIM YekOM TOpROBOMy IpeDnPnAInH, B KOToPOM 6blna COBepSeHa NOKyNka.
I3 rapaHTn NCKJIOueHb BCE 6bICTpON3HaUNBaUOuNEcraTeTaN, KaK, HanpIMep:
- yNJIOTHHTeJIbHOE KOJIbIcO
-ynIIOHTeNb KnaanaHa npuroToBneHn nn
-ynIIOTHnTeJIb ceJa KlananaHa
-3aKaTbIbAIOUaCRAyNIOHTeJIbHaMaHKeTa - KoIbIcKpyrIoro ceeHnIa Euromatic
- nIIOckn ynpIoTHnTeIb KpeNexHoro 6oI Ta pyuKn KpbIiKn
I3 rapaHTnN NCKNIOUaOTc NOBpeKDeHn, KOToPbIE BO3HNKJIN PO CNeDyUOUM npuHHam:
- HENODXODAEE IN HeHaNEXKaUeepnIMHeHHe
-He npabnIbHoe nIe HepeKhoe o6paueHne - HeNaIeKaIIM o6pa3OM BbIOnHeHbIe peMOHTbIe pa60TbI
- MOHTaX 3aNaChbIX YacTeH, KOtOpBle He COOTBeTCTByIOT OpRHaJIbHOMy IcNoJIHeHIO
- XIMMueckne ININ ΦIN3Nueckne BO3DeIeCTBnRA Ha NOBepxHOCTN 3deJIINr
- HecobIOHeHne 3TOrO pyKOBOCTBa NO 3KcNIIyatauIN
10 net rapaHTn NOCTabKn Ha 3anaChbIe yactN
Bce cyHKUHOHaHbIe DeTaII BaIe KAcTpOJI-NCKOpOBAPK MoKHO DOnONHITeHbHO npNo6peCTn KaK MInHMym B TeueHne 10 ne Tocne ChrTn N3DeNc C npOn3BOdCTBa. Bo3MOxHb I3MeHeHna 3aNaChbIX qacteI.
AmpocnnaHoro nctpnbIOTopaB Pocnn
KomnaHpaMo,
105483MockBa,Pocn,
yI.3-ⅠapkoBaI.d.41a,
TeN.: (495) 234 61 01
Фанкc(495)7429305
DOnonHnTeIbHaN HOpMaunna HaxOuNTcno aDpecy www.fissler.com

Bruksanvisning
Tack for fortroendet!
Halibut 6-7 min tryb I
Lupacz 6-7 min tryb I
Karmazyn 7-8 min tryb I
Zupy & dania „z jegno garnka"
aill lgl y glll lal lal lal ll lal lal lal
1
(R)
j = k 又 QQ = 1
5 1
2:14
JyI 1
( xt^2 + x) ( xt^2 + x) = - ( xt^2 + x) ^2
1
1
150 1
2
a
1:1 111111111
J
JyIyIyIyIyIyIyIyIyIyIyIyIyIyIyIyIyIyIyIy
y
Jai Jai Jai Jai Jai Jai Jai Jai Jai Jai Jai Jai Jai Jai
S OBC = S COD + S_ BOC
= ( x1,y1) , = ( x2,y2)
()
j 1
1 1
m = 311
aagll a g biollae ydlal
(1)
(A-3”3-1Kill)
()
a
(M)
J) (A-5" 5-1 Jkll jil) jil
.
()110 1
(45)
i 1
a a a a a a a a a a a a a a a a a a a a a a
()18
[la]gai gai bll
a a a a a a a a a a a a a a a a a a a a a
a
-
elbill jiajuyu cuiil jauo-19
-
1bll 2000000000000000
()-20
.
- ab = 12 时, a1 = 12 , b1 = 64
zill jy go dgy 1 kll y g aol -21
-
j-22
Saly 2ill
gabll plaae 23
plaoall 2e1i jui gila - 24
(B)
m = 311
y 1
y 1
aaii i jaii jaii jaii jaii jaii jaii jaii jaii jaii jaii jaii jaii jaii jaii jaii jaii jaii jaii jaii jaii jaii jaii jaii jaii jaii jaii jaii jaii jaii jaii jaii jaii jaii jaii
y.
biin iiei peabll
1
aJ 1
y
g jyj yj 1
J 1
aIiIg Ix
g g g g g g g g g g g g g g g g g g g g g g g g g
i 1000000000000000000000000000000000000000000
aalil
y
aalaa aaiy 2yds 1 Jd y Lgauai all
400 1
y j (clogj j 1 y j j j j j j j j j j j j j j j j j j j j j j j j j j j j j j j j j j j
i 1
a
)
()
Fissler n aiae jg y g aie eae ee e ae eae eae eae eae eae