
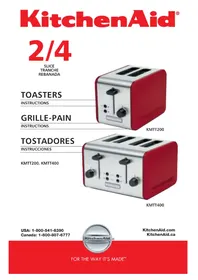
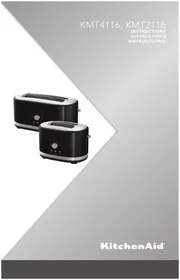
5KMT4205 - Toaster KITCHENAID - Free user manual and instructions
Find the device manual for free 5KMT4205 KITCHENAID in PDF.
| Product Type | Toaster |
| Brand | KitchenAid |
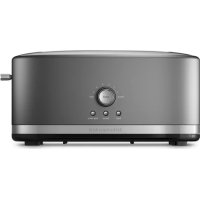
| Model | 5KMT4205 |
| Number of Slices | 4 |
| Power Supply | 220-240 V ~ 50/60 Hz |
| Power | 2500 W |
| Browning Control | 7 levels (1 light to 7 dark) |
| Special Functions | Keep Warm, Bagel, Defrost, Sandwich |
| Extra-wide Slots | Yes, up to 2.8 cm thick |
| Self-centering Racks | Yes |
| Independent Controls | Yes, for each pair of slots (4-slice model) |
| Cord Storage | Yes, underneath the base |
| Crumb Tray | Removable, hand-washable |
| Audible Alert | At end of cycle |
| Auto Shut-off | Yes, after keep warm cycle (3 min) |
| Indicator Lights | Browning level and keep warm indicator |
| Optional Accessories | KitchenAid sandwich rack |
| Warranty | 2 years |
Frequently Asked Questions - 5KMT4205 KITCHENAID
User questions about 5KMT4205 KITCHENAID
0 question about this device. Answer the ones you know or ask your own.
Ask a new question about this device
Download the instructions for your Toaster in PDF format for free! Find your manual 5KMT4205 - KITCHENAID and take your electronic device back in hand. On this page are published all the documents necessary for the use of your device. 5KMT4205 by KITCHENAID.
USER MANUAL 5KMT4205 KITCHENAID
Important safeguards. 6
Electrical requirements 8
Electrical equipment waste disposal. 8
PARTS AND FEATURES
Toaster parts 9
Control panel features. 10
Toaster features.
Before first use 1
Using the Toaster 12
Using the special toasting functions 13
CARE AND CLEANING 17
TROUBLESHOOTING 18
WARRANTY AND SERVICE
Important safeguards. 19
Electrical requirements 20
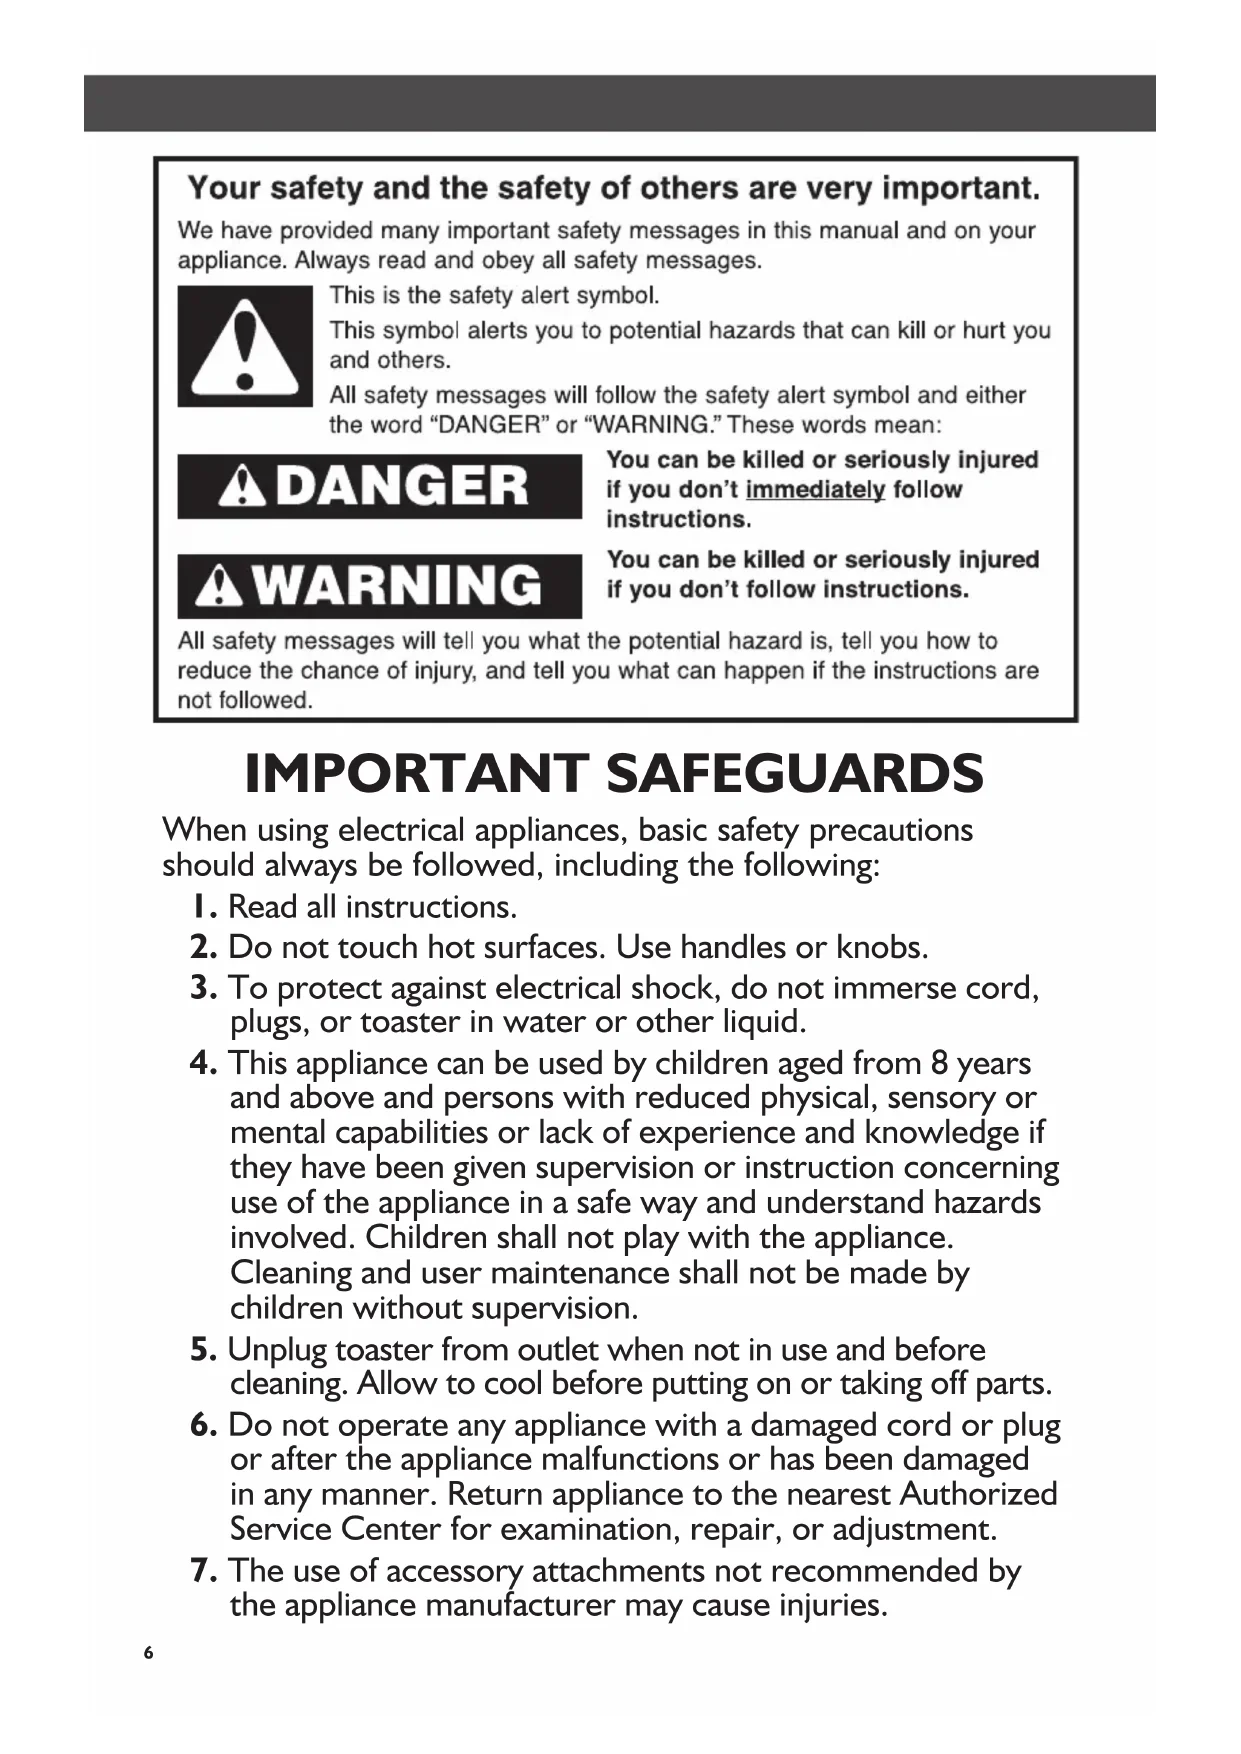
Your safety and the safety of others are very important.
We have provided many important safety messages in this manual and on your appliance. Always read and obey all safety messages.

This is the safety alert symbol.
This symbol alerts you to potential hazards that can kill or hurt you and others.
All safety messages will follow the safety alert symbol and either the word "DANGER" or "WARNING." These words mean:
DANGER
You can be killed or seriously injured if you don't immediately follow instructions.
WARNING
You can be killed or seriously injured if you don't follow instructions.
All safety messages will tell you what the potential hazard is, tell you how to reduce the chance of injury, and tell you what can happen if the instructions are not followed.
IMPORTANT SAFEGUARDS
When using electrical appliances, basic safety precautions should always be followed, including the following:
- Read all instructions.
- Do not touch hot surfaces. Use handles or knobs.
- To protect against electrical shock, do not immerse cord, plugs, or toaster in water or other liquid.
- This appliance can be used by children aged from 8 years and above and persons with reduced physical, sensory or mental capabilities or lack of experience and knowledge if they have been given supervision or instruction concerning use of the appliance in a safe way and understand hazards involved. Children shall not play with the appliance. Cleaning and user maintenance shall not be made by children without supervision.
- Unplug toaster from outlet when not in use and before cleaning. Allow to cool before putting on or taking off parts.
- Do not operate any appliance with a damaged cord or plug or after the appliance malfunctions or has been damaged in any manner. Return appliance to the nearest Authorized Service Center for examination, repair, or adjustment.
-
The use of accessory attachments not recommended by the appliance manufacturer may cause injuries.
-
Do not use outdoors.
- Do not let cord hang over edge of table or counter, or touch hot surfaces.
- Do not place on or near a hot gas or electric burner, or in a heated oven.
III. To disconnect, turn any control to "OFF," then remove plug from outlet. - Do not use toaster for other than intended use.
- Oversize foods, metal foil packages, or utensils must not be inserted in toaster as they may involve a risk of fire or electric shock.
- A fire may occur if toaster is covered with or touching flammable material, including curtains, draperies, walls and the like, when in operation.
- Do not attempt to dislodge food when toaster is plugged in.
- This product is designed for household use only.
SAVE THESE INSTRUCTIONS
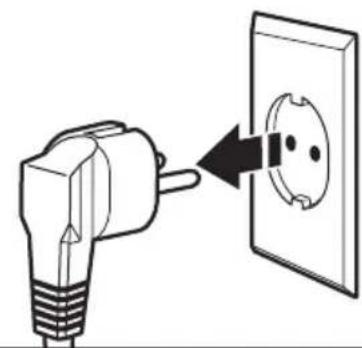
Electrical requirements
WARNING

Electrical Shock Hazard
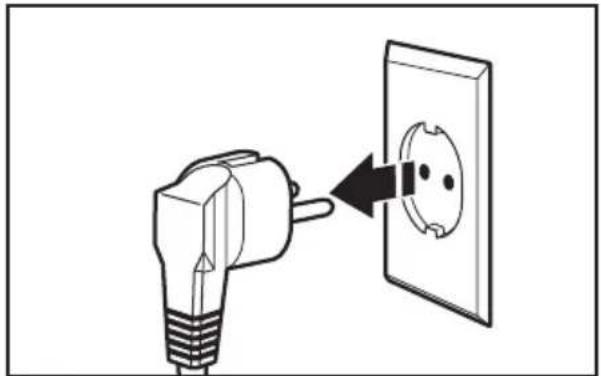
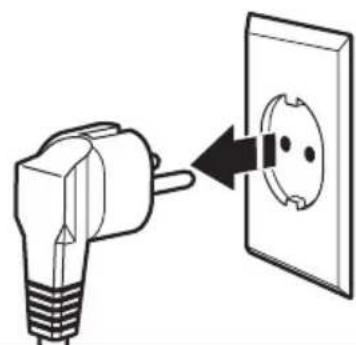
Plug into a grounded outlet.
Do not remove ground prong.
Do not use an adapter.
Do not use an extension cord.
Failure to follow these instructions can result in death, fire, or electrical shock.
Voltage: 220-240 Volts
Frequency: 50/60 Hertz
Wattage: For 2-slot models: 1250 Watts
For 4-slot models: 2500 Watts
NOTE: If the power cord is damaged, it must be replaced by the manufacturer or its service agent in order to avoid a hazard. Do not use an extension cord. If the power supply cord is too short, have a qualified electrician or serviceman install an outlet near the appliance.
Electrical equipment waste disposal
Disposal of packing material
The packing material is 100% recyclable and is marked with the recycle symbol. The various parts of the packing must therefore be disposed of responsibly and in full compliance with local authority regulations governing waste disposal.
Scrapping the product
-
This appliance is marked in compliance with European Directive 2002/96/EC, Waste Electrical and Electronic Equipment (WEEE).
-
By ensuring this product is disposed of correctly, you will help prevent potential negative consequences for the environment
and human health, which could otherwise be caused by inappropriate waste handling of this product.
- The symbol on the product or on the accompanying documentation indicates that it should not be treated as domestic waste but must be taken to an appropriate collection center for the recycling of electrical and electronic equipment.
For more detailed information about treatment, recovery and recycling of this product, please contact your local city office, your household waste disposal service or the shop where you purchased the product.
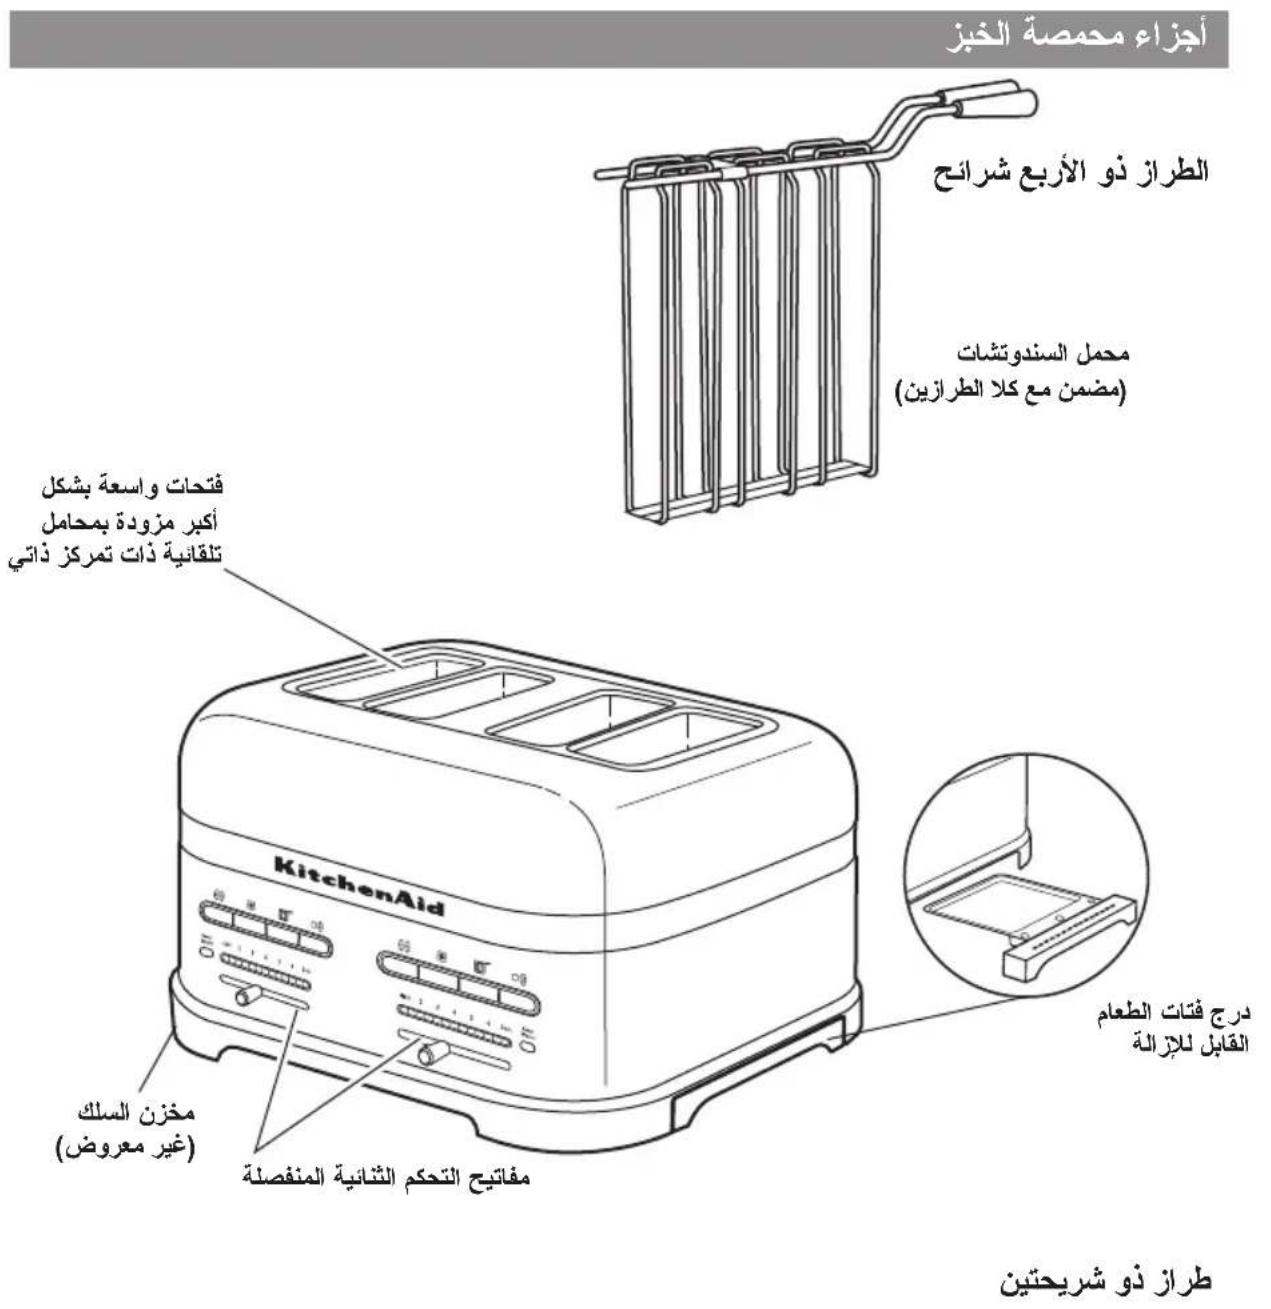
Toaster parts
4-slice model
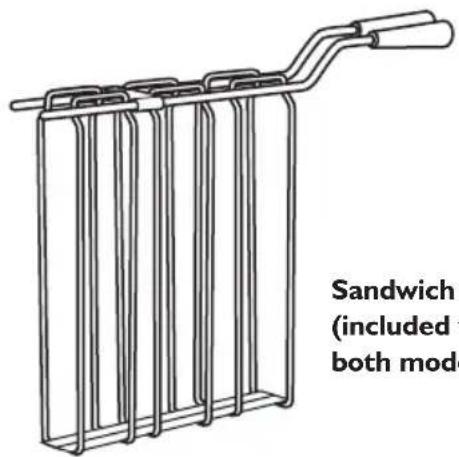
Sandwich rack (included with both models)
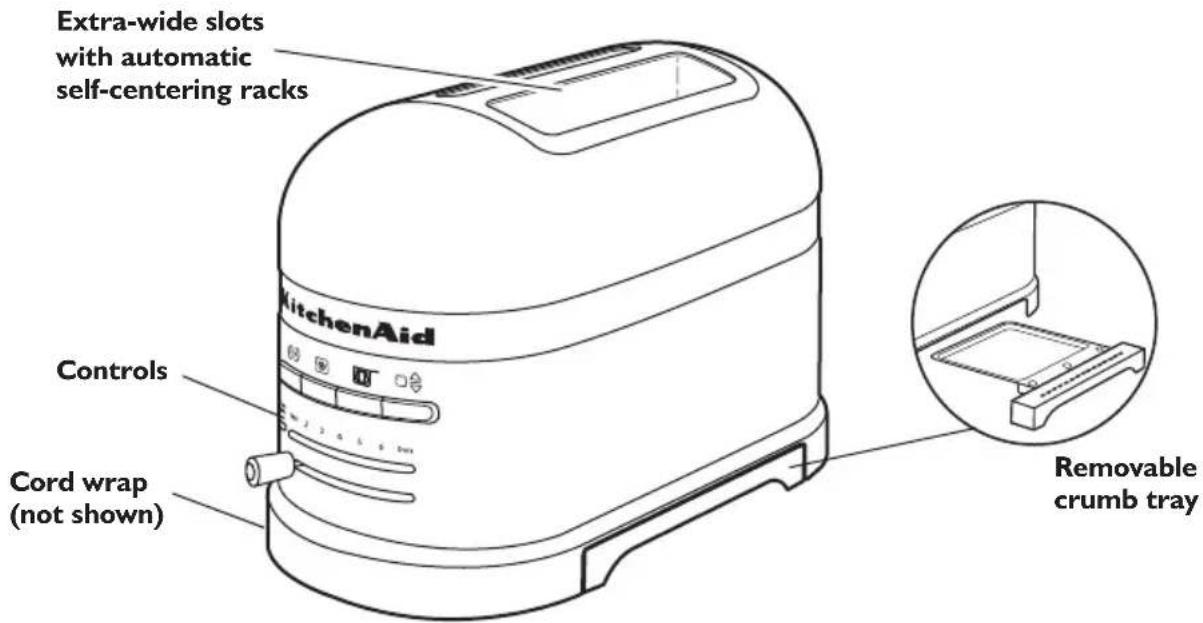
Extra-wide slots with automatic self-centering racks

2-slice model
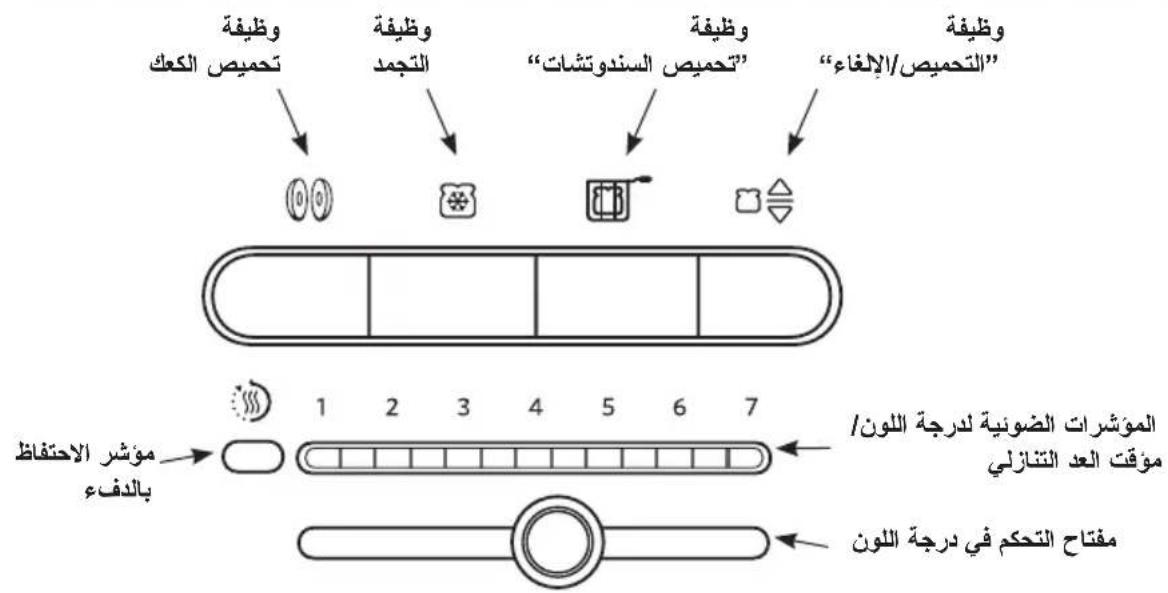
Control panel features
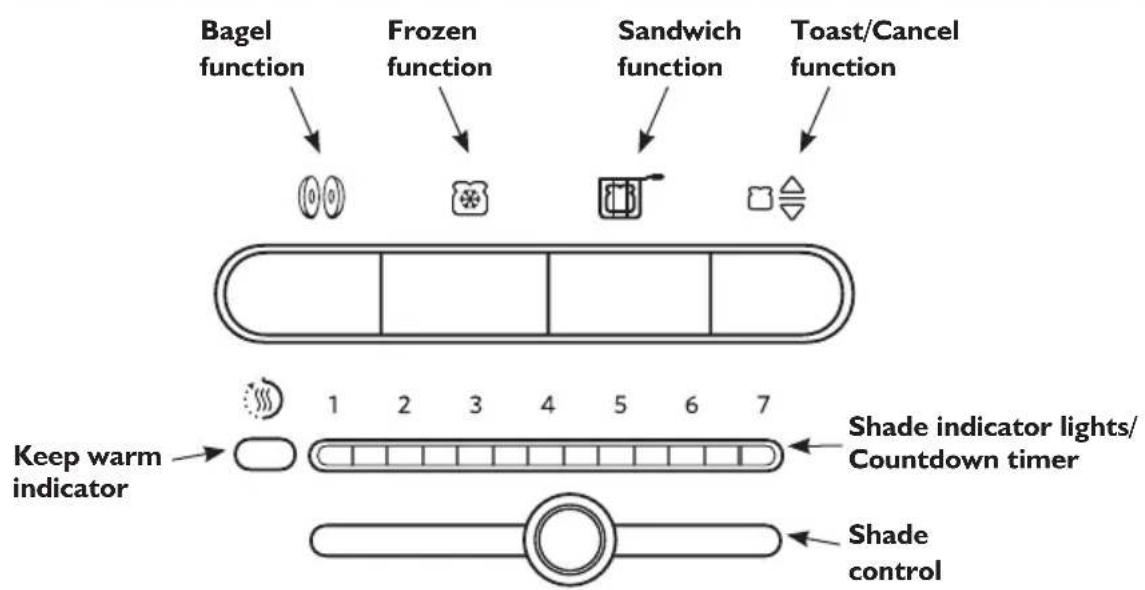
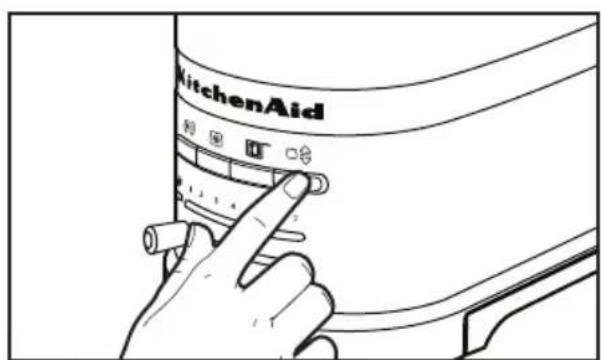
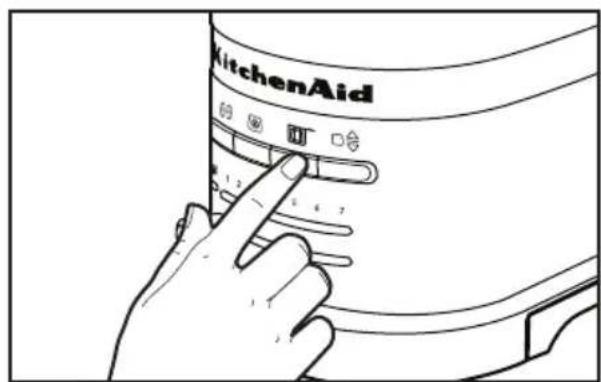
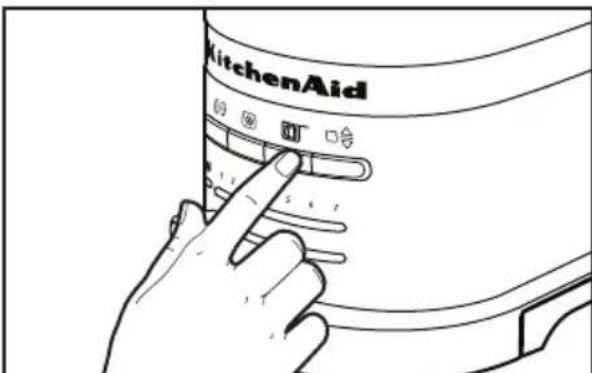
Toast/Cancel function
This is an automatic toaster. As soon as bread is placed in either slot it will begin to lower and toasting will begin using the selected settings.
Some food may be too light to trigger automatic toasting. If food does not begin to drop after 3 seconds, press TOAST/CANCEL ( 等) to start the cycle manually. Press again to cancel a toasting cycle already in process, or to end a Keep warm cycle.
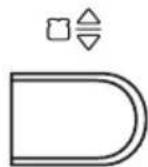
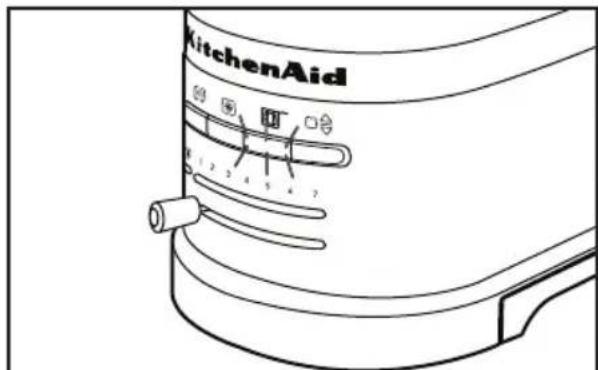
Shade control and Shade indicator lights/Countdown timer
Precisely sets the desired brownness level. Indicator lights show the setting at a glance. During toasting, lights on the shade setting bar will blink to indicate time left in the toasting cycle.
Keep warm indicator
If the food is not removed within 45 seconds of the end of a cycle, the toaster will automatically lower the food
and activate a "Keep warm" cycle using low heat for up to 3 minutes. The Keep warm indicator will light while this cycle is active. You can cancel this cycle at any time by pressing TOAST/CANCEL (□)。
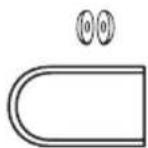
Bagel function
Your Toaster features a special setting for toasting bagels, ensuring optimal heat and time for the best results. The heating elements will adjust to
nicely toast the inside of a cut bagel without burning the bagel's outside surface.
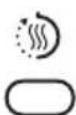
Frozen function
Your Toaster features a Frozen function that gently defrosts and toasts frozen bread. Use Frozen for frozen foods only.
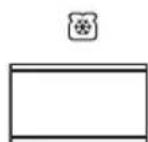
Sandwich function
Your Toaster features a special "Sandwich" setting to be used exclusively with the KitchenAid Sandwich rack to toast sandwiches made with
thinly sliced meats and cheese. See "Toasting sandwiches" for more information.
Toaster features
Extra-wide slots with automatic self-centering racks
Extra-wide slots allow you to easily toast bread, bagels, and English muffins up to 2.8cm (1 / 8^ ) thick. Self-centering racks help ensure even heating of thin or thick breads. An automatic lift mechanism raises and lowers racks.
Controls
Easy-to-use controls allow you to quickly select the desired settings and light to provide visual feedback.
Dual independent controls (4-slice models only)
Dual independent controls allow you to select different settings for each pair of slots.
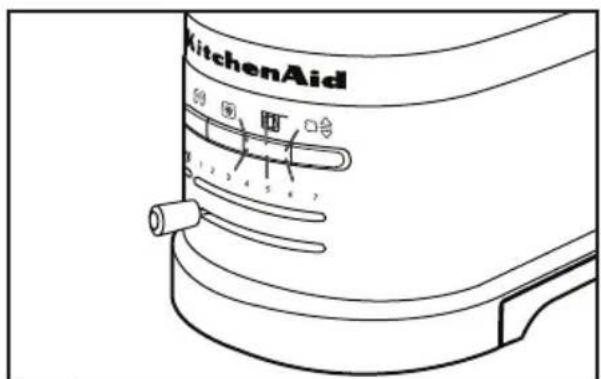
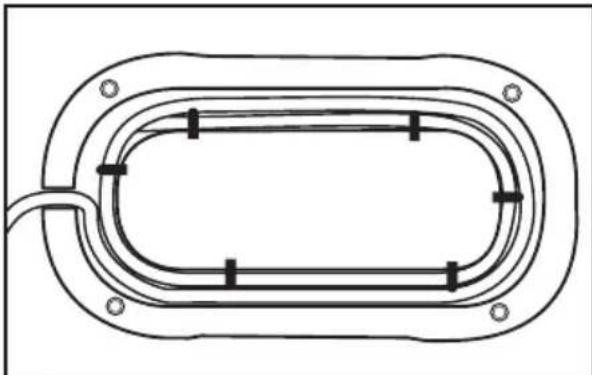
Cord wrap
The cord wrap provides convenient storage of the cord when not in use.
Removable crumb tray
The removable crumb tray slides out for quick removal of crumbs. Hand-wash only.
Before using your Toaster, check the extra-wide slots and remove any packing or printed material that might have fallen inside during shipping or handling. Do not probe inside the Toaster with a metal object.
You may see light smoke the first time you use the Toaster. This is normal. The smoke is harmless and will soon disappear.

Shorten cord, if necessary, by wrapping cord under the base. The Toaster's feet are tall enough to allow the cord to exit from under any side of the Toaster.
Using the Toaster
WARNING

Electrical Shock Hazard
Plug into a grounded outlet.
Do not remove ground prong.
Do not use an adapter.
Do not use an extension cord.
Failure to follow these instructions can result in death, fire, or electrical shock.
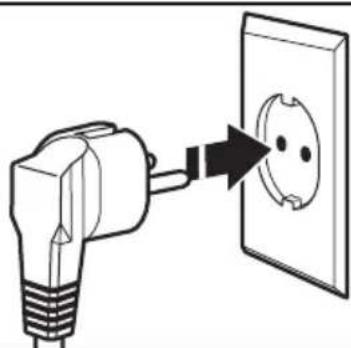
Plug the Toaster cord into a grounded outlet.
NOTE: Different types of bread and their moisture levels may require different shade settings. For example, dry bread will brown more rapidly than moist bread and will require a lighter setting.

1 2 3 4 5 6 7


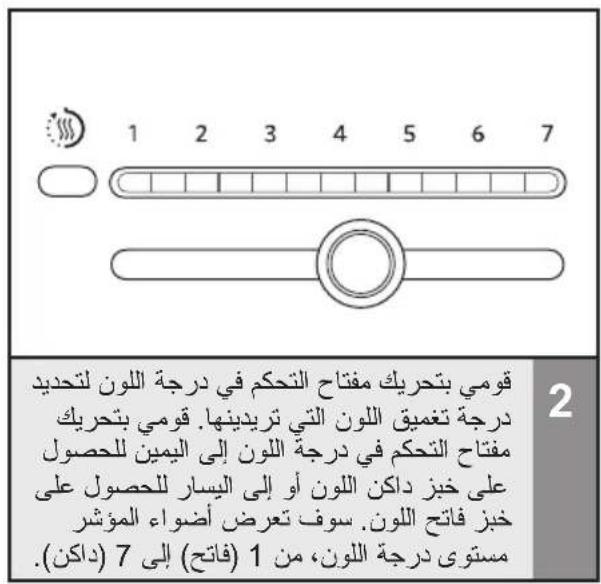
2
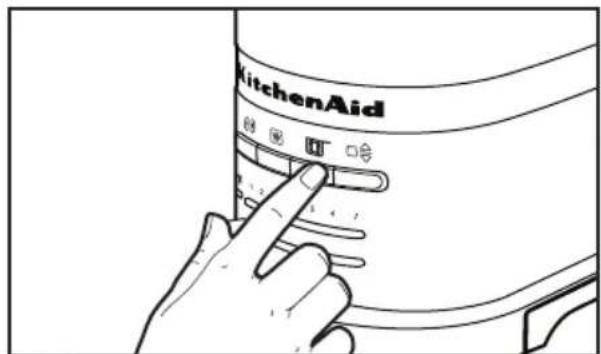
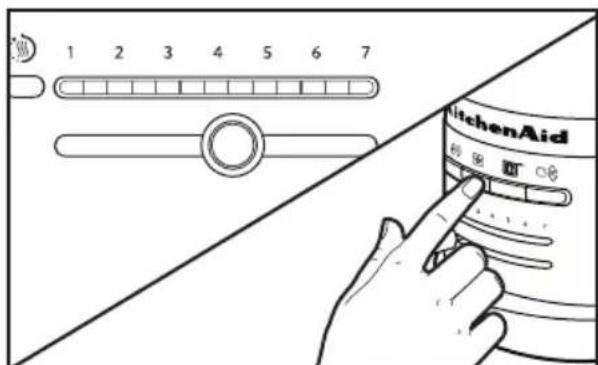
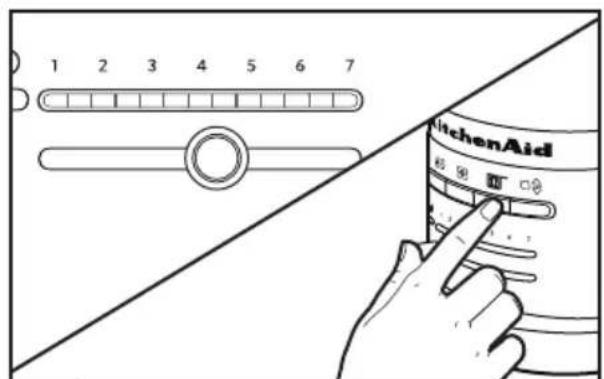
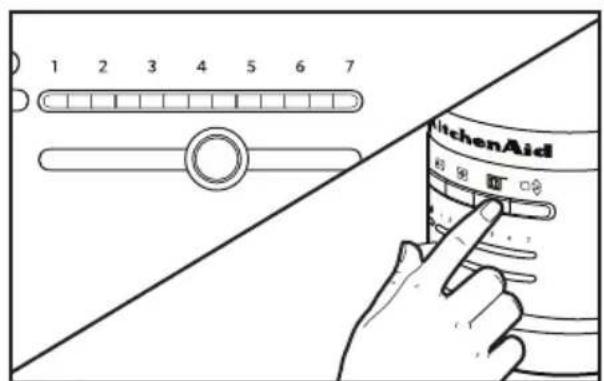
Move the Shade control to select the degree of brownness you want. Move the Shade control to the right for darker toast or to the left for lighter. The indicator lights will display the shade level, from 1 (light) to 7 dark).
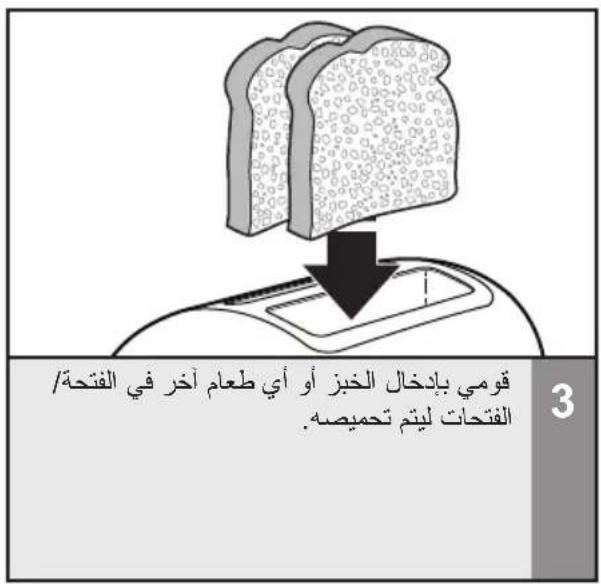
3
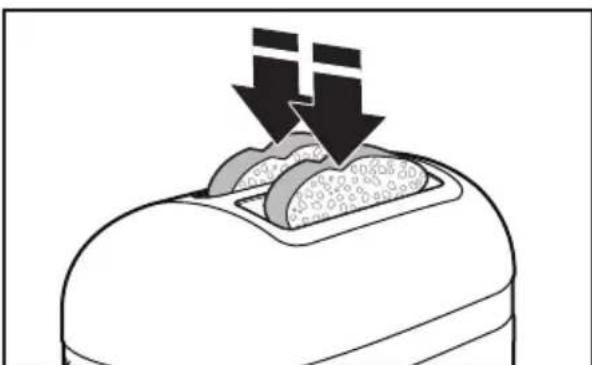
Insert bread or other food to be toasted in slot(s).
NOTE: For even toasting on 2-slot models, toast only one bread type and thickness at a time. If toasting two different types or thicknesses of bread with 4-slot models with dual independent controls, be sure to toast only one bread type in each pair of slots.
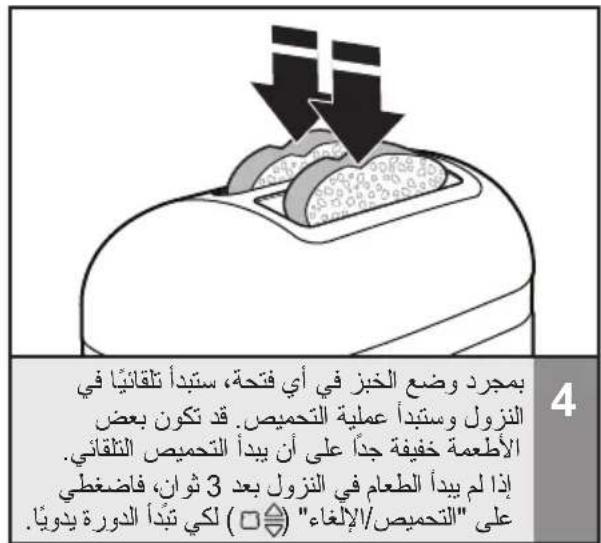
As soon as bread is placed in either slot it will automatically begin to lower and.
to light to trigger automatic toasting. If
the food does not begin to drop after
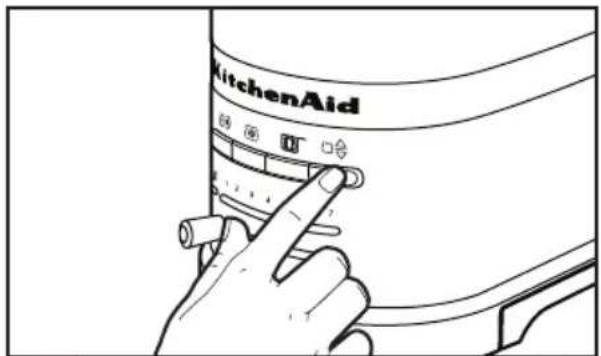
3 seconds press TOAST/CANCEL ( 合) to start the cycle manually.
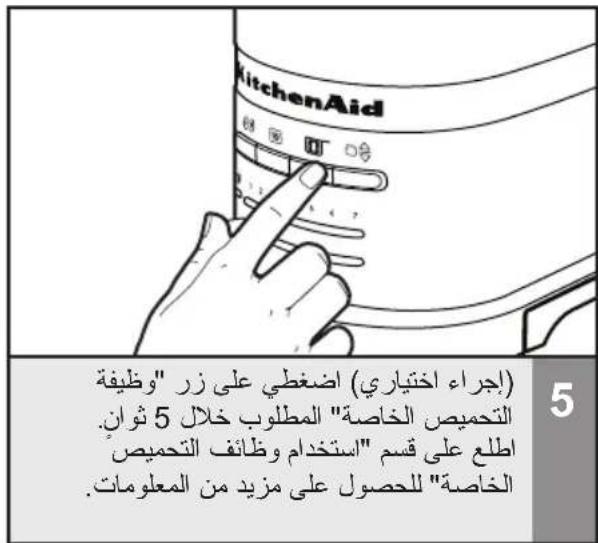
5 (Optional) Press desired special toasting function button within 5 seconds. See the "Special Toasting Functions" section for more information.
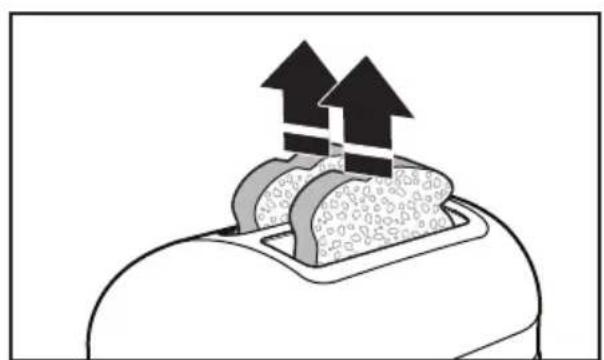
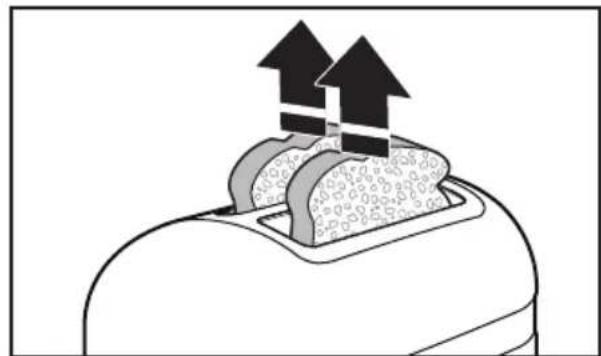
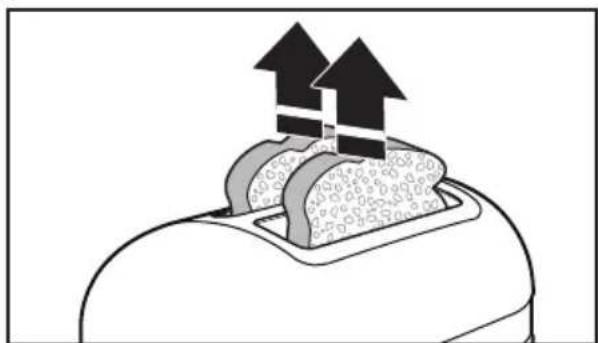
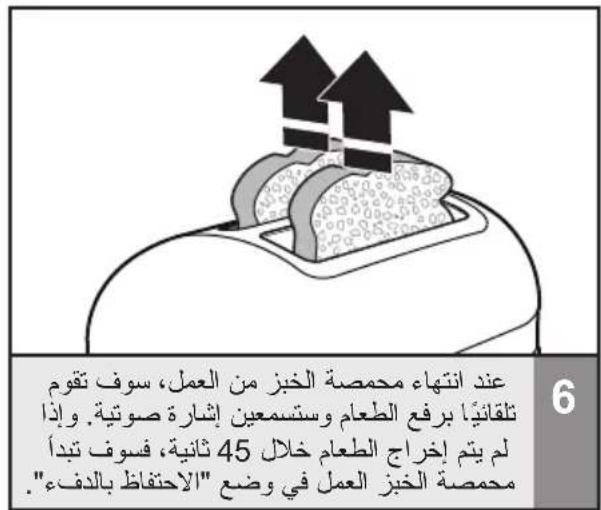
6 When the Toaster is finished, it will automatically raise the food and a signal will sound. If food is not removed within 45 seconds, the Toaster will initiate the Keep warm mode.
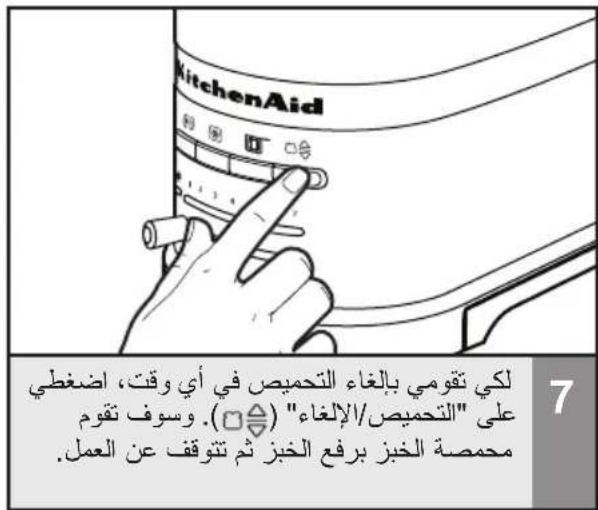
7 To cancel toasting at any time, press TOAST/CANCEL (□). The Toaster will raise the toast and turn off.
Using the special toasting functions
If the food is not removed within 45 seconds of the end of a cycle, the Toaster will automatically lower the food and activate a "Keep warm" cycle using low heat for up to 3 minutes. The Keep warm ( ) indicator will light while this cycle is active.
Keep warm function (
Press the TOAST/CANCEL ( ) button once. If food is not removed, the Keep warm function will activate.
2 If food is not removed within the 3 minute Keep warm cycle, it will raise up and the Toaster will turn off.
Your Toaster features a special setting for toasting bagels, ensuring optimal heat and time for the best results. The heating elements will adjust to nicely toast the inside of a cut bagel without burning the bagel's outside surface.
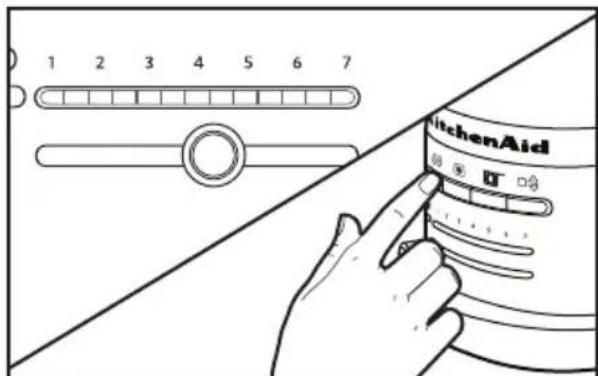
With the Shade control set to the desired level of brownness, press the BAGEL (O) button.
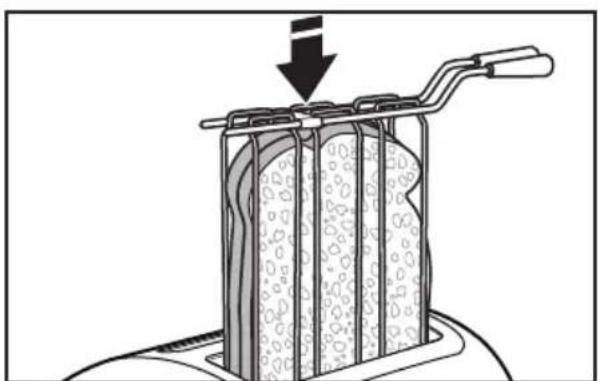
2 Insert bagel halves with the cut sides facing in, as shown. The Toaster will automatically lower the bagel and start toasting.
3 When the bagel is ready, the Toaster will raise it and a signal will beep. If bagel is not removed within 45 seconds, the Toaster will enter Keep warm mode.
Frozen function (
Your Toaster features a Frozen mode that gently defrosts and toasts frozen bread and bagels. Use the Frozen function for frozen foods only.
With the desired brownness level selected, press the FROZEN ( 串 ) button.
2 The Toaster automatically lowers the bread, runs a defrosting cycle to thaw it, then toasts it to the desired brownness.
Toasting Sandwiches (
Your Toaster features a special "Sandwich" setting to be used exclusively with the KitchenAid Sandwich rack to toast sandwiches made with thinly sliced meats and cheeses.
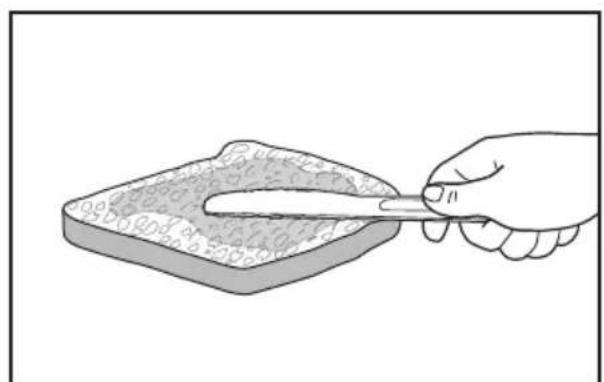
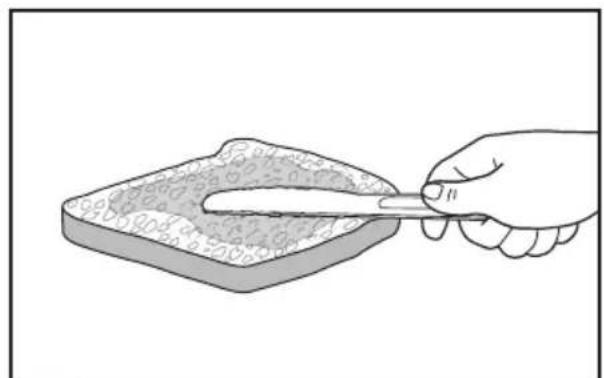
Lightly butter the outside of the sandwich bread - do not butter the side that will face the filling. Buttering the outside of the bread will slow browning and help warm the filling.
2 Fill the sandwich with desired ingredients, but do not overfill it! Thinly sliced ingredients - like ham, turkey, and cheese - work best.
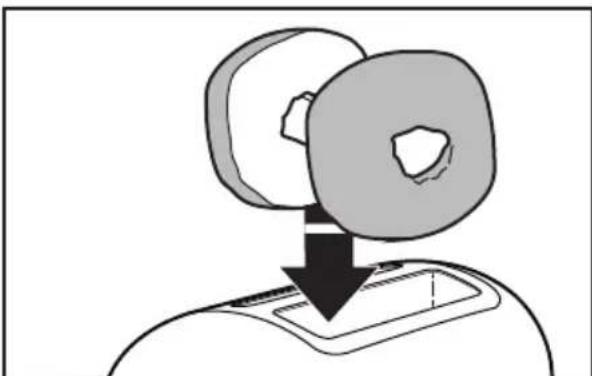
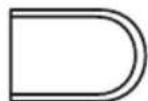
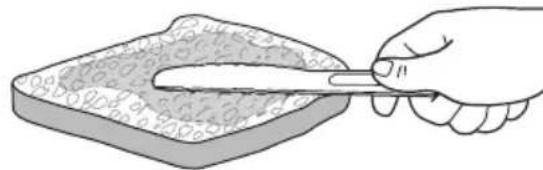
3 Open the Sandwich rack by spreading the handles apart. Then, place an edge of your sandwich flush with the bottom channel of the rack, as shown.
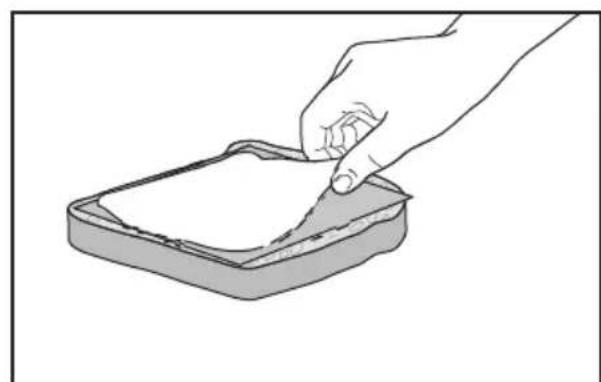
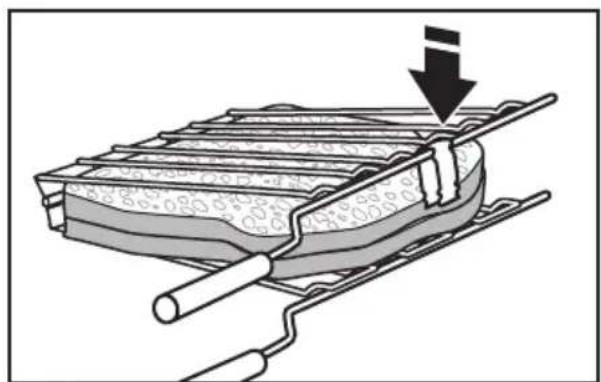
4 Press the Sandwich rack handles together to grip the sandwich. Close the clip to keep grids together.
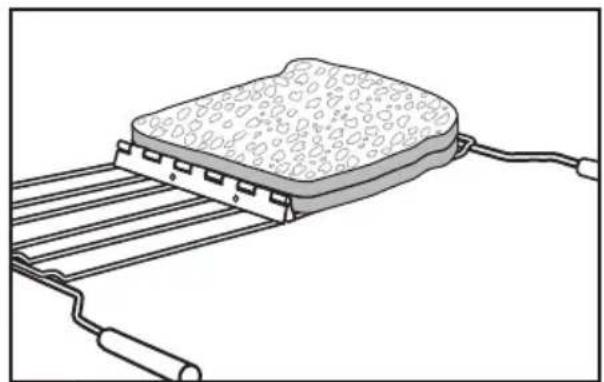
5 Set the Shade control to the desired level of brownness, then press the SANDWICH (D) button.
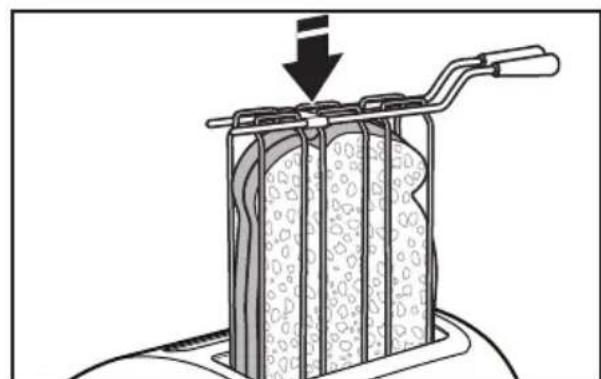
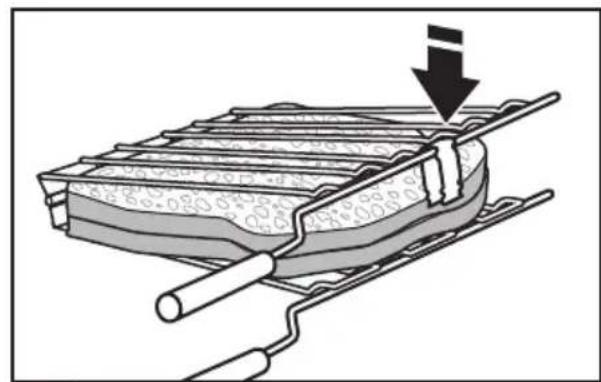
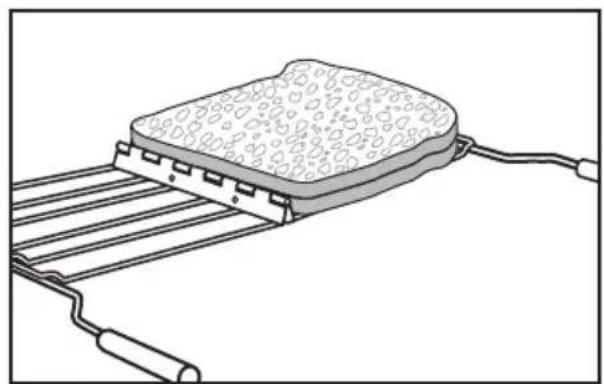
6 Insert the Sandwich rack into the toaster slot, with your sandwich inside, as shown. The Toaster will automatically lower the Sandwich rack and start toasting.
NOTE: For even toasting on 2-slot models, toast only one bread type and thickness at a time. If toasting two different types or thicknesses of bread with 4-slot models with Dual Independent Controls, be sure to toast only one bread type in each pair of slots.
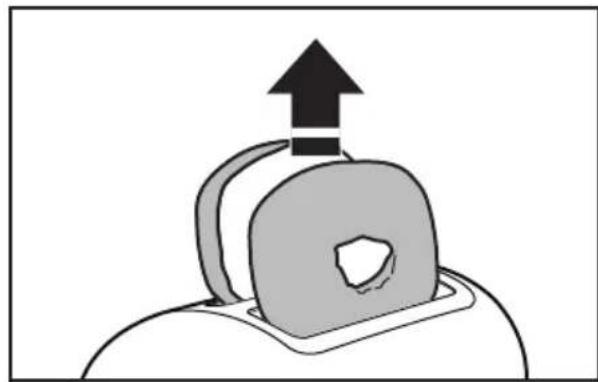
Do NOT store your Sandwich rack in the Toaster, or place it back in the Toaster once sandwich is toasted and unloaded. This would start a new toasting cycle and prevent toaster from working properly.
7 When the sandwich is ready, a signal will beep 3 times, and the Sandwich button light will blink.
8 Remove Sandwich rack and press either the SANDWICH ( ) button or the TOAST/CANCEL ( ) button to return the carriage to its proper position.
NOTE: If Sandwich rack is not removed, a signal will beep every 30 seconds for 2 minutes and the Sandwich button light will blink to remind you to remove it. If Sandwich rack is not removed within 2 minutes, the toaster will automatically turn off. In any case, the Sandwich rack must be removed to operate Toaster again.
Unplug the Toaster and let it cool before cleaning.
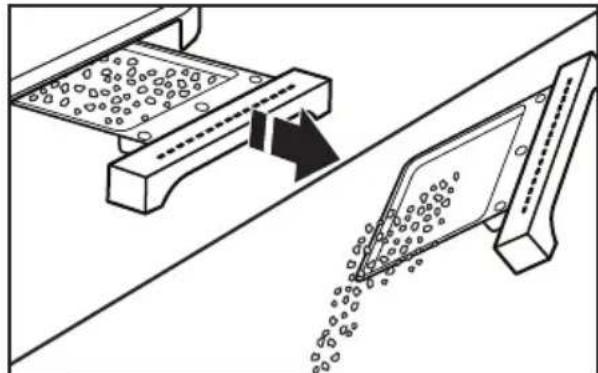
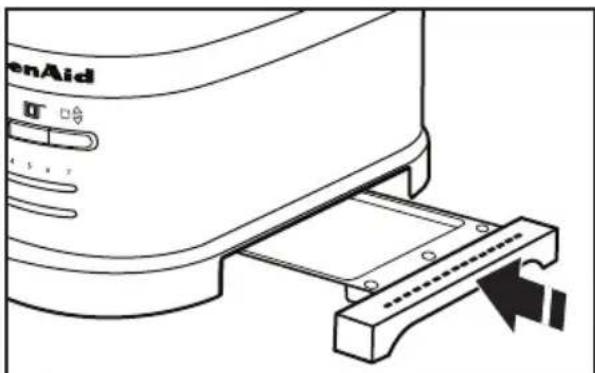
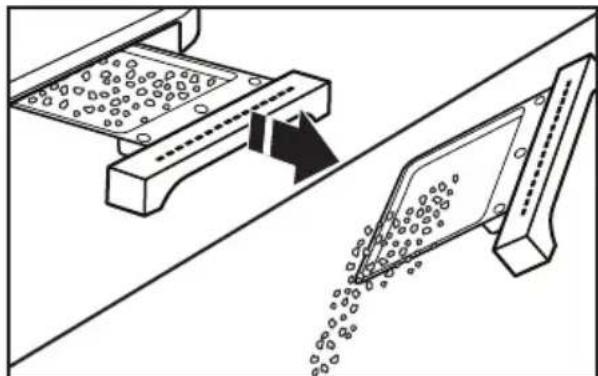
2 Grasp the center of the crumb tray then slide it out. Shake the crumbs into a waste container. It is recommended that the crumb tray be emptied after each use. Crumb tray is hand-wash only.
IMPORTANT: The tray will be hot immediately following a toasting cycle.
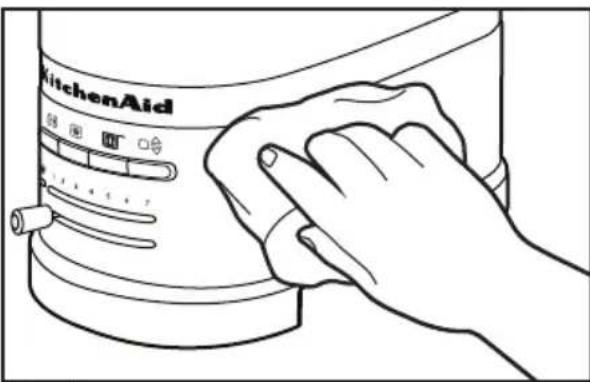
NOTE: If grease or oil splatters on the Toaster, wipe splatters away immediately using a soft, damp cotton cloth.

3 Wipe Toaster with a soft, damp cotton cloth. Do not use paper towels, abrasive cleansers or liquid cleaning products. Do not immerse Toaster in water.
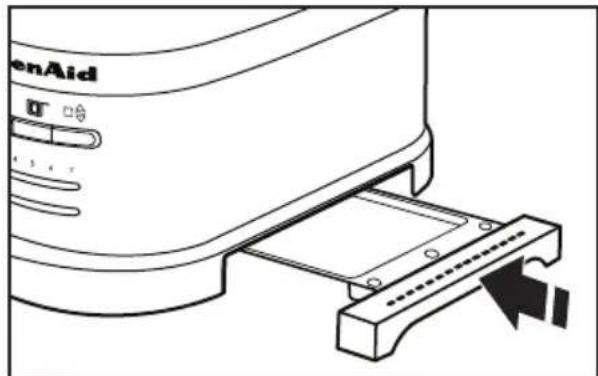
4 Return crumb tray to toaster. Press it in firmly until it clicks into position. Do not use the Toaster without the crumb tray in proper position.
NOTE: KitchenAid does not recommend the use of a toaster cover.
WARNING

Electrical Shock Hazard
Plug into a grounded outlet.
Do not remove ground prong.
Do not use an adapter.
Do not use an extension cord.
Failure to follow these instructions can result in death, fire, or electrical shock.
NOTE: You may see light smoke the first time you use the Toaster. This is normal. The smoke is harmless and will soon disappear.
If your Toaster should fail to operate, check the following:
- If the Toaster does not begin to drop and toast after 3 seconds, it might be that the food inserted is too light to trigger automatic toasting. Press TOAST/CANCEL (O) to start the cycle manually.
- If the Toaster fails to operate and the Sandwich light blinks, it means that a heavy item is preventing the Toaster from working properly. Remove the Sandwich rack or any other heavy items from the Toaster, then press the SANDWICH button (or the TOAST/CANCEL button) to allow the carriage to return to its proper position.
- Check that the Toaster is plugged into a grounded 3-prong electrical outlet.
- If the Toaster is plugged in, unplug it, then plug in the toaster again.
- If the Toaster still does not work, check the household fuse or circuit breaker.
If the problem cannot be corrected, contact an Authorized Service Center (see the "Warranty and service" section).
Do not return the Toaster to the retailer - they do not provide service.
KitchenAid Toaster warranty
| Length of Warranty: | KitchenAid Will Pay For: | KitchenAid Will Not Pay For: |
| Europe, Middle East and Africa:Two years full warranty from date of purchase. | The replacement parts and repair labor costs to correct defects in materials or workmanship. Service must be provided by an Authorized KitchenAid Service Center. | A. Repairs when Toaster is used for operations other than normal household food preparation.B. Damage resulting from accident, alterations, misuse, abuse, or installation/ operation not in accordance with local electrical codes. |
KITCHENAID DOES NOT ASSUME ANY RESPONSIBILITY FOR INDIRECT DAMAGES.
Customer service
In U.K. and Ireland:
For any questions, or to find the nearest KitchenAid Authorized Service Center, please find our contact details below.
NOTE: All service should be handled locally by an Authorized KitchenAid Service Center.
Contact number for U.K. and Northern Ireland:
Tollfree number 0800 988 1266 (calls from mobile phones are charged standard network rate)
Contact number for Ireland:
Tollfree number +44 02086165148
E-mail contact for U.K. and Ireland:
Go to www.kitchenaid.co.uk, and click on the link "Contact Us" at the bottom of the page
Address for U.K. and Ireland:
KitchenAid Europa, Inc.
POBOX19
B-2018 ANTWERP II
BELGIUM
In other countries:
For all product related questions and after sales matters, please contact your dealer to obtain the name of the nearest Authorized KitchenAid Service/Customer Center.
www.KitchenAid.eu
INHALTSVERZEICHNIS
GARANTIA E ASSISTÊNCIA
Garantia da torradeira KitchenAid. 115
Centros de assistencia 116
Servico de assistencia 116
Eevnpetnon nEaTov 132
Tóo ng δikn oac aσφáλεia oso kalTwv áλλwv εival nolu onμavtkn.
To ouyekipievo eyyeipidio napexovtai noa unuuata aopaaleiac kaohc enionc kai naw otnv idia tn ouokevn. diaacte navt a e npooxk aepapocet iota ola ta unnuuata aopaaleiac.

To ouyekpiévo anotéλe i npoεiδoioηtiko oμβoλo aφaλεiac.
Auro to ouoAo oac npoeiooie iia navouc kivduvouc, nov mnpei va npokaoleovu vaumuoi o naokaa kalavato e ocakai touc yupw oac.
Mny aqapeite to akpo yeiownc.
MnV npoiouoioe tetaohpatiotn.
MnV npnoiOnoiOeKaalwio EneKtaoc.
Mny apapeite to akpo yeiwoanc.
INNEHÄLLSFÖRTECKNING
SÄKERHETSFÖRESKRIFTER FÜR BRODROSTEN
KitchenAids garanti for brodrosten
info@servicecompaniet.no
Kundeservice
Norsk Importer:
HOWARD AS:
Hansteensgate 12
0253 OSLO
Tel: 23084130
www.KitchenAid.eu
SISÄLLYSLUETTELO
LEIVÄNPAAHTIMEN TURVALLISUUS
TEXHnKA B3ONACHOCTN INCIOJIb3OBAHm TOCTEPA
MepblnpedoctopoXnoctn 214
3neKtpueckne Tpe6oBaHnra 216
Ytunnaon OTOxOoB 3neKtpueckoro o6OpyObaHn. 216
YACTN IN IX XAPAKTEPNCTUKN
CocTBHbIe yactn TocTepa 217
Onncahne naHenn ynpaBneHn 218
Onicahne TocTepa 219
BKJIIOUeyHNE TOCTEPA
Ipeed nepBbIM uCnoJb3OBaHnem 219
IcnoJb3OBAHne TocTepa 220
IcnoJb3OBaHHe cneuaJIbHbIX onuIN noJxapuBaHnra. 221
UXODIYNCCTKA 225
BbIaBJIeHHe N UCTPAHEHNE HEnCnPABHOCTeN 226
TAPAHNTI IN TEXHNUECKOE OBCJYKUBAHNE
TapaHTnHa TocTeP KitchenAid 227
LcHTpbI o6cnyKbAHnra 228
06cnyxnbHne KIneHTOB 228
Bawa 6e3onacnoctb n 6e3onacnoctb pyrnx cTouT Ha nepbOM MeCTe.
B daHHo nHCTpykunn Ha BaWe mYcTPOINCTBe mbl pa3MeCTnMHOJXeCTBO BaxKbIX COO6ueHn 06e3OnaCHOCTN. O63aTeNbHO npOHTnte BCE coo6uEHHN O 6e3OnaCHOCTN n CJeDyTe INx yKa3AHnM.

3To cMBOJ npedynpejckdneHn 6 onaacnoCTn.
3TOT CUMBOI npedynpejckdaet Bac O BO3MOKhbIX ONaCHOCTx, CNOCO6HbIX HaHECTN TpaBMy nn daJe y6ntb Bac n dpynx IIOe.
Bce coo6eHnO 6e3oNaCHOCTn CneIyOT 3a 3Tm CnMBONM n CNoBaMn «OPACHOCTb» nn «BHHMAHNE». 3Tu cnOba o3HaayoiT:
ONACHOCTb
Bb moKTe nOrn6HyTb nn NOnyUHTb TAgKeIbe TpaBmbl, ecHHeMeDHeHo He NoCNeDyTe NHCTpyKzIaM.
BHIMAHNE
Bb moXeTe nOrn6Hytb nn noJyUHTb TjXeJIbe TpaMbbl, ecH He noCneJyEte HNCTpyKunm.
IpeynpexdeHn 6 onaCHOyKaKyT Bam Ha noteHuaNbHyo onaCHOctb, daTy peKomeHaun OTHCNTbHO TO, KaYMeHbWntb BepoTHOCTb TpaBmbl, a TaKKe Ha To, YTO MOKe Ipn30HTN, ecn Bb He 6yndeTe CneoBaT HhCTpyKcHm.
MEPbI PPEIOCTOPOXKHOCTN
Iprn nCNoJIb3OBAHnN 6bITOBbIX əJIeKTpOpnp6OpOB Heo6xoJIMOC6JIIOJaTb OCHOBHbIe Mepbl IpeDIOCTOpOXHOCTN, B YaCACTHOCTN:
1.Прочтente BCE INHCTpyKcnn.
2. He npikacaiTecb K ropaym NOBepxHocTAm. IcnoIb3yIte pyuKn nn pykoarKn.
3.Bo n36eXaHne nopaxeHnJ 3JIeKTpuecknM TOKOM Hn B Koem clyuae He norpykaIte shHyp, stTeNceIb IIN TOCTep B BOyu IIN dpyryIO XnIDKOCTb.
4. ΘOT npi6op moKeT nCNoIb3OBaTbcra DeTbMn CTapWe 8 letn IInuamn C orpaHnueHHbIMn fN3nueCKnIMn, ceHCOPHBIMn IIn yMCTBeHHbIMn BO3MOXHOCTaMn, He IMeIOUIMN OnbTa o6pauneHna C TexHnKO; eCIn OHN HaxoJrTcP NOKHTPOJeM IIna OTBETCTBEHHORO 3a INx 6e3OpacHOCTb, IIn O3HaKOMJIeHbIC npaBnIaMn erO 6e3OpacHOH JkCnIyatauHn. He N03BOJnTe DeTAM nIgPaTb C yCTpoiCTBOM. YnCTKa n O6cnyKINBaHne He DOJXHbI BblONHЯTbcra DeTbMn 6e3 npinCMOTpa.
5. Bcerda otKJIouaIte TocTe pO CeTn, ecIn Bbl erO He nCNoJIb3YeTe nII nepei OunchKO np6Opa. Ipeed Tem KaK yCTaHaBnBaTb nII BBHIMaTb qAcTn n3 np6Opa, daITe emy OCTbITb.
- He IncnoB3yIte yCTpoIcTBO, ecn y Hero NOBpeJdeH shHyp 3JIeKTPoPiTuHaNr nn BnIka, B Cnyuae HapUWeHna erO HopMaJIbHOJ pa6Otbl, a TaKxe nocJe naDeHnra nn Horo IOBpeJdeHnra. OTHeCnTe yCTpoIcTBO B 6JIxKaIshn ABTOpIN3OBaHHbI cepBnCHbI ueHTp dJa OCMOTpa, peMOHTa nn HaCTpoIKn.
- Исторынец He pekomehnoBaHHbIX npoIN3BOIDTeJIeM BCnOMOraTeIbHbIX npHaJneKHOCTe MoKeT npuBeCTN K TpaBMam.
- He nCloIb3yIte np6Op Ha OTKpbITOM BO3dyxe.
- He donyckaite CBncaHna shhpa nntaHna C kpa cToJa nn dpyro pa6oey nobepxHOCTn N KOHTaKTa C ropaymN NOBepxHOCTaMn.
- He ctabte np6op B6n3n r3OBoN nn 3neKtpuecko neu, a TaKke B Harpetyo DyXOBky.
- Дя OTКлюецни пибopa OT сети NOBepHnte Любую руку упраьеня в пооженье "ВыКЛ.", пося чero BыньTe ВиКу ИЗ розETКИ.
12.Испοлььтуг Te TocTeр Tolibko no npedHa3NaueHnIO.
13.Bo n36eXaHne pIcKa BO3rOpAHn IJI NopaxKeHn 3JIeKTPnuecknM TOKOM, He NOMEuAte B TocTepe npOyKTbI OueHbOJbWOrO pa3Mepa, npOyKTbl, 3aBepHyTbe B oJbry IJI N KxOHHyIO NOcydy. - Ecni BO BpeMa pa6Otbl TocTeP NOKpbIT nIi npKacaeTc K IeRKOBOcPnJaMeHJUoUImCra MaTePnaJAm, HApnpMep 7TopaM, dpaNpOBKaM, CTeHaM n T.D., To 3TO MoXeT npNBecTn K Noxapy.
- Hn B Koem cnyae He nbTaI TeCb BbIHMaTb 3aCTpBwne B TOCTepe npOdyKtbl, KOrDa OH BKJIIOyeH B CeTb.
- ΘTO T npu6Op npeHa3HaueH dIy IcNoIb3OBAHnA ToIbKO B DOMaUHem X03aNCTBe.
COXPAHNTE DAHHOE PYKOBODCTBO
Злектудастпобаяня

BHUMAHNE

Onachoctb npaKeHn 3NeKtpnueckm TOKOM
IopKJIIOUHTe K 3a3emHeHHo pO3eTke.
He ydaanrte 3aemnoumni 3neKtpo.
He nCnoJb3yIte aIaIaTep.
He nCnonb3yIte ydnnHmTeIb.
Heco6IIODeHne 3TNX INCTpyKcHIMOxETnPnBcTn K CmepTu, NOxApynnn nopaxKeHHIO 3NeKtpnueckm TOKOM.
HanpajkeHe: 220-240 BoIbT
Yachota: 50/60 Fepu
MoUHocTb: 1250 BaTT-MoJenb Ha 2 JOMTuKa, 2500 BaTT-MoJenb Ha 4 JOMTuKa
PIMMEAHHE: Ecnu shnyp nntaHnnoBpeKdE,TO OHdoJKeH 6bItb 3aMeHeH npOn3BOUInTeIeM IIN cepBnCHbIM ceHTpOM, BO n36ExKaHne onacHOCTN. He nCNoIb3yIte yDlnHInTeIe.N.O6paTnTEcb K KBaIInΦnIupOBaHHOMy 3JIeKTpNKy IIN pa60THNKy cepBnC ueHTpa 3a NOMOuBIO.
Yttnn3aunr OTXoOB 3JIeKtpnueckoro 6OpydoBaHn
Ytun3aun ynaKOBOHybIX MaTePnAIOB
YnakoBOHbI MaTePnaJIbI NOJNExKaT BTOpHOn Nepepa6OTKe I COepeKAt COOTBeCTByUOuN 3HaK TEm He MeHee,OTDeJIbHbI YeactNuYnakoBKn DOJXHbI 6bITb YTNIN3OBaHbI COrJaCHO npaBnAm MeCTHOaDMNHcTpaCUN, KacaIOUIMCra NIKBnDaUIN OTxOIOB.
Ytun3aunn 13denn
-3To 6OpUdoBaHne MapKupoBaHo corIacHO EbponeckOJ dIpeKtue 2002/96/EC no nCnoJIb3OBaHIO 3JeKtpnueCKOro n 3JeKtpoHHoro 6OpUdoBaHna (WEEE).
-Co6IIOJeHHe npaBn yTuIN3aCnN 3dJIy nOMOraET npedOTbPaTb NOTeHcnaJIbHbIe HeRaTNBhIe NocJeDCTBnI Dn OkpyKaIoUeI
CpeBn 3DopOBb yeNoBeka, KOTOpbIe MOrJIb 6bl 6blTb Bbl3BaHbl HeNpaBnBHOyTNII3aUne 3TORO npOpykTa.
-3HaHa n3dennn nn Ha cOnpoBODnteHbIX DOKymEHTax 06o3NaHaayet, yTO yCTpOietBO nonaAet NOI ONpeJeHne 6bITOBbIX OTXoOB IN DOJXHO 6bIT DoCTaBHeBO B COOTBeTCTByIOuIN ueHtp No nepepa6OTke 3JIeKTPnueCKORO n 3JIeKTPoHHOrO 6OpUdoBaHn.
1 Haxmnte KhoNky IopJxapuBaHne/OTmeHa (1)nn pa3. Ecnn roTOBblte Tocbl He ydaJIntb, TocTepepeJeT B pexMM noIorpeBa npOyKToB.
2 EcnI TOCTbI He BbIHMaTb B TeueHne 3-MnHyTHoro pexkma NODorpeBa, OHN NOHNMyTCa, aTOCTep OTKIOUHTcR.
PnroToBneHHe cHbNuee (
Bau Toctep UMeET CneuHaBHyU HAcTpoIky dIy cHDbNueY, KOtOpYIO cIeIyET IcNoJIb3OBAbToIbKO CpeWetKoI dIy cHDbNueY KInchenAid. DaHna HaCTpoIka IcNoJIb3YeTcIy npIroTOBHeHnA C3HDbNueY C TOHKO Hape3aHHbIM MmCm N CbIpOM.
1 HamaxbTe BHeuHIO CTOpOHy C3HDbNua TOHKIM CNOeMaCna. He MaXbTe MacIOM Ty CTOpOHy C3HDbNua, rDe HaxOJNTcHauNHka. EcnBbI HaMaXeTe MacIOM BHeuHIO CTOpOHy Xle6a, To 3TO 3aMeJnT noJxapNBaHne n o6ecNeHT noDOrpeB HauHHKn.

2 IomeCTnTe B cHnBnU HaunHKy, HO He IOMeuaIte CInuKoM MHO rnrpeJeHTOB! Lyuwe BCero nCNoIb3OBAr ToHko Hape3aHHbIe INrpeJeNTbl, TaKe KaK BetTuHa, MRCO INHIOwATnHa NcbIp.
3 PackpoTe peWeTky, B3aBwncb 3a pyuKn. 3aTeM nOIOXnTe cHdBnU Ha peWeTky TaK, KaN nOKa3aHo Ha pncyHKe.
4 3akpoTe peweTky dny cHbUey, B3aBUnc6 3a pyuKn. 3akpoTe 3axm, yTO6blpeWeTka He OTKpbInacb.
5 BbI6epnte Heo6xOaMyIO CTeneHb NOJXapNBaHnA c NOMOuOp peryIaTopa CTeneHn NOJXapNBaHnHaXmTe KHOkny dIpynproTOBHeHn C3HDbUyei (T).
6 TIOMeCTnTe peWeETky C cHdBnuyem B OTdeneHne TocTepa TaK, KaK NOKa3aHO Ha pucynke. TocTep aBTOMaTHueCKN ONyCTNT peWeETky C cHDbNVcM n HaChet pa6OtaTb.
BKNIOYEHNE TOCTEPA
PIMMEYAHNE:Дя paBHomepHOrO NOJXapNBaHnTOCTOB B MoJeIx IJI 2 JOMTkoB XNe6a CneJyET OJHOBpeMeHHo rTOBtB TOJIbKO OINH BnD XNe6Horo N3dEJIy OJHOI N ToJ Xe TOnIuHbI. Pn npiroTOBHeHN DByx Pa3NHybIX BnIOB XNe6hblx N3dEJIy pa3NHyOH ToIuHbI B MOJIeJAX DnA 4 JOMTkoB XNe6a C BoIH Ho He3aBcHmOc CNTeMoI ynpabHeHn CNeJyET rTOBtB TOJIbKO OINH BnD XNe6HbIX N3dEJIy B OJHOI nape OTdJIeHn.
HE OCTaBnIe peWetky dIy C3HDbNuee B TOCTepe I He BO3BpaJauTe ee B TOCTep nocJe nprirotOBHeHn yUdAeHnC3HDbNua. B IpOTNBOM cIyuae HauHETcR HObI uKJI NOJXapINBaHn, YTO MOKeT pINBeCTn K NOLOMKe TOCtepa.
7 Iocne toro, KaC cHDbVc 6ydet roTOB, TocTeP nOdaCT npedynpeXdaUOuN cnHa13pa3a, IN KOnka dIpy npiroToBHeHn C3HDbUyei NaHT MIRaTb.
8 BbHbTe peweTky C cHdBnuem n3 TOCTepa HaxMITE KHOKNy cHdBNU ()nn KHOKNy POnkapnBaHne/ Otmeha(,Ira TOrO uTo6bI KapetKa BepHynaCb B NcXoDHOe NOIOKeHne.
PIMMEYAHNE: EcnB He ydaHte peWetky dNcHDbuue N3 TOCTepa, OH 6yET NOdaBaTb 3ByKOBOc nHaJ uepe3 KaKdbie 30 cekyHd B TeueHne 2 MInyt, a KHOJa dNpIroTOBHeHn C3HDbUeey 6yTeMraTb. EcnB He ydaHte peWetky dNcHDbUeey N3 TOCTepa B TeueHne 2 MInyt, TocTeP abTomatnuecKn BblKnIOHTcR. B IIObom cnyae, dNr TORO YTO6bl TOCTep Hauan pa6oTaTb CHOBA, Bam Heo6xOJMo BblHyTb N3 Hero peWetky dNcHDbUeey.
1 Npeo ounctkOJ OTKIOUHTe TocTe pOT cETN I daIte emy OCTbITb.
2 Bo3bMntecb 3a ceHtpaBHyu qactb NODOnHa dIg KPOWeK I BbIHbTe erO. Bb6pocbTe KPOsKn B MycOpHoe BeDpo.Mbl peKoMeHdyem OunuTaB NOdON dIg KPOWeK Nocne KaJDoRo NCnOJIb3OBaHn TocTepa.IoDDon dIg KPOWeK PpeHa3HaueH ToIbKO dIg pyuHO rMbITbY.
BHIMAHHE: Cpa3y nocIe OKOHuaHn Ipouecca npuROTOBHeHn TOCTOB NOdoH 6ydt ropaym.
PIMMEAHHE: B cnyuae nonaHaHna Knpa nn Macna Ha Kopnyc TocTepa, cpa3y Ke npoTpnte erO uCToBnAHHoXnONuTaO6ymaxHoTpAnOuKoN.
3 IIpOtpnTe TocTe MmKoBnAaJHOn XIOnuTaO6ymaxHoTkaHbU.He NcNoJIb3yInTe 6ymaxHbIe caNΦeTKn, a6pa3nBhIe nn JxNdkne YnCTaIue cpeIcTba. He nOrpyKaIte TocTe B BOdy.
4 YctaHOBInTe NOdOn DnA KPOWeK BTOCTep.HaxMMTe, NOKa OH He 3auekenKHeTc. He nCnoNb3yIe TOCTep6e3 yCTaHOBJeHHoro NOdoHaDnKPOWeK.
PIMMEAHHE: KitchenAid He peKomeHdyET nCNoJb3ObaT b yexon dIa TocTepa.
BHUMAHVE

Onachoctb nopajeknna 3JIeKTPmuecknTOKOM
IopknHouHTe K3a3emHeHHo p03eTke.
He ydaIaIte 3aemnoi 3neKtpo.i.
He nCnoJb3yIte aIaIaTeP.
He nCnoB3yIte yDnHnHTenb.
Heco6IIODeHne 3Tnx INCHtpKcHn MoKeT npNBecTu K CmepTu, NoKapy UIN NopaxKeHHIO 3JNEKTpueckIM TOKOM.
PIMMEYAHNE: Pn nepBOM nCNoIb3OBAHN TOCTepa n3 Hero MoKeT NOITN JeRKn DbIM. 3TO He RaBJeTc npn3HaKOM HEnCnpaBHOCTN. 3TOT dblm 6e3OnaceH nCKopo nCye3HeT.
EcnB Baw TocTep He pa6oTaet, npOBepbTe cneDyUoOee:
- EcInTOCTep He ONyCKaET N He HaunHaet TOTOBNTb TOCTbI Yepe3 3 ceKyuHdbI, TO 3TO MOKeT 6bITb B pe3yJbTaTe TORO, yTO npOdyKTb CINuKOM JERKne DnA TORO, yTO6bl pPnBecTN B DeiCTBne MExaHN3M aBTOMaTnueCKORo PpNROTOBHeHn. Haxmnte KhONky PoJxkapuBaHne/ OTMeha (,yTO6bl 3aNyCTnTB uNKJI npNROTOBHeHn TOCTOB BpyHyU.
- Ecnn TocTepeH pa6oTaT, a KhoNka nI npnroTOBHeH NCHBNUeM MTRAeT, TO 3TO O3HaUaeT, yTO B HEM HaxOHTC TAnKeBbI npedMeT, KOToPbIM MeWaeT erO HopMaIbHOH pa6Ote. BbInbTe peWeETKy IIN C3HDbUeH uIN dpyRoT TaKeBbI npedMeT IN3 TOCTepa, IOCNe Uero HaXMMTE KhoNkY IIN npnroTOBHeH NCHBNUeH (II) nn KhoNkPyOnKaIpaHbAHne/OTmeHa (O), IIN TORO YTO6bl KapeTKa BePhynacb B HopMaIbHOe NOLOKeHne.
- Y6eIITecb B TOM, yTO TOCTep NOdkJIIOUeH K 3a3EmJeHHOu PO3eTKe.
- Ecnn TocTepe NOdknIOueH K cETn, BbIHbTe WTeNCeIb N3 pO3eTKn, NocNe Yero BCTaBbTe ero CHOBa B pO3eTKy.
- Ecn TocTepe He pa6oTaet, npOBepbTe npo6Kn BpacnpedeJIteJbHOM uNTke.
Ecn npo6nema He moxet 6bItb peweha, o6paTntecb B aBtOpn3OBaHHbI ueHtp o6cnykBaHnra (cm. pa3dJeIbI "IapaHTnI nTexnueckoe o6cnykBaHne").
He Bo3BpaaIte 6IeHep npOdaBu - OH He BbIOnHReT peMOHT.
Гаранту на тостер KitchenAid
"DANGER" aks lal yxlll jr Jxll
"WARNING"
i 1
a

A

AaJU JI 1JLJIaIaIaIaIaIaIaIaIaIaIaIaIaIaIaIaIaIaIaIaIaIaIaIaIaIaIaIaIaIaIaIaIaIaIaI a
L
a
aiee eae ee eee
1 10
- 1
.
1
j 1
8 8
1 gils 121 g aiai jiejaiy
Jgliae jiey jiey jiey jiey jiey jiey jiey jiey
Jabla Jn no aal g bllac 2 n
.
Lcjj 1j
J 1
J 1
S OBC = S COD + S_ BOC
1 + u7 = 7 + 1 > ( 1 + u) u7 = 7 + 1 > ( 1 + u) u = 7 + 1 > ( 1 + u) ( 1 + u) = 7 + 1
3^x = - 2 + 22k

V.
A
9. 4.15.1

240-220: 220
60/50:
1250:1250 2500
Jn Jn Jn Jn Jn Jn Jn Jn Jn Jn Jn Jn Jn Jn Jn Jn Jn Jn Jn Jn Jn Jn Jn Jn Jn Jn Jn Jn Jn Jn Jn Jn Jn Jn Jn Jn Jn Jn Jn Jn Jn Jn Jn Jn Jn Jn Jn Jn Jn Jn Jn


auiy
.
.
i 1
1
1 1
a 1
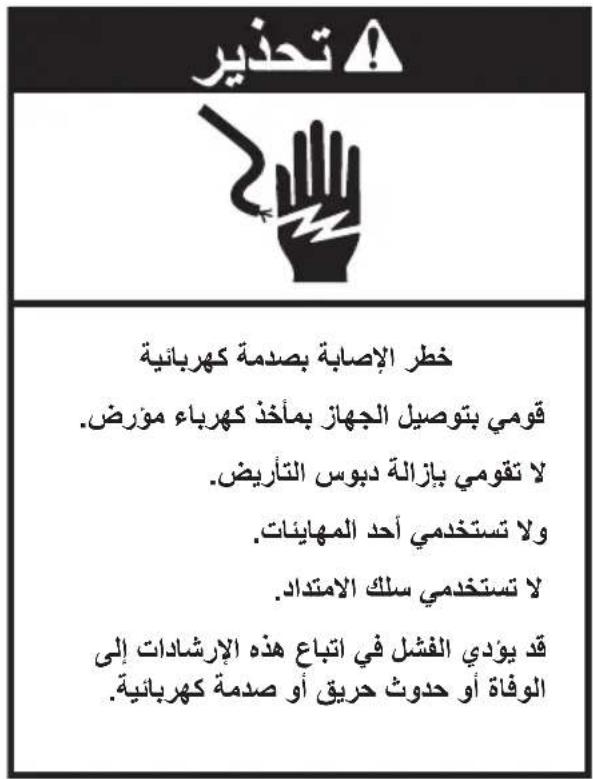
auiyssll jjssll cuiai no aicill
aaii iiaii 12n no jalil n no sill y- aill ic alaiinall aill gll i jy n ci elu w Jalaill dna n jkki iit gll gnu laiiy I aas y. aiiall 12n cylai e gss
i j 1000000000000000000000000000000000000000000000000000000000000
Jg Jyjuaill clogall no yjo Jyall
iKo Jiaiy jyco yjdi oLc! gaiiau g jiaial li
gi jialll jao aill ao jiaol all ayal
.iaia iia jiail jiaial
aill 1ga cnaolil
100% a y jy yj yj yj yj yj yj yj yj yj yj yj yj yj yj yj yj yj yj yj yj yj yj yj yj yj yj yj yj yj yj yj yj yj yj yj yj yj yj yj yj yj yj yj yj yj yj yj yj yj yj y
aaii
J 2002/96/EC (WEEE)
j
()4gj)alaiaiyil 100
aJlalll pablil cIg J
clig jyssll jalll plabll cIg yj
.100 100
J 15 J 15 J 15 J 15 J 15 J 15 J 15 J 15 J 15 J 15 J 15 J 15 J 15 J 15 J 15 J 15 J 15 J 15 J 15 J 15 J 15 J 15 J 15 J 15 J 15 J 15
- 111111111111111111111111111111
jaiaa
J 100000000000000000000000000000000000000000000
JgX1 p1
J 1 J 1 J 1 J 1 J 1 J 1 J 1 J 1 J 1 J 1 J 1 J 1 J 1 J 1 J 1 J 1 J 1 J 1 J 1 J 1 J 1 J 1 J 1 J 1 J 1 J 1 J 1 J 1 J 1 J 1 J 1 J 1 J 1 J 1 J
aasll Jaaee
J 100
"zil
jia 12000 jie jie jie jie jie jie jie jie jie jie jie jie jie jie jie jie jie jie jie jie jie jie jie jie jie jie jie jie jie jie jie jie jie jie jie jie jie jie jie jie jie jie jie jie jie jie jie jie jie jie jies

aagaaagaaagaaagaaagaaagaaagaaagaaagaaagaaagaaagaaagaaagaaagaaagaaagaaagaaagaaagaaagaaagaaagaaagaaagaaagaaagaaagaaagaaagaaagaaagaaagaaagaaagaaagaaagaaagaaagaa
Jlillll lglg 1000000000000000000000000000000000000000000000000000000000000000
a
"Jagill" agjg jilll aaa aa jii
Jal ggi jll jI lac Jai jll
g jai slkag. aaoa jil
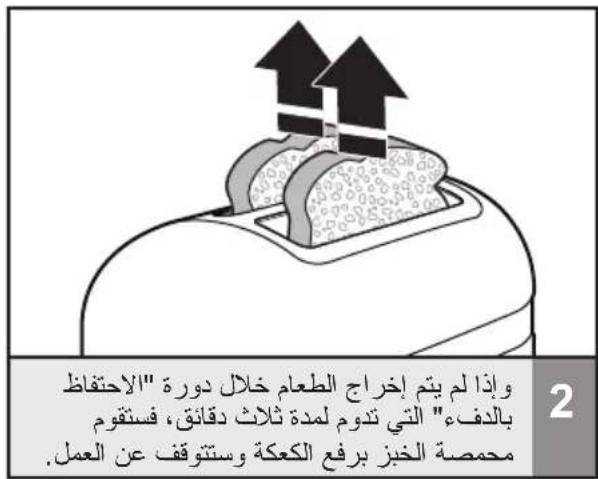
Joi 2oall ao b1 y "Jagill"

"ciis gii
J 1000000000000000000000000000000000000000000000000000000000000000000000000000000

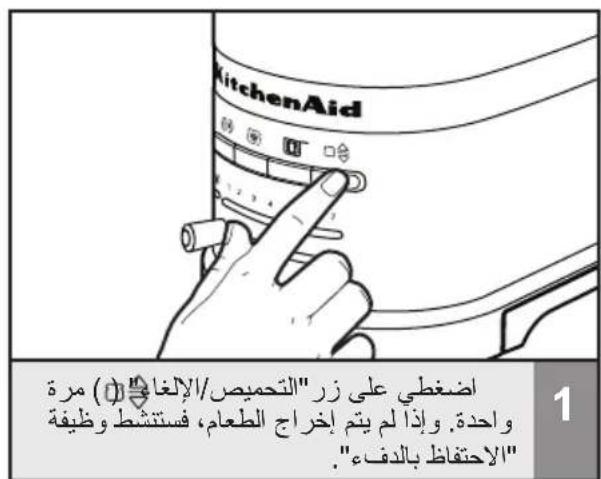
aai" 1. jlll gll l aai jil
sdy
45 152 plab jj yj p 1
Joo Joo g o0o jy j
hui jplab jj ie jolit jil
jpli iu uu lal joln
g 3 Jia 2a jai 1 a
. 0i i 1
. 0i 1
.


aal
1 45 45 45
.8jgl0a buii i()
()
y 1
a 4 1 2 3 4 5 6

KichenAid Cwio 1000000000000000000000000000000000000000000000000

Jg 10000000000000000000000000000000000000000000000000000000000
2
a a a a a a a a a a a a a a a a a a a a a a a a a a a a a a a a a a a a a a a a a a a a a a a a a a a a
3
()
a a a a a a a a a a a a a a a a a a a a a a a a a a a a a a a a a a a a a a

J 1 J jj j j j j j j j j j j j j j j j j j j j j j j j j j j j j j j j j j j j j j j j j j j j j j j j j j j j j j j j j j j j
2

Baaal 1
1
aaii iiee 1
2
yS11 jai aaoa Jao g 1jiai i 2ii Ie5 jil
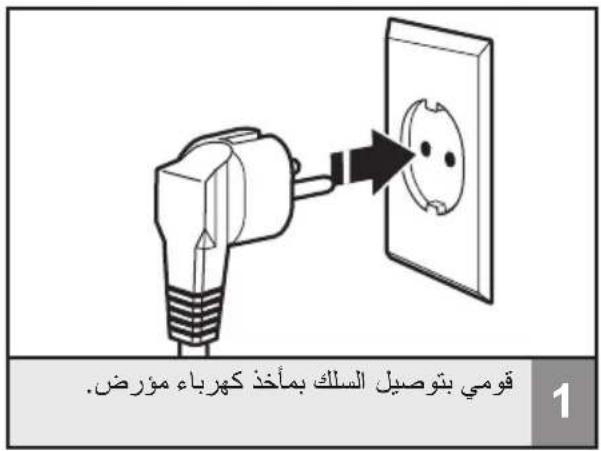
1
a
KitchenAid 5s Jn Jn Jn Jn Jn Jn Jn

KitchenAid
© 2014. All rights reserved.
Specifications subject to change without notice.

- PARTS AND FEATURES
- CARE AND CLEANING 17
- TROUBLESHOOTING 18
- WARRANTY AND SERVICE
- Your safety and the safety of others are very important.
- DANGER
- WARNING
- IMPORTANT SAFEGUARDS
- SAVE THESE INSTRUCTIONS
- Electrical requirements
- Electrical equipment waste disposal
- Disposal of packing material
- Scrapping the product
- Toaster parts
- 4-slice model
- 2-slice model
- Control panel features
- Toast/Cancel function
- Shade control and Shade indicator lights/Countdown timer
- Keep warm indicator
- Bagel function
- Frozen function
- Sandwich function
- Toaster features
- Extra-wide slots with automatic self-centering racks
- Controls
- Dual independent controls (4-slice models only)
- Cord wrap
- Removable crumb tray
- Using the Toaster
- Using the special toasting functions
- Keep warm function (
- Frozen function (
- Toasting Sandwiches (
- KitchenAid Toaster warranty
- Customer service
- In U.K. and Ireland:
- In other countries:
- INHALTSVERZEICHNIS
- GARANTIA E ASSISTÊNCIA
- Tóo ng δikn oac aσφáλεia oso kalTwv áλλwv εival nolu onμavtkn.
- INNEHÄLLSFÖRTECKNING
- SÄKERHETSFÖRESKRIFTER FÜR BRODROSTEN
- KitchenAids garanti for brodrosten
- Kundeservice
- SISÄLLYSLUETTELO
- LEIVÄNPAAHTIMEN TURVALLISUUS
- TEXHnKA B3ONACHOCTN INCIOJIb3OBAHm TOCTEPA
- YACTN IN IX XAPAKTEPNCTUKN
- BKJIIOUeyHNE TOCTEPA
- TAPAHNTI IN TEXHNUECKOE OBCJYKUBAHNE
- Bawa 6e3onacnoctb n 6e3onacnoctb pyrnx cTouT Ha nepbOM MeCTe.
- ONACHOCTb
- BHIMAHNE
- MEPbI PPEIOCTOPOXKHOCTN
- COXPAHNTE DAHHOE PYKOBODCTBO
- Злектудастпобаяня
- BHUMAHNE
- Yttnn3aunr OTXoOB 3JIeKtpnueckoro 6OpydoBaHn
- Ytun3aun ynaKOBOHybIX MaTePnAIOB
- Ytun3aunn 13denn
- PnroToBneHHe cHbNuee (
- BKNIOYEHNE TOCTEPA
- BHUMAHVE
- EcnB Baw TocTep He pa6oTaet, npOBepbTe cneDyUoOee:
- Гаранту на тостер KitchenAid
- a
- j
- jaiaa
- JgX1 p1
- aasll Jaaee
- "zil
- aagaaagaaagaaagaaagaaagaaagaaagaaagaaagaaagaaagaaagaaagaaagaaagaaagaaagaaagaaagaaagaaagaaagaaagaaagaaagaaagaaagaaagaaagaaagaaagaaagaaagaaagaaagaaagaaagaaagaa
- "ciis gii
- sdy
- aal
- ()
- KitchenAid
Brand : KITCHENAID
Model : 5KMT4205
Category : Toaster