
ASP 5 N - Log splitter ATIKA - Free user manual and instructions
Find the device manual for free ASP 5 N ATIKA in PDF.
| Product type | Firewood splitter |
| Brand | ATIKA |
| Model | ASP 5 N |
| Splitting force | 50 kN (5 tons) |
| Hydraulic system pressure | 20.6 MPa (206 bar) |
| Allowable log length | 200 to 520 mm |
| Allowable log diameter | 50 to 250 mm |
| Splitting stroke | 370 mm |
| Push rod advance speed | 3.7 cm/s |
| Return speed | 6.2 cm/s |
| Hydraulic oil tank capacity | 3.5 liters |
| Recommended hydraulic oil | Shell Tellus T22 or equivalent |
| Electric motor power | 2200 W (P1) S3 25% |
| Power supply | 230 V ~ 50 Hz |
| Recommended fuse | 10 A (slow-blow) |
| Noise level (idle) | 78.8 dB(A) |
| Noise level (under load) | 89.8 dB(A) |
| Dimensions (L x W x H) | 1160 x 425 x 610 mm |
| Weight | 55 kg |
| Recommended working height | 72 to 85 cm (work surface) |
| Controls | Two-hand operation: start button + control handle |
| Main functions | Splitting dry wood without nails or wires |
| Maintenance and cleaning | Clean after each use; lubricate piston rod; change oil every 250 h |
| Safety | Protective equipment: safety glasses, gloves, safety shoes, hearing protection; do not approach hands near the wedge |
| Spare parts and repairability | Use only original parts; repairs to be carried out by after-sales service |
| Warranty | Refer to the provided warranty statement |
Frequently Asked Questions - ASP 5 N ATIKA
User questions about ASP 5 N ATIKA
0 question about this device. Answer the ones you know or ask your own.
Ask a new question about this device
Download the instructions for your Log splitter in PDF format for free! Find your manual ASP 5 N - ATIKA and take your electronic device back in hand. On this page are published all the documents necessary for the use of your device. ASP 5 N by ATIKA.
USER MANUAL ASP 5 N ATIKA
Original instructions

Page 11
Notice originale

Page 20
Do not operate machine before having read the operating instructions, understood all the notes and assembly the machine as described here.
Keep the instructions in a safe place for future use.
Contents
Extent of delivery 11
Symbols machine / operating instructions 11/12
Normal intended use 12
Residual risks 12
Safety instructions 12
Description of device / spare parts 14
Assembly 15
Location 15
Commissioning 15
Working with the log splitter 15
Maintenance and care 16
Transport instructions 17
Storage 17
Guarantee 17
Possible faults 18
Technical data 19
Wiring diagram 19
Hydraulic diagram 19
EC Declaration of Conformity 156

Extent of delivery
After unpacking, check the contents of the box for
completeness
possible transport damage.
| 1 | Pre-assembled device unit | 10 | Rear wall, right |
| 2 | Carrying handle | 11 | Lateral access guard |
| 3 | Support brace, right (2x) | 12 | Upper access guard, left |
| 4 | Support braces, left | 13 | Upper access guard, right |
| 5 | Guard plate | 14 | Connecting plate (2x) |
| 6 | Wood tray, rear | 15 | Fastener bag |
| 7 | Wood tray, front | 16 | Operating instructions |
| 8 | Front access guard | 16A | Assembly and operating instruction sheet |
| 9 | Rear wall, left | 17 | Warranty declaration |
Report any damage or missing items to your dealer, supplier or the manufacturer immediately. Complaints made at a later date will not be acknowledged.
Symbols on the machine

Carefully read operator's manual before handling the machine.

Wear hearing protection when working with the machine to protect your hearing.
Wear protective goggles when working with the machine to protect the eyes from chips and splinters.

Wear safety shoes when working with the machine to protect the feet from falling logs.
Wear safety gloves when working with the machine to protect the hands from chips and splinters.

Do not expose to rain. Protect against humidity.

It is prohibited to remove or modify protective and safety devices.

Must be operated by a single person only. Keep bystanders as well as pets and domestic animals away (minimum distance 5 m) from the danger zone.

Danger of being cut or trapped; never touch any dangerous parts when the splitting wedge is in motion.

Caution!
Always note when the log ram is in motion.

Caution!
Never remove a log jammed against the wedge by hand.

Caution!
Switch off the motor and disconnect the mains plug before performing cleaning, maintenance or repair work.

Dispose of the old oil properly (local oil disposal point). The old oil must not be poured into the ground or drainage system, or mixed with other waste.

Vent the hydraulic system before putting the log splitter into operation. (see "Start-up")

Lifting point

Strapping point

This product complies with European regulations specifically applicable to it.
Electrical devices do not go into the domestic rubbish.
Give devices, accessories and packaging to an ecofriendly recycling.
According to the European Directive 2012/19/EU on electrical and electronic scrap, electrical devices that are no longer serviceable must be separately collected and brought to a facility for an environmentally compatible recycling.
Symbols operating instructions

Potential hazard or hazardous situation. Failure to observe these instructions may lead to injuries or cause damage to property.

Important information on proper handling. Failure to observe these instructions may lead to malfunction.

User information. This information helps you to use all the functions optimally.

Assembly, operation and servicing. Here you are explained exactly what to do.

Please refer to the attached assembly and operating instruction sheet for references to figure numbers in the text.

Normal intended use
- The log splitter must only be used for splitting logs.
- The log splitter is only applicable for the private utilization in the field of house and hobby.
- Only straight-cut logs are suitable for use with the log splitter.
- Metal parts (nails, wire etc.) must be removed from logs before splitting.
- The intended usage also includes compliance with the operating, servicing and repair conditions prescribed by the manufacturer and following the safety instructions included in the instructions.
The relevant accident prevention regulations for the operation as well as the other generally acknowledged occupational medicine and safety rules must be complied with. - Every other form of use is considered improper use. The manufacturer accepts no liability for any damages resulting from improper use, and any risk is in this case borne solely by the user.
- Unauthorised modifications on the log splitter exclude a liability of the manufacturer for damages of any kind resulting from it.
- Only persons who are familiarised with the device and informed about possible risks are allowed to prepare, operate and service this device. Repair works may only be carried out by us or by a customer service agent nominated by us.
Residual risks
Even if used properly, residual risks can exist even if the relevant safety regulations are complied with due to the design determined by the intended purpose.
Residual risks can be minimised if the "Safety advices" and the "Intended usage" as well as the whole of the operating instructions are observed.
Observing these instructions, and taking proper care, will reduce the risk of personal injury or damage to the equipment.
- Risk of injury from ejected wood pieces.
- Risk of injury to feet from wood dropping down
- Risk of injury to fingers when detaching jammed wood pieces
- Noncompliance with safety instructions may result in injuries of the operator or property damages.
- Carelessness, failure to comply with the safety regulations and incorrect use can result in injuries to your hands and fingers when the splitting blade is moving.
- Risk from electricity when using improper electrical connections.
- Touching live parts of opened electrical components.
- Risk of fire and slipping by leaking hydraulic fluid.
- Impairment of hearing when working on the machine for longer periods of time without ear protection.
In addition, in spite of all the precautionary measures taken, non-obvious residual risks can still exist.
Safety instructions
Before starting this device, read and keep to the following advice. Also observe the preventive regulations of your professional association and the safety provisions applicable in the respective country, in order to protect yourself and others from possible injury.
Pass the safety instructions on to all persons who work with the machine.
① Keep these safety instructions in a safe place.
- Persons who work with the firewood splitter must have received proper instructions about the intended work and be familiar with the use of the firewood splitter and the safety instructions.
- Make yourself familiar with the equipment before using it, by reading and understanding the operating instructions.
- Do not use the machine for unsuitable purposes (see "Normal intended use" and "Working with the log splitter").
- Be attentive. Be observant. Attend to what you do. Start working with rationality. Do not use the device when you are tired or under the influence of drugs, alcohol or medications. One moment of carelessness when using the device can result in serious injuries.
- Children and young persons under 18 years of age as well as persons who have not read the instruction manual are not allowed to operate this product.
-
Never work while persons, in particular small children, or pets are close to you.
-
Do not allow other persons, especially children, to touch the tool or motor.
Personal protective equipment
-
Never work without suited protective equipment.
-
Do not wear loose-fitting clothes or jewellery, they could be caught by movable parts.
Hairnet in case of long hair
Eye and ear protection
Solid shoes with toe protection caps (safety shoes) - Long pants
- Protective gloves
- First-aid material
- Mobile telephone if required
Safety instructions - before working
Carry out the following checks before the initiation and regularly during the working process. Observe the relevant sections in the operating instruction manual:
- Is the device assembled completely and properly?
Is the device in good and safe condition? - Are the handles clean and dry?
-
Before starting your work make sure that:
-
no other persons, children or animals stay within the working area,
you can always step back without any barriers,
you have always a secure standing position. -
Is workplace free of risks to stumble? Keep your workplace in an orderly condition! Untidiness can result in accidents - Risk of stumbling!
-
Take environmental influences into consideration:
-
Do not work under insufficient light conditions (e.g. fog, rain, snow flurry or twilight).
- Do not work in bad weather conditions (e.g. risk of lightning, rain, snow flurry).
-
Do not use this machine near inflammable liquids or gases.
-
The operator is responsible for accidents or risks which occur to other persons or their properties.
- Ensure that you have stand in a secure standing position and maintain your balance at all times.
- Do not modify the machine or parts of it.
Safety instructions - operating
- Assume a working position in the area of the operating handle. Never stand in the splitting wedge's zone.
- Never stand on top of the machine.
- Turn off the device when taking a break so that nobody is at risk. Secure the device against unauthorized access.
Safety notices for firewood splitters
The log splitter may only be operated by a single person.
- Never try to split logs containing nails, wire or other similar objects.
- Already split wood and wood chips create a dangerous working area. The operator may stumble, slip or fall. Always keep the working area neat and tidy.
- Never place the hands on or near any moving parts of the machine when it is switched on. Maintain a safe distance from the log, the ram and the wedge in order to protect your hands from injury.
- Only split wood that corresponds to the dimensions to be processed.
Safety instructions - while working
- Never work alone. Keep acoustic and visual contact to other persons at all times to allow immediate first aid in emergency cases.
- Immediately stop the engine at imminent danger or in emergency cases.
- Never leave the device running unattended.
- Immediately stop working when you feel unwell (e.g. headache, dizziness, nausea, etc.). Otherwise there is an increased risk of accidents.
- Do not overload the machine! You work better and safer in the given performance range.
- Take breaks when working so that the engine can cool down.
Behaviour in an emergency situation
- Initiate all required first aid measures suited for the injury and seek qualified medical advice as quick as possible.
- Protect the injured person against further injuries and immobilise the injured person.
General safety instructions
- Use the machine, accessories, tools etc. in compliance with these instructions. When doing so take the work conditions and the activity to be carried out into account. The use of the machine for other than the intended applications may cause dangerous situations.
- Do not spray machine with water (this is hazardous due to live components).
- Do not leave the machine standing in the rain or use when raining.
-
Maintain the machine carefully:
-
Follow the maintenance instructions.
-
Keep handles dry and free of oil, resin and grease.
-
Check the machine for possible damage:
Before further use of the machine the safety devices must be checked carefully for their proper and intended function. Only operate the device with complete and correctly attached safety equipment and do not alter anything on the device that could impair its safety.
GB
-
Check whether movable parts function perfectly and do not stick or whether parts are damaged. All parts must be correctly installed and fulfil all conditions to ensure perfect operation.
Damaged safety devices and parts must be properly repaired or exchanged by a recognized, specialist workshop; insofar as nothing else is stated in the instructions for use.
Damaged or illegible safety labels have to be replaced. -
Do not allow any tool key to be plugged in!
Before switching on, checking always that all tools are removed. - Store unused equipment in a dry, locked place out of the reach of children.
- Switch the machine off and remove the mains plug from the
socket when
- Carrying out repair work.
Performing maintenance and cleaning work. - Eliminating faults.
- Checking of connection cables whether they are swallowed or damaged
Storage and transport - Leaving unattended (even during short interruptions).

Do not carry out repair operations on the machine other than those described in section "Maintenance" but contact the manufacturer or authorized customer service centres.

Repairs to other parts of the machine must be carried out by the manufacturer or one of his customer service points.

Use only original spare parts and accessory parts. Accidents can arise for the user through the use of other spare parts. The manufacturer is not liable for any damage or injury resulting from such action.
Electrical safety
- Design of the connection cable according to IEC 60245 (H 07 RN-F) with a core cross-section of at least
2.5 ~mm^2 for a maximum cable length of up to 10 ~m - Never use the machine with a power supply cable of over 10 m in length. Longer power supply cables will cause a drop in voltage. The motor will not be able to provide its maximum performance and the operation of the machine will be impaired.
- Plugs and coupler outlets on connection cables must be made of rubber, non-rigid PVC or other thermoplastic material of same mechanical stability or be covered with this material.
- The connector of the connection cable must be splash-proof.
- When installing the power supply cable observe that it does not interfere, is not squeezed, bended and the plug connection does not get wet.
-
Wind off completely the cable when using a cable drum.
-
Do not use the cable for purposes for which it is not meant. Protect the cable against heat, oil and sharp edges. Do not use the cable to pull the plug from the socket.
- Regularly check the extension cables and replace them if they are damaged.
- Do not use any defective connection cables.
- When working outdoors, only use extension cables especially approved and appropriately labelled for outdoor use.
- Do not set up any provisional electrical connections.
- Never bypass protective devices or deactivate them.

The electrical connection or repairs to electrical parts of the machine must be carried out by a certified electrician or one of our customer service points. Local regulations - especially regarding protective measures - must be observed.
1 14
Description of device / Spare parts
Please refer to the attached assembly and operating instruction sheet.
| Pos. | Order no. | Designation | |
| ASP 4 N-2 ASP 5 N-2 | |||
| 1 | × | Preassembled device | |
| 2 | 360348 | Carrying handle | |
| 3 | 359782 | Support brace | |
| 4 | 359783 | Support braces | |
| 5 | 359784 | 359796 | Guard plate |
| 6 | 359785 359797 | Wood tray, rear | |
| 7 | 359786 359789 | Wood tray, front | |
| 8 | 359787 Front access guard | ||
| 9 | 359789 | 359799 | Rear wall, left |
| 10 | 359788 | Rear wall, right | |
| 11 | 359790 Lateral access guard | ||
| 12 | 359792 359800 Upper access guard, left | ||
| 13 | 359791 Upper access guard, right | ||
| 14 | 359793 | Connecting plate | |
| 15 | × | Fastener bag | |
| 16 | × | Operating instructions | |
| 16A | × | Assembly and operating instruction sheet | |
| 17 | × | Warranty declaration | |
| 18 | × | Blade guard | |
| 19 | × | Bleed screw | |
| 20 | 360379 | 360349 | Dipstick |
| 21 | × | Operating pushbutton | |
| 22 | × | Supporting foot | |
| 23 | × | Cable | |
| 24 | × | Motor | |
| 25 | 360354 | Wheel | |
| 26 | × | Operating handle | |
| 27 | × | Log ram | |
| 28 | × | Piston rod | |
| 29 | 360350 | Oil seal | |
| 30 | 359776 | Safety label | |
Assembly

Connect the firewood splitter to the power supply system only after having finished the complete assembly.
Mount the wood trays and the access guard as shown in Figures 2 - 12 on the assembly and operating chart.

Do not tighten the screw connections too firmly at first, the sheet metal parts must still remain movable!

Make sure after mounting that all screws are tightened firmly.
Location

Position the log splitter on a work surface at a height of about 72 - 85cm , this will create a comfortable working position.

The device must be firmly mounted on a work surface for safe handling.
The small parts required for mounting are not included in the scope of delivery. Use the following for this purpose:
Hexagonal screw M 8 x ....
Length depending on the thickness of the work table)
Washer 8mm
Hexagon nut M 8, self-locking
Ensure that the working area meets the following conditions:
- secured against slipping
- even
- free of tripping hazards
- adequate light

Do not operate the machine in the direct vicinity of gas or petrol pipes or containers, or any other easily inflammable materials.
Commissioning
-
Check that the machine is completely and correctly assembled.
Before each use, check -
Connection cables for defects (cracks, cuts, etc.).

Do not use any defect cables
- there are no damages at the machine
(see „safety instructions“) - All screws are tight.
- check the hydraulic system for any possible leaks
the oil level
Mains connection
- Compare the voltage given on the machine model plate with the mains voltage and connect the machine to the relevant and properly earthed plug.
-
Only use extension cables with sufficient core cross-section.
-
Connect the machine via a 30mA fault current safety switch.

Fuse protection: 10 A time-lag


Switching on:

Push the button (21). The motor is running as long as the button remains pushed.

Switching off
Stop pushing the button.

Prior to every use, check the function of the discon- ion mechanism (by switching on and off).
Do not use any device where the operating pushbutton does not work properly. Repair or replace damaged pushbuttons immediately.
Hydraulics

Check the hydraulic lines and hoses before each use.
- Never operate the machine in the event of any possible danger from hydraulic fluid.
- Ensure that the machine and working area are clean and free of oil.
Danger of slippage or fire!
- Check the hydraulic reservoir regularly to ensure that it contains enough hydraulic oil (see "Care and maintenance").
Capacity: approx. 2.4 litres ASP 4 N-2 approx. 3.5 litres ASP 5 N-2
Working with the log splitter
What type of logs can I split?
Size of logs
| ASP 4 N-2 | ASP 5 N-2 | |
| Wood length: | min. 130 – max. 370 mm | min. 200 – max. 520 mm |
| Diameter: | min. 50 – max. 250 mm | |
The log diameter is a recommended guideline figure, because: thin logs can be difficult to split if they contain knots or if the fibres are too strong.
Do not try to split green logs. Dry logs are much easier to split, and do not cause jams as often as green (damp) wood.

Hardwood tend to bursting: Exercise utmost caution! Be aware that wood with knots can burst open. Never split wood that has not been debranched beforehand.
Special instructions for splitting logs
Preparations:
The logs to be split should be cut to the maximum dimensions. Ensure also that the logs are cut straight and square.
Place the log properly on the log splitter, so as not to cause any risk of stumbling or falling to the operator.
Bleeding
Vent the hydraulic system before putting the log splitter into operation.
- Open the bleed screw (19) 3 - 4 complete turns.
- Close the bleed screw again when you are finished splitting logs.
If the hydraulic system is not vented, the trapped air will damage the seals and cause permanent damage to the log splitter.

Operating
Two-hand operation
- Press the operating pushbutton (21) on the electric motor. Wait a few moments until the motor has reached its operating revolutions and the required pressure has been built up in the hydraulic pump.
- Press the operating handle (26) down simultaneously. The log ram (27) pushes the log against the splitting wedge, and the log will be split.
- Release the operating lever as well as the operating pushbutton. The log ram will now return to its original starting position
Splitting logs
- A13ys place the logs lengthwise and flat on the main frame of the log splitter. The log must be enclosed by the log guide plates.
18 Never place the log on the frame at an angle.
Always ensure that the splitting wedge (18) and the log ram (27) contact the ends of the log at right-angles. - Never try to split two logs at once.
- Never try to remove or replace the log during the splitting process.
① Never try to force the splitting of the log by maintaining the pressure for several seconds. This can lead to damage to the machine.
Reposition the log on the main frame and repeat the splitting process, or put the log to one side.
How to release a jammed log?
-
Loose the operating lever as well as the operating pushbutton that the log ram can go back.
-
20 Place a triangular wooden chock under the log, then move the log ram forward so that it pushes the chock under the jammed log.
- If the log is not released, keep repeating this procedure, using larger chocks, until the log is released.
Never use a hammer to release a jammed log, and keep your hands away from the log.
Do not enlist the aid of a second person - this is a one-man job.
22 Do not try to release the log by using a hammer, since this may break the motor block.
Finishing work
Attend to that the log ram has gone back to its basic position.
Then remove the plug from the power socket.
15 Close the bleed screw (19).
Follow the care and maintenance instructions.
Maintenance and care

Remove the plug from the power socket before starting any maintenance or cleaning work.
Maintenance and repair work other than those described in this chapter is only allowed to be carried out by service staff.
For maintaining and cleaning, removed security devices must unconditionally be mounted properly and proved again.
Only use genuine spare parts. Other than genuine parts may result in unpredictable damages and injury.

Wear protective gloves in order to avoid injury to the ds.
① Observe the following in order to keep the log splitter in good working order:
- Clean the machine thoroughly after you have finished using it.
- Remove any resin remains on the machine.
- Oil the piston rod (28) regularly with an environmentally friendly spray oil.
- Check the oil level and change the oil as necessary.
Sharpening the splitting wedge
① After extended periods of use, or if the splitting performance is reduced, sharpen the splitting wedge (18) with a file (and remove any burrs).
How do I check the oil level?
- The log ram (27) must be in its starting position.
- Stand the log splitter on end, with the filler opening at the top.
A second person will be required to up-end and hold the log splitter.
-
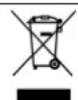
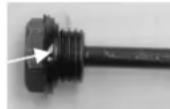
23 Unscrew the dipstick (20). Do not drop or lose the oil seal when removing the dipstick.
-
Clean the dipstick and the oil seal.
- Replace the dipstick fully into the oil reservoir.
- Now remove the dipstick again, and read off the oil level.
The oil level must lie between MIN and MAX.
Replenish the same type of oil if the level is too low (MIN or less).
- Check the oil seal and replace it if it is damaged in any way.
Oil seal (23)
- Replace the dipstick and screw it firmly into place.
Caution! Do not tighten the screw too tightly, since this may damage the oil seal or the thread in the cylinder cover.
When should I change the oil?
The first oil change should be carried out after 50 operating hours, and then every 250 operating hours.
Changing the oil:
- The log ram must be in its starting position.
- Place a container under the log splitter to catch the old oil. The container should have a capacity of at least 4 litres.
- 23 Unscrew the dipstick. Do not drop or lose the oil seal when removing the dipstick.
- 24 Now tip the machine to empty the oil into the container.
- Stand the log splitter on end, with the filler opening at the top.
A second person will be required to up-end and hold the log splitter.
- Pour in the new hydraulic oil (Quantity, see "Technical Data") using a clean funnel.
- Clean the dipstick and the oil seal.
- Check the oil seal and replace it if it is damaged in any way.
- Replace the dipstick and screw it firmly into place. Caution! Do not tighten the screw too tightly, since this may damage the oil seal or the thread in the cylinder cover.
Dispose of the old oil properly (local oil disposal point). The old oil must not be poured into the ground or drainage system, or mixed with other waste.
Hydraulic oil
We recommend the following hydraulic oils for the hydraulic cylinder:
Shell Tellus T 22
Aral Vitam Gf 22
BP Energel HLP 22 order no. 400142 (1 litre)
Mobil DTE 11
or equivalent
Do not use any other types of oil. The use of any other type of oil will adversely affect the operation of the hydraulic cylinder.
Transport instructions
Before each transport
- Switch off device.
- Tighten the vent screw
- Pull out power plug
- Remove the split wood
13 To transport, hold the carrying handle and lift the log splitter. In this position, it is easy to move the log splitter.
Use the lifting points provide for transport with a crane.
- Secure the device against tipping over or sliding away when transporting it by crane.
- When transporting the product within a car put it in the boot or on a separate loading area. While doing so, secure the log splitter at the points provided with straps.
Storage

Before each storage
- Switch off device.
- Tighten the vent screw
- Pull out power plug
Store machines that are not in use in a dry locked place protected against frost and outside the reach of children and unauthorized persons.
Before extended storage, please observe the following to increase the service life of the device and to ensure smooth operation:
Thoroughly clean the device.
- Check the device for damaged or worn parts.
Guarantee
Please observe the enclosed terms of guarantee.
Possible faults
| Problem | Possible Cause | Remedy |
| Logs are not being split properly (insufficient splitting performance) | →The log is not positioned correctly →The log exceeds the maximum dimensions or the wood is too hard for the performance of the machine ⇒Splitting blade does not split log ⇒Oil leak ⇒Hydraulic pressure too low ⇒Incorrect connecting lead (longer than 10 m or too small cable cross-section). | →Reposition the log correctly ⇒Cut the log to the required dimensions ⇒Sharpen splitting blade, check for burrs or notches ⇒Place a sheet of cardboard under the log splitter in order to locate the leak. To correct the problem, refer to the manufacturer ⇒Check the oil level and add more oil if necessary If the problem cannot be rectified, refer to the manufacturer ⇒Use the correct connecting lead |
| Log ram travels out jerkily or under heavy vibration | →Air in the circuit | →Open the bleed screw ⇒Check the oil level and add more oil if necessary If the problem cannot be rectified, refer to the manufacturer |
| Log ram will not move out | →Hydraulic pump defective | →To correct the problem, refer to the manufacturer |
| Motor does not start | →No power supply. ⇒Mains cable defective. ⇒Electric motor defective | →Check the fuse ⇒Replace the connection cable or have it checked by an electrician ⇒To correct the problem, refer to the manufacturer |
| Oil leak at the dipstick | →Oil seal at the dipstick not sealing | →Replace the oil seal. |
In case of further faults or inquiries please contact your local dealer.
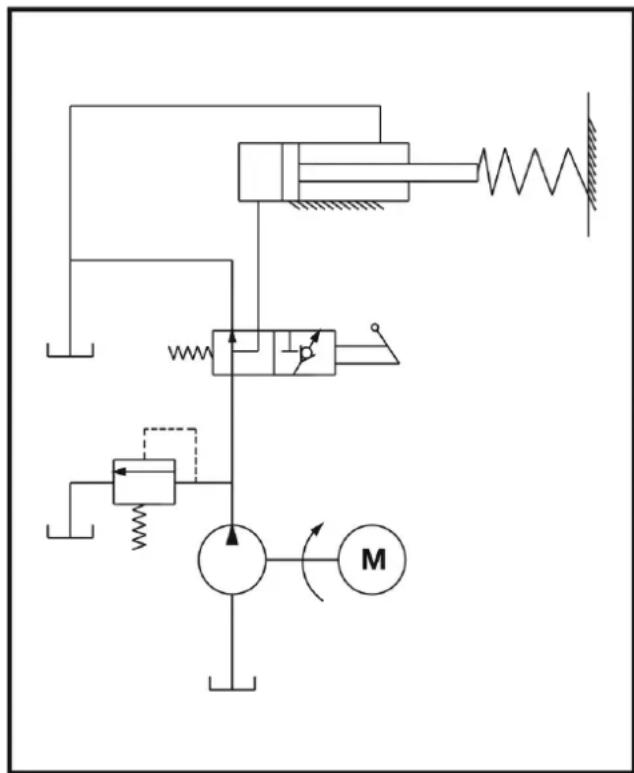
Technical data
Type / Model ASP 4 N-2 ASP 5 N-2
Year of construction see last page
Splitting force 40kN (4 t) 50kN (5 t)
Hydraulic pressure 16,5 Mpa (165 bar) 20,6 Mpa (206 bar)
Log length 130 - 370 mm 200 - 520 mm
Log diameter 50 - 250 mm 50 - 250 mm
Stroke 290 mm 370 mm
Feed speed 3,8 cm/s 3,7 cm/s
Return speed 6,4 cm/s 6,2 cm/s
Piston rod diameter 30 mm Hydraulic oil (max.) 2.4 litres 3.5 litres
Electric motor performance P_1 = 1500 ~W P_1 = 2200 ~W S3 25%
Power supply, Short circuit-current 230 V~ 50 Hz, 1 kA
Sound pressure L_PA (Idling) 78,8 dB (A)
Sound pressure L_PA (under load) 89,8 dB (A)
Dimensions Length 995 x Width 425 x Height 610 mm Length 1160 x Width 425 x Height 610 mm
Weight
49 kg
55 kg
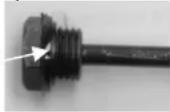
Wiring diagram
Hydraulic diagram


He n3naarTa He naBxk. Na3eTe ot Bnara.

3a6paHEno e da ce otctpaHraBt mHa da ce npomeHr npedna3HN npncnoc6JeHn npncnoc6JeHn 3a 6e3onacHOCT.

3a pa6ota cmo Ha einn yOBek! Nua, KOnTO He B3IMat yAcTne, KaKTo I DOMaHHI N OJIe3HN XINBOTHn Tpr6Ba Da 6bDat DbpxAHN daney OT OnaChaTa 0BlaCT (MNHIMaHNO pa3cTOrHHe 5 m).
OnachoctOTnpa3BaHeI npema3BaHe;HkoRa Da He ce DOKacBat OnaChi Oblactu, KOrato Ce DBNKn pa3nopnKlnH.

BHHMaHHe:

BnHarn Da ce BnIMaba 3a DnXKeHHeTo Ha nIb3raHa Ha CTBOJOBete.
BHHMaHHe:
Ja He ce OTCpaHraBa HNKora c pBue cTe6No, KOETO e3aceHaNo B KInHa.
BHHMaHHe:
Ipei peMOHT,TexHnuecka IOpdpbJka INoNUCTBaHe N3KJIIOUeTe DBMraTeJI IN3dIbpNaIte Uencena OT KOHTaTa.

N3xBpIeTe HaIeXHo Otpa6oTeHTo MaCNo (c6opeH nyHKT 3a Otpa6oTeHn Macna Ha MrcTo). 3a5paHeHO e Otpa6oTeHTo MacNo da ce H3nycka B 3emTa IIN da ce CMEcBa C OTnAbuHTe.
Ipei Da IycheMaunHaTa 3a ceneHe Ha
IbPba 06e3Bb3dywete XnDpaBnHnHaTa
CnCTema. (Bx."Iyck")

ToUka 3a BUnraHe

Toka 3a ykpeneBaHe
PpOdyKbT OTROBapHa CnEunHnHTe 3a npOdyKa DeICTBaUN eBPOneNCKn DnpeKTNB.
EneKtpueecknte ypeHn He 6nBa da ce n3XBbPnT B KOHTeHepnTe 3a 6ntOBn OTnAdbu.
Ypeinte, npnHaJnxHocHTe n ONaKOBKeTep6Ba Da ce npedabat 3a npepa60tKa BCbOTBeTCTBne c pa3npope6nte 3a ona3BaHe Ha OKoJIHATA cpeia.
Cnopee eBponeckata DnpeKtna 2012/19/EO 3a ctapnte eEektpnueckn EektpoHn ypei HEn3noJ3Baemnte eEektpnueckn ypei Tpr6bda da ce cb6npat pa3deIHO n da ce peunknpat, 6e3 da ce Bpei Ha OKonHaTa Cpeia.
CnmboHnHa pBkoBODCTBOTO 3a eknIooatauia

Ipo3a onachocn nn onacha cnTyau. Hecna3baHTo Ha Te3n yka3aHn moKe da doBepe Do HapaHbAHn nn MaTePnaJIHn 1eTn.

Baxn yka3aHna 3a npabNJha pa6ota. Hecna3BaHeTo Ha Te3u yka3aHn MoKe da DoBeDe do HEn3npaBHocTn.

Yka3aHn 3a non3BaTeIe. Te3n yka3aHn ige BN NOMOrHaT Da n3non3BaTe ONTMajHO BCNUKn yHKuN.

MOnTaJx, 06cIyKBaHe nTexHnueCa noIapbJka. TyKe o6aChBa KaKBO ToUHO Tp6Ba Da HAnpaBInTe.
MOna B3eMeTe Ha NOMOu npINOxKeHOTo pKOBODCTBO 3a MOHTaX I O6CJyKBaHe, KOraTO B TEkCTa NMa yKa3aHne KbM Homep Ha fNrypa.

He octabraye nHCTpymEnT BbTpe!
Bunhar npedn BkIIOUbaHe npOBepTe, daHn BCNUKn HNCTpyMeHTn caOTCTpaHEH.
- YpeDn, KOnTo He Ce NOJ3BaT CbXpaHraBaTe B cyxo, 3aKnIOUeHO NOMEueHne, n3BbN O6cera Ha Deua.
-
N3KJIIOUeTe MaUNHaTa n N3TeJIeTe UeNCEJa OT KOHTaKaTApn:
-
pemOHTH pa60TN
-pa60tnno no npdpbXkata n noocntBaHeto
-OTCTpaHraBaHe Ha Hen3npaBHOCTN - npOBepka, daJI 3axpaHbauIte Ka6eJI ca ONIeTeHN nnIOBpeDeHH
TpaHcnpT INcbxpaHeHne - Hanyckahe Ha ypega (cbuio npn KpaTkoBpeMeHHn npekcbAHNA).
He npednpneMaTe Dpyr peMOHTn Ha MaunHaTa OCBEN ONHcAHTE B rnaBata ,NoDpJbKka",a ce 06bPheTe DnpeKTHO KbM pOn3BOUnteIa, CbOTBeTHO KbM KOMNETeHTHn cepBu3.
PemOHNTHe Ha npyHn qactn Ha ypeDa Tp8Ba da 6bDat H3BbPWBaHN OT CtpaHa Ha npou3BOIDTeJI peCn.OT HAKOIT HeROBHTe cepBN3HN CEHTPOBE 3a KJIneHTN.
H3non3BaIte cMo opnHaJIHn pe3epBHN qactn n npHaIeXHocTN. NocpeCTBOM H3noI3BaHeTo Ha dpyrn pe3epBHN qactn n dpyrnpHaIeXHocTm MoraT Da Bb3HKnHAT 3NoIOnyKn 3a Notpe6nten. 3a npoN3TuAunTe OT TOBa uetn npon3BOJNTeJr T He HOCN OTROBOPHOCT.
EneKtpueecka 6e3onacHOCT
- ɪərʌbɪnɪhɛne Ha npɪcɒbɛdɪnɪnteɪnɪtælaɪnɪnɪa cɒrɪnɑsHo IEC 60245 (H 07 RN-F) C hʌppeuHo ceyeHne Ha xɪnɪtæla Hau-mʌkko
2,5mm^2 npn Ka6eHa nBbJxHa do mAc.10m - HnKora He n3noi3BaIte 3axpaHbAu KabeHn Ha 10 m. NdoBJIr npncBeHNHTeHN npoBOdHcN ppeIN3BnKBat cnaHa HanpexKeHTo. DBrarTeJr Beye He DoCTnMaKcMmaHata CN MoUHOCT, cyHKpyra Ha MaunHaTa ce HamajraBa.
- INCTaJIINpaHIne B INPCbEiINHInTeJINHN JIINN UENCEJI IN CbeDInHInTeJINKoHTaKTHN KytTN TpA6Ba Da ca I3paBToEH NOT ryma, MEK PVC mnn OT dpyr TepmonlaTcHm MaTePnAn Cbc CbUata MExAHuHa RaOCT nnn da IMat NOKpTne OTO TaKbMaTePnAn.
- ⅢeCenHTo cBeHHeHHe Ha npCbeHNHTeHnKa6eTp6Ba Da e 3aUHTeHO OT nonaHaTe HbOdHn Ppbckn.
- Pn noIarHeTo Ha npncBcEHNHInTe JINHn Tpr6Ba Da 6bJe obpHaTO BHMaHne Ha TOBa, Te Da He 6bDat npITnCKaHn, IpeBbAHn N cenceJIHOTo CbeHNHeHne Da He 6bJe HAMOKpeHo.
- Ppi ynoTpe6a Ha MaKapa 3a Ka6einn pa3MOTaTe Ka6eNa HAnbJnHO.
He n3noI3BaIte Ka6eJa 3a ueJIN, 3a KOnto ToH He e npedHa3HaueH. Na3eTe Ka6eJa ot ropeuHa, Macno u octpn Pb6OBe. 3auNTeTe Ka6eJa ot 3arpaBaHe, Macno u ocTpi Pb6OBe. He n3noI3BaIte Ka6eJa, 3a da n3TerIInTe UenCeJa OT KOHTaKaTa. - KoHTpOINpaIte peIOBHO yIbJIKNITeHNITE Ka6eHn n 3aMeHnTe, KOrATo ca NoBpeHn.
He n3no3BaIte deeKTHn npncbEeHNHTEN Ka6eN.
Ha otkpnto non3baaTe caMo ydbnKHTeJI, KOtO ca pa3peuHn 3a TOBa n IMat cB0TBHTO 060haueHne.
He n3IIOJI3BaIte BpeMeHHn eJIeKtpuYeCKn npncbeDUNHtENH Bp73KN.
- HnKora He uHTnpaTe 3aunTHnTe yCTpOcnTba n He rN 3BExKaIte OT DeiCTBne.

Cbbp3BaHTo KbM eNeKtpnueckata MpeXa, cbOTBeTHo pemOHHTne pa60Tu NO eNeKtpnuecknte Yactn Ha MaunHaTApra6Ba Da ce N3BpWBat OT onpaBOMOuen EeKtpocneuaJInc Tnn OT HkoN OT HaWNTe cepBN3u. Tpa6Ba Da ce Cna3BaT MeCTHnTe pa3npoe6n Hn Hn-Beue Te3n, KOtO ca Cbbp3aHn Cbc 3aunTHnTE MEPKn.
1 14
Описане на урета /
Pe3epBHN qactn
B3eMeTe npuToxKeHTo yNbTbaHe 3a MOHTax K o6cnyKBaHe.
PbBo He 3aTraIte BnHTOBITE CbeDInHeHn, Yactnte OT NaMapuHa Tp6Ba Da ocTaHaT NODBxHH!

Cne mohtaxa ce yBepTe, ye BCnKn 6oJTOBe ca 3aterHaTH.
NocTabaHe

3a da 3aemete ydo6ha cToKa 3a pa60ta, noCTaBeTe ypeHa 3a ueene Ha nbpBa Ha pa6oTHa NOBbpxHocT C BnCOuHa 72-85 cm.

3a 6e3oNa cha pa60Ta ypeBb Tpr6Ba Da e cTa6uHNo 3akpeneh Bbpxy pa6oTeH Nnot.
Heo6xoDnMITE 3a MONTaxa Ipe6Hn Yactn He ce cbdbpxkat B o6ema Ha doCTabKa. 3a ueNTa N3non3BaIte:
UeCTOCTeH60T M8x
(BbIknHa CnopeIe6eJIInHaTa Ha pa6oTHaMa ca)
山ain6a 8mm
ⅢecTOcTeHnraIkaM8,camooCnpypBaUa ce
ObpheTe BHMaHne Ha ToBa, pa6oTHaTa 0bnaCT da otrobaRa Ha cNeHNTE ycIOBn:
He ce nTb3ra
paBHO e
- NO HERO HEMA ONACHOCTN OT CINbBAHe
IOCTaTbUHOOCBETeHO e

Ja He ce ekcnnoaHpa MaunHaTa B 6n3oCT do ra3, 6eH3nHOBn KaHn Hn Dpyr Necho rOpMn MaTePnaHn.
Пускан eкпноаця
- y6eTe ce, ye ypeBt e MOHTnpaH n3qNo n B CboTBetCTBnC npedncaHnra.
-
PpeDn Bcya yNoTpe6a npObepaBaiTe:
-
npncbeHnHTeHNHTe Ka6eH - 3a depeKTH MeCTa (nykHaTnH, cpe3OBe nIu npyI noo6H);
He H3noJ3BaIe depeKTHn Ka6eJIi
ypea-3a eBentyaIHHIOBpei (norgneHn 6e3onacha pa60ta)
-Даи BCNCHK BnHTOBe 60NTObe ca 3aTeHnat 3dpabo.
XnDpaBnKaTa3aTeOBe
HNBOTO HA MACJOTO
PpncbeHnHaHe KbM eNEKtpueeckaTa Mpeka
CpaBHeTe nocOueHTo Bbpxy fapnHata TaBeJka HAnpExeHne C HApExeHMeTO B MpeKaTaN CBpKTeYpeDa KbM CbOTBeTHN KOHT, KOIT OTOROBaPHa npedncaHnra.
- Ⅰзползваiteу yдьлжntelogen ka6elen cdoctaTbHOrToJrMo HanpeyuHo ceueHne.
- PnncbeneHHe Te ypea npe3 nepeKTHO-TOKOBaTa 3aunTa 30 mA.
Hnkora He donbIbaTe nIcMeha Te dbpBecnHa no BpeMe Ha pa6oTHra npocec.
1 Da He ce npedn3BnKba HnKora HaueenBaHe Ha CTBoNa nocpeCDTBOM NOdtpxHa He NpIb3raHeTO B npOdbJxHneHa HnKOIO cekyHn. ToBa MoKe Da DoBeDe Do nobpeDn Ha MaunHata.
HarnaceTe CTBona OTHOBO Bbpxy rnaBHata paMKn nOBTOpe TPOeca Ha HaucenBaHe n OCTaBeTe CTBonaHaCTpaHI.
Kac ce ocbo6oxdaBa 3akneunno ce cTe6no?
- Пусhte рькхваткata 3a obcnyxbaHe n 6byToHa 3a obcnyxbaHe, 3a Да може пььзraча Ha CTBOJa DA ce npuDnKmОbpaTHO..
- 20 21 NocTaBeTe DbPBeH KlnH NOd CTBOJa, 3aBnKTe Nlb3raya 3a CTBOJa, 3a Da MOKe ToJ Da HATNCHe KInHa NOd 3aKnNeUeHOTo CTe6No.
- B cnya, Ye CTBOJa He ce ocbo6oJn, Da ce noBtOpn npoLecac BCE no-roJeMn KInHObe.
Pn ocbo6oxdaBaHTo HNKora He noyKbaTe Bbpy 3akneHTo Cte6No n He cnaarTe pueTe 6nn3o do CTBOJa.
He monete Btopo Jnue 3a nodkpena.
22 He ce onntBaIte Da n3BaIte CTBOJa NocpeICTBOM yprHe c HcTpymeHr. ToBa MoKe Da DoBeDe Do nobpeXdaHe Ha ypeHa.
KpaHa pa6oTaTa:
O6bpHETe BHHMaHHe Ha TOBa IJIb3raYbT Ha CTBOJa da ce npINBnKInI 6OpaTHo IO INXoDHOTo CN NOJIOKeHne.
CneToBa 3BaTee 1eNceNa 3a MpeXkaTa OT KOHTaKaTa.
15 3aBnHTeTe OTHBOO 06e3b3dyuHtENHn BnHT.
Da ce cna3BaT yka3aHnraTa 3a noDpBkKa n rpnKn.
TexHnuecka noDpBxka

IpeiBcKa texHueeKa noDpBxKa nNoocTbaHe 3dbPnBaTe uenceJa
Pa60Tu No TexHnueckata NODpBxKa N NOuNCTBaHeTo, pa3nHt OT ONHCaHNTe B HAcTOrUa pa3dEi, MORa T da ce 3BbPwBAT cMo OT cepBn3a.
3aunthnTe npncnocobneHna, kOnTO ca cBaaneHc ceI n3BbPbBAHe Ha TEXHuecka IODpBXka N NOUcTbaHe, Tpa6Ba Da 6bDat OTHOBo HAdnEeHO MOHTnpAHN INPOBepHn.
Ia ce n3non3BaT cAmO opunHaHn YactN. Dpyr Yactn MORAT da npedn3BnuKat HnepeBnIMM NOpeDu HapaHbAHNA.
A Na ce Hocr npedna3n pKabu, 3a da ce npedotbpaTBAHapAHBaHnHa pBcTe.
Cna3BaIte cneHTo, 3a da 3ana3nTe roDnOCTTa Ha ypeDa 3a HauenBaHe Ha IbPBA:
- Почисте осовно Maшина т спд пиклочан ha pa6ota.
-
OtctpaHete otnaHnO t cmona.
-
HamacnBaIte peoBHO MOTOBJIkata (28) c ekOJOruHc MaCIO 3a npbckaHe.
- Поверява Te HNBOTo Ha MacNoTo peCn. CmEHNrTe MaCNoTO.
HaToUbaHe Ha KInHa
Cnei npoBnKInHa eKcnnoatauaHnn npn HamaJIeH KanaHT Ha HauenBaHe da ce nPiN pa3npHn KINH c nnHa nla (da ce OTcpaHrOCTpnte pb6oBe).
Kak da npoBepnHbTo Ha macnot?
- Плбзгачьт 3а CTBOЛа ТрябWA Да ce E ВьрHAЛВ ИЗХОДНОТСИ NOLOЖЕп.
- 06bprhe ypea 3a HauenBaHe Ha IbPbecnHa Taka, Ye OTBopbT 3a HauhlbAHeTo Da NOKa3Ba Harope.
3a n3npabRHe n DbpxaHe Ha ypeDa 3a ceneHe Ha DbPBA e Heo6xOdM BToPn YOBek.
- 23 Pa3BnHTeTe npbYkata 3a n3MepBaHe Ha MacNoTo. Pn CHEMaHTo BHMaBaIte 3a yNtBTHHeHTo 3a MacNoTO.
4.Поистete npьчкata 3a Измерван Ha MacIoTO n yIbTHHeHNeTo 3a MacIoTO. - NocTaBete npbukata 3a n3MepBaHe OTHOBO OTBopa Do ynop.
- 13BaTe OTHOBO npbYkaTa 3a n3MepBaHe Ha MacNoTO. 25 HnBTo Ha MaCnTo Tp8Ba Da e MeJxMy MIN u MAX.
三 Pn HnCKo HnBO Ha MacNoTo (MIN nnn no-MaJko) DoneTe nOdoHo macNo.
- Поверете упьтейнente за macnoto.То Тябва да sbde cmeHENo ри поврди.
YyIbTHeHne 3a MacJIoTO (23)
- 3aBnHTeTe OTHOBOpbPkata 3a N3MepBaHe Ha MacNoTo. BnImaHé! He 3aTgAraTe npekaneHo 3dpaBO BnHTa, 3a da ce npedOTbpaTbAT NOBpeNHa yNtBTHHeHMeTO 3a MacNoTo n B pe36bata Ha KaNaKa Ha cnINnDbpa.
Kora da cmeHra macnoto?
PbpbMaHaMaacnoTo cne50 yacaeknnoataa, cneTobHa BceKn 250 yacaeknnoataa.
CmHa:
1.Пьзraчтзвona trpa6ba da ce e npnDbuxmdo n3XoHOTO cn NOJoxeHne.
2. IocTabete pe3epBoap, KOTo MoKe Da MoEme MNHImaJIHO 4IITpa MacNo, NoI ypeJa 3a HaueiBaHe Ha IbPBeCnHa.
3. 23 Pa3BnHTe Te npbUkata 3a n3MepBaHe Ha MacNoTO. Pn CHEMaHTo BHMaBaIte 3a yNtBTHHeHNeTO 3a MACNoTO.
4. 24 CnED TOBa o6bPHeTe MaunHaTa, 3a Da n3CnneTe MacIIOTo B pe3epBoapa.
5. CJIeT OToB a Taka 06bPHeTe ypeDa 3a HaueNBAHe Ha IbPBeCInHa, Ye OTBOpBT 3a HAnbJIbAHe Da e 06bPHaT Harope.
BG
3a n3npabRHe n DbpxaHe Ha ypeHa 3a ceneHe Ha DbPBA e Heo6xOdIm BTOpH YOBek.
- HanbHHeTe HOBOTo XnDpaBnMHO MacNo (KoJIneCTBO BnK ,TexHnueckn DaHH") C NOMOuTa Ha NcTAta FyHnIy.
- Почисте пьчкata 3a Измервах Ha Macnoto И улът themselves 3a Macnoto.
- Поберете упьтейнenteо 3a macnoto.To trpaBa da 6bde cmeheNo npn nobpeu.
- 3aBnHTeTe OTHOBo npbUkaTa 3a n3MepBaHe Ha MacNoto. BnImaHne! He 3aTgAraTe npekaiEno 3dpaBO BnHTa, 3a da ce npedOTbpaTBAt NOBpeiHa yNJbTHeHNeTo 3a MacNoto n B pe36aTa Ha kanaKa Ha cnINHDbpa.
N3XBbPteHaIeXHo Otpa6oTeHTo MacNo (c6opeh nyHKT 3a OTPa6oTeHn Macna Ha MrcTo). 3a6paHeo e OTPa6oTeHTo MacNo Da ce H3nycka B 3eMaTa Hn Da ce CMEcBa C OTnAbuHTe.
XnDpaBnHmacno

3a ypeda 3a HauePbHe Ha IbpBecnHa Hne npenopbYBaMe cIeHNTe XndpaBnHm Macna:
Shell Tellus T 22
Aral Vitam Gf 22
BP Energol HLP 22 Nopbka-Ne. 400142 (1 Liter)
Mobil DTE 11
NIM paBHOCToHNO
Ia He ce H3noJ3BaT dpyrBnIOBe macNo. N3noJ3BaHeTo Ha dpyrBnIOBe MacNo OKa3Ba BInHHe Ha yHKuYraHa ypeJ 3a HaueNbaHe Ha DpBa.
Yka3aHn 3a TpaHcnpTnpaHe
IpeuBcKaO TpaHcnpTnpaHe

- n3KIIIOUeTe ypeDa
-3aterHete 06e3Bb3dyaBaAaunra 6oT - n3dbpnbaiTe uencejia!
- Otrpahe Haenm Maepn
3a TpaHcnpTnpuHe XbaHete TpaHcnpTHaTa pbUka NOBdInrHeTe ypeDa 3a ZeneHe Ha DbPBA 3a OrpeB. B ToBa NOLOXKeHne ypeDbT 3a ZeneHe Ha DbPBA MoKe JleCHO Da ce TpaHcnpTnpa.

3a TpaHcnpOpTnpaHe c KpaH 3nON3BaIte IeHNTe 3a TOBa TOUKN 3a BnraHe.
ФИКСИРАТЕ ypeDA CpeUy npeo6pbucaHe IIN NtB3raHe, KOraTO rTo pAnHCnOpTnPaTe cKpaH.
TpaHcnpTupaTe ypeDa B MNC camo B 6araXnka nIIN B OTeJHa nloU 3a TpaHcnpTupaHe. Pn TOBa fNkCupaTe ypeDa 3a ceneHe Ha DbPba Ha npEeBnDEHnTe TOnKn C yKpEnBaun KOnAHN.
CbXpaHHeHne

Ppeu BCaKO cBxpanHeHne:
- n3KnHouTe ypeDa
- 3aterheTe 06e3Bb3dyaabaanra 6oTT
- n3dpbnBaIe Te IeceJa!
CbxpaHraBaTe ypeiNe, KOTo He ce H3NoJ3BaT, Ha cyxo, 3aTBOpEHO MAcTo, 3aUHTeHO OT 3aMpb3BaHe, HeOcTbNHi 3a Deua N HeOTOpuHpaHn JIua.
Obphe Te BnMaHne npEi No-npoIbIKNTeHNO cbXpaHeHne Ha cNeIHOTo, 3a Da yIbJIKNTe XNBota Ha MaunHaTa N da rapaHTnpate JecHO obcnykBaHe:
- PpaBete OCHOBHO NOUCTBaHe.
- PpOBepeTe ypeDa 3a noBpeDeHn nn n3HOceHn acTn.
TapaHcua
Molna B3emTe IOD BHIMMaHHe IpiNIOXeHaTa rapaHcNoHHa DeKnapaun.
Bb3MOxHn Hen3npaBHOCTN
Inden hver transport

- Sluk for apparatus
- Tilspaending af afluftningsskrue
- Trak netstikket
Fjernelse af klvet materiale
GB under our sole responsibility, that the product
Brennholzspalter (Log splitter) ASP 4 N-2, Serial number: 000001 - 020000
Brennholzpalter (Log splitter) ASP 5 N-2, Serial number: 000001 - 020000
is conform with the above mentioned EC directive as well as with the provisions of the guidelines below: 2014/30/EU, 2011/65/EU
BG DekaipnapeHa CBOA OTROBOPHOCT,Ye npOyKTbT
Brennholzpalter (Ype3a HaenBaHe Ha dbpBa 3a ropehe) ASP 4 N-2, CepnH Hmep: 000001 - 020000
Brennholzspalter (Ype3aHaenBaHe HaDbpBa 3ra ropeHe) ASP 5 N-2, CepnH HOMep: 000001 - 020000
CbOTBETCTBa Ha pa3nopeedte Ha ropeoocohne DnpekTnBu Ha EO, KaKTo n Ha 3nckBaHnra Ha npynte, OTHacraIte ce 3a Hero npekTnBn: 2014/30/EC, 2011/65/EC


- Contents
- Extent of delivery
- Symbols on the machine
- Symbols operating instructions
- Normal intended use
- Residual risks
- Safety instructions
- Personal protective equipment
- Safety instructions - before working
- Safety instructions - operating
- Safety notices for firewood splitters
- Safety instructions - while working
- Behaviour in an emergency situation
- General safety instructions
- GB
- Electrical safety
- 14
- Description of device / Spare parts
- Assembly
- Location
- Commissioning
- Do not use any defect cables
- Mains connection
- Hydraulics
- Working with the log splitter
- Special instructions for splitting logs
- Preparations:
- Bleeding
- Operating
- Two-hand operation
- Splitting logs
- How to release a jammed log?
- Finishing work
- Maintenance and care
- Sharpening the splitting wedge
- How do I check the oil level?
- When should I change the oil?
- Changing the oil:
- Hydraulic oil
- Transport instructions
- Storage
- Guarantee
- Possible faults
- Technical data
- Wiring diagram
- Hydraulic diagram
- Toka 3a ykpeneBaHe
- CnmboHnHa pBkoBODCTBOTO 3a eknIooatauia
- EneKtpueecka 6e3onacHOCT
- Описане на урета /
- Pe3epBHN qactn
- NocTabaHe
- Пускан eкпноаця
- PpncbeHnHaHe KbM eNEKtpueeckaTa Mpeka
- Kac ce ocbo6oxdaBa 3akneunno ce cTe6no?
- KpaHa pa6oTaTa:
- TexHnuecka noDpBxka
- HaToUbaHe Ha KInHa
- Kak da npoBepnHbTo Ha macnot?
- Kora da cmeHra macnoto?
- CmHa:
- BG
- XnDpaBnHmacno
- Yka3aHn 3a TpaHcnpTnpaHe
- IpeuBcKaO TpaHcnpTnpaHe
- CbXpaHHeHne
- Ppeu BCaKO cBxpanHeHne:
- TapaHcua
- Bb3MOxHn Hen3npaBHOCTN
Brand : ATIKA
Model : ASP 5 N
Category : Log splitter