
K 5.79 MD T250 - Pressure washer Kärcher - Free user manual and instructions
Find the device manual for free K 5.79 MD T250 Kärcher in PDF.
| Product type | High-pressure cleaner |
| Brand | Kärcher |
| Model | K 5.79 MD T250 |
| Operating pressure | 12.5 MPa |
| Maximum admissible pressure | 14 MPa |
| Water flow rate | 6.7 L/min |
| Detergent flow rate | 0 - 0.3 L/min |
| Max. supply temperature | 40 °C |
| Supply voltage | 220-240 V ~ 50/60 Hz |
| Connected power | 2 kW |
| Network protection | 10 A (delayed action) |
| Protection class | II |
| Protection index | IP X5 |
| Length | 315 mm |
| Width | 345 mm |
| Height | 860 mm |
| Weight (ready to operate with accessories) | 11.4 kg |
| Reaction force on the gun handle | 20 N |
| Sound pressure level LpA | 78 dB(A) |
| Sound power level LWA + uncertainty | 93 dB(A) |
| Hand/arm vibration | < 2.5 m/s² |
| Included spray lance | Vario Power (pressure adjustment) + Rotabuse |
| Integrated detergent tank | Yes |
| Safety devices | Main switch, gun handle lock, discharge valve with pressure switch |
| Optional accessories | Kärcher water filter, system separator, reinforced hose |
| Maintenance | Cleaning of the water inlet filter and the detergent suction hose before prolonged storage |
Frequently Asked Questions - K 5.79 MD T250 Kärcher
User questions about K 5.79 MD T250 Kärcher
0 question about this device. Answer the ones you know or ask your own.
Ask a new question about this device
Download the instructions for your Pressure washer in PDF format for free! Find your manual K 5.79 MD T250 - Kärcher and take your electronic device back in hand. On this page are published all the documents necessary for the use of your device. K 5.79 MD T250 by Kärcher.
USER MANUAL K 5.79 MD T250 Kärcher
Regi ster and win! www.kaercher.com


Inhaltsverzeichnis
71364 Winnenden (Germany)
Tel.: +49 7195 14-0
Fax: +49 7195 14-2212
Winnenden, 2010/12/01
Contents
General information. EN .1
Safety instructions EN.2
Operation EN.3
Transport EN.6
Storage. EN..6
Maintenance and care . . . EN . . .6
Troubleshooting EN.6
Technical specifications . . . EN . . .8
CE Declaration EN.8
General information
Dear Customer,

Please read and comply with these original instructions prior
to the initial operation of your appliance and store them for later use or subsequent owners.
Proper Use
This high-pressure cleaner is designed for domestic use only:
- to clean machines, vehicles, buildings, tools, facades, terraces, garden equipment etc. using a high-pressure water jet (and detergents if required).
with accessories, replacement parts and detergents approved by KARCHER. Observe the instructions provided with these detergents.
Environmental protection

The packaging material can be recycled. Please do not place the package to the ordinary refuse for disposal, but go for the proper recycling.

Old appliances contain valuable materials that can be recycled. Please arrange for the proper recycling of old
appliances. Please dispose your old appliances using appropriate collection systems.
Notes about the ingredients (REACH)
You will find current information about the ingredients at:
The warranty terms published by the relevant sales company are applicable in each country. We will repair potential failures of your appliance within the warranty period free of charge, provided that such failure is caused by faulty material or defects in manufacturing. In the event of a warranty claim please contact your dealer or the nearest authorized Customer Service centre.
Please submit the proof of purchase. (See address on the reverse)
Symbols in the operating instructions
Danger
Immediate danger that can cause severe injury or even death.
Warning
Possible hazardous situation that could lead to severe injury or even death.
Caution
Possible hazardous situation that could lead to mild injury to persons or damage to property.
Symbols on the machine
- High-pressure jets can be dangerous if improperly used. The jet must not be directed at persons, animals, live electrical equipment appliance itself.
- Frost can destroy the not completely drained appliance. Store the appliance in a frost resistant room during winter.
Safety instructions
Danger
- Never touch the mains plug and the socket with wet hands.
The appliance must not be used if the power cord or important parts of the appliance, e.g. high-pressure hoses, trigger gun or safety devices are damaged.
Check the power cord and mains plug for damage before every use. If the power cord is damaged, please arrange for it to be replaced immediately by an authorised repair agent or a skilled electrician
Check the high-pressure hose for damage before every use. Please arrange for the immediate replacement of a damaged high-pressure hose.
The appliance may not be used in areas where a risk of explosion is present.
If the appliance is used in hazardous areas (e.g. filling stations) the corresponding safety provisions must be observed.
High-pressure jets can be dangerous if improperly used. The jet must not be directed at persons, animals, live electrical equipment or at the appliance itself.
The high-pressure jet must not be directed at other persons or directed by the user at him/herself to clean clothing or footwear. - Never use the appliance to clean objects containing hazardous substances (e.g. asbestos).
Vehicle tyres or tyre valves are susceptible to damage from the high-pressure jet and may burst. The first indication of this is a discolouration of the tyre. Damaged vehicle tyres/tyre valves are highly dangerous. Ensure that a distance of at least 30~cm is observed when cleaning with the jet!
■ Risk of explosion! Do not spray flammable liquids.
Never draw in fluids containing solvents or undiluted acids and solvents! This includes petrol, paint thinner and heating oil. The spray mist thus generated is highly inflammable, explosive and poisonous. Do not use acetone, undiluted acids and solvents as they are damaging to the materials from which the appliance is made.
Warning
The mains plug and the coupling of an extension cable must be watertight and must never lay in the water.
Unsuitable extension cables can be hazardous. Only use extension cables outdoors which have been approved for this purpose and labelled with a sufficient cable cross-section: 1 - 10 m: 1.5 mm²; 10 - 30 m: 2.5 mm²
Always fully unroll electrical cables from the cable drum.
High-pressure hoses, fixtures and couplings are important for the safety of the appliance. Only use high-pressure hoses, fixtures and couplings recommended by the manufacturer.
This appliance is not intended for use by persons with reduced physical, sensory or mental capabilities.
The appliance must not be operated by children or persons who have not been instructed accordingly.
Children should be supervised to prevent them from playing with the appliance.
Keep packaging film away from children - risk of suffocation!
The operator must use the appliance correctly. When working with the appliance, he must consider the local conditions and pay due care and attention to other persons, in particular children, who are nearby.
Do not use the appliance when there are other persons around unless they are also wearing safety equipment.
Wear protective clothing and safety goggles to protect against splash back containing water or dirt.
Caution
In case of extended downtimes, switch the appliance off at the main switch / appliance switch or remove the mains plug.
Do not operate the appliance at temperatures below 0^ .
Observe a distance of at least 30~cm when using the jet to clean painted surfaces to avoid damaging paintwork.
Never leave the appliance unattended when it is in operation.
Make sure that the power cable or extension cables are not damaged by running over, pinching, dragging or similar. Protect the power cable from heat, oil, and sharp edges.
All current-conducting parts in the working area must be protected against jet water.
The appliance may only be connected to an electrical supply which has been installed in accordance with IEC 60364.
The appliance may only be connected to alternating current. The voltage must correspond with the type plate on the appliance.
The highest allowed net impedance at the electrical connection point (refer to technical data) is not to be exceeded. In case of confusion regarding the power impedance present on your connection, please contact your utilities provider.
For safety reasons, we recommend that you operate the appliance only via a earth-leakage circuit breaker (max. 30 mA).
- Cleaning operations which produce oily waste water, e.g. engine washes, underbody washes, may only be carried out using washing stations equipped with an oil separator.
This appliance was designed to be used with detergents which are sup
plied or recommended by the manufacturer. The use of other detergents or chemicals may compromise the safety of the appliance.
Safety Devices
Caution
Safety devices protect the user and must not be modified or bypassed.
Power switch
The appliance switch prevents unintentional operation of the appliance.
Lock trigger gun
This lock locks the lever of the trigger gun and prevents the inadvertent start of the appliance.
Overflow valve with pressure switch
The overflow valve prevents the permissible working pressure from being exceeded. If the lever on the trigger gun is released the pressure switch turns off the pump, the high-pressure jet is stopped. If the lever is pulled the pump is turned on again.
Prerequisites for the appliance's stability
Caution
Create stability for the appliance prior to all work on or with the appliance to prevent accidents or damage.
- The stability of the appliance is warranted when it is placed onto an even surface.
Operation
Scope of delivery
The scope of delivery of your appliance is illustrated on the packaging. Check the contents of the appliance for completeness when unpacking.
In the event of missing accessories or any transport damage, please contact your dealer.
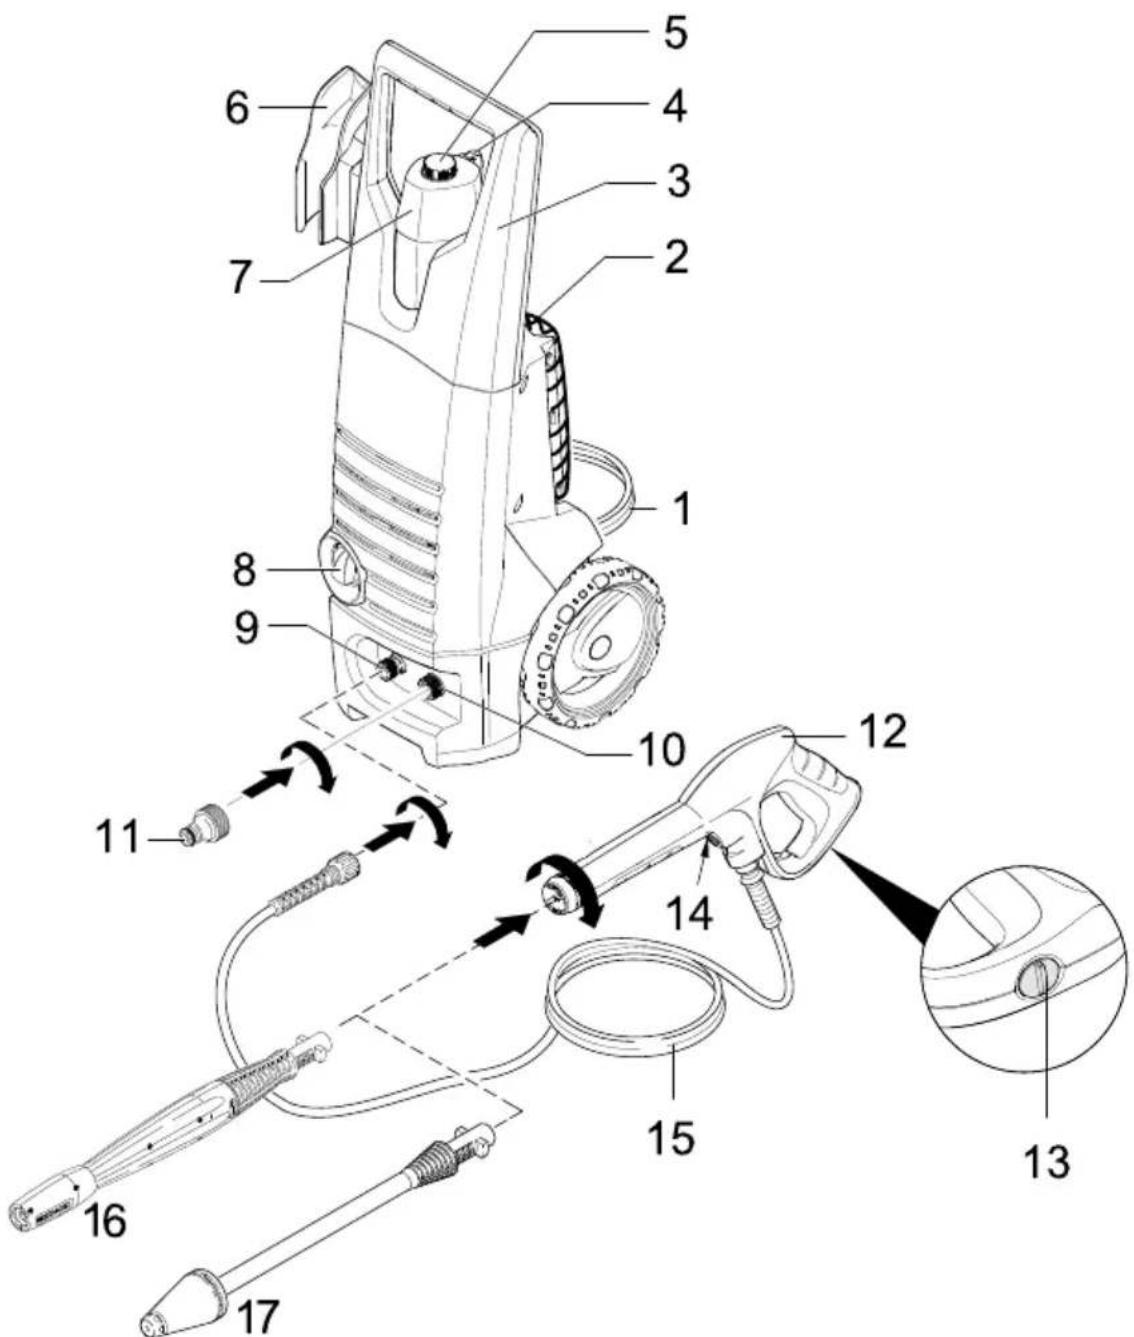
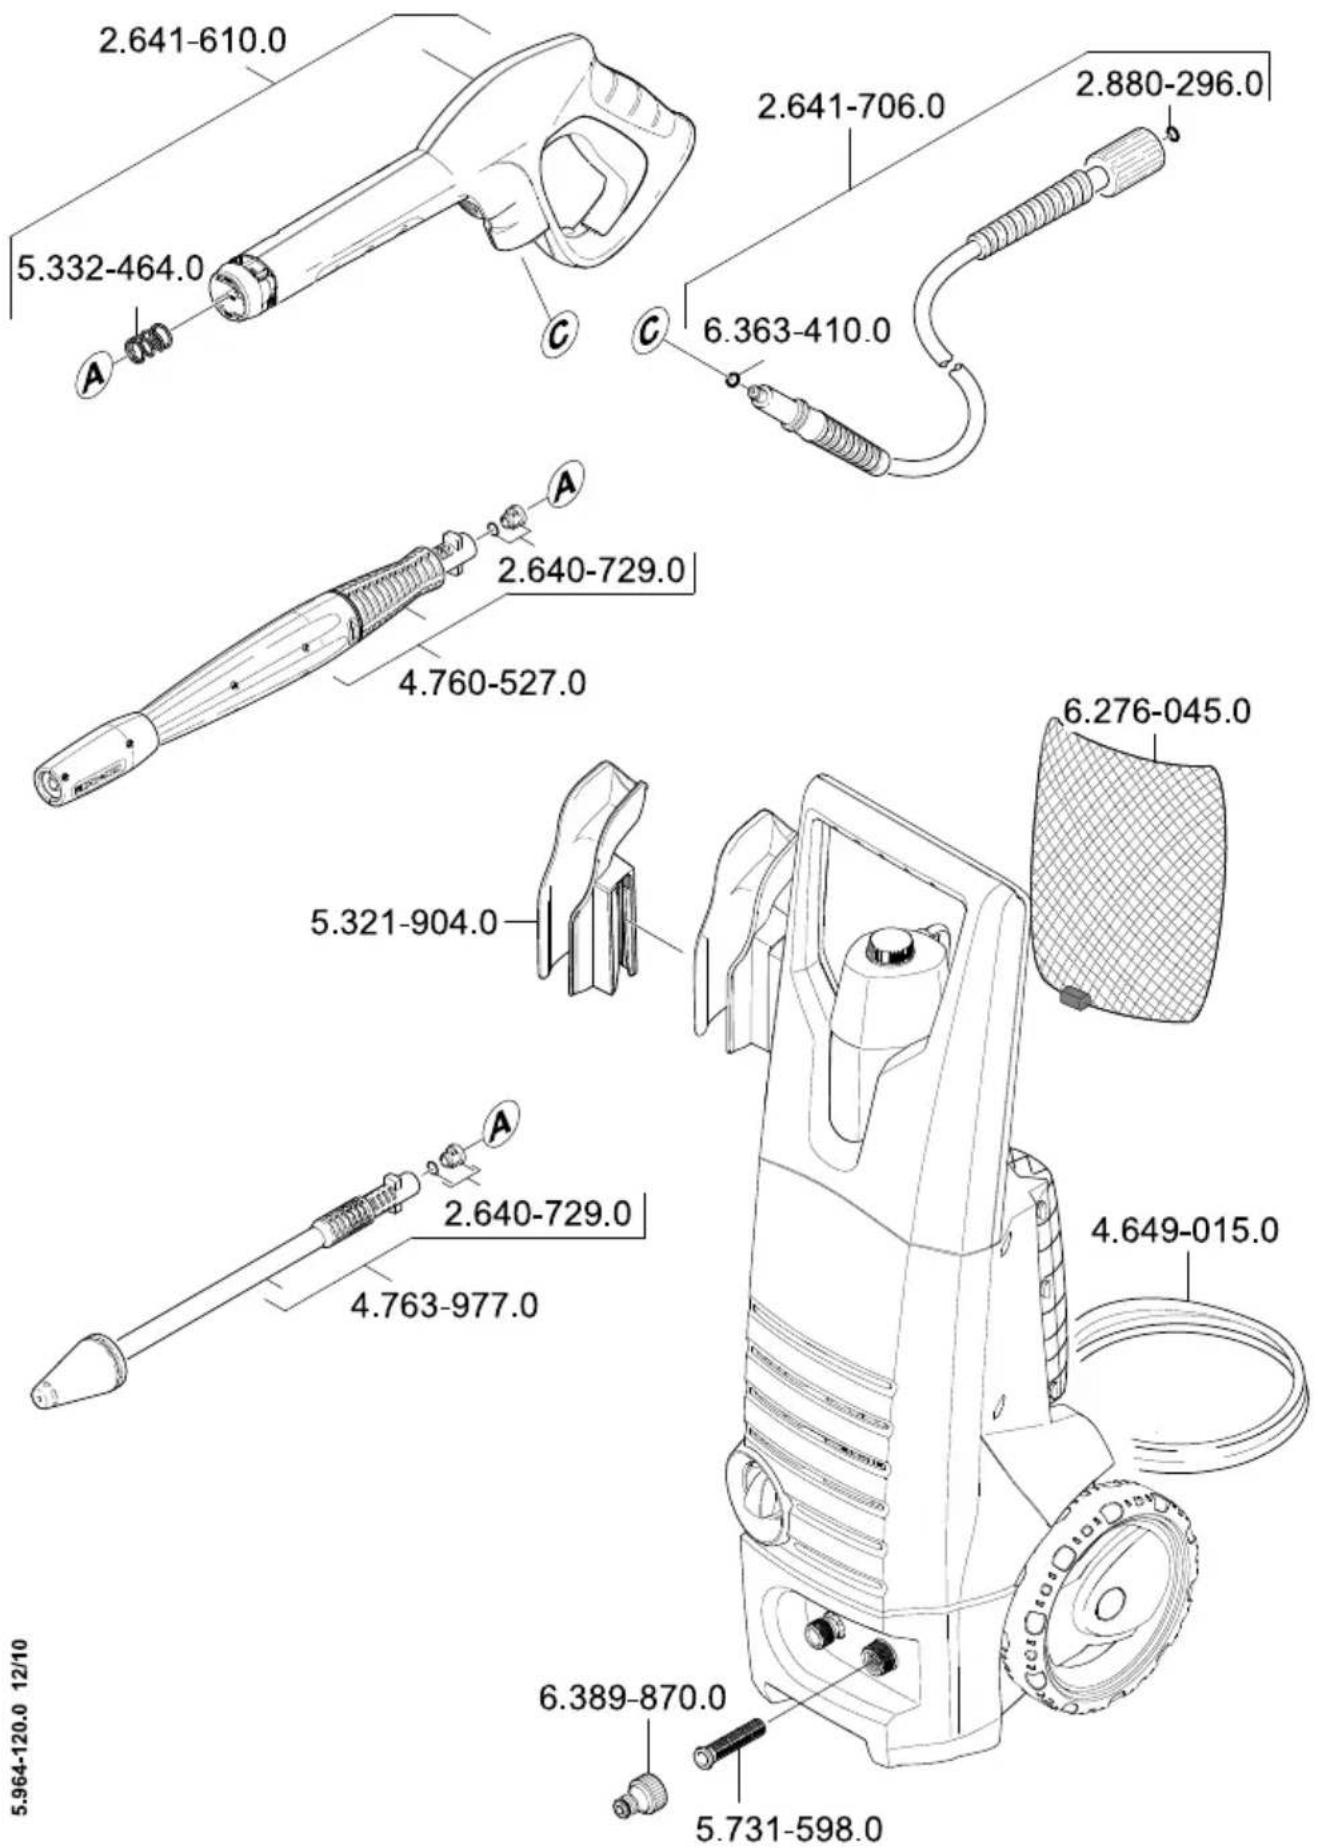
Description of the Appliance
Illustrations on Page 2
1 Power cable with plug
2 Storage for spray lance
3 Transport handle
4 Suction hose for detergent
5 Dosage regulator for detergent
6 Storage for trigger gun
7 Detergent Tank
8 ON/OFF switch for appliance
9 High pressure connection
10 Connection for water supply with filter
11 Coupling element for water connection
12 Trigger gun
13 Lock trigger gun
14 Key to detach the high pressure hose from the trigger gun
15 High pressure hose
16 Spray lance with pressure regulation (Vario Power)
17 Spray lance with Dirtblaster
Special accessories
Special accessories expand the possibilities of using your appliance. Please contact your KÄRCHER dealer for further information.
Before Startup
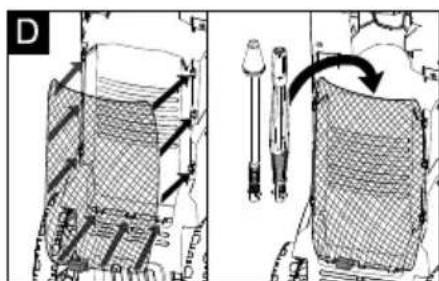
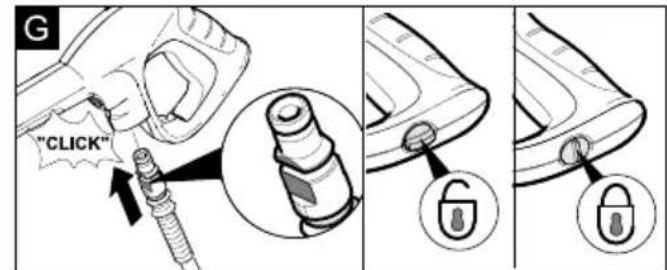
Illustration A-F
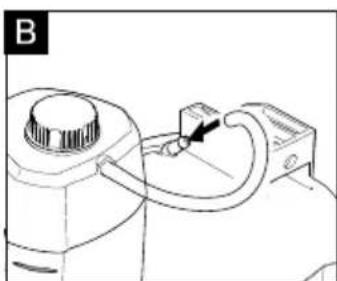
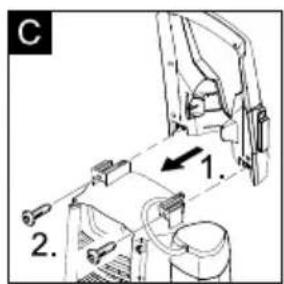
Mount loose parts delivered with appliance prior to start-up. Illustration
Push the high pressure hose into the trigger gun until it locks audibly. Note: Make sure the connection nipple is aligned correctly.
Check the secure connection by pulling on the high pressure hose.
Water supply
Warning
According to the applicable regulations, the appliance must never be used on the drinking water supply without a system separator. Use a

suitable system separator manufactured by KARCHER; or, as an alternative, a system separator as per EN 12729 Type BA. Water flowing through a system separator is considered non-drinkable.
Caution
Always connect the system separator to the water supply, never directly to the appliance!
Note: Impurities in the water can damage the high-pressure pump and accessories. For protection, the use of the KÄRCHER water filter (optional accessory, order no. 4.730-059) is recommended.
Water supply from mains
Observe regulations of water supplier. For connection values, see type plate/technical data.
Use a fibre-reinforced water hose (not included) with a standard coupling. (Minimum diameter 1/2 inch (13 mm), minimum length 7.5 m).
Screw the supplied coupling element to the water connection on the appliance.
Push the water supply hose onto the coupling unit, then connect it to the water supply.
Start up
Caution
Dry runs lasting longer than two minutes lead to damages to the high pressure pump. If the appliance does not build up pressure within two minutes, switch it off and proceed as instructed in the Chapter "Troubleshooting".
Connect the high pressure hose to the high pressure connection of the appliance.
Push the spray lance into the trigger gun and fasten it by turning it through 90^ .
Completely open the water tap.
Insert the mains plug into the socket.
Turn on the appliance "I/ON".
Operation
Danger
The trigger gun is subjected to a recoil force when the water jet is discharged. Make sure that you have a firm footing and are also holding the trigger gun and spray lance firmly.
Caution
Prior to cleaning, make sure that the high pressure is placed safely on level ground. Wear protective goggles and protective clothing during the cleaning process.
Unlock the lever on the trigger gun.
Pull on the lever of the trigger gun; the device will switch on.
Note: Release the lever of the trigger gun; the device will switch off again. High pressure remains in the system.
Spray lance with pressure regulation
Carrying out the most common cleaning tasks. The work pressure can be stagelessly regulated between "Min" and "Max".
Release the lever on the trigger gun.
Turn the spray lance to the desired position.
Note: Suitable for working with detergent; for this, turn the spray lance to the "Mix" position.
Spray lance with Dirtblaster
For particularly dirty items or areas.
Caution
Car tyres, paint or sensitive surfaces such as wood should not be cleaned with the dirt blaster, as there is a risk of damage. Not suitable for use with detergents.
Working with detergent
Please use exclusively KARCHER detergents and care products to carry out the respective cleaning task, as these were specifically developed for your appliance. The use of other detergents and care products may lead to premature wear and can invalidate your warranty claims. Please ob
tain information at your local dealer or request information directly from KÄRCHER.
Use spray lance with pressure regulation (Vario Power).
Turn the spray lance to "Mix" position. Note: This will mix the detergent with the water stream.
Fill the detergent solution in the detergent tank (observe dosage instructions on the packaging of the detergent).
Adjust the suction volume of the detergent solution by means of the dosage regulator for detergents.
Recommended cleaning method
Spray the detergent sparingly on the dry surface and allow it to react, but not to dry.
Spray off loosened dirt with the high-pressure jet.
Interrupting operation
Release the lever on the trigger gun.
Lock the lever on the trigger gun.
During longer breaks (more than 5 minutes), also turn the appliance off using the "0/OFF" switch.
Insert the trigger gun in its holder.
Finish operation
Caution
Only separate the high-pressure hose from the trigger gun or the appliance while there is no pressure in the system.
After working with detergent, suspend detergent suction hose in a container filled with clear water, switch the appliance on for around 1 minute once the spray lance has been removed and rinse until water runs clear.
Release the lever on the trigger gun.
Turn off the appliance "0/OFF".
Turn off tap.
Press the lever on the trigger gun to release any remaining pressure in the system.
Lock the lever on the trigger gun.
Pull out the mains plug.
Transport
Caution
In order to prevent accidents or injuries, keep in mind the weight of the appliance during transport (see Specifications).
When transporting by hand
Lift appliance by the carrying handle and carry it.
Pull the appliance by its transport handle.
When transporting in vehicles
Secure the appliance against shifting and tipping over.
Storage
Caution
In order to prevent accidents or injuries, keep in mind the weight of the appliance when selecting a storage location for it (see Specifications).
Storing the Appliance
Park the machine on an even surface.
Insert the trigger gun in its holder.
Stow away the mains cable, the high-pressure hose and accessory at the appliance.
Prior to extended storage periods, as during the winter, also observe the instructions in the Care section.
Frost protection
Caution
Protect the appliance and its accessories against frost.
The appliance and its accessories can get destroyed through frost if there are any water residues in them. To avoid damage to them:
Completely drain all water from the appliance: Switch the appliance on with detached high-pressure hose and detached water supply (max. 1 minute)
and wait, until no more water exits at the high-pressure connection. Turn off the appliance.
Store the appliance and the entire accessories in a frost-safe room.
Maintenance and care
Danger
Turn off the appliance and remove the mains plug prior to any care and maintenance work.
Care
Prior to longer periods of storage, e.g. in the winter:
Remove filter from suction hose for detergent and clean under running water.
Pull out the sieve in the water connection using flat-nose pliers and clean under running water.
Maintenance
The appliance is maintenance-free.
Spare parts
Use only original KARCHER spare parts. You will find a list of spare parts at the end of these operating instructions.
Troubleshooting
You can rectify minor faults yourself with the help of the following overview. If in doubt, please consult the authorized customer service.
Danger
Turn off the appliance and remove the mains plug prior to any care and maintenance work.
Repair works may only be performed by the authorized customer service.
Appliance is not running
Pull on the lever of the trigger gun; the device will switch on.
Check whether the voltage indicated on the type plate corresponds to the voltage of the mains supply.
Check the mains connection cable for damages.
Pressure does not build up in the appliance
Check setting at the spray lance.
Appliance ventilation: Switch the appliance on with the high-pressure hose detached and operate (max. 2 minutes) until the water exits the high-pressure connection without bubbles. Switch off appliance and reconnect high-pressure hose.
Check the water supply.
Pull out the sieve in the water connection using flat-nose pliers and clean under running water.
Appliance does not start, motor hums
Cause: Voltage reduction due to weak mains supply or when using an extension cable.
When switching on, first pull the lever of the trigger gun and then switch the appliance switch to "I/ON".
Strong pressure fluctuations
Clean high-pressure nozzle: Remove dirt and debris from the nozzle bore, using a needle and rinse through with water from the front.
Check water flow quantity.
Appliance is leaking
Slight leakage from the appliance pump is normal. If the leakage increases contact the authorized customer service.
No detergent infeed
Use spray lance with pressure regulation (Vario Power). Turn the spray lance to "Mix" position.
Check the settings at the dosage regulator for detergent.
Clean the detergent suction hose filter.
Check the detergent suction hose for kinks.
Technical specifications
| Water connection | ||
| Max. feed temperature °C | 40 | |
| Min. feed volume l/min 10 | ||
| Max. feed pressure MPa 1,2 | ||
| Electrical connection | ||
| Voltage 1~50/60 Hz | V 220 - 240 | |
| Connected load kW 2,1 | ||
| Maximum admissible net-work impedance Zmax | Ohm (0,355 + j x 0,222) | |
| Mains fuse (slow-blow) A 10 | ||
| Protective class II | ||
| Protection class IP X5 | ||
| Performance data | ||
| Working pressure MPa 12 | 5 | |
| Max. permissible pres-sure | MPa | 14 |
| Water flow rate | l/min | 6,7 |
| Dimensions and weights | ||
| Length | mm | 315 |
| Width | mm | 345 |
| Height mm 860 | ||
| Weight, ready to operate with accessories | kg | 11,4 |
| Detergent flow rate | l/min 0 | - 0,3 |
| Recoil force of trigger gun | N 20 | |
| Values determined as per EN 60335-2-79 | ||
| Hand-arm vibration value Uncertainty K | m/s2m/s2 | < 2,5 0,3 |
| Sound pressure level LpA | dB(A) | 78 |
| Uncertainty KpA | dB(A) | 2 |
| Sound power level LWA + Uncertainty KWA | dB(A) | 93 |
Subject to technical modifications!
CE Declaration
We hereby declare that the machine described below complies with the relevant basic safety and health requirements of the EU Directives, both in its basic design and construction as well as in the version put into circulation by us. This declaration shall cease to be valid if the machine is modified without our prior approval.
Product: High-pressure cleaner Type: 1.950-xxx
Relevant EU Directives
2006/42/EC (+2009/127/EC)
2004/108/EC
2000/14/EC
Applied harmonized standards
EN 55014-1: 2006 + A1: 2009
EN 55014-2: 1997 + A2: 2008
EN 60335-1
EN 60335-2-79
EN 61000-3-2: 2006 + A2: 2009
EN 61000-3-3:2008
EN 62233: 2008
Applied conformity evaluation method
2000/14/EC: Appendix V
Sound power level dB(A)
Measured: 91
Guaranteed: 93
The undersigned act on behalf and under the power of attorney of the company management.


Authorised Documentation Representative S. Reiser
71364 Winnenden (Germany)
Phone: +49 7195 14-0
Fax: +49 7195 14-2212
Winnenden, 2010/12/01
Table des matieres
Consignes generales . . . FR . .1
2006/42/CE (+2009/127/CE)
2004/108/CE
2000/14/CE

Head of Appropriation
Responsible de la documentation:
S. Reiser
71364 Winnenden (Germany)
Telephone: +49 7195 14-0
Winnenden, 2010/12/01
Indices
Avvertenze generali . . . . . . . . . . . . . . . . . . . . . . . . . . . . . . . . . . . . . . . . . . . . . . . . . . . . . . . . . . . . . . . . . .
Normedisicurezza .IT.2
Uso. IT .4
Trasporto IT .6
Supporto. IT .6
2006/42/CE (+2009/127/CE)
2004/108/CE
2000/14/CE
71364 Winnenden (Germany)
Tel.: +49 7195 14-0
Fax: +49 7195 14-2212
Winnenden, 2010/12/01
Inhoud
71364 Winnenden (Germany)
Tel.: +49 7195 14-0
Fax: +49 7195 14-2212
Winnenden, 2010/12/01
Índice de contentsos
2006/42/CE (+2009/127/CE)
2004/108/CE
2000/14/CE
71364 Winnenden (Germany)
Tfno.: +49 7195 14-0
Fax: +49 7195 14-2212
Winnenden, 2010/12/01
Indices
2006/42/CE (+2009/127/CE)
2004/108/CE
2000/14/CE
71364 Winnenden (Germany)
Tel.: +49 7195 14-0
Fax: +49 7195 14-2212
Winnenden, 2010/12/01
Indholdsfortegnelse
2006/42/EF (+2009/127/EF)
2004/108/EF
2000/14/EF
71364 Winnenden (Germany)
TIf.: +49 7195 14-0
Fax: +49 7195 14-2212
Winnenden, 2010/12/01
Innholdsfortegnelse
Generelle merknader . . . . . NO . . .1
2006/42/EF (+2009/127/EF)
2004/108/EF
2000/14/EF
71364 Winnenden (Germany)
TIf: +49 7195 14-0
Winnenden, 2010/12/01
71364 Winnenden (Germany)
Tel.: +49 7195 14-0
Fax: +49 7195 14-2212
Winnenden, 2010/12/01
Sisallysluettelo
71364 Winnenden (Germany)
Puh.: +49 7195 14-0
Winnenden, 2010/12/01
Yπoδεiεiασφαλεiαs EL...2
Xειρισμός EL...4
Mεταφορα. EL .6
Atoθηκευη. EL...7
Φpovtida kai ouvtipnoan EL .7
Avtietwion .EL.7
Texvika xapaktnpiotiká . . . EL . .9
CE EL...9
EVIKec UTOOeIeIc
Ayanté TELaTn,

Piv xpoioioeTe Tn ou-keun oac yia pwn φopá, δ
baote autcTGpiPwTOTUttc oyniecs XpnoC, evpynoTE ouqwva e autcKai Kpatntote TIGYIAeAovtikn XpnoN yia tov EIOEVO IIOKTNTn.
Kavovikxpno
Xpnoiopoioinote auTo ooutnma kathetaapioou uynanc Tieonc aTtOKkEiotikya iia oikakn xpno:
71364 Winnenden (Germany)
Tnλ.: +49 7195 14-0
Φαξ: +49 7195 14-2212
Winnenden, 2010/12/01
Içindekiler
71364 Winnenden (Germany)
Tel.: +49 7195 14-0
Winnenden, 2010/12/01
OrnaBneHne
O6uyeka3aHnRU.1
Yka3aHnno TeXnKe 6e30nac
HOCTN RU.2
UnpaBJIeHne. RU...4
TpaHcnpTnpOBka RU...7
XpaHeHne. RU .7
YxOuI TeXHnueckoe 06cnyKu
BaHne RU...8
POMOuB BCnyae HenoJaOK RU .8
TexHnueckne daHHbIe RU...9
3aBHeHne o COOTBeTCTBnN
Tpe6oBaHnM CE .RU..10
06u ne yka3aHnna
Ybaxaembl nokynaTeIb!

Ipeed nepBbIM npimHeHnem Baawero npnbopa npouHTaTe
3TyOpHnHaJIbHyIO INHCTpyKcIIO NO 3KcNPy-atauIN, NocNe 3TOrO DeIcTByIe COOT-BETCTBEHNO I COxpaHITe ee dIaJIbHeIWeRo IOnb3OBAHNr IIN dIra CneDyUoIero BnaJeNbua.
He BbI6paCbBaIte yNaKOBky BmecTe C Do-
MaunmOTXoamn, a cdaTe ee B OINH 3 NyHKTOB npneMa BTOPOHOrO cbIpba.
CtapbIe npnbOpbl coepkataeHHbIe nepepa6aTbIBaEMbIe MaTePnaJIbI, noIeJkaUne nepeJaue B nyHKTbl
PnneMKn BTOpHOrO cbipb. Po3Tomy yTNn3npyTe cTapbI np6opbl uepe3 COOTBETCTBYUOUI CNCTeMbI PnneMKn OTXODOB.
Инструкции по примеоню komno-heHTOB (REACH)
AktyaJIbHbIe CBeDeHnO KOMNoHEnTax npuBeDeHbI Ha Be6-y3JIe nO cJIeDyUoEMy aJpeCy:
BkIIOuHaTeNb annapaTa
IlaBbI BblKnHouaTeIb npenTCTByeT He npoN3BOJbHO pa6Ote annapata.
Pnp6op n npHaJnEJXHocTn MoYr 6bITb NOBpeKdEhbl MOpO3OM,ecNI ecNI n3 HNX PONHOCTbU He ydaJeHa Boda.Bo n36exaHne NOBpeKdEHH:
→ I3annapata cIeMyet noJIHoCTbIO ydaJITb BODy. BKHouHTb annapat 6e3 NOKJIuOeHHORo UIaHra BbICOKOTO daBHeHnI 6e3 npCoeDInHeHHORo BOIOChA6KeHnI (MaKcIMyM Ha 1 MmHyTu) IN IOdoXdAtb Do Tex NOp, Noka He npeKpaTtbcr BBITEKaHne BODbI u3 UIaHra
BbICOKO rDaBHeHn. BbIKIOUHTe annapaT.
XpaHnTe npnbop n Bce npHaJneJxocTn B 3aunueHHOM OT MOp03a NOMEeHN.
YxOД n TeXHnueckoe o6cJy- XINBaHne
Onachocmb
Ipu npoebeenu nio6bix pa6om no yxody u mexHueckomy o6cnjXueaHuo annapam cneyem bIKIOUumb, a cemeoU whyp - bHymb u3 p03emku.
yxoA
Ipeed dIInTeJIbHbIM XpaHeHnEm, HApPIMep, 3MmOi:
→ CHIMITE ΦиЛьТР ИЗ BCаСыВаЮцero
Шпанга ДлЯ мОюцero cpeДСТВИ Пpo-
МоітЕ erO пPoTOчHов BODО,
→ BbHbTe c nOMOuIIO pIoCKoRy6ueB ceTeBOiNJIbTp I3 3JIeMeHTa IJRA BOOchAb6XeHnI npOMoITe erO npOTouHOI BOIOJ.
TexHnueckoe o6cIyXnBaHne
AnnapaT He HykdaetcB npoФnJaKTnueckom 6cbnyxNbAHnn.
3aNachbIe yactn
IcnoJIb3yIte TOnbKO opuHnHaJIbHbIe 3a- nacHbIe qactN cHpMbI KARCHER. OnicaHne 3aapanChbIX qacte HaxoDITcB KOnCe DaHHo INCTpyKcIN N O KcPnPyTaUcN.
HOMOuB BClyuae HEnoJaIOK
He6oIbIe HeIcnpaBHOCTM MoXHO yCTpaHHTb CAMOCTeJIbHO C NOMOuH O CJeDyUoJero ONIcaHn.
B cnyuae comHeHn cIeDyeT o6paaTaBcB ynoHOMOeHHyO cnKy6y cepBnCHoro 06cnjxNBAHn.
Onachocmb
Ipu npoebeenu nio6bix pa6om no yxody u mexHuueckomy o6cnyKueaHuo anna
pam cneyem ebiknioumb, a cemeoU uHyp - bHymb u3 po3emku.
PemohmHbIe pa6omblu pa6omblc 3nekmpuueckmu y3nAmu Mozym npou3o0dumbcra molbko ynonHomoeHHou cnykbocepbucHO2O 6cbykuBaHua.
Pp6op He pa6oTaet
→ BbITaHyTb pbIur pyHOro nIcToJeTa- pacnblnte, np6Op BKIOuHTc.
→Пюверьte COOTBeTCTBHe HAnpЯKeHnЯ,yKa3aHHOrO B 3aBOdCKoT Ta6nU-Ke,HAnpЯKeHnIO NCTOuHnKa 3JIeKTPo3Heprnn.
Поберпь се teвои kaбель на поьpeжденя.
IaBJIeHHe B npIbope He yBeJIuHnBaETcR
→Проверпь Habстpoику CTpyHOn Tpy6-KN.
YdaneHne Bo3dyxa n3 npnbopa: BkIIOyntb aannapat 6e3 noDKIIOueHHoro BblcOKOHaOpHoro IJnAHra nnoDoxTaB (He 6oJee 2 MNHyT), noka n3 BblcOKOHaOpHoro IJnAHra He NaHET BblxOIDtB BOda 6e3 ny3bIPbKOB Bo3dyxa. BblIOyntb np6op n 3aHOBO NOCDeHNHTb BblcOKOHaOpHbI JnAHR.
→Проверпь поаду Воры.
→ BbHbTe c nOMOu bIO pIOCKoY6ueB ceTeBOIΦnIbTp I3 3JIeMeHTa IJIy BOIOchAb6XeHnI npOMOIte erO npOTouHOI BOIOI.
Pn6op He BkIouaetc, DBrTaTeNb ry- dnt
IpuuHa: NadeHue HapjxHeu u3-3a cnabou 3neKmpocemu unu npu uCnoB3oBaHuu yDunHumen.
→При Выкlioуенпрждь BCero BblHyTb рыаг руногипстолета-pacnblЛNTeЯ,3aTeM yCTaHOBtBВыкlioуател萌 annapaTa B NOLOXKeHne,I/ON"(I/BKJI).
CnIbHbIe nepenadI daBneHnIa
OuHCTnTbΦopcyHky BbICOKOro daBneHnra: IVrOknoydAnrTb 3aRpa3HeHne n3 OTBepCTnqΦopcyHKn n npomblte ee cpepeN BOdoi.
→Поверп Te KОЛчecTBo NOДаВаemon BOДы.
Pn6op herepMeTneH
He3naHTeJIbHa HeRpeMeTnHocTb annapaTa o6ycNoBJeHa TexHnueCKmN oc6eHHocTMy. Pn cnIbHOJ HeRpeMeTHuHcTn 6paTntEcB aABTOpN30 BaHHyO cLyK6y cepBnCHOrO 6cLyKnBAHNr.
Ynctraaee cpeDCTBO He BCacbBaetc
NcnoB3OBaTb CtpyHHyIO Tpy6Ky c pe rIyITopOM DaBHeHnA (Vario Power). NObepHyTb CtpyHHyIO Tpy6Ky B nOIO XeHne ,Mix".
→Проверпь рergyларTopdo3ирOBКIMO IOцero cpeДCTBa.
OuHCTnTbΦnIbTp BO BCaCbIBaIOUeM UHaHRe MOIOUeRO CpeDCTBa.
→Проверпьсаьваюшлангдпя MOJOцero cpeДСТВаHa neperи6bl.
TexHnueckne daHHbIe
71364 Winnenden (Germany)
Ten.: +49 7195 14-0
ΦaKc: +49 7195 14-2212
Winnenden, 2010/12/01
Tartalomjegyzék
71364 Winnenden (Germany)
Tel.: +49 7195 14-0
Fax: +49 7195 14-2212
Winnenden, 2010/12/01
Obsah
2006/42/ES (+2009/127/ES)
2004/108/ES
2000/14/ES
2000/14/ES: Priloha V
71364 Winnenden (Germany)
Tel.: +49 7195 14-0
Fax: +49 7195 14-2212
Winnenden, 2010/12/01
Vsebinsko kazalo
Splošna navodila .SL.1
Varnostna navodila .SL...2
Uporaba. SL...3
Transport. 5
Skladiščenje SL...6
Zadevne ES-directive:
2006/42/ES (+2009/127/ES)
2004/108/ES
2000/14/ES
71364 Winnenden (Germany)
Tel.: +49 7195 14-0
Winnenden, 2010/12/01
Spis tresci
2006/42/WE (+2009/127/WE)
2004/108/WE
2000/14/WE
S. Reiser
Head of Approbation
71364 Winnenden (Germany)
tel.: +49 7195 14-0
faks: +49 7195 14-2212
Winnenden, 2010/12/01
Cuprins
Mult stimate client,

Transportul in vehicule
Asiguraşi aparatul contra alunecarii si răsturnarii.
Depozitarea
Atentie
Directive EG respectate:
2006/42/CE (+2009/127/CE)
2004/108/CE
2000/14/CE
Norme armonizate utilize:
EN 55014-1: 2006 + A1: 2009
EN 55014-2: 1997 + A2: 2008
EN 60335-1
EN 60335-2-79
EN 61000-3-2: 2006 + A2: 2009
EN 61000-3-3:2008
EN 62233: 2008
71364 Winnenden (Germany)
Tel.: +49 7195 14-0
Fax: +49 7195 14-2212
Winnenden, 2010/12/01
Obsah
2006/42/ES (+2009/127/ES)
2004/108/ES
2000/14/ES
Uplatnované harmonizovane normy:
EN 55014-1: 2006 + A1: 2009
EN 55014-2: 1997 + A2: 2008
EN 60335-1
EN 60335-2-79
EN 61000-3-2: 2006 + A2: 2009
EN 61000-3-3:2008
EN 62233: 2008
2000/14/ES: Priloha V
71364 Winnenden (Germany)
Tel: +49 7195 14-0
Fax: +49 7195 14-2212
Winnenden, 2010/12/01
Pregled sadržaja
Opé napomene. HR...1
Sigurnosni napuci. . . . . . . HR . . .2
Rukovanje HR.3
Transport .HR.5
Skladištenje . HR.6
Njega i odrzavanje . . . . . . . . . . . . . . . . . . . . . . . . . . . . . . . . . . . . . . . . . . . . . . . . . . . .
Otklanjanesmetnji. .HR.6
2006/42/EZ (+2009/127/EZ)
2004/108/EZ
2000/14/EZ
Primijenjene uskladene norme:
EN 55014-1: 2006 + A1: 2009
EN 55014-2: 1997 + A2: 2008
EN 60335-1
EN 60335-2-79
EN 61000-3-2: 2006 + A2: 2009
EN 61000-3-3: 2008
EN 62233: 2008
71364 Winnenden (Germany)
Tel.: +49 7195 14-0
Winnenden, 2010/12/01
Pregled sadržaja
Opste napomene .SR...1
Sigurnosne napomene.... SR...2
Rukovanie SR.3
Transport. SR .6
Skladištenje SR...6
Nega i održavanje SR...6
Otklanjanje smetnji. . . . . . SR . . .6
Tehnički podaci SR...8
CE izjava SR...8
Opste napomene
Poštovani kupće,

2006/42/EZ (+2009/127/EZ)
2004/108/EZ
2000/14/EZ
Primenjene uskladene norme:
EN 55014-1:2006 + A1:2009
EN 55014-2: 1997 + A2: 2008
EN 60335-1
EN 60335-2-79
EN 61000-3-2: 2006 + A2: 2009
EN 61000-3-3:2008
EN 62233: 2008
71364 Winnenden (Germany)
Tel.: +49 7195 14-0
Winnenden, 2010/12/01
CbDtpxahanne
O6uynka3aHnB BG...1
YkaaHna 3a 6e3oNaChocT. BG .2
O6cnyKBaHe BG...4
TpaHcnpT BG...6
CbXpaHHe. BG...7
PnKn noDpBkKa .BG .7
Yka3aHnna 3a 6e3oNaCHOCT
Onachocm
Hukozha He doKocbaume KOhmaKma u uenceNa c bnaJku pbu.
He pa6omeme cypeda,ako 3axpaHba- uumkaben unu baxnu acmu Ha ype- da, Hnnpumep Mapkyb m 3a pa6oma nod hanahe, nucmonema 3a pbuho npckaHe unu npedna3Hume npucnoco6JeHua ca nopepeHu.
Ipeu 8cya ynompe6a npoeepaume mpeko8ra 3axpaH8au, ka6en c uencela 3a nopedu. Iopepehen mpeko8u 3axpaH8au, ka6en mpa6ba He3a-6a8ho da ce 3amenu om omopuzpan cepu3/cneuaunucm - eJekmpomexHuk.
Ipeu 8cya ekcnnoamaun npoeepa eaume mapkyua 3a paobma nohnae 3a nopedu. He3abaeho nOMeHeme nopedeHnMa Mapkyu.
3a6paHa e pa6omama 8be 63puo00nacHu NOMeueHua.
Ja ce cna3eam Mepkume 3a 6e3oanacHocm npu pa6oma c ypeda e onachu30Hu (HaNPumep Ha 6eH3uHocmaHcuu).
Cmpyama nod bucoko hanahe moxe da 6bde onacha npu henpabunha ynompe6a. He hacoubaume cmpyma kM xopa, jueomhu, akmuehu eJeekmuee cku ypedu unu KbMcamura yped.
He hacoubaume cmpyma nod bucoko Hanraahe KbM dpyu unu KbM cebe cu, 3a da noucmme obneknomo cu unu obyekume cu.
Ja He ce obnueam npedMemu, Koumo cbbpxam onacHu 3a 3dpaeemo ee- uecma (Hanp. a3becm).
I Tymume Ha aemomobunme u behmunme Ha aemomobunhume ymu Mozam da ce nopejam unu cnykam om
bucokomo haiahe. Ibpeum npu3nak 3a moea e obe3ueembaHemo Ha ymama. Nopepehume aomomobunu ymu u behmuli Mozam da doedam do famaHn uocneduu. Ppu noucmehe ocmaeeme pa3cmohue om none 30 cm!
Onachocm om ekcnno3ua!
He npbckaume b3nmaeHreMu meHocmu.
Hukoa He 3acmykaume meuHocmu, cbdpkaa pu pa3m8opumenu, unu Hepa3peDeHu Kucenuu u pa3m8opumenu! Takuea ca Hanpumep beH3un, pa3peDume 3a 6ou unu Haofma.
Cunho pa3npbckeaHama cmpy e nec Ho 6b3nlaMeHuma, ekcnno3ueHa u om poBa. He u3non3aume auemoh, Hepa3peDeHu Kucenuu u pa3m8opumenu, 3auomo me amakyeam u3no3 baHume e ypeDa Mamepuanu.
△IpeynpexdeHue
I Iencenbmu KynnyHsbm Ha yobnxu me np6ba da 6bdam odoymouybu u He 6uba da ce Hamupam ebe oda.
Henodxoaduume yobjxumenu Mozam da ca onachu. Ha omkpmo u3-non3aume camo cbomeemno pa3pewehme u cbomeemnO o60Ha-ueye yobjxumenu c docmabuHo HanpeuHO ceueHue: 1 - 10 M: 1,5 MM2; 10 - 30 M: 2,5 MM2
Bunau pa3euaume yobjxumena doKpau om 6apabana.
Mapkyume 3a pa6oma noHa nAraHe, apmamypama u epb3kume ca baxHu 3a 6e3oIacnOcmmHa ypeDa. H3noI3- 8aume cAm npenopbuaHume om npou3Bodumela Mapkyu 3a pa6oma noHa nAraHe, apmamypu u epb3ku.
To3u ypeo He e npedha3naeH 3a o6cnykeaHe om luua c oepaHuyeHu fu3uuecku, ceH3OpHu uU yMcmbeHu cnocobocmu. Ypeb m He mp8ea da ce u3no138a om deua, Mnaedeku uU Heomopu3upaHu luua.
Deuama mpa6ba da 6bdam nohado3op, 3a da ce zapaumupa, ye Hma da upaam c ypeda.
Дрьхme onakobvHomo φoJuo daNeue om deua, cIeemByea onachocm om 3adywaeane!
Iompebumenmmp6ea da u3non3ea ypeda cnped npednucnna. Tou mpeba da ce cbobpa3ea c daedeHocmume Ha McaMo U da EHumaa npupa boma cypeda daNu HaoKoNo Hma xopa.
He u3non3baume ypeda, ako 6 obceza ce Hamupam dpyu nuca, oceeh ako He Hocram 3aumno obnekno.
3a 3auuma om Hanpbckbahe c boda unu MPbcomua Hoceme nodxodrao npedna3Ho obneKno u npedna3Hu ouJa/Macka.
BHumaHue
Ipu no-npodbJxumEnHu nay3u u3- KIOUcme ypea om 2naeHnur pekbc- bau / npekbcaeaHa ypea unu 2o u3baDe me om uecnema.
He u3non3eaume ypeda npu memnepamypu no0 ^ C
3a da u36e2Heme noepdu, npu no- yucmeBaHe ocuaypeMe MUHmAnHo pa3cmOraHue om 30 cm mejdy cmpyma u 6oJdUcaHume noBbpxHocmu.
Iopo epeMe Ha pa6oma ypeobm da He ce ocmae 6e3 HAd3op.
Bhumabaune kaebm haypeda unu yobkumela m da he ce noepedam unu ckbcam nopadu hacmbnahe, npesbahe, onbahe unu dpy0. Na3eme kaeba om monnuHa, macna u ocmpu pb6oe.
Bcuku eekmuuecku yacmu u elemmu 6oceza Ha paoba mpaeea da ca 3aumenu om bodhama cmpyra.
Ypeobm moke da ce eknoyea camo KbM eIeKmpuuecku KOHmakm, u3IbHeH om eIeKmpomexHuk cb2naCHO IEC 60364.
Cepb3eaume ypeda cmo KbM npomHe nue mok. HanpexeHuemo mp8ba da
cbombemcmehaumupaHOMO bpx maBekamaHa ypeHa HnpeXeHue.
He 6uea da ce haobuwa maKcumanHo donycmumo nblno HapexeHue Ha MPexama Ha ekempuueckama moka 3a npucbeduhahe (buxme TexHuuecku daHHU).Ppu HeacHomu no omHoweHue Ha hauhomo Ha Bawa-ma moka 3a npucbeduhahe nblno HapexeHue Ha MPexama mona da ce c6bpXeme c Bawemo npedpurnue no enekmpo3axpaheae.
I IpuuHnHa cuayphocmna npunuHno npenopb4aMe 3adeumhaHemo Ha ypea npes 3auumHo npucnocobneue 3a naooe 6 HanpeJxHuemo (MaKc. 30 mA).
I OnuucmeaHe, npu Koemo ce omdeJam MacnoocbObpxkau omnaobyu bodu, Hnnp., npu Muehe Ha dbuzameu u doJHama yacm Ha Kopnyca,mpraea da cmaBa cAmoHa MuEku cbc cenapamop 3a Macna.
To3u ypeo e pa3pa6omeH 3a non3eAne Ha npenapamu 3a noucmbane, Koumo ce docmaem unu npenopbyeam om npou3eodumn. N3non3eAhemo Ha dpyu npenapamu 3a noucmbane unu xumukanu moke da bnou Hadejdo-Hocmma u 6e0nacnocmna Ha ypea.
PpeDna3Hn npncnoc6JeHnA
BhumaHue
IpeDn3Hume npucnocobneHu cnykam 3a 3auuma Ha nompe6umEn u He mpa6Ba da ce npomehAm uu 3ao6ukanm.
KnIOu Ha ypea
IpeKbCBAuybT Ha ypeDa npedOTBpaTЯBa HnpeDHaMepeHTo nysKaHe B eKcnNoaTa-zaHa ypeDa.
Tp6a 3a pa3npackBaHe c perylnpaHe Ha hanaheTo (Vario Power)
3a Han-OhuaHnTe pa6OTn NO nouCTBaHe. Pa6oTHo HJaRaHe moKe da ce peryIina pa 6e3TeHnHO MeJdy ,Min" n ,Max".
OTnycheTe IocTa Ha nIcToJeTa 3a npbckaHe Ha pbKa.
Tp6ata 3a pa3npackBaHe da ce 3aBbptn B JKeJahOTO NIOJOKeHne.
Yka3aHne: Poadxoady 3a pa6oTa c no-uctBaU npenapATn, 3a ueT Ta 3aBbPTeTe CTOMaHeHaTa Tpb6a Ha nOJoxeHne „Mix".
Tp6a 3a pa3npbckBaHe c MeJaUka 3a MPbcoTnra
3a ynpntn 3ambpcBaHna.
BhumaHue
He noucmeaume aemomobunhu ymu, Iak unu yecmeumnH noebpxhocmu
kamo dbpeo c ppe3ama 3a 3ambpc8aHua, onachocm om yepexdahe.
He e noxoada 3a pa6ota c nouctba- uo cpeDCTBO.
Pabota c nouNCTBaAso CpeDcTBO
3a cboTBeTHaTa 3aJaHa 3a nouCTBaHe
H3noJ3BaIte cAmo CpeDCTBa 3a NoUcTBA-
He n PndpBxka Ha KARCHER, Tb' KaTo
Te ca pa3pa6OteHn CneuaJIHo 3a H3noJ3-
BaHe c Bauny ypei. H3noJ3BaHeTo Ha
dpyrncpeDCTBa 3a NoUcTBAHe n NOJ-
dpbXka MoKe Da IOBeJe Do 6bp30 N3Hoc-
BaHe n OTMaHa Ha npTeHcNITE 3a
rapaHcNJa. MoJ, INΦopMnpaIte Ce B cpe-
CuaJIIN3InpaHaTa TbProBcKa MpeKa IJI N3-
NcKaIte INΦopMaUnn ot KARCHER.
Да ce n3noJ3Ba Tpb6a 3a pa3npackBaHe c peryIupaH He HaHaJraHeto (Vario Power)
TpbaTa 3a pa3npbckBaHe da ce 3aBbpTN B NOJKeHne ,Mix".
Yka3aHHe: ITOTo3nHaunH npN ekCnNo-atauia NOUcTBauuT TpaHCnOpT ce CMEcBa C BODHaTa Ctpy.
→ HanbIhHeTe pa3TBopa Ha noUcTbauO cpeIcTBO B pe3epBoapa 3a noUcTbauO cpeIcTBO (Cna3BaIte DaHHnte 3a Do3npaHe Ha BapeJa Ha noUcTbaUTo cpeIcTBO).
HactpoTe KOJIuYeCTBOTO HO N3cMyKBaHe Ha pa3TBopa Ha NOUcTBAuTo CpeDCTBO C peryIaTOP Do3npaHe 3a NouCTBaUO CpeDCTBO.
IpenopbYnteJen MeToJHa NouchTbaHe
→ Hanpbckaite cyxata noBbpxhoct c MaJIko npenapat 3a NOUcTBaHe N OC-TaBeTe Da NopeiCTBa (Ho Da He N3cbX-BA).
Pa3TBOpEHaTa MpbCOTnJa Ce n3-ПлakHe CbC CTpyr NOd BnCOKO HaJraHe.
PpeKbcBaHe Ha pa6oTa
OTnycheTe IocTa Ha nIcToJeTa 3a npbckaHe Ha pbKa.
Блораде Лоста на пистоleta за рьчно пьскан.
→Припгкбане на pa6oTa 3a no-npo-ДьлжИтELNo Врeme (Hад 5 МнHyТ), ИЗ-КЛЮЧЕ ДОпьЛнИтELNo урEDA „0/OFF".
NocTabete nuctoeta 3a pbuHO npbCKaHe B Mactoto 3a cbxpaHeHne Ha nctoeta 3a pbuHO npbckaHe.
Kpaɪ ha pa6oTaT
BHumaHue
Camo omdelememapkya 3a pa6oma nod Hnrahe om nucmonema 3a pbuHO npckane unu om ypea, ako e cuscemama Hma HauHo Hnrahe.
→ CnéД pa6Ota c noUncTbaUso cpeIcTBO 3aKaueTe Mapkyua 3a BCMyKBaHe B CbI C yIcTa BOda, BKIIIOUeTe ypeJa 3a OKoJIo 1 MInHyTa c demOHTnpaHa Tpb6a 3a pa3nPbCKBaHe n N3JIpaKHeTe.
OTnycheTe IocTa Ha nIcToJeTa 3a npbckaHe Ha pKa.
→ I3KJIIOUeTe ypeJa ,0/OFF".
→ 3aTbOpete KpaHa 3a BOdaTa.
→ПиТСНЕТЯнCTОЛЕТа3a npьсканeHa pka,3aДaocBOбОДNTe cnCTemataOTOCaTbHOTOHaJIraHe.
Бл_OKираіte Лоста на пистолета 3a рьчно пьскан.
→ N3dbpnaIte uencena.
TpaHcnpT
BHumaHue
3a da ce u36e2ham 3nnonyku unu hapaHraHua npu mpaHcnpmupaHe, 3eMeme noD eHumaue meanomo Ha ypea (Bux mexHuueckume daHHU).
PbueH TpaHcnpT
Повдигнелуpeда 3a ДрьжkaТи ro Hocete.
TerneTe ypea 3a TpaHcnpTHaTa npkka.
TpaHcnpT B npeBo3Hn cpeDCTBa
OcnrypeTe ypeDa npOTnB n3nIb3BaHe n npeo6pbuaH.
CbXpaHHeHne
BhumaHue
3a da ce u36e2HAM 3nONOyku unu HapaHraeaHua npu u36opa Ha Mmcmomo 3a cbxpaHeHue, 3ememe nod EHumaHue meJnomo Ha ypeDa (euk mexHuyeckume daHHU).
CbxpaHHeHa ypeDa
YpeIbT ce nocTaB BbpxypaBHa nnoc-KoCT.
NocTaBeTe nIcToJeTa 3a pBHyO npbCKaHe B MAcTOTO 3a CbXpaHHe Ha nIcToJeTa 3a pBHyO npbCKaHe.
→Пиберетахранвашиякавл,марКучазработапдналгагеипиНадлжноCTeВурда.
Ipei nO-npoBjXHTeJHo cBxpaHeHne, Hnnp. npes 3uMaTa Cna3BaTepOnbJIHnTeJHo yKa3aHnTa B rJaBa NOpdpBxka.
3aunTa OT 3amptb3BaHe
BhumaHue
Ypeda u npuHaadneKHocmme da ce na3am om 3aMpb38aHe.
UpeIbT n npHaJdJIeXHoCTIte ce pa3py- IaBaT npn 3aMp3BaHe, aKO ca HaNbIHO n3npa3HeHn OT B0a. 3a da ce n36eHnat yBpeKDaHn:
→ИзпраЗнete урета habьлно OT BODa- ta:Вклочete урета 6e3 повьрзан Маркуз работа пон налягане и 6e3 повьрзано зхсаньане CBODа (MaKc. 1Min)иичakaite,ДOKATOOTИЗBOda 3a Високо habягане спpe дa ИЗЛИЗa BOda.IЗклочete урета.
YpeDa IVCBNUKn npHaJNeJXHOCTNu da ce CbXpaHraBt B 3aUHTeHO OT 3aMPb3BaHe MAcTO.
PnXn n PndpBxka
Onachocm
Ipeu ckaekpu paobmu no nopdpkka-ma ypedbmda ce u3knueua u encebnm da ce u3eaqda om konhma.
Poaepbxxka
Ipei no-npoobJxKHTeJIHO cbXpaHeHne, HapnMpE np3 3mMaTa:
N3TeTJIeTeΦnITbpaOTBCMyKaTeJIHnMapKyu 3aNouNCtBaUcOcpeICTBO INoNouNCTeTe NOI TeuaB ODa.
N3TeTneTe ueKkata OT Bpb3KaTa 3a KpaHa 3a BOda C NOMOHTa Ha PNOCKN KHeuI I NaocTeTe PoTteUaBoDa.
Poaepbxxka
YpeBbHe ce HxKdae OT noDpBkka.
Pe3epBn qactn
I3noJ3BaIte cAmO opuHnHaJIHn pe3epBn qactn Ha KARCHER. CnncbK Ha pe3epB-Hnte qactn Ie Hamepnte B KpaJ Ha HacToaIoo YnbTbaHe 3a pa6ota.
YpeIbT He DoCTnra HajraHa
Пюверете настpoиkaраза на Трьбата 3a pa3пьсКВаHe.
06e3Bb3dUyBaAHe Ha ypeHa: BkIIOueTe ypeDa 6e3 MapKyu 3a pa6Ota noiHaJIraHe i n3uKaIte (MaKc. 2 MInHy-TH), DOKaTO BOJaTa 3aNoOHe Da N3JIN3a 6e3 MexypyeTa OT IN3BOJa 3a BnCOKo HaJIraHe. N3KnIOUeTe ypeHa n OTHOBo IODBbPKeTe MapKyu 3a pa6Ota noiHaJIraHe.
Поберете 3axpaHbaHeTo c BODa.
N3TeTneTe ueKkata OT Bpb3KaTa 3a KpaHa 3a BOda C NOMOuTa Ha NIOCKN KNeU N I NOuNCTeTe PoT Teuaa BOda.
YpeBbT He noterJ, MOTOpbT 6pbMcu
PpuuHa: Cnadahe Ha HnpeXeHuemo nopadu cna6a eIekmpuecka Mpeka unu npu u3no36aHe Ha yobJxumen.
→ПривклioчваHETo ПьрBOИЗдбрnaIte JIOCTaHa NICTOJIeTa 3a рьчHO npbcka-He,СпeД TOBa NOCTaBeTe ppeKbcBaYaHa ypeDaHa "I/ON".
CINH Kone6aHnB HajraHeTo
71364 Winnenden (Germany)
Ten.: +49 7195 14-0
ΦaKc: +49 7195 14-2212
Winnenden, 2010/12/01
Sisukord
Uldmärkusi ET.1
Ohutusalased markused .ET.2
Käsitsemine ET.4
Transport. ET .6
Hoiulepanek ET.6
Veevarustus veevargist
Toode: Körgsurveyesur
Tüup: 1.950-xxx
71364 Winnenden (Germany)
Tel: +49 7195 14-0
Winnenden, 2010/12/01
Satura rādītājs
71364 Winnenden (Germany)
Tālr.: +49 7195 14-0
Fakss: +49 7195 14-2212
Winnenden, 2010/12/01
Turinys
Bendrieji nurodymai LT .1

S. Reiser
Head of Appropriation
71364 Winnenden (Germany)
Tel.: +49 7195 14-0
Faksas: +49 7195 14-2212
Winnenden, 2010/12/01
3mict
3araIbHi Bka3iBKn. . UK...1
IpaBnla 6e3neKn UK...2
Ekcnnyataia UK.4
TpaHcnpTyBaHHa ...UK...7
36epiraHHa. UK...7
Dorjra Ta texHiye
obcnyroByBaHHra. UK...7
ДономoraуВипадку
HenolaoK UK...8
TexhiHi xapaKTepcntkn.. UK...8
3aBa npo BiIDNoBIDHicTb
BIMORAM CE. UK...9
3araJIbHi Bka3iBKn
ShaohBn nokyneCb!

IpeedepnIM3actocyBaHHaBaworo npictpoIO npouHTaTe
IOpnirHaBHy iHCTpyKciIO 3
eknnyataui,nicna zboRo dIte
BIDNOIBHO HeI Ta 36epexitb II IJIa
KoMnJIeKT noCTaayHHa
KoMnJIeKTAciI npNCTpoU 3a3HaueHa Ha ynaKOBuI. Pp n po3NakyBaHHI npNCTpoU nepeBipTu KOMnJIeKTAciIO.
Y pa3i HeCTaui DoaTkoBOrO 6bnaHaHnna6o yuKoJKeHb, OTPMaHnx NiJ Yac TpaHCNoptyBaHHra, cnIIOBIDOMTe npo ce
B ToproBbHy opraHizauio, kA npoana anapaT.
Onc npncptpo
Due. pucyhku Ha cmopinui 2
1 Ka6eIb IJn npEiHaHHaO MepeKi 3i TTeNCeJIbHOIO BUNKOIO
2 36epiraHnCtpymHHoTpy6Kn
3 PyuKa IJra TpaHcNoptyBaHHa
4 BcMoKtByBaIbHn IJIaHr dIy MmHOrO 3ac06y
5 PeryIaTOp Do3yBaHnMnHOro 3acO6y
6 36epirahnpyuHOro nicToJeTypo3nnIOBaaya
7 Pe3epByap nIa MmHoro 3ac06y
8 Bumkau
9 3'εДнHaHHBиCOKOrO TnCKy
10PiIDBeHHeNBAOIN3ΦIbTpom
11 YactnHa 3'eHaHHaIJIa IIBeHHeHHa BOiN
12 Puchn nictoneT-po3nnIOBaU
13БлokуВання рунoro nicToJypo3nIIOBaaya
14 KhoNka IJRA BiD'EDHaHHaIaHry BnCOKOro TnCKy BiD pyHoro niCTOJeTypo3nnIOBaVa
15 Pykab BnCOKOro TnCKy
16 CtpymeHeBa Tpy6ka 3 peryIIOBaHHaM TnCKy (Vario Power)
17 CtymehBa Tpy6ka 3 0
CneuaJIbHe DonomixHe o6naHaHHa
IodatkoBe oIaHaHnHa Po3uHPOe MoKJInBOcTi BnKOpNCTaHHBaWoRO npncTpoIO. IodatkoBy iHΦopMaciIO Bn MoKTe OTpImaTu y BaWoRo ToproBoro areHTa φipMn KARCHER.
Ppei noaTkom po6oTu
MaJIIOHOK A-F
Ipeed noaTkom ekcnnyataci anapaty BCTaHOBHTN DoaHi He3akpinJIeHi YacTHHN. ManIOHOK
BCTaBHTn ⅢJaNr BnCOKOro TnCKy B pyuHni nictOJeT-p03nnIIOBaU do KnaCaHHra.
Bka3iBka: DOTpIMyBaTncb npabInbHoro po3MiueHHa 3'EdHyBaJbHoro HineJIIO.
→ IpeBipuTuHauiHicTb KpInJenHn, NOTaRHyBwU 3a WJaHr BucOKoT TnCKy.
IopabaHbBODn
△PonepeoHn
Bidnoiio do dioux dupekmue 3abopohembc eKcnnyamaui npunady 6e3 cenapamopy cucmem y cucmemi
bodonocmaaHnna numhoI bodu. Cid bukopucmoeyamu iDnoiDu hcuapamop cuscmem qipmu KARCHER abo aIbmephamueHu cenapamop cuscem, 32iHO EN 12729 muny BA. Boda, uO npouwna uepe3 cuscmemhu cenapamop, 6eaxacmbc HnpudamHO o dny numma.

yeaa!
CucmemHu po3diBnuk 3aeKdu NiDKluoyamu do cucmemu BODONocmaaHna, i Hikolu 6e3nocepedhbo do npuna dy!
Bka3iBka: BODaHi 3a6pydHeHHa MOxTyb CnpuHHTn NOoKOJXeHHa HAcOcy BnCOKOro TnCKy Ta npUaIaIa. IJa 3axNcTy paIMo cKOpNCtAtnScb BOaHmΦIbTpOM KARCHER (CneuaJIbHe npUaIaIa, Homep 3amOBJIeHHa 4.730-059).
IopdaBHaHNa BOn 3 BoDOrOHy
IotpmyTecb npaPiinpneMCTBa BOIOOCTaHaHH.
IToTyXHiCTb DnB. Ha 3BODcbKiI Ta6JIuUci/ B TexHiUHx DaHx.
→ CkopnctaItecB BOJHIM IJIaHROM 3MiUHO MaTepiAly (B KOMNJIeKTNoCTaHaHH He BXOdntb) 3i 3BVuaHIO
3'EDHyBaIbHOU MyΦTOH. (iAmEtp: MiHIMy 1/2 IIOHa a6o 13 MM; peKOMeHDoBaHa IOBxHa 7,5 M).
3'εДнУВаЛьНу MyФТу 3 KOMПЕКТу
пд'сДиНaIte Do eIeMeHtу anapaTa ДЯ
нodаВaHHa BODИ.
→HaɪiNbTe BɔdəHoi WɪnʌHr Ha 3'ɛdHyBaJIbHу MyΦTy anapaty, nɪcɪŋ YOrO nɪd'ɛdHaɪte NOrO dO BɔdɔrOhy.
BVeDeHnB eKcnnyataciio
yeaaa!
Po6oma ecxy npomraom 6ilbwe 2 xBunuH npubodumb do buxody 3 naoy bucoKoHaipno Hacoca. Kaio npucmpiu npomraom 2 XeunuH He Habupaemuck, mo uOso cnid Bumkhymu i diamu bIDnoBIOHO kazikam, kI npueodmbc8 aJabi "Onomoa y eunadky Henonadok".
3'εdHaTn IJNaHr BnCOKOTo TnCKy C nID'εdHaHHaM BnCOKOTo TnCKy.
→HadiNbTe Ha pyuHn niCToJeTpo3nnIOBaCtpyMHHy Tpy6ky Ta 3aΦikCyIte ii, NOBepHyBUn Ha 90^
Lijnkom BiDkprnTe BODoHnKpaH.
BcTaBTe MepeKeBn uTeKepe y po3eTKy.
→ YbIMKHiTb anapat ,I/ON" (I/YBIMK.).
Eknpnyataciia
△O6epeXHo!
Cmpymnb bodu, uo buxodumb 3
fopcyhku niobucokum hanoPOM,
cnpuunhe biDau pyuhozo nicmonemy-
po3nuloea. 3 ciipnuhu cnid
3aHmu cmiuke noJoxeHHa, MiHO
mpumamu pyHu nicmonem-po3nuloea
3i cmpymunHO mpy6koHO.
yeaa!
Ipeod noqamkom Mumm Heo6xio
nepekohamuc8 momy, 0o Muouu
npunad bucoko2o mucky cmiko
ecmaHOeNo Ha pieHiu noepxHi. Pid yac
Mumm buKOpucmoeyume 3axuchi
okyJnpu ma 3axuchu oya.
Po36nokyBaTu BaxiNb pyHoro nicToNeTy-po3nnIIOBaua.
→Notarynt3aBaxiNb,anapat yBIMKHeTbcra.
Bka3iBka:JaKuoBaJxilb 3HOBy 3BiJbHnTbcra,anapat 3HOby BmKHeTbcra. Bncokn Tnck 3aJIuHaetbcra B cnCTemi.
Струмени Трубka 3 реруновань Тиcke (Vario Power)
PekomeHIOBaHi MeToOn OuNueHHa
→ P03nHnTn HeBEnky KInbKicTb 3acO6y
ДЯЧишЕнгHa cyxH NOBepxHIO Ta
3aJIuNHTn DiIaTI (He BucNxAtn).
3MnIe po3uHHeHn 6pyd cTpymHeH BnCOKOro TnCKy.
PpnnHnTn ekcnnyataciIO
3BilbHITb BaKijb 3 pyHm po3nIIOBaueM
3a6nokyBaTu Baxinb pyHoro nictoJeTy-po3nnIOBaay.
→ПьдчасТрИВалиХпeрьуpo6OTbI (нонад5хВилIH) anapaT cniД BИМКаTN ,0/OFF"(0/BIMK.).
BcTaBnTpyHn nictOeTp03nIOBaUy TpMaU.
3aikyuHnpo60Tu
yeaaa!
UHaB eucokozomucky biD'edHyeamu bID pyHoo po3nuloea a6o npucmpo o minbku modi, kOu B cucmemi bIdcymHiu muck.
→При роботах 3 миним 3acobom BCMOKTyBaJIbHn WJlaHr ДлЯ минHorO 3acobу onyctHTn B pe3epByap 3 YNCTOIO BOHO, yBbIMKHyTnb anapaT, nonepeHbO 3HЯВSi n CTPyMnHHy Tpy6ky, TaДaBSh NOMy NonpaIOBaTN BnpoIDOBx 1 XBNIHH.
3BilbHITb BaXJIb 3 pyHIM pO3nIIOBaUeM
→ BumKHyTu anapat "0/OFF" (0/BUMK.).
→ 3akpntu BOdoonpoBiHn KpaH.
→HaTnCHyTuHa pyuKy po3nnIIOBaUa, 0o6 3MeHUnTI TnCK y CnCTeMI.
3a6nokyBaTu Baxinb pyHoro nictoJeTy-po3nIIOBaua.
BirarHitb MepexeBy wTeNceIbHy BnIky.
TpaHcnpTyBaHHa
yeaaa!
Дялобианна Heцachum bunadkam ma mpaemyaHIO npu mpaHCnpmyaHni npuna dy cnid npuHma do yea zu basy npuna dy (due. po3di "TexhiHaHi").
TpaHcnpTyBaHHBpyHy
BucokoPiHn npncpti3a pyky Ta nepenectn.
→ПриладТягпЗарукуДЯТраHCnOpTyBaHн.
TpaHcnpTyBaHHa TpaHcnpTHmN 3ac06amn
3aΦikcyBaTn npnlaB iD 3CyHeHnTa nepeKnDaHHa.
36epirannn
yeaza!
Для заобizaанна Heцас hum bunadkam ma mpaemyaанню npu bubopi Micya 3берizанна npunaу cnid npuuhma do yea zu bazy npunaу (due. po3di "Texhihi daHi").
36epiratnpictpi
BcTaHOBnTn npncTpri Ha piBHi noBepxHi.
BcTaBnTpyHn nictOJeTp03nIOBaUy TpImaU.
→ Cknactn MepexeBni Ka6eIb, WnaHr BncoKOro TnCKy Ta npJaandHa anapati.
Ipepe TpnbalnM 36epiraHHaM, HapnKnaB3mky, cIiD oDaTkoBO 3BepHyTu yBaIyHa Bka3iBKn B po3diNi "DorJiaD".
3axnct BiMop03iB
yeaa!
3axuamu anapam ma npunaodbaMop03y.
PpnaT a npnaneJxHocTi moKytb
noCTpaXdATN BiD MOpO3y, kUo 3 HIX
NoBHiCTIO He cnUeHO BODy. IJa
yHNKHeHHa NOWKoDKeHb.
3 anapaty ciiD zilkom BndaHHTN BOy. BMNKaTN anapat 6e3 npneHaHoro IJahra BnCOKOro TnCKy i 6e3 npEHaHORo BOIONoCTaAHN (MaKcIMyM Ha 1 XBnInHy) Ta noyeKaTN DOTN, DOKN pPnINHtbcr BNTik BOiN 3i IJahry BnCOKOrO TnCKy. BMKnHITb anapaT.
36epiratn npncpti 3 ycima akcecyapamny TeNlomy npmimiEHHI.
Доглад таTekhiчнослуgroвваня
△ObepeXHo!
Iid yac npoBeDeHnry 6yob-kaKux po6im 3 dozny ma mexHiUO zo6cIy2OByeAHH anapam cniod bumkhymu, a mepeKeBu u whyp - bumzu 3 po3emku.
Dorna
IpeedIOBrrn Nepiooom 36epiraHHa, HapnKJaD y3mKy:
3HimiTb φiJIbTp 3i BCMOKTyBaJIbHOrO
UJHaHry DJIa MmHOrO 3acO6y Ta
IpOMnTe NOro IpoTOuHOIO BOJO.
→ BntaHitb 3 donomoroIO nnockory6uB MepeXeBn IbTp 3 eIemEnTy dJa BOdONocTauHn Ta npOMnTe NOro y npOTouHi BOdi.
Texhiyhe 06cnyroByBaHHa
Anapat He notpe6ye npophiiaKTnHoro 06cnyroByBaHHa.
3anachi yactnnn
BnKOpncToByTe TblbKn OpnIbHaJIbHbI 3anachi yactnHn φipmK KARCHER. Onnc 3anachnx yactnH hapniki daHOi IHctpykqii 3 ekcnnyataui.
Дономогау Випадку НениадOK
He3NaUHi yUkOJKeHHa Bm MoKeTe BnnpaBNTi CamOCTiH0 3a DonOMorOHO HAcTynHOrO OrJaIy.
YcMHiHnX BnPaKax,6yDbIaCKa, 3BepTaITeCra Do KOMPeTeHTHOI cIyJbN TexHiHOI NiIDTpIMKn.
△ObepeXHo!
Iid yac npoBeDeHn8 bdyb-kaKux po6im 3 dozny ma mexHiCyHO2O obcIy2OByeHaHH anapam cniod bumKnHymu, a mepeKeBu u shyp - bumemu 3 po3emku.
Pemohmhi po6omu ma po6omu 3
eIekmpuHUMu 8y3nAmu MoKe
Bukohyeamu minbku yno8HOaKeHa
cnyX6a cepieCHOO o6cny2oByeaHn.
PnuctriH He npaioe
→ BntaHrytn BaKinb pyHoro nicToeta- pO3nIIOBaHa, npncTpiB BMKHeTbcra.
Ipepebipte BiinobiHictb HanpyrN, Bka3aHOY 3aBOcBki Ta6nuci, Hanpy3i Dkepeena eNeKtpoeHeprii.
IpeBipuTm MepxeBn KaebbHa NOsKOJKeHHa.
Pnctpi He npaioe nid Tnckom
→ IpeBipTuHaCTpoOBaHHa CTpyMNHOI Tpy6Kn.
→BudanenHn noBITpia3 npncTpoU: BImKHyTN npncTpii 6e3 niKnIoueHOro BucOKoHaipHO rO 7aHra Ta nOueKaTu (He 6iJIbwe 2 xBNiIN), NOKN 3 BucOKoHaipHO 7aHra He nOuHe BHXODHTN BOda 6e3 6yNb6aWok nobitpr. BImKHyTN npncTpii Ta 3aHOBO npneDHaTu 7laHr BUCOKO TnCKy.
→ IpepeBipuTn noDaBaHnB ODoN
→ BntaHtB 3 donomoroIO nlockory6uIB MepeXeBn IbTp 3 eIemEnTy dJa BOdoNocTaauHHra TApomnTe NOro y npotoChHi BoDi.
AnapaT He BMnKaTbCra, DBnrgn ryntB
IpuuHa: IadHHa Hapya uyepe3 cna6ky eIekmpomepexy a6o npu eukopucmaHnI noo6xyea.
→Прии ВIMКнEHHI HacampeEd BNTIITN BaxiNb pyHOrO niCToJeTy- po3nIIHObAua,NotIM yCTaHObitb BIMKau anapaty B noLoXeHHra ,I/ON" (I/YBIMK.).
BéniKi nepenadn TscKy
OuHCTHTn fOpcyHKy BUCOKOTo TnCKy: TOnkoI np6paTn 6pyd 3 OTbOpy fOpcyHKn Ta npomTu i cpeedy BOHO.
IpepeBipTe KINbKicTb NOdaBaHoI BOdN.
Anapat HerepmetnHni
He3haCyHy herepMeTuHicTb anapaty 3ymoBJIeHO TexHiuHMn oO6IINBOcTMy. Ppi CunbHiJ HerepMeTuHocTi 3BepHiTbcrdo aBtOpN3OBaHOi cnyK6n cepBichoro 06cnyroByBaHHra.
OuHCHN 3ac6 He BCMOKTyEcBcA
71364 Winnenden (Germany)
Ten.: +49 7195 14-0
ΦaKc: +49 7195 14-2212
Winnenden, 2010/12/01
5.964-120.0 12/10
A Alfred Karcher Ges.m.b.H. LichtblaustraBe 7 1220 Wien (01)250600
AUS
Kärcher Pty. Ltd.
40 Koornang Road
Scoresby VIC 3179
(03) 9765 - 2300
B/LUX
Kärcher N.V.
Industriebeg 12
2320 Hoogstraten
B:0900 10027
LUX:0032 900 10027
BR
Kärcher Industria e Comércio Ltda.
Av. Prof. Benedicto Montenegro 419
CEP 13.140-000 - Paulinia - SP
0800 176 111
CDN
Karcher Canada Inc.
6975 Creditview Road Unit #2
Mississauga, Ontario L5N 8E9
1-800-465-4980
HK
Kärcher Limited
Unit 10, 17/F.
APEC Plaza
49 Hoi Yuen Road
Kwun Tong, Kowloon (02) 357-5863
Karcher S.p.A. Via A.Vespucci 19 21013 Gallarate (VA) 848-998877
IRL
Karcher Limited
12 Willow Business Park
Nangor Road
Clondalkin Dublin 12
(01) 409 77 77
KOR
Karcher Co.Ltd.(South Korea)
Youngjae B/D,50-1,51-1
Sansoo-dong,Mapo-ku
Seoul 121-060
032-465-8000
MAL
Karcher Cleaning Systems Sdn. Bhd.
No. 8, Jalan Serindit 2
Bandar Puchong Jaya
47100 Puchong, Selangor
(03) 5882 1148
MEX
Karcher Mexico, SA de CV
Av. Gustavo Baz No. 29-C
Col. Naucalpan Centro
Naucalpan, Edo. de Mexico
C.P. 53000 Mexico
01 800 024 13 13
NZ
Karcher Limited
12 Ron Driver Place
East Tamaki,Auckland
(09)274-4603
P
Neoparts-Com.eInd.Automóvel, S.A.
Av. Infante D. Henrique, Lote 35
1800-218 Lisboa
218558300
PL
Kärcher Sp. zo.o.
UI. Stawowa 140
31-346 Krakow
(012)6397-222
PRC
Kärcher Cleaning Systems Co., Ltd.
Part B, Building 30,
No. 390 Ai Du Road
Shanghai Waigaoquiao 200131
(021)5046-3579
RO
Karcher Romania s.r.l.
Sos.Odaii Nr.439
013606Bucuresti 0372709001
RUS
OOO «Kepxep>
109147,MockBa
yn.TaraHcKaJn34,ctp.3
+74952283945
S
Kärcher AB
Tagenevagen 31
42502 Hisings-Karra (031)577-300
SGP
Karcher Asia Pacific Pte. Ltd.
5 Toh Guan Road East
01-00 Freight Links
Express Distripark
Singapore 608831
6897-1811
SK
Kärcher Slovakia, s.r.o.
Beniakova 2
94901 Nitra
037 6555 798
TR
Kärcher Servis Ticaret A.S.
9 Eylül Mahallesi
307 Sokak No. 6
Gaziemir / Izmir
(0232) 252-0708
TWN
Karcher Limited
5F/6. No.7
Wu-Chuan 1st Rd
Wu-Ku Industrial Zone
Taipei County
(02) 2299-9626
UA
Kärcher Ukraine
Kilzeva doroga, 9
03191, Kyiv
(044) 594 75 75
UAE
Karcher FZE
Jebel Ali Free Zone
RA 8,XB1,Jebel Ali,Dubai (04)8836-776
USA
Alfred Karcher, Inc
2170 Satellite Blvd
Suite 350
Duluth,GA 30097
678-935-4545;877-527-2437
ZA
Kärcher (Pty.) Limited
144 Kuschke Street
Meadowdale
Edenvale 1614
(011) 574-5360
KARCHER www.kaercher.com


