
Trio LOVEmotion Legend - Stroller CHICCO - Free user manual and instructions
Find the device manual for free Trio LOVEmotion Legend CHICCO in PDF.
| Product type | Stroller |
| Brand | Chicco |
| Model | Trio LOVEmotion Legend |
| Recommended age | From birth to 36 months |
| Maximum supported weight | 15 kg |
| Restraint system | 5-point harness (shoulder straps, waist belt, crotch strap) |
| Compatibility carrycot | Chicco Love |
| Car seat compatibility | Chicco Oasys 0+ |
| Brake type | Stop & Go (parking brake on rear wheels) |
| Front wheels | Swiveling or fixed (lockable) |
| Canopy | With retractable sunshade net, removable, forward-facing or parent-facing position |
| Handle | Ergonomic, adjustable in height and rotation (8 positions), removable single handle |
| Backrest adjustment | Reclining (multiple positions) |
| Leg rest adjustment | 2 positions |
| Shopping basket | Max capacity 5 kg |
| Changing bag | Max capacity 2 kg, lateral attachment or on handles |
| Rain cover | Included, usable forward-facing or parent-facing |
| Leg cover | Included, 2 positions |
| Comfort kit | Padded shoulder straps and crotch strap |
| Care | Clean with damp sponge and mild soap; cover hand washable in cold water, do not bleach, do not tumble dry, do not iron, do not dry clean |
| Warranty | Compliant with national regulations of the country of purchase |
| Use | Not suitable for jogging or rollerblading |
Frequently Asked Questions - Trio LOVEmotion Legend CHICCO
User questions about Trio LOVEmotion Legend CHICCO
0 question about this device. Answer the ones you know or ask your own.
Ask a new question about this device
Download the instructions for your Stroller in PDF format for free! Find your manual Trio LOVEmotion Legend - CHICCO and take your electronic device back in hand. On this page are published all the documents necessary for the use of your device. Trio LOVEmotion Legend by CHICCO.
USER MANUAL Trio LOVEmotion Legend CHICCO
natural_image
Illustration of a baby stroller with purple body and hood, no text or symbols present


natural_image
Illustration of a blue and white carabiner with wheels and handle (no text or symbols)
natural_image
Illustration of a blue wheeled cart with wheels and a red-handled lever mechanism, shown from two different angles (no text or symbols)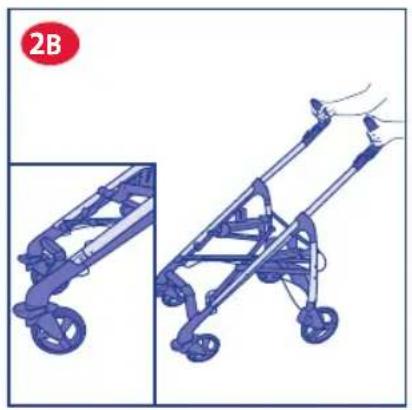
natural_image
Illustration of a stroller with wheels and a hand operating it, shown from two different angles (no text or symbols)
natural_image
3D model of a mechanical device with a red circle highlighting a component (no text or symbols present)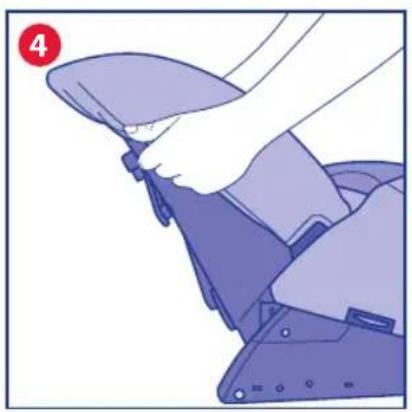
natural_image
Illustration of a hand adjusting a seatbelt mechanism (no text or symbols visible)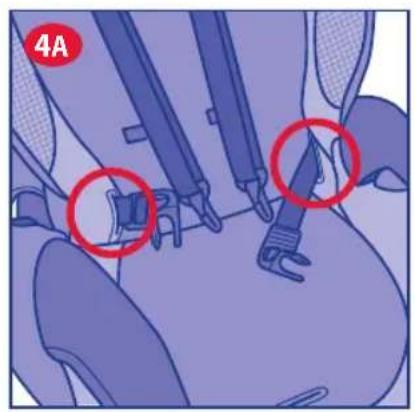
natural_image
Medical illustration showing surgical instruments in a procedure (no text or symbols present)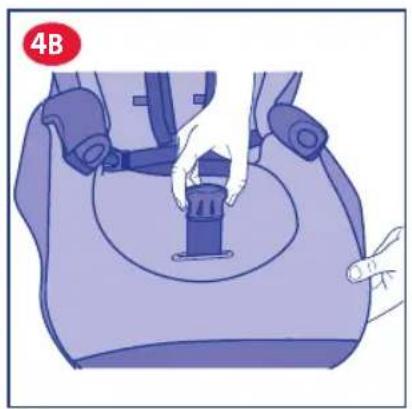
natural_image
Illustration of a person using a seatbelt device to press or install a seatbelt (no text or symbols present)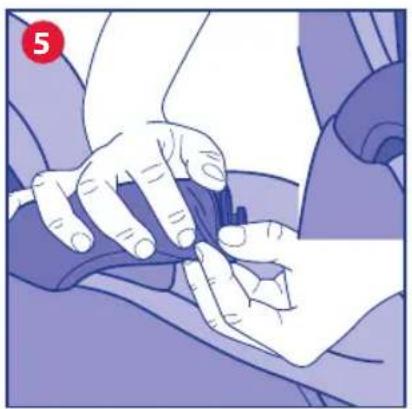
natural_image
Illustration of hands performing a medical procedure on a patient's arm (no text or symbols visible)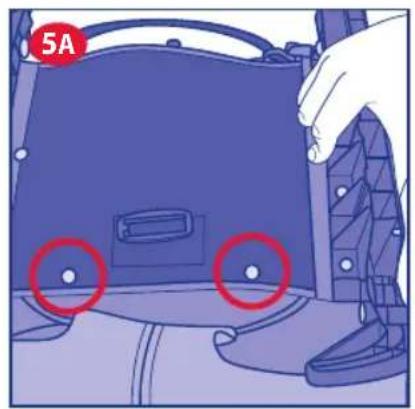

natural_image
Illustration of hands holding a blue fabric or cable component, no text or symbols present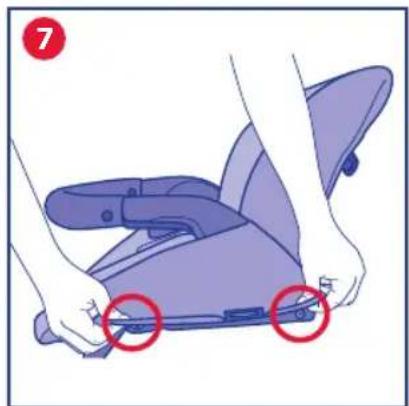
natural_image
Illustration of a person using a purple seatbelt device with two red circles highlighting the seat area (no text or symbols present)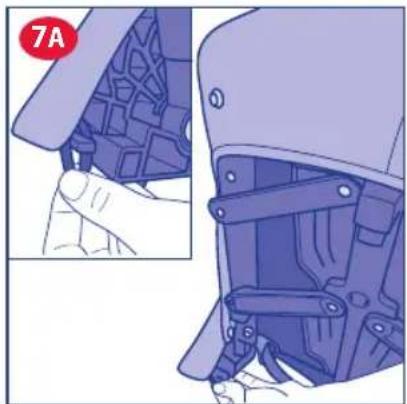
natural_image
Illustration of a robotic arm joint with a hand inserting a component (no text or symbols visible)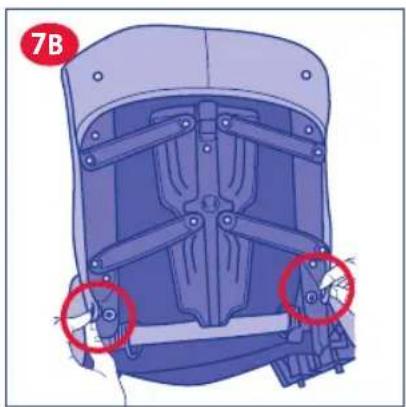
natural_image
Mechanical component diagram showing internal structure with two red circles highlighting specific parts (no text or symbols present)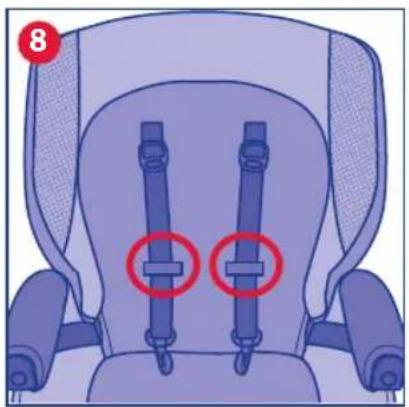
natural_image
Illustration of a baby car seat with two blue straps and two red circled buttons, no text or symbols present.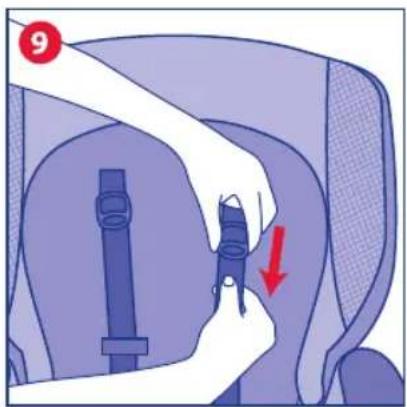
natural_image
Illustration of hands adjusting a seatbelt with a red arrow indicating a downward motion (no text or symbols present)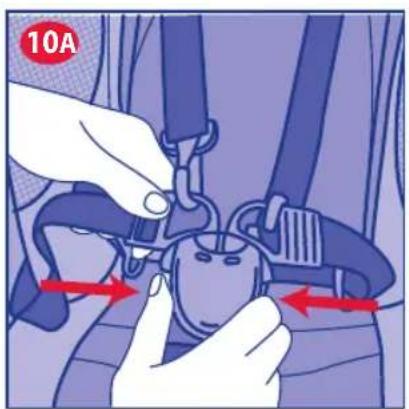
natural_image
Illustration of a person seated on a ladder using a seatbelt device (no text or symbols visible)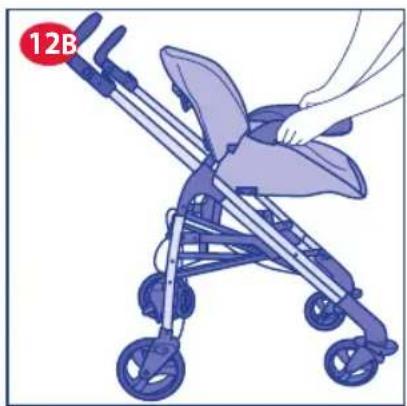
natural_image
Illustration of a baby stroller with hands holding the seat, no text or symbols present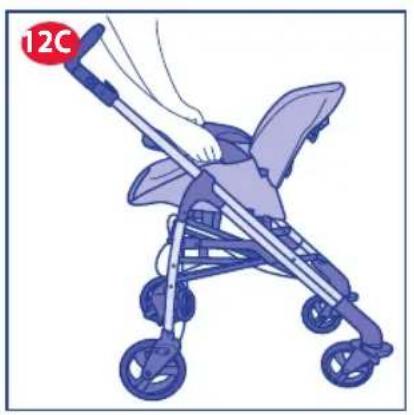
natural_image
Illustration of a baby stroller with hands holding a tray, no text or symbols present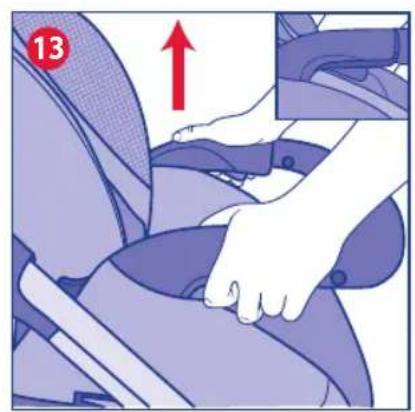
natural_image
Mechanical assembly diagram showing a belt drive mechanism with a red arrow indicating direction (no text or symbols present)
natural_image
Illustration of a baby stroller with a hand adjusting the seat area, showing a red arrow indicating direction (no text or symbols)
natural_image
Illustration of a baby stroller with a blue mesh canopy and metal frame (no text or symbols)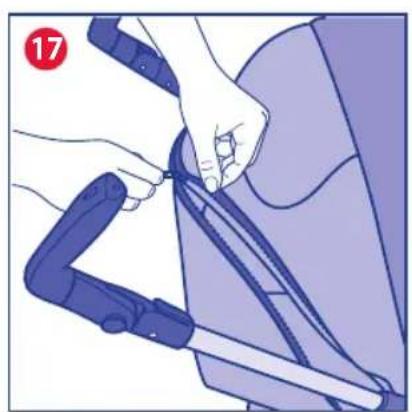
natural_image
Illustration of a person using a medical device to adjust or install a patient's arm (no text or symbols visible)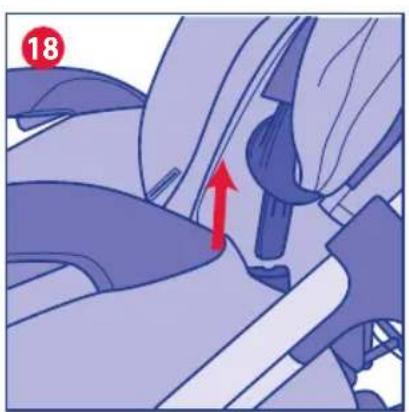
natural_image
Mechanical assembly diagram showing a belt drive mechanism with a red arrow indicating direction (no text or symbols present)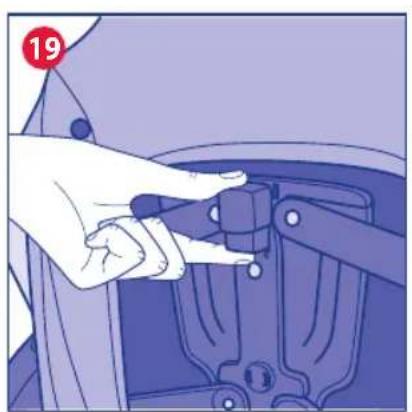
natural_image
Illustration of a hand adjusting a mechanical component with a red circular badge showing number 19 (no text or symbols on the diagram itself)
natural_image
Illustration of a hand holding a blue cable clip attached to a person's seat, with a red circle highlighting the clip (no text or symbols present)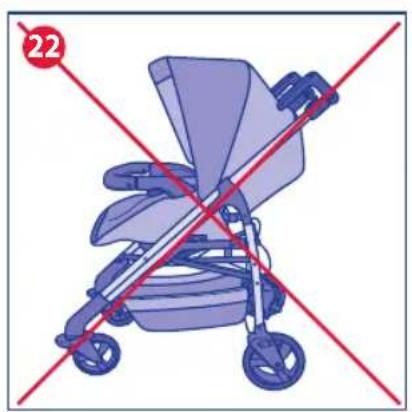
natural_image
Illustration of a baby stroller with two crossed red lines and a circled number 22 (no text or symbols on the diagram itself)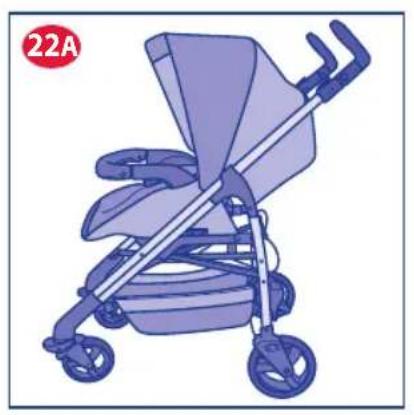
natural_image
Illustration of a baby stroller with purple body and wheels, no text or symbols present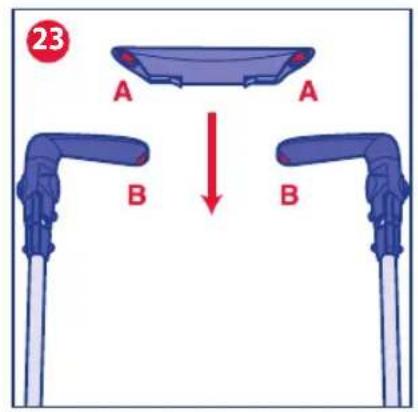
natural_image
Illustration of a vehicle chassis frame with wheels and a red arrow indicating a specific component (no text or symbols present)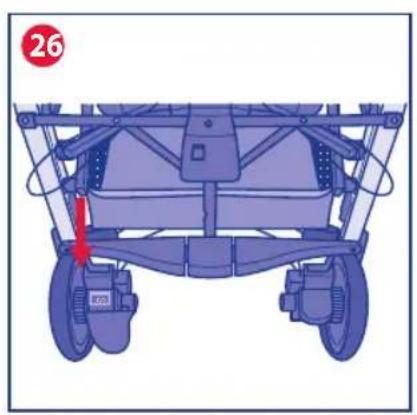
natural_image
Top-down view of a vehicle chassis frame with wheels and suspension components (no text or symbols)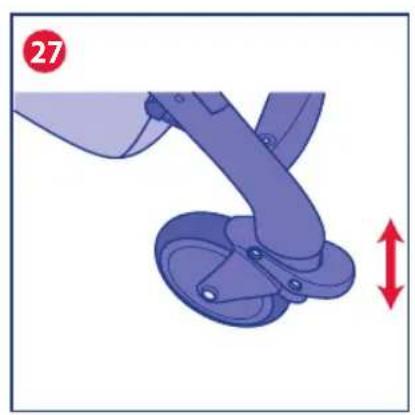
natural_image
Illustration of a blue mechanical component with a red double-headed arrow indicating vertical motion (no text or symbols)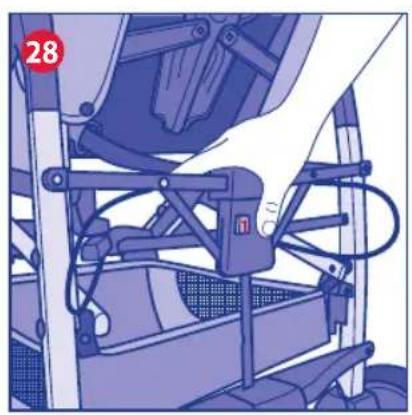
natural_image
Mechanical assembly diagram showing a hand pressing a component on a vehicle chassis (no text or symbols visible)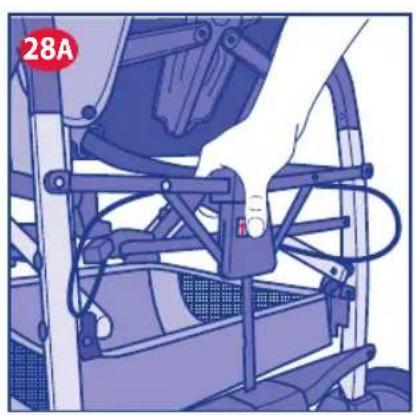
natural_image
Illustration of a person operating a vehicle chassis with visible wiring and components (no text or symbols)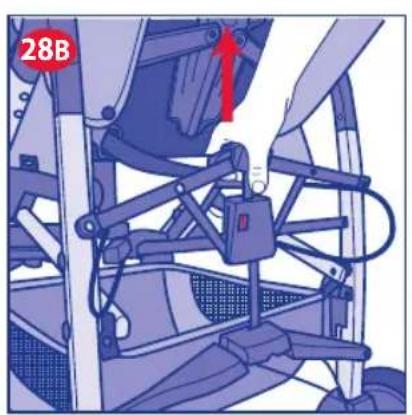
natural_image
Mechanical assembly diagram showing a lever mechanism with a red arrow indicating direction (no text or symbols present)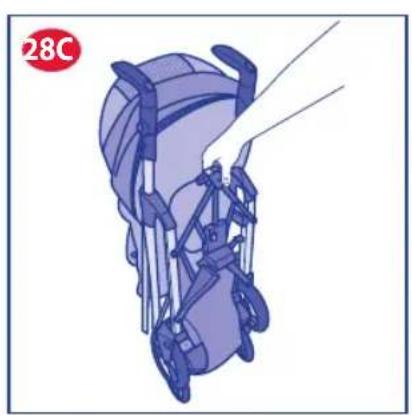
natural_image
Illustration of a baby stroller with blue frame and seat, no text or symbols present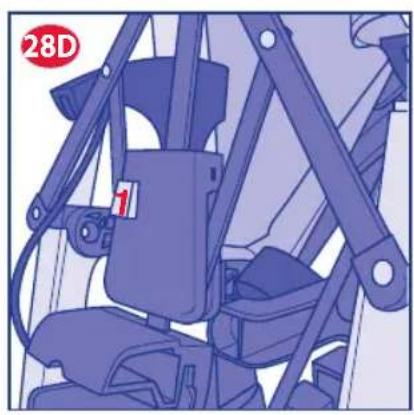
natural_image
Illustration of a bicycle seatbelt mechanism with no visible text or symbols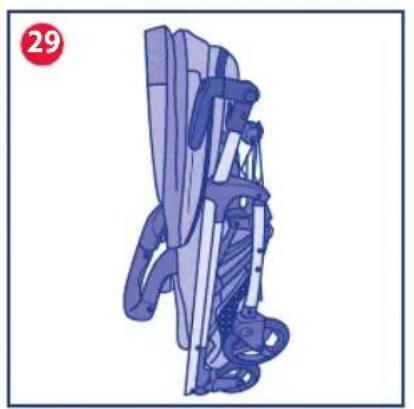
natural_image
Illustration of a person wearing a roller skates, viewed from the side (no text or symbols)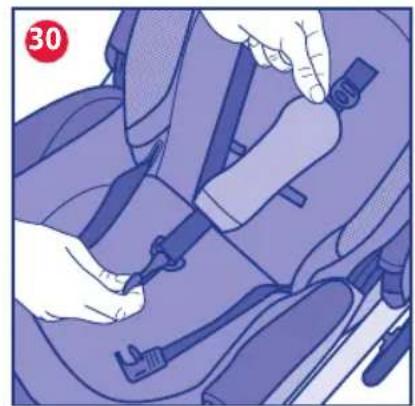
natural_image
Illustration of hands adjusting a car seatbelt device (no text or symbols visible)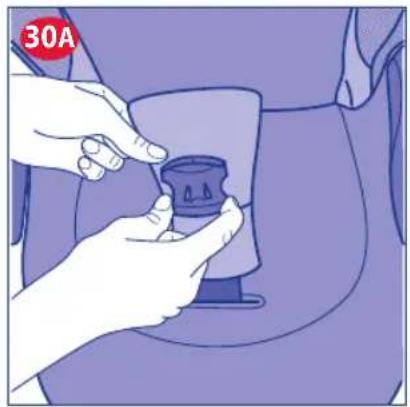
natural_image
Illustration of hands adjusting a car seatbelt component (no text or symbols visible)
natural_image
Illustration of a baby stroller with two red circles highlighting the inner body (no text or symbols present)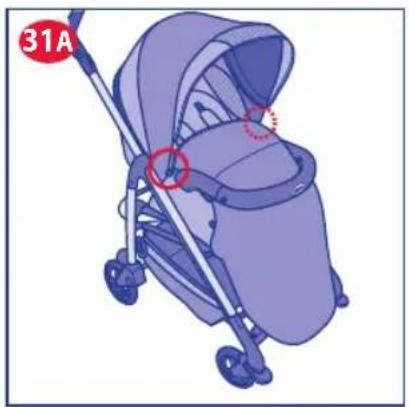
natural_image
Illustration of a baby stroller with a red circle highlighting the innermost part (no text or symbols present)
natural_image
Top-down view of a baby stroller with two red circles highlighting the seat area (no text or symbols)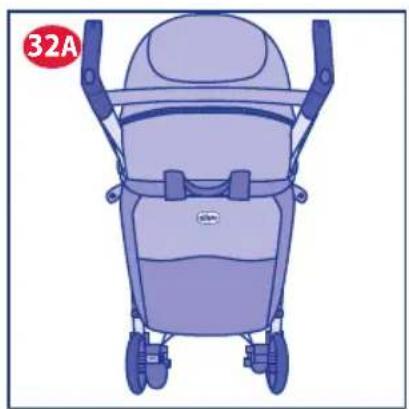
natural_image
Illustration of a purple baby stroller with blue straps and wheels, no text or symbols present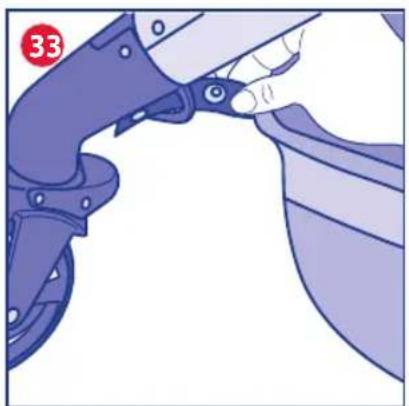
natural_image
Illustration of a hand adjusting a mechanical component (no text or symbols visible)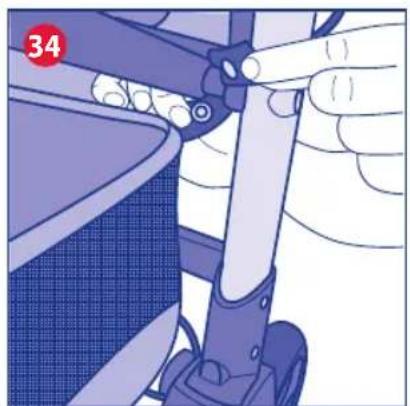
natural_image
Close-up of a hand adjusting a mechanical component with a numbered label (34) in the corner, no visible text or symbols on the main subject.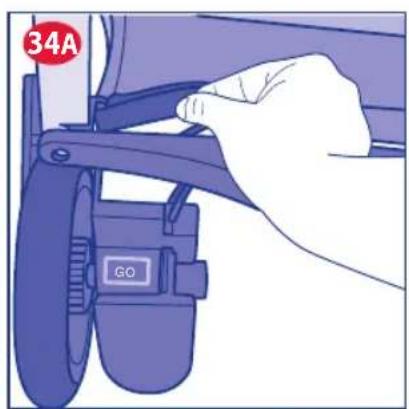
natural_image
Illustration of a baby stroller with mesh frame and red circular annotations (no text or symbols)
ISTRUZIONI D'USO
IMPORTANTE - TENERE QUESTE ISTRUZIONI PER RIFERIMENTI FUTURI.
ATTENZIONE: TENERE I SACCHETTI DI PLASTICA LONTANI DAI BAMBINI PER EVITARE SOFFOCAMENTO.
AVVERTENZE
UTILIZZO POLTRONCINA E SACCA
IMPORTANT - KEEP THESE IN- STRUCTION FOR FU- TURE REFERENCE.
WARNING: KEEP THIS PLASTIC COVER AWAY FROM CHILDREN TO AVOID SUFFOCATION.
WARNINGS
- WARNING: Never leave your child unattended.
- WARNING: Ensure that all the locking devices are engaged before use.
- WARNING: To avoid injuries ensure that your child is away when unfolding and folding this product.
- WARNING: Do not let your child play with this product.
- WARNING: Always use the restraint systems.
- It is necessary to utilise the crotch strap and safety harness in order to guarantee safety to your child. Always use the safety harness in combination with the crotch strap.
- WARNING: Check that the carrycot or seat unit or car seat attachment devices are correctly engaged before use.
- WARNING: This product is not suitable for running or skating.
- The stroller use is designed for children aged between 0 and 36 months and weighing up to 15 kg.
- It is recommended to use the back-
rest in completely reclined posi-
tion for children from birth up to 6
months.
- Only Car Seat CHICCO OASYS 0+ and/or Carrycot CHICCO LOVE with fitting device are compatible with CHICCO LOVE stroller.
- The parking device shall be engaged when placing and removing the children.
• Always apply the brakes whenever the stroller is stopped.
- Never leave the stroller on a sloped surface, with a child on board, even with the brakes engaged.
- Do not overload the storage basket. Maximum weight 5 kg.
- Any load attached to the handle and/or on the backrest and/or the sides of the vehicle will affect the stability of vehicle.
- Do not carry more than one child at a time.
- Do not use accessories, replacement parts, or any component not supplied or approved by the manufacturer / distributor.
- Do not use this product if some parts are broken, torn or missing.
- For car seats used in conjunction with a chassis, this vehicle does not replace a cot or a bed. Should your child need to sleep, then it should be placed in a suitable pram body, cot or bed.
- Before assembly, check that neither the product nor any of its components have been damaged during transportation. In this case, do not use and keep out of reach of children.
- During these operations, ensure that the moving parts of the stroll-
er will not come into contact with your child.
• Make sure that the person using the stroller knows how to do it in the safest way.
• This product must only be used by an adult.
• The product must be assembled by an adult.
- To avoid all strangulation risks, never give children objects with cords or strings attached, or leave them with in proximity of such objects.
- Never use the stroller on staircases or escalators: you could suddenly lose control of it.
• Always pay attention when going up and down steps or pavements.
- If the stroller has been exposed directly to sunlight for a long time, you must let it cool down before placing your child inside of it. Prolonged exposure to direct sunlight may cause the colour of the materials and fabric to fade.
- Prevent the stroller from contact with salty water. It might cause the formation of rust.
- Do not use the stroller on the beach.
- When unused, the stroller should be kept out of reach of children.
TIPS FOR CLEANING AND MAINTENANCE
This product requires periodical maintenance. Cleaning and maintenance operations must be performed exclusively by an adult.
CLEANING
Clean the fabric parts using a wet sponge and neutral soap. The lining can be removed (please refer to the section "Fitting/removing the seat lining"). Please refer to the care labels for instructions on how to clean the fabric parts. Below are the cleaning symbols and their meanings:

Wash by hand in cold water

Do not bleach

Do not tumble dry

Do not iron

Do not dry clean
Routinely wipe clean plastic parts with a soft damp cloth. Never use solvents or abrasive detergents. In case the stroller has come into contact with water, always dry the metal parts to prevent rust formation.
MAINTENANCE
Regularly check the condition of the wheels and, keep them clean from dust and sand. To avoid friction that may prevent correct operation of the stroller, make sure that all the movable plastic parts along the metal frame are clean from dust, dirt or sand. Keep the stroller in a dry place. Lubricate the moving parts only if necessary, with a light application of a silicone based lubricant.
LIST OF COMPONENTS
Check that none of the components of this model are missing before assembling the product. If any part is missing, contact Chicco Customer Service. No tools are needed to assemble this product. The following pieces are needed for product assembly:
- Frame
- Seat
- Seat lining
• Hood - Bumper bar
- Storage basket
• Bag - Leg cover
- Rain cover
- Joined handgrip
• Comfort kit (shoulder and crotch straps)
WARNING: When opening the stroller, make sure that your child or other children are at a safety distance. Make sure that during these operations the moving parts of the stroller will not come into contact with your child.
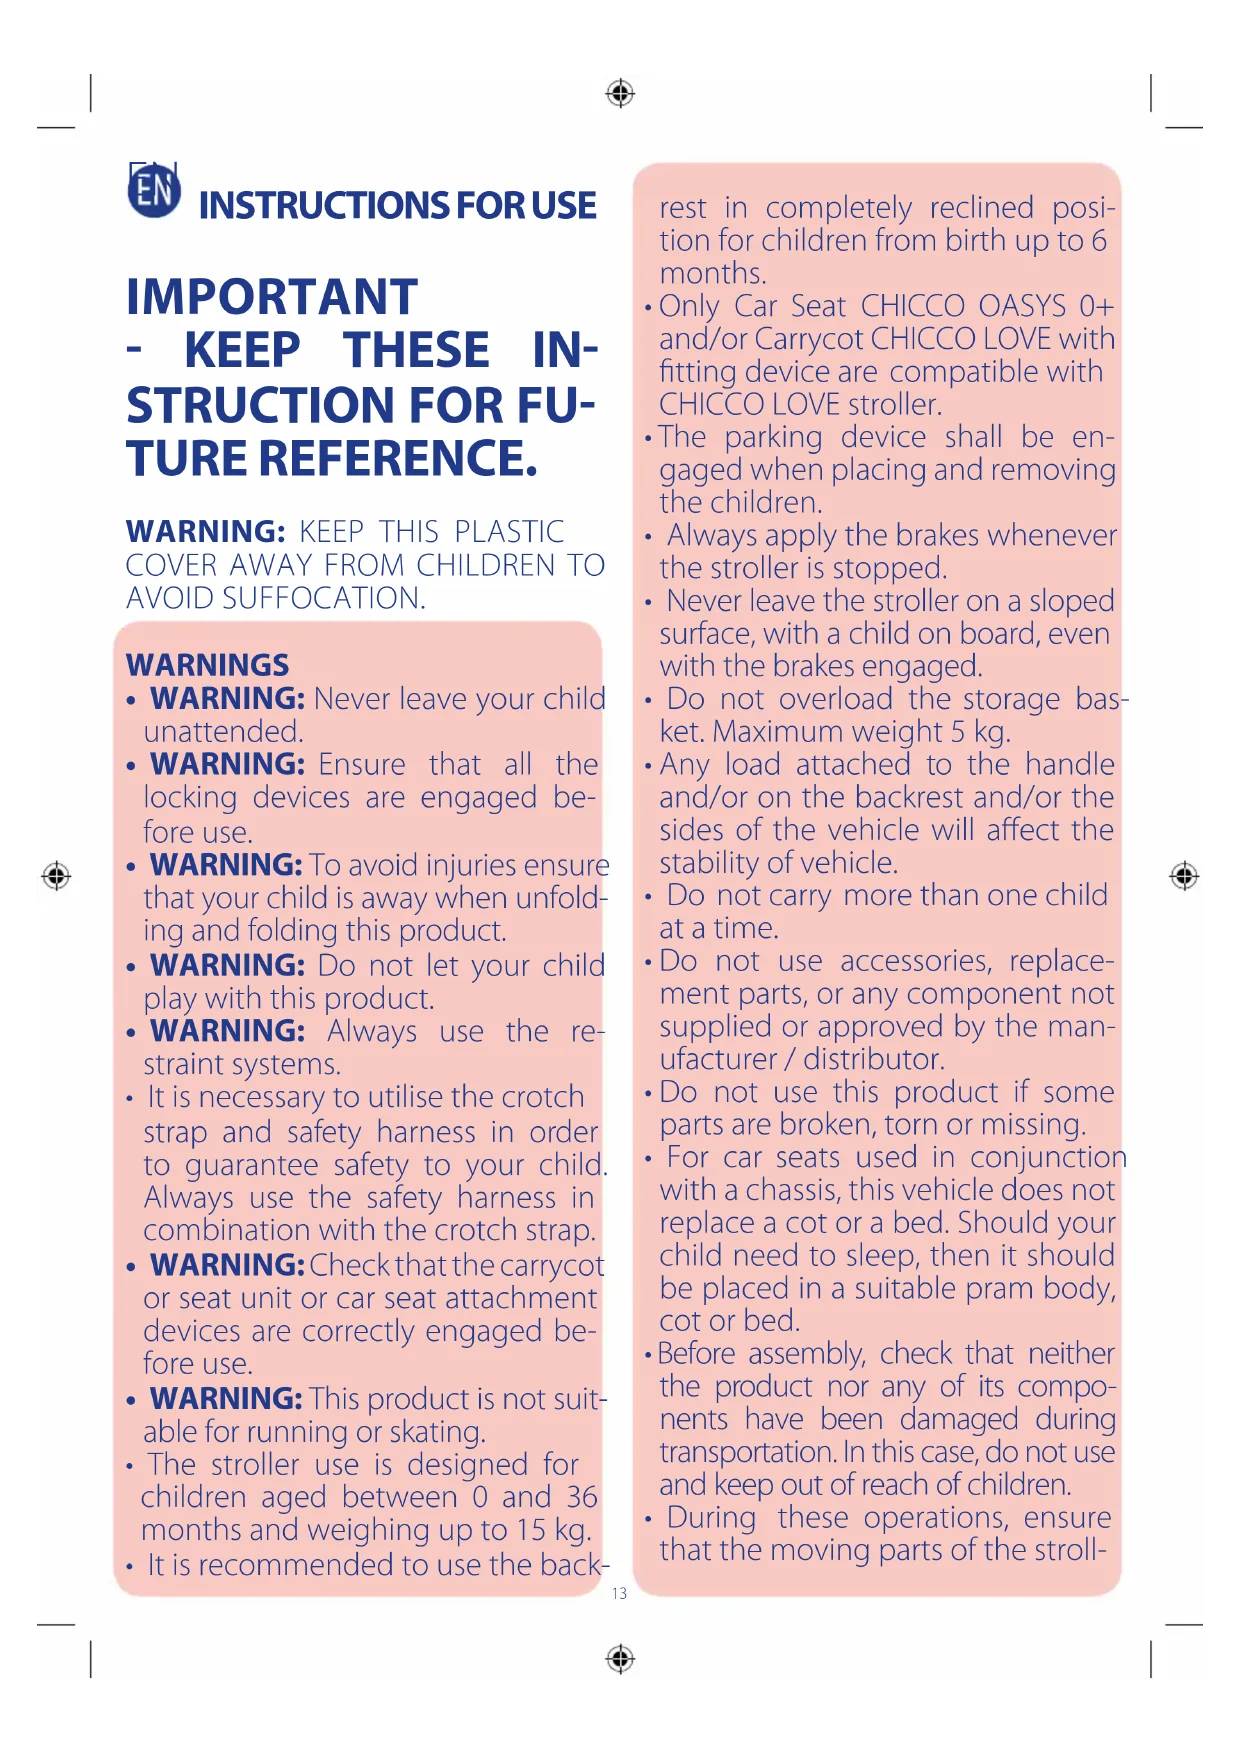
- With the stroller positioned vertically (fig.1) lift both handles to the relevant position by pushing the buttons on the sides (fig. 1 A). Make sure that the handgrips are locked in position for use.
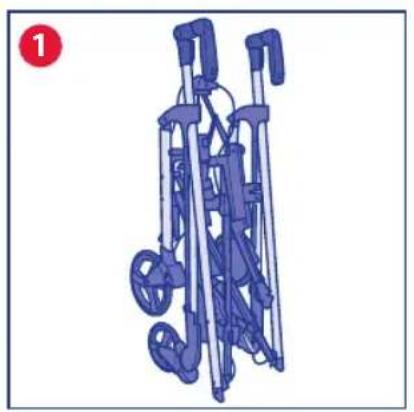
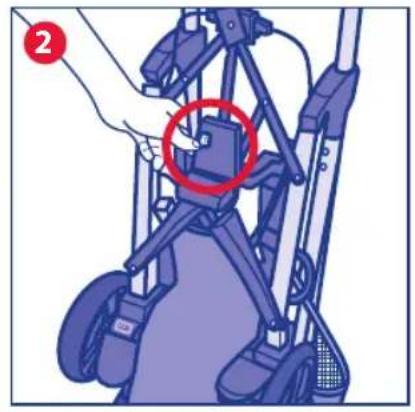
- To open the frame, press the button shown in Fig. 2 (1-push). Then lift the stroller's handgrips and raise the stroller to make it easier for it to open (Fig. 2A). The stroller is completely opened when the tubes are completely fixed to the front (fig. 2B). To complete the opening of the stroller, press the rear crossbar (fig. 2C).
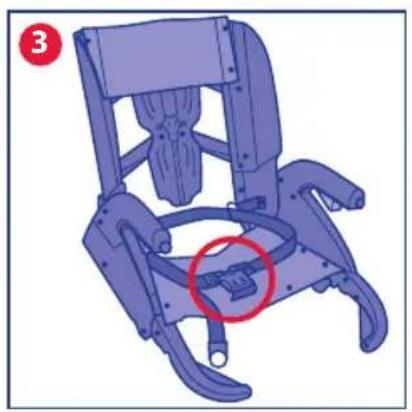
FITTING/REMOVING THE SEAT LINING
- Fitting the lining must be done with the seat disengaged from the stroller Before starting, open the waist buckle shown in fig. 3.
-
Fit the lining by sliding it first on the backrest (fig. 4) and insert the waist strap in the relevant slots in the lower part of the backrest (fig. 4 A). Then insert the crotch strap in the slot in the seat (fig. 4B).
-
Fit the fabric on the armrest making sure that it is fit correctly (fig. 5), and fasten the fabric to the base of the seat with the two buttons circled in red (fig. 5A).
- Insert the legrest supports in the lower part of the lining (fig. 6).
- To complete the fitting of the lining on the seat, fasten the two buttons on the sides (fig. 7), fit the elastic strap on the relevant hook as shown in fig. 7A and fasten the buttons in the lower part of the backrest (fig. 7B).
To remove the lining, follow the same steps in the reverse order.
SAFETY HARNESS
The stroller comes with a five-point safety harness which consists in two shoulder straps, a waist strap and a crotch strap with a buckle.
- WARNING: when using with children aged 0 to 6 months, you may have to shorten the length of the straps to adapt them to your baby To do so, use the shoulder straps by inserting them first through the adjustment slots (fig. 8).
- Make sure the shoulder straps are adjusted at a suitable height for your child: otherwise, adjust the height (fig. 9).
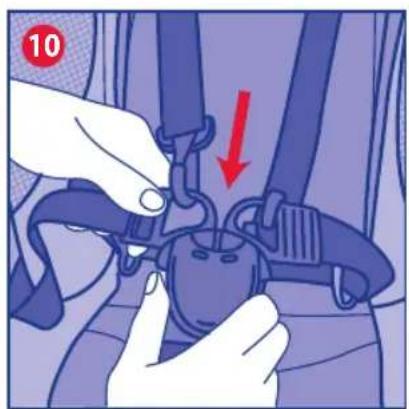
- After placing your child, put the two forks in the buckle (Fig. 10) and adjust the width of the waist belt if needed, pressing on the buckles. To unfasten the waist belt, press the two lateral forks at the same time (fig. 10A).
WARNING: To ensure the safety of your child, you must use the crotch strap, waist belt and safety harness at the same time.
WARNING: After removal of the safety harness (e.g. for washing), ensure that the harness is reassembled correctly using the anchorage points. The harness must be re adjusted.
BUMPER BAR
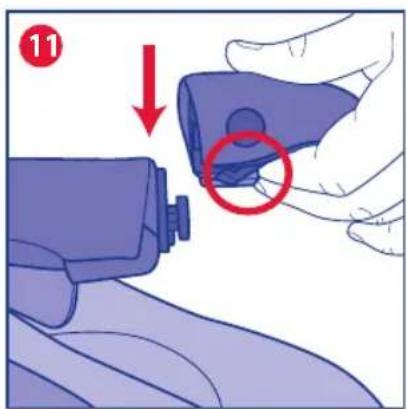
- The seat features a bumper bar. To fasten the bar, press the two buttons located in the lower part of the two extremities and fit it on the pins located at the end of the armrests (fig. 11). To remove the bumper bar, follow the steps described above in the reverse order. You can release one side of the bumper bar to let your child to seat. The bumper bar can be used both forward facing and parent facing.
WARNING: Always fasten your child with the safety harnesses. The bar IS NOT a device for containing your child.
WARNING: The bar must not be used to lift the product with the child inside of it.
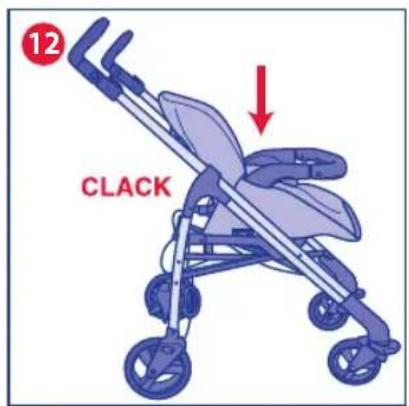
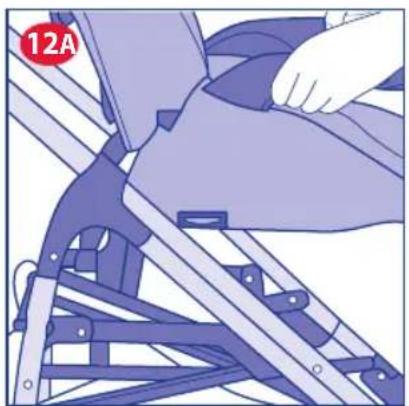
- To attach the stroller seat, insert it in the relevant vertical fastening devices until you hear the click which confirms that it has been fastened (fig. 12). To facilitate fastening the seat on the stroller, please read the instructions on the labels on both sides of the fabric showing you the correct alignment of the seat with the fasteners (fig. 12 A). The seat can be attached both forward facing (fig. 12B) and parent facing (fig. 12C).
WARNING: Before using, make sure that the seat is properly locked on by pulling it upwards.
WARNING: If not properly locked, press both white keys on the fitting device of the structure and repeat the fitting procedure checking the complete locking. Otherwise contact the Chicco customer service.
- To release the seat, press both buttons under the arm-rests at the same time (fig. 13) and lift it.
WARNING: The child must never be sitting in the seat when fastening/unfastening it.
HOOD
-
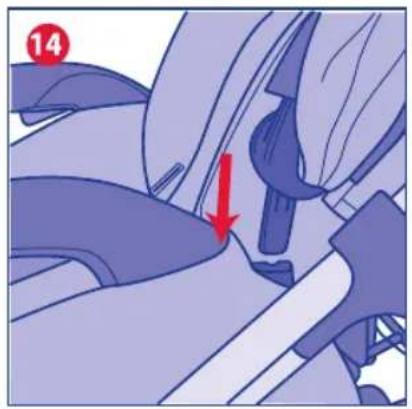
The seat has two fastening devices located on the sides of the backrest base which are used to fit the hood. To fit the hood, slide the clip-on system into the fastening devices, as shown in fig. 14. Once fastened to the seat, the hood follows it in forward facing or parent facing position. To complete fitting the hood on the seat, fasten the rear part of the hood on the back of the stroller backrest using the relevant buttons (fig 14 A).
-
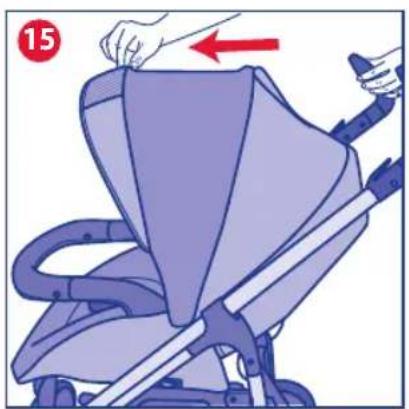
To open the canopy, push the front arch forward (fig. 15).
-
The hood features a removable net that helps protect your child from intense light (fig. 16)
-
To remove the rear flap and convert the hood into a summer sunshade, open the rear zipper (fig. 17) and unfasten the buttons on the back of the seat's backrest.
-
To remove the hood, simply pull it up and out from the fastening devices and slide the hooks upwards (fig. 18).
WARNING: The hood must be fixed on both sides of the stroller. Ensure that the hood is correctly secured into position.
HOW TO ADJUST THE BACKREST
- Press the button on the stroller backrest to recline it to the desired position (fig. 19). Release the button and the backrest will click into the closest lock position. Simply push the backrest up to raise it again.
WARNING: The child's weight can make these operations more difficult.
HOW TO ADJUST THE LEGREST
- The legrest has two positions. To adjust it, use the buttons under the leg rest (fig. 20).
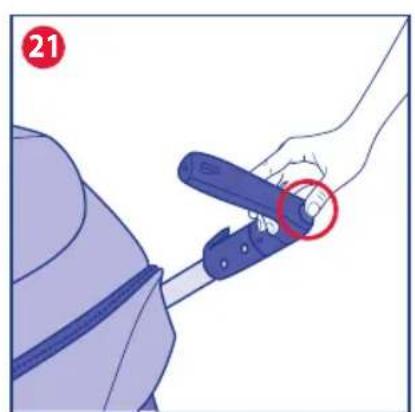
ADJUSTABLE DOUBLE TWIST ERGONOMIC HANDGRIPS
- Press the button on the handgrip to rotate it to the required position, according to the height and position most suited to the user (fig. 21). The handgrip can be adjusted to 8 different positions.
- WARNING: when using the stroller, the handgrips must not be in the DOWN position (fig. 22). Make sure that the handgrips are locked in the UP position, as shown in fig. 22 A.
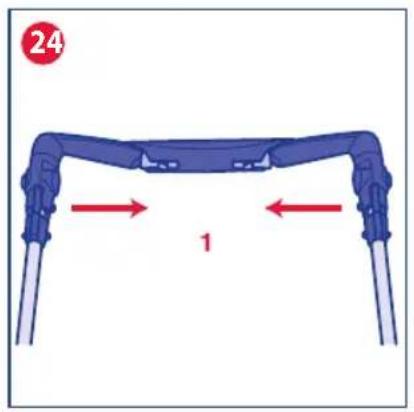
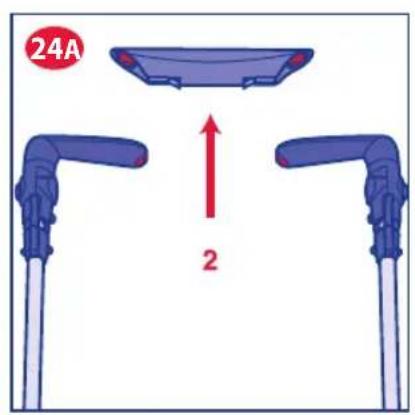
JOINED HANDGRIP
-
To join the handgrips together, match pins A and B with the relevant holes (fig. 23) until you hear the click.
-
To disengage the joined handgrips, press the two central levers inward at the same time (fig. 24) and pull it up and out (fig. 24 A).
WARNING: before using the product with joined handgrips, checks always that they are fastened correctly.
WARNING: Never use the joined handgrips to lift the stroller with your child in it!
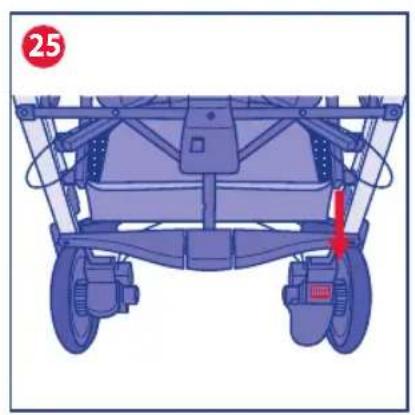
PARKING BRAKE
The parking brake acts on both stroller's rear wheels at the same time. The stroller features a STOP AND GO system to guarantee ease of use; it is marked with coloured stickers
on the rear brake levers.
- To brake the stroller, press the right lever down (fig. 25). A red STOP sticker automatically appears and the opposite lever springs up.
- To release the stroller, press the left lever down (fig. 26). A green GO sticker automatically appears and the opposite lever springs up.
WARNING: Always apply the brakes whenever the stroller is stopped. Never leave the stroller on a sloped surface, with a child inside, even with the parking brakes engaged.
WARNING: After operating the brake lever, ensure that the brakes are correctly engaged in both of the rear wheel units.
SWIVEL WHEELS
The stroller has front swivel/fixed wheels. It is recommended to use the wheels in the fixed mode on particularly changeable surfaces. The use of the wheels in the swivel mode is recommended in order to increase the control of the stroller on a normal road surface.
27. To make the front wheels swivel, push the front lever down with your foot as shown in fig. 27. To block the front wheels in fixed mode, raise the lever with your foot. On fixed mode, all the wheels will remain locked in straight position.
WARNING: Both wheels must always be locked or unlocked at the same time.
WARNING: When opening the stroller, make sure that your child or other children are at a safety distance. Ensure that during these operations the moving parts of the stroller will not come into contact with your child. The stroller can be closed either forward or parent facing. The instructions are the same for both positions.
Before closing the stroller, close the hood by aligning it with the backrest.
WARNING: Always disengage the joined handgrips (if present) before closing the stroller.
WARNING: You must remove all contents from the basket before closing the stroller.
- To close the stroller, press button 1 – push (fig 28) and at the same time press button 2 under the wording 2-pull (fig. 28 A). Keeping both buttons pushed, pull up to activate the closing mechanism (fig. 28 B). The stroller is now closed completely (fig. 28 C). To reduce the space occupied by the stroller when closed, recline the back-rest.
WARNING: Once closed, button 1 returns to its starting position (protruding), fig. 28D.
- Tilt the handgrips forward (fig. 29). The closed and locked stroller stands by itself.
USING THE CARRYCOT AND CAR SEAT
This stroller can fit only with Oasys 0+ child car seat and the Love carrycot. They both require the same fastening system to be attached on the structure. To fasten and release the carrycot or child car seat, read the related instructions. Before attaching the child car seat or carrycot, remove the stroller seat.
WARNING: Before using the stroller with the carrycot or child car seat, always make sure that the fastening system is properly locked.
WARNING: If not properly locked, press both white keys on the fitting device of the structure and repeat the fitting procedure checking the complete locking. Otherwise contact the Chicco customer service.
COMFORT KIT
The Comfort Kit comprises 2 shoulder straps and crotch strap.
- Fit the shoulder straps over the straps as shown in figure 30 and insert the crotch strap in the relevant slot (fig. 30 A).
LEG COVER
The leg cover can be used in two different ways.
- The leg cover can be placed over the bumper bar and fastened within the slots as illustrated in fig. 31. Otherwise, you can pass the leg cover's upper part under the bumper bar and fasten it by inserting the buttons through the slots at the sides of the hood (fig. 31A).
BAG
- The bag can be used in two different positions. Option 1: fasten the bag using the two buttons positioned on the sides as shown in fig. 32. Option 2: fasten the bag to the stroller's handgrips passing the shoulder strap through the relevant slots as shown in fig. 32 A.
WARNING: do not overload. The bag must not weight more than 2 kg.
CARRY-ALL BASKET
The stroller is equipped with a spacious basket.
- To attach the basket on the stroller, insert the fabric strip placed on the front in the relevant slot and fasten the button (fig. 33). Repeat this operation on the other side.
- Fasten the basket also on the rear by fastening the fabric strip on the tube shown in fig. 34 by using the button. Insert the velcro in the relevant space and fold it on the basket (fig. 34 A).
RAIN COVER
The stroller is equipped with a rain cover.
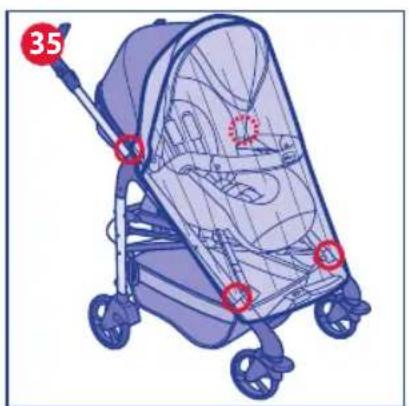
- Attach the rain cover on the stroller using the slots in the fabric located above the joint of the lateral tubes and the snap buttons located above the front wheels (fig. 35). After use, if wet, let the rain cover to dry before folding and storing it. The rain cover can be used both forward facing and parent facing.
WARNING: The rain cover cannot be used on the stroller without hood, as it may cause suffocation. When the rain cover is fitted on the stroller, never leave it exposed to direct sunlight with the child inside, as the temperature will rise considerably.
Important Note: The pictures and instructions contained in the booklet are referred to the complete stroller model. Some of the components and functions described here may vary depending on the model purchased.
WARRANTY
The product is guaranteed against any conformity defect in normal conditions of use as provided for by the instructions for use. The warranty shall not therefore apply in the case of damages caused by improper use, wear or accidental events.
For the duration of warranty on conformity defects please refer to the specific provisions of national laws applicable in the country of purchase, where provided.

NOTICE D'EMPLOI
IMPORTANT - CONSERVER CES INSTRUCTIONSPOUR CONSULTATION ULTÉRIEURE.
ATTENTION : TENIRLESEMBALLAGES EN PLASTIQUE HORS DE PORTÉE DES ENFANTS POUR ÉVITER TOUT RISQUE DE SUFFOCATION.
AVERTISSEMENTS
RÅD FÖR RENGÖRING OCH SKÖTSEL
SAMMANKOPPLINGSHANDTAG
INDSTILLING AF RYGLÆN
LUKNING AF KLAPVOGNEN
RÅD FOR RENHOLD OG VEDLIKEHOLD
- اIncreasing toward the world's goal of the world's goal of the world's goal of the world's goal of the world's goal of the world's goal of the world's goal of the world's goal of the world's goal of the world's goal of the world's goal of the world's goal of the world's goal of the world's goal of the world's goal of the world's goal of the world's goal of the world's goal of the world's goal of the world's goal of the world's goal
ARTSANA UK Ltd. 2nd Floor 1 Imperial Place Maxwell Road Borehamwood Hertfordshire - WD6 1JN 01623 750870 (office hours) www.CHICCO.uk.com

ARTSANA SPAIN S.A.U. C/Industria 10 Pol. Industrial Urtinsa Apartado De Correos 212 - E 28923 Alcorcon (Madrid)-Spain 902 117 093 www.CHICCO.es

ARTSANA PORTUGAL S.A. Rua Humberto Madeira, 9 2730-097 Queluz De Baixo Barcarena Portugal 21 434 78 00 800 20 19 77 www.CHICCO.pt

ARTSANA BELGIUM N.V. Temselaan 5 B-1853 Strombeek - Bever Belgium +32 23008240 www.CHICCO.be

ARTSANA INDIA PRIVATE LIMITED, 7Th Floor, Tower B, Paras Twin Towers, Golf Course Road, Sector 54 Gurgaon - 122002 - Haryana, India (+91)(124)(4964500) www.CHICCO.in

ARTSANA S.p.A. Via Saldarini Catelli, 1 22070 Grandate (CO) - Italy Tel. (+39) 031 382 111 Fax (+39) 031 382 400 www.CHICCO.com
NOTE


Apri il lettore di QR-Code sul tuo cellulare, inquadra il codice con la fotocamera e scopri il video dimostrativo.
EN Open the QR-Code reader on your cell phone, focus on the code with the camera and watch the demonstration video.
Ouvrez le lecteur de QR-Code sur votre mobile, encadrez le code avec la caméra et découvrez le film de démonstration.
DE Öffnen Sie den QR-Code-Leser auf Ihrem Handy, richten Sie die Kamera auf den Code und entdecken Sie das Demo-Video.
ES Abra el lector de códigos QR en su móvil, apunte la cámara hacia el código y descubra el video demostrativo.
PT Abra o leitor de Código QR no seu telemóvel, enquadre o código com a câmara e descubra o vídeo de demonstração.
Open het gedeelte met de QR-code op je mobiele telefoon. Scan de code met je fototoestel en ontdek de demonstratie-video.
Öppna läsaren för QR-koden på din mobil, zooma in koden med kameran för att se videon.
NO
Äpne QR kodeleseren på mobiltelefonen din, pek med kameraet mot koden og se demonstrasjonsvideoen.
DA Tænd for QR-Code aflæseren på din mobiltelefon, fokusér på koden med kameraet og se demovideoen.
Käynnistä matkapuhelimesi QR-koodinlukija, kohdista kamera koodlin ja katso esittelyvideo.
CZ Spustte čtečku QR kódů na vašem mobilním telefonu, kamerou načtěte kód a prohlédněte si předváděcí video.
Włącz czytnik kodu QR w telefonie komórkowym, skieruj aparat cyfrowy telefonu na kod i odkryj film pokazowy.
ΕΛ Ανοίξτε τον αναγνώστη QR-Code οτο κινητό τηλέφωνό οας, πλαιοιώστε τον κωδικό με την κάμερα και δείτε το βίντεο επίδειξης.
Cep telefonunuzun QR-Kod okuyucuyu açınız, kodun fotoğrafını çekiniz ve açıklayıcı videoyu keşfediniz.
Открыть считывающее устройство QR-Code на своем мобильном телефоне, навести на код фотокамеру и посмотреть демонстрационный видеоролик.
BG Отворете QR код четеца на вашия мобилен телефон, насочете към него фотокамерата и открийте демонстрационното видео.
Відкрити пристрій, що зчитує QR-Code, на власному мобільному телефоні, навести на код фотокамеру і подивитися демонстраційний відеоролик.
BR Abra o leitor de código QR em seu celular, enquadre o código com a câmera e descubra o vídeo de demonstração do produto.