
Liteway 2 - Stroller CHICCO - Free user manual and instructions
Find the device manual for free Liteway 2 CHICCO in PDF.


| Product type | Compact stroller |
| Brand | Chicco |
| Model | Liteway 2 |
| Recommended age | From 6 months up to 15 kg |
| Maximum child weight | 15 kg |
| Stroller weight | 6.5 kg |
| Folded dimensions | 30 x 30 x 110 cm |
| Unfolded dimensions | 85 x 50 x 105 cm |
| Wheels | 4 double plastic wheels, front swivel |
| Suspension | No |
| Brake | Parking brake on rear wheels |
| Backrest adjustment | Multiple positions up to nearly reclined |
| Harness | 5-point |
| Canopy | With visibility window |
| Footrest | Adjustable |
| Storage basket | Under the stroller |
| Handlebar | Ergonomic grip |
| Folding mechanism | One-hand fold, compact |
| Self-standing | No |
| Car seat compatibility | No (adapters not included) |
| Care and cleaning | Clean with a damp cloth and mild soap. Do not use abrasive products. |
| Safety | Compliant with EN 1888-1:2018 standards |
| Spare parts and reparability | Available from Chicco customer service |
Frequently Asked Questions - Liteway 2 CHICCO
User questions about Liteway 2 CHICCO
0 question about this device. Answer the ones you know or ask your own.
Ask a new question about this device
Download the instructions for your Stroller in PDF format for free! Find your manual Liteway 2 - CHICCO and take your electronic device back in hand. On this page are published all the documents necessary for the use of your device. Liteway 2 by CHICCO.
USER MANUAL Liteway 2 CHICCO
L I T E W A Y ^2

natural_image
Illustration of a blue children's stroller with adjustable arms and wheels (no text or symbols)
natural_image
Illustration of a hand using a mechanical device to lift a circular component, with no visible text or symbols.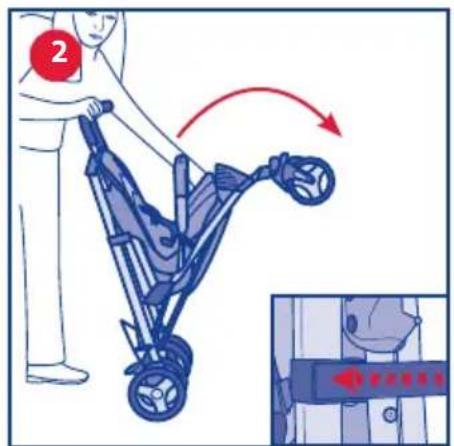

natural_image
Top-down technical illustration of a car seatbelt device (no text or symbols visible)
natural_image
Illustration of hands adjusting a blue belt buckle with a red directional arrow (no text or symbols)
natural_image
Illustration of hands adjusting a blue plastic buckle (no text or symbols visible)
natural_image
Illustration of a mechanical device with a red circular mark and blue outline (no text or symbols)
natural_image
Illustration of a hand adjusting a seatbelt with a red arrow indicating the angle (no text or symbols present)
natural_image
Illustration of a stroller with attached arm and legs, showing no text or symbols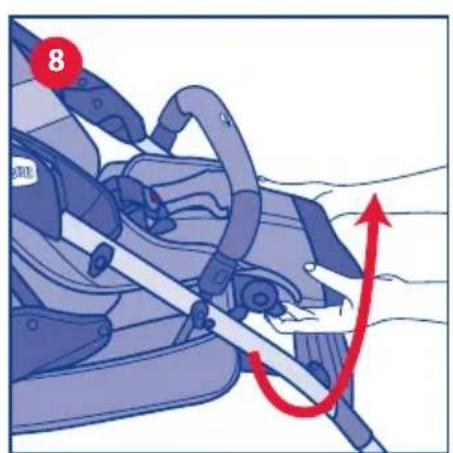

natural_image
Illustration of a hand adjusting a car wheel on a bicycle (no text or symbols visible)
natural_image
Illustration of a stroller with wheels and a hand operating it, showing a red arrow indicating motion (no text or symbols)
natural_image
Mechanical diagram showing a wheel assembly with a red arrow indicating motion direction (no text or symbols)
natural_image
Illustration of a blue bicycle steering wheel with a red double-headed arrow indicating vertical motion (no text or symbols)
natural_image
Illustration of a person wearing a seatbelt and holding a device, with no visible text or symbols.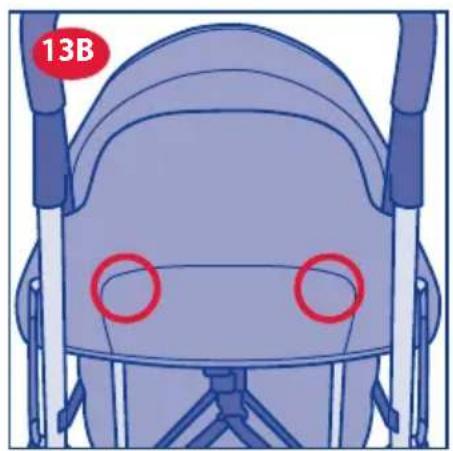
natural_image
Illustration of a stylized robot head with red circles highlighting eyes, labeled '13B' in the top-left corner (no other text or symbols)

natural_image
Illustration of a garment pattern with a red circle and dashed seam, no text or symbols present
natural_image
Illustration of a blue bicycle seatbelt with a red circular head and a red belt (no text or symbols)
natural_image
Illustration of a stroller with wheels and a hand adjusting the seat (no text or symbols)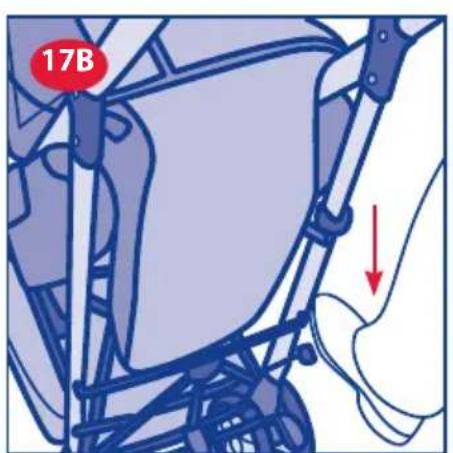

natural_image
Illustration of a person using a stroller with motion arrows indicating movement (no text or symbols)

natural_image
Illustration of a child wearing a stroller with hands adjusting the seat (no text or symbols present)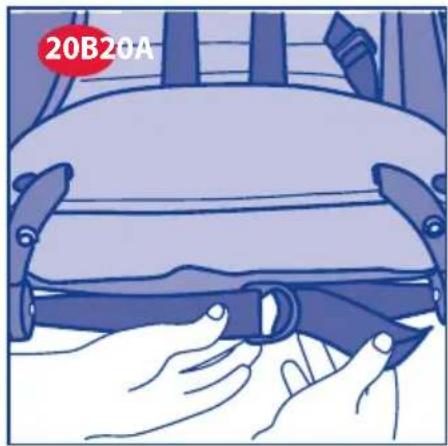
natural_image
Illustration of hands adjusting a seatbelt with a red circular badge labeled '20B20A' (no other text or symbols)

natural_image
Close-up of a hand adjusting a mechanical component with a red circle highlighting a specific area (no text or symbols present)
natural_image
Illustration of a hand holding a blue object against a white background, with a red circular label '21A' in the top-left corner (no other text or symbols)


natural_image
Illustration of a stroller with wheels and a red circular mark on the side (no text or symbols)

natural_image
Illustration of a stroller with a red safety belt and blue frame (no text or symbols)

natural_image
Illustration of a hand adjusting a stroller with red arrows indicating movement or repair points (no text or symbols present)

natural_image
Illustration of a person's leg and foot assembly with mechanical components, no text or symbols present
natural_image
Illustration of a person wearing a full-body seatbelt with hands adjusting the seat (no text or symbols visible)AVVISO IMPORTANTE
IMPORTANTE - TENERE QUESTE ISTRUZIONI PER RIFERIMENTI FUTURI.
ATTENZIONE: PRIMA DELL'USO RI- MUOVERE ED ELIMINARE EVENTUA- LI SACCHETTI DI PLASTICA E TUTTI GLI ELEMENTI FACENTI PARTE DELLA CONFEZIONE DEL PRODOTTO O CO- MUNQUE TENERLI LONTANI DALLA PORTATA DEI BAMBINI.
AVVERTENZE
IMPORTANT- KEEP THESE INSTRUCTION FOR FUTURE REFERENCE.
WARNING: BEFORE USE, REMOVE AND DISPOSE OF ALL PLASTIC BAGS AND PACKAGING MATERIALS AND KEEP THEM OUT OF REACH OF CHILDREN.
WARNINGS
- WARNING: Before assembly, check that the product and all of its components have not been damaged during transportation. Should any part be damaged do not use and keep out of reach of children.
- WARNING: Never leave your child unattended.
- WARNING: Ensure that all the locking devices are engaged before use.
- WARNING: To avoid injury ensure that your child is kept away when unfolding and folding this product.
- WARNING: Do not let your child play with this product.
- WARNING: Always use the restraint system.
- WARNING: This product is not suitable for running or skating.
- The stroller use is designed for children aged between 0 and 36 months and weighing up to 15 kg.
- It is recommended to use the back-rest in completely reclined position for children from birth up to 6 months.
- The parking device shall be engaged when placing and removing the children.
- Do not overload the storage basket. Maximum weight 3 kg.
- Any load attached to the handle and/or on the backrest and/or the sides of the vehicle will affect the stability of vehicle.
- Do not carry more than one child at a time.
- Do not use accessories, replacement parts, or any component not supplied or approved by the manufacturer / distributor.
- Is necessary to utilise crotch strap and safety harness in order to guarantee safety to your child. Always use the safety harness in combination with the crotch strap.
- Ensure that during these operations the moveable parts of the stroller do not come into contact with your child.
- Never leave the stroller on a sloped surface, with a child on board, even with the brakes engaged.
- Never use the stroller on staircases or escalators: you could suddenly lose control of it.
- When unused, the stroller should be kept out of reach of children.
• This product must only be used by an adult.
• The product must be assembled by an adult.
- Do not let other children play un-attended close to the stroller or climb on it.
• Make sure that the person using the stroller knows how to do it in the safest way.
• After removal of the safety harness (e.g. for washing), ensure that the harness is reassembled correctly
using the anchorage points. The harness must be re adjusted. To make sure the harness straps are fitted correctly (on the rear surface of the seat), place the child inside, fasten the straps and then pull the ends of the straps firmly.
• Always apply the brakes whenever the stroller is stopped.
- To avoid all strangulation risks, never give children objects with cords or strings attached, or leave them with in proximity of such objects.
• Always pay attention when going up and down steps or pavements.
- If the stroller has been exposed directly to sunlight for a long time, you must let it cool down before placing your child inside of it. Prolonged exposure to direct sunlight may cause the colour of the materials and fabric to fade.
- Do not use this product if some parts are broken, torn or missing.
- Prevent the stroller from contact with salty water. It might cause the formation of rust.
- Do not use the stroller on the beach.
TIPS FOR CLEANING AND MAINTENANCE
This product requires periodical maintenance. Cleaning and maintenance operations must be carried out by an adult.
CLEANING
The cover can be removed (please refer to the section "How to Remove the Fabric Cover"). Please refer to the care labels for instructions on how to clean the fabric parts. Below are the cleaning symbols and their meanings:

Wash by hand in cold water

Do not bleach

Do not tumble dry

Do not iron

Do not dry clean
Periodically wipe clean plastic parts with a soft damp cloth. Always dry the metal parts to prevent the formation of rust if the folding cot has come into contact with water.
MAINTENANCE
Lubricate the moving parts only if necessary, with a light application of a silicone based lubricant. Regularly check the condition of the wheels and, keep them clean of dust and sand. To avoid friction that may prevent correct operation of the stroller, make sure that all the movable plastic parts along the metal frame are clean of dust, dirt or sand. Keep the stroller in a dry place.
GENERAL INSTRUCTIONS
HOW TO ASSEMBLE THE FRONT WHEELS
- Assemble the front wheel, inserting it into the appropriate joint. A click will be heard, indicating that it is locked correctly into position (fig. 1). Repeat this operation with the other wheel.
WARNING: Before use, ensure that the wheels are locked correctly.
WARNING: When opening the stroller, make sure that your child or other children are at a safety distance.
Make sure that during these operations the moving parts of the stroller will not come into contact with your child
-
Release the closing device and push the front part of the stroller forward (fig. 2).
-
Push the rear primary locking mechanism downward with your foot (fig. 3).
WARNING: Before use, ensure that the stroller is locked in the open position, by checking that the rear locking mechanism is effectively locked.
HOW TO USE THE SAFETY HARNESS
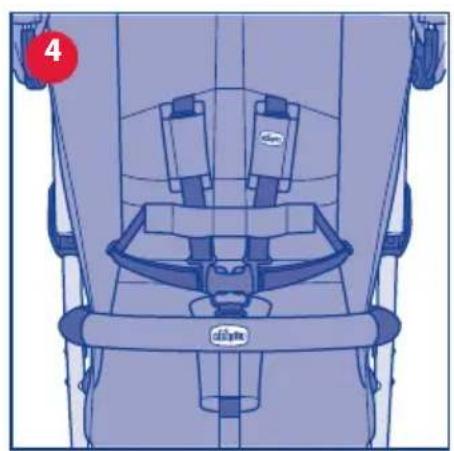
This stroller has a five-point safety harness featuring two shoulder straps, two adjustment holes, a waist strap and a crotch strap with buckle.
After removal of the safety harness (e.g. for washing), ensure that the harness is reassembled correctly using the anchorage points. The harness must be re adjusted.
WARNING: When carrying children up to 6 months of age, the shoulder straps must be passed through the 2 adjuster slots.
- If necessary, adjust the height of the shoulder straps, inserting them into the adjustment hole, as shown in fig. 4. After sitting your child in the stroller, fasten the safety harness, first inserting the two prongs into the hole located on the shoulder straps (fig. 4A and 4B) and then into the buckle of the crotch strap (fig. 4C). Adjust the length of the straps, ensuring that they adhere to the child's shoulders and body correctly. To unfasten the waist strap, press and pull the side prongs.
WARNING: Children must wear all the time the safety harness. To ensure your child's safety, it is necessary to always use the safety harness.
HOW TO ADJUST THE BACKREST
The backrest can be adjusted to 5 positions.
-
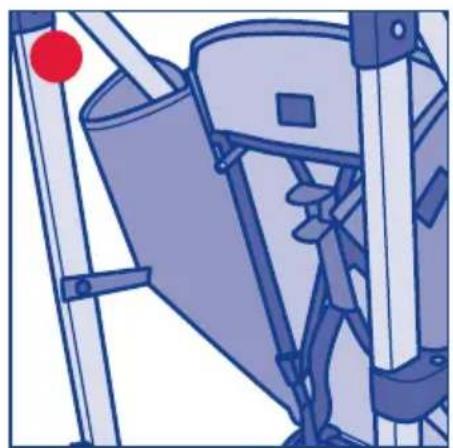
Fit the two fabric panels to the rear tubes by fastening the two press studs, as shown in Fig. 5.
-
To adjust the inclination of the backrest, press the but-
ton located on the backrest. Release the button to lock the backrest in the nearest position (Fig. 6).
- To raise the backrest to the desired position, simply push it upwards (Fig. 7).
WARNING: The child's weight can make these operations more difficult.
HOW TO ADJUST THE LEGREST
The stroller's legrest can be adjusted in 2 positions for your child's improved comfort.
-
To adjust the position of the legrest, turn the two lateral levers up until you reach the horizontal locking position (fig. 8).
-
To return to the starting position, press the lateral buttons (fig. 9).
WARNING: The legrest does not have the function to retain the child.
REAR BRAKES
The rear wheels have linked brakes, which can be applied simultaneously to the two rear wheels by using just one pedal.
-
To apply the brakes, push one of the two levers located at the centre of the rear wheel units in a downward direction, as shown in fig. 10.
-
To unlock the braking system, push one of the two levers located at the centre of the rear wheel units in an upward direction, as shown in fig. 11.
WARNING: Always apply the brakes whenever the stroller is stopped. Never leave the stroller on a sloped surface, with a child inside, even with the parking brakes engaged.
WARNING: After operating the brake lever, ensure that the brakes are correctly engaged in both of the rear wheel units.
FRONT SWIVEL WHEELS
The stroller has front swivel/fixed wheels. It is recommended to use the wheels in the fixed mode on particularly changeable surfaces. The use of the wheels in the swivel mode is recommended in order to increase the control of the stroller on a normal road surface
- To use the front wheels in the swivel mode, push the front lever in an upward direction with your foot, as shown in fig. 12. To use the front wheels in the fixed mode, lower the lever with the foot. The wheel will lock in the straight position, regardless of its previous position.
WARNING: Both wheels must always be locked or unlocked at the same time.
SUMMER/WINTER HOOD
- To fit the hood, fasten the plastic clip in the appropriate positions, as shown in fig. 13A. To complete fitting the hood on the seat, fasten the rear part of the hood on the back of the stroller backrest using the relevant buttons (fig 13B).
WARNING: The hood must be fixed on both sides of the stroller. Ensure that the hood is correctly secured into position.
-
Open the hood as shown in fig. 14A. Close the hood pulling the front part towardS you as shown in fig. 14B.
-
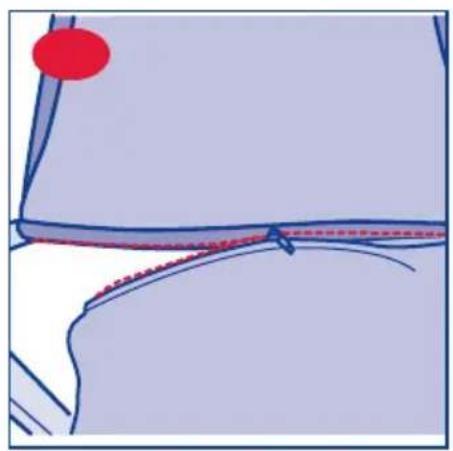
The hood can become a summer sun-canopy. The rear panel may be removed by unfastening the zip and buttons on the rear side of the backrest (fig. 15).
-
The hood features an extractable flap that helps protecting your child from intense light (fig. 16)
HOW TO CLOSE THE CHAIR
WARNING: When opening the stroller, make sure that your child or other children are at a safety distance. Make sure that during these operations the moving parts of the stroller will not come into contact with your child Before closing the stroller, ensure that the storage basket is empty.
-
To close the stroller, pull the rear locking mechanism in an upward direction (fig. 17A), and unlock the pedal, located on the right side of the stroller, with your foot (see fig. 17B).
-
To close the stroller completely, push the handles forward (fig. 18).
-
When the stroller is closed, the locking device located on the side of the stroller will automatically lock it in the close position (see fig. 19), therefore preventing any accidental opening of the stroller.
HOW TO REMOVE THE FABRIC COVER
The fabric cover of the stroller can be removed. 20. To remove the fabric cover, raise the legrest (fig. 20A). Then unfasten the buckle (fig. 20B), the press studs on the seat (fig. 20C) and the velcro straps around the lower part of the backrest bar (fig. 20D); remove the fabric cover, taking care to slide the safety harness through the appropriate hole. 21. Unfasten the press studs located on the rear tubes of the stroller, as shown in fig. 21A. Unfasten the press stud C and remove the two hooks D and E, located under the fabric panel on the side of the stroller (fig. 21B). Lastly, remove the fabric cover from the backrest, pulling it in an upward direction. Follow the steps above in reverse order to fit the lining again.
WARNING: Check regularly that the belt under the seat is tensioned (fig. 20B).
ACCESSORIES
WARNING: The accessories described below may not be available for some versions of this product. Please read carefully the instructions on the accessories available for the model purchased.
STORAGE BASKET
The stroller may come with a storage basket.
- Fasten the basket by passing the front slots through the supports A. Fasten the velcro straps around the tubes B; Then pass the rear straps around the tubes C and fasten the press studs (fig. 22).
WARNING: Do not overload the storage basket. Maximum weight 3 Kg.
RAIN COVER
The stroller may come with a rain cover.
- To fit the rain cover, pass the straps around the tubes of the stroller in the positions shown in fig. 23 and fasten the velcro on the back of the rain cover.
After use, if the rain cover is wet, let it dry in the air before folding the rain cover to store it.
WARNING: Be extremely careful when using the rain cover.
WARNING: Do not use the rain cover if the stroller is not fitted with the hood or sun canopy to prevent the risk of suffocation. When the rain cover is fitted on the stroller, never leave it exposed to direct sunlight with the child inside, as the temperature will rise considerably.
FLEECE FOOTMUFF
Some versions have a fleece footmuff, which is ideal in cold weather.
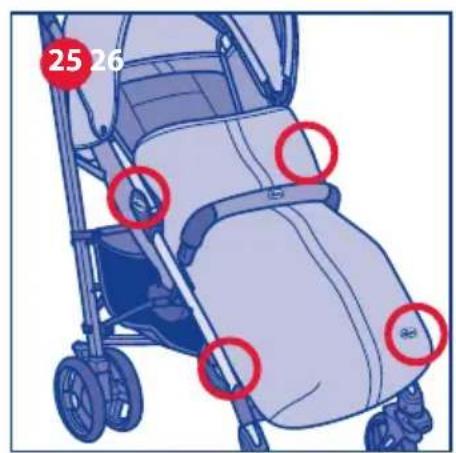
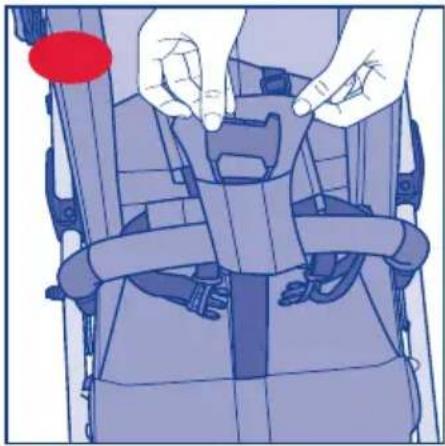
- The footmuff has holes that allow you to slide through the safety harness when you use the footmuff (fig. 24).
- Fit the fleece footmuff as shown in fig. 25, fastening the press studs in the positions shown.
WARNING: Always use the fleece footmuff with the safety harness inserted through the appropriate holes.
WARNING: Check the temperature of the zone where your child is positioned. Do not cover your child too much
LEG COVER
- The footmuff can be used as a legcover by opening the zip and removing the lower part in fleece (fig. 26).
- To fit the leg cover, fasten the clips by wrapping the straps around the stroller's tubes in the positions shown in fig. 27.
BUMPER BAR
- To remove the bumper bar, press the two buttons on the side of the bumper bar (fig. 28) and pull the bar towards you. Open one side of the bumper bar only to seat the child in the stroller more easily.
- To fasten the bumper bar to the structure again, insert the two plastic ends of the bumper bar in the supports as illustrated in fig. 29.
WARNING: Always fasten your child with the safety belts. The bar IS NOT a device for containing your child.
WARNING: The bumper bar must not be used to lift the stroller.
CARRYING HANDLE
- To facilitate carrying the stroller when closed, the stroller features a convenient carrying handle (fig. 30)
COMFORT KIT
The stroller may come with the Comfort Kit consisting of comprises 2 shoulder pads and a crotch strap.
- Fit the pads over the straps as shown in fig. 31A and insert the crotch strap in the relevant slot (fig. 31B).
Important Note: The pictures and instructions contained in the booklet are referred to the complete stroller model. Some of the components and functions described here may vary depending on the model purchased.
WARRANTY
The product is guaranteed against any conformity defect in normal conditions of use as provided for by the instructions for use.
The warranty shall not therefore apply in the case of damages caused by improper use, wear or accidental events.
For the duration of warranty on conformity defects please refer to the specific provisions of national laws applicable in the country of purchase, where provided
AVERTISSEMENT IMPORTANT
IMPORTANT - CONSERVER CES INSTRUCTIONS POUR CONSULTATION ULTÉRIEURE.
AVERTISSEMENT : AVANT L'EMPLOI, ENLEVER ET ÉLIMINER TOUS LES SACS EN PLASTIQUE ET ÉLÉMENTS QUI FONT PARTIE DE L'EMBALLAGE DU PRODUIT ET LES TENIR HORS DE PORTÉE DES ENFANTS.
AVERTISSEMENTS
RÅD FÖR RENGÖRING OCH SKÖTSEL
Expected Agricultural Policy for the 2018-2019 period, it was a general view of the policy.
ARTSANA UK Ltd. 2nd Floor 1 Imperial Place Maxwell Road Borehamwood Hertfordshire - WD6 1JN 01623 750870 (office hours) www.chicco.uk.com

ARTSANA POLAND Sp.zo.o.
Aquarius, Ul. Połczyńska 31 A
01-377 Warszawa
+48 22 290 59 90
www.chicco.com

ARTSANA MEXICO S.A
Dec V. Ruben Dario 1015
Colonia Lomas De Providencia 44647
Guadalajara, Jalisco-Mexico
01800 702 8983
www.chicco.com.mx

Артсана С.п.А.
ARTSANA INDIA PRIVATE LIMITED,
7Th Floor, Tower B, Paras Twin Towers,
Golf Course Road, Sector 54
Gurgaon - 122002
Haryana, India
(+91)(124)(4964500)
www.chicco.in

ARTSANA SUISSE S.A
Stabile la Punta Via Cantonale 2/b
22070 Grandate (CO) - Italy
Tel. (+39) 031 382 111
Fax (+39) 031 382 400
www.chicco.com

ARTSANA BRASIL LTDA.
Rua Major Paladino, N° 128,
Galpão 18

- L I T E W A Y 2
- AVVISO IMPORTANTE
- AVVERTENZE
- WARNINGS
- TIPS FOR CLEANING AND MAINTENANCE
- CLEANING
- MAINTENANCE
- GENERAL INSTRUCTIONS
- HOW TO ASSEMBLE THE FRONT WHEELS
- HOW TO USE THE SAFETY HARNESS
- HOW TO ADJUST THE BACKREST
- HOW TO ADJUST THE LEGREST
- REAR BRAKES
- FRONT SWIVEL WHEELS
- SUMMER/WINTER HOOD
- HOW TO CLOSE THE CHAIR
- HOW TO REMOVE THE FABRIC COVER
- ACCESSORIES
- STORAGE BASKET
- RAIN COVER
- FLEECE FOOTMUFF
- LEG COVER
- BUMPER BAR
- CARRYING HANDLE
- COMFORT KIT
- WARRANTY
- AVERTISSEMENT IMPORTANT
- AVERTISSEMENTS
- RÅD FÖR RENGÖRING OCH SKÖTSEL
Brand : CHICCO
Model : Liteway 2
Category : Stroller