
USB3.0_HZ1 - Other computer accessories ASUS - Free user manual and instructions
Find the device manual for free USB3.0_HZ1 ASUS in PDF.

| Product Type | USB 3.0 Docking Station |
| Brand | ASUS |
| Model | USB3.0_HZ1 |
| Dimensions | 264 x 87 x 29 mm |
| Weight | 299.5 g |
| Power Supply | AC 100-240 V power adapter, output DC 5 V / 4 A |
| USB 3.0 Downstream Ports | 3 Type-A ports |
| USB 3.0 Upstream Port | 1 Type-B port |
| Video Ports | 1 x DVI-D (single link), 1 x VGA, 1 x HDMI |
| Audio Port | 1 x headphone jack, 1 x microphone jack |
| Network Port | 1 x RJ-45 10/100/1000 Mbps |
| Security | 2 Kensington security locks |
| Supported Operating Systems | Windows XP (SP3), Vista (32/64-bit), 7 (32/64-bit) |
| Required Processor | Intel Atom, single/dual/quad Core, i3/i5/i7/Core |
| Package Contents | Docking station, power adapter, USB 3.0 cable, driver CD, user guide |
| Maintenance and Cleaning | Unplug before cleaning, use a dry non-abrasive cloth |
| Spare Parts and Repairability | Contact an authorized ASUS dealer for any defective parts |
Frequently Asked Questions - USB3.0_HZ1 ASUS
User questions about USB3.0_HZ1 ASUS
0 question about this device. Answer the ones you know or ask your own.
Ask a new question about this device
Download the instructions for your Other computer accessories in PDF format for free! Find your manual USB3.0_HZ1 - ASUS and take your electronic device back in hand. On this page are published all the documents necessary for the use of your device. USB3.0_HZ1 by ASUS.
USER MANUAL USB3.0_HZ1 ASUS
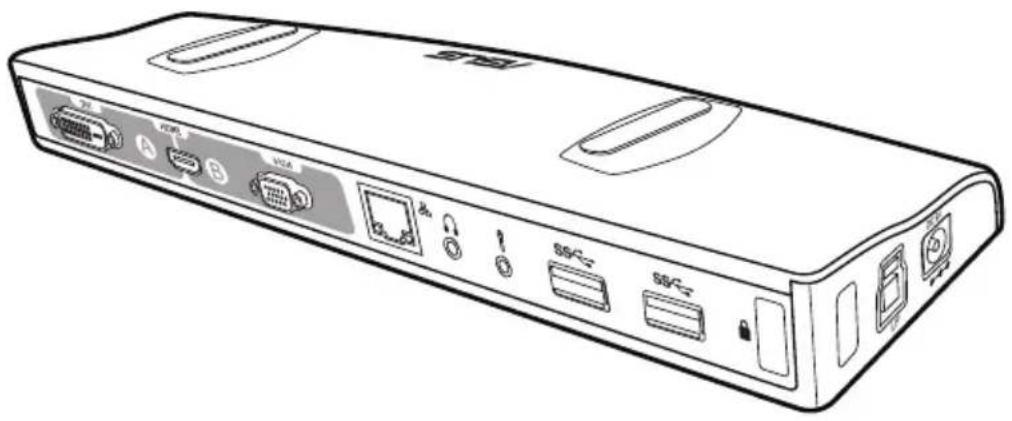
HZ-1 USB 3.0 Docking Station
natural_image
Line drawing of a portable electronic device rear panel with ports and connectors (no text or symbols)User Guide
Table of contents
English....1
Français.... 18
Deutsch 29
Português....40
Español....51
Italiano....62
Українська.... 73
Русский....84
Türkçe....95
簡体中文....106
繁體中文....117
Polski....128
Čeština.... 139
Magyar 150
Slovensky....161
Slovenščina....172
Română 183
ASUS contact information
ASUSTeK Computer Inc.
Address 15 Li-Te Road, Peitou, Taipei, Taiwan 11259
Telephone +886-2-2894-3447
Fax +886-2-2890-7798
E-mail info@asus.com.tw
Online support support.asus.com
ASUS Computer International (America)
Address 800 Corporate Way, Fremont, CA 94539, USA
Telephone +1-510-739-3777
Fax +1-510-608-4555
Web site usa.asus.com
Technical Support
Telephone +1-812-282-2787
Support fax +1-812-284-0883
Online support support.asus.com
ASUS Computer GmbH (Germany and Austria)
Address Harkort Str. 21-23, D-40880 Ratingen, Germany
Fax +49-2102-959911
Web site www.asus.de
Online support support.asus.com
* EUR 0.14/minute from a German fixed landline; EUR 0.42/minute from a mobile phone.
Conventions used in this guide
To ensure that you perform certain tasks properly, take note of the following symbols used throughout this manual.

DANGER/WARNING: Information to prevent injury to yourself when trying to complete a task. complete a task.

CAUTION: Information to prevent damage to the components when trying to complete a task. Complete a task.


Where to find more information
Refer to the following sources for additional information and for product and software updates.
ASUS websites
The ASUS website provides updated information on ASUS hardware and software products. Refer to the ASUS website www.asus.com.
ASUS Local Technical Support
Visit ASUS website at http://support.asus.com/contact for the contact information of local Technical Support Engineer.
| Manufacturer: | ASUSTeK Computer Inc.Tel: +886-2-2894-3447Address: No. 150, LI-TE RD., PEITOU, TAIPEI 112, TAIWAN |
| Authorised representative in Europe: | ASUS Computer GmbHAddress: HARKORT STR. 21-23, 40880RATINGEN, GERMANY |
| Authorised distributors in Turkey: | BOGAZICI BIL GISAYAR SAN. VE TIC. A.S.Tel: +90 212 3311000Address: AYAZAGA MAH. KEMERBURGAZ CAD. NO.10 AYAZAGA/ISTANBUL |
| CIZGI Elektronik San. Tic. Ltd. Sti.Tel: 0090 2123567070Address: CEMAL SURURI CD. HALIM MERIC IS MERKEZI No:15/C D: 5-6 34394 MECIDIYEKOY/ISTANBUL |
Notices

Federal Communications Commission Interference Statement
This equipment has been tested and found to comply with the limits for a Class B digital device, pursuant to Part 15 of the FCC Rules.
These limits are designed to provide reasonable protection against harmful interference in a residential installation.
This equipment generates, uses, and can radiate radio frequency energy and, if not installed and used in accordance with the instructions, may cause harmful interference to radio communications.
However, there is no guarantee that interference will not occur in a particular installation.
If this equipment does cause harmful interference to radio or television reception, which can be determined by turning the equipment off and on, the user is encouraged to try to connect the interference by one or more of the following measures:
• Reorient or relocate the receiving antenna.
- Increase the separation between the equipment and the receiver.
- Connect the equipment to an outlet on a circuit different from that to which the receiver is connected.
- Consult the dealer or an experienced radio/TV technician for help.

CE Mark Warning
This is a Class B product, in a domestic environment, this product may cause radio interference, in which case the user may be required to take adequate measures.
Safety Certifications

C-Tick Mark: N13219

BSMI Certification

Complying with the REACH (Registration, Evaluation, Authorisation, and Restriction of Chemicals) regulatory framework, we published the chemical substances in our products at ASUS REACH website at http://green.asus.com/english/REACH.htm.
CAUTION: Do not throw this product in municipal waste. This product has been designed to enable proper reuse of parts and recycling. This symbol of the crossed out wheeled bin indicates that the product (electrical and electronic equipment) should not be placed in municipal waste. Check local regulations for disposal of electronic products.
CAUTION: Do not throw the battery in municipal waste. This symbol of the crossed out wheeled bin indicates that the battery should not be placed in municipal waste.
ASUS Recycling/Takeback Services
ASUS recycling and takeback programs come from our commitment to the highest standards for protecting our environment. We believe in providing solutions for you to be able to responsibly recycle our products, batteries, other components as well as the packaging materials. Please go to http://csr.asus.com/english/Tackback.htm for the detailed recycling information in different regions.
Knowing your HZ-1 USB 3.0 docking station
Package contents
• ASUS Docking Station x1
- Power adapter x1
- Driver CD x1
- USB 3.0 cable x1
- User Guide x1

If any of the items is damaged or missing, contact your retailer.
Specifications summary
| Ports | USB 3.0 downstream port for a USB 3.0 device(Type A receptacle) x3Microphone port x1Headphone port x110/100/1000Mbps LAN (RJ-45) port x1DVI-D (Single Link) port x1VGA port x1HDMI port x1DC IN port x1USB 3.0 upstream port for a notebook/desktop computer(Type B receptacle) x1 |
| Security solution | Security lock hole x2 |
| Power adapter | Input: AC 100-240VOutput: DC 5V/4A |
| Physical dimensions | 264 x 87 x 29 mm (L x W x H) |
| Weight | 299.5g |
| OS Support | Windows® XP (SP3) / Windows® Vista (32 bit/64 bit) / Windows® 7 (32 bit/64 bit) |
| CPU Requirement | Intel® based PCs (Atom N270, Single / Dual / Quad Core, i3 / i5 / i7 / Core CPUs) |

• Specifications are subject to change without prior notice.
- The software's performance depends on the processing power's availability, as well as the operating system in use. More system capability provides better performance.
Hardware features
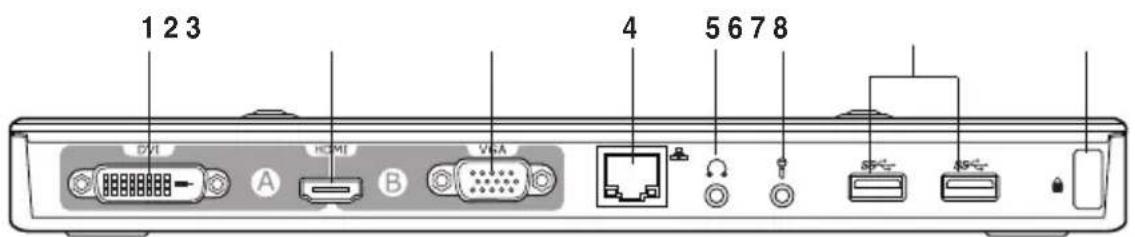
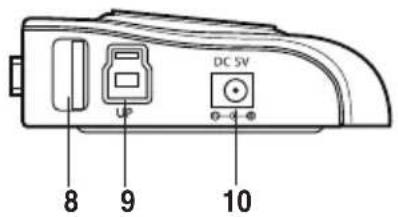
Back view
Left side view
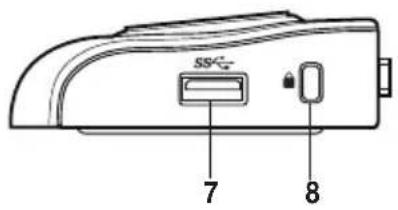
Right side view
| 1 DVI-D (Single Link) portConnects to a DVI-D monitor or other DVI-D compatible devices. |
| 2 HDMI portConnects to an HDMI monitor or other HDMI compatible devices. |
| 3 VGA portConnects to a VGA monitor or other VGA compatible devices. |
| 4 10/100/1000Mbps LAN (RJ-45) portConnects to a cable/DSL modem or a local area network (LAN). |
| 5 Headphone portConnects to a pair of headphones or a speaker. |
| 6 Microphone portConnects to a microphone. |
| 7 Standard USB 3.0 downstream portConnects to a USB 3.0 device such as a mouse and joystick. |
| 8 Security lock holeSecure your docking station to an immovable object using a security lock. |
| 9 USB 3.0 upstream portConnects and passes data to your computer. |
| 10 DC IN portInsert the power adapter into this port to supply power to your docking station and the devices connected to it. |
Installing your HZ-1 USB 3.0 docking station
Installing the drivers
- Place the Driver CD into your computer's optical drive.
- Click Setup.exe.
- Select your language and click I Accept.
- Wait until the drivers are installed successfully in your computer.

- It is normal if your computer screen goes black or flashes temporarily during the driver installation process.
- Ensure that you install the driver before connecting the docking station to your computer.
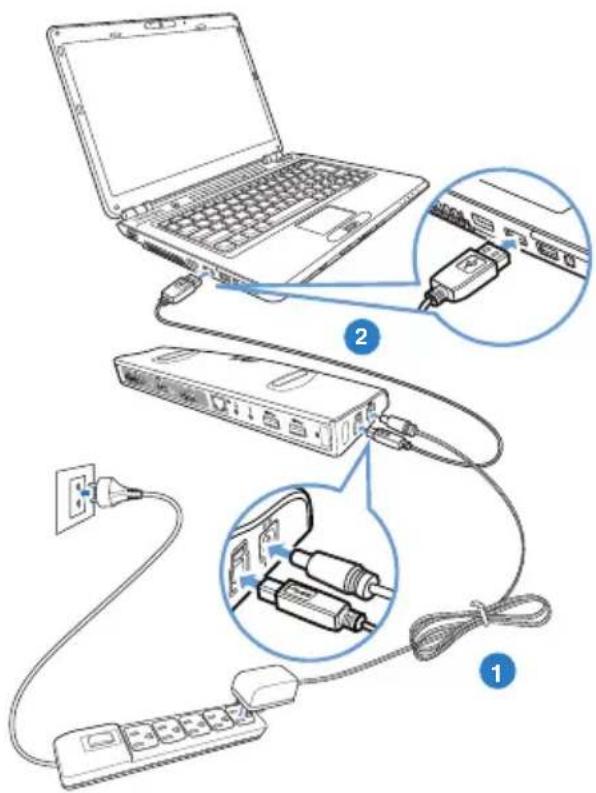
Setting up your docking station
To set up your docking station:
- Connect one end of the bundled power adapter to the DC IN port on your docking station and the other end to a 100-240V AC power outlet.

Use only the bundled power adapter. Using other power adapters may damage your device.
- Connect the square end of the bundled USB 3.0 cable to the USB 3.0 upstream port on your docking station and the other end to your computer's USB 3.0 port.
Using your HZ-1 USB 3.0 docking station

While using your docking station, keep it connected to a power outlet. Otherwise, the devices connected to it will not function properly.
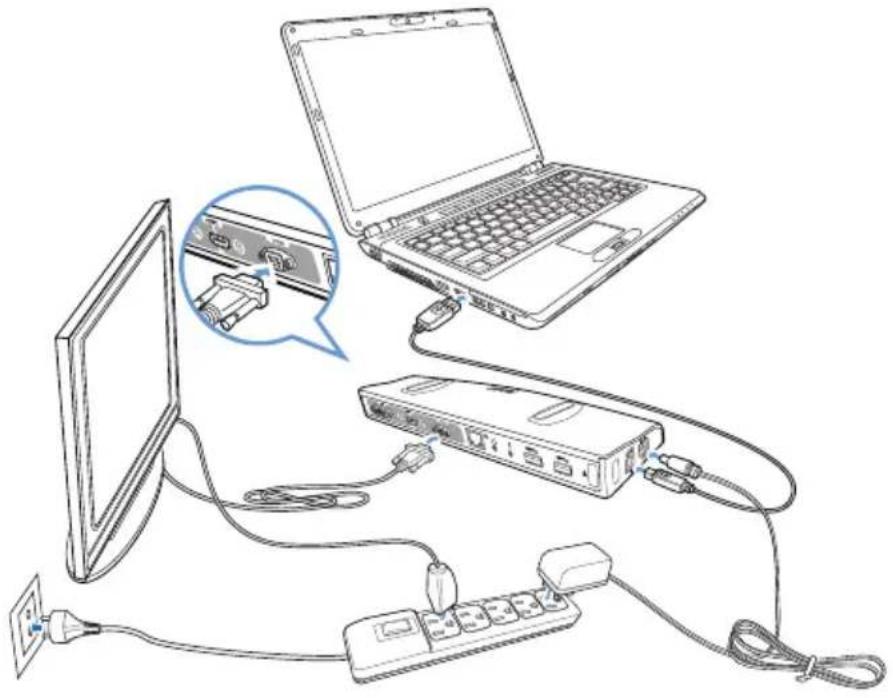
Connecting an external monitor
Use a VGA, an HDMI, or a DVI-D cable to connect an external monitor to your docking station.
natural_image
Line drawing of a laptop connected to a network device via cables, with an inset showing a close-up of the cable (no text or symbols present)To connect external monitor to your docking station, specify the dual output connection mode:
VGA + HDMI
• HDMI + DVI-D

- The VGA / HDMI / DVI-D cable and HDMI-to-DVI converter are purchased separately.
- Do not connect the monitors to the VGA, HDMI, and DVI-D ports simultaneously. It may cause unexpected error in your monitor configuration.
- Refer to Release Note.txt in the Driver CD for more information on the video feature of your docking station.
- Use an HDMI-to-DVI converter in connecting two DVI interface monitors.
- Use an HDMI-to-DVI converter in connecting one VGA and one DVI interface monitors.
The following table shows the HZ-1 USB 3.0 Docking Station's connection:
| External Monitor Cable Connection Type | Docking Video Output | |||
| Video Output Section A Video Output Section B DVI HDMI VGA HDMI | ||||
| VGA | ☒ | ☒ | ☒ | ☒ |
| DVI-D | ☒ | ☒ | ☒ | ☒ |
| DVI-I | ☒ | ☒ | ☒ | ☒ |
| HDMI | ☒ | ☒ | ☒ | ☒ |
Connection output types:
● : direct connection
☒: different connection interface
■: need to use converter
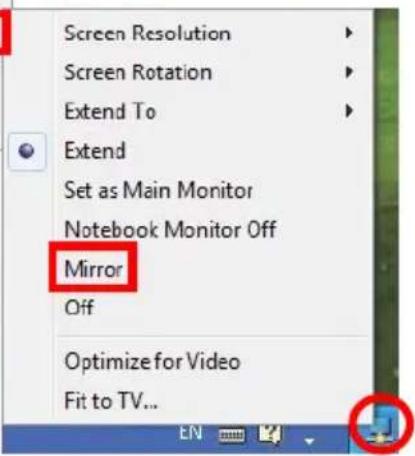
Controlling the display
When the devices are attached, an icon appears in the taskbar. This gives you access to the DisplayLink manager menu.
- From the taskbar, click the Show hidden icons arrow.
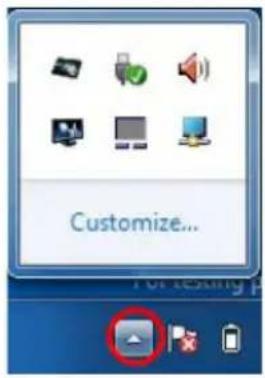
- Click the to show the docking station's menu list.
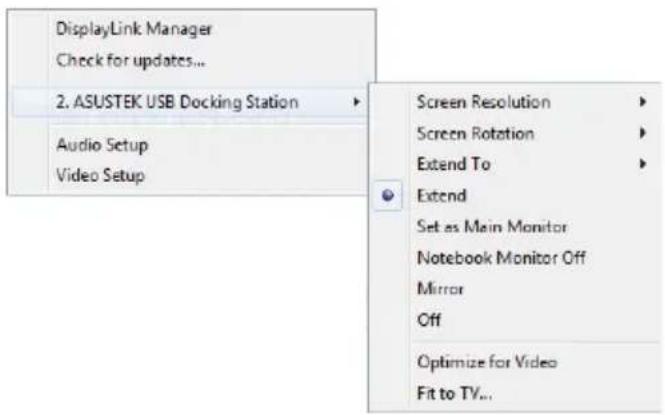
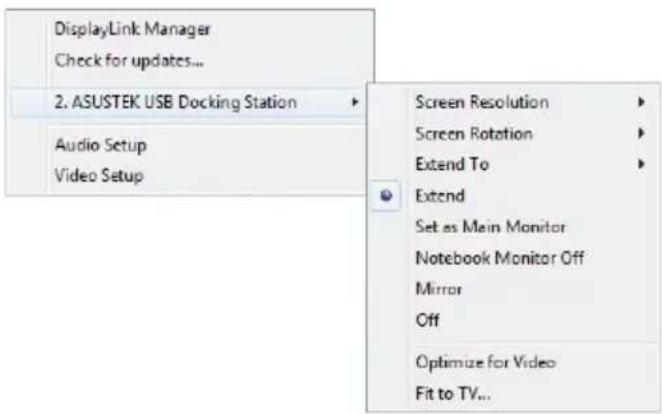
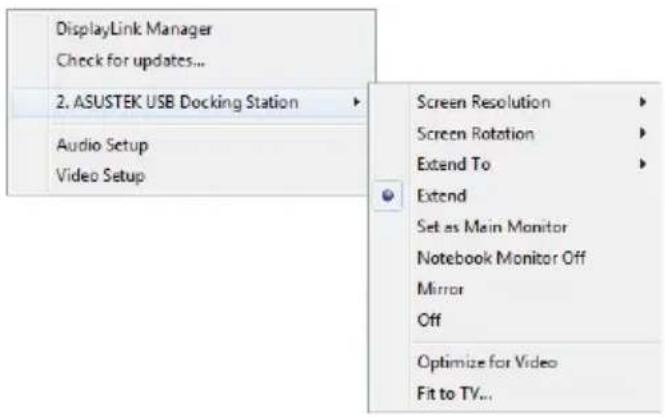
Docking station's functions
| Menu Function | |
| DisplayLink Manager | Click to open and manage your displays using the Windows utility. |
| Check for updates Click | click to check and download the latest driver version from the update server. |
| ASUSTEK USB Docking Station | Click to view and use a list of submenus to enhance the settings of your docking station:Screen Resolution:Click to select the screen resolution.You can set the screen resolution only for the main monitor.Screen Rotation:Click to select the rotation setting for the extended monitor.Extend to:Click to extend your Windows desktop to your extended monitors depending on their positions: Left, Right, Up, or Down.Extend:Click to extend your Windows desktop to the extended monitor.Set as Main Monitor:Click to set the screen as the main displayNotebook Monitor Off:Click to switch off the notebook's display and makes the extended monitor as the main display.This option only appears when one extended monitor is connected to your docking station. This option will only appear in laptop computers.Mirror:Click to reproduce an exact replica of your main display to your extended monitor.The main display's resolution is the same as the extended monitor's resolution.Off:Switches off the displayOptimize for Video:Select this option to enable a better movie playback performance.Only select this option when playing the video content. Texts may appear less clear when enabled.Fit to TV:Click to adjust the size of the desktop on the connected TV screen.This option only works in extended mode.This option is not designed to work on multiple screens.Fit to TV does not support rotated modes. |
| Audio Setup Click to open the Windows Audio Configuration window.Video Setup Click to open the Windows Screen Resolution window. | |
Extending your desktop to an external monitor
Use an external monitor to extend your desktop and have an additional workspace. This allows you to:
- Display one document or application across your computer monitor and external monitor.
- Use each monitor to display a different document or application.

It is normal for your computer screen to go black or flashes temporarily after you change the display mode of your external monitor.
To extend your desktop to an external monitor:

Each time you connect an external monitor to the docking station, a DisplayLink software icon is shown in the Windows notification area. The DisplayLink software allows you to connect and manage an external display.
- Right-click in the notification area to open the DisplayLink menu.
- Click ASUSTEK USB Docking Station.
- Click Extend.

-
In Extend mode, the external monitor cannot be set as the main monitor.
• From the ASUSTEK USB Docking Station menu: -
Click Extend To to specify the position for the display on your external monitor.
- Click Screen Resolution and Screen Rotation to adjust the properties for your external monitor.
- Click Off to disable the display on your external monitor. Click Set as Main Monitor to enable it.
- Click DisplayLink Manager to manage your displays using the Windows ^ utility.

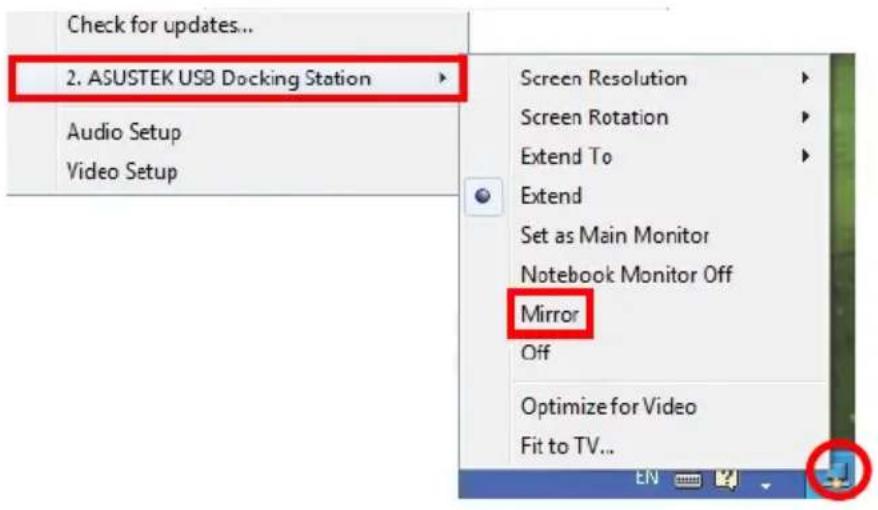
Mirroring your desktop to an external monitor
Use an external monitor to duplicate your desktop area.

NOTE: It is normal if your computer screen goes black or flashes temporarily after you change the display mode of your external monitor.
To mirror your desktop to an external monitor:
- Right-click in the notification area to open the DisplayLink menu.
- Click ASUSTEK USB Docking Station.
- Click Mirror.

- In Mirror mode, the screen resolution and color quality for your external monitor are not user-configurable. The docking station automatically adjusts the settings.
• From the ASUSTEK USB Docking Station menu: - Click Off to disable the display on your external monitor. Click Set as Main Monitor to enable it.
- Click DisplayLink Manager to manage your displays using the Windows ^® utility.
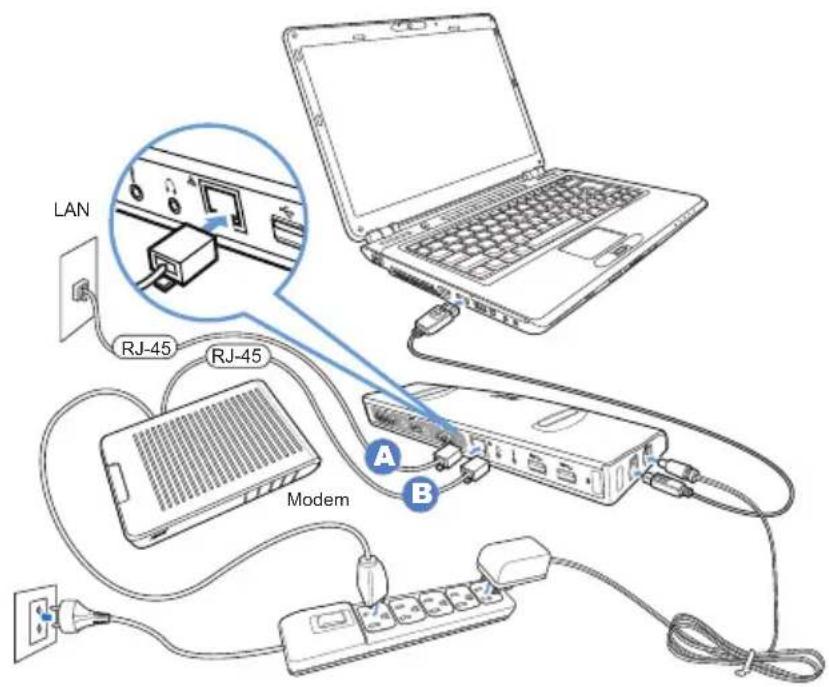
Connecting to the Internet
Use an RJ-45 cable to connect your docking station to a local area network (LAN) (A) or a DSL/cable modem (B).
The yellow LED on the LAN port lights up when there is an Internet connection. The green LED lights up when there is Internet activity.

- If you fail to connect to the Internet using the docking station at your office, check with the network administrator if the MAC address of the docking station is blocked by your company's firewall.
-
Check the bottom of your docking station for its MAC address. You may also obtain the MAC address through the following ways:
-
From the Windows ^ desktop, click Start > All Programs > Accessories > Command prompt.
-
At the command prompt, key in ipconfig -all and then Press
. -
Locate HighSpeed USB-Ethernet Adapter.
• The RJ-45 cable is purchased separately.
Disconnecting your HZ-1 USB 3.0 docking station
You can connect and disconnect the docking station while your computer is running.

• DO NOT disconnect the docking station while data is being transferred between your computer and the docking station. Wait until data transfer has completed.
• DO NOT disconnect the docking station while you are connecting to the Internet via its LAN port. Disconnect the Internet connection first.
To disconnect your USB 3.0 docking station:
• Use the Safely remove hardware feature from the notification area to eject the USB-Ethernet adapter and the connected devices such as a USB flash drive and USB hard disk drive.
• Unplug the docking station from your computer and the power outlet.
natural_image
Line drawing of a laptop connected to a network device via cable, with an inset showing a close-up of the device (no text or symbols present)natural_image
Line drawing of a laptop connected to a network device via cables, with an inset showing a close-up of the cable (no text or symbols present)Ligar à Internet
natural_image
Line drawing of a laptop connected to a network device via cable, with an inset showing a close-up of the device (no text or symbols present)Conectarse a Internet
natural_image
Line drawing of a laptop connected to a network device via cables, with an inset showing a close-up of the cable (no text or symbols present)Mirror del Desktop su un Monitor Esterno
- ASUSTEK USB Docking Station
Audio Setup
Video Setup
Per disconnettere la docking station USB 3.0:
natural_image
Line drawing of a laptop connected to a network device via cable, with an inset showing a close-up of the device (no text or symbols present)Функції док-станції
natural_image
Line drawing of a laptop connected to a network device via cable, with an open inset showing a close-up of the device (no text or symbols present)Функции док-станции
natural_image
Line drawing of a laptop connected to a network device via cables, with an inset showing a close-up of the cable (no text or symbols present)When the devices are attached, an icon appears in the taskbar. This gives you access to the DisplayLink manager menu.
Connecting to the Internet
natural_image
Line drawing of a laptop connected to a computer via cable, showing internal components and wiring (no text or symbols)- 点击 以显示扩展基座菜单列表。
扩展基座功能
连接上网
natural_image
Line drawing of a laptop connected to a network device via cables, showing cable routing and connection points (no text or symbols)- 點選 以顯示擴充基座選單。
擴充基座功能
將您的桌面複製至外接顯示器
使用外接顯示器複製您的桌面區域。
