PPB200BTB - Speaker PEAQ - Free user manual and instructions
Find the device manual for free PPB200BTB PEAQ in PDF.
| Product Type | FM Radio and Bluetooth® Speaker |
| Brand | PEAQ |
| Model | PPB200BTB |
| Dimensions (W x H x D) | 424 x 127 x 100 mm |
| Weight | 1750 g |
| Power Supply | Mains adapter 9 V === / 0.6 A (model K06S090060G); Built-in rechargeable battery (4h charging) |
| Output Power | 2 x 10 W (stereo) |
| FM Radio | Range 87.5 - 108 MHz, auto search, 20 station memory |
| Bluetooth® | Version V3.0+EDR, profiles A2DP and AVRCP, range min. 8 m |
| Connectivity | AUX-IN jack (3.5 mm), USB port (max. 32 GB), microSD slot (max. 32 GB) |
| Supported Audio Formats | MP3 files on USB or microSD (playback from same folder) |
| Additional Functions | Sleep timer, equalizer (Flat, Hip Hop, Jazz, Rock, Classic), bass adjustment, brightness adjustment, RDS clock |
| Care and Cleaning | Unplug before cleaning; slightly damp cloth; avoid harsh products, gasoline, alcohol |
| Safety | Household use only; do not expose to moisture; do not open; use only provided adapter; do not block ventilation |
| Batteries and Environment | Built-in non-replaceable battery; do not dispose in fire; do not short-circuit; WEEE recycling |
| Included Accessories | Mains adapter with DC cable, AUX-IN cable, user manual |
Frequently Asked Questions - PPB200BTB PEAQ
User questions about PPB200BTB PEAQ
0 question about this device. Answer the ones you know or ask your own.
Ask a new question about this device
Download the instructions for your Speaker in PDF format for free! Find your manual PPB200BTB - PEAQ and take your electronic device back in hand. On this page are published all the documents necessary for the use of your device. PPB200BTB by PEAQ.
USER MANUAL PPB200BTB PEAQ
natural_image
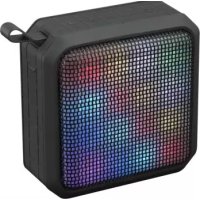
Exterior view of a modern black and silver handheld device with a digital display showing '12:00' (no text or symbols on body)Portable Boombox PPB200BT-B
natural_image
Close-up of a USB cable connector and its digital display showing 190 microcontroller (no text or symbols on device)natural_image
Close-up of a black plug connecting a cable to a white electrical outlet (no text or symbols visible)natural_image
Diagram showing connections between a device labeled 'OV3d' and a smartphone displaying music notes (no text or symbols on the devices themselves)natural_image
Close-up of a smartphone rear panel showing a card slot, ports, and a small SAGS card (no visible text or symbols)natural_image
Close-up of a black office phone with a digital display and antenna (no visible text or symbols)A2DP (Advanced Audio Distribution Profile)
natural_image
Close-up of a USB flash drive and its internal device with musical note (no text or symbols visible)natural_image
Close-up of a device's internal component with a labeled port and indicator arrow (no readable text or symbols)natural_image
Close-up of a device's cable and display screen showing a 90-degree angle indicator (no text or symbols on main components)natural_image
Close-up of a black plug connecting a cable to a white electrical outlet (no text or symbols visible)natural_image
Diagram showing connections between a device labeled 'pV30' and a smartphone displaying music notes (no text or symbols on the devices themselves)natural_image
Close-up of a device's cable connector with a USB port and cable stack (no visible text or symbols)natural_image
Close-up of a device rear panel showing a card slot, ports, and a separate card with an arrow pointing to the slot (no visible text or symbols)natural_image
Close-up of a Bluetooth device with a vertical antenna and control panel (no visible text or symbols)natural_image
Close-up of a device's internal component with a labeled port and indicator finger (no readable text or symbols)Important Safety Instructions. Please read the instructions carefully and keep them for later use.
To reduce the risk of fire or electric shock, do not expose the device to rain or moisture. Do not expose the device to splashes or moisture. Do not place liquid filled objects, e.g. vases, on top of the device.
- This product is only intended for audio entertainment. Do not use the product for any other purpose than described in this manual in order to avoid any hazardous situation. Improper use is dangerous and will void any warranty claim.
- For household use only. Do not use outdoors.
- Danger! Excessive sound pressure from earphones and headphones can cause hearing loss. If you listen to loud music for a long time, your hearing may be impaired. Set to a moderate volume.
- Danger of suffocation! Keep all packaging material away from children.
- Only use under normal room temperature and humidity conditions.
- The product is only suitable for use at moderate degrees of latitude. Do not use in the tropics or in particularly humid climates.
- Outdoor antennas should be located away from power lines.
- Do not move the product from cold into warm places and vice versa. Condensation can cause damage to the product and electrical parts.
- Do not use attachments or accessories other than recommended by the manufacturer or sold with this appliance. Install in accordance with this user manual.
- When installing the product, leave sufficient space for ventilation. Do not install in bookcases, built-in cabinets or the like.
- The ventilation should not be impeded by covering the ventilation openings with items, such as newspapers, table-cloths, curtains, etc. Do not insert any objects
into the product. Do not place any electronic equipment or toys on the product. Such items could fall from the top and cause product damage and/or personal injury.
- Do not install near any heat sources such as radiators, heat registers, stoves or other appliances (including amplifiers) that produce heat.
- Do not apply excessive force to the front or top, as this could ultimately overturn the product.
- Do not shift or move the product when powered on.
- Do not touch, push or rub the surface of the product with any sharp or hard objects.
- Danger! To reduce the risk of fire or electric shock, do not expose this product to rain or moisture.
- The product shall not be exposed to dripping or splashing and no objects filled with liquids, such as vases, shall be placed on the product.
- Care should be taken so that no objects or liquids enter the enclosure through openings.
- No naked flame sources, such as lighted candles, should be placed on the product.
- Refer all servicing to authorised service agent. Do not attempt to repair the product yourself. Servicing is required when the product has been damaged in any way, such as the supply cord or plug are damaged, liquid has been spilled, objects have fallen into the product, the enclosure is damaged, the product has been exposed to rain or moisture, does not operate normally, or has been dropped.
- Before connecting the product to a socket outlet, make sure the voltage indicated on the product corresponds to your local mains.
- If the supply cord is damaged, it must be replaced by the manufacturer or its service agent or similarly qualified person in order to avoid hazard.
- Regularly check if the supply cord, product or extension cable is defective. If found defective, do not put the product into operation. Immediately pull the plug.
- Place the supply cord and, if necessary, an appropriate extension cable in such away that pulling or tripping over it is impossible. Do not allow the supply cord to hang down within easy reach.
- Do not jam, bend or pull the supply cord over sharp edges.
- Use only power supplies listed in the user instruction.
- The adaptor power plug is used as the disconnect device; the disconnect device shall remain readily operable. To completely disconnect the power input, disconnect the adaptor power plug.
- The product may not function properly or not react to the operation of any control due to electrostatic discharge. Switch off and disconnect the appliance; reconnect after a few seconds.
- Protect the supply cord from being walked on or pinched particularly at the plug, convenience receptacles and the point where it exits from the product.
- Never pull the adaptor power plug by the supply cord or with wet hands.
- Disconnect the adaptor power plug in case of faults during use, during lightening storms, before cleaning and when not using the product for a longer period of time.
- Danger! Before cleaning, switch the product off and disconnect the adaptor power plug from the socket.
- When the product has reached the end of its service life, make it defective by disconnecting the adaptor power plug from the socket and cutting the cord in two.
- Please refer the information on exterior bottom enclosure for electrical and safety information before installing or operating the apparatus.
- Rating label position: On the bottom of the radio.
- Never expose rechargeable batteries to excessive heat (e.g. bright sun, fire), and never throw them into fire. The rechargeable batteries could explode.
- The rechargeable battery is permanently built into the product and cannot be replaced
- Never short-circuit the contacts of the rechargeable battery. Do not throw the rechargeable battery or the product into fire. There is a danger of fire and explosion!
- Never charge the rechargeable battery of the product unattended.
Intended use
This product is intended for audio playback via Bluetooth®, FM-Radio, audio input (AUX IN), USB or microSD memory. Any other use may result in damage to product or injuries. The Imtron GmbH assumes no liability for damage to the product, for property damage or for personal injury due to careless or improper usage of the product, or usage of product which does not meet the manufacturer's specified purpose.
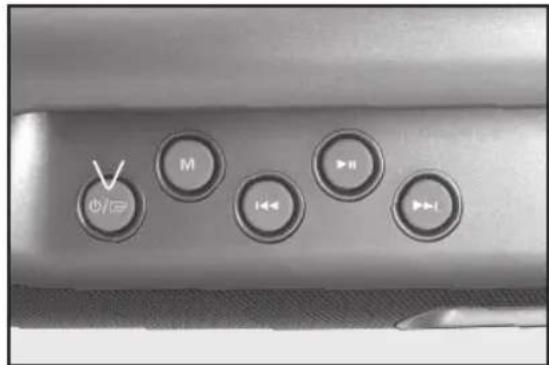
Components
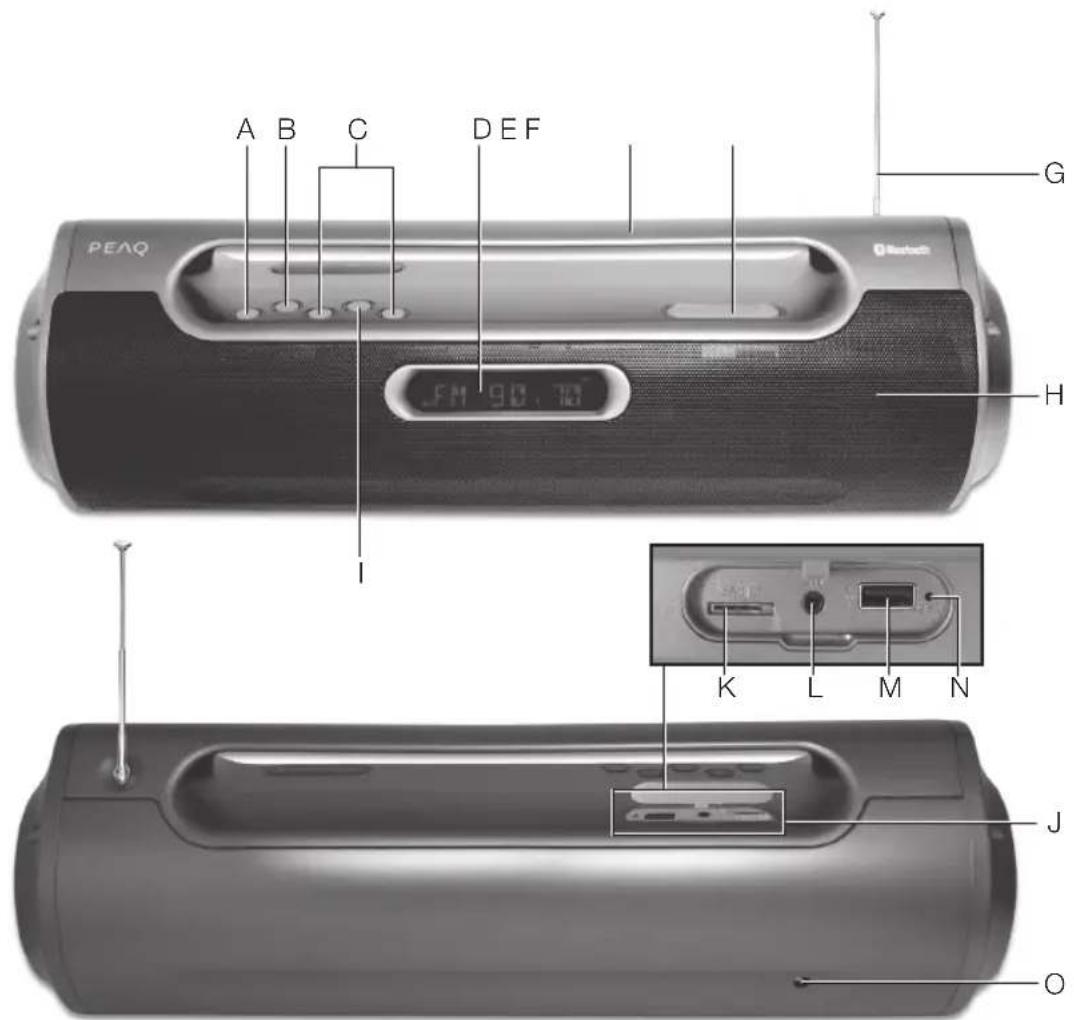
A. ☐/☐/ mode button
B. M button (setting mode)
C. A←Back→Forward
D. Display
E. Handle
F. Volume +/-
G. Antenna
H. Speaker
Accessories
1 x FM radio and bluetooth ^® speaker
1 x Power adaptor with DC cable and plug
1 x AUX-IN cable
1 x user manual
I. ▶|| Playback/Pause button
J. Cover
K. microSD card slot
L. AUX-IN jack
M. USB slot
N. RESET button
O. DC-IN jack
Before first time use
Read this user guide carefully to avoid damages or injuries due to improper use. Pay special attention to the safety instructions. Keep the instructions for future reference and include them when transferring the product to third persons.
The product must be charged before the first use. Please refer to the chapter "Charging batteries".
Carefully remove all packaging materials and check the product for completeness and integrity. Do not use a damaged product.
Power supply
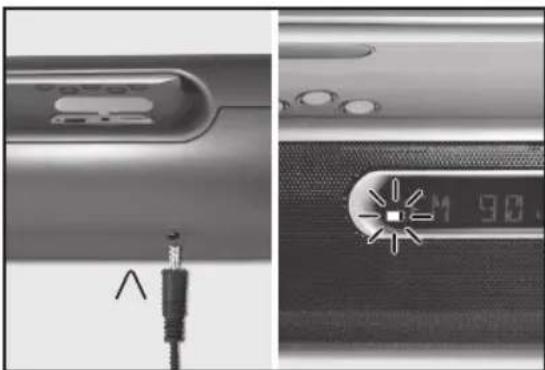
CHARGING BATTERIES
natural_image
Close-up of a USB cable connector and its screen showing a 90-degree display (no text or symbols visible)The radio can be operated via the build in batteries.
To charge the rechargeable batteries, connect one end of the power adapter to the DC IN jack. Connect the power adapter to an electrical outlet. During charging the icon ■ashes on the display. When the battery is fully charged, the symbol disappears.
The charging time is 4 hours.
Note: Playing time is dependent on parameters such as mode, volume, etc.
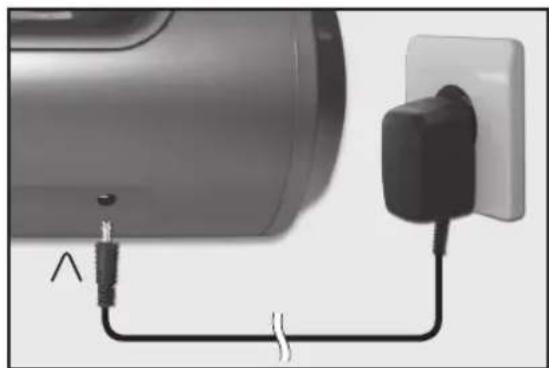
AC OPERATION
natural_image
Close-up of a plug connecting a black cable to a white socket (no text or symbols visible)The radio can also be operated via AC connection.
Plug one end of the adapter into the DC IN jack and connect the power cord to an electrical outlet.
Connections
AUX IN
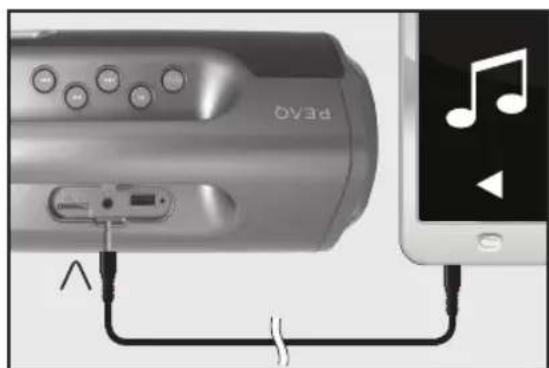
natural_image
Diagram showing connections between a device labeled 'OV3d' and a smartphone displaying music notes (no text or symbols on the device itself)You can also connect external audio play-back devices by plugging the AUX IN cable into the AUX IN jack.
Setting
USB
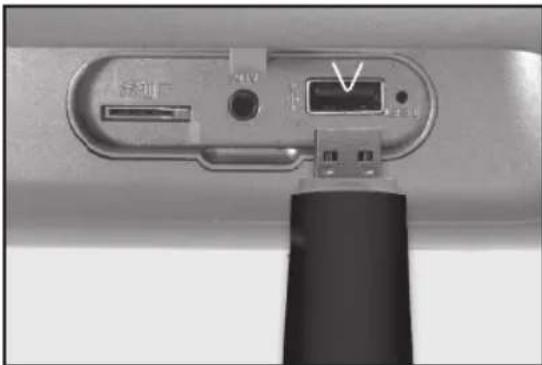
natural_image
Close-up of a camera lens component with a USB port and cable attachment (no visible text or symbols)Connect an USB drive with the product, to enable playback of music data from USB.
TURN ON/OFF
Press the on/off button to turn on the product. Press and hold the on/off button to turn off the product.
microSD
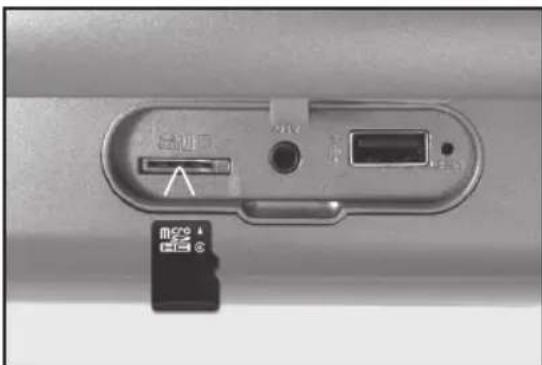
natural_image
Close-up of a device rear panel showing a card slot, ports, and a separate card with an arrow pointing to the slot (no visible text or symbols)You can also play music data from a microSD card.
ADJUSTING ANTENNA
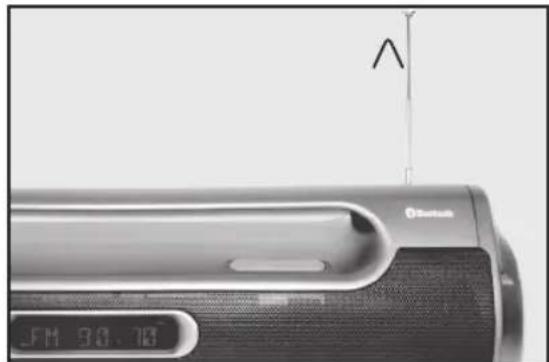
natural_image
Close-up of a portable electronic device with a digital display and antenna (no visible text or symbols)Pull out the antenna, turn and swivel it, so it faces upwards for best reception.
VOLUME
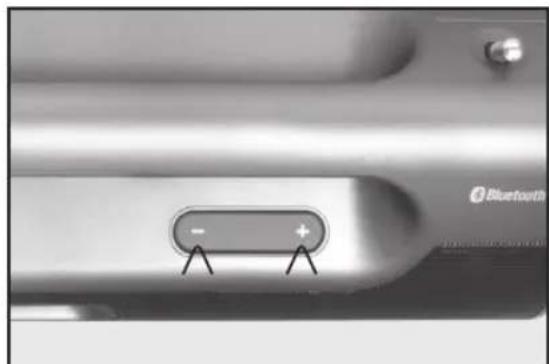
natural_image
Close-up of a Bluetooth switch button with plus and minus signs, no readable text or symbols beyond brand logoAdjust the volume of the speaker with the -/+ button.
CLOCK
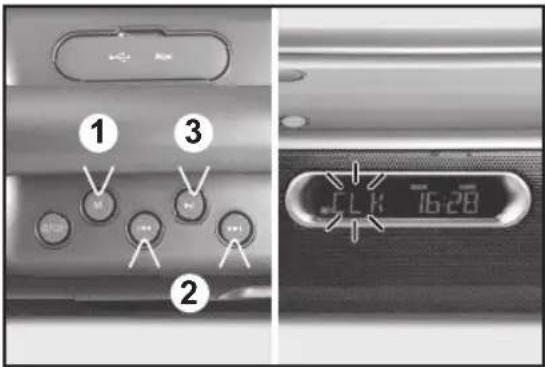
- Turn on the product.
- Press the M button and scroll through the menu with the ◀◀/▶▶ button until CLK appears. Confirm with ▶button.
- Use the ◀◀ / ▶▶ button to adjust the setting and confirm each time with ▶button. After the clock is set, the product switch to clock synchronization mode:
• RDS: Synchronizing with broadcast channels
• OFF: Manual setting
- Press M button to exit the setting mode.
SLEEP TIMER (SWITCH OFF TIME)

-
Press the M button and scroll through the menu with the ◀◀◀ button until SLEEP appears. Confirm with ▶button.
-
Select an switch off time with the ◀◀◀ / ▶▶button. You can choose from the following preset switch-off:
-
SLEEP 90: 90 minutes
- SLEEP 60: 60 minutes
- SLEEP 30: 30 minutes
- SLEEP 15: 15 minutes
-
SLEEP 00: Sleep-function off
-
Confirm with ▶Button.
- Press M button to exit the setting mode.
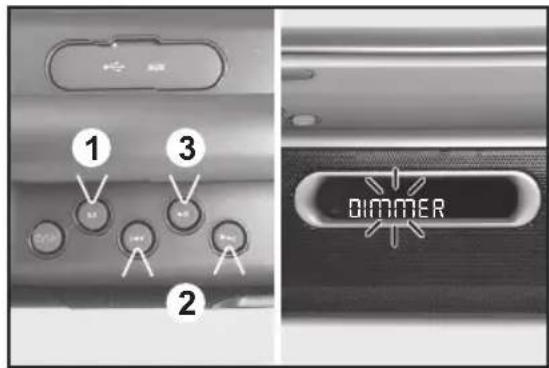
DISPLAY-BACKLIGHT
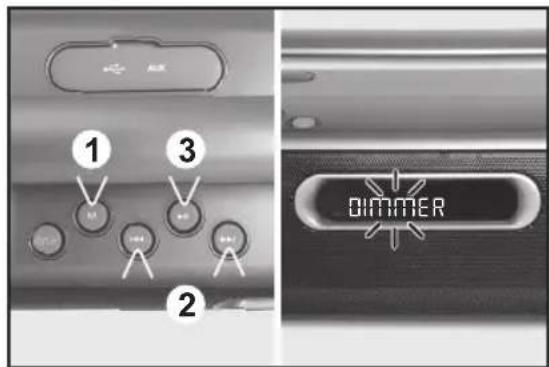
- Press the M button and scroll through the menu with the ◀◀/▶▶ button until DIM-MER appears. Confirm with ▶Button.
- Select a brightness setting with ◀◀◀ / ▶▶▶ button and confirm by pressing ▶▶▶
- Press M button to exit the setting mode.
SOUND
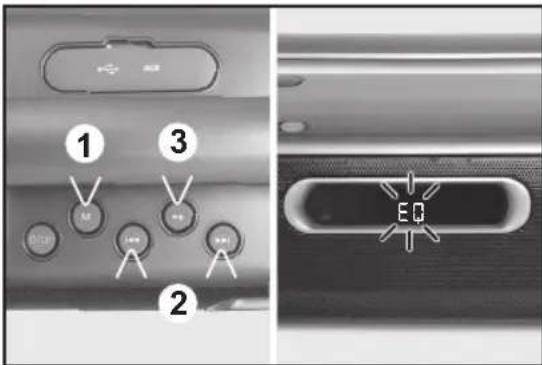
- Press the M button and scroll through the menu with the ◀◀ / ▶▶I button until EQ appears. Confirm with ▶Button.
-
Select a sound setting with the ◀◀/▶▶I button and confirm by pressing ▶II You can choose from following preset sounds:
-
FLAT
- HIP HOP
• JAZZ - ROCK
-
CLASSIC
-
Press M button to exit the setting mode.
BASS ON/OFF
- Press the M button and scroll through the menu with the ◀◀◀ / ▶button until BASS appears. Confirm with ▶button.
- Select with ◀◀/▶button Bass (ON) or (OFF) and confirm by pressing ▶button.
- Press M button to exit the setting mode.
Bluetooth®
This mode allows you to use the radio as a speaker for an external device (e.g. mobile phone or MP3 player). The signal is transmitted wirelessly via Bluetooth ^® .
Note: Before playback, you must pair the radio (in this case the Bluetooth® receiver) and the device (transmitter). The Bluetooth® ID is PPB200BT-B.
COMPATIBILITY
This product is compatible with Bluetooth® enabled mobile phones and music devices. It features Bluetooth® version 3.0+EDR. It also works with devices featuring other Bluetooth® versions that support e.g.
Wireless stereo listening
A2DP (Advanced Audio Distribution Profile)
Wireless music control
AVRCP (Audio/Video Remote Control Profile)
Note:
- Keep the range of 8 meter when pairing.
- Before pairing a Bluetooth® AV source, refer to the AV source user guide regarding safety instructions and use with other devices.
FM radio
PAIRING
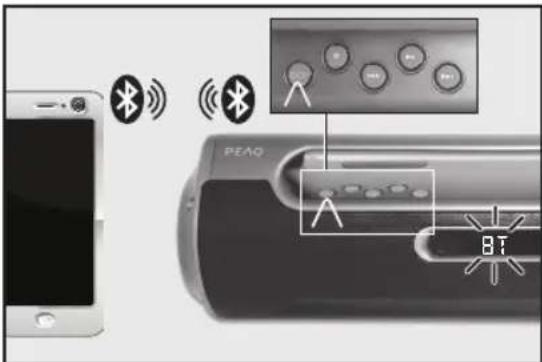
- Press the button until BT appears on the display. The product is in Bluetooth® mode.
- Activate the Bluetooth® function on the playback device. If necessary make a search for Bluetooth® devices. Pair your playback device with PPB200BT-B. The devices are now connected, and the display will light in blue.
-
To end the Bluetooth® connection:
-
Turn off the Bluetooth® function on the playback device.
- Change the Mode.
- Press and hold the button ▶ until the connection is ended.
- In this mode, the radio receives a VHF signal and displays information about the radio station, etc.
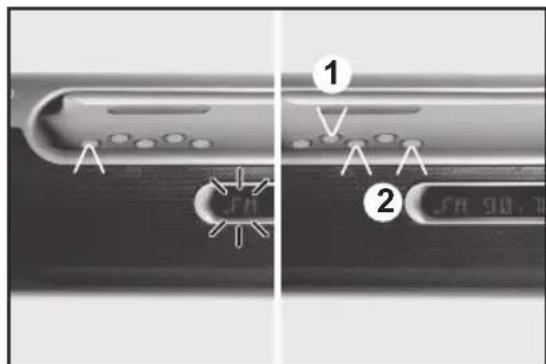
- Press the ☐ button until FM appears on the display.
AUTO SCAN AND PROGRAM
- Press the M button and scroll through the menu with the ◀◀/▶button until AUTOSCAN appears. Confirm with ▶II button.
- AUTO appears on the display and the automatic channel search will be start. Found channels will be stored automatically.
BLUETOOTH®-PLAYBACK
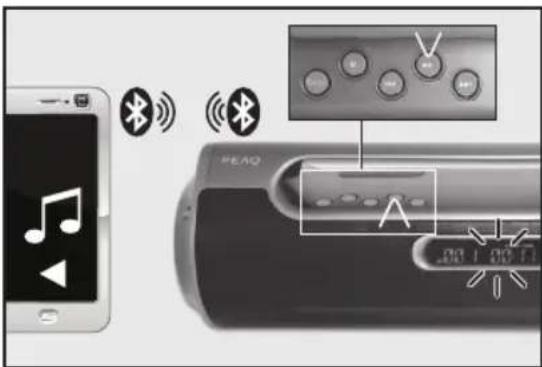
- Start the music playback on the audio device or press ▶ button on the speaker (if supported).
- Press the ◀◀ /▶▶I button shortly to skip title forward or backward.
- Adjust the volume with -/+ button.
MANUAL CHANNEL SETTING
Press the ◀◀ / ▶ button to select the desired channel. If hold the ◀◀ / ▶ for longer, this begins a search which stops automatically once the next channel has been found.
AUX-IN mode
MANUEL PROGRAM SETTING
- You can assign your chosen channel to the program memory between 1-20.
- Select a set channel and press M button. Scroll through the menu with the ◀◀/▶▶ button until MEMORY appears. Confirm with ▶button.
- Assign with the ◀◀ /▶▶ button program memory for the channel and confirm by pressing ▶Button.
- Press M button to exit the setting mode.
CHOOSE A STORED CHANNEL
- Press the Ⓗ button until FM appears on the display.
- Select a set channel with ◀◀/ ▶▶▶
INFO DISPLAY
- Press the M button and scroll through the menu with the ◀◀◀ / ▶▶▶ button until INFO appears. Confirm by pressing ▶▶ button.
-
Select an info display with the ◀◀ / ▶▶I button and confirm by pressing ▶II You can choose from followings:
-
Station Text
- Station Name
- Program Typ
-
Rds Clock
-
Confirm by pressing▶Button.
- Press M button to exit the setting mode.
Note: You can mute/unmute the FM radio by pressing the ▶II.

This mode allows you to use the radio as a speaker for an external device (e.g. mobile phone or MP3 player).
Warning! Observe the relevant safety information for use with other devices when connecting an external device.
- Connect the cinch plug (3.5 mm) of the audio cable with the audio playback device and the other cinch plug (3,5 mm) into the AUX-IN jack of the speaker.
- Press the 📄 button until AUX appears on the display. The product is in AUX-IN mode.
- Turn on the audio playback device and start the music playback.
- You can adjust the volume with the -/+ button.
Note: You can mute/unmute the AUX-IN playback by pressing the ▶II
microSD cardUSB playback
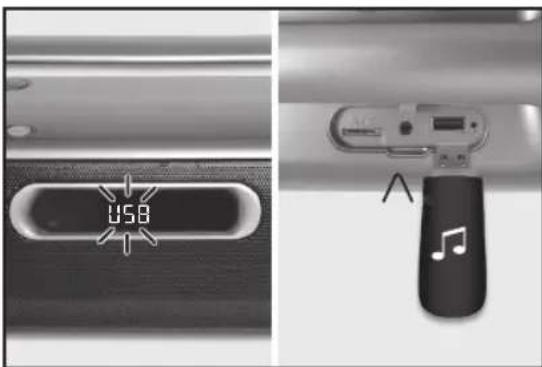
- Plug in an USB drive.
- Press the button until USB appears on the display. The product is in USB playback mode. The speaker reads the USB data immediately and starts the playback with the first track.
- Press the ◀◀ / ▶▶I button to skip a title forward or backward.
- Use the ▶II to pause or continue the play-back.
- You can adjust the volume with the -/+ button.
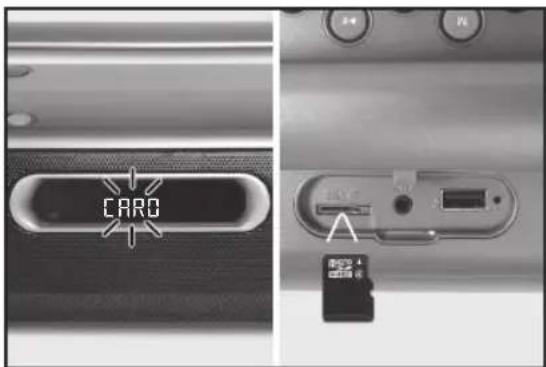
- Insert a microSD into the microSD slot.
- Press the button until SD appears on the display. The product is in microSD playback mode. The speaker reads the microSD immediately and starts the play-back with the first track.
- Press the ◀◀ / ▶▶ button to skip a title forward or backward.
- Use the ▶II to pause or continue the play-back.
- You can adjust the volume with the -/+ button.
Note:
• Support USB drive up to max. 32 GB.
- All tracks you want to play must be in a folder on the USB drive. Title in subfolders cannot be played. The order of the playback is determined by the order of the folder.
- Connect the USB device directly to the USB port of your product. The usage of an extension cord is not recommended and may cause radio interference and faulty data transfer. This product supports USB 1.1 and 2.0.
Note: Supports microSD card up to max. 32 GB.
PLAYBACK MODE (USB AND microSD PLAYBACK)
-
Press the M button and scroll through the menu with the ◀◀/▶▶button until PLAYMOD appears. Confirm with ▶II button.
-
Select a playback mode with the ◀◀/▶▶ button. You can choose from followings:
| Symbol | Mode |
| Repeat all titles | |
| Repeat the actual title continuously | |
| Random playback | |
| Normal playback |
-
Confirm by pressisng the▶II button.
-
Press M button to exit the setting mode.
Reset
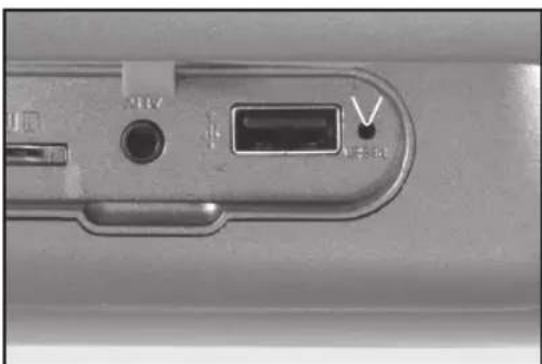
natural_image
Close-up of a metallic electronic device's internal components, showing ports and a central port (no visible text or symbols)Press the RESET button with a pointed object (e.g. a paperclip) to restart the speaker in case of malfunctions.
Note: Function/memory will not be reset.
Cleaning and care
- Unplug the adaptor from the socket before cleaning the unit.
- Attention! Do not let water penetrate into the unit.
- Clean the housing with a lightly dampened cloth.
- Do not use sharp, scouring or aggressive cleaners.
- Do not use chemicals (such as gasoline or alcohol) to clean the housing.
Troubleshooting
If there are any problems during operation, please refer to the following table. If problems cannot be solved as indicated under Solution, please contact your manufacturer.
| Problem Possible causes Solution | ||
| Product does not function | Battery emptyInterrupted power supply | Re-charge batteriesCheck the power supply |
| NO Sound • Volume | is very lowExternal device is muted | Adjust the volumeCheck and turn off mute on the external device. |
| Poor audio quality with Bluetooth® connection | Poor Bluetooth® reception | Move both devices closer together or remove any obstacles between. |
| No Bluetooth® connection | The external device does not support the profiles for this productBluetooth® function is disable | Try to pair with another external device.Enable the Bluetooth® function. |
| microSD can’t be read | microSD defect • Insert a new microSD | |
| USB drive can’t be read | USB drive defectData format not support. | Insert a new USB driveCheck the data format |
| Poor radio reception quality | Poor radio reception • Place the product to another place and adjust the antenna again. | |
Disposal

Do not dispose of this appliance as unsorted municipal waste. Return it to a designated collection point for the recycling of WEEE. By doing so, you will help to conserve resources and protect the environment. Contact your retailer or local authorities for information.

Please dispose of batteries in an environmentally friendly manner. Do not put batteries into the household waste. Please use the return and collection systems in your community or contact the dealer where you purchased the product.
Technical data
POWER ADAPTOR
Model : K06S090060G
Manufacturer : Dongguan Guanjin Electronics Technology Co. Ltd Input : 100 - 240 V\~ 50/60 Hz, 0.3 A
Output : 9 V = - - - / 0.6 A
RADIO
Input: 9 V = - / 0.6 A
FM-TUNER
Tuning range : 87.5 - 108 MHz
Tuning grid : 0.05 MHz
SPEAKER
Output power : 2 x 10 W
Sound system : Stereo
CONNECTION
USB : Yes (max. 32 GB)
microSD : Yes (max. 32 GB)
AUX-IN : Yes
BLUETOOTH®
Bluetooth® Profile : A2DP und AVRCP
Bluetooth® Range : Min. 8 m
Bluetooth® Version : V3.0+EDR
Dimension (W x H x D) : 424 x 127 x 100 mm
Weight : 1750 g
natural_image
Close-up of a USB cable connector and its digital display showing 130 μF (no text or symbols on the device itself)natural_image
Close-up of a black plug connecting a cable to a white electrical outlet (no text or symbols visible)natural_image
Diagram showing connections between a device labeled 'OV3d' and a smartphone displaying music notes (no text or symbols on the device itself)natural_image
Close-up of a device rear panel showing a card slot, ports, and a separate card with an arrow pointing to the slot (no visible text or symbols)natural_image
Close-up of a Bluetooth device with a digital display showing 'FM 98.70' and antenna (no readable text or symbols beyond branding)natural_image
Close-up of a USB flash drive and its internal device with musical note (no text or symbols visible)natural_image
Close-up of a device's internal components, including a USB port and a switch (no visible text or symbols)natural_image
Close-up of a USB cable connector and its digital display showing 30 μF (no text or symbols visible)natural_image
Close-up of a wall-mounted device connected to a plug, showing wiring and grounding (no text or symbols visible)natural_image
Diagram showing connections between a device labeled 'pEV30' and a smartphone displaying music notes (no text or symbols on the device itself)natural_image
Close-up of a device's rear panel showing a USB flash drive and a card slot (no visible text or symbols)natural_image
Close-up of a black office phone with a digital display and antenna (no visible text or symbols)natural_image
Close-up of a computer mouse with a port and indicator lights (no visible text or symbols)A. Be/ké/mod gomb
natural_image
Close-up of a USB cable connector and its LCD screen showing 14:90 (no text or symbols on the device itself)natural_image
Close-up of a plug connecting a cable to a battery outlet (no text or symbols visible)natural_image
Diagram showing connections between a handheld device (labeled 'p3d0') and a smartphone displaying music notes (no text or symbols on devices)natural_image
Close-up of a device rear panel showing a card slot, ports, and a small SAG card (no visible text or symbols)natural_image
Close-up of a Bluetooth device with a digital display and antenna (no readable text or symbols)natural_image
Close-up of a device's internal component with a labeled port and indicator finger (no readable text or symbols)natural_image
Close-up of a device component with a plug and indicator lights, no visible text or symbolsnatural_image
Close-up of a black plug connecting a cable to a white electrical outlet (no text or symbols visible)natural_image
Diagram showing connection between a device labeled 'pEVO' and a smartphone displaying music notes (no text or symbols on the device itself)natural_image
Close-up of a camera lens with an attached USB port and a black cylindrical base (no visible text or symbols)natural_image
Close-up of a computer interface showing a card slot and ports (no readable text or symbols)natural_image
Close-up of a handheld electronic device with a digital display and antenna (no visible text or symbols)natural_image
Close-up of a device's internal component with a labeled port and indicator lights (no readable text or symbols)A. Aa/2it / modus knop
B. M knop (instellingsmodus)
C. Terug/Vooruit
D. Scherm
E. Handvat
F. Volume +/-
G. Antenne
H. Luidspreker
Accessoires
natural_image
Close-up of a USB cable connector and its digital display showing 90 μF (no text or symbols on the device itself)natural_image
Close-up of a plug connecting a cable to a battery outlet (no text or symbols visible)natural_image
Diagram showing connections between a device labeled 'OV3d' and a smartphone displaying music notes (no text or symbols on the device itself)natural_image
Close-up of a device rear panel showing a card slot, ports, and a small SAG card (no visible text or symbols)natural_image
Close-up of a Bluetooth device with a digital display and antenna (no readable text or symbols)-
Druk op de M knop en blader door het menu met de ◀◀◀ / ▶▶◆◆◆◆◆◆◆◆◆◆◆◆◆◆◆◆◆◆◆◆◆◆◆◆◆◆◆◆◆◆◆◆◆◆◆◆◆◆◆◆◆◆◆◆◆◆◆◆◆◆◆◆◆◆◆◆◆◆◆◆◆◆◆◆◆◆◆◆◆◆◆◆◆◆◆◆◆◆◆◆◆◆◆◆◆◆◆◆◆◆◆◆◆◆◆◆◆◆◆◆ ◆◀◀◀ ◆◀◀◀ ◆◀◀◀ ◆◀◀◀ ◆◀◀◀ ◆◀◀◀ ◆◀◀◀ ◆◀◀◀ ◆◀◀◀ ◆◀◀◀ ◆◀◀◀ ◆◀◀◀ ◆◀◀◀ ◆◀◀◀ ◆◀◀◀ ◆◀◀◀ ◆◀◀◀ ◆◀◀◀ ◆◀◀◀ ◆◀◀◀ ◆◀◀▶ ◆◀◀◀ ◆◀◀◀ ◆◀◀◀ ◆◀◀◀ ◆◀◀◀ ◆◀◀◀ ◆◀◀◀ ◆◀◀◀ ◆◀◀◀ ◆◀◀◀ ◆◀◀◀ ◆◀◀◀ ◆◀◀◀ ◆◀◀◀ ◆◀◀◀ ◆◀◀◀ ◆◀◀◀ ◆◀◀◀ ◆◀◀◀ ◆◀◀▲ ◆◀◀▲ ◆◀◀▲ ◆◀◀▲ ◆◀◀▲ ◆◀◀▲ ◆◀◀▲ ◆◀◀▲ ◆◀◀▲ ◆◀◀▲ ◆◀◀▲ ◆◀◀▲ ◆◀◀▲ ◆◀◀▲ ◆◀◀▲ ◆◀◀▲ ◆◀◀▲ ◆◀◀▲ ◆◀◀▲ ◆◀◀▲ ◆◀◀▼ ◆◀◀▼ ◆◀◀▼ ◆◀◀▼ ◆◀◀▼ ◆◀◀▼ ◆◀◀▼ ◆◀◀▼ ◆◀◀▼ ◆◀◀▼ ◆◀◀▼ ◆◀◀▼ ◆◀◀▼ ◆◀◀▼ ◆◀◀▼ ◆◀◀▼ ◆▶▶▶▶▶▶▶▶▶▶▶▶▶▶▶▶▶▶▶▶▶▶▶▶▶▶▶▶▶▶▶▶▶▶▶▶▶▶▶▶▶▶▶▶▶▶▶▶▶▶▶▶▶▶▶▶▶▶▶▶▶▶▶▶▶▶▶▶▶▶▶▶▶▶▶▶▶▶▶▶▶▶▶▶▶▶▶▶▶▶▶▶▶▶▶▶▶▶▶▶>
-
Selecteer en zet de tijd uit met de ◀◀◀ / ▶▶▶ knop. U kunt kiezen uit de volgende voorkeuze-instellingen:
-
SLAAP 90: 90 minuten
- SLAAP 60: 60 minuten
- SLAAP 30: 30 minuten
- SLAAP 15: 15 minuten
-
SLAAP 00: Slaapfunctie uit
-
Bevestig met de ▶knop.
- Druk op de M toets om de instelmodus te verlaten.
SCHERM-BACKLIGHT
A2DP (Advanced Audio Distribution Profile)
natural_image
Close-up of a metallic electronic device's internal components, showing a port and a small labeled section (no readable text or symbols)Leverancier : Dongguan Guanjin Electronics Technology Co. Ltd
Ingang : 100 - 240 V\~ 50/60 Hz, 0,3 A
Uitgang : 9 V = - / 0,6 A
RADIO
Ingang : 9 V = - / 0,6 A
FM-TUNER
Afstembereik : 87,5 - 108 MHz
natural_image
Close-up of a USB cable connector and its digital display showing 90 μF (no text or symbols on the device itself)natural_image
Close-up of a plug connecting a cable to a battery outlet (no text or symbols visible)natural_image
Diagram showing connections between a handheld device (labeled 'p3d0') and a smartphone displaying music notes (no text or symbols on devices)natural_image
Close-up of a device's rear panel showing a card slot, ports, and a USB flash (no visible text or symbols)natural_image
Close-up of a black office phone with a digital display and antenna (no visible text or symbols)natural_image
Close-up of a device's internal component with a labeled port and indicator lights (no readable text or symbols)A. Toca-Ligar/Desligar/Modo
B. Tecla M (definir o modo)
C. /◄►Reçur/Avançar
D. Visor
E. Pega
F. Volume +/-
G. Antena
H. Colunas
Acessórios
natural_image
Close-up of a USB cable connector and its LCD screen showing 14:90 (no text or symbols on the device itself)natural_image
Close-up of a black plug connecting a cable to a white electrical outlet (no text or symbols visible)natural_image
Diagram showing connection between a device labeled 'pEVO' and a smartphone displaying music notes (no text or symbols on the device itself)natural_image
Close-up of a device's rear panel showing a card slot, ports, and a USB flash (no visible text or symbols)natural_image
Close-up of a black Bluetooth device with a white display and antenna (no visible text or symbols)natural_image
Close-up of a camera lens component with a USB port and indicator lights (no visible text or symbols)Fornecedor : Dongguan Guanjin Electronics Technology Co. Ltd
Entrada : 100 - 240 V\~ 50/60 Hz, 0,3 A
Saída : 9 V
--- / 0,6 A
RADIO
Entrada : 9 V
=--- / 0,6 A
Sintonizador FM
natural_image
Close-up of a USB cable connector and its digital display showing 1.38 (no text or symbols on the device itself)natural_image
Close-up of a power outlet cable connecting a motor (no text or symbols visible)natural_image
Diagram showing connection between a device labeled 'pEVO' and a smartphone displaying music notes (no text or symbols on the device itself)natural_image
Close-up of a device's rear panel showing a card slot, ports, and a USB flash (no visible text or symbols)natural_image
Close-up of a black office phone with a digital display and antenna (no visible text or symbols)natural_image
Close-up of a mechanical component with a small rectangular slot and a V-shaped indicator (no text or symbols visible)natural_image
Close-up of a USB cable connector and its LCD screen with a starburst graphic (no text or symbols visible)natural_image
Close-up of a black plug connecting a cable to a white electrical outlet (no text or symbols visible)natural_image
Diagram showing connections between a device labeled 'Ov3d' and a smartphone displaying music notes (no text or symbols on the device itself)natural_image
Close-up of a smartphone rear panel showing a card slot, ports, and a memory card (no visible text or symbols)natural_image
Close-up of a white electronic device with a digital display and antenna, no visible text or symbols on the device itself.natural_image
Close-up of a device's internal component with a labeled arrow pointing to a button (no readable text or symbols)natural_image
Close-up of a device component with a connector and a digital display showing 190 (no readable text or symbols)natural_image
Close-up of a black plug connecting a cable to a white electrical outlet (no text or symbols visible)natural_image
Diagram showing connections between a device labeled 'ÖV3d' and a smartphone displaying music notes (no text or symbols on the device itself)natural_image
Close-up of a camera module with ports and a USB cable attachment (no visible text or symbols)natural_image
Close-up of a device rear panel showing a card slot, ports, and a USB flash (no visible text or symbols)natural_image
Close-up of a black Oilon device with a digital display and antenna (no readable text or symbols)natural_image
Close-up of a device's internal component with a USB port and indicator lights (no readable text or symbols)Satici : Dongguan Guanjin Electronics Technology Co. Ltd
Giriş : 100 - 240 V\~ 50/60 Hz, 0,3 A
Çıkış : 9 V
--- / 0,6 A
RADIO
Giriş : 9 V
=--- / 0,6 A