Trio City Premier - Stroller BABY JOGGER - Free user manual and instructions
Find the device manual for free Trio City Premier BABY JOGGER in PDF.
User questions about Trio City Premier BABY JOGGER
0 question about this device. Answer the ones you know or ask your own.
Ask a new question about this device
Download the instructions for your Stroller in PDF format for free! Find your manual Trio City Premier - BABY JOGGER and take your electronic device back in hand. On this page are published all the documents necessary for the use of your device. Trio City Premier by BABY JOGGER.
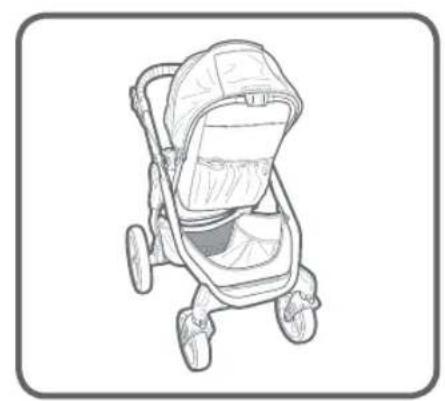
USER MANUAL Trio City Premier BABY JOGGER
1 Handlebar 11 Front Wheel Release Button
2 Handlebar Adjustment Button 12 Footwell
3 Parking Brake 13 Harness Buckle
4 Seat Mounting Bracket 14 Harness Pads
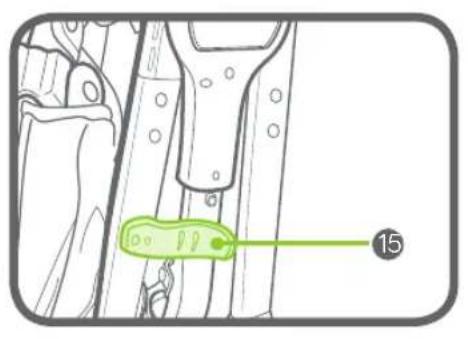
5 Rear Wheel Release Button 15 Storage Lock
6 Rear Wheel 16 Canopy
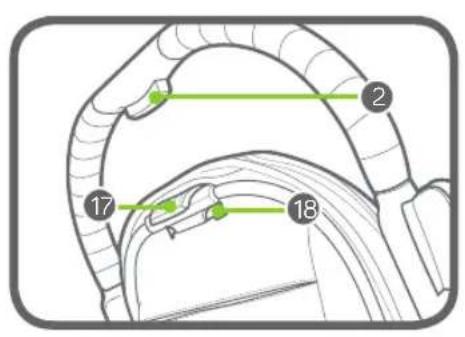
7 Storage Basket 17 Seat Recline Button
8 Footwell Adjustment Button
18 Seat Fold Button
9 Front Wheel
19 Accessory Mounting Slots
10 Swivel/Lock


WARNING
IMPORTANT - Keep these instructions for future reference.
Read these instructions carefully before use. Your child's safety may be affected if you do not follow these instructions.
SINGLE STROLLER
This stroller seats one passenger. NEVER allow more than one child at a time on this stroller.
WARNING This seat unit is not suitable for children under 6 months. Maximum weight is 15kg ; maximum height is 101.6 cm.
Total weight load recommended for this stroller is 23kg 15 kg in the seat, 1 kg in the seat back pocket, and 7 kg in the basket.
WARNING: This stroller is not suitable for running or skating.
WARNING:Never leave your child unattended.
WARNING: Always use the restraint system.
WARNING: Check that the pram body or seat unit attachment or car seat attachment devices are correctly engaged before use.
WARNING: To avoid injury, ensure that your child is kept away when unfolding and folding this product.
WARNING: Lock the brakes before loading and unloading your child and whenever the stroller is not moving.
WARNING: Ensure that all the locking devices are engaged before use.
WARNING: Do not let your child play with this product.
WARNING: Parcels or accessory items, or both, placed on the unit may cause the unit to become unstable.
WARNING: Any load attached to the handle and/or on the back of the backrest and/or on the sides of the vehicle will affect the stability of the vehicle.
This seat should be used in the most reclined position until a child can sit up unaided, roll over, or push itself up on it's hands and knees.
- Stroller is not meant to be used for transporting children up or down stairs or escalators. Damage resulting to stroller will not be covered under warranty.
This stroller does not replace a cot or a bed. Should your child need to sleep, then it should be placed in a suitable pram body, cot, or bed.
- Accessories which are not approved by Baby Jogger shall not be used.
Watch out for cars - never assume that a driver can see you and your child.
The passenger shall remain seated (no standing in the stroller).
- Use only replacement parts supplied or approved by Baby Jogger.
FRAME
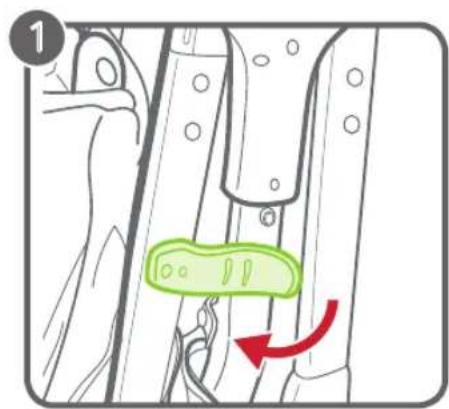
- Unpack the stroller frame from the box and set the wheels aside. Unlock the stroller by pulling the Storage Lock Lever.
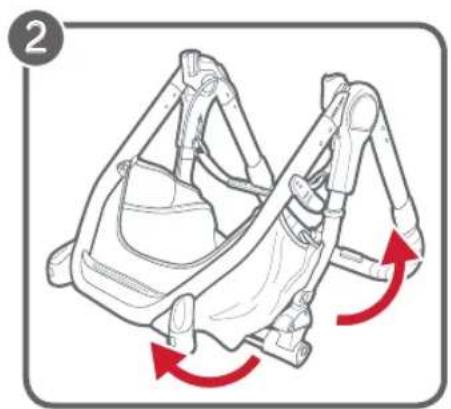
2 Lift the Handlebar away from the lower frame. The stroller will click into place.
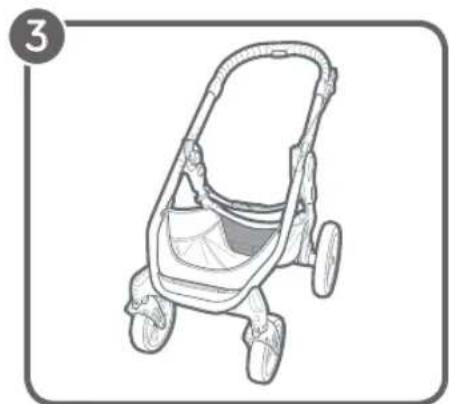
3 Place the stroller in the upright position.
WARNING: Ensure that all the locking devices are engaged before use.
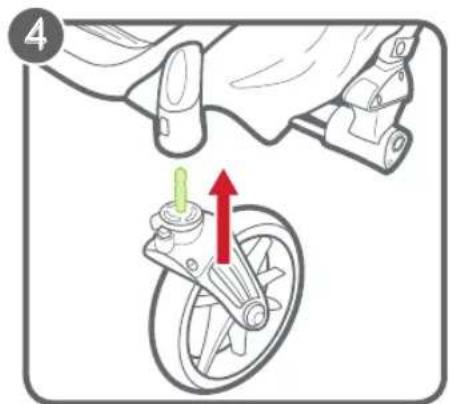
FRONT WHEEL
4Installation
- Lay stroller on its back so the Handlebar is resting on the floor.
- Attach the Front Wheel by sliding it into the front wheel mount until it clicks. Gently pull on the Front Wheel to make sure it is properly attached.
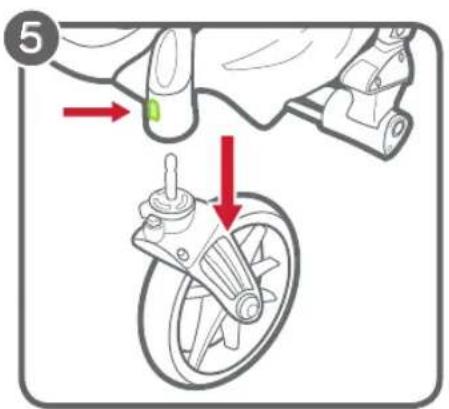
5Removal
While pressing the front wheel release button, gently slide the Front Wheel out of the front wheel mount.
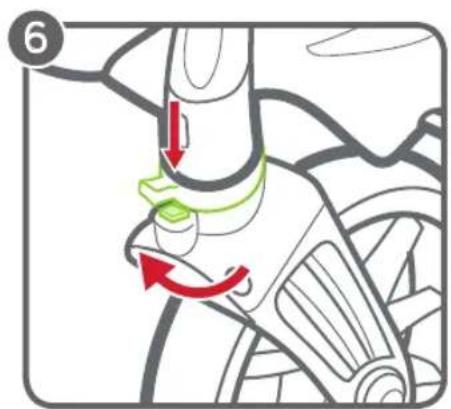
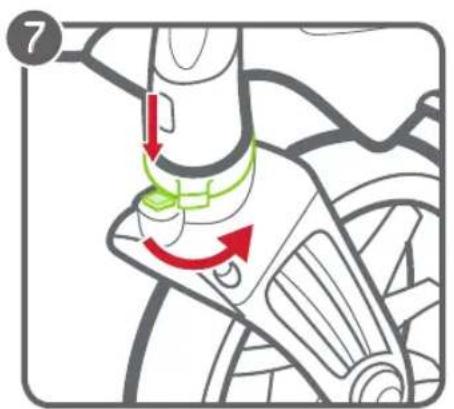
SWIVEL FEATURE
6 Press the Swivel Lock button down and slide the Swivel Lock to the left to lock the front wheel assembly in a fixed position for long distance strolling.
7 Press the Swivel Lock button down and slide the Swivel Lock to the right to allow the front wheel assembly to swivel.
WARNING: When loading and unloading child, lock the front wheel in a fixed position. Although the front wheel of your stroller locks, it is not intended for jogging or exercise purposes.
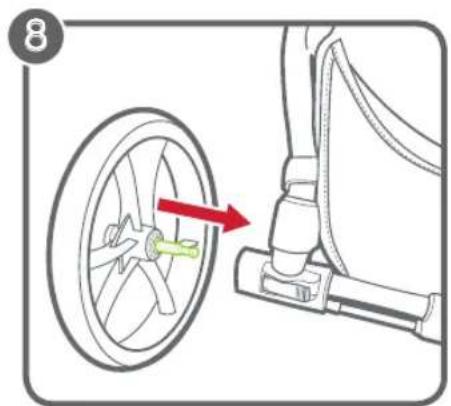
REAR WHEELS
8Installation
- Align the Rear Wheel axle with the wheel mount on the stroller frame and insert it into the wheel mount until it clicks into place.
Gently pull on the Rear Wheel to make sure it is properly attached.
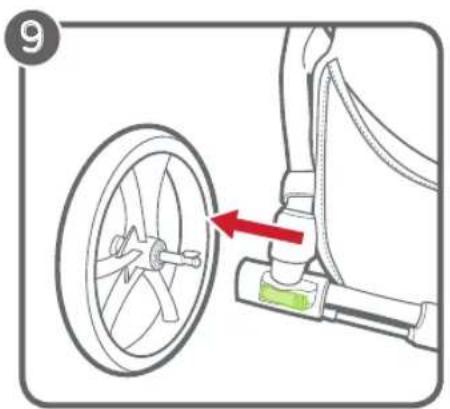
9Removal
While pressing the Wheel Release Button, gently slide the Rear Wheel out of the wheel mount.
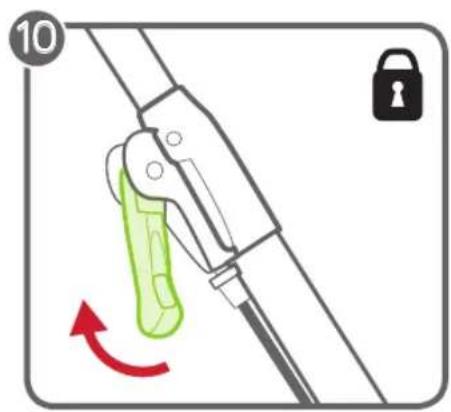
BRAKE
10 To Lock the Brakes: gently pull the Brake Lever into upright position until it clicks into place.
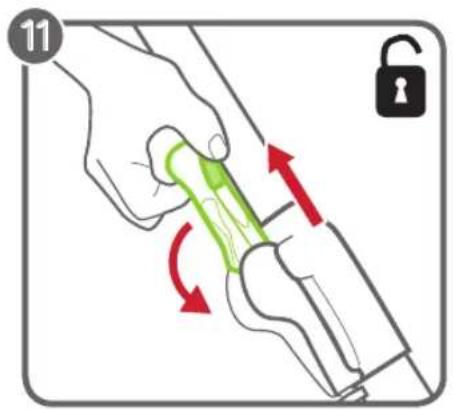
11 To Release the Brakes. Pinch the gray labs and pull the lever towards you. Push the Brake Lever down until it is parallel with the frame.
WARNING: Lock the brakes before loading and unloading your child and whenever the stroller is not moving.
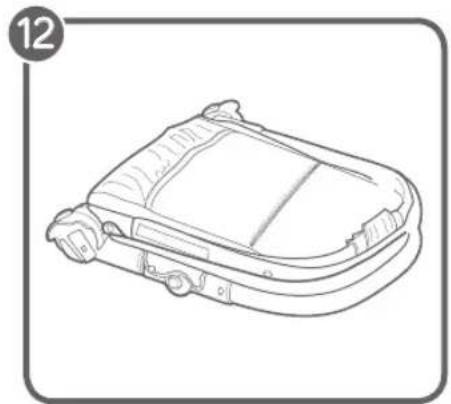
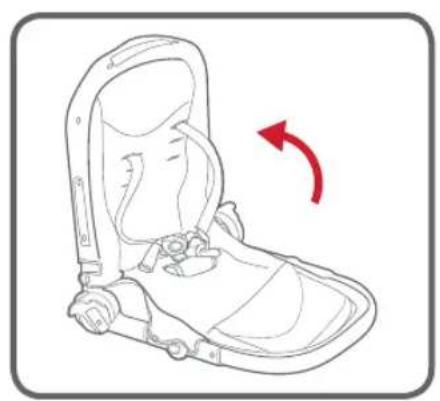
SEAT-UNFOLD THE SEAT
12 Holding the footwell and the top of the seat, open the seat.
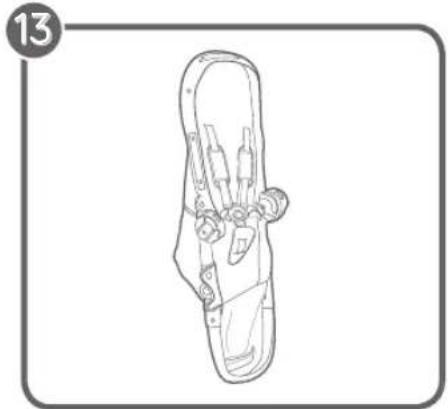
13 The seat will lock into its open position.
CANOPY
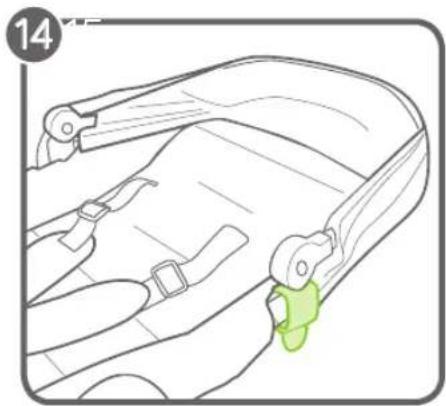
14 Attach the canopy to the frame. Attach the Canopy's brackets to the sides of the seat frame.
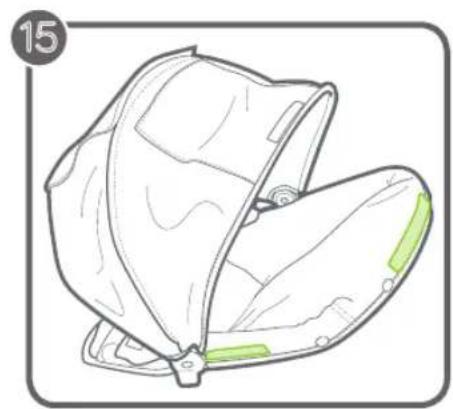
15 Attach the 3 fastening strips on the canopy to the top of the seat.
ADJUSTING SAFETY HARNESS
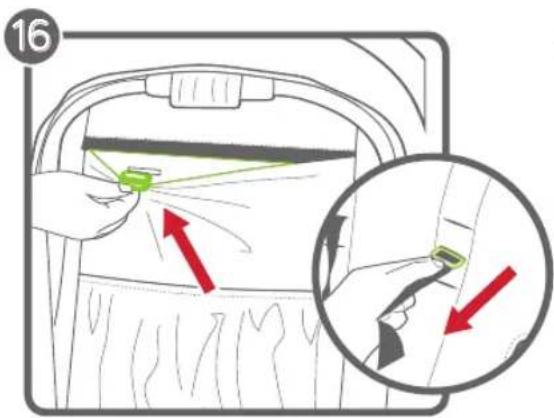
16 From the back of the seat, undo the fastening strip and open the pocket to locate the plastic square stopper. Turn stopper and pass through the openings in the PE board and seat fabric.
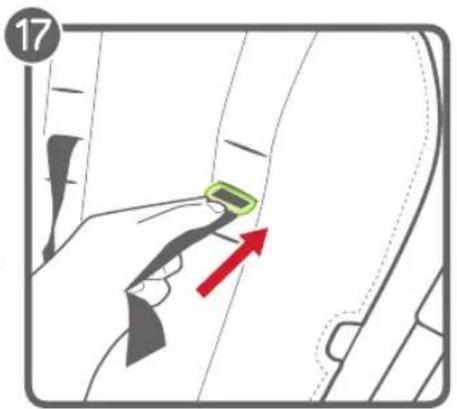
17 Reinsert stopper at seat opening closest to child's shoulders. Pass back through seat fabric and PE board. Tug on strap to ensure stopper is locked. Repeat on both sides.
WARNING: Avoid serious injury from falling or sliding out. Always properly adjust and fasten safety harness.
WARNING: Always use the crotch strap in combination with the shoulder straps and waist belt.
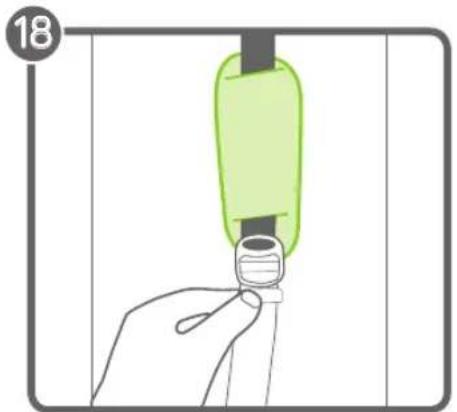
18 Slide the Harness Pads up to access plastic guide on strap.
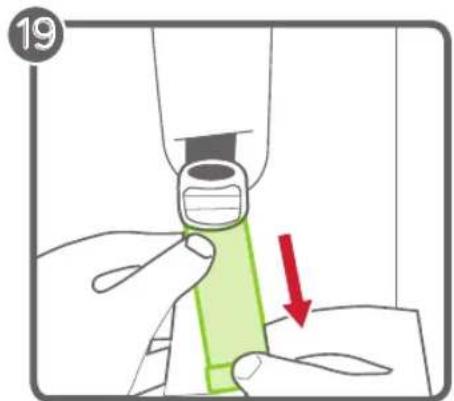
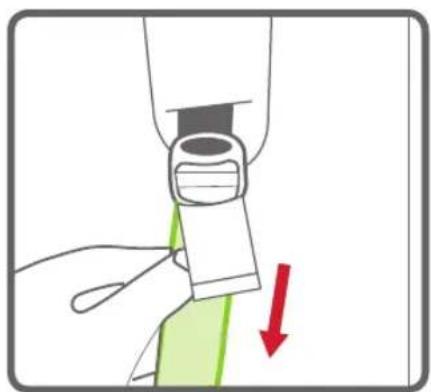
19 Hold the plastic guide and pull strap to tighten or loosen.
USING SAFETY HARNESS
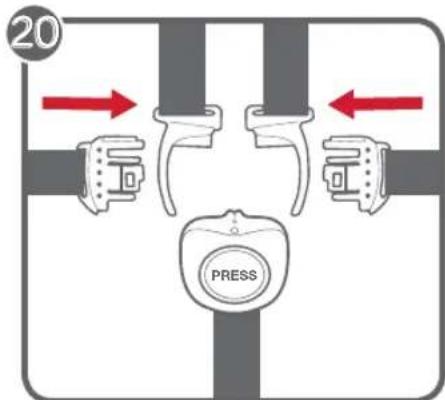
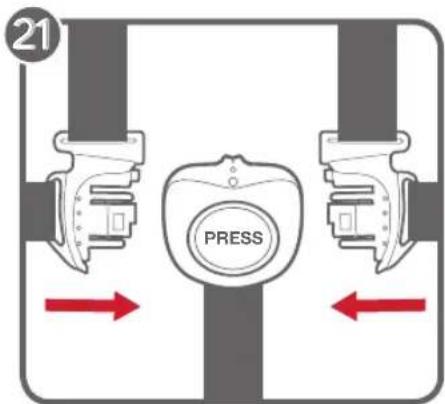
20 Insert side strap buckle into harness buckle on both sides.
21 Insert connected harness and side strap buckles into the sides of the crotch buckle.
22 Press button on crutch buckle to release.
PLACE THE SEAT ON THE FRAME
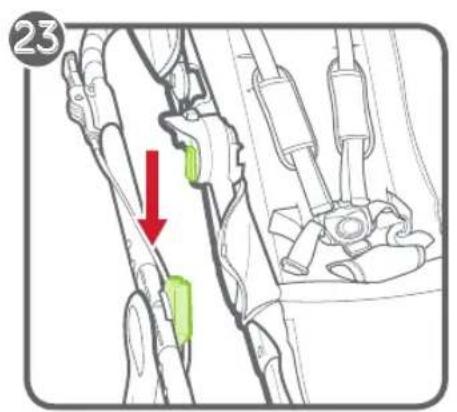
23 Align the Accessory Mounting Brackets with the mounting brackets on the stroller frame.
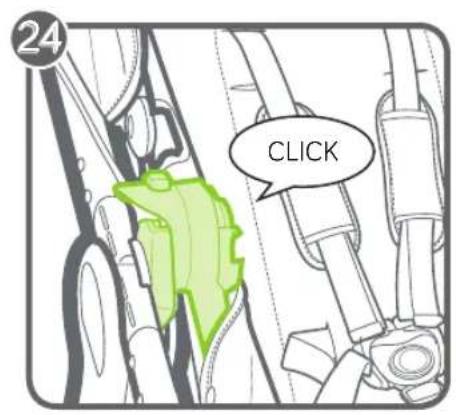
24 Slide the seat into the brackets until it clicks into place. Ensure that both sides of the seat are securely fastened into the frame before use.
NOTE: The seat may be installed either forward-facing or rear-facing.
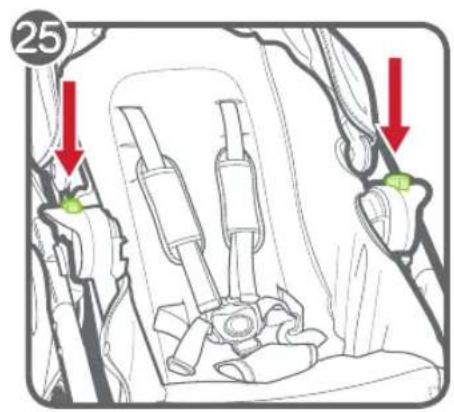
REMOVE THE SEAT
25 Press gray tabs on Mounting Brackets and pull up.
WARNING: Always remove your child from the seat before removing the seat from the frame.
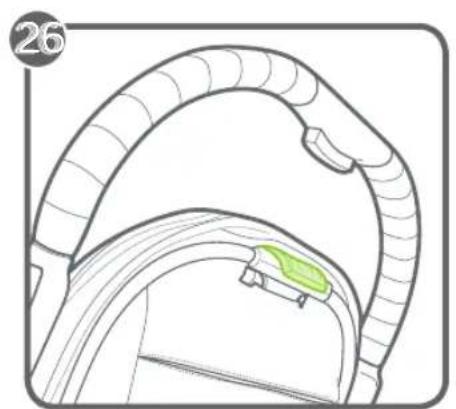
RECLINE THE SEAT
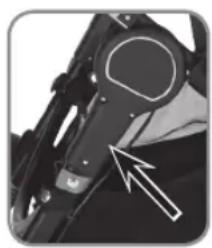
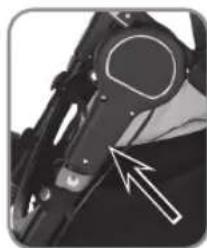
26 Lift the Seat Recline Lever located at the top of the seat, behind the canopy.
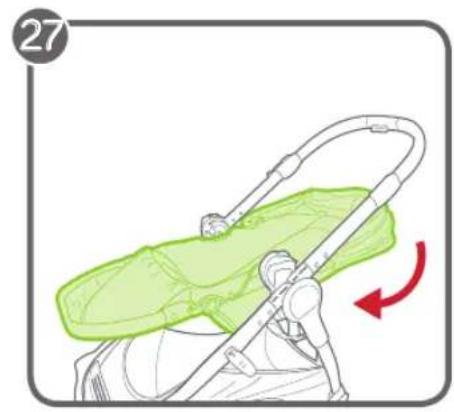
27 Pull down to lower the seat and pull up to raise the seat until it clicks into the desired position.
HANDLEHEIGHTADJUSTMENT
28 Simply squeeze the Handle Adjustment Button and slide the handle up or down to the desired length.
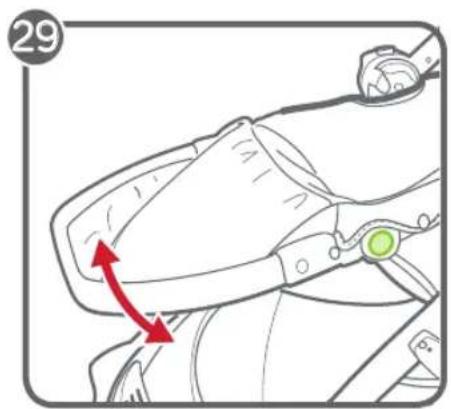
ADJUSTABLE FOOTWELL
29 Adjust the angle: Press the Adjustment Buttons on the Footwell and move it up or down until it clicks into the desired position.
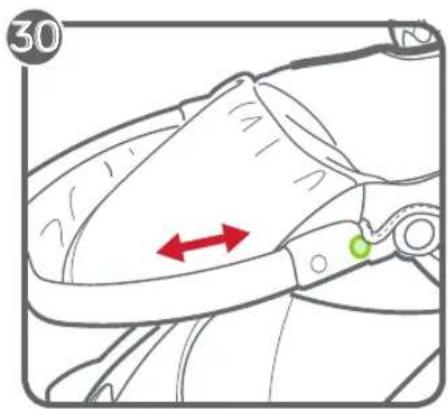
30 Adjust the length: Press the bottom buttons on the Footwell and slide it in or out until it clicks into place.
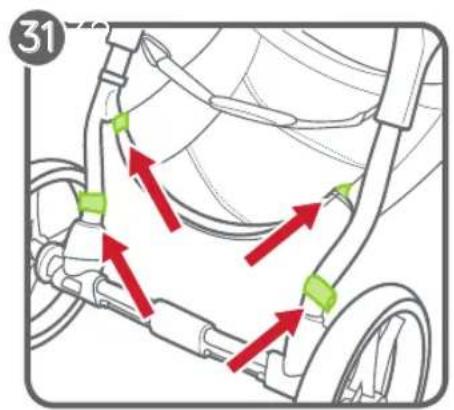
BASKET REMOVAL
31 Unfasten the top snaps of the Basket around the middle support bar of the
frame. Then unfasten the bottom snaps around the side support bars of the frame.
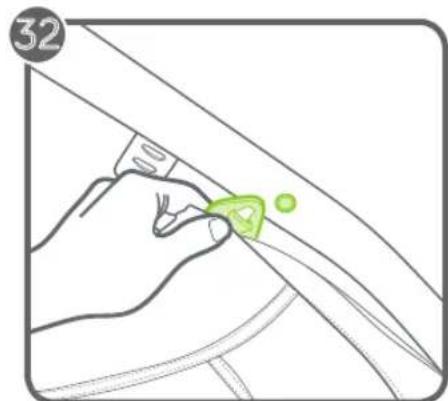
32 Unhook the top front plastic loop from over the metal knob on the front of the frame. Repeat for the opposite side.
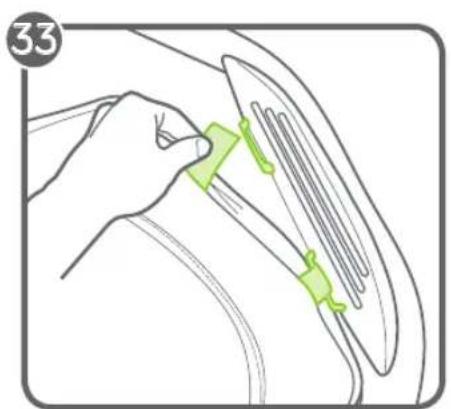
33 Unthread the front fastening strips through the plastic loops located behind the front wheel mount.
FOLDING
- Remove your child from the seat.
The stroller may be folded with or without the seat attached, and forward-facing or rear-facing. - When folding rear-facing, it is recommended that the seat be reclined all the way before folding.
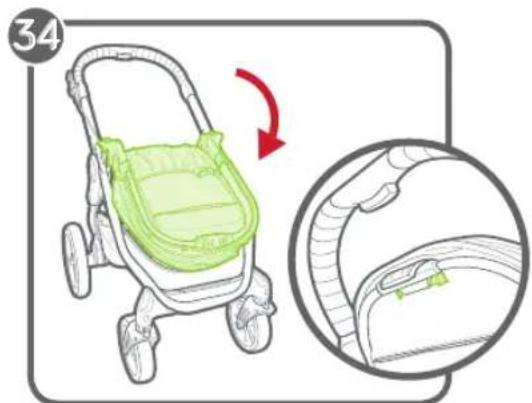
34 Squeeze the fold buttons on the back of the seat and fold the seat forward.
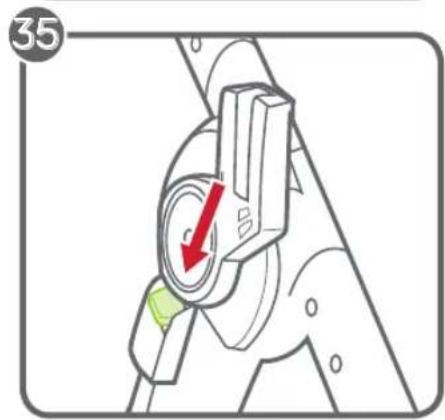
35 Push the red button on the frame until it clicks.
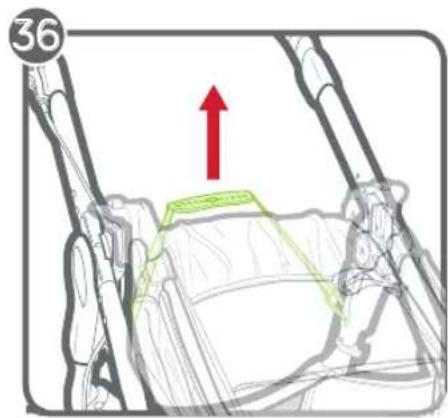
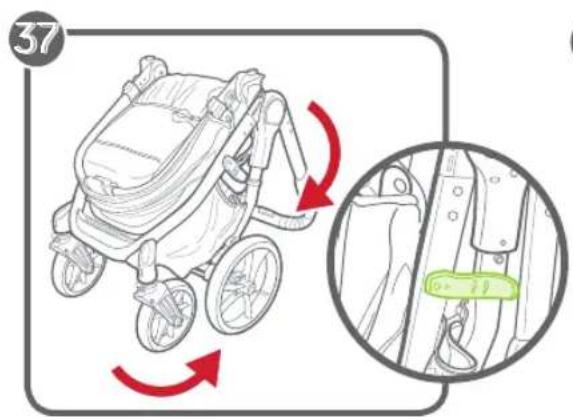
36 Pull up on the folding strap and let the frame collapse.
37 Make sure the storage lock lever clicks into place.
REMOVING THE SEAT FABRIC
38 Unsnap the seat fabric from the seat frame.
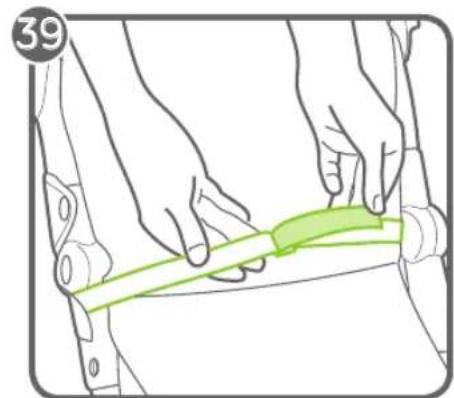
39 From the back of the seat, unfasten the hook-and-loop and slide the strap through the D-ring.
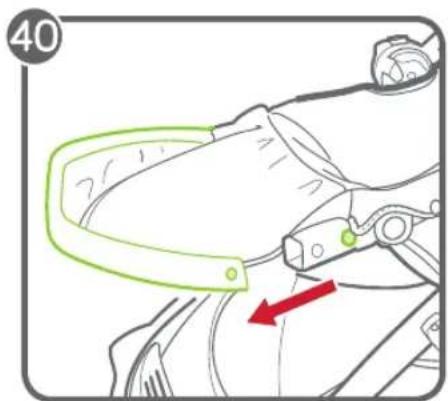
40 Press the Footwell Adjustment Buttons and pull out on the Footwell to remove the footwell bar from the seat frame.
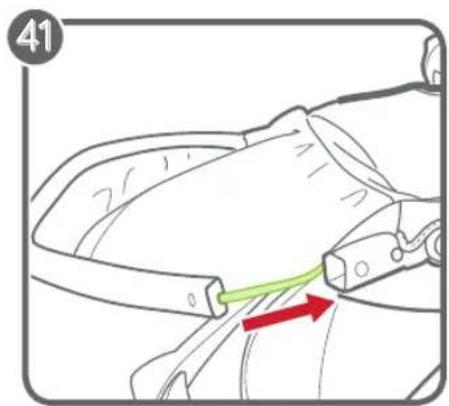
41 Pull the seat fabric out of the channel in the Footwell bar.
CARE AND MAINTENANCE
To preserve the longevity of your stroller, it is important to perform simple, regular maintenance. From time to time, make sure that the joints and folding areas are still in good condition. If you hear any squeaking or feel tension, you can take your stroller to a local bike shop for added lubrication. All repairs should only be carried out by an authorized dealer.
WASHING
Seat Fabric
- You can machine wash your stroller's seat in cold water with a mild detergent.
- Be sure to remove the metal frame and PE boards from the seat before washing
- Do not use solvents, caustic or abrasive cleaning materials.
- To minimize shrinkage, simply reattach the seat to the frame to dry.
- Do not press, iron, dry clean, tumble dry or wring the fabric.
- If the seat covers need to be replaced, only use parts from a Baby Jogger Authorized Dealer. They are the only ones that are guaranteed to have been safety tested and designed to fit this seat.
Plastic/Metal Parts
- Wipe clean using a mild soap and warm water.
- You must not remove, dismantle or alter any part of the seat folding mechanism or brakes.
Wheel Care
- The wheels can be cleaned using a damp cloth. They will need to be dried completely with a soft towel or cloth.
STORING
- Sunshine can fade seat fabric and dry out tires, so storing your stroller indoors will prolong its good looks.
DO NOT store outside. - Ensure that the stroller is dry before storing for prolonged periods.
Always store the stroller in a dry environment. - Store the stroller in a safe place when not in use (i.e. where children cannot play with it).
DO NOT place heavy objects on top of the stroller.
DO NOT store the stroller near a direct heat source such as a radiator or fire.
REGISTER YOUR STROLLER ONLINE AT www.babyjogger.com/register
Baby Jogger's Limited Lifetime Warranty:
Baby Jogger warrants that the frame is free of manufacturer defects for the lifetime of the product. Manufacturer's defects include but are not limited to the breaking of welds and frame tube damage. Textile or soft side materials and all other components shall be warranted for one year from the date of purchase (except for tubes and tires). Proof of purchase is required to make a warranty claim and the warranty is only extended to the original purchaser.
THIS WARRANTY DOES NOT COVER:
Normal wear and tear
Corrosion or rust
- Incorrect assembly, or the installation of third party parts or accessories not compatible with the original design
- Accidental or intentional damage, abuse or neglect, or use on stairs or escalators.
Commercial use
- Improper storage/care of the unit
This warranty specifically excludes claims for indirect, incidental, or consequential damages. The implied warranties of merchantability and fitness for a particular purpose is according to the specific warranty period for this model unit at time of purchase. Some states do not allow the exclusion or limitation of incidental or consequential damages, so the above limitations or exclusions may not apply to you. This warranty gives you specific legal rights, and you may also have other rights which vary from state to state. To know what your legal rights are in your state, consult your local or state consumer affairs office or your State's Attorney General.
If your stroller was purchased outside of the United States, please contact the distributor in the country nearest you. Their contact information can be found on our website at http:// www.babyjogger.com/retailers/#international. Claims for warranty outside of the country in which the product was purchased may incur shipping charges.
NOTE: When contacting Baby Jogger distributor regarding your stroller, please have your stroller's serial number and manufacturing date ready. It can be found on the right fold mechanism.

Guidon 11
www.babyjogger.com/register
www.babyjogger.com/register
www.babyjogger.com/register
Ograničeno jamstvo tvrtke Baby Jogger:
SETET-BRETTEUT SETET
GWARANCJANE OBEJMUJE
www.babyjogger.com/register
Garantia de Vida Útul Limitada da Baby Jogger:
SCAUN - DEPIEREA SCAUNULUI
INCLINAREA SCAUNULUI
PERYINPYEMAR HN7A JIAYHOF
29 PerynnpoBaHne yIa: HaxMnte KhoNkpeynpoBaHna Ha Hnue n nepemecnte ee BBepx IIN BHN3 TaK, YTO6bI OHa
CO UeJyKom npnHa Heo6xOdImoe NOJIOKeHne.
30 PerynnpoBaHne nnHb: HaxMnte KhoNKn CHN3y Ha HNIe DnI HOr N 3aDINHBTe ee BHytpb INN BblBnHbTe HApxky TaK, YTO6bl OHa co UeJNkOM npHraJa Heo6xoDnMOe IIOXKeHne.
CHRTNE KOP3HbI
31 OTeHnTe KHOKN Ha BepxHnx 3axBaTAX Kop3nHbI BOKpyr cpeDneH HeCyuEe NepeKnaDnHbI paMbI. 3aTeM OTCTeHnTe KHOKN Ha HnXnHx 3axBaTAX BOKpyr 6OKOBbIX NepeKnaDnPambl.
32 CHIMITE BepxHIO nepeHIOI INaCTKOBYIO NtTIO C MetaJIINueCKOBOBCTyNABnepeDHeu qACTn paMbI. IOBTOPHTe DeIcTBNE C IpOTNBONOJOHO CTOpOHbl.
33 BbTaUHTe nepeHnne noJocKn dJa KpeJIeHnuepe3 nJaCTNKOBBe nTJIn, paCNoIooKeHHBle 3a 3axmOM dJa KpeJIeHnue nepeJHero KOJeca.
CKIADbIBAHHE
-
Y6epepe6eHka c cnHehba.
-
PporyIouHyIO KOJIACKy MOKHO CKNaIbIbATb C yCTaHOBJIeHHbIM CnIeHbEM IINI 6e3 HERO, a TAKKe C CnIeHbEM ObaPeHHbIM BnepeD INI HA3aI.
-
PnCKNaIbIBaHm KOJIaCKn C cnDeHbEm, OpbaueHHbIM Ha3a,IpeKoMeHdyETcMaKcMaIbHo OTKnHyTb CNdeHbe NepeD CKNaIbIBaHnEM.
34 HaxmTe KHONKn CKnAdbBaHnC 3aDHe nCTopoHbI CnDeHbI N CNOXHTe CnDeHbe BnpeI.
35 Haxmnte KpacHyo KhoNky Ha pame, noka He ycblIwnte ueJyOK.
36 NotaHnTe BBepx pemeHb cKaNbBaHnra; pama cNoKHTc.
37 YeDntecb, yTO pbHar qKcTopa DnXpaHeHn npHnI npaBnHoe NOIOKeHne CO UeJNkOM.
CHYTNE YEXJIACNDEHbI
38 OTeHnTe yexoJ cndeHbry ot paMbI cnDeHbY.
39 C 3aHHe CTOpOHe CnDEHb OTCTeHnTe JInyKu INPOTAHHe peMeHb Ype3 D-0pa3Hoe KOnbO.
40 HaxmTe KhoNk perynpoBaHn HnHn DnHOH N BbITAHnTe HnWy DnHOH, YTO6bI CHrTb NOHoxKc paMbI CnDEhB.
41 BbITaHnTe yexoJ cnJeHbI n3 na3aB NOHOKKe HNIIN DnIHor.
YXODI TEXHnueCKOE OBCJyXnBAHne
YTo6bI nporylOuHna KOnJcKa npocnyxHa
DolbWe, BaxHo BblNoJIHrTb npocToi
peyIpyHbI yXoJ. IepnoDmUeCKn cJeDuET
npOBepaTb, HaxOJaTc JIn CoeDInHeHH
m MecTa crN6OB B XopoWem pa6Ouem
coCToRHN. EcJN Bbl CblIwnte ckPn nJIn
yBCTByeTe HATJKeHne, MOXHO OTHeCTN
KoJIACKy B 6nJkaMn MaRa3IN BeLOCnPeDoB
dJn CMa3Kn. JIO6bIe BnDbI peMOHTa DOnJkHbI
npOBODtBCa ABTOPu3OBAHHbIM dNJIePOM.
CTNPKA
Uexon cnndnba
- Yexon cndeHb nporyuOHO KOnaCKn MOxHO CTnpaTB B CTpAlbHOI MaHHe BXoIOHOB BOe, INcNoJb3yMaKoDeiCTByUOee MOUooe CpeDCTBO.
He 3a6yDbTe CHTb MeTaJIInuYeCKyIO paMy I nIpaCTNKOBbIe naHeJIIN nepeI CTnPKoI.
He nCnoIb3yIte pactBopnteI, kayctnueckne IIN a6pa3NBhle uNCTaIne cpeIcTba.
-TO6bIMHNHMn3npOBaTb yCaKy, npocTo CHOBA npkpeHte yexon cndeHbHa paMy DnA CyuKN.
He cyuHTe noI npecCOM, He rJaDbTe, He noDBeprAte XIMNueCKo YnCTKe, He cyuHTe B CTHpaJIbHOm MaUNHe N He BBkpyuBaIte MaTePnAJ. - Ecni YexoI cIeHbI Heo6xOIMO 3aMeHHTb, IcNoJIb3yIte ToJIbKO n3JeIMn, NOCTaBJIeMbIe aBTOpN3OBaHHbIMn dInIepAMn KOMNaHN Baby Jogger. TOnbKO Ha TaKHe N3DeJIINr IpeIOCTabJIeTcra rapaHTn rPiOBeIeHn IcNbITAHn Ha 6e3oNaChOcTB n COOTBeTCTBn rAbapuTam CNDHeHb.
Пл actикobьie/MeTaJIINuYeCKne DeTaJIIn
-
PpOtpaIte, nCNoJIb3yMaRKOeIcTBvUOuM MbJIbHbI paCTBOp INTeNpyIO BDOy.
-
Henb3y y6npaTb, pa36npaTb nnn BnDOn3MeHnTb NIO6yU qAcTb MExaHn3MaCKnaDbIBaHnCnDeHb nIITOPMO3OB.
YXoJ3aKoJIecamn
Koneca MoXH0 OUnuTaB BnaXHoN TpRnKOJ.
IX Heo6xOUMO NOnHOCTbIO BbICyWNTb
MRAKIM NONOTeHcEM INI TpRnKOJ.
XPAHEHNE
Bpe3yIbTaTe Bo3dEiCTBnA COJHeuHOro CBeTa MaTePnA nCIDEhBЯ MOKeT BblcBeCTN, a NOKpbIuKn IpecoxHyTb, NO3Tomy XpaHeHne KOLrCKn B NOMEUeHn N03BOJIaRET DOnbIe coXpaHHTb npVBNeKaTeIbHbI BHeuHn BvI.
HE xpaHnte Ha yIuIe.
- Y6eIITecb, yTO KOJRAcKa IONHOCTbIO BbICoxla, npexKe Yem CLOXHTb ee IJIa XpaHeHnHa dIINTeNbHbI nepNoD.
Bcerda xpaHnTe KOJIaCKy B CyXOM MeCTe.
XpaHnte nporynoHyIO KOJACKy B 6e3oNaChOM MeCTe,ecn OHa He NCNoIb3yeTcR (T.e.TAM,TrdE Detn He CMOryTC Hei IrpaTb).
HE CTaBbTe TaXKeIbIe npEIMeTbI Ha KOJIaCKy.
HE xpaHnTe nporyIoUHyo KOnrcky B6nn3n OT npMbIX NCTOuHNKOB TeNna, TaNX KaK o6OrpeBaTeNb NN OROhb.
3APERINCTPUPYITE CBOIO PPOIyoHyIO KOJIACKY OHJIaH NO AIDPECY: www.babyjogger.com/register
Beccpouhna rapaHTnC orpaHnueHnMn KOMnHn Baby Jogger:
KomnaHn Baby Jogger rapaHTnpyET Ha BeCb cPOK 3KcNpyatauHn 3dJIy, YTO pAm He IMeet npOn3BOODCTBHeHHbIX DepeKToB. IpOn3BOODCTBHeHHbIe DepeKtBi BKIOUaOT, CpeIN npOyero, DepeKtBI CBAPbIX KOHCTpyKUm IN DepeKtBI npOoPnIpaMbI. Ha DetaII N3 TeKCTnIa IIIM MArKO TKAHN, a TaKKe BCE dpyrIe KOMNoHEThBI npeIOCTabJraE rapaHTnCpOKOM Ha OIN RoD C DaTBI NOKynk (3a NCKNIOUeHEm npOoPnIeN uIN).ДЯ obpaueHnC npTeHneM NO rapaHTn Tpe6yEtC DOka3aTeNbCTBO NOKynK; rapaHTnHbIe O6a3aTeNbCTBa DeiCTBNTbHbI TOIbKO B OTHOWeHn NEpbOHaayalbHorO NOKyNaTeJIa.
HACTOJIARIAPAHTINHE NOKPBIBAET:
-06bIuHbI u3HOC
-Bo3deIcTBnE Koppo3nn nn O6pa3OBaHne pKaBunHbI
- HenpaBnblHyIO c6Opky nnn yctaHOBKy TpebMn JncaMn DeTaeN nn npHaJnxKHOCTe, He COBmecTmbix C opuHaHaBbIM dN3aHOM
CnyaHbIe IINI pEHaMepeHHbIe NOBpeXdEHn, HEnpaBnIbHOe NcNoJb3OBaHne IINI XaJIaTHoCTb, JIN6O INcNoJb3OBaHne Ha JeCTHnuaX IINI 3CKaJIaTOPax.
ИспользоваимеВКOMМерчecкицелях
- HenpaBnIbHoe xpaHeHne/uyxOJ 3a n3deJIeMeM
Hactoia rapaHTn OpeTeHNO NCKIOuae TIO6bIe npTeH3N B CBA3N C HnnpMbIM, cnayhBMn IIN KOCBeHHbIMy b6ItkAMn. POnpa3ymBaemble rapaHTm npiroHOCTn IIN pOdaXn INpIROHOCTn IIN KAKoJ-NIO BO KOHKpeTHOH CEJI N COOTBEcTBcYOT OCObOMy rapaHTnHOMy nepNoD ydaHNO MoeJI Na dAty npOdaXn. B HeKOTOpbIX 7tatax He pa3pe7aeTcN CKIOUChEne IIN ORpaHNUeHne npTeH3N B CBA3N C HnnpAmbIM IIN KOCBeHHbIMy 6bITkAMn, N03TOMy yka3aHHbIe BblIe OraPauHueHn IIN NCKIOUeHn MOrT K Bam He npImHeTbcR. Hactoia rapaTn npEOCTabJIeT Bam Oco6bIe 3aKOHHbIe npaba. Bbl TaKke MoKeTe IMeT dpyrIe npaba, KOToPbIE MOrT OTNIuATbcR B 3aBNCIMocTn OT 7tata. YTO6bl y3HaTb, KaIMM 3aKOHHbIMn PpaBAMN BBI MOKeTe BOCIOJIb3OBaTbcR B CBOEm 7tate, ObpatNTecB B MeCTHoe npDeCTaBnteBCTBO IIN npDeCTaBNTeBCTBO 7tata No 3aUnTe npab Notpe6bTeJe IIN K RehepaNBHomY pOKypopy CBOero 7tata.
Ecn nporynohna konka 6bna kynneha 3a npdejanm CoeineHHbx 7TaTOB AmeNKn,
6bpaTntecb K nctpmbotpy B 6nKaiwei ctpane. KoNTaKTHyIO INΦopMaUHO MOxHO haHTn Ha
Haewem Be6-caTe no aDpcy: http://www.babyjogger.com/retailers/#international. IpeTeH3nI
no rapaHTn 3a npdeJanm cTpaHbI, rge 6bINO npno6peTeHO n3dJIne, mOryT NOBNeYb paXoDbI
Ha TpaHCnpTIpOBky.
UPORABA VARNOSTNEGA H-PASU
20 Stranske zaponke pasu vstavite v zaponko H-traku na obeh straneh.
21 Vstavite spet trak in stranski zaponki
trakov v stranici mednožne zaponke
22 Pritisnite gumb na mednozni zaponki da jo sprostite.
NAMESTITEV SEDEZA NA OKVIR
www.babyjogger.com/register
LgRgRgRgRgRgRgRgRgRgRgRgRgRgRgRgRgRgRgRgRgRgRgRgRgRgRgRgRgRgRgRgRgRgRgRgRgRgRgRgRgRgRgRgRgRgRgRgRgRgRg
PE
17
S_ OBC = 12 · CO · BC = 12 × CD × 5
aegy g aee 1e Jgpe.
15 ① ( a + b) ,( b + c) . ② ( a + b) ( a^2 + ab + b^2) .
1.
g bgsll 1s2 s21 aL0
pKg 1
J 100
afoe aiee eae 1
在 Rt ABN 中:
18
p121 1e o0g dSaxxuXu
19
Sn + 1 = nan + + 12
olai jolao pl
20
S OBC = S AOB + S_ BOC
21
1
Jabj 1.
jzjjz jzjjz
2
a 1
3
J 1
1.
alol alol
4
gell janns: 10
S OBC = S ABC + S_ AOB
aia 15
1.
J 150
5
Imported for Baby Jogger in Europe by:
KoolTrade Ltd • Unit 3, Orbital Way
Denton, Manchester • United Kingdom M34 3QA
Bichos Atrevidos S.L.U. CIF:B82998949
Infante Don Luis 18, 28660 Boadilla-Madrid · Spain
Tel. (+34) 91485 5550
Euro-Trade Office, School & Baby Corporation
Čs. armády 360 • 735 51 Bohumín-Pudlov • Czech Republic
Euro-Trade Office, School & Baby Corporation
Dolné Rudiny 8363/5 • 010 01 Žilina • Slovakia
Alisa Company • 408 office • #26 Varshavskoye Shosse
Varshavskoye Plaza Moscow, Russia
babyjogger