ISOFIX - Baby products BABY JOGGER - Free user manual and instructions
Find the device manual for free ISOFIX BABY JOGGER in PDF.
| Technical Features | Compatible with ISOFIX systems, easy and secure installation in the vehicle. |
|---|---|
| Usage | Designed for the safe transport of babies in cars, suitable for child car seats. |
| Maintenance and Repair | Clean with a damp cloth, regularly check attachment points and the condition of the belts. |
| Safety | Complies with current safety standards for car seats, protection against side impacts. |
| General Information | Recommended for children from birth up to 18 kg, lightweight and easy to carry. |
Frequently Asked Questions - ISOFIX BABY JOGGER
User questions about ISOFIX BABY JOGGER
0 question about this device. Answer the ones you know or ask your own.
Ask a new question about this device
Download the instructions for your Baby products in PDF format for free! Find your manual ISOFIX - BABY JOGGER and take your electronic device back in hand. On this page are published all the documents necessary for the use of your device. ISOFIX by BABY JOGGER.
USER MANUAL ISOFIX BABY JOGGER
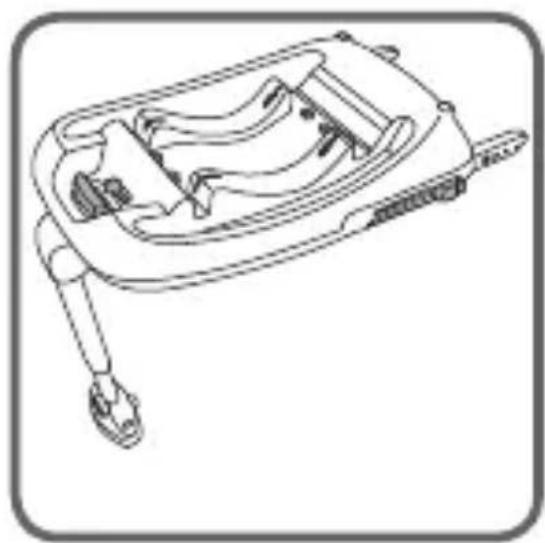
REMOVING THE BASE FROM THE VEHICLE


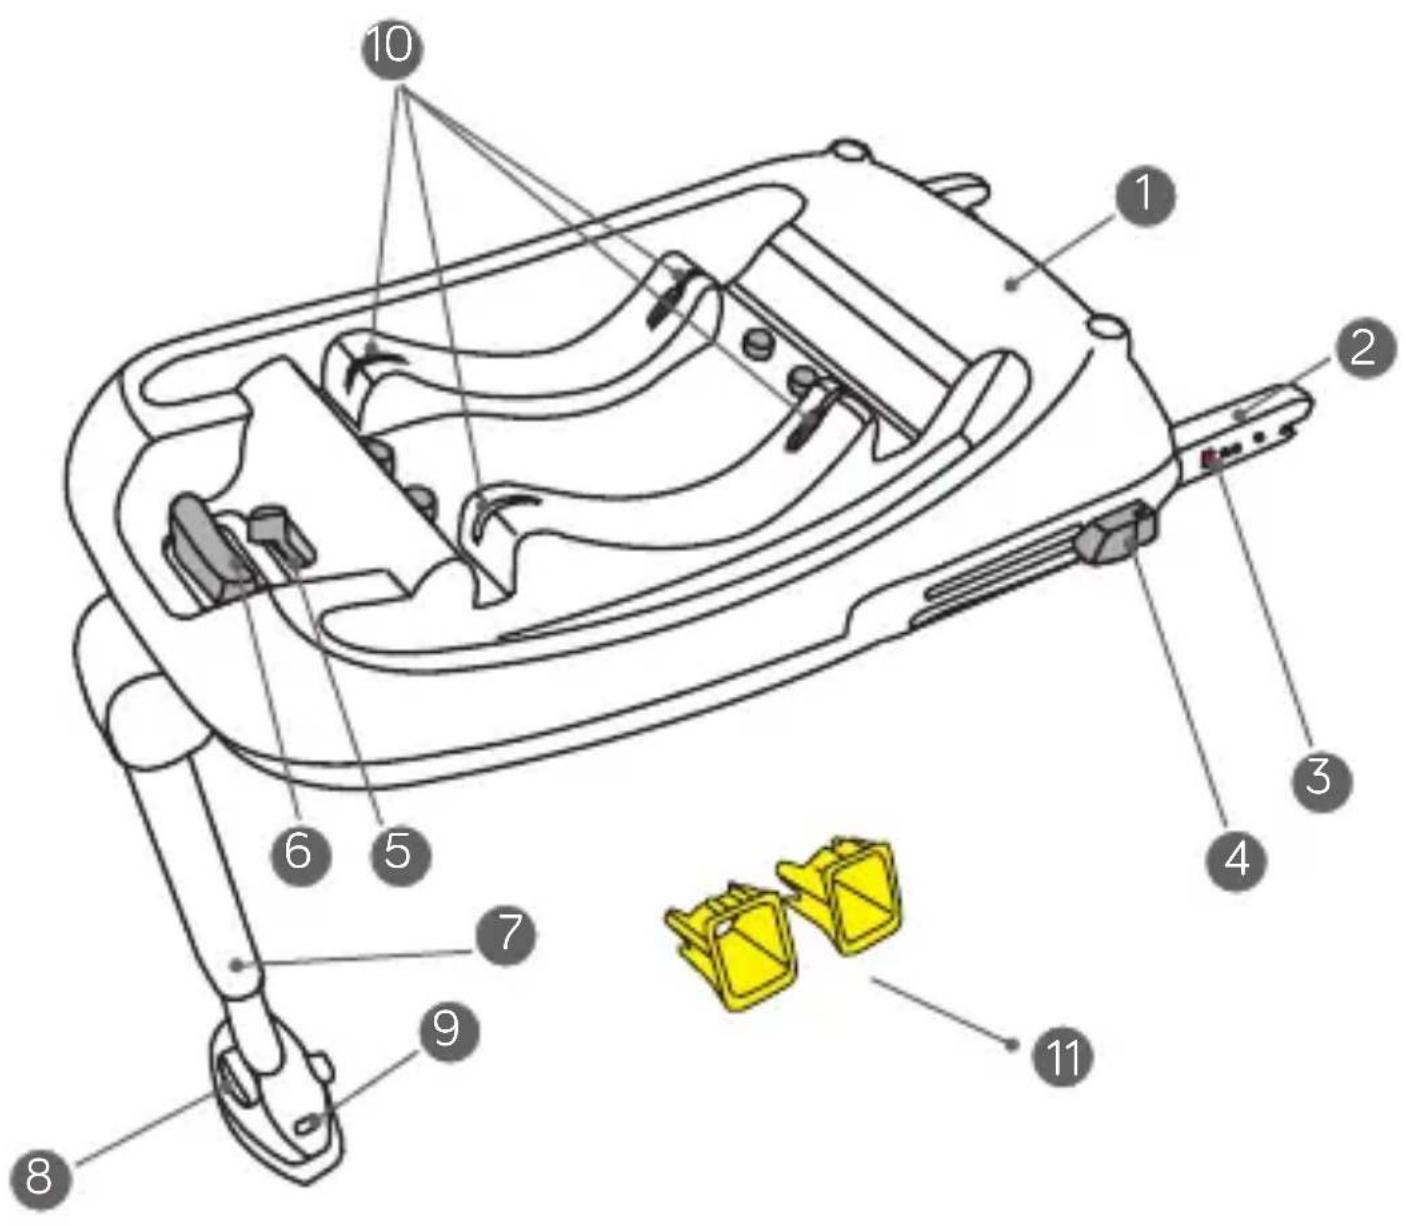
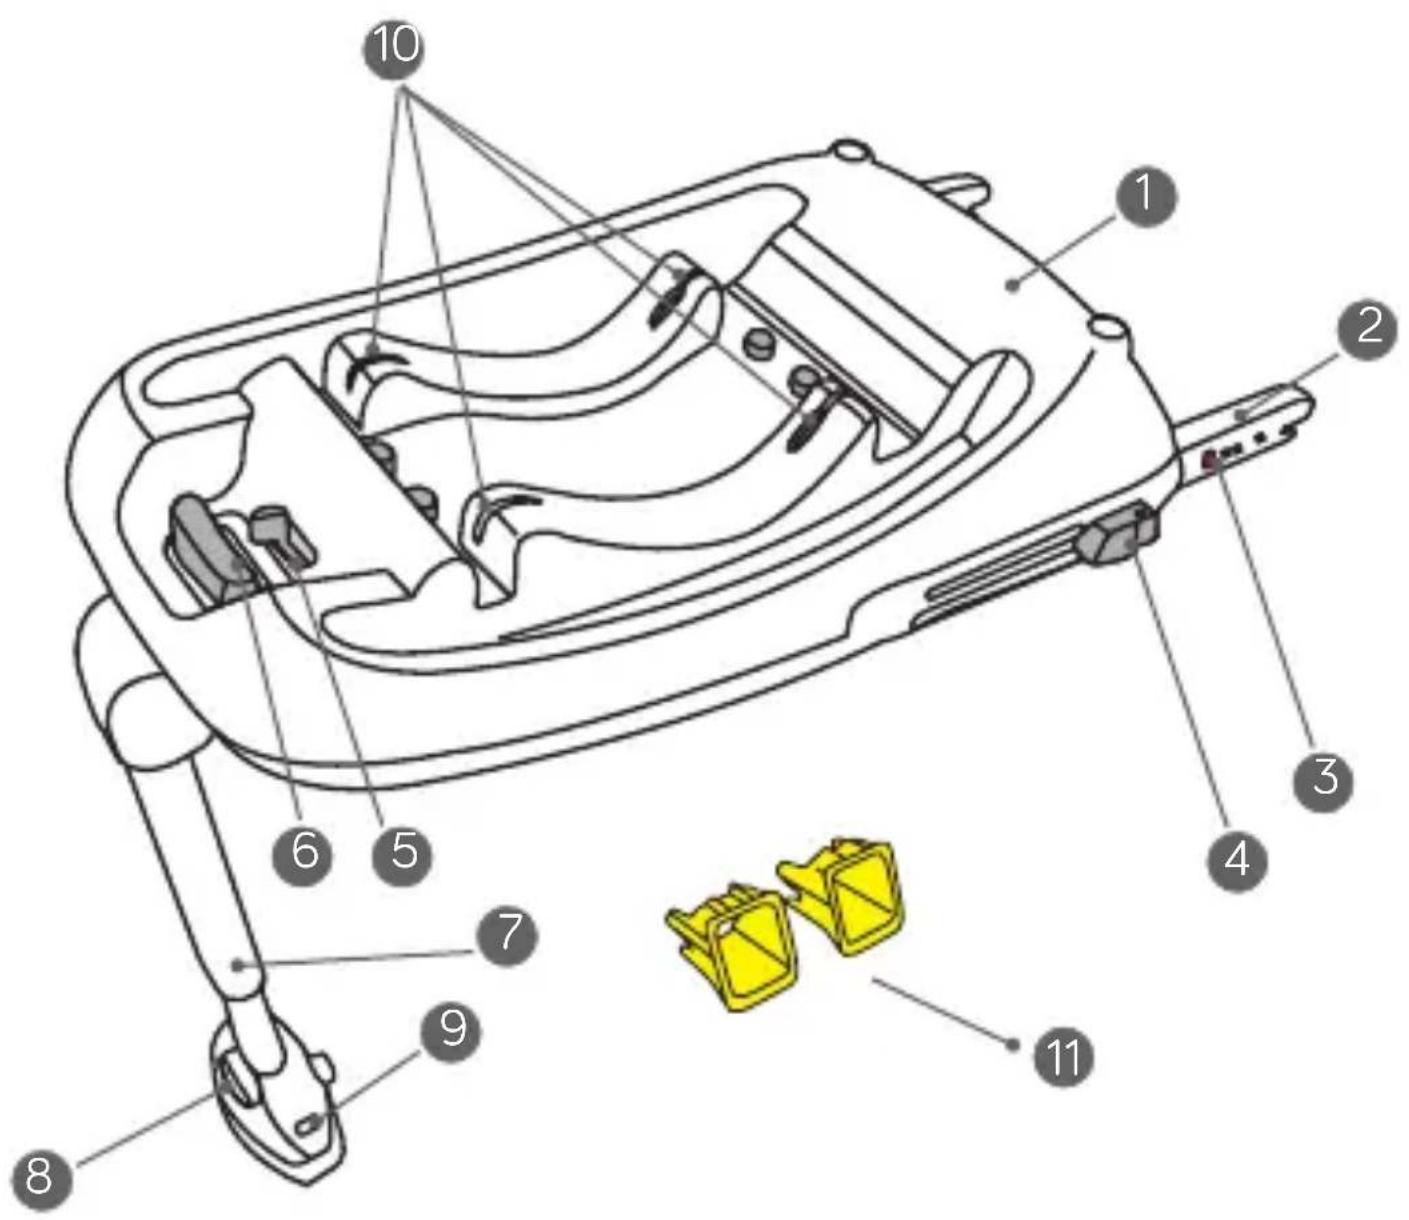
1 Base 7 Support Leg
2 ISOFIX Connector Arms 8 Support Leg Adjuster
3 ISOFIX Connection Indicator 9 Support Leg Pressure Indicators
4 ISOFIX Adjustment Button 10 Shell Connection Bars
5 Car Seat Secondary Lock Release 11ISOFIX Guides
6 Car Seat Release Button
NOTICE
- This is an ISOFIX CHILD RESTRAINT SYSTEM. It is approved to Regulation No. 44, 04 series of amendments for general use in vehicles fitted with ISOFIX anchorage systems.
- A correct fit is likely if the vehicle manufacturer has declared in the vehicle handbook that the vehicle is capable of accepting a ISOFIX attachments.
- The mass group and the ISOFIX size class for which this device is intended is: Mass Group 0+ (0-13 kg), ISOFIX Class E.
- This Child Restraint is classified for Semi-universal use and is suitable for fixing into the seat positions listed in the car fitting list provided at www.babyjogger.com
- If in doubt, consult either the child restraint manufacturer or the retailer.

WARNING
- IMPORTANT Please read all instructions in this manual and in the vehicle owner's manual related to child safety seats carefully and understand them. Install and use the child safety seat as described in the instruction manual. Failure to do this could result in
serious injury or death of your child. Keep the instruction manual with the child safety seat for future use.
- NEVER use the Car Seat on a passenger seat fitted with a front air bag. It is VERY DANGEROUS.
- This ISOFIX base is only to be used with the Baby Jogger City Go car seat.
- The base with it's adjustable front support leg has been tested and certified according to ECE R44.04 Semi-Universal approval.
- This approval will be invalidated if you make any modification or alteration to the base or infant carrier. Any modifications can only be made by the manufacturer.
- This ISOFIX base must be fitted in accordance with the user guide.
- Not all infant carrier bases fit all vehicles.
- For vehicle fitting suitability, consult the vehicle application list before you purchase and install the base to make sure that the make, model and year of your vehicle is suitable.
- Please consult the vehicle handbook for ISOFIX attachment points.
- Read the instructions carefully to ensure full understanding on installation and use.
- Do not place anything such as a towel or
cushion under the ISOFIX base. This could affect the performance of the base in an accident.
- Never buy a second hand base.
- In the case of an accident, replace the ISOFIX base. It may have unseen damage.
- Always secure the base on the vehicle's ISOFIX points. All occupants in the vehicle must be correctly restrained complying with the current law.
- DO NOT place any objects in the footwell in front of the ISOFIX base.
- Do not allow children to play with or adjust the ISOFIX base.
- Do not leave children alone in the vehicle.
- Do not place the ISOFIX base on a table or high surface, always use the floor.
- Always be sure the ISOFIX base does not become trapped in the vehicle door or by a folding seat.
- Make sure that all folding vehicle seats are securely latched.
- Do not fit the ISOFIX base on a side or rear facing vehicle seat.
-
Always store the ISOFIX base in a safe, dry environment when it is not in use.
-
The rigid items and plastic parts car seat must be locate and install the car seat so that it is not liable to become trapped by a moveable seat or in a door of the vehicle.
- DO make sure to properly secure any loose objects, such as luggage or books, in your car as they may cause injuries in the event of an crash.
- Do not use load bearing points other than those specified by restraint manufacturer in the instructions or on the restraint body.
INSTALLING THE BASE
- Install ISOFIX guides on vehicle lower anchor bars.
2 Pull out the support leg from the attachment.
3 Pinch the Adjustment buttons on each side of the car seat and slide out the ISOFIX attachment legs. The length is adjustable in 8 different positions.
4 Attach the ISOFIX connector arms to the lower anchor bars.
5 Push the adjustment buttons towards the ISOFIX anchors until both connectors are locked and the indicators are green on both sides.
6 Push the base back towards the seat back, making sure the base is installed firmly against the seat back.
7 Push the support leg adjuster and adjust the support leg so that it makes full and firm contact with the vehicle floor. The two pressure monitors at the base of the support leg must turn from red to green to ensure proper installation. Check that the front support leg clicks into position and is correctly adjusted.
Note:
- Check that the front support leg clicks into position and is correctly adjusted.
- Do not place the front support leg on a floor storage compartment lid. The front support leg MUST make full contact with the vehicle floor.
- Make sure the support leg does not raise the base from the surface of the vehicle seat.
ATTACHING THE CAR SEAT TO THE BASE
8 Lower the carseat on to the base and make sure that all 4 connection bars engage firmly and click into position on the base connection points. Make sure the infant carrier handle is in the upright position and that it clicks into place.
9 Lift the car seat to make sure that all four connections have engaged and the three connection indicators have changed from red to green.
DETACHING THE CAR SEAT FROM THE BASE
10 While sliding the secondary lock to the left, pull the seat release button to release the car seat from the base.
11 Lift up to remove car seat.
REMOVING THE BASE FROM THE VEHICLE
12 Squeeze the ISOFIX adjustment buttons on each side of base to release the connector arms. Slide adjustment buttons back to the "8" position to store connector arms. Push the support leg adjustment button to adjust leg and place in the storage area under the base. Remove base from vehicle.
13 Store instruction manual under the the seat pad in the groove in the seat.
1 Base 7 Support Leg
2 ISOFIX Connector Arms 8 Support Leg Adjuster
3 ISOFIX Connection Indicator 9 Support Leg Pressure Indicators
4 ISOFIX Adjustment Button 10 Shell Connection Bars
5 Car Seat Secondary Lock Release 11ISOFIX Guides
6 Car Seat Release Button
KENNISGEVING
Dit is
een
KINDERBEVEILIGINGSSYSTEM.
1 Base 7 Support Leg
2 ISOFIX Connector Arms 8 Support Leg Adjuster
3 ISOFIX Connection Indicator 9 Support Leg Pressure Indicators
4 ISOFIX Adjustment Button 10 Shell Connection Bars
5 Car Seat Secondary Lock Release 11ISOFIX Guides
6 Car Seat Release Button
MERKNAD
- Dette er et ISOFIX BARNESETESYSTEM. Det er godkjent i henhold til Forskrift nr. 44, 04, endringsserien, for generell bruk i kjoretøyen utstyrt med ISOFIX forankringssystemer.
Riktig tilpasning er sannsynlig hvis kjoretøyprodusenten har erklært i handboken for kjoretyet at kjoretyet kan holde ISOFIX festeanordninger. - Massegruppen og ISOFIX størrelsesklasse som davon erhoten er beregnet for en Massegruppe 0+ (0-13 kg), ISOFIX klasse E.
- Dette barnesetet er klassifisert for halv-universell bruk og passer til forankring i setestillinger som eroppførtbiltilpassingslisten som finnes på www.babyjogger.com
- Hvis du er i tvil, kontakt barneseteprodusenter aller forhandleren.

ADVARSEL
1 Base 7 Support Leg
2 ISOFIX Connector Arms 8 Support Leg Adjuster
3 ISOFIX Connection Indicator 9 Support Leg Pressure Indicators
4 ISOFIX Adjustment Button 10 Shell Connection Bars
5 Car Seat Secondary Lock Release 11ISOFIX Guides
6 Car Seat Release Button
ADVERTENCIA
A Newell Rubbermaid Company
6655 Peachtree-Dunwoody Rd. NE • Atlanta, GA 30328
T: 800.241.1848 • F: 804.262.6277 • www.babyjogger.com