City Tour 2 - Stroller BABY JOGGER - Free user manual and instructions
Find the device manual for free City Tour 2 BABY JOGGER in PDF.
User questions about City Tour 2 BABY JOGGER
0 question about this device. Answer the ones you know or ask your own.
Ask a new question about this device
Download the instructions for your Stroller in PDF format for free! Find your manual City Tour 2 - BABY JOGGER and take your electronic device back in hand. On this page are published all the documents necessary for the use of your device. City Tour 2 by BABY JOGGER.
USER MANUAL City Tour 2 BABY JOGGER
natural_image
Line drawing of a baby stroller with car seat and seatbelt (no text or symbols)ASSEMBLY INSTRUCTIONS INSTRUCTIONS D'ASSEMBLAGE INSTRUCCIONES DE MONTAJE ISTRUZIONI PER IL MONTAGGIO GEBRAUCHSANLEITUNG NÁVOD K SESTAVENÍ SAMLINGSANVISNINGER KOKOAMISOHJEET ОДНГИЕЗ ЗУНАРМОЛОГНЕНЗ UPUTE ZA SASTAVLJANJE OSSZESZERELÉSI UTASÍTÁSOK MONTAGE INSTRUCTIES: MONTERINGSANVISNING INSTRUKCJA MONTAZU INSTRUÇÕES DE MONTAGEM INSTRUCTIUNI DE ASAMBLARE ИНСТРУКЦИИ ПО СБОРКЕ UPUTSTVA ZA SASTAVLJANJE NÁVOD NA MONTÁŽ NAVODILA ZA SESTAVO MONTERINGSINSTRUKTIONER MONTAJ TALİMATLARI إرشادات التجめる
©2016 PD349311F 7/16

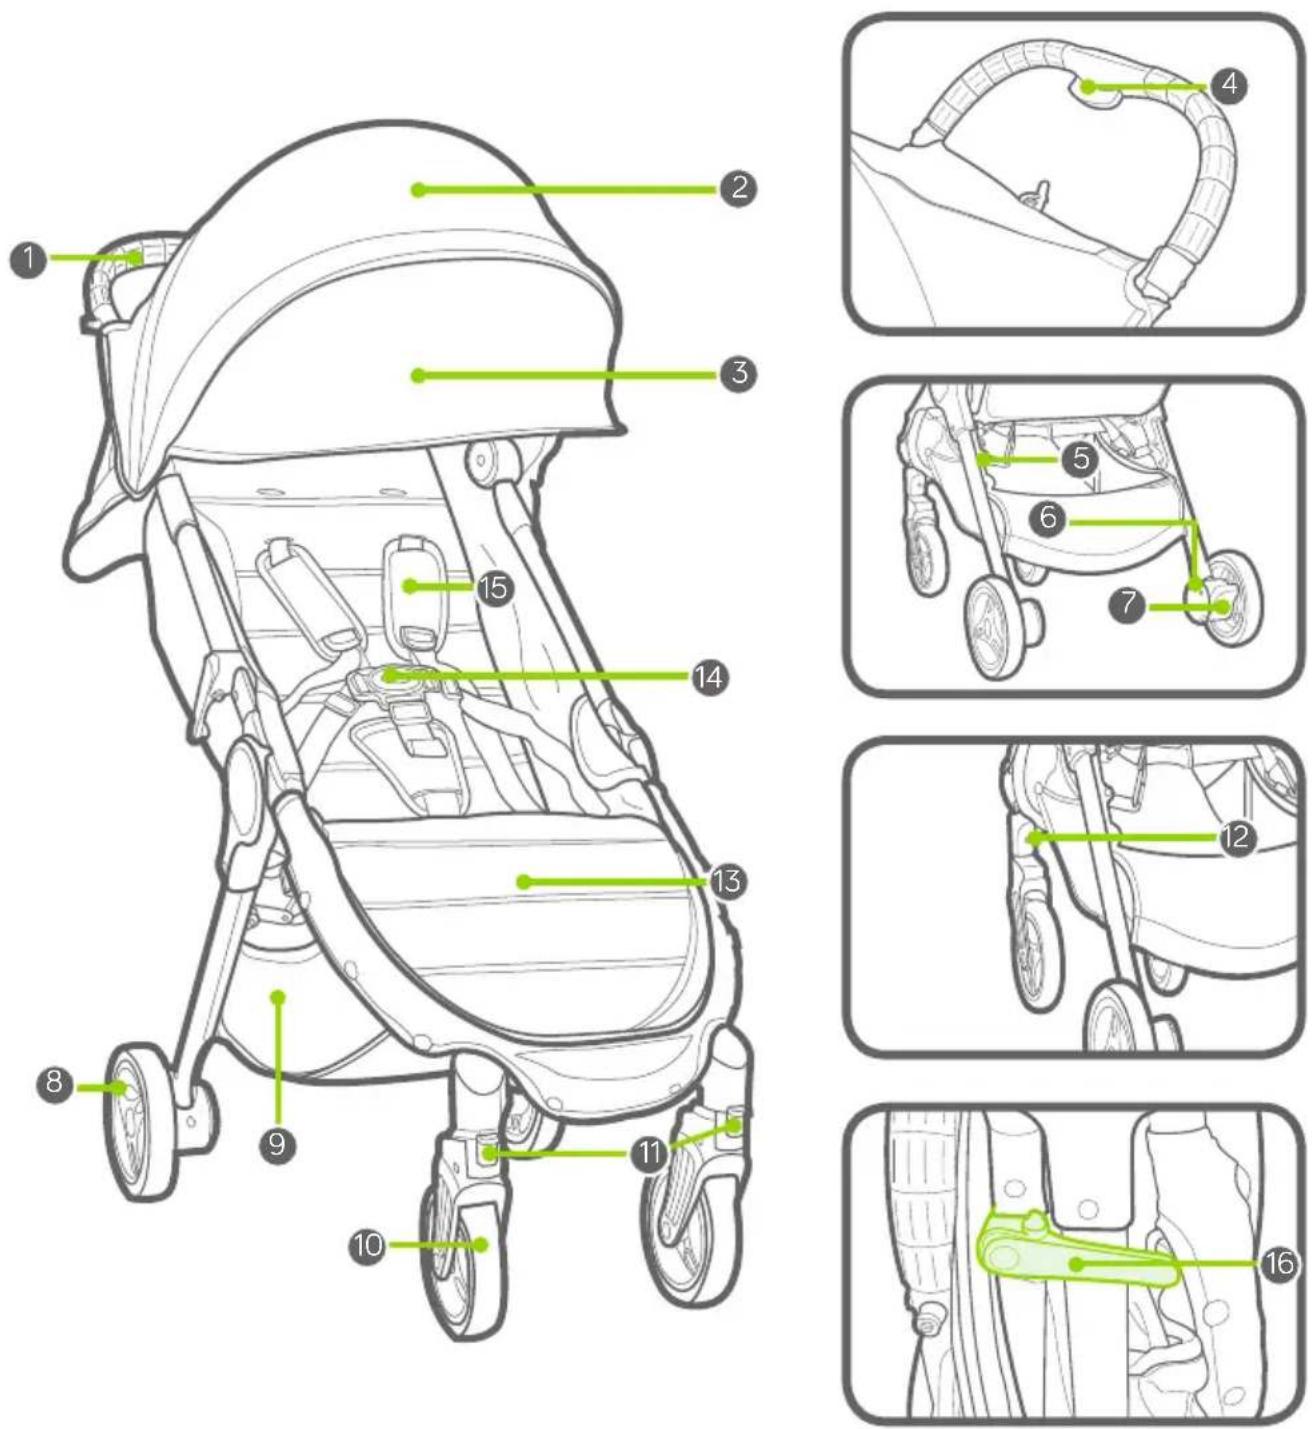
1 Handlebar 9 Storage Basket
2 Canopy 10 Front Wheel
3 Canopy Extension 11 Swivel/Lock
4 Handlebar Fold Button 12 Front Wheel Release Button
5 Lock Release Button 13 Footwell
6 Rear Wheel Release Button 14 Harness Buckle
7 Parking Brake 15 Harness Pads
8 Rear Wheel 16 Auto-lock
text_image
Diagram illustrating the use of a handbell mechanism with labeled parts and magnified detail view
natural_image
Diagram of a bicycle seat assembly with red directional arrows indicating rotation (no text or labels)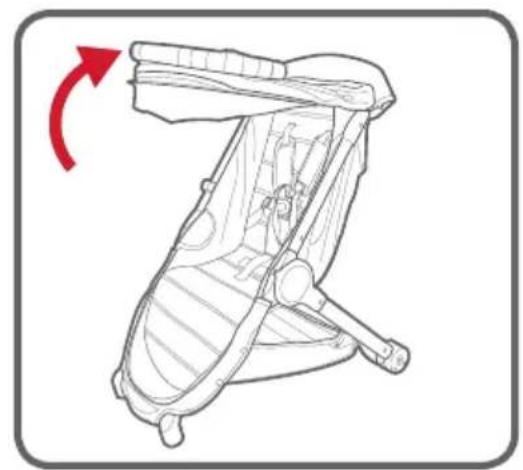
natural_image
Line drawing of a car seat assembly with a red arrow indicating rotational motion (no text or symbols)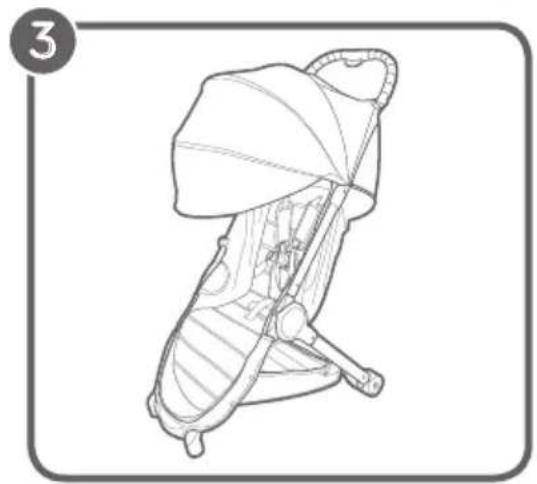
natural_image
Line drawing of a baby seat with adjustable arm and seatbelt (no text or symbols)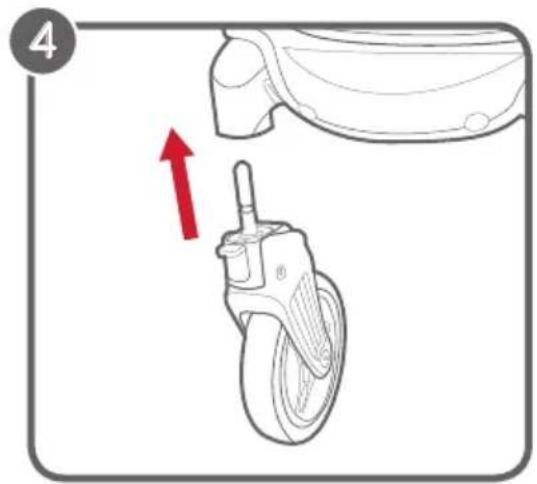
natural_image
Diagram showing a car wheel and its adjustment mechanism with red arrows indicating motion (no text or symbols)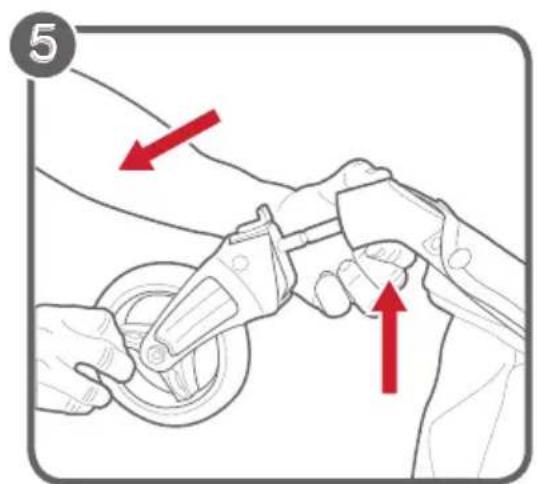
text_image
5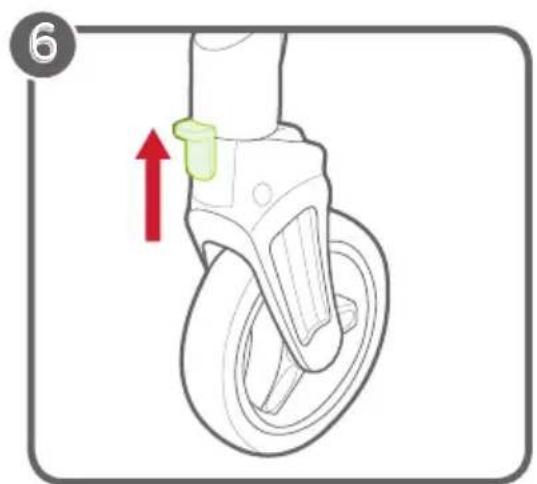
natural_image
Illustration of a car steering wheel with a red arrow indicating motion direction (no text or symbols)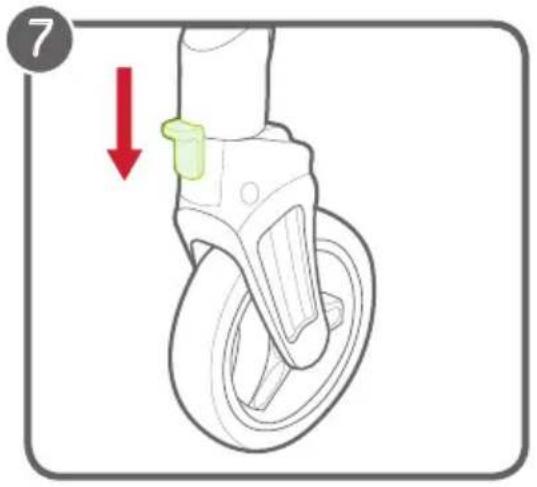
natural_image
Illustration of a car steering wheel with a red arrow indicating motion direction (no text or symbols)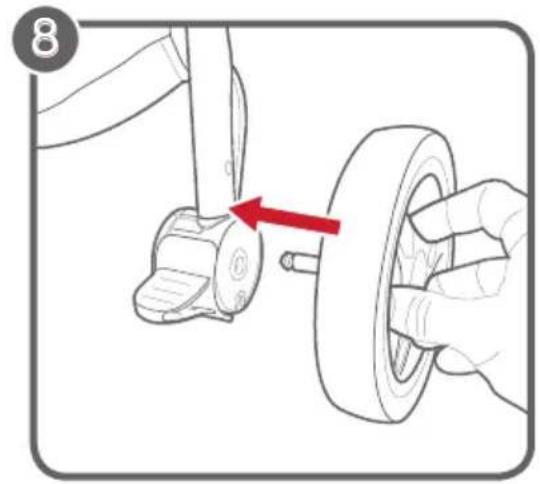
text_image
8
text_image
9
text_image
10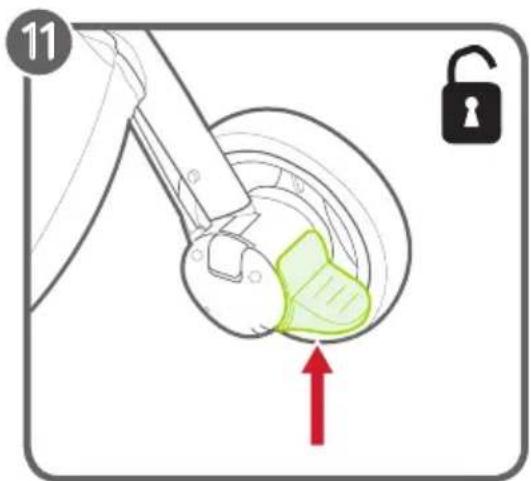
text_image
11 ↑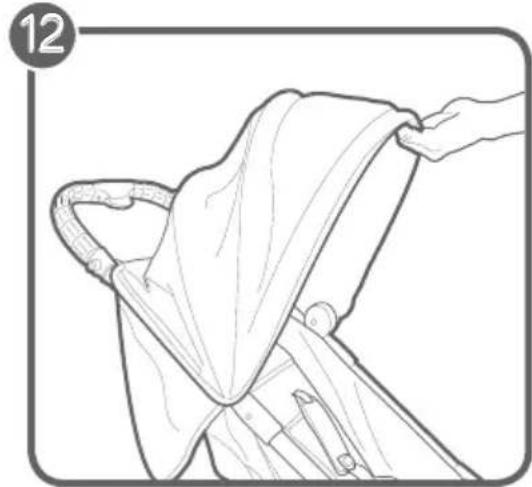
natural_image
Line drawing of a person folding a fabric or cloth, no text or symbols present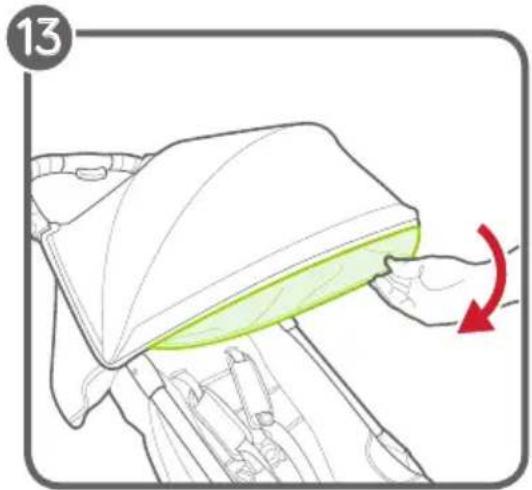
natural_image
Illustration of a hand pressing down on a bicycle seat cover with a red arrow indicating rotation (no text or symbols)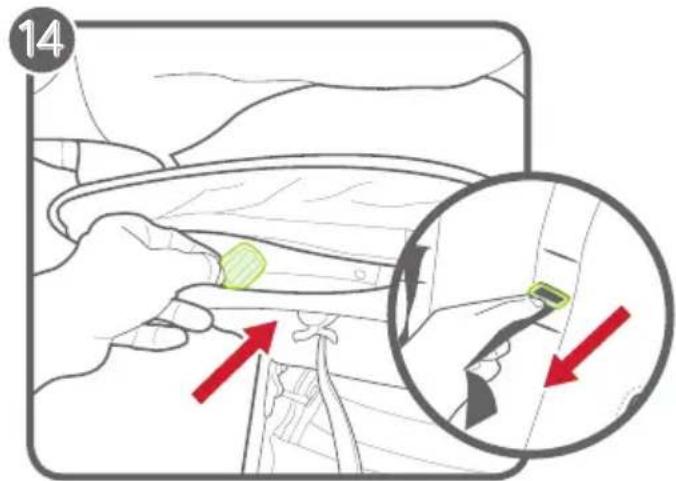
text_image
14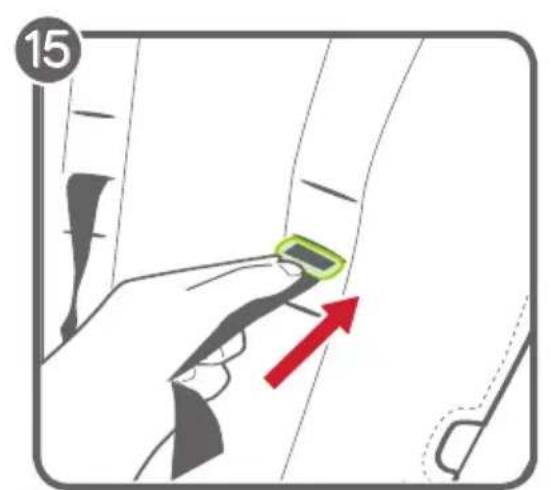
text_image
15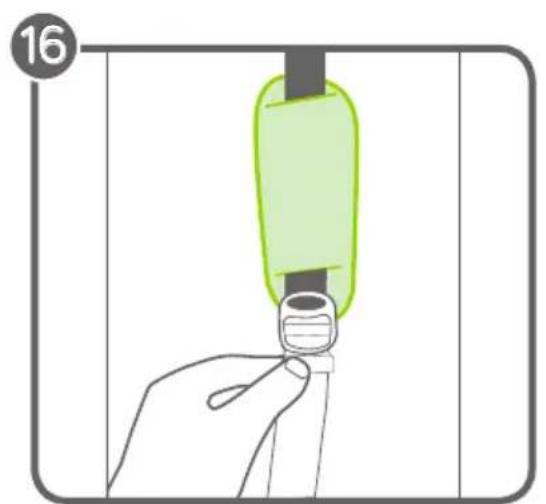
natural_image
Illustration of a hand holding a small object with a green-labeled object inserted, no text or symbols present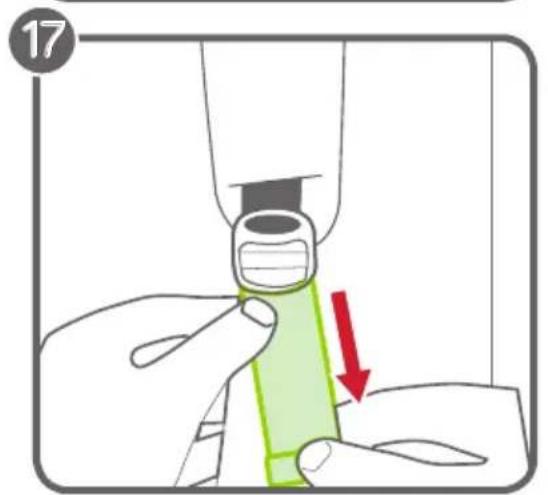
text_image
17
natural_image
Illustration of a hand fastening a small object with a red arrow indicating downward motion (no text or symbols)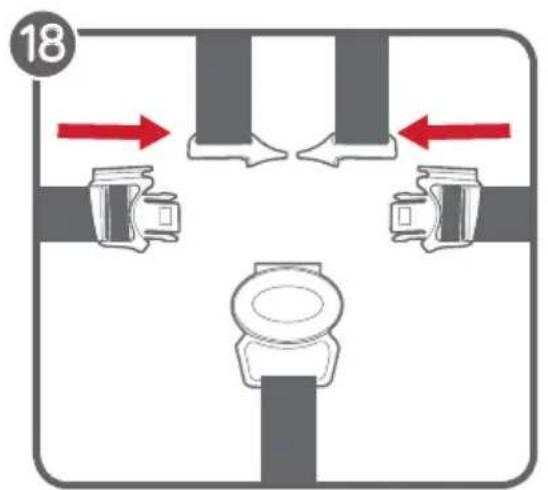
text_image
18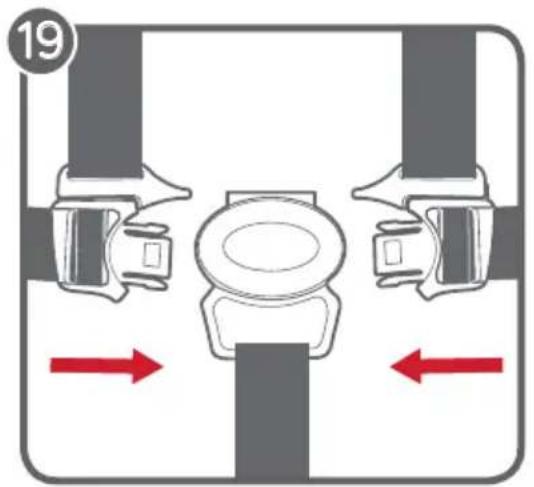
natural_image
Diagram of a mechanical or electrical component with two vertical arms and a central circular component, showing red directional arrows (no text or symbols)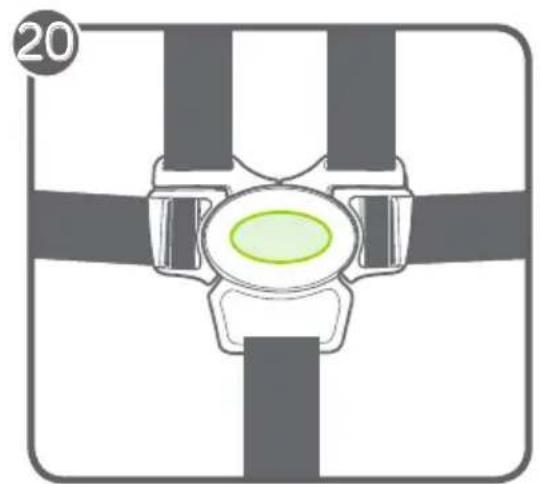
natural_image
Diagram of a mechanical or electrical component with four vertical bars and a central oval (no text or symbols)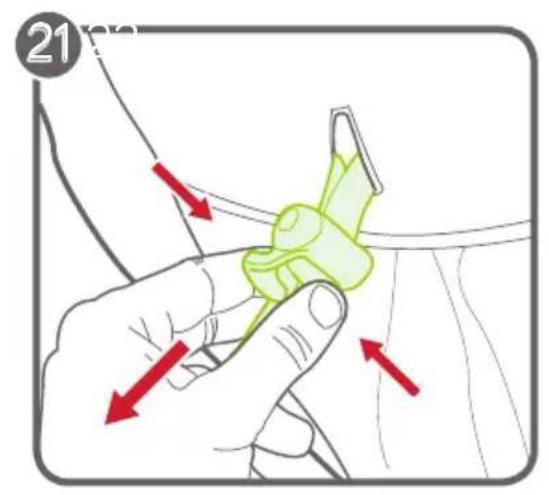
text_image
21 mm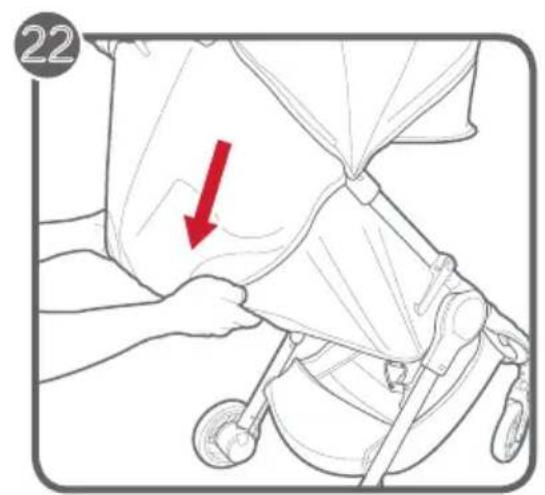
text_image
22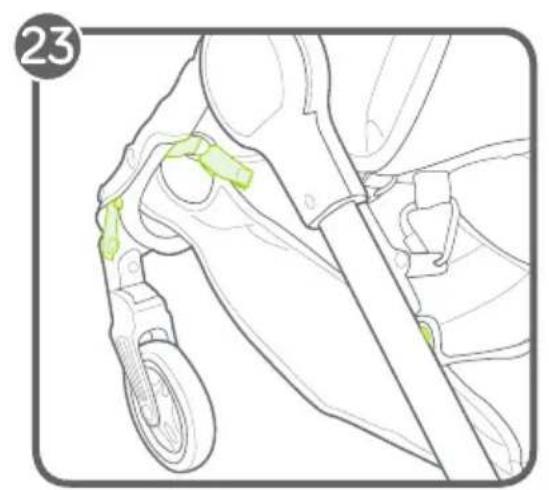
natural_image
Line drawing of a scooter interior with green accents, no text or symbols present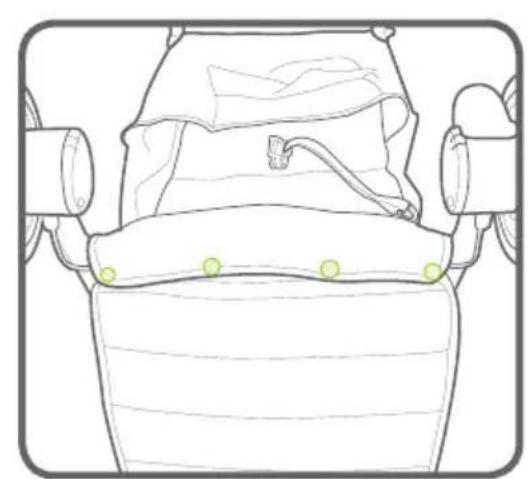
natural_image
Diagram of an insect head with visible anatomical structures and green dots indicating specific points (no text or labels)
natural_image
Illustration of a hand holding a flexible hose with a green tag, no text or symbols present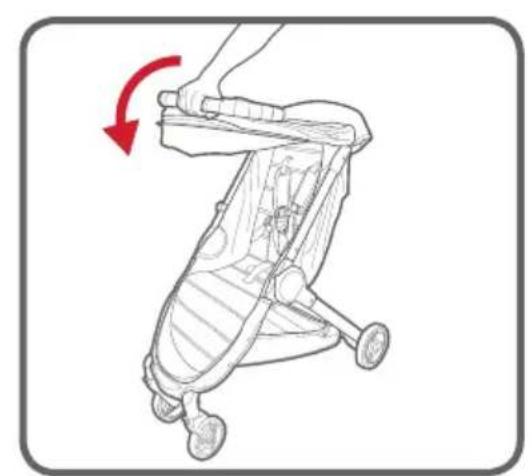
natural_image
Line drawing of a baby stroller with a hand adjusting the seat (no text or symbols)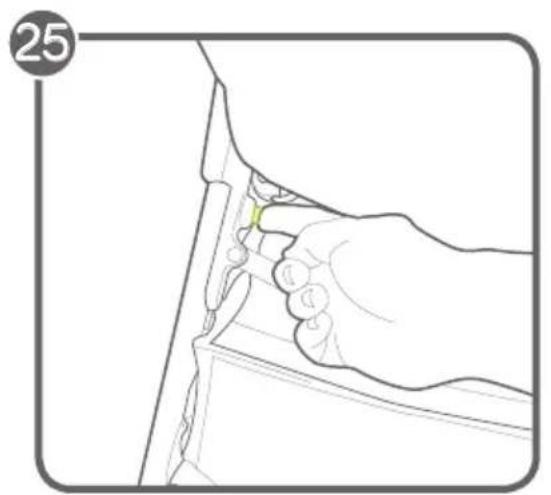
natural_image
Line drawing of a hand inserting a small component into a device (no text or symbols)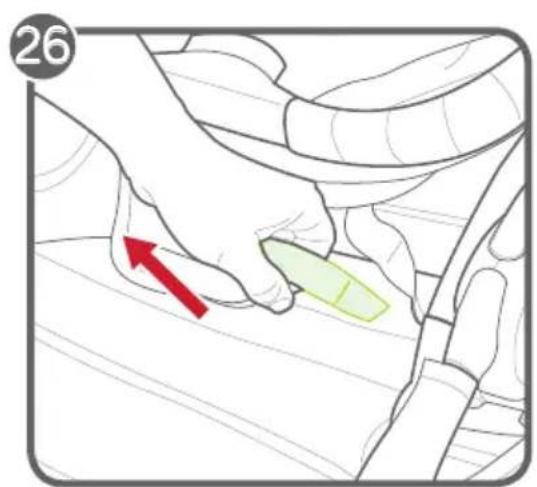
text_image
26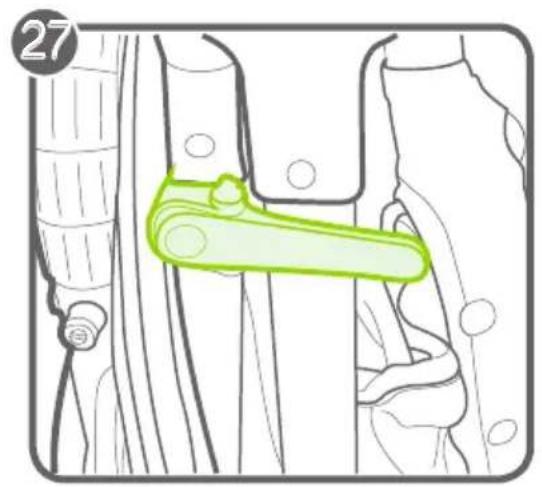
natural_image
Diagram of a mechanical component with a green handle, no visible text or symbols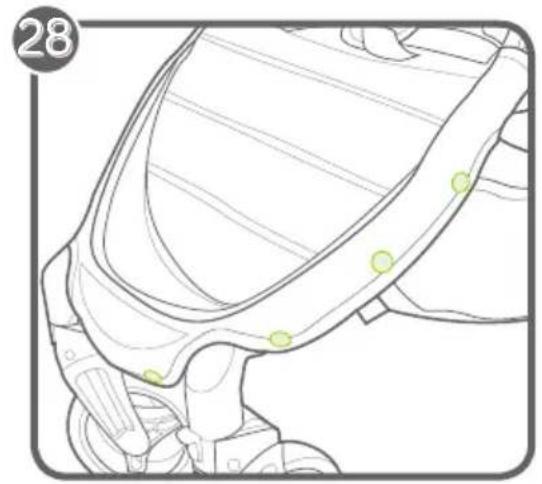
natural_image
Technical line drawing of a mechanical component with green circular markers indicating features (no text or symbols)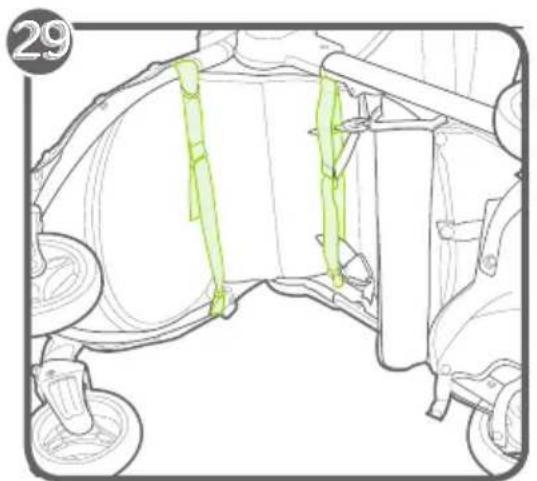
natural_image
Technical line drawing of a vehicle chassis with green safety stripes, no visible text or symbols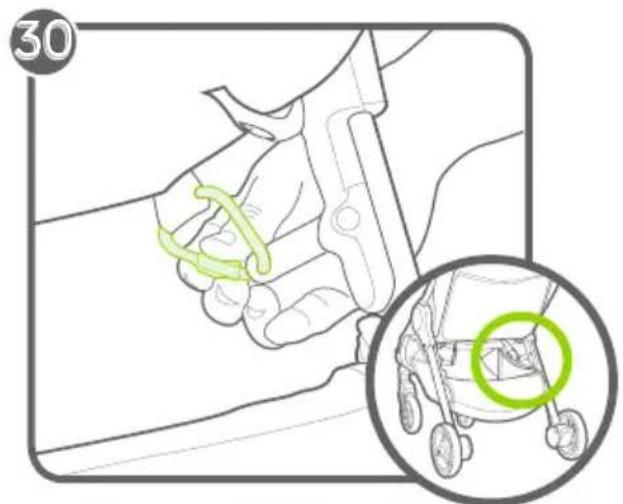
natural_image
Illustration of a hand holding a green tool, with an inset showing a close-up of a stroller (no text or symbols)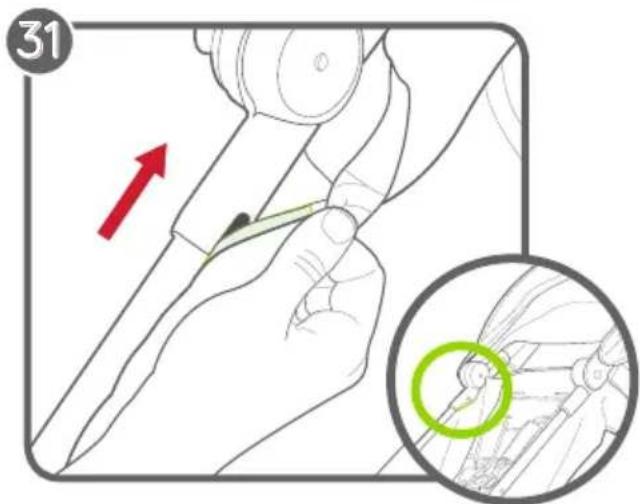
text_image
31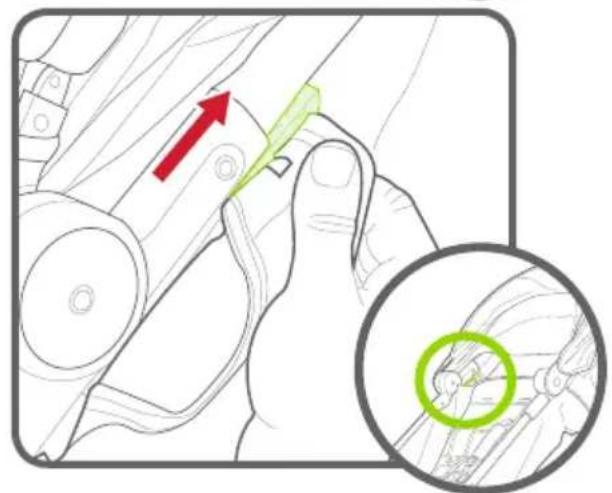
natural_image
Diagram showing a hand holding a tool with a green arrow and red arrow pointing upward, alongside an inset close-up of a mechanical component (no text or symbols)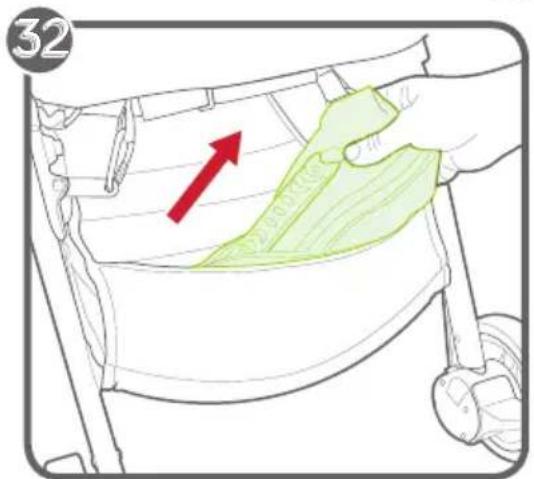
text_image
32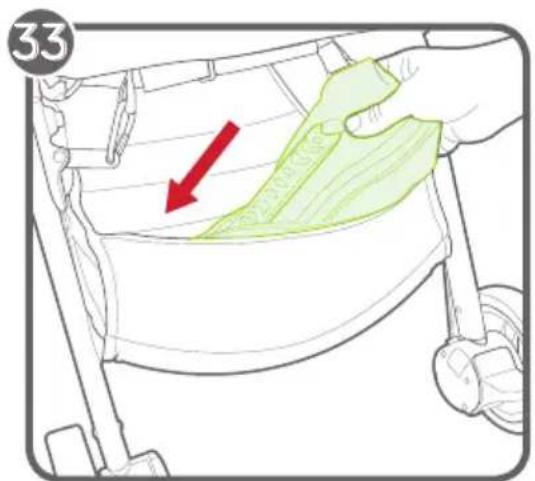
text_image
33
WARNING
IMPORTANT - Keep these instructions for future reference.
Read these instructions carefully before use. Your child's safety may be affected if you do not follow these instructions.
SINGLE STROLLER
- This stroller seats one passenger. NEVER allow more than one child at a time on this stroller.
- This seat unit is not suitable for children under 6 months. Maximum weight is 15 kg (33 lb); maximum height is 101.6 cm (40 in).
- Total weight load recommended for this stroller is 23 kg (50 lb). 15 kg (33 lb) in the seat, 1 kg (2 lb) in the seat back pocket, and 7 kg (15 lb) in the basket.
- This stroller is not suitable for running or skating.
• Never leave your child unattended.
• Always use the restraint system. - To avoid injury, ensure that your child is kept away when unfolding and folding this product.
- Do not let your child play with this product.
- Parcels or accessory items, or both, placed on the unit may cause the unit to become unstable.
-
Any load attached to the handle and/or on the back of the backrest and/or on the sides of the vehicle will affect the stability of the vehicle.
-
Ensure that all the locking devices are engaged before use.
- Lock the brakes before loading and unloading your child and whenever the stroller is not moving.
- Stroller is not meant to be used for transporting children up or down stairs or escalators. Damage resulting to stroller will not be covered under warranty.
- This stroller does not replace a cot or a bed. Should your child need to sleep, then it should be placed in a suitable pram body, cot, or bed.
- Accessories which are not approved by Baby Jogger shall not be used.
- Watch out for cars - never assume that a driver can see you and your child.
- The passenger shall remain seated (no standing in the stroller).
- Use only replacement parts supplied or approved by Baby Jogger.
FRAME
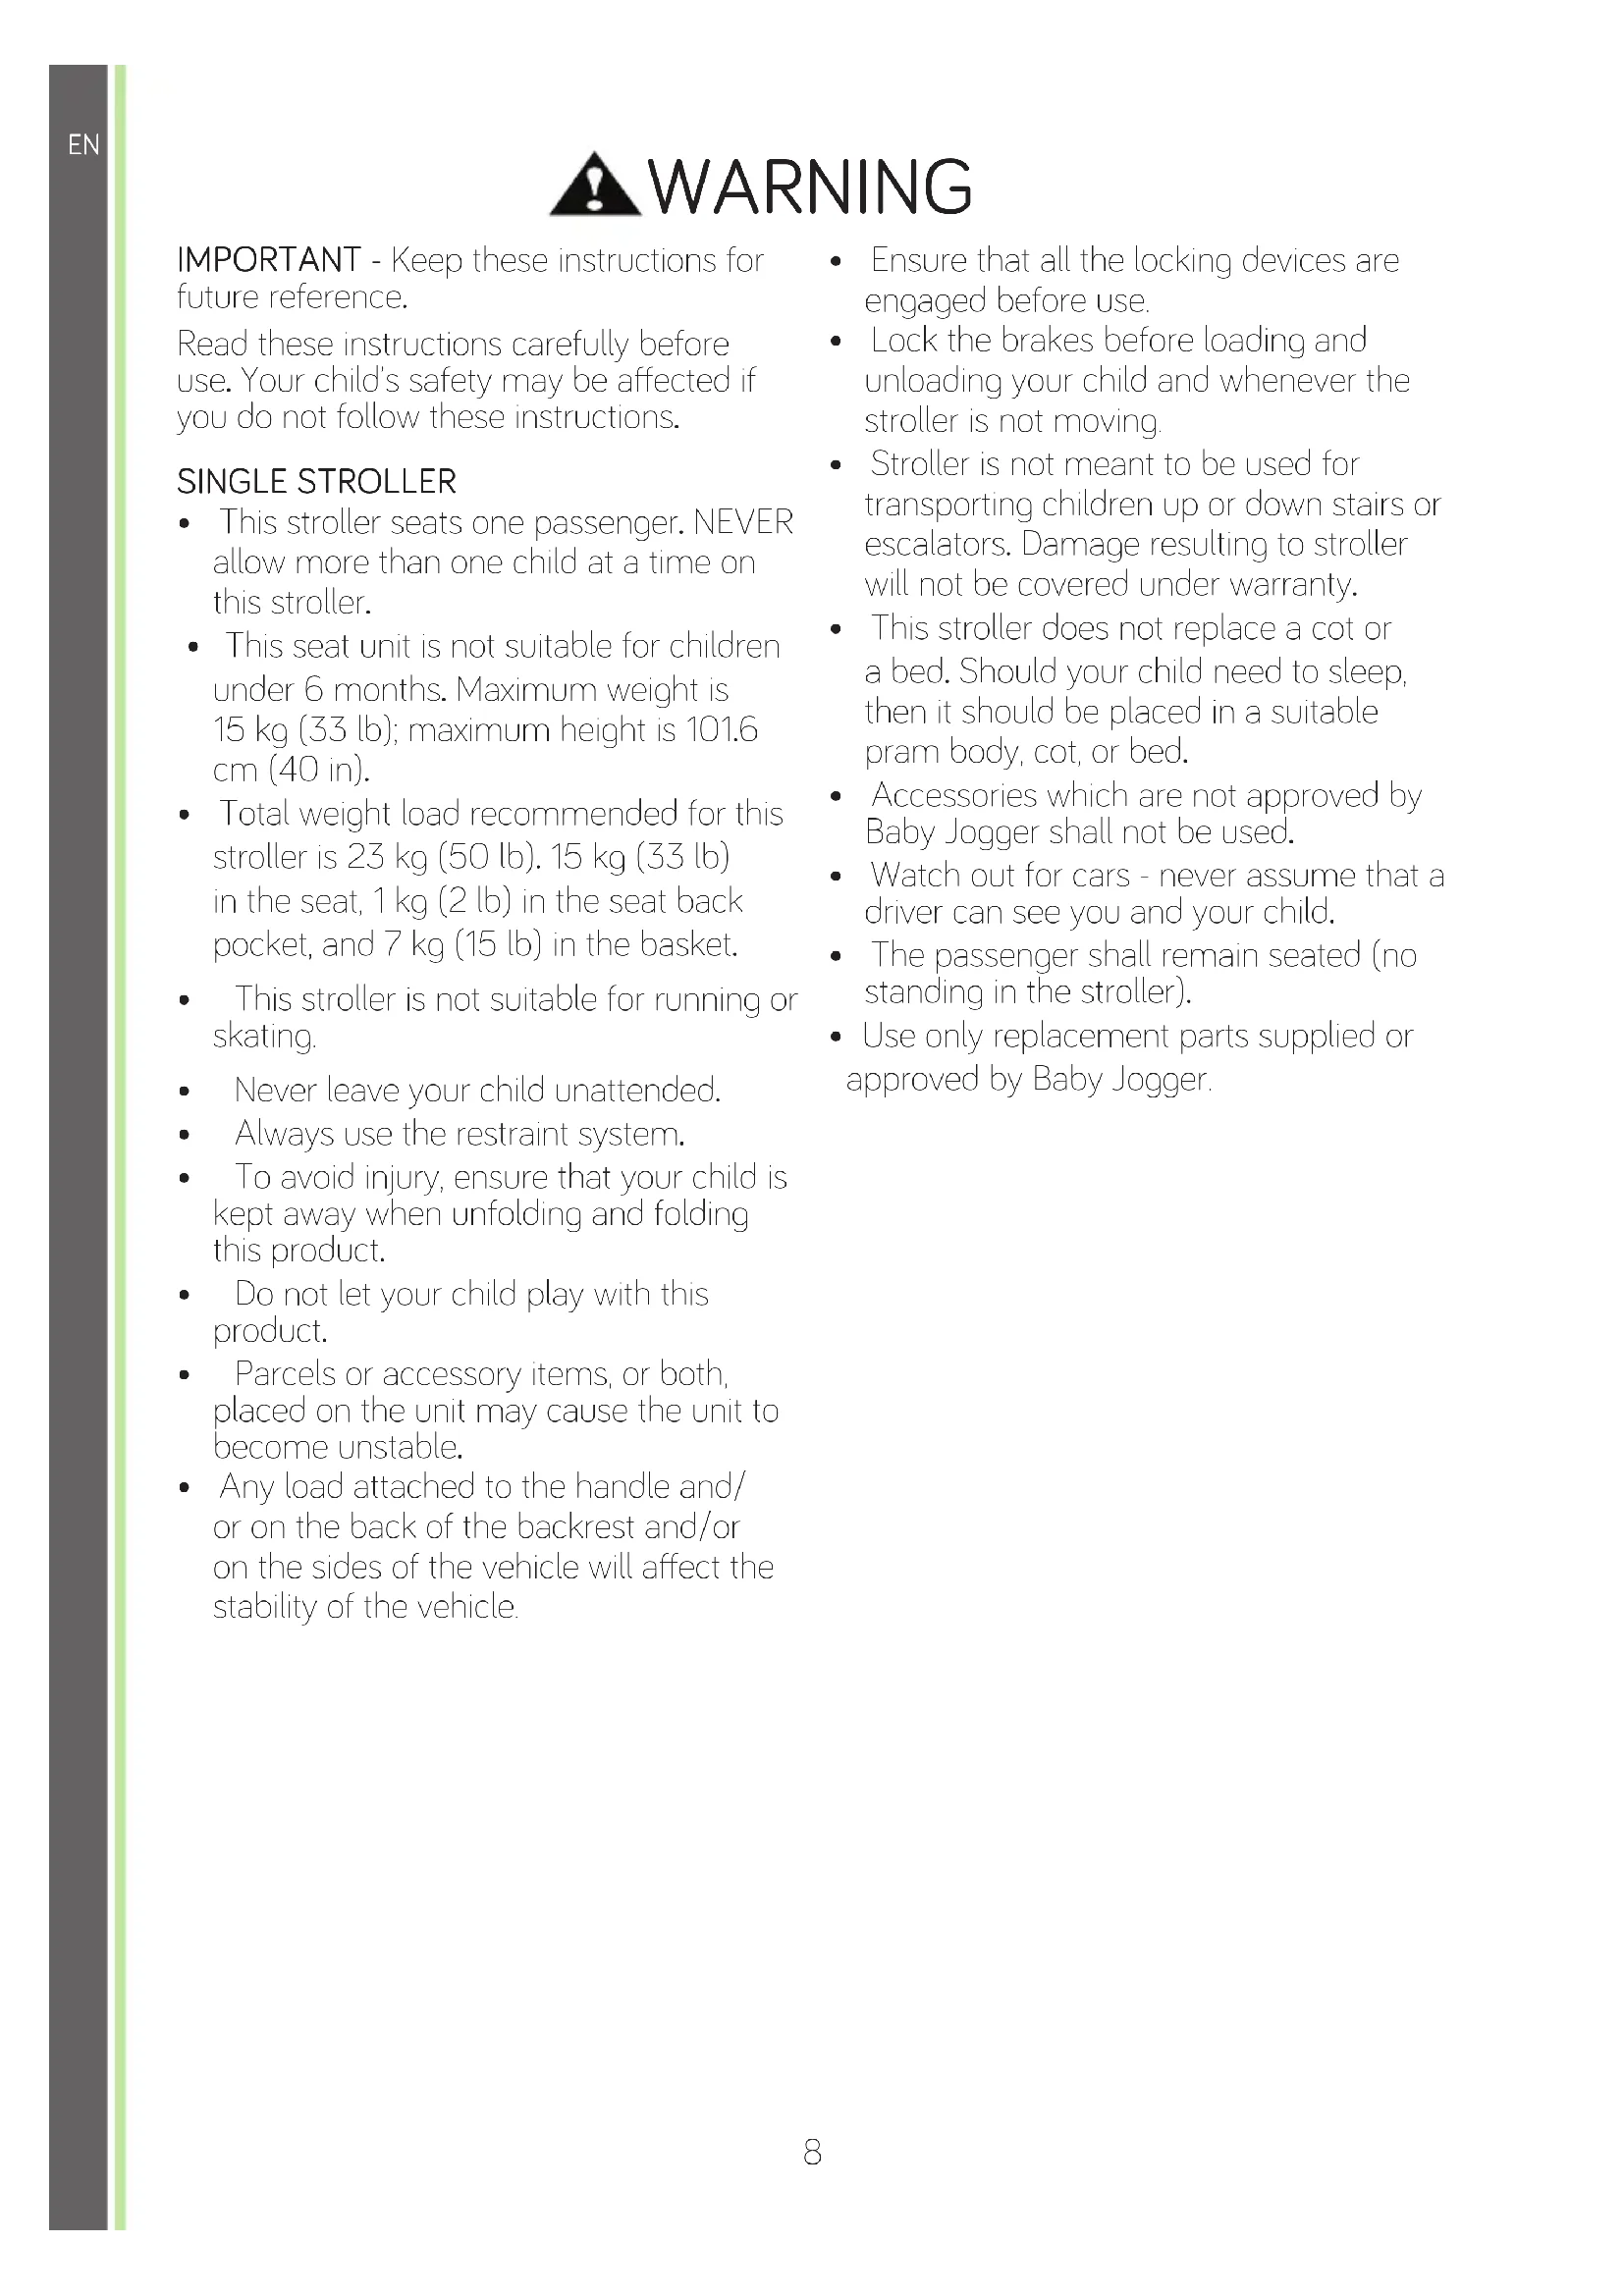
1 Unpack the stroller frame from the box and set the wheels aside. Unlock the stroller by pulling the auto-lock lever.
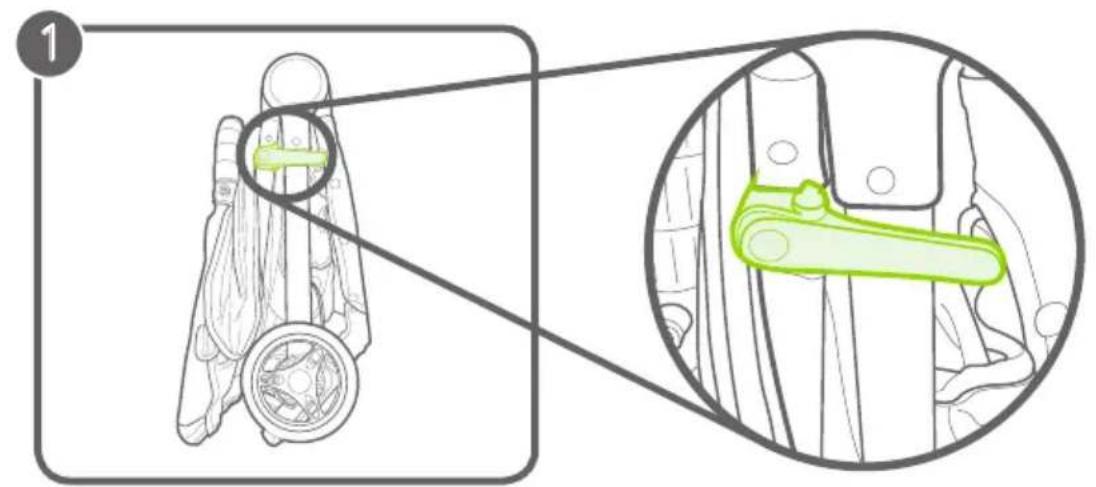
2 Lift the footwell and seat away from the lower frame. Then lift the handlebar away from the seat. The stroller will lock into place and you will hear a click.
3 Place the stroller in the upright position.
WARNING: Ensure that all the locking devices are engaged before use.
FRONT WHEEL
4Installation
- Lay stroller on its back so the handlebar is resting on the floor.
- Attach the front wheel by sliding it into the front wheel mount until it clicks. Gently pull on the front wheel to make sure it is properly attached.
5Removal
- While pressing the front wheel release button, gently slide the front wheel out of the front wheel mount.
SWIVEL FEATURE
6 Push the swivel lock button up to lock the front wheel to a fixed position.
7 Press the swivel lock button down to allow the front wheel assembly to swivel.
WARNING: When loading and unloading child, lock the front wheel in a fixed position. Although the front wheel of your stroller locks, it is not intended for jogging or exercise purposes.
REAR WHEELS
8Installation
- Align the rear wheel axle with the wheel mount on the stroller frame and insert it into the wheel mount until it locks into place. You will hear a click.
• Gently pull on the rear wheel to make sure it is properly attached.
9Removal
- While pressing down on the wheel release button, gently slide the rear wheel out of the wheel mount.
BRAKE
10 To lock the brakes: push the brake lever down to engage the brakes.
11 To release the brakes: lift the brake lever up.
WARNING: Lock the brakes before loading and unloading your child and whenever the stroller is not moving.
CANOPY
12 Pull forward to open canopy, push backwards to close canopy.
13 To use the canopy extension: Pull the extension out from under the canopy until it snaps into place, push the extension under the main canopy to hide.
ADJUSTING SAFETY HARNESS
14 From the back of the seat, undo the fastening strip and open the pocket to locate the plastic square stopper. Turn stopper and pass through the openings in the PE board and seat fabric.
15 Reinsert stopper at seat opening closest to child's shoulders. Pass back through seat fabric and PE board. Tug on strap to ensure stopper is locked. Repeat on both sides.
WARNING: Avoid serious injury from falling or sliding out. Always properly adjust and fasten safety harness.
WARNING: Always use the crotch strap in combination with the shoulder straps and waist belt.
16 Slide the harness pads up to access plastic guide on strap.
17 Hold the plastic guide and pull strap to tighten or loosen.
USING SAFETY HARNESS
18 Insert side strap buckle into harness buckle on both sides.
19 Insert connected harness and side strap buckles into the sides of the crotch buckle.
20 Press button on crotch buckle to release.
RECLINE THE SEAT
21 Pinch the clamp behind the seat, and slide it down to desired recline.
22 Pull seat down on both sides to match the clamp position. Reverse steps to return to the upright position.
WARNING: When making adjustments to the stoller seat, make sure child's head, arms, and legs are clear of moving seat parts and stroller frame.
BASKET REMOVAL
23 Unfasten the snaps of the Basket from the front, rear, and under the back support bar.
FOLDING
- Remove your child from the seat.
• Disengage front wheel swivel locks. - Remove all attachments and all items from basket.
24 Squeeze the fold button on the handle bar and fold the frame forward.
25 Push the red lock release button.
26 Pull up on the "Pull to Fold" folding handle and let the frame collapse.
27 Make sure the auto-lock lever clicks into place.
REMOVING THE SEAT FABRIC
28 Unsnap the seat fabric from the seat frame on both sides.
29 From the underside of the seat, unfasten the hook-and-loop and slide the strap through the D-ring.
30 Remove the "Pull to Fold" folding handle from the frame by unfastening the triangle carabiner hooks and slide the straps through the seat.
31 Pull the seat fabric out of the channels in the frame.
CARRY BAG
32 Unzip carry bag storage pocket, fold your stroller, place stroller into carry bag.
33 To store the carry bag: Fold the carry bag tightly, place into the storage pocket, and zip the pocket.
CARE AND MAINTENANCE
To preserve the longevity of your stroller, it is important to perform simple, regular maintenance. From time to time, make sure that the joints and folding areas are still in good condition. If you hear any squeaking or feel tension, you can take your stroller to a local bike shop for added lubrication. All repairs should only be carried out by an authorized dealer.
WASHING
Seat Fabric
- You can machine wash your stroller's seat in cold water with a mild detergent.
- Be sure to remove the metal frame and PE boards from the seat before washing.
- Do not use solvents, caustic or abrasive cleaning materials.
- To minimize shrinkage, simply reattach the seat to the frame to dry.
- Do not press, iron, dry clean, tumble dry or wring the fabric.
- If the seat covers need to be replaced, only use parts from a Baby Jogger Authorized Dealer. They are the only ones that are guaranteed to have been safety tested and designed to fit this seat.
Plastic/Metal Parts
- Wipe clean using a mild soap and warm water.
- You must not remove, dismantle or alter any part of the seat folding mechanism or brakes.
Wheel Care
- The wheels can be cleaned using a damp cloth. They will need to be dried completely with a soft towel or cloth.
STORING
- Sunshine can fade seat fabric and dry out tires, so storing your stroller indoors will prolong its good looks.
• DO NOT store outside. - Ensure that the stroller is dry before storing for prolonged periods.
• Always store the stroller in a dry environment. - Store the stroller in a safe place when not in use (i.e. where children cannot play with it).
- DO NOT place heavy objects on top of the stroller.
- DO NOT store the stroller near a direct heat source such as a radiator or fire.
Baby Jogger's Limited Lifetime Warranty:
Baby Jogger warrants that the frame is free of manufacturer defects for the lifetime of the product. Manufacturer's defects include but are not limited to the breaking of welds and frame tube damage. Textile or soft side materials and all other components shall be warranted for one year from the date of purchase (except for tubes and tires). Proof of purchase is required to make a warranty claim and the warranty is only extended to the original purchaser.
THIS WARRANTY DOES NOT COVER:
• Normal wear and tear
- Corrosion or rust
- Incorrect assembly, or the installation of third party parts or accessories not compatible with the original design
• Accidental or intentional damage, abuse or neglect, or use on stairs or escalators.
- Commercial use
- Improper storage/care of the unit
This warranty specifically excludes claims for indirect, incidental, or consequential damages. The implied warranties of merchantability and fitness for a particular purpose is according to the specific warranty period for this model unit at time of purchase. Some states do not allow the exclusion or limitation of incidental or consequential damages, so the above limitations or exclusions may not apply to you. This warranty gives you specific legal rights, and you may also have other rights which vary from state to state. To know what your legal rights are in your state, consult your local or state consumer affairs office or your State's Attorney General.
If your stroller was purchased outside of the United States, please contact the distributor in the country nearest you. Their contact information can be found on our website at http://www.babyjogger.com/retailers/#international. Claims for warranty outside of the country in which the product was purchased may incur shipping charges.
natural_image
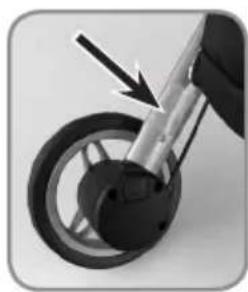
Close-up of a mechanical component with a metallic rod and black wheel, showing a small arrow pointing to a specific part (no text or symbols visible)NOTE: When contacting Baby Jogger distributor regarding your stroller, please have your stroller's serial number and model number ready. They can be found on the inside of the rear leg.
NOTES:

natural_image
Close-up of a bicycle wheel with a metallic lever and arrow indicating motion (no text or symbols)natural_image
Close-up of a bicycle wheel assembly with a metallic lever and black hub (no text or symbols visible)natural_image
Close-up of a car's wheel and suspension mechanism with an arrow indicating motion (no text or symbols)natural_image
Close-up of a car's wheel and suspension mechanism with an arrow indicating motion (no text or symbols)text_image
Technical diagram of a stroller with numbered parts and corresponding exploded views for each component.natural_image
Close-up of a bicycle wheel assembly with a black arrow pointing to the wheel (no text or symbols visible)natural_image
Close-up of a mechanical component with a black arrow pointing to a specific part (no text or symbols visible)natural_image
Close-up of a car's wheel and suspension mechanism with an arrow indicating motion (no text or symbols)natural_image
Close-up of a car's wheel and suspension mechanism with an arrow indicating motion (no text or symbols)text_image
Technical diagram of a stroller with numbered parts and corresponding exploded views for each component.1 Ručka 9 Košara za pohranu
2 Krović 10 Prednji kotač
3 Produljenje krovića 11 Okretanje/blokada
4 Gumb na ručki za sklapanje kolica 12 Gumb za otpuštanje prednjih kotača
5 Gumb za otpuštanje 13 Naslon za noge
6 Gumb za otpuštanje stražnjih kotača
7 Parkirna kočnica 15 Jastučići pojasa
8 Stražnji kotač 16 Automatsku blokadu
14 Kopča pojasa

UPOZORENJE
natural_image
Close-up of a bicycle wheel assembly with a black arrow pointing to the wheel (no text or symbols visible)NAPOMENA: Kada budete kontaktirali distributera tvrtke Baby Jogger glede vaših kolica, imajte pri ruci serijski broj kolica i broj modela. Oni se nalaze na unutrašnjoj strani zadnje noge.
natural_image
Close-up of a car's wheel and suspension mechanism with an arrow indicating motion (no text or symbols)natural_image
Close-up of a car's wheel and suspension mechanism with an arrow indicating motion (no text or symbols)text_image
Technical diagram of a stroller with numbered parts and corresponding exploded views for each component.1 Håndtak
2 Kalesje 10 Bakhjul
3 Kalesjeforlengelse 11 Svingledd/lås
4 Knapp for setebretting 12 Utløserknapp for fronthjul
5 Låsutløserknapp 13 Fotrom
6 Utløserknapp for bakhjul 14 Selespenne
7 Parkeringsbremse 15 Seleputer
8 Bakhjul 16 Automatisk lås
9 Oppbevaringskurv

ADVARSEL
STELL OG VEDLIKEHOLD
natural_image
Close-up of a car wheel with a black arrow pointing to the wheel rim (no text or symbols visible)MERK: Hvis du skal kontakte Baby Jogger-distributøren angående sittevognen, må du ha vognens serienummer og modellnummer klare. Du finner disse på innsiden av det bakre benet.

text_image
Technical diagram of a stroller with numbered parts and corresponding exploded views for each component.1 Rączka 9 Koszyk
GWARANCJA NIE OBEJMUJE:
natural_image
Close-up of a car's wheel and suspension mechanism with an arrow indicating motion (no text or symbols)natural_image
Close-up of a bicycle wheel assembly with a metallic lever and black hub (no text or symbols visible)SACUL PÊNTRU TRANSPORT
natural_image
Close-up of a car's wheel and suspension mechanism with a black arrow indicating motion (no text or symbols)text_image
Technical diagram of a stroller with numbered parts and corresponding close-ups of the body parts, likely for educational or technical reference.natural_image
Close-up of a mechanical component with a black arrow pointing to a specific part (no text or symbols visible)natural_image
Close-up of a bicycle wheel assembly with a black arrow pointing to the pivot point (no text or symbols visible)NAPOMENA: Kada budete kontaktirali distributera kompanije Baby Jogger u vezi vaših kolica, imajte pri ruci serijski broj kolica i broj modela. Oni se nalaze na unutrašnjoj strani zadnje nožice.

natural_image
Close-up of a bicycle wheel with a metallic lever and arrow indicating motion (no text or symbols)text_image
Technical diagram of a stroller with numbered parts and corresponding exploded views for each component.UPORABA VARNOSTNEGA H-PASU
18 Stranske zaponke pasu vstavite v zaponko H-traku na obeh straneh.
19 Vstavite spet trak in stranski zaponki trakov v stranici mednožne zaponke.
20 Pritisnite gumb na mednožni zaponki, da jo sprostite.
NAGIBANJE SEDEŽA
natural_image
Close-up of a bicycle wheel assembly with a black arrow pointing to the pivot point (no text or symbols visible)natural_image
Close-up of a bicycle wheel assembly with a metallic lever and black hub (no text or symbols visible)natural_image
Close-up of a bicycle wheel assembly with a metallic lever and black hub (no text or symbols visible)text_image
Labeled diagram of a baby stroller with numbered parts for identification9 سلة التخزين
10 العجلةolinaية
11 القل الدوار
natural_image
Diagram of a curved mechanical component with a green arrow and number 4 label (no text or symbols beyond the number)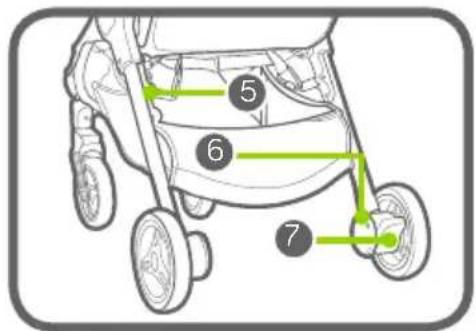
text_image
5 6 7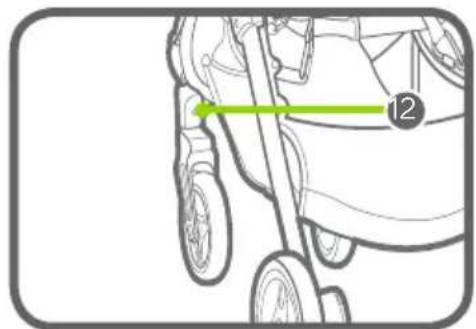
natural_image
Line drawing of a stroller with a green arrow pointing to the side of the wheel (no text or symbols)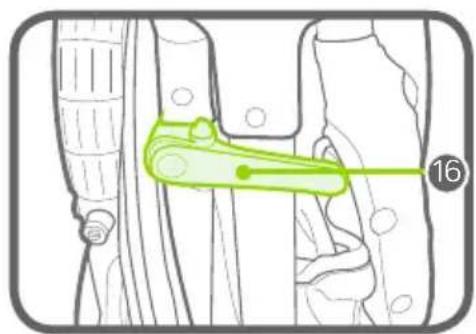
natural_image
Technical line drawing of a mechanical component with a green bracket and numbered label (16), no readable text or symbols present.1 المقود
2 المظلة
3 تمديد المطلة
4 زر طي المقود
5 زر تحير القل
tight Wave I Chakam Rbp A Shrtpa Aman
بشكل صحيح.
الإطار
natural_image
Close-up of a bicycle wheel with a metallic suspension and arrow indicating motion (no text or symbols).הכלההוּרָהוּרָהוּרָהוּרָהוּרָהוּרָהוּרָהוּרָהוּרָהוּרָהוּרָהוּרָהוּרָהוּרָהוּרָה
הכלה
natural_image
Close-up of a mechanical component with a black arrow pointing to a specific part (no text or symbols visible)Brands in Motion Inc.
300 Ambassador Drive • Mississauga, Ontario • L5T 2J3
Toll Free: 1.866.774.7177 T: 905.795.3154 • F: 905.795.8988
www.babyjogger.ca
Imported for Baby Jogger in Europe by:
KoolTrade Ltd • Unit 3, Orbital Way
Denton, Manchester • United Kingdom M34 3QA
Bichos Atrevidos S.L.U. • CIF:B82998949
Infante Don Luis 18, 28660 Boadilla-Madrid • Spain
Tel. (+34) 91 485 5550
Euro-Trade Office, School & Baby Corporation
Čs. armády 360 • 735 51 Bohumín-Pudlov • Czech Republic
Euro-Trade Office, School & Baby Corporation
Dolné Rudiny 8363/5 • 010 01 Žilina • Slovakia
Alisa Company • 408 office • #26 Varshavskoye Shosse
Varshavskoye Plaza • Moscow, Russia