OBO 3221 - Oven OK - Free user manual and instructions
Find the device manual for free OBO 3221 OK in PDF.
| Product type | Built-in electric oven |
| Brand | OK |
| Model | OBO 3221 |
| Dimensions (H x W x D) | 595 x 575 x 595 mm |
| Net weight | 37.8 kg |
| Power supply | 220-240 V~, 50/60 Hz |
| Maximum rated power | 3000 W |
| Cavity volume | 70 L |
| Maximum temperature | 250 °C |
| Cooking modes | Defrosting, rapid heat (grill + fan, double upper heat), grill, upper and lower heat with fan, upper and lower heat, lower heat, fan-assisted convection |
| Interior lighting | Halogen bulb, type E14 |
| Energy efficiency class | A |
| Energy consumption (conventional mode) | 0.99 kWh/cycle |
| Energy consumption (convection mode) | 0.89 kWh/cycle |
| Energy efficiency index | 94.5 |
| Installation type | Built-in |
| Recommended cleaning | Damp cloth and mild detergent; do not use steam cleaner |
| Child safety | Supervision required for children under 8 years; hot surfaces |
| Bulb replacement | Unplug the appliance, allow to cool, replace with E14 bulb |
| Power cord | Replacement by an authorized service center |
| Intended use | Heating, cooking and roasting food for domestic use |
| Number of cavities | 1 |
Frequently Asked Questions - OBO 3221 OK
User questions about OBO 3221 OK
0 question about this device. Answer the ones you know or ask your own.
Ask a new question about this device
Download the instructions for your Oven in PDF format for free! Find your manual OBO 3221 - OK and take your electronic device back in hand. On this page are published all the documents necessary for the use of your device. OBO 3221 by OK.
USER MANUAL OBO 3221 OK
Thanks for your purchase of an ok. product. Please read this manual carefully and keep it for future reference.
IMPORTANT SAFETY INSTRUCTIONS. READ CAREFULLY AND KEEP FOR FUTURE REFERENCE.
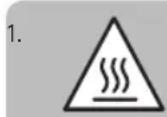
Risk of burning! Do not touch the product's hot surfaces. Heat rises from the product during use. Caution! Hot surface!
2. WARNING: The appliance and its accessible parts become hot during use. Care should be taken to avoid touching heating elements. Children less than 8 years of age shall be kept away unless continuously supervised.
3. This product can be used by children aged from 8 years and above and persons with reduced physical, sensory or mental capabilities or lack of experience and knowledge if they have been given supervision or instruction concerning use of the appliance in a safe way and understand the hazards involved.
4. Children shall not play with the appliance.
5. Cleaning and user maintenance shall not be made by children unless they are older than 8 and supervised.
6. Keep the product and its cord out of reach of children aged less than 8 years.
7. If the supply cord is damaged it shall be replaced by the manufacturer or a workshop commissioned by the manufacturer or by a similarly qualified person in order to avoid hazards.
8. During use the appliance becomes hot. Care should be taken to avoid touching heating elements inside the oven.
9. WARNING: Accessible parts may become hot during use. Young children should be kept away.
10. Do not use harsh abrasive cleaners or sharp metal scrapers to clean the oven door glass since they can scratch the surface, which may result in shattering of the glass.
11. Do not use steam cleaner for cleaning!
12. Follow the instructions in the chapter Cleaning and care.
13. WARNING: Ensure that the appliance is switched off before replacing the lamp to avoid the possibility of electric shock.
-
Slide the baking tray or the grate straight in the oven's slots. Make sure not to tilt it.
-
Read this user manual thoroughly before first use and pass it on with the product. Pay attention to the warnings on the product and in this user manual. It contains important information for your safety as well as for the use and maintenance of the equipment.
- Use the product only for its intended purpose and with recommended accessories and components. Improper use or wrong operation may lead to hazards.
- Never leave the product unsupervised while it is switched on.
- Never immerse electrical parts of the product in water during cleaning or operation. Never hold the product under running water.
- Do not under any circumstances attempt to repair the product yourself (e.g. damage of power cord, product is dropped, etc.). For servicing and repairs, please consult an authorized service agent.
- The mains voltage must match the information on the rating label of the product.
- Avoid damages to the power cord that may be caused by kinks or contact with sharp corners.
- Keep the power cord and power plug away from all heat sources like for example, ovens, hot plates and other heat-producing products/objects.
- Only unplug from the power socket by the plug itself. Do not pull on the cord.
- Use this product in dry indoor areas only and never outdoors.
- This product is not intended for commercial use. It is designed for household use only.
- Clean the product and all other accessories after each use.
INTENDED USE
This product is designed for heating and cooking and baking foods on baking tray, cooking grate or in a suitable pan. Any other use may result in damage to product or injuries.
COMPONENTS
A. Transport and assembly handles
B. Status indicator light
C. Temperature knob
D. Display
E. +/- and function button
F. Mode selection knob
G. Mounting holes
H. Baking tray
I. Grade
J.Oven door
K.Oven door handle
L. Front frame with seal
M. Baking tray slots
N. Cavity bottom with lower heat
O. Upper heat / grill
P. Circulating fan with heating element (not shown)
Q. Oven light (not shown)
R. Screws with spacers and caps
S. Heating fan (not shown)
BEFORE FIRST USE
- Remove the product and accessories from the original packaging carefully. For disposal of the original packaging, follow applicable legal requirements. If you have questions about correct disposal, contact your local authority.
- Check the package contents for completeness and damage. If the package content is incomplete or damages can be found, contact your place of purchase immediately.
After unpacking clean the product, see chapter Cleaning and care. - To remove any manufacturing residues and odors in the oven before first use, operate the built-in oven for 15 minutes at 200^ . Follow the instructions of chapter OPERATION.
INSTALLATION
Note: The built-in oven is equipped with power cord and plug. Make sure before installation that the wall outlet is at the desired place of installation.
Consider the dimension (in mm) of the product and the installation opening. Make sure a corresponding recess on the back side of the kitchen cabinet is available.
Place the product in front of the opening and put the power plug with power cord through the hole in the back side of the kitchen cabinet.
3 Put the product into the installation opening. Insert the screws with spacers into the holes in the front frame and screw the oven with the cabinet. Then connect the caps on the screw heads.
4 Connect the power plug to a suitable wall outlet. A beep sounds up and the time 12:30 flashes in the display. Set the correct time before first use.
EN
22
OPERATION
Switching oven ON and OFF
If oven is in standby mode, switch ON before use.
Press the function key at least 3 seconds until the icon appears in the display. The oven is ready for operation.
Time setting
Press and Reys simultaneously for at least 3 seconds. The display flashes.
Set hours / minutes with buttons and confirm each with the function key .
The oven switches to standby mode.
Timer and alarm
This function can be used as a kitchen timer.
Note: This function can only be used, when the oven is ready for operation and cannot be used in standby mode. The icon must be shown in display.
7 Press the function key until the symbol appears. The symbol is blinking.
Set hours / minutes with buttons and confirm each with the function key .
The symbol d is shown continuously and the set time is elapsing.
Note: After the time expires, an alarm will peep. Stop the alarm by short pressing any button.
CONVENTIONAL USE
Mode and temperature selection
8 Set mode and temperature knob as desired.
| Mode Function | Temperature | |
| Oven light ON | -- | |
| Defrosting: This function is used for gentle defrosting of frozen food. Note: Air at room temperature circulates in the cooking chamber without any additional heating. | -- | |
| Quick heating by double upper heat and fan: This function is suitable for grilling larger pieces of meat (e.g. rolled pork roast, chicken). Note: The grill heating element, heating element for upper heat and the fan are ON. | 50 - 250 °C | |
| Quick heating by double upper heat: This function is suitable for quickly grilling of small and big pieces of flat meat, e.g. steaks and for gratin at high temperatures. Tip: Put smaller pieces more up and bigger pieces more down in the cooking chamber. Note: The grill and upper heating element operate simultaneously. The default temperature is 210 °C. | 50 - 250 °C | |
| Grill heating ON: This function is suitable for grilling big and small pieces of flat meat, e.g. steaks and for gratin. Tip: Put smaller pieces more up and bigger pieces more down in the cavity. Note: The grill heating element automatically switches on/off to keep the set temperature. The default temperature is 210 °C. | 50 - 250 °C | |
| Upper- and lower heat with fan: This function is suitable for roasting larger pieces of meat at higher temperatures. Note: More uniform heating of the cavity. Food is browned outside and remains juicy inside. | 50 - 250 °C | |
| Upper- and lower heat: This function is suitable for baking and frying. Note: Place the food in the middle of cavity. | 50 - 250 °C | |
| Lower heat: This function is suitable for low-temperature cooking of casserole and for pastries or pizzas where a crispy cake base or crust is desired. Note: Food is only heated from the bottom and the upper side does not get brown. | 50 - 250 °C | |
| Heater fan (fan with ring heater): This mode is suitable for baking and frying. Tip: Multiple levels of the cooking chamber can be used simultaneously. | 50 - 250 °C |
The oven is heating up and the status indicator light is on. Once the set temperature is reached, the light turns off.
Note: To maintain the set temperature, the heating elements and thus the status light switch on and off during operation.
To turn off the product set the temperature selection to 0 and mode selection switch to. Press the function key together with the button for at least 3 sec., the oven will be switched to standby.
EN
24
PROGRAM MODES
Semi-automatic mode - setting the cooking time
This function is used to set a remaining cooking time. The maximum settable remaining cooking time is 10 hours. The setting and activation can be done during cooking or before.
- Press the function key until the display shows the text dur. The text is blinking.
- Set hours / minutes with buttons and confirm each with the function key. An A is shown in display, the function is activated and the set time is elapsing.
- Set the desired operating mode and temperature.
Note: The oven switches off when the preset cooking time expired.
Semi-automatic mode - setting the time to finish cooking
This function is used to set a time to finish cooking. The setting and activation can be done during cooking or before.
- Press the function key until the display shows the text End. The text is blinking.
- Set hours / minutes with buttons and confirm each with the function key. An A is shown in display, the function is activated and the time to finish cooking is set.
- Set the desired operating mode and temperature.
Note: The oven switches off when the time to finish cooking is reached.
Automatic Mode - preset the cooking time and the time to finish cooking
This function is used to set a cooking time and time to finish cooking.
- Press the function key until the display shows the text dur. The text is blinking. Set hours / minutes with buttons and confirm each with the function key. An A is shown in display.
- Press the function key again until the display shows the text End. The text is blinking. Set hours / minutes with + buttons and confirm each with the function key . The current time and an A are shown in display.
The cooking time and the time to finish the cooking are set and the function is activated.
Note: The built-in oven is switched off when the time to finish the cooking is reached.
- Set the desired operating mode and temperature.
Note: The time to finish the cooking can only be set for a coming period of 23 hours and 59 minutes.
INSERTING BAKING TRAY OR GRADE
14 Slide the baking tray or the grate straight in the oven's slots. Make sure not to tilt it.
CLEANING AND CARE
Warning! When cleaning, never use solvents or abrasive materials, hard brushes, metallic or sharp objects. Solvents are harmful to human health and can attack plastic parts, while abrasive cleaning mechanisms and tools may scratch the surface(s).
Do not use steam cleaner for cleaning!
Warning! Switch off the oven and let it cool down completely before cleaning.
Clean the cavity with a damp cloth. Wipe the oven thoroughly so that no residues remain. Make sure that no water enters the product interior (e.g. through the circulation fan).
Clean the exterior surfaces of the product with a slightly damp cloth and dry them well.
Make sure that no water (e.g. at the switches) enters the product interior.
Tip: Tenacious stains can be soaked for a long period before removing it. If necessary use fat-dissolving liquids for cleaning.
16 Clean grate and baking tray with warm water and a mild detergent. Dry all parts thoroughly.
BULB REPLACEMENT
WARNING: Ensure that the appliance is switched off before replacing the lamp to avoid the possibility of electric shock.
Caution! Before changing the interior light of the oven, the cavity and the bulb must be completely cooled down.
17 Take off the lamp cover and remove the defective bulb.
Insert a new bulb type E14 and screw the lamp cover.
Please be sure to dismantle the related components according to the user manual for non-destructive maintenance purposes. Protect the parts to make the re-installed work can be favoring and avoid damage.
ENERGY-SAVING
- If possible, only use dark, black-painted or enamel baking tins. They absorb heat especially well.
Only preheat the oven if stated so in the recipe. - Avoid opening the oven door too many times during preparation.
- When cooking for a long time, turn off the oven 10 minutes earlier and use the residual heat to complete cooking.
EN
26
SPECIFICATIONS
| Model OBO 3221 | |
| Type of oven Built- in oven | |
| Heat source Electricity | |
| Rated voltage 220-240V~, 50/60Hz | |
| Rated power max. 3000 W | |
| Protection class I | |
| Max. temperature 250 °C | |
| Cavity volume 70 L | |
| Dimensions 595 x 575 x 595 mm | |
| Cavity bulb type Halogen lamp, E14 | |
| Energy consumption | |
| Conventional heating (EC electric cavity) 0.99 kWh/cycle | |
| Circulating heat/ convection heat (EC electric cavity) 0.89 kWh/cycle | |
| Energy efficiency index (EEI cavity) 94.5 | |
| Number of cavities 1 | |
| Net weight | 37.8 kg |
This is a built-in oven.
- Erp-testing was done according to EN 60350-1:2013.
- See website below for detailed technical information or ask your vendor for specification sheet. www.ok-online.com.
DISPOSAL
The crossed-out wheeled bin logo requires the separate collection of waste electric and electronic equipment (WEEE). Electric and electronic equipment may contain dangerous and hazardous substances. Do not dispose of this appliance as unsorted municipal waste. Return it to a designated collection point for the recycling of WEEE. By doing so, you will help to conserve resources and protect the environment. Contact your retailer or local authorities for more information.
ENHORABUENA
Built in Oven
The number of cavities: 1
The heat sources per cavity: Electricity
The volume of cavity 1:70 L
Energy consumption per cycle in conventional mode (for cavity 1): 0.99 kWh
Energy consumption per cycle in fanforced convection mode (for cavity 1): 0.89kWh
The energy efficiency index for Cavity 1: 94.5
The energy efficiency class for cavity 1: Class A