Si Switch - Stroller PEG PEREGO - Free user manual and instructions
Find the device manual for free Si Switch PEG PEREGO in PDF.
| Product type | Stroller |
| Brand | PEG PEREGO |
| Model | Si Switch |
| Usage | Child from birth up to 15 kg (seat); bassinet up to 9 kg; car seat up to 13 kg |
| Maximum child weight (seat) | 15 kg |
| Maximum basket weight | 5 kg |
| Number of wheels | 4 (2 front swivel/fixed, 2 rear fixed) |
| Brake | Foot brake on rear wheels |
| Restraint system | 5-point safety harness, adjustable in height |
| Adjustments | Reclining backrest, adjustable footrest, front bar 2 positions |
| Canopy | Extendable with ventilation window and toy ring |
| Reversible seat | Yes (parent-facing or forward-facing) |
| Folding | Compact with or without seat, carrying handle |
| Included accessories (COMPLETO) | Canopy, apron, front bar, rain cover, basket |
| Compatible accessories | Car seat Primo Viaggio SL, bassinet Pop-Up (via adapters) |
| Material | Metal frame, fabric parts |
| Care | Clean frame with damp cloth; fabric parts hand wash max 30°C, no bleach, no tumble dry |
| Safety | Complies with standards; brake always applied when stopped; never leave child unattended |
| Spare parts | Use only original Peg Perego parts |
| After-sales service | Tel. 0039/039/60.88.213, fax 0039/039/33.09.992 |
| Manufacturer | PEG-PEREGO S.p.A., certified ISO 9001 |
Frequently Asked Questions - Si Switch PEG PEREGO
User questions about Si Switch PEG PEREGO
0 question about this device. Answer the ones you know or ask your own.
Ask a new question about this device
Download the instructions for your Stroller in PDF format for free! Find your manual Si Switch - PEG PEREGO and take your electronic device back in hand. On this page are published all the documents necessary for the use of your device. Si Switch by PEG PEREGO.
USER MANUAL Si Switch PEG PEREGO
EN Instructions for use
FR Notice d'emploi
RU INHCTpyKcun no noJb3ObaHHIO
TR Kullanim kilavuzu
HR/SRB/MNE/BiH Upute za uporabu
EL OdyiEeXpnoeOwC
pLx:wx1 LcLcJ:AR

1
b
2
d
3
e
4
5
b
6
7
8
9
10
11
12
13
14
15
b
16

17
18

19
20
21
22
23
24
25
26
b
C

27
Si Switch
Si Switch
Thank you for choosing a Peg-Pérego product.
WARNING
IMPORTANT: Keep these instructions for future reference. Read and keep them for safety use. The child's safety could be at risk if these instructions are not followed.
This product was designed for the transport of 1 child in the seat.
Do not use this product for a number of occupants greater than that intended by the manufacturer.
This product is approved for children from birth up to a weight of 15kg in the seat.
- When used in combination with "Seggiolino Si Switch": For new born babies is recommended to use the backrest in the most reclined position.
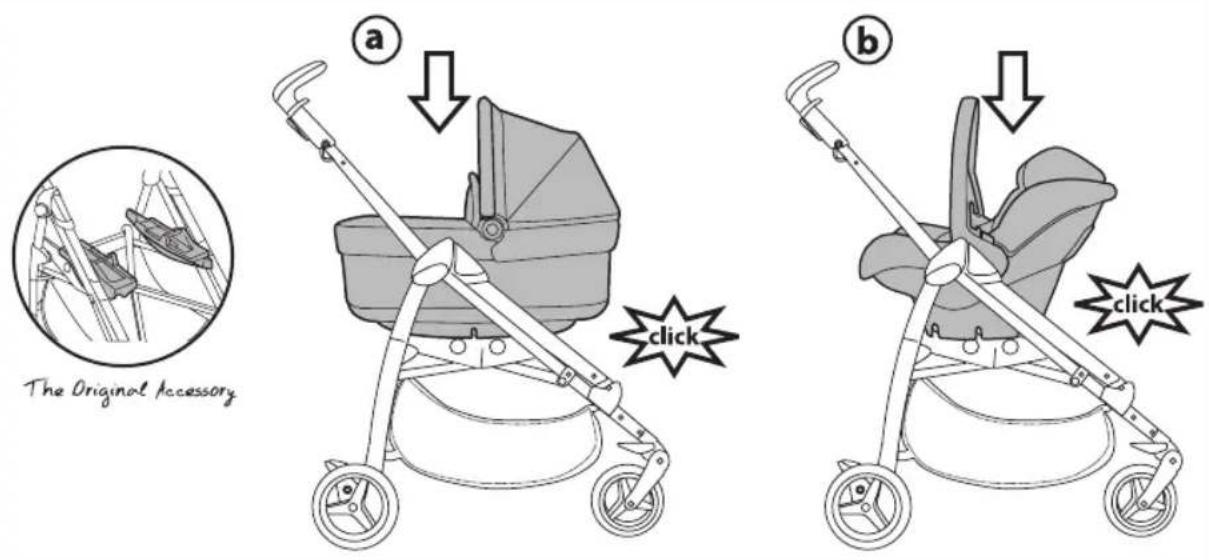
Do not turn the seat around with the child seated inside it. Si Switch has been designed to be used in
combination with Peg-Perego Ganciomatic products: the Si Switch + "Primo Viaggio SL" car seat (group 0+) is approved for children from birth up to 13kg ; the Si Switch + "Navetta POP-POP" bassinet (group 0) is approved for children from birth up to 9kg .
This article has been designed to be used in combination with Peg Perego Ganciomatic products: "Primo Viaggio SL" car seat (group 0+), "Navetta Pop-Up" bassinet (group 0).
When used in combination with pram body : this product is suitable for a child who cannot sit up by itself, roll over and a cannot push itself up on it's hands and knees. Maximum weight of the child : 9 Kg.
Don't apply and don't use any different mattress of that specified by the Manufacturer in the Instruction Manual of pram body.
Any carrying handle (if present) shall be left out of the pram body during use.
- When used in combination with car seat (0+ group), this vehicle does not replace a cot or a bed. Should your child need to sleep, then it should be placed in a suitable pram body, cot or bed.
WARNING Check that the pram body or seat unit or car seat attachment devices are correctly engaged before use. Check that the Peg Perego Ganciomatic product are correctly fixed to the item.
WARNING The assembly and preparation of the product must be carried out by an adult.
- Do not use this product if there are parts missing or signs of breakage.
WARNING Always use the restraint system. Always use the five point harness. Always use the harness crotch strap in combination with the waist strap.
WARNING Never leave your child unattended.
Always apply the brake when stationary.
WARNING Ensure that all the locking devices are engaged before use.
WARNING To avoid injury ensure that your child is kept away when unfolding and folding this product.
WARNING This product is not a toy. Do not let your child play with this product
Do not insert fingers into the mechanisms.
- Be careful not to hurt the child when adjusting the mechanisms (handlebar, backrest ...).
Any weights hanging on the handlebar or handles could make the item unstable; follow the manufacturer's instructions regards the maximum loads transportable.
The front bar (if present) is not designed to support the child's weight. It is not designed to keep the child in the seat and does not substitute for the waist belt.
- Do not load the baskets over 5Kg . Do not put weight in the cup holder (if present) in excess of those indicated on the cup holders themselves and never hot drinks. Do not put loads of more than 0.2Kg in the hood pockets (if present).
- Do not use the product near to stairs or steps, heat sources, naked flames or dangerous objects within reach of the child.
Only replacement parts supplied or recommended by the manufacturer/distributor shall be used.
WARNING Don't use the rain cover (if present) on a product without a hood or parasol that can hold it. Always use the rain cover only under adult supervision. Don't use the rain cover indoors and check to ensure the child is not to warm; do not park the vehicle close to heat sources and keep well away from the lighted cigarettes. Ensure that the rain cover is not interfering with any moving parts of the carriage/stroller. Always remove the rain cover before folding your carriage/stroller.
WARNING This product is not suitable for running or skating.
Always apply the brake when loading or unloading children.
WARNING Do not add any mattress.
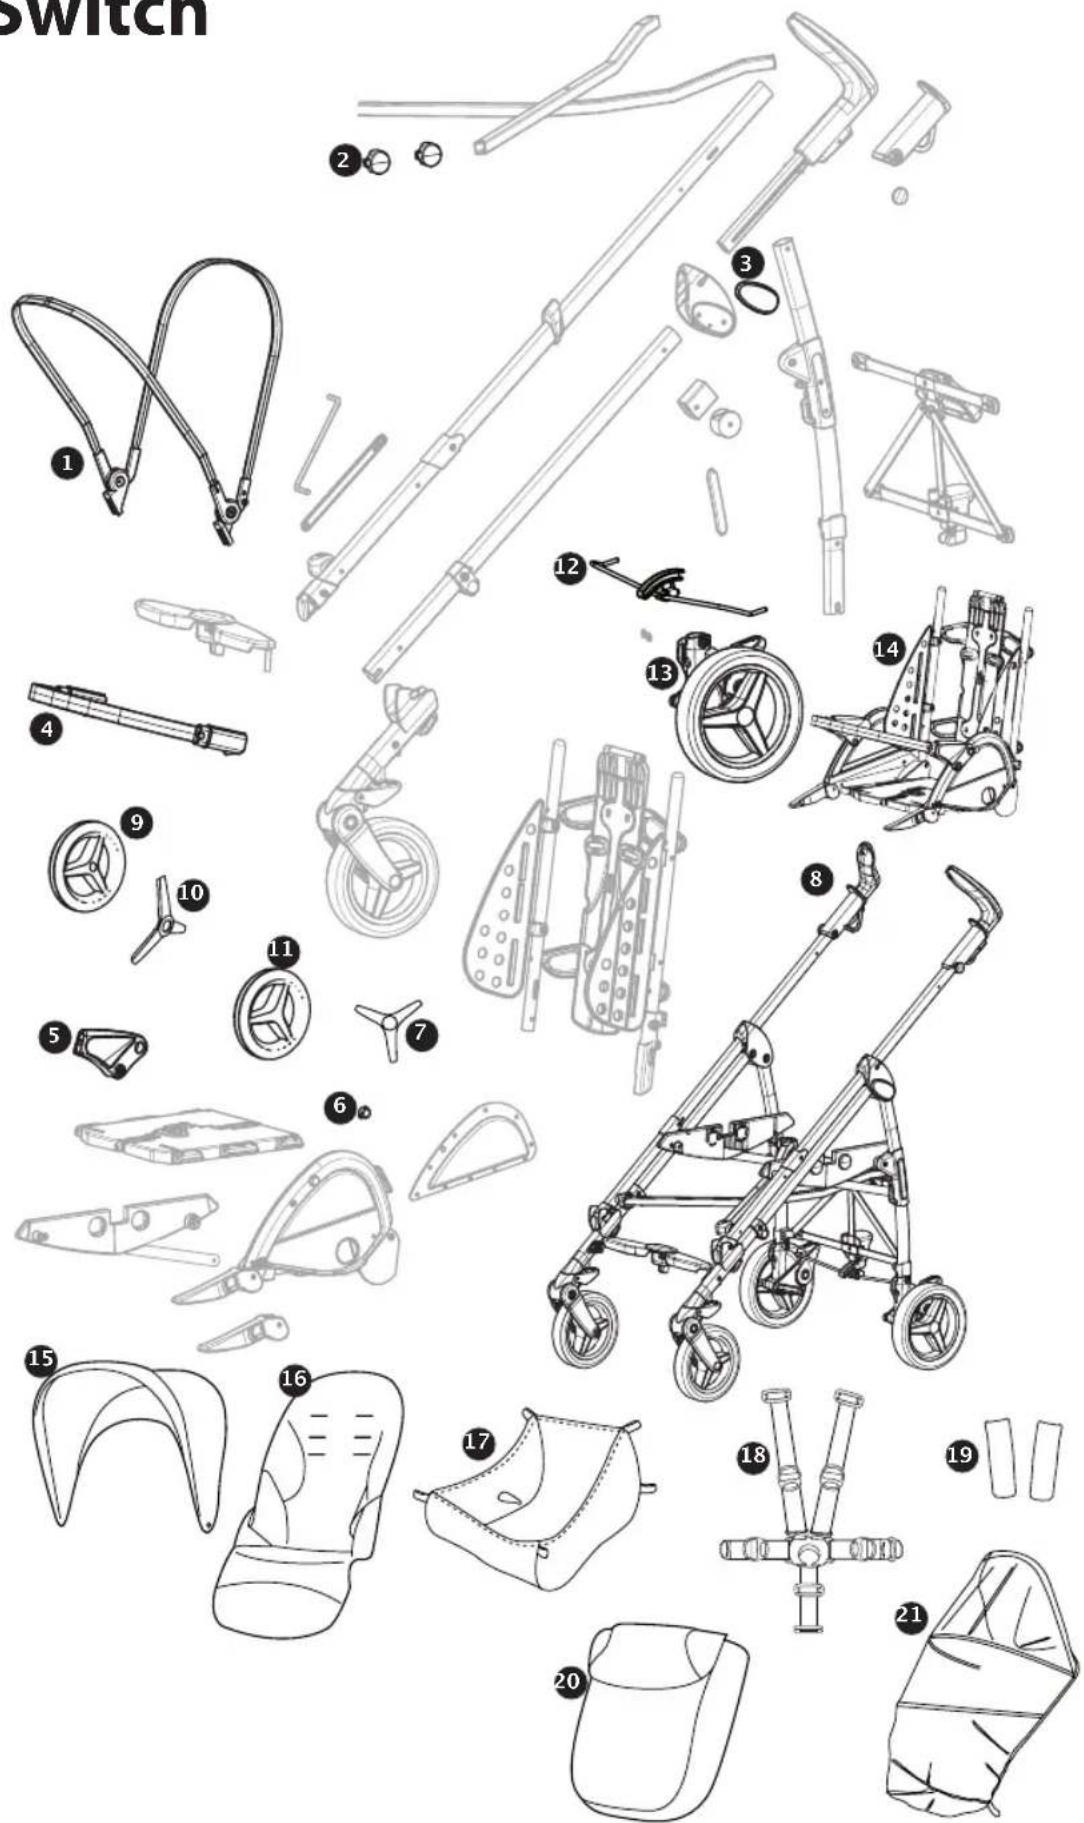
PRODUCT PARTS
Check the package contents and contact our Customer Service for any claim.
The Si Switch COMPLETO stroller includes: 2 swiveling or locking front wheels, 2 rear wheels, a basket, a hood, a foot muff, a front bar, and a rain canopy.
- The Si Switch CLASSICO stroller includes: 2 swiveling or locking front wheels, 2 rear wheels, a basket, a hood, a front bar.
INSTRUCTIONS
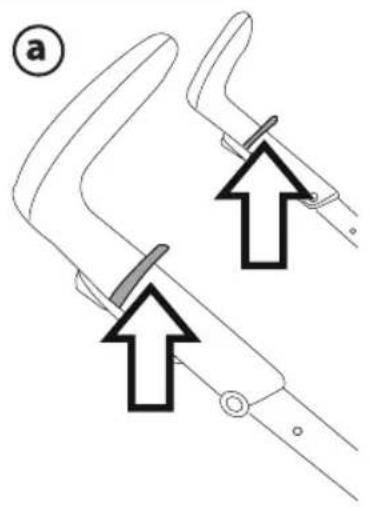
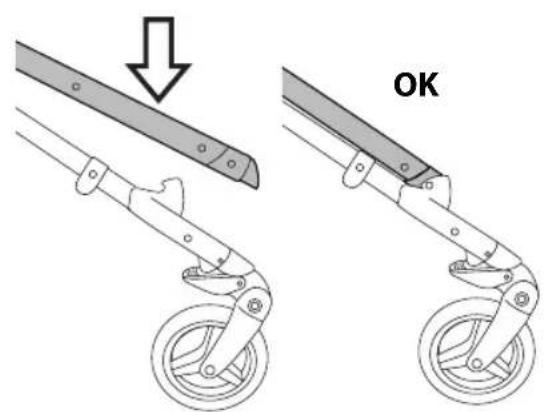
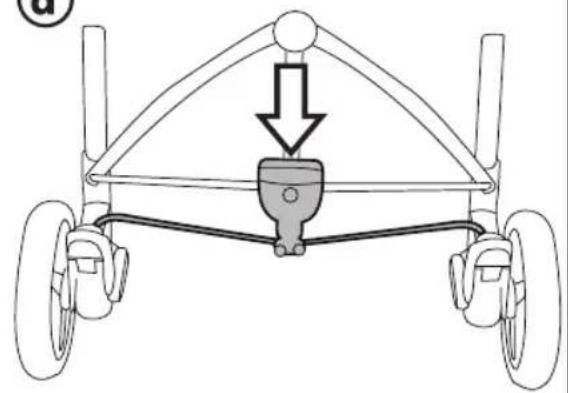
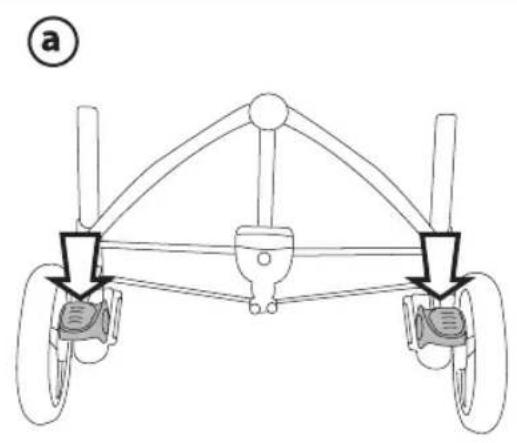
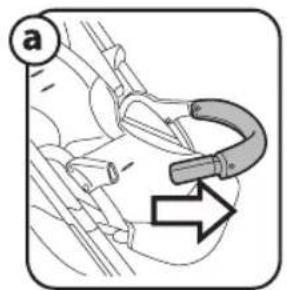
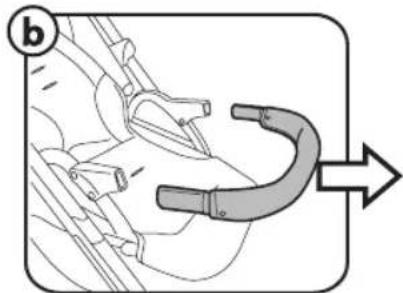
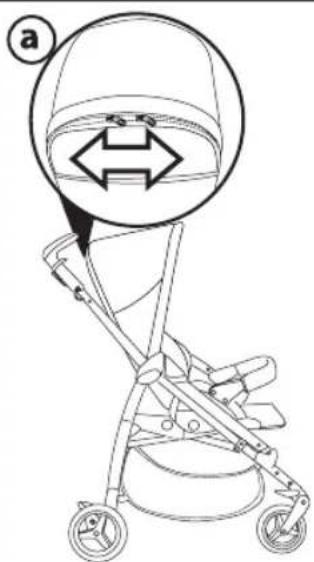
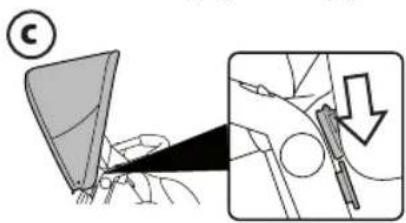
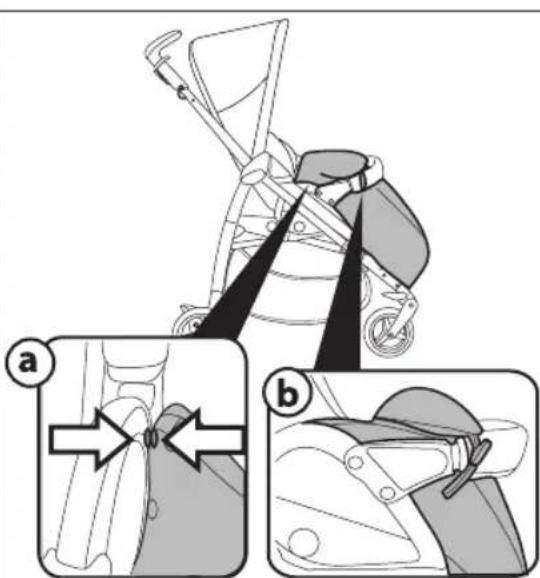
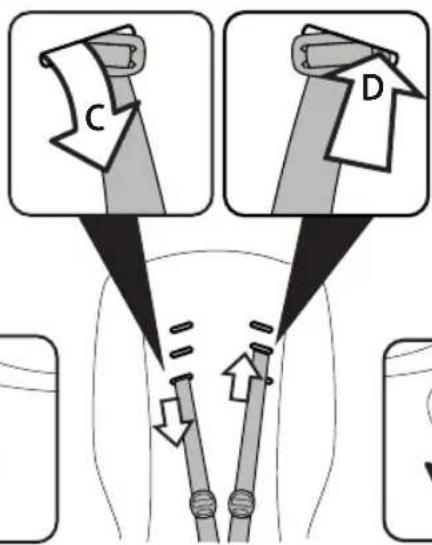
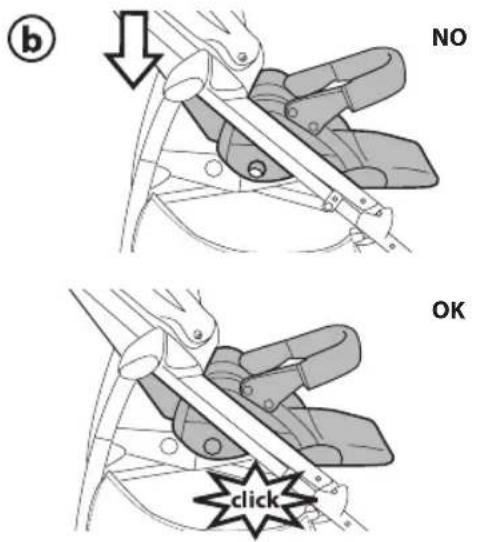
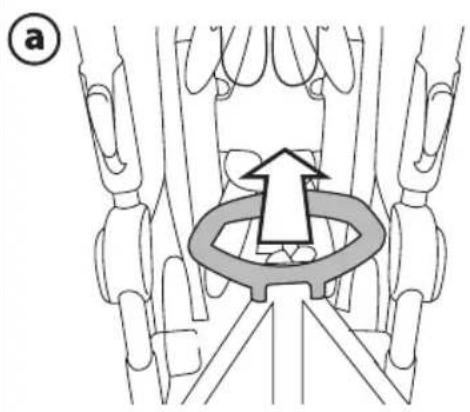
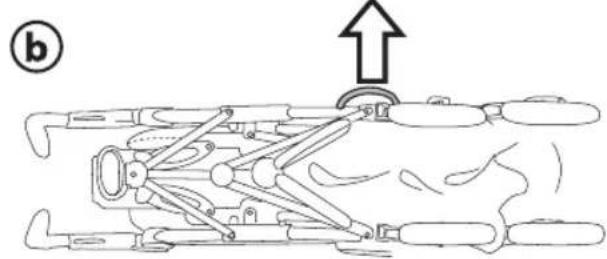
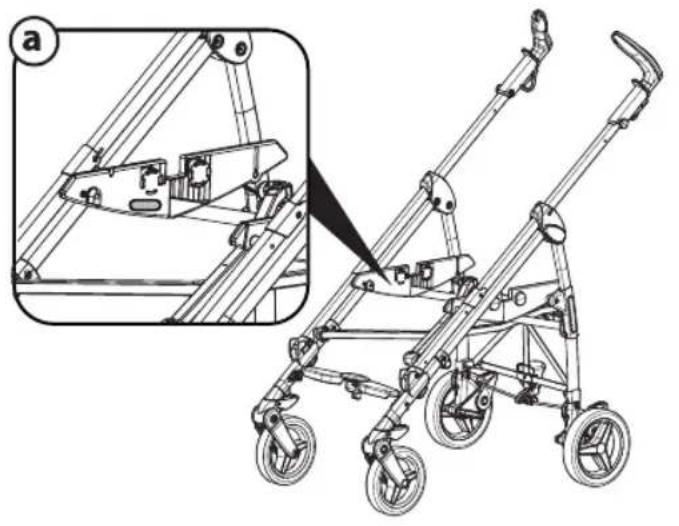
- OPENING THE STROLLER: lift the side levers on the handles simultaneously (fig_a) and pull upwards until the stroller opens. To ensure it has opened properly, check that the side tubes are fastened together (fig_b).
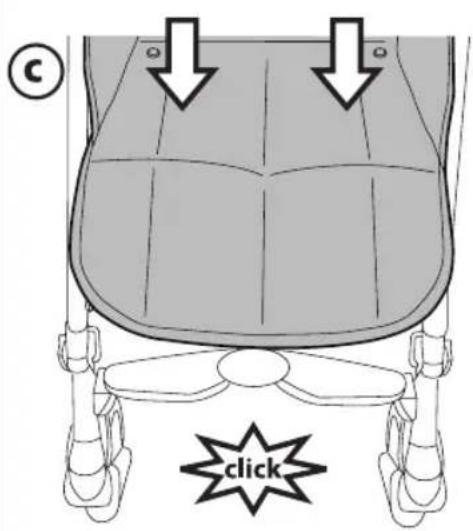
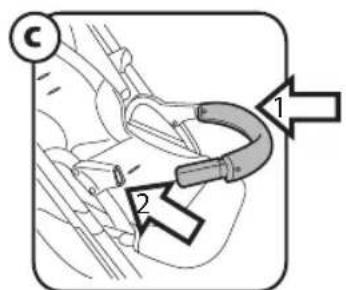
- If the hooks are not secured properly, press the seat downwards (fig_c) until they click into place. Finally, press downwards with your foot (fig_d).
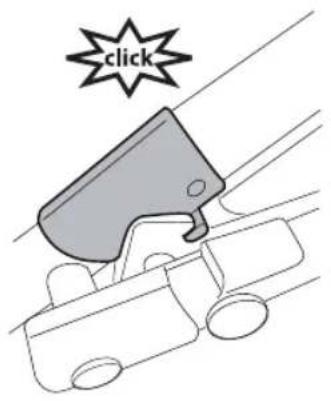
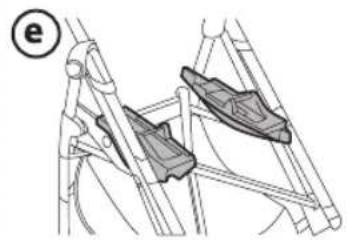
- Place the front bar into the position of use by lifting it upwards until it locks into place (fig_e).
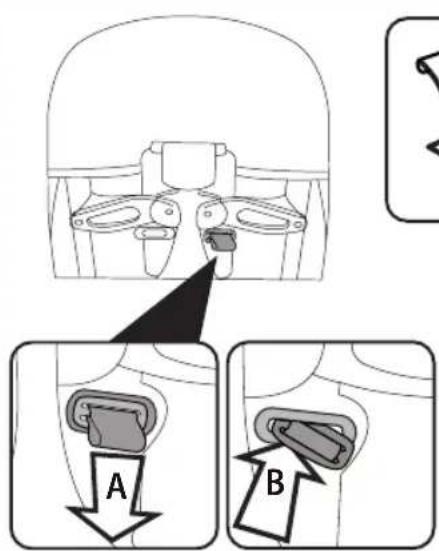
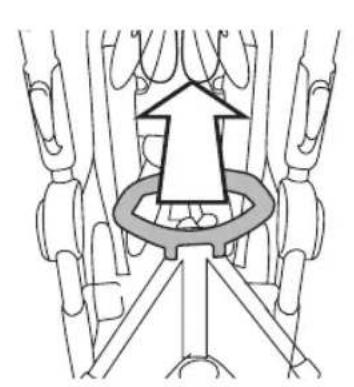
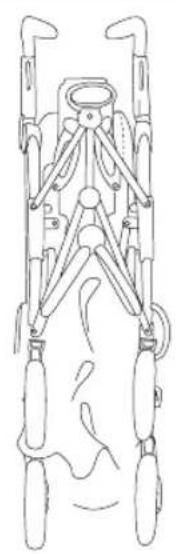
- BASKET: to mount the basket, slip the loops over the rear hooks A and B and the front hooks C and D.
- BRAKE: To set the brake on the stroller, lower the lever on the rear wheel unit with your foot. To release the brake, lift the lever (fig_a). When stationary, always apply the brake.
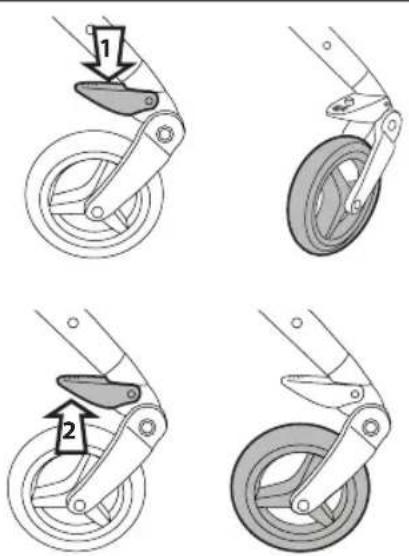
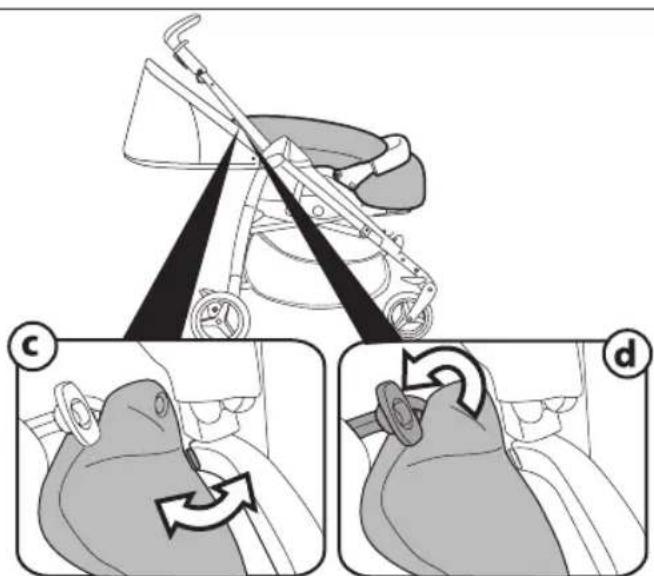
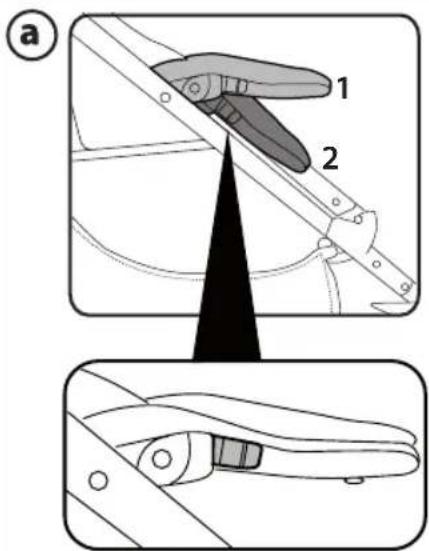
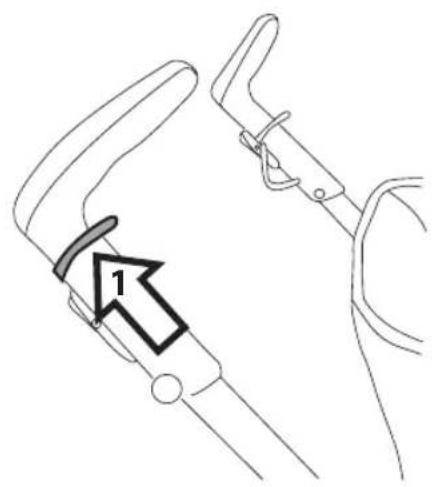
SWIVEL WHEELS: to make the front wheels swivel, lower the lever (arrow 1). To lock them, push the lever in the opposite direction (arrow 2). The rear wheels are fixed (fig_b). - FRONT BAR: It can be put in 2 positions: POSITION 1: Use.
POSITION 2: Folding.
To adjust it, press the two side buttons at the same time.
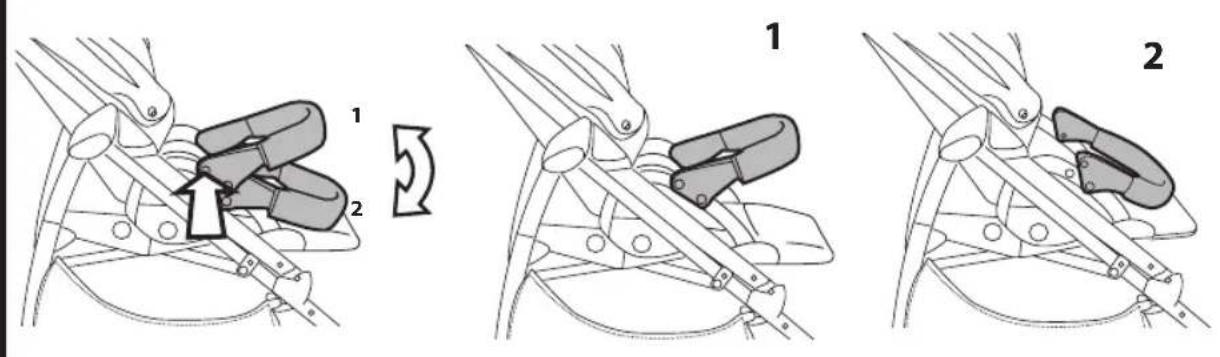
- The front bar can only be opened on one side, to make it easier for the child to get in and out of the stroller when he or she is bigger. To open the front bar, press the button under the armrest and at the same time pull the front bar outwards (fig_a). To remove the front bar, press the two buttons under the armrests and at the same time pull the front bar outwards (fig_b).
To attach the front bar, insert the two ends into the armrests until they lock into place (fig_c).
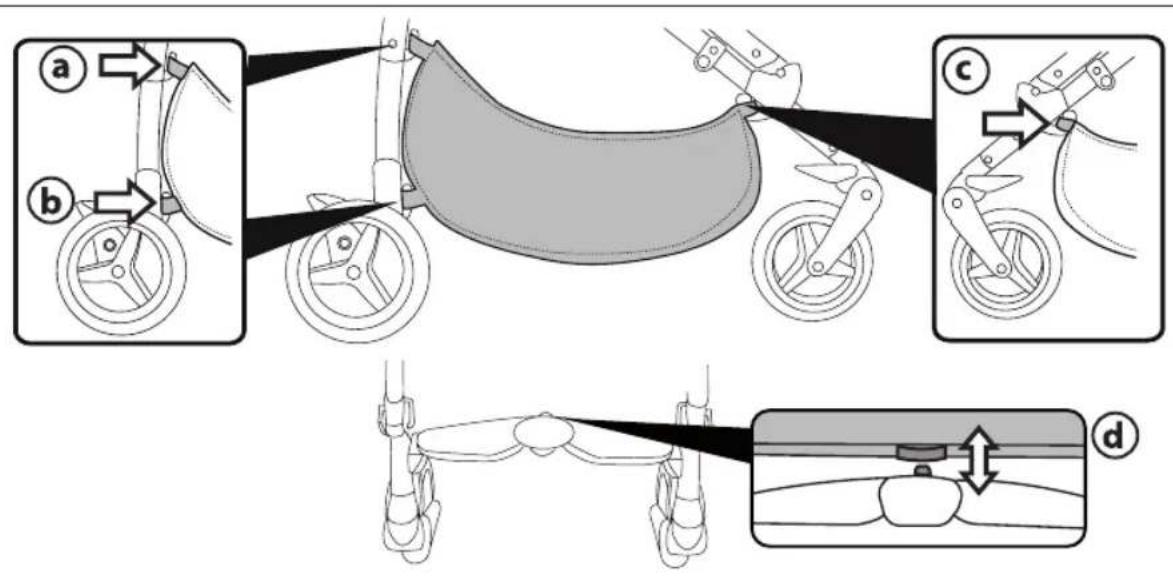
8. HOOD: Open the zipper to extend the hood and protect your child from the sun even with the stroller's backrest fully reclined (fig_a).
Lifting the cloth flap reveals a mesh insert that allows you to see the child while asleep and promotes better ventilation (fig_b).
To release the hood, unfasten the attachments on the two sides of the seat (fig_c)
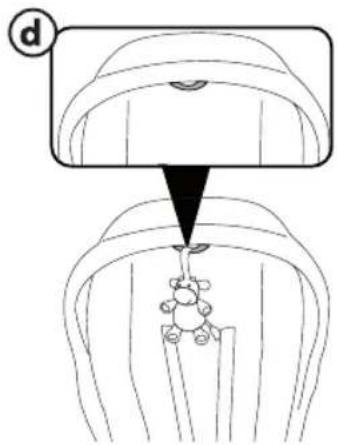
The hood includes a slot from which you can hang your child's favorite toy (fig_d).
9. FOOT MUFF Si Switch COMPLETE: to fasten it correctly, slip the foot muff under the footrest and leg rest and place it over the seat, keeping the front bar on the outside. Fasten the FIRST button of the foot muff to the inside of the stroller (fig_a) and hook the frog fastenings, also to the front bar (fig_b).
On lowering the stroller's backrest, it is possible to place the foot muff higher up and cover the child better. To do this, fasten the SECOND button of the foot muff to the inside of the stroller (fig_c) and hook the frog fastenings to the highest loops (fig_d).
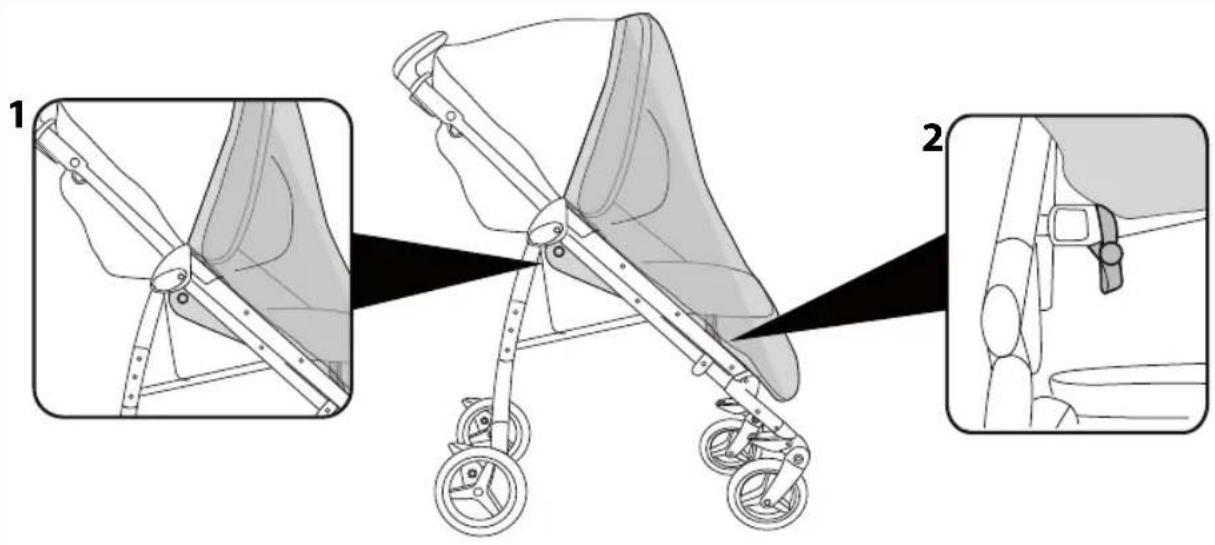
10-RAINCANOPYSi Switch COMPLETO: to add the rain canopy, place it on the stroller, fasten it at the sides to the inside of the frame (fig_1), and fasten the elastics after pulling them round the lower part of the stroller frame (fig_2).
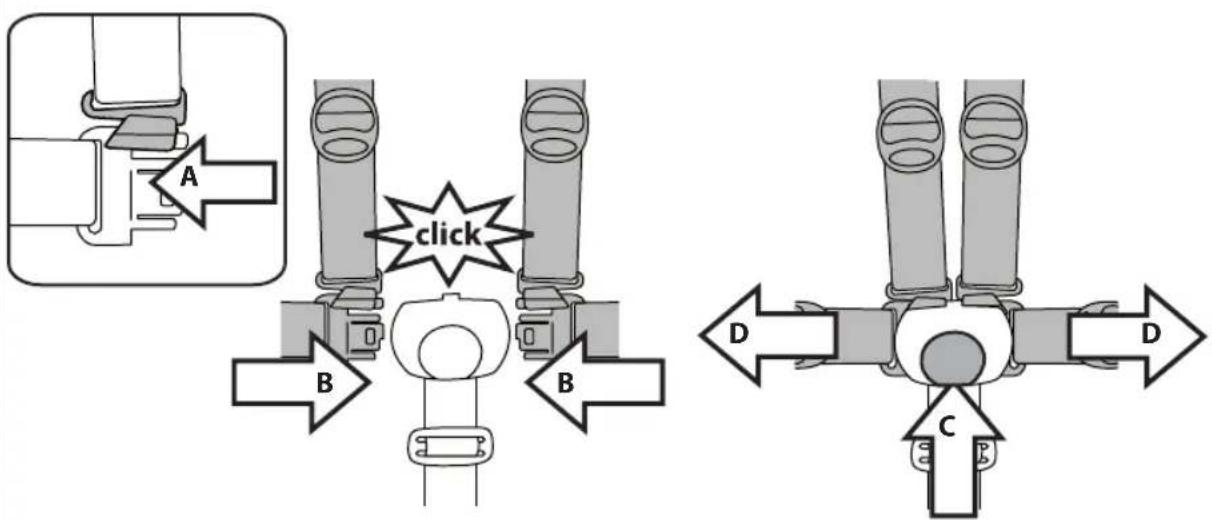
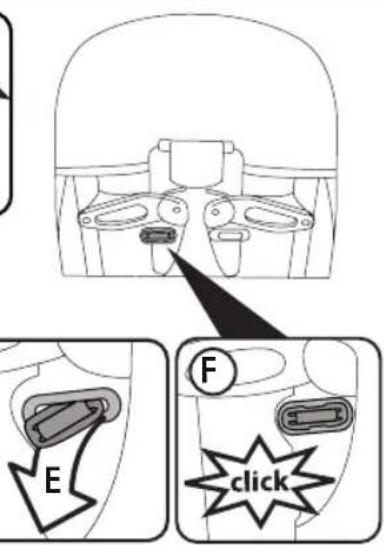
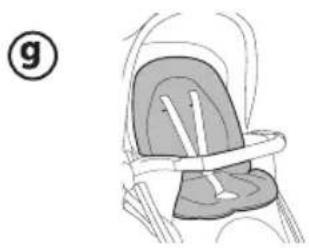
11. 5-POINT SAFETY HARNESS: to fasten, insert the two buckles of the waist strap (with attached shoulder straps, arrow a) into the leg divider strap until they click into place (arrow b). To unfasten them, press the button which is situated in the centre of the fastener (arrow c) and pull the waist strap outwards (arrow d).
12- To tighten the waist strap, pull on both sides in the direction of the arrows; to loosen it, do the opposite.
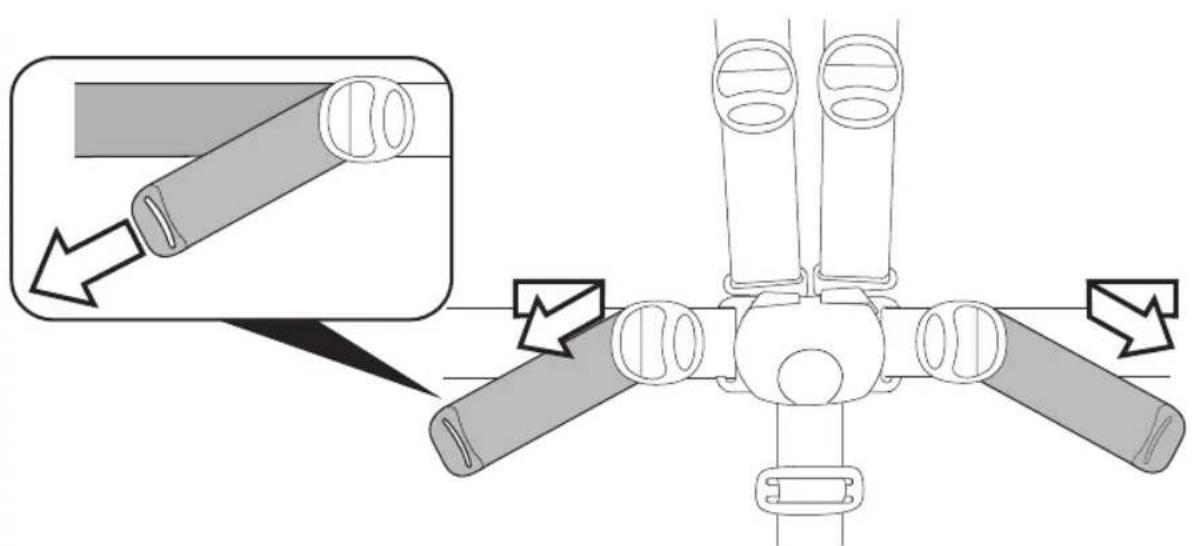
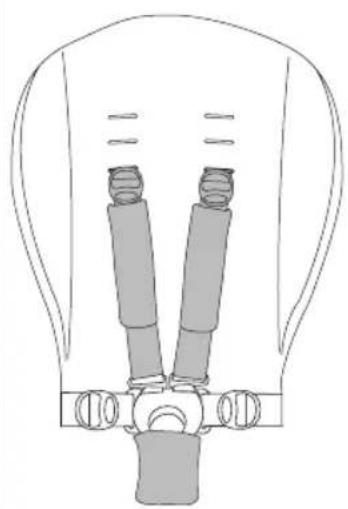
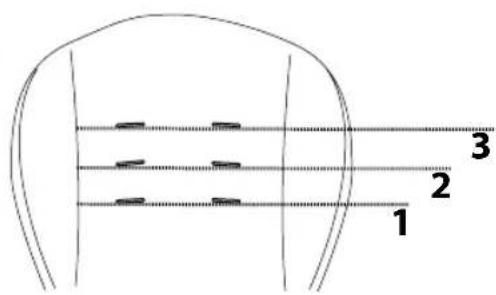
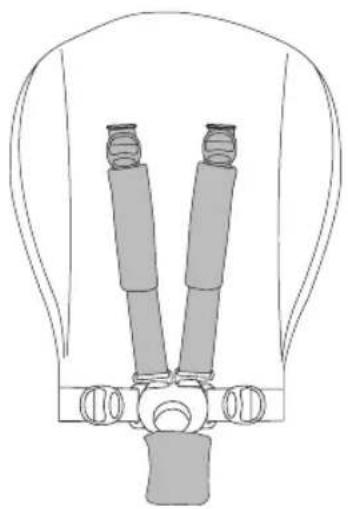
13. It is possible to set the safety harness at 3 different heights, depending on how tall the child is. As the child gets bigger, the harness must be moved to a higher position.
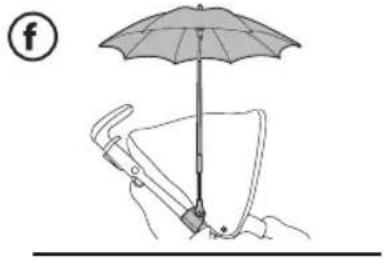
14. To adjust the height of the safety harnesses, release the two buckles on the rear of the backrest. Pull the shoulder straps towards you (arrow a) until the buckles are released and insert them in the backrest loops (arrow b). Remove the shoulder straps from the sack (arrow c) and insert them in the most appropriate buckle (arrow d), then reattach the two buckles behind the backrest (arrow e). The buckles are securely attached when a click is heard (fig f).
15. ADJUSTING THE LEG REST: The leg rest can be adjusted in 2 positions. To lower it, pull the two side levers downwards and at the same time lower the leg rest. To raise it, push the leg rest upwards until it locks into place.
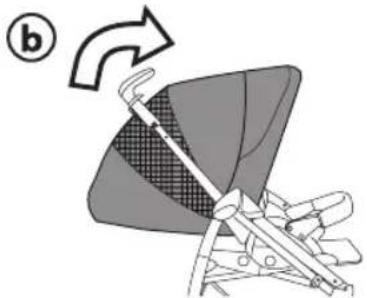
ADJUSTING THE BACKREST: The backrest reclines into various positions. To lower the backrest, lift the handle and simultaneously lower the backrest, locking it in desired position. To raise it, push the backrest upwards.
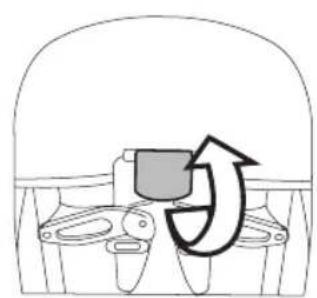
16- REVERSIBLE SEAT The seat can be attached to the frame facing either mom (fig_a) or the world (fig_b).
17- RELEASING/FASTENING THE SEAT
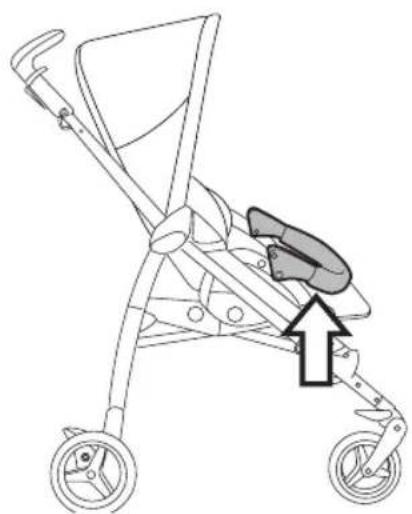
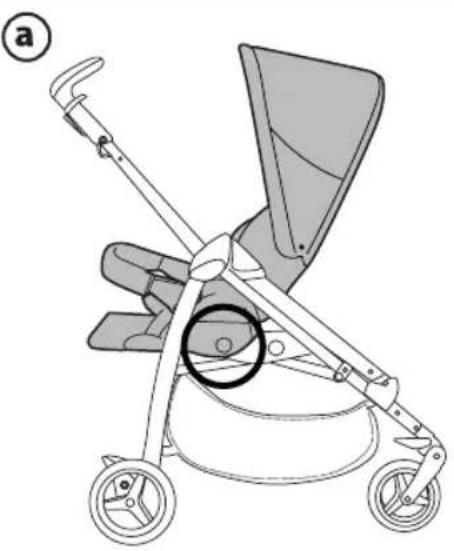
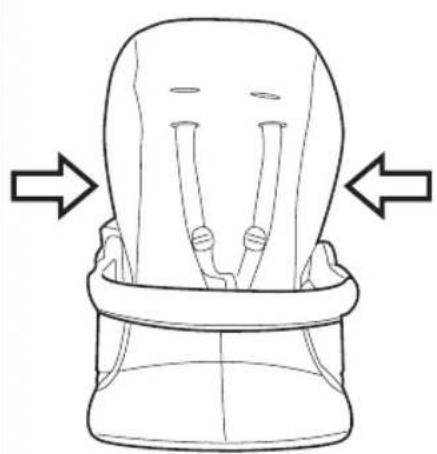
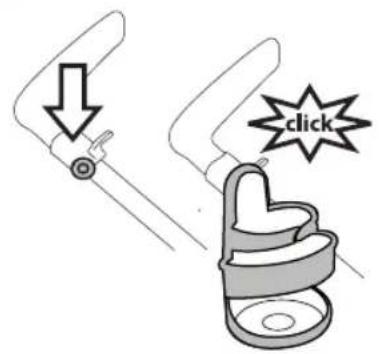
To release the seat: press the side buttons simultaneously and lift the seat, which will have unfastened, by pressing on the rounded area of the structure, as shown in the figure (fig_a).
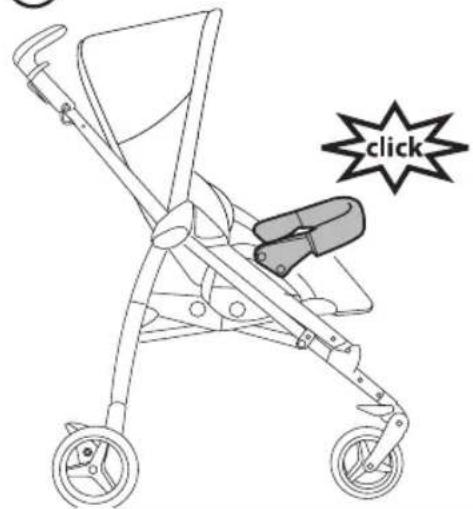
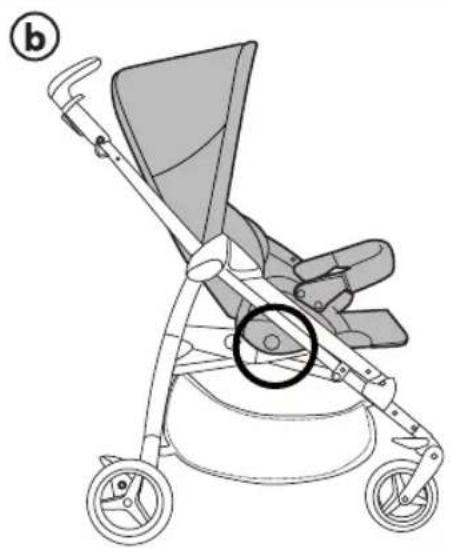
To fasten the seat: place it on the frame with the side buttons corresponding to the relevant holes; the seat will click into place (fig_b).
Ensure the two side buttons are properly secured.
18-CLOSING THE STROLLER:The stroller can be closed:
- without the seat
with the seat facing mom
with the seat facing the world.
To close the stroller with the seat docked (in either direction), you must: close the hood, lower the backrest fully, lower the front bar to the 2nd position (closing position), and lock the front wheels.
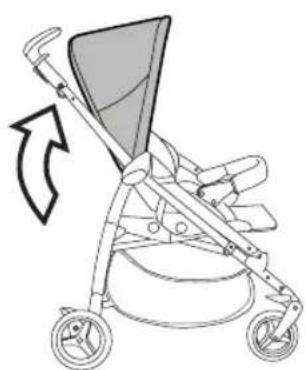
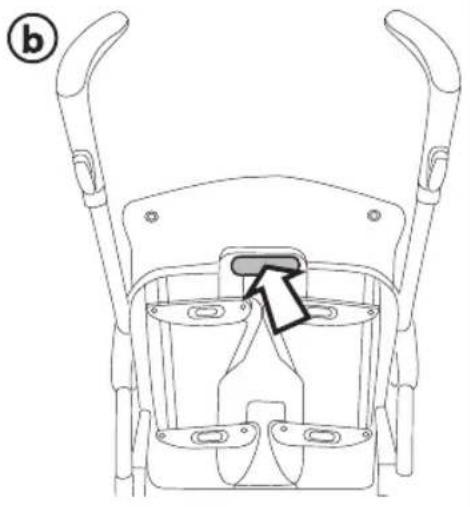
One at a time, lift the levers on the handles until you hear a clicking sound (fig_a)
- Grasp the central handle and pull it upwards until the stroller folds up. Check the safety fastening to ensure the frame has folded properly. When folded, the stroller will stand upright.
- The stroller folds up more compactly if you release the seat (paragraph 17).
- CARRYING: The stroller can be conveniently carried (with the front wheels set on stationary) by the central handle (fig_a). It can also be carried by the side handle (fig_b).
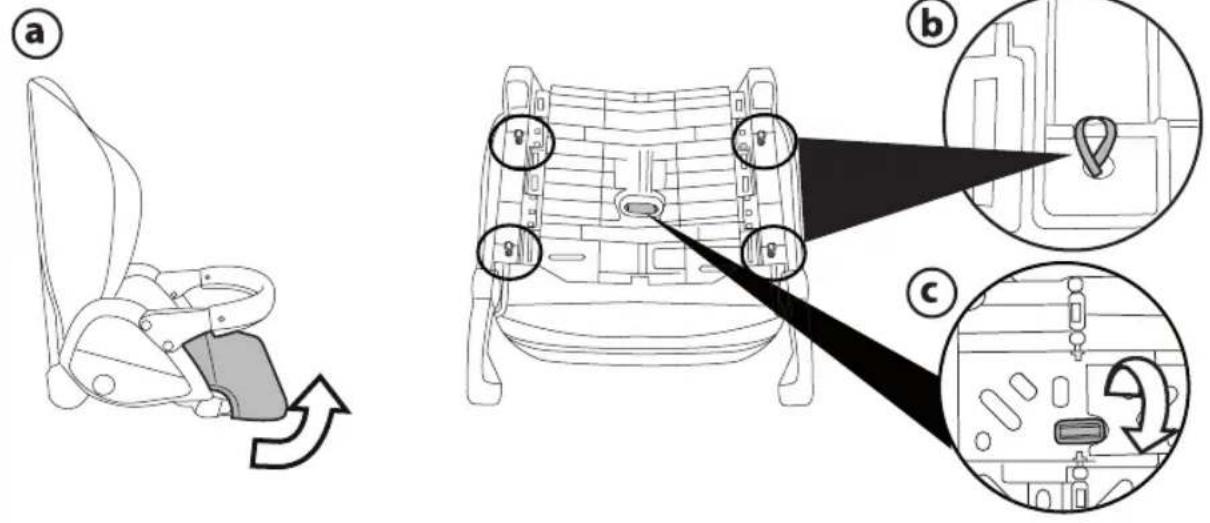
- REMOVING THE COVER: to remove the cover from the stroller, remove the seat from the frame (paragraph 17a); slide the cover off the footrest (fig_a); detach the 4 elastic bands from the sides of the backrest (fig_b); remove the crotch strap (fig_c);
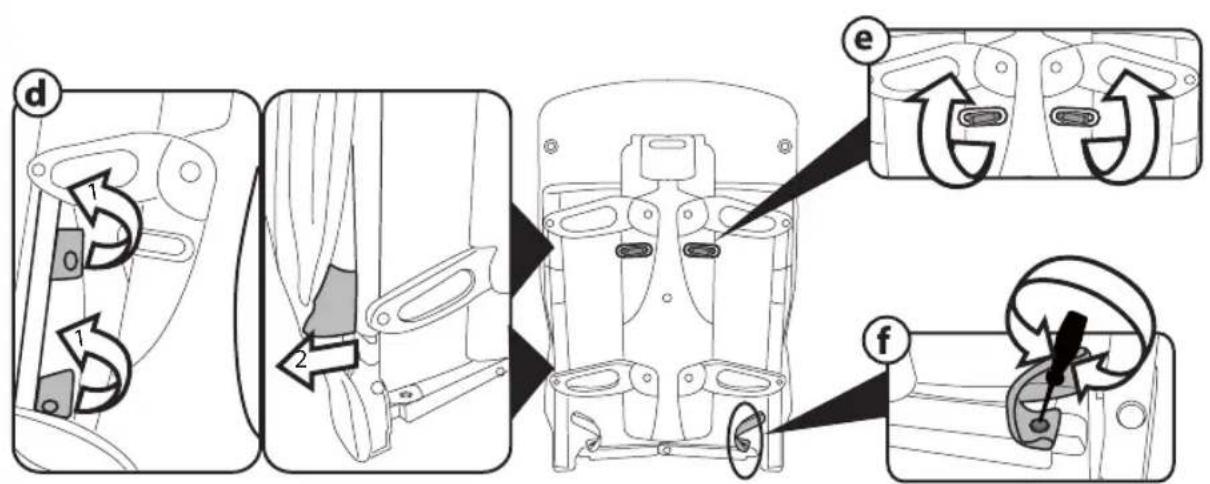
- unbutton and remove the rigid tabs (fig_d) on both sides on the rear of the backrest; slide out the two buckles (fig_e); unscrew the strap's two screws on both sides using a screwdriver and pliers to hold the nut steady (fig_f); remove the cover from the top.
FASTENING
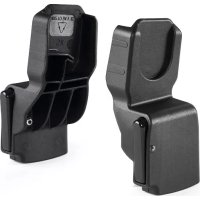
NAVETTA POP-UP & PRIMO VIAGGIO SL
24- NAVETTA POP-UP: To fasten the Navetta Pop-Up bassinet, sold separately, to the frame, you will need to buy the adapters as additional accessories. To attach the bassinet properly, consult the relating instruction manual.
PRIMO VIAGGIO SL: To fasten the Primo Viaggio SL car seat, sold separately, to the frame, you will need to buy the adapters as additional accessories. To attach the car seat properly, consult the relating instruction manual.
SERIAL NUMBERS
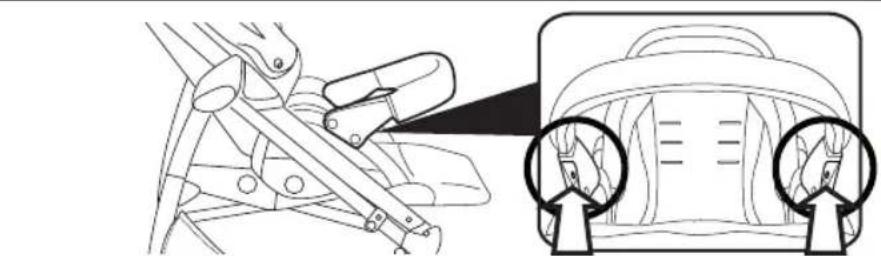
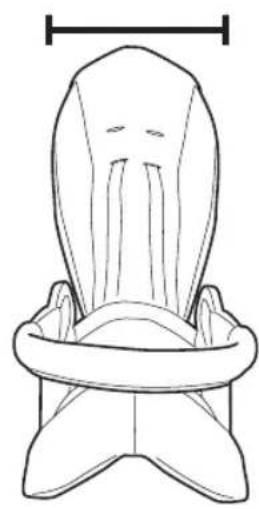
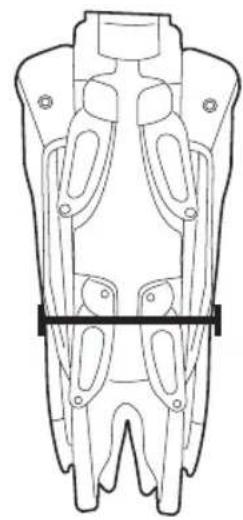
- The Si Switch seat provides the following information: product name, production date and serial number. This information is essential in the event of a claim (fig_a).
The Si Switch backrest provides the following information: product name, production date and serial number. This information is essential in the event of a claim (fig_b).
ACCESSIONS
- MOSQUITO NET: may be fastened to the hood (fig_a).
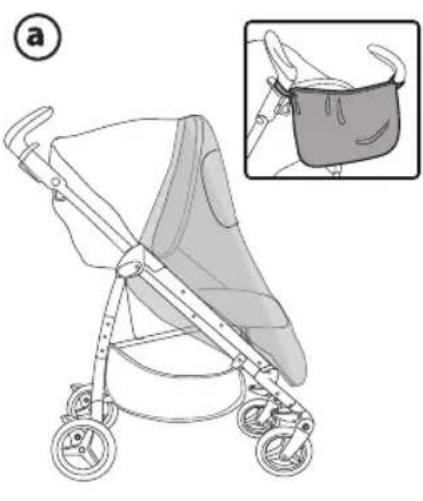
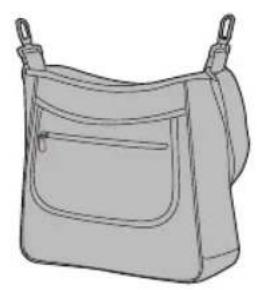
BAG: this baby changing bag with mat may be stened to the stroller (fig_b).
CUP HOLDER: may be secured to the mushroom button on the frame (fig_c)
- TRAVEL BAG: Practical bag for air travel with the stroller (fig_d).
FASTENING ADAPTERs: adapters for attaching the PegPerego Primo Viaggio SL car seat (Group 0+), Navetta Pop-Up bassinet (group 0), to the frame (fig_e).
PARASOL: a handy matching parasol (fig_f).
PADDED CUSHION: for Peg Perego high chairs and strollers. Winter side of quilted jersey fabric, summer side of 100% cotton (fig_g).
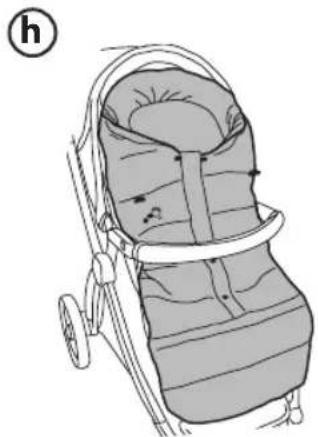
VARIO FOOT MUFF: Foot muff for Peg Perego strollers (fig_h).
CLEANING AND MAINTENANCE
PRODUCT MAINTENANCE: protect from the weather water, rain, or snow; prolonged and continuous exposure to bright sunlight may give rise to colour changes of various different materials; store this product in a dry place.
CLEANING THE CHASSIS: periodically clean all plastic parts with a damp cloth. Do not use solvent or similar cleaning products; keep all metal parts dry to prevent rusting; keep moving parts clean (adjustment mechanisms, locking mechanisms, wheels, ...) and free of dust and sand and, if necessary, lubricate with light machine oil.
CLEANING THE RAIN CANOPY: wash with a sponge and soapy water; do not use detergents.
CLEANING FABRIC PARTS: brush fabric parts to remove dust and wash by hand at a maximum temperature of 30^ ; do not wring; do not use chlorine bleach, do not iron; do not dry clean; do not apply solvent-based stain removers and do not dry in a tumble dryer.

PEG-PEREGO S.p.A.

Peg-Perego S.p.A. is an ISO 9001 certified company. This certification is a guarantee for customers and consumers of the transparency and trustworthiness of the company's procedures and working methods.
Peg Pérego can make changes at any time to the models described in this publication for technical or commercial reasons. Peg Pérego is at the disposal of its customers and consumers to ensure that all their demands and queries are fully satisfied. It is a key part of our policy to ensure we are always aware of our customers' views and requirements. We would therefore be very grateful if, after using a Peg Pérego product, you take the time to fill in our CUSTOMER SATISFACTION QUESTIONNAIRE, making a note of any comments or suggestions you might have. You can find the questionnaire on the Peg Pérego website: www.pegperegogo.com
PEG-PEREGO AFTER-SALES SERVICE
If any parts of the item get lost or damaged, only use genuine Peg Pérego spare parts. For any repairs, replacements, information on the products and sales of genuine spare parts and accessories, contact the Peg Pérego Assistance Service and state the serial number of the product, if present.
tel.0039/039/60.88.213
fax 0039/039/33.09.992
e-mail assistenza@pegperegoo.it
website www.pegperegco.com
FR_Français
ACCESSIONS EN OPTION
OMBRELLE: ombrelle assortie (fig_f).
PRODUKTETS KOMPONENTER
27.CyMKA JIIIpyTEJSECTBNI: npaKTnHna cyMka dIa abnanepeJeTob cKoJIrCKoI (pnc.d).
AДАПТЕрbl: aanTepbl ДЯ уctahOBkn Ha pamé abToKpeCn a PegPerego Primo Viaggio SL (rpynnb 0+), IIOJIbKa Navetta Pop-Up (rpynna 0); (pnc. e).
3OHTVK: ydo6hny 3oHTNK, nOxOJaunn no CBety (pnc. f).
MRAKNI BKNIAIbIiH-IOyUKA: IJNJIeTcKINx CTyBnIKOB IN KONICOK Peg PeregO.3mHraCTopoHa n3 npocTeaHHoTO TpNKOTaKa, JETHRA CTopoHa n3 100% xionka (pnc.g).
VARIO FOOT MUFF: MyΦTa dIa HOr dIa KOnIcOK Peg Perego (pnc.h).
CHCTKA N YXOJ
YXOJ3A N3DEJIEM: 3aunntte n3dene ot atmocfephbx OcakOB - Chera nn DoxJa. NoctoHHn npoJOLKHTeNBHn NOBepKHeHOCTb COHHeHbIM lyam MOKeT Bbi3BaTb UBeTOBbIe H3MeHEHn MHOrNX MaTePnAbNO. XpaHnTE 3TO I3dEne B CYXOM MeCe.
YNTCKA UACCN: nepnoDnueckn OunuauTe
INaCTMACCOBbIe DetanB BlaxKHO TpRKnO, 6e3
NcONb3OBaHnPACTBOPINe N CXoNbHbBEUcETB.
DepXnTE MetaNNueCKeN cactn n3dEIny CyxMn, YTObbl
PepDoTbPaTntb Obpa3OBaHne PkaaUnhbl. IOnpepnBaHTe
VNTOTy BEx CDbNxUxxCra Detanei (peynipOBuOHn bie n
CoedmHtBeHbIe Detanu, KOJeca N T.D.), yJaAnr PbNbIe
NEcOK. Pn Heo6xOIMOCn, CMAkBe Tnx NfERKIM MaClOM.
YNTKA IOXDEBINA: IpombBaIte ero ry6koM MblbHO BDOH, He Nl3yHTec MoOuIMC pdeCTBaM.
YNCTKA TKAHbIX YACTE: ynCTnte TeKoT KaHbIe
yactn, yTObI ydaNTb Nbl. CtnpaIte BpyHyIO
npm MaKC. TemnePataType 30^ He BblkpyuBaTb; He
OTBeINBaTb Xlopom; He rnaNTb; He nCTNTB
XmUncTKe; He O6pa6aTbIBatpactBOpNTeJMaMHn He
CyuNTb Pn nOMOUs 6apa6aHHbx cyuNNbHbIX MaunH.

PEG-PEREGO S.p.A.

Peg-Perego S.p.A. cepTnФицроваHA no ISO 9001.CepTnФикuaIGNrapaHTnpyET 3aKa3uKam NNotpe6BnteM,TO KOMMaHnA pa6OtaT,co6JIIOdA npINuNtbl rnaChOCTn INdoBepn. KomNaHnE Peg-Perego IMeet npabo
BHCOTB B IIOOBI MOMENT N3MeHHeN B MOJEN, OINCAHNBE B HaCTOaEM N3DaHN, NO pInuHnHAM texHHeCKORO INKOMpeueCKORO xapaKtePA. Peg-Perego HaxoDITC K cyIyram CBOWX KNIEHTOB DnI N01HO R yOBOHTBOpEHN BCex INx Tpe6oBaHn. POToM, nIra Hac OueHb BaXHO 3HaTb MHeHne Hauxx KIneHTOB. POToM, Mbl ByDem Bam pIn3HATEbHbI, eCNl Nocne IcNOB3OBAHn HAwero IN3dennBbl 3aONHnTe AHKETY O5 YOOBJTEBOPEHHOCTNI NOTPEBNTEJI, KOtopyo MoKHO NaHTn Ha Haem CaIne TB INThepHe, BBiCKa3bIBaCBON 3aMeuaHn INI peKomeHdaaUN. WwW.pegperego.com
CJYKBA OBCJYKUBAHN PEG-PEREGO
B cnyuae ytepu nnn npnakceccyapOB, npmehnTe TOnbko fnpmeHHbIe 3aNaChbIe qactn pOn3BOcTBA KOMnHaNN Peg Perego. JnBa BbInonHeHn peMOHTa, 3aMeHbI 3aNaChbIX qacteN nNoLyueHn INoFOpMaunn O6 UcTpOoiCTBe 06paauaiTecb B cnyx6y nocienpodaJHoro 06CnyKuBaHn Peg PeReo, coo6uINB, npn erO hAnuHn, cepuHbI Homep npOdykta:
Cpok cnjxkb:3 roda
TapaHTnHbI cpoK:12 mecaeB
ren.:0039/039/60.88.213
0039/039/33.09.992
e-mail assistenza@pegperegoo.it
caNT B INHTepHeTe: www.pegperegco.com
I3roToBnteB:PEGPEREGOS.P.A.
(Per Perero C.I.A.); A.pec: Via de Gasperi 50 - 20862
ARCORE (MB), Italy (Bna de Iacnepn 50,
aLoal 2:Si Switch CLASSICO aJg
wJgslb.o.aaalw.aalc2:alay alIg
Golgo
p123456789010qalej
(a_0gJ) 1
10 10
LdJLJI LgJLJI LLI JI J:JLJS
(b)
LgLoJLO81 JLoL31 L
guiuuglu(C-ogwJ)ooLJI JcIaJl
.(d_ajgll) pall abwlg Jawb bwa aI gJg.
Lc84e,6g2p 150x1g
.e0gJ1) gooeJUgELaW
1 4
1.DgCnloL0x1nolb1gBgA
Jaaal plasw Jabai aoc loa:Jolal
Jabjio + Peg-Perego Ganciomatic: Si Switch
Jalll aayyolal lalal
JJIaIJIbAolJIgOLJIgOJALAIyIeIJI
JalJI JgLiio 12g g jgSi
acg0s1)olwll waa Jalaal seao ggljll poiciu
jIJI JJIJI aJc cXa CwJd eWJIOiog.(+0
m = 311
gJalal arc g 1sga aegog gill Jalal jol
1
y 1
LJ11 Ls J5 Jao Jaoj Jab8a g j
Peg Perego Ganciomatic
.
jg 3 g
.
All of the intellectual property rights for the contents of this instruction manual belong to PEG PEREGO S.p.A. and are protected by the laws in force.

si switch
FI001502I196
30/03/2015