OTD 202D - Tumble drier OK - Free user manual and instructions
Find the device manual for free OTD 202D OK in PDF.
| Product type | Condenser tumble dryer |
| Brand | OK |
| Model | OTD 202D |
| Dimensions (H x W x D) | 890 x 660 x 685 mm |
| Power supply | 220-230 V ~ 50 Hz |
| Maximum current | 12 A |
| Maximum power | 2500 W |
| Drying power | 2200 W |
| Maximum capacity | 8 kg |
| Number of programs | 15 |
| Programs | Cotton, Synthetics, Time (30/60/90 min), Anti-Bacterial, Silk, Refresh, Air Dry |
| Additional functions | Buzzer, Quick, Delicate, Delay Start, Child lock |
| Display | LED (remaining time, indicators) |
| Cleaning | Lint filters (after each cycle), Condenser (once a month), Water tank (after each cycle) |
| Safety | Child lock, automatic shut-off, anti-crease protection |
| Protection class | IP X4 |
| Electrical class | Class I |
| Spare parts | Filters, condenser, water tank, drain hose |
| Included accessories | Drain hose, user manual |
| Repairability | Replacement of cord by qualified professional |
Frequently Asked Questions - OTD 202D OK
User questions about OTD 202D OK
0 question about this device. Answer the ones you know or ask your own.
Ask a new question about this device
Download the instructions for your Tumble drier in PDF format for free! Find your manual OTD 202D - OK and take your electronic device back in hand. On this page are published all the documents necessary for the use of your device. OTD 202D by OK.
USER MANUAL OTD 202D OK
-
Buzzer
-
Quick
-
Delicate
-
Child Lock
-
Delay start
13.086vŋ
- Evεiεiε:
Child Lock
Drying
Cooling
→End
-
Start -Evapξη
-
EvεIειC:
→apiaouuunukvotn

Read the instructions.
- This appliance is not intended for use by persons (including children) with reduced physical, sensory or mental capabilities, or lack of experience and knowledge, unless they have been given supervision or instruction concerning use of the appliance by a person responsible for their safety.
- If the supply cord is damaged, it must be replaced by the manufacturer, its service agent or similarly qualified persons in order to avoid a hazard.
- The tumble dryer is not to be used if industrial chemicals have been used for cleaning.
- The lint trap has to be cleaned frequently.
- The appliance must not be installed behind a lockable door, a sliding door or a door with a hinge on the opposite side to that of the tumble dryer, in such a way that a full opening of the tumble dryer door is restricted.
BEFORE SWITCHING THE DEVICE ON FOR THE FIRST TIME
Do...
... ensure that the device is installed and electrically grounded by a qualified service person in accordance to local codes to prevent shock hazard and assure stability during operation.
... install this tumble dryer properly in accordance with the installation instructions before use.
... keep surrounding areas free from accumulation of lint, dust and dirt.
...use a separate earthed socket for the power supply.
... ensure that the electrical system meets the requirements laid out in the installation part of this manual.
...avoid future hazard or electrical shock.
...make sure a carpet must not obstruct the openings.
Do not...
... install or store this device outdoors in a damp place, or in on area which may be prone to water leaks such as under or near a sink unit. In the event of a water leak allow the device to dry naturally.
... operate the tumble dryer if any parts are missing or broken.
... store or use gasoline or other flammable vapours and liquids in the vicinity to the device.
...use an adaptor plug or extension cord.
... connect the device to the power supply until installation is complete.
... repair or replace any part of the appliance attempt any servicing unless specifically recommended in the user-maintenance instructions or in published user-repair instructions that you understand and have skills to carry out.
EN
SAFETY ADVICE
DURING DAILY USE OF THE DEVICE
Do...
... wait until the tumble dryer has stopped completely before reaching into the drum to prevent injury. Never reach into the tumble dryer when the drum is moving.
...clean lint screen before or after each load.
... remove the tumble dryer door to prevent accidental entrapment before the device is removed from service.
... unplug the device before carrying out any maintenance or repair. Hold the plug and not the electric cable when unplugging the power supply.
... wash items that have been soiled with substances such as cooking oil, acetone, alcohol, petrol, kerosene, spot removers, turpentine, waxes and wax removers in hot water with an extra amount of detergent before being dried in the tumble dryer.
... ensure that the device is not used by persons with reduced physical, sensory or mental capabilities, lack of experience and knowledge without supervision or instruction by a person responsible for their safety.
... supervise children to ensure that they do not play with the device.
Do not...
...sit on top of the tumble dryer.
...tamper with controls.
...dry unwashed items in the tumble dryer.
... dry items such as foam rubber (latex foam), shower caps, waterproof textiles, rubber backed articles and clothes or pillows filled with foam rubbers pads.
... dry items that have been previously cleaned in, washed in, soaked in, or spotted with gasoline, cleaning solvents, kerosene, waxes, etc. Do not store these items spotted with gasoline, cleaning solvents, kerosene, waxes, etc. on or near the tumble dryer. These substances give off vapours that could ignite or explode.
... use heat to dry items containing plastic, foam, rubber or similarly textured rubberlike materials or items containing feathers or down to prevent fire.
... stop a tumble dryer before the end of the drying cycle unless all items are quickly removed and spread out so that the heat is dissipated.
CONGRATULATIONS
Thanks for your purchase of this ok. product. Please read this manual carefully and keep it for future reference.
If you sell the device, give it away, or leave it behind when you move house, make sure you also pass on this manual so that the new owner can become familiar with the device and safety warnings.
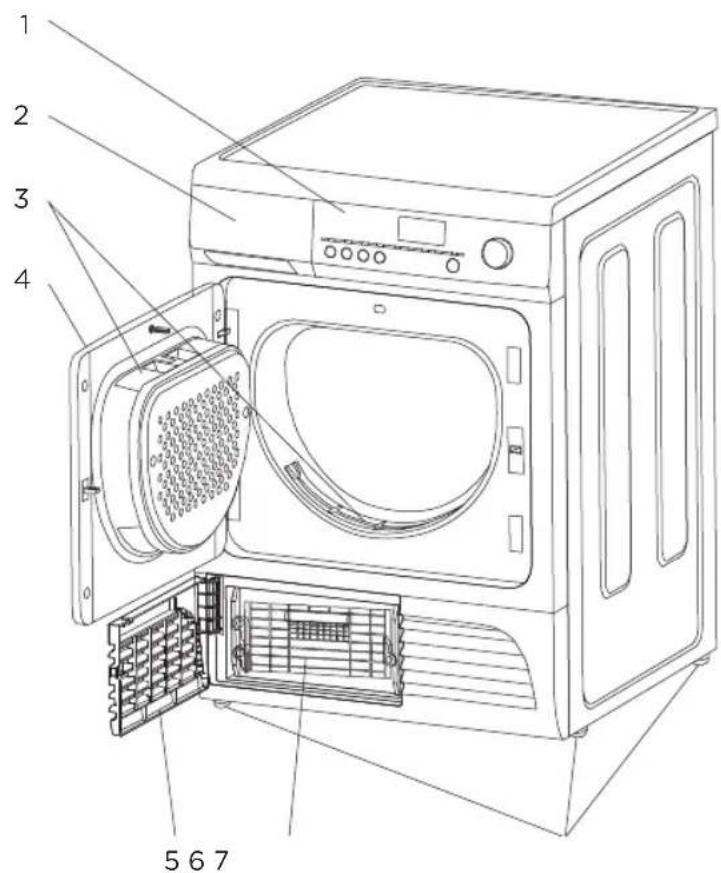
DESCRIPTION
- Control panel
- Water collection tank
- Filters
- Tumble dryer door
- Condenser door
- Condenser
- Feet
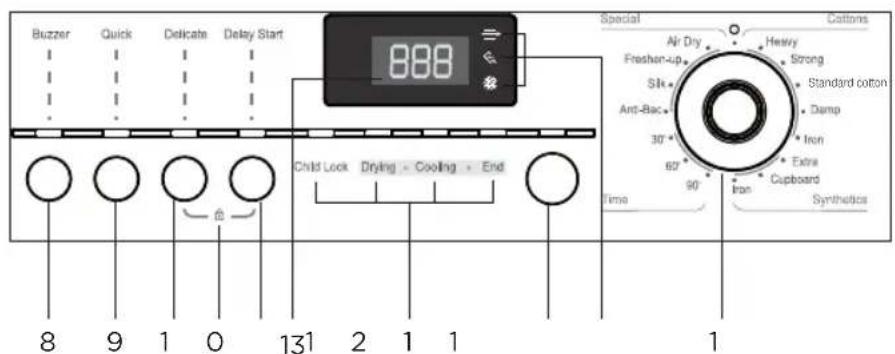
Control panel
DESCRIPTION
- Buzzer
- Quick
- Delicate
- Child Lock
- Delay start
- Display
- Indicators:
Child Lock
Drying
Cooling
→ End
-
Start
-
Indicators:
an condenser
→ mpty water container
Clean fi Iters
- Program selector
Rear of the tumble dryer
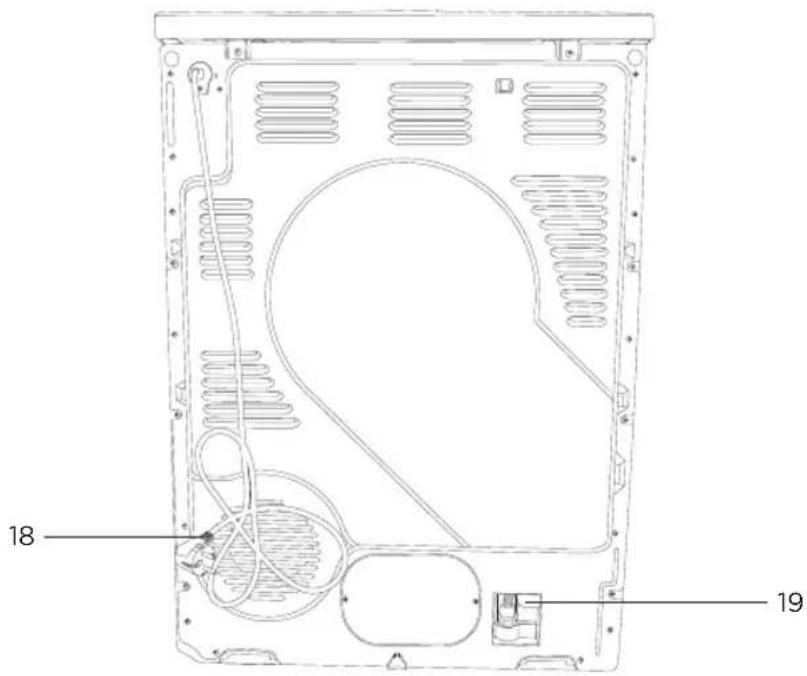
- Power cord with plug 19. Drain
Accessories
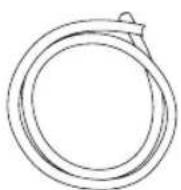
- Drainpipe
BEFORE FIRST USE
- Remove all packaging materials.
- Check for completeness and transport damage. In case of damages or incomplete delivery please contact your dealer.
- Clean the appliance ( Cleaning and care).
Basic instructions
To ensure the tumble dryer operates normally, attention must be paid to the following instructions:
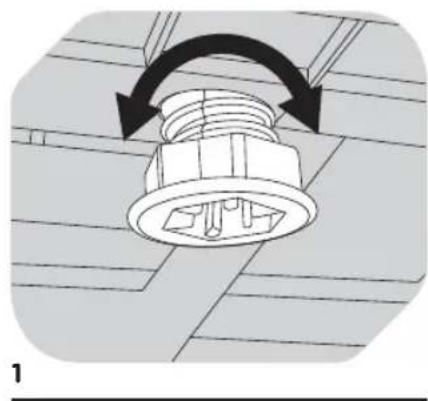
- The tumble dryer must be level when installed. Its bottom is equipped with adjustable feet. Adjust these 4 feet to level the device before operation (fig.1).
- Check whether any damage occurred to the tumble dryer during transportation. A damaged tumble dryer must not be used. If the device is damaged, contact your dealer.
The tumble dryer must be kept away from flammable substances. - The surrounding environment must be dry and ventilated.
- To allow the tumble dryer to perform well, the ambient temperature shall not be lower than 10^ nor higher than 35^ .
Draining water with the drainpipe
During the drying of the laundry, the condensate water is automatically collected in the water collection tank inside the tumble dryer, so that the water needs to be removed from the tank after every drying cycle. If your tumble dryer is in the vicinity of a drain, you may allow the condensed water to discharge directly into the drain through the drainpipe provided to avoid emptying the tank every time.
The method to connect the drainpipe is as follows:
2

3
BEFORE FIRST USE
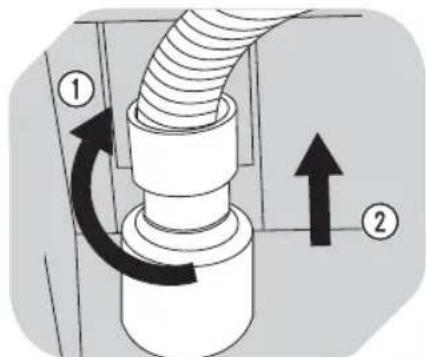
- Loosen the built-in drainpipe (fi g. 2).
- Insert the accessory drainpipe on the fixture.
Fix the accessory drainpipe on the joint (fig. 3).
Note: The outlet of the drain pipe must not be higher than 1 metre above the floor.
OPERATION
Preparation
Attention! This tumble dryer is for domestic use only. Do not use it for purposes other than that for which it was designed. Follow the instructions given on the label of each garment and dry only machine-washable parts.
- Before use, clean any deposits from inside the drum of the tumble dryer with a wet cloth
- Clean debris on the filter screen to increase the drying efficiency.
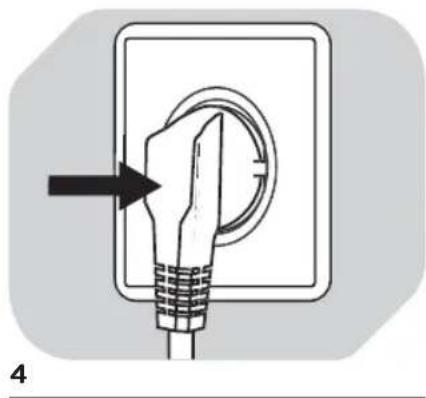
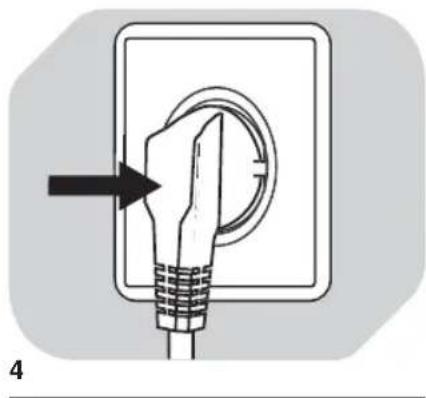
Connecting to the power supply
The socket must be adequate for the maximum power of the tumble dryer (fuses in the power circuit must be rated no less than 15 A).
- Connect the device to an earthed socket outlet (220 - 230 V~ / 50 Hz) (fig. 4).
Before turning on power
Before turning on the power for the tumble dryer check:
... Whether the supply voltage is in accordance with the value indicated on the rating label.
... Whether the supply receptacle can withstand the maximum power load to the tumble dryer.
... Whether the supply receptacle is in accordance with the plug of the tumble dryer.
... If not, replace the power cord or receptacle to make them accord with each other. The replacement of the power cord must be made by a qualifi ed professional or our authorized service agent.
Preparing the laundry
Warning! Do not dry delicate silk, down and other delicate fabrics to avoid damage to the laundry.
OPERATION

5

6
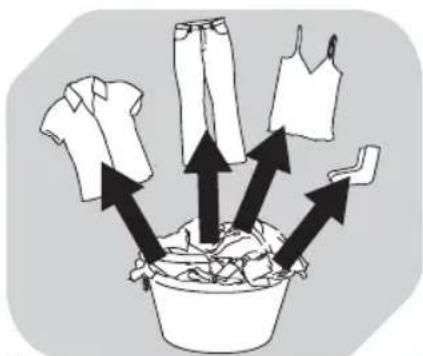
- Check whether the laundry to be dried is suitable to be dried in the tumble dryer. The tumble dryer can only dry the laundry that has been spun dry. Do not put too wet laundry into the tumble dryer (fi g. 5).
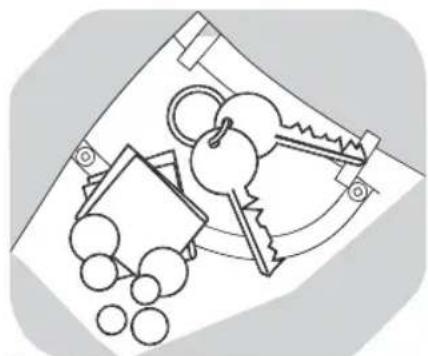
- Empty pockets from keys, coins, etc., remove lighters, matches and harder decorative objects (e.g. brooches) and remove adornment that is not suitable to be dried (fi g. 6).
- Close zippers and hooks. Make sure buttons are sewn on tightly and place small items such as socks, belts, bras, etc. in a mesh bag.
- Unfold large pieces of fabric such as bed sheets, bedspreads, etc.
Loading the tumble dryer
- Laundry should be spun as dry as possible in order to save energy.
Make sure that the laundry you are going to dry is suitable for drying in a tumble dryer. You will find information about this on the care labels. - Place the laundry evenly into the drum after shaking it loose.
- Make sure not to overload the tumble dryer.
- Fabric softeners or similar products should be used as specified by the fabric softener instructions.
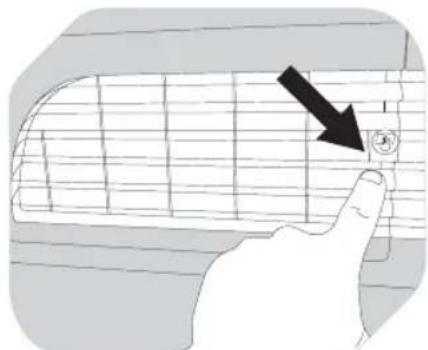
Lightly push on the tumble dryer's door to open it (fi q. 7).
7
OPERATION
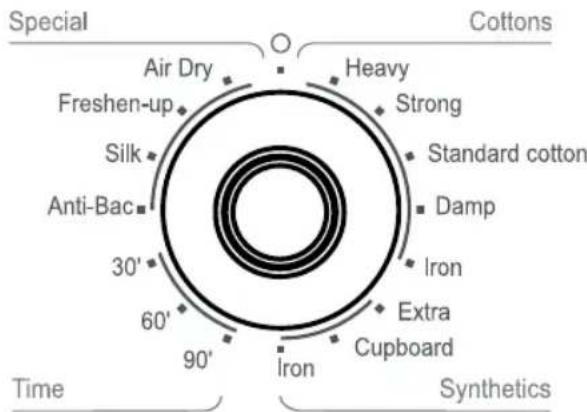
Program selection
To get me best drying results, an appropriate drying program should be selected according to the laundry type. Please turn the program knob to select the right program.
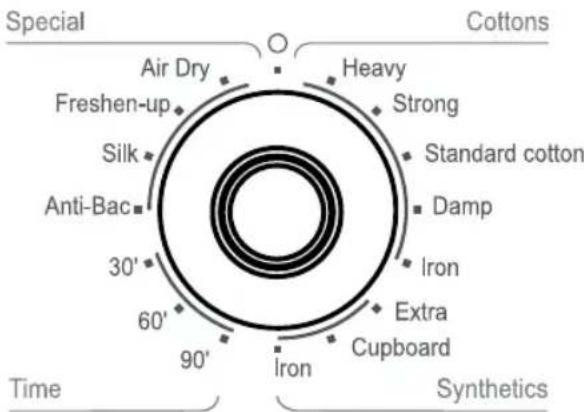
| Program Dryness Apparel Max. | |||
| Cottons | Heavy - | Jeans, work clothes | |
| Strong - | |||
| Standard Cotton - | Normal cotton fabrics | ||
| Damp Damp | |||
| Iron Ready for ironing | Bed-cloths, sheets, | tablecloths | |
| Synthetics | Extra Very dry Heavy | synthetic materials | |
| Normal synthetic materials | |||
| Iron Ready for ironing | |||
| Time | 30 minutes | - | Heavy materials that require further drying |
| 90 minutes | |||
| Special | Anti-Bac | - | Underwear, winter Clothes |
| Silk | 2 kg | ||
| Freshen-up | 4 kg | ||
| Air Dry | Air dry | t-shirts, cotton trousers | |
| 8 kg | |||
OPERATION
Selecting additional functions
Depending on the program, several additional functions can be chosen. This needs to be done after selecting the drying program and before starting the drying program. An indicator light will be shown to point out which function is active.
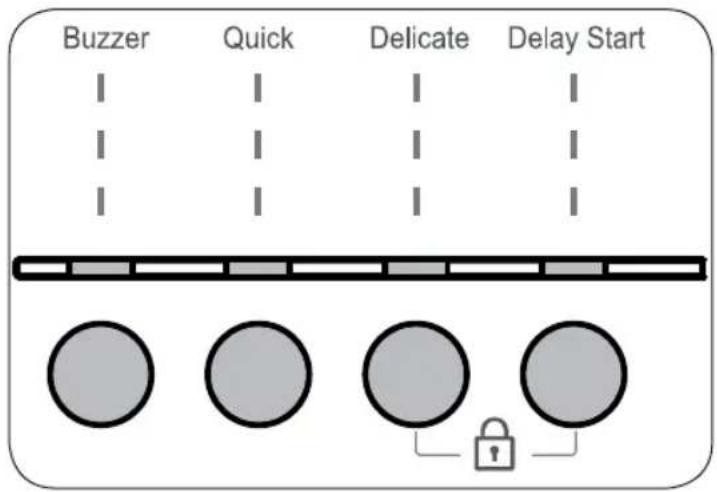
| Button Function | |
| Buzzer When active, a signal will sound when... • Any button is pressed. • The door is opened during operation. • The condenser is removed during operation. • The water container is full. • The drying program is fi nished. | |
| Quick • The function reduces the drying time by 10 minutes. • Can be combined with programs: Standard, Heavy, Strong. • Cannot be combined with function: Delicate. | |
| Delicate • Suitable for delicate materials | |
| Delay Start • The function delays the start of the device from 1 to 24 hours. • Can be combined with all programs and all additional functions. | |
| (Delicate + Delay Start) | The function locks all buttons. Press Delicate and Delay Start simultaneously to activate the child lock function. The child lock function is ended when... • Delicate and Delay Start are pressed simultaneously. • The door is opened during operation. • The condenser is removed during operation. • The water container is full. |
OPERATION
Drying
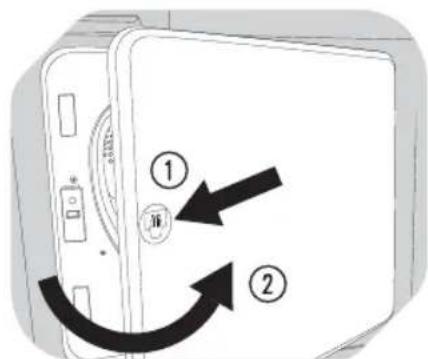
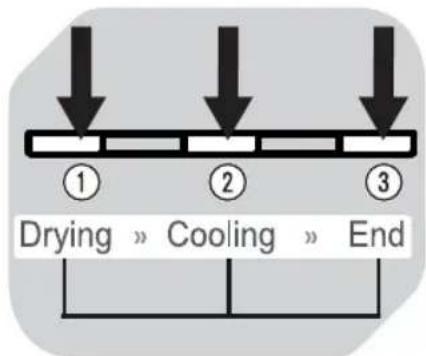
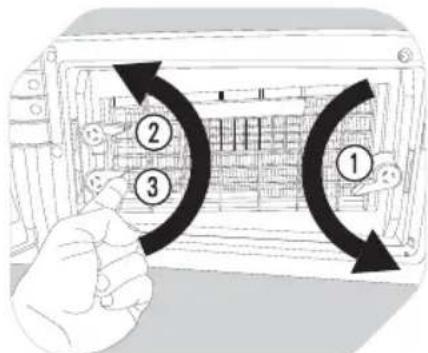
Press the Start button. The tumble dryer will operate according to the pre-set program. The Drying indicator lights up (fig. 8, arrow ①).
- The remaining drying time is shown in the display.
- At the end of a drying cycle the laundry will run through a 10 minute cooling cycle. The Cooling indicator lights up (fig. 8, arrow ② ).
The tumble dryer will stop operation automatically when a drying cycle ends. The End indicator will light up (fig. 8, arrow ③).
- Open the tumble dryer door and take out the laundry.
If the laundry is not removed, the tumble dryer will start the anti-crease protection automatically. During the anti-crease protection cycle, the tumble dryer's drum will run at intervals to keep your laundry loose.
8
Recommendation: Remove laundry immediately when the device has finished the selected drying program.
Turning off the tumble dryer
- Set the program dial to 0 (fi g. 9). Disconnect the power plug from the wall socket.
- Lightly push on the tumble dryer's door to open it. Remove the dried laundry.

9
Tips for saving energy
- Spin the laundry as dry as possible in the washing machine before putting it into the tumble dryer.
- Avoid overloading the tumble dryer.
- Shake the laundry and make it loose before loading it into the tumble dryer.
- Regularly clean the interior of the drum with a moist cloth.
- Choose a proper drying program. Make sure the laundry is not dried longer than needed.
- Clean the fi iters after every drying cycle.
Clean the condenser once a month.
CLEANING AND CARE
Warning! Before cleaning, make sure to switch off the device. Disconnect the plug from power. Let the device cool completely.
Cleaning the tumble dryer
Wipe the body of the tumble dryer and the control panel with a damp cloth. Remember not to use any organic solvent or corrosive agent to avoid damage to the device.
Cleaning the fi Iters
To ensure good ventilation during drying, the filters must be cleaned after every drying program is complete.
10 11
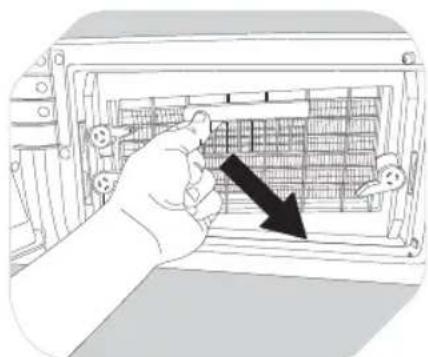
- Open the door.
- Remove both fi Iters from the tumble dryer (fi gs. 10, 11).
Clean off the dust on the fi tter screen with a moist towel.
After cleaning, reinsert the fi Iters.
Emptying the water collection tank
During operation, steam condenses into water and is collected in the water collection tank. Empty the water collection tank after the program is complete.

12 13
CLEANING AND CARE
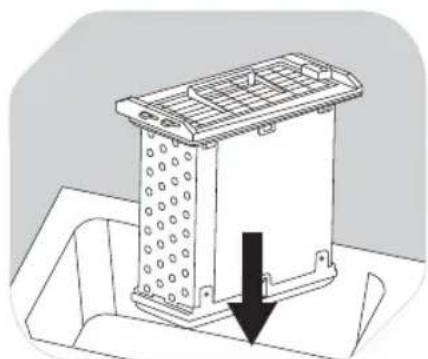
- Hold the handle and pull the tank outwards to remove it (fi g. 12). Keep it level to prevent the water from overflowing.
- Pour away the water (fi q. 13). Reinsert the tank.
Note: Do not use the water for drinking or for food processing.
Cleaning the drum
After the tumble dryer has operated for a time, fabric caring agents or calcium contained in the water will form an almost invisible layer on the inside of the drum.
- Regularly clean the interior of the drum with a moist cloth.
Cleaning the condenser
The condenser must be cleaned monthly.
Switch off the power supply and disconnect the power plug before cleaning:
14 15
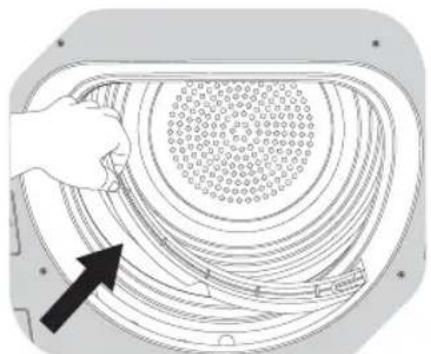
- Unlock and open the condenser door (fi q. 14).
- Open the 3 locking levers (fi g. 15).
16 17
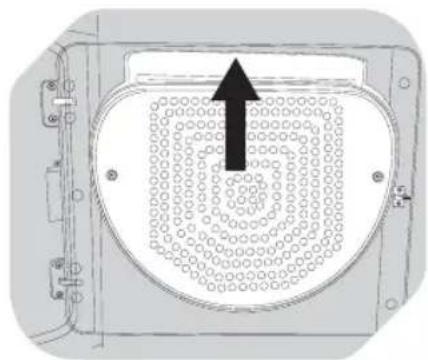
Pull out the condenser by its handle (fi q. 16).
- Thoroughly clean the condenser Allow all the water to drip out over a sink. Then, clean the seals (fi g. 17).
CLEANING AND CARE
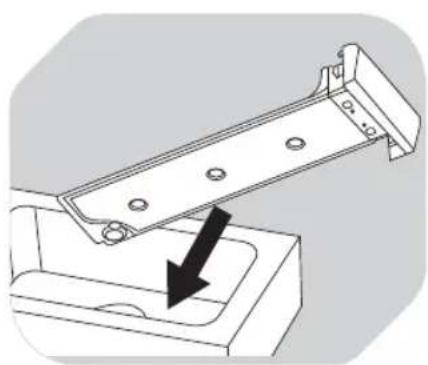
- Re-insert the condenser. Fix the locking levers. Close the condenser door until it locks into position.
Note: Do not use sharp tools for cleaning the condenser.
TROUBLESHOOTING
The following circumstances do not constitute problems. Do not contact the service centre until the problem has been confirmed.
| Problem Cause Solution | ||
| Tumble dryer fails to operate. | ·Poor connection to the power supply. ·Power failure. ·Check the power supply. ·No drying program is set. ·Set Device has not been switched on. ·The water collection tank is full. ·The tumble dryer door is not properly closed. | ·Check connection to the power supply. ·drying program ·Switch on the device. ·Empty the water collection tank. ·Close the tumble dryer door properly. |
| Tumble dryer fails to oper ate. Indicator End lights up. | ·The laundry has reached the condition defi ned by the program setting. ·There is no laundry in the drum. | ·Make sure the program is set correctly. ·Check if there is laundry in the drum. |
| Drying time is too long and the results are not satisfactory. | ·The program setting is not correct. ·The fi Iters have not been cleaned. ·The condenser is blocked. ·Clean the condenser. ·The tumble dryer is overloaded. | ·Check if your program setting is appropriate. ·Clean the fi Iters. ·Reduce the amount of laundry in the drum. |
TROUBLESHOOTING
| Problem Cause Solution | ||
| Drying time is too long and the results are not satisfactory. (cont.) | The laundry is too wet. • Spin the vent duct is blocked. • Check the vent duct and unblock it. | The laundry properly before drying. Check the vent duct and unblock it. |
| Remaining time on the display stops or skips. | The remaining time will be adjusted and corrected continuously and automatically based upon the following factors: • Type of laundry. • Loaded amount. • The degree of spinning dry of laundry. • Ambient temperature. | The automatic adjustment is a normal operation. |
TECHNICAL DATA
Power source: 220 - 230V / 50Hz
Max. working current 12 A
Max. load: 8 kg
Drying programs: 15
Max. power: 2500 W
Dry heating power: 2200 W
Dimensions: H 890 x W 660 x D 685
IP protection class: IPX4
Protection class: Class I
mm
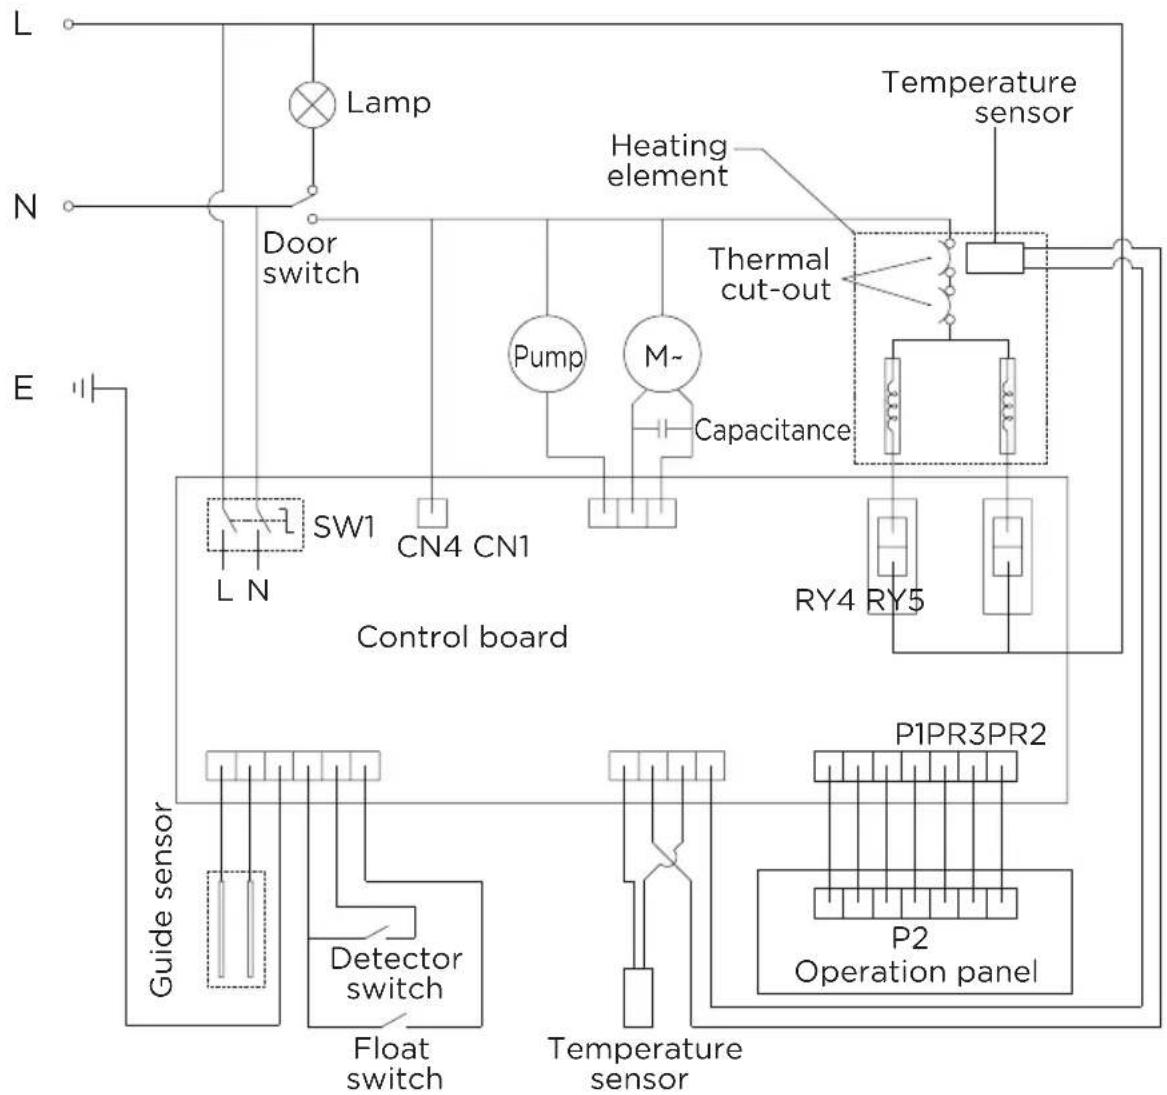
ELECTRICAL DIAGRAM
DISPOSAL
The crossed-out wheeled bin logo requires the separate collection of waste electric and electronic equipment (WEEE). Electric and electronic equipment may contain dangerous and hazardous substances. Do not dispose of this appliance as unsorted municipal waste. Return it to a designated collection point for the recycling of WEEE. By doing so, you will help to conserve resources and protect the environment. Contact your retailer or local authorities for more information.
APPENDIX
Care labels
| Care label Description | |
| Resistant material | |
| Delicate fabric | |
| 95 | Washable at 95 °C |
| 60 | Washable at 60 °C |
| 40 | Washable at 40 °C |
| 30 | Washable at 30 °C |
| Hand wash | |
| Dry clean only | |
| Wool seal | |
| cl | Bleachable in cold water |
| Do not bleach | |
| Iron at 200 °C | |
| Iron at 150 °C | |
| Care label Description | |
| Iron at 100 °C | |
| Do not iron | |
| Dry cleaning with any solvent | |
| Dry cleaning with pericloride | |
| Dry cleaning with aviation fuel | |
| Do not dry clean | |
| Dry fl at | |
| Hang to dry | |
| Dry on clothes hanger | |
| Tumble dry, normal heat | |
| Tumble dry, reduced heat | |
| Do not tumble dry | |
APPENDIX
Typical weight of apparel items
| Type Material Typical weight | ||
| Bed sheet (single) Cotton 800 g | ||
| Blended fabric clothes Blended fabrics 800 g | ||
| Jackets Cotton 800 g | ||
| Jeans / 800 g | ||
| Overalls Cotton 950 g | ||
| Ladies pyjamas / 200 g | ||
| Shirts / 300 g | ||
| Socks Blended fabrics 50 g | ||
| T-Shirt Cotton 300 g | ||
| Underwear | Blended fabrics | 70 g |
ES
3NeKtpnuecka po3eTka DoJXHa 6bITb paccuTaHa Ha MaKcImaJIbHyIO NOTpe6JIeMyIO MOUHOCTb CyuINbHOI MaUNHbI (npedoxpaHHTeN, yCTaHOBNEHHBe B cENI INrTaHn, DOJIxHbI 6bITb paccHTaHbI He MeHee Yem Ha 15 A).
- IopocoeDHHHTe yCTpoNCTBO K 3a3eMJIeHHoJ 3JIeKTPnuecko po3eTke (220-230 B~ / 50 Tc) (cm. pnc. 4).
Ipeed BkIIOeHnem
Ipeed BkIOueHnEM cyuINbHOJ MaunHbI ybeNTecb, TTo...
HapxkeHne nTaHn COOTBcTBye3HaehHIO, yKa3aHHOMy Ha TINOBO Ta6NueKe.
p03eTKa, K KOtopoI NOdkJIIOyeHa CyuINbHa MaUNHa, paccHTaHa Ha MaKcIMaJIbHyIO NOTpe6JIeMyIe MoUHOCTb.
TIN pO3ETK, K KOTOPONIPOUNBEdHO NODKNIOUeHne, COBnaJaET C TINOM WTeNCeHBNO BILKN CYUNNBHO MAUNHbI.
... Ecnn 3to He TaK, 3aMeHnTe uHyp nHTaHn nnpo3eTky Ha n3deJne HxKHO Tnna. 3aMeHa uHpy nHTaHn DOJIxHa npOu3BOuNTbcra KBaIuΦuNpOBaHHbIM CneuaJINCtOM nAn ABTOPn30BaHHbIM cepBnCHbIM ueHTpom.
NoIroTOBka6eJIbIa
IpeynpekdeHne! He cyuTe Beun n3 weJka, nyxa unn dpyrnx deJNKaTHbIX MaTePnaIOB BO n36ekHne nx nobpeKdeHn.
NCHOJIb3OBAHNE
5
6
Y6eHITecb, YTO BEU, KOTOpBIE Bbl CObnpaTeCb CyuNTb, PpeHa3HaueHb IJRA CYuKN B CyuINbHOI MaUNHe. CyuINbHaMaUNHa PpeHa3HaueHa IJRA CyuKN TOJbKO BbIXaTbIX Beuei. He cyuInTE B HcNtKOM MOKpbie Beun (CM. pnc. 5).
I3BJIeKNTe H3 KapMaHOB KJIIOUH, MOHeTbI, 3aXnraJKN, cNNUK, TBepDble yKpaWeHn (HaPmEep 6pouN) n JIO6bIe akCeCCyapbl, He npEdHa3NaeHHbIe dIa cyuKn (cm. pnc. 6).
3actHnTe BCE MoHNn IN KPOUKn. Y6eINTEcB, YTO nyROBnCbI He 6oTbOTcI. IIOXHTe MEIKNe BEuN, HAnpIMep HOCKN, NOHaC, BOCrTaJIbTEpbI N T. II. B CETHaTbM MeOOK.
PacnpabBe 6oIbIoe 6eJIbe, HApnpMep npocTbHI, NOKpbIbAJa n T. I.
3arpy3ka 6eJbA
JIN CHNXEHN NOTpe6JIeHn 3HEpnn Bcun DOJXHbI 6bITb OTKaTb KaK MOxHO JyUwe.
Y6eIITecb, YTO Beu, KOtOpbIe Bbl CObpaTeCb cyuNTb, PpeHa3HaueHb IJRA cyuKn B CyuINbHOH MaunHe. INHOpMaUIO 0B 3TOM Bbl HaJeTe Ha JpJIbIKax NO yXOyD.
IpeKdyeemnoIOXHTBeuINBCyUINbHyIO MaunHy, V6eINTEcb, YTO OHN He CLeXaJIncb.
He 3arpykaTe B cyuNbHyo MaunHy CnukOM MHO Buee
KoHnIuHOep IIN 6eJIb NII NOIO6HbIE CpeCTBa CNeJeYET NcNOb3OBaTb B COOTBeTCTBnC yKa3aHnAMN IO INcNOb3OBaHIO.
HeCnIbHOHaJaBnTe Ha DBepU CyuINbHOn MaunHbI, YTO6bl OTKpbItb ee (CM. pnc. 7).

7
NCIOJIb3OBAHNE
Bb6op nporpammbi
IJaIOCTNKeHn npc cyuKe HauNyUwero pe3yJbTaTAtBbIepeTpnporpaMMy, COOTBeTCTByIOUyIO TNY Beuei, KOToPbIE Bbl CyuNTe. IJa BbIbopa HyxHoN nporpaMMblNCIOJIb3yIte nepeKJIouaTeJIb nporpaMM.