PMS300 - Hi-fi system PEAQ - Free user manual and instructions
Find the device manual for free PMS300 PEAQ in PDF.
| Product type | Hi-fi system with CD player, DAB/FM tuner, iPhone/iPod docking station, passive speakers |
| Brand | PEAQ |
| Model | PMS300 |
| CD player | CDs, CD-Rs; frequency response 20 Hz-20 kHz; S/N ratio 90 dB; distortion < 0.1% THD; stereo RCA audio output |
| DAB/FM tuner | DAB III/L and FM bands; 40 presets; input sensitivity 800 mV; output power 2 x 35 W / 4 Ω; bass/treble adjustment ±14 dB; distortion < 0.1% THD |
| Speakers | Long-term power 35 W, short-term 70 W; frequency response 80 Hz-20 kHz; sensitivity 86 dB 1 W/1 m; impedance 4-8 Ω; tweeter 25 mm soft dome, woofer 100 mm |
| CD player dimensions | 222 x 270 x 70 mm (W x D x H) |
| CD player weight | 2.0 kg |
| Tuner dimensions | 222 x 270 x 70 mm |
| Tuner weight | 3.9 kg |
| Speaker dimensions | 130 x 230 x 227 mm (per speaker) |
| Speaker weight | 2.45 kg each |
| Power supply | Mains (100-240 V AC); internal fuses; max power CD player 30 W, tuner 150 W |
| Main functions | CD/USB playback; DAB/FM radio; iPhone/iPod dock; AUX1, AUX2 inputs; line output; bass/treble/balance control; super bass; equalizer; repeat, random, program functions |
| Included accessories | Remote control, 2 AAA batteries, 2 speakers, iPhone dock, 2 power cables, 2 speaker cables, RCA cable, antenna cable, power adapter, dock connection cable, user manual |
| Care and cleaning | Unplug before cleaning; use a soft, dry cloth; do not use chemical or abrasive products |
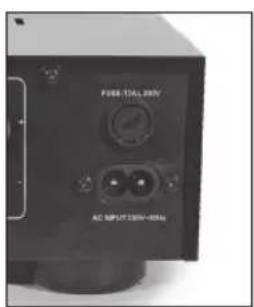
| Safety | Double insulation (class II); do not expose to moisture/rain; risk of electric shock; laser radiation if opened; do not block ventilation openings |
| Repairability and spare parts | Fuse replaceable by a qualified technician; repairs must be carried out by after-sales service; damaged power cord must be replaced by the manufacturer |
| General information | Manual available in 13 languages; online support via questions; Made for iPod/iPhone certified |
Frequently Asked Questions - PMS300 PEAQ
User questions about PMS300 PEAQ
0 question about this device. Answer the ones you know or ask your own.
Ask a new question about this device
Download the instructions for your Hi-fi system in PDF format for free! Find your manual PMS300 - PEAQ and take your electronic device back in hand. On this page are published all the documents necessary for the use of your device. PMS300 by PEAQ.
USER MANUAL PMS300 PEAQ
The unit supports the listed iPod / iPhone devices (iPod / iPhone devices shown are not included)
4th generation (video)
8GB 16GB

iPod nano
5th generation
(video camera)
8GB 16GB

iPod nano
6th generation
8GB 16GB

iPod
4th generation
20GB

iPod
4th generation
40GB

iPod
4th generation
(color display)
20GB 30GB

iPod
4th generation
(color display)
40GB 60GB

iPod
5th generation
(video)
30GB

iPod
5th generation
(video)
60GB 80GB

iPod touch
1st generation
8GB 16GB 32GB

iPod touch
2nd generation
8GB 16GB 32GB

iPod touch
3rd generation
32GB 64GB
iPod touch
4th generation
8GB 32GB 64GB

iPhone
4GB 8GB 16GB

iPhone 3G
8GB 16GB

iPhone 3GS
16GB 32GB

iPhone 4
16GB 32GB

iPhone 4S
16GB 32GB 64GB
iPod/iPhoneiPod/iPhone
TOnoOeTHsH MInATAPION


17 Ynoboxec ouwdoanxieiw
18 FUSE: avriotaon ektn
19 YrtofoxK kalwiou trophiooia
Bao ouv6eoc iPhone
20 Ytiooxn DC in
21 LINE OUT: Σύνδεση σε 16
22 'EoocBivteo ouvotoww
23 'Eooc S-Video
24 Ytiofoxuovfoeoc iPhone
EMBRAEA IEPINOY 6 M
Eπioñμavon aσφαλεία
CD/USB: Aetroupyia CD/USB
AMP: Everpyoiojote n the to
ektn oE Aotoupyia avouovnC.
ApiunkαπKtpa:
0,1-9,+10
Tia mvounpio apieo nataote 1-9,vi a diu npio apieo kai oE etoupyi CD,piwta nataote +10 ,mu nato To koupi Tou deTpou npio.
Avanapaywyn biokou CD, CD-R
Avantapaywyh USB MP3, WMA
Aoyoc anmuotoc npoc 85 dB
(S/N)
Anokpion ouxvotntac 20 Hz ecw20 kHz Aoyoc nmuatoc npoc hopbo (S/N):90
dB
Napaúóφωηn: <0.1% THD
Avaoyikn Eooc nou Stereo RCA
Méviotn kataváλωρ εύμα- 30 Watts
TOC
AiaotaoεiC (IxBxY) 222 x 270 x 70 mm
Bapoc (kaθaρό): 2.0 kg
Dékτης DAB/FM
Pnoeianaymuevcpuoioic 40
Euatoa 800 mV
Iaxuc eXo02ch x 35 Watts / 4 Ohm
Pouon nyou: Mnaa +/- 14 dB
Pouian nXou:Piua +/- 14 dB
Napaúópφωη: <0.1% THD
Line In 3× /A ,uTdooxn iPhone
Line Out 1× /A
Tepuatiko nxeiou Ynooexocuovdeonncnynlnc noiotntac
Méyiotn kataváλωηρεúμa-150 Watts
TOC
AiaotaoεiC (NxBxY) 222 x 270 x 70 mm
Bapoc (kaθaρό): 3.9 kg
Hxεia
IoXuc paKpac diapkeiaac 35 Watt
Ioxucbpaxeiacdiapkeia 70 Watt
Anokpion ouxvotntac 80-20 kHz
Euai09noi 86 dB 1M/1W
Avtiotaon 4-8 Ohm
Tweeter 25 mm soft dome
Woofer 100 mm
Aiaotaoεic (NxBxY) 130 x 230 x 227 mm
Bapoc (kaθaρο): 2.45 kg × 2 τεμι.
Oi ouokevc USB kaawdia eTKeTaoic v unoTnpicovtai.
IMPORTANT SAFETY INSTRUCTIONS
READ CAREFULLY AND KEEP FOR FUTURE REFERENCE.

The lightning flash with arrowhead within an equilateral triangle is intended to alert the user to the presence of uninsulated "dangerous voltage" inside the enclosure of this appliance, which may be of sufficient magnitude to constitute a risk of electric shock to persons.
The exclamation point within an equi-lateral triangle is intended to alert the user to the presence of important operating and maintenance instructions in the literature accompanying this appliance
CAUTION! Use of controls or adjustments of procedures other than those specified herein may result in hazardous radiation exposure.
-
For safety reasons, this class II appliance is provided with double or reinforced insulation as indicated by this symbol.
-
Before connecting the appliance to a socket outlet, make sure the voltage indicated on the appliance corresponds to your local mains.
-
The MAINS plug is used as the disconnect device; the disconnect device shall remain readily operable.
-
If the supply cord is damaged, it must be replaced by the manufacturer or its service agent or similarly qualified person in order to avoid hazard.
WARNING: To reduce the risk of fire or electric shock, do not expose this appliance to rain or moisture. The apparatus
shall not be exposed to dripping or splashing and no objects filled with liquids, such as vases, shall be placed on the apparatus.
-
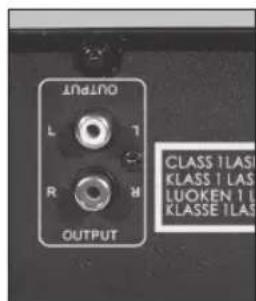
CAUTION: This player employs a laser system. to prevent direct exposure to the laser beam, do not try to open the enclosure or defeat the safety interlocks. When open and the interlocks are defeated, visible laser radiation is present.
-
Regularly check if the supply cord, appliance or extension cable are defective. If found defective, do not put appliance into operation. Immediately pull the plug.
-
Place the supply cord and, if necessary, an extension cable in such a way that pulling or tripping over it is impossible. Do not allow the supply cord to hang down within easy reach.
-
Do not jam, bend or pull the supply cord over sharp edges.
-
Protect the supply cord from being walked on or pinched particularly at the plug, convenience receptacles and the point where it exits from the appliance.
-
Never pull the plug by the supply cord or with wet hands.
-
Disconnect the mains plug in case of faults during use, during lightening storms, before cleaning and when not using the appliance for a longer period of time.
-
The appliance may not function properly or not react to the operation of any control due to electrostatic discharge. Switch off and disconnect the appliance; reconnect after a few seconds.
Refer all servicing to qualified service personnel. Do not attempt to repair the appliance yourself. Servicing is required when the appliance has been damaged in any way, such as the supply cord or plug are damaged, liquid has been spilled, objects have fallen into the appliance, the enclosure is damaged, the appliance has been
exposed to rain or moisture, does not operate normally, or has been dropped.
- Upon completion of any service or repairs to this product, ask the service technician to perform safety checks to determine that the product is in proper operating condition.
- Do not use attachments or accessories other than recommended by the manufacturer or sold with this appliance. Install in accordance with this user manual.
- When installing the appliance, leave sufficient space for ventilation. Do not install in bookcases, built-in cabinets or the like.
- The ventilation should not be impeded by covering the ventilation openings with items, such as newspapers, table-cloths, curtains, etc. Do not insert any objects.
- No naked flame sources, such as lighted candles, should be placed on the apparatus.
- Do not place any electronic equipment or toys on the appliance. Such items could fall from the top and cause product damage and/or personal injury.
- Do not install near any heat sources such as radiators, heat registers, stoves or other appliances (including amplifiers) that produce heat
- Do not apply excessive force to the front or top, as this could ultimately overturn the appliance.
- Do not shift or move the appliance when powered on.
- Do not touch, push or rub the surface of the appliance with any sharp or hard objects.
- Do not move the appliance from cold into warm places and vice versa. Condensation can cause damage to the appliance and electrical parts.
- For appliances with earphone jack: DANGER! Excessive sound pressure from earphones and headphones can cause
hearing loss. If you listen to loud music for a long time, your hearing may be impaired. Set to moderate volume.
- For appliances with USB function: Reset appliance by disconnecting USB device from appliance in case of malfunction.
- For appliances with USB function: If an USB data storage medium malfunctions as a result of electrostatic discharge and momentary electrical surges, disconnect the device from the appliance.
- For appliances / accessories intended for use of batteries:
CAUTION! Danger of explosion if batteries are incorrectly replaced. Replace only with the same or equivalent type. Observe correct polarity.
- Batteries (battery pack or batteries installed) shall not be exposed to excessive heat such as sunshine, fire or the like. Protect from mechanical shock. Keep dry and clean. Keep away from children.
-
Do not open, dismantle, shred or short-circuit batteries. Do not mix old and new batteries.
-
Dispose of properly. Pay attention to environmental aspects of battery disposal. Do not dispose of in household waste.
- Refer to safety and other instructions on the battery or its packaging.
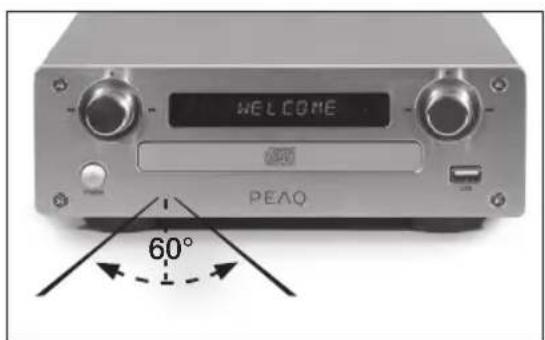
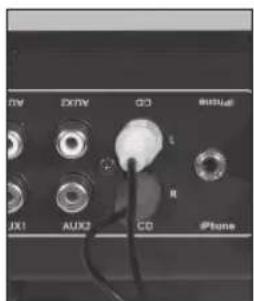
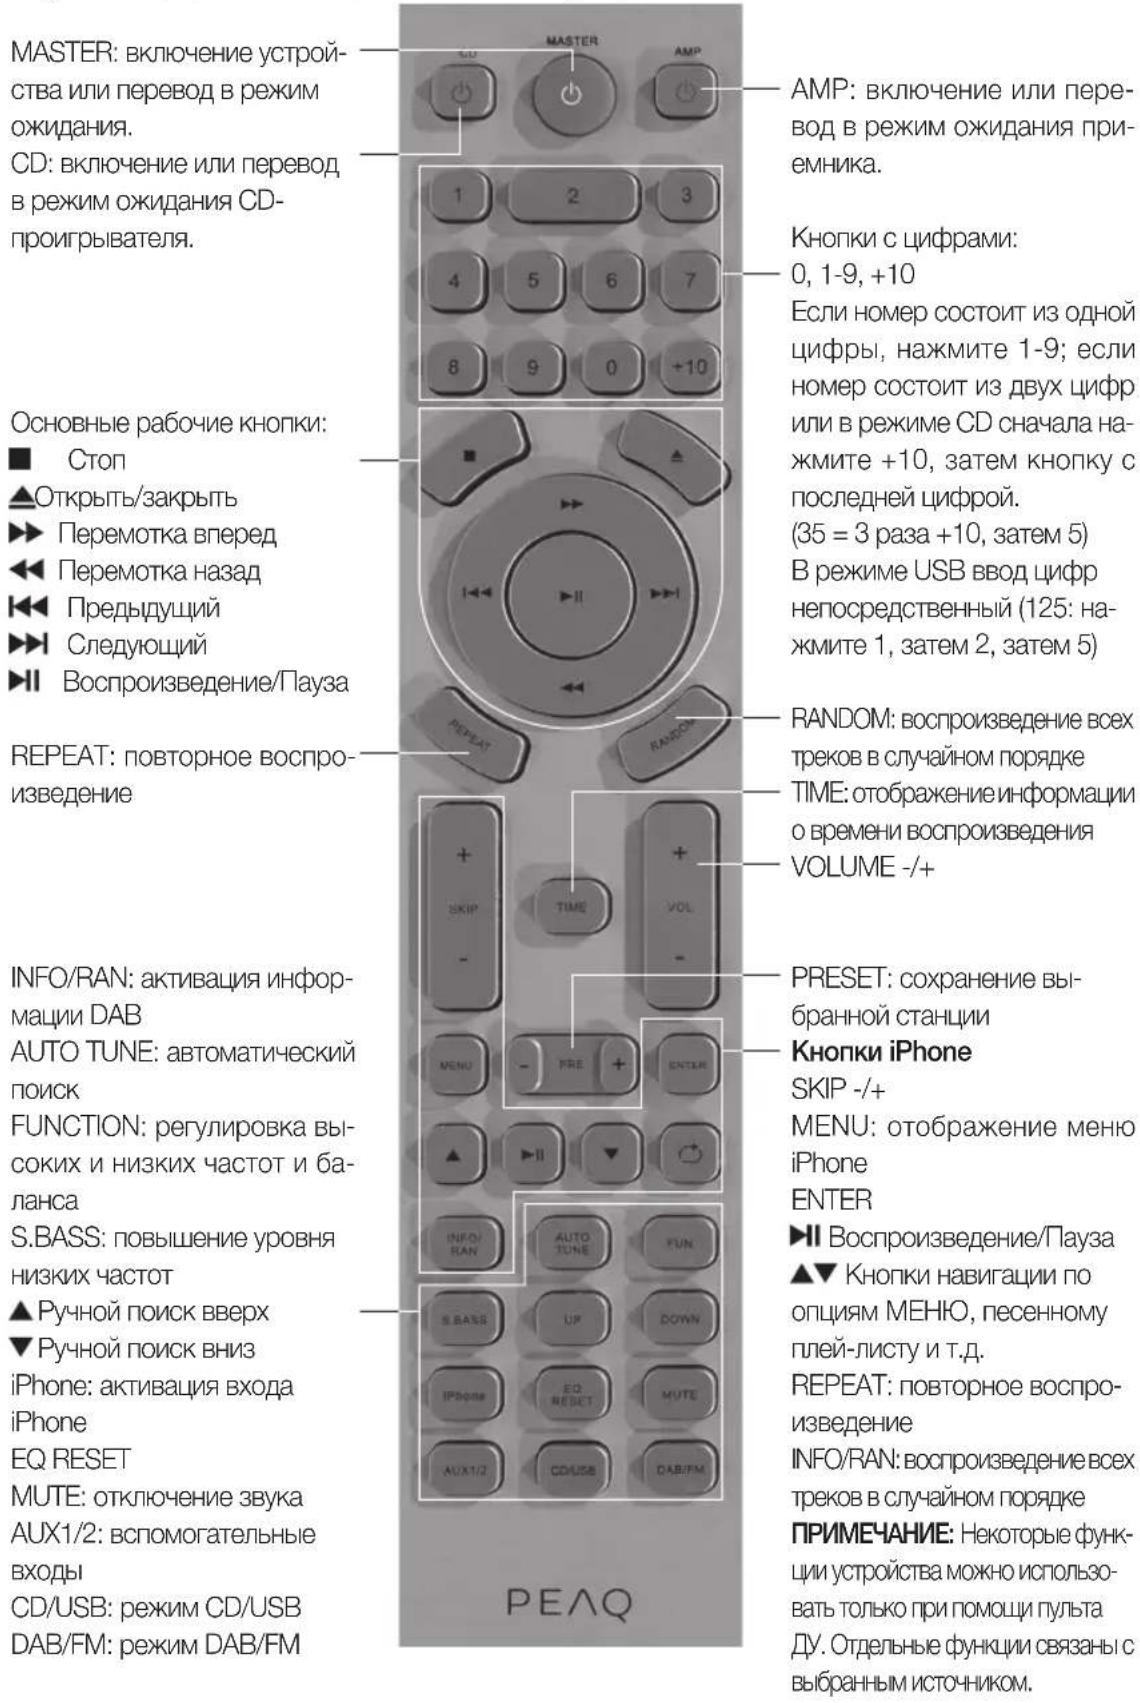
CD Player

162534798
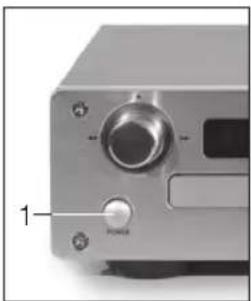
1 Power
2 Function knob:
OPEN/CLOSE
FAST FORWARD
FASTREWIND
3 Display
4 CD tray
5 Function knob:
PLAY/PAUSE
PREVIOUS
NEXT
6 USB Port
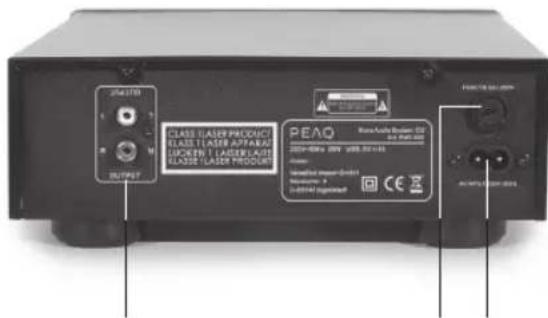
7 OUTPUT
8 FUSE
9 Supply cord connector

Accessories
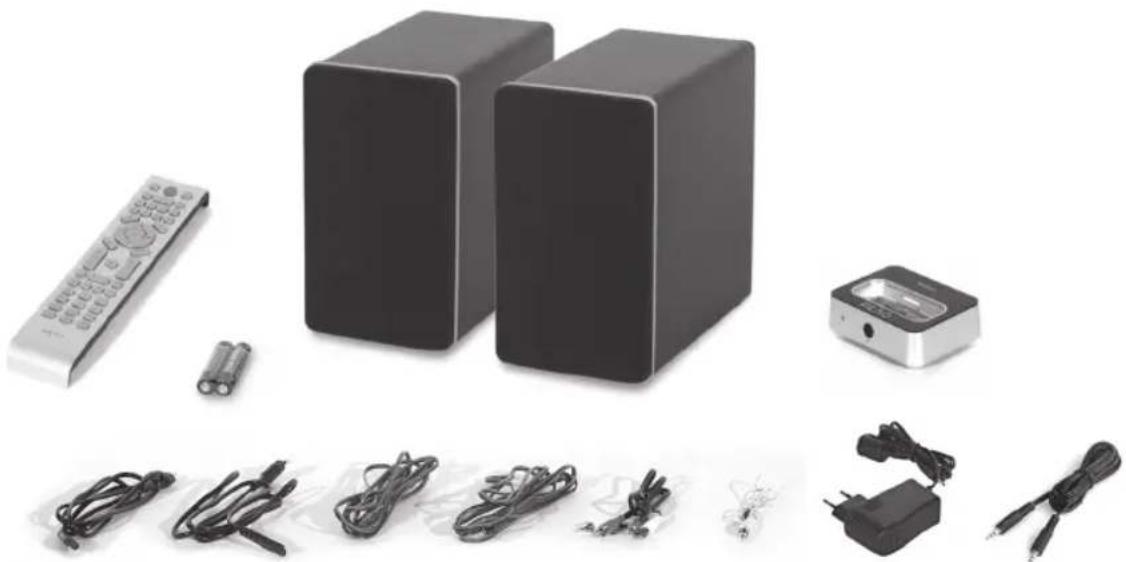
1x Remote control
2x Batteries (AAA)
2x Speakers
1x iPhone dock
2x Supply cords
2x Speaker cables
1x Cinch cable
1x Antenna cable
1x Power adaptor
1x iPhone dock connection cable
1x User Manual

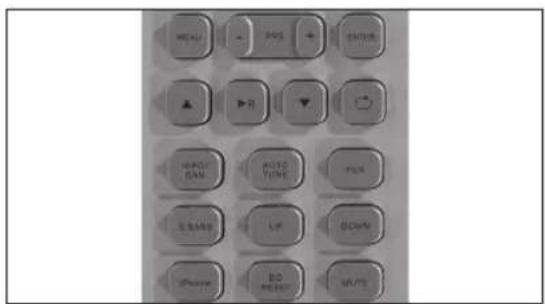
Stereo Receiver

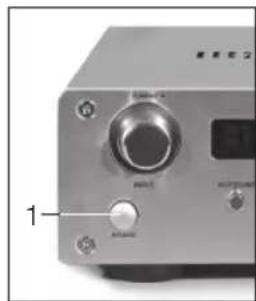
1 Power
2 Function knob: TUNING -/+ INPUT
3 Display
4 AUTOTUNE
5 INFO
6 BROWSE
7 SAVE
8 ENTER
9 Function knob:
VOLUME -/+
MENU
10 Headphone jack
11 Antenna DAB/FM connection
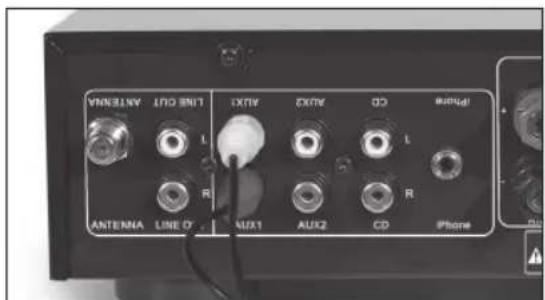
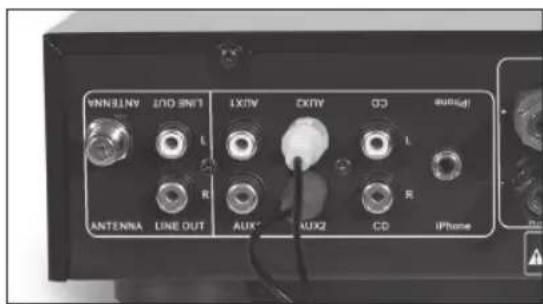
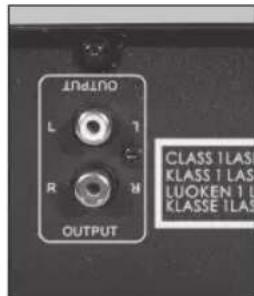
12 LINE OUT: Stereo output
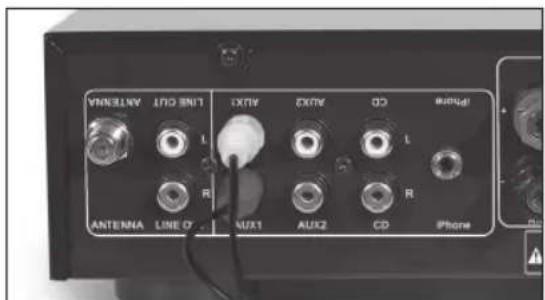
13 AUX1: Connection for optional equipment
14 AUX2: Connection for optional equipment
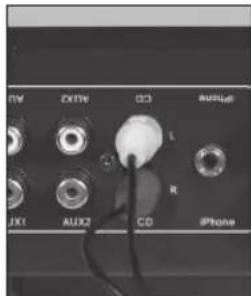
15 CD: For connection of CD Player
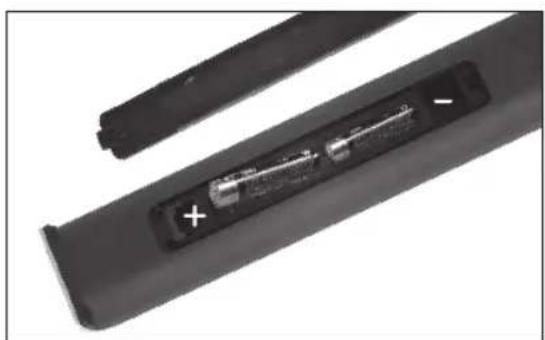
INSERTING BATTERIES
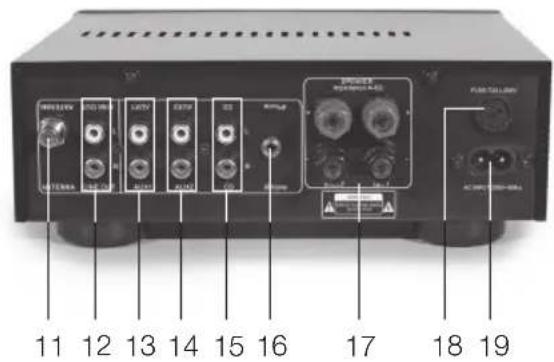

16 LINE IN: Input Connector
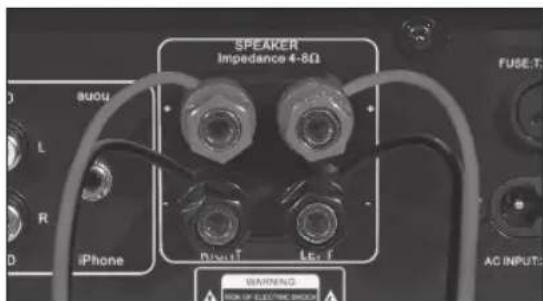
17 Speaker connections
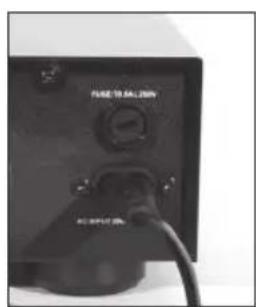
18 FUSE: Receiver fuse
19 Supply cord connector
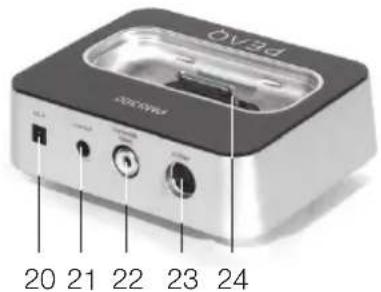
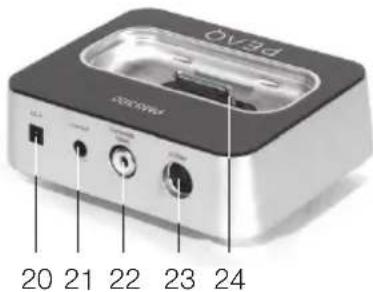
iPhone Dock
20 DC in
21 LINE OUT: Connect to 16
22 Composite Video out
23 S-Video out
24 iPhone connector
CONTROL RANGE APPROX. 6 M

Safety remark
Important safety instructions. Read carefully and keep for future reference.
The laser radiation label is located at the bottom of the appliance.
Do not touch the lens inside the disc compartment.
CAUTION! Use of controls or adjustments of procedures other than those specified herein may result in hazardous radiation exposure.
DANGER! Invisible laser radiation when open and safety interlock failed or defeated. Avoid direct ex
posure to the beam. Do not touch the lens.

CAUTION
RISK OF ELECTRIC SHOCK DO NOT OPEN

WARNING: SHOCK HAZARD-DO NOT OPEN AVIS: RISQUE DE CHOC ELECTRIQUE-NE PAS OUVRIR

The lightning flash with arrowhead within an equilateral triangle is intended to alert the user to the
presence of uninsulated "dangerous voltage" inside the enclosure of this appliance, which may be of sufficient magnitude to constitute a risk of electric shock to persons and animals.

The exclamation point within an equilateral triangle is intended to alert the user to the presence of
important operating and maintenance instructions in the literature accompanying this appliance.
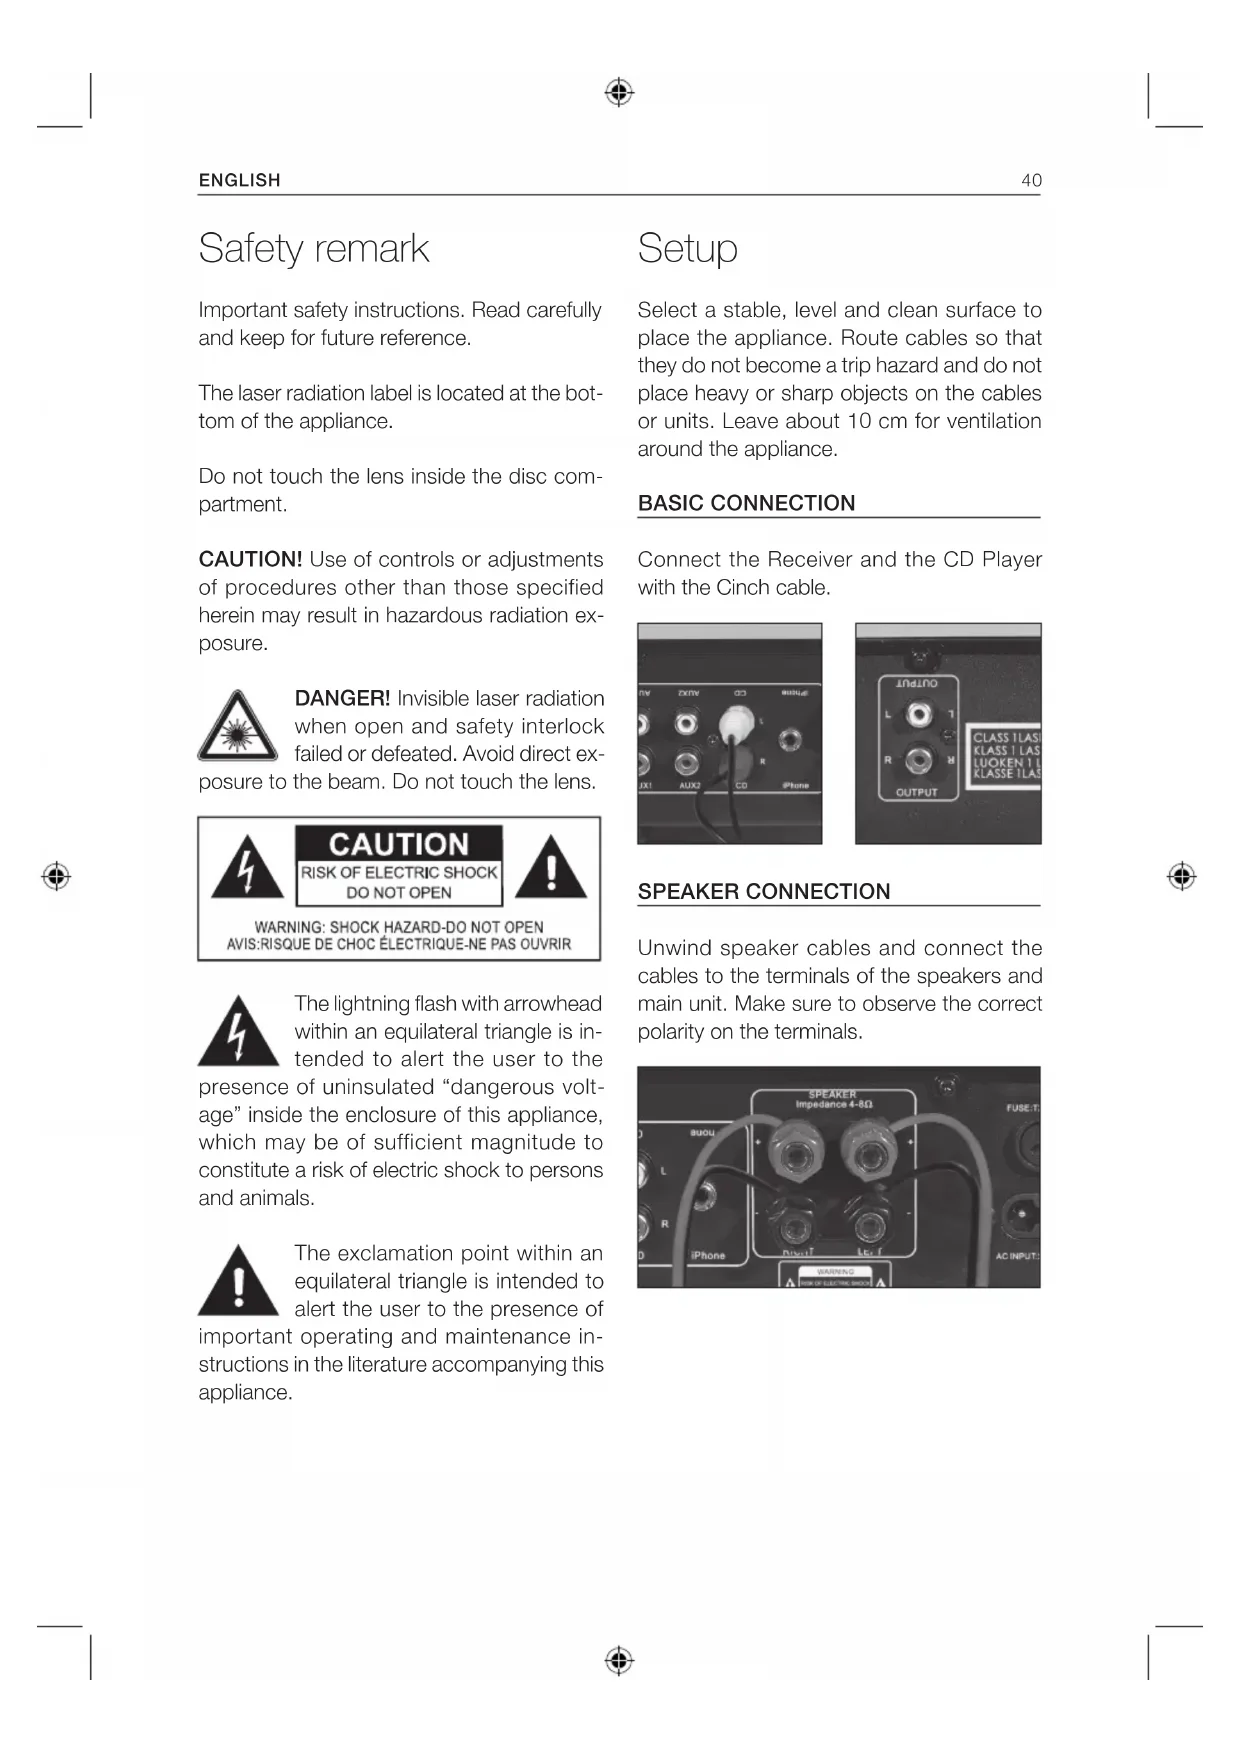
Setup
Select a stable, level and clean surface to place the appliance. Route cables so that they do not become a trip hazard and do not place heavy or sharp objects on the cables or units. Leave about 10cm for ventilation around the appliance.
BASIC CONNECTION
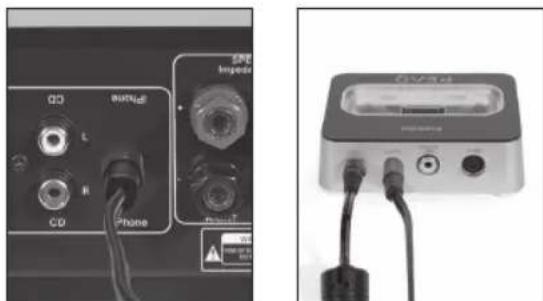
Connect the Receiver and the CD Player with the Cinch cable.
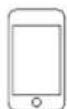
SPEAKER CONNECTION
Unwind speaker cables and connect the cables to the terminals of the speakers and main unit. Make sure to observe the correct polarity on the terminals.
Unscrew the connector screw and run the cable into the opening under the connector. Screw down evenly, to lock the cable in place.

ATTENTION
Make sure the polarity is correct!
POWER SUPPLY
Connect the included supply cords to the supply cord connector on each unit.
Plug in both appliances.
POWER ON/OFF, STANDBY
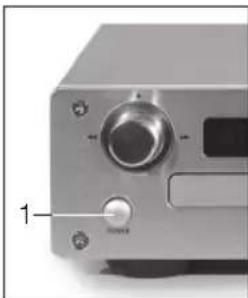
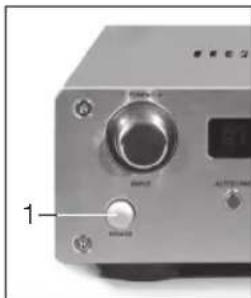

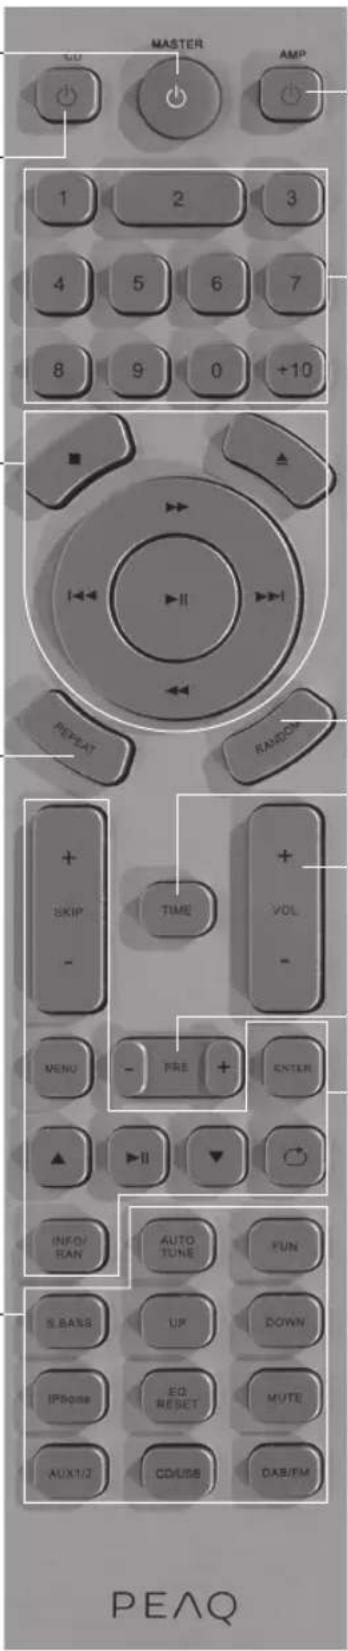
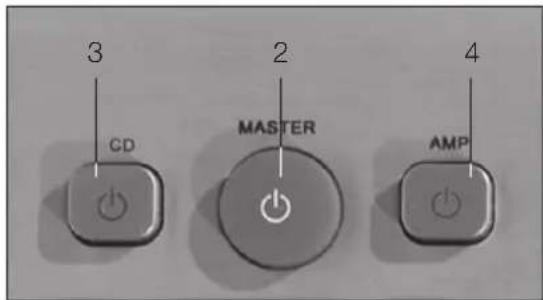
1 Press power button on Receiver and CD player to turn each unit on/off.
2 MASTER : Press to turn both CD Player and Receiver on or into standby.
3 CD : Turn CD player on or into standby.
4 AMP : Turn Receiver player on or into standby.
NOTE: During standby mode, a red indicator light turns on. The CD player can be turned off if only the Receiver is used.
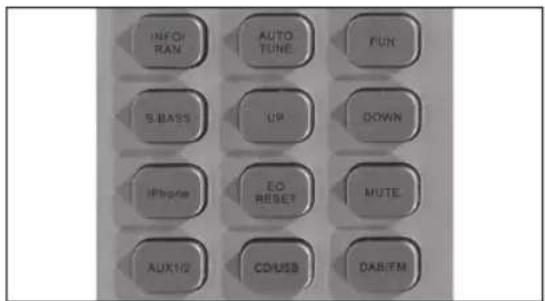
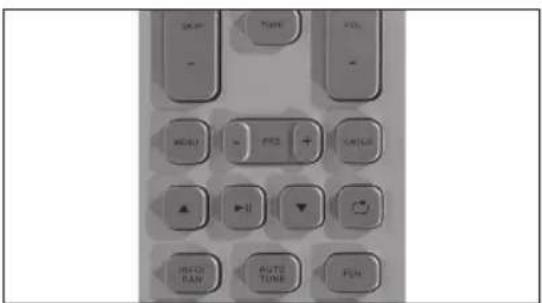
Remote control
MASTER: Turn unit on or into standby.
CD: Turn CD player on or into standby.
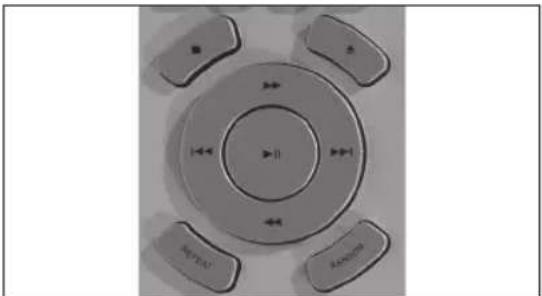
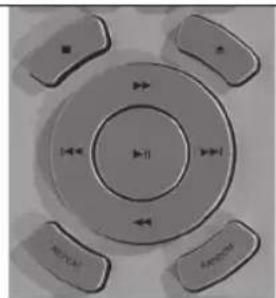
Basic operation buttons:
Stop
Open/Close
Fast forward
Fast reverse
Previous
Next
Play/Pause
REPEAT: Repeat playback
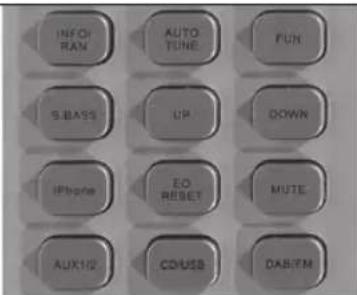
INFO/RAN: Activate DAB information
AUTO TUNE: Auto scan
FUNCTION: Adjust bass, treble and balance
S.BASS: Increase bass level
Manual tuning up
Manual tuning down iPhone: Activate iPhone input
EQ RESET
MUTE: No sound
AUX1/2: AUX input
CD/USB: CD/USB mode
DAB/FM: DAB/FM mode
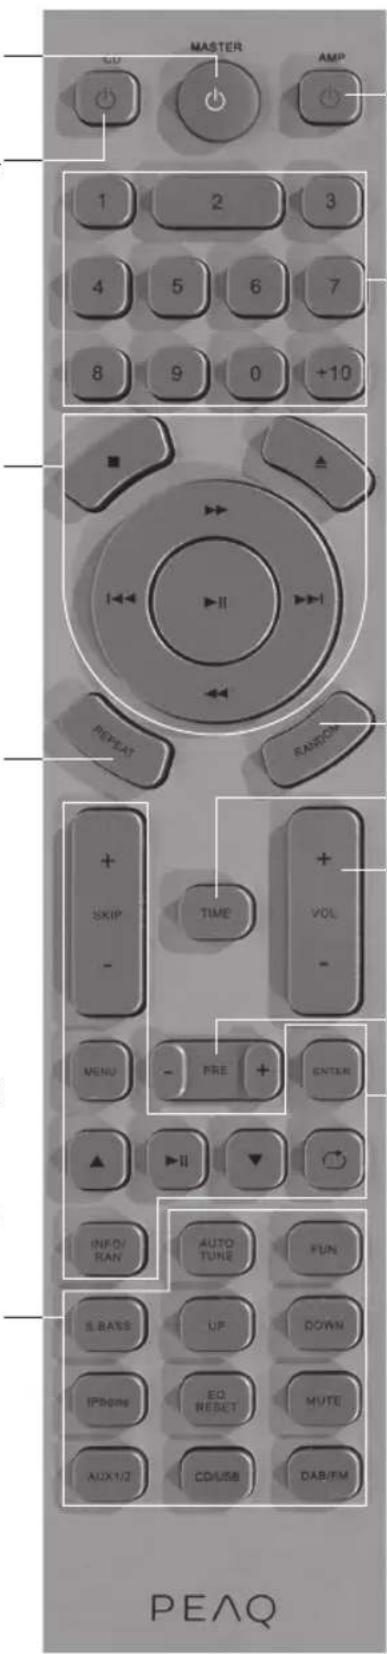
AMP: Turn Receiver on or into standby.
Number buttons:
0,1-9,+10
For single-digit number, press 1-9; for two-digit numbers and in CD mode, first press +10 , then press the end number button.
(35 = 3 times +10, then 5)
In USB mode, enter numbers directly (125: press 1, then 2, then 5)
RANDOM: Play all tracks in random order
TIME: Display playback time information
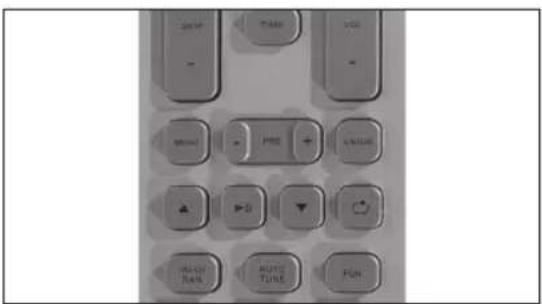
VOLUME -/+
PRESET: Choose stored station
iPhone keys
SKIP/-/+
MENU: Show iPhone menu ENTER
Play/Pause
Navigation buttons in MENU option, playlist song, etc.
REPEAT: Repeat playback INFO/RAN: Play all tracks in random order
NOTE: Some functions of the unit can only be performed by means of the remote control. Some functions are connected with the selected input source.
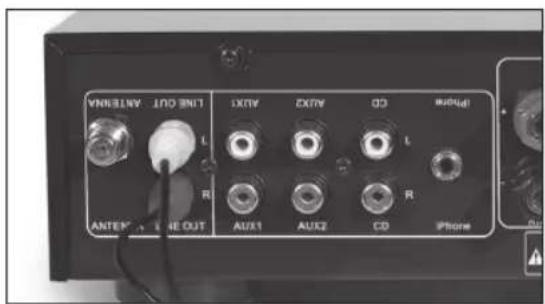
Connections
ANTENNA

Connect the FM antenna to the ANTENNA jack on the back of the receiver. Try different positions of the antenna to figure out the best reception position.
SUBWOOFER

Use Cinch cable to connect audio outputs (red/white) to respective inputs of Subwoofer.
DVD PLAYER
Use Cinch cable to connect audio outputs (red/white) to respective inputs of DVD player.
TV
Use Cinch cable to connect audio outputs (red/white) to respective inputs of TV.
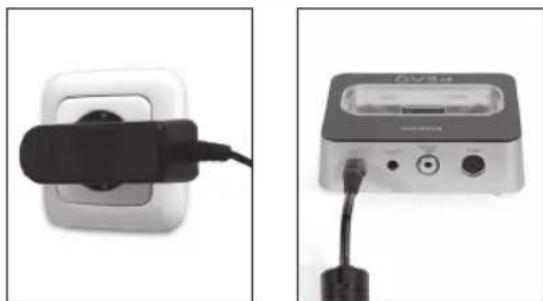
iPhone DOCK
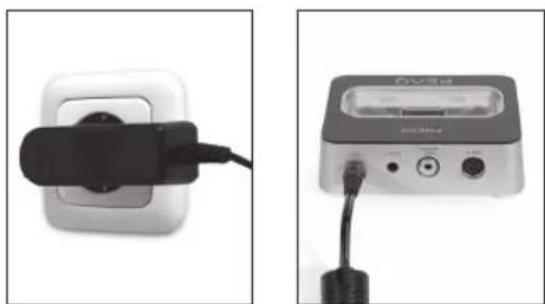
Connect the power adaptor to a mains supply and to the DC in jack of the iPhone dock.
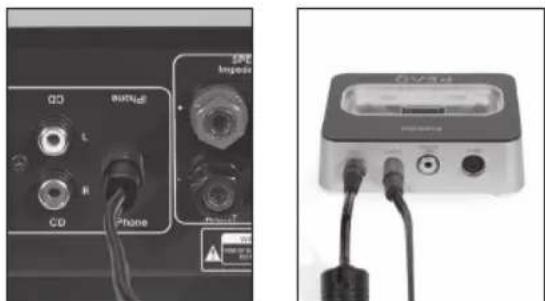
Connect the audio connection cable to the LINE IN jack of the receiver and to the LINE OUT jack of the iPhone dock.
Stereo Receiver functions
INFORMATION / RANDOM
In DAB or FM mode press INFO/RAN to activate DAB information or RDS (Radio Data System) on FM stations.
In iPhone mode press INFO/RAN to play all tracks in random order.
AUTO TUNING
Press AUTO TUNE to auto scan and auto stop when a new station is found.
EQUALIZER/BALANCE
- Press FUN once to adjust Bass level.
- Press FUN twice to adjust Treble level.
- Press FUN three times to adjust Balance (right/left) speaker output level.
Use VOL + / - to adjust each setting.
SUPER BASS
Press S.BASS once to increase +4dB at 100Hz for more bass sound output; press twice to cancel the function.
MANUAL TUNING
Press UP or DOWN to search for stations manually.
iPhone
Press iPhone to switch to iPhone input. Make sure the iPhone dock is connected correctly.
RESET EQUALIZER
Press EQ RESET to reset the eualizer to original settings. This does not effect the Super Bass settings.
MUTE
To switch off the volume temporarily, press MUTE. Press MUTE again to resume at preset volume or cancel MUTE by pressing VOL +/-
AUX1/2
Press AUX1/2 to switch from AUX1 to AUX2 input.
CD/USB
Press CD to switch to CD/USB mode. If both a CD and USB device are connected, CD playback will be prioritized.
DAB / FM
Press DAB/FM to switch from DAB to FM radio.
VOLUME
- Press VOL +/- to decrease or increase the volume.
- Turn the volume control on the front panel right or left to increase or decrease the volume.
CD/USB playback
Amplifier unit must be in CD mode to run CD operation. Use buttons on remote control or use respective operating elements on the front panel of the CD Player.
To listen to MP3 or WMA Music Files insert a USB Stick.
NOTE: Connect the USB device directly to the USB port of the unit. Using an extension cable is not recommended and may cause interference and failure of data transfer.
EJECT/LOAD A DISC
To open or close the disc tray, press the OPEN/CLOSE button.
Playback starts automatically from first track. If there is no disc in the tray or USB device inserted, the message NO DISC will be displayed.
PLAY/PAUSE
In stop mode, press once to start playback. To pause the playback temporarily, press once more; sound will be muted. To resume, press again.
FAST FORWARD FASTREWIND
During playback, press fast forward or to rewind. Press resume normal playback.
PREVIOUS NEXT
During playback, press skip to the next track. To previous track, press twice fast. If pressed once, current track will be played from the beginning.
STOP PLAYBACK
Press to stop the playback.
TRACK SELECTION
Press the respective number button 0-9 / +10 on the remote control.
REPEAT
During CD playback, press REPEAT repeatedly to activate the following repeat functions:
- Repeat Title
-Repeat All - Repeat Off
RANDOM
Press RANDOM to play all tracks in random order.
TIME
Press TIME repeatedly to display:
- Current track / Elapsed time
Current track / Remaining time
Total tracks / Elapsed time
Total tracks / Remaining time
iPhone/iPod playback
Amplifier unit must be in iPhone mode to run iPhone operation. Use buttons on remote control or use respective operating elements on the front panel of the appliance.
iPhone
Press iPhone to play music from the connected iPhone/iPod.
NOTE: Make sure the iPhone/iPod is connected correctly to the iPhone dock.
MENU
Press MENU to access the menu of your iPhone/iPod.
While in menu, press MENU to go to the previous menu.
UP / DOWN
Press go up and down in the iPhone/ iPod menu.
PLAY/PAUSE
Press once to start playback. To pause the playback temporarily, press once more; sound will be muted. To resume, press again.
Alternatively press ENTER on the front panel.
ENTER
Press ENTER to confirm a selection in the iPhone/iPod menu.
REPEAT
During iPhone/iPod playback, press REPEAT repeatedly to activate the following repeat functions:
-RepeatTitle
- Repeat All
- Repeat Off
SKIP
- Press SKIP+ once to skip to the next track.
- Press SKIP- once to skip to the beginning of the current track.
- Press SKIP- twice fast to skip to the previous track.
Tuner playback
Amplifier unit must be in DAB or FM mode to run tuner operation. Use buttons on remote control or use respective operating elements on the front panel of the appliance.

DAB / FM
Press DAB/FM to switch from DAB to FM radio.
INFORMATION
In DAB or FM mode press INFO/RAN to activate DAB information or RDS (Radio Data System) on FM stations.
NOTE: In DAB mode the signal strength is also displayed if the station is stored.
AUTO TUNING
Press AUTO TUNE to auto scan and auto stop when a new station is found. During search Q SCAN is displayed.
Press AUTO TUNE for 2-3 seconds for a full scan. During search F SCAN is displayed.
NOTE: The L band can only be tuned manually.
MANUAL TUNING
Press UP or DOWN to search for stations manually or use the TUNING +/- control on the front panel.
NOTE: In DAB mode press ENTER to select the current station or set the AUTO ENTER function to ON.
Press ENTER on the remote control for 2-3 seconds, to set AUTO ENTER function ON or OFF.
ANTENNA
In DAB mode, press INFO to display the signal quality. Try different antenna routings for best signal reception.
SAVING STATIONS
Once a station is found, press the respective number button 0 - 9 / +10 on the remote control for 3 seconds to store the channel.
Alternatively press SAVE together with BROWSE on the front panel.
CYCLE STORED STATIONS
Press PRE +/- to cycle through the stored stations or press the respective number button 0-9 / +10 on the remote control.
Alternatively press BROWSE on the front panel.
RESET STATIONS
To delete all stored stations, press and hold INFO until RESET is displayed. Then press ENTER to confirm.
STEREO/MONO
Press ENTER on the front panel to set STEREO or MONO mode.
Troubleshooting
| No power when CD Player or DAB Receiver is turned on. | Switch on the electric current at the socket. |
| Check if the plug has been correctly inserted into the socket. | |
| Check if the internal fuse has blown and must be replaced by a qualified service technician. | |
| Check the power cord has not been damaged, if so it must be replaced. | |
| No sound. The CD Player or DAB Receiver | er unit has not been turned on. |
| CD Player is incorrectly connected to the DAB Receiver. | |
| No CD in the unit; or no MP3/WMA files on the USB. | |
| The volume control is set to a minimum on the DAB Receiver. | |
| The speaker cables have not been correctly connected to the amplifier. | |
| A wrong input source has been selected on the DAB Receiver. | |
| The unit does not read the disc. Insert the | disc correctly with the label facing up. |
| Clean or replace disc. | |
| Check if it is a CD or a CD-R (CD-RW is not supported). | |
| The unit skips some parts during play-back. | Check if the disc is clean and undamaged. |
| The unit is positioned on an unstable surface. | |
| A buzzing can be heard. The RCA cables | between CD Player and the DAB Receiver are damaged. |
| The RCA cables between CD Player and the DAB Receiver are wound around the power cord. | |
| There is sound in one channel only. The bal | ance control is not correctly adjusted. |
| The audio input cables have been incorrectly connected or damaged. | |
| The input source is defective. | |
| The speaker cables have been incorrectly con- nected or damaged. | |
| The speakers are defect. | |
| High buzzing. The audio input cables have | been incorrectly connected or damaged. |
| The pick-up in the CD Player is defective. | |
| Weak bass and poor stereo perspective. T | he speaker connection is out of phase. Check that the positive and negative poles have been correctly connected, both at the back of the DAB Receiver and at the back of the speaker. |
| Distortion of sound. Some of the conductors | or wires of the speaker cable are in contact with each other which causes distortion. |
| Bass and treble controls are set too high in relation to speaker specifications, the main volume is set too high. | |
| The display does not display any information. | CD Player or DAB Receiver is defective and should be serviced by a qualified technician. |
| ERROR is displayed on the display. | |
| The unit does not switch between input modes. | |
| The display does not show DAB information. | The Receiver has not found any stations on DAB. |
| The selected station does not broadcast any information. | |
| The antenna signal is too poor, please see the section on adjusting the antenna. | |
| Tick/blob sounds at some of the stations. | Like all other digital media DAB is reproduced in a very high sound quality. But if the antenna signal is too weak, you will not hear any whistling but instead you will hear blackouts or "tick/blob" sounds. |
| Check if the antenna signal is strong enough. | |
| See the section on adjusting the antenna. |
iPod/iPhone
"Made for iPod," and "Made for iPhone," mean that an electronic accessory has been designed to connect specifically to iPod or iPhone respectively, and has been certified by the developer to meet Apple performance standards. Apple is not responsible for the operation of this device or its compliance with safety and regulatory standards. Please note that the use of this accessory with iPod or iPhone may affect wireless performance.
iPhone & iPod are trademarks of Apple Inc., registered in the U.S. and other countries.
INTENDED USE
This appliance is intended for recieving and playing audio signals. Only use according to these instructions. Improper use is dangerous and will void any warranty claim. Observe the safety instructions.
DISPOSAL
The crossed-out wheeled bin logo requires the separate collection of waste electric and electronic equipment (WEEE). Electric and electronic equipment may contain dangerous and hazardous substances. Do not dispose of this appliance as unsorted municipal waste. Return it to a designated collection point for the recycling of WEEE. By doing so, you will help to conserve resources and protect the environment. Contact your retailer or local authorities for more information.
Specifications
CD Player
Disc playback CD, CD-R
USB playback MP3, WMA
S/N ratio >85 dB
Frequency response 20Hz to 20kHz S/N ratio: 90 dB
Distortion < 0.1% THD
Analogue audio output Stereo RCA
Max power consumption 30 Watts
Dimensions (WxDxH) 222 × 270 × 70 ~mm
Net Weight: 2.0kg
DAB/FM Receiver
S/N ratio >90 dB
Wave bands DAB Band III / L-band, FM
Presets 40
Input Sensitivity 800mV
Power output 2ch x 35 Watts / 4 Ohm
Tone control: Bass +/- 14 dB
Tone control: Treble +/- 14 dB
Distortion <0.1% THD
Line In 3 x R/L, iPhone connector
Line Out 1 x R/L
Speaker Terminal High Quality binding posts
Max power consumption 150 Watts
Dimensions (WxDxH) 222 x 270 x 70 mm
Net Weight 3.9 kg
Loudspeakers
Power at long term 35 Watt
Power at short term 70 Watt
Frequency response 80-20 kHz
Sensitivity 86 dB 1M/1W
Load impedance 4-8 Ohm
Tweeter 25 mm soft dome
Woofer 100 mm
Dimensions (WxDxH) 130 x 230 x 227 mm
Net Weight 2.45 kg x 2pcs
USB devices with extension cables are not supported.
Tweeter 25mm cupula suave
Woofer 100 mm
Dimensiones (An x Lg x Al) 130 x 230 x 227 mm
Peso neto 2,45 kg x 2 uds.
DAB/FM : Mode DAB/FM
Lecture USB MP3, WMA
Rapport S/N > 85 dB
Hangszinvezerles: mely hang- +/- 14 dB
szin
Risk of electric shock! Do not open

CAUTION: To prevent the risk of electric shock, do not remove cover (or back). No user-serviceable parts inside. Refer servicing to qualified service personnel.
PORTATA APPROSS. 6 M

OPENEN/SLUITEN
SNEL VOORUIT SPOELEN
SNEL ACHTERUIT SPOELEN
3 Display
4 CD-lade
5 Functieknop:
AFSPELEN/PAUZE
VORIGE
VOLGENDE
6 USB-poort
CD: Schakel de CD-speler in of zet unde stand-by.
AMP: Schakel de receiver in of zetzsche stand-by.
EQ RESET (Rep or equalizator)
MUTE: Sem som
AUX1/2: Entrada AUX
CD/USB: Modos CD/USB
DAB/FM: Modos DAB/FM
3TOT np6op BO3dEChTBIO DOxKJN NIN Bnarn. BepeNTe eO OT KaneJIb 6pbI3r, He CTabBe Ha HrO COCyDblC XKnKOCTaMn, HanpIMep, Ba3bl.
BHIMAHHE: B daHOM nIeepne nCnoB3yETcna3epnacntema. IJn npedotBpaueHn npaMOrO o6nyehn Ja3epom He nbITaNTEcB OTKpbITbKOpNcNIO TMeHNTb 3aunTHyo 6loKnPOBky.B Clyae OTKpbTnKopNyc NIN NOBpeXKeHn 3aLHTHO 6LOKNPOBKn BO3HnKaet BEoPHTOCTbJa3ePHoro N3nyehn BVNDMOrO dana30Ha.
-PeryIaRHO npOBepaTe 3neKTPueckn Ka6eB Ka6eB cAmO rnp6opa uIN yDmHNTeJbHbN Ka6eB Ha npEaMeT HAnuHn NOBpeKdEHn. B Cnyae O6hApXKeHn IOBpeXdEHn He 3KcNpyaTpyte np6op. He3aMeDInTeJbHO OTKnIOHTe UTenCeIbHyIO BNky.
PacnoIaraiTe CnIOBOI KabeIb I,ecnH Heo6xoDIMO,ydHHTeIbHbIKaBJIb TaKIM O6pa3OM,TO6bl NCKIIouHTb BepoRTHOCTb TOrO,TO KTOJIOMOKET HAcTyIITb INI 3aueNTbC8 3a Hero. He donyckaIte npOBicaHnCnIOBOr Ko6eJIaB JERKO DOCTyINbIX MecTax.
-He 3aximmaTe, He crnbaiTe n He npotraBauTe CnIOBOI KaebIype3 octPbIyrJIbl.
He HactynaiTe n He doynckaTe 3aueemneHn CInIOBOrO Ka6eI,OCo6eHNO Bo3Ne WTeNCeIbHOB BnIK.ObecneYdo6Hoe paCNoLoXeHne npi-6opa OTHocNTJIbHO CTeBOI pO3ETKn.
HkoIgda He OTKIOUaTe WTEncBHyO BUNKy, NO-TaHyB 3a CINIOBOI SHyp, INN MOKpbIM pykam.
-OTKIIHuaTe cTeBOIUITeNcB B Clyae KOpOTKO 3aMbIKaHnB IpoUeCCE 3KcIpyaTauu, BOBpeMraP03bl,pepey6bOPko,a TaKke KOgda npi6op He 3KcIpyATpyETcR B TeueHne DInTEJbHOBOPeMeHN.
- Pn6bop MoKet FyHKUOHNPOBaTb HeHaJIeKaIIM O6pa3OM NII HpeaHnpoBaTb Ha KOMaHdbI IIO6bIX cpeCTB UypaBHeNn NO npuHnE 3eKtPoCtAtNuCeKOrO pa3Pra. BbIKNoHTe n OTKnIOHTe Pn6bOp OT CETn 3eKTPoNTaHn; NOBTOPHO NOIKNIOHTe ERO No PPOJeeCTBm HECKOJIbKINCEkyHd.
-ObcIyKINBaHnepn6opaDOnJXHOOCUeCTBJIaTbCRA KBAJIINΦNlncIpOBaHHbIMN COtpyDNHKAMNCepBnCHOrO UeHTpa.He nIbIraITecb OTpeMOHTnpoBaTb
npnbop camoCTOteJIbHO.ObcnyKINBaHne npnbopa Tpe6yETcB CnUyae IIO6bIX NOBpeXKeHn, HApnPmep, NOBpeXKeHne CINOBoro Ka6eYI INI INTEncJIbHO BUNIK, PPOINB XNIOKCTN, NaEHeNe KaKnx-InbO npedMeTOB Ha npnbop, NOBpeXKeHne KOpTyCa, NOnaDaHne DOxJa IINI BLaRn, C60N B paBoTe INI PaDeHne CamoTo npnbopa.
-После завершени работ по облuyкванию пплобьх ремонтных работ порочte cotypedика сервсноцентра пponзоветиRobовку be3-Опасhoectи,чTOбы yбeДNTьСВ ИСпразвhoectи ппбopa.
-He nCNoB3yIte BCNOmOraTeJIbHbIe npNCNOCO6JIeHnI nn akceccCyapbl,OTJInuHbIe OT peKOMEHIOBaHHbIX pOn3BOIDTeJIeM IIN NOCTaJIaREMbIX BMeCTe C pIn6Opom. IpOn3BOIDTe yCTaHOBV COOTBETCTBnC HAcTOrUcIM pyKOBoIDCTBOM IOJIb3OBaTEJIa.
-Пиуctановке ппбopa OCTabTe npoctpaHCTBO, Heo6xoДIMоE ДЯ BeHTnIaIu. He yctaHaBInBaITe pnpbop B KHNKbIX ShkaPax, BCTpoEHbIX ShkaPax nIN IOXoxIx MecTax.
-He 6IOKpyIte BeHTnIaIIOHHbIe OTBepCTN TaKIMN IpeMTeAMN, KaK Ra3eTbI, CKaTEpTN, 3aHaBeCKN I T.D. He BCTaBnIe TB HIX KaKNe-JINBO npEIMeTbI.
-He paclnojaraIte Ha npi6ope nCTOHHNI OTKpbI-TORoOrH,HaNPIMep,3aXKeHHbIe CBeuN.
-He pacnojaraIte Ha npibope HnkaKnx 3neKtpOnHbIX yCTpoiCTB nnn nrgywek. TaKne npedMeblMoryt ynaCTb n NobpeNTb cam np6op nn nnHaHECTN TeJeCHbie NOBpeXdHnA.
- He yctaHabnBaIte np6op B6n3n C IIObIMNCTOCHKAMn TEJIa, TaKIMN KAK BaTapeN, OBOrpeBaTeJI, KAMHbI, ININ INHbIMN PpNCNOPeHNJMM (BKJIOUcAryUCNIITeJI), IN3NyauOUMN TENIO.
- He npimehnIte qpe3mepHyIO CNJy K JInCeBOI INBepxHey qACTN, T.K. 3TO MOKET pINBECTN K OnpoKINbBAHIO npnbopa.
- He nepehocite n He nepeBnraite BkIoueHHbI np6op.
-He npikacaiTecb, He nadabnBaIte H He Tpnte NOBepxHOCTb np6opa OCTpbIM NIM TBepdbIMN ppeImTaM.
-He nepenocite npnbop n3 xoJIONbIx B TeJIbIe NOMEueHn I HAObOpOT.Obpa3OBaHne KOHDeHCata MoKET npBeCTN K BbIXOy I3 CToP aK CaMOrO npnbopa, TaK I JIObIX 3JeKTPnuecknx 3JIemEHTOB.
-Дя npi6obOB C rHe3dOM dЯ HayuHnKOB: ONACHOCTb! Co3daBaemoe HayuHnKaMn Ype3-MepHOe 3ByKOBoE DaBHeHne MOKeT pINBeCTN Knotepe cIyxa.ДиTeJIbHOe nPoClyuBaHne My3bIKn Ha 6OJIbIoN rPOMKOCTN MOKeT HaHeCTN BpeD cIyxy.YcTaHOBtE yMepeHHyO rPOMKOCTb 3ByaHnI.
-ДяустpoctВсфункшenUSB:BcnyuaeBo3-NHKNOBeHnC6oEBBpaBotepepe3aRpy3nte npi-6op nocpeCTBOMOTKJIIOUeHnus USB-npN60paOTyCTPOINCTBa.
-Дяустоивсфункций USB:ЕсиВ pe3ynbTateэл ektpocstatuheckoro pa3ра n KpaTkoBpeMeHHbIX BbI6pocOB ToKa b pa6ote USBHakONITeHa6JIIOdaIOTcRc c60n,OTKIIIOHTe erO ot np6opa.
-Дяпборов /akceccyapob,прdenarauux pa6oty ot 6atapei:
BHIMAHHE!Bcnyae HnnpabunbHOn 3aMeHb6atapeek cyueCTByet onachoctb B3pbBa.3aMeHy Heo6xOIMO npON3BOuNTb Ha TaKHe JKe NnN3KBnBaIeHThBe 6atapeyKn. Co6IIOJaTe noJapHOCTb.
-He noDBepraTe 6batapeKn (KOMnIeKT 6batapeek nn yCTaHOBJIeHbIe 6batapeKn) Upe3MePHomy BO3JeCTBnIO TeNla, HApnPmEp, IprMbIe COHHeHbIe JUyn, OOrHb N T.D. He DOnyCKaIte MexAHnHeCKnx YdapOB. XpaHInTe B CyXOM N YIcTOM MeCTe. XpaHInTe B HeOCTyINOM IJRA DetEIMeCTe.
- He BCKpbBaiTe, He pa36bpaTte, He 3MeIbuaTe n He DOpyckaiTe KOPOTKOFO 3aMbKaHn8 6aTaapeek. He NcNoJIb3yInTe BmecTe CTapbie HOBbie 6aTapeKn.
- Ytun3npyTe HndIeXaIIM 06pa3OM. Co6IIO-daIte 3KoJIoRnueCKne acNeKTbI yTun3aIIM 6a-tapeek. He yTun3npyTe C 6bITOBbIMN OTXoAMN.
-CobnoaTe HCTpyKuNo 6e3oNaCHOCTaKaKe INbIe HCTpyKU, Yka3aHHbIe Ha 6aTapeKe IIN ee yPaKOBke.
CD-пponгьва teь
162534798
1IITaHne
2ФyHKUHOHaJIbHaKHOIIKa:
OTKpblb/3AKPblb
NEPEMOTKA BNEPED
NEPEMOTKA HA3A
3 Ducnnei
4 JIoTOKДЛЯ KOMNaKT-ДИСКOB
5ФyHKUHOHaJIbHЯKHOIIKa:
BOCNPON3BEDEHNE/NAY3A
PPEdbNyUIN
CNEUYOLNI
6 USB-nopt
7 BbIXO
8 PPEIOXPAHNTIELb
9 Pa3bEm nIa Hypa 3JIeKtpoNTaHnIa

Принолжности

1nybT dy
2 6aTapeiKn (AAA)
2 duHaMnKa
1DOKdIaiPhone
2 Ka6eJIy nITaHnI
2 Ka6eJy DnHaMnKa
1 ka6eIb c pa3beMOM RCA
1 Ka6eIb aHTeHHbl
1 aanTep nTaHn
1 Ka6ebIb nokKnIOUeHn Doka dJa iPhone
1PykoBOJCTBOIOJIb3OBaTeJIa

CTepeonpneMnK
1 NITaHne
2ФyHKUHOHaJIbHaJ KHOJa: HACTPOIKA-/+ BXOJ
3 Dnncnnne
4 ABTOHACTPOIKA
5 NHΦO
6 OE3OP
7 COXPAHHTb
8 BBOD
9 Φункциональная КОНКА: 3BYK-/+ MEHIO
10 He3do nI HayuHINKOB
11 PdKJIIOUeHHe aHTeHHbI DAB/FM
12 LINE OUT: cTepeoBbIXoD
13 AUX1: noKIOueHne DOONHITeNbHOO6OpyIDOBAHNA
14 AUX2: noKnIOueHnne IOnoJI HHTeIbHOO o6OpyIDOBaHn
15 CD: nodknuehene CD-npourpbBaTeTae
YCTAHOBKA BATAPEI


16 LINE IN: BxOJHOn pa3bEm
17 POnKJIIOUeHnI DnHaMnKa
18 FUSE: npedeoxpaHnteIb npneMnka
19 Pa3bEmДЯшура ЗлЕКТрОпТань.
Dok iPhone
20 BxoI noCT. Toka
21 LINE OUT:do 16 nodknuehen
22 Komno3nThbB BnDEOBbIXoD
23 BbIXoN S-Video
24 Pâşbem¿nI iPhone
3OHA YNPABENEHNA NPNBNI3NTeJIbHO 6 M

KoMMeHTapn IIO TexHnKe 6e3OpaCHOCTN
BaxKbIe IHCTpyKuIN NO TexHKe 6e3oNaCHOCTN. BHIMATEJIbHO pOCHaTNe u CoXpaHnTe Ha6yUee.
Tabluka o Ia3epHom nIyueHn pa3MeueHa Ha HxKHe Yactn np6opa.
He npikacaiTecb K JINH3e BOTcKe DnA nCKa.
BHIMAHHE!IcnoJb3OBAHne cpeCTB ynpabJIeHnI NnHaCTpoK,OTJNUHbIX OT ONiCaHHbIX B DaHHOM pyKOBOdCTBe,MOKeT npVBECTN K ONaCHOMy paNlauOnOHHomY n3nyHeHIO.

ONACHOCTb! Pn OTKpbTm KOpIpyCa n OTka3e nn Hecpa6aTBaHm3aunTHo 6JOKNPOBKn CyuectByET
HEBINMOE JIa3epHoe I3JIyHeHne.I36eAITE HeIIOcpeIcTBeHHOrO BO3JeICTBnI LyHa. He KacainTECb JINH3bl.


WARNING: SHOCK HAZARD-DO NOT OPEN AVIS: RISQUE DE CHOC ELECTRIQUE-NE PAS OUVRIR

CIMBOJ MOJIHIN CO CTpeIKO BHyTpni paBHOCTOPOHHeT PteyrolbHnKa CJYKNT, YTO6blPiPnBJeH BhIMaHHe
NOLb3OBaTeJI K HAIChIHO HeH3OJIIMPOBaHHORo "Onachoro HanpJKeHn" BHyTpNI 3TOrO npi6opa, BEJIuHa KOtOpRo MOKeT 6bITb DOCTaTOUHOI INI NopaxeHn IIOEIN JIKBOTHbIX TOKOM.

BocknlaateIbHbI 3NaK BHyTpI paB-HocToPOHHero TpeYroJIbHnka Cnyknt, YTObI npINBLeyb BHMaHHe NOJIb30-
BATEJI K BAXHOI ONEPAUN I yKa3aHnM IO 06CJyKINBAHIO B JNTepaType, COnpoBXkDaUOSeI 3TOT pN6Op.
YCTaHOBka
IomeCTte yctpoNCTBO Ha yctOuHByIO,poBHyIO uHCTyIO NOBepxHocTb. IpoJoxNTE Ka6eIN TaK, YTO6bl OHn HE IpeDCTaBJIu CO60 NOMExy DnI nepeMeUeHn; He CTaBBTe Ha Ka6eIN UIn YcTPONCTBO TAnKeJIbIe nn OCTpbIe IpeDMeTbI. OCTaBBTe BOKpyr yctpoNCTBa OKoI0 10 cm dnn BEHTINLAuN.
OCHOBHOE NOKJIIOUHNE
IopKnHouHTe npnemHK n CD-npOurpblBaTeJI npn NOMOu Ka6eNc pa3bEmom RCA.
IIOKJIIOUCHNE DINHAMNKA
Pa3motaTe Ka6eN DnHAMIKOB N NOKIOUHTe INBpa3bEmblINHAMIKOB N OCHOBHORO 6Ioka. CneHrte 3a co6JIHODeHHeM npabunbHOJ NOJAPHOCTN.

OTKpyTTE BnHT COeINHITeI N BBeITe Ka6JIb B OTBepCTne IOd COeINHITeIeM. PaBHomepHO 3aKpyTTE BnHT, YTObI 3aΦNcIPoBaTb Ka6JIb.

BHIMMAHNE
Y6eITeCb B npaBnIbHocTn nolpHocTn!
3NEKTPONITAHNE
IOnKIOHInTe BXOJaUHe B KOMnJIeKT NOCTaBKn KaBeJIN NITaHnK pa3bemyДЯKaBeJIN NITaHnHa KaXdOM IV3 yCTPOIcTB.

BkIIOHITe oBa yCTpOINCTBa B Cetb.
BKJIIOUOHEHNE/BbIKJIIOUOHEHNEIITAHNPEKIM OXINDAHNA
1ДЯВКПIOUeHnI/БblKIIIOUeHnI npiEmHnKa n CD-нроИрьВATEJI HaxMmTe KhoNky nITaHnHa KaJdOM N3 YCTpOcIbT.
2 MASTEROHKMITE,HTO6bIOJNOHBpEmHO BKNIOHTB NIN IpeBecTN BpeKIM OKNI-dAHnI CD-npOIgPbIBaTeN, IN pniEMNHK.
3 CDΦ:BKNHouHeHnI INn IpeBEOB D peKIM OXINaHnCD-IPoINrPBbATEJI.
4 AMPB: BkHueHne nnn nepeBOB B peKIM OxKnDaHn npNEMHnka.
PIMMEAHNE:BpeKIMeOxuJaHn3aRopa-ETcKpachbI CBetOBo INHnKaTOp.
EcInncNoB3yETcTOJbKO pNemHnk,CD-
TPOINrpbBaTeJIb MOXHO BbIKIOHTb.
Пульт достанционно упразьени
ПОДКЛЮЧЕНИА
AHTEHHA

IopKnIOuHte FM-antehny K pa3bemy ANTENNA C 3aHHe CTOpOHbI pPiemHnka. IoppoByTe npiDaTb aHTeHHe pa3HbI NOOXeHry, YTO6bI DoBtbcra HauLyUHero pPiema.
HN3KOYACTOTHbIM DNHAMIK
Pn nmoa Kabe n c pa3bemom RCA coepHInTe ayIOBbIXOdbI (KpaChb/6enbl) C COOTBETCTByHOLMM BXoAMN HIN3K0yAcTOTHORO DNHAMKa.
DVD-IPONIPbIBATEJIb
Pn nomoukabena c pa3bemom RCA coeHnTe ayIOBbIXOdbi (KpaChb/6enb) c COOTBeTCTByuUIMN BXoJamnDVD-npOirpbBaTeJra.
TELEBn3OP

Pn nmoi Ka6eIc pa3bemom RCA coeHnTe ayIOBbIXOdbI (KpaChb/6ebI) C COOTBeTCTByTOUIMN BXODAM TeneBn3opa.
DOKДЯ iPhone
IopKnIOuHIne aanTep nHTaHnK CTeBOMy NTOUHkny K0 BXOy NoCT. Toka Doka dna iPhone.
IopKnIOHnTe ayIOKa6eIb K JINHEINOMY BXO- DY (LINE IN) npneMnka n K JINHeINOMy BbxOdy (LINE OUT)doKa dJa iPhone.
Функци NTepeOpneMnka
INHOPMALIM/INPON3BOJbHO
B pexime DAB uI FM haxmTe INFO/RAN nIaKTHBaUu INHopMaUu DAB uIN RDS (cncTeMa paAnovHOpMaUu) Ha FM-CTAHx.
B pexime iPhone haxmite INFO/RAN Ira BocnpoN3BeHnB BCex TpeKOB B CnyaHOM NopRKe.
ABTOMATUNECKN NIONCK
Haxmte AUTO TUNE JIABTOMATINHECKORONCKaN ABTOMATINHECKO OCTAHOBKN PnO ObHApyKeHNHOBOI CTAHUIN.
3KBAIAI3EP/BAIAHC
1.ДяpenyIpOBKn HxKHXx YactOT HaxMnTe FUN OINH pa3.
2.ДяргелювкВьICOKИXЧАСТОТHAKKMITEFUN DBAXXbl.
3.ДпяperулровкбаланcaБыхогаHaДИнhamKK(Левьн/Парвь)нХмITE FUNТРира3a.
IINMHeHnKaKDoHnactpOnKnNcNoB3yTeVOL+/-.
SUPER BASS
HaxMMTE S.BASS OINH pa3, YTO6bI DO6aBnTb HIXKHe yactOTb(Ha +4D5 np1 100Tc); DBOHoe HaxKaTne OTMeHReT BbIbOp cyHKU.
PCHONNONCK
HaxMMTe UP nnn DOWN, nny puyHoro noucka ctaH Lm.
iPhone
Haxmte iPhone npeeknue Hn Bxod iPhone. Y6eNTecb, Tdo Dnil iPhone dock nocknue HndJexkaum o6pa30m.
CBPOC 3KBAJAN3EPA
HaxMMTE EQ RESET IINB03Bpata K nepBOHaHbHbIM HacTpoiKam EKBaIaN3epa. 3To He 3atparnBaET HacTpoiKu Super Bass.
OTKJIHOUEHME 3BYKA
ДяВЕРЕМЕНΗΟ OTΚΙΝΥЕΗ 3БУКΑ HAXΚΜΤΕ MUTE.
Чтобл ВЕРΥΤΒСК PAаHEE yCTaHOBЛECHOMY yPObHIO
rPOMKΟCTN, CHОВΑ HAXΚΜΤΕ MUTE ΜΙΝΟ TМЕΗΤΕ pεχιΜ БeЗ 3БУКΑ HAXΚΑΤΕΜ VOL +/-.
AUX1/2
Haxmte AUX1/2 nIy nepeKIOHeHn Mekdy BxOaAMN AUX1 nAUX2.
CD/USB
Haxmmte CD npeeknuehen B pexm CD/USB. Ecn npkiouen CD-npounpibatei, u USBnakonntel, npnpitetbIM 6ydt Bocnpo3BedeHne CD.
DAB/FM
HaxMMTe DAB/FMДЯпяреклоченmaMeKdy DAB n FM-paio.
「POMKOCTb
1.ДЯумehbueHINI yBENHINrPOMKOCnHa- KMTTE VOL+/-
2. yTo6bI yBEnHHTb mN yMeHbHHTb rPOMKoCTb 3Byka, NOBepHnTe peyJrTOp rPOMKoCTn Ha nepeDHe nHaHn BInEBO mN BnPaBO.
Bocnpon3BedeHne CD/USB
Дя BOCPON3BedeHNA 6JOK yCINITeJI DOnJxH HAXOHTbCBApeXIMe CD. IcnoJIb3yInTe KHOKN Ha Nylte DY nIN COOTBETCTBYIOUne 3JeMeHTbI ynpablenHa nepeHn naHEn CD- npoIPbIBaTeJ.
I npocnyuBnHaMy3bikalhBx cpaioB MP3 nn WMA BCTaBte USB-hakonntel.
PIMMEAHHE: NpKIOHTe USB-HakONITb HENOCpeCTBeHHo USB-nopt yctpoiCTBa.
IcnoIb30BaHHe yDnHHTeHbHoro KaBEn He peKOMeHdyETcN MoXeT BbI3BaTb NOMExN OLIM6Kn npI nepeDaHe daHHbx.
N3BJIeEHNE/3AΓPY3KAДИCKA
YTo6bI OTKpbITb INI 3aKpbITb IOTOK INI INCKOB, HAKMITEHOHNI KY OPEN/CLOSE.
Bocpnn3BeHne HaHHeTcABTomAtnHeckn C nepBoi DopoxKn. Ecn B JOTKe HET DnCKa N He BCTabLeH USB-Hakonntb, OTobpaNTcAo6eHne NO DISC.
IBOCPON3BEDEHNE/AY3A
B pexime octaHOBN OIN pa3 HaxMITE 11 T06bl HaxkTaB BOCnPOU3BeHEne. Iy naY3bl B BOCnPOU3BeHm HAXMITE 11e pa3;3Byk BydET OTKIOueH. T06bl BO3O6HOBVb BOCnPOU3BeHEne, CHOBA HAXMITE
NEPEMOTKA BINEPD NEPEMOTKA HA3AD
BoBpemBocnpon3BeHnHaXMMTe 1npeMOTKn BnepeiNnI pI nepeMOTKn Ha3a.
Haxmte HTo6bI BepHyTbcra K HopMaJIbHOMy Bocnpa3BedeHHIO.
PENbIyUuN CNEYIOU
Bo Bpemra BoCpOu3BedeHn HaxMITE TRObI nepeTn K CJIeDyUoLcMy TpeK. YpeE3 TprN CeKyHdbI DBaXkbI 6bICTPO HaxMITE TRObI nepeTn K npDeBdyUcEmy TpeK. Ppi OJHokpaTHOM HaKaTmTe KyuTm TpeK 6yET BoCpOu3BODITbC hauHa.
OCTAHOBKA BOCIPON3BDEEHNIA
YTO6bIOCTAOHOBNTBBOCPON3BeDEHNE,HAKMMTE
BbIEOP TPEKA
HaKMMTe KONky C COOTBETCTByOuJeIuOp0 0-9/ +10HaNyIbTe Dv.
NOBOTOP
Bo BpemBocpnn3BeHnA CD haxmte REPEAT COOTBETCTByIOUeue YncNo pa3 Ia aKTHBaUNCneYIOx FyHKnn NOBTOPA:
-IOBTOPTb3aRJIOBOK
-Повторпь BCE
- BbIKIOHHTb IOBTOP
ПОНЗВОЛьНОЕ BOCПОПИЗBEDEHNE
Haxmte RANDOM nBocnpn3BeHnBCEX TpeKOB B CnyaHOM npRKe.
BPEM
HaKMTe TIME COOTBETCTBYOLUe YNCIO pa3, TTO6bI OTO6paNTb:
-TekuTpeK/VCTeKUeeBpemr
-TekuT TpE/K/OctabWueecBpemr
- Bce TpeKn /VCTekLuee BpeM
-Bce TpeK/OCtBaUeecBpeM
Восprонзveдени iPod/Phone
Дявocрpon3BedeHЯ coapedKIMoro iPhone 6nOK ycnnteJIOJKeH haxoHTbCBA pexime iPhone. NcnoJIb3yIte KhoIKN Ha nyIbTe DYNiN COOTBeTCTByIOUJIme 3JIeMeHTbl ynpaBHeHЯ npeHNe NaHEn yCTpOICTBa.
iPhone
HaKMTe iPhone nBocnpn3BeHnMy3blKc nPckHoueHHoro iPhone/iPod.
PIMMEAHNE:Y6eNTecb,yTo iPhone/iPod npabnIbHo nOdkHouen Kdoky dny iPhone.
MEHIO
Haxmte MENU npepexoB MeHIO BaIero iPhone/iPod.
HaxoBbMeHIO,HaKMITEKHOKNy MENU nIpepeOda BnpdeBdyUe MeHIO.
BBEPX/BHN3
HaKmTe Iy nepexoA BBePx nn Bn3 B MeHIO iPhone/iPod.
HIBOCIPON3BEDEHNE/PAY3A
HaxMITE OIN pa3, Yo6bI HaxaTb BOCnpon3BedeHne. Iy naY3bIB BocnpOn3BeHnHaxMITE epe pa3; 3Byk 6yDenOTKJIIOueH.
TO6bI BO306HOBNTb BOCINPOIN3BeJeHHe,CHOBA HAXMITE
BbI TaKke MoXeTe HaxKaTb ENTER Ha nepeHne IaHeJI.
BBOI
Haxmte ENTER nnoTBepeHnBb6opa B MeHIO iPhone/iPod.
NOBOTOP
Bo BpemBocnpo3BeHncoepKIMOrO iPhone/iPod haxmTe REPEAT COOTBeTCTByuOue uNcNo pa3 dna akTbAun CneDyUxNx fynkui noBtopa:
-IOBTOPTb3aROJIOBOK
- IOBTOPTb BCE
- BbIKIOUHTb IOBTOp
NEPEXOD
- TTo6bl nepeTn K cIeDyTOUcEmy TpeKy, OINH pa3 HaxMITE SKIP+.
- YTo6bI nepeTn K Haany Tekyuero Tpeka, OINH pa3 HaxMITE SKIP-.
- YTo6bI nepeTn K npeBldUyEmy TpeKy, DbaKdbI 6bICTPO HaxMMTe SKIP-.
Испобзованые Тюнега
ДлгИСПОЛБЗOBAHМТоHEpa6IOKyCINITeRДOLJIKeH haxOДТбСВРexIMeDABnIMFM.NcPoiB3yIte KHOPIKHaIpyIbTeDyIINCOOTBetCTByHOLme3IeMeH TblypapBHeHnHaIpeHNeNaHEnYCTpOHTBa.
DAB/FM
Haxmte DAB/FM npeeknoe Hmexy DAB n FM-pao.
NHΦOPMALI
B pexkme DAB nI FM hakmte INFO/RAN nIaKtNbauu nHcOpMaun DAB nI RDS (CnCTema paonHcOpMaun) Ha FM-CTAHJx.
PIMMEAHNE: B pexime DAB, ecn ctaHua coXpaHeHa, TAKKE OTobpaxkaetc MOUHOCTb CINHana.
ABTOMATUNCHEKNIPOICK
Haxmte AUTO TUNE abTOMATnHEcKO rONCKa n ABtOMATnHEcKO OCTaHOBKn Pn ObHApXeHm HOBoI CTAHm. Bo BpMa noncka OTobpaKaetcQ SCAN.
Длгплного саимроваянхмITE AUTO TUNE n ydepxmbaite b TeheHne 2-3 cekHy.Bo Время ппсka OTobpaхкael F SCAN.
PIMMEAHHE: NOKB Dnana3OHe CBepXBbICOXX 1ACTOT (L) MOKET PON3BOITbcrTOIbKO BpyHyIO.
PCHONNONCK
Haxmte UP nnn DOWN pyHoro noncka cHaI nn nncnbl3yTe peynrTop TUNING + / - Ha nepeedne naen.
IPIMMEAHHE: B pexime DAB haxmite ENTER, TTO6bI BBipatb TekyuO CTaHIO, mY yTaHOBITE cyHKUIO AUTO ENTER Ha ON.
HaKMTe n ydepXnBaIte ENTER Ha nyIbTe Dy B Te- YHeHne 2-3 cekHy, YTObI BKIOHHTb NIN BBIKHOHTb cyHKJIO AUTO ENTER.
AHTEHHA
B pexime DAB haxmte INFO, cyoI OTobpa3ntb kaeeTbo cHana. PnpObyTe pa3Hbe nIOJKeHn aHTeHHbI dna HauNyUero npHema cHana.
COXPAHEHNECTAHLI
Iocne TOrO KaK CTAHnHa HaJdeHa, HaxMITE KONKy c COOTBETCTByoUe NfppoN 0-9/+10Ha npJIbTe Dv n ydepXnBaIte B TeueHme 3 cekyHd Ira coxpanHeHna KaHana.
BbI TAKKe MoKTe OJHOBpeMeHHo HaxKaTb SAVE n BROWSE Ha nepeHne naHn.
LUKJIHHECKNI PPOCMOTPCO- XPAHEHHbIX CTAHLIM
Дя LИКЛHecKOTo npocMOTpa COxpaHEHHbIX CTAH LIM HAKMTe PRE +/- NIM KONKY C COOTBETCTBYO- Ue IuIp0i 0-9/+10 HaIyIbTe Dv.
BbI TaKKe MoKTe HaxKaTb BROWSE Ha nepeHnei naHem.
CBPOCCTAHLI
YTO6bI ydaJIb BCE COxpaHeHHbIe CTaHcUIM, HaxMMTe uYdpeXnBaIte INFO, noka He oTo6pa3ntcR ESRET. 3aTEM HaxMMTe ENTER IINIIOITBePckJeHIA.
STEREO/MONO
Haxmte ENTER nna hactpoikn pekima STEREO mMONO.
Понь и устараенье несправност
JIHeHbI BbIXoI 1x npaB./neB.
Pa3bEm dIy dHAmka BbcOKoKaueCTBeHHbIe BNHTOBbIE KJEMMbI
MaKc.3HepronoTpe6JeHne 150BT
Pa3Mepbl (LxΓxB) 222 x 270 x 70 MM
Bec HeTTo 3,9K
HnHaMnKn
DolroBpeMeHHa MoUHocTb 35BT
KpaTkoBpeMeHHa Mo-70BT
HOCTb
Yactotha xapaKTepeNCTnka 80-20 K
YyBCTBNTeJIbHOcTb 86D1M/1BT
MmpeHc Harpy3K 4-8OM
BbICOKOaCToTHbI dHAmNK MArKn KynoJ 25 MM
Hn3KoactOTbIuHaMk 100 MM
Pa3Mepbl (LxΓxB) 130 x 230 x 227 MM
Bec HeTTo 2,45 Kx 2 Wt.
USB-ycTpoCTBa C ydInHnteIbHbIMKa6eIaMn He noDpeXnBAOTcA.
VIKTIGA SÄKERHETSINSTRUKTIONER
LAS NOGA OCH SPARA FOR FRAM-TIDA BEHOV.

PRESET: Valj sparad station
iPhone-knappar
SKIP-/+
MENU: Visa iPhone-menyn ENTER
Spela/pausa
▼ Navigeringsknappari alternatively MENU, spellata for sanger etc.
Dalga bantlan DAB bandi III / L bandi, FM
On ayarlamalar 40
CAUTION: To prevent the risk of electric shock, do not remove cover (or back). No user-serviceable parts inside. Refer servicing to qualified service personnel.