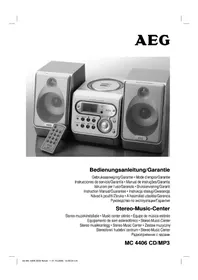
MC 4420 CRUSB - Hi-fi system AEG - Free user manual and instructions
Find the device manual for free MC 4420 CRUSB AEG in PDF.
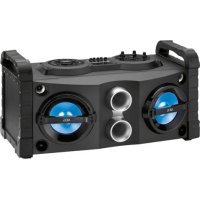
| Product type | Hi-fi system with vinyl turntable, USB player and SD/MMC card |
| Brand | AEG |
| Model | MC 4420 CRUSB |
| Power supply | 230 V, 50 Hz |
| Power consumption | 14 W |
| Net weight | 3.7 kg |
| Protection class | II |
| Remote control battery | 1 x 3V, type CR 2025 |
| Supported audio formats | MP3, WMA |
| Inputs | USB (storage device), SD/MMC card, AUX-IN (3.5 mm jack), built-in phono turntable |
| Outputs | LINE OUT (RCA) |
| Playback functions | Repeat (track, album, folder), random play, intro (10 seconds), programming, search by initial (FIND) |
| Recording function | MP3 encoding from disc or AUX-IN source, USB/SD transfer |
| Turntable | Speeds 33/45 RPM, anti-skating adjustment, counterweight, pitch control, automatic stop |
| Remote control | Infrared, range up to 5 m |
| Cleaning and maintenance | Disconnect before cleaning; use a slightly damp cloth without additives |
| Safety | Do not expose to moisture; do not open the casing; damaged cord must be replaced by a professional |
| Repairability | Have repairs done by a qualified technician; spare parts not specified in the manual |
Frequently Asked Questions - MC 4420 CRUSB AEG
User questions about MC 4420 CRUSB AEG
0 question about this device. Answer the ones you know or ask your own.
Ask a new question about this device
Download the instructions for your Hi-fi system in PDF format for free! Find your manual MC 4420 CRUSB - AEG and take your electronic device back in hand. On this page are published all the documents necessary for the use of your device. MC 4420 CRUSB by AEG.
USER MANUAL MC 4420 CRUSB AEG
natural_image
Exterior view of a vintage AEG radio with open lid and control panel (no visible text or symbols)PERFECT IN FORM AND FUNCTION AEG
Deutsch
Inhalt
Location of Controls...... page 3
User manual...... page 61
Technical Specifications...... page 67
Język polski
Spis treści
Location of Controls
natural_image
Diagram of a rolling roller being cut with an arrow indicating rotation (no text or symbols)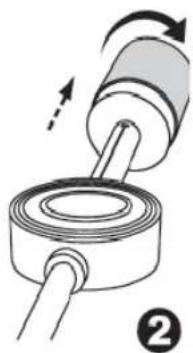
natural_image
Diagram of a mechanical device with rotating shaft and housing, showing motion direction (no text or symbols)natural_image
Diagram of a mechanical device with rotating components and a shaft, no text or symbols present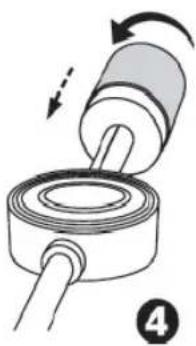
natural_image
Diagram of a mechanical assembly with rotating components and directional arrows (no text or symbols)8 Deutsch
Anti-Skating (22)
natural_image
Diagram of a mechanical component with a rotating shaft and roller, showing motion direction (no text or symbols)natural_image
Diagram of a mechanical assembly with a cylindrical component and a ring, showing motion direction (no text or symbols)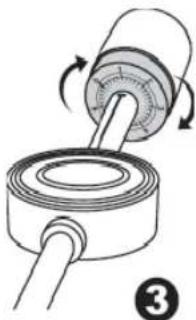
natural_image
Diagram of a mechanical assembly with rotating components and a coiled shaft (no text or symbols)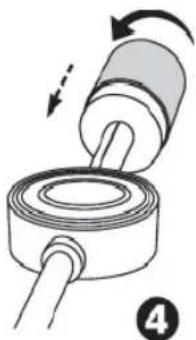
natural_image
Diagram of a mechanical assembly showing a rotating cylindrical component being inserted into a ring (no text or symbols present)18 Nederlands
tpm-schakelaar (25).
1 Touche INFO
2 Touche • REC (fonction codage)
3 Touche ▶II (Lecture/Pause)
4 Touche ■ (Stop)
5 Touche SOURCE
6 Compartiment pile
natural_image
Diagram of a mechanical component with a rotating shaft and threaded end, showing a force direction (no text or symbols)natural_image
Diagram of a mechanical device with rotating shaft and housing, showing motion direction (no text or symbols)natural_image
Diagram of a mechanical device with rotating components and a shaft, no text or symbols presentnatural_image
Diagram of a mechanical assembly showing a cylindrical component being inserted into a ring, with motion arrows indicating direction (no text or symbols)Anti-Skating (22)
natural_image
Diagram of a mechanical component with a rotating shaft and threaded end, showing a directional arrow (no text or symbols)natural_image
Diagram of a mechanical assembly with rotating components and directional arrows (no text or symbols)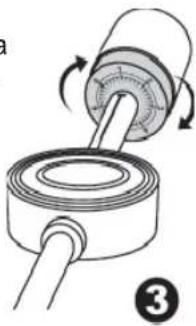
natural_image
Diagram of a mechanical device with rotating components and a shaft, no text or symbols present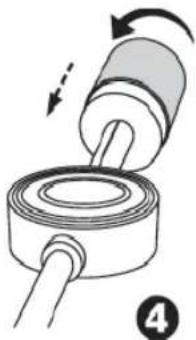
natural_image
Diagram of a mechanical assembly showing a cylindrical component being inserted into a coiled cable, with motion arrows indicating direction (no text or symbols)Anti-deslizamiento (22)
natural_image
Diagram of a mechanical component with a rotating shaft and threaded end, showing a directional arrow (no text or symbols)natural_image
Diagram of a mechanical assembly with rotating components and directional arrows (no text or symbols)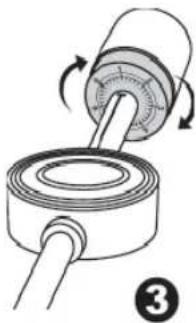
natural_image
Diagram of a mechanical device with rotating components and a shaft, no text or symbols present
natural_image
Diagram of a mechanical assembly with rotating components and directional arrows (no text or symbols)Antideslizamento (22)
Slot SD/MMC card (1)
natural_image
Diagram of a mechanical component with a rotating shaft and housing, showing a curved arrow indicating rotation (no text or symbols present)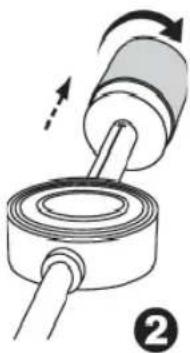
natural_image
Diagram of a mechanical device with rotating shaft and housing, showing motion direction (no text or symbols)natural_image
Diagram of a mechanical device with rotating components and a shaft, no text or symbols present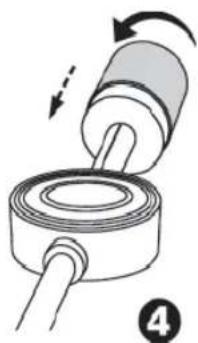
natural_image
Diagram of a mechanical assembly showing a rotating cylindrical component and a ringed base with a rod (no text or symbols)Anti-Skating (22)
8 EJECT tast (Tone arm-reverse)
9 POWER/ FUNCTION Funksjonsutvalgsbryter (OFF/ PHONO / USB/SD / AUX-IN)
10 SOURCE tast (USB-SD/MMC bryter)
11 FOLDER UP tast (opp Album)
12 REPEAT/INTRO/RAN tast (repeter/tilfeldig spill)
13 PROG tast
14 LCD-Skjerm
15 AUX IN plugg
16 USB tilkobling
natural_image
Diagram of a mechanical component with a rotating shaft and threaded end, showing a curved arrow indicating rotation (no text or symbols present)- Vri pickuparmens motvekt med urviseren bakover til du när enden av det hvite merket. (III.2).

natural_image
Diagram of a mechanical assembly with rotating components and directional arrows (no text or symbols)natural_image
Diagram of a mechanical device with rotating components and a shaft, no text or symbols presentnatural_image
Diagram of a mechanical assembly showing a rotating cylindrical component being inserted into a ring (no text or symbols present)Antiskli (22)
General Safety Guidelines
Before using this device, carefully read this user manual and keep it together with the Warranty Certifi cate, cashier receipt and if possible, the original package inclusive its interior packing. If you hand on the device to any third person, include the user manual as well.
- To avoid the risk of fire or electric shock, you should not expose the device to rain or humidity. Do not use the device near water (e.g. bathroom, swimming pool, humid cellars)
- Use the device only for the proposed purpose.
- Plug the device only into a properly installed socket. Be sure the device voltage corresponds to the grid voltage.
- When using external grid adaptors, pay attention to the correct polarity and voltage. Insert batteries correctly.
- Avoid covering the device's vent openings.
- Never open the device's case. Improper repairs can cause severe danger to the user. If the device or particularly the power cord is damaged, don't use the device any further and have it repaired by a qualified specialist. Check the power cord regularly for damages.
- To avoid any danger, a damaged power cord must be replaced only by the producer, its customer service or a similarly qualified person with an equal cord.
- If the device won't be used over an extended period of time, disconnect the power cord and remove the batteries.
These symbols may be found on the device and shall indicate the following:
The lightning symbol warns the user of dangerously high voltages inside the case.

The exclamation mark symbol points to important instruction or maintenance remarks in the accompanying guidelines.
Children and disabled persons
- For the safety of your children, keep any packing parts (plastic bags, cartilage, Styrofoam etc.) out of their reach.
Warning!
Don't let small children play with foils for danger of suffocation!
- To save children or frail persons from danger of electric devices, make sure this device is used only under supervision. This device is no toy. Do not let small children play with it.
Symbols in this user manual
Important notes for your safety are marked distinctively. Pay absolute attention to them to avoid accidents and damage to the device.
Warning:
Warns of dangers for your health and indicates potential risks of injury.
Attention:
Indicates potential dangers for the device or other objects.
iNote:
Highlights tips and information for you.
Location of Controls
1 SD/MMC card slot
2 IR Sensor for remote control
3 Control lamp POWER
4 Cover
5 • REC Key (encoding function)
6 ▶/ ▶ keys (scan forward / scan backward)
7 ▶ || / ■ key (Play/Pause/Stop)
8 EJECT key (Tone arm-reverse)
9 POWER/FUNCTION Function selection switch (OFF/ PHONO / USB/SD / AUX-IN)
10 SOURCE key (USB-SD/MMC switch)
11 FOLDER UP key (up Album)
12 REPEAT/INTRO/RAN key (Repeat/Random play)
13 PROG key
14 LCD-Display
15 AUX IN jack
16 USB connection
17 AC \~ power connection
18 LINE OUT connections
19 Adjustment screw with rubber cover
20 Tone arm counter-weight
21 Needle pressure adjustment ring
22 ANTI-SKATING control
23 Tone arm lift lever
24 Tone arm support/lock
25 33/45 rpm selector
26 PITCH ADJ. control (rpm fi ne tuning)
27 Guiding lever
28 Stroboscope lamp
29 Stroboscope mirror
30 Center axle
31 Record plate
32 Adapter for 45 rpm-single records (Puck)
Remote Control
1 INFO key
2 • REC key (encoding function)
3 ▶|| key (Play/Pause)
4 ■ (Stop) key
5 SOURCE key
6 Battery compartment
7 FOLDER ▼/▲ key (down Album / up Album)
8 ▶/▲ keys (Scan forward / Scan backward)
9 REPEAT key (Repeat/Random Play)
10 FIND key
11 PROG key
First Use of the Device/Introduction
- Before the first use of the device, read the user manual carefully.
- Select a proper place for the device such as a dry, even and non slip area where you can easily operate the device.
- Make sure the device is vented sufficiently.
- If still in place, remove the protection foil from the display.
- Connect the device to your amplifier (AUX IN) by a Cinch cable (2x RCA).
Power Supply
- Insert the grid plug into a properly installed three prong socket with 230V, 50Hz.
- Make sure the grid voltage corresponds to the figures on the rating plate.
Insert the battery
i Note:
The Lithium cell in the battery compartment of the remote control has been saved by a foil for transport. This saves the battery life span. Before first use, remove this foil to activate the remote control.
The battery of the remote control is a long life Lithium cell. If during use, the reach of the remote control narrows please proceed as follows:
- Open the battery compartment on the bottom of the remote control.
- Replace the cell by a battery of the same kind (CR 2025). Pay attention to correct polarity.
- Close the battery compartment.
If the device is not used for an extended period of time, remove the batteries from the device to avoid any leaking of battery acid.
Attention:
Batteries don't pertain to household waste. Please take empty batteries to a competent collection point or back to a dealer.
Warning:
- Never expose batteries to high temperatures or direct sunlight or throw batteries into fire for danger of explosion!
- Keep batteries away from children. They are not toys!
- Don't open batteries forcefully.
- Avoid contact to metal objects (Rings, nails, screws etc.) for danger of short circuit!
- By a short circuit, batteries can heat up strongly and eventually catch fire. Burnings can be the result.
- For your safety, battery poles should be taped during transport.
- If a battery leaks avoid rubbing the liquid into eyes or mucous membranes. After touching the fluid, clean your hands and rinse eyes with clean water; if discomfort continues see the doctor.
General Operation
i Note:
Some keys you can find as well on the device as on the remote control. Identical keys effect the same function.
Turning off
The device is out of operation when the mode selection switch (9) is in OFF position. The POWER control lamp goes out. Then pull the mains plug.
Infrared remote control
For wireless control within a distance of 5m. If the distance decreases you should change the batteries. For proper operation mind a clear view between the remote control and the sensor (2) on the device.
USB Connection (16)
This device has been designed according to the latest standard of technical development in the fi eld of USB. The vast amount of various all kinds of USB storage media offered today don't allow to provide full compatibility with all USB storage media. Due to this reason, in rare cases problems might occur with playback of USB storage media. This is no malfunction of the device.
- Push the mode selection switch (9) in the USB/SD position. The display will show "NO USB". The device is now in USB mode.
- Connect a USB storage media.
- After a few seconds, the display will show the total number of folders and songs/tracks.
- Press the ▶||key (7/3) to play the music data. The current song, the symbol ▶ MP3 or ▶ WMA will appear on the display respectively.
- For operation please refer to section "Description of keys".
Attention:
Before removing the USB storage media, put the mode selection switch (9) to PHONO.
SD/MMC card slot (1)
- If you want to playback data from a SD/MMC card insert it in the provided slot.
- Press the card into the slot till it snaps in with a "click".
- Put the mode selection switch (9) in the USB/SD position.
- Press the SOURCE key (10/5) once. The symbol “☐” will appear on the display. The device is now in SD/MMC mode. After a few seconds, the display will show the total number of folders and songs/tracks.
- Press the key ▶II(7/3) to playback the music data. The current song, the symbol ▶MP3 or ▶WMA will appear on the display respectively.
- For handling please refer to the section "Description of operational keys".
- Press onto the SD/MMC card again to remove it.
AUX-IN Jack (15)
For the connection of analogue player devices. Through this jack, you can play the input of other devices like MP3 players, CD players etc. via the speakers of this device.
- Connect the external device to the AUX-IN jack with a 3.5mm Stereo jack plug.
- Put the mode selection switch (9) in AUX-IN position. The display will show "AUX".
English
- Via the speakers, you will hear the playback of the external device.
- For further procedures, please refer to the user manual of the external source.
i Note:
Adjust the volume of the external device to a comfortable level.
Record Player Adjustments
Before being able to use the record player, you might have to adjust some settings.
Horizontal balance and surface pressure
- Set the ANTI-SKATING control (22) to "0".
-
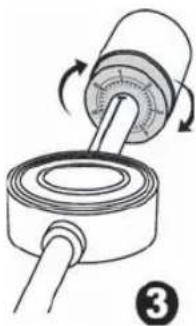
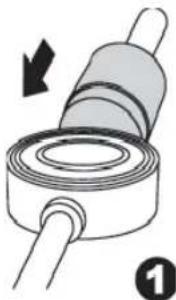
Push the tone arm counterweight to the end of the tone arm. Turn the tone arm counterweight till the keyway snaps into the furrow.
-
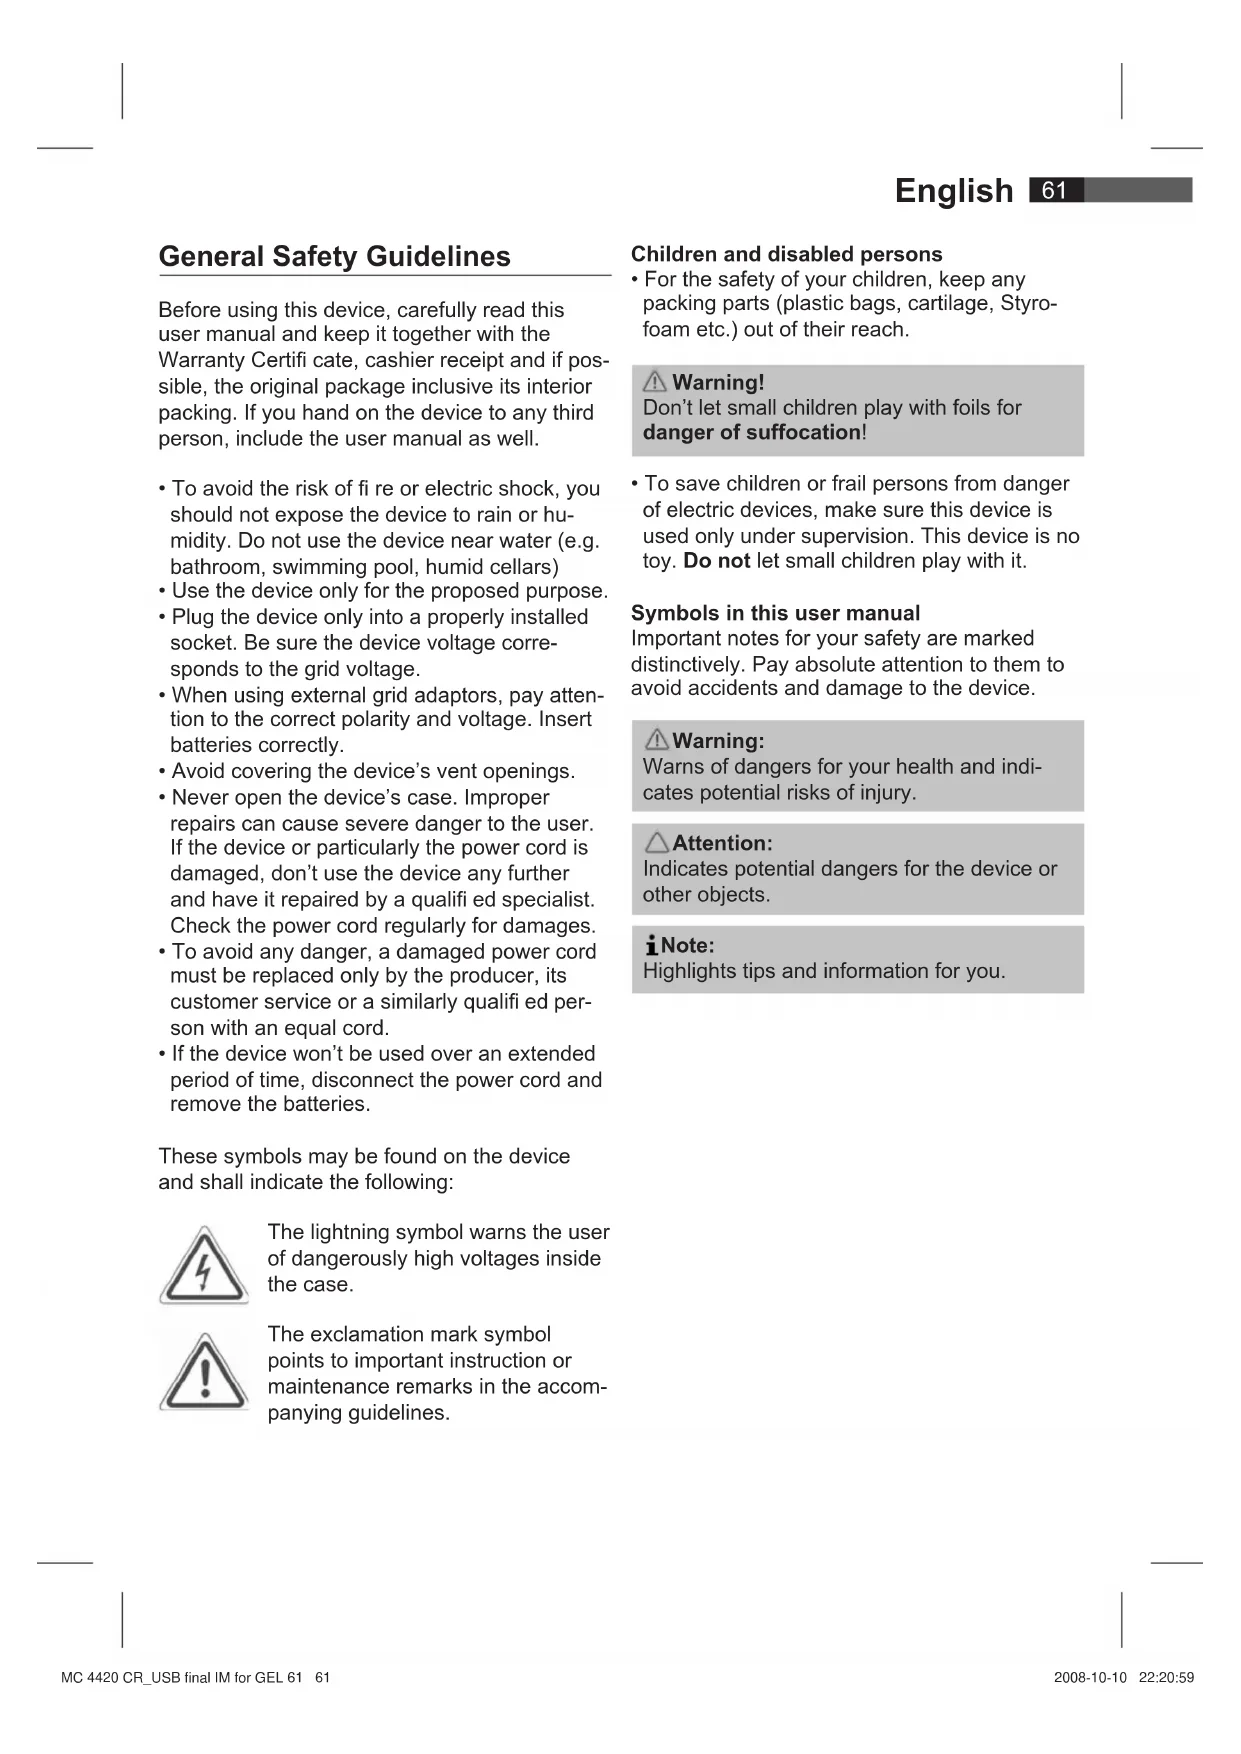
Turn the tone arm counterweight clockwise backwards till the end of the white mark is reached (Fig.2).
-
Turn the tone arm counterweight clockwise backwards till the end of the white mark is reached (Fig.2).
-
Now turn the surface pressure adjustment ring till position "1" is above the line (Fig.3).
natural_image
Diagram of a mechanical component with a rotating roller and shaft, showing a curved arrow indicating rotation (no text or symbols present)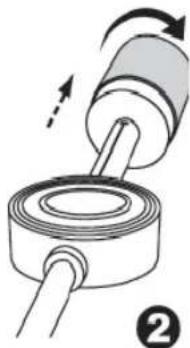
natural_image
Diagram of a mechanical component being inserted into a ring, showing motion direction (no text or symbols)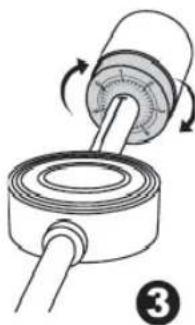
natural_image
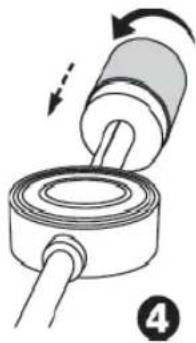
Diagram of a mechanical assembly showing a rotating shaft and housing with directional arrows (no text or symbols)- Now turn the tone arm counterweight counter clockwise to adjust the weight.
natural_image
Diagram of a mechanical assembly with rotating components and directional arrows (no text or symbols)Anti-Skating (22)
The Anti-Skating function counters the pull of the needle inside.
- Adjust the scale to the same value as the surface pressure adjustment ring (21).
Record Player operation
- Set the mode selection switch (9) to PHONO.
- Open the cover (4) by pulling it upwards on its front.
- Put a record on the turntable. When using a 45rpm single put the adapter (puck) (32), central axle (30).
- Unlock the lock of the tone arm support (24) and remove the needle protection.
- Set the desired revs with the rpm selection switch (25).
- Use the tone arm lift lever (23) to lift the tone arm. Using the guiding lever (27), guide the tone arm over the outer edge of the record. The turntable will start revolving automatically. Use the tone arm lift lever again to let the needle touch down on the record.
- At the end of the record, the tone arm will return automatically to its support. Lock the holder and attach the needle protection.
i Note:
- With some records, the turntable might stop before the end of the record because the switch-off point lies outside of the tone arms radius. In this case, adjust the desired switch-off point using the adjustment screw (19).
-
Remove the rubber cover.
-
Turn the screw clockwise to set the switch-off point closer to the center.
-
Reattach the rubber cover.
- If the switch-off point is outside of the record end, adjust the screw counter clockwise. The switch-off point will be moved toward the edge of the record.
- To stop playback before the record end press the EJECT key (8). The tone arm will return automatically to its support. Lock the holder and attach the needle protection.
Rpm fi ne tuning control (26)
This control helps you to fi ne tune the turntable speed.
+ = faster, - = slower
Using the stroboscope mirror rows, you can adjust the proper revolution level according to the record size in use.
- While the turntable is rotating move the PITCH ADJ. control so that the illuminated mirror row optically is brought to a virtual standstill.
- The turntable will revolve now in the optimal speed for this record.
Description of Control Keys
▶II (7/3)
You can suspend and resume playback. The elapsed playing time fl ashes on the display. Pressing the key again resumes playback from the same point.
SOURCE (10/5)
Press this key to switch between USB and card modes. The symbol “◀” or “☐” appears on the display respectively.
▶/◀(6/8)
With running music track:
With ▶▶ you can skip to the next track or the next but one etc.
- When you press and hold the key a music search starts (the sound is muted).
- When you press and hold the key in the stop
mode a quick run begins to your desired track.
Pressing the ▶II key starts the playback of the track.
The ◀ key can be used for the following:
Press 1x = starts the current song from the beginning
Press 2x = skips to the previous track.
Press 3x = plays the foregoing song etc. Press and hold to start a music search (the sound is muted). Press and hold to start a quick run to your desired track begins. Pressing the ▶II key starts the playback of the track.
■ (7/4)
MP3/WMA is stopped.
i Note:
Press and hold the ▶||/ ■ key (7) on the device to stop playback.
REPEAT/INTRO/RAN (12) (9 on the RC)
Press 1x: The current song will be repeated continually (the display shows “☐”).
Press 2x: The complete CD will be repeated continually (the display shows “ALL”).
Press 3x: The selected folder on the MP3 CD will be repeated continually (the display shows “☐ FOLDER”). Using the FOLDER UP / FOLDER ▼/▲ keys (11/7 on the remote control), you can select the individual folders.
Press 4x: Each track on the CD will be played for 10 seconds.
Press 5x: RANDOM appears on the display, MP3 and the track number played first. All tracks will be played in a random sequence.
Press 6x: The mode will be deactivated and the CD will be played back in the normal mode.
FIND (10 on the RC)
With a CD in MP3 format
You can search for content (when included in the MP3 file) as follows:
Press 1x: The name of the first track with the initial letter "A" will be shown in the display. If "NOFILE" appears on the display there's no track with initial letter "A". Using the ▶/▲ keys (6/8) you can select the first track of the next initial "A-Z" and "0-9".
i Note :
Only one track of a certain initial can be displayed. If there are more tracks with the same initial on the CD in spite only one track will be shown.
Press 2x: The title of the fi rst folder appears on the display. Select the desired folder by the ▶/ ▶ keys (6/8) and press the ▶|| key. Playback will start with the fi rst track of this folder.
Press 3x: The display changes to the normal mode.
INFO (1 on the RC)
If the ID-3 tag information is saved it appears on the display as running belt.
FOLDER ▼ (7 on the RC)
Press this key during playback to move one folder down. Afterwards, playback will start automatically. If this key is pressed in stop mode the first track number of the selected folder appears on the display. Start playback with the ▶II key.
FOLDER UP / ▲ (11) (7 on the RC)
Press this key during playback to move one folder up. The following steps see above.
Encoding Function
This function enables you to convert data from a record or a connected analogue source (AUX-IN) into MP3 format in real time and to save it on your connected MP3 player or on an inserted memory card. In addition you have the opportunity to transfer data from a memory card to your MP3 player and vice versa.
i Note:
The device automatically creates a folder on the target media:
AUDIO = record; FCOPY = data transfer USB/CARD.
-
Select the desired source by the mode selection switch (9) ((USB/SD / AUX-IN or PHONO). Prepare a record or connect your MP3 player or insert your memory card.
-
For data transfer between USB and card: Using the SOURCE key(10/5) you can select the media you want to transfer data from. In stop mode, press the ●REC key (5/2) to transfer all files.
For records: Start playback as described in "Record Player Operation" and then press the • REC key.
For external sources (AUX-IN): Start play-back as described in "AUX-IN Jack" and then press the ● REC key.
- The device will check now if an MP3 player or a memory card has been connected. USB or CARD fl ashes on the display respectively.
i Note:
- For data transfer between USB and card, the device checks the target media first for sufficient memory.
- If you have connected both MP3 player and memory card, USB and CARD appear on the display. You can select the target media by the ▶/ ▶ keys (6/8).
- If you press the ● REC key during playback of a track only this track will be recorded. The device will stop after finishing the playback of this MP3 track.
-
When recording from a record, the device will not recognize the end of the track automatically.
-
"REC" and the symbol of the target media will flash on the display.
i Note:
During data transfer between USB and card, the copying status is indicated by a percent display. There is no sound.
- Press the • REC key to stop or abort the recording.
i Note:
Files aborted during data transfer between USB and card will not be saved.
Programmable Playback
Allows programming of an arbitrary track sequence.
- Press and hold the ▶||/ ■ key (7) on the device or press the ■ key (4) on the RC.
- Press the PROG key (13/11 on the RC). "P-01" (memory) fl ashes on the display and "PROG" appears. Select the desired track using the ▶/▲ keys (6/8) and press the PROG key again. The display will change to memory P-02.
- Select the next track using the ▶/▲ keys and press the PROG key again. Repeat this procedure till all tracks are chosen.
i Note:
With the memory capacity reached by the tracks to be programmed, "FULL" will flash on the display.
- Press the ▶II key (7/3) to start playback. The display shows all track numbers in their sequence; the symbol ▶ MP3 or ▶ WMA and PROG appear on the display. You can also suspend playback by this key.
- Pressing and holding the ▶II/ ■ key (7) or pressing the ■ key (4) will stop playback but the program will remain.
- To resume playback of the program, please first press the PROG key once and then press the ▶■key.
- To delete the program, press and hold the ▶||/ ■ key (7) or press the ■ key (4). The icon PROG will disappear.
The device stops automatically after playback of all programmed tracks. The programmed order will remain in the memory till you change to normal mode or remove the CD or the device is switched off.
You can combine the programmed tracks with the REPEAT function. After programming and starting the device, press the REPEAT/INTRO/RAN key (12) (9 on the RC) up to 4x to apply the modes as described in section "REPEAT/INTRO/RAN".
Please remark:
There is an abundance of burning and compression modes as well as differences in quality of USB storage media and SD/MMC memory cards.
Due to these facts, in rare cases, problems may occur with playback of USB storage media and SD/MMC memory cards. This is not a malfunction of the device.
Cleaning and Maintenance
- Before cleaning, pull the power plug.
- External stains can be removed by a slightly moist cloth, without additives.
Technical Specifications
Model: MC 4420 CR/USB
Power supply: 230 V, 50 Hz
Input: 14 W
Batteries (Remote Control): ....1 x 3V, Type CR 2025
Protection Class:......II
Net weight: 3,7 kg
Technical modifications reserved!
This device has been tested according to all applicable, current CE guidelines like electromagnetic tolerance and low voltage directive and has been designed according to the latest safety technology regulations.
Technical modifications reserved!
The Meaning of the symbol "Garbage Can"
Protect our environment. Electronic devices don't pertain to general waste.
Use the collection points designated for the disposal of electric devices and hand over your electric appliances you won't use any more there.
Thus you help to avoid potential effects of wrong disposal on the environment and human health.
Therewith you contribute to reuse, recycling and other forms of utilization of outdated electric and electronic devices.
Information on where to dispose of these devices can be obtained at your community or at the municipal administration.
natural_image
Diagram of a mechanical component with a rotating shaft and threaded end, showing a directional arrow (no text or symbols)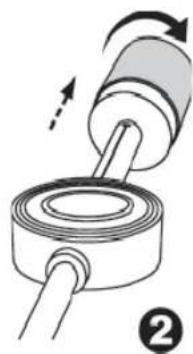
natural_image
Diagram of a mechanical assembly with rotating components and directional arrows (no text or symbols)
natural_image
Diagram of a mechanical device with rotating components and a shaft, no text or symbols present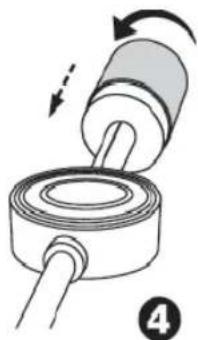
natural_image
Diagram of a mechanical assembly with a cylindrical component and a ring, showing motion direction (no text or symbols)natural_image
Diagram of a mechanical component with a rotating roller and shaft, showing a directional arrow (no text or symbols)natural_image
Diagram of a mechanical assembly with a cylindrical component and a coiled spring, showing motion direction (no text or symbols)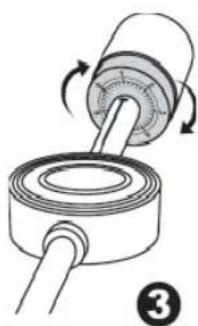
natural_image
Diagram of a mechanical device with rotating shaft and housing, showing motion arrows (no text or symbols)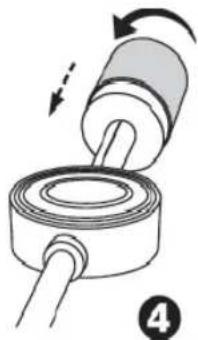
natural_image
Diagram of a mechanical assembly showing a cylindrical component being inserted into a coiled tube, with motion arrows indicating direction (no text or symbols)natural_image
Diagram of a mechanical component with a rotating roller and threaded shaft, labeled with number 1 (no text or symbols on the diagram itself)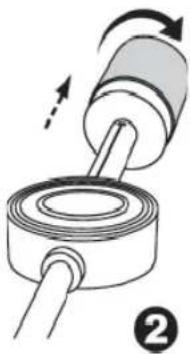
natural_image
Diagram of a mechanical device with rotating shaft and housing, showing motion direction (no text or symbols)natural_image
Diagram of a mechanical device with rotating components and a shaft, no text or symbols present
natural_image
Diagram of a mechanical assembly with rotating components and directional arrows (no text or symbols)i Megjegyzés:
natural_image
Diagram of a mechanical component with a roller and shaft, showing a rotation arrow (no text or symbols)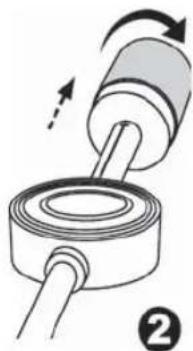
natural_image
Diagram of a mechanical assembly with rotating components and directional arrows (no text or symbols)