MC 4421 - Hi-fi system AEG - Free user manual and instructions
Find the device manual for free MC 4421 AEG in PDF.
| Product type | Hi-fi system |
| Brand | AEG |
| Model | MC 4421 |
| Net weight | Approximately 2.7 kg |
| Power supply | 230 V ~ 50 Hz |
| Player | CD / MP3 |
| Radio | AM (525-1615 kHz) / FM (87.5-108 MHz) |
| Functions | Alarm with buzzer, radio, CD; random play, repeat, programming |
| Auxiliary input | AUX jack (3.5 mm) |
| Headphone jack | Yes, stereo |
| USB port | Yes (MP3 playback) |
| Card reader | Card slot (not specified) |
| Remote control | Included, operates with 2 AAA batteries (not included) |
| Clock backup batteries | 2 AA batteries (not included) |
| Cleaning | Soft, damp cloth; do not use chemical products |
| Safety | Class 1 laser; do not open; lightning protection |
| Spare parts | Not specified; contact authorized service |
Frequently Asked Questions - MC 4421 AEG
User questions about MC 4421 AEG
0 question about this device. Answer the ones you know or ask your own.
Ask a new question about this device
Download the instructions for your Hi-fi system in PDF format for free! Find your manual MC 4421 - AEG and take your electronic device back in hand. On this page are published all the documents necessary for the use of your device. MC 4421 by AEG.
USER MANUAL MC 4421 AEG
natural_image
Black portable electronic device with AEG speakers and control knobs, no visible text or symbols on the device itself.MC 4421 CD/MP3
DESIGN MUSIC CENTER MIT VERTIKAL CD/MP3-PLAYER D NOWOCZESNE CENTRUM MUZYCZNE Z PIONOWYM ODTWARZACZEM CD/MP3 PL
DESIGN MUSIC CENTER WITH VERTICAL CD/MP3 PLAYER GB ONTWERP MUZIEKCENTRUM MET VERTICALE CD/MP3-SPELER NL
SYSTÈME MUSIQUE DESIGN AVEC LECTEUR CD/MP3 VERTICAL FR DUŞEY TASARIMLI CD/MP3 ÇALARLI ŞIK MUZIK SETI TR
FORMATERVEZETT MUSIC CENTER FUGGLEGES CD/MP3 LEJATSZOVAL H JUDEBNI CENTRUM DESIGN S VERTIKALNIM PREHRAVACEM CD/MP3 CZ
CENTRO MUSICA DI DESIGN CON LETTORE CD/MP3 VERTICAL ① SISTEM DESIGN MUSIC CU PLAYER VERTICAL CD/MP3 RO
CENTRAL MUSICA DE DISEÑO CON REPRODUCTOR CD/MP3 VERTICAL E МУЗИКАЛЬНЫЙ ЦЕНТР «DESIGN» С ВЕРТИКАЛЬНЫМ СД/MP3 ПРОНГРЫВАТЕЛЕМ RU
UKW (FM) 87.5 - 108 MHz
text_image
The triangular symbol with the lighting set wears the user to the presence of dangerous non-oseered voltage on the Inside of this device which may occur an electric shock. WARNING DANGER OF A HAZARDOUS ELECTRIC SHOCK. DO NOT OPEN WARNING TO REDUCE THE RISK OF AN ELECTRIC SHOCK. DO NOT REMOVE THE FRONT OR BACK COVER. INSIDE THE UNIT. THERE ARE NO PARTS THAT CAN BE REPAIRED OR ADJUSTED BY THE USER. PLEASE REFER TO QUALIFIED TECHNICians. The triangular symbol with the examination highlights important points of which the user should refer to the manual regarding maintenance and repair.FURTHER INFORMATION

Beware of small pieces and batteries, do not swallow them. It may be hazardous to your health and lead into suffocation. Please, Make sure to keep small devices and batteries out of the reach of children.

Important advice regarding hearing protection
Caution:
You care for your hearing, and so do we.
Therefore, use caution while using this appliance.
Our recommendation: Avoid high volumes.
Children should be supervised while using headphones; make sure that the appliance is
not set to high volume
Caution!
High volumes may cause irreparable damage to children's ears.

NEVER let allow anyone, especially children, to put objects into the holes, slots or openings on this devise. This may lead into death due to electric shock. The device must only be opened by a qualified assistant.

Only use the appliance for its intended purpose.
This device may only be used in housings and business premises.

Please keep this instruction manual for further reference

Instructions on environment protection
Do not dispose of this product in the usual household garbage at the end of its life cycle; hand it over at a collection point for the recycling of electrical and electronic appliances. The symbol on the product, the instructions for use or the packing will inform about the methods for disposal.
The materials are recyclable as mentioned in its marking. By recycling, material recycling or other forms of re-utilization of old appliances, you are making an important contribution to protect our environment.
Please inquire at the community administration for the authorized disposal location.

Do not obstruct the ventilation of the device. Make sure, that no curtains, newspapers, furniture or any other type of object are blocking the ventilation system of the apparatus. The ventilation system must be clear of objects at all times! Overheating may lead into serious damage of the device and reduce its performance and lifespan.

Heat and warmth
Do not expose the appliance to direct sunlight. Make sure that the appliance is not subject to direct heat sources such as heaters or open fire. Make sure that the ventilation slots of the appliance are not covered.

Moisture and cleaning
This appliance is not waterproof! Do not immerse player in water. Do not allow player to come in contact with water. If water gets inside the player it may cause serious damage. Do not use cleaning agents that contain alcohol, ammoniac, benzene or abrasives as these could damage the player. For cleaning, use a soft, moistened cloth.

Professional recycling
Batteries and packaging should not be disposed of in the trash. Batteries must be handed over to a collection centre for used batteries. Separating disposable packaging materials is ecologically friendly.
- READ INSTRUCTIONS - All safety and operating instructions should be read before the device is operated.
- RETAIN INSTRUCTIONS - The safety and operating instructions should be retained for future reference.
- HEAD WARNINGS - All warnings and cautions on the device and in the manual should be adhered to.
- FOLLOW INSTRUCTIONS - All operating and use instructions should be followed.
- WATER AND MOISTURE - The appliance should not be used near water, e.g. near a bathtub, washbowl, kitchen sink, laundry tub, in a wet basement, or near a swimming pool or the like.
- WALL MOUNTING - Use keyhole brackets on the rear of the device for wall mounting.
- VENTILATION - Openings in the device serve its proper ventilation, are necessary for the operation and prevent overheating. The appliance should be situated so that its location or position does not interfere with its proper ventilation. Do not place on bed, sofa, rug or similar surface that may block the ventilation openings, in a built-in installation, such as a bookcase or cabinet that may impede the flow of air through the ventilation openings.
- HEAT - The appliance should be situated away from heat sources such as radiators, heat registers, stoves or other appliances (including amplifiers) that produce heat.
- POWER SOURCES - The product should be operated only with the type of power supply indicated on the rating label. If you are not sure of the type of power supply to your home, consult your product dealer or local power company. For products intended to operate with battery power or other sources, refer to the manual.
- POWER CORD PROTECTION - Power supply cords should be routed so that they are not likely to be walked on or pinched by items placed upon or against them, paying particular attention to cords at plugs, convenience receptacles, and the point where they exit from the device.
-
PERIODS OF NONUSE - Unplug from mains power supply when left unused for a long period of time.
-
OBJECT AND LIQUID ENTRY - Care should be taken so that objects do not fall and liquids are not spilled into the device.
-
DAMAGE REQUIRING SERVICE - Unplug this product from the wall outlet and take it to qualified service personnel under the following conditions:
a) if power supply cord or plug are damaged;
b) if liquid has been spilled into or objects have fallen into the device;
c) if the device has been exposed to rain or water;
d) if the device does not operate when used according to the manual. Adjust only those controls that are covered by the manual as an improper adjustment of other controls may interfere with the normal operation;
e) if the product has been dropped or damaged in any way:
f) if the product shows a distinct change in performance; this indicates a need for service.
-
SERVICING - The user should not attempt to service the product beyond that described in the manual. All servicing should be referred to qualified service personnel.
-
CLEANING - Unplug this product from the wall outlet before cleaning. Do not use liquid cleaners or aerosol cleaners. Use a damp cloth for cleaning.
-
LIGHTNING - For added protection during a lightning storm or when it is left unattended and unused for long periods of time, unplug device from the wall outlet and disconnect the antenna or cable system. This will prevent damage to the device due to lightning and power surges.
-
SAFETY CHECK - Upon completion of any service or repairs to this device ask the service technician to perform safety checks to determine that it is in proper operating condition.
-
OVERLOAD - Do not overload wall outlets, extension cords or integral convenience receptacles as this can result in fire or electric shock.
-
ELECTROSTATIC DISCHARGE - In case of error message or malfunction, unplug power supply and remove all batteries; afterwards, connect power supply again.
CAUTION
THIS CD PLAYER IS A CLASS I LASER PRODUCT. HOWEVER, THIS CD PLAYER USES A VISIBLE / INVISIBLE LASER BEAM, WHICH COULD CAUSE HAZARDOUS RADIATION EXPOSURE IF DIRECTED. BE SURE TO OPERATE THE CD PLAYER CORRECTLY AS INSTRUCTED.
INVISIBLE LASER RADIATION WILL BE EMITTED WHEN THE PRODUCT IS OPEN AND INTERLOCKS ARE DEFEATED. DO NOT DEFEAT THE SAFETY INTERLOCKS.
GRAPHIC SYMBOLS WITH SUPPLEMENTARY MARKINGS ARE LOCATED ON THE BOTTOM OF THE UNIT.
USE OF CONTROLS, ADJUSTMENTS OR PERFORMANCE OF PROCEDURES HEREIN MAY RESULT IN HAZARDOUS RADIATION EXPOSURE.
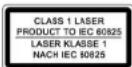
LOCATION OF CONTROLS
text_image
Technical diagram of a computer monitor with numbered components and labeled parts, including front, top, and side views.-
BUZZ / MP3 / RADIO / AUX FUNCTION SELECTOR
-
AM / FM MO / FM ST BAND SELECTOR
-
◀TUNING▶ CONTROL KNOB
-
CD DOOR
-
PLAY / PAUSE BUTTON
-
F.FWD BUTTON
-
REPEAT BUTTON
-
VOL + BUTTON
-
VOL - BUTTON
-
OPEN / CLOSE BUTTON
-
REW. BUTTON
-
STOP BUTTON
-
REMOTE SENSOR
-
FM STEREO INDICATOR
-
LCD DISPLAY
-
STANDBY / ON BUTTON
-
AL.ON / OFF BUTTON
-
PROG. BUTTON
-
AL.SET BUTTON
20 MIN SET BUTTON
-
HOUR SET BUTTON
-
TIME SET BUTTON
23 SPEAKERS
-
AUX INPUT JACK
-
HEADPHONE JACK
-
P. RIGHT SPEAKER JACK
-
I LEFT SPEAKER JACK
-
E LEFT OF BAKER GATOR
-
BATTERY COMPARTMENT
-
BATTERY COI
-
EMANTENNA
-
- POWER:
-
AC POWER SUPPLY CABLE
-
MOUNTING BRACKETS
-
CARD SLOT
-
USB-PORT
-
DOOR
-
CD/CARD/USB
FUNCTION SELECTOR
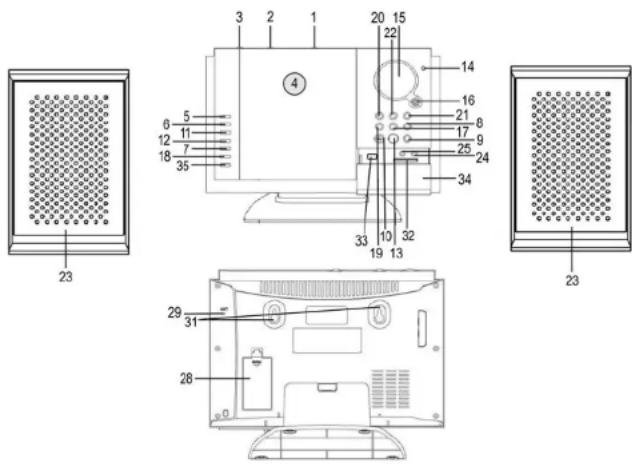
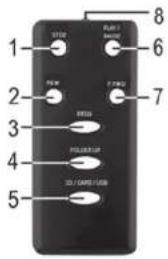
REMOTE CONTROL
- STOP button
- REW button
- PROG button
- FOLDER UP button
- CD / CARD / USB button
- PLAY / PAUSE button
- F.FWD button
- Battery compartment

text_image
1 2 3 4 5 6 7 8 RUN 3 RUS FIRD FROG POLDER UP DD/CMPS/USBCHANGE BATTERIES
- Open the battery cover at the rear of the remote control.
- Insert 2 x AAA batteries while observing the polarity. We recommend the use of alkaline batteries.
- Close the battery compartment properly.
POWER SUPPLY (MAINS 230V \~ 50HZ)
Connect the power supply cable plug to a (230V \~ 50Hy) wall outlet.
Warning:
- Before using the device, check that the local mains power supply is compatible with the HI-FI System (230V - 50Hz).
- Do not plug or unplug the power supply cable with wet hands.
- When planning not to use this unit for long periods of time (i.e. vacation, etc.) disconnect from the wall outlet.
- When disconnecting from the wall outlet, please pull the plug; do not pull the cord in order to avoid electric shock caused by the damaged cable.
BATTERY SAFETY PRECAUTIONS:
- Keep batteries away from children and pets.
- Insert the batteries observing the polarity (+/-). Failure to properly align the battery polarity can cause damage and/or property damage.
- Remove exhausted batteries from the device. Remove the batteries when the device will not be used for extended periods of time to prevent damage due to battery leakage.
- Never throw batteries into the fire. Do not expose batteries to fire or other heat sources.
- Battery disposal: exhausted batteries must be properly disposed of and recycled in compliance with all applicable laws. For detailed information contact your local municipality's waste authority.
- Follow the battery manufacturer's safety, usage and disposal instructions.
BACKUP BATTERY
Two 1.5V "AA" batteries (not included) may be installed as a backup option to maintain the time in case of power failure. In the event of a power outage, the clock will continue to operate and the actual time will be maintained. The LCD display and other functions will resume once electrical power is restored. The backup batteries should be replaced as needed; remove the batteries if the clock is not used or stored for long periods of time.
SET CURRENT TIME
Connect the AC power cord to a wall outlet.
- While pressing and holding the TIME SET button, press the HOUR button to set the desired hour.
- While pressing and holding the TIME SET button, press the MIN button to set the desired minutes.
SET ALARM
-
While pressing and holding the AL.SET button, press the HOUR button to set the desired alarm hour.
-
While pressing and holding the AL.SET button, press the MIN button to set the desired alarm minutes.
- After setting the alarm time, remember to press the AL.ON / OFF button to turn on the alarm function (alarm icon ⏻ will be displayed in the LCD).
NOTE:
- When sliding the function switch to BUZZ position the unit will turn to standby mode.
- When sliding the function switch to BUZZ position, the unit cannot be turned on with the STANDBY / ON button until sliding the switch to CD / RADIO / AUX mode.
WAKE UP TO ALARM BUZZER:
a. Slide the BUZZ / CD / RADIO / AUX function selector to BUZZ position.
b. The alarm buzzer will sound for 3 minutes at the set alarm time.
Note: Press the AL.ON / OFF button to turn off the alarm.
WAKE UP TO CD:
a. Slide the BUZZ / CD / RADIO / AUX function selector to CD position.
b. Open the CD door manually and insert a CD (with the label side facing up) into the CD compartment.
c. Close the CD Door manually.
d. The CD will sound at the set alarm time playing the first track on the CD.
Note: The unit will automatically be turned off after 1 hour.
To deactivate the alarm (CD) manually, press the STOP Button.
WAKE UP TO RADIO:
a. Slide the BUZZ / CD / RADIO / AUX function selector to RADIO position.
b. Slide the AM / FM MO / FM ST Band selector to AM or FM position.
c. Press the STANDBY / ON button to turn the unit on.
d. Tune the radio with the ◀TUNING▶ control knob to a broadcasting station and adjust the volume.
e. Then press the STANDBY / ON button to turn off the unit.
f. The radio will sound at the set alarm time.
Note: The unit will automatically be turned off after 1 hour.
To deactivate the alarm (Radio) manually, press the STANDBY /ON button.
TURN OFF ALARM
To cancel the alarm mode:
Press the AL.ON / OFF button to turn off the alarm function (the alarm icon 📁 in the LCD display turns off).
ADJUST VOLUME
- Press VOL + button to increase the volume.
- Press VOL - button to decrease the volume.
RADIO OPERATION
- Set the BUZZ / CD / RADIO / AUX function selector to RADIO position.
- Set the AM/ FM MO/FM ST band selector to the desired band.
- Press the STANDBY / ON button to switch on the device.
- Rotate the ◀TUNING▶ control knob to the desired radio station.
Note: For better AM reception turn the unit to position the built-in directional antenna; for better FM reception fully extend the FW wire antenna.
Note: The STEREO indicator will light when a program is received in FM Stereo. If the FM reception is noisy, switch the band selector to the FM MO position and the program will be received in mono.
- Press the VOL +/- to adjust to a comfortable listening level.
- To switch off the radio press the STANDBY / ON button.
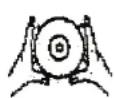
HANDLING COMPACT DISCS
- Always protect a disc against scratches and dust. If a disc is treated with reasonable care, wiping off the disc with a soft cloth should be the only maintenance needed to retain its excellent sound reproduction. Discs should be retained in their original cases during periods of nonuse.
- Handle a disc only by its edges. Do not touch the surface.
- Handle a disc as shown in the illustrations.
- Use a soft cloth to wipe a disc clean. Do not use benzene, thinners or other chemical cleaners as damage may result. A disc should always be wiped in a straight line from its center to its edge. Never wipe a disc in a circular motion.
- Do not expose a disc to direct sunlight, high humidity, or high temperatures for extended periods of time. Do not place the disc on other equipment or near any heat source.
- Dust on the pickup lens can lead to erratic operation and skipping of the sound during playback. To clean the pickup lens, open the disc compartment and blow the dust off. Use a camera lens blower (available at most camera stores).
Note: Do not touch the lens. Do not allow any liquids to enter the product.
• To clean the CD player cabinet use a soft and damp cloth.
• Never use benzene or other strong chemical cleaners, as these could damage the finish.
DO DO NOT


CD PLAYBACK
NOTE: Never touch the laser lens inside the CD compartment. Clean the laser lens with a CD cleaner disc if it becomes dirty.
- Slide the BUZZ / CD / RADIO / AUX function selector to CD position.
- Open the CD compartment manually and insert a CD into the tray with label facing up.
- Press the STANDBY / ON button to turn on the unit, the disc will rotate for a few seconds and then start playback automatically.
- Select the previous or next track with REW. F.FWD
- Press the PLAY / PAUSE button to start playback.
- Press the PLAY / PAUSE button to pause playback, press the PLAY / PAUSE button again to resume playback.
- Press the STOP button to stop playback.
RANDOM PLAYBACK
- Press the REPEAT button once, RAND will be displayed and the CD is played in random order.
SEARCH REVERSE / FORWARD
- Press and hold REW./.FWD buttons to search through the track at high speed. When the desired track section is found, release the button and normal playback will resume
-
Press the REW. once to skip to the beginning of the current track. Press two or more times to skip to the previous tracks on the disc.
-
Press the F.FWD to skip to the next track on the disc.
-
Press and hold the CD Reverse Search (REW) Button, the current track will be scanned and move backwards to the previous track(s); When the desired track section is found, release the button and normal play will resume.
-
Press and hold the CD Forward Search (F.FWD) Button, the current track will be scanned and move forward to the next track(s); When the desired track section is found, release the selected button and normal play will resume.
REPEAT FUNCTION
Press the REPEAT button to repeat a single track or all tracks on a CD.
- Press the REPEAT button once during playback, REP will be displayed. The same track will be repeated.
- Press the REPEAT button a second time to repeat all tracks, ALL REP will be displayed and the whole CD is repeated.
- To cancel repeat mode press the REPEAT button a third time.
PROGRAM FUNCTION
The Program feature is used to program up to 20 tracks to play in a selected order.
- While in stop mode press the PROG. button, PROG 01 flashes in the display.
- Press REW. / F.FWD to select the desired track.
- Press the PROG. button to store the track into memory.
- Repeat step 2 to 3 to select up to 20 tracks.
- To play the selected tracks in the programmed sequence press the PLAY/PAUSE button. Track number and PROG are displayed.
- Press the REW. / F.FWD buttons to listen to the previous or next programmed track. Note: After all programmed tracks have played, the CD player will return to stop mode
- To clear the programmed tracks from memory press STOP twice.
MP3 DISC SECTION
Note: Because MP3 discs have a large capacity, disc access times are a little longer.
- Slide the function switch (BUZZ / CD / RADIO / AUX) to CD position.
- Open the CD DOOR and insert a CD into the tray with the label facing up.
- Close the CD DOOR, the disc will rotate for a few seconds and then play automatically.
- Use the REW / F.FWD buttons to select a track.
- Press the PLAY/PAUSE button to pause playback.
- To stop the album temporarily, press PAUSE button, to resume, press again.
- Press the STOP button to stop playback.
REPEAT PLAYING FUNCTION
Single track repeat
While in playback mode, press the REPEAT button once to repeat the current track. The display shows as REP.
Single folder repeat
In playback mode, press the REPEAT button twice, all tracks in the current album will be repeated, the display shows REP, folder number and track number.
Disc repeat
In playback mode, press the REPEAT button 3 times to play all tracks on the disc repeatedly. The display shows ALL REP.
Random playback
While in playback mode, press the REPEAT button 4 times, RAND appears in the display. Press the PLAY / PAUSE button to begin random playback.
ALBLUM SETTING
Press the FOLDER UP button to select the desired album
Note: this function is only valid for MP3 discs, which contain the songs in different folders. Select tracks to playback from the album.
TRACK SEARCH
Press the REW and F.FWD buttons during playback to skip to the desired previous or next track.
FORWARD / REVERSE SEARCH
Press and hold REW. / F.FWD during playback to scan the track which is being played at high speed. When the desired section of the current track if found, release the button and normal playback will resume.
Press and hold the F.FWD button while playing to scan the current track forward at high speed. Press and hold the REW, while playing to scan the current track backward at high speed.
PROGRAM PLAYBACK
The tracks on the disc can be programmed to play in any order (up to 10 tracks can be programmed).
Note: this can only be done in stop mode.
Press the PROG. button while in the stop mode, PROG 01 flashes in the display. Press FOLDER UP to select the desired album, and press REW. / F.FWD to select the desired tracks in the album, then press PROG. to store in memory. The first track number is now stored and the program number changes to PROG 02, waiting for your next selection. Repeat above steps to program additional tracks. After programming is finished, press the PLAY / PAUSE button to start playback from the first programmed track. The player stops automatically after all programmed tracks have been played.
AUX INPUT JACK
- Press the STANDBY / ON button to turn on the unit.
- Connect the AUX cable from the output jack of your media player such as portable MP3 player to the AUX input jack.
- Slide the BUZZ / CD / RADIO / AUX function selector to AUX.
- Playback starts from your media player.
HEADPHONE JACK
Your device is equipped with a headphone jack for private listening. Simply plug any 3.5mm stereo headphone into the headphone jack. With the headphone connected the speakers will be automatically muted.
TECHNICAL DATA
Frequency range: AM 525 - 1615 kHz
FM 87.5 - 108 MHz
Back-up battery for clock: 2 x 1.5V AA batteries (not included)
Remote control: 2 x 1.5V AAA batteries (not included)
Power supply: 230V \~ 50Hz
Net weight: ca. 2.7 kg
This device has been tested according to all relevant current CE guidelines, such as electromagnetic compatibility and low voltage directives, and has been constructed in accordance with the latest safety regulations.
Subject to technical changes without prior notice!
MC 4421 CD/MP3
SYSTÈME MUSIQUE DESIGN AVEC LECTEUR CD/MP3 VERTICAL
MANUELD'UTILISATION
text_image
Technical diagram of a computer monitor with labeled parts and exploded views, showing front, top, and side views with numbered annotations.- SELETTORE FUNZIONE
2 SELETTORE BANDA AM/ FM MO / FM ST.
3 MANOPOLA CONTROLLO ◀TUNING▶
4 PORTACD
5 PULSANTE PLAY/PAUSE
6 PULSANTE FWD
- PULSANTE REPEAT
8 PULSANTE VOL
9 PULSANTE VOL
- PULSANTE OPEN / CLOSE
11 PULSANTE REW
12 PULSANTE STOP
13 REMOTE SENSOR
14 INDICATORE FM STEREO
15 DISPLAY LCD
16 PULSANTE STANDBY / ON
17 PULSANTE AL.ON / OFF
18 PULSANTE PROG.
19 PULSANTE AL.SET
GESTIONE DEI COMPACT DISC
text_image
1 STG PUSH POWER 8 6 2 FEN FIREP 7 3 BROS 4 POLESHIP 5 2D CHS/FLAMECAMBIAR BATERÍAS
MANUAL DE INSTRUÇÕES
text_image
Technical diagram of a computer monitor with numbered components and labeled parts, including front, top, and side views.text_image
Technical diagram of a computer monitor with numbered components and labeled parts, including front, top, and side views.- BUZZ / CD / RADIO / AUX
SELEKTOR FUNKCJI - AM / FM MO / FM ST, SELEKTOR PASMA
- ◀TUNING▶ REGULATOR KONTROLNY
- DRZWICZKI CD
- PRZYCISK PLAY / PAUSE
- PRZYCISK F.FWD
- PRZYCISK REPEAT
- PRZYCISK VOL +
- PRZYCISK VOL -
- PRZYCISK OPEN / CLOSE
- PRZYCISK REW
- PRZYCISK STOP
13 REMOTE SENSOR - WSKAŻNIK EM STEREO
- EKRAN LCD
- PRZYCISK STANDBY / ON
-
PRZYCISK AL.ON / OFF
-
PRZYCISK PROG.
19 PRZYCISK AI SET - PRZYCISK USTAWIEN MIN
- PRZYCISK USTAWIEN HOUR
- PRZYCISK USTAWIEN TIME SET
- GŁOŚNIKI
- GNIAZDO WEJŚCIOWE AUX
- GNIAZDO SŁUCHAWEK PHONES
- R SPEAKER GNIAZDO PRAWEGO GŁOŚNIKA
- I SPEAKER GNIAZDO LEWEGO GŁOŚNIKA
28 KOMORA BATERII - ANTENA FM
- KABEL ZASILAJACYAC
- WSPORNIKI MONTAŻOWE
32 CARD - USB
- DRZWICZKI
- SELEKTOR FUNKCJI CD / CARD / USB
PILOT
- Przycisk STOP
- Przycisk REW
- Przycisk PROG
- Przycisk FOLDER UP
- Przycisk CD / CARD / USB
- Przycisk PLAY / PAUSE
- Przycisk F.FWD
- Komora baterii
text_image
1 2 3 4 5 6 7 8 RUB 7 RUB 6 PUM 7 PUM 6 PUM 5 LED/SPRING-USBWYMIANA BATERII
text_image
Technical diagram of a computer monitor with numbered components and labeled parts, including front, top, and side views.- BUZZ / CD / RADIO / AUX İŞLEV SEÇİSİ
- FM ST./FM MO/AM BANT SEÇİSİ
- ◀TUNING▶ AYAR DÜĞMESİ
- CD KAPAĞI
- PLAY / PAUSE TUŞU
- F.FWD TUŞU
- REPEAT TUSU
- VOL + TUŞU
- VOL - TUŞU
- OPEN / CLOSE TUŞU
- REWUSU
- STOP TUSU
- REMOTE SENSOR
- FM STEREO GÖSTERGESI
- LCD EKRANI
- STANDBY / ON TUŞU
-
AL.ON / OFF TUŞU
-
PROG. TUŞU
- AL.SET TUŞU
- MIN AYAR TUŞU
- HOUR AYAR TUŞU
- TIME SET TUŞU
- HOPARLÖR
- AUX GİRİŞ YUVASI
- KULAKLIK GİRİŞ
- R SPEAKER SAG HOPARLÖR GİRİŞİ
- L SPEAKER SOL HOPARLÖR GİRİŞİ
- PIL BÖLMESİ
- FM ANTENI
- AC ELEKTRİK KABLOSU
- KURULUM SABLONU
- CARD
- USB
- KAPAGI
- CD/CARD/USB
UZAKTAN KUMANDA
DOĞRU SAATİ AYARLAMA
DOPLŇUJÍCÍ INFORMACE

MANUAL CU INSTRUCTIUNI
text_image
ATENTIER RISO DE ELECTROCUTARE NU DESCHIDETI ATENTIE: IN VEDEREA REDUCERII RISCULUI DE ELECTROCUTARE, VA RUGAV SA NU SIODATETI CAPACUL (SAU CARGASA DORSAL), NU EXISTA PARTI SCHIMBRABLE IN INTERIOR, PENTRU REPARATI, ADRESATIVA PERSONALUIUII DEL SPECIALITATE, AUTORIZAT ATENTIER SU DESCHIDETIINFORMATII SUPLIMENTARE

REPETAREA UNEI FUNCTIUNI
text_image
Technical diagram of a computer monitor with numbered components and labeled parts, including front, top, side, and interior views.(please) for the information.