SDMHX95 - Monitor SONY - Free user manual and instructions
Find the device manual for free SDMHX95 SONY in PDF.

User questions about SDMHX95 SONY
0 question about this device. Answer the ones you know or ask your own.
Ask a new question about this device
Download the instructions for your Monitor in PDF format for free! Find your manual SDMHX95 - SONY and take your electronic device back in hand. On this page are published all the documents necessary for the use of your device. SDMHX95 by SONY.
USER MANUAL SDMHX95 SONY
This display is designed for use in Japan only and cannot be used in any other country.
主女仕樣
The model and serial numbers are located at the rear of the unit. Record these numbers in the spaces provided below. Refer to them whenever you call upon your dealer regarding this product. Model No. Serial No.
WARNING
To reduce the risk of fire or electric shock, do not expose this apparatus to rain or moisture.
Dangerously high voltages are present inside the unit. Do not open the cabinet. Refer servicing to qualified personnel only.
FCC Notice
This equipment has been tested and found to comply with the limits for a Class B digital device, pursuant to Part 15 of the FCC Rules. These limits are designed to provide reasonable protection against harmful interference in a residential installation. This equipment generates, uses, and can radiate radio frequency energy and, if not installed and used in accordance with the instructions, may cause harmful interference to radio communications. However, there is no guarantee that interference will not occur in a particular installation. If this equipment does cause harmful interference to radio or television reception, which can be determined by turning the equipment off and on, the user is encouraged to try to correct the interference by one or more of the following measures:
- Reorient or relocate the receiving antenna.
- Increase the separation between the equipment and receiver.
- Connect the equipment into an outlet on a circuit different from that to which the receiver is connected.
- Consult the dealer or an experienced radio/TV technician for help. You are cautioned that any changes or modifications not expressly approved in this manual could void your authority to operate this equipment.
IMPORTANT
If you have any questions about this product, you may call; Sony Customer Information Services Center 1-800-222-7669 or http://www.sony.com/
Declaration of Conformity
Trade Name:SONY
Model: SDM-HX75/HX95
Responsible Party: Sony Electronics Inc.
Address: 16530 Via Esprillo, San Diego, CA 92127 U.S.A.
Telephone Number: 858-942-2230
This device complies with part 15 of the FCC rules. Operation is subject to the following two conditions: (1) This device may not cause harmful interference, and (2) this device must accept any interference received, including interference that may cause undesired operation.
NOTICE
This notice is applicable for USA/Canada only.
If shipped to USA/Canada, install only a UL LISTED/CSA
LABELLED power supply cord meeting the following specifications:
SPECIFICATIONS
Plug Type Nema-Plug 5-15p
Cord Type SVT or SJT, minimum 3 × 18 AWG
Length Maximum 15 feet
Rating Minimum 7 A, 125 V
NOTICE
As an ENERGY STAR Partner, Sony Corporation has determined that this product meets the ENERGY STAR guidelines for energy efficiency.
(SDM-HX75 only)
Table of Contents
Precautions 4
Identifying parts and controls 5
Setup 7
Setup 1: Connect the video signal cables. 7
Setup 2: Connect the audio cord 8
Setup 3: Connect the power cord 8
Setup 4: Bundle the cords and cables 9
Setup 5: Turn on the monitor and computer 9
Setup 6: Adjust the tilt and swivel 10
Selecting the input signal (INPUT button) 11
Customizing Your Monitor 12
Navigating the menu 12
TURE/AUDIO menu 13
MODE menu 13
PICTURE menu 13
Adjusting the BACKLIGHT 13
Adjusting the CONTRAST 13
Adjusting the BRIGHTNESS 14
Adjusting the GAMMA 14
Adjusting the COLOR 14
Adjusting the SHARPNESS 15
AUDIO menu 15
Adjusting TREBLE, BASS or BALANCE 15
Adjusting SURROUND 15
MODE RESET menu
(resetting every mode to the default) 15
SCREEN menu (analog RGB signal only) 16
MENUPPOSITIONmenu 17
INPUT SENSING ON/OFF menu 17
LANGUAGE menu 18
RESET menu (reset to the default setting) 18
ON MENU LOCK menu 18
Technical Features 19
Controlling the volume 19
Power saving function 19
Setting the MODE (PICTURE/AUDIO) (mode) 20
Automatic brightness adjustment function (light sensor) 20
Automatic picture quality adjustment function
(analog RGB signal only) 20
Troubleshooting 21
On-screen messages 21
Trouble symptoms and remedies 22
Specifications 24
Precautions
Warning on power connections
- Use the supplied power cord. If you use a different power cord, be sure that it is compatible with your local power supply.
For the customers in the U.S.A.
If you do not use the appropriate cord, this monitor will not conform to mandatory FCC standards.
For the customers in the UK
If you use the monitor in the UK, be sure to use the appropriate UK power cord.
Example of plug types
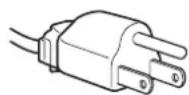
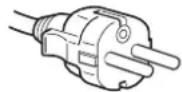
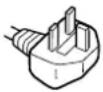
for 100 to 120V AC for 200 to 240V AC for 240V AC only
The equipment should be installed near an easily accessible outlet.
Installation
Do not install or leave the monitor:
- In places subject to extreme temperatures, for example near a radiator, heating vent, or in direct sunlight. Subjecting the monitor to extreme temperatures, such as in an automobile parked in direct sunlight or near a heating vent, could cause deformations of the casing or malfunctions.
- In places subject to mechanical vibration or shock.
- Near any equipment that generates a strong magnetic field, such as a TV or various other household appliances.
- In places subject to inordinate amounts of dust, dirt, or sand, for example near an open window or an outdoor exit. If setting up temporarily in an outdoor environment, be sure to take adequate precautions against airborne dust and dirt. Otherwise irreparable malfunctions could occur.
Handling the LCD screen
- Do not leave the LCD screen facing the sun as it can damage the LCD screen. Take care when you place the monitor by a window.
- Do not push on or scratch the LCD screen. Do not place a heavy object on the LCD screen. This may cause the screen to lose uniformity or cause LCD panel malfunctions.
- If the monitor is used in a cold place, a residual image may appear on the screen. This is not a malfunction. The screen returns to normal as the temperature rises to a normal operating level.
- If a still picture is displayed for a long time, a residual image may appear for a while. The residual image will eventually disappear.
- The LCD panel becomes warm during operation. This is not a malfunction.
About the built-in stereo speakers
Be sure to keep magnetic recording equipment, tapes, and floppy discs away from the speaker's opening as the speakers generate a magnetic field. This magnetic field may affect data stored on magnetic tapes and discs.
Note on the LCD (Liquid Crystal Display)
Please note that the LCD screen is made with high-precision technology. However, black points or bright points of light (red, blue, or green) may appear constantly on the LCD screen, and irregular colored stripes or brightness may appear on the LCD screen. This is not malfunction.
(Effective dots: more than 99.99% )
Maintenance
- Be sure to unplug the power cord from the power outlet before cleaning your monitor.
- Clean the LCD screen with a soft cloth. If you use a glass cleaning liquid, do not use any type of cleaner containing an anti-static solution or similar additive as this may scratch the LCD screen's coating.
- Clean the cabinet, panel, and controls with a soft cloth lightly moistened with a mild detergent solution. Do not use any type of abrasive pad, scouring powder, or solvent, such as alcohol or benzine.
- Do not rub, touch, or tap the surface of the screen with sharp or abrasive items such as a ballpoint pen or screwdriver. This type of contact may result in a scratched picture tube.
- Note that material deterioration or LCD screen coating degradation may occur if the monitor is exposed to volatile solvents such as insecticide, or if prolonged contact is maintained with rubber or vinyl materials.
Transportation
- Disconnect all cables from the monitor, and grasp both side of the LCD display firmly taking care not to scratch the screen when transporting. If you drop the monitor, you may be injured or the monitor may be damaged.
- When you transport this monitor for repair or shipment, use the original carton and packing materials.
Disposal of the monitor
- Do not dispose of this monitor with general household waste.
- The fluorescent tube used in this monitor contains mercury. Disposal of this monitor must be carried out in accordance to the regulations of your local sanitation authority.
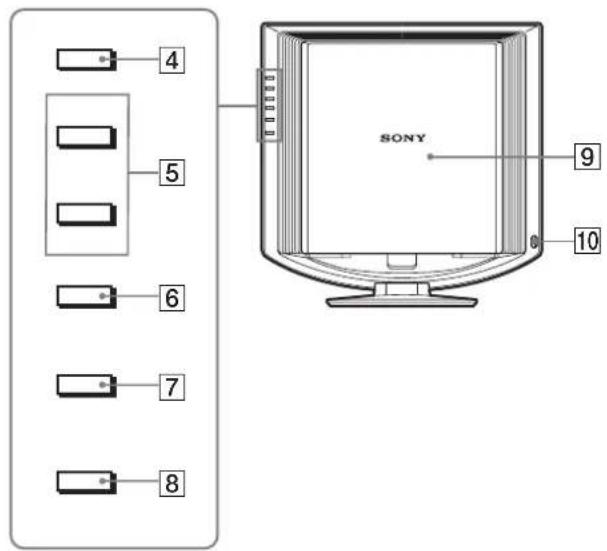
Identifying parts and controls
See the pages in parentheses for further details.
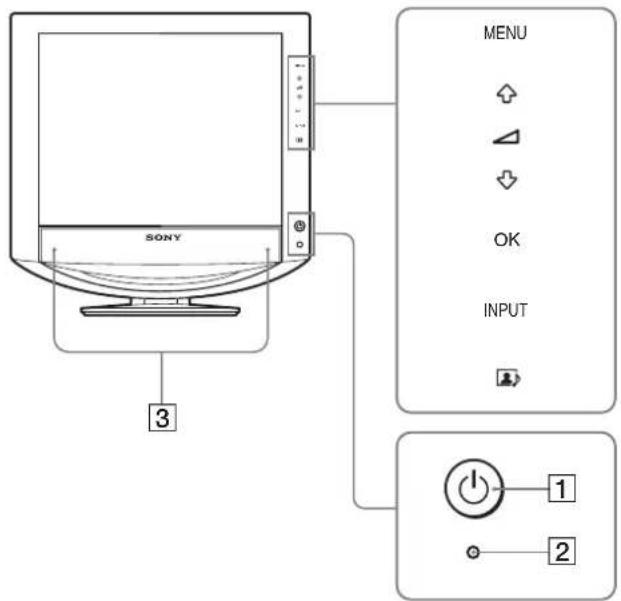
Front of the LCD display
Side view of the LCD display
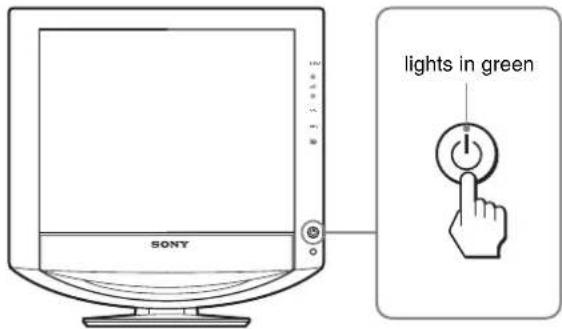
1 (Power) switch and (power) indicator (pages 9, 19)
To turn the display on or off, press the (power) switch. The power indicator lights up in green when the display is turned on, and lights up in orange when the display is in the power saving mode.
Light sensor (page 20)
This sensor measures the brightness of the surrounding area. Be sure not to cover the sensor with papers, etc.
3Stereo speakers (page 19)
These speakers output the audio signals as sound.
4 MENU button (page 12)
This button turns the menu screen on and off.
5 / and (volume control) buttons (pages 12, 19)
These buttons are used to select the menu items and make adjustments, and also display the "Volume" menu to control the volume.
OK button (page 12)
This button activates the selected menu item and adjustments made using the / buttons (5).
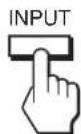
7INPUT button (page 11)
This button switches the video input signal between INPUT1, INPUT2 and INPUT3 when two computers are connected to the monitor.
8 1ton (page 20)
This button changes the MODE (PICTURE/AUDIO).
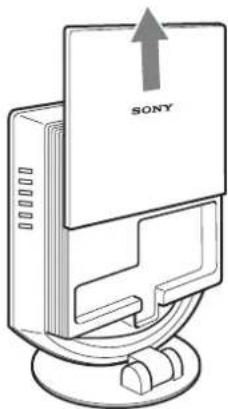
9Back cover (page 7)
Slide up this cover when you connect cables or cords.
10 Headphones jack (page 19)
This jack outputs audio signals to the headphones.

Rear of the LCD display
11AC IN connector (page 8)
This connector connects the power cord (supplied).
12Security Lock Hole
The security lock hole should be used with the Kensington Micro Saver Security System.
Micro Saver Security System is a trademark of Kensington.
Audio input jack for INPUT1 (page 8)
This jack inputs audio signals when connected to the audio output jack of a computer or other audio equipment connected to INPUT1.
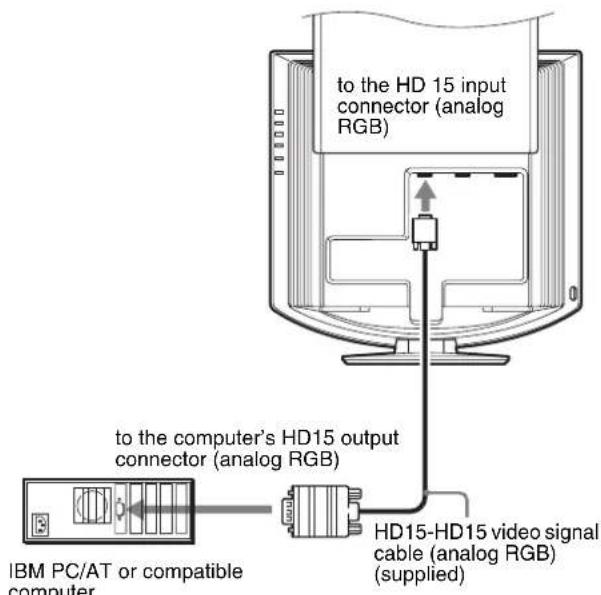
14HD15 input connector (analog RGB) for INPUT1 (page 7)
This connector inputs analog RGB video signals (0.700 Vp-p, positive) and sync signals.
15 Audio input jack for INPUT2 (page 8)
This jack inputs audio signals when connected to the audio output jack of a computer or other audio equipment connected to INPUT2.
16HD15 input connector (analog RGB) for INPUT2 (page 7)
This connector inputs analog RGB video signals (0.700 Vp-p, positive) and sync signals.
Audio input jack for INPUT3 (page 8)
This jack inputs audio signals when connected to the audio output jack of a computer or other audio equipment connected to INPUT3.
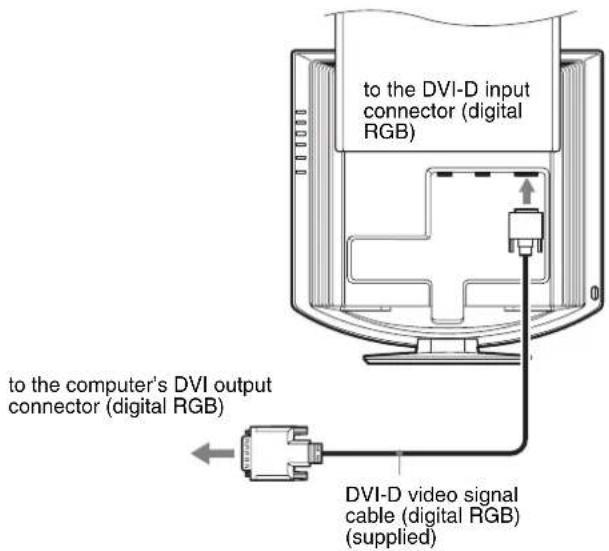
18DVI-D input connector (digital RGB) for INPUT3 (page 7)
This connector inputs digital RGB video signals that comply with DVI Rev.1.0.
19Cable holder (page 9)
This part secures cables and cords to the monitor.
Setup
Before using your monitor, check that the following items are included in your carton:
- LCD display
Power cord
HD15-HD15 video signal cable (analog RGB)
DVI-D video signal cable (digital RGB)
Audio cord (stereo miniplug) - CD-ROM (utility software for Windows/Macintosh, Operating Instructions, etc)
Warranty card - Quick Setup Guide
Setup 1:Connect the video signal cables
- Turn off the monitor and computer before connecting them.
- When connecting the computer to the monitor's HD15 input connector (analog RGB), refer to "Connect a computer equipped with an HD15 output connector (analog RGB)."
Note
Do not touch the pins of the video signal cable connector as this might bend the pins.
Slide up the back cover.
Connect a computer equipped with a DVI output connector (digital RGB)
Using the supplied DVI-D video signal cable (digital RGB), connect the computer to the monitor's DVI-D input connector (digital RGB) for INPUT3.
GB
Connect a computer equipped with an HD15 output connector (analog RGB)
Using the supplied HD15-HD15 video signal cable (analog RGB), connect the computer to the monitor's HD 15 input connector (analog RGB) for INPUT1 or INPUT2.
Connect the computer according to the following illustrations.
- Connecting to an IBM PC/AT or compatible computer
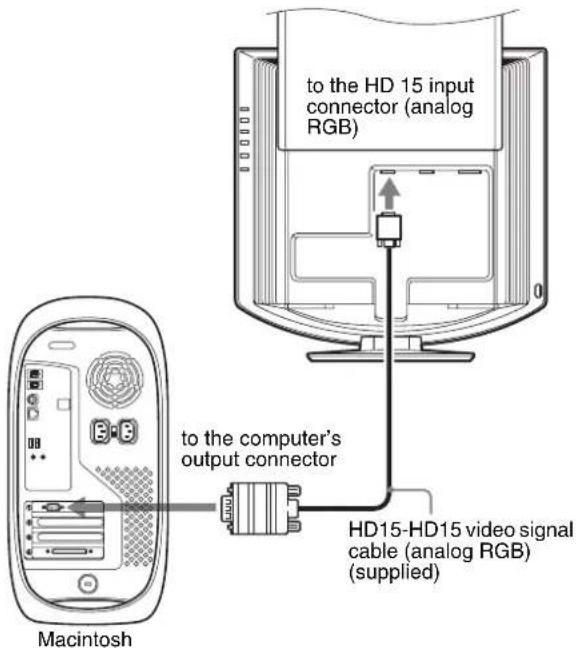
Connecting to a Macintosh
When connecting a Macintosh computer, use an adapter (not supplied), if necessary. Connect the adapter to the computer before connecting the video signal cable.
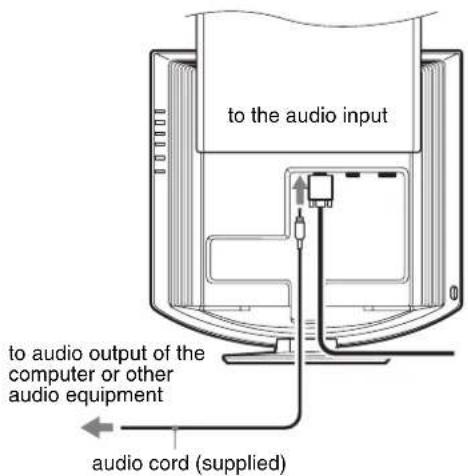
Setup 2:Connect the audio cord
Connect the supplied audio cord to the monitor's corresponding audio input jack.
Using the monitor's speakers or headphones, you can listen to sound from your computer or other audio equipment connected to the monitor's audio input jacks. For more information, see "Controlling the volume" on page 19.
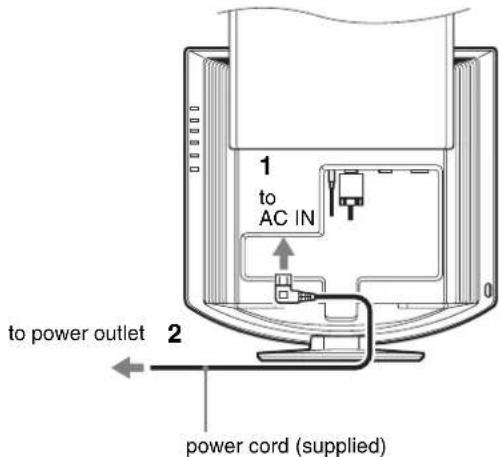
Setup 3:Connect the power cord
1 Connect the supplied power cord securely to the monitor's AC IN connector.
2 Connect the other end securely to a power outlet.
Setup 4: Bundle the cords and cables
1 Slide up the back cover.
2 Secure the video signal cable, audio cords and the power cord using the cable holder on the cabinet.
3 Slide down the back cover.

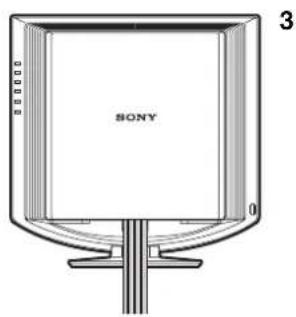
Setup 5:Turn on the monitor and computer
1 Press the (power) switch on the front of the monitor.
The (power) indicator lights up in green.
2 Turn on the computer.
3 Press the INPUT button to select the desired input signal.
The selected input's picture appears on the screen.
For more information, see "Selecting the input signal (INPUT button)" on page 11.
The installation of your monitor is complete. If necessary, use the monitor's controls to adjust the picture (page 12).
If no picture appears on your screen
- Check that the power cord and the video signal cable are properly connected.
- If "NO INPUT SIGNAL" appears on the screen:
The computer is in the power saving mode. Try pressing any key on the keyboard or moving the mouse.
- Check that the input signal setting is correct by pressing the INPUT button (page 11).
-
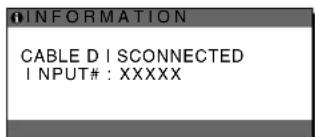
If "CABLE DISCONNECTED" appears on the screen:
-
Check that the video signal cable is properly connected.
-
Check that the input signal setting is correct by pressing the INPUT button (page 11).
-
If "OUT OF RANGE" appears on the screen, reconnect the old monitor. Then adjust the computer's graphics board within the following ranges.
| Analog RGB Digital RGB | |
| Horizontal frequency | 28-80 kHz 28-64 kHz |
| Vertical frequency | 48-75 Hz 60 Hz |
| Resolution | 1280 x 1024 or less 1280 x 1024 or less |
For more information about on-screen messages, see "Trouble symptoms and remedies" on page 22.
No need for specific drivers
The monitor complies with the "DDC" Plug & Play standard and automatically detects all the monitor's information. No specific driver needs to be installed on the computer.
The first time you turn on your computer after connecting the monitor, the setup Wizard may appear on the screen. In this case, follow the on-screen instructions. The Plug & Play monitor is automatically selected so that you can use this monitor.
The vertical frequency is set to 60Hz
Since flickers are unobtrusive on the monitor, you can use it as it is. You do not need to set the vertical frequency to any particular high value.
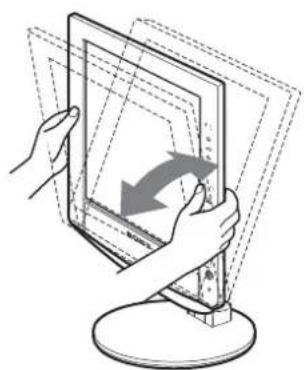
Setup 6:Adjust the tilt and swivel
This monitor can be adjusted within the angles shown below.
Grasp the sides of the LCD panel, then adjust screen angles.
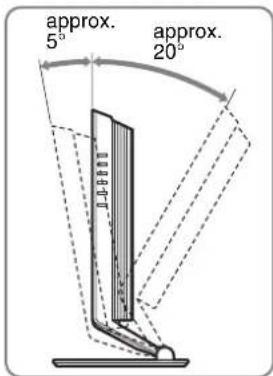
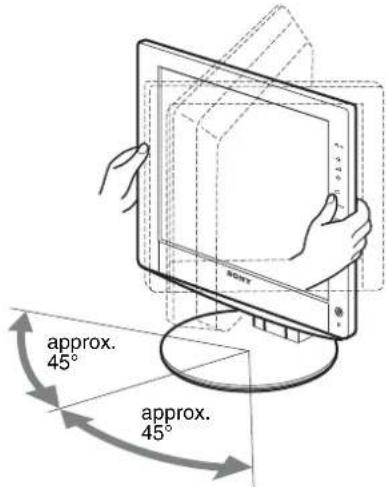
To use the monitor comfortably
Adjust the viewing angle of your monitor according to the height of your desk and chair, and so that light is not reflected from the screen to your eyes.
Note
When adjusting the screen tilt and height, proceed slowly and carefully, being sure not to hit the monitor against the desk.
Selecting the input signal
(INPUT button)
Press the INPUT button.
The input signal change each time you press this button.

INPUT
| On-screen message | Input signal configuration |
| (Appears about 5 seconds on the upper left corner.) | |
| INPUT1: HD15 HD15 input connector (analog RGB) for INPUT1 | |
| INPUT2: HD15 HD15 input connector (analog RGB) for INPUT2 | |
| INPUT3: DVI-D DVI-D input connector (digital RGB) for INPUT3 | |
Customizing Your Monitor
Before making adjustments
Connect the monitor and the computer, and turn them on. For the best results, wait for at least 30 minutes before making adjustments.
You can make numerous adjustments to your monitor using the on-screen menu.
Navigating the menu
1 Display the main menu.
Press the MENU button to display the main menu on your screen.
2 Select the menu.
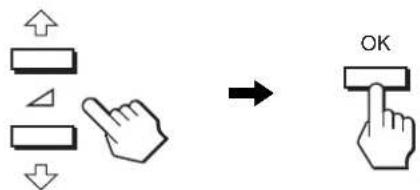
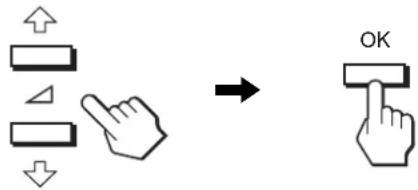
Press the / buttons to display the desired menu. Press the OK button to move to the first menu item.
3 Select the item you want to adjust.
Press the / buttons to select the item you want to adjust, then press the OK button.
If 1s one of the menu items.
When you select and press the OK button, the display returns to the previous menu.
4 Adjust the item.
Press the / buttons to make the adjustment, then press the OK button.
When you press the OK button, the setting is stored, then the display returns to the previous menu.
5 Close the menu.
Press the MENU button once to return to normal viewing. If no buttons are pressed, the menu closes automatically after about 45 seconds.

Resetting the adjustments to the default settings
You can reset the adjustments using RESET menu. For more information about resetting the adjustments, see 一 (RESET) on page 18.

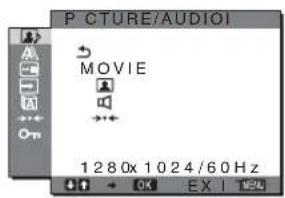
PICTURE/AUDIO menu
You can adjust the following items using PICTURE/AUDIO menu.
- MODE
(GAME/MOVIE/PC/AUTO)
PICTRE - AUDIO
- MODE RESET
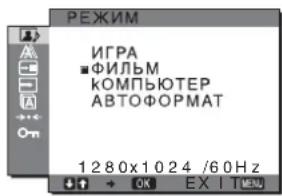
MODE menu
You can select the appropriate screen brightness for your purpose. The PICTURE/AUDIO settings can be set for each mode.
Furthermore, you can change the mode for each input (INPUT1/INPUT2/INPUT3).
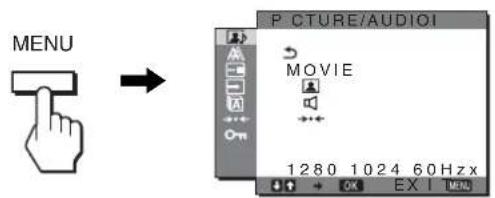
1 Press the MENU button.
The main menu appears on the screen.
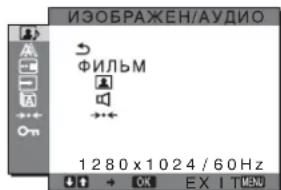
2 Press the / button to select (PICTURE/ AUDIO) and press the OK button.
The PICTURE/AUDIO menu appears on the screen.
3 Press the / button to select "MOVIE" and press the OK button.
The MODE menu appears on the screen.
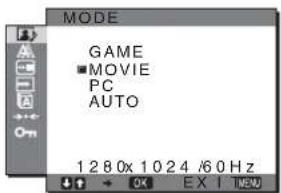
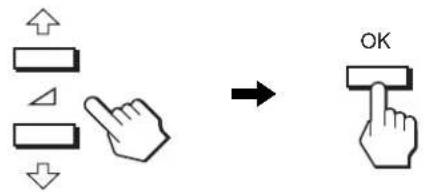
4 Press the / button to select the desired mode and press the OK button.
The default setting is MOVIE.
GAME: Bright picture.
MOVIE: Clear picture with strong contrast.
- PC: Soft tone picture.
- AUTO: Automatically adjusts the screen brightness according to the brightness of the surroundings (automatic brightness adjustment function). For more information, see "Automatic brightness adjustment function (light sensor)" (page 20).
NOTE
In the AUTO mode, you cannot adjust the backlight.
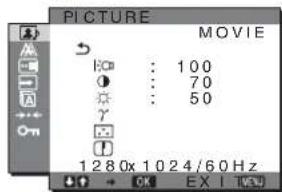
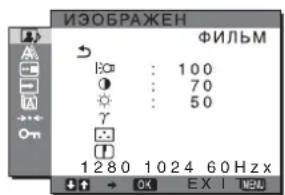
PICTURE menu
You can adjust the following items using the PICTURE menu.
- BACKLIGHT
- CONTRAST
BRIGHTNESS
GAMMA menu
-COLOR menu
SHARPNESS
Adjusting the BACKLIGHT
If the screen is too bright, adjust the backlight to make the screen easier to see.
1 Press the MENU button.
The main menu appears on the screen.
2 Press the / button to select (PICTURE/ AUDIO) and press the OK button.
The PICTURE/AUDIO menu appears on the screen.
3 Press the / buttons to select (PICTURE) and press the OK button.
The PICTURE menu appears on the screen.
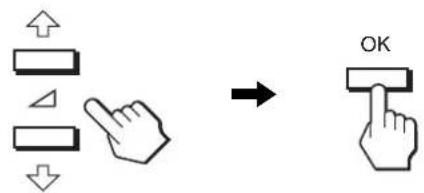
4 Press the / buttons to select "I:O BACKLIGHT" and press the OK button.
The "BACKLIGHT" menu appears on the screen.
5 Press the / buttons to adjust the light level and press the OK button.
Adjusting the CONTRAST
Adjust the picture contrast.
1 Press the MENU button.
The main menu appears on the screen.
2 Press the / button to select (PICTURE/ AUDIO) and press the OK button.
The PICTURE/AUDIO menu appears on the screen.
3 Press the / buttons to select (PICTURE) and press the OK button.
The PICTURE menu appears on the screen.
4 Press the / buttons to select "CONTRAST" and press the OK button.
The "CONTRAST" menu appears on the screen.
5 Press the / buttons to adjust the contrast and press the OK button.
Adjusting the BRIGHTNESS Adjust the picture brightness (black level).
1 Press the MENU button. The main menu appears on the screen.
2 Press the / button to select (PICTURE/ AUDIO) and press the OK button. The PICTURE/AUDIO menu appears on the screen.
3 Press the / buttons to select (PICTURE) and press the OK button. The PICTURE menu appears on the screen.
4 Press the / buttons to select "BRIGHTNESS" and press the OK button. The "BRIGHTNESS" menu appears on the screen.
5 Press the / buttons to adjust the brightness and press the OK button.
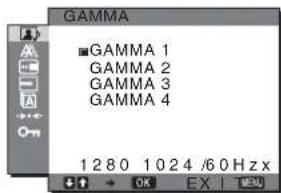
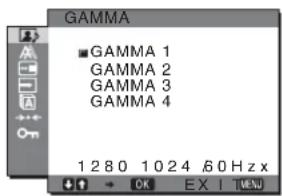
Adjusting the GAMMA You can associate the picture's color shade on the screen with the picture's original color shade.
1 Press the MENU button. The main menu appears on the screen.
2 Press the / button to select (PICTURE/ AUDIO) and press the OK button. The PICTURE/AUDIO menu appears on the screen.
3 Press the / buttons to select (PICTURE) and press the OK button. The PICTURE menu appears on the screen.
4 Press the / buttons to select "γ (GAMMA)" and press the OK button. The GAMMA menu appears on the screen.
5 Press the / buttons to select the desired mode and press the OK button.
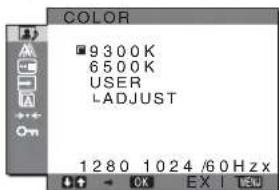
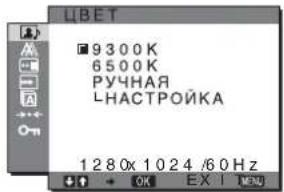
Adjusting the COLOR
You can select the picture's color level for the white color field from the default color temperature settings.
Also, if necessary, you can fine tune the color temperature.
1 Press the MENU button. The main menu appears on the screen.
2 Press the / button to select (PICTURE/ AUDIO) and press the OK button. The PICTURE/AUDIO menu appears on the screen.
3 Press the / buttons to select (PICTURE) and press the OK button. The PICTURE menu appears on the screen.
4 Press the / buttons to select "Color" and press the OK button. The COLOR menu appears on the screen.
5 Press the / buttons to select the desired color temperature and press the OK button. White balance changes from bluish to reddish as the color temperature is adjusted from 9300K to 6500K.
Fine tuning the color temperature The color temperature can be set for each mode (GAME/MOVIE/PC/AUTO).
1 Press the MENU button. The main menu appears on the screen.
2 Press the / button to select (PICTURE/ AUDIO) and press the OK button. The PICTURE/AUDIO menu appears on the screen.
3 Press the / buttons to select (PICTURE) and press the OK button. The PICTURE menu appears on the screen.
4 Press the / buttons to select "Color" and press the OK button. The COLOR menu appears on the screen.
5 Press the / buttons to select "ADJUST" and press the OK button. The fine tuning menu for color temperature appears on the screen.
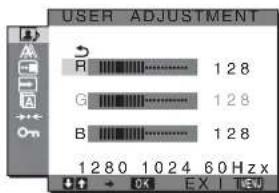
6 Press the / buttons to select R (Red) or B (Blue) and press the OK button. Then press the / buttons to adjust the color temperature and press the OK button. Since this adjustment changes the color temperature by increasing or decreasing the R and B components with respect to G (green), the G component is fixed.
7 Press the / buttons to select, then press the OK button. The new color setting is stored in memory and automatically recalled whenever "User" is selected. The COLOR menu appears on the screen.
Adjusting the SHARPNESS
Adjust to sharpen the edge of images, etc.
1 Press the MENU button.
The main menu appears on the screen.
2 Press the / button to select (PICTURE/ AUDIO) and press the OK button.
The PICTURE/AUDIO menu appears on the screen.
3 Press the / buttons to select (PICTURE) and press the OK button.
The PICTURE menu appears on the screen.
4 Press the / buttons to select "SHARPNESS" and press the OK button.
The "SHARPNESS" menu appears on the screen.
5 Press the / buttons to adjust the sharpness and press the OK button.
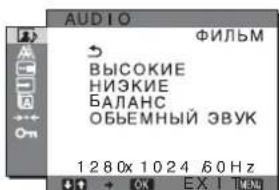
■ AUDIO menu
You can adjust the following items using the AUDIO menu.
Adjusting TREBLE, BASS or BALANCE
1 Press the MENU button.
The main menu appears on the screen.
2 Press the / button to select (PICTURE/ AUDIO) and press the OK button.
The PICTURE/AUDIO menu appears on the screen.
3 Press the / buttons to select (AUDIO) and press the OK button.
4 Press the / buttons to select TREBLE, BASS or BALANCE, and press the OK button.
5 Press the / buttons to select the desired mode and press the OK button.
Adjusting SURROUND
1 Press the MENU button.
The main menu appears on the screen.
2 Press the / button to select (PICTURE/ AUDIO) and press the OK button.
The PICTURE/AUDIO menu appears on the screen.
3 Press the / buttons to select (AUDIO) and press the OK button.
4 Press the / buttons to select SURROUND and press the OK button.
5 Press the / buttons to select the desired mode and press the OK button.
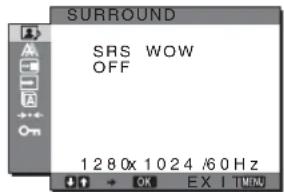
- SRS WOW: Deep rich bass tone and clear high tone creates a rich surround sound experience, and movies and games, especially, can be enjoyed with powerful sound.
OFF: Turns off the SRS WOW effect.
Adopting the latest technology developed by SRS Labs, Inc., SRS WOW significantly improves the sound quality of various audio sources.
MODE RESET menu (resetting every mode to the default) · · ·
You can reset the adjustments to the default settings.
1 Press the MENU button.
The main menu appears on the screen.
2 Press the / button to select (PICTURE/ AUDIO) and press the OK button.
The PICTURE/AUDIO menu appears on the screen.
3 Press the / buttons to select “ RESET” and press the OK button.
The "RESET" menu appears on the screen.
4 Press the / buttons to select the desired mode and press the OK button.
- OK: To reset every mode in the PICTURE/AUDIO menu to the default settings.
- CANCEL: To cancel resetting and return to the PICTURE/AUDIO menu.
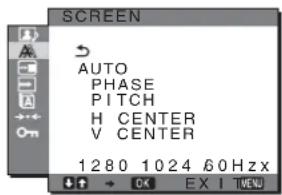
SCREEN menu (analog RGB signal only)
You can adjust the following items using the SCREEN menu.
- AUTO
PHASE
PI T C H
HCENTER
V C E N T E R
Note
When receiving digital RGB signals from the DVI-D input connector for INPUT3, adjustment is unnecessary.
Automatic picture quality adjustment function
When the monitor receives an input signal, it automatically adjusts the picture's position and sharpness (phase/pitch), and ensures that a clear picture appears on the screen (page 20).
Note
While the automatic picture quality adjustment function is activated, only the (power) switch will operate.
If the automatic picture quality adjustment function of this monitor seems to not completely adjust the picture
You can make further automatic adjustment of the picture quality for the current input signal (See "AUTO" below).
If you still need to make further adjustments to the picture quality
You can manually adjust the picture's sharpness (phase/pitch) and position (horizontal/vertical position).
These adjustments are stored in memory and automatically recalled when the monitor receives a previously input and registered input signal.
Make further automatic adjustments to the picture quality for the current input signal (AUTO)
1 Press the MENU button.
The main menu appears on the screen.
2 Press the / buttons to select (SCREEN) and press the OK button.
The SCREEN menu appears on the screen.
3 Press the / buttons to select "AUTO" and press the OK button.
Make the appropriate adjustments of the screen's phase, pitch and horizontal/vertical position for the current input signal and store them.
Adjust the picture's sharpness manually (Phase/Pitch)
You can adjust the picture's sharpness as follows. This adjustment is effective when the computer is connected to the monitor's HD15 input connector (analog RGB).
1 Set the resolution to 1280 × 1024 on the computer.
2 Load the CD-ROM.
3 Start the CD-ROM, and display the test pattern.
For Windows User
When Auto run operates:
Click Display Adjustment tool (Utility).
Click "Adjust" and confirm the resolution and then click
"Next".
Test pattern for PITCH and PHASE appears in order.
When Auto run fails to operate:
1 Open "My Computer" and right click the CD-ROM icon. Go to "Explorer" and open the CD-ROM icon.
2 Open | Utility| and then select |Windows|.
3 Start [Win_Untility.exe].
Test pattern appears.
For Macintosh User
1 Open [Utility] and then select [Mac].
2 Start [Mac_Utility.exe].
Test pattern appears.
4 Press the MENU button.
The main menu appears on the screen.
5 Press the / buttons to select (SCREEN) and press the OK button.
The SCREEN menu appears on the screen.
6 Press the / buttons to select "PHASE" and press the OK button.
The "PHASE" adjustment menu appears on the screen.
7 Press the / buttons until the horizontal stripes are at a minimum.
Adjust so that the horizontal stripes are at a minimum.
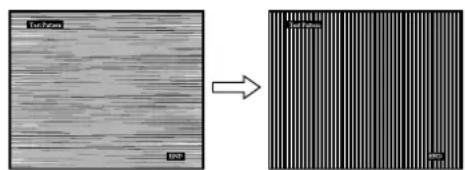
8 Press the OK button.
The main menu appears on the screen.
If vertical stripes are observed over the entire screen, adjust the pitch using the following procedures.
9 Press the / buttons to select "PITCH" and press the OK button.
The "PITCH" adjustment menu appears on the screen.
10 Press the / buttons until the vertical stripes disappear.
Adjust so that the vertical stripes disappear.
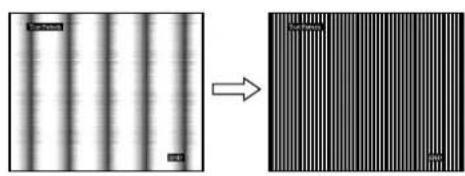
11 Click END on the screen to turn off the test pattern.
Adjust the picture's position manually (H CENTER/V CENTER)
If the picture is not in the center of the screen, adjust the picture's centering as follows.
1 Set the resolution to 1280 × 1024 on the computer.
2 Load the CD-ROM.
3 Start the CD-ROM, and display the test pattern.
For Windows User
When Auto run operates:
Click Display Adjustment tool (Utility).
Click "Adjust" and confirm the resolution and then click "Next".
Test pattern for H CENTER and V CENTER appears in order.
When Auto run fails to operate:
1 Open "My Computer" and right click the CD-ROM icon. Go to "Explorer" and open the CD-ROM icon.
2 Open [Utility] and then select [Windows].
3 Start [Win_Ultity.exe].
Test pattern appears.
For Macintosh User
1 Open [Utility] and then select [Mac].
2 Start [Mac_Untity.exe].
Test pattern appears.
4 Press the MENU button.
The main menu appears on the screen.
5 Press the / buttons to select (SCREEN) and press the OK button.
The SCREEN menu appears on the screen.
6 Press the / buttons to select "H CENTER" or "V CENTER" and press the OK button.
The "H CENTER" adjustment menu or "V CENTER" adjustment menu appears on the screen.
7 Press the / buttons to center the test pattern on the screen.
8 Click END on the screen to turn off the test pattern.
- MENU POSITION menu
You can change the menu position if it is blocking an image on the screen.
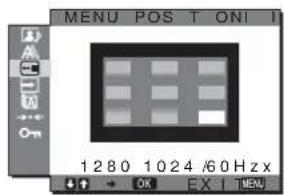
1 Press the MENU button.
The main menu appears on the screen.
2 Press the / buttons to select (MENU POSITION) and press the OK button.
The "MENU POSITION" menu appears on the screen.
3 Press the / buttons to select the desired position and press the OK button.
You can choose one of 9 positions where the menu will appear.
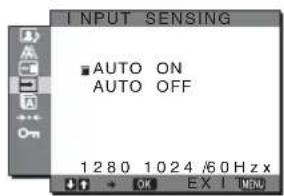
INPUT SENSING ON/OFF menu
When you select AUTO ON in the INPUT SENSING ON/OFF menu, the monitor automatically detects an input signal to an input terminal, and changes the input automatically before the monitor goes into the power saving mode.
1 Press the MENU button.
The main menu appears on the screen.
2 Press the / buttons to select (INPUT SENSING ON/OFF) and press the OK button.
The INPUT SENSING menu appears on the screen.
3 Press the / buttons to select the desired mode and press the OK button.
- ON: When the selected input terminal has no input signal, or when you select an input terminal by the INPUT button on the monitor and the terminal has no input signal, the on-screen message appears (page 21) and the monitor checks the input signal to another input terminal automatically to change the input. When the input is changed, the selected input terminal is displayed on the left upper of the screen. When there is no input signal, the monitor goes into the power saving mode automatically.
- OFF: The input is not changed automatically. Press the INPUT button to change the input.
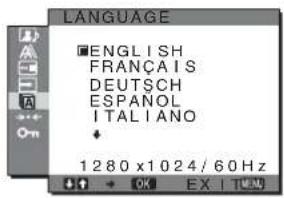
LANGUAGE menu
1 Press the MENU button.
The main menu appears on the screen.
2 Press the / buttons to select (LANGUAGE) and press the OK button.
The LANGUAGE menu appears on the screen.
3 Press the / buttons to select a language and press the OK button.
- English
- Français: French
- Deutsch: German
-
Espanol: Spanish
Italiano: Italian
Nederlands: Dutch
Svenska: Swedish -
Pycckn:
·:币
·中文: C h i n e s e
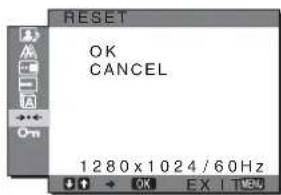
RESET menu (reset to the default setting)
1 Press the MENU button.
The main menu appears on the screen.
2 Press the / buttons to select (RESET) and press the OK button.
The RESET menu appears on the screen.
3 Press the / buttons to select the desired mode and press the OK button.
- OK: To reset all of the adjustment data to the default settings. Note that the "LANGUAGE" setting is not reset by this method.
- CANCEL: To cancel resetting and return to the menu screen.
- MENU LOCK menu
Lock the control of buttons to prevent accidental adjustments or resetting.
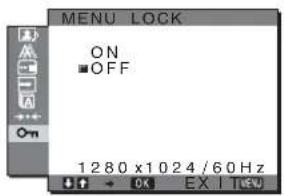
1 Press the MENU button.
The main menu appears on the screen.
2 Press the / buttons to select ON (MENU LOCK) and press the OK button.
The MENU LOCK menu appears on the screen.
3 Press the / buttons to select either "On" or "Off."
- ON: Only the (power) switch and INPUT button will operate. If you attempt any other operation, the icon appears on the screen.
- OFF: Set "MENU LOCK" to off. If "MENU LOCK" has been set to "ON," when you press the MENU button, "MENU LOCK" is automatically selected.
Technical Features
Controlling the volume
Using the monitor's speakers or headphones, you can listen to sound from your computer or other audio equipment connected to the monitor's audio input jacks.
You can control the volume by using a separate "Volume" menu from the main menu.
1 Press the / buttons when no menu appears on the screen.
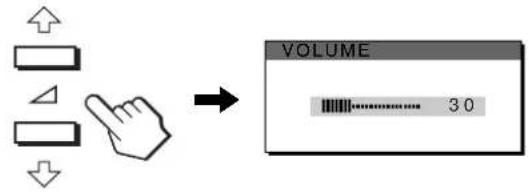
2 Press the / buttons to control the volume.
The menu automatically disappears after about 5 seconds.
Notes
- You cannot adjust the volume when the main menu is displayed on the screen.
- When your monitor is in power saving mode, no sound comes from the speakers or the headphones.
Power saving function
This monitor meets the power-saving guidelines set by VESA, ENERGY STAR (SDM-HX75 only), and NUTEK. If the monitor is connected to a computer or video graphics board that is DPMS (Display Power Management Standard) for Analog input/DMPM (DVI Digital Monitor Power Management) for Digital input compliant, the monitor will automatically reduce power consumption as shown below.
SDM-HX75
| Power mode Power consumption (power) indicator | |
| normal operation | 50 W (max.) green |
| active off* (deep sleep)** | 1 W (max.) amber |
| ( power) off 1 W (max.) off | |
SDM-HX95
| Power mode | Power consumption | ( power) indicator |
| normal operation | 60 W (max.) green | |
| active off* (deep sleep)** | 1 W (max.) amber | |
| ( power) off 1 W (max.) off | ||
- When your computer enters the "active off" mode, the input signal is cut and "NO INPUT SIGNAL" appears on the screen. After 5 seconds, the monitor enters the power saving mode.
** "Deep sleep" is a power saving mode defined by the Environmental Protection Agency.
Setting the MODE (PICTURE/ AUDIO) (mode)
If you press the button on the right side of the monitor repeatedly, you can select the MODE from GAME MOVIE PC AUTO.
When you select "AUTO," the monitor automatically adjusts the screen brightness according to the brightness of the surroundings (Automatic brightness adjustment function). For more information, see "Automatic brightness adjustment function (light sensor)".
Press the button repeatedly.
The default setting of the MODE is set to "MOVIE". When you press the button once, "MOVIE" (the default setting) is displayed, and when you press again, "PC" is displayed.
Each time you press the button, the mode changes as follows.
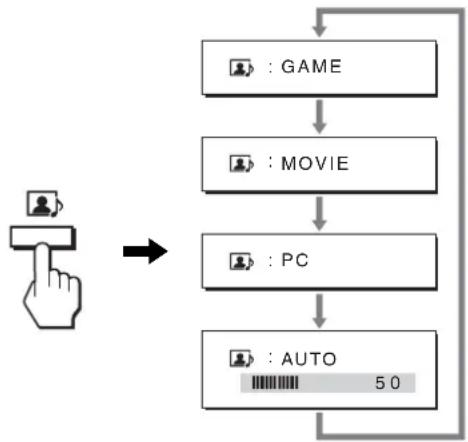
Each mode appears on the screen and the MODE is changed. The menu automatically disappears after about 5 seconds.
Automatic brightness adjustment function (light sensor)
This monitor is provided with a feature to automatically adjust the screen brightness according to the brightness of the surroundings. The brightness of the screen is set to the most appropriate level by setting the code to AUTO with the button on the right side of the monitor, or in the PICTURE/AUDIO menu. The default setting of the brightness of the screen is set to MOVIE. Also, when you set the code to AUTO with the but on the right side of the monitor, the adjustment bar is also displayed. You can adjust the bar with the / buttons. Screen brightness changes according to the level you set.
Automatic picture quality adjustment function (analog RGB signal only)
When the monitor receives an input signal, it automatically adjusts the picture's position and sharpness (phase/pitch), and ensures that a clear picture appears on the screen.
The factory preset mode
When the monitor receives an input signal, it automatically matches the signal to one of the factory preset modes stored in the monitor's memory to provide a high quality picture at the center of the screen. If the input signal matches the factory preset mode, the picture appears on the screen automatically with the appropriate default adjustments.
If input signals do not match one of the factory preset modes
When the monitor receives an input signal that does not match one of the factory preset modes, the automatic picture quality adjustment function of this monitor is activated to ensure that a clear picture always appears on the screen (within the following monitor frequency ranges):
Horizontal frequency: 28 - 80kHz
Vertical frequency: 48 - 75Hz
Consequently, the first time the monitor receives input signals that do not match one of the factory preset modes, the monitor may take a longer time than normal to display the picture on the screen. This adjustment data is automatically stored in memory so that next time, the monitor will function in the same way as when the monitor receives the signals that match one of the factory preset modes.
If you adjust the phase, pitch, and picture position manually
For some input signals, the automatic picture quality adjustment function of this monitor may not completely adjust the picture position, phase, and pitch. In this case, you can set these adjustments manually (page 16). If you set these adjustments manually, they are stored in memory as user modes and automatically recalled whenever the monitor receives the same input signals.
Troubleshooting
Before contacting technical support, refer to this section.
On-screen messages
If there is something wrong with the input signal, one of the following messages appears on the screen. To solve the problem, see "Trouble symptoms and remedies" on page 22.
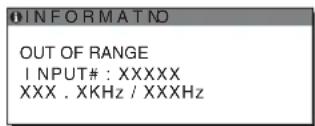
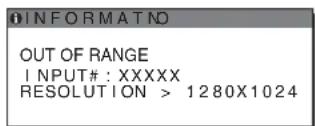
If "OUT OF RANGE" appears on the screen
This indicates that the input signal is not supported by the monitor's specifications. Check the following items. For more information about on-screen messages, see "Trouble symptoms and remedies" on page 22.
If "xxx.x kHz / xxx Hz" is displayed
This indicates that either the horizontal or vertical frequency is not supported by the monitor's specifications.
The figures indicate the horizontal and vertical frequencies of the current input signal.
If "RESOLUTION >1280× 1024 " is displayed
This indicates that the resolution is not supported by the monitor's specifications (1280 × 1024 or less).
If "NO INPUT SIGNAL" appears on the screen
This indicates that no signal is being input via the currently selected connector.
When INPUT SENSING ON/OFF (page 17) is set to ON, the monitor finds another input signal and changes the input automatically.

"GO TO POWER SAVE"
The monitor will enter the power saving mode after about 5 seconds from the time the message is displayed.
If "CABLE DISCONNECTED" appears on the screen
This indicates that the video signal cable has been disconnected from the currently selected connector.
When INPUT SENSING ON/OFF (page 17) is set to ON, the monitor finds another input signal and changes the input automatically.
Trouble symptoms and remedies
If a problem occurs as a result of a connected computer or other equipment, refer to the connected computer/equipment's instruction manual.
| Symptom Check these items | |
| No picture | |
| If the (power) indicator is not lit, or if the (power) indicator will not light up when the (power) switch is pressed, | Check that the power cord is properly connected. |
| If “CABLE DISCONNECTED” appears on the screen, | Check that the video signal cable is properly connected and all plugs are firmly seated in their sockets (page 7).Check that the video input connector's pins are not bent or pushed in. Check that the input select setting is correct (page 11).A non-supplied video signal cable is connected. If you connect a non-supplied video signal cable, “CABLE DISCONNECTED” may appear on the screen. This is not a malfunction. |
| If “NO INPUT SIGNAL” appears on the screen, or the (power) indicator is amber, | Check that the video signal cable is properly connected and all plugs are firmly seated in their sockets (page 7).Check that the video input connector's pins are not bent or pushed in. Check that the input select setting is correct (page 11).■Problem caused by a connected computer or other equipment, and not caused by the monitorThe computer is in the power saving mode. Try pressing any key on the keyboard or moving the mouse. Check that your graphics board is installed properly. Check that the computer's power is on. |
| If “OUT OF RANGE” appears on the screen (page 21), | ■Problem caused by a connected computer or other equipment, and not caused by the monitorCheck that the video frequency range is within that specified for the monitor. If you replaced an old monitor with this monitor, reconnect the old monitor and adjust the computer's graphics board within the following ranges:Horizontal frequency: 28-80 kHz (Analog RGB), 28-64 kHz (Digital RGB)Vertical frequency: 48-75 Hz (Analog RGB), 60 Hz (Digital RGB)Resolution: 1280×1024 or less |
| If using Windows, • If you replaced an old monitor with this monitor, reconnect the old monitor and do the following. Select “SONY” from the “Manufacturers” list and select “SDM-HX75 or SDM-HX95” from the “Models” list in the Windows device selection screen. If “SDM-HX75 or SDM-HX95” does not appear in the “Models” list, try “Plug & Play.” | |
| If using a Macintosh system, • When connecting a Macintosh computer, use an adapter (not supplied) if necessary. Connect the adapter to the computer before connecting the video signal cable. | |
| Picture flickers, bounces, oscillates, or is scrambled. | Adjust the pitch and phase (analog RGB signal only) (page 16).Try plugging the monitor into a different AC outlet, preferably on a different circuit.■Problem caused by a connected computer or other equipment, and not caused by the monitorCheck your graphics board manual for the proper monitor setting.Confirm that the graphics mode (VESA, Macintosh 19" Color, etc.) and the frequency of the input signal are supported by this monitor. Even if the frequency is within the proper range, some graphics boards may have a sync pulse that is too narrow for the monitor to sync with correctly.This monitor does not process interlace signals. Set for progressive signals.Adjust the computer's refresh rate (vertical frequency) to obtain the best possible picture (60 Hz is recommended). |
| Picture is fuzzy. • Adjust the contrast and brightness (page 13, 14).Adjusting the sharpness (page 15).Adjust the pitch and phase (analog RGB signal only) (page 16).■Problem caused by a connected computer or other equipment, and not caused by the monitorSet the resolution to 1280×1024 on your computer. | |
| Picture is ghosting. | · Eliminate the use of video cable extensions and/or video switch boxes. · Check that all plugs are firmly seated in their sockets. |
| Picture is not centered or sized properly (analog RGB signal only). | · Adjust the pitch and phase (page 16). · Adjust the picture position (page 17). Note that some video modes do not fill the screen to the edges. |
| Picture is too small. | ■Problem caused by a connected computer or other equipment, and not caused by the monitor · Set the resolution to 1280 × 1024 on your computer. |
| Picture is dark. · Adjust the backlight (page 13). | · Adjust the brightness (page 14). · Adjust the gamma on the GAMMA menu (page 14). · It takes a few minutes for the display to become bright after turning on the monitor. · When the mode is set to AUTO, the display brightness may become dark in low ambient light (page 13, 20). |
| Wavy or elliptical pattern (moire) is visible. | · Adjust the pitch and phase (analog RGB signal only) (page 16). |
| Color is not uniform. | · Adjust the pitch and phase (analog RGB signal only) (page 16). |
| White does not look white. | · Adjust the color temperature (page 14). |
| Monitor buttons do not operate (appears on the screen). | · If “MENU LOCK” is set to “ON,” set it to “OFF” (page 18). |
| Resolution displayed on the menu screen is incorrect. | · Depending on the graphics board setting, the resolution displayed on the menu screen may not coincide with the one set on the computer. |
Displaying this monitor's information
While the monitor is receiving a video signal, press and hold the MENU button for more than 5 seconds until the information box appears.
Press the MENU button again to make the box disappear.
Example
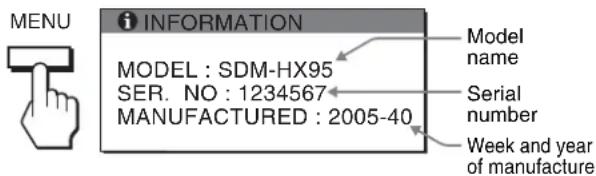
If any problem persists, call your authorized Sony dealer and give the following information:
- Model name: SDM-HX75 or SDM-HX95
- Serial number
- Detailed description of the problem
- Date of purchase
- Name and specifications of your computer and graphics board
- Type of input signals (analog RGB/digital RGB)
Specifications
LCD panel Panel type: a-Si TFT Active Matrix
Picture size: 17 inch (43 cm)
(SDM-HX75)
19 inch (48cm)
(SDM-HX95)
Input signal format RGB operating frequency*
Horizontal:
28-80 kHz (analog RGB)
28-64 kHz (digital RGB)
Vertical:
48-75 Hz (analog RGB)
60Hz (digital RGB)
Resolution Horizontal: Max.1280 dots
Vertical: Max.1024 lines
Input signal levels Analog RGB video signal:
0.7 Vp-p, 75 Ω, positive
SYNC signal:
TTL level, 2.2k
positive or negative
(Separate horizontal and vertical,
or composite sync)
Digital RGB (DVI) signal:
TMDS (Single link)
Audio input Stereo minijack, 0.5 Vrms
Speaker output 3W× 2
Headphones jack Stereo minijack
Power requirements SDM-HX75
100-240 V, 50-60 Hz, Max. 1.0 A
SDM-HX95
100-240 V, 50-60 Hz, Max. 1.1 A
Power consumption Max. 50 W (SDM-HX75)
Max. 60 W (SDM-HX95)
Operating temperature 5 - 35^
Dimensions (width/height/depth)
Display (upright):
SDM-HX75
Approx. 414× 418.5× 232mm
(16^3 / 8 × 16^1 / 2 × 9^1 / 4 inches)
SDM-HX95
Approx. 466.5 × 468 × 265 ~mm
(18^32 / 8× 18^12 / 2× 10^12 inches)
Mass SDM-HX75
Approx. 6.5kg (14 lb 5 oz)
SDM-HX95
Approx. 8.5kg (18 lb 12 oz)
Plug & Play DDC2B
Accessories See page 7.
- Recommended horizontal and vertical timing condition
Horizontal sync width duty should be more than 4.8% of total horizontal time or 0.8 sec whichever is larger.
Horizontal blanking width should be more than 2.5 μsec.
Vertical blanking width should be more than 450~ sec
Design and specifications are subject to change without notice.
TFTLCDColor ComputerDisplay
SDM-HX75
SDM-HX95
Owner's Record
The model and serial numbers are located at the rear of the unit. Record these numbers in the spaces provided below. Refer to them whenever you call upon your dealer regarding this product. Model No. __ Serial No. ____
WARNING
To reduce the risk of fire or electric shock, do not expose this apparatus to rain or moisture.
Dangerously high voltages are present inside the unit. Do not open the cabinet. Refer servicing to qualified personnel only.
FCC Notice
This equipment has been tested and found to comply with the limits for a Class B digital device, pursuant to Part 15 of the FCC Rules. These limits are designed to provide reasonable protection against harmful interference in a residential installation. This equipment generates, uses, and can radiate radio frequency energy and, if not installed and used in accordance with the instructions, may cause harmful interference to radio communications. However, there is no guarantee that interference will not occur in a particular installation. If this equipment does cause harmful interference to radio or television reception, which can be determined by turning the equipment off and on, the user is encouraged to try to correct the interference by one or more of the following measures:
- Reorient or relocate the receiving antenna.
- Increase the separation between the equipment and receiver.
- Connect the equipment into an outlet on a circuit different from that to which the receiver is connected.
- Consult the dealer or an experienced radio/TV technician for help. You are cautioned that any changes or modifications not expressly approved in this manual could void your authority to operate this equipment.
IMPORTANT
If you have any questions about this product, you may call; Sony Customer Information Services Center 1-800-222-7669 or http://www.sony.com/
Declaration of Conformity
Trade Name:SONY
Model: SDM-HX75/HX95
Responsible Party: Sony Electronics Inc.
Address: 16530 Via San Diego, CA 92127 U.S.A
Telephone Number: 858-942-2230
This device complies with part 15 of the FCC rules. Operation is subject to the following two conditions: (1) This device may not cause harmful interference, and (2) this device must accept any interference received, including interference that may cause undesired operation.
NOTICE
This notice is applicable for USA/Canada only.
If shipped to USA/Canada, install only a UL LISTED/CSA
LABELLED power supply cord meeting the following specifications:
SPECIFICATIONS
Plug Type Nema-Plug 5-15p
Cord Type SVT or SJT, minimum 3 × 18 AWG
Length Maximum 15 feet
Rating Minimum 7 A, 125 V
NOTICE
As an ENERGY STAR Partner, Sony Corporation has determined that this product meets the ENERGY STAR guidelines for energy efficiency.
(SDM-HX75 only)
Inhalt
The model and serial numbers are located at the rear of the unit. Record these numbers in the spaces provided below. Refer to them whenever you call upon your dealer regarding this product. Model No. Serial No.
WARNING
To reduce the risk of fire or electric shock, do not expose this apparatus to rain or moisture.
Dangerously high voltages are present inside the unit. Do not open the cabinet. Refer servicing to qualified personnel only.
FCC Notice
This equipment has been tested and found to comply with the limits for a Class B digital device, pursuant to Part 15 of the FCC Rules. These limits are designed to provide reasonable protection against harmful interference in a residential installation. This equipment generates, uses, and can radiate radio frequency energy and, if not installed and used in accordance with the instructions, may cause harmful interference to radio communications. However, there is no guarantee that interference will not occur in a particular installation. If this equipment does cause harmful interference to radio or television reception, which can be determined by turning the equipment off and on, the user is encouraged to try to correct the interference by one or more of the following measures:
- Reorient or relocate the receiving antenna.
- Increase the separation between the equipment and receiver.
- Connect the equipment into an outlet on a circuit different from that to which the receiver is connected.
- Consult the dealer or an experienced radio/TV technician for help. You are cautioned that any changes or modifications not expressly approved in this manual could void your authority to operate this equipment.
IMPORTANT
If you have any questions about this product, you may call; Sony Customer Information Services Center 1-800-222-7669 or http://www.sony.com/
Declaration of Conformity
Trade Name:SONY
Model: SDM-HX75/HX95
Responsible Party: Sony Electronics Inc.
Address: 16530 Via San Diego, CA 92127 U
Telephone Number: 858-942-2230
This device complies with part 15 of the FCC rules. Operation is subject to the following two conditions: (1) This device may not cause harmful interference, and (2) this device must accept any interference received, including interference that may cause undesired operation.
Esprillo,
NOTICE
This notice is applicable for USA/Canada only.
If shipped to USA/Canada, install only a UL LISTED/CSA
LABELLED power supply cord meeting the following specifications:
SPECIFICATIONS
Plug Type Nema-Plug 5-15p
Cord Type SVT or SJT, minimum 3 × 18 AWG
Length Maximum 15 feet
Rating Minimum 7 A, 125 V
NOTICE
As an ENERGY STAR Partner, Sony Corporation has determined that this product meets the ENERGY STAR guidelines for energy efficiency.
(SDM-HX75 only)
Table des matieres
Précautions. 4
Spcifications techniques. 19
Réglage du MODE (IMAGE/AUDIO) (mode 20
Specifications techniques
Contrôle du volume
Réglage du MODE (IMAGE/AUDIO) (mode)
The model and serial numbers are located at the rear of the unit. Record these numbers in the spaces provided below. Refer to them whenever you call upon your dealer regarding this product. Model No. Serial No.
WARNING
To reduce the risk of fire or electric shock, do not expose this apparatus to rain or moisture.
Dangerously high voltages are present inside the unit. Do not open the cabinet. Refer servicing to qualified personnel only.
FCC Notice
This equipment has been tested and found to comply with the limits for a Class B digital device, pursuant to Part 15 of the FCC Rules. These limits are designed to provide reasonable protection against harmful interference in a residential installation. This equipment generates, uses, and can radiate radio frequency energy and, if not installed and used in accordance with the instructions, may cause harmful interference to radio communications. However, there is no guarantee that interference will not occur in a particular installation. If this equipment does cause harmful interference to radio or television reception, which can be determined by turning the equipment off and on, the user is encouraged to try to correct the interference by one or more of the following measures:
- Reorient or relocate the receiving antenna.
- Increase the separation between the equipment and receiver.
- Connect the equipment into an outlet on a circuit different from that to which the receiver is connected.
- Consult the dealer or an experienced radio/TV technician for help. You are cautioned that any changes or modifications not expressly approved in this manual could void your authority to operate this equipment.
IMPORTANT
If you have any questions about this product, you may call; Sony Customer Information Services Center 1-800-222-7669 or http://www.sony.com/
Declaration of Conformity
Trade Name:SONY
Model: SDM-HX75/HX95
Responsible Party: Sony Electronics Inc.
Address: 16530 Via San Diego, CA 92127 U
Telephone Number: 858-942-2230
This device complies with part 15 of the FCC rules. Operation is subject to the following two conditions: (1) This device may not cause harmful interference, and (2) this device must accept any interference received, including interference that may cause undesired operation.
Esprillo,
NOTICE
This notice is applicable for USA/Canada only.
If shipped to USA/Canada, install only a UL LISTED/CSA
LABELLED power supply cord meeting the following specifications:
SPECIFICATIONS
Plug Type Nema-Plug 5-15p
Cord Type SVT or SJT, minimum 3 × 18 AWG
Length Maximum 15 feet
Rating Minimum 7 A, 125 V
NOTICE
As an ENERGY STAR Partner, Sony Corporation has determined that this product meets the ENERGY STAR guidelines for energy efficiency.
(SDM-HX75 only)
Indices
Precauciones 4
"IR A AHORRO ENERGÍA"
(Horizontal y vertical
The model and serial numbers are located at the rear of the unit. Record these numbers in the spaces provided below. Refer to them whenever you call upon your dealer regarding this product. Model No. __ Serial No. ____
WARNING
To reduce the risk of fire or electric shock, do not expose this apparatus to rain or moisture.
Dangerously high voltages are present inside the unit. Do not open the cabinet. Refer servicing to qualified personnel only.
FCC Notice
This equipment has been tested and found to comply with the limits for a Class B digital device, pursuant to Part 15 of the FCC Rules. These limits are designed to provide reasonable protection against harmful interference in a residential installation. This equipment generates, uses, and can radiate radio frequency energy and, if not installed and used in accordance with the instructions, may cause harmful interference to radio communications. However, there is no guarantee that interference will not occur in a particular installation. If this equipment does cause harmful interference to radio or television reception, which can be determined by turning the equipment off and on, the user is encouraged to try to correct the interference by one or more of the following measures:
- Reorient or relocate the receiving antenna.
- Increase the separation between the equipment and receiver.
- Connect the equipment into an outlet on a circuit different from that to which the receiver is connected.
- Consult the dealer or an experienced radio/TV technician for help. You are cautioned that any changes or modifications not expressly approved in this manual could void your authority to operate this equipment.
IMPORTANT
If you have any questions about this product, you may call; Sony Customer Information Services Center 1-800-222-7669 or http://www.sony.com/
Declaration of Conformity
Trade Name:SONY
Model: SDM-HX75/HX95
Responsible Party: Sony Electronics Inc.
Address: 16530 Via San Diego, CA 92127 U.S.A
Telephone Number: 858-942-2230
This device complies with part 15 of the FCC rules. Operation is subject to the following two conditions: (1) This device may not cause harmful interference, and (2) this device must accept any interference received, including interference that may cause undesired operation.
NOTICE
This notice is applicable for USA/Canada only.
If shipped to USA/Canada, install only a UL LISTED/CSA
LABELLED power supply cord meeting the following
specifications:
SPECIFICATIONS
Plug Type Nema-Plug 5-15p
Cord Type SVT or SJT, minimum 3 × 18 AWG
Length Maximum 15 feet
Rating Minimum 7 A, 125 V
NOTICE
As an ENERGY STAR Partner, Sony Corporation has determined that this product meets the ENERGY STAR guidelines for energy efficiency.
(SDM-HX75 only)
Indice
Precauzioni 4
"VAI A RISPARMIO ENERG"
The model and serial numbers are located at the rear of the unit. Record these numbers in the spaces provided below. Refer to them whenever you call upon your dealer regarding this product. Model No. __ Serial No. ____
WARNING
To reduce the risk of fire or electric shock, do not expose this apparatus to rain or moisture.
Dangerously high voltages are present inside the unit. Do not open the cabinet. Refer servicing to qualified personnel only.
FCC Notice
This equipment has been tested and found to comply with the limits for a Class B digital device, pursuant to Part 15 of the FCC Rules. These limits are designed to provide reasonable protection against harmful interference in a residential installation. This equipment generates, uses, and can radiate radio frequency energy and, if not installed and used in accordance with the instructions, may cause harmful interference to radio communications. However, there is no guarantee that interference will not occur in a particular installation. If this equipment does cause harmful interference to radio or television reception, which can be determined by turning the equipment off and on, the user is encouraged to try to correct the interference by one or more of the following measures:
- Reorient or relocate the receiving antenna.
- Increase the separation between the equipment and receiver.
- Connect the equipment into an outlet on a circuit different from that to which the receiver is connected.
- Consult the dealer or an experienced radio/TV technician for help. You are cautioned that any changes or modifications not expressly approved in this manual could void your authority to operate this equipment.
IMPORTANT
If you have any questions about this product, you may call; Sony Customer Information Services Center 1-800-222-7669 or http://www.sony.com/
Declaration of Conformity
Trade Name:SONY
Model: SDM-HX75/HX95
Responsible Party: Sony Electronics Inc.
Address: 16530 Via Esprillo, San Diego, CA 92127 U.S.A.
Telephone Number: 858-942-2230
This device complies with part 15 of the FCC rules. Operation is subject to the following two conditions: (1) This device may not cause harmful interference, and (2) this device must accept any interference received, including interference that may cause undesired operation.
NOTICE
This notice is applicable for USA/Canada only.
If shipped to USA/Canada, install only a UL LISTED/CSA
LABELLED power supply cord meeting the following specifications:
SPECIFICATIONS
Plug Type Nema-Plug 5-15p
Cord Type SVT or SJT, minimum 3 × 18 AWG
Length Maximum 15 feet
Rating Minimum 7 A, 125 V
NOTICE
As an ENERGY STAR Partner, Sony Corporation has determined that this product meets the ENERGY STAR guidelines for energy efficiency.
(SDM-HX75 only)

BZ03
I3roTOBnteIb: CoH KopnpoeWn
Ampc: 6-7-35 KntaunHaraba,
UHHara-Ky, Tokno 141-0001, Anonna
CtpaHa- npOn3BODntEnb: Koper
Copepknne
Mepb npoeocTopoxhoctn 4
IeHTnDnkaaIeTaneuOpraHOynpaBneHna 5
IoproTOBka K pa6oTe 7
Ioprotobka K pa6ote 1: PooceHnTe Ka6eJN BnDcOcnHana .7
Ioprotobka K pa6ote 2: IopknouHTe aydnokabeB 8
Ioprotobka K pa6ote 3: IopknHouTe Ka6eNb nHTAHn .8
Ioprotobka K pa6ote 4: Ynoxnte npoc Kaenei .9
Ioprotobka K pa6ote 5:BkHIOHTe MOHITOp N KOMNbOTep .9
Ioprotobka K pa6oTe 6: Otperynpyte HaKnoH n NobopoT .. 10
Bb6op BxoJHoro cHnHa (KhoNka INPUT) 11
IopctpoKa MoHTopa 11
IepemeueHne no 3KpaHHomy MeHIO 11
MeHIO 3OBPAXEH/AyIO 12
MeHOPEKIM 12
MeHIOI3OBPAXEH 13
PerynpoBkA 3IeMeHtA IOICBETKA 13
PerynpoBka 3JeMeHtA KOHTPACT 13
PeryJnpoBkA 3JIeMeHtA RPKOCTb 13
HacpoKa npaMeTpa GAMMA 13
HacrpoKa napameTpa LIBET 14
PerynpoBka 3IeMeHtpeE3KOCTb 14
MeHIO AUDIO 14
HacpoKa npametpa BblCOKNE, Hn3KNE nn
BAJIAHC 15
HacpoKa napametpa ObEMHbl 3BYK. 15
MeHIOPEXKIM C6POC (BOcTaHOBLeHne 3HaueHn IIO
ymoJIaHnIO dIa BcExpeXIMOB) 15
MeHIO KPAH (ToIbKO dIa analoroboro ciHaJa RGB) 15
MeHIO 03 MEHIO 17
MeHIO PACnO3H BXODA BKJI/BbIKJ 17
MeHIO LALGUAGE 17
MeHIO 一 ^ 一 CBPOC (BOcCTaHOBJIeHne 3NaHeHnI no yMOnuHaHnI).18
MeHIO BJOKIPOBKAMEHIO 18
TexHHueckne ocObeHHocTHn 18
PerynpoBka rpoMkoCTn 18
Функцял ЗКОHOMN 3Heprn.. 19
YcTaHObKa PEXIM (N3OBPAXKEH/AyIO) (peXIM ).19
Функца abTomatueckoн Habtpoukn ApKocTN
(DaTcNK CBeta) 19
Функца abTomatuecko pergunpoBkn KaeeCTBa n3O6paXeHnA
(Tonbko aHaIorObBc nHn RGB) 20
UcTpaHHe HeuCnPaBHOCTe 20
3KpaHbIe coo6ueHH. 20
CmTTOMbI HEnoJaOK IN DeiCTBnI NO IN yCTpaHeHIO 22
TexHnueckne xapaKTepeNCTnKn 25
MepblnpedoctopoXHoctn
MepblnpedocTopoKHOCTn npn noDKIOUeHNN K cetu 3JekTpONHTAHN
- NcnoJb3yIte ka6eIb nITaHnI, NoCTabJIReMbI C MOHTOPOM. Ppi nCNoJb3OBAHN dpyrO rKa6eI IITaHnY6eINTecb B TOM, YTO OH NOxOJT DnI R NCNOJb3OBAHN B MEcTHo CEtN.
Для nokynateneB CWA
Pnncno30BaHn HecooTBeCTbYIOe Ro Ka6eI
HNTAHMOHTOP He 6yET OTBeuAtb 06raTeNbHbIM
ctHaDapTaFCC.
3aIINcIbIAIOue O6OpyIOBaHHe, KAcCeTbI INNCKeTbI CNeJeYET DePxAbTaHa HEKOTOPom pacCTOAHIN OT OTBepCTm DnHAMKOB, TaK KaK DnHAMKUN 3JNyAoiT MaHHTHOE NOIE. 3TO MaHHTHOE NOIE MOXET BO3DeIeCTBOBaTb Ha KACCeTbI INDcKeTbI IN PnIBecTn K IOTepe XpaHuaXcRa H Hx DaHHbx.
PpmeuHne no KKd
C NOMOUIIO DNHAMIKOB BbIaOTc3BYKOBbIE CnHbI.
4Khonka MENU (ctp. 11)
3Ta KHONKa BKNIOaET N BbIKIOaET 3KpaH MeHIO.
5 KhoNKn / n (rpomKocTb) (cTp. 11, 18)
3TN KONKIN CNOJb3yOTcI DnB Bb6opa 3neMeHTOB MEHIO N BblONHeHn HaCTPOE, a TaKKe OTopaxKeHn MeHIO "PomKOctb" dNppeRynpoBaHN rPOMKoCTN.
6KHonkaOK(ctp.11)
3Ta KONKa AKTNBn3NpyET 3JIeMeHT MeHIO N HAcTPOKNI, BbI6paHHBe C NOMOuBIO KHOJOK / (5).
7Khonka INPUT (ctp. 11)
C NOMOUIIO 3ToK HONKMOXHO NpeKIOUaTB BxOHN BuDeocnHaN MeKdy INPUT1, INPUT2 INPUT3, KOrda Dba KOMNbIOTepa NoDKIIOueHbIK MOHITopy.
8KhoNka (cTp. 19)
3Ta KhoNka Cnyxnt Dnna nepeKluOeHnPAEXM (I306PAXHE/AYDIO).
93aHnKpbuHa (cTp.7)
CdbnHbTe 3Ty KpbIshky BBePx npN NOdkNoueHm Ka6eJe.
10The3doHayuHnKOB(cTp.18)
C NOMOUIIO 3TOrO rHe3Ja NoDAIOTcR 3ByKOBbIE CNrHaJIbI Ha HayuHInKn.

BnC3aHnHaDncnneJKKD
11Γhe3do AC IN (ctp.8)
K 3TOMy pa3bemy NOdkJIOHaeTcKa6eJIb NITaHn (npunaraeTc).
12OTBepTne 3aunTHoN 6noknpOBKn
OTBepCTne 3aunTHoN 6nOKnPOBKn Heo6xOIMo
HcnoIb3OBaTb DnA CnCTeM 6e3OnaChocTn Kensington
Micro Saver Security System.
Micro Saver Security System -Зерптурааннад Toproвая Марka Kensington.
13BxOdHoe ayDnOrHe3do dIa INPUT1 (ctp.8)
Yepe3 3TO THe3DO NOCTyNAOT 3ByKObIe CnHaJIbI npi NOKJIIOUeHIM K BbIXOJHOmy ayDnOHTHe3dy KOMNBJTEpa IIN DpyrOTo ayDnOYcTPOIcTBA, NOKJIIOUeHHoro K BXOy INPUT1.
14BxodHoe rHe3do HD15 (aHaIorOBbR RGB) INP1T1 (ctp.7)
Yepe3 3TO rHe3do nOdaIOTc aHaIorOBbIe BnDeocirHaJIb RGB (0,700 Vp-p, nooXnt.) uCnHaNbICnHxpoHN3aun.
15BxOdHoe ayDnOrHe3do dIa INPUT2 (ctp.8)
Yepe3 3TO rHe3DO nocTynaIO T 3ByKOBbIe CnHaJIbI npi
NoKJIIOUcHIM K BbIXOHOmy ayINOrHE3dy
KOMNbIOTepa NIN dpyrORo ayINOyCTpOInCTBa,
NoKJIIOUcHHO r K BXOy INPUT2.
16BxOdHoe rHe3do HD15 (aHaIorOBbI RGB) INPIT2 (ctp.7)
Yepe3 3TO rHe3do nOdaIOCTc aHaIaNoROBbIe BnDEocnHaJIb RGB (0,700 Vp-p, nooXnt.) nCnHaNbICnHxpoHN3aun.
17BxoAnHoe aydnoHrHe3do nI INPUT3 (ctp.8)
Yepe3 3TO rHe3DO NOCTyNAOT 3ByKObIe CnHaJIb I npi
NoKJIIOUcHIM K BbIXOHOMy ayDNOrHe3dy
KOMNbIOTepa NIN dpyrOro aydNOyCtPOIcTBA,
NoKJIIOUcHHO R BXOy INPUT3.
18BxoDhoe rHe3do DVI-D (uΦpOBoR RGB) dIINPUT3 (cTp.7)
Yepe3 3TO THe3DO NOdaOTcNΦpObBIE BnDEocnHaJIb RGB, COoTBeTCTByIOuIe DVI Rev.1.0.
19Деркателдякавел (ctp. 9)
3Ta Detalb 3akpennreT Ka6enn n Hypbl Ha MOHHTope.
Повтовka к paбоTe
IpeepnocnoB3OBAHmEMMOHITOPa npOBepbTe HAnuHne B Kopo6ke cJeDyIOUX npHaNdxKxHOCTe:
ДиспелжКД
Ka6eIb nTuHaHn
Ka6eIbBnDeocuHanaHD15-HD15(aHaIorOBbRGB)
Ka6eIb BnDeocnHana DVI-D (uΦpOBoR RGB)
Aynokaben (ctepoe MNHnTKepe)
- CD-ROM (nporpaMMbI DnH Windows n Macintosh, HNCTpyKUIN NO 3KcnnyatauIN N.T.D.)
-「 rapaHTnHbI TaIOH
PykoBoDCTBO no 6bICTpOyCTaHOBKe
EcIn B MeHIO OTo6paKaetc
PnBbIbOpE Haxatm KhoTKn OK Ha dncnnee cHOBa OTo6paKaetc npdebyuuee MeHIO.
4 Hactpoite 3JemeHT.
HaxMnte KONKn ↓↑ДЯ BbINOJIHeHЯ HAcTpOiKN, 3aTeM HaxMnte KONky OK.
Pn HaxaTNI KHOKN OK HacptpoKa coXpaHReTcA, a DncnJe BO3BpaaaeTcK npedeIyUeMy MeHIO.
53akpoTe MeHIO.
HaKmTe KhoNky MENU oIN pa3 dIN BO3Bpata B HopMaJIbHbI peXIM npocMToPa. EcIn KhoNKe He 6bln HaKaTbI, TO 3KpaHHoe MeHIO abTomaTneCKn nCHe3aET np6bn3nteNbHO uepe3 45 cekyHd.

MENU
BocctaHOBJeHne 3HaueHn no yMOnJauHnO dJa npametpoB
C6pocntb HacTpoKMOXHO C NOMOuMeHOCBPOC.
IINI NOIyHeHn IIOIpO6HbIX CBeJeHn O BbIIOJIHeHn C6pOca HacTpoeK CM. (C6POC) Ha cTp. 18.
MeHoo
N3OBPAJXEH/AYDINO
C NOMOUIMOHIO I30PAXEH/AYDNO MOXHO NOCTpontb CNeIyUOuNE 3JeMeHTbl.
PEKIM
(IVPRA/ΦNJIbM/KOMNbIOTEP/ABTOΦOPMAT)
- 306PAKEH
- AYDIO
PEXKIM C5POC +
MeHIO PEXKIM
Moxho BbIpaTb npKoCTb 3kpaHa B COOTBETCTBm C npOCMaTpNBaEmbIM N3OpaKeHem.
IapametpbMeHIO N3O5PAXEH/AYDNO MoKHO yCTaHOBNTb IJI KAKDOPO peXIMa.
KpomeTOrO,MOxHO u3MeHHTbpeXIM dIa KaXdOro BXOda (BXOД1/BXOД2/BXOД3).
1 HaxmTe KhONky MENU.
Ha 3KpaHne nOBnTcR JnaBHOe MeHIO.
2 HaxMnte KhoNky TnBbIbOpa 3JeMeHtA (N3OBPAXKEH/AyDNO) n HaxMnte KhoNky OK.
Ha 3KpaHe IIOBNTcMeHIO I3O6PAXKEH/AYINIO.
3 HaXMMTe KHNky 1 JnBbIbOpa 3JemeHtA “HJIbM” HxMMTe KHNky OK.
Ha 3kpahe noBntc MeHIO PEXKIM.
4 HaXMMTe KONKn / ,YTO6bI Bb6paTb HxHbIpeXIM, N HaXMMTe KONKy OK.
IymoJuaHHIO yCTaHaBJIbBaETc3NaueHHe ΦNJIbM.
- IΓP A:Apkoe n3o6paxeHne.
- ΦИл b M:Четкoe OуЕнь КоHTpaCTHoe n3o6paXkeHne.
- kOMΠbIOTEP:U306paXeHHe cMaRKnMToHaMn.
- ABTOΦOPMAT: ABTomatHeCKaHacTPOka RPKoCTn
3KpaHa B COOTBETCTBm COCBSeEHOCbO OKpyKaIOJIero npocTpaHCTBa (fynKcnaa ABTomATnueCKoH HAcTPOIKn npKOCTn).IINr NOJyEHH DOnONHtEnbHbIX CBeDeHm CM. "FynKcnaA BToMaTnueCKoH HAcTPOIKN npKOCTn (daTHNK CBeta) Ha cTp.19.
PpmeaHne
B pexime AUTO HeIb3a HacTpoNTb NoCDBeTky.
MeHIO N3O6PAXEH
BbMOXeTe NOCTpOHTb 3TN 3JIeMeHtbl C NOMOuHO MeHIO H3OBPAXKEH.
- POUCBETKA
- KOHTPACT
- RPKOCTb
MeHIO GAMMA
MeHHoLBT - PE3KOCTb
PeryIinpobka 3JemeHTa NOCBETKA F
Ecnn 3KpaH CnIuKOM npKm, HAcTpoNte 3aDHOIO NOCBETky, YTO6bIC Hm 6bINo yDo6Hee pa6oTaB.
1 HaxmTe KhoNky MENU.
Ha 3KpaH eONABNTc rIaBHOe MeHIO.
2 HaxMMTe KHOJky / nIaBbIbOpa 3JIeMeHTa (N306PAXKEH/AYDNO) HaxMMTe KHOJky OK.
Ha 3KpaHe IIOBHTcMeHIO I3O6PAXKEH/AYDNIO.
3 HaXMMTe KHOKNK / 1ДЯ BbI6opa (N3O6PAXKEH) HaxMMTe KHOKNy OK.
Ha 3KpaHne NOrBntcMaHIO N3O5PAXHE.
4 HaKMTe KHONKn 1nBb6opa "IIOCDETKA"HaKMTe KHONky OK.
Ha 3KpaHne NOBnTcMeHIO “NODCBETKA”.
5 HaKMTe KONKn / nHaCTpoKn yPOBnOcBeueHnHaKMTe KONky OK.
PerynpoBka 3JIeMeHtA KOHTPACT
HaCToPeKoHTpAcTHOCTb N3O6paXeHnA.
1 Haxmte KhoNky MENU.
Ha 3KpaHe nOBuTcraIaBHOe MeHIO.
2 HaKmTe KhoNky / nIaBbIbOpa3JeMeHtA (N3O6PAXEHE/AyDnO)HaKmTe KhoNky OK.
Ha 3KpaHne noaBntcMeHIO N3ObPAXKeH/AyIIO.
3 HaKMITE KONKn / 1A Bb6opa (N3O6PAXEH) HAKMITE KONKy OK.
Ha 3kpaHne NOBnTcMaHIO N3O5PAXHE.
4 HaxMnte KhoNKn 个nBbIbopa“KOHTPACT" n HaxMnte KhoNky OK.
Ha 3KpaHe NOBHTcMehNo "KOHTPACT".
5 HaXMMTe KHNKn / ,YTO6bI OTpeRynpoBaTb KOHTpactHOCTb, HxMMTe KONkOK.
PerylupobKa 3IemeHtA RPKOCTb
HacpoTe npKocTb n3o6paKeHHa (ypoBeHb cepHoRo).
1 Haxmte KhoNky MENU.
Ha 3kpaHne noABTcraIaBHOe MeHIO.
2 HaKMMTe KONKy 1/↑ nIaBbIbOpa 3JemeHTa (N3O6PAXEHE/AyDIO) HaxMMTe KONky OK.
Ha 3KpaHe NOBHTc MeHIO I3O6PAKEXH/AYDNO.
3 HaXMMTe KhoNKn / dIaBb6opa
(N305PAXKEH)инхмte кHonky OK.
Ha 3kpaHne nOBHTcMeHIO N3O6PAXKEH.
4 HaXMMTe KONKn / JBA BB6opa.
"APKOCtB" n HaxmTe KhONky OK.
Ha 3KpaHe IIOBNTcMeHIO "APKOCTb".
5 HaXMMTe KhoNKn / ,TTo6bI OtperyLnpoBaTb
Hactpoika napametpa GAMMA
MoxhoconocTabtubTeBOBOTeHOKn3o6paKeHHa 3KpaeCUBeTOBbIMOTteHKOMn3o6paKeHHOpuHaJa.
1 Haxmte KhoNky MENU.
Ha 3KpaHne NOABNTcraJnabHoe MeHIO.
2 HaKMMTe KHOJky 1AIN BbIbopa 3JeMeHTa (N3O6PAXKEH/AyDNO) HauKMnTe KHOJky OK.
Ha 3KpaHe nOBuTc MeHIO I3O6PAXKEH/AyDIO.
3 HaXMMTe KHNKn / JIy Bb6opa
(N306PAXKEH) nHaKmTe KhONkY OK.
Ha 3kpaHne noBnTcM MeHIO N3O6PAXHE.
4 HaKMMTe KHONKn / ДЯ BBi6opa“γ(GAMMA)" HHaKMnTe KhONKy OK.
Ha 3KpaHe NOBHTcMeHIO GAMMA.
5 HaxMnte KONKn / ,YTO6bl Bb6paTb HyXhbi peXHM, n HaxMnte KONKy OK.
HacptpoKa napameTpA LBT
Moxho Bb6paTb ypOBeH zBETA 6eNo rno n3 CneIyUoXn HAcTpoE KCBETOB TeMnepaTypbI no yMOJIHaHIO.
Takke npH Heo6xoDmOCTn MOxHO TOHcTpOnTb UBeToBvIO TEMpePaTyP.
1 HaxmTe KhoNky MENU.
Ha 3KpaHne NORBITCR TnaBHOE MeHIO.
2 HaKMnTe KONky / DnBb6opa 3JeMeHTa (N3OEBPAXEH/AyDNO) Hn KaMnTe KONky OK.
Ha 3KpaHne NOABNTcMaMeHIO N3O6PAXEH/AYJNO.
3 HaxMMTe KONKn / AnBb6opa (N3OBPAXEH) HaxMMTe KONky OK.
Ha 3KpaHe nOBuTc MeHIO IV3ObPAxEH.
4 HaxmTe KhoNk / AnBb6opa " (UBET)" n HaxmTe KhoNky OK.
Ha 3KpaHne NOBHTCA MeHIO LBT.
5 HaKMnte KHOKN 1A IN BbIbopa Heo6xOUMOnuBeTOBOI TemnepaTypbl, a 3aTeM HaXMnte KONKy OK.
ПрииИЗMeHeHIMI CBetOBOM TemnepaTybI c 9300K Ha 6500K 6aJIaHc 6eJorO CBeta IImeHReTcH OT CINHEBaTbIX OTTEHKOB Do KpachOBaTbIX.
ToHnHa HAcTpoKa ZBeTOBm TEMpePaTypbI
LBeToBvIyTeMnepaTyPoMoXHOycTaHOBuTbIaKaJdopexKIma (NΓPA/ΦιMb/M/KOMMbIOTEP/ABTOΦOPMAT).
1 HaxmTe KhoNkY MENU.
Ha 3KpaHnOaBtCraTnaBHOe MeHIO.
2 HaXMMTe KONky 1AIN BbIbOpa JIeMeHTa (N3O6PAXEHE/AyDNO) HaxMMTe KONky OK.
Ha 3KpaHne NOABNTcMeHIO N3O6PAXEH/AYJNO.
3 HaxMMTe KONKn / AnBb6opa (N3O6PAXEH n HaxMMTe KONKy OK.
Ha əkpaH eonBntcMehIO N3O6PAXEH.
4 HaxMnte KhoNk / AnBbIbopa " (UBET)" HaXMMTe KhoNky OK.
Ha 3KpaHe NOBHTcMeHIO LBT.
5 HaxMnte KHONK 1ДЯ BbIbopa“HACTPOIKA" n HaxMnte KhONKy OK.
Ha 3KpaHe NOBNTcMeHIO TOHNO HAcTPOKN CBeTOBOI TEMNepaTypbI.

6 HaxMnte KhoNKn / ,YTo6bI BbI6paTb R (KpacBn) nB CnHn), a 3aTeMaXMnte KhoNky OK. 3aTeMaXMnte KhoNkn / nHaCTpOuKn UBeTOBOI TempeTpbl, a NotOM HaxMnte KhoNky OK.
NockoIbky 3Ta HacTpoika CBeTOBOI TeMnepaTypbI n3MeHnEeTcra nyTeMaYBeJIuYeHnI IIN yMeHbSeHnA coCTaBnAoUx R N B OTHocIneBHo G (3eNeHbI), coCTaBnAoUaG ocTaeTcHn3MeHHoI.
7 HaxMnte KhONKn nA BbIbOpa 3nemeHTa , a 3aTEM HaxMnte KhONky OK.
HOBa HAcTpoiKa UBeTa COxpaHntC B NAmTn N 6yTeBb3bBaTcBn3 NAmTn KaKdbn pa3 npN BblOpe 3neMeHTa "PyHaA".
Ha 3KpaHe NOBnTc MeHIO LBT.
PerynpoBka 3neMeHa PE3KoCTb
PerynipOBka pe3KocTn KpOMOK n3o6paXeHn n T.Д.
1 HaxmTe KhoIky MENU.
Ha 3KpaHnOBnTc rnaBHOe MeHIO.
2 HaxMMTe KhoNky / JnBbIbOpa 3JemeHTa (N3O6PAXKEH/AyDNO) HaxMMTe KhoNky OK.
Ha 3KpaHe nOBHTcMeHIO N3OBPAXKEH/AYdNO.
3 HaXMMTe KHOJKN ⅡIЯ BBI6opa 3JIeMeHTa (N3O6PAXKEH) HaxMMTe KHOJKY OK.
Ha 3KpaHne NOBHTcMeHIO N3O6PAXHE.
4 HaKMnTe KONKn / ,T06bl Bbl6paTb"PE3KoCTb",HaKMnTe KONky OK.
Ha 3KpaHne noBnTcMaHIO "PE3KOCTb".
5 HaxMnte KhoNk N/↑, YTo6bI OtperynnpoBaTpe3KocTb, HaxMnte KhoNky OK.
MeHIO AUDIO
CneIyUOUINE 3JIeMeHTbIMoXHO NOIDCTPOINTB C NOMOUIMOHIO AUDIO.
- BblcOKnE
- HN3KNE
BAJAHC
OBbEMHbI 3BYK
Hacpoika napametpa BbICOKVE, HN3KNE nIe BAJAHC
1 HaxmTe KhONkY MENU.
Ha 3kpaHne noBHTcraIaBHOe MeHIO.
2 HaxMnte KhoNky / nIy BbIbOpa 3JeMeHtA (N306PAXKEH/AYINO) HaxMnte KhoNky OK. Ha 3KpaHe NORBNTcMaHIO N306PAXKEH/AYINO.
3 HaXMMTe KONKn 个N BbIbOpa 3JemeHTa (AUDIO) HaxMMTe KONKy OK.
4 HaXMMTe KHNKn / ,YTO6bI Bb16paTb BbICOKNE, HN3KNE nnn BAJAHC, nHaXMMTe KONKy OK.
5 HaXMMTe KHNKn / ,HTO6bl BbI6paTb HxHbI pexMm, n HaXMMTe KONky OK.
Hactpoika napametpa ObEMhbl 3BYK
1 HaxmTe KhoNky MENU.
Ha 3KpaHne NOBnTc rnaBHOe MeHIO.
2 HaKMMTe KONKy / nIy BbIbopa 3JeMeHTa (N3O6PAXEH/AYIO) HaxMMTe KONky OK. Ha 3KpaHe NoBnTcMaHIO N3O6PAXEH/AYIO.
3 HaKMnTe KhoNKn / DnBbIbOpa 3JemeHTa (AUDIO) H aKmTe KhoNky OK.
4 HaxMnte KhoNk N JI Bbl6opa OEBEMHbIN 3BYK n HaxMnte KhoNky OK.
5 HaxMMTe KONKn / ,YTO6bl BbI6paTb HxHbI pexMM, n HaxMMTe KONKy OK.

·SRS WOW:Iy6okne HacbIeHHbIe 6acOBbIe YactOTbl, a TaKxE OTcETINBbIe BbICOKNe TOHa cO3daIO TcFKeT HaCbIeHHORO 06bEMHOro 3ByaHn. FmJIbMbI n Oco6eHNO mRpbI BOCpInHMiaIOTCa NOHOBOMy 6laRoApra MOUHOMY 3ByKy.
BbIKJI:3ΦΦeKT SRS WOW BbIKJIIOueH.
5naorapnncnoB3OBAHNO COBpeMeHHoTexHOIOrn pa3pa6oTaHHo KOMnHaNei SRS Labs, Inc., yHKunr SRS WOW cyueCTBeHHo yLyuwaet KaueCTBO 3ByaHn pa3NJUHbIX aydnoNtOCHKOB.
MeHIO PEXKIM C5POC (BOccTaHOBJeHne 3HaueHnI NO yMOJuaHnIO dIra BCEx peXIMOB) +
Moxho c6pocntb HacTpoKn Do 3HaueHn no yMOJuaHIO.
1 Haxmte KhoNky MENU.
Ha 3KpaHne noBHTcraIaBHOe MeHIO.
2 HaKMTe KONky / nA BbIbOpa 3JeMeHTa (N3OBPAXKEH/AyDNO) HaxMTe KONky OK.
Ha 3KpaHe NOBITc MeHIO I3O6PAKEXH/AYINIO.
3 HaKMnTe KhONKn / ДЯ BbIbopa“-C6POC"HaKMnTe KhONky OK.
Ha 3KpaHe NOBITcMeHIO "C5POC".
4 HaXMMTe KHONKn / ,YTO6bl BbI6paTb HxHbIpeXkM, HxAMTe KHONKy OK.
OK: BocctaHOBJIeHne 3NaueHn no yMOJHaHIO IIN BCEx peXIMOB B MeHIO N3O6PAXEH/AYINO.
OTMEHA:OTMeHa c6poca n BO3BpaT B MeHO N3O6PAXEH/AYJNO.
MeHIO A.KPAH (ToIbKO dIa anJorOBoro cnHaJa RGB)
Cneyuouine 3nemHTbIMOXHOIOCTpOHTb C NOMOuBMOHIO 3KPAH.
- ABTOΦOPMAT
-ΦA3A
LJAG - TOPIN3 LIEHTP
- BEPTUK UEHTP
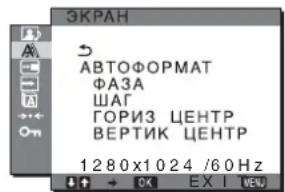
PnmeuHne
B clyae npema ucpobbix CnHAnOB RGB c BxOHO rHe3da DVI-D nI INPUT3 perynipOBKa He Tpe6yeTc.
Функца ABTomaTnueckopeRyIpOBKn KaueCTBa n3O6paXeHHa
Pn npneMe BXoHOrO CnHaJa MOHITOp aBToMaTHueCKn perynpuyet noJoxeHne n pe3KocTb N306paXeHn (pa3a/ war) n o6ecneuBaet YETKoe N306paXeHne Ha 3kpaHe (cTp.20).
PpmeaHne
EcnnnAknBn3npoBaHa cyHKnna ABOTMaTnuecko perynnpOBKn KaeeCTBa n06paXeHn, pa6Otae TOnbKO BbIKIOaTeIb (NTaHne).
EcHn npu nCnoJb3OBAHH yHKnA BtOMaTHueckoI peryNIOBKN kaueeCTBa H3O6paXeHN 3TORO MOHTOPa H3O6paXeHne HAcTPOEHO He NOnHocTBIO MoKHO BbINONHTb DaJIbHeMlyO AToMaTHueCKyO HAcTPOIKy KaeeCTBa H3O6paXeHn DnT EKUeBO BXODHOrO CnHana (CM. "ABTOΦOPMAT" Hxke).
EcIn Tpe6yeTcBbINOJHnTb DOnOJHnTeJbHyIO peryI npOBky KaueCTBa N3o6paXeHHa
Moxho BpyHyo OtperynipoBaBpe3KocTb (pa3a/war) n noJoxHeHne (no ropn3oHTan/No Beptkkanu) n36paXeHna.
3TN HactpoiKn COxpaHHTcB N nAMrTn n ABTomatueckn Bbl3bBAOTc KaKdbi pa3, KOrDa MOHITop NOlyuayeTIpeBaPnteHbHO BBedeHHbI n 3apeNCTpnpoBaHHbI BXOHDH CNrHaI.
Дальнше abTomatueckne NaCTpoKN KaueCTBa n3o6paXeHnЯ dIЯ TeKyuero BXoJHOro cnHaJa (ABTOΦOPMAT)
1 HaxmTe KhoIky MENU.
Ha 3kpaHne nOBuTcR rIaBHOe MeHIO.
2 HaxMnte KHONK / dIy BbIbopa (3KPAH) n HaxMnte KHONky OK.
Ha 3KpaHne NOBnTcMaHIO 3KPAH.
3 HaKMTe KHONKn / JnBb6opa "ABTOΦOPMAT" n HaKMTe KHONky OK.
BbINOHNHe COOTBeTCTByIOUe HAcTPOKn 0a3bl 3KpaHa, Iura n NIOJoxEHn NO rOpN3OHTaIN/ BepTKaJI INI TKeYUeBOXoHOrO CnHana n coxpanHe nx.
■PyuHaI peryunipOBka pe3KocTn 3o6paXeHn (Fa3a/llar)
Pe3KocTb n3o6paXeHn MoXHo OtperyIuPoBaTb CJeDyUOIMM o6pa3OM. 3Ta HAcTpOJa DeiCTByET, KOrDa KOMIbIOTep PNOkJIIOUeH K BXOHOMy rHe3dy HD15 MOHTopa (aHaNoorOBbl RGB).
1 YcTaHOBnte pa3peuHne 1280×1024 Ha KOMNbItepe.
2 BCTaBBTe KOMnKaT-DnCK.
3 3aynctnte nporpammy Ha KOMnakT-Dncke n OTo6pa3nte TectobbI WAp6noH. IJa IOnb3oBAtenr Windows KOrda pa6Otae ATbONouck:
JHKeHNTe Ha Display Adjustment (yTnInTa HacToPouKa dncnJe).
JeKHTe "HaCTpOHTb", NOtBepnTe pa3peuHne n HaxMITE "JaIee".
IooepedHO BbIOaTcTeCTOBBte Tabnucbl nna 1yHKuIN WAr n FA3A.
Korda ABTONONCK He pa6oTaE:
1 OTKpoTe MoKOMbIOpTe n npaBoN KhoNkoMbIu NueJKNHe 3HaOcKD-ROM. IpeenDiTE B"PiPoBOnHnK" n OTKpoTe 3HaOcKD-ROM.
2 OtkpoTe [Utility] n BbIbepnTe [Windows].
3 3anyctute [Win_Utility.exe].
PONBNTC TECTOBa Ta6Jua.
Длnoьбоветя Macintosh
1 OtkpoiTe [Utility] n BbIbepuTe [Mac].
2 3anyctntre [Mac_Utility.exe].
IIOBNTC TECTOBAR Tabnua.
4 HaxmTe KhONky MENU.
Ha 3KpaHe NOBuTcra TaBHOe MeHIO.
5 HaKMMTe KONKn (3KPAH)HaKMMTe KONky OK.
Ha 3KpaHe nOBnTcMeHIO 3KPAH.
6 HaxMnte KONKn 1nBbIbopa“ΦA3A" n HaxMnte KONky OK.
Ha 3KpaHne NOBHTCmEHIO HAcTPOJKN “ΦA3A”.
7 HaxmMaTe KHOJKNK 1, NOKa TOpN3OHTaJIbHbIe IIOLOcBi He CTAHyT MHNMaJIbHbIMn.
Otperynpyte TaKIM 6pa3OM, YTo6blTopn30HTaHbHbIe NOIOcbl 6blMNHMImaHbHbIMN.

8 HaXmTe KhONkY OK.
Ha 3KpaHe NOABNTCA TnaBHOe MeHIO.
EcHnHa Bcem 3KpaHe BnHbI BepTikalhble nOocbl, Otperynpyte war, BbINOHNB CNe dyoune DeCTBna.
9 HaxMnte KhoNk / 1nBb6opa "UAT" n HaxMnte KhoNky OK.
Ha 3KpaH NoBnTc MeHIO HAcTpoKn "JIAF".
10 HaxnmaTe KhoNk noka BepTKKaIbHbIe NOJocbl He Ncye3HyT.
Otperynpyte TaKIM o6pa3OM, TTo6blBepTtKaIbHbIe NOnocblNcHe3NI.
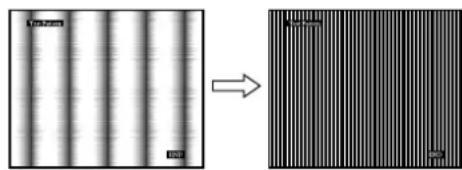
11 Haxmnte KhoNky END Ha 3KpaHe, YTO6bI OTKHOHTb TECTOBBI WAp6JIOH.
PyuHa perynipOBka noJoxeHn n3o6paXeHn (TOPN3 LCEHTP /BEPTNK LCEHTP)
Ecnn n3o6paXeHne pacnoJoxKeHo He no cHTpy 3KpaHa, OtperynpyTe ceHTpOBky n3o6paXeHnCneDyUOUM o6pa3OM.
1 YcTaHOBInTe pa3peSeHne 1280×1024 Ha KOMNbIToPepe.
2 BCTaBbTe KOMnakT-Dnck.
3 3anyctnte nporpammy Ha KOMnakT-DnCKe n OTO6pa3nte TECTOBbI WAp6NoH.
IINIOJIb3OBATeNIA Windows KOrda pa6oTaE AToTOnouck:
UeKHTe Ha Display Adjustment (yTnnta Hacptpoika dncnne).
IeKHTe "Hactpontb",noTBePnte pa3peueHne HaxMITE "Jaiee".
Iooepedno BbIOaTcTeCTOBBte TaBnCbI dna fynKpI TOPN3 UEHTP n BEPTNK UEHTP.
Korda ABTONOONCK He pa6oTaeT:
1 OTKpoIte MoK KomIbIOpTe n npabOi KNHKnO MbluN 3HaQoK CD-ROM. IpeenDHTe B "PpOboHnK" oTkoIte 3HaQoK CD-ROM.
2 OtkpoTe [Utility] n BbIbepnTe [Windows].
3 3anyctnte [Win_Utility.exe].
IoBtcaTeCTOBaTa6nla.
1 OtkpoiTe [Utility] n BbIbepuTe [Mac].
2 3anyctnte [Mac_Utility.exe].
IoBntcTeCTOBaTa6nla.
4 Haxmnte KhoNky MENU.
Ha 3kpahe nOBNTcra TnaBHOe MeHIO.
5 HaxMnte KONKn 1A JnBbIbopa A (3KPAH) n HaxMnte KONKY OK.
Ha 3KpaHne nOBnTcMHeIO 3KPAH.
6 HaxMnte KhoNKn 11 nIy BbIbOpa "TOPN3 LcHTP"nnn "BEPTNK LcHTP"HaxMnte KhoNky OK.
Ha 3KpaHne NOBUTcMeHIO HAcTpoiKn "TOPN3 LIEHTP"nnn"BEPTNK LIEHTP".
7 HaKMnte KHOKNI / IJIpeMeueHn TectoBOrO WabJOna B ueHtp 3KpHa.
8 HaxMMTe KONky END Ha 3KpaHe, YTO6bI OTKJIIOHTb TECTOBBI WApJHOH.
MeHIO 03 MEHIO
Moxho n3MeHnTb noJIOKeHne MeHIO,ecnOHO 3aropaxnBaetnO6paXeHneHa3KpaHe.
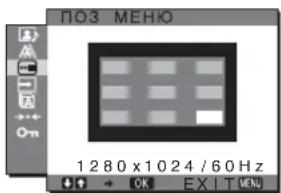
1 Haxmte KhoNky MENU.
Ha 3KpaHe NOABNTc rIJaBHOe MeHIO.
2 HaKMNTe KHONK / ,YTO6bI Bb16paTb 3JIeMeHT (IO3 MEHIO), a 3aTeM HaKMNTe KNONKY OK. Ha ekpaHe NOBUTcRe MeHIO IO3 MEHIO.
3 HaxMnte KONKn 1A JnBb6opa Heo6xOUMORO noJoxKeHn HaxMnte KONky OK.
MoxHO BbIpaTb OJHO n3 9 NOnOKeHn, B KOTOpOM 6yDet OTobpaKaTaBcMaHIO.
MeHIO PACIO3H BXOДA BKJI/ BbIKJ
EcJN Bb6paTb 3HaueHne ABTOPACn BKn B MeHOp PACNO3H BXODA BKJI/BbIKI, MOHTOP aBTOMaTHueCKn 06hApyKNT BXoHOn CnHnC BxOHO rBaema n
peKIOUHTcHa Hero, npEeJDe Yem MoHITop nepeIeT B peKIM 3KOHOMN 3Heprn.
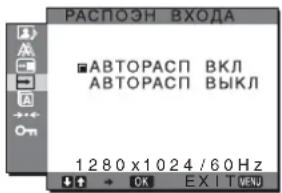
1 HaxmTe KhoNky MENU.
Ha 3kpaHne NOABNTcraJnabHoe MeHIO.
2 HaKMnTe KHOHKy /↑, YTO6bl BbIbpaTb (PACIO3H BXODA BKJI/BbIKJI), 3aTeMaXmTe KhoNky OK.
Ha 3KpaHe noBnAeTcMeHIO PACNO3H BXOJA.
3 HaxMnte KONKn / ,YTO6bI Bbl6paTb HyXHbI pexkM, n HaxMnte KONky OK.
BKI: Ecnn Ha BbIbpaHOM BxOJHOM pa3beMe OTCyTCTByET BXoDHOH CnIHaJI NIN ECNN BXoHOH pa3bEM BbIbPaetcC NOMOUBK HONKN INPUT Ha MOHTOpE Ha 3TOM pa3bEm OTCyTCTByET BXoHOH CnIHaJI, Ha 3KpaHe NOBtCn COOBSeHne (CTp.20), IN MOHTOp ABTomaTHeCKN PNOBepNT HAJIYNE BXoHOrO CnIHaJI Ha DpyTHX BXoDHbIX pa3bEmAX IN 3MeHnT BXoD. Pn IN3MeHnHN BxOJa BblbpaHHbIKBXoHOH pa3bEM OTObpaKaTeCn B NebOM BepXHEmyrJy 3kpaHa. Pn OTCyTCTBnB XBOJHO RcHHaJI MoHTOp ABTomaTHeCKN NepExOJNT B pexHM 3KOHOMN 3HEprn.
- BbIKJI: ABToMaTnueckoe N3MeHeHne BXOJa He BbINOnHHaTe HxMIne KHOInKy INPUT nIaN I3MeHeHna BXoDHoro pa3beMa.
MeHIO LANGUAGE
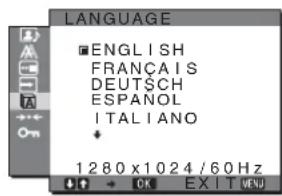
1 Haxmte Khonky MENU.
Ha 3KpaHe nOBuTcra TaBHOe MeHIO.
2 HaxMnte KHONKn 个NBA6opa 3neMeHTa (LANGUAGE) n HaxMnte KHONky OK.
Ha 3Kpahe NOBJIaTeC MeHIO LANGUAGE.
3 HaXMMTe KHONKn 12 ,YTO6bIBBbIpaTbA3blK, HaxMMTe KNONkO.K.
- English: AHRIMCKM
- Francais:Фразиузкий
- Deutsch: Hemeukn
- Espanol: IvcaNaHcKm
Italiano: I'TaJIbHcKnI - Nederlands: Голандакий
Svenska: UWeDckn - Pycckn
:日HCKN
:KTaickn
MeHIO · · · CBPOC (BOcCTaHOBJIeHHe 3HaueHnI NO yMOJIuaHnIO)
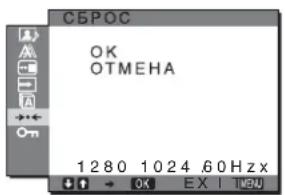
1 HaxmTe KhoIky MENU.
Ha 3KpaHe NOBtCra TnaBHOe MeHIO.
2 HaKMnTe KhoNKn 14 JnBbIbOpa 3JMeHtA (CEPOC) HaxmTe KhoNky OK.
Ha 3KpaHe nOBnAeTcMa MeHIO C5POC.
3 HaxMnte KONKn JIy BbIbOpa Heo6xOIMoropexkma, a 3aTeM HaxMnte KONky OK.
OK: C6poc BceX DaHHbIX HacTpOyIKn Do 3HaueHmNo yMOnuHaHIO. Heo6xOJIMo NOMHtB, YTO 3TNM CnOCOBm HeJIb3r C6pocNtB HacTpOyKy 3NeMeHTa “LALANGUAGE".
OTMEHA: OTMeHa c6poca n Bo3BpaT K 3KpaHy MEHIO.
MeHIO 6NOKIPOBKAMEHIO
Блорва упавелен KMONКAMN nnpodTbpaueHn cnyaHbIX hactpoeK nnn c6poca.
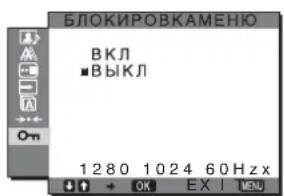
1 HaxmTe KhoIky MENU.
Ha 3KpaHe nOBuTcraBHOe MeHIO.
2 HaxMnte KHONK / nA BbIbOpa 3JemeHTa (BLOKINPOBKBAMEHIO) HaxMnte KHONky OK.
Ha 3KpaHne noBJIeTcMeHIO BLOKIPOBKAMEHIO.
3 HaXMMTe KHOKN / ДЯ BbIbopa“BKЛ"nN "BbIKJ".
BKJI:Pa6oTaIOT TOnbKO BbIKHouaTeNb (nHTaHHe) n KHOJa INPUT. Ppi BblONHeHm DpyrNx Opeaun Ha 3KpaHe NOBNTc3HaOc
BbIKJI: YcTaHOBKa 3HaueHnBbIKJ.ДЯЗЛeMeHTa "FLOKINPOBKAMEHIO".EcJINДЯ
3JIeMeHTa "FLOKINPOBKAMEHIO"
6bIJOyCTaHOBJIeHO 3HaueHne "BKJI",To npJ
HaxKaTNI KhoIKN MENU 3JIeMeHT "O
БLOKINPOBKAMEHIO"6yJeT BbIbpaH
aBTOMaTNUeCKN.
TexHnueckne ocObeHHoctn
PerynipoBka rpoMkoCTN
PnncnoB3ObaHnnrpoMkorOBopnteNeuHayuHkoB MoKHO npocnyuBaTb 3ByK OT KOMnbOTepa NIN dpYnx ayduooyctpoCTB, NOdkNoueHHbIX K BXoHbIM aydnoIrHe3dAm MOHTopa.
PROMKOCTB MOXHO peryIINPOBaTb C NOMOUIBIO OTDeJIbHORo MEHIO "POMKOCTb" KOTOPOE MOXHO Bbl6paTb B rnaBHOM MEHIO.
1 HaxMnte KhoNKn / ,Korda Ha 3kpaHe He oTo6paXaetc MeHIO.
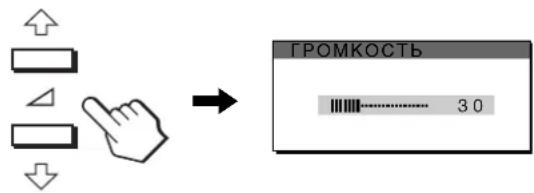
2ДЯperyIpOBKNrpoMkoCTnHaXMMTe KHOKN
MeHIO aBToMaTuYeCKn NcYe3HeT npN6n3nTeIbHo.
Yepe3 5 cekyHd.
PpmeuHn
KordaHa 3kpahe OTo6paxaetc rnaBHOe MeHIO, perylnpoBka rpomkoCTn HeBO3MOxHa.
KordaMOHITOp HaxoDITcBpeXIMe 3KOHOOMN 3Heprn,3ByK He BBIOITcH Neu YpeE rPOMKOROBOPNTEN,HN Hepe3 HayuHnKn.
ФункцяЗКOHOMN3Heprnn
Даньий монитор соовтсгуетHopмам ekohомп элкtpоэнрг,在уctановлелвIM VESA,ENERGY STAR (Tолькдя SDM-HX75)и NUTEK.Есни монитор ногкючен К комь�тepy ии ВideогралчесКOMY адantlype,noДерхивалочIMDPMS(ctaHdapt ynpablenHa NITaHnem MOHITOPA)ДЯнанALORBOBxOHDHO CINHana nIIN CTaHdapt DMPM(ynpablneHne nITaHnEM uФpoBOrO MOHITOPA DVI)ДЯнuФpoBOROBxOHDHO CINHana,MOHITOP 6ydet ABTomatueckn ChnxKaTb notpe6NeHne 3HepnIn COrlaCHO npubedeHHOn HNXe TaBInuie.
SDM-HX75
Pexm MoHtOpa, npeBapntelbHo yCTaHOBJHHbI Ha 3aBOe
Pn npneMe BxOJHOro CnHaJa MOHITOp aBOMaTnueckn
COrIacOBbIAeTe rO C OdHM N3 peKIMOB,
npdeBaPnteJIbHO yCTaHOBJIeHHbIX Ha 3aBODe n
XpaHJUHXCB NAmATN MOHITopA, dNf oBeCeNeHnRA
BbICOKoKaueCTBeHHORo N3o6paxKeHnB UcHTpe 3kPaHa.
EcIn BxOJHO CnHaN COOTBeTCTByeT ppeBaPnteH0
yCTaHOBHeHHOMy Ha 3aBOpe pexkMn, Ha 3kpaHe
ABTomaTHeCKN NOBAAETcN 3o6paxKeHne C
COOTBeTCTByIOUMN HAcTPOKnAMn No yMOJIuHNIO.
EcnBxOxDhIe CnHaNbI He COOTBeTCTBYIOT HNODHOMY n3 npEaBapntbHo yCTaHOBJEHbIX Ha3aBOde peKIMOB
Pn npneMoHHTOpM BxOJHO CnHaJa, He COOTBETCTByIOUeRO HN ODNOMY N3 PpeBapNTeNbHO yCTaHOBNeHHbIX Ha 3aBOJe pexKIMOB, AKTNIBN3uPyETcA fHKUNABTOMATNUeCKoI perynipOBKn KaecTBA n3O6paKeHn MOHToPA, KOtopa oBeceNuBaET NOCTOARHHO YeTKOE n3O6paXeHne Ha 3kPaHe (B CJIeDyUOux Dnana30Hax qactOT CNHXPOHn3aun MoHHTOPa):
Yactota ropn3oHTaIbHoi pa3BepTKN: 28-80K
YactotaBepTKaJIbHOJpa3BepTKn: 48-75
I030my, KOrda Ha MOHITOp npBbI pa3 NOCTynaETBXOHDON CnHAn, He COOTBeTCTByIOUHN HOnOMy n3IpeDbapNTeBHO yCTaHOBNeHHbIX Ha 3aBOe peXIMOB, dNt OTO6paXeHn I3o6paXeHn Tpe6yeTc6OJIbWe BpemHn, Yem OBtuHO. DaHbIe 3ToH NAcTpOKn ABTomATnueckn CoXPaHIOrTCB NAmTu, No30MY B cJeDyIOuN pa3 MOHITOp 6yDet pa6oTaTb TaK, KaK npi npneMe CNHaIOB, COOTBeTCTByIOUx OOnHOmY n3 IpeDbapNTeBHO yCTaHOBNeHHbIX Ha 3aBOe peXIMOB.
B cnyae perynpoBkn pa3bl, wara n noLoXeHn H3o6paKeHn BpyHyIO
ДЯ HeKOTopbIX BXOHNbIX CnHAnOBФyHKUINABTOMaTHueckOpeRyIuPobKN KaYeCTBa n3o6paXeHNA3TOROMHTOPaMOxET He Do KOHua HAcTpOnTbNOIOXeHne n3o6paXeHNA,foaHy uwar.B 3ToM cnyae3Ty HaCTPOkY MoXHO BblONHHTB BpyHyIO (cTp.16).EcIn HAcTPOkN yCTaHOBNeHb BYPyHyO,OniCOxPAHOTCB NAMATN KAK NOb3OBaTeJIbCKne peKHMbIN ABTOMaTHueCKN BblIBaIOTCAKKn pa3,KOrJaHaMOHHTOP NoCTyNaIOT TaKne Xe BXoDNbIE CnHaNbl.
YcTpaHHeH HenCpabHocTei
PpeXeJeHemObpaTnTbcB CnyKbTyexHuecko NoadepKKN, O3HaKOBtEcB c daHHbIM pa3deIOM.
3KpaHHbIe coo6eHnIa
EcniYTO-To He B nopAKe CO BXOHNbIM CnHAnOM,Ha 3KpaHe NOBnEETc ONDHO3CNEyIOxN COo6eHn.ДЯ yCTpaHEHn HENoIaIKn CM."CmNTombl HENoIaOK n DeiCTBnNo INx yCTpaHEHIO" Ha cTp.22.
EcnHa 3KpaHe NOBJIaTeCn COO6eHne "HEONYCT PAPPEKM
3To yKa3bIiBaet Ha To, YTO BXOHN CnHAn He COOTBETCTByeT XapaKTePncTnKam MOHTopa. PpOBepbTe CJeDyIOoee.
Длп получени долнгельнбх сбдени 66краньх cooшцehнax CM. "Cmntombi HeNoJaOK n DeiCTBn no nx yctpaHEnHO" Ha cTp. 22.
Ecnn oTo6paXaetc coo6eHne "xxx.x kHz/ xxx Hz"
3To yKa3bIbaeHT Ha To, YTO JIn6o YacTota Ropn3OHTaJIbHOJ pa3BepTKN, JIn6o YacTota BepTKaJIbHOJ pa3BepTKH He COOTBTCTBYET XapakTePncTnKAM MOHITopa.
LcnpbO3HaayoT yactoTbI rOpn3oHTaBHO BepTKaBHO pa3BepTKN TEKyuero BXoHoro CnHaHa.

HEOJYCT PAPPEKIM BXO#:XXXX XXX.XkHz/XXXXHz
EcnHa3KpaHe OTo6paKaaeTcHnDnKaunna "PA3PEUHEHNE >1280× 1024
3To yKa3bIbAeT Ha To, YTO daHHe pa3peWeHne He NOdEepXnBaETcXapaKTepNCTKAMM MOHTopa (1280×1024nnmMehee).

HEDONYCT PAPPEKIM BXO#:XXXXX PA3PEUEHME > 1280X1024
EcnHa 3KpaHe NOBnEeTcCoo6ueHne“HET CnHJIA"
3To yka3bIbaeT Ha To, YTO Yepe3 Bbl6paHHbI B HacToHnn MOMENT pa3bEm CnHaN He Noaetc. Korda nI npaMeTp aPACIO3H BXOJa BKJI/BbIKI (ctp. 17) ycTaHOBHeNo 3HaueHne BKL, MoHTOp haoiNT dpyro BxOJHO CnHaN I ABTomTuYeCKn NepeKInoHaet BXOJ.
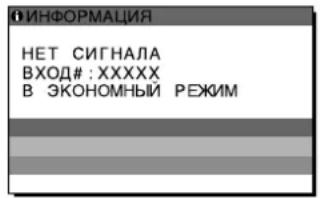
"B3KOHOMHbI PEXUM"
Iotppe6JHemaMaMoUHOCTb
MaKc. 50 BT (SDM-HX75)
MaKc. 60 Bt (SDM-HX95)
Pa6oay TemnepaTypa 5-35 C
Pa3mepbl (uPnHa/BbICota/rry6nHa)
DncnJeB BepTKKaJIbHOM
noJoxhenn):
SDM-HX75
Pn6n.414×418,5×232MM
SDM-HX95
Pn6J.466,5×468×265MM
Macca SDM-HX75
Pn6n.6,5Kr
SDM-HX95
Pn6n.8,5Kr
Plug & Play DDC2B
PnHaJNeKHoCTn CM. cTp.7.
-
PekomeHnyemb pyekmCnHXPOH3aunno ropn3oHTaN BepTnKaJIn
-
ⅢnpuHa nmylbca ropn3oHTaIbHoCnHxpoHn3aun DOnkHa 6bItb 60bnbe 4,8% 06uero nepnoDa rOpn3oHTaIbHo pa3BepTK nN 0,8 MKC,B 3aBucmocTn OT TORO, KOtopa N3 HNX 60bnbe.
HTepBamMexMyCnHnAAMnRopn3OHTaJbHOpa3BepTKdONKeH6blb60bnBe2,5MkC.
ИHTepBaI MExJy CnHaIaMn BepTkaJIbHoi pa3BepTKI DOnJKeH 6bITb 60JIbWe 450 MKC.
KoHCTpyKUNI XapaKTepnCTNk MOrY N3MeHrTBcA 6e3 npEbpntelbHorO yBeOMnEHNA.
TFTLCDColor ComputerDisplay
SDM-HX75
SDM-HX95
Owner's Record
The model and serial numbers are located at the rear of the unit. Record these numbers in the spaces provided below. Refer to them whenever you call upon your dealer regarding this product. Model No. Serial No.
WARNING
To reduce the risk of fire or electric shock, do not expose this apparatus to rain or moisture.
Dangerously high voltages are present inside the unit. Do not open the cabinet. Refer servicing to qualified personnel only.
FCC Notice
This equipment has been tested and found to comply with the limits for a Class B digital device, pursuant to Part 15 of the FCC Rules. These limits are designed to provide reasonable protection against harmful interference in a residential installation. This equipment generates, uses, and can radiate radio frequency energy and, if not installed and used in accordance with the instructions, may cause harmful interference to radio communications. However, there is no guarantee that interference will not occur in a particular installation. If this equipment does cause harmful interference to radio or television reception, which can be determined by turning the equipment off and on, the user is encouraged to try to correct the interference by one or more of the following measures:
- Reorient or relocate the receiving antenna.
- Increase the separation between the equipment and receiver.
- Connect the equipment into an outlet on a circuit different from that to which the receiver is connected.
- Consult the dealer or an experienced radio/TV technician for help. You are cautioned that any changes or modifications not expressly approved in this manual could void your authority to operate this equipment.
IMPORTANT
If you have any questions about this product, you may call; Sony Customer Information Services Center 1-800-222-7669 or http://www.sony.com/
Declaration of Conformity
Trade Name:SONY
Model: SDM-HX75/HX95
Responsible Party: Sony Electronics Inc.
Address: 16530 Via Esprillo, San Diego, CA 92127 U.S.A.
Telephone Number: 858-942-2230
This device complies with part 15 of the FCC rules. Operation is subject to the following two conditions: (1) This device may not cause harmful interference, and (2) this device must accept any interference received, including interference that may cause undesired operation.
NOTICE
This notice is applicable for USA/Canada only.
If shipped to USA/Canada, install only a UL LISTED/CSA
LABELLED power supply cord meeting the following specifications:
SPECIFICATIONS
Plug Type Nema-Plug 5-15p
Cord Type SVT or SJT, minimum 3 × 18 AWG
Length Maximum 15 feet
Rating Minimum 7 A, 125 V
NOTICE
As an ENERGY STAR Partner, Sony Corporation has determined that this product meets the ENERGY STAR guidelines for energy efficiency.
(SDM-HX75 only)
Digital RGB-signal (DVI):
TMDS (Enkel länk)
Ljudang Stereo minikontakt, 0,5 Vrms
Högtalarutgang 3 W × 2
Hörlursutgang Stereo-minikontakt
Stromforsjrgning SDM-HX75
100-240V,50-60Hz
Max. 1,0 A
SDM-HX95
100-240V,50-60Hz
Max. 1,1 A
The model and serial numbers are located at the rear of the unit. Record these numbers in the spaces provided below. Refer to them whenever you call upon your dealer regarding this product. Model No. Serial No.
WARNING
To reduce the risk of fire or electric shock, do not expose this apparatus to rain or moisture.
Dangerously high voltages are present inside the unit. Do not open the cabinet. Refer servicing to qualified personnel only.
FCC Notice
This equipment has been tested and found to comply with the limits for a Class B digital device, pursuant to Part 15 of the FCC Rules. These limits are designed to provide reasonable protection against harmful interference in a residential installation. This equipment generates, uses, and can radiate radio frequency energy and, if not installed and used in accordance with the instructions, may cause harmful interference to radio communications. However, there is no guarantee that interference will not occur in a particular installation. If this equipment does cause harmful interference to radio or television reception, which can be determined by turning the equipment off and on, the user is encouraged to try to correct the interference by one or more of the following measures:
- Reorient or relocate the receiving antenna.
- Increase the separation between the equipment and receiver.
- Connect the equipment into an outlet on a circuit different from that to which the receiver is connected.
- Consult the dealer or an experienced radio/TV technician for help. You are cautioned that any changes or modifications not expressly approved in this manual could void your authority to operate this equipment.
IMPORTANT
If you have any questions about this product, you may call; Sony Customer Information Services Center 1-800-222-7669 or http://www.sony.com/
Declaration of Conformity
Trade Name:SONY
Model: SDM-HX75/HX95
Responsible Party: Sony Electronics Inc.
Address: 16530 Via Esprillo, San Diego, CA 92127 U.S.A.
Telephone Number: 858-942-2230
This device complies with part 15 of the FCC rules. Operation is subject to the following two conditions: (1) This device may not cause harmful interference, and (2) this device must accept any interference received, including interference that may cause undesired operation.
NOTICE
This notice is applicable for USA/Canada only.
If shipped to USA/Canada, install only a UL LISTED/CSA
LABELLED power supply cord meeting the following specifications:
SPECIFICATIONS
Plug Type Nema-Plug 5-15p
Cord Type SVT or SJT, minimum 3 × 18 AWG
Length Maximum 15 feet
Rating Minimum 7 A, 125 V
NOTICE
As an ENERGY STAR Partner, Sony Corporation has determined that this product meets the ENERGY STAR guidelines for energy efficiency.
(SDM-HX75 only)
Inhoudsopgave
A SCHERM menu (alleen analogog RGB-signal) 15
POSITIE MENU menu 17
INGANG ZOEKEN AAN/UIT menu 17
LANGUAGE menu 17
RESET menu (standaardinstelling herstellen) 17
TOETSEN SLOT menu 18
De standardinstelling is FILM.
Klik op Display Adjustment tool (Utility).
Klik op Display Adjustment tool (Utility).
"GA NAAR STROOMSPAAR"
The model and serial numbers are located at the rear of the unit. Record these numbers in the spaces provided below. Refer to them whenever you call upon your dealer regarding this product. Model No. Serial No.
WARNING
To reduce the risk of fire or electric shock, do not expose this apparatus to rain or moisture.
Dangerously high voltages are present inside the unit. Do not open the cabinet. Refer servicing to qualified personnel only.
FCC Notice
This equipment has been tested and found to comply with the limits for a Class B digital device, pursuant to Part 15 of the FCC Rules. These limits are designed to provide reasonable protection against harmful interference in a residential installation. This equipment generates, uses, and can radiate radio frequency energy and, if not installed and used in accordance with the instructions, may cause harmful interference to radio communications. However, there is no guarantee that interference will not occur in a particular installation. If this equipment does cause harmful interference to radio or television reception, which can be determined by turning the equipment off and on, the user is encouraged to try to correct the interference by one or more of the following measures:
- Reorient or relocate the receiving antenna.
- Increase the separation between the equipment and receiver.
- Connect the equipment into an outlet on a circuit different from that to which the receiver is connected.
- Consult the dealer or an experienced radio/TV technician for help. You are cautioned that any changes or modifications not expressly approved in this manual could void your authority to operate this equipment.
IMPORTANT
If you have any questions about this product, you may call; Sony Customer Information Services Center 1-800-222-7669 or http://www.sony.com/
Declaration of Conformity
Trade Name:SONY
Model: SDM-HX75/HX95
Responsible Party: Sony Electronics Inc.
Address: 16530 Via San Diego, CA 92127 U
Telephone Number: 858-942-2230
This device complies with part 15 of the FCC rules. Operation is subject to the following two conditions: (1) This device may not cause harmful interference, and (2) this device must accept any interference received, including interference that may cause undesired operation.
NOTICE
This notice is applicable for USA/Canada only.
If shipped to USA/Canada, install only a UL LISTED/CSA
LABELLED power supply cord meeting the following specifications:
SPECIFICATIONS
Plug Type Nema-Plug 5-15p
Cord Type SVT or SJT, minimum 3 × 18 AWG
Length Maximum 15 feet
Rating Minimum 7 A, 125 V
NOTICE
As an ENERGY STAR Partner, Sony Corporation has determined that this product meets the ENERGY STAR guidelines for energy efficiency.
(SDM-HX75 only)
Indices
Precauções 4
Regular a SHARPNESS 15
Menu AUDIO 15
Regular TREBLE, BASS ou BALANCE 15
Regular SURROUND 15
Menu MODE RESET (REPOSIÇAO DE MODO)
(reposicao de todos os mode para a predefiniacao) 15
A Menu SCREEN (apenas sinal RGB analogico) 16
Menu MENU POSITION 17
Menu INPUT SENSING ON/OFF 17
A Menu LANGUAGE 18
Menu RESET (repor na predefiniçao) 18
On Menu MENU LOCK 18
Characteristica tceicas 19
Controlo volume 19
Funcao de economia de energia 19
Definir o MODO (PICTURE/AUDIO) (modo 20
Funcao de regulaao automatica do brilho (sensor de luz) . 20
Regular TREBLE, BASS ou BALANCE
3 Execute [Win_Utility.exe].
Surge o padrao de teste.
ParautilizadoresdeMacintosh
2 Execute [Mac_Utility.exe].
Surge o padrao dc teste.
Visualizar as informacoes do monitor
Resolucao Horizontal: Max. 1280 pontos
The model and serial numbers are located at the rear of the unit. Record these numbers in the spaces provided below. Refer to them whenever you call upon your dealer regarding this product. Model No. Serial No.
WARNING
To reduce the risk of fire or electric shock, do not expose this apparatus to rain or moisture.
Dangerously high voltages are present inside the unit. Do not open the cabinet. Refer servicing to qualified personnel only.
FCC Notice
This equipment has been tested and found to comply with the limits for a Class B digital device, pursuant to Part 15 of the FCC Rules. These limits are designed to provide reasonable protection against harmful interference in a residential installation. This equipment generates, uses, and can radiate radio frequency energy and, if not installed and used in accordance with the instructions, may cause harmful interference to radio communications. However, there is no guarantee that interference will not occur in a particular installation. If this equipment does cause harmful interference to radio or television reception, which can be determined by turning the equipment off and on, the user is encouraged to try to correct the interference by one or more of the following measures:
- Reorient or relocate the receiving antenna.
- Increase the separation between the equipment and receiver.
- Connect the equipment into an outlet on a circuit different from that to which the receiver is connected.
- Consult the dealer or an experienced radio/TV technician for help. You are cautioned that any changes or modifications not expressly approved in this manual could void your authority to operate this equipment.
IMPORTANT
If you have any questions about this product, you may call; Sony Customer Information Services Center 1-800-222-7669 or http://www.sony.com/
Declaration of Conformity
Trade Name:SONY
Model: SDM-HX75/HX95
Responsible Party: Sony Electronics Inc.
Address: 16530 Via Esprillo, San Diego, CA 92127 U.S.A.
Telephone Number: 858-942-2230
This device complies with part 15 of the FCC rules. Operation is subject to the following two conditions: (1) This device may not cause harmful interference, and (2) this device must accept any interference received, including interference that may cause undesired operation.
NOTICE
This notice is applicable for USA/Canada only.
If shipped to USA/Canada, install only a UL LISTED/CSA
LABELLED power supply cord meeting the following specifications:
SPECIFICATIONS
Plug Type Nema-Plug 5-15p
Cord Type SVT or SJT, minimum 3 × 18 AWG
Length Maximum 15 feet
Rating Minimum 7 A, 125 V
NOTICE
As an ENERGY STAR Partner, Sony Corporation has determined that this product meets the ENERGY STAR guidelines for energy efficiency.
(SDM-HX75 only)
目录
使用前注意事项 4
识别部件和控制钮 5
安装. 7
The model and serial numbers are located at the rear of the unit. Record these numbers in the spaces provided below. Refer to them whenever you call upon your dealer regarding this product. Model No. Serial No.
WARNING
To reduce the risk of fire or electric shock, do not expose this apparatus to rain or moisture.
Dangerously high voltages are present inside the unit. Do not open the cabinet. Refer servicing to qualified personnel only.
FCC Notice
This equipment has been tested and found to comply with the limits for a Class B digital device, pursuant to Part 15 of the FCC Rules. These limits are designed to provide reasonable protection against harmful interference in a residential installation. This equipment generates, uses, and can radiate radio frequency energy and, if not installed and used in accordance with the instructions, may cause harmful interference to radio communications. However, there is no guarantee that interference will not occur in a particular installation. If this equipment does cause harmful interference to radio or television reception, which can be determined by turning the equipment off and on, the user is encouraged to try to correct the interference by one or more of the following measures:
- Reorient or relocate the receiving antenna.
- Increase the separation between the equipment and receiver.
- Connect the equipment into an outlet on a circuit different from that to which the receiver is connected.
- Consult the dealer or an experienced radio/TV technician for help. You are cautioned that any changes or modifications not expressly approved in this manual could void your authority to operate this equipment.
IMPORTANT
If you have any questions about this product, you may call; Sony Customer Information Services Center 1-800-222-7669 or http://www.sony.com/
Declaration of Conformity
Trade Name:SONY
Model: SDM-HX75/HX95
Responsible Party: Sony Electronics Inc.
Address: 16530 Via Esprillo, San Diego, CA 92127 U.S.A.
Telephone Number: 858-942-2230
This device complies with part 15 of the FCC rules. Operation is subject to the following two conditions: (1) This device may not cause harmful interference, and (2) this device must accept any interference received, including interference that may cause undesired operation.
NOTICE
This notice is applicable for USA/Canada only.
If shipped to USA/Canada, install only a UL LISTED/CSA
LABELLED power supply cord meeting the following specifications:
SPECIFICATIONS
Plug Type Nema-Plug 5-15p
Cord Type SVT or SJT, minimum 3 × 18 AWG
Length Maximum 15 feet
Rating Minimum 7 A, 125 V
NOTICE
As an ENERGY STAR Partner, Sony Corporation has determined that this product meets the ENERGY STAR guidelines for energy efficiency.
(SDM-HX75 only)
Obsah
- MODE
(GAME/MOVIE/PC/AUTO)
PICUTE
AUDIO
MOVERESET
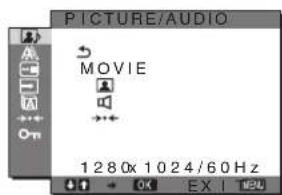
MODE nabídka
Klepnete na Display Adjustment Tool (Utility).
The model and serial numbers are located at the rear of the unit. Record these numbers in the spaces provided below. Refer to them whenever you call upon your dealer regarding this product. Model No. __ Serial No. ____
WARNING
To reduce the risk of fire or electric shock, do not expose this apparatus to rain or moisture.
Dangerously high voltages are present inside the unit. Do not open the cabinet. Refer servicing to qualified personnel only.
FCC Notice
This equipment has been tested and found to comply with the limits for a Class B digital device, pursuant to Part 15 of the FCC Rules. These limits are designed to provide reasonable protection against harmful interference in a residential installation. This equipment generates, uses, and can radiate radio frequency energy and, if not installed and used in accordance with the instructions, may cause harmful interference to radio communications. However, there is no guarantee that interference will not occur in a particular installation. If this equipment does cause harmful interference to radio or television reception, which can be determined by turning the equipment off and on, the user is encouraged to try to correct the interference by one or more of the following measures:
- Reorient or relocate the receiving antenna.
- Increase the separation between the equipment and receiver.
- Connect the equipment into an outlet on a circuit different from that to which the receiver is connected.
- Consult the dealer or an experienced radio/TV technician for help. You are cautioned that any changes or modifications not expressly approved in this manual could void your authority to operate this equipment.
IMPORTANT
If you have any questions about this product, you may call; Sony Customer Information Services Center 1-800-222-7669 or http://www.sony.com/
Declaration of Conformity
Trade Name:SONY
Model: SDM-HX75/HX95
Responsible Party: Sony Electronics Inc.
Address: 16530 Via Esprillo, San Diego, CA 92127 U.S.A.
Telephone Number: 858-942-2230
This device complies with part 15 of the FCC rules. Operation is subject to the following two conditions: (1) This device may not cause harmful interference, and (2) this device must accept any interference received, including interference that may cause undesired operation.
NOTICE
This notice is applicable for USA/Canada only.
If shipped to USA/Canada, install only a UL LISTED/CSA
LABELLED power supply cord meeting the following specifications:
SPECIFICATIONS
Plug Type Nema-Plug 5-15p
Cord Type SVT or SJT, minimum 3 × 18 AWG
Length Maximum 15 feet
Rating Minimum 7 A, 125 V
NOTICE
As an ENERGY STAR Partner, Sony Corporation has determined that this product meets the ENERGY STAR guidelines for energy efficiency.
(SDM-HX75 only)
Tartalomjegyzék
Ovintezkedesek 4
Alkatreszek es kezeloelemek 5
Uzembe helyezés 7
Ha lathato a menupont.
The model and serial numbers are located at the rear of the unit. Record these numbers in the spaces provided below. Refer to them whenever you call upon your dealer regarding this product. Model No. __ Serial No. ____
WARNING
To reduce the risk of fire or electric shock, do not expose this apparatus to rain or moisture.
Dangerously high voltages are present inside the unit. Do not open the cabinet. Refer servicing to qualified personnel only.
FCC Notice
This equipment has been tested and found to comply with the limits for a Class B digital device, pursuant to Part 15 of the FCC Rules. These limits are designed to provide reasonable protection against harmful interference in a residential installation. This equipment generates, uses, and can radiate radio frequency energy and, if not installed and used in accordance with the instructions, may cause harmful interference to radio communications. However, there is no guarantee that interference will not occur in a particular installation. If this equipment does cause harmful interference to radio or television reception, which can be determined by turning the equipment off and on, the user is encouraged to try to correct the interference by one or more of the following measures:
- Reorient or relocate the receiving antenna.
- Increase the separation between the equipment and receiver.
- Connect the equipment into an outlet on a circuit different from that to which the receiver is connected.
- Consult the dealer or an experienced radio/TV technician for help. You are cautioned that any changes or modifications not expressly approved in this manual could void your authority to operate this equipment.
IMPORTANT
If you have any questions about this product, you may call; Sony Customer Information Services Center 1-800-222-7669 or http://www.sony.com/
Declaration of Conformity
Trade Name:SONY
Model: SDM-HX75/HX95
Responsible Party: Sony Electronics Inc.
Address: 16530 Via Esprillo, San Diego, CA 92127 U.S.A.
Telephone Number: 858-942-2230
This device complies with part 15 of the FCC rules. Operation is subject to the following two conditions: (1) This device may not cause harmful interference, and (2) this device must accept any interference received, including interference that may cause undesired operation.
NOTICE
This notice is applicable for USA/Canada only.
If shipped to USA/Canada, install only a UL LISTED/CSA
LABELLED power supply cord meeting the following specifications:
SPECIFICATIONS
Plug Type Nema-Plug 5-15p
Cord Type SVT or SJT, minimum 3 × 18 AWG
Length Maximum 15 feet
Rating Minimum 7 A, 125 V
NOTICE
As an ENERGY STAR Partner, Sony Corporation has determined that this product meets the ENERGY STAR guidelines for energy efficiency.
(SDM-HX75 only)
Spistresci
ZERO (BOLEC OCHRONNY)
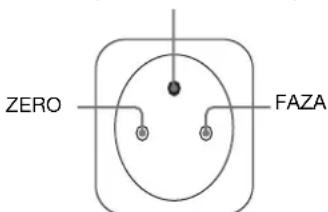
The model and serial numbers are located at the rear of the unit. Record these numbers in the spaces provided below. Refer to them whenever you call upon your dealer regarding this product. Model No. Serial No.
WARNING
To reduce the risk of fire or electric shock, do not expose this apparatus to rain or moisture.
Dangerously high voltages are present inside the unit. Do not open the cabinet. Refer servicing to qualified personnel only.
FCC Notice
This equipment has been tested and found to comply with the limits for a Class B digital device, pursuant to Part 15 of the FCC Rules. These limits are designed to provide reasonable protection against harmful interference in a residential installation. This equipment generates, uses, and can radiate radio frequency energy and, if not installed and used in accordance with the instructions, may cause harmful interference to radio communications. However, there is no guarantee that interference will not occur in a particular installation. If this equipment does cause harmful interference to radio or television reception, which can be determined by turning the equipment off and on, the user is encouraged to try to correct the interference by one or more of the following measures:
- Reorient or relocate the receiving antenna.
- Increase the separation between the equipment and receiver.
- Connect the equipment into an outlet on a circuit different from that to which the receiver is connected.
- Consult the dealer or an experienced radio/TV technician for help. You are cautioned that any changes or modifications not expressly approved in this manual could void your authority to operate this equipment.
IMPORTANT
If you have any questions about this product, you may call; Sony Customer Information Services Center 1-800-222-7669 or http://www.sony.com/
Declaration of Conformity
Trade Name:SONY
Model: SDM-HX75/HX95
Responsible Party: Sony Electronics Inc.
Address: 16530 Via Esprillo, San Diego, CA 92127 U.S.A.
Telephone Number: 858-942-2230
This device complies with part 15 of the FCC rules. Operation is subject to the following two conditions: (1) This device may not cause harmful interference, and (2) this device must accept any interference received, including interference that may cause undesired operation.
NOTICE
This notice is applicable for USA/Canada only.
If shipped to USA/Canada, install only a UL LISTED/CSA
LABELLED power supply cord meeting the following specifications:
SPECIFICATIONS
Plug Type Nema-Plug 5-15p
Cord Type SVT or SJT, minimum 3 × 18 AWG
Length Maximum 15 feet
Rating Minimum 7 A, 125 V
NOTICE
As an ENERGY STAR Partner, Sony Corporation has determined that this product meets the ENERGY STAR guidelines for energy efficiency.
(SDM-HX75 only)
Kazalo
Pozor 4
Delimonitorja in elementi za nastavljanje 5
Nastavitev 7
Nastavitev 1: Prikljucite video signalne kable. 7
- MODE
(GAME/MOVIE/PC/AUTO)
PICTURE
AUDHO - MODE RESET
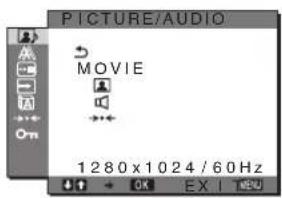
MODE meni
1 Priti s nite g u m b M E N U
Na zaslonu se prikaze glavni meni.
2 Pritiskajte gumba / za izbiro (SCREEN) ter pritisnite gumb OK.
Na zaslunu se prikaze meni SCREEN.
3 Pritiskajte gumba / za izbiro AUTO
Ustrezn no nestavite fazo zaslona, razlocljivost ter vodoravni/navpični položaj za trenutni vchodni signal ter jih shranite.
Ročno nastavite ostrino slike (faza/višina tona)
Ostrino slike lahko nastavite kot sledi. Ta nastavitev deluje, ko je racunalnik prikljucen na izhodni konektor HD15 monitorja (analogni RGB).
1 Nastavite razločljivost na računalniku na 1280 × 1024.
2 Naložite CD-ROM.
3 Zazenite CD-ROM in prikazite testni vzorec.
Za Windows uporabnike
Kadar Auto run deluje:
Kliknite Display Adjustment tool (Orodje za nastavitev prikazovalnika) (Utility).
Kliknite Adjust in potrnite locljivost ter nato kliknite Next.
Testni vorcec za PITCH in PHASE se pojavi.
Kadar Auto run ne deluje:
1 Odpritc My Computer in potem z desnim gumbom kliknite ikono CD-ROM.
Pojdite na Explorer\* in odprte ikono CD-ROM.
2 Odprite [Utility] in potem izberite [Windows].
3 ZaZenite [Win_Utility.exe].
Pojavi se testni vzorec.
Za Macintosh uporabnike
1 Odprite [Utility] in potem izberite [Mac].
2 ZaZenite [Mac_Utility.exe].
Pojavi se testni vzorec.
4 P r i t i s n i t e g u m b M E N U .
Na zaslonu se prikaze glavni meni.
5 Pritiskajte gumba / za izbiro (SCREEN) ter pritisnite gumb OK.
Na zaslonu sc prikaze meni SCREEN.
6 Pritiskajte gumba / za izbiro ^ 其 PHASE
Nazaslonu se prikaze nastavitveni meni PHASE\*.
7 Pritiskajte gumba / tolikokrat, da so vodoravni pasovi minimali.
Nastavlajte toliko casa, da so vodoravni pasovi minimalni.

8 Pritisnite gumb OK
Na zaslonu se prikaze glavni meni.
Ce se preko vsega zaslona povavijo navpični pasovi, nastavite visino tona z naslednjimi postopki:
9 Pritiskajte gumba / za izbiro >PITCH « ter pritisnite gumb OK.
Na zaslonu se prikaze nastavitveni meni PITCH<.
10 Pritiskajte gumba / tolikokrat, da izginejo navpični pasovi.
Nastavljaje toliko šasa, da navpični pasovi izginejo.

11 Kliknite END na zaslonu za izklop preizkusnega vzorca.
Ročno nastavite položaj slike (H CENTER /V CENTER)
Če slika ni na sredini zaslona, jo postavite v središec s spodaj opisanim postopkom.
1 Nastavite razločljivost na računalniku na 1280 × 1024.
2 Naložite CD-ROM.
3 Zazenite CD-ROM in prikazite testni vzorec.
Za Windows uporabnike
Kadar Auto run deluje:
Kliknite Display Adjustment tool (Orodje za nastavitev prikazovalnika) (Utility).
Kliknite Adjust in potrldite locljivost ter nato kliknite Next.
Testni vzorec za H CENTER in V CENTER se pojavi.
Kadar Auto run ne deluje:
1 Odpritc My Computer in potem z desnim gumbom kliknite ikono CD-ROM. Poidite na Explorer in odprit ekono CD-ROM.
2 Odprite [Utility] in potem izberite [Windows].
3 ZaZenite [Win_Utility.exe].
Pojavi se testni vzorec.
Za Macintosh uporabnike
1 Odpritc [Utility] in potem izberite [Mac].
2 ZaZenite [Mac_Utility.exe].
Pojavi se testni vzorec.
4 P r i t i s n i t e g u m b M E N
Na zaslonu se prikaze glavni meni.
5 Pritiskajte gumba / za izbiro (SCREEN) ter pritisnite gumb OK.
Na zaslonu se prikaze meni SCREEN.
6 Pritiskajte gumba / za izbiro »H CENTER« ali »VCENTER « ter pritisnite gumb OK.
Na zaslonu se prikaze nastavitveni meni »H CENTER« ali »V CENTER«.
7 Pritiskajte gumba / za središćno poravnavo preizkusnega vzorca zaslona.
8 Kliknite END na zaslonu za izklop preizkusnega vzorca.
- MENU POSITION meni
Položaj menija na zaslonu lahko spremenite, ce vam zastira sliko na zaslonu.

1 Pritis nite gumb MENU. Na zaslou se prikaze glavni meni.
2 Pritiskajte gumba / za izbiro (MENU POSITION) ter pritisnite gumb OK.
Na zaslonu se prikaze meni MENU POSITION<.
3 Za izbiro zeelenega položaja pritiskajte gumba / nato pa gumb OK.
Ko se prikaze meni, lahko izberete enega od 9polozajev.
INPUT SENSING ON/OFF meni
Ko izberete AUTO ON v INPUT SENSING ON/OFF meniju, monitor samodejno odkriere vchodni signal na vchodnih sponkah in samodejno spremeni vhd preden gre monitor v naacin varcevanja energia.

1 Priti s nite g u m b M E N U .
Na zaslonu se prikaze glavni meni.
2 Pritiskajte gumba / za izbiro (INPUT) U -SENSING ON/OFF) ter pritsnite gumb OK.
Na zaslonu se pojavi meni INPUT SENSING.
3 Za izbiro zejenega načina pritiskajte gumba ↓/↑ nato pa gumb OK.
- ON: Ce izbrana vhdna sponka nima vhdnega signala ali ce izberete vhdno sponko z gumbom INPUT na monitorju in vhdna sponka nima signala, se nazaslonu pojavisporocilo (stran 21) in monitor samodejno preveri vhdni signal na drugi vhdni sponki ter zamenja vhd. Ko se zamenja vhd, se levo zgoraj prikaze izbrana vhdna sponka. Ce ni vhdnega signala, gre monitor samodejno y naacin varcevanja energia.
- OFF: Vchod se ne spremeni samodejno. Pritisnite gumb INPUT in spremenite vchod.
LANGUAGE meni

1 P r i t i s n i t e g u m b M E N U .
Na zaslonu sc prikaze glavni meni.
2 Pritiskajte gumba / za izbiro (LANGUAGE) ter pritisnite gumb OK.
Na zaslonu se prikaze menui LANGUAGE.
3 Pritiskajte gumba / za izbiro jezika ter pritsnite gumb OK.
- English: anglesko
- Français: francosko
- Deutsch: nemsko
- Espanol: spansko
- Italiano: italijansko
Nederlands: nizozemsko
Svenska:svedsko
Pycckn: rusko
- 日本語: japonsko
·中文: kitajsko
- MENU LOCK meni
Zaklenite upravljanje gumbov, da boste takoprevecili nakljune spremembe ali vrintev izhodisno stanje.

1 Pritisnite gumb MENU. Nazaslonu se prikaze glavni meni.
2 Pritiskajte gumba / za izbiro (MENU LOCK) ter pritsnite gumb OK.
Na zaslonu sc prikaze meni MENU LOCK.
3 Pritiskajte gumba / in izberite >vklop Ali izklop.
ON: Delujeta samo stikalo (napajanja) in gumb INPUT. Ce poizkusite kaksnogo funkcijo, se nazaslonu prikaze ikona
OFF: Nastavite MENU LOCK v izklopljeno. Ce je bil MENU LOCK postavljena v ON,je ob pritisku na gumb MENU, ^已_m MENU LOCK izbran samodejno.
RESET meni (povrnitev v izhodišćno stanje)

1 P r i t i s n i t e g u m b M E N U .
Na zaslonu se prikaze glavni meni.
2 Pritiskajte gumba / za izbiro (RESET) ter pritisnite gumb OK.
Na zasloun se prikaze meni RESET.
3 Za izbiro zeiljenega načina pritiskajte gumba / nato pa gumb OK.
- OK: Za vrnitev vseh nastavitvenih podatkov v privzete vrednosti. Upostevajtc, da se nestavitev « LANGUAGE« po tej metodi nc vrnc v izhodisćno stanjc.
CANCEL:Preklicvrnitveizhodisnih podatkov in povratek v glavni meni.
Tehniche značilnosti
Nastavitev jakosti zvoka
Z uporabo zvočnikov na monitorju ali slusalk, lahko poslusate zvok iz vašega računalnika ali druge avdio opreme priljucene preko vtčnic na avdio vchod monitorja.
Nastavitev jakosti zvoka lahko opravite z locenega.), >Jakost zvoka<, ki ga izberete iz glavnega.),
1 Pritiskajte gumba / , ce se meni ne prikaze nazaslonu.

2 Pritiskajte gumba / za nastavitev jakosti zvoka. Menipo5samodejnoizgine.
Opombe
- Ko je nazaslonu prikazan glavni meni, ne morete nastavljati jakosti zvoka.
- Ko je vas monitor v načinu varčevanja energija, iz zvočnikov in slušalk ne prihaja zvok.
Funkcija varcevanja energije
Ta monitor izpolnjuje priporočila za varčevanje energia, dolocenih s strani VESA, ENERGY STAR (samo SDM-HX75), in NUTEK. Če je monitor prikljucen na računalnik ali video graficno plošćo, ki je skladna z DPMS (Display Power Management Standard) za analogni vchodni prikljucek/DMPM (DVI Digital Monitor Power Management) za digitalni vchodni prikljucek, bo monitor samodejno zmanjsal porabo energia, kot je prikazano spodaj.
SDM-HX75
Način
napajanja Poraba energije ⊙ indicator
(napajanja) normalno
delovanje 50 W (maks.) zelena aktiven
izklopljen*
(globoko
spanje)** 1 W (maks.) rumenorjava ☉ izklop 1 W (maks.) izklop
SDM-HX95
Način
napajanja Poraba energije indicator
(napajanja) normalno
delovanje 60 W (maks.) zelena aktiven
izklopljen*
(globoko
spanje)** 1 W (maks.) rumenorjava izklop 1 W (maks.) izklop
* Ko vaš računalnik vystopi v način »aktivno izklopljen«, je vchodni signal prekinjen in na zaslonu se pojaví sporocilo «NO INPUT SIGNAL«. Po 5 s monitor vystopi v način varčevanja energije.
**»Globoko spanje « je nacin varcevanja energije dolocen s strani Environmental Protection Agency.
Nastavitev MODE (PICTURE/ AUDIO) (načina)
Če večkrat pritsinete gumb na desni strani monitorja, lahko izberete način MODE iz GAME → MOVIE → PC → AUTO.
Ko izberete AUTO monitor samodejno nastavi osvetljenost zaslona glede na osvetljenost okolja (funkcija samodejne nestavitve osvetljenosti). Za dodatne informacij glej Funkcija za samodejno nastavitev osvetljenosti (detektor svetlobe)
Veckrat pritisnite nmb.
Privzeta nastavitev funkcije MODE je MOVIE<. Ce pritisnete mb enkrat, se prikaze MOVIE< (izhodišna nastavitev), ko pritisnete ponovno, se prikaze PC<.
Vsakič, ko pritisnete gumb način spremeni kot sledi.

Vsak nacin se prikaze na zaslonu in MODE se spremeni. Menip 5s samodejno izgine.
Funkcija za samodejno nastavitev osvetljenosti (detektor svetlobe)
Monitor je opremljen takto, da samodejno nastavi osvetljenost zaslona glede na osvetljenost okolja.
Osvetljenost zaslona se nastavi na Najustreznejsi nivo z
nastavitvijo nacinna AUTO z gumbom na sni
strani monitorja ali preko v meniju PICTURE/AUDIO.
Privzeta nastavitev osvetlitve zaslona je MOVIE.
Ko nastavite in na AUTO z gumn na desni stranizaslona, sc prikaze tudi nastavitvena vrstica. Vrstico lahko nastavite z gumboma / . Osvetlitevzaslona se spreminja glede na nivo, ki ste ga nastavili.
Funkcija samodejne nastavitve kakovosti slike (samo analogni RGB signal)
Ko monitor sprejme vchodni signal, samodejno nastavi položaj in ostrino slike (fazo/razločljivost) in zagotovi, da se nazaslonu pojav jasna slika.
Tovarniška nastavitev
Ko monitor sprejme vchodni signal, samodejno uskladi signal na enega od tovarnisko nastavljenih načinov, shranjenega v pomnilniku monitorja in takozagotovi visoko kakovostno sliko na sredini zaslona. Če vchodni signal ustreza tovarnisko nastavljenemu, se slika z ustreznimi izhodisćnimi nastavitvami samodejno povaji na zaslonu.
Vhodni signali ne ustrezajo tistim iz tovarniske nastavitve
Ko monitor sprejme vhodni signal, ki se ne ujema s tovarnisko nastavljenimi nacini, se aktivira funkcija samodejne nastavitve kakovosti slike tega monitorja in zagotovi, da se nazaslonu vedno pojav jasna slya (v naslednjih frekvenenih podroejih monitorja):
Horizontalafrevenca: 28 - 80kHz
Vertikalna frekvenca: 48-75 Hz
Ko monitor prvic sprejme vchodne signale, ki ne ustrezajo tovarnisko nestavljenim naacinom, lahko monitor potrebuje vec casa za prikaz slike na zaslonu kot obicajno. Podatki za nestavitev so samodejno shranjeni v pomnilnik, takdo bo monitor naslednjic deloval na enak naclin, kot ce monitor sprejme signal, ki ustreza tovarnisko nestavjenemu naclinu.
Ročne nastavitve faze, razločljivosti in položaja slike
Za nekatere vchodne signale funkcija samodejne nastavitve kakovosti tega monitorja nc nastavi polozaja slike, faze inrazlocljivosti.V tem primuru lahko rocno nastavitte prilagoditve (stran 16).Ce rocno nastavitce te prilagoditve, se shranijo v pomnilniku kot uporabnijski načini in sesamodecjno prikliejo, ko monitor sprejmec enake vchodnesignale.
Odpravljanje napak
Preden vzpostavite stik s tehnicno pomocjo, si oglejte to poglavje.
Sporočila na zaslonu
V primeru tezav z vhodnim signalom, sc nazaslonu prikaze eno od naslednjih sporocil. Za rešitev problema glej
>Simptomi težav in njihovo odpravljanje « na strani 22.
Ce se na zaslonu pojavi OUT OF RANGE
to pomeni, da monitor ne podpira vchodnega signala.
Preverite naslednje elemente.
Zanatanenejse informacije o sporocilih nazaslonu glej
"Simptomi težav in njihovo odpravljanje' na strani 22.
Ce se prikaze xxx.x kHz / xxx Hz"
to pomeni, da monitor ne podpira horizontalne ali vertikalne frevence.
Slike prikazujejo horizontalne in vertikalne frevence trenutnega vchodnega signala.

Ce se prikaze >RESOLUTION > 1280 × 1024
to pomeni, da monitor ne podpira vchodnega signala (1280× 1024 ali manj).

Če se na zaslonu pojavi «NO INPUT SIGNAL«
to pomeni, da na trenutno izbranem konektorju vchodni signal ni prisoten.
Ce je INPUT SENSING ON/OFF (stran 17) nastavljen na ON, monitor poisce drugi vchodni signal in samodejno spremeni vchod.

>GO TO POWER SAVE
Monitor bo v cca. 5 s po prikazu sporocila vstopil v stanje varcevanje energia.
Ce se na zaslonu pojavi »CABLE DISCONNECTED«
to pomeni, da je bil video signalni kabel odstranjen iz trenutno izbranega konektorja.
Ce je INPUT SENSING ON/OFF (stran 17) nastvljen na ON, monitor poise drugi vchodni signal in samodejno spremeni vchod.

Simptomi težav in njihovo odpravljanje
Če se problem pojavi kot rezultat prikljucitve računalnika ali druge opreme, poglejte v navodila priključenega računalnika/ opreme.
Simptom Preverite naslednje elemente Ni spline Če indicator (napajanja) ne sveti ali Če se indicator (napajanja) ne prižge, ko je vklopljeno stikalo (napajanja), Preverite ali je napajali kabel priključen pravilno. Če se na zaslonu pojavī >CABLE DISCONNECTED« Preverite, Če je video kabel pravilno priključen in Če so vsi konektorji trdno v svojih vtičnicah (stran 7).
Preverite, Če niso nožice na konektorjih ukrivljene ali zmečkane.
Preverite, da je nastavitć ivizbire vhoda pravilna (stran 11).
Priključen je video kabel, ki ni bil dobavljen v naši posiljki. Če priključite video signalni kabel, ki ni bil dobavljen v naši posiljki, se lahko na zaslonu pojavī >CABLE DISCONNECTED«. To ni napaka v dclovanje. Če se na zaslonu pojavī napis >NO INPUT SIGNAL « Ali indicator (napajanja) sveti rumenorjavo, Preverite, Če je video kabel pravilno priključen in Če so vsi konektorji trdno v svojih vtičnicah (stran 7).
Preverite, Če niso nožice na konektorjih ukrivljene ali zmečkane.
Preverite, da je nastavitć ivizbire vhoda privilna (stran 11).
■Problem povzroča priključeni računalnik ali druga oprema in ne monitor.
•Racunalnik je v načinu varčevanje energije. Pritisnite tipko na tipkovnici ali premaknite miško.
•Preverite, da je graficna kartica privilno vstavljena v računalnik.
•Preverite ali je racunalnik vklopljen. Če se na zaslonu (strain 21) pojavī >OUT OF RANGE« ■Problem povzroča priključeni računalnik ali druga oprema in ne monitor.
•Preverite ali je frekvenčno področje znotraj frekvençnegа področja monitorja. Če ste nadomesti lari monitor s tem monitorjem, ponovno priključite stari monitor in nastavitć računalniško graficno Kartico v naslednjih obsegih: Horizontalna frekvenca: 28-80 kHz (Analogni RGB), 28-64 kHz (Digitalni RGB) Vertikalna frekvenca: 48-75 Hz (Analogni RGB), 60 Hz (Digitalni RGB) Resolutija: 1280 × 1024 ali manj Če uporabljate program Windows, Če ste stari monitor nadomesti s tem monitorjem, priključite stari monitor in naredite našednje: Izberite «SONY « sseznama «Proizvajalci « in izberite «SDM-HX75 ali SDM-HX95 « sseznama «Modeli « v zaslonu za izbiro Windows naprav. Če se «SDM-HX75 ali SDM-HX95 « ne povjavita vseznamu «Modeli «, poskusite «Plug & Play». Če uporabljate system Macintosh, Ko priključite računalnik Macintosh, po potrebi uporabite adapter (ni dobavljen). Priključite adapter na računalnik prej preden priključite videosignalni kabel. Slika utripa, se odbija, niha ali je popačena. Nastavite razločljivost in fazo (samo analogni RGB signal) (strain 16).
Poskusite vtakniti monitor v drugo omrežno vtičnico, po možnosti v drugem tokokrogu.
■Problem povzroča priključeni računalnik ali druga oprema in ne monitor.
•Pogleje v priročnik vašs gražíne kartice kako je potrebno nastavitni monitor.
•Potrdite, da vaš monitor podpira grafíni način (VESA, Macintosh 19" Color, itd.) in frekvenco vchodnega signala. Tudi Če je frekvenca v pravilnem področju, imajo nkatere grafíncé kartice preozek sinhronizacijski impulz, da bi privalno sinhroniziral monitor.
•Ta monitor ne podpira preplcteniš signalov. Nastavite monitor za progresivne signale.
•Prilagodite računalnikovo hitrost osveževanja (vertikalno frekventa), da dobite najboljšo možno sliko (priporočena je 60 Hz). Slika je zamegljena. Nastavite kontrast in osvetlitev (strain 13, 14).
Nastavitev ostrinc (strain 15).
Nastavite razločljivost in fazo (samo analogni RGB signal) (strain 16).
■Problem povzroča priključeni računalnik ali druga oprema in ne monitor.
•Nastavite razločljivost na 1280 × 1024 na vašem računalniku. Slika ima sence. Odstranitc kabelske podaljškc za video kable in/ali video stikalne omarice.Preverite ali so vsi koncktorji trdno v svojih vticnicah. Slika ni na sredini ali ni prave velikosti (samo za analogue RGB signale). Nastavite razločljivost in fazo (strain 16).Nastavite položaj slike (strain 17).Upostevajte, da nekateri video načini ne zapolnijo zaslona do vogalov. Slika je premajhna. Problem povzroča praključeni računalnik ali druga oprema in ne monitor.Nastavite razločljivost na 1280 × 1024 na vašem računalniku. Slika je temna. • Nastavite osvetlitev ozadja (strain 13).Nastavite osvetlitev (strain 14).Nastavite gamo na meniju GAMMA (strain 14).Monitor potrebuje po vklopu nekaj minut, da zeroslon postane svetel.Ce je „bin nastvljen na AUTO, lahko osvetlitev zaslona pri slabi svetlobi okolja postane temnejša (strain 13, 20). Pojavijo se valoviti ali elipsasti vzorci. Nastavite razločljivost in fazo (samo analogni RGB signal) (strain 16). Barva ni povsod enaka. Nastavite razločljivost in fazo (samo analogni RGB signal) (strain 16). Bela barva nima izgleda bele barve. Nastavite temperaturo barve (strain 14). Gumbi monitorja ne delujejo ( „pojavi na zeroslonu). Če je »MENU LOCK« vklučen na »ON«, jo izključite na »OFF« (strain 18). Na zeroslonu prikazana razločljivost je nepravilna. V odvisnosti od nastavitev na graficni kartici, se razločljivost prikazana na meniju njuno ne ujema s tisto, ki je nastvljena na računalniku.
Prikaz informacij o tem monitorju
Ko monitor sprejema video signal, pritisnite in držite gumb MENU za več kot 5 s, dokler se ne pojav informacijski okno.
S ponovnim pritiskom na gumb MENU okno izgine.
Primer

Če ne morete odpraviti težave,Pokličite pooblasčenega prodajalca SONY opreme in mu posredujte naslednje informacije:
- Naziv modela: SDM-HX75 ali SDM-HX95
Serijska stevilka
Natan'en opis tezave
- Datum nakupa
- Naziv in tehnici podatki vasega računalnika in graficne kartice
- Vrsto signala (analogni RGB/digitalni RGB)
Specifikacije
LCD panel Vrsta panela: a-Si TFT z aktivno
matriko
Velikost slike:17" (43 cm)
(SDM-HX75)
19^ (48cm)
(SDM-HX95)
Oblika vchodega signala Delovna frekvenca RGB*
Horizontala:
28-80 kHz (analogni RGB)
28-64 kHz (digitaln RGB)
Vertikalna:
48-75 Hz (analogni RGB)
60 Hz (digitaln RGB)
Razlocljivost Horizontalna: Maks. 1280 tock
Vertikalna: Maks.1024 vrstic
Nivo vchodnega signala Analogi RGB video signal:
0,7 Vp-p, 75 Ω, positiven
SYNC signal:
TTL nivo, 2.2k
positivenali negativen
(Locen horizontalen in
vertikalenali kompositinysync)
Digitalni RGB (DVI) signal:
TMDS (Enojna povezava)
Avdio prikljucek Stereo mini prikljucek, 0,5 Veff
Izhod za zvočnike 3W× 2
Priključek za slusalke Stereo mini priključek
Zahtve za moč SDM-HX75
100-240V,50-60Hz,Maks.1,0A
SDM-HX95
100-240V,50-60Hz.Maks.1,1A
Porabljena moč Maks. 50 W (SDM-HX75)
Maks. 60 W (SDM-HX95)
Delovna temperatura 5-35 C
Dimenzije (sirina/visina/globina)
Zaslon (pokončen):
SDM-HX75
Pribl. 414× 418.5× 232mm
SDM-HX95
Pribl. 466,5× 468× 265mm
Masa SDM-HX75
Pribl. 6.5 kg
SDM-HX95
Pribl. 8,5 kg
Plug & Play DDC2B
Dodatki Glej stran 7.
* Priporočeni horizontali in vertikalničasovni pogoji
- Sirina horizontalega delovnega signala mora biti vecja od 4.8% skupnega horizontalega casa ali 0,8~ s, kar koli je daljse.
Horizontalna sirina brisanja naj bo vec kot 2,5 s.
- Vertikalna sibirina brisanja naj bo vec kot 450~ s
Oblikovanje in specifikacije so predmet sprembrez obvestila.
TFTLCD Color Computer Display
SDM-HX75
SDM-HX95
Owner's Record
The model and serial numbers are located at the rear of the unit. Record these numbers in the spaces provided below. Refer to them whenever you call upon your dealer regarding this product. Model No. ______ Serial No. ______
WARNING
To reduce the risk of fire or electric shock, do not expose this apparatus to rain or moisture.
Dangerously high voltages are present inside the unit. Do not open the cabinet. Refer servicing to qualified personnel only.
FCC Notice
This equipment has been tested and found to comply with the limits for a Class B digital device, pursuant to Part 15 of the FCC Rules. These limits are designed to provide reasonable protection against harmful interference in a residential installation. This equipment generates, uses, and can radiate radio frequency energy and, if not installed and used in accordance with the instructions, may cause harmful interference to radio communications. However, there is no guarantee that interference will not occur in a particular installation. If this equipment does cause harmful interference to radio or television reception, which can be determined by turning the equipment off and on, the user is encouraged to try to correct the interference by one or more of the following measures:
- Reorient or relocate the receiving antenna.
- Increase the separation between the equipment and receiver.
- Connect the equipment into an outlet on a circuit different from that to which the receiver is connected.
- Consult the dealer or an experienced radio/TV technician for help. You are cautioned that any changes or modifications not expressly approved in this manual could void your authority to operate this equipment.
IMPORTANT
Para prevenirrialquier mal functionamento y evitar daños, por favor, lea detalladamente este manual de instrucciones antes de conectar y operar este equipo.
If you have any questions about this product, you may call; Sony Customer Information Services Center 1-800-222-7669 or http://www.sony.com/
Declaration of Conformity
Trade Name:SONY
Model: SDM-HX75/HX95
Responsible Party: Sony Electronics Inc.
Address: 16530 Via Esprillo,
San Diego, CA 92127 U.S.A.
Telephone Number: 858-942-2230
This device complies with part 15 of the FCC rules. Operation is subject to the following two conditions: (1) This device may not cause harmful interference, and (2) this device must accept any interference received, including interference that may cause undesired operation.
NOTICE
This notice is applicable for USA/Canada only.
If shipped to USA/Canada, install only a UL LISTED/CSA
LABELLED power supply cord meeting the following specifications:
SPECIFICATIONS
Plug Type Nema-Plug 5-15p
Cord Type SVT or SJT, minimum 3 × 18 AWG
Length Maximum 15 feet
Rating Minimum 7 A, 125 V
NOTICE
Cette notice s'applique aux Etats-Unis et au Canada uniquement.
Si cet appeareil est exporté aux Etats-Unis ou au Canada, utiliser le cordon d'alimentation portant la mention UL LISTED/CSA
LABELLED et replissant les conditions suivantes: SPECIFICATIONS
Type de fiche Fiche Nema 5-15 broches
Cordon Type SVT ou SJT, minimum 3 × 18 AWG
Longueur Maximum 15 pieds
Tension Minimum 7 A. 125 V


As an ENERGY STAR Partner, Sony Corporation has determined that this product meets the ENERGY STAR guidelines for energy efficiency.
(SDM-HX75 only)
Içindekiler
Uyarilar 4
Bolmelerin ve kontrdugmelerin tanimlanmasi 5
Kurulum 7
Kurulum 1:Video sinyal kabolarini takin 7
Kurulum 2: Ses kablosunu baglayin 8
Kurulum 3: Güç kablosunu®, baglıyan 8
Kurulum 4: Kordonlari ve kablolari sarin 9
Kurulum 5: Monitor ve bilgisayari aqin 9
Kurulum 6: Egikligi ve aciyi ayarlama. 10
Giris sinyalini seme (INPUT duğmesi) 11
Monitörun Kullanıciya Yaşlı Apaşi 12
Menuyu kullanma 12
PICTURE/AUDIO menusu 13
MODEmenusu 13
PICTURE menu 13
BACKLIGHT ayarlama 13
CONTRAST ayarlama ① 13
BRIGHTNESS ayarlama 14
GAMMA ayarlama 14
COLOR ayarlama 14
SHARPNESS ayarlama 15
AUDIO menusu 15
TREBLE, BASS veya BALANCE'yi ayarlama 15
SURROUND ayarlama 15
MODERESETmenusu
(tum modlari varsaylan ayara geri dondurme) 15
SCREENmenusu(sadeceanalogRGBsinyali) 16
MENUPPOSITIONmenusu 17
INPUT SENSING ON/OFF menusu 17
LANGUAGE menu 18
RESET menu (varsaylan ayarlara geridondürme) 18
ON MENU LOCK menusu 18
Teknik Ozellikler 19
Sesi kontrl etme 19
Enerji tasarrufu fonksiyonu 19
MOD'u Ayarlama (PICTURE/AUDIO) (modu) 20
Otomatik parlaklik ayarlama fonksiyonu (Isik sensor) 20
Otomatik resim kalitesi ayarlama fonksiyonu
(sadece analog RGB sinyali) 20
Sorun giderme 21
Goruntuli mesajlar 21
Hata belirtileri ve olasi giderme yontemleri 22
Özellikler 24
Uyanilar
Guc baglantilar ile ilgili uyari
- Verilen güç kablosunu kullanin. Eger farklı bir güç kablosu kullaniyorsaniz, güç kaynaginizla uyumlu oldugundan emin olun.
A.B.D. deki musteriler icin
Eger uygun kablo kullanmazsaniz, bu monitor zorunlu FCC standartlarma uygun olmayacaktir.
Ingiltere'dekimüsteriler icin
Eger bu monitori Ingiltere'de kullanyorsaniz, Ingiltere'ye uygun guc kablosu kullanin.
Fiş tiplerinin ornekleri


100ila 120VACicin 200ila 240VACicin sadece 240V ACicin
Cihaz, kolaylikla erisilebilen bir prize yakin olarak yerlestirilmidir.
Kurulum
Monitoru asagidaki yerlerde kurmayin veya birakmayin:
- Asiri sicut yerler, ornegin radyator yani, isitici yani veya dokrudan gunes isigi alan yerler. Monitoru, mesela gunes altinda park edilmis araba icinde veya isitici yaninda, asiri sicaga maruz birakmak, kasada deformasyona ve arizalarara sebep olabilir.
- Mekanik vibrasyon veya soka aqik yerlerde.
- TV veya diger ev aletleri gibi gülü manyetak alan yaratanan cihazlarin)yakinnda.
- Asiri derecede toz, kir veya kum olan yerlerde, ornegin aqik pencere kenari veya cikis kapisi gibi. Eger geci ci olarak dis ortamda kullanilmasi gerekiyorsa, havadaki toza ve kire karsi gerekli onlemleri almalisimiz. Aksi takdirde tamiri mumkun olmayan arizalar olusabilir.
LCD ekranı kullanma
- LCD ekrani güneşe bakar seksilde birakmayin, bu LCD ekrana zarar verebilir. Monitoru pencere yanina yerleşirirken dikkatli olun.
- LCD ekrana bastirmayin ve ekrani eizmeyin. LCD ekran üzerine agr nesneler koymayin. Bu ekranı duzgünlıgün kaybetmesine ve LCD panel arizasa nsebp olabilir.
Eger monitor soguk bir yerde kullanilirsa, ekranda hayalet görtü olugabilir. Bu bir aniza degildir. Sicaklik normal calisma seviyesine donduğunde, ekran normale doner.
- Eger sabit bir resim uzun sure gosterilirse, bir sure icin hayalet görtunj olusabilir. Hayalet görtunj daha sonra yok olur.
LCD panel calhma sirasinda isir. Bu bir aniza degildir.
Dahili stereo hoparlörler hakkinda
Manyetakayit cihazlarini, bantlari ve floppy disketleri hoparlorun acikligindan uzakututun,cunku hoparlorler manyetakalan uretirler. Bu manyetakalan,manyetakbant ve disketlerde kayith verileri etkileyebilir.
LCD ile ilgili not (Siv Kristal Ekran)
Lütfen LCD ekranin yüksk hassasiyct technolojis ilc
yapildigi unutmayin. Bununla birlikte, LCD ekran üzerinde
sabit siyah noktalar vya parlak isik noktaları (krmizi, mavi
veya yesil) ve dizensiz renkli seritler ya da parlaklik belirebilir.
Bu bir aniza degildir.
(Etkili noktalar: %99,99 dan fazla)
Bakim
- Monitorunütu temizlemeden once güç kablosunu elektrik prizinden Çekın.
- LCD ekranı yumusak bir bez ile temizleyin. Eger cam temizleyici bir sivi kullanacaksanuz, anti statik gezelti vya benzeri katki iceren bir temizleyici kulanmayin, bu LCD ekranı kaplamasanı,Qizebilir.
- Kasayi, paneli ve kontrolleri hafif deterjanl solusyonla islatilmis yumusak bir bez ile temizleyin. Asindici ped, temizleme tozu veya alkol ya da benzin gibi gezuciler kullanmayin.
- Ekran yüseyini tumenmez kalem veya tornavida gibi keskin veya asindirnci maddelerle, silmeyin, dokunmayin ve temas etmeyin. Bu Tür bir temas resim tupunde Çizilmeye yol acabilir.
Eger monitor bocek ilaclan gibi guclu solventler maruz kalir veya kauquk yada vinil malzemelerle sert temasta bulunursa malzemede bozulma veya LCD ekran kaplamasinda bozulma meydana gelebilir.
Tasima
- Tasima esnasinda monitordeki tum kabolari ayirin ve ekram cizmemeye ozen gostererek LCD monitorun iki tarafindan sikica tutun. Eger monitoru dinurnsiz yaralanabilirsiniz veya monitor hasar gorebilir.
- Bu monitorü tamir veya gonderi icin tasirken original kutusunu ve ambalaj malzemelerini kullanin.
Monitor atilmasi
- Bu monitorü genel ev atiklar ile birlikte atmayın.
- Bu monitörde kullananan flóresan típte civa bulunmaktadir. Bu monitorün atilmasinda yerel temizlik idarenizin yönetmeliklerine uyulması gereklidir.
Böümlerin ve kontrolduğmelerinin tanımlanması
Daha fazla detay icin parantez icindeki sayfalara bakimiz.

LCD monitor on yuzu
LCD monitor yandan görtintusu

1 (Guc) duigmesive 念 (g u c) isi (sayfalar 9, 19) Ekranacmak ve kapatmak icin, 念 (g u c) anahtarina basin Gucisigi, monitor acildygnda yesil yanar, monitor erjeri tasarrufu modundayken ise turuncu olarak yanar.
2 Isik sensor (sayfa 20) Bu sensor cevredekleri alanin parlakligini olcer. Sensoru kagit vs. ile kapatmadiginuzdan emin olun.
3 Stereo hoparlorler (sayfa 19) Bu hoparlorer ses sinyallerini ses olarak disari verir.
4 MENU dugmesi (sayfa 12) Bu dugme menu ekranini acar ve kapatir.
5 / ve (ses kontrl) duğmeleri (sayfalar 12, 19) Bu duğmeler menu maddelerini seçmek ve ayar yapmak icin ve sesi kontrl etmek üzere "Ses" menusünu görtunjulemek icin kullamilr.
OK duğmesi (sayfa 12) Bu duğme, ↓/↑ duğmeleri ile seçilen menu maddelerini ve yapilan ayarlın aktive eder (5).
7 INPUT duğmesi (sayfa 11) Bu duğme, monitó iki bilgisayar baglandında video giris sinyalinin INPUT1, INPUT2 ve INPUT3arasindaGPCİ yapmasını saglar.
8 ügmesi (sayfa 20) Bu duğme MOD'u (PICTURE/AUDIO) degistirir.
9 Arka kapak (sayfa 7) Bu kapagi, kabolari vya ag kabolarini takarken yukari kaydiriniz.
10 Kulaklik fisi (sayfa 19) Bu fiis sesinyallerini kullakliklara verir.

LCD monitor arka yuzu
11 ACIN Soketi (sayfa 8)
Bu soket guc kablosunu baglar (saglanmistir).
12 Güvenlik Kilidi Boşlugu
Güvenlik kilidi boşluqku Kensington Micro Saver Security System ile birlikte kullanilmahdir.
Micro Saver Security System, Kensington'un tescilli markasdir.
13 INPUT1[in ses giris fis (sayfa 8)
Bu fiş, bir bilgisayarin ses Çişkış fişine baglandında vya INPUT1'e digerbir ses cihazı baglandında ses sinyallerini verir.
14 INPUT2 icin HD15 giris soketi (analog RGB) (sayfa 7)
Bu soket RGB video (0,700 Vp-p, pozitif) ve sync sinyallerini verir.
15 INPUT2 icin ses giris fişi (sayfa 8)
Bu fi, bir bilgisayarin ses cikis fisine baglandiginda veya INPUT2'ye diger bir ses cihazi baglandignda ses sinyallerini verir.
16 INPUT2 icin HD15 giris soketi (analog RGB) (sayfa 7)
Bu soket RGB video (0,700 Vp-p, pozitif) ve sync sinyallerini verir.
17 INPUT3 için ses giris fişi (sayfa 8)
Bu fis, bir bilgisayarin ses cikis fisine baglandignda veya INPUT3'e digerbir ses cihazi baglandignda ses sinyallerini verir.
18 INPUT3 icin DVI-D giris soketi (dijital RGB) (sayfa 7)
Bu soket DVI Rev. 1.0 ilc uyumlu dijital RGB video sinyallerini verir.
19 Kablo tutucu (sayfa 9)
Bu parca, kabolari ve ag kabolarini monitore sabitler.
Kurulum
Monitorunuzi kullanmaya baskamadan once, asagidakilerin kutuda bulundugundan emin olun.
LCDckran
Gückablosu
HD15-HD15 video sinyal kablosu (analog RGB)
DVI-D video sinyal kablosu (dijital RGB)
- Ses kablosu (stereo mini fi§)
- CD-ROM (Windows/Macintosh için program yazilimi, Isletim Talimatlari, vs.)
- Garanti karti
- Kolay Kurulum Kilavuzu
Kurulum 1:Video sinyal kabolarini takin
- Baglamadan-once monitorü ve bilgisayaruzi kapatn.
- Bilgisayarı monitorın HD15*giris doketine (analog RGB) baglarken, bakimiz "HD15*cikis doketi olan bir bilgisayar baglayın (analog RGB).
Not
Video sinyal kablosu baglayicisin pinlerine dokunmayin, dokunmak pinlerin egilmesine yol acabilir.
Arka kapaqi yukari kaydirin.

DVI seksiş doketi olan bir bilgisayar bestehtiny (dijital RGB)
Saglianan DVI-D video sinyal kablosunu (dijital RGB) kullanarak, bilgisayari monitor输入 INPUT3 icin olan DVI-D giris soketine (dijital RGB) baglayin.

HD15 cikis doketi akan bir bilgisayar baglayin (analog RGB)
Saglianan HD15-HD15 video sinyal kablosunu (analog RGB) kullanarak, bilgisayari monitor输入 INPUT1 veya INPUT2 için akan HD 15 girisoketine (analog RGB) baglayin.
Bilgisayari, asagidaki sekillere bakarak baglaym.
IBM PC/AT veya uyumlu bilgisayara baglama


■Bir Macintosh bilgisayara baglama
Bir Macintosh bilgisayar baglarken, gerekirse bir adaptoror (saglianmamustur) kullanin. Video sinal kablosunu baglamadan once adaptororu bilgisayara baglayin.
Kurulum 2: Ses kablosunuimentary in
Verilen ses kablosunu monitori ilgili ses giris fişine baglayin.
Monitorun hoparlorlini vya kulaklkarini kullanarak, bilgisayarinizdan vya monitorun ses giris fislerine bagli diger ses cihazlarindan gelen sesleri dinleyebilirsiniz. Daha fazla bilgi icin, bkz "Sesi kontrol etme" sayfa 19.

Kurulum 3: Güç kablosunubaughin
1 Sağlanan Güç kablosunu monitorin AC IN soketine-SAglambir sekilde baglayin.
2 Diger ucu bir prize saglam bir sekilde takin.

Kurulum 4: Kordonlari ve kabolari sarin
1 Arka kapaqi yukari kaydirin.
2 Kabin üzerindeki kablo tutucusunu kullanarak video sinyal kablosunu, ses kabolarini ve guç kablosunu saglamlayin.
3 Arka kapaqi aasaiki kaydirin.


Kurulum 5:Monitörü ve bilgisayarı�能
1 Monitorün onündeki (guc dugmesine) basin. (G C) 1sigi yesil yanacaktir.

2 Bilgisayari acin.
3 lstediginiz giris sinyalini secmek icin INPUT duğmesine basin.
Secilen giri sin resmi ekranda belir.
Daha fazla bilgi icin, bkz "Giri sinyalini seçme (INPUT dügmesi)" sayfa 11.

Monitorunzun kurulumu tamamlanmistir. Eger gerekliyse grotuyu ayarlamak icin monitorun kontrol duigmelerini kullanin (sayfa 12).
Eger ekraninizda görtü yoksa
- Monitor bilgisayariniza dizgün olarak baglandigundan emin olun.
Eger ekranda "NO INPUT SIGNAL" görtülenirse:
Bilgisayar enerji tasarrufu modundadir. Klavyede herhangi bir tuja basmayi veya fareyi hareket ettirmeyi deneyin.
- INPUT dugmesine bescharen giris sinyal ayarmin dokru olup olmadigi kontrl edin (sayfa 11).
Eger ekranda "CABLE DISCONNECTED" görtülenirse:
Video sinyal kablosunun duzgün sekilde baghi olup olmadigiin kontrol edin.
- INPUT dugmesine basarak giris sinyal ayarmin dokru olup olmadigi ini kontrol edin (sayfa 11).
Eger ekraninizda "OUT OF RANGE" belirise, eski monitori tekrar baglayin. Ardindan bilgisayarin ekran karini, asagidaki araliklara ayarlayin.
Analog RGB Dijital RGB Yatay frekans 28-80 kHz 28-64 kHz Dikey frekans 48-75 Hz 60 Hz Çüzünürlük 1280 × 1024 vya daha/DDüzuk 1280×1024 vya daha/DDüzuk
Göruntülu mesaj hakkinda daha genis bilgi icin, bkz "Hata belirtileri ve olas giderme yontemleri" sayfa 22.
Özel sürüçülere gerek yoktur
Bu monitor "DDC" Tak ve Çalıstır (Plug & Play) standartlarina uygundur ve otomatik olarak monitor bilgilerini algilar. Bilgisayariniza özelbir sürüci yüklenncsine gerek duyulmaz.
Monitor PC'ize bagladiktan sonra PC'yi ilk kez calisturdigiizda Kurulum Sihirbazy ekranda belirebilir. Bu durumda, ekranda beliren talimatlari takip edin. Tak ve Kullan Monitor otomatik olarak secilir, boylece monitoru kullanabilirsiniz.
Dikey frekans 60 Hz' e ayarlidir.
Titremeler ortadan kalktignda monitur bu halyle kullanabilisiniz. Ayirbyuksekegerin dikey frekansi ayarlanamiza gerek yoktur.
Kurulum 6:Eğikligi ve açıyı ayarlama
Monitor asagida belirtilen acilarda ayarlanabilir.
LCD panelin kenarlarindan kavrayin ve ekran acilarim ayarlayin.


Monitoru rahat bir sekilde kullanmak icin
Monitorunuzn gorus acisini, uzerinde bulundugu masa ve kullandiginiz sandalyein yuksekligine gore ve 1sik monitorden gozunüze yansimayacak sekilde ayarlayin.
Not
Ekran eginimi ve yuksekligini ayarlarken, monitoru masaya carpmamaya dikkat ederek, yavae ve dikkatli hareket edin.
Giriş sinyalini/seme
(INPUT diugmesi)
INPUT duğmesine basin.
Bu dugmeye her bastigimzda girisinyali degisir.

INPUT
Ekran mesaji Giriş sinyali yapilendirma(Sol üst koosec yaklaşık 5saniyeGPCUK.) INPUT1: HD15 HD15 giris Soketi(analog RGB) INPUT1 icin INPUT2: HD15 HD15 giris Soketi(analog RGB) INPUT2 icin INPUT3: DVI-D DVI-D giris Soketi(dijital RGB) INPUT3 icin
Monitor Kullanıya Bağlı Ayarı
Ayarlari yapmadan once
Monituro bilgisayara baglayin ve ikisini de calistirin. Iyi sonuc elde etmek icin, ayar yapmadan once en az 30 dakika bekleyin.
Ekranda beliren�� u kullanar monitorunuzde pek cok ayar degisikligi yapabilirsiniz.
Menüyü kullanma
1 Ana menüyi Güsterme.
Ekrandaki ana menuyu gostermek icin MENU dugmesine basun.

2 Meniyu secin.
Istediginiz menuyu görtuntilemek icin / dugmelerine basin. Ik menu maddesinc gecmek icin OK dugmesinc basin.

3 Ayarlamak istediginiz maddeyi secin.
Ayar yapmak istediginiz maddeyi sejmek icin, / dugmelcrine daha sonra da OK dugmesine basin.

menu maddelerinden biri isc.
sectiginizde ve OK dugmesine bastigimiza, ekran bir onceki menyu de doner.
4 Maddeyi ayarlayin.
Ayarlamalari yapmak icin dugmelerine daha sonra da OK dugmesine basin.
OK duğmesine bastügünizda ayarlar saklanir ve ekran bir oncki menüye dōner.

5 Menuyu kapatma.
Normal goruntuye donmek icin MENU dugmesine bir kez basin. Eger herhangi bir dugmeye basilmazsa menu 45 saniye icinde otomatik okayakapanir.

■ Ayarlari fabrika ayarlarina geridondürme.
Ayarli, RESET menusunu kullanarak sifirlayabilirsiniz. Ayarli sifrlama ile ilgili daha fazla bilgi icin, bakiniz sayfa 18 deki 一 ^ 一 (RESET).

PICTURE/AUDIO menüsu
PICTURE/AUDIO menüünü kullanarak asagidaki ögeleri ayarlayabilirsiniz.
- MODE (GAME/MOVIE/PC/ AUTO)
- PICTUR
AUDI
- MODERESET

MODEmenusu
Amaciniza gore uygun ekran parlakligini secebilirsiniz.
PICTURE/AUDIO ayarlan her bir mod icin ayarlanabilir.
Ayrica, her giris (INPUT1/INPUT2/INPUT3) iar modu degistirebilirisiniz.
1 MENU duğmesine basin.
Ana menu ekranda görtüntülenir.
2 (P TURE AUDIO)i sejmek icin / duqmelerine ve sonra da OK duqmesine basin.
PICTURE/AUDIO menus ekranda görtülenir.
3 "MOVIE" i seçmek,— in / duğmelerine ve sonra da OK duğmesine basin.
MODE menusü ekranda görtunülenir.

4 Istediginiz modu sejmek icin / duigmesine basin ve sonra OK duigmesine basin.
Varsaylan ayar MOVIE dir.
- GAME: Parlak resim.
MOVIE: Guclu kontrastli net resim.
- PC: Yumusak tonlu resim.
- AUTO: Ekran parlakligimi evecre parlakligina gore otomatik olarak ayarlar (otomatik parlaklik ayarlama fonksiyonu). Daha fazla bilgi icin, bkz "Otomatik parlaklik ayarlama fonksiyonu (isik sensorü)" (sayfa 20).
NOT
AUTO modda, arka 1sigi ayarlayamazsimiz.
PICTURE menu A
PICTURE menusunu kullanarak asagidaki ogeleri ayarlayabilirsiniz.
- BACK LIGHT
- CONTRAST
BRIGHTNESS
GAMMA menusu
- COLOR menusü
SHARPNE

BACKLIGHT ayarlama
Eger ekran cok parlaksa, arka isigi ayarlayin ve ekranin daha kolay gorunmesini saglayin.
1 MENU duğmesine basin.
Ana menuckranda görtuntilenir.
2 (PICTURE/AUDIO)i sejmek icin / duqmelerine ve sonra da OK duqmesine basin.
PICTURE/AUDIO menusu ckranda gorbuntulenir.
3 (PICTURE) seceneğini seçmek icin ↓/↑ duğmelerine ve sonra da OK duğmesine basin.
PICTURE mcnusckranda goruntulcnir.
4 " BACKLIGHT" seceneğini/seçmek icin ↓/↑ Düğmelerine ve sonra da OK Düğmesine basin.
"BACKLIGHT" menusü ekranda göruntülenir.
5 Isik seviyesini ayarlamak icin, / duğmelerine basin ve sonra OK duğmesine basin.
CONTRAST ayarlama 1
Resim kontrastini ayarlayin.
1 MENU duğmesine basin.
Ana menu ekranda görtuntilenir.
2 (PICTURE/AUDIO)i sejmek icin / duqmelerine ve sonra da OK duqmesine basin.
PICTURE/AUDIO menus ekranda gortintulenir.
3 (PICTURE) seceneğini seçmek icin ↓/↑ Düğmelerine ve sonra da OK Düğmesine basin.
PICTURE menusu ekranda goruntulenir.
4 "CONTRAST"seçeneğini seçmek icin 1 / 1 duqmelerine ve sonra da OK duqmesine basin.
"CONTRAST" menus ekranda görtülenir.
5 Kontrasti ayarlamak icin, / duigmelerine basin ve sonra OK duigmesine basin.
BRIGHTNESS ayarlama
Resmin parlakhligi ayarlayin (siyah seviyesi).
1 MENU duğmesine basin.
Ana menu ekranda görtunülenir.
2 (PICTURE/AUDIO)'i sejmek icin / duqmelerine ve sonra da OK duqmesine basin. PICTURE/AUDIO menusu ekranda goruntulenir.
3 (PICTURE) seçeneğini seçmek icin ↓/↑ Düğmelerine ve sonra da OK Düğmesine basin. PICTURE menü ekranda görtüntülenir.
4 “BRIGHTNESS” seçeneğini seçmek icin ↓/↑ Dügmelerine ve sonra da OK Düɡmesine basin. “BRIGHTNESS” menü su ekranda görtündelenir.
5 Parlakiği ayarlamak icin, / diğmelerine basin ve sonra OK diğmesine basin.
GAMMA ayarlama
Göruntünun renk gölgesini, göruntünun original renk gölgesi ile birlestirebilirsiniz.

1 MENU duğmesine basin.
Ana menu ekranda görtuntilenir.
2 (PICTURE/AUDIO)'i sejmek icin / duqmelerine ve sonra da OK duqmesine basin. PICTURE/AUDIO menusu ekranda goruntulenir.
3 (PICTURE) seçeneğini seçmek icin ↓/↑ Düğmelerine ve sonra da OK Düğmesine basin. PICTURE menusü ekranda görtündelenir.
4 " (GAMMA)"seçeneğini seçmek icin 1 / 1 duğmelerine ve sonra da OK duğmesine basin. GAMMA menusu ekranda görtüntülenir.
5 Istediginiz modu sejmek icin / duğmelerine basin ve sonra OK duğmesine basin.
COLOR ayarlama
Goruntunun beyaz renk alanindaki renk seviyesini, varsaylan renk isisi ayarlarindan scebilirsiniz.
Ayrica,gerekirse,renk isisinaince ayar da yapabilirsiniz.

1 MENU duğmesine basin.
Ana menuckranda görtuntilcnir.
2 (PITURE/AUDIO)'i sejmek icin / duqmelerine ve sonra da OK duqmesine basin. PICTURE/AUDIO menusu ekranda goruntulcnir.
3 (PICTURE) seçeneğini seçmek icin ↓/↑ Düğmelerine ve sonra da OK Düğmesine basin. PICTURE menü su ekranda görtündelenir.
4 "COLOR") seçeneğini seçmek,—/üdümelerine ve sonra da OK düzmesine basin. COLOR menüsi ekranda görtüntenir.
5 Istediiginiz renk isisiin seqmek icin / duqmelerine ve sonra da OK duqmesine basin. Renk 9300K'dan 6500K'yaogrdu ayarlanirken beyaz dengesi maviden kirmiziya dogru degisir.
Renk Isisina ince ayar yapma
Renk isisi her bir mod icin ayarlanabilir. (GAME/MOVIE/PC/AUTO)
1 MENU Düğmesine basin.
Ana menu ekranda görtunülenir.
2 (P TURE/AUDIO)i secmek icin / duqmelerine ve sonra da OK duqmesine basin. PICTURE/AUDIO menusu ckranda goruntulenir.
3 (PICTURE) seçeneğini seçmek icin ↓/↑ Düğmelerine ve sonra da OK Düğmesine basin. PICTURE menük erkanda görtüntülenir.
4 "COLOR"seçeneğini seçmek icin ↓/↑ Düğmelerine ve sonra da OK Düğmesine basin. COLOR menüsu ekranda görtüntenir.
5 "ADJUST" seçeneğini seçmek,— in / duğmelerine ve sonra da OK duğmesine basin. Renk isisi,— ince,—ayar,—ekranda belirir.

6 R (Kirmizi) veya B (Mavi) seçeneğini/seçmek icin ↓/↑ Düğmelerine ve sonra da OK Düğmesine basin. Ardindan, istediginiz renk isisini ayarlamak icin ↓/↑ Düğmelerine ve sonra da OK Düğmesine basin.
Bu ayar, renk isisin R ve B bolumlerini G (yeil) bolumune gore artirarak veya azaltarak degistirdiginden, G bolumu sabittir.
7 seceneğini seçmek,— in / duğmelerine ve OK duğmesine basin.
Yeni renk ayari bellekte saklanir ve "Kullanici" seçildiginde otomatik atau geriçagrlr.
COLOR menus ekranda goruntulenir.
SHARPNESS ayarlama
Göruntülerin kenarlying kesklinstirmek vs. iqin ayarlayin.
1 MENU duğmesine basin.
Ana menu ekranda goruntulenir.
2 (PICTURE/AUDIO)i sejmek icin /+ duqmelerine ve sonra da OK duqmesine basin. PICTURE/AUDIO menusu ekranda goruntulenir.
3 (PICTURE) seçeneğini seçmek icin ↓/↑ Düğmelerine ve sonra da OK Düğmesine basin. PICTURE menük erkanda görtüntülenir.
4 "SHARPNESS" seçeneğini seçmek icin ↓/↑ Düğmelerine ve sonra da OK Düğmesine basin. SHARPNESS menüsu ekranda göruntülenir.
5 Keskinligi ayarlamak icin, / dugmelerine basin ve sonra OK dugmesine basin.
■ AUDIO menusü
AUDIO menüsunu kullanarak asagidaki ögeleri ayarlayabilirsiniz.
TREBLE
BASS
BALANCE
- SURROUND

TREBLE, BASS veya BALANCE'yi ayarlama
1 MENU diugmesine basin.
Ana menu ekranda görtüntenir.
2 (PICTURE/AUDIO)i sejmek icin / duqmelerine ve sonra da OK duqmesine basin. PICTURE/AUDIO menusu ekranda goruntulcnir.
3 (AUDIO) seceneğini seçmek icin ↓/↑ Düğmelerine ve sonra da OK Düğmesine basin.
4 TREBLE, BASS veya BALANCE seceneğiniseçmek icin ↓/↑ Düğmelerine ve sonra da OK Düğmesine basin.
5 Istediginiz modu semcik icin / diugmelerine basin ve sonra OK diugmesine basin.
SURROUND ayarlama
1 MENU dugmesine basin.
Ana menu ekranda goruntulcnir.
2 (PICTURE/AUDIO)i sejmek icin / duqmelerine ve sonra da OK duqmesine basin. PICTURE/AUDIO menusu ekranda goruntulenir.
3 (AUDIO) seceneğini seçmek icin ↓/↑ Düğmelerine ve sonra da OK Düğmesine basin.
4 SURROUND seceneğini seçmek icin ↓/↑ Düğmelerine ve sonra da OK Düğmesine basin.
5 Istediiginiz modu sejmek icin / duqmelerine basin ve sonra OK duqmesine basin.

SRS WOW: Derin, zengin bastonu vct nyuktckton zengin bir surround ses saglar ve ozellikle filmer ve oyunlar guci sce ilc daha eglenceli hale gelir.
- OFF (KAPALI): SRS WOW efektini kapatri.
SRS Laboratuarlan tarafindan gelistirilen son teknolojiyikullanan SRS WOW, cseitli ses kaynaklarinun ses kalitesinionemli miktarda artirr.
■ MODE RESET menüsu (tüm modlari varsayilan ayara geri dondürme)
Yaptiginz ayarlar fabrika ayarlarina geridondurebilirsiniz.
1 MENU duğmesine basin.
Ana menu ekranda görtüntenir.
2 (PICTURE/AUDIO)i sejmek icin / duqmelerine ve sonra da OK duqmesine basin. PICTURE/AUDIO menusu ekranda goruntulenir.
3 “RESET” seçeneğini seçmek,— in ↓/↑ Düğmelerine ve sonra da OK Düğmesine basin. “RESET” menü su ekranda görtündenir.
4 Istediiginiz modu sejmek icin / digmelerine basin ve sonra OK digmesine basin.
- OK: PICTURE/AUDIO menusündeki her modu varsayilan ayarlara geri dondurmek icin.
- CANCEL: Sifirlamayi epital etmek ve PICTURE/ AUDIO menusune donmek icin.
SCREEN menüsu (sadece analog RGB sinyali)
SCREEN menüsunü kullanarak asagidaki ögeleri ayarlayabilirsiniz.
·AUTO
PHASE
PITCH
HCENTER
VCENTER

Not
INPUT3 için DVI-D giris soketinden digital RGB sinyalleri alirken, ayar gereksizdir.
- Otomatik görtü kalitesi ayarlama fonksiyonu
Monitor bir giris sinyali aldiginda, otomatik olarak resmin pozisyonunu ve kesklinigi (faz/aralik) ayarlar ve ekranda net bir resmin görtüntülenmesini saglar (sayfa 20).
Not
Otomatik görtü kalitesi fonksiyonu aktif durumda oldugunda sadece (guc) dugmesi calisir.
Eger bu monitori onomatik görtü kalitesi fonksiyonu, görtütu tam olarak ayarlayamazsa
Geçerli giri sinyali icin, daha ileri otomatik goruntu kalitesi ayarlan yapabilirsiniz (Aasagidaki "AUTO" bolumune bakin).
Eger görtü kalitesiyle ilgili daha fazla ayar yapmak isterseniz
Görtünün kcskinligini (faz/aralık) ve konumunu (yatay/dikcy konumunu) elinizle ayarlayabilirsiniz.
Bu ayarlar, bellekte saklanir ve monitor onceden girilmis veya kaytll giris sinyalini alduginda, otomatik okayak gerig cagrilur.
Geçerli giriş sinyali icin, daha ileri otomatik görtü kalitesi ayarlı yapabilirsiniz (AUTO)
1 MENU diugmesine basin.
Ana menu ekranda görtüntenir.
2 (SCREEN) seçeneğini seçmek icin ↓/↑ duğmelerine ve sonra da OK duğmesine basin.
SCREEN menusu ekranda görtuntilenir.
3 "AUTO"seceneignisecmekicin / duigmelerine ve sonra da OK duigmesine basin.
Ekranin, geleeri giriş sinyali icin faz, aralık ve yatay/dikey konumu ile ilgili gerekli ayarlamaları yapın ve bunlari saklayın.
Resmin keskinligini manuel olarak ayarlama (Phase (Faz)/Pitch (Aralik))
Resmin keskinliginci asagidaki sekilde ayarlayabilirsiniz. Bu ayar, bilgisayar monitori HD15 giris soketine (analog RGB) baglandiginda etkindir.
1 Bilgisayarda cüzünurlugu 1280× 1024 olarak ayarlayin.
2 CD-ROM'ü yerleştinir.
3 CD-ROM 'u besoinin ve ornek testi görtüntüleyin. Windows Kullanıçları icin
Otomatik calistirma islemi basladignda:
Display Adjustment tool 'a (Utility) tiklayin.
"Adjust" a tiklayin ve gezūnūrlügū dokrulayin ve ardūndan "Next"c tiklayin.
PITCH ve PHASE 参数 ornek test sirayla görtunülenir.
Otomatik calistirma islemi basarisiz oldugunda:
1 "My Computer" i açin ve CD-ROM simgesine tɪklayin.
"Explorer" a gadin ve CD-ROM simgesini acn.
2 [Utility]yiacin ve arundan [Windows]i segin.
3 [Win_Untility.exe]yi calistirn.
Ornek test görtuntilenir
Macintosh kullanicari icin
I | Utility|yi acin ve arindan |Mac|i secin.
2 [Mac_Utility.exe]yicalisturin.
Örnek test görtüntenir.
4 MENU duğmesine basin.
Ana menuckranda goruntulcnir.
5 (SCREEN) seçeneğini seçmek 参数 ↓/↑ duğmelerine ve sonra da OK duğmesine basin.
SCREEN menusu ekranda görtuntilenir.
6 "PHASE"seconeigni secmek icin / duqmelerine ve sonra da OK duqmesine basin.
"PHASE" ayar menusu ekranda gorbuntulenir.
7 Yatay cizgiler minimum seviyeye inene kadar / duğmelerine basin.
Ayari, yatay cizgiler minimum seviyede olacak sekilde yapin.

8 OK dugmesine basin.
Ana menu ekranda goruntulenir.
Eger tum ekranda dikey cizgiler goruntulenirse, aralgi
(pitch) aşaqidaki sekilde ayarlayin.
9 "PITCH" seçeneğini seçmek icin ↓/↑ Düğmelerine ve sonra da OK Düğmesine basin.
"PITCH" ayar menusü ekranda görtülenir.
10 Dikey cizgiler kaybolana kadar / duğmelerine basin.
Ayari, dikey cizgiler kaybolacak sekilde yapin.

11 Örnek testi sona erdirmek icin ekrandaki [END]e tiklayin.
Resmin konumunu manuel olarak ayarlama (H CENTER/V CENTER)
Göruntü ekranin merkezinde bulunmuyorsa görtüyu ortalamak icin asagidaki admlar takip edin.
1 Bilgisayardaoczūnūrlügū 1280×1024 ordeal ayarlayin.
2 CD-ROM'ü yerleştinir.
3 CD-ROM 'u baslatin ve ornek testi görtüntüleyin. Windows Kullanıçları ilen Otomatik calıstirma ilemi basladigianda:
Display Adjustment tool 'a (Utility) tiklayin.
"Adjust" a tiklayin ve gezūnūrlügū dokrulayin ve ardindan "Next" e tiklayin.
H CENTER ve V CENTER,—ünörnek test sirayla görtülenir.
Otomatik calistirma islemi basarisiz oldugunda:
1 "My Computer"i acin ve CD-ROM simgesine tiklayin. "Explorer"a gadin ve CD-ROM simgesini acin.
2 | Utility|'yi acin ve ardindan | Windows'|i scein.
3 [Win_Untility.exe]yigeahstirm.
Ornek test görtuntilenir.
Macintosh kullanicari iqin
1 | Utility|yi aqin ve ardindan |Mac'i segin.
2 [Mac_Utility.exe]yicalisturn.
Örnek test görtüntülenir.
4 MENU dugmesine basin.
Ana menu ekranda görtüntülcnir.
5 (SCREEN) seçeneğini seçmek 参数 ↓/↑ Düğmelerine ve sonra da OK Düğmesine basin. SCREEN mnusü ekranda görtündülçir.
6 "H CENTER" veya "VCENTER" seçeneğinisecmek icin 1 / 1 dügmelerine ve sonra da OKdugmesine basin.
"H CENTER" ayar menusu veya "VCENTER" ayar menusu ekranda görtüntenir.
7 Örnek testi ekranda ortalamak icin, ↓/↑ duğmelerine basin.
8 Örnek testi sona erdirmek icin ekrandaki [END]e tiklayin.
- MENU POSITION menüsu
Eger ekrandaki bir nesneyi gormenizi engellyorsa, menu konumunu degistirebilirisiniz.

1 MENU duğmesine basin.
Ana menuckranda goruntulenir.
2 (MENU POSITION) seceneğini seçmek icin ↓/↑ duğmelerine ve sonra da OK duğmesine basin.
"MENU POSITION" menusü ekranda görtuntülenir.
3 Istediiginiz konumu seçmek icin / Düğmelerine ve sonra da OK Düğmesine basin.
Menunun yeri icin 9 konumdan birini secebilirsiniz.
INPUT SENSING ON/OFF menusu
INPUT SENSING ON/OFF menusände AUTO ON scencegini sectiginizde, monitor otomatik olarak bir giris terminaline bir giris sinyali saptar ve enerji tasarruf moduna gircmedcn once girisi otomatik olarak dcgisirir.

1 MENU duğmesine basin.
Ana menuckranda goruntulenir.
2 (INPUT SENSING ON/OFF) seçeneğini seçmek icin ↓/↑ Düğmelerine ve sonra da OK Düğmesine basin.
INPUT SENSING menus ekranda goruntulcnir.
3 Istediiginiz modu sejmek icin / duqmelerine basin ve sonra OK duqmesine basin.
- ON: SeçilenGIS terminalindeGIS sinyali yoksa veya INPUT Düğmesi ilebirGIS terminali seçtigünizde ve terminaldeGIS sinyali yoksa,ekran mesaj görtüntülir (sayfa 21)ve monitor,giri otomatik olarak degistirmek icin baska birGIS terminaline yönclikGIS sinyalini kontrl cder. Giris degistirildigiinde,seçilenGIS terminali ekranin solust kisminda görtüntülir. Giris sinyali yoksa,monitor otomatik olarakenerj ti nasarruf moduna gece.
OFF:Giris otomatik olarak dcgistirilmz.Girisidcgtistirmek icin INPUT dugmesine basim.

LANGUAGE menu

1 MENU Düğmesine basin.
Ana menu ekranda görtüntenir.
2 (LANGUAGE) seçeneğini seçmek icin ↓/↑ duğmelerine ve sonra da OK duğmesine basin.
LANGUAGE menüki ekranda görtülenir.
3 Bir dil seçmek icin, ↓/↑ duğmelerine ve sonra da OK duğmesine basin.
- English: ingilizee
- Frangais; Fransizca
- Deutsch: Almanca
- Espanol: Ispanyolca
Italiano: Italyanca
Nederlands: Felemenkce
Svenska: Isveççë
- Pycckn:
·日本語:
·中文: C i
- MENU LOCK menüsu
Istenmeyen ayarlar ve sifirlamaları onlemek icin, Düğmelerin kontrollerini kilitler.

1 MENU duğmesine basin.
Ana menu ekranda goruntulcnir.
2 (MENULOCK)secenegeini semekicin / duqmelerine ve sonra da OKduqmesine basin. MENULOCK menusckranda goruntulenir.
3 "On" veya "Off." seçeneğini seçmek icin ↓/↑ duğmelerine basin.
- ON: Sadecce (guc) anahtari ve INPUT dugmeci calisacaktir. Eger herhangi bir islem yapmaya calisirsaniz, ekranda okunu belirir.
OFF:“MENULOCK”ayarini kapahya getirr.
a "MENU LOCK" ayan "ON" olarak sceildiyse, MENU duigmesinc bastigmizda, "OM MENU LOCK" otomatik olarak secilir.
RESET menu (varsayilan ayarlara geri dondürme)

1 MENU duğmesine basin.
Ana menu ekranda görtüntülenir.
2 (RESET) seçeneğini seçmek icin ↓/↑ duğmelerine ve sonra da OK duğmesine basin.
RESETmenusekranda görtuntilenir.
3 Istediginiz modu semcikicn / duqmelerine basin ve sonra OK duqmesine basin.
- OK: Yaplan ayarlan, fabrika ayarlarina geri dondurmek icin "BANGUAGE" ayari bu yontemle degismez.
- CANCEL: Sifirlamayi iptal etmek ve menu ekranina donmek icin.
Teknik Özellikler
Sesi kontrol etme
MonitorHoparlorini veyakulakhikarini kulanarak, bilgisayarimizdan veya monitor ses giris fislerine bagh diges cihazlarindan gelen sesleri dinleyebilirsiniz.
Ana * nüden ayr bir "Ses" * munsunu kullanarak sesi kontrl edbilirsiniz.
1 Ekranda herhangi bir menu gänmediginde / duğmelerine basin.

2 Sesi kontral etmek icin / duğmelerine basin.
Yaklajk 5 saniye sonra menu otomatik olarak kaybolur.
Notlar
Ekranda ana menu görtüntilenirken sesi ayarlayamazsiniz.
- Monitor enerji tasarruf modundayken, hoparlorlerden veya kulakhklardan ses gelmez.
Enerji tasarrufu fonksiyonu
Bu monitor VESA, ENERGY STAR (yalnizca SDM-HX75) ve NUTEK erji tasarrufu standartlarina uygundur. Monitor eger Analog giris icin DPMS (Display Power Management Standard)/Dijital giris icin DMPM (DVI Digital Monitor Power Management) uyumlu bir bir bilgisayara veya video grafik katina baglanirsa, monitor asagida gosterilen sekilde otomatik olarak erji tuketimini azaltacaktir.
SDM-HX75
Enerji modu Enerji tüketimi (enerji) gostergesi normal calisma 50 W (maks.) yeşil aktif kapanma* (derin uyku)** 1 W (maks.) kehribar ( power) off (güç kapah) 1 W (maks.) off
SDM-HX95
Enerji modu Enerji tüketimi (enerji) gõstergesi normal calisma 60 W (maks.) yeşil aktif kapanma* (dcrin uyku)** 1 W (maks.) kchibar ( power) off (güç kapalı) 1 W (maks.) off
* Eger bilgisayarimiz "aktif kapanma" moduna geçerse, giri sinyali kesilir ve ekranda "NO INPUT SIGNAL" (giri sinyali yok)进展情况。5 saniye sonra monitori ereri tasarrufu moduna geleçer.
**“derin uyku” Environmental Protection Agency tarafindan tanimlanan enerji tasarrufu modudur.
MOD'u Ayarlama (PICTURE/ AUDIO) (modu)
Monitörün sag tarafindaki duğmesine üst üste bastıgünizda, MODE'u GAME MOVIE PC AUTO olarak secebilirsiniz.
"AUTO" seçeneğini seçtiğinizde, monitor ekran parlakligim Çevre parlakligina gore otomatik olarak ayarlar (otomatik
parlakhl ayarlama fonksiyonu). Daha fazla bilgi icin, bkz
"Otomatik parlakhík ayarlama fonksiyonu (ɪsɪk sensörü)".
duğmesine üst üste basin.
MODE'un varsayilan ayan "MOVIE" olarak ayarlanmistir.
duğmesine bir kez bastıgünizda, "MOVIE" (varsayilan
ayar) goruntulener, tekarr bastiginzda, PCgoruntulener.
dugmesine her bastuginizda, mod asagidaki gibi degisir.

Her bir mod ekranda görünür ve MODEdehygistirilir. Yaklaşik 5 saniye sonra menu otomatik olarak kaybolur.
Otomatik parlaklik ayarlama fonksiyonu (Isik sensörü)
Monitor, ekran parlakligini vevre parlakligina gore otomatik ayarlama özelligi ile donatilmustir. Ekran parlakligi, modunu monitrorun sag tarafindaki duğmesi ile AUTO olarak ayarlayarak veya PICTURE/AUDIO menusunde en uygun seviyeye ayarlanir. Ekran parlakligin varsayilan ayari MOVIE olarak ayarlanmustir.
Ayrica, monitorun sag tarafindaki igmesi ile modunu AUTO orak ayarladiginzda, ayar cugu da goruntuliner. Cubugu / dugmeleri ile ayarlayabilirsiniz. Ayarladiginiz seviyege gore ekran parlakligi degisir.
Otomatik resim kalitesi ayarlama fonksiyonu (sadece analog RGB sinyali)
Monitor birGISinyali aldiGnda, otomatik olarak resmin pozisyonunu ve keskinligini (faz/ aralk) ayarlar ve ekranda net bir resmin görtüntenmesini saglar.
Temel (fabrika ayarli) mod
Monitor birGISinyali alduginda,ekranin ortasinda yuksek kaliteli bir goruntu elde edcbilmek icin, bu sinyali monitorun belleginde saklu alan temel modlardan biri ile elesfirir. Giris sinyali temel mod ilc uyusursa, resim otomatik olarak uygun varsayilan ayarlarla ekranda goruntulenir.
Giri sinyalleri temel modlardan biri ile uyusmazsa
Monitor tcmel modlardan birine uymayan bir girisinyali ahrsa, ekranda daima net bir goruntu saglamak uzere, otomatik goruntu kalitesci ayar fonksiyonu aktive edilir (asagidaki monitor frekans arahklar dahilinde):
Yatay frckans:28-80 kHz
Dikey frekans:48-75 Hz
Sonuc olarak, monitor ilk defa, temel ayarlarina (fabrika ayari) uymayan birGIS sinyali aldignda monitorun ekranda goruntuyu gostermesi normalden dahuzun surebilir. Bu ayar verisi otomatik olarak hafizada saklanur ve daha sonra tekar alglandignda sanki monitor temel ayarlarina uyan birGIS sinyali almis gibi islem gorur.
Faz,arylk ve görtü konumunu manuel olarak ayarlarsaniz
Otomatik görtü kaliteci ayar fonksiyonu, bazirgis sinyallerinde görtü konumunu, fazi ve arahı tam olarak ayarlayamayabilir. Bu durumda, bu ayarlar manuel olarak yapabilirsiniz (sayfa 16). Yaptıgüniz manuel ayarlar hafizada saklanir ve monitorayo nir giris sinalini algladında yaniden kullanir.
Sorun giderme
Teknik destege basvurmadan once bu bolume bakin.
Göründülü mesajlar
Eger giris sinyalinde sorun yaşanyorsa, asagidaki mesajlardan bir tanesi ekranda görtülenir. Sorunu gidermek icin, bkz "Hata belirtleri ve olasi giderme yontemleri" sayfa 22.
Eger ekranda "OUT OF RANGE" görtülenirse
Bu, giris sinyalinin monitor özellikleri tarafindan desteklenmedigi gimir. Asagdaki ögeleri kontrl edin. Goruntulu mesaj hakkinda daha genis bilgi icin, bkz "Hata belirtileri ve olası giderme yontemleri" sayfa 22.
Eger ekranda "xxx.x kHz / xxx Hz" belirse
Bu, yatay ve dikey frekanslarin ikisinin de monitor tarafindan desteklenmedigi anlamna gelir. Rakamlar, gececrli giris sinyalinin yatay ve dikey frekanslarini gosterir.

Eger ekranda "RESOLUTION >1280× 1024 belirarse
Bu, czozunurlugun monitor özellikleri tarafindan desteklenmedigiösterir (1280× 1024 vya daha dusuk).

Eger ekranda "NO INPUT SIGNAL" görtüntenirse
Bu, seçili dokten sinyal gelmedigini belirir.
INPUT SENSING ON/OFF (sayfa 17) ON olarak
ayarlandiunda, monitor对不起 girisi sinyali bulur ve girisi otomatik olarak degistirir.

"GO TO POWER SAVE"
Monitor, ekranda mesaj belirdikten yaklasik 5 saniye sonra enerji tasarrufu moduna girer.
Eger ekranda "CABLE DISCONNECTED" görtüntenirse
Bu, video sinyal kablosunun geleerli doketten cikarildigi (sokete takili olmadigi) anlamina gelir.
INPUT SENSING ON/OFF (sayfa 17) ON olarak ayarlandigianda, monitor Barbara bir giris sinyali bulur ve girisi otomatik olarak degistirir.

Hata belirtileri ve olasi giderme yontemleri
Bagh bir bilgisayar veya diger cihazlarla ilgili bir sorun ortaya cikarsa, bagh bilgisayann/cihazin kullamn kilavuzuna bakim.
Belirti Bu öğeleri kontrl edin No picture (görüntü yok) ü(güç) gõstergesi yanmiyorsa veü(güç) Düğmesine basildıngnda daü(güç) yanmazsa, Güç kablosunun takil olup olmadıyıni kontrl edin. Eşer ekranda "CABLE DISCONNECTED" görtüntenirse, Video sinal y kablosunun ve dioer donanimlarin ilgili soketlerde taklulu durumda olup olmadıyıni kontrl edin. (sayfa 7).Video giris seksti pinlerin bülmemeş veya icinc kacmamş oludgün cmin olun.Giris secim ayarrnln doğru olup olmadıyıni kontrl edin (sayfa 11).Såglandmamş bir video sinal kablosu taklulu.Såglandmamş bir video sinal kablosunubagliarsanz, ekranda "CABLE DISCONNECTED" (kablo takluludehyil) mesajbelirc bilir.Bu ariza degildir. Eşer, ekranda "NO INPUT SIGNAL" mesaji belirirse veya ü(güç) gõstergesi kehribarsa, Video sinal kablosunun ve dioer donanimlarin ilgili soketlerde taklulu durumda olup olmadıyıni kontrl edin. (sayfa 7).Video giris seksti pinlerin bülmemeş veya icinc kacmamş oludgün cmin olun.Giris secim ayarrnln doğru olup olmadıyıni kontrl edin (sayFA 11).■ Monitör nedeniyledehyil, bir bilgisayar veya böylan farklbir cihaz nedeniyle olusapan problemlerBilgisayar enerji tasarrufu modunda. Klavyede herhangi bir tuşa basmayi veya fareyi hareket etirmeyi deneyin.Ekran kartınzin dizgün sekilde takldündan emin olun.Bilgisayarainenç konumda olup olmadıyıni kontrl edin. Eşer ekranda "OUT OF RANGE" görtüntenirse (sayfa 21), ■ Monitör nedeniyledehyil, bir bilgisayar veya böylan farklbir cihaz nedeniyle olusapan problemlerVideo (görüntü) frekansinn monitorün destckledigi özellikler icinde olup olmadıyıni kontrl edin. Eşer eski bir monitorün yerine, bu monitorüt aktysaniz, esk monitorüyecnakin ve bilgisayar nkran kartın asagida belirtilen araliklarda ayarlayin:Yatay frekans: 28-80 kHz (Analog RGB), 28-64 kHz (Dijital RGB)Dikey frekans: 48-75 Hz (Analog RGB), 60 Hz (Dijital RGB)Çüzünurlük: 1280×1024 veya daha Dennisuk Eşer Windows kullanyorsaniz, Eşer eski bir monitorün yerine, bu monitorüt aktysaniz, eski monitorüyeniden takin ve asagidaki talimatlari uyugulain. Windows donannin seçimi pencercsinde "Manufactures" (üretici) listeden "SONY"i ve "Models" (modeller) listeden "SDM-HX75 veya SDM-HX95" seçin. "Models" (modeller) listede "SDM-HX75 veya SDM-HX95" görtüntenmezse, "Plug & Play." (Tak ve Çalıtr)i denteyin. Eşer Macintosh system kullanyorsaniz, Bir Macintosh bilgisayar baglarken, gerekirse bir adaptör (saglanmamştur) kullanin. Video sinal kablosunu baglamadan once adaptörü bilgisayara baglayin. Görtütitremesi, oynaması, sallanması ya da karişması. Aralgi (pitch) ve fazı (phase) ayarlayin (sadece analog RGB sinyal) (sayfa 16).Monitörü, tercihen farkh bir elektrik devresi üzerindeki, farkh bir AC prizine takmayi deneyin.■ Monitör nedeniyledehyil, bir bilgisayar veya böylan farklbir cihaz nedeniyle olusapan problemler■ Grafik kartinin monitorüre uygun sekilde ayarlanmş olduğundan emin olun.Grafik modunun, (VESA, Macintosh 19" Color, vs.) ve giris sinyali frekansinnbu monitor tarafindan desteklendiginden emin olun. Frekans uyung aralika olsa bile, bazik ekran kartılari bu monitorün.Doğru senkronizasyon yapabilmesine izin vermeyecek kadar dar bir senkronizasyon pulsuna sahip olabilir.Bu monitorçapraz sinyallere islemez. Progresif sinyallere icin ayarlıdir.Mümkün olan en iyi kalitedeki görtüntenü kalitesi icin bilgisayarın tazeleme orannii (dikey frekans) ayarlayin (60 Hz tavsiye edilir). Görtünten bulanik. Kontrast ve parlakiğluyarayarlayin (sayfa 13, 14).Keskinligiayaarla maa (sayfa 14).Araligi(pitch) ve fazı (phase) ayarlayin (sadece analog RGB sinyal) (sayfa 16).■ Monitör nedeniyledehyil, bir bilgisayar veya böylan farklbir cihaz nedeniyle olusapan problemler■ Bilgisayarmüzda çozunūrūgü 1280×1024 olarak ayarlayin. Belirti Bu öğeleri kontrol edin Hayalet görtunjü. · Video kablosunun ya da video)yönendiricinin uzatma kablosunuiptal edin. · Tümparçaların (donanımları) ilgili sokitlerdedoğanbir seksilde takilı olduguundancmin olun. Resim ortalanmamış veyaboyutlar)düzgündegil(sadeceanalog RGB sinyalleri). · Araligi(pitch)ve fazı(phase)ayarlayın(sayfa 16).· Görtunjükonumunuayarlayın(sayfa 17)Bazıvideo modlartin ekranı tam olarakdoldurmadıyıunutmayın. Görtunjüçok ufak. ■ Monitor nedeniyle degil,bir bilgisayar veya建議anan farklıbir cihaznedeniyle olusan problemler· Bilgisayarınkındaçozsunurlugu 1280×1024 olarak ayarlayın. Görtunjüçok karanlık.· Arka,isişiayaarlayın(sayfa 13).·Parlaki,isiayaarlayın(sayfa 14).·GAMMA mensünde gamayıayarlayın(sayfa 14).·Monitör acıldıktaşsonra parlaki,isiçgmcsibirkıç dokika sürebilar.·odu AUTO olarak ayarlandışında,ekran parlaki,isiçinda karanlıkolabilir(sayfa 13,20). Dalgali veya oval(moire)birgörtunjüvar. ·Araligi(pitch)ve fazı(phase)ayarlayın(sadece analog RGB sinyal)(sayfa 16). Renk)dünlenlidegil. ·Araligi(pitch)ve fazı(phase)ayarlayın(sadece analog RGB sinyal)(sayfa 16). Beyaz renk tam olarak beyagöruntülenmiyor. ·Renk isisiniyaarlayın(sayfa 14). Monitörduğmeleriçalismyor(okaanda:görtunjülenir). ·“MENU LOCK”“ON”durumda isc OFF’a getirin(sayfa 18). Menü ekranindagöruntülenençüzunurlükyanlış. ·Ekrankartıayarın,isi olarak,menüekranindagöruntülenençüzunurlük,bilgisayarda ayarlıolanla,aynı olmayabilir.
Monitor bilgilerini görtuntileme
Monitor bir giris sinyali algilarken, MENU Düğmesini, bilgi kutusu belirene kadar, 5 saniyeden fazla basili tutunuz.
Bilgi kutusunu kaldirmak icin MENU duğmesine tekrar basir.
Ornek


Eger sorun devam ederse yetkili Sony saticisina basvurun ve asagidaki bilgileri verin:
Model ismi: SDM-HX75 veya SDM-HX95
- Serinumaras1
- Problemin detayl açiklamasi
- Satin alma tarihi
- Bilgisayarimuzin ve ekran kartimuzin ismi ve Özellikleri
- Giris sinyali tipi (analog RGB/dijital RGB)
Özellikler
LCD panel Panel tipi: a-Si TFT Aktif Matris
Göründu boyut: 17 inc (43 cm)
(SDM-HX75)
19 inc (48 cm)
(SDM-HX95)
Giris sinyali formati RGB calisma frekansi*
Yatay:
28-80 kHz (analog RGB)
28-64 kHz (dijital RGB)
Dikey:
48-75 Hz (analog RGB)
60Hz (dijital RGB)
Czünurluk Yatay: Maks.1280 nokta
Dikey: Maks.1024 satir
Giri sinyal seviyeleri Analog RGB video sinyali:
0,7 Vp-p, 75 Ω, positif
SYNC sinyali:
TTL seviye, 2,2 kΩ,
positif veya negatif
(Ayr) yatay ve dikey, veya
komposit sync)
Dijital RGB (DVI) sinyali:
TMDS (Tek baglanti)
Ses girisi Stereo mini fis, 0,5 Vrms
Hoparlor cikisi 3 W × 2
Kulaklik fişi Stereo mini fiş
Güçgereksinimleri SDM-HX75
100-240V,50-60Hz,Maks.1,0A
SDM-HX95
100-240V,50-60Hz,Maks.1,1A
Güç tuketimi Maks. 50 W (SDM-HX75)
Maks. 60 W (SDM-HX95)
Calisma sicaklig5-35 C
Boyutlar (genislik/yukseklik/derinlik)
Ekran (dik durumda):
SDM-HX75
Yaklasik 414× 418,5× 232mm
SDM-HX95
Yaklajk 466,5× 468× 265mm
Agirlhk SDM-HX75
Yaklasik 6,5 kg
SDM-HX95
Yaklasik 8,5 kg
Tak ve Kullan DDC2B
Aksesuarlar Bkz sayfa 7.
* Tavsiye edilen yatay ve dikey zamanlama kosulu
- Yatay sync genisligi toplam yatay zamanin 4,8 sinden veya 0,8 s, den fazla olmalidir, hangisi daha buyuk isc.
Yatay boşluk genişi 2,5 μs den fazla olmaldir.
Dikey bošluk genisligi 450 μs den fazla olmaldir.
Tasarim ve ozellikler haber verilmeksizin degistirilebilir.
Ročno nastavite ostrino slike (faza/višina tona)
Ostrino slike lahko nastavite kot sledi. Ta nastavitev deluje, ko je racunalnik prikljucen na izhodni konektor HD15 monitorja (analogni RGB). 1 Nastavite razločljivost na računalniku na 1280 × 1024.2 Naložite CD-ROM.
3 Zazenite CD-ROM in prikazite testni vzorec.
Za Windows uporabnike
Kadar Auto run deluje:
Kliknite Display Adjustment tool (Orodje za nastavitev prikazovalnika) (Utility). Kliknite Adjust in potrnite locljivost ter nato kliknite Next. Testni vorcec za PITCH in PHASE se pojavi.Kadar Auto run ne deluje:
1 Odpritc My Computer in potem z desnim gumbom kliknite ikono CD-ROM. Pojdite na Explorer\* in odprte ikono CD-ROM. 2 Odprite [Utility] in potem izberite [Windows]. 3 ZaZenite [Win_Utility.exe]. Pojavi se testni vzorec.Za Macintosh uporabnike
1 Odprite [Utility] in potem izberite [Mac]. 2 ZaZenite [Mac_Utility.exe]. Pojavi se testni vzorec. 4 P r i t i s n i t e g u m b M E N U . Na zaslonu se prikaze glavni meni.5 Pritiskajte gumba / za izbiro (SCREEN) ter pritisnite gumb OK.
Na zaslonu sc prikaze meni SCREEN.6 Pritiskajte gumba / za izbiro ^ 其 PHASE
Nazaslonu se prikaze nastavitveni meni PHASE\*.
7 Pritiskajte gumba / tolikokrat, da so vodoravni pasovi minimali.
Nastavlajte toliko casa, da so vodoravni pasovi minimalni.

8 Pritisnite gumb OK
Na zaslonu se prikaze glavni meni.
Ce se preko vsega zaslona povavijo navpični pasovi, nastavite visino tona z naslednjimi postopki:
9 Pritiskajte gumba / za izbiro >PITCH « ter pritisnite gumb OK.
Na zaslonu se prikaze nastavitveni meni PITCH<.
10 Pritiskajte gumba / tolikokrat, da izginejo navpični pasovi.
Nastavljaje toliko šasa, da navpični pasovi izginejo.

11 Kliknite END na zaslonu za izklop preizkusnega vzorca.
Ročno nastavite položaj slike (H CENTER /V CENTER)
Če slika ni na sredini zaslona, jo postavite v središec s spodaj opisanim postopkom.
1 Nastavite razločljivost na računalniku na 1280 × 1024.
2 Naložite CD-ROM.
3 Zazenite CD-ROM in prikazite testni vzorec.
Za Windows uporabnike
Kadar Auto run deluje:
Kliknite Display Adjustment tool (Orodje za nastavitev prikazovalnika) (Utility).
Kliknite Adjust in potrldite locljivost ter nato kliknite Next.
Testni vzorec za H CENTER in V CENTER se pojavi.
Kadar Auto run ne deluje:
1 Odpritc My Computer in potem z desnim gumbom kliknite ikono CD-ROM. Poidite na Explorer in odprit ekono CD-ROM.
2 Odprite [Utility] in potem izberite [Windows].
3 ZaZenite [Win_Utility.exe].
Pojavi se testni vzorec.
Za Macintosh uporabnike
1 Odpritc [Utility] in potem izberite [Mac].
2 ZaZenite [Mac_Utility.exe].
Pojavi se testni vzorec.
4 P r i t i s n i t e g u m b M E N
Na zaslonu se prikaze glavni meni.
5 Pritiskajte gumba / za izbiro (SCREEN) ter pritisnite gumb OK.
Na zaslonu se prikaze meni SCREEN.
6 Pritiskajte gumba / za izbiro »H CENTER« ali »VCENTER « ter pritisnite gumb OK.
Na zaslonu se prikaze nastavitveni meni »H CENTER« ali »V CENTER«.
7 Pritiskajte gumba / za središćno poravnavo preizkusnega vzorca zaslona.
8 Kliknite END na zaslonu za izklop preizkusnega vzorca.
- MENU POSITION meni
Položaj menija na zaslonu lahko spremenite, ce vam zastira sliko na zaslonu.

1 Pritis nite gumb MENU. Na zaslou se prikaze glavni meni.
2 Pritiskajte gumba / za izbiro (MENU POSITION) ter pritisnite gumb OK.
Na zaslonu se prikaze meni MENU POSITION<.
3 Za izbiro zeelenega položaja pritiskajte gumba / nato pa gumb OK.
Ko se prikaze meni, lahko izberete enega od 9polozajev.
INPUT SENSING ON/OFF meni
Ko izberete AUTO ON v INPUT SENSING ON/OFF meniju, monitor samodejno odkriere vchodni signal na vchodnih sponkah in samodejno spremeni vhd preden gre monitor v naacin varcevanja energia.

1 Priti s nite g u m b M E N U .
Na zaslonu se prikaze glavni meni.
2 Pritiskajte gumba / za izbiro (INPUT) U -SENSING ON/OFF) ter pritsnite gumb OK.
Na zaslonu se pojavi meni INPUT SENSING.
3 Za izbiro zejenega načina pritiskajte gumba ↓/↑ nato pa gumb OK.
- ON: Ce izbrana vhdna sponka nima vhdnega signala ali ce izberete vhdno sponko z gumbom INPUT na monitorju in vhdna sponka nima signala, se nazaslonu pojavisporocilo (stran 21) in monitor samodejno preveri vhdni signal na drugi vhdni sponki ter zamenja vhd. Ko se zamenja vhd, se levo zgoraj prikaze izbrana vhdna sponka. Ce ni vhdnega signala, gre monitor samodejno y naacin varcevanja energia.
- OFF: Vchod se ne spremeni samodejno. Pritisnite gumb INPUT in spremenite vchod.
LANGUAGE meni

1 P r i t i s n i t e g u m b M E N U .
Na zaslonu sc prikaze glavni meni.
2 Pritiskajte gumba / za izbiro (LANGUAGE) ter pritisnite gumb OK.
Na zaslonu se prikaze menui LANGUAGE.
3 Pritiskajte gumba / za izbiro jezika ter pritsnite gumb OK.
- English: anglesko
- Français: francosko
- Deutsch: nemsko
- Espanol: spansko
- Italiano: italijansko
Nederlands: nizozemsko
Svenska:svedsko
Pycckn: rusko
- 日本語: japonsko
·中文: kitajsko
- MENU LOCK meni
Zaklenite upravljanje gumbov, da boste takoprevecili nakljune spremembe ali vrintev izhodisno stanje.

1 Pritisnite gumb MENU. Nazaslonu se prikaze glavni meni.
2 Pritiskajte gumba / za izbiro (MENU LOCK) ter pritsnite gumb OK.
Na zaslonu sc prikaze meni MENU LOCK.
3 Pritiskajte gumba / in izberite >vklop Ali izklop.
ON: Delujeta samo stikalo (napajanja) in gumb INPUT. Ce poizkusite kaksnogo funkcijo, se nazaslonu prikaze ikona
OFF: Nastavite MENU LOCK v izklopljeno. Ce je bil MENU LOCK postavljena v ON,je ob pritisku na gumb MENU, ^已_m MENU LOCK izbran samodejno.
RESET meni (povrnitev v izhodišćno stanje)

1 P r i t i s n i t e g u m b M E N U .
Na zaslonu se prikaze glavni meni.
2 Pritiskajte gumba / za izbiro (RESET) ter pritisnite gumb OK.
Na zasloun se prikaze meni RESET.
3 Za izbiro zeiljenega načina pritiskajte gumba / nato pa gumb OK.
- OK: Za vrnitev vseh nastavitvenih podatkov v privzete vrednosti. Upostevajtc, da se nestavitev « LANGUAGE« po tej metodi nc vrnc v izhodisćno stanjc.
CANCEL:Preklicvrnitveizhodisnih podatkov in povratek v glavni meni.
Tehniche značilnosti
Nastavitev jakosti zvoka
Z uporabo zvočnikov na monitorju ali slusalk, lahko poslusate zvok iz vašega računalnika ali druge avdio opreme priljucene preko vtčnic na avdio vchod monitorja.
Nastavitev jakosti zvoka lahko opravite z locenega.), >Jakost zvoka<, ki ga izberete iz glavnega.),
1 Pritiskajte gumba / , ce se meni ne prikaze nazaslonu.

2 Pritiskajte gumba / za nastavitev jakosti zvoka. Menipo5samodejnoizgine.
Opombe
- Ko je nazaslonu prikazan glavni meni, ne morete nastavljati jakosti zvoka.
- Ko je vas monitor v načinu varčevanja energija, iz zvočnikov in slušalk ne prihaja zvok.
Funkcija varcevanja energije
Ta monitor izpolnjuje priporočila za varčevanje energia, dolocenih s strani VESA, ENERGY STAR (samo SDM-HX75), in NUTEK. Če je monitor prikljucen na računalnik ali video graficno plošćo, ki je skladna z DPMS (Display Power Management Standard) za analogni vchodni prikljucek/DMPM (DVI Digital Monitor Power Management) za digitalni vchodni prikljucek, bo monitor samodejno zmanjsal porabo energia, kot je prikazano spodaj.
SDM-HX75
Način
napajanja Poraba energije ⊙ indicator
(napajanja) normalno
delovanje 50 W (maks.) zelena aktiven
izklopljen*
(globoko
spanje)** 1 W (maks.) rumenorjava ☉ izklop 1 W (maks.) izklop
SDM-HX95
Način
napajanja Poraba energije indicator
(napajanja) normalno
delovanje 60 W (maks.) zelena aktiven
izklopljen*
(globoko
spanje)** 1 W (maks.) rumenorjava izklop 1 W (maks.) izklop
* Ko vaš računalnik vystopi v način »aktivno izklopljen«, je vchodni signal prekinjen in na zaslonu se pojaví sporocilo «NO INPUT SIGNAL«. Po 5 s monitor vystopi v način varčevanja energije.
**»Globoko spanje « je nacin varcevanja energije dolocen s strani Environmental Protection Agency.
Nastavitev MODE (PICTURE/ AUDIO) (načina)
Če večkrat pritsinete gumb na desni strani monitorja, lahko izberete način MODE iz GAME → MOVIE → PC → AUTO.
Ko izberete AUTO monitor samodejno nastavi osvetljenost zaslona glede na osvetljenost okolja (funkcija samodejne nestavitve osvetljenosti). Za dodatne informacij glej Funkcija za samodejno nastavitev osvetljenosti (detektor svetlobe)
Veckrat pritisnite nmb.
Privzeta nastavitev funkcije MODE je MOVIE<. Ce pritisnete mb enkrat, se prikaze MOVIE< (izhodišna nastavitev), ko pritisnete ponovno, se prikaze PC<.
Vsakič, ko pritisnete gumb način spremeni kot sledi.

Vsak nacin se prikaze na zaslonu in MODE se spremeni. Menip 5s samodejno izgine.
Funkcija za samodejno nastavitev osvetljenosti (detektor svetlobe)
Monitor je opremljen takto, da samodejno nastavi osvetljenost zaslona glede na osvetljenost okolja.
Osvetljenost zaslona se nastavi na Najustreznejsi nivo z
nastavitvijo nacinna AUTO z gumbom na sni
strani monitorja ali preko v meniju PICTURE/AUDIO.
Privzeta nastavitev osvetlitve zaslona je MOVIE.
Ko nastavite in na AUTO z gumn na desni stranizaslona, sc prikaze tudi nastavitvena vrstica. Vrstico lahko nastavite z gumboma / . Osvetlitevzaslona se spreminja glede na nivo, ki ste ga nastavili.
Funkcija samodejne nastavitve kakovosti slike (samo analogni RGB signal)
Ko monitor sprejme vchodni signal, samodejno nastavi položaj in ostrino slike (fazo/razločljivost) in zagotovi, da se nazaslonu pojav jasna slika.
Tovarniška nastavitev
Ko monitor sprejme vchodni signal, samodejno uskladi signal na enega od tovarnisko nastavljenih načinov, shranjenega v pomnilniku monitorja in takozagotovi visoko kakovostno sliko na sredini zaslona. Če vchodni signal ustreza tovarnisko nastavljenemu, se slika z ustreznimi izhodisćnimi nastavitvami samodejno povaji na zaslonu.
Vhodni signali ne ustrezajo tistim iz tovarniske nastavitve
Ko monitor sprejme vhodni signal, ki se ne ujema s tovarnisko nastavljenimi nacini, se aktivira funkcija samodejne nastavitve kakovosti slike tega monitorja in zagotovi, da se nazaslonu vedno pojav jasna slya (v naslednjih frekvenenih podroejih monitorja):
Horizontalafrevenca: 28 - 80kHz
Vertikalna frekvenca: 48-75 Hz
Ko monitor prvic sprejme vchodne signale, ki ne ustrezajo tovarnisko nestavljenim naacinom, lahko monitor potrebuje vec casa za prikaz slike na zaslonu kot obicajno. Podatki za nestavitev so samodejno shranjeni v pomnilnik, takdo bo monitor naslednjic deloval na enak naclin, kot ce monitor sprejme signal, ki ustreza tovarnisko nestavjenemu naclinu.
Ročne nastavitve faze, razločljivosti in položaja slike
Za nekatere vchodne signale funkcija samodejne nastavitve kakovosti tega monitorja nc nastavi polozaja slike, faze inrazlocljivosti.V tem primuru lahko rocno nastavitte prilagoditve (stran 16).Ce rocno nastavitce te prilagoditve, se shranijo v pomnilniku kot uporabnijski načini in sesamodecjno prikliejo, ko monitor sprejmec enake vchodnesignale.
Odpravljanje napak
Preden vzpostavite stik s tehnicno pomocjo, si oglejte to poglavje.
Sporočila na zaslonu
V primeru tezav z vhodnim signalom, sc nazaslonu prikaze eno od naslednjih sporocil. Za rešitev problema glej
>Simptomi težav in njihovo odpravljanje « na strani 22.
Ce se na zaslonu pojavi OUT OF RANGE
to pomeni, da monitor ne podpira vchodnega signala.
Preverite naslednje elemente.
Zanatanenejse informacije o sporocilih nazaslonu glej
"Simptomi težav in njihovo odpravljanje' na strani 22.
Ce se prikaze xxx.x kHz / xxx Hz"
to pomeni, da monitor ne podpira horizontalne ali vertikalne frevence.
Slike prikazujejo horizontalne in vertikalne frevence trenutnega vchodnega signala.

Ce se prikaze >RESOLUTION > 1280 × 1024
to pomeni, da monitor ne podpira vchodnega signala (1280× 1024 ali manj).

Če se na zaslonu pojavi «NO INPUT SIGNAL«
to pomeni, da na trenutno izbranem konektorju vchodni signal ni prisoten.
Ce je INPUT SENSING ON/OFF (stran 17) nastavljen na ON, monitor poisce drugi vchodni signal in samodejno spremeni vchod.

>GO TO POWER SAVE
Monitor bo v cca. 5 s po prikazu sporocila vstopil v stanje varcevanje energia.
Ce se na zaslonu pojavi »CABLE DISCONNECTED«
to pomeni, da je bil video signalni kabel odstranjen iz trenutno izbranega konektorja.
Ce je INPUT SENSING ON/OFF (stran 17) nastvljen na ON, monitor poise drugi vchodni signal in samodejno spremeni vchod.

Simptomi težav in njihovo odpravljanje
Če se problem pojavi kot rezultat prikljucitve računalnika ali druge opreme, poglejte v navodila priključenega računalnika/ opreme.
Simptom Preverite naslednje elemente Ni spline Če indicator (napajanja) ne sveti ali Če se indicator (napajanja) ne prižge, ko je vklopljeno stikalo (napajanja), Preverite ali je napajali kabel priključen pravilno. Če se na zaslonu pojavī >CABLE DISCONNECTED« Preverite, Če je video kabel pravilno priključen in Če so vsi konektorji trdno v svojih vtičnicah (stran 7).
Preverite, Če niso nožice na konektorjih ukrivljene ali zmečkane.
Preverite, da je nastavitć ivizbire vhoda pravilna (stran 11).
Priključen je video kabel, ki ni bil dobavljen v naši posiljki. Če priključite video signalni kabel, ki ni bil dobavljen v naši posiljki, se lahko na zaslonu pojavī >CABLE DISCONNECTED«. To ni napaka v dclovanje. Če se na zaslonu pojavī napis >NO INPUT SIGNAL « Ali indicator (napajanja) sveti rumenorjavo, Preverite, Če je video kabel pravilno priključen in Če so vsi konektorji trdno v svojih vtičnicah (stran 7).
Preverite, Če niso nožice na konektorjih ukrivljene ali zmečkane.
Preverite, da je nastavitć ivizbire vhoda privilna (stran 11).
■Problem povzroča priključeni računalnik ali druga oprema in ne monitor.
•Racunalnik je v načinu varčevanje energije. Pritisnite tipko na tipkovnici ali premaknite miško.
•Preverite, da je graficna kartica privilno vstavljena v računalnik.
•Preverite ali je racunalnik vklopljen. Če se na zaslonu (strain 21) pojavī >OUT OF RANGE« ■Problem povzroča priključeni računalnik ali druga oprema in ne monitor.
•Preverite ali je frekvenčno področje znotraj frekvençnegа področja monitorja. Če ste nadomesti lari monitor s tem monitorjem, ponovno priključite stari monitor in nastavitć računalniško graficno Kartico v naslednjih obsegih: Horizontalna frekvenca: 28-80 kHz (Analogni RGB), 28-64 kHz (Digitalni RGB) Vertikalna frekvenca: 48-75 Hz (Analogni RGB), 60 Hz (Digitalni RGB) Resolutija: 1280 × 1024 ali manj Če uporabljate program Windows, Če ste stari monitor nadomesti s tem monitorjem, priključite stari monitor in naredite našednje: Izberite «SONY « sseznama «Proizvajalci « in izberite «SDM-HX75 ali SDM-HX95 « sseznama «Modeli « v zaslonu za izbiro Windows naprav. Če se «SDM-HX75 ali SDM-HX95 « ne povjavita vseznamu «Modeli «, poskusite «Plug & Play». Če uporabljate system Macintosh, Ko priključite računalnik Macintosh, po potrebi uporabite adapter (ni dobavljen). Priključite adapter na računalnik prej preden priključite videosignalni kabel. Slika utripa, se odbija, niha ali je popačena. Nastavite razločljivost in fazo (samo analogni RGB signal) (strain 16).
Poskusite vtakniti monitor v drugo omrežno vtičnico, po možnosti v drugem tokokrogu.
■Problem povzroča priključeni računalnik ali druga oprema in ne monitor.
•Pogleje v priročnik vašs gražíne kartice kako je potrebno nastavitni monitor.
•Potrdite, da vaš monitor podpira grafíni način (VESA, Macintosh 19" Color, itd.) in frekvenco vchodnega signala. Tudi Če je frekvenca v pravilnem področju, imajo nkatere grafíncé kartice preozek sinhronizacijski impulz, da bi privalno sinhroniziral monitor.
•Ta monitor ne podpira preplcteniš signalov. Nastavite monitor za progresivne signale.
•Prilagodite računalnikovo hitrost osveževanja (vertikalno frekventa), da dobite najboljšo možno sliko (priporočena je 60 Hz). Slika je zamegljena. Nastavite kontrast in osvetlitev (strain 13, 14).
Nastavitev ostrinc (strain 15).
Nastavite razločljivost in fazo (samo analogni RGB signal) (strain 16).
■Problem povzroča priključeni računalnik ali druga oprema in ne monitor.
•Nastavite razločljivost na 1280 × 1024 na vašem računalniku. Slika ima sence. Odstranitc kabelske podaljškc za video kable in/ali video stikalne omarice.Preverite ali so vsi koncktorji trdno v svojih vticnicah. Slika ni na sredini ali ni prave velikosti (samo za analogue RGB signale). Nastavite razločljivost in fazo (strain 16).Nastavite položaj slike (strain 17).Upostevajte, da nekateri video načini ne zapolnijo zaslona do vogalov. Slika je premajhna. Problem povzroča praključeni računalnik ali druga oprema in ne monitor.Nastavite razločljivost na 1280 × 1024 na vašem računalniku. Slika je temna. • Nastavite osvetlitev ozadja (strain 13).Nastavite osvetlitev (strain 14).Nastavite gamo na meniju GAMMA (strain 14).Monitor potrebuje po vklopu nekaj minut, da zeroslon postane svetel.Ce je „bin nastvljen na AUTO, lahko osvetlitev zaslona pri slabi svetlobi okolja postane temnejša (strain 13, 20). Pojavijo se valoviti ali elipsasti vzorci. Nastavite razločljivost in fazo (samo analogni RGB signal) (strain 16). Barva ni povsod enaka. Nastavite razločljivost in fazo (samo analogni RGB signal) (strain 16). Bela barva nima izgleda bele barve. Nastavite temperaturo barve (strain 14). Gumbi monitorja ne delujejo ( „pojavi na zeroslonu). Če je »MENU LOCK« vklučen na »ON«, jo izključite na »OFF« (strain 18). Na zeroslonu prikazana razločljivost je nepravilna. V odvisnosti od nastavitev na graficni kartici, se razločljivost prikazana na meniju njuno ne ujema s tisto, ki je nastvljena na računalniku.
Prikaz informacij o tem monitorju
Ko monitor sprejema video signal, pritisnite in držite gumb MENU za več kot 5 s, dokler se ne pojav informacijski okno.
S ponovnim pritiskom na gumb MENU okno izgine.
Primer

Če ne morete odpraviti težave,Pokličite pooblasčenega prodajalca SONY opreme in mu posredujte naslednje informacije:
- Naziv modela: SDM-HX75 ali SDM-HX95
Serijska stevilka
Natan'en opis tezave
- Datum nakupa
- Naziv in tehnici podatki vasega računalnika in graficne kartice
- Vrsto signala (analogni RGB/digitalni RGB)
Specifikacije
LCD panel Vrsta panela: a-Si TFT z aktivno
matriko
Velikost slike:17" (43 cm)
(SDM-HX75)
19^ (48cm)
(SDM-HX95)
Oblika vchodega signala Delovna frekvenca RGB*
Horizontala:
28-80 kHz (analogni RGB)
28-64 kHz (digitaln RGB)
Vertikalna:
48-75 Hz (analogni RGB)
60 Hz (digitaln RGB)
Razlocljivost Horizontalna: Maks. 1280 tock
Vertikalna: Maks.1024 vrstic
Nivo vchodnega signala Analogi RGB video signal:
0,7 Vp-p, 75 Ω, positiven
SYNC signal:
TTL nivo, 2.2k
positivenali negativen
(Locen horizontalen in
vertikalenali kompositinysync)
Digitalni RGB (DVI) signal:
TMDS (Enojna povezava)
Avdio prikljucek Stereo mini prikljucek, 0,5 Veff
Izhod za zvočnike 3W× 2
Priključek za slusalke Stereo mini priključek
Zahtve za moč SDM-HX75
100-240V,50-60Hz,Maks.1,0A
SDM-HX95
100-240V,50-60Hz.Maks.1,1A
Porabljena moč Maks. 50 W (SDM-HX75)
Maks. 60 W (SDM-HX95)
Delovna temperatura 5-35 C
Dimenzije (sirina/visina/globina)
Zaslon (pokončen):
SDM-HX75
Pribl. 414× 418.5× 232mm
SDM-HX95
Pribl. 466,5× 468× 265mm
Masa SDM-HX75
Pribl. 6.5 kg
SDM-HX95
Pribl. 8,5 kg
Plug & Play DDC2B
Dodatki Glej stran 7.
* Priporočeni horizontali in vertikalničasovni pogoji
- Sirina horizontalega delovnega signala mora biti vecja od 4.8% skupnega horizontalega casa ali 0,8~ s, kar koli je daljse.
Horizontalna sirina brisanja naj bo vec kot 2,5 s.
- Vertikalna sibirina brisanja naj bo vec kot 450~ s
Oblikovanje in specifikacije so predmet sprembrez obvestila.
TFTLCD Color Computer Display
SDM-HX75
SDM-HX95
Owner's Record
The model and serial numbers are located at the rear of the unit. Record these numbers in the spaces provided below. Refer to them whenever you call upon your dealer regarding this product. Model No. ______ Serial No. ______
WARNING
To reduce the risk of fire or electric shock, do not expose this apparatus to rain or moisture.
Dangerously high voltages are present inside the unit. Do not open the cabinet. Refer servicing to qualified personnel only.
FCC Notice
This equipment has been tested and found to comply with the limits for a Class B digital device, pursuant to Part 15 of the FCC Rules. These limits are designed to provide reasonable protection against harmful interference in a residential installation. This equipment generates, uses, and can radiate radio frequency energy and, if not installed and used in accordance with the instructions, may cause harmful interference to radio communications. However, there is no guarantee that interference will not occur in a particular installation. If this equipment does cause harmful interference to radio or television reception, which can be determined by turning the equipment off and on, the user is encouraged to try to correct the interference by one or more of the following measures:
- Reorient or relocate the receiving antenna.
- Increase the separation between the equipment and receiver.
- Connect the equipment into an outlet on a circuit different from that to which the receiver is connected.
- Consult the dealer or an experienced radio/TV technician for help. You are cautioned that any changes or modifications not expressly approved in this manual could void your authority to operate this equipment.
IMPORTANT
Para prevenirrialquier mal functionamento y evitar daños, por favor, lea detalladamente este manual de instrucciones antes de conectar y operar este equipo.
If you have any questions about this product, you may call; Sony Customer Information Services Center 1-800-222-7669 or http://www.sony.com/
Declaration of Conformity
Trade Name:SONY
Model: SDM-HX75/HX95
Responsible Party: Sony Electronics Inc.
Address: 16530 Via Esprillo,
San Diego, CA 92127 U.S.A.
Telephone Number: 858-942-2230
This device complies with part 15 of the FCC rules. Operation is subject to the following two conditions: (1) This device may not cause harmful interference, and (2) this device must accept any interference received, including interference that may cause undesired operation.
NOTICE
This notice is applicable for USA/Canada only.
If shipped to USA/Canada, install only a UL LISTED/CSA
LABELLED power supply cord meeting the following specifications:
SPECIFICATIONS
Plug Type Nema-Plug 5-15p
Cord Type SVT or SJT, minimum 3 × 18 AWG
Length Maximum 15 feet
Rating Minimum 7 A, 125 V
NOTICE
Cette notice s'applique aux Etats-Unis et au Canada uniquement.
Si cet appeareil est exporté aux Etats-Unis ou au Canada, utiliser le cordon d'alimentation portant la mention UL LISTED/CSA
LABELLED et replissant les conditions suivantes: SPECIFICATIONS
Type de fiche Fiche Nema 5-15 broches
Cordon Type SVT ou SJT, minimum 3 × 18 AWG
Longueur Maximum 15 pieds
Tension Minimum 7 A. 125 V


As an ENERGY STAR Partner, Sony Corporation has determined that this product meets the ENERGY STAR guidelines for energy efficiency.
(SDM-HX75 only)
Içindekiler
Uyarilar 4
Bolmelerin ve kontrdugmelerin tanimlanmasi 5
Kurulum 7
Kurulum 1:Video sinyal kabolarini takin 7
Kurulum 2: Ses kablosunu baglayin 8
Kurulum 3: Güç kablosunu®, baglıyan 8
Kurulum 4: Kordonlari ve kablolari sarin 9
Kurulum 5: Monitor ve bilgisayari aqin 9
Kurulum 6: Egikligi ve aciyi ayarlama. 10
Giris sinyalini seme (INPUT duğmesi) 11
Monitörun Kullanıciya Yaşlı Apaşi 12
Menuyu kullanma 12
PICTURE/AUDIO menusu 13
MODEmenusu 13
PICTURE menu 13
BACKLIGHT ayarlama 13
CONTRAST ayarlama ① 13
BRIGHTNESS ayarlama 14
GAMMA ayarlama 14
COLOR ayarlama 14
SHARPNESS ayarlama 15
AUDIO menusu 15
TREBLE, BASS veya BALANCE'yi ayarlama 15
SURROUND ayarlama 15
MODERESETmenusu
(tum modlari varsaylan ayara geri dondurme) 15
SCREENmenusu(sadeceanalogRGBsinyali) 16
MENUPPOSITIONmenusu 17
INPUT SENSING ON/OFF menusu 17
LANGUAGE menu 18
RESET menu (varsaylan ayarlara geridondürme) 18
ON MENU LOCK menusu 18
Teknik Ozellikler 19
Sesi kontrl etme 19
Enerji tasarrufu fonksiyonu 19
MOD'u Ayarlama (PICTURE/AUDIO) (modu) 20
Otomatik parlaklik ayarlama fonksiyonu (Isik sensor) 20
Otomatik resim kalitesi ayarlama fonksiyonu
(sadece analog RGB sinyali) 20
Sorun giderme 21
Goruntuli mesajlar 21
Hata belirtileri ve olasi giderme yontemleri 22
Özellikler 24
Uyanilar
Guc baglantilar ile ilgili uyari
- Verilen güç kablosunu kullanin. Eger farklı bir güç kablosu kullaniyorsaniz, güç kaynaginizla uyumlu oldugundan emin olun.
A.B.D. deki musteriler icin
Eger uygun kablo kullanmazsaniz, bu monitor zorunlu FCC standartlarma uygun olmayacaktir.
Ingiltere'dekimüsteriler icin
Eger bu monitori Ingiltere'de kullanyorsaniz, Ingiltere'ye uygun guc kablosu kullanin.
Fiş tiplerinin ornekleri


100ila 120VACicin 200ila 240VACicin sadece 240V ACicin
Cihaz, kolaylikla erisilebilen bir prize yakin olarak yerlestirilmidir.
Kurulum
Monitoru asagidaki yerlerde kurmayin veya birakmayin:
- Asiri sicut yerler, ornegin radyator yani, isitici yani veya dokrudan gunes isigi alan yerler. Monitoru, mesela gunes altinda park edilmis araba icinde veya isitici yaninda, asiri sicaga maruz birakmak, kasada deformasyona ve arizalarara sebep olabilir.
- Mekanik vibrasyon veya soka aqik yerlerde.
- TV veya diger ev aletleri gibi gülü manyetak alan yaratanan cihazlarin)yakinnda.
- Asiri derecede toz, kir veya kum olan yerlerde, ornegin aqik pencere kenari veya cikis kapisi gibi. Eger geci ci olarak dis ortamda kullanilmasi gerekiyorsa, havadaki toza ve kire karsi gerekli onlemleri almalisimiz. Aksi takdirde tamiri mumkun olmayan arizalar olusabilir.
LCD ekranı kullanma
- LCD ekrani güneşe bakar seksilde birakmayin, bu LCD ekrana zarar verebilir. Monitoru pencere yanina yerleşirirken dikkatli olun.
- LCD ekrana bastirmayin ve ekrani eizmeyin. LCD ekran üzerine agr nesneler koymayin. Bu ekranı duzgünlıgün kaybetmesine ve LCD panel arizasa nsebp olabilir.
Eger monitor soguk bir yerde kullanilirsa, ekranda hayalet görtü olugabilir. Bu bir aniza degildir. Sicaklik normal calisma seviyesine donduğunde, ekran normale doner.
- Eger sabit bir resim uzun sure gosterilirse, bir sure icin hayalet görtunj olusabilir. Hayalet görtunj daha sonra yok olur.
LCD panel calhma sirasinda isir. Bu bir aniza degildir.
Dahili stereo hoparlörler hakkinda
Manyetakayit cihazlarini, bantlari ve floppy disketleri hoparlorun acikligindan uzakututun,cunku hoparlorler manyetakalan uretirler. Bu manyetakalan,manyetakbant ve disketlerde kayith verileri etkileyebilir.
LCD ile ilgili not (Siv Kristal Ekran)
Lütfen LCD ekranin yüksk hassasiyct technolojis ilc
yapildigi unutmayin. Bununla birlikte, LCD ekran üzerinde
sabit siyah noktalar vya parlak isik noktaları (krmizi, mavi
veya yesil) ve dizensiz renkli seritler ya da parlaklik belirebilir.
Bu bir aniza degildir.
(Etkili noktalar: %99,99 dan fazla)
Bakim
- Monitorunütu temizlemeden once güç kablosunu elektrik prizinden Çekın.
- LCD ekranı yumusak bir bez ile temizleyin. Eger cam temizleyici bir sivi kullanacaksanuz, anti statik gezelti vya benzeri katki iceren bir temizleyici kulanmayin, bu LCD ekranı kaplamasanı,Qizebilir.
- Kasayi, paneli ve kontrolleri hafif deterjanl solusyonla islatilmis yumusak bir bez ile temizleyin. Asindici ped, temizleme tozu veya alkol ya da benzin gibi gezuciler kullanmayin.
- Ekran yüseyini tumenmez kalem veya tornavida gibi keskin veya asindirnci maddelerle, silmeyin, dokunmayin ve temas etmeyin. Bu Tür bir temas resim tupunde Çizilmeye yol acabilir.
Eger monitor bocek ilaclan gibi guclu solventler maruz kalir veya kauquk yada vinil malzemelerle sert temasta bulunursa malzemede bozulma veya LCD ekran kaplamasinda bozulma meydana gelebilir.
Tasima
- Tasima esnasinda monitordeki tum kabolari ayirin ve ekram cizmemeye ozen gostererek LCD monitorun iki tarafindan sikica tutun. Eger monitoru dinurnsiz yaralanabilirsiniz veya monitor hasar gorebilir.
- Bu monitorü tamir veya gonderi icin tasirken original kutusunu ve ambalaj malzemelerini kullanin.
Monitor atilmasi
- Bu monitorü genel ev atiklar ile birlikte atmayın.
- Bu monitörde kullananan flóresan típte civa bulunmaktadir. Bu monitorün atilmasinda yerel temizlik idarenizin yönetmeliklerine uyulması gereklidir.
Böümlerin ve kontrolduğmelerinin tanımlanması
Daha fazla detay icin parantez icindeki sayfalara bakimiz.

LCD monitor on yuzu
LCD monitor yandan görtintusu

1 (Guc) duigmesive 念 (g u c) isi (sayfalar 9, 19) Ekranacmak ve kapatmak icin, 念 (g u c) anahtarina basin Gucisigi, monitor acildygnda yesil yanar, monitor erjeri tasarrufu modundayken ise turuncu olarak yanar.
2 Isik sensor (sayfa 20) Bu sensor cevredekleri alanin parlakligini olcer. Sensoru kagit vs. ile kapatmadiginuzdan emin olun.
3 Stereo hoparlorler (sayfa 19) Bu hoparlorer ses sinyallerini ses olarak disari verir.
4 MENU dugmesi (sayfa 12) Bu dugme menu ekranini acar ve kapatir.
5 / ve (ses kontrl) duğmeleri (sayfalar 12, 19) Bu duğmeler menu maddelerini seçmek ve ayar yapmak icin ve sesi kontrl etmek üzere "Ses" menusünu görtunjulemek icin kullamilr.
OK duğmesi (sayfa 12) Bu duğme, ↓/↑ duğmeleri ile seçilen menu maddelerini ve yapilan ayarlın aktive eder (5).
7 INPUT duğmesi (sayfa 11) Bu duğme, monitó iki bilgisayar baglandında video giris sinyalinin INPUT1, INPUT2 ve INPUT3arasindaGPCİ yapmasını saglar.
8 ügmesi (sayfa 20) Bu duğme MOD'u (PICTURE/AUDIO) degistirir.
9 Arka kapak (sayfa 7) Bu kapagi, kabolari vya ag kabolarini takarken yukari kaydiriniz.
10 Kulaklik fisi (sayfa 19) Bu fiis sesinyallerini kullakliklara verir.

LCD monitor arka yuzu
11 ACIN Soketi (sayfa 8)
Bu soket guc kablosunu baglar (saglanmistir).
12 Güvenlik Kilidi Boşlugu
Güvenlik kilidi boşluqku Kensington Micro Saver Security System ile birlikte kullanilmahdir.
Micro Saver Security System, Kensington'un tescilli markasdir.
13 INPUT1[in ses giris fis (sayfa 8)
Bu fiş, bir bilgisayarin ses Çişkış fişine baglandında vya INPUT1'e digerbir ses cihazı baglandında ses sinyallerini verir.
14 INPUT2 icin HD15 giris soketi (analog RGB) (sayfa 7)
Bu soket RGB video (0,700 Vp-p, pozitif) ve sync sinyallerini verir.
15 INPUT2 icin ses giris fişi (sayfa 8)
Bu fi, bir bilgisayarin ses cikis fisine baglandiginda veya INPUT2'ye diger bir ses cihazi baglandignda ses sinyallerini verir.
16 INPUT2 icin HD15 giris soketi (analog RGB) (sayfa 7)
Bu soket RGB video (0,700 Vp-p, pozitif) ve sync sinyallerini verir.
17 INPUT3 için ses giris fişi (sayfa 8)
Bu fis, bir bilgisayarin ses cikis fisine baglandignda veya INPUT3'e digerbir ses cihazi baglandignda ses sinyallerini verir.
18 INPUT3 icin DVI-D giris soketi (dijital RGB) (sayfa 7)
Bu soket DVI Rev. 1.0 ilc uyumlu dijital RGB video sinyallerini verir.
19 Kablo tutucu (sayfa 9)
Bu parca, kabolari ve ag kabolarini monitore sabitler.
Kurulum
Monitorunuzi kullanmaya baskamadan once, asagidakilerin kutuda bulundugundan emin olun.
LCDckran
Gückablosu
HD15-HD15 video sinyal kablosu (analog RGB)
DVI-D video sinyal kablosu (dijital RGB)
- Ses kablosu (stereo mini fi§)
- CD-ROM (Windows/Macintosh için program yazilimi, Isletim Talimatlari, vs.)
- Garanti karti
- Kolay Kurulum Kilavuzu
Kurulum 1:Video sinyal kabolarini takin
- Baglamadan-once monitorü ve bilgisayaruzi kapatn.
- Bilgisayarı monitorın HD15*giris doketine (analog RGB) baglarken, bakimiz "HD15*cikis doketi olan bir bilgisayar baglayın (analog RGB).
Not
Video sinyal kablosu baglayicisin pinlerine dokunmayin, dokunmak pinlerin egilmesine yol acabilir.
Arka kapaqi yukari kaydirin.

DVI seksiş doketi olan bir bilgisayar bestehtiny (dijital RGB)
Saglianan DVI-D video sinyal kablosunu (dijital RGB) kullanarak, bilgisayari monitor输入 INPUT3 icin olan DVI-D giris soketine (dijital RGB) baglayin.

HD15 cikis doketi akan bir bilgisayar baglayin (analog RGB)
Saglianan HD15-HD15 video sinyal kablosunu (analog RGB) kullanarak, bilgisayari monitor输入 INPUT1 veya INPUT2 için akan HD 15 girisoketine (analog RGB) baglayin.
Bilgisayari, asagidaki sekillere bakarak baglaym.
IBM PC/AT veya uyumlu bilgisayara baglama


■Bir Macintosh bilgisayara baglama
Bir Macintosh bilgisayar baglarken, gerekirse bir adaptoror (saglianmamustur) kullanin. Video sinal kablosunu baglamadan once adaptororu bilgisayara baglayin.
Kurulum 2: Ses kablosunuimentary in
Verilen ses kablosunu monitori ilgili ses giris fişine baglayin.
Monitorun hoparlorlini vya kulaklkarini kullanarak, bilgisayarinizdan vya monitorun ses giris fislerine bagli diger ses cihazlarindan gelen sesleri dinleyebilirsiniz. Daha fazla bilgi icin, bkz "Sesi kontrol etme" sayfa 19.

Kurulum 3: Güç kablosunubaughin
1 Sağlanan Güç kablosunu monitorin AC IN soketine-SAglambir sekilde baglayin.
2 Diger ucu bir prize saglam bir sekilde takin.

Kurulum 4: Kordonlari ve kabolari sarin
1 Arka kapaqi yukari kaydirin.
2 Kabin üzerindeki kablo tutucusunu kullanarak video sinyal kablosunu, ses kabolarini ve guç kablosunu saglamlayin.
3 Arka kapaqi aasaiki kaydirin.


Kurulum 5:Monitörü ve bilgisayarı�能
1 Monitorün onündeki (guc dugmesine) basin. (G C) 1sigi yesil yanacaktir.

2 Bilgisayari acin.
3 lstediginiz giris sinyalini secmek icin INPUT duğmesine basin.
Secilen giri sin resmi ekranda belir.
Daha fazla bilgi icin, bkz "Giri sinyalini seçme (INPUT dügmesi)" sayfa 11.

Monitorunzun kurulumu tamamlanmistir. Eger gerekliyse grotuyu ayarlamak icin monitorun kontrol duigmelerini kullanin (sayfa 12).
Eger ekraninizda görtü yoksa
- Monitor bilgisayariniza dizgün olarak baglandigundan emin olun.
Eger ekranda "NO INPUT SIGNAL" görtülenirse:
Bilgisayar enerji tasarrufu modundadir. Klavyede herhangi bir tuja basmayi veya fareyi hareket ettirmeyi deneyin.
- INPUT dugmesine bescharen giris sinyal ayarmin dokru olup olmadigi kontrl edin (sayfa 11).
Eger ekranda "CABLE DISCONNECTED" görtülenirse:
Video sinyal kablosunun duzgün sekilde baghi olup olmadigiin kontrol edin.
- INPUT dugmesine basarak giris sinyal ayarmin dokru olup olmadigi ini kontrol edin (sayfa 11).
Eger ekraninizda "OUT OF RANGE" belirise, eski monitori tekrar baglayin. Ardindan bilgisayarin ekran karini, asagidaki araliklara ayarlayin.
Analog RGB Dijital RGB Yatay frekans 28-80 kHz 28-64 kHz Dikey frekans 48-75 Hz 60 Hz Çüzünürlük 1280 × 1024 vya daha/DDüzuk 1280×1024 vya daha/DDüzuk
Göruntülu mesaj hakkinda daha genis bilgi icin, bkz "Hata belirtileri ve olas giderme yontemleri" sayfa 22.
Özel sürüçülere gerek yoktur
Bu monitor "DDC" Tak ve Çalıstır (Plug & Play) standartlarina uygundur ve otomatik olarak monitor bilgilerini algilar. Bilgisayariniza özelbir sürüci yüklenncsine gerek duyulmaz.
Monitor PC'ize bagladiktan sonra PC'yi ilk kez calisturdigiizda Kurulum Sihirbazy ekranda belirebilir. Bu durumda, ekranda beliren talimatlari takip edin. Tak ve Kullan Monitor otomatik olarak secilir, boylece monitoru kullanabilirsiniz.
Dikey frekans 60 Hz' e ayarlidir.
Titremeler ortadan kalktignda monitur bu halyle kullanabilisiniz. Ayirbyuksekegerin dikey frekansi ayarlanamiza gerek yoktur.
Kurulum 6:Eğikligi ve açıyı ayarlama
Monitor asagida belirtilen acilarda ayarlanabilir.
LCD panelin kenarlarindan kavrayin ve ekran acilarim ayarlayin.


Monitoru rahat bir sekilde kullanmak icin
Monitorunuzn gorus acisini, uzerinde bulundugu masa ve kullandiginiz sandalyein yuksekligine gore ve 1sik monitorden gozunüze yansimayacak sekilde ayarlayin.
Not
Ekran eginimi ve yuksekligini ayarlarken, monitoru masaya carpmamaya dikkat ederek, yavae ve dikkatli hareket edin.
Giriş sinyalini/seme
(INPUT diugmesi)
INPUT duğmesine basin.
Bu dugmeye her bastigimzda girisinyali degisir.

INPUT
Ekran mesaji Giriş sinyali yapilendirma(Sol üst koosec yaklaşık 5saniyeGPCUK.) INPUT1: HD15 HD15 giris Soketi(analog RGB) INPUT1 icin INPUT2: HD15 HD15 giris Soketi(analog RGB) INPUT2 icin INPUT3: DVI-D DVI-D giris Soketi(dijital RGB) INPUT3 icin
Monitor Kullanıya Bağlı Ayarı
Ayarlari yapmadan once
Monituro bilgisayara baglayin ve ikisini de calistirin. Iyi sonuc elde etmek icin, ayar yapmadan once en az 30 dakika bekleyin.
Ekranda beliren�� u kullanar monitorunuzde pek cok ayar degisikligi yapabilirsiniz.
Menüyü kullanma
1 Ana menüyi Güsterme.
Ekrandaki ana menuyu gostermek icin MENU dugmesine basun.

2 Meniyu secin.
Istediginiz menuyu görtuntilemek icin / dugmelerine basin. Ik menu maddesinc gecmek icin OK dugmesinc basin.

3 Ayarlamak istediginiz maddeyi secin.
Ayar yapmak istediginiz maddeyi sejmek icin, / dugmelcrine daha sonra da OK dugmesine basin.

menu maddelerinden biri isc.
sectiginizde ve OK dugmesine bastigimiza, ekran bir onceki menyu de doner.
4 Maddeyi ayarlayin.
Ayarlamalari yapmak icin dugmelerine daha sonra da OK dugmesine basin.
OK duğmesine bastügünizda ayarlar saklanir ve ekran bir oncki menüye dōner.

5 Menuyu kapatma.
Normal goruntuye donmek icin MENU dugmesine bir kez basin. Eger herhangi bir dugmeye basilmazsa menu 45 saniye icinde otomatik okayakapanir.

■ Ayarlari fabrika ayarlarina geridondürme.
Ayarli, RESET menusunu kullanarak sifirlayabilirsiniz. Ayarli sifrlama ile ilgili daha fazla bilgi icin, bakiniz sayfa 18 deki 一 ^ 一 (RESET).

PICTURE/AUDIO menüsu
PICTURE/AUDIO menüünü kullanarak asagidaki ögeleri ayarlayabilirsiniz.
- MODE (GAME/MOVIE/PC/ AUTO)
- PICTUR
AUDI
- MODERESET

MODEmenusu
Amaciniza gore uygun ekran parlakligini secebilirsiniz.
PICTURE/AUDIO ayarlan her bir mod icin ayarlanabilir.
Ayrica, her giris (INPUT1/INPUT2/INPUT3) iar modu degistirebilirisiniz.
1 MENU duğmesine basin.
Ana menu ekranda görtüntülenir.
2 (P TURE AUDIO)i sejmek icin / duqmelerine ve sonra da OK duqmesine basin.
PICTURE/AUDIO menus ekranda görtülenir.
3 "MOVIE" i seçmek,— in / duğmelerine ve sonra da OK duğmesine basin.
MODE menusü ekranda görtunülenir.

4 Istediginiz modu sejmek icin / duigmesine basin ve sonra OK duigmesine basin.
Varsaylan ayar MOVIE dir.
- GAME: Parlak resim.
MOVIE: Guclu kontrastli net resim.
- PC: Yumusak tonlu resim.
- AUTO: Ekran parlakligimi evecre parlakligina gore otomatik olarak ayarlar (otomatik parlaklik ayarlama fonksiyonu). Daha fazla bilgi icin, bkz "Otomatik parlaklik ayarlama fonksiyonu (isik sensorü)" (sayfa 20).
NOT
AUTO modda, arka 1sigi ayarlayamazsimiz.
PICTURE menu A
PICTURE menusunu kullanarak asagidaki ogeleri ayarlayabilirsiniz.
- BACK LIGHT
- CONTRAST
BRIGHTNESS
GAMMA menusu
- COLOR menusü
SHARPNE

BACKLIGHT ayarlama
Eger ekran cok parlaksa, arka isigi ayarlayin ve ekranin daha kolay gorunmesini saglayin.
1 MENU duğmesine basin.
Ana menuckranda görtuntilenir.
2 (PICTURE/AUDIO)i sejmek icin / duqmelerine ve sonra da OK duqmesine basin.
PICTURE/AUDIO menusu ckranda gorbuntulenir.
3 (PICTURE) seceneğini seçmek icin ↓/↑ duğmelerine ve sonra da OK duğmesine basin.
PICTURE mcnusckranda goruntulcnir.
4 " BACKLIGHT" seceneğini/seçmek icin ↓/↑ Düğmelerine ve sonra da OK Düğmesine basin.
"BACKLIGHT" menusü ekranda göruntülenir.
5 Isik seviyesini ayarlamak icin, / duğmelerine basin ve sonra OK duğmesine basin.
CONTRAST ayarlama 1
Resim kontrastini ayarlayin.
1 MENU duğmesine basin.
Ana menu ekranda görtuntilenir.
2 (PICTURE/AUDIO)i sejmek icin / duqmelerine ve sonra da OK duqmesine basin.
PICTURE/AUDIO menus ekranda gortintulenir.
3 (PICTURE) seceneğini seçmek icin ↓/↑ Düğmelerine ve sonra da OK Düğmesine basin.
PICTURE menusu ekranda goruntulenir.
4 "CONTRAST"seçeneğini seçmek icin 1 / 1 duqmelerine ve sonra da OK duqmesine basin.
"CONTRAST" menus ekranda görtülenir.
5 Kontrasti ayarlamak icin, / duigmelerine basin ve sonra OK duigmesine basin.
BRIGHTNESS ayarlama
Resmin parlakhligi ayarlayin (siyah seviyesi).
1 MENU duğmesine basin.
Ana menu ekranda görtunülenir.
2 (PICTURE/AUDIO)'i sejmek icin / duqmelerine ve sonra da OK duqmesine basin. PICTURE/AUDIO menusu ekranda goruntulenir.
3 (PICTURE) seçeneğini seçmek icin ↓/↑ Düğmelerine ve sonra da OK Düğmesine basin. PICTURE menü ekranda görtüntülenir.
4 “BRIGHTNESS” seçeneğini seçmek icin ↓/↑ Dügmelerine ve sonra da OK Düɡmesine basin. “BRIGHTNESS” menü su ekranda görtündelenir.
5 Parlakiği ayarlamak icin, / diğmelerine basin ve sonra OK diğmesine basin.
GAMMA ayarlama
Göruntünun renk gölgesini, göruntünun original renk gölgesi ile birlestirebilirsiniz.

1 MENU duğmesine basin.
Ana menu ekranda görtuntilenir.
2 (PICTURE/AUDIO)'i sejmek icin / duqmelerine ve sonra da OK duqmesine basin. PICTURE/AUDIO menusu ekranda goruntulenir.
3 (PICTURE) seçeneğini seçmek icin ↓/↑ Düğmelerine ve sonra da OK Düğmesine basin. PICTURE menusü ekranda görtündelenir.
4 " (GAMMA)"seçeneğini seçmek icin 1 / 1 duğmelerine ve sonra da OK duğmesine basin. GAMMA menusu ekranda görtüntülenir.
5 Istediginiz modu sejmek icin / duğmelerine basin ve sonra OK duğmesine basin.
COLOR ayarlama
Goruntunun beyaz renk alanindaki renk seviyesini, varsaylan renk isisi ayarlarindan scebilirsiniz.
Ayrica,gerekirse,renk isisinaince ayar da yapabilirsiniz.

1 MENU duğmesine basin.
Ana menuckranda görtuntilcnir.
2 (PITURE/AUDIO)'i sejmek icin / duqmelerine ve sonra da OK duqmesine basin. PICTURE/AUDIO menusu ekranda goruntulcnir.
3 (PICTURE) seçeneğini seçmek icin ↓/↑ Düğmelerine ve sonra da OK Düğmesine basin. PICTURE menü su ekranda görtündelenir.
4 "COLOR") seçeneğini seçmek,—/üdümelerine ve sonra da OK düzmesine basin. COLOR menüsi ekranda görtüntenir.
5 Istediiginiz renk isisiin seqmek icin / duqmelerine ve sonra da OK duqmesine basin. Renk 9300K'dan 6500K'yaogrdu ayarlanirken beyaz dengesi maviden kirmiziya dogru degisir.
Renk Isisina ince ayar yapma
Renk isisi her bir mod icin ayarlanabilir. (GAME/MOVIE/PC/AUTO)
1 MENU Düğmesine basin.
Ana menu ekranda görtunülenir.
2 (P TURE/AUDIO)i secmek icin / duqmelerine ve sonra da OK duqmesine basin. PICTURE/AUDIO menusu ckranda goruntulenir.
3 (PICTURE) seçeneğini seçmek icin ↓/↑ Düğmelerine ve sonra da OK Düğmesine basin. PICTURE menük erkanda görtüntülenir.
4 "COLOR"seçeneğini seçmek icin ↓/↑ Düğmelerine ve sonra da OK Düğmesine basin. COLOR menüsu ekranda görtüntenir.
5 "ADJUST" seçeneğini seçmek,— in / duğmelerine ve sonra da OK duğmesine basin. Renk isisi,— ince,—ayar,—ekranda belirir.

6 R (Kirmizi) veya B (Mavi) seçeneğini/seçmek icin ↓/↑ Düğmelerine ve sonra da OK Düğmesine basin. Ardindan, istediginiz renk isisini ayarlamak icin ↓/↑ Düğmelerine ve sonra da OK Düğmesine basin.
Bu ayar, renk isisin R ve B bolumlerini G (yeil) bolumune gore artirarak veya azaltarak degistirdiginden, G bolumu sabittir.
7 seceneğini seçmek,— in / duğmelerine ve OK duğmesine basin.
Yeni renk ayari bellekte saklanir ve "Kullanici" seçildiginde otomatik atau geriçagrlr.
COLOR menus ekranda goruntulenir.
SHARPNESS ayarlama
Göruntülerin kenarlying kesklinstirmek vs. iqin ayarlayin.
1 MENU duğmesine basin.
Ana menu ekranda goruntulenir.
2 (PICTURE/AUDIO)i sejmek icin /+ duqmelerine ve sonra da OK duqmesine basin. PICTURE/AUDIO menusu ekranda goruntulenir.
3 (PICTURE) seçeneğini seçmek icin ↓/↑ Düğmelerine ve sonra da OK Düğmesine basin. PICTURE menük erkanda görtüntülenir.
4 "SHARPNESS" seçeneğini seçmek icin ↓/↑ Düğmelerine ve sonra da OK Düğmesine basin. SHARPNESS menüsu ekranda göruntülenir.
5 Keskinligi ayarlamak icin, / dugmelerine basin ve sonra OK dugmesine basin.
■ AUDIO menusü
AUDIO menüsunu kullanarak asagidaki ögeleri ayarlayabilirsiniz.
TREBLE
BASS
BALANCE
- SURROUND

TREBLE, BASS veya BALANCE'yi ayarlama
1 MENU diugmesine basin.
Ana menu ekranda görtüntenir.
2 (PICTURE/AUDIO)i sejmek icin / duqmelerine ve sonra da OK duqmesine basin. PICTURE/AUDIO menusu ekranda goruntulcnir.
3 (AUDIO) seceneğini seçmek icin ↓/↑ Düğmelerine ve sonra da OK Düğmesine basin.
4 TREBLE, BASS veya BALANCE seceneğiniseçmek icin ↓/↑ Düğmelerine ve sonra da OK Düğmesine basin.
5 Istediginiz modu semcik icin / diugmelerine basin ve sonra OK diugmesine basin.
SURROUND ayarlama
1 MENU dugmesine basin.
Ana menu ekranda goruntulcnir.
2 (PICTURE/AUDIO)i sejmek icin / duqmelerine ve sonra da OK duqmesine basin. PICTURE/AUDIO menusu ekranda goruntulenir.
3 (AUDIO) seceneğini seçmek icin ↓/↑ Düğmelerine ve sonra da OK Düğmesine basin.
4 SURROUND seceneğini seçmek icin ↓/↑ Düğmelerine ve sonra da OK Düğmesine basin.
5 Istediiginiz modu sejmek icin / duqmelerine basin ve sonra OK duqmesine basin.

SRS WOW: Derin, zengin bastonu vct nyuktckton zengin bir surround ses saglar ve ozellikle filmer ve oyunlar guci sce ilc daha eglenceli hale gelir.
- OFF (KAPALI): SRS WOW efektini kapatri.
SRS Laboratuarlan tarafindan gelistirilen son teknolojiyikullanan SRS WOW, cseitli ses kaynaklarinun ses kalitesinionemli miktarda artirr.
■ MODE RESET menüsu (tüm modlari varsayilan ayara geri dondürme)
Yaptiginz ayarlar fabrika ayarlarina geridondurebilirsiniz.
1 MENU duğmesine basin.
Ana menu ekranda görtüntenir.
2 (PICTURE/AUDIO)i sejmek icin / duqmelerine ve sonra da OK duqmesine basin. PICTURE/AUDIO menusu ekranda goruntulenir.
3 “RESET” seçeneğini seçmek,— in ↓/↑ Düğmelerine ve sonra da OK Düğmesine basin. “RESET” menü su ekranda görtündenir.
4 Istediiginiz modu sejmek icin / digmelerine basin ve sonra OK digmesine basin.
- OK: PICTURE/AUDIO menusündeki her modu varsayilan ayarlara geri dondurmek icin.
- CANCEL: Sifirlamayi epital etmek ve PICTURE/ AUDIO menusune donmek icin.
SCREEN menüsu (sadece analog RGB sinyali)
SCREEN menüsunü kullanarak asagidaki ögeleri ayarlayabilirsiniz.
·AUTO
PHASE
PITCH
HCENTER
VCENTER

Not
INPUT3 için DVI-D giris soketinden digital RGB sinyalleri alirken, ayar gereksizdir.
- Otomatik görtü kalitesi ayarlama fonksiyonu
Monitor bir giris sinyali aldiginda, otomatik olarak resmin pozisyonunu ve kesklinigi (faz/aralik) ayarlar ve ekranda net bir resmin görtüntülenmesini saglar (sayfa 20).
Not
Otomatik görtü kalitesi fonksiyonu aktif durumda oldugunda sadece (guc) dugmesi calisir.
Eger bu monitori onomatik görtü kalitesi fonksiyonu, görtütu tam olarak ayarlayamazsa
Geçerli giri sinyali icin, daha ileri otomatik goruntu kalitesi ayarlan yapabilirsiniz (Aasagidaki "AUTO" bolumune bakin).
Eger görtü kalitesiyle ilgili daha fazla ayar yapmak isterseniz
Görtünün kcskinligini (faz/aralık) ve konumunu (yatay/dikcy konumunu) elinizle ayarlayabilirsiniz.
Bu ayarlar, bellekte saklanir ve monitor onceden girilmis veya kaytll giris sinyalini alduginda, otomatik okayak gerig cagrilur.
Geçerli giriş sinyali icin, daha ileri otomatik görtü kalitesi ayarlı yapabilirsiniz (AUTO)
1 MENU diugmesine basin.
Ana menu ekranda görtüntenir.
2 (SCREEN) seçeneğini seçmek icin ↓/↑ duğmelerine ve sonra da OK duğmesine basin.
SCREEN menusu ekranda görtuntilenir.
3 "AUTO"seceneignisecmekicin / duigmelerine ve sonra da OK duigmesine basin.
Ekranin, geleeri giriş sinyali icin faz, aralık ve yatay/dikey konumu ile ilgili gerekli ayarlamaları yapın ve bunlari saklayın.
Resmin keskinligini manuel olarak ayarlama (Phase (Faz)/Pitch (Aralik))
Resmin keskinliginci asagidaki sekilde ayarlayabilirsiniz. Bu ayar, bilgisayar monitori HD15 giris soketine (analog RGB) baglandiginda etkindir.
1 Bilgisayarda cüzünurlugu 1280× 1024 olarak ayarlayin.
2 CD-ROM'ü yerleştinir.
3 CD-ROM 'u besoinin ve ornek testi görtüntüleyin. Windows Kullanıçları icin
Otomatik calistirma islemi basladignda:
Display Adjustment tool 'a (Utility) tiklayin.
"Adjust" a tiklayin ve gezūnūrlügū dokrulayin ve ardūndan "Next"c tiklayin.
PITCH ve PHASE 参数 ornek test sirayla görtunülenir.
Otomatik calistirma islemi basarisiz oldugunda:
1 "My Computer" i açin ve CD-ROM simgesine tɪklayin.
"Explorer" a gadin ve CD-ROM simgesini acn.
2 [Utility]yiacin ve arundan [Windows]i segin.
3 [Win_Untility.exe]yi calistirn.
Ornek test görtuntilenir
Macintosh kullanicari icin
I | Utility|yi acin ve arindan |Mac|i secin.
2 [Mac_Utility.exe]yicalisturin.
Örnek test görtüntenir.
4 MENU duğmesine basin.
Ana menuckranda goruntulcnir.
5 (SCREEN) seçeneğini seçmek 参数 ↓/↑ duğmelerine ve sonra da OK duğmesine basin.
SCREEN menusu ekranda görtuntilenir.
6 "PHASE"seconeigni secmek icin / duqmelerine ve sonra da OK duqmesine basin.
"PHASE" ayar menusu ekranda gorbuntulenir.
7 Yatay cizgiler minimum seviyeye inene kadar / duğmelerine basin.
Ayari, yatay cizgiler minimum seviyede olacak sekilde yapin.

8 OK dugmesine basin.
Ana menu ekranda goruntulenir.
Eger tum ekranda dikey cizgiler goruntulenirse, aralgi
(pitch) aşaqidaki sekilde ayarlayin.
9 "PITCH" seçeneğini seçmek icin ↓/↑ Düğmelerine ve sonra da OK Düğmesine basin.
"PITCH" ayar menusü ekranda görtülenir.
10 Dikey cizgiler kaybolana kadar / duğmelerine basin.
Ayari, dikey cizgiler kaybolacak sekilde yapin.

11 Örnek testi sona erdirmek icin ekrandaki [END]e tiklayin.
Resmin konumunu manuel olarak ayarlama (H CENTER/V CENTER)
Göruntü ekranin merkezinde bulunmuyorsa görtüyu ortalamak icin asagidaki admlar takip edin.
1 Bilgisayardaoczūnūrlügū 1280×1024 ordeal ayarlayin.
2 CD-ROM'ü yerleştinir.
3 CD-ROM 'u baslatin ve ornek testi görtüntüleyin. Windows Kullanıçları ilen Otomatik calıstirma ilemi basladigianda:
Display Adjustment tool 'a (Utility) tiklayin.
"Adjust" a tiklayin ve gezūnūrlügū dokrulayin ve ardindan "Next" e tiklayin.
H CENTER ve V CENTER,—ünörnek test sirayla görtülenir.
Otomatik calistirma islemi basarisiz oldugunda:
1 "My Computer"i acin ve CD-ROM simgesine tiklayin. "Explorer"a gadin ve CD-ROM simgesini acin.
2 | Utility|'yi acin ve ardindan | Windows'|i scein.
3 [Win_Untility.exe]yigeahstirm.
Ornek test görtuntilenir.
Macintosh kullanicari iqin
1 | Utility|yi aqin ve ardindan |Mac'i segin.
2 [Mac_Utility.exe]yicalisturn.
Örnek test görtüntülenir.
4 MENU dugmesine basin.
Ana menu ekranda görtüntülcnir.
5 (SCREEN) seçeneğini seçmek 参数 ↓/↑ Düğmelerine ve sonra da OK Düğmesine basin. SCREEN mnusü ekranda görtündülçir.
6 "H CENTER" veya "VCENTER" seçeneğinisecmek icin 1 / 1 dügmelerine ve sonra da OKdugmesine basin.
"H CENTER" ayar menusu veya "VCENTER" ayar menusu ekranda görtüntenir.
7 Örnek testi ekranda ortalamak icin, ↓/↑ duğmelerine basin.
8 Örnek testi sona erdirmek icin ekrandaki [END]e tiklayin.
- MENU POSITION menüsu
Eger ekrandaki bir nesneyi gormenizi engellyorsa, menu konumunu degistirebilirisiniz.

1 MENU duğmesine basin.
Ana menuckranda goruntulenir.
2 (MENU POSITION) seceneğini seçmek icin ↓/↑ duğmelerine ve sonra da OK duğmesine basin.
"MENU POSITION" menusü ekranda görtuntülenir.
3 Istediiginiz konumu seçmek icin / Düğmelerine ve sonra da OK Düğmesine basin.
Menunun yeri icin 9 konumdan birini secebilirsiniz.
INPUT SENSING ON/OFF menusu
INPUT SENSING ON/OFF menusände AUTO ON scencegini sectiginizde, monitor otomatik olarak bir giris terminaline bir giris sinyali saptar ve enerji tasarruf moduna gircmedcn once girisi otomatik olarak dcgisirir.

1 MENU duğmesine basin.
Ana menuckranda goruntulenir.
2 (INPUT SENSING ON/OFF) seçeneğini seçmek icin ↓/↑ Düğmelerine ve sonra da OK Düğmesine basin.
INPUT SENSING menus ekranda goruntulcnir.
3 Istediiginiz modu sejmek icin / duqmelerine basin ve sonra OK duqmesine basin.
- ON: SeçilenGIS terminalindeGIS sinyali yoksa veya INPUT Düğmesi ilebirGIS terminali seçtigünizde ve terminaldeGIS sinyali yoksa,ekran mesaj görtüntülir (sayfa 21)ve monitor,giri otomatik olarak degistirmek icin baska birGIS terminaline yönclikGIS sinyalini kontrl cder. Giris degistirildigiinde,seçilenGIS terminali ekranin solust kisminda görtüntülir. Giris sinyali yoksa,monitor otomatik olarakenerj ti nasarruf moduna gece.
OFF:Giris otomatik olarak dcgistirilmz.Girisidcgtistirmek icin INPUT dugmesine basim.

LANGUAGE menu

1 MENU Düğmesine basin.
Ana menu ekranda görtüntenir.
2 (LANGUAGE) seçeneğini seçmek icin ↓/↑ duğmelerine ve sonra da OK duğmesine basin.
LANGUAGE menüki ekranda görtülenir.
3 Bir dil seçmek icin, ↓/↑ duğmelerine ve sonra da OK duğmesine basin.
- English: ingilizee
- Frangais; Fransizca
- Deutsch: Almanca
- Espanol: Ispanyolca
Italiano: Italyanca
Nederlands: Felemenkce
Svenska: Isveççë
- Pycckn:
·日本語:
·中文: C i
- MENU LOCK menüsu
Istenmeyen ayarlar ve sifirlamaları onlemek icin, Düğmelerin kontrollerini kilitler.

1 MENU duğmesine basin.
Ana menu ekranda goruntulcnir.
2 (MENULOCK)secenegeini semekicin / duqmelerine ve sonra da OKduqmesine basin. MENULOCK menusckranda goruntulenir.
3 "On" veya "Off." seçeneğini seçmek icin ↓/↑ duğmelerine basin.
- ON: Sadecce (guc) anahtari ve INPUT dugmeci calisacaktir. Eger herhangi bir islem yapmaya calisirsaniz, ekranda okunu belirir.
OFF:“MENULOCK”ayarini kapahya getirr.
a "MENU LOCK" ayan "ON" olarak sceildiyse, MENU duigmesinc bastigmizda, "OM MENU LOCK" otomatik olarak secilir.
RESET menu (varsayilan ayarlara geri dondürme)

1 MENU duğmesine basin.
Ana menu ekranda görtüntülenir.
2 (RESET) seçeneğini seçmek icin ↓/↑ duğmelerine ve sonra da OK duğmesine basin.
RESETmenusekranda görtuntilenir.
3 Istediginiz modu semcikicn / duqmelerine basin ve sonra OK duqmesine basin.
- OK: Yaplan ayarlan, fabrika ayarlarina geri dondurmek icin "BANGUAGE" ayari bu yontemle degismez.
- CANCEL: Sifirlamayi iptal etmek ve menu ekranina donmek icin.
Teknik Özellikler
Sesi kontrol etme
MonitorHoparlorini veyakulakhikarini kulanarak, bilgisayarimizdan veya monitor ses giris fislerine bagh diges cihazlarindan gelen sesleri dinleyebilirsiniz.
Ana * nüden ayr bir "Ses" * munsunu kullanarak sesi kontrl edbilirsiniz.
1 Ekranda herhangi bir menu gänmediginde / duğmelerine basin.

2 Sesi kontral etmek icin / duğmelerine basin.
Yaklajk 5 saniye sonra menu otomatik olarak kaybolur.
Notlar
Ekranda ana menu görtüntilenirken sesi ayarlayamazsiniz.
- Monitor enerji tasarruf modundayken, hoparlorlerden veya kulakhklardan ses gelmez.
Enerji tasarrufu fonksiyonu
Bu monitor VESA, ENERGY STAR (yalnizca SDM-HX75) ve NUTEK erji tasarrufu standartlarina uygundur. Monitor eger Analog giris icin DPMS (Display Power Management Standard)/Dijital giris icin DMPM (DVI Digital Monitor Power Management) uyumlu bir bir bilgisayara veya video grafik katina baglanirsa, monitor asagida gosterilen sekilde otomatik olarak erji tuketimini azaltacaktir.
SDM-HX75
Enerji modu Enerji tüketimi (enerji) gostergesi normal calisma 50 W (maks.) yeşil aktif kapanma* (derin uyku)** 1 W (maks.) kehribar ( power) off (güç kapah) 1 W (maks.) off
SDM-HX95
Enerji modu Enerji tüketimi (enerji) gõstergesi normal calisma 60 W (maks.) yeşil aktif kapanma* (dcrin uyku)** 1 W (maks.) kchibar ( power) off (güç kapalı) 1 W (maks.) off
* Eger bilgisayarimiz "aktif kapanma" moduna geçerse, giri sinyali kesilir ve ekranda "NO INPUT SIGNAL" (giri sinyali yok)进展情况。5 saniye sonra monitori ereri tasarrufu moduna geleçer.
**“derin uyku” Environmental Protection Agency tarafindan tanimlanan enerji tasarrufu modudur.
MOD'u Ayarlama (PICTURE/ AUDIO) (modu)
Monitörün sag tarafindaki duğmesine üst üste bastıgünizda, MODE'u GAME MOVIE PC AUTO olarak secebilirsiniz.
"AUTO" seçeneğini seçtiğinizde, monitor ekran parlakligim Çevre parlakligina gore otomatik olarak ayarlar (otomatik
parlakhl ayarlama fonksiyonu). Daha fazla bilgi icin, bkz
"Otomatik parlakhík ayarlama fonksiyonu (ɪsɪk sensörü)".
duğmesine üst üste basin.
MODE'un varsayilan ayan "MOVIE" olarak ayarlanmistir.
duğmesine bir kez bastıgünizda, "MOVIE" (varsayilan
ayar) goruntulener, tekarr bastiginzda, PCgoruntulener.
dugmesine her bastuginizda, mod asagidaki gibi degisir.

Her bir mod ekranda görünür ve MODEdehygistirilir. Yaklaşik 5 saniye sonra menu otomatik olarak kaybolur.
Otomatik parlaklik ayarlama fonksiyonu (Isik sensörü)
Monitor, ekran parlakligini vevre parlakligina gore otomatik ayarlama özelligi ile donatilmustir. Ekran parlakligi, modunu monitrorun sag tarafindaki duğmesi ile AUTO olarak ayarlayarak veya PICTURE/AUDIO menusunde en uygun seviyeye ayarlanir. Ekran parlakligin varsayilan ayari MOVIE olarak ayarlanmustir.
Ayrica, monitorun sag tarafindaki igmesi ile modunu AUTO orak ayarladiginzda, ayar cugu da goruntuliner. Cubugu / dugmeleri ile ayarlayabilirsiniz. Ayarladiginiz seviyege gore ekran parlakligi degisir.
Otomatik resim kalitesi ayarlama fonksiyonu (sadece analog RGB sinyali)
Monitor birGISinyali aldiGnda, otomatik olarak resmin pozisyonunu ve keskinligini (faz/ aralk) ayarlar ve ekranda net bir resmin görtüntenmesini saglar.
Temel (fabrika ayarli) mod
Monitor birGISinyali alduginda,ekranin ortasinda yuksek kaliteli bir goruntu elde edcbilmek icin, bu sinyali monitorun belleginde saklu alan temel modlardan biri ile elesfirir. Giris sinyali temel mod ilc uyusursa, resim otomatik olarak uygun varsayilan ayarlarla ekranda goruntulenir.
Giri sinyalleri temel modlardan biri ile uyusmazsa
Monitor tcmel modlardan birine uymayan bir girisinyali ahrsa, ekranda daima net bir goruntu saglamak uzere, otomatik goruntu kalitesci ayar fonksiyonu aktive edilir (asagidaki monitor frekans arahklar dahilinde):
Yatay frckans:28-80 kHz
Dikey frekans:48-75 Hz
Sonuc olarak, monitor ilk defa, temel ayarlarina (fabrika ayari) uymayan birGIS sinyali aldignda monitorun ekranda goruntuyu gostermesi normalden dahuzun surebilir. Bu ayar verisi otomatik olarak hafizada saklanur ve daha sonra tekar alglandignda sanki monitor temel ayarlarina uyan birGIS sinyali almis gibi islem gorur.
Faz,arylk ve görtü konumunu manuel olarak ayarlarsaniz
Otomatik görtü kaliteci ayar fonksiyonu, bazirgis sinyallerinde görtü konumunu, fazi ve arahı tam olarak ayarlayamayabilir. Bu durumda, bu ayarlar manuel olarak yapabilirsiniz (sayfa 16). Yaptıgüniz manuel ayarlar hafizada saklanir ve monitorayo nir giris sinalini algladında yaniden kullanir.
Sorun giderme
Teknik destege basvurmadan once bu bolume bakin.
Göründülü mesajlar
Eger giris sinyalinde sorun yaşanyorsa, asagidaki mesajlardan bir tanesi ekranda görtülenir. Sorunu gidermek icin, bkz "Hata belirtleri ve olasi giderme yontemleri" sayfa 22.
Eger ekranda "OUT OF RANGE" görtülenirse
Bu, giris sinyalinin monitor özellikleri tarafindan desteklenmedigi gimir. Asagdaki ögeleri kontrl edin. Goruntulu mesaj hakkinda daha genis bilgi icin, bkz "Hata belirtileri ve olası giderme yontemleri" sayfa 22.
Eger ekranda "xxx.x kHz / xxx Hz" belirse
Bu, yatay ve dikey frekanslarin ikisinin de monitor tarafindan desteklenmedigi anlamna gelir. Rakamlar, gececrli giris sinyalinin yatay ve dikey frekanslarini gosterir.

Eger ekranda "RESOLUTION >1280× 1024 belirarse
Bu, czozunurlugun monitor özellikleri tarafindan desteklenmedigiösterir (1280× 1024 vya daha dusuk).

Eger ekranda "NO INPUT SIGNAL" görtüntenirse
Bu, seçili dokten sinyal gelmedigini belirir.
INPUT SENSING ON/OFF (sayfa 17) ON olarak
ayarlandiunda, monitor对不起 girisi sinyali bulur ve girisi otomatik olarak degistirir.

"GO TO POWER SAVE"
Monitor, ekranda mesaj belirdikten yaklasik 5 saniye sonra enerji tasarrufu moduna girer.
Eger ekranda "CABLE DISCONNECTED" görtüntenirse
Bu, video sinyal kablosunun geleerli doketten cikarildigi (sokete takili olmadigi) anlamina gelir.
INPUT SENSING ON/OFF (sayfa 17) ON olarak ayarlandigianda, monitor Barbara bir giris sinyali bulur ve girisi otomatik olarak degistirir.

Hata belirtileri ve olasi giderme yontemleri
Bagh bir bilgisayar veya diger cihazlarla ilgili bir sorun ortaya cikarsa, bagh bilgisayann/cihazin kullamn kilavuzuna bakim.
Belirti Bu öğeleri kontrl edin No picture (görüntü yok) ü(güç) gõstergesi yanmiyorsa veü(güç) Düğmesine basildıngnda daü(güç) yanmazsa, Güç kablosunun takil olup olmadıyıni kontrl edin. Eşer ekranda "CABLE DISCONNECTED" görtüntenirse, Video sinal y kablosunun ve dioer donanimlarin ilgili soketlerde taklulu durumda olup olmadıyıni kontrl edin. (sayfa 7).Video giris seksti pinlerin bülmemeş veya icinc kacmamş oludgün cmin olun.Giris secim ayarrnln doğru olup olmadıyıni kontrl edin (sayfa 11).Såglandmamş bir video sinal kablosu taklulu.Såglandmamş bir video sinal kablosunubagliarsanz, ekranda "CABLE DISCONNECTED" (kablo takluludehyil) mesajbelirc bilir.Bu ariza degildir. Eşer, ekranda "NO INPUT SIGNAL" mesaji belirirse veya ü(güç) gõstergesi kehribarsa, Video sinal kablosunun ve dioer donanimlarin ilgili soketlerde taklulu durumda olup olmadıyıni kontrl edin. (sayfa 7).Video giris seksti pinlerin bülmemeş veya icinc kacmamş oludgün cmin olun.Giris secim ayarrnln doğru olup olmadıyıni kontrl edin (sayFA 11).■ Monitör nedeniyledehyil, bir bilgisayar veya böylan farklbir cihaz nedeniyle olusapan problemlerBilgisayar enerji tasarrufu modunda. Klavyede herhangi bir tuşa basmayi veya fareyi hareket etirmeyi deneyin.Ekran kartınzin dizgün sekilde takldündan emin olun.Bilgisayarainenç konumda olup olmadıyıni kontrl edin. Eşer ekranda "OUT OF RANGE" görtüntenirse (sayfa 21), ■ Monitör nedeniyledehyil, bir bilgisayar veya böylan farklbir cihaz nedeniyle olusapan problemlerVideo (görüntü) frekansinn monitorün destckledigi özellikler icinde olup olmadıyıni kontrl edin. Eşer eski bir monitorün yerine, bu monitorüt aktysaniz, esk monitorüyecnakin ve bilgisayar nkran kartın asagida belirtilen araliklarda ayarlayin:Yatay frekans: 28-80 kHz (Analog RGB), 28-64 kHz (Dijital RGB)Dikey frekans: 48-75 Hz (Analog RGB), 60 Hz (Dijital RGB)Çüzünurlük: 1280×1024 veya daha Dennisuk Eşer Windows kullanyorsaniz, Eşer eski bir monitorün yerine, bu monitorüt aktysaniz, eski monitorüyeniden takin ve asagidaki talimatlari uyugulain. Windows donannin seçimi pencercsinde "Manufactures" (üretici) listeden "SONY"i ve "Models" (modeller) listeden "SDM-HX75 veya SDM-HX95" seçin. "Models" (modeller) listede "SDM-HX75 veya SDM-HX95" görtüntenmezse, "Plug & Play." (Tak ve Çalıtr)i denteyin. Eşer Macintosh system kullanyorsaniz, Bir Macintosh bilgisayar baglarken, gerekirse bir adaptör (saglanmamştur) kullanin. Video sinal kablosunu baglamadan once adaptörü bilgisayara baglayin. Görtütitremesi, oynaması, sallanması ya da karişması. Aralgi (pitch) ve fazı (phase) ayarlayin (sadece analog RGB sinyal) (sayfa 16).Monitörü, tercihen farkh bir elektrik devresi üzerindeki, farkh bir AC prizine takmayi deneyin.■ Monitör nedeniyledehyil, bir bilgisayar veya böylan farklbir cihaz nedeniyle olusapan problemler■ Grafik kartinin monitorüre uygun sekilde ayarlanmş olduğundan emin olun.Grafik modunun, (VESA, Macintosh 19" Color, vs.) ve giris sinyali frekansinnbu monitor tarafindan desteklendiginden emin olun. Frekans uyung aralika olsa bile, bazik ekran kartılari bu monitorün.Doğru senkronizasyon yapabilmesine izin vermeyecek kadar dar bir senkronizasyon pulsuna sahip olabilir.Bu monitorçapraz sinyallere islemez. Progresif sinyallere icin ayarlıdir.Mümkün olan en iyi kalitedeki görtüntenü kalitesi icin bilgisayarın tazeleme orannii (dikey frekans) ayarlayin (60 Hz tavsiye edilir). Görtünten bulanik. Kontrast ve parlakiğluyarayarlayin (sayfa 13, 14).Keskinligiayaarla maa (sayfa 14).Araligi(pitch) ve fazı (phase) ayarlayin (sadece analog RGB sinyal) (sayfa 16).■ Monitör nedeniyledehyil, bir bilgisayar veya böylan farklbir cihaz nedeniyle olusapan problemler■ Bilgisayarmüzda çozunūrūgü 1280×1024 olarak ayarlayin. Belirti Bu öğeleri kontrol edin Hayalet görtunjü. · Video kablosunun ya da video)yönendiricinin uzatma kablosunuiptal edin. · Tümparçaların (donanımları) ilgili sokitlerdedoğanbir seksilde takilı olduguundancmin olun. Resim ortalanmamış veyaboyutlar)düzgündegil(sadeceanalog RGB sinyalleri). · Araligi(pitch)ve fazı(phase)ayarlayın(sayfa 16).· Görtunjükonumunuayarlayın(sayfa 17)Bazıvideo modlartin ekranı tam olarakdoldurmadıyıunutmayın. Görtunjüçok ufak. ■ Monitor nedeniyle degil,bir bilgisayar veya建議anan farklıbir cihaznedeniyle olusan problemler· Bilgisayarınkındaçozsunurlugu 1280×1024 olarak ayarlayın. Görtunjüçok karanlık.· Arka,isişiayaarlayın(sayfa 13).·Parlaki,isiayaarlayın(sayfa 14).·GAMMA mensünde gamayıayarlayın(sayfa 14).·Monitör acıldıktaşsonra parlaki,isiçgmcsibirkıç dokika sürebilar.·odu AUTO olarak ayarlandışında,ekran parlaki,isiçinda karanlıkolabilir(sayfa 13,20). Dalgali veya oval(moire)birgörtunjüvar. ·Araligi(pitch)ve fazı(phase)ayarlayın(sadece analog RGB sinyal)(sayfa 16). Renk)dünlenlidegil. ·Araligi(pitch)ve fazı(phase)ayarlayın(sadece analog RGB sinyal)(sayfa 16). Beyaz renk tam olarak beyagöruntülenmiyor. ·Renk isisiniyaarlayın(sayfa 14). Monitörduğmeleriçalismyor(okaanda:görtunjülenir). ·“MENU LOCK”“ON”durumda isc OFF’a getirin(sayfa 18). Menü ekranindagöruntülenençüzunurlükyanlış. ·Ekrankartıayarın,isi olarak,menüekranindagöruntülenençüzunurlük,bilgisayarda ayarlıolanla,aynı olmayabilir.
Monitor bilgilerini görtuntileme
Monitor bir giris sinyali algilarken, MENU Düğmesini, bilgi kutusu belirene kadar, 5 saniyeden fazla basili tutunuz.
Bilgi kutusunu kaldirmak icin MENU duğmesine tekrar basir.
Ornek


Eger sorun devam ederse yetkili Sony saticisina basvurun ve asagidaki bilgileri verin:
Model ismi: SDM-HX75 veya SDM-HX95
- Serinumaras1
- Problemin detayl açiklamasi
- Satin alma tarihi
- Bilgisayarimuzin ve ekran kartimuzin ismi ve Özellikleri
- Giris sinyali tipi (analog RGB/dijital RGB)
Özellikler
LCD panel Panel tipi: a-Si TFT Aktif Matris
Göründu boyut: 17 inc (43 cm)
(SDM-HX75)
19 inc (48 cm)
(SDM-HX95)
Giris sinyali formati RGB calisma frekansi*
Yatay:
28-80 kHz (analog RGB)
28-64 kHz (dijital RGB)
Dikey:
48-75 Hz (analog RGB)
60Hz (dijital RGB)
Czünurluk Yatay: Maks.1280 nokta
Dikey: Maks.1024 satir
Giri sinyal seviyeleri Analog RGB video sinyali:
0,7 Vp-p, 75 Ω, positif
SYNC sinyali:
TTL seviye, 2,2 kΩ,
positif veya negatif
(Ayr) yatay ve dikey, veya
komposit sync)
Dijital RGB (DVI) sinyali:
TMDS (Tek baglanti)
Ses girisi Stereo mini fis, 0,5 Vrms
Hoparlor cikisi 3 W × 2
Kulaklik fişi Stereo mini fiş
Güçgereksinimleri SDM-HX75
100-240V,50-60Hz,Maks.1,0A
SDM-HX95
100-240V,50-60Hz,Maks.1,1A
Güç tuketimi Maks. 50 W (SDM-HX75)
Maks. 60 W (SDM-HX95)
Calisma sicaklig5-35 C
Boyutlar (genislik/yukseklik/derinlik)
Ekran (dik durumda):
SDM-HX75
Yaklasik 414× 418,5× 232mm
SDM-HX95
Yaklajk 466,5× 468× 265mm
Agirlhk SDM-HX75
Yaklasik 6,5 kg
SDM-HX95
Yaklasik 8,5 kg
Tak ve Kullan DDC2B
Aksesuarlar Bkz sayfa 7.
* Tavsiye edilen yatay ve dikey zamanlama kosulu
- Yatay sync genisligi toplam yatay zamanin 4,8 sinden veya 0,8 s, den fazla olmalidir, hangisi daha buyuk isc.
Yatay boşluk genişi 2,5 μs den fazla olmaldir.
Dikey bošluk genisligi 450 μs den fazla olmaldir.
Tasarim ve ozellikler haber verilmeksizin degistirilebilir.
7 Pritiskajte gumba / tolikokrat, da so vodoravni pasovi minimali.
Nastavlajte toliko casa, da so vodoravni pasovi minimalni. 8 Pritisnite gumb OK
Na zaslonu se prikaze glavni meni. Ce se preko vsega zaslona povavijo navpični pasovi, nastavite visino tona z naslednjimi postopki:9 Pritiskajte gumba / za izbiro >PITCH « ter pritisnite gumb OK.
Na zaslonu se prikaze nastavitveni meni PITCH<. 10 Pritiskajte gumba / tolikokrat, da izginejo navpični pasovi. Nastavljaje toliko šasa, da navpični pasovi izginejo.  11 Kliknite END na zaslonu za izklop preizkusnega vzorca.Ročno nastavite položaj slike (H CENTER /V CENTER)
Če slika ni na sredini zaslona, jo postavite v središec s spodaj opisanim postopkom. 1 Nastavite razločljivost na računalniku na 1280 × 1024. 2 Naložite CD-ROM. 3 Zazenite CD-ROM in prikazite testni vzorec. Za Windows uporabnike Kadar Auto run deluje: Kliknite Display Adjustment tool (Orodje za nastavitev prikazovalnika) (Utility). Kliknite Adjust in potrldite locljivost ter nato kliknite Next. Testni vzorec za H CENTER in V CENTER se pojavi. Kadar Auto run ne deluje: 1 Odpritc My Computer in potem z desnim gumbom kliknite ikono CD-ROM. Poidite na Explorer in odprit ekono CD-ROM. 2 Odprite [Utility] in potem izberite [Windows]. 3 ZaZenite [Win_Utility.exe]. Pojavi se testni vzorec. Za Macintosh uporabnike 1 Odpritc [Utility] in potem izberite [Mac]. 2 ZaZenite [Mac_Utility.exe]. Pojavi se testni vzorec. 4 P r i t i s n i t e g u m b M E N Na zaslonu se prikaze glavni meni. 5 Pritiskajte gumba / za izbiro (SCREEN) ter pritisnite gumb OK. Na zaslonu se prikaze meni SCREEN. 6 Pritiskajte gumba / za izbiro »H CENTER« ali »VCENTER « ter pritisnite gumb OK. Na zaslonu se prikaze nastavitveni meni »H CENTER« ali »V CENTER«. 7 Pritiskajte gumba / za središćno poravnavo preizkusnega vzorca zaslona. 8 Kliknite END na zaslonu za izklop preizkusnega vzorca.- MENU POSITION meni
Položaj menija na zaslonu lahko spremenite, ce vam zastira sliko na zaslonu.  1 Pritis nite gumb MENU. Na zaslou se prikaze glavni meni. 2 Pritiskajte gumba / za izbiro (MENU POSITION) ter pritisnite gumb OK. Na zaslonu se prikaze meni MENU POSITION<. 3 Za izbiro zeelenega položaja pritiskajte gumba / nato pa gumb OK. Ko se prikaze meni, lahko izberete enega od 9polozajev.INPUT SENSING ON/OFF meni
Ko izberete AUTO ON v INPUT SENSING ON/OFF meniju, monitor samodejno odkriere vchodni signal na vchodnih sponkah in samodejno spremeni vhd preden gre monitor v naacin varcevanja energia.  1 Priti s nite g u m b M E N U . Na zaslonu se prikaze glavni meni. 2 Pritiskajte gumba / za izbiro (INPUT) U -SENSING ON/OFF) ter pritsnite gumb OK. Na zaslonu se pojavi meni INPUT SENSING. 3 Za izbiro zejenega načina pritiskajte gumba ↓/↑ nato pa gumb OK. - ON: Ce izbrana vhdna sponka nima vhdnega signala ali ce izberete vhdno sponko z gumbom INPUT na monitorju in vhdna sponka nima signala, se nazaslonu pojavisporocilo (stran 21) in monitor samodejno preveri vhdni signal na drugi vhdni sponki ter zamenja vhd. Ko se zamenja vhd, se levo zgoraj prikaze izbrana vhdna sponka. Ce ni vhdnega signala, gre monitor samodejno y naacin varcevanja energia. - OFF: Vchod se ne spremeni samodejno. Pritisnite gumb INPUT in spremenite vchod.LANGUAGE meni
 1 P r i t i s n i t e g u m b M E N U . Na zaslonu sc prikaze glavni meni. 2 Pritiskajte gumba / za izbiro (LANGUAGE) ter pritisnite gumb OK. Na zaslonu se prikaze menui LANGUAGE. 3 Pritiskajte gumba / za izbiro jezika ter pritsnite gumb OK. - English: anglesko - Français: francosko - Deutsch: nemsko - Espanol: spansko - Italiano: italijansko Nederlands: nizozemsko Svenska:svedsko Pycckn: rusko - 日本語: japonsko ·中文: kitajsko- MENU LOCK meni
Zaklenite upravljanje gumbov, da boste takoprevecili nakljune spremembe ali vrintev izhodisno stanje.  1 Pritisnite gumb MENU. Nazaslonu se prikaze glavni meni. 2 Pritiskajte gumba / za izbiro (MENU LOCK) ter pritsnite gumb OK. Na zaslonu sc prikaze meni MENU LOCK. 3 Pritiskajte gumba / in izberite >vklop Ali izklop. ON: Delujeta samo stikalo (napajanja) in gumb INPUT. Ce poizkusite kaksnogo funkcijo, se nazaslonu prikaze ikona OFF: Nastavite MENU LOCK v izklopljeno. Ce je bil MENU LOCK postavljena v ON,je ob pritisku na gumb MENU, ^已_m MENU LOCK izbran samodejno.RESET meni (povrnitev v izhodišćno stanje)
 1 P r i t i s n i t e g u m b M E N U . Na zaslonu se prikaze glavni meni. 2 Pritiskajte gumba / za izbiro (RESET) ter pritisnite gumb OK. Na zasloun se prikaze meni RESET. 3 Za izbiro zeiljenega načina pritiskajte gumba / nato pa gumb OK. - OK: Za vrnitev vseh nastavitvenih podatkov v privzete vrednosti. Upostevajtc, da se nestavitev « LANGUAGE« po tej metodi nc vrnc v izhodisćno stanjc. CANCEL:Preklicvrnitveizhodisnih podatkov in povratek v glavni meni.Tehniche značilnosti
Nastavitev jakosti zvoka
Z uporabo zvočnikov na monitorju ali slusalk, lahko poslusate zvok iz vašega računalnika ali druge avdio opreme priljucene preko vtčnic na avdio vchod monitorja. Nastavitev jakosti zvoka lahko opravite z locenega.), >Jakost zvoka<, ki ga izberete iz glavnega.),1 Pritiskajte gumba / , ce se meni ne prikaze nazaslonu.
2 Pritiskajte gumba / za nastavitev jakosti zvoka. Menipo5samodejnoizgine.
Opombe
- Ko je nazaslonu prikazan glavni meni, ne morete nastavljati jakosti zvoka. - Ko je vas monitor v načinu varčevanja energija, iz zvočnikov in slušalk ne prihaja zvok.Funkcija varcevanja energije
Ta monitor izpolnjuje priporočila za varčevanje energia, dolocenih s strani VESA, ENERGY STAR (samo SDM-HX75), in NUTEK. Če je monitor prikljucen na računalnik ali video graficno plošćo, ki je skladna z DPMS (Display Power Management Standard) za analogni vchodni prikljucek/DMPM (DVI Digital Monitor Power Management) za digitalni vchodni prikljucek, bo monitor samodejno zmanjsal porabo energia, kot je prikazano spodaj. SDM-HX75| Način napajanja | Poraba energije ⊙ indicator (napajanja) |
| normalno delovanje | 50 W (maks.) zelena |
| aktiven izklopljen* (globoko spanje)** | 1 W (maks.) rumenorjava |
| ☉ izklop 1 W (maks.) izklop | |
| Način napajanja | Poraba energije | indicator (napajanja) |
| normalno delovanje | 60 W (maks.) zelena | |
| aktiven izklopljen* (globoko spanje)** | 1 W (maks.) rumenorjava | |
| izklop 1 W (maks.) izklop | ||
Nastavitev MODE (PICTURE/ AUDIO) (načina)
Če večkrat pritsinete gumb na desni strani monitorja, lahko izberete način MODE iz GAME → MOVIE → PC → AUTO. Ko izberete AUTO monitor samodejno nastavi osvetljenost zaslona glede na osvetljenost okolja (funkcija samodejne nestavitve osvetljenosti). Za dodatne informacij glej Funkcija za samodejno nastavitev osvetljenosti (detektor svetlobe)Veckrat pritisnite nmb.
Privzeta nastavitev funkcije MODE je MOVIE<. Ce pritisnete mb enkrat, se prikaze MOVIE< (izhodišna nastavitev), ko pritisnete ponovno, se prikaze PC<. Vsakič, ko pritisnete gumb način spremeni kot sledi.  Vsak nacin se prikaze na zaslonu in MODE se spremeni. Menip 5s samodejno izgine.Funkcija za samodejno nastavitev osvetljenosti (detektor svetlobe)
Monitor je opremljen takto, da samodejno nastavi osvetljenost zaslona glede na osvetljenost okolja. Osvetljenost zaslona se nastavi na Najustreznejsi nivo z nastavitvijo nacinna AUTO z gumbom na sni strani monitorja ali preko v meniju PICTURE/AUDIO. Privzeta nastavitev osvetlitve zaslona je MOVIE. Ko nastavite in na AUTO z gumn na desni stranizaslona, sc prikaze tudi nastavitvena vrstica. Vrstico lahko nastavite z gumboma / . Osvetlitevzaslona se spreminja glede na nivo, ki ste ga nastavili.Funkcija samodejne nastavitve kakovosti slike (samo analogni RGB signal)
Ko monitor sprejme vchodni signal, samodejno nastavi položaj in ostrino slike (fazo/razločljivost) in zagotovi, da se nazaslonu pojav jasna slika.Tovarniška nastavitev
Ko monitor sprejme vchodni signal, samodejno uskladi signal na enega od tovarnisko nastavljenih načinov, shranjenega v pomnilniku monitorja in takozagotovi visoko kakovostno sliko na sredini zaslona. Če vchodni signal ustreza tovarnisko nastavljenemu, se slika z ustreznimi izhodisćnimi nastavitvami samodejno povaji na zaslonu.Vhodni signali ne ustrezajo tistim iz tovarniske nastavitve
Ko monitor sprejme vhodni signal, ki se ne ujema s tovarnisko nastavljenimi nacini, se aktivira funkcija samodejne nastavitve kakovosti slike tega monitorja in zagotovi, da se nazaslonu vedno pojav jasna slya (v naslednjih frekvenenih podroejih monitorja): Horizontalafrevenca: 28 - 80kHz Vertikalna frekvenca: 48-75 Hz Ko monitor prvic sprejme vchodne signale, ki ne ustrezajo tovarnisko nestavljenim naacinom, lahko monitor potrebuje vec casa za prikaz slike na zaslonu kot obicajno. Podatki za nestavitev so samodejno shranjeni v pomnilnik, takdo bo monitor naslednjic deloval na enak naclin, kot ce monitor sprejme signal, ki ustreza tovarnisko nestavjenemu naclinu.Ročne nastavitve faze, razločljivosti in položaja slike
Za nekatere vchodne signale funkcija samodejne nastavitve kakovosti tega monitorja nc nastavi polozaja slike, faze inrazlocljivosti.V tem primuru lahko rocno nastavitte prilagoditve (stran 16).Ce rocno nastavitce te prilagoditve, se shranijo v pomnilniku kot uporabnijski načini in sesamodecjno prikliejo, ko monitor sprejmec enake vchodnesignale.Odpravljanje napak
Preden vzpostavite stik s tehnicno pomocjo, si oglejte to poglavje.Sporočila na zaslonu
V primeru tezav z vhodnim signalom, sc nazaslonu prikaze eno od naslednjih sporocil. Za rešitev problema glej >Simptomi težav in njihovo odpravljanje « na strani 22.Ce se na zaslonu pojavi OUT OF RANGE
to pomeni, da monitor ne podpira vchodnega signala. Preverite naslednje elemente. Zanatanenejse informacije o sporocilih nazaslonu glej "Simptomi težav in njihovo odpravljanje' na strani 22.Ce se prikaze xxx.x kHz / xxx Hz"
to pomeni, da monitor ne podpira horizontalne ali vertikalne frevence. Slike prikazujejo horizontalne in vertikalne frevence trenutnega vchodnega signala. Ce se prikaze >RESOLUTION > 1280 × 1024
to pomeni, da monitor ne podpira vchodnega signala (1280× 1024 ali manj). Če se na zaslonu pojavi «NO INPUT SIGNAL«
to pomeni, da na trenutno izbranem konektorju vchodni signal ni prisoten. Ce je INPUT SENSING ON/OFF (stran 17) nastavljen na ON, monitor poisce drugi vchodni signal in samodejno spremeni vchod. >GO TO POWER SAVE
Monitor bo v cca. 5 s po prikazu sporocila vstopil v stanje varcevanje energia.Ce se na zaslonu pojavi »CABLE DISCONNECTED«
to pomeni, da je bil video signalni kabel odstranjen iz trenutno izbranega konektorja. Ce je INPUT SENSING ON/OFF (stran 17) nastvljen na ON, monitor poise drugi vchodni signal in samodejno spremeni vchod. Simptomi težav in njihovo odpravljanje
Če se problem pojavi kot rezultat prikljucitve računalnika ali druge opreme, poglejte v navodila priključenega računalnika/ opreme.| Simptom Preverite naslednje elemente | |
| Ni spline | |
| Če indicator (napajanja) ne sveti ali Če se indicator (napajanja) ne prižge, ko je vklopljeno stikalo (napajanja), | Preverite ali je napajali kabel priključen pravilno. |
| Če se na zaslonu pojavī >CABLE DISCONNECTED« | Preverite, Če je video kabel pravilno priključen in Če so vsi konektorji trdno v svojih vtičnicah (stran 7). Preverite, Če niso nožice na konektorjih ukrivljene ali zmečkane. Preverite, da je nastavitć ivizbire vhoda pravilna (stran 11). Priključen je video kabel, ki ni bil dobavljen v naši posiljki. Če priključite video signalni kabel, ki ni bil dobavljen v naši posiljki, se lahko na zaslonu pojavī >CABLE DISCONNECTED«. To ni napaka v dclovanje. |
| Če se na zaslonu pojavī napis >NO INPUT SIGNAL « Ali indicator (napajanja) sveti rumenorjavo, | Preverite, Če je video kabel pravilno priključen in Če so vsi konektorji trdno v svojih vtičnicah (stran 7). Preverite, Če niso nožice na konektorjih ukrivljene ali zmečkane. Preverite, da je nastavitć ivizbire vhoda privilna (stran 11). ■Problem povzroča priključeni računalnik ali druga oprema in ne monitor. •Racunalnik je v načinu varčevanje energije. Pritisnite tipko na tipkovnici ali premaknite miško. •Preverite, da je graficna kartica privilno vstavljena v računalnik. •Preverite ali je racunalnik vklopljen. |
| Če se na zaslonu (strain 21) pojavī >OUT OF RANGE« | ■Problem povzroča priključeni računalnik ali druga oprema in ne monitor. •Preverite ali je frekvenčno področje znotraj frekvençnegа področja monitorja. Če ste nadomesti lari monitor s tem monitorjem, ponovno priključite stari monitor in nastavitć računalniško graficno Kartico v naslednjih obsegih: Horizontalna frekvenca: 28-80 kHz (Analogni RGB), 28-64 kHz (Digitalni RGB) Vertikalna frekvenca: 48-75 Hz (Analogni RGB), 60 Hz (Digitalni RGB) Resolutija: 1280 × 1024 ali manj |
| Če uporabljate program Windows, | Če ste stari monitor nadomesti s tem monitorjem, priključite stari monitor in naredite našednje: Izberite «SONY « sseznama «Proizvajalci « in izberite «SDM-HX75 ali SDM-HX95 « sseznama «Modeli « v zaslonu za izbiro Windows naprav. Če se «SDM-HX75 ali SDM-HX95 « ne povjavita vseznamu «Modeli «, poskusite «Plug & Play». |
| Če uporabljate system Macintosh, | Ko priključite računalnik Macintosh, po potrebi uporabite adapter (ni dobavljen). Priključite adapter na računalnik prej preden priključite videosignalni kabel. |
| Slika utripa, se odbija, niha ali je popačena. | Nastavite razločljivost in fazo (samo analogni RGB signal) (strain 16). Poskusite vtakniti monitor v drugo omrežno vtičnico, po možnosti v drugem tokokrogu. ■Problem povzroča priključeni računalnik ali druga oprema in ne monitor. •Pogleje v priročnik vašs gražíne kartice kako je potrebno nastavitni monitor. •Potrdite, da vaš monitor podpira grafíni način (VESA, Macintosh 19" Color, itd.) in frekvenco vchodnega signala. Tudi Če je frekvenca v pravilnem področju, imajo nkatere grafíncé kartice preozek sinhronizacijski impulz, da bi privalno sinhroniziral monitor. •Ta monitor ne podpira preplcteniš signalov. Nastavite monitor za progresivne signale. •Prilagodite računalnikovo hitrost osveževanja (vertikalno frekventa), da dobite najboljšo možno sliko (priporočena je 60 Hz). |
| Slika je zamegljena. | Nastavite kontrast in osvetlitev (strain 13, 14). Nastavitev ostrinc (strain 15). Nastavite razločljivost in fazo (samo analogni RGB signal) (strain 16). ■Problem povzroča priključeni računalnik ali druga oprema in ne monitor. •Nastavite razločljivost na 1280 × 1024 na vašem računalniku. |
| Slika ima sence. | Odstranitc kabelske podaljškc za video kable in/ali video stikalne omarice.Preverite ali so vsi koncktorji trdno v svojih vticnicah. |
| Slika ni na sredini ali ni prave velikosti (samo za analogue RGB signale). | Nastavite razločljivost in fazo (strain 16).Nastavite položaj slike (strain 17).Upostevajte, da nekateri video načini ne zapolnijo zaslona do vogalov. |
| Slika je premajhna. | Problem povzroča praključeni računalnik ali druga oprema in ne monitor.Nastavite razločljivost na 1280 × 1024 na vašem računalniku. |
| Slika je temna. • Nastavite osvetlitev ozadja (strain 13).Nastavite osvetlitev (strain 14).Nastavite gamo na meniju GAMMA (strain 14).Monitor potrebuje po vklopu nekaj minut, da zeroslon postane svetel.Ce je „bin nastvljen na AUTO, lahko osvetlitev zaslona pri slabi svetlobi okolja postane temnejša (strain 13, 20). | |
| Pojavijo se valoviti ali elipsasti vzorci. | Nastavite razločljivost in fazo (samo analogni RGB signal) (strain 16). |
| Barva ni povsod enaka. | Nastavite razločljivost in fazo (samo analogni RGB signal) (strain 16). |
| Bela barva nima izgleda bele barve. | Nastavite temperaturo barve (strain 14). |
| Gumbi monitorja ne delujejo ( „pojavi na zeroslonu). | Če je »MENU LOCK« vklučen na »ON«, jo izključite na »OFF« (strain 18). |
| Na zeroslonu prikazana razločljivost je nepravilna. | V odvisnosti od nastavitev na graficni kartici, se razločljivost prikazana na meniju njuno ne ujema s tisto, ki je nastvljena na računalniku. |
Prikaz informacij o tem monitorju
Ko monitor sprejema video signal, pritisnite in držite gumb MENU za več kot 5 s, dokler se ne pojav informacijski okno. S ponovnim pritiskom na gumb MENU okno izgine. Primer  Če ne morete odpraviti težave,Pokličite pooblasčenega prodajalca SONY opreme in mu posredujte naslednje informacije: - Naziv modela: SDM-HX75 ali SDM-HX95 Serijska stevilka Natan'en opis tezave - Datum nakupa - Naziv in tehnici podatki vasega računalnika in graficne kartice - Vrsto signala (analogni RGB/digitalni RGB)Specifikacije
LCD panel Vrsta panela: a-Si TFT z aktivno matriko Velikost slike:17" (43 cm) (SDM-HX75) 19^ (48cm) (SDM-HX95) Oblika vchodega signala Delovna frekvenca RGB* Horizontala: 28-80 kHz (analogni RGB) 28-64 kHz (digitaln RGB) Vertikalna: 48-75 Hz (analogni RGB) 60 Hz (digitaln RGB) Razlocljivost Horizontalna: Maks. 1280 tock Vertikalna: Maks.1024 vrstic Nivo vchodnega signala Analogi RGB video signal: 0,7 Vp-p, 75 Ω, positiven SYNC signal: TTL nivo, 2.2k positivenali negativen (Locen horizontalen in vertikalenali kompositinysync) Digitalni RGB (DVI) signal: TMDS (Enojna povezava) Avdio prikljucek Stereo mini prikljucek, 0,5 Veff Izhod za zvočnike 3W× 2 Priključek za slusalke Stereo mini priključek Zahtve za moč SDM-HX75 100-240V,50-60Hz,Maks.1,0A SDM-HX95 100-240V,50-60Hz.Maks.1,1A Porabljena moč Maks. 50 W (SDM-HX75) Maks. 60 W (SDM-HX95) Delovna temperatura 5-35 C Dimenzije (sirina/visina/globina) Zaslon (pokončen): SDM-HX75 Pribl. 414× 418.5× 232mm SDM-HX95 Pribl. 466,5× 468× 265mm Masa SDM-HX75 Pribl. 6.5 kg SDM-HX95 Pribl. 8,5 kg Plug & Play DDC2B Dodatki Glej stran 7. * Priporočeni horizontali in vertikalničasovni pogoji - Sirina horizontalega delovnega signala mora biti vecja od 4.8% skupnega horizontalega casa ali 0,8~ s, kar koli je daljse. Horizontalna sirina brisanja naj bo vec kot 2,5 s. - Vertikalna sibirina brisanja naj bo vec kot 450~ s Oblikovanje in specifikacije so predmet sprembrez obvestila.TFTLCD Color Computer Display
SDM-HX75 SDM-HX95Owner's Record
The model and serial numbers are located at the rear of the unit. Record these numbers in the spaces provided below. Refer to them whenever you call upon your dealer regarding this product. Model No. ______ Serial No. ______WARNING
To reduce the risk of fire or electric shock, do not expose this apparatus to rain or moisture. Dangerously high voltages are present inside the unit. Do not open the cabinet. Refer servicing to qualified personnel only.FCC Notice
This equipment has been tested and found to comply with the limits for a Class B digital device, pursuant to Part 15 of the FCC Rules. These limits are designed to provide reasonable protection against harmful interference in a residential installation. This equipment generates, uses, and can radiate radio frequency energy and, if not installed and used in accordance with the instructions, may cause harmful interference to radio communications. However, there is no guarantee that interference will not occur in a particular installation. If this equipment does cause harmful interference to radio or television reception, which can be determined by turning the equipment off and on, the user is encouraged to try to correct the interference by one or more of the following measures: - Reorient or relocate the receiving antenna. - Increase the separation between the equipment and receiver. - Connect the equipment into an outlet on a circuit different from that to which the receiver is connected. - Consult the dealer or an experienced radio/TV technician for help. You are cautioned that any changes or modifications not expressly approved in this manual could void your authority to operate this equipment.IMPORTANT
Para prevenirrialquier mal functionamento y evitar daños, por favor, lea detalladamente este manual de instrucciones antes de conectar y operar este equipo. If you have any questions about this product, you may call; Sony Customer Information Services Center 1-800-222-7669 or http://www.sony.com/Declaration of Conformity
Trade Name:SONY Model: SDM-HX75/HX95 Responsible Party: Sony Electronics Inc. Address: 16530 Via Esprillo, San Diego, CA 92127 U.S.A. Telephone Number: 858-942-2230 This device complies with part 15 of the FCC rules. Operation is subject to the following two conditions: (1) This device may not cause harmful interference, and (2) this device must accept any interference received, including interference that may cause undesired operation.NOTICE
This notice is applicable for USA/Canada only. If shipped to USA/Canada, install only a UL LISTED/CSA LABELLED power supply cord meeting the following specifications: SPECIFICATIONS Plug Type Nema-Plug 5-15p Cord Type SVT or SJT, minimum 3 × 18 AWG Length Maximum 15 feet Rating Minimum 7 A, 125 VNOTICE
Cette notice s'applique aux Etats-Unis et au Canada uniquement. Si cet appeareil est exporté aux Etats-Unis ou au Canada, utiliser le cordon d'alimentation portant la mention UL LISTED/CSA LABELLED et replissant les conditions suivantes: SPECIFICATIONS Type de fiche Fiche Nema 5-15 broches Cordon Type SVT ou SJT, minimum 3 × 18 AWG Longueur Maximum 15 pieds Tension Minimum 7 A. 125 V   As an ENERGY STAR Partner, Sony Corporation has determined that this product meets the ENERGY STAR guidelines for energy efficiency. (SDM-HX75 only)Içindekiler
Uyarilar 4 Bolmelerin ve kontrdugmelerin tanimlanmasi 5Kurulum 7
Kurulum 1:Video sinyal kabolarini takin 7 Kurulum 2: Ses kablosunu baglayin 8 Kurulum 3: Güç kablosunu®, baglıyan 8 Kurulum 4: Kordonlari ve kablolari sarin 9 Kurulum 5: Monitor ve bilgisayari aqin 9 Kurulum 6: Egikligi ve aciyi ayarlama. 10 Giris sinyalini seme (INPUT duğmesi) 11Monitörun Kullanıciya Yaşlı Apaşi 12
Menuyu kullanma 12 PICTURE/AUDIO menusu 13 MODEmenusu 13 PICTURE menu 13 BACKLIGHT ayarlama 13 CONTRAST ayarlama ① 13 BRIGHTNESS ayarlama 14 GAMMA ayarlama 14 COLOR ayarlama 14 SHARPNESS ayarlama 15 AUDIO menusu 15 TREBLE, BASS veya BALANCE'yi ayarlama 15 SURROUND ayarlama 15 MODERESETmenusu (tum modlari varsaylan ayara geri dondurme) 15 SCREENmenusu(sadeceanalogRGBsinyali) 16 MENUPPOSITIONmenusu 17 INPUT SENSING ON/OFF menusu 17 LANGUAGE menu 18 RESET menu (varsaylan ayarlara geridondürme) 18 ON MENU LOCK menusu 18Teknik Ozellikler 19
Sesi kontrl etme 19 Enerji tasarrufu fonksiyonu 19 MOD'u Ayarlama (PICTURE/AUDIO) (modu) 20 Otomatik parlaklik ayarlama fonksiyonu (Isik sensor) 20 Otomatik resim kalitesi ayarlama fonksiyonu (sadece analog RGB sinyali) 20Sorun giderme 21
Goruntuli mesajlar 21 Hata belirtileri ve olasi giderme yontemleri 22Özellikler 24
Uyanilar
Guc baglantilar ile ilgili uyari
- Verilen güç kablosunu kullanin. Eger farklı bir güç kablosu kullaniyorsaniz, güç kaynaginizla uyumlu oldugundan emin olun.A.B.D. deki musteriler icin
Eger uygun kablo kullanmazsaniz, bu monitor zorunlu FCC standartlarma uygun olmayacaktir.Ingiltere'dekimüsteriler icin
Eger bu monitori Ingiltere'de kullanyorsaniz, Ingiltere'ye uygun guc kablosu kullanin. Fiş tiplerinin ornekleri    100ila 120VACicin 200ila 240VACicin sadece 240V ACicin Cihaz, kolaylikla erisilebilen bir prize yakin olarak yerlestirilmidir.Kurulum
Monitoru asagidaki yerlerde kurmayin veya birakmayin: - Asiri sicut yerler, ornegin radyator yani, isitici yani veya dokrudan gunes isigi alan yerler. Monitoru, mesela gunes altinda park edilmis araba icinde veya isitici yaninda, asiri sicaga maruz birakmak, kasada deformasyona ve arizalarara sebep olabilir. - Mekanik vibrasyon veya soka aqik yerlerde. - TV veya diger ev aletleri gibi gülü manyetak alan yaratanan cihazlarin)yakinnda. - Asiri derecede toz, kir veya kum olan yerlerde, ornegin aqik pencere kenari veya cikis kapisi gibi. Eger geci ci olarak dis ortamda kullanilmasi gerekiyorsa, havadaki toza ve kire karsi gerekli onlemleri almalisimiz. Aksi takdirde tamiri mumkun olmayan arizalar olusabilir.LCD ekranı kullanma
- LCD ekrani güneşe bakar seksilde birakmayin, bu LCD ekrana zarar verebilir. Monitoru pencere yanina yerleşirirken dikkatli olun. - LCD ekrana bastirmayin ve ekrani eizmeyin. LCD ekran üzerine agr nesneler koymayin. Bu ekranı duzgünlıgün kaybetmesine ve LCD panel arizasa nsebp olabilir. Eger monitor soguk bir yerde kullanilirsa, ekranda hayalet görtü olugabilir. Bu bir aniza degildir. Sicaklik normal calisma seviyesine donduğunde, ekran normale doner. - Eger sabit bir resim uzun sure gosterilirse, bir sure icin hayalet görtunj olusabilir. Hayalet görtunj daha sonra yok olur. LCD panel calhma sirasinda isir. Bu bir aniza degildir.Dahili stereo hoparlörler hakkinda
Manyetakayit cihazlarini, bantlari ve floppy disketleri hoparlorun acikligindan uzakututun,cunku hoparlorler manyetakalan uretirler. Bu manyetakalan,manyetakbant ve disketlerde kayith verileri etkileyebilir.LCD ile ilgili not (Siv Kristal Ekran)
Lütfen LCD ekranin yüksk hassasiyct technolojis ilc yapildigi unutmayin. Bununla birlikte, LCD ekran üzerinde sabit siyah noktalar vya parlak isik noktaları (krmizi, mavi veya yesil) ve dizensiz renkli seritler ya da parlaklik belirebilir. Bu bir aniza degildir. (Etkili noktalar: %99,99 dan fazla)Bakim
- Monitorunütu temizlemeden once güç kablosunu elektrik prizinden Çekın. - LCD ekranı yumusak bir bez ile temizleyin. Eger cam temizleyici bir sivi kullanacaksanuz, anti statik gezelti vya benzeri katki iceren bir temizleyici kulanmayin, bu LCD ekranı kaplamasanı,Qizebilir. - Kasayi, paneli ve kontrolleri hafif deterjanl solusyonla islatilmis yumusak bir bez ile temizleyin. Asindici ped, temizleme tozu veya alkol ya da benzin gibi gezuciler kullanmayin. - Ekran yüseyini tumenmez kalem veya tornavida gibi keskin veya asindirnci maddelerle, silmeyin, dokunmayin ve temas etmeyin. Bu Tür bir temas resim tupunde Çizilmeye yol acabilir. Eger monitor bocek ilaclan gibi guclu solventler maruz kalir veya kauquk yada vinil malzemelerle sert temasta bulunursa malzemede bozulma veya LCD ekran kaplamasinda bozulma meydana gelebilir.Tasima
- Tasima esnasinda monitordeki tum kabolari ayirin ve ekram cizmemeye ozen gostererek LCD monitorun iki tarafindan sikica tutun. Eger monitoru dinurnsiz yaralanabilirsiniz veya monitor hasar gorebilir. - Bu monitorü tamir veya gonderi icin tasirken original kutusunu ve ambalaj malzemelerini kullanin.Monitor atilmasi
- Bu monitorü genel ev atiklar ile birlikte atmayın. - Bu monitörde kullananan flóresan típte civa bulunmaktadir. Bu monitorün atilmasinda yerel temizlik idarenizin yönetmeliklerine uyulması gereklidir.Böümlerin ve kontrolduğmelerinin tanımlanması
Daha fazla detay icin parantez icindeki sayfalara bakimiz.  LCD monitor on yuzu LCD monitor yandan görtintusu  1 (Guc) duigmesive 念 (g u c) isi (sayfalar 9, 19) Ekranacmak ve kapatmak icin, 念 (g u c) anahtarina basin Gucisigi, monitor acildygnda yesil yanar, monitor erjeri tasarrufu modundayken ise turuncu olarak yanar. 2 Isik sensor (sayfa 20) Bu sensor cevredekleri alanin parlakligini olcer. Sensoru kagit vs. ile kapatmadiginuzdan emin olun. 3 Stereo hoparlorler (sayfa 19) Bu hoparlorer ses sinyallerini ses olarak disari verir. 4 MENU dugmesi (sayfa 12) Bu dugme menu ekranini acar ve kapatir. 5 / ve (ses kontrl) duğmeleri (sayfalar 12, 19) Bu duğmeler menu maddelerini seçmek ve ayar yapmak icin ve sesi kontrl etmek üzere "Ses" menusünu görtunjulemek icin kullamilr. OK duğmesi (sayfa 12) Bu duğme, ↓/↑ duğmeleri ile seçilen menu maddelerini ve yapilan ayarlın aktive eder (5). 7 INPUT duğmesi (sayfa 11) Bu duğme, monitó iki bilgisayar baglandında video giris sinyalinin INPUT1, INPUT2 ve INPUT3arasindaGPCİ yapmasını saglar. 8 ügmesi (sayfa 20) Bu duğme MOD'u (PICTURE/AUDIO) degistirir. 9 Arka kapak (sayfa 7) Bu kapagi, kabolari vya ag kabolarini takarken yukari kaydiriniz. 10 Kulaklik fisi (sayfa 19) Bu fiis sesinyallerini kullakliklara verir.  LCD monitor arka yuzu 11 ACIN Soketi (sayfa 8) Bu soket guc kablosunu baglar (saglanmistir). 12 Güvenlik Kilidi Boşlugu Güvenlik kilidi boşluqku Kensington Micro Saver Security System ile birlikte kullanilmahdir. Micro Saver Security System, Kensington'un tescilli markasdir. 13 INPUT1[in ses giris fis (sayfa 8) Bu fiş, bir bilgisayarin ses Çişkış fişine baglandında vya INPUT1'e digerbir ses cihazı baglandında ses sinyallerini verir. 14 INPUT2 icin HD15 giris soketi (analog RGB) (sayfa 7) Bu soket RGB video (0,700 Vp-p, pozitif) ve sync sinyallerini verir. 15 INPUT2 icin ses giris fişi (sayfa 8) Bu fi, bir bilgisayarin ses cikis fisine baglandiginda veya INPUT2'ye diger bir ses cihazi baglandignda ses sinyallerini verir. 16 INPUT2 icin HD15 giris soketi (analog RGB) (sayfa 7) Bu soket RGB video (0,700 Vp-p, pozitif) ve sync sinyallerini verir. 17 INPUT3 için ses giris fişi (sayfa 8) Bu fis, bir bilgisayarin ses cikis fisine baglandignda veya INPUT3'e digerbir ses cihazi baglandignda ses sinyallerini verir. 18 INPUT3 icin DVI-D giris soketi (dijital RGB) (sayfa 7) Bu soket DVI Rev. 1.0 ilc uyumlu dijital RGB video sinyallerini verir. 19 Kablo tutucu (sayfa 9) Bu parca, kabolari ve ag kabolarini monitore sabitler.Kurulum
Monitorunuzi kullanmaya baskamadan once, asagidakilerin kutuda bulundugundan emin olun. LCDckran Gückablosu HD15-HD15 video sinyal kablosu (analog RGB) DVI-D video sinyal kablosu (dijital RGB) - Ses kablosu (stereo mini fi§) - CD-ROM (Windows/Macintosh için program yazilimi, Isletim Talimatlari, vs.) - Garanti karti - Kolay Kurulum KilavuzuKurulum 1:Video sinyal kabolarini takin
- Baglamadan-once monitorü ve bilgisayaruzi kapatn. - Bilgisayarı monitorın HD15*giris doketine (analog RGB) baglarken, bakimiz "HD15*cikis doketi olan bir bilgisayar baglayın (analog RGB).Not
Video sinyal kablosu baglayicisin pinlerine dokunmayin, dokunmak pinlerin egilmesine yol acabilir.Arka kapaqi yukari kaydirin.
DVI seksiş doketi olan bir bilgisayar bestehtiny (dijital RGB)
Saglianan DVI-D video sinyal kablosunu (dijital RGB) kullanarak, bilgisayari monitor输入 INPUT3 icin olan DVI-D giris soketine (dijital RGB) baglayin. HD15 cikis doketi akan bir bilgisayar baglayin (analog RGB)
Saglianan HD15-HD15 video sinyal kablosunu (analog RGB) kullanarak, bilgisayari monitor输入 INPUT1 veya INPUT2 için akan HD 15 girisoketine (analog RGB) baglayin. Bilgisayari, asagidaki sekillere bakarak baglaym.IBM PC/AT veya uyumlu bilgisayara baglama
  ■Bir Macintosh bilgisayara baglama Bir Macintosh bilgisayar baglarken, gerekirse bir adaptoror (saglianmamustur) kullanin. Video sinal kablosunu baglamadan once adaptororu bilgisayara baglayin.Kurulum 2: Ses kablosunuimentary in
Verilen ses kablosunu monitori ilgili ses giris fişine baglayin. Monitorun hoparlorlini vya kulaklkarini kullanarak, bilgisayarinizdan vya monitorun ses giris fislerine bagli diger ses cihazlarindan gelen sesleri dinleyebilirsiniz. Daha fazla bilgi icin, bkz "Sesi kontrol etme" sayfa 19. Kurulum 3: Güç kablosunubaughin
1 Sağlanan Güç kablosunu monitorin AC IN soketine-SAglambir sekilde baglayin. 2 Diger ucu bir prize saglam bir sekilde takin. Kurulum 4: Kordonlari ve kabolari sarin
1 Arka kapaqi yukari kaydirin. 2 Kabin üzerindeki kablo tutucusunu kullanarak video sinyal kablosunu, ses kabolarini ve guç kablosunu saglamlayin. 3 Arka kapaqi aasaiki kaydirin.  Kurulum 5:Monitörü ve bilgisayarı�能
1 Monitorün onündeki (guc dugmesine) basin. (G C) 1sigi yesil yanacaktir.  2 Bilgisayari acin. 3 lstediginiz giris sinyalini secmek icin INPUT duğmesine basin. Secilen giri sin resmi ekranda belir. Daha fazla bilgi icin, bkz "Giri sinyalini seçme (INPUT dügmesi)" sayfa 11.  Monitorunzun kurulumu tamamlanmistir. Eger gerekliyse grotuyu ayarlamak icin monitorun kontrol duigmelerini kullanin (sayfa 12).Eger ekraninizda görtü yoksa
- Monitor bilgisayariniza dizgün olarak baglandigundan emin olun. Eger ekranda "NO INPUT SIGNAL" görtülenirse: Bilgisayar enerji tasarrufu modundadir. Klavyede herhangi bir tuja basmayi veya fareyi hareket ettirmeyi deneyin. - INPUT dugmesine bescharen giris sinyal ayarmin dokru olup olmadigi kontrl edin (sayfa 11). Eger ekranda "CABLE DISCONNECTED" görtülenirse: Video sinyal kablosunun duzgün sekilde baghi olup olmadigiin kontrol edin. - INPUT dugmesine basarak giris sinyal ayarmin dokru olup olmadigi ini kontrol edin (sayfa 11). Eger ekraninizda "OUT OF RANGE" belirise, eski monitori tekrar baglayin. Ardindan bilgisayarin ekran karini, asagidaki araliklara ayarlayin.| Analog RGB Dijital RGB | ||
| Yatay frekans | 28-80 kHz 28-64 kHz | |
| Dikey frekans | 48-75 Hz 60 Hz | |
| Çüzünürlük 1280 × 1024 vya daha/DDüzuk 1280×1024 vya daha/DDüzuk | ||
Özel sürüçülere gerek yoktur
Bu monitor "DDC" Tak ve Çalıstır (Plug & Play) standartlarina uygundur ve otomatik olarak monitor bilgilerini algilar. Bilgisayariniza özelbir sürüci yüklenncsine gerek duyulmaz. Monitor PC'ize bagladiktan sonra PC'yi ilk kez calisturdigiizda Kurulum Sihirbazy ekranda belirebilir. Bu durumda, ekranda beliren talimatlari takip edin. Tak ve Kullan Monitor otomatik olarak secilir, boylece monitoru kullanabilirsiniz. Dikey frekans 60 Hz' e ayarlidir. Titremeler ortadan kalktignda monitur bu halyle kullanabilisiniz. Ayirbyuksekegerin dikey frekansi ayarlanamiza gerek yoktur.Kurulum 6:Eğikligi ve açıyı ayarlama
Monitor asagida belirtilen acilarda ayarlanabilir. LCD panelin kenarlarindan kavrayin ve ekran acilarim ayarlayin.   Monitoru rahat bir sekilde kullanmak icin
Monitorunuzn gorus acisini, uzerinde bulundugu masa ve kullandiginiz sandalyein yuksekligine gore ve 1sik monitorden gozunüze yansimayacak sekilde ayarlayin.Not
Ekran eginimi ve yuksekligini ayarlarken, monitoru masaya carpmamaya dikkat ederek, yavae ve dikkatli hareket edin.Giriş sinyalini/seme
(INPUT diugmesi)
INPUT duğmesine basin. Bu dugmeye her bastigimzda girisinyali degisir.  INPUT| Ekran mesaji Giriş sinyali yapilendirma(Sol üst koosec yaklaşık 5saniyeGPCUK.) |
| INPUT1: HD15 HD15 giris Soketi(analog RGB) INPUT1 icin |
| INPUT2: HD15 HD15 giris Soketi(analog RGB) INPUT2 icin |
| INPUT3: DVI-D DVI-D giris Soketi(dijital RGB) INPUT3 icin |
Monitor Kullanıya Bağlı Ayarı
Ayarlari yapmadan once
Monituro bilgisayara baglayin ve ikisini de calistirin. Iyi sonuc elde etmek icin, ayar yapmadan once en az 30 dakika bekleyin. Ekranda beliren�� u kullanar monitorunuzde pek cok ayar degisikligi yapabilirsiniz.Menüyü kullanma
1 Ana menüyi Güsterme.
Ekrandaki ana menuyu gostermek icin MENU dugmesine basun. 2 Meniyu secin.
Istediginiz menuyu görtuntilemek icin / dugmelerine basin. Ik menu maddesinc gecmek icin OK dugmesinc basin. 3 Ayarlamak istediginiz maddeyi secin.
Ayar yapmak istediginiz maddeyi sejmek icin, / dugmelcrine daha sonra da OK dugmesine basin. menu maddelerinden biri isc.
sectiginizde ve OK dugmesine bastigimiza, ekran bir onceki menyu de doner.4 Maddeyi ayarlayin.
Ayarlamalari yapmak icin dugmelerine daha sonra da OK dugmesine basin. OK duğmesine bastügünizda ayarlar saklanir ve ekran bir oncki menüye dōner. 5 Menuyu kapatma.
Normal goruntuye donmek icin MENU dugmesine bir kez basin. Eger herhangi bir dugmeye basilmazsa menu 45 saniye icinde otomatik okayakapanir. ■ Ayarlari fabrika ayarlarina geridondürme.
Ayarli, RESET menusunu kullanarak sifirlayabilirsiniz. Ayarli sifrlama ile ilgili daha fazla bilgi icin, bakiniz sayfa 18 deki 一 ^ 一 (RESET). PICTURE/AUDIO menüsu
PICTURE/AUDIO menüünü kullanarak asagidaki ögeleri ayarlayabilirsiniz. - MODE (GAME/MOVIE/PC/ AUTO) - PICTUR AUDI - MODERESET MODEmenusu
Amaciniza gore uygun ekran parlakligini secebilirsiniz. PICTURE/AUDIO ayarlan her bir mod icin ayarlanabilir. Ayrica, her giris (INPUT1/INPUT2/INPUT3) iar modu degistirebilirisiniz.1 MENU duğmesine basin.
Ana menu ekranda görtüntülenir. 2 (P TURE AUDIO)i sejmek icin / duqmelerine ve sonra da OK duqmesine basin. PICTURE/AUDIO menus ekranda görtülenir. 3 "MOVIE" i seçmek,— in / duğmelerine ve sonra da OK duğmesine basin. MODE menusü ekranda görtunülenir.  4 Istediginiz modu sejmek icin / duigmesine basin ve sonra OK duigmesine basin. Varsaylan ayar MOVIE dir. - GAME: Parlak resim. MOVIE: Guclu kontrastli net resim. - PC: Yumusak tonlu resim. - AUTO: Ekran parlakligimi evecre parlakligina gore otomatik olarak ayarlar (otomatik parlaklik ayarlama fonksiyonu). Daha fazla bilgi icin, bkz "Otomatik parlaklik ayarlama fonksiyonu (isik sensorü)" (sayfa 20).NOT
AUTO modda, arka 1sigi ayarlayamazsimiz.PICTURE menu A
PICTURE menusunu kullanarak asagidaki ogeleri ayarlayabilirsiniz. - BACK LIGHT - CONTRAST BRIGHTNESS GAMMA menusu - COLOR menusü SHARPNE BACKLIGHT ayarlama
Eger ekran cok parlaksa, arka isigi ayarlayin ve ekranin daha kolay gorunmesini saglayin.1 MENU duğmesine basin.
Ana menuckranda görtuntilenir. 2 (PICTURE/AUDIO)i sejmek icin / duqmelerine ve sonra da OK duqmesine basin. PICTURE/AUDIO menusu ckranda gorbuntulenir. 3 (PICTURE) seceneğini seçmek icin ↓/↑ duğmelerine ve sonra da OK duğmesine basin. PICTURE mcnusckranda goruntulcnir. 4 " BACKLIGHT" seceneğini/seçmek icin ↓/↑ Düğmelerine ve sonra da OK Düğmesine basin. "BACKLIGHT" menusü ekranda göruntülenir. 5 Isik seviyesini ayarlamak icin, / duğmelerine basin ve sonra OK duğmesine basin.CONTRAST ayarlama 1
Resim kontrastini ayarlayin.1 MENU duğmesine basin.
Ana menu ekranda görtuntilenir. 2 (PICTURE/AUDIO)i sejmek icin / duqmelerine ve sonra da OK duqmesine basin. PICTURE/AUDIO menus ekranda gortintulenir. 3 (PICTURE) seceneğini seçmek icin ↓/↑ Düğmelerine ve sonra da OK Düğmesine basin. PICTURE menusu ekranda goruntulenir. 4 "CONTRAST"seçeneğini seçmek icin 1 / 1 duqmelerine ve sonra da OK duqmesine basin. "CONTRAST" menus ekranda görtülenir. 5 Kontrasti ayarlamak icin, / duigmelerine basin ve sonra OK duigmesine basin.BRIGHTNESS ayarlama
Resmin parlakhligi ayarlayin (siyah seviyesi). 1 MENU duğmesine basin. Ana menu ekranda görtunülenir. 2 (PICTURE/AUDIO)'i sejmek icin / duqmelerine ve sonra da OK duqmesine basin. PICTURE/AUDIO menusu ekranda goruntulenir. 3 (PICTURE) seçeneğini seçmek icin ↓/↑ Düğmelerine ve sonra da OK Düğmesine basin. PICTURE menü ekranda görtüntülenir. 4 “BRIGHTNESS” seçeneğini seçmek icin ↓/↑ Dügmelerine ve sonra da OK Düɡmesine basin. “BRIGHTNESS” menü su ekranda görtündelenir. 5 Parlakiği ayarlamak icin, / diğmelerine basin ve sonra OK diğmesine basin.GAMMA ayarlama
Göruntünun renk gölgesini, göruntünun original renk gölgesi ile birlestirebilirsiniz.  1 MENU duğmesine basin. Ana menu ekranda görtuntilenir. 2 (PICTURE/AUDIO)'i sejmek icin / duqmelerine ve sonra da OK duqmesine basin. PICTURE/AUDIO menusu ekranda goruntulenir. 3 (PICTURE) seçeneğini seçmek icin ↓/↑ Düğmelerine ve sonra da OK Düğmesine basin. PICTURE menusü ekranda görtündelenir. 4 " (GAMMA)"seçeneğini seçmek icin 1 / 1 duğmelerine ve sonra da OK duğmesine basin. GAMMA menusu ekranda görtüntülenir. 5 Istediginiz modu sejmek icin / duğmelerine basin ve sonra OK duğmesine basin.COLOR ayarlama
Goruntunun beyaz renk alanindaki renk seviyesini, varsaylan renk isisi ayarlarindan scebilirsiniz. Ayrica,gerekirse,renk isisinaince ayar da yapabilirsiniz.  1 MENU duğmesine basin. Ana menuckranda görtuntilcnir. 2 (PITURE/AUDIO)'i sejmek icin / duqmelerine ve sonra da OK duqmesine basin. PICTURE/AUDIO menusu ekranda goruntulcnir. 3 (PICTURE) seçeneğini seçmek icin ↓/↑ Düğmelerine ve sonra da OK Düğmesine basin. PICTURE menü su ekranda görtündelenir. 4 "COLOR") seçeneğini seçmek,—/üdümelerine ve sonra da OK düzmesine basin. COLOR menüsi ekranda görtüntenir. 5 Istediiginiz renk isisiin seqmek icin / duqmelerine ve sonra da OK duqmesine basin. Renk 9300K'dan 6500K'yaogrdu ayarlanirken beyaz dengesi maviden kirmiziya dogru degisir.Renk Isisina ince ayar yapma
Renk isisi her bir mod icin ayarlanabilir. (GAME/MOVIE/PC/AUTO) 1 MENU Düğmesine basin. Ana menu ekranda görtunülenir. 2 (P TURE/AUDIO)i secmek icin / duqmelerine ve sonra da OK duqmesine basin. PICTURE/AUDIO menusu ckranda goruntulenir. 3 (PICTURE) seçeneğini seçmek icin ↓/↑ Düğmelerine ve sonra da OK Düğmesine basin. PICTURE menük erkanda görtüntülenir. 4 "COLOR"seçeneğini seçmek icin ↓/↑ Düğmelerine ve sonra da OK Düğmesine basin. COLOR menüsu ekranda görtüntenir. 5 "ADJUST" seçeneğini seçmek,— in / duğmelerine ve sonra da OK duğmesine basin. Renk isisi,— ince,—ayar,—ekranda belirir.  6 R (Kirmizi) veya B (Mavi) seçeneğini/seçmek icin ↓/↑ Düğmelerine ve sonra da OK Düğmesine basin. Ardindan, istediginiz renk isisini ayarlamak icin ↓/↑ Düğmelerine ve sonra da OK Düğmesine basin. Bu ayar, renk isisin R ve B bolumlerini G (yeil) bolumune gore artirarak veya azaltarak degistirdiginden, G bolumu sabittir. 7 seceneğini seçmek,— in / duğmelerine ve OK duğmesine basin. Yeni renk ayari bellekte saklanir ve "Kullanici" seçildiginde otomatik atau geriçagrlr. COLOR menus ekranda goruntulenir. SHARPNESS ayarlama Göruntülerin kenarlying kesklinstirmek vs. iqin ayarlayin. 1 MENU duğmesine basin. Ana menu ekranda goruntulenir. 2 (PICTURE/AUDIO)i sejmek icin /+ duqmelerine ve sonra da OK duqmesine basin. PICTURE/AUDIO menusu ekranda goruntulenir. 3 (PICTURE) seçeneğini seçmek icin ↓/↑ Düğmelerine ve sonra da OK Düğmesine basin. PICTURE menük erkanda görtüntülenir. 4 "SHARPNESS" seçeneğini seçmek icin ↓/↑ Düğmelerine ve sonra da OK Düğmesine basin. SHARPNESS menüsu ekranda göruntülenir. 5 Keskinligi ayarlamak icin, / dugmelerine basin ve sonra OK dugmesine basin. ■ AUDIO menusü AUDIO menüsunu kullanarak asagidaki ögeleri ayarlayabilirsiniz. TREBLE BASS BALANCE - SURROUND TREBLE, BASS veya BALANCE'yi ayarlama
1 MENU diugmesine basin. Ana menu ekranda görtüntenir. 2 (PICTURE/AUDIO)i sejmek icin / duqmelerine ve sonra da OK duqmesine basin. PICTURE/AUDIO menusu ekranda goruntulcnir. 3 (AUDIO) seceneğini seçmek icin ↓/↑ Düğmelerine ve sonra da OK Düğmesine basin. 4 TREBLE, BASS veya BALANCE seceneğiniseçmek icin ↓/↑ Düğmelerine ve sonra da OK Düğmesine basin. 5 Istediginiz modu semcik icin / diugmelerine basin ve sonra OK diugmesine basin.SURROUND ayarlama
1 MENU dugmesine basin. Ana menu ekranda goruntulcnir. 2 (PICTURE/AUDIO)i sejmek icin / duqmelerine ve sonra da OK duqmesine basin. PICTURE/AUDIO menusu ekranda goruntulenir. 3 (AUDIO) seceneğini seçmek icin ↓/↑ Düğmelerine ve sonra da OK Düğmesine basin. 4 SURROUND seceneğini seçmek icin ↓/↑ Düğmelerine ve sonra da OK Düğmesine basin. 5 Istediiginiz modu sejmek icin / duqmelerine basin ve sonra OK duqmesine basin.  SRS WOW: Derin, zengin bastonu vct nyuktckton zengin bir surround ses saglar ve ozellikle filmer ve oyunlar guci sce ilc daha eglenceli hale gelir. - OFF (KAPALI): SRS WOW efektini kapatri. SRS Laboratuarlan tarafindan gelistirilen son teknolojiyikullanan SRS WOW, cseitli ses kaynaklarinun ses kalitesinionemli miktarda artirr. ■ MODE RESET menüsu (tüm modlari varsayilan ayara geri dondürme) Yaptiginz ayarlar fabrika ayarlarina geridondurebilirsiniz. 1 MENU duğmesine basin. Ana menu ekranda görtüntenir. 2 (PICTURE/AUDIO)i sejmek icin / duqmelerine ve sonra da OK duqmesine basin. PICTURE/AUDIO menusu ekranda goruntulenir. 3 “RESET” seçeneğini seçmek,— in ↓/↑ Düğmelerine ve sonra da OK Düğmesine basin. “RESET” menü su ekranda görtündenir. 4 Istediiginiz modu sejmek icin / digmelerine basin ve sonra OK digmesine basin. - OK: PICTURE/AUDIO menusündeki her modu varsayilan ayarlara geri dondurmek icin. - CANCEL: Sifirlamayi epital etmek ve PICTURE/ AUDIO menusune donmek icin.SCREEN menüsu (sadece analog RGB sinyali)
SCREEN menüsunü kullanarak asagidaki ögeleri ayarlayabilirsiniz. ·AUTO PHASE PITCH HCENTER VCENTER Not
INPUT3 için DVI-D giris soketinden digital RGB sinyalleri alirken, ayar gereksizdir.- Otomatik görtü kalitesi ayarlama fonksiyonu
Monitor bir giris sinyali aldiginda, otomatik olarak resmin pozisyonunu ve kesklinigi (faz/aralik) ayarlar ve ekranda net bir resmin görtüntülenmesini saglar (sayfa 20).Not
Otomatik görtü kalitesi fonksiyonu aktif durumda oldugunda sadece (guc) dugmesi calisir.Eger bu monitori onomatik görtü kalitesi fonksiyonu, görtütu tam olarak ayarlayamazsa
Geçerli giri sinyali icin, daha ileri otomatik goruntu kalitesi ayarlan yapabilirsiniz (Aasagidaki "AUTO" bolumune bakin).Eger görtü kalitesiyle ilgili daha fazla ayar yapmak isterseniz
Görtünün kcskinligini (faz/aralık) ve konumunu (yatay/dikcy konumunu) elinizle ayarlayabilirsiniz. Bu ayarlar, bellekte saklanir ve monitor onceden girilmis veya kaytll giris sinyalini alduginda, otomatik okayak gerig cagrilur.Geçerli giriş sinyali icin, daha ileri otomatik görtü kalitesi ayarlı yapabilirsiniz (AUTO)
1 MENU diugmesine basin.
Ana menu ekranda görtüntenir.2 (SCREEN) seçeneğini seçmek icin ↓/↑ duğmelerine ve sonra da OK duğmesine basin.
SCREEN menusu ekranda görtuntilenir.3 "AUTO"seceneignisecmekicin / duigmelerine ve sonra da OK duigmesine basin.
Ekranin, geleeri giriş sinyali icin faz, aralık ve yatay/dikey konumu ile ilgili gerekli ayarlamaları yapın ve bunlari saklayın.Resmin keskinligini manuel olarak ayarlama (Phase (Faz)/Pitch (Aralik))
Resmin keskinliginci asagidaki sekilde ayarlayabilirsiniz. Bu ayar, bilgisayar monitori HD15 giris soketine (analog RGB) baglandiginda etkindir. 1 Bilgisayarda cüzünurlugu 1280× 1024 olarak ayarlayin.2 CD-ROM'ü yerleştinir.
3 CD-ROM 'u besoinin ve ornek testi görtüntüleyin. Windows Kullanıçları icin
Otomatik calistirma islemi basladignda:
Display Adjustment tool 'a (Utility) tiklayin. "Adjust" a tiklayin ve gezūnūrlügū dokrulayin ve ardūndan "Next"c tiklayin. PITCH ve PHASE 参数 ornek test sirayla görtunülenir.Otomatik calistirma islemi basarisiz oldugunda:
1 "My Computer" i açin ve CD-ROM simgesine tɪklayin. "Explorer" a gadin ve CD-ROM simgesini acn. 2 [Utility]yiacin ve arundan [Windows]i segin. 3 [Win_Untility.exe]yi calistirn. Ornek test görtuntilenirMacintosh kullanicari icin
I | Utility|yi acin ve arindan |Mac|i secin. 2 [Mac_Utility.exe]yicalisturin. Örnek test görtüntenir.4 MENU duğmesine basin.
Ana menuckranda goruntulcnir.5 (SCREEN) seçeneğini seçmek 参数 ↓/↑ duğmelerine ve sonra da OK duğmesine basin.
SCREEN menusu ekranda görtuntilenir.6 "PHASE"seconeigni secmek icin / duqmelerine ve sonra da OK duqmesine basin.
"PHASE" ayar menusu ekranda gorbuntulenir.7 Yatay cizgiler minimum seviyeye inene kadar / duğmelerine basin.
Ayari, yatay cizgiler minimum seviyede olacak sekilde yapin. 8 OK dugmesine basin.
Ana menu ekranda goruntulenir. Eger tum ekranda dikey cizgiler goruntulenirse, aralgi (pitch) aşaqidaki sekilde ayarlayin.9 "PITCH" seçeneğini seçmek icin ↓/↑ Düğmelerine ve sonra da OK Düğmesine basin.
"PITCH" ayar menusü ekranda görtülenir. 10 Dikey cizgiler kaybolana kadar / duğmelerine basin. Ayari, dikey cizgiler kaybolacak sekilde yapin.  11 Örnek testi sona erdirmek icin ekrandaki [END]e tiklayin.Resmin konumunu manuel olarak ayarlama (H CENTER/V CENTER)
Göruntü ekranin merkezinde bulunmuyorsa görtüyu ortalamak icin asagidaki admlar takip edin. 1 Bilgisayardaoczūnūrlügū 1280×1024 ordeal ayarlayin. 2 CD-ROM'ü yerleştinir.3 CD-ROM 'u baslatin ve ornek testi görtüntüleyin. Windows Kullanıçları ilen Otomatik calıstirma ilemi basladigianda:
Display Adjustment tool 'a (Utility) tiklayin. "Adjust" a tiklayin ve gezūnūrlügū dokrulayin ve ardindan "Next" e tiklayin. H CENTER ve V CENTER,—ünörnek test sirayla görtülenir.Otomatik calistirma islemi basarisiz oldugunda:
1 "My Computer"i acin ve CD-ROM simgesine tiklayin. "Explorer"a gadin ve CD-ROM simgesini acin. 2 | Utility|'yi acin ve ardindan | Windows'|i scein. 3 [Win_Untility.exe]yigeahstirm. Ornek test görtuntilenir.Macintosh kullanicari iqin
1 | Utility|yi aqin ve ardindan |Mac'i segin. 2 [Mac_Utility.exe]yicalisturn. Örnek test görtüntülenir.4 MENU dugmesine basin.
Ana menu ekranda görtüntülcnir. 5 (SCREEN) seçeneğini seçmek 参数 ↓/↑ Düğmelerine ve sonra da OK Düğmesine basin. SCREEN mnusü ekranda görtündülçir.6 "H CENTER" veya "VCENTER" seçeneğinisecmek icin 1 / 1 dügmelerine ve sonra da OKdugmesine basin.
"H CENTER" ayar menusu veya "VCENTER" ayar menusu ekranda görtüntenir.7 Örnek testi ekranda ortalamak icin, ↓/↑ duğmelerine basin.
8 Örnek testi sona erdirmek icin ekrandaki [END]e tiklayin.- MENU POSITION menüsu
Eger ekrandaki bir nesneyi gormenizi engellyorsa, menu konumunu degistirebilirisiniz.  1 MENU duğmesine basin. Ana menuckranda goruntulenir.2 (MENU POSITION) seceneğini seçmek icin ↓/↑ duğmelerine ve sonra da OK duğmesine basin.
"MENU POSITION" menusü ekranda görtuntülenir.3 Istediiginiz konumu seçmek icin / Düğmelerine ve sonra da OK Düğmesine basin.
Menunun yeri icin 9 konumdan birini secebilirsiniz.INPUT SENSING ON/OFF menusu
INPUT SENSING ON/OFF menusände AUTO ON scencegini sectiginizde, monitor otomatik olarak bir giris terminaline bir giris sinyali saptar ve enerji tasarruf moduna gircmedcn once girisi otomatik olarak dcgisirir.  1 MENU duğmesine basin. Ana menuckranda goruntulenir.2 (INPUT SENSING ON/OFF) seçeneğini seçmek icin ↓/↑ Düğmelerine ve sonra da OK Düğmesine basin.
INPUT SENSING menus ekranda goruntulcnir.3 Istediiginiz modu sejmek icin / duqmelerine basin ve sonra OK duqmesine basin.
- ON: SeçilenGIS terminalindeGIS sinyali yoksa veya INPUT Düğmesi ilebirGIS terminali seçtigünizde ve terminaldeGIS sinyali yoksa,ekran mesaj görtüntülir (sayfa 21)ve monitor,giri otomatik olarak degistirmek icin baska birGIS terminaline yönclikGIS sinyalini kontrl cder. Giris degistirildigiinde,seçilenGIS terminali ekranin solust kisminda görtüntülir. Giris sinyali yoksa,monitor otomatik olarakenerj ti nasarruf moduna gece. OFF:Giris otomatik olarak dcgistirilmz.Girisidcgtistirmek icin INPUT dugmesine basim. LANGUAGE menu
 1 MENU Düğmesine basin. Ana menu ekranda görtüntenir. 2 (LANGUAGE) seçeneğini seçmek icin ↓/↑ duğmelerine ve sonra da OK duğmesine basin. LANGUAGE menüki ekranda görtülenir. 3 Bir dil seçmek icin, ↓/↑ duğmelerine ve sonra da OK duğmesine basin. - English: ingilizee - Frangais; Fransizca - Deutsch: Almanca - Espanol: Ispanyolca Italiano: Italyanca Nederlands: Felemenkce Svenska: Isveççë - Pycckn: ·日本語: ·中文: C i- MENU LOCK menüsu
Istenmeyen ayarlar ve sifirlamaları onlemek icin, Düğmelerin kontrollerini kilitler.  1 MENU duğmesine basin. Ana menu ekranda goruntulcnir. 2 (MENULOCK)secenegeini semekicin / duqmelerine ve sonra da OKduqmesine basin. MENULOCK menusckranda goruntulenir. 3 "On" veya "Off." seçeneğini seçmek icin ↓/↑ duğmelerine basin. - ON: Sadecce (guc) anahtari ve INPUT dugmeci calisacaktir. Eger herhangi bir islem yapmaya calisirsaniz, ekranda okunu belirir. OFF:“MENULOCK”ayarini kapahya getirr. a "MENU LOCK" ayan "ON" olarak sceildiyse, MENU duigmesinc bastigmizda, "OM MENU LOCK" otomatik olarak secilir.RESET menu (varsayilan ayarlara geri dondürme)
 1 MENU duğmesine basin. Ana menu ekranda görtüntülenir. 2 (RESET) seçeneğini seçmek icin ↓/↑ duğmelerine ve sonra da OK duğmesine basin. RESETmenusekranda görtuntilenir. 3 Istediginiz modu semcikicn / duqmelerine basin ve sonra OK duqmesine basin. - OK: Yaplan ayarlan, fabrika ayarlarina geri dondurmek icin "BANGUAGE" ayari bu yontemle degismez. - CANCEL: Sifirlamayi iptal etmek ve menu ekranina donmek icin.Teknik Özellikler
Sesi kontrol etme
MonitorHoparlorini veyakulakhikarini kulanarak, bilgisayarimizdan veya monitor ses giris fislerine bagh diges cihazlarindan gelen sesleri dinleyebilirsiniz. Ana * nüden ayr bir "Ses" * munsunu kullanarak sesi kontrl edbilirsiniz.1 Ekranda herhangi bir menu gänmediginde / duğmelerine basin.
2 Sesi kontral etmek icin / duğmelerine basin.
Yaklajk 5 saniye sonra menu otomatik olarak kaybolur.Notlar
Ekranda ana menu görtüntilenirken sesi ayarlayamazsiniz. - Monitor enerji tasarruf modundayken, hoparlorlerden veya kulakhklardan ses gelmez.Enerji tasarrufu fonksiyonu
Bu monitor VESA, ENERGY STAR (yalnizca SDM-HX75) ve NUTEK erji tasarrufu standartlarina uygundur. Monitor eger Analog giris icin DPMS (Display Power Management Standard)/Dijital giris icin DMPM (DVI Digital Monitor Power Management) uyumlu bir bir bilgisayara veya video grafik katina baglanirsa, monitor asagida gosterilen sekilde otomatik olarak erji tuketimini azaltacaktir. SDM-HX75| Enerji modu Enerji tüketimi | (enerji) gostergesi | |
| normal calisma | 50 W (maks.) yeşil | |
| aktif kapanma* (derin uyku)** | 1 W (maks.) kehribar | |
| ( power) off (güç kapah) | 1 W (maks.) off | |
| Enerji modu Enerji tüketimi | (enerji) gõstergesi | |
| normal calisma | 60 W (maks.) yeşil | |
| aktif kapanma* (dcrin uyku)** | 1 W (maks.) kchibar | |
| ( power) off (güç kapalı) | 1 W (maks.) off | |
MOD'u Ayarlama (PICTURE/ AUDIO) (modu)
Monitörün sag tarafindaki duğmesine üst üste bastıgünizda, MODE'u GAME MOVIE PC AUTO olarak secebilirsiniz. "AUTO" seçeneğini seçtiğinizde, monitor ekran parlakligim Çevre parlakligina gore otomatik olarak ayarlar (otomatik parlakhl ayarlama fonksiyonu). Daha fazla bilgi icin, bkz "Otomatik parlakhík ayarlama fonksiyonu (ɪsɪk sensörü)". duğmesine üst üste basin. MODE'un varsayilan ayan "MOVIE" olarak ayarlanmistir. duğmesine bir kez bastıgünizda, "MOVIE" (varsayilan ayar) goruntulener, tekarr bastiginzda, PCgoruntulener. dugmesine her bastuginizda, mod asagidaki gibi degisir.  Her bir mod ekranda görünür ve MODEdehygistirilir. Yaklaşik 5 saniye sonra menu otomatik olarak kaybolur.Otomatik parlaklik ayarlama fonksiyonu (Isik sensörü)
Monitor, ekran parlakligini vevre parlakligina gore otomatik ayarlama özelligi ile donatilmustir. Ekran parlakligi, modunu monitrorun sag tarafindaki duğmesi ile AUTO olarak ayarlayarak veya PICTURE/AUDIO menusunde en uygun seviyeye ayarlanir. Ekran parlakligin varsayilan ayari MOVIE olarak ayarlanmustir. Ayrica, monitorun sag tarafindaki igmesi ile modunu AUTO orak ayarladiginzda, ayar cugu da goruntuliner. Cubugu / dugmeleri ile ayarlayabilirsiniz. Ayarladiginiz seviyege gore ekran parlakligi degisir.Otomatik resim kalitesi ayarlama fonksiyonu (sadece analog RGB sinyali)
Monitor birGISinyali aldiGnda, otomatik olarak resmin pozisyonunu ve keskinligini (faz/ aralk) ayarlar ve ekranda net bir resmin görtüntenmesini saglar.
Temel (fabrika ayarli) mod
Monitor birGISinyali alduginda,ekranin ortasinda yuksek kaliteli bir goruntu elde edcbilmek icin, bu sinyali monitorun belleginde saklu alan temel modlardan biri ile elesfirir. Giris sinyali temel mod ilc uyusursa, resim otomatik olarak uygun varsayilan ayarlarla ekranda goruntulenir.Giri sinyalleri temel modlardan biri ile uyusmazsa
Monitor tcmel modlardan birine uymayan bir girisinyali ahrsa, ekranda daima net bir goruntu saglamak uzere, otomatik goruntu kalitesci ayar fonksiyonu aktive edilir (asagidaki monitor frekans arahklar dahilinde): Yatay frckans:28-80 kHz Dikey frekans:48-75 Hz Sonuc olarak, monitor ilk defa, temel ayarlarina (fabrika ayari) uymayan birGIS sinyali aldignda monitorun ekranda goruntuyu gostermesi normalden dahuzun surebilir. Bu ayar verisi otomatik olarak hafizada saklanur ve daha sonra tekar alglandignda sanki monitor temel ayarlarina uyan birGIS sinyali almis gibi islem gorur.Faz,arylk ve görtü konumunu manuel olarak ayarlarsaniz
Otomatik görtü kaliteci ayar fonksiyonu, bazirgis sinyallerinde görtü konumunu, fazi ve arahı tam olarak ayarlayamayabilir. Bu durumda, bu ayarlar manuel olarak yapabilirsiniz (sayfa 16). Yaptıgüniz manuel ayarlar hafizada saklanir ve monitorayo nir giris sinalini algladında yaniden kullanir.Sorun giderme
Teknik destege basvurmadan once bu bolume bakin.Göründülü mesajlar
Eger giris sinyalinde sorun yaşanyorsa, asagidaki mesajlardan bir tanesi ekranda görtülenir. Sorunu gidermek icin, bkz "Hata belirtleri ve olasi giderme yontemleri" sayfa 22.Eger ekranda "OUT OF RANGE" görtülenirse
Bu, giris sinyalinin monitor özellikleri tarafindan desteklenmedigi gimir. Asagdaki ögeleri kontrl edin. Goruntulu mesaj hakkinda daha genis bilgi icin, bkz "Hata belirtileri ve olası giderme yontemleri" sayfa 22.Eger ekranda "xxx.x kHz / xxx Hz" belirse
Bu, yatay ve dikey frekanslarin ikisinin de monitor tarafindan desteklenmedigi anlamna gelir. Rakamlar, gececrli giris sinyalinin yatay ve dikey frekanslarini gosterir. Eger ekranda "RESOLUTION >1280× 1024 belirarse
Bu, czozunurlugun monitor özellikleri tarafindan desteklenmedigiösterir (1280× 1024 vya daha dusuk). Eger ekranda "NO INPUT SIGNAL" görtüntenirse
Bu, seçili dokten sinyal gelmedigini belirir. INPUT SENSING ON/OFF (sayfa 17) ON olarak ayarlandiunda, monitor对不起 girisi sinyali bulur ve girisi otomatik olarak degistirir. "GO TO POWER SAVE"
Monitor, ekranda mesaj belirdikten yaklasik 5 saniye sonra enerji tasarrufu moduna girer.Eger ekranda "CABLE DISCONNECTED" görtüntenirse
Bu, video sinyal kablosunun geleerli doketten cikarildigi (sokete takili olmadigi) anlamina gelir. INPUT SENSING ON/OFF (sayfa 17) ON olarak ayarlandigianda, monitor Barbara bir giris sinyali bulur ve girisi otomatik olarak degistirir. Hata belirtileri ve olasi giderme yontemleri
Bagh bir bilgisayar veya diger cihazlarla ilgili bir sorun ortaya cikarsa, bagh bilgisayann/cihazin kullamn kilavuzuna bakim.| Belirti Bu öğeleri kontrl edin | |
| No picture (görüntü yok) | |
| ü(güç) gõstergesi yanmiyorsa veü(güç) Düğmesine basildıngnda daü(güç) yanmazsa, | Güç kablosunun takil olup olmadıyıni kontrl edin. |
| Eşer ekranda "CABLE DISCONNECTED" görtüntenirse, | Video sinal y kablosunun ve dioer donanimlarin ilgili soketlerde taklulu durumda olup olmadıyıni kontrl edin. (sayfa 7).Video giris seksti pinlerin bülmemeş veya icinc kacmamş oludgün cmin olun.Giris secim ayarrnln doğru olup olmadıyıni kontrl edin (sayfa 11).Såglandmamş bir video sinal kablosu taklulu.Såglandmamş bir video sinal kablosunubagliarsanz, ekranda "CABLE DISCONNECTED" (kablo takluludehyil) mesajbelirc bilir.Bu ariza degildir. |
| Eşer, ekranda "NO INPUT SIGNAL" mesaji belirirse veya ü(güç) gõstergesi kehribarsa, | Video sinal kablosunun ve dioer donanimlarin ilgili soketlerde taklulu durumda olup olmadıyıni kontrl edin. (sayfa 7).Video giris seksti pinlerin bülmemeş veya icinc kacmamş oludgün cmin olun.Giris secim ayarrnln doğru olup olmadıyıni kontrl edin (sayFA 11).■ Monitör nedeniyledehyil, bir bilgisayar veya böylan farklbir cihaz nedeniyle olusapan problemlerBilgisayar enerji tasarrufu modunda. Klavyede herhangi bir tuşa basmayi veya fareyi hareket etirmeyi deneyin.Ekran kartınzin dizgün sekilde takldündan emin olun.Bilgisayarainenç konumda olup olmadıyıni kontrl edin. |
| Eşer ekranda "OUT OF RANGE" görtüntenirse (sayfa 21), | ■ Monitör nedeniyledehyil, bir bilgisayar veya böylan farklbir cihaz nedeniyle olusapan problemlerVideo (görüntü) frekansinn monitorün destckledigi özellikler icinde olup olmadıyıni kontrl edin. Eşer eski bir monitorün yerine, bu monitorüt aktysaniz, esk monitorüyecnakin ve bilgisayar nkran kartın asagida belirtilen araliklarda ayarlayin:Yatay frekans: 28-80 kHz (Analog RGB), 28-64 kHz (Dijital RGB)Dikey frekans: 48-75 Hz (Analog RGB), 60 Hz (Dijital RGB)Çüzünurlük: 1280×1024 veya daha Dennisuk |
| Eşer Windows kullanyorsaniz, | Eşer eski bir monitorün yerine, bu monitorüt aktysaniz, eski monitorüyeniden takin ve asagidaki talimatlari uyugulain. Windows donannin seçimi pencercsinde "Manufactures" (üretici) listeden "SONY"i ve "Models" (modeller) listeden "SDM-HX75 veya SDM-HX95" seçin. "Models" (modeller) listede "SDM-HX75 veya SDM-HX95" görtüntenmezse, "Plug & Play." (Tak ve Çalıtr)i denteyin. |
| Eşer Macintosh system kullanyorsaniz, | Bir Macintosh bilgisayar baglarken, gerekirse bir adaptör (saglanmamştur) kullanin. Video sinal kablosunu baglamadan once adaptörü bilgisayara baglayin. |
| Görtütitremesi, oynaması, sallanması ya da karişması. | Aralgi (pitch) ve fazı (phase) ayarlayin (sadece analog RGB sinyal) (sayfa 16).Monitörü, tercihen farkh bir elektrik devresi üzerindeki, farkh bir AC prizine takmayi deneyin.■ Monitör nedeniyledehyil, bir bilgisayar veya böylan farklbir cihaz nedeniyle olusapan problemler■ Grafik kartinin monitorüre uygun sekilde ayarlanmş olduğundan emin olun.Grafik modunun, (VESA, Macintosh 19" Color, vs.) ve giris sinyali frekansinnbu monitor tarafindan desteklendiginden emin olun. Frekans uyung aralika olsa bile, bazik ekran kartılari bu monitorün.Doğru senkronizasyon yapabilmesine izin vermeyecek kadar dar bir senkronizasyon pulsuna sahip olabilir.Bu monitorçapraz sinyallere islemez. Progresif sinyallere icin ayarlıdir.Mümkün olan en iyi kalitedeki görtüntenü kalitesi icin bilgisayarın tazeleme orannii (dikey frekans) ayarlayin (60 Hz tavsiye edilir). |
| Görtünten bulanik. | Kontrast ve parlakiğluyarayarlayin (sayfa 13, 14).Keskinligiayaarla maa (sayfa 14).Araligi(pitch) ve fazı (phase) ayarlayin (sadece analog RGB sinyal) (sayfa 16).■ Monitör nedeniyledehyil, bir bilgisayar veya böylan farklbir cihaz nedeniyle olusapan problemler■ Bilgisayarmüzda çozunūrūgü 1280×1024 olarak ayarlayin. |
| Belirti Bu öğeleri kontrol edin | |
| Hayalet görtunjü. | · Video kablosunun ya da video)yönendiricinin uzatma kablosunuiptal edin. · Tümparçaların (donanımları) ilgili sokitlerdedoğanbir seksilde takilı olduguundancmin olun. |
| Resim ortalanmamış veyaboyutlar)düzgündegil(sadeceanalog RGB sinyalleri). | · Araligi(pitch)ve fazı(phase)ayarlayın(sayfa 16).· Görtunjükonumunuayarlayın(sayfa 17)Bazıvideo modlartin ekranı tam olarakdoldurmadıyıunutmayın. |
| Görtunjüçok ufak. | ■ Monitor nedeniyle degil,bir bilgisayar veya建議anan farklıbir cihaznedeniyle olusan problemler· Bilgisayarınkındaçozsunurlugu 1280×1024 olarak ayarlayın. |
| Görtunjüçok karanlık.· Arka,isişiayaarlayın(sayfa 13).·Parlaki,isiayaarlayın(sayfa 14).·GAMMA mensünde gamayıayarlayın(sayfa 14).·Monitör acıldıktaşsonra parlaki,isiçgmcsibirkıç dokika sürebilar.·odu AUTO olarak ayarlandışında,ekran parlaki,isiçinda karanlıkolabilir(sayfa 13,20). | |
| Dalgali veya oval(moire)birgörtunjüvar. | ·Araligi(pitch)ve fazı(phase)ayarlayın(sadece analog RGB sinyal)(sayfa 16). |
| Renk)dünlenlidegil. | ·Araligi(pitch)ve fazı(phase)ayarlayın(sadece analog RGB sinyal)(sayfa 16). |
| Beyaz renk tam olarak beyagöruntülenmiyor. | ·Renk isisiniyaarlayın(sayfa 14). |
| Monitörduğmeleriçalismyor(okaanda:görtunjülenir). | ·“MENU LOCK”“ON”durumda isc OFF’a getirin(sayfa 18). |
| Menü ekranindagöruntülenençüzunurlükyanlış. | ·Ekrankartıayarın,isi olarak,menüekranindagöruntülenençüzunurlük,bilgisayarda ayarlıolanla,aynı olmayabilir. |