
INZONE M10S - Monitor SONY - Free user manual and instructions
Find the device manual for free INZONE M10S SONY in PDF.

| Product Type | OLED Monitor |
| Brand | Sony |
| Model | INZONE M10S (SDM-27Q10S) |
| Screen Size | 27 inches (67.3 cm) |
| Display Resolution | 2560 × 1440 pixels |
| Dimensions with stand (W × H × D) | 60.4 × 50.4 × 19.7 cm |
| Dimensions without stand (W × H × D) | 60.4 × 35.0 × 5.8 cm |
| Weight with stand | 6.2 kg |
| Weight without stand | 4.2 kg |
| Power Supply | 19.5 V DC via AC adapter (input 100-240 V AC, 50/60 Hz) |
| Input/Output Ports | HDMI 2.1 (×2), DisplayPort 2.1, USB Type-A, mini stereo jack |
| Main Features | Panel Refresh, Pixel Shift, Afterimage Reduction, Game Mode, G-SYNC Compatibility |
| Operating Temperature | 0 °C - 40 °C |
| Operating Humidity | 10 % - 80 % RH (non-condensing) |
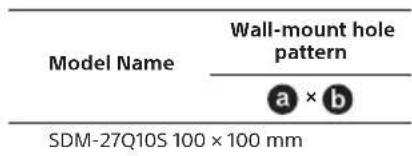
| Wall Mount | VESA 100 × 100 mm standard (mount not included) |
| Maintenance and Cleaning | Use a dry microfiber cloth; do not spray liquid directly |
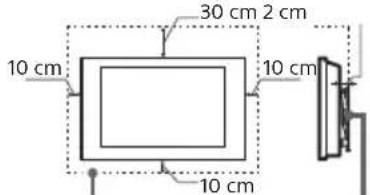
| Safety | Respect ventilation clearances (min. 10 cm on sides, 30 cm above), use only the supplied Sony power cord |
| Spare Parts and Repairability | Not specified; contact Sony support |
Frequently Asked Questions - INZONE M10S SONY
User questions about INZONE M10S SONY
0 question about this device. Answer the ones you know or ask your own.
Ask a new question about this device
Download the instructions for your Monitor in PDF format for free! Find your manual INZONE M10S - SONY and take your electronic device back in hand. On this page are published all the documents necessary for the use of your device. INZONE M10S by SONY.
USER MANUAL INZONE M10S SONY
This OLED Monitor comes with the following manuals. Please retain the manuals for future reference.
Setup Guide
Operating Instructions (This manual)
Help Guide (Web manual)
Provides information including advanced usage.

https://rd1.sony.net/help/tv/27q10s/h_zz/
Note
- Images and illustrations used in the Setup Guide and this manual are for reference only and may differ from the actual product.
Location of the identification label
Labels for the OLED Monitor Model No., Production Date (year/month) and Power Supply rating are located on the rear of the OLED Monitor or package. Other label(s) can be found by removing the Table-Top Stand.
For models with supplied mains adaptor: Labels for mains adaptor Model No. and Serial No. are located on the bottom of mains adaptor.


NOTICE FOR CUSTOMERS IN THE UNITED KINGDOM
A moulded plug complying with BS1363 is fitted to this equipment for your safety and convenience.
Should the fuse in the plug supplied need to be replaced with the same rating of fuse approved by ASTA or BSI to BS 1362 (i.e., marked with ⚙ or ⚗ must be used.
If the plug supplied with this equipment has a detachable fuse cover, be sure to attach the fuse cover after you change the fuse. Never use the plug without the fuse cover. If you should lose the fuse cover, please contact your nearest Sony service station.
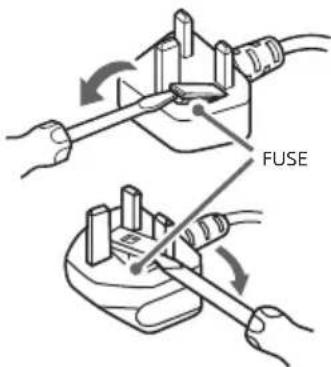
How to replace the fuse
Open the fuse compartment with a blade screwdriver, and replace the fuse. Please refer to the illustration that actually equipped with the product.
IMPORTANT NOTICE
This product has been manufactured by or on behalf of Sony Corporation.
EU and UK Importer: Sony Europe B.V.
Inquiries to the EU Importer or related to product compliance in Europe should be sent to the manufacturer's authorized representative, Sony Belgium, bijkantoor van Sony Europe B.V., Da Vincilaan 7-D1, 1930 Zaventem, Belgium.
Inquiries to the UK Importer or related to product compliance in the UK should be sent to the manufacturer's authorized representative, Sony Europe B.V., The Heights, Brooklands, Weybridge, Surrey KT13 0XW, United Kingdom.
Energy consumption and other information for the power supply, as required by Commission Regulation (EU) 2019/1782, is available at the following website: https://compliance.sony.eu and https://compliance.sony.co.uk for the United Kingdom
Safety Information
WARNING
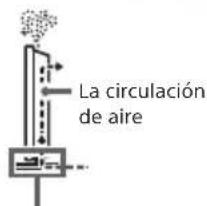
Ventilation
- Never cover the ventilation holes or insert anything into the cabinet.
- Leave space around the OLED Monitor as shown below.
Installed on the wall
Leave at least this space around the set.
Installed with stand
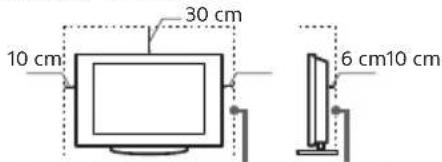
Leave at least this space around the set.
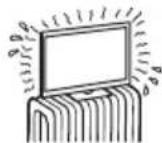
• To ensure proper ventilation and prevent the collection of dirt or dust:
- Do not lay the OLED Monitor flat, install upside down, backwards, or sideways.
- Do not place the OLED Monitor on a shelf, rug, bed or in a closet.
- Do not cover the OLED Monitor with a cloth, such as curtains, or items such as newspapers, etc.
- Do not install the OLED Monitor as shown below.
Air circulation is blocked.
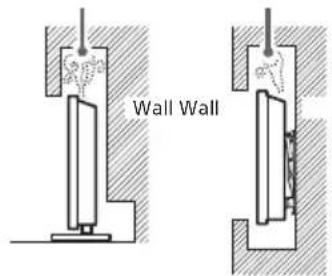

Do not block the air circulation area.
Mains lead
Handle the mains lead and socket as follows in order to avoid any risk of fire, electric shock or damage and/or injuries:
- Use only mains leads supplied by Sony, not other suppliers.
- Insert the plug fully into the mains socket.
- Operate the OLED Monitor on a 100 V - 240 V AC supply only.
- When wiring cables, be sure to unplug the mains lead for your safety and take care not to catch your feet on the cables.
- Disconnect the mains lead from the mains socket before working on or moving the OLED Monitor.
- Keep the mains lead away from heat sources.
- Unplug the mains plug and clean it regularly. If the plug is covered with dust and it picks up moisture, its insulation may deteriorate, which could result in a fire.
Note
- Do not use the supplied mains lead on any other equipment.
- Do not pinch, bend, or twist the mains lead excessively. The core conductors may be exposed or broken.
- Do not modify the mains lead.
- Do not put anything heavy on the mains lead.
- Do not pull on the mains lead itself when disconnecting the mains lead.
- Do not connect too many appliances to the same mains socket.
- Do not use a poor fitting mains socket.
(A)(B)
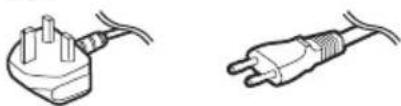
natural_image
Two types of electrical plugs shown side by side: one with a plug and cable, the other with a terminal plug (no text or symbols present)Notice for customers in United Kingdom, Ireland, Malta, Gibraltar, and Cyprus
Be sure to use the supplied mains lead (A). For safety reasons, use specified supplied mains lead mentioned.
Notice for customers in Other countries
Be sure to use the supplied mains lead (B). For safety reasons, use specified supplied mains lead mentioned.
NOTE ON MAINS ADAPTOR
Warning
To reduce the risk of fire or electric shock, do not expose this apparatus to rain or moisture.
To prevent fire or shock hazard, do not place objects filled with liquids, such as vases, on the apparatus. Do not install this equipment in a confined space, such as a bookshelf or similar unit.
- Please ensure that the mains socket is installed near the equipment and shall be easily accessible.
- Be sure to use the supplied mains adaptor and mains lead. Otherwise it may cause a malfunction.
- Connect the mains adaptor to an easily accessible mains socket.
- Do not coil the mains lead around the mains adaptor. The core wire may be cut and/or it may cause a
malfunction of the media receiver.
- Do not touch the mains adaptor with wet hands.
- If you notice an abnormality in the mains adaptor, disconnect it from the mains socket immediately.
- The set is not disconnected from the mains source as long as it is connected to the mains socket, even if the set itself has been turned off.
- As the mains adaptor will become warm when it is used for a long time, it may feel hot when touching it with your hand.
Prohibited Usage
Do not install/use the OLED Monitor in locations, environments or situations such as those listed below, or the OLED Monitor may malfunction and cause a fire, electric shock, damage and/or injuries.
Locations:
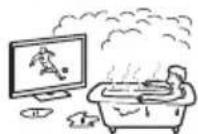
- Outdoors (in direct sunlight), at the seashore, on a ship or other vessel, inside a vehicle, unstable locations, near water, rain, moisture or smoke.
Environments:
- Places that are hot, humid, or excessively dusty; where insects may enter; where it might be exposed to mechanical vibration, near the source of naked flame, such as lighted candle, which is placed on the OLED Monitor. The OLED Monitor shall not be exposed to dripping or splashing and no objects filled with liquids, such as vases, shall be placed on the OLED Monitor.
Situations:
- Use when your hands are wet, with the cabinet removed, or with attachments not recommended by the manufacturer. Disconnect the OLED Monitor from mains socket during lightning storms.
• Install the OLED Monitor so that it sticks out into an open space. Injury or damage from a person or object bumping into the OLED Monitor may result. - Place the OLED Monitor in a humid or dusty space, or in a room with oily smoke or steam
(near cooking tables or humidifiers). Fire, electric shock, or warping may result.
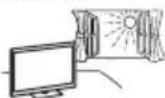
• Install the OLED Monitor in places subject to extreme temperature such as in direct sunlight, near a radiator or a heating vent. The OLED Monitor may overheat in such condition which can cause deformation of the enclosure and/or OLED Monitor malfunction.
- If the OLED Monitor is placed in the changing room of a public bath or hot spring, the OLED Monitor may be damaged by airborne
- For best picture quality, do not expose the screen to direct illumination or sunlight.
- Avoid moving the OLED Monitor from a cold area to a warm area. Sudden room temperature changes may cause moisture condensation. This may cause the OLED Monitor to show poor picture and/or poor colour. Should this occur, allow moisture to evaporate completely before powering the OLED Monitor on.
Broken pieces:
- Do not throw anything at the OLED Monitor. The screen glass may break by the impact and cause serious injury.
- If the surface of the OLED Monitor cracks, do not touch it until you have unplugged the mains lead. Otherwise this may cause an electric shock.
When not in use
- If you will not be using the OLED Monitor for several days, the OLED Monitor should be disconnected from the mains for environmental and safety reasons.
- As the OLED Monitor is not disconnected from the mains when the OLED Monitor is just turned off, pull the plug from the mains socket to disconnect the OLED Monitor completely.
For children
- ALWAYS keep small accessories out of the reach of children, so that they are not mistakenly swallowed.
If the following problems occur...
Turn off the OLED Monitor and unplug the mains lead immediately if any of the following problems occur.
Ask your dealer or Sony service centre to have it checked by qualified service personnel.
When:
- Mains lead is damaged.
- Poor fitting of mains socket.
- OLED Monitor is damaged by being dropped, hit or having something thrown at it.
- Any liquid or solid object falls through openings in the cabinet.
About OLED Monitor Temperature
When the OLED Monitor is used for an extended period, the panel surrounds become warm. It may feel hot when touching it with your hand.
Medical Institutions
This product cannot be used as a medical device. It may cause a medical equipment malfunction.
Do not place this product close to medical devices
This product (including accessories) has magnet(s) which may interfere with pacemakers, programmable shunt valves for hydrocephalus treatment, or other medical devices. Do not place this product close to persons who use such medical devices. Consult your doctor before using this product if you use any such medical device.
Keep out of the reach of children or the supervised individuals
This product (including accessories) has magnet(s). Swallowing magnet(s) could cause serious harm, such as choking hazard or intestinal injuries. If magnets (or a magnet) were swallowed, consult a doctor immediately.
Magnetic influence
This product (including accessories such as covers) uses magnets.
Do not place magnetically sensitive objects (cash cards, credit cards with magnetic coding, etc.) near this product.
Precautions
• View the OLED Monitor in moderate light, as viewing the OLED Monitor in poor light or during long period of time, strains your eyes.
- When using headphones, adjust the volume so as to avoid excessive levels, as hearing damage may result.
OLED SCREEN:
- Although the OLED screen is made with high-precision technology and 99.99% or more of the pixels are effective, black dots may appear or bright points of light (white, red, blue, or green) may appear constantly on the OLED screen. This is a structural property of the OLED screen and is not a malfunction.
- To avoid damaging the OLED screen, do not expose the OLED screen to direct sunlight.
- Do not push or scratch the OLED screen of this monitor. The image may be uneven or the OLED screen may be damaged.
- The screen and cabinet get warm when this monitor is in use. This is not a malfunction.
- Avoid spraying insect repellent with volatile material on the OLED screen
- Avoid prolonged contact with rubber or plastic material to the OLED screen.
- When disposing of your monitor be sure to follow your local laws and regulations.
Protecting the Screen
Precautions to Protect the Screen from Damage
Image retention
OLED Monitor's are susceptible to image retention (burn-in) due to the characteristics of the materials used. Image retention may occur if images are displayed in the same location on the screen repeatedly or over extended periods of time. This is not a malfunction of the monitor. Avoid displaying images that may cause image retention.
The following are examples of images and displays that may cause image retention:
- Content with black bars either on the top and bottom and/or the left and right sides of the screen. (for example, Letterboxed, 4:3 screen)
• Static images such as photos.
• Static content from applications. - Displays of Frame rate counter, Crosshair, Timer in Gaming assist.
To reduce the risk of image retention:
- Sony recommends that you turn off the monitor normally by pressing the power button on the monitor.
- Fill the screen by changing [Aspect ratio] to eliminate the black bars.
- Avoid displaying static images with bright colors (including white) or logos on any portion of the screen.
- Set the picture settings based on the ambient conditions. The standard setting of Game mode is recommended for Picture mode.
- Turn off displays of Frame rate counter, Crosshair, Timer in Gaming assist.
The monitor has following features to help reduce/prevent image retention.
Panel refresh
A panel refresh will adjust the panel uniformity. Panel refresh can be performed and should only be used when image retention is very noticeable.
Caution:
- The Panel refresh function may affect the panel. Do not perform Panel refresh more than once a year as it may affect the usable life of the panel.
- The effectiveness of a panel refresh may vary depending on the image retention condition.
- Panel refresh takes up to one hour to complete.
The following also applies for some models as indicated before executing a Panel refresh.
- A white, red, green, or blue line may be displayed on the screen during the Panel refresh, this is not a malfunction of the monitor.
- Panel refresh will only work when the room temperature is between 10 °C and 40 °C.
Pixel shift
Automatically moves the image on the screen to prevent image retention.
Other feature
The screen brightness is automatically reduced when displaying still images, clocks, bright colors or logos etc.
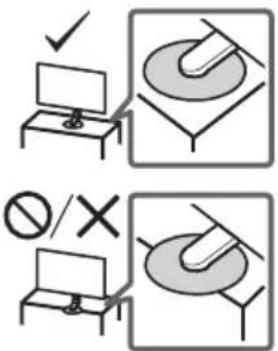
Handling and cleaning the screen surface/cabinet of the OLED Monitor

Precautions:
- Avoid touching the screen.
- To remove dust from the screen surface/cabinet, wipe gently with a microfiber cloth.
- Never spray water or detergent directly on the OLED Monitor. It may drip to the bottom of the screen or exterior parts, and enter the OLED Monitor, and may cause damage to the OLED Monitor.
Optional Equipment
- Keep optional components or any equipment emitting electromagnetic radiation away from the OLED Monitor. Otherwise picture distortion and/or noisy sound may occur.
- This equipment has been tested and found to comply with the limits set out in the EMC Standards using a connection signal cable shorter than 3 meters.
Disposal of the OLED Monitor
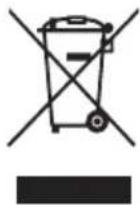
Disposal of old electrical & electronic equipment (applicable in the European Union and other countries with separate collection systems)
This symbol on the product or on its packaging indicates that this product shall not be treated as household waste. Instead it shall be handed over to the appropriate collection point for the recycling of electrical and electronic equipment. By ensuring that this product is disposed of correctly, you will help to prevent potential negative consequences for the environment and human health, which could be caused by inappropriate waste handling of this product. The recycling of materials will help to conserve natural resources. For more detailed information about recycling of this product, please contact your local Civic Office, your household waste disposal service or the shop where you purchased the product.
Installation/Set-up
• Install and use the OLED Monitor in accordance with the instructions below in order to avoid any risk of fire, electric shock or damage and/or injuries.
Installation
- The OLED Monitor should be installed near an easily accessible mains socket.
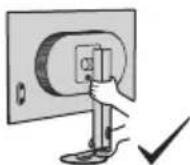
- Place the OLED Monitor on a stable, level surface to prevent it from falling over and causing personal injury or property damage.
• Install the OLED Monitor where it cannot be pulled, pushed, or knocked over. - Install the OLED Monitor so that the OLED Monitor's Table-Top Stand does not protrude out from the OLED Monitor stand (not supplied). If the Table-Top Stand protrudes out from the OLED Monitor stand, it may cause OLED Monitor to topple over, fall down, and cause personal injury or damage to the OLED Monitor.
Transporting
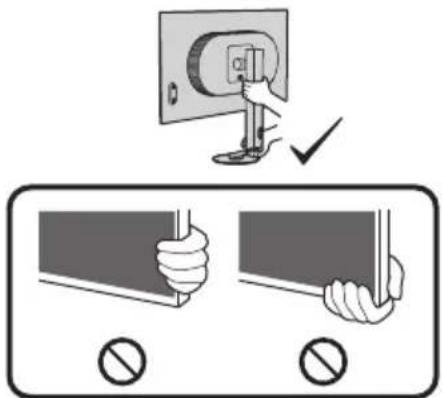
- Before transporting the OLED Monitor, disconnect all cables.
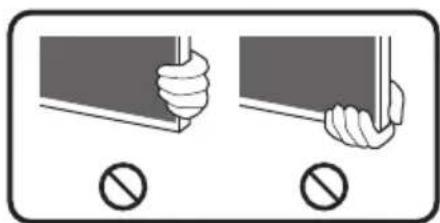
- When transporting the OLED Monitor by hand, hold it as shown below. Do not put stress on the OLED panel and the frame around the screen.
natural_image
Two hand gestures with a minus symbol, no text or labels present- When lifting or moving the OLED Monitor, hold it firmly from the bottom.
- When transporting the OLED Monitor, do not subject it to jolts or excessive vibration.
- When transporting the OLED Monitor for repairs or when moving, pack it using the original carton and packing material.
Installing the OLED Monitor to the Wall
This OLED Monitor's instruction manual only provides the steps to prepare the OLED Monitor for Wall-Mount installation before it is installed on the wall.
Your OLED Monitor can be mounted to a wall using a suitable Wall-Mount Bracket (not supplied). If the Table-Top Stand is attached to the OLED Monitor, the OLED Monitor may require detaching the Table-Top Stand.
Prepare the OLED Monitor for the Wall-Mount Bracket before making cable connections.
For product protection and safety reasons, Sony strongly recommends that installation of your OLED Monitor on the wall be performed by qualified professionals. Do not attempt to install it yourself.
- Follow the instruction guide provided with the Wall-Mount Bracket for your model. Sufficient expertise is required in installing this OLED Monitor, especially to determine the strength of the wall for withstanding the OLED Monitor's weight.
- The screws for installing the Wall-Mount Bracket to the OLED Monitor are not supplied.
- The length of the screw for Wall-Mount Bracket differs depending on the Wall-Mount Bracket thickness. Please refer to below illustration.
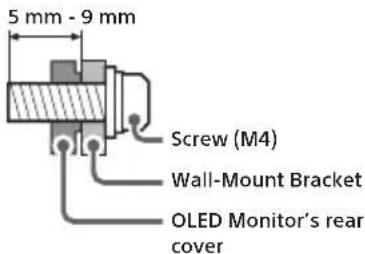
- Refer to the following table for the wall-mount hole pattern.

flowchart
graph TD
    a["a"] --> b["b"]
    a --> c1["•"]
    a --> c2["•"]
    b --> c3["•"]
    b --> c4["•"]
Specifications
System
Panel system OLED (Organic Light Emitting Diode) Panel
Input/Output jacks
HDMI IN 1/2 (HDMI 2.1, HDCP 2.3) (Stereo mini jack)
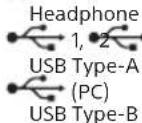
UPDATE (This terminal is for software update only.) DP
DisplayPort (Ver. 2.1) - C + 19.5 V Mains adaptor input
Power, Product Fiche and others
Power requirements 19.5 V DC with AC adapter Rating: Input 100 V – 240 V AC, 50/60 Hz Screen size (measured diagonally) (Approx.)
(cm/inches) 67.3 / 27 Display resolution (horizontal × vertical) (pixels) 2 560 × 1 440
Dimensions (Approx.) (w × h × d) (cm) with Table-Top Stand
60.4 × 50.4 × 19.7 without Table-Top Stand 60.4 × 35.0 × 5.8
Stand width (Approx.) (cm) 15.9
Mass (Approx.) (kg)
with Table-Top Stand
6.2
without Table-Top Stand
4.2
Others
Operating temperature
0^ - 40^
Operating humidity
10% - 80% RH (non-condensing)
Note
- Design and specifications are subject to change without notice.
- Some of the on-screen instructions may not apply to your OLED Monitor model.
- Product fiche in this manual is for COMMISSION DELEGATED REGULATION (EU) 1062/2010. Refer to its website for (EU) 2019/2013 information.
Product registration number
(COMMISSION DELEGATED
• The terms HDMI, HDMI High-Definition Multimedia Interface, and the HDMI Logo are trademarks or registered trademarks of HDMI Licensing Administrator, Inc.
- DisplayPort™, the DisplayPort™ logo, the DisplayHDR™ logo and the AdaptiveSync™ logo are trademarks owned by the Video Electronics Standards Association (VESA®) in the United States and other countries.
- © 2021 NVIDIA, the NVIDIA logo, and NVIDIA G-SYNC Compatible are trademarks and/or registered trademarks of NVIDIA Corporation in the U.S. and other countries.
Précautions :
Transport
Precauciones:
Transporte
natural_image
Two hand gestures holding a document, each with a prohibition symbol below (no text or labels)Transport
natural_image
Two hand gestures with a minus symbol below, no text or labels presentAfmetingen (ong.) (b × h × d) (cm)
met tafelstandaard
60,4 × 50,4 × 19,7
Transport
Precauções:
Transporte
natural_image
Two hand gestures holding a document, each with a prohibition symbol below (no text or labels)Precauzioni:
Trasporto
Transport
Forholdsregler:
Transport
Mål (Ca.) (b × h × d) (cm)
Varotoimenpiteet:
natural_image
Simple line drawing showing a computer monitor and a magnifying glass over a tray (no text or symbols)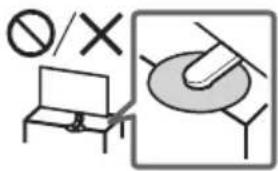
natural_image
Two hand gestures with a prohibition symbol below, no text or labels presentForholdsregler:
natural_image
Illustration showing a computer monitor on a desk and a magnifying glass with a circular object, no text or symbols present.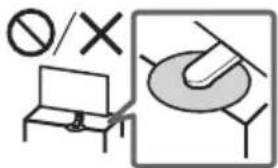
Bæring
natural_image
Two hand gestures with a minus sign, no text or symbols presentMål (ca.) (b × h × d) (cm)
med bordstativ
60,4×50,4×19,7
uten bordstativ
60,4×35,0×5,8
Stativbredde (ca.) (cm)
15,9
Vekt (ca.) (kg)
med bordstativ 6,2
uten bordstativ 4,2
Annet
natural_image
Two types of electrical plugs shown side by side, one with a plug and cable, the other with a terminal plug (no text or symbols)Środki ostrożności:
Transport
natural_image
Two hand gestures with a minus symbol below, no text or labels presentPanel OLED (Organic Light Emitting Diode)
Upozornění:
Přeprava
natural_image
Two hand gestures holding a document, each with a prohibition symbol below (no text or labels)Upozornenia:
Preprava
Óvintézkedések:
Szállítás
INFORMATIE IMPORTANTĂ
Transportul
natural_image
Two hand gestures with a minus symbol below, no text or labels presentПредпазни мерки:
Пренасяне
natural_image
Two hand gestures with a stop symbol below, no text or labels presentΠροφυλάξεις:
Μεταφορά
Ettevaatusabinõud:
natural_image
Illustration showing a computer monitor on a desk and a magnifying glass with a circular button, no text or symbols present.
Transportimine
natural_image
Two hand gestures with a minus sign, no text or symbols presentTransportēšana
natural_image
Illustration showing a computer monitor on a desk and a magnifying glass with a tool, no text or symbols present.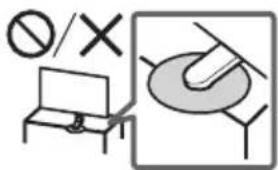
Gabenimas
natural_image
Two hand gestures holding a document, each with a prohibition symbol below (no text or labels)Mjere opreza:
Prijevoz
- Prilikom podizanja ili pomjeranja OLED monitora, čvrsto ga držite odozdo.
- Kada prenosite OLED monitor ne izlažite ga pretjeranim vibracijama ili potresima.
- Kada prevozite OLED monitor radi popravka ili selidbe, stavite ga u originalnu ambalažu i pakiranje.
Postavljanje OLED monitora na zid
Korisnički priručnik za ovaj OLED monitor navodi samo korake za pripremu OLED monitora za instaliranje na zid.
Previdnostni ukrepi:
Prenašanje
- Pri dvigovanju ali premikanju Monitor OLED trdno primite za dno.
- Med prenašanjem Monitorja OLED ne izpostavljajte udarcem ali premočnemu tresenju.
- Kadar Monitor OLED prevažate na popravilo ali pri selitvi, ga zapakirajte v originalno škatlo in embalažni material.
Vgradnja Monitorja OLED na steno
Ta navodila za uporabo za Monitor OLED kažejo samo korake za pripravo Monitorja OLED, preden ga vgradite na steno.
Prenošenje
- Pre prenošenja OLED monitora, odspojite sve kablove.
- Prilikom ručnog prenošenja OLED monitora, držite ga kako je prikazano ispod. Ne izlažite pritisku OLED panel i okvir oko ekrana.
- Prilikom podizanja ili pomeranja OLED monitora, čvrsto ga držite odozdo.
- Prilikom prenošenja OLED monitora, ne izlažite ga drmanju ili prekomernim vibracijama.
- Prilikom prenošenja OLED monitora zbog popravke ili prilikom preseljenja, zapakujte ga koristeći originalni karton i ambalažu za pakovanje.
Postavljanje OLED monitora na zid
Uputstvo za upotebu ovog OLED monitora sadrži samo korake za pripremu OLED monitora za montiranje na zid.
Vaš OLED monitor se može montirati na nosač za postavljanje na zid (nije isporučen). Ako je OLED monitor pričvršćen na postolje za sto, uklonite postolje za sto. Pre povezivanja kablova, pripremite OLED monitor za nosač za postavljanje na zid.
High-Definition Multimedia Interface
Video Electronics Standards Association
(VESA)
on NVIDIA G-SYNC Compatible-1
natural_image
Two hand gestures holding a document, each with a prohibition symbol below (no text or labels)בְרַעָה
תְבָרִי
תְבָרִי בְּשַׁה
:תְרָהִיַעֹן
.תְבָרִיַעֹלְהָם
• OLED - n is by OLED - n is by
תְבָרִיּוֹתָה
• OLEDA