Canvio AeroCast - External hard drive TOSHIBA - Free user manual and instructions
Find the device manual for free Canvio AeroCast TOSHIBA in PDF.
| Product Type | External wireless hard drive |
| Brand | Toshiba |
| Model | Canvio AeroCast |
| Storage Capacity | 1 TB (formatted NTFS) |
| Dimensions (W x D x H) | 121.4 x 86 x 24.4 mm |
| Weight | Approximately 280 g |
| Power Supply | AC adapter (5 V) or rechargeable internal battery |
| Battery Charging Time | Up to 3 hours |
| Battery Life | Up to 5 hours of continuous video streaming |
| Connectivity | USB 3.0, Wi-Fi 802.11 b/g/n (2.4 GHz) |
| Main Features | Wireless storage, media streaming, photo/video backup from SD card, Internet access in Bridge mode, Chromecast support |
| Mobile Apps | Free Toshiba Wireless HDD app for iOS and Android |
| Supported File Types | Video: mp4, m4v, mov; Music: mp3, m4a, aac, wav; Images: jpg, bmp, png, gif, tif; Documents: pdf, doc, docx, ppt, pptx, xls, xlsx, txt, rtf |
| User Profiles | 4 profiles (Standard, Owner 1, 2, 3) |
| SD Card Reader | Yes, supports SD/SDHC/SDXC Class 10 |
| Operating Temperature | 5 to 35 °C |
| Care and Cleaning | Use a soft, dry cloth; do not use chemicals |
| Safety | Protected Wi-Fi password, overload protection, important safety instructions (see manual) |
| Spare Parts and Repairability | Do not disassemble; contact the reseller for repairs |
| General Information | CE compliant, compatible with Windows, Mac, Android and iOS |
Frequently Asked Questions - Canvio AeroCast TOSHIBA
User questions about Canvio AeroCast TOSHIBA
0 question about this device. Answer the ones you know or ask your own.
Ask a new question about this device
Download the instructions for your External hard drive in PDF format for free! Find your manual Canvio AeroCast - TOSHIBA and take your electronic device back in hand. On this page are published all the documents necessary for the use of your device. Canvio AeroCast by TOSHIBA.
USER MANUAL Canvio AeroCast TOSHIBA
Please be sure to change the default password immediately upon first usage of the product. To set your unique password please refers to this user manual and FAQs on your applicable regional support site. The default password is automatically set upon shipping of the product. Even if the default password is changed to your unique password, your unique password may be reset to a default password in the following situations:
- When the user resets the product by using the associated App or by depressing the Reset button to accomplish a reset.
- When the option "Enable factory default after firmware upgrade" is selected and the user updates the firmware.
Regulatory statements
CE Compliance

This product is CE marked in accordance with the requirements of the applicable EU Directives. Responsible for CE marking is Toshiba Electronics Europe GmbH, Hansaallee 181, 40549 Düsseldorf, Germany.
Working Environment
The Electromagnetic Compliance (EMC) of this product has been verified typically for this product category for a so called Residential, Commercial & Light Industry Environment. Any other working environment has not been verified by Toshiba and the use of this product in these working environments is maybe restricted or cannot be recommended. Possible consequences of the use of this product in non verified working environments can be: Disturbances of other products or of this product in the nearby surrounding area with temporarily malfunction or data loss/corruption as result. Example of non verified working environments and related advices:
Industrial environment (e.g. where 3-phase 380V mains is being used mainly): Danger of disturbances of this product due to possible strong electromagnetic fields especially near to big machinery or power units.
■ Medical environment: The compliance to the Medical Product Directive has not been verified by Toshiba, therefore this product cannot be used as a medical product without further verification. The use in usual office environments e.g. in hospitals should be no problem if there is no restriction by the responsible administration.
■ Automotive environment: Please search the owner instructions of the related vehicle for advices regarding the use of this product (category).
Aviation environment: Please follow the instructions of the flight personnel regarding restrictions of use.
Additional Environments not Related to EMC
- Explosive atmosphere: The use of this product in such special working environment (Ex) is not allowed.
Following information is only valid for EU-member States:
REACH - Compliance Statement
The new European Union (EU) chemical regulation, REACH (Registration, Evaluation, Authorization and Restriction of Chemicals), entered into force on 1 June 2007.
Toshiba will meet all REACH requirements and is committed to provide our customers with information about the chemical substances in our products according to REACH regulation.
Disposal of products
The use of the symbol indicates that this product may not be treated as household waste. By ensuring this product is disposed of correctly, you will help prevent potential negative consequences for the environment and human health, which could otherwise be caused by inappropriate waste handling of this product.
For more detailed information about recycling of this product, please contact your local city office, your household waste disposal service or the shop where you purchased the product.
Disposal of batteries and/or accumulators
The crossed out wheeled dust bin symbol indicates that batteries and/or accumulators must be collected and disposed of separately from household waste. By participating in separate collection of batteries, you will help to assure the proper disposal of products and thus help to prevent potential negative consequences for the environment and human health. For more detailed information about the collection and recycling programs available in your country, please contact your local city office or the shop where you purchased the product.
The following information is valid only for Turkey:
Compliant with AEEE Regulation.
Safety icons
This manual contains safety instructions that must be observed to avoid potential hazards that could result in personal injuries, damage to your equipment, or loss of data. These safety cautions have been classified according to the seriousness of the risk, and icons highlight these instructions as follows:
| Signal Words Meaning | |
| [BKYD] DANGER | Indicates an imminently hazardous situation which, if not avoided, will result in death or serious injury. |
 WARNING WARNING | Indicates a potentially hazardous situation which, if not avoided, could result in death or serious injury. |
| [W3DD] CAUTION | Indicate a potentially hazardous situation which, if not avoided, could result in minor or moderate injury. |
 | Indicates practices that may cause property damage and other problems, but not personal injury. |
 | Provides important information. |
| *Serious injury including blindness, wounds, burns (low and high temperature), electric shock, fractures, and poisoning, etc. with long-lasting effects or that require hospitalization and/or long-term hospital visits for treatment.*Minor or moderate injury includes wounds, burns, electric shock, etc. not requiring hospitalization and/or long-term hospital visits for treatment.*Property damage means damage to drive. | |
*Serious injury including blindness, wounds, burns (low and high temperature), electric shock, fractures, and poisoning, etc. with long-lasting effects or that require hospitalization and/or long-term hospital visits for treatment.
*Minor or moderate injury includes wounds, burns, electric shock, etc. not requiring hospitalization and/or long-term hospital visits for treatment.
*Property damage means damage to drive.
Other icons used
Additional icons highlight other helpful or educational information:
 | TECHNICAL NOTE: This icon indicates technical information about the device. |
 | HINT: This icon indicates helpful hints and tips. |
 | DEFINITION: This icon indicates the definition of a term used in the text. |
Battery safety precautions
| DANGER | Do not immerse the device (with the internal battery in it) in liquid such as water, beverages, or other fluids.The battery (including protection circuit) may catch on fire, smoke, explode, or cause heat generation by unexpected electrical load. |
| DANGER | Keep the device (with the internal battery in it) away from heat and fire.Heat will damage the battery and may cause it to generate heat, smoke, catch fire, or explode. |
| DANGER | Do not disassemble the device and the internal battery.Disassembly or modification of the battery may damage the protection circuit. This may cause the battery to generate heat, smoke, catch fire, or explode. |
| WARNING | Keep the product away from small children. If the product is broken or has cracks, keep the battery and any of its component parts away from small children.If the battery liquid or any of its component parts are swallowed, seek medical attention immediately. |
| WARNING | Stop charging if the charging process cannot be finished.If the battery can not finish the charging process within the specified time, halt the charging process. The battery may generate heat, smoke, catch fire, or explode. |
| WARNING | This drive has a rechargeable battery inside. Do not throw away used batteries as home rubbish.Please bring them to a recycle agency or put in a recycle box for portable rechargeable batteries. If used batteries are thrown away as home rubbish, there is a possibility that they may cause the rubbish collection to catch fire or smoke. |
| WARNING | Always immediately turn the power off and disconnect the power cable/cord plug from the plug socket and stop using the battery if you observe any of the following conditions: Offensive or unusual odor/Excessive heat/Discoloration/Deformation, crack, or leaks/Smoke/Other unusual event during use, such as abnormal sound. Do not turn on the drive's power again. Continued use could cause a fire or rupture possibly resulting in serious injury or drive failure including but not limited to the loss of data. |
| WARNING | If the drive is leaking or its case is cracked, put on protective gloves to handle it. |
| ⚠️ CAUTION | Only charge the battery in temperatures between 5°C and 35°C. Charging outside of this temperature range may cause the battery to leak, generate heat, or result in serious damage. It may also cause the battery’s performance and life to deteriorate. |
| ⚠️ CAUTION | Actual battery life may vary depending on settings, application usage, features or tasks selected, network configuration, operating temperature and many other factors. Recharge time varies depending on usage. The battery may not charge while the drive is consuming full power. After a period of time, the battery will lose its ability to perform at maximum capacity. This is normal for all batteries. |
Power and other Safety Precautions
| WARNING | Do not leave parts such as plastic covers and the electric plug within reach of children and pets. Misuse of parts including, but not restricted to, accidental swallowing may cause choking and suffocation resulting in death or serious injury. If you suspect a part has been swallowed, immediately take appropriate emergency action and consult a doctor. |
| WARNING | Do not place the drive on a shaky table, uneven, tilted surface or other unstable location. The drive may fall, causing damage to the drive or possibly injury. |
| WARNING | Do not carry out improper maintenance or disassemble, as this may cause personal injury or may result in electric shock or fire. |
| WARNING | Do not expose the drive to wet or damp conditions, as it may result in electric shock or fire. |
| WARNING | Do not allow any liquids or metal objects such as screws, staples or paper clips to enter the drive. Foreign objects may create a short circuit, which may cause product damage and fire, possibly resulting in serious injury. |
| WARNING | Do not use the drive when the metal parts and plastic parts exhibit abnormal characteristics, as this may result in electric shock. |
| WARNING | Do not use the drive if it has been dropped or damaged, as this may result in electric shock. |
| WARNING | If the Product produces an odor, overheats or smokes, immediately turn off the drive and disconnect the power cord from the outlet and disconnect the USB cable from the device. Failure to do so may result in fire, damage to the drive and/or personal injury including burns and electric shock. Do not use the drive again. Please contact the store from which you purchased it. |
| WARNING | Do not plug the AC adaptor into a power source that does not correspond to the voltage, current and the frequency specified on the regulatory label of the unit. An overload on the socket and/or AC adaptor may cause a fire or electric shock, possibly resulting in serious injury. |
| WARNING | Do not pull on the power cable/cord to remove a plug from a socket. Always grasp the plug directly. Pulling a power cable/cord may cause fracture resulting in a fire or electric shock and serious injury. |
| WARNING | Always confirm that the power plug has been fully inserted into the socket, to ensure a secure electrical connection. An overload on the socket may cause a fire or electric shock, possibly resulting in serious injury. |
| WARNING | Always make sure the drive and AC adaptor have adequate ventilation and are protected from overheating when the AC adaptor is connected to a power outlet. Inadequate ventilation may cause the drive and AC adaptor to overheat resulting in a fire or electric shock and serious injury. |
| WARNING | If dust gets on the power plug connectors or connector base, turn the power off and disconnect the power plug. Then clean the connector and/or connector base with a dry soft cloth. Failure to do so may cause a fire or electric shock, possibly resulting in serious injury. |
| WARNING | Avoid extended contact between the drive and your skin. The drive may become hot! Avoid prolonged contact to prevent skin irritation and/or heat injury. |
| WARNING | Avoid extended contact between the AC adaptor and your skin. The AC adaptor may become hot! Avoid prolonged contact to prevent skin irritation and/or heat injury. |
| NOTICE | Do not disconnect the USB cable and AC adaptor while operating, as this may result in loss of data or damage to the drive. |
| NOTICE | Do not touch the USB cable while and AC adaptor operating, as this may result in loss of data or damage to the drive. |
| NOTICE | Do not bump, drop or jar the drive, as this may result in loss of data or damage to the drive. |
| NOTICE | Do not use the drive at high or low temperatures or when the temperature changes suddenly. This may result in loss of data or damage to the drive. (Operating: 5°C - 35°C) |
| NOTICE | Make sure that you backup as much data on the drive as you can to the other storage drive. |
| NOTICE | Do not use the drive when dew condensation is present, as this may result in loss of data or damage to the drive. |
| NOTICE | Do not cover the drive during operating, as it may become overheated. |
| NOTICE | Do not use the drive during a thunderstorm. If you see lightning or hear thunder, immediately turn off the devices to which this drive is connected, computer and peripherals, and disconnect the power cord from the outlet, and disconnect the USB cable from the computer. An electric surge caused by the lightning may result in loss of data or damage to the drive. |
| NOTICE | Do not clean the drive or any accessories with any chemicals. To clean the outside of the drive or the accessories, use a dry soft cloth. Use of chemicals may result in deterioration, deformation or discoloration of those items and the loss of data. |
| NOTE | Compatibility may vary depending on user's hardware configuration and operating system. |
| NOTE | USB 3.0 is backward compatible with USB 2.0. |
| NOTE | If the drive is not provided with enough power, it will not operate. |
| NOTE | You may need a USB 3.0 Express Card Host Controller for your computer if the computer doesn't have a USB 3.0 port. You can also connect the drive to your computer's USB 2.0 port. However the transfer rate will be downgraded to that of USB2.0. |
| NOTE | One Gigabyte (1GB) means 10^9 = 1,000,000,000 bytes and one Terabyte (1TB) means 10^12 = 1,000,000,000,000 bytes using power of 10. A computer operating system, however, reports storage capacity using powers of 2 for the definition of 1GB = 2^30 = 1,073,741,824 bytes and 1TB = 2^40 = 1,099,511,627,776 bytes, and therefore shows less storage capacity. Available storage capacity (including examples of various media files) will vary based on file size, formatting, setting, software and operating system as well as other factors. |
| NOTE | Use only the accessories supplied by the manufacturer. |
| NOTE | This drive needs the power supply from AC adaptor supplied by the manufacturer. |
| NOTE | Product specifications are subject to change without notice. |
Safety information and Rules and Regulations for wireless LAN
| CAUTION | Wireless LAN devices may cause interference with medical equipment such as cardiac pacemakers. If you use personal medical equipment, consult with your physician and medical equipment instructions before using the Product. The Product should not be used in environments with medical equipment such as hospitals and medical offices, or near users of personal medical equipment, as use of this Product may cause injury in such environments. |
| CAUTION | Always turn off wireless functionality if the computer is near automatic control equipment or appliances such as automatic doors or fire detectors. Radio waves can cause malfunction of such equipment, possibly resulting in injury. |
| NOTE | Do not use the Wireless LAN functionality near a microwave oven or in areas subject to radio interference or magnetic fields. Interference from a microwave oven or other source can disrupt Wireless LAN operation. |
| NOTE | The transmission speed over the wireless LAN, and the distance over which the wireless LAN can reach, may vary depending on surrounding electromagnetic environment, obstacles, access point design and configuration, client design and software/hardware configurations. The transmission rate described is the theoretical maximum speed as specified under the appropriate standard – the actual transmission speed will be lower than the theoretical maximum speed. |
Immunity from responsibility
■ Toshiba is not responsible for data corruption or data loss. (Toshiba will neither carry out any data recovery nor cover any data recovery costs.)
■ Toshiba is not responsible for any damage due to the failure or negligence of users, fire, earthquake, or other accident beyond the control of Toshiba.
Toshiba is not responsible under any circumstances if you do not follow the guidelines given in the user's manual.
■ Toshiba is not responsible under any circumstances for misuse of the connection apparatus and software.
This product support is available only in the country where the Product was originally purchased.
Usage restrictions
This drive is used in standard applications such as office work, personal drive and household appliances. Toshiba Corporation shall not be liable except for this type of use. Do not use for special purposes (atomic controls, aeronautic or space systems, mass transport vehicle operating controls, medical devices for life support, or weapons firing controls) where particularly high reliability requirements exist, where the pertinent levels of safety are not guaranteed, or where a failure or operational error could threaten a life or cause a physical injury.
Notice
The information contained in this manual, including but not limited to any product specifications, is subject to change without notice.
TOSHIBA ELECTRONICS EUROPE GMBH PROVIDES NO WARRANTY WITH REGARD TO THIS MANUAL OR ANY OTHER INFORMATION CONTAINED HEREIN AND HEREBY EXPRESSLY DISCLAIMS ANY IMPLIED WARRANTIES OF MERCHANTABILITY OR FITNESS FOR ANY PARTICULAR PURPOSE WITH REGARD TO ANY OF THE FOREGOING. TOSHIBA ASSUMES NO LIABILITY FOR ANY DAMAGES INCURRED DIRECTLY OR INDIRECTLY FROM ANY TECHNICAL OR TYPOGRAPHICAL ERRORS OR OMISSIONS CONTAINED HEREIN OR FOR DISCREPANCIES BETWEEN THE PRODUCT AND THE MANUAL. IN NO EVENT SHALL TOSHIBA BE LIABLE FOR ANY INCIDENTAL, CONSEQUENTIAL, SPECIAL, OR EXEMPLARY DAMAGES, WHETHER BASED ON TORT, CONTRACT OR OTHERWISE, ARISING OUT OF OR IN CONNECTION WITH THIS MANUAL OR ANY OTHER INFORMATION CONTAINED HEREIN OR THE USE THEREOF.
GNU General Public License ("GPL")
Firmware incorporated into this product may include third party copyrighted software licensed under the GPL or Lesser General Public License (“LGPL”) (collectively, “GPL Software”) and not Toshiba’s End User License Agreement. A copy of that license may be obtained at http://www.gnu.org, and www.toshiba.eu/externalstorage/support. With respect solely to the GPL Software, no warranty is provided, to the extent permitted by applicable law. Modification of or tampering with the Software is solely at your own risk and will void the product warranty. Toshiba is not responsible for any such modification or tampering. Toshiba will not support any product in which you have or have attempted to modify the Software supplied by Toshiba.
Copyright
This manual may not be reproduced in any form without the prior written permission of Toshiba. No liability is assumed with respect to the use of the information contained herein.
© 2018 TOSHIBA Electronics Europe GmbH. All rights reserved.
Trademarks
The Toshiba name and its logos are registered trademarks of Toshiba.
Android, Google Play, and Chromecast, are trademarks of Google, Inc.
Mac, Mac OS, OSX, iPad, iPhone and Time Machine are trademarks of Apple Inc., registered in the U.S. and other countries. App Store is a service mark of Apple Inc.
IOS is a trademark or registered trademark of Cisco in the U.S. and other countries and is used under license.
App Store is a service mark of Apple Inc.
DLNA is a trademark or a registered trademark of the Digital Living Network Alliance.
Wi-Fi ^® is a registered trademark of the Wi-Fi Alliance ^® .
Windows is either a registered trademark or a trademark of Microsoft Corporation in the United States and/or other countries.
All other brand and product names are trademarks or registered trademarks of their respective companies.
Table of Contents
Introduction....14
Overview 14
Components 14
Features 14
Hardware specifications .... 14
Software specifications....15
Chapter 1 Getting Started .... 16
Charging the Canvio AeroCast Wireless Hard Drive. 16
Connect to Canvio AeroCast....17
Connect via USB....17
Connect wirelessly 18
Chapter 2 Canvio AeroCast Wireless Hard Drive Software Utility. . . . . . . . . . . . . . . . . . . . . . 20
System login 20
Connect wirelessly to a PC/Mac 20
Client login for iPhone or iPad 21
Client login for Android™ 22
Main interface 22
Application main interface....23
Pictures Management interface....25
Picture Viewer interface 27
Videos Management interface....28
Video Playback interface (iPhone, iPad, and Android™ device only) 30
Music Management interface 32
Music Player interface (iPhone, iPad, and Android™ device only) 34
Documents Management interface 36
Document Viewer interface (iPhone, iPad, and Android™ device only) 38
File/Folder Management interface....39
Transferring files 41
Chapter 3 Backup Management....42
Using the Backup Management feature 42
Manual backup 42
Automatic backup 43
Chapter 4 Settings Management.... 44
Wireless LAN settings 44
Operation. 45
Information 46
User symbol and name 47
Internet settings 48
Internet connection in Bridge Mode 48
Internet connection via your Chromecast™ device....51
Language 55
Cache 55
OSS info 56
TOSHIBA Support 56
Index. 57
Introduction
Overview
The Toshiba Canvio AeroCast Wireless Hard Drive allows you to wirelessly access your music, videos, pictures, and data. You can stream files to your iPad, iPhone, tablet, smartphone, and notebook, without worrying about tangled cables or wires. With 1 terabyte of storage space, you have plenty of room to transfer your files over from your mobile devices. The built-in USB 3.0 port makes file transfer even faster.
Components
The Canvio AeroCast Wireless Hard Drive includes the following components:
AC adaptor
USB 3.0 cable
Quick Start guide
Features
■ Built-in 1 TB HDD storage with NTFS format.
■ Connect wirelessly or using the included USB 3.0 cable.
■ Access and stream your music, videos, pictures and data using the free Toshiba Wireless HDD app supporting iPhone, iPad, and Android™ operating systems.
■ Up to 5 Hours of continuous battery life in video streaming condition. Battery life may differ depending on user conditions.
■ Four user profiles available to help keep your files organized.
■ Access the Internet via wireless, supporting 802.11 b/g/n.
■ Supports SD/SDHC/SDXC memory card, Class 10 compatible. Please check "Toshiba Wireless HDD" app site for SDXC supporting version.
Hardware specifications
| Product dimension: 121.4mm (L) x 86mm (W) x 24.4mm (H)[4.8 in (L) x 3.4 in (W) x 1.0 in (H)] | ||
| Weight: Approx. 280g (9.9 oz) | ||
| Battery: Charging time: 3 hours maximum | ||
| Environmental requirements: | ||
| Wireless LAN | ||
| Standard: 802.11 b/g/n | ||
| Frequency: 2.4 GHz | ||
| Speed: 1T1R up to 150Mbps | ||
| Temperature | ||
| Operating: 5 to 35° C (41 to 95° F) | ||
| Storage: -20 to 40° C (-4 to 104° F) | ||
| Humidity | ||
| Operating: 20-80% | ||
| Storage: 8-90% | ||
Software specifications
| Compatible File Types: | |
| Videos: mp4, m4v, mov | |
| Music: mp3, m4a, aac, wav | |
| Pictures: jpg, bmp, png, gif, tif | |
| Documents: pdf, doc, docx, ppt, pptx, xls, xlsx, txt, rtf | |
| System requirements: | |
| Operating System | |
| Windows®: | Windows® 7 (32bit & 64bit), Windows® 8.1 (32bit & 64bit) |
| OS X : OS X v10.7, v10.8 | |
| iPhone or iPad operating system: | Support for AndroidTM and iOS smartphones or tablets. Please check “Wireless HDD for Toshiba” app site for supported versions. |
| AndroidTM: | |
NOTE
This drive is formatted in NTFS for Windows®. In case for use with both Windows® PC and Mac, by installing “Tuxera NTFS for Mac” on Mac, user can read and write data to both Windows® PC and Mac. But in this case, user cannot use the Time Machine function of OS X.
Chapter 1
Getting Started
Charging the Canvio AeroCast Wireless Hard Drive
To get started using the Canvio AeroCast, ensure that your device is charged. The Canvio AeroCast Wireless Hard Drive can be charged via the AC adaptor and USB cable.
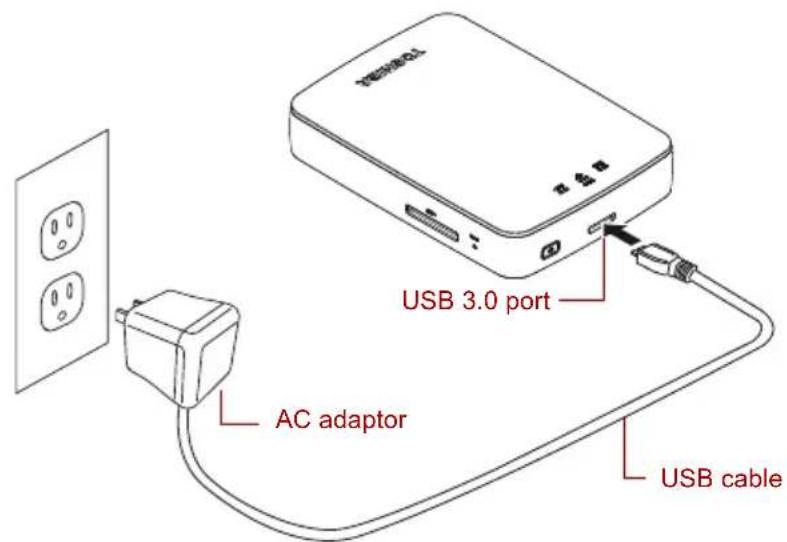
(Sample Illustration) Canvio AeroCast Wireless Hard Drive charging
To charge the Canvio AeroCast Wireless Hard Drive:
- Attach the USB cable to the AC adaptor.
- Plug the USB cable into the USB 3.0 Host port on the Canvio AeroCast Wireless Hard Drive.
- Plug the AC adaptor into a live electrical wall outlet.
While charging, the battery indicator light will blink slowly (interval time is 2 seconds).
Connect to Canvio AeroCast
You can connect to the Canvio AeroCast Wireless Hard Drive directly with the included USB cable (Direct-Attached Storage mode) or connect wirelessly (Wireless LAN mode).
Connect via USB
To operate via USB, connect the Canvio AeroCast Wireless Hard Drive to the computer's USB port using the included USB cable.
For Mac users:
To write files via USB, you will need to install the "NTFS driver for Mac" to your Mac. Refer the pre-loaded manual stored on the Canvio AeroCast Wireless Hard Drive.
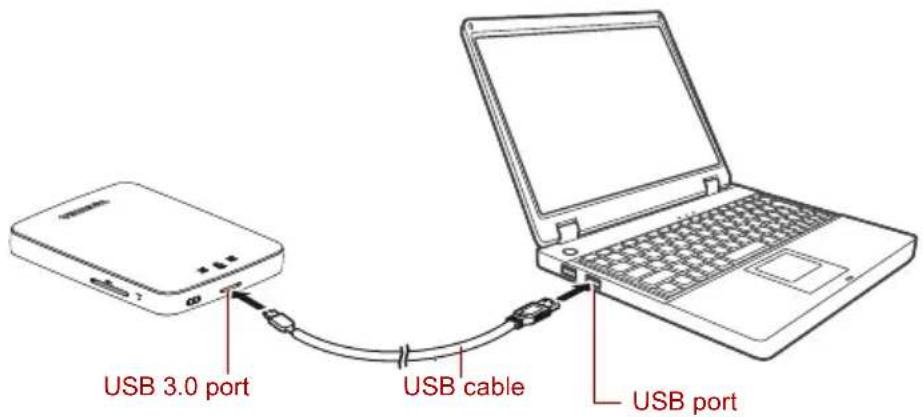
(Sample Illustration) Connect via USB
To connect the Canvio AeroCast to your computer:
- Make sure the Canvio AeroCast Wireless Hard Drive is powered OFF.
- Connect the included USB 3.0 cable to the Canvio AeroCast Wireless Hard Drive.
- Connect the other end of the USB 3.0 cable to your computer's USB port.
You can now begin transferring data to and from the product.
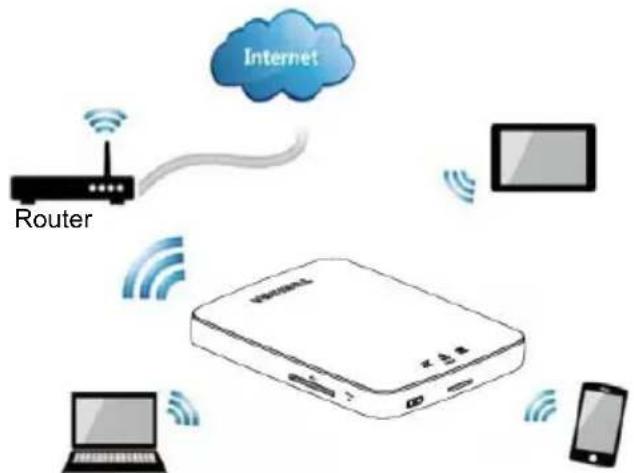
Connect wirelessly
You can access the Canvio AeroCast Wireless Hard Drive wirelessly from Windows ^® , Mac, iPhone, iPad, Android ^™ mobile devices and DLNA ^® devices (Please check “Toshiba Wireless HDD” app site for DLNA ^® supporting version.) by connecting to Canvio AeroCast.
flowchart
graph TD
    A["Router"] -->|Wireless Signal| B["Internet"]
    B --> C["Monitor"]
    C --> D["Laptop"]
    D --> E["Smartphone"]
    style A fill:#f9f,stroke:#333
    style B fill:#ccf,stroke:#333
    style C fill:#cfc,stroke:#333
    style D fill:#fcc,stroke:#333
    style E fill:#cff,stroke:#333
(Sample Image) Wireless LAN mode
The Canvio AeroCast Wireless Hard Drive automatically functions in Wireless LAN mode once the connection has been set up, see “Connect wirelessly to a PC/Mac” on page 20.
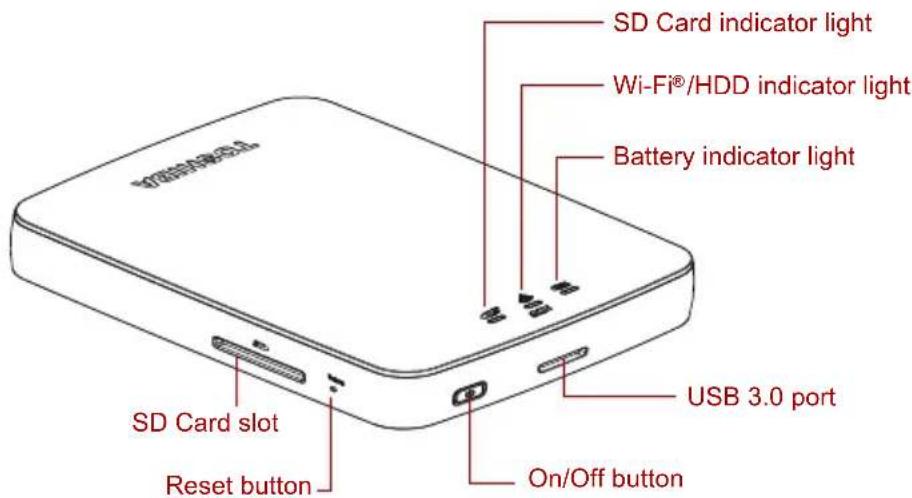
(Sample Illustration) Ports, buttons, and indicators
SD Card Slot:
■ Supports SD/ SDHC/ SDXC memory card, Class 10 compatible. Please check "Toshiba Wireless HDD" app site for SDXC supporting version.
In Wireless LAN mode, you can access the SD Card.
Reset button:
In Wireless LAN mode, press and hold for 5 seconds. The system will restore to its factory settings.
On/Off button:
■ Press and hold for 2 seconds: Wireless LAN mode turns ON.
■ Press and hold for 2 seconds again: Wireless LAN mode turns OFF.
NOTE
If the battery is too low, you cannot turn the Canvio AeroCast Wireless Hard Drive ON. The battery indicator will blink Orange for 6 seconds, and then turn off.
USB 3.0 port:
■ Compatible with USB 3.0 and USB 2.0.
- Allows for data transfer between a computer and the Canvio AeroCast Wireless Hard Drive, when connected.
- Allows you to charge the product battery when connected to the AC adaptor.
Battery Indicator light:
Green: 30% or more available battery power.
■ Yellow: 10%-30% remaining battery power.
Orange (blinking fast): the product is out of battery power or the operating temperature is too high. the product will shut down after 30 seconds.
■ Green or Yellow (blinking slowly): The battery is charging.
■ Green (Not blinking): Finish charging
■ Green or Yellow (blinking fast): The product is shutting down or turning ON.
■ LED Off: The device is powered OFF.
Wireless LAN/HDD indicator:
Wireless LAN Mode
Blue: Wireless LAN is ON (no data access).
Blue (blinking): Wireless LAN is ON (storage access available).
Blue (turned off): Wireless LAN is OFF.
USB Mode
■ White: No data access.
■ White (blinking): Data access available.
- White (turned off): The device is in Sleep or Standby mode. It is safe to disconnect the device.
SD Card indicator:
■ Only glows in Wireless LAN Mode
■ Violet: No SD Card access.
■ Violet (blinking): SD Card access available.
■ Violet (turned off): SD Card is in Standby.
Chapter 2
Canvio AeroCast Wireless Hard Drive Software Utility
System login
Connect wirelessly to a PC/Mac
- Press the ON/OFF button to power on the system.
-
Once the Wi-Fi ^® indicator light stops blinking, enable the Wireless LAN feature on your PC/Mac and open the Wireless Network connection.
-
Select the Toshiba whdd xxxx wireless connection (where xxxx is a 4-digit number generated by your Canvio AeroCast Wireless Hard Drive (default wireless SSID: Toshiba whdd xxxx), and then enter the default password 12345678.
Please be sure to change the default password immediately upon first usage of the product.
- The Canvio AeroCast Wireless Hard Drive can now be accessed as a network-attached device.
File copy wirelessly to PC
You can wirelessly transfer files to the Canvio AeroCast Wireless Hard Drive to a PC once the drive has been mapped.
- To map the drive on your PC, click or touch Computer, and then Map Network Drive.
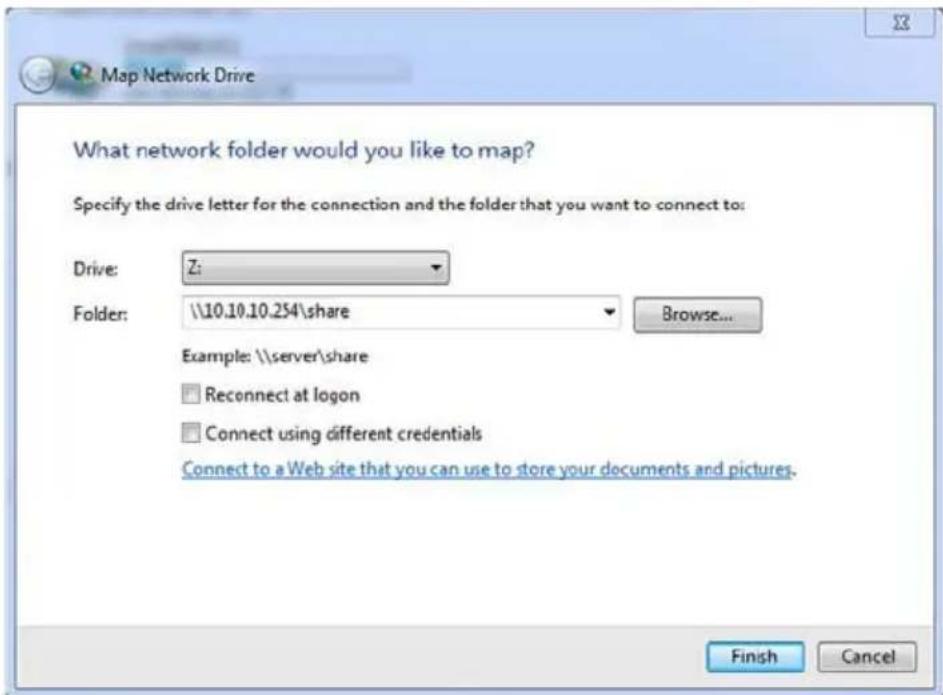
(Sample Image) Map Network Drive screen
-
Select a letter from the "Drive" drop down menu.
-
In the "Folder" field, type \10.10.10.254\share, and then click or touch Finish.
You should now be able to see your Canvio AeroCast Wireless Hard Drive on your PC's "My Computer" screen.
File copy wirelessly to Mac
On a Mac, the Canvio AeroCast Wireless Hard Drive automatically displays as a network drive. You can transfer files by simply dragging and dropping them to the desired location.
For faster file transfer use a USB cable. For more information, see "Connect via USB" on page 17.
Client login for iPhone or iPad
Install the app for iPhone and iPad
- In the App Store, search for and locate the Toshiba Wireless HDD app.
- Install the Toshiba Wireless HDD app and follow the on-screen installation instructions.
- The Toshiba Wireless HDD icon appears on the Desktop once the installation process is complete.
Connecting wirelessly to an iPhone or iPad
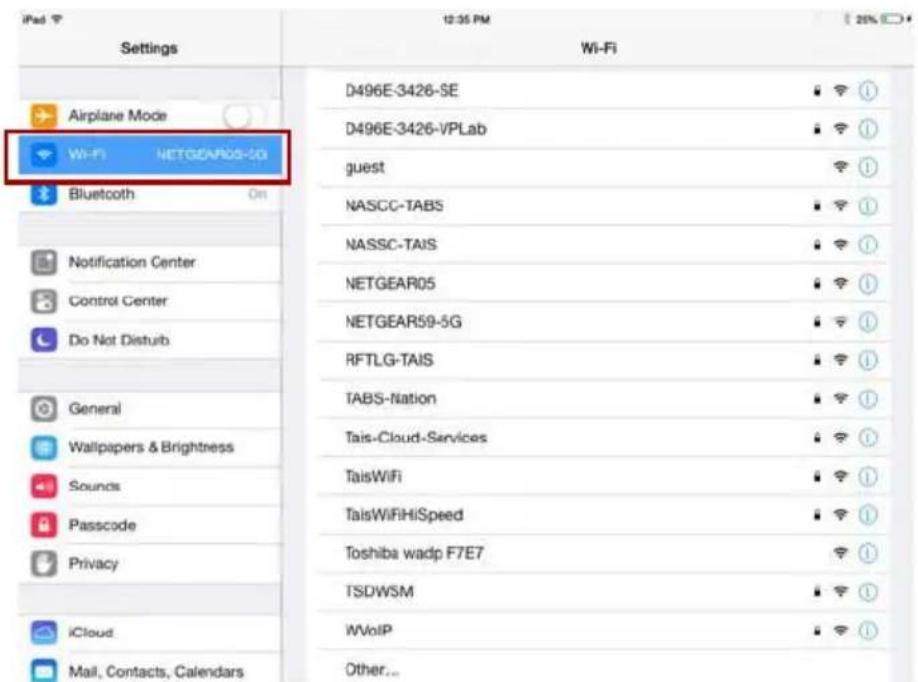
- Press the ON/OFF button to power ON the Canvio AeroCast. Wait for the Wi-Fi® indicator light to stop blinking.
- On your iPad/iPhone, click or touch Setting, and then Wi-Fi.
- Select Toshiba whdd xxxx (where xxxx is a 4-digit number generated by your Canvio AeroCast device).
- Enter the default password 12345678.
Please be sure to change the default password immediately upon first usage of the product.
Application login
Run the "Toshiba Wireless HDD" app.
Client login for Android™
Install Android™ app
- In the Google Play™, search for and locate the Toshiba Wireless HDD app.
- Install the Toshiba Wireless HDD app and follow the on-screen installation instructions.
- The Toshiba Canvio AeroCast icon appears on the Desktop once the installation process is complete.
Connecting wirelessly to an Android™ device
- Press the ON/OFF button to power ON the Canvio AeroCast. Wait for the Wi-Fi® indicator light to stop blinking.
- Once the Wi-Fi ^® indicator light stops blinking, click or touch Setting, and then the Wireless LAN option in your tablet or smartphone.
- Select Toshiba whdd xxxx (where xxxx is a 4-digit number generated by your Canvio AeroCast device).
- Enter the default password 12345678.
Please be sure to change the default password immediately upon first usage of the product.
Application login
Run the "Toshiba Wireless HDD" app.
Main interface
When displaying the main interface screen, the application may inform you that an update is available. The following 3 options are available:
■ OK (enables the update process; recommended)
- Cancel (cancels the update process)
Do not prompt (discontinues future notifications; not recommended)
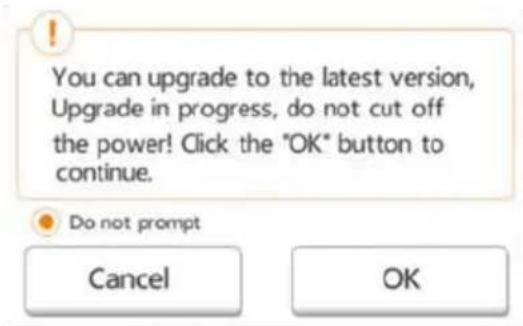
(Sample Image) Firmware update screen
If you select OK to update, the system will inform you to wait 5mins.
The system is being upgraded. Please wait 5 minutes. Remaining (#n) seconds ... After the upgrade is successful, please reconnect the device Wi-Fi.
(Sample Image) Firmware update - wait 5 minutes screen
If you select Cancel, you may be informed of any available upgrades the next time you login and enter the main interface.
If you select Do not prompt, the application will never again automatically inform you of a firmware upgrade, however, you can manually upgrade the firmware in the Setting screen.
Application main interface
Below are examples of the Toshiba Wireless HDD main screen viewed in the iPhone, iPad, or Android™ app.
Tablets/iPads
Smartphones/iPhones
(Sample Image) Main interface screen - app
Main interface functionality
Below is a description of each button/icon and its function within the main interface:
| Button/Icon Function | ||
 | Pictures | Displays the Pictures Management screen. |
 | Videos | Displays the Videos Management screen |
 | Documents | Displays the Documents Management screen. |
 | Music | Displays the Music Management screen. |
 | File/Folder | Displays the File/Folder Management screen. |
 | Backup | Displays the Backup Management screen.(iPhone, iPad, and AndroidTM devices only.) See “Backup Management” on page 42. |
 | Click or touch to select a ChromecastTM device.(Only available when a ChromecastTM device is available.) See “Internet connection via your ChromecastTM device” on page 51. | |
 | Click or touch to disconnect a ChromecastTM device. (Only available when a ChromecastTM device is connected.) | |
 | Click or touch the HDD button to switch to the Canvio AeroCast internal HDD storage. | |
 | Click or touch the SD Card button to display the SD Card pop up menu functions. The available functions are “Detect SD Card” and “Unmount SD Card.” | |
 | Click or touch the Local button to switch to the local device.(iPhone, iPad, or AndroidTM devices only.) | |
 | The SD Card is available. | |
 | The SD Card is not available. Click or touch to display the SD Card pop up menu functions. The available functions are “Detect SD Card” and “Unmount SD Card.” | |
 | Internet connection is available. Click or touch to display Internet Setting screen. | |
 | No Internet connection is available. Click or touch to display Internet Setting screen. | |
| Button/Icon Function | |
 | Displays the current battery level of the Canvio AeroCast Wireless Hard Drive. |
 | Click or touch the Settings button to enter the Canvio AeroCast Wireless Hard Drive system settings. |
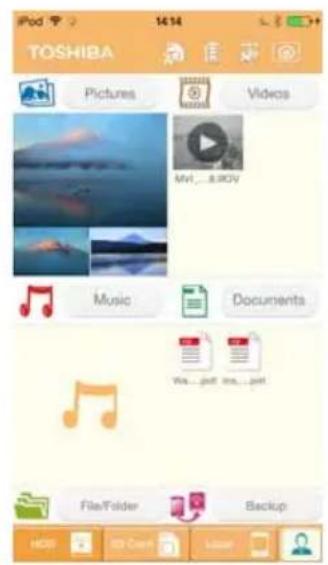
Pictures Management interface
NOTE
Before using this feature, content should be transferred to the Canvio AeroCast Wireless Hard Drive via USB connection, see "Connect via USB" on page 17.
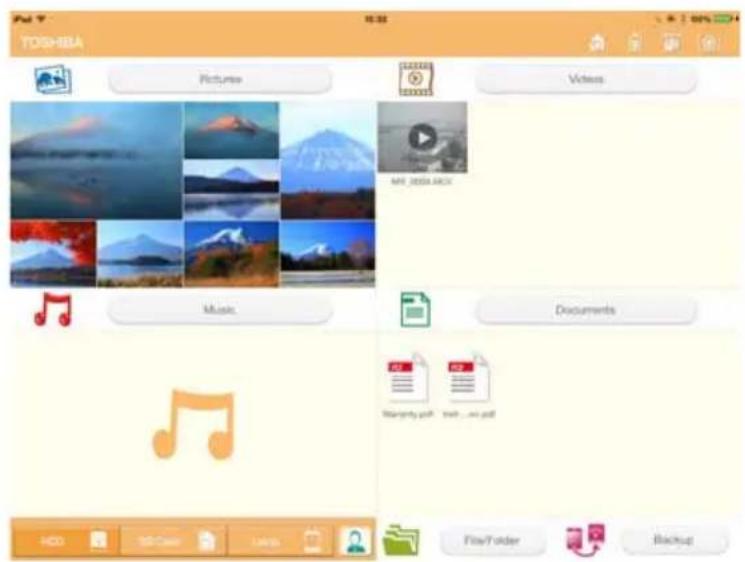
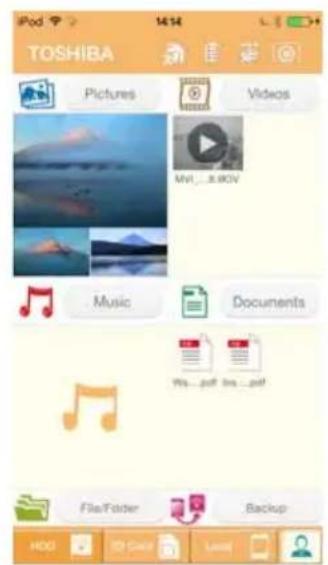
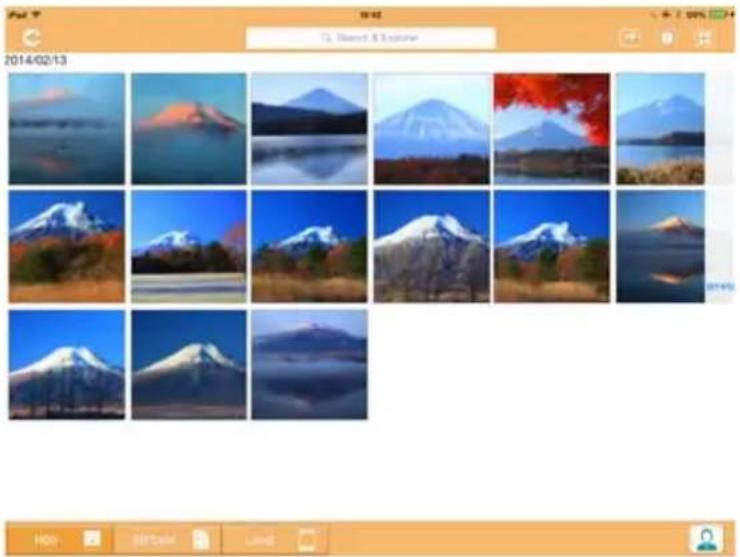
Click or touch the Picture button to display the Pictures Management screen.
Below is an example of the Pictures Management screen.
natural_image
Grid of 20 mountain landscape photos with clear sky and forest, no visible text or symbolsTablets/iPads

natural_image
Grid of 12 nature photos including Mount Fuji, Snow-capped mountains, and a lake, displayed in an app interface (no text or symbols on the images themselves)Smartphones/iPhones
(Sample Image) Pictures Management screen
Below is a description of each button/icon and its function within the Pictures Management screen:
| Button/Icon Function | ||
 | Click or touch theBackbutton to return to the main screen. | |
 | When theSort by nameicon is displayed, the pictures are sorted by filename. | |
 | When theSort by dateicon is displayed, the pictures are sorted by file date.Click or touch the icon to toggle between modes. | |
| Button/Icon Function | |
 | When the Thumbnail icon is displayed, the pictures are displayed in thumbnails. |
 | When the List icon is displayed, the pictures are displayed as a list, featuring a smaller thumbnail along with file information.Click or touch the icon to toggle between modes. |
 | Click or touch the Go To button to display a pop-up menu with navigation options from the main interface. |
| Q Search & Explorer | Enter key letters or numbers in the Search & Explorer field to perform a search of a specific file or folder. If there is no Search & Explorer field, tap on the Folder icon and navigate through the folders to find the desired file. |
 | Click or touch the HDD button to switch to the Canvio AeroCast Wireless Hard Drive's internal storage. |
 | Click or touch the SD Card button to switch to the inserted SD Card. |
 | Click or touch the Local button to switch to the local device.(iPhone, iPad, or AndroidTM devices only.) |
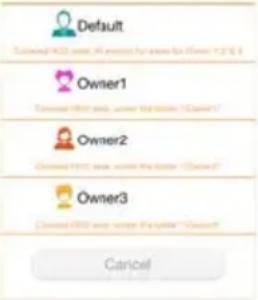
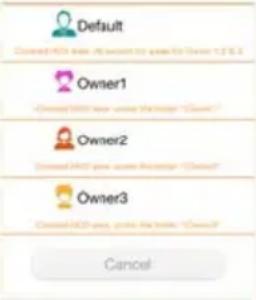 | In the HDD storage mode, you can choose pictures from one of 4 users. Click or touch the User icon to display other users.The 4 user default names are: Default, Owner1, Owner2, and Owner3. To configure these names, see “User symbol and name” on page 47. |
 | |
Picture Viewer interface
Click or touch the desired picture file in the Picture Management screen to display it in the Picture Viewer screen.

(Sample Image) Picture Viewer screen
Below is a description of each button/icon and its function within the Picture Viewer interface screen:
| Button/Icon Function | ||
 | Click or touch theBackbutton to return to the Pictures Management screen. | |
 | Click or touch theDownloadbutton to download the current picture to the local album.(HDD mode only.) | |
 | Click or touch theUploadbutton to upload the current picture from the local album to the current owner’s “Uploaded” folder.(Local mode only.) | |
 | Click or touch thePlay/Pausebutton to start/stop the photo slide show. | |
 | Click or touch theDeletebutton to delete the current picture. | |
 | Click or touch theSharebutton to share the current picture to Facebook, Twitter, or email. | |
 | Click or touch to select a ChromecastTM device. (Only available when a ChromecastTM device is available.) See “Internet connection via your ChromecastTM device” on page 51. | |
 | Click or touch to disconnect a ChromecastTM device. (Only available when a ChromecastTM device is connected.) | |
Videos Management interface
NOTE
Before using this feature, content should be transferred to the Canvio AeroCast Wireless Hard Drive via USB connection, see "Connect via USB" on page 17.
Click or touch the Videos button to display the Videos Management screen.

2014/05

(Sample Image) Videos Management screen
Below is a description of each button/icon and its function within the Videos Management screen:
| Button/Icon Function | |
 | Click or touch the Back button to return to the main screen. |
 | When the Sort by name icon is displayed, the videos are sorted by filename. |
 | When the Sort by date icon is displayed, the videos are sorted by file date.Click or touch the icon to toggle between modes. |
 | When the Thumbnail icon is displayed, the videos are displayed in thumbnails.When the List icon is displayed, the videos are displayed as a list, featuring a smaller thumbnail along with file information.Click or touch the icon to toggle between modes. |
 | |
 | Click or touch the Go To button to display a pop-up menu with navigation options from the main interface. |
| Q Search & Explorer | Enter key letters or numbers in the Search & Explorer field to perform a search of a specific file or folder. If there is no Search & Explorer field, tap on the Folder icon and navigate through the folders to find the desired file. |
 | Click or touch the HDD button to switch to the Canvio AeroCast Wireless Hard Drive's internal storage. |
 | Click or touch the SD Card button to switch to the Canvio AeroCast's inserted SD Card. |
 | Click or touch the Local button to switch to the local device.(iPhone, iPad, or AndroidTM devices only.) |
 | When switching to the Canvio AeroCast Wireless Hard Drive's internal storage, you can choose videos from one of 4 users. Click or touch the Owner icon to display other users.The 4 user default names are: Default, Owner1, Owner2, and Owner3 |
 | |
Video Playback interface (iPhone, iPad, and Android™ device only)
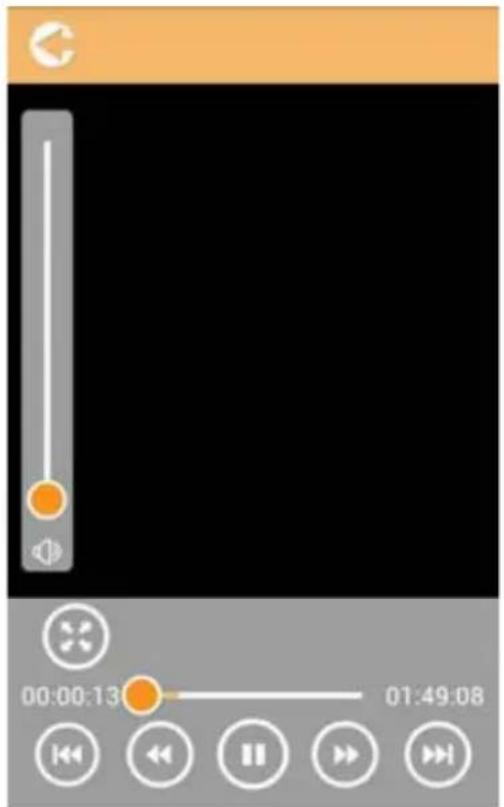
Click or touch a video file to display the Video Playback screen.
(Sample Image) Video Playback screen
Below is a description of each button/icon and its function within the Video Playback screen:
| Button/Icon Function | |
 | Click or touch the Back button to return to the main screen. |
 | Click or touch the Zoom button to adjust the playback screen size. |
 | Click or touch the Previous button to switch to the previous video playback. |
 | Click or touch the Next button to switch to the next video playback. |
 | Click or touch the Rewind button to rewind the video 20 seconds. |
 | Click or touch the Forward button to forward the video 20 seconds. |
 Click or touch the Play/Pause button to play/pause the currently playing video. Click or touch the Play/Pause button to play/pause the currently playing video. | |
| 00:00:13 01:49:08 Drag the Playback progress bar, to navigate to different positions in the video playback. | |
 Drag the Volume control bar to adjust the volume of the video. Drag the Volume control bar to adjust the volume of the video. | |
 Click or touch to select a ChromecastTM device. (Only available when a ChromecastTM device is available.) See “Internet connection via your ChromecastTM device” on page 51. Click or touch to select a ChromecastTM device. (Only available when a ChromecastTM device is available.) See “Internet connection via your ChromecastTM device” on page 51. | |
 Click or touch to disconnect a ChromecastTM device. (Only available when a ChromecastTM device is connected.) Click or touch to disconnect a ChromecastTM device. (Only available when a ChromecastTM device is connected.) | |
Music Management interface
NOTE
Before using this feature, content should be transferred to the Canvio AeroCast Wireless Hard Drive via USB connection, see "Connect via USB" on page 17.
(Sample Image) Music Management screen
Below is a description of each button/icon and its function within the Music Management screen:
| Button/Icon Function | |
 | Click or touch the Back button to return to the main screen. |
 | When the Thumbnail icon is displayed, music tracks are displayed in thumbnails.When the List icon is displayed, music tracks are displayed as a list, featuring a smaller thumbnail along with file information.Click or touch the icon to toggle between modes. |
 | |
 | Click or touch the Go To button to display a pop-up menu with navigation options from the main interface. |
| Button/Icon Function | |
| Q Search & Explorer | Enter key letters or numbers in the Search & Explorer field to perform a search of a specific file or folder. If there is no Search & Explorer field, tap on the Folder icon and navigate through the folders to find the desired file. |
 | Click or touch the HDD button to switch to the Canvio AeroCast Wireless Hard Drive's internal storage. |
 | Click or touch the SD Card button to switch to the Canvio AeroCast's inserted SD Card. |
 | Click or touch the Local button to switch to the local device.(iPhone, iPad, or AndroidTM devices only.) |
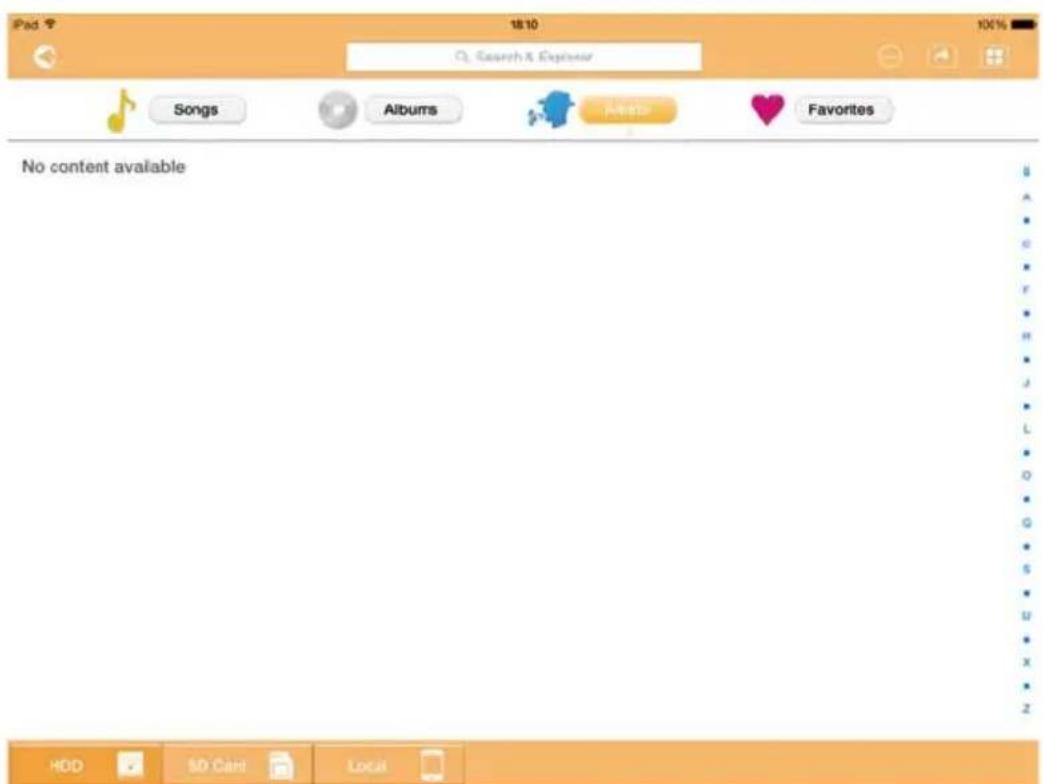
| [SCTK]Songs | Click or touch the All Songs button to view all of the song files available on the Canvio AeroCast Wireless Hard Drive (default mode). |
 Albums Albums | Click or touch the Albums button to view all of the song files by albums. |
 Artists Artists | Click or touch the Artist button to view all of the song files by Artist. |
 Favorites Favorites | Click or touch the Favorites button to view all of your favorite songs. You can add songs to the favorites screen by clicking or touching the ( ) button on the Songs screen, Album screen, or Artist screen. Remove songs from the Favorites screen by clicking or touching the ( ) button on the Music Player. |
Songs
Albums
Artists
Favorites
Music Player interface (iPhone, iPad, and Android™ device only)
Click or touch a music file to display the Music Player screen.
(Sample Image) Music Player screen
Below is a description of each button/icon and its function within the Music Player screen:
| Button/Icon Function | ||
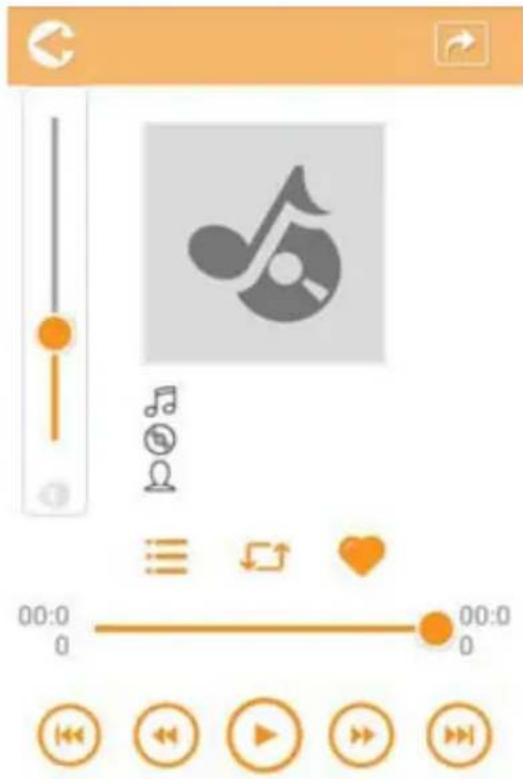
 | Click or touch theBackbutton to return to the Music Management screen. | |
 | Click or touch theMusic Playlistbutton to change the songs in a playlist. | |
 | Click or touch thePreviousbutton to switch to the previous music playback. | |
 | Click or touch thenextbutton to switch to the next music playback. | |
 | Click or touch theRewindbutton to rewind the music 20 seconds. | |
 | Click or touch theForwardbutton to forward the music 20 seconds. | |
| Button/Icon Function | |
 | Click or touch the Play/Pause button to play/pause the currently playing music. |
| 00:00:13 01:49:08 Drag the Playback progress bar, to navigate to different positions in the music playback. | |
| [4CDA] | Drag the Volume control bar to adjust the volume of the music. |
 | Click or touch the Music mode button to switch between the following four musical modes: Shuffle ( ) (default mode), Loop Playback ( ), Order Play ( ), and Single Cycle ( ). |
 | Click or touch the Favorites button to add the currently playing music to your Favorites. |
Documents Management interface
Click or touch the Documents button to display the Documents Management screen.
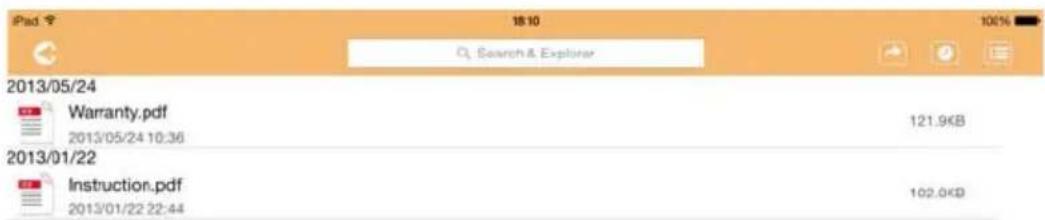
2013/05 2013/01

(Sample Image) Documents Management screen
Below is a description of each button/icon and its function within the Documents Management screen:
| Button/Icon Function | ||
 | Click or touch the Back button to return to the main screen. | |
 | When the Sort by name icon is displayed, the documents are sorted by filename. | |
 | When the Sort by date icon is displayed, the documents are sorted by file date.Click or touch the icon to toggle between modes. | |
 | When the Thumbnail icon is displayed, the documents are displayed in thumbnails. | |
 | When the List icon is displayed, the documents are displayed as a list, featuring a smaller thumbnail along with file information.Click or touch the icon to toggle between modes. | |
 | Click or touch the Go To button to display a pop-up menu with navigation options from the main interface. | |
| Button/Icon Function | |
| Q Search & Explorer | Enter key letters or numbers in the Search & Explorer field to perform a search of a specific file or folder. If there is no Search & Explorer field, tap on the Folder icon and navigate through the folders to find the desired file. |
| Click or touch the HDD button to switch to the Canvio AeroCast Wireless Hard Drive's internal storage. |
 | Click or touch the SD Card button to switch to the Canvio AeroCast's inserted SD Card. |
 | Click or touch the Local button to switch to the local device.(iPhone, iPad, or AndroidTM devices only.) |
  | When switching to the Canvio AeroCast Wireless Hard Drive's internal storage, you can choose videos from one of 4 users. Click or touch the Owner icon to display other users.The 4 user default names are: Default, Owner1, Owner2, and Owner3 |
Document Viewer interface (iPhone, iPad, and Android™ device only)
Click or touch a document file to display the Document Viewer screen. In the iPhone and iPad app, only supported file types can be viewed. In the Android™ app, you are prompted to open the document in another available app. You can choose to use that app just once or always. If you select Always, you will not see the prompt again.

natural_image
Blank white image with no visible content, text, or symbols(Sample Image) Document Viewer screen
Below is a description of each button/icon and its function within the Document Viewer screen:
| Button/Icon Function | |
 | Click or touch the Find button to open the find screen. Enter key letters or numbers in the search box to perform a search of specific text. |
 | Click or touch the Options button to view various document options. |
File/Folder Management interface
Click or touch the File/Folder button to display the File/Folder Management screen.

(Sample Image) File/Folder Management interface - Application screen
Below is a description of each button/icon and its function within the Documents Management screen:
| Button/Icon Function | ||
 | Click or touch theBackbutton to return to the main screen. | |
 | When theSort by nameicon is displayed, the files/folders are sorted by filename. | |
 | When theSort by dateicon is displayed, the files/folders are sorted by file date.Click or touch the icon to toggle between modes. | |
 | When theThumbnailicon is displayed, the files/folders are displayed in thumbnails. | |
 | When theListicon is displayed, the files/folders are displayed as a list, featuring a smaller thumbnail along with file/folder information.Click or touch the icon to toggle between modes. | |
| Button/Icon Function | |
 | Click or touch the Go To button to display a pop-up menu with navigation options from the main interface. |
 | Enter key letters or numbers in the Search & Explorer field to perform a search of a specific file or folder. If there is no Search & Explorer field, tap on the Folder icon and navigate through the folders to find the desired file. |
 | Click or touch the HDD button to switch to the Canvio AeroCast Wireless Hard Drive's internal storage. |
 | Click or touch the SD Card button to switch to the Canvio AeroCast's inserted SD Card. |
 | Click or touch the Local button to switch to the local device.(iPhone, iPad, or AndroidTM devices only.) |
 | Click or touch the Refresh button to refresh the screen. |
 | Click or touch the Share button to share the current document via email. Note that this feature only works with photo files. |
 | A Checkmark icon indicates that the file or folder is selected. |
 | Click or touch the Setting button to display the following options: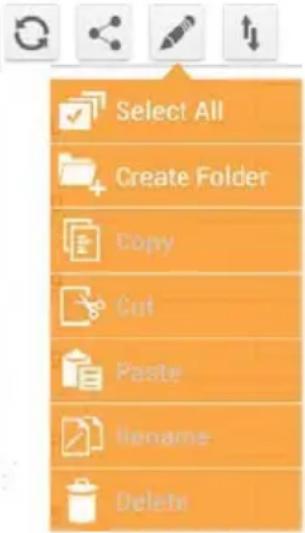 |
 | Click or touch the Transfer button to display the File transfer status screen. |
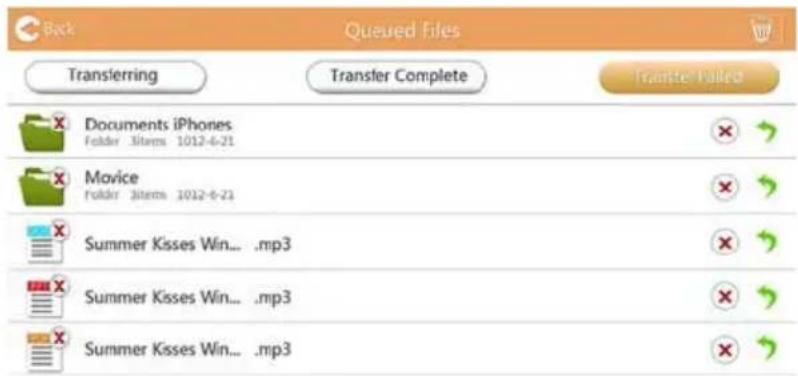
Transferring files
When an action is taken with a file or folder (copy, cut, upload, or download), the File transmission dialog box opens. A progress bar of each transmission is displayed as well as successful and failed transmissions.
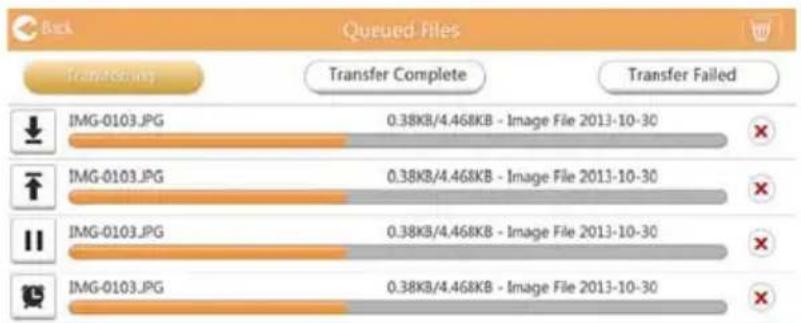
bar
Back Queued Files | Image | Transferring | Transfer Complete | Transfer Failed | |---|---|---|---| | IMG-0103.JPG | 0.38KB/4.468KB | Image File 2013-10-30 | ✗ | | IMG-0103.JPG | 0.38KB/4.468KB | Image File 2013-10-30 | ✗ | | IMG-0103.JPG | 0.38KB/4.468KB | Image File 2013-10-30 | ✗ | | IMG-0103.JPG | 0.38KB/4.458KB | Image File 2013-10-30 | ✗ |(Sample Image) Queued Files status screen
The Upload ( ) icon indicates an uploading file/folder in progress.
The Download ( ± ) icon indicates a downloading file/folder in progress.
- Touch the Upload/Download icon to pause the upload/download process. The Pause ( )icon is displayed.
The (icon) icon indicates that a file/folder is waiting for upload/download. This application allows for individual file/folder upload/download.
- Touch the Cancel ( ) icon to cancel all queued files. The buttons above the Queued Files list indicate "Transfer Complete" or "Transfer Failed."
(Sample Image) Document Viewer Queued Files screen
If a transfer fails and you wish to try again, click the Re-Transfer ( ) button.
Chapter 3
Backup Management
Using the Backup Management feature
(For iPhone, iPad, and Android ^TM devices only.)
You can back up the files on the SD Card or local device to one of the four user directories: Default, Owner1, Owner2, or Owner3. The backup is an incremental backup.
You can back up the SD card manually or use the automatic backup function. Local devices must be backed up manually.
If the size of the backup files are larger than the available space on the Canvio AeroCast Wireless Hard Drive's internal storage, you will see a warning message before the backup process begins.
Manual backup
- To perform a manual backup, click or touch the Backup button on the main screen.
- Click or touch Backup SD Card or Backup Local Data.
- Click or touch a desired user directory you wish to back up the files to.
- Click or touch Start Backup. Files from the SD Card or local device will be backed up to the selected user directory. The backup progress is displayed at the bottom of the interface screen. Once the backup has finished, you will see a message indicating the backup succeeded.
Automatic backup
You can set up an Automatic backup for your SD Card by selecting the Auto Copy box on the Backup SD Card screen. The next time you insert the SD Card, all of the videos and pictures on the SD Card will be automatically backed up to the selected user directory.
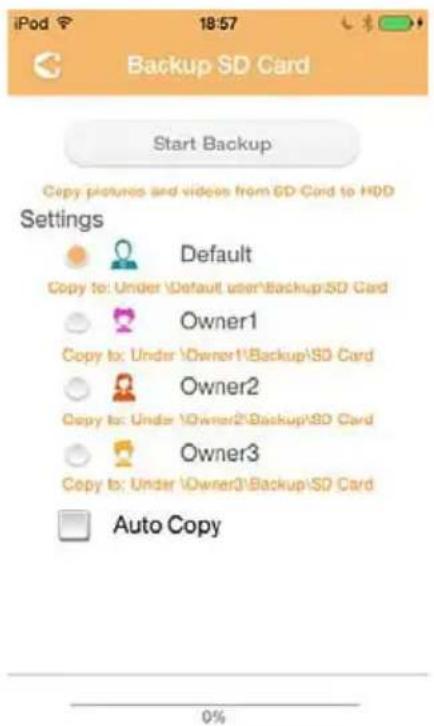
(Sample Image) Back up data - Automatic screen
NOTE
Be sure to confirm that any transfers from the SD Card are complete before removing the card.
Chapter 4
Settings Management
Click or touch the Settings button in the upper-right corner of the Main interface screen to display the Setting interface screen. The following modules are available:
Wireless
Operation
Information
■ User symbol and name
SSID Attribute
Internet
Language
Cache
OSS Info
Wireless LAN settings
Click or touch Wireless to display the Wireless LAN settings screen.
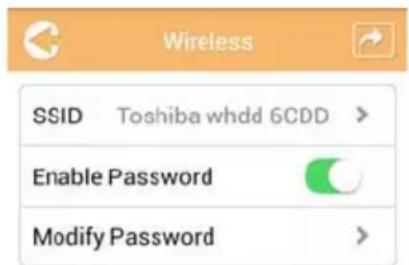
(Sample Image) Settings - Wireless screen
The following options are available:
SSID
Enable Password
Modify Password
SSID:
- Click or touch the SSID button to enter the SSID settings screen.
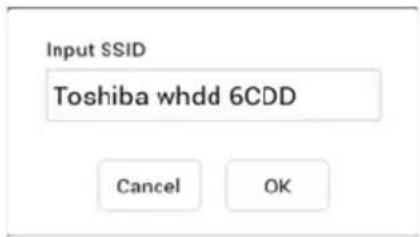
(Sample Image) Settings - SSID settings screen
- Enter your SSID. The default SSID is "Toshiba whdd xxxx."
- Click or touch the OK button.
- Click or touch the Apply button at the top-right corner of the Wireless screen.
Enable Password:
- Move the Enable slider to the right or left to enable or disable the password feature.
- Click or touch the Apply button at the top-right corner of the Wireless screen.
Modify Password:
- Click or touch the Modify Password button.
- Enter the new password.
- Click or touch the OK button.
- Click or touch the Apply button at the top-right corner of the Wireless screen.
Operation
You can reset, power off, or restart the Canvio AeroCast Hard Drive from the Operation screen. Click or touch Settings, and then Operation to display the Operation screen:
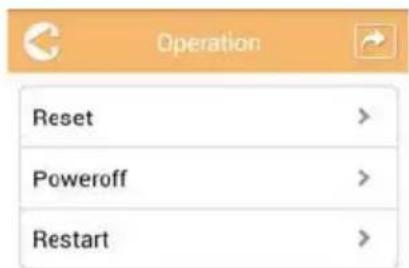
(Sample Image) Settings - Operation screen
The following options are available:
■ Reset—Click or touch to reset the Canvio AeroCast Wireless Hard Drive settings.
Power off—Click or touch to power OFF the Canvio AeroCast Wireless Hard Drive.
■ Restart—Click or touch to restart the Canvio AeroCast Wireless Hard Drive.
Information
The Information screen provides system information for the Canvio AeroCast Wireless Hard Drive. Click or touch Settings, and then Information to display the Information screen:
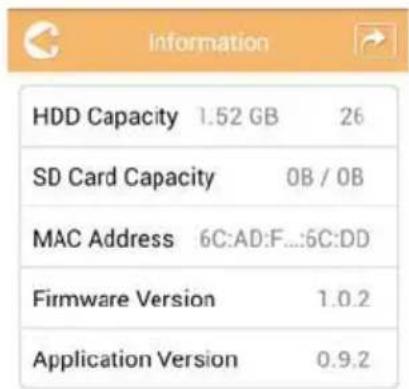
(Sample Image) Settings - Information screen
The following fields are available:
■ HDD Capacity
SD Card Capacity
MAC Address
Firmware Version
Application Version
User symbol and name
Click or touch Settings, and then User symbol and name to display the User symbol and name screen.
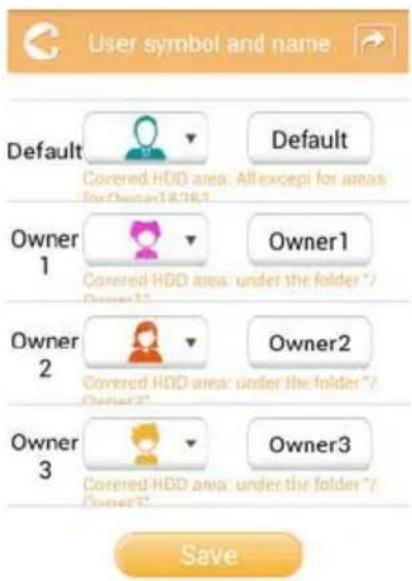
(Sample Image) Settings - User symbol and name screen
On this screen, you can change user icons and names. This change will reflect on the Picture Management screen, Video Management screen, SD Card screen, and Backup screen.
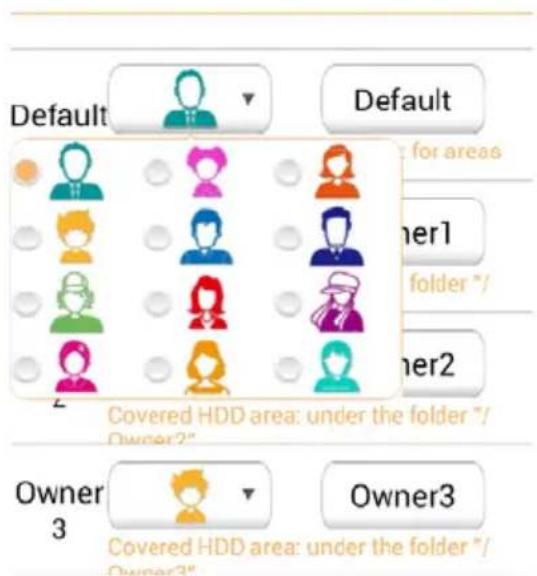
(Sample Image) Settings - User symbol and name management screen
There are a total of 12 icons to choose from. You can also type a new name for each user.
Click or touch a User icon, and then type a name, if desired, for each of the four users (e.g. "Default" to "Father").
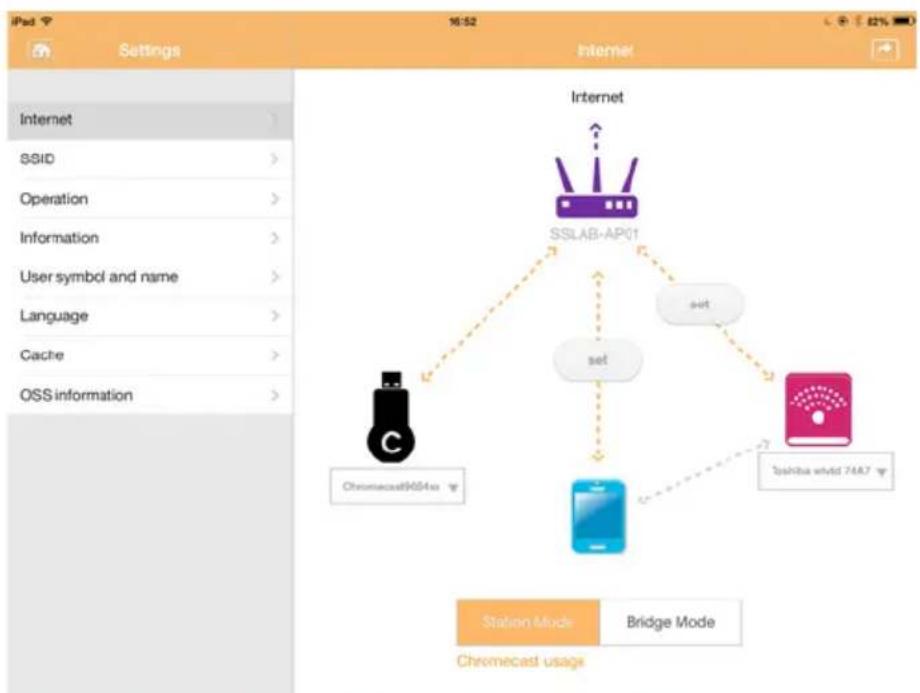
Internet settings
The Internet screen allows you to configure the Internet settings for your Canvio AeroCast device.
There are two (2) Canvio AeroCast Wireless Hard Drive work connection modes to choose from:
Home Network (Station Mode)
■ Public Network (Bridge Mode)
In the Bridge Mode, you can connect the Canvio AeroCast Wireless Hard Drive to a network while keeping your mobile device connected to the Canvio AeroCast. This allows you to access the Internet without having to disconnect your device from the Canvio AeroCast network and connect it to the local network. Bridge Mode also allows you to share files via email and social media from within the Toshiba Wireless HDD app.
In Station Mode, both the Canvio AeroCast Wireless Hard Drive and your mobile device are connected to the local network. In this mode, you can still access the Canvio AeroCast Wireless Hard Drive and the Internet, however this method also allows the Canvio AeroCast Wireless Hard Drive to communicate with a Chromecast ^™ device that is also connected to the same network. The Canvio AeroCast Wireless Hard Drive must be set to Station Mode in order to connect to a Chromecast ^™ device.
Internet connection in Bridge Mode
NOTE
You must be connected to the network to choose or switch to Public Network (Bridge Mode).
- To configure your Internet settings to run in Bridge mode, select Public Network.
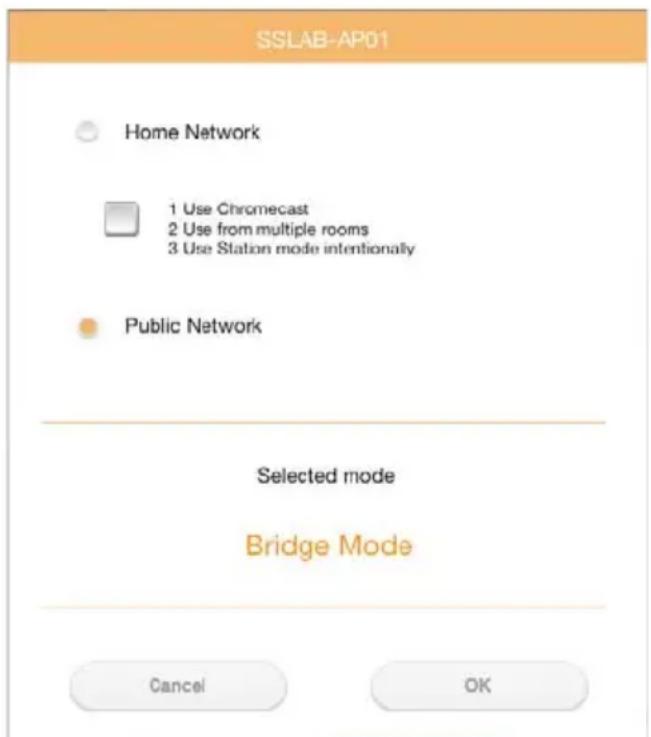
(Sample Image) Choosing Bridge Mode screen (iOS)
2. Click or touch the OK button.
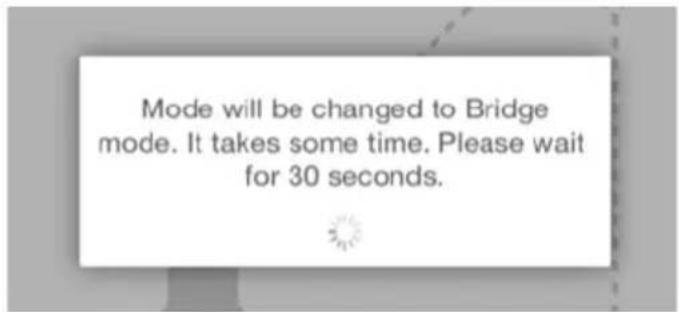
The following message appears when switching from Station Mode to Bridge Mode:
(Sample Image) Message screen (iOS)
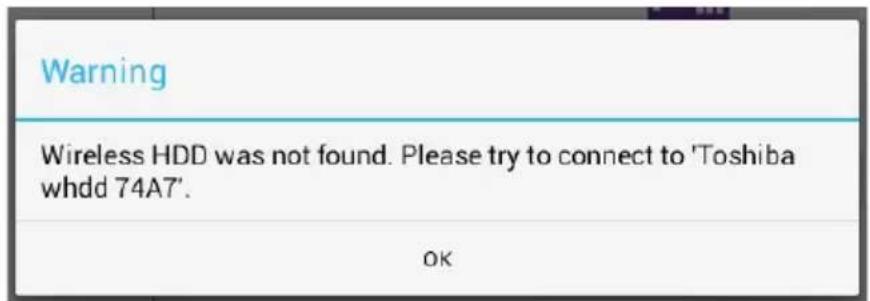
If the app cannot find the Canvio AeroCast Wireless Hard Drive, you may see the following message:
(Sample Image) Message screen (iOS)
3. To change the WLAN to Access Point on the Canvio AeroCast Wireless Hard Drive, return to the Settings screen on your local device.

(Sample Image) Settings screen (iOS)
4. Select your router.
If the app is successful at finding the Canvio AeroCast Wireless Hard Drive, you may see the following message:

(Sample Image) Message screen (iOS)
The screen below displays a successful connection:
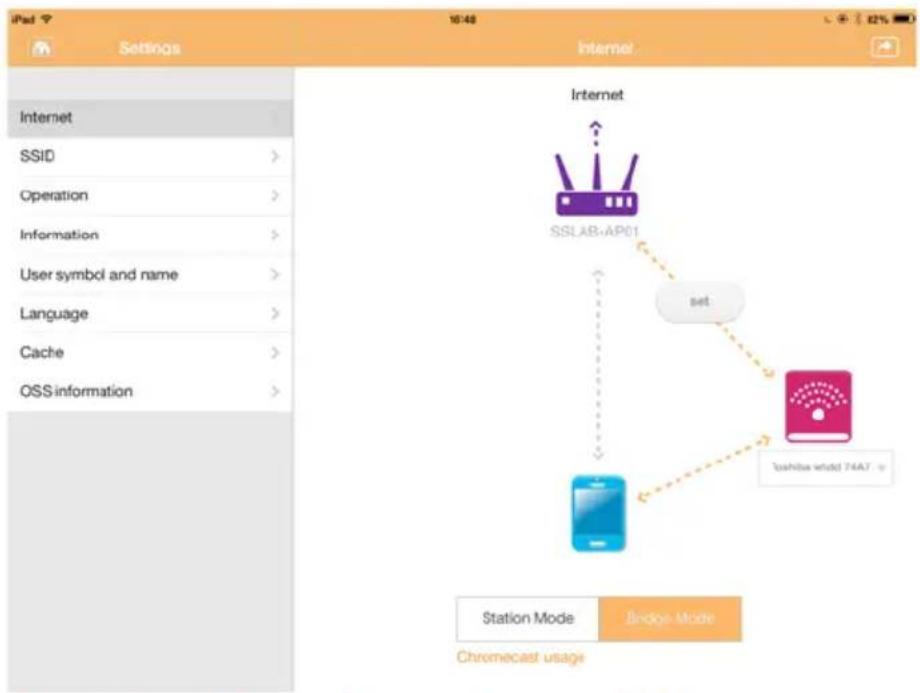
flowchart
graph TD
    A["Internet"] --> B["SSLAB-AP01"]
    B --> C["set"]
    C --> D["Toshiba Whidd 74A7"]
    D --> E["Mobile Device"]
    E --> F["Chromecast usage"]
    style A fill:#f9f,stroke:#333
    style B fill:#ccf,stroke:#333
    style C fill:#cfc,stroke:#333
    style D fill:#fcc,stroke:#333
    style E fill:#cff,stroke:#333
    style F fill:#ffc,stroke:#333
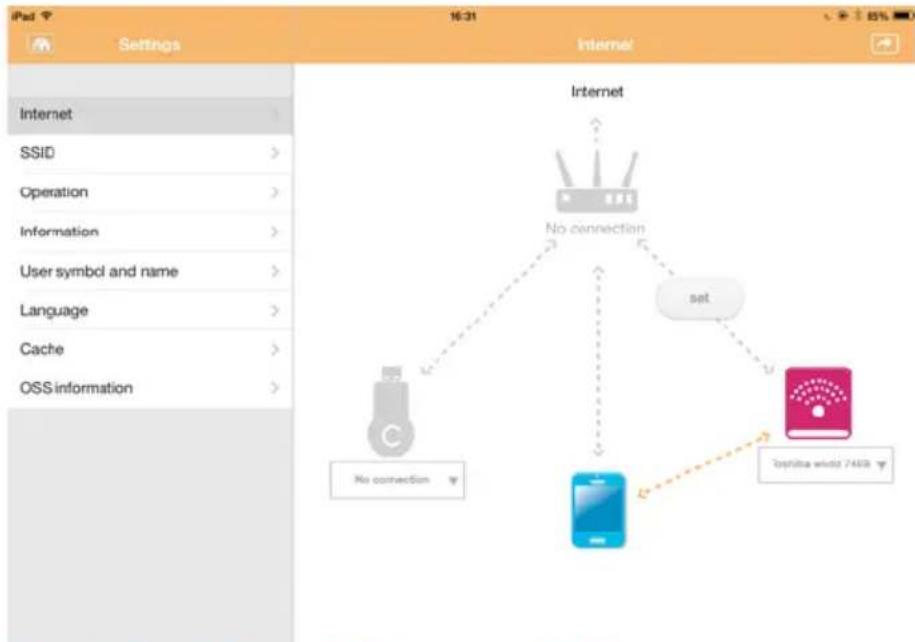
(Sample Image) Successful connection screen (iOS)
Internet connection via your Chromecast™ device
To connect your Chromecast™ device begin by setting up your Chromecast™ device (sold separately) per the instructions provided with the Chromecast™. Then follow the instructions below:
- Click or touch Settings, and then Internet to display the Internet screen. The Internet screen displays the current connections available with the Canvio AeroCast Wireless Hard Drive.
flowchart
graph TD
    A["No connection"] --> B["Yes"]
    C["Yes"] --> D["No connection"]
    E["Yes"] --> F["No connection"]
    G["Yes"] --> H["No connection"]
    I["Yes"] --> J["No connection"]
    K["Yes"] --> L["No connection"]
    M["Yes"] --> N["No connection"]
    O["Yes"] --> P["No connection"]
    Q["Yes"] --> R["No connection"]
    S["Yes"] --> T["No connection"]
    U["Yes"] --> V["No connection"]
    W["Yes"] --> X["No connection"]
    Y["Yes"] --> Z["No connection"]
    AA["Yes"] --> AB["No connection"]
    AC["Yes"] --> AD["No connection"]
    AE["Yes"] --> AF["No connection"]
    AG["Yes"] --> AH["No connection"]
    AI["Yes"] --> AJ["No connection"]
    AK["Yes"] --> AL["No connection"]
    AM["Yes"] --> AN["No connection"]
    AO["Yes"] --> AP["No connection"]
    AQ["Yes"] --> AR["No connection"]
    AS["Yes"] --> AT["No connection"]
    AU["Yes"] --> AV["No connection"]
    AW["Yes"] --> AX["No connection"]
    AY["Internet"] --> AZ["Internet"]
(Sample Image) Internet Settings screen (iOS)
- Connect the Canvio AeroCast Wireless Hard Drive to the router by clicking or touching the Set (set) icon that is located between the Not Connected and TOSHIBA icons within the network connection diagram.

flowchart
graph TD
    A["Router"] -->|No connection| B["Mobile Device"]
    A -->|No connection| C["Toshiba wssd 7408"]
    A -->|No connection| D["Other Device"]
    style A fill:#f9f,stroke:#333
    style B fill:#bbf,stroke:#333
    style C fill:#bfb,stroke:#333
    style D fill:#ffb,stroke:#333
(Sample Image) Wi-Fi® connections screen (iOS)
-
Choose the wireless network you wish to connect to from the options listed in the "Choose Network" menu, and then enter the password to connect to it.
-
Ensure that the Home Network radio button is enabled. Click or touch the checkbox to enable it.
You will see a screen similar to the one below:
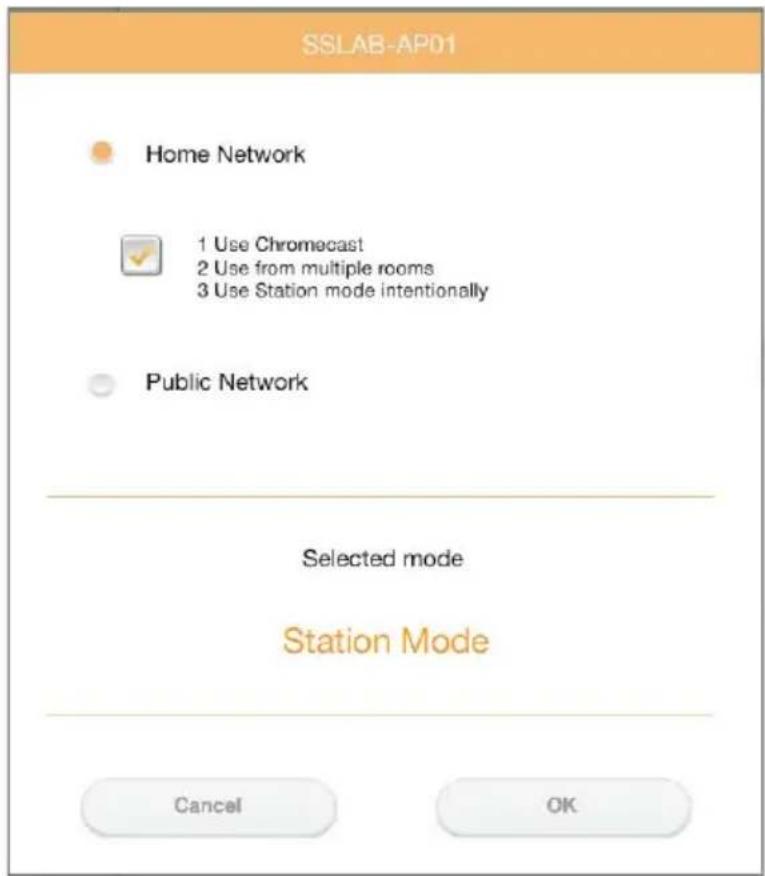
(Sample Image) SSID connection screen (iOS)
- Click or touch the OK button.
The following message appears when switching from Bridge Mode to Station Mode:
(Sample Image) Message screen (iOS)
You may see the following message:
Please connect this device to the same network that the wireless HDD is connected to, Guests or other SSID under the same network
OK
(Sample Image) Message screen (iOS)
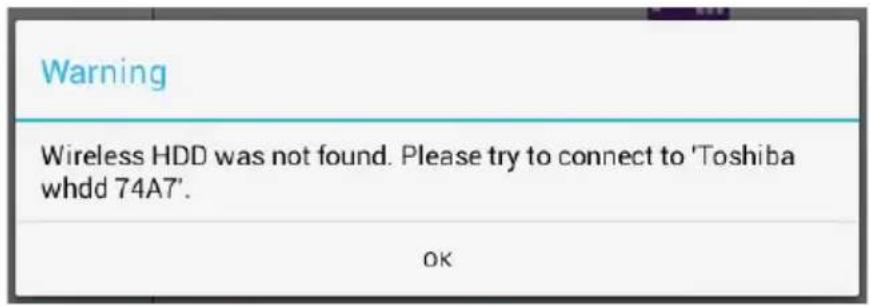
If the app cannot find the Canvio AeroCast Wireless Hard Drive, you may see the following message:
(Sample Image) Message screen (iOS)
- To change the WLAN to "Access Point" on the Canvio AeroCast Wireless Hard Drive, return to the Settings screen.
(Sample Image) Settings screen (iOS)
7. Select your router.
If the app is successful at finding the Canvio AeroCast Wireless Hard Drive, you may see the following message:

(Sample Image) Message screen (iOS)
8. Click or touch the OK button.
You should now be connected to your Chromecast™ device, Canvio AeroCast Wireless Hard Drive, and your local device.
The screen below displays a successful connection:
flowchart
graph TD
    A["Internet"] --> B["SSLAB-AP01"]
    B --> C["Set"]
    B --> D["Chromecast9654xx"]
    B --> E["Chromecast whvd 74A7"]
    B --> F["set"]
    B --> G["Chromecast usage"]
    style A fill:#f9f,stroke:#333
    style B fill:#ccf,stroke:#333
    style C fill:#cfc,stroke:#333
    style D fill:#fcc,stroke:#333
    style E fill:#cff,stroke:#333
    style F fill:#ffc,stroke:#333
    style G fill:#fcc,stroke:#333
(Sample Image) Successful connection screen (iOS)
NOTE
If you connect to the Home Network (Station Mode), other people will have access to your attached storage device through the network.
Use caution when connecting to a network in a public place as others may be able to connect to your device.
Language
The default language for the Canvio AeroCast Wireless Hard Drive is English. You can change the language setting for your Canvio AeroCast Wireless Hard Drive in the Language screen.
- From the Settings screen, click or touch Language.
A list of languages is displayed.
| iPad 9 Settings | 16:54 Language | |
| Internet | > | English ✓ |
| SSID | > | Español |
| Operation | > | Español Latinamérica |
| Information | > | Français |
| User symbol and name | > | canadiense-Francés |
| Language | Deutsch | |
| Cache | > | Italiano |
| OSS information | > | Português |
| Polskie | ||
| türk | ||
| pyccsuih | ||
| 한국어 | ||
| 简体中文 | ||
| 繁體中文 | ||
(Sample Image) Language screen
- Click your desired language.
The language is immediately updated on your screen.
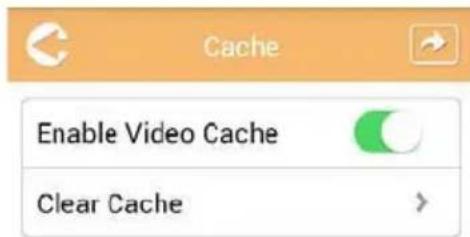
Cache
In the Cache screen you can apply cache settings on your local device to improve the response speed of the Canvio AeroCast Wireless Hard Drive.
(Sample Image) Cache screen
The following options are available:
■ Enable Video Cache
Clear Cache
Enable Video Cache:
Move the Enable Video Cache slider to the right or left to enable or disable video cache respectively.
Clear Cache:
Click or touch the Clear Cache button to clear the Canvio AeroCast Wireless Hard Drive's cache.
OSS info
The OSS Info screen allows you to see information regarding the Open Source Software utilized in Canvio AeroCast Wireless Hard Drive.
TOSHIBA Support
Need help?
Please contact TOSHIBA's hard drive and storage products support page: www.toshiba-storage.com/support
For warranty claims, please check: www.externalhdd.storrepair.de
Index
A
AeroCast System login ..... 20
AeroCast main interface application....23
Android ^TM Application login.....22
Client login ..... 22
Connect wirelessly.....22
Install app 22
B
Backup Management feature .. 42
C
Cache 55
Canvio AeroCast Charging 16
Connection.....17
Features..... 14
Components ..... 14
Connection USB 17
Wirelessly 18
Contacting Toshiba....56
D
Document Viewer interface....38
Documents Management interface 36
F
File copy wirelessly Mac....21 PC....21
File/Folder Management interface 39
H
Hardware specifications.....14
I
Icon Safety 4
Internet connection Bridge Mode .....48 Station Mode .....51 Via Chromecast™ .....51
iPhone and iPad Install application .....21
iPhone or iPad Application login .....22 Client login .....21 Connect wirelessly .....22
L
Language.....55
M
Main interface .....22 Functionality .....24
Music Management interface. . .32
Music Player interface .....34
0
OSS info ....56
Overview....14
P
Picture Viewer interface.....27
Pictures Management interface....25
S
Safety
Icons 4
SD Card
Automatic backup ..... 43
Manual backup ..... 42
Settings
Internet. 48
Settings Management
Information.....46
Operation....45
User symbol and name ... 47
Wireless LAN. 44
Software specifications ..... 15
T
Trademarks....11
V
Video Playback interface ..... 30
Videos Management interface . 28
W
Wireless connection
PC/Mac 20
Regulační opatření
Splnění CE
CE
natural_image
Symbol of a trash bin crossed with no text or numbers, representing waste sorting or disposal (no text present)The system is being upgraded. Please wait 5 minutes. Remaining {#n} seconds ... After the upgrade is successful, please reconnect the device Wi-Fi.
natural_image
Grid of 20 mountain landscape photos with visible peaks and valleys, no text or symbols present.Tablety/iPady

natural_image
Grid of 12 landscape photos including Mount Fuji, Volcanic Mountain, and Snow-capped peaks under blue sky (no text or symbols)Chytré telefony/iPhony
natural_image
Blank white image with no visible content, text, or symbolsPlease connect this device to the same network that the wireless HDD is connected to, Guests or other SSID under the same network
OK
natural_image
Symbol of a trash bin crossed with no text or numbers, representing waste sorting or disposal (no text present)The system is being upgraded. Please wait 5 minutes. Remaining {#n} seconds ... After the upgrade is successful, please reconnect the device Wi-Fi.
natural_image
Grid of 20 mountain landscape photos with visible peaks and valleys, no text or symbols present.Tablets/iPads

natural_image
Grid of 12 mountain and lake photographs displayed in a photo editing app interface (no text or symbols on the photographs themselves)Smartphones/iPhones
natural_image
Blank white image with no visible content, text, or symbolsPlease connect this device to the same network that the wireless HDD is connected to, Guests or other SSID under the same network
OK
www.toshiba-storage.com/support
(Eksempel) Skæmbilledet Firmware update - wait 5 minutes (Firmwareopdatering - vent 5 minutter)
natural_image
Grid of 16 landscape photos of Mount Fuji and surrounding mountains, each with unique colors and natural lighting (no text or symbols)Tabletter/iPads

natural_image
Grid of 12 landscape photos showing Mount Fuji and surrounding mountains, each with clear sky reflections (no text or symbols)Smartphones/iPhones
(Eksempel) Skærmbilledet Pictures Management (Billedadministration)
(Eksempel) Skæmbilledet Videos Management (Videoadministration)
(Eksempel) Skæmbilledet Documents Management (Dokumentadministration)
natural_image
Blank white image with no visible content, text, or symbolsPlease connect this device to the same network that the wireless HDD is connected to, Guests or other SSID under the same network
OK
natural_image
Symbol of a trash bin crossed with no text or numbers, representing waste sorting or disposal (no text present)GNU General Public License (“GPL”)
The system is being upgraded. Please wait 5 minutes. Remaining {#n} seconds ... After the upgrade is successful, please reconnect the device Wi-Fi.
natural_image
Grid of 20 mountain landscape photos with varying colors and landscapes, displayed in a photo editing interface (no text or symbols on the images themselves)Tablets/iPads

natural_image
Grid of 16 black-and-white mountain photos in various scenic views, no text or symbols visibleSmartphones/iPhones
natural_image
Blank white image with no visible content, text, or symbolsPlease connect this device to the same network that the wireless HDD is connected to, Guests or other SSID under the same network
OK
www.toshiba-storage.com/support
The system is being upgraded. Please wait 5 minutes. Remaining (#n) seconds ... After the upgrade is successful, please reconnect the device Wi-Fi.
natural_image
Grid of 16 landscape photos including Mount Fuji, Snow-capped mountains, and a lake, displayed in an image editing interface (no text or symbols on the images themselves)natural_image
Grid of 12 landscape photos of Mount Fuji and surrounding mountains, displayed in a photo editing interface (no text or symbols on the images themselves)natural_image
Blank white image with no visible content, text, or symbolsSSID
Enable Password
Modify Password
SSID:
flowchart
graph TD
    A["No connection"] --> B["Yes"]
    C["Yes"] --> D["No connection"]
    E["Yes"] --> F["No connection"]
    G["Yes"] --> H["No connection"]
    I["Yes"] --> J["No connection"]
    K["Yes"] --> L["No connection"]
    M["Yes"] --> N["No connection"]
    O["Yes"] --> P["No connection"]
    Q["Yes"] --> R["No connection"]
    S["Yes"] --> T["No connection"]
    U["Yes"] --> V["No connection"]
    W["Yes"] --> X["No connection"]
    Y["Yes"] --> Z["No connection"]
    AA["Yes"] --> AB["No connection"]
    AC["Yes"] --> AD["No connection"]
    AE["Yes"] --> AF["No connection"]
    AG["Yes"] --> AH["No connection"]
    AI["Yes"] --> AJ["No connection"]
    AK["Yes"] --> AL["No connection"]
    AM["Yes"] --> AN["No connection"]
    AO["Yes"] --> AP["No connection"]
    AQ["Yes"] --> AR["No connection"]
    AS["Yes"] --> AT["No connection"]
    AU["Yes"] --> AV["No connection"]
    AW["Yes"] --> AX["No connection"]
    AY["Internet"] --> AZ["Internet"]
Please connect this device to the same network that the wireless HDD is connected to, Guests or other SSID under the same network
OK
www.toshiba-storage.com/support
natural_image
Symbol of a trash bin crossed with no text or numbers, representing waste sorting or disposal (no text present)(Illustration) Connexion USB
The system is being upgraded. Please wait 5 minutes. Remaining (#n) seconds ... After the upgrade is successful, please reconnect the device Wi-Fi.
natural_image
Grid of 20 mountain landscape photos with visible peaks and valleys, no text or symbols present.Tablettes/iPads

natural_image
Grid of 12 landscape photos including Mount Fuji, Snow-capped mountains, and a lake, displayed in an app interface (no text or symbols on the images themselves)Smartphones/iPhones
natural_image
Blank white image with no visible content, text, or symbols(Illustration) Écran de connexion SSID (iOS)
Please connect this device to the same network that the wireless HDD is connected to, Guests or other SSID under the same network
OK
www.toshiba-storage.com/support
The system is being upgraded. Please wait 5 minutes. Remaining {#n} seconds ... After the upgrade is successful, please reconnect the device Wi-Fi.
natural_image
Grid of 20 mountain landscape photos with visible peaks and valleys, no text or symbols present.Tablets/iPads

natural_image
Grid of 12 landscape photos showing Mount Fuji and surrounding mountains, with no visible text or symbols.Smartphones/iPhones
natural_image
Blank white image with no visible content, text, or symbolsPlease connect this device to the same network that the wireless HDD is connected to, Guests or other SSID under the same network
OK
www.toshiba-storage.com/support
The system is being upgraded. Please wait 5 minutes. Remaining {#n} seconds ... After the upgrade is successful, please reconnect the device Wi-Fi.
Tableti/iPad uredaji
Pametni telefoni/ iPhone uređaji
natural_image
Grid of 20 mountain landscape photos with varying colors and landscapes, displayed in a photo editing interface (no text or symbols on the images themselves)Tableti/iPad uređaji

natural_image
Grid of 12 landscape photos including Mount Fuji, Kakot, and Danta under clear skies (no text or symbols)Pametni telefoni/ iPhone uređaji
natural_image
Blank white image with no visible content, text, or symbols(Slika primjera) Postavke - zaslon za upravljanje korisničkim simbolom i nazivom
Možete birati između ukupno 12 ikona. Za svakog korisnika možete upisati i novo ime.
Kliknite ili dodirnite ikonu korisnika, zatim unesite ime svakog od četiri korisnika, ako to želite (npr. od „Default“ do „Father“).
Postavke za internet
Zaslon Internet vam omogućava konfiguraciju postavki za internet za uređaj Canvio AeroCast.
Možete birati između dva (2) radna načina povezivanja bežičnog tvrdog diska Canvio AeroCast:
■ Home Network (Kućna mreža) (način stanice)
■ Public Network (Javna mreža) (način premošćivanja)
U načinu premošćivanja svoj bežični tvrdi disk Canvio AeroCast ćete moći povezati s mrežom dok je istovremeno mobilni uređaj povezan s uređajem Canvio AeroCast. To vam omogućava da internetu pristupite bez odspajanja uređaja sa Canvio AeroCast mreže te njegovo povezivanje s lokalnom mrežom. Način premošćivanja vam omogućava i dijeljenje datoteka putem e-pošte i društvenih medija u sklopu aplikacije Toshiba Wireless HDD.
U načinu stanice, bežični tvrdi disk Canvio AeroCast i vaš mobilni uređaj povezani su s lokalnom mrežom. U ovom načinu i dalje možete pristupiti bežičnom tvrdom disku Canvio AeroCast i internetu, međutim, ovaj način bežičnom tvrdom disku Canvio AeroCast omogućava i komunikaciju s Chromecast™ uređajem koji je također povezan s istom mrežom. Bežični tvrdi disk Canvio AeroCast mora biti postavljen u način stanice da bi se mogao povezati s Chromecast™ uređajem.
flowchart
graph TD
    A["No connection"] --> B["Yes"]
    C["Yes"] --> D["No connection"]
    E["Yes"] --> F["No connection"]
    G["Yes"] --> H["No connection"]
    I["Yes"] --> J["No connection"]
    K["Yes"] --> L["No connection"]
    M["Yes"] --> N["No connection"]
    O["Yes"] --> P["No connection"]
    Q["Yes"] --> R["No connection"]
    S["Yes"] --> T["No connection"]
    U["Yes"] --> V["No connection"]
    W["Yes"] --> X["No connection"]
    Y["Yes"] --> Z["No connection"]
    AA["Yes"] --> AB["No connection"]
    AC["Yes"] --> AD["No connection"]
    AE["Yes"] --> AF["No connection"]
    AG["Yes"] --> AH["No connection"]
    AI["Yes"] --> AJ["No connection"]
    AK["Yes"] --> AL["No connection"]
    AM["Yes"] --> AN["No connection"]
    AO["Yes"] --> AP["No connection"]
    AQ["Yes"] --> AR["No connection"]
    AS["Yes"] --> AT["No connection"]
    AU["Yes"] --> AV["No connection"]
    AW["Yes"] --> AX["No connection"]
    AY["Internet"] --> AZ["Internet"]
(Slika primjera) Zaslon s postavkama za internet (iOS)
- Povežite bežični tvrdi disk Canvio AeroCast s usmjerivačem tako da kliknete ili dodirnete ikonu Set (Postavi) ( ) koja se nalazi između ikona Not Connected (Nije povezano) i TOSHIBA u prikazu mrežne veze.
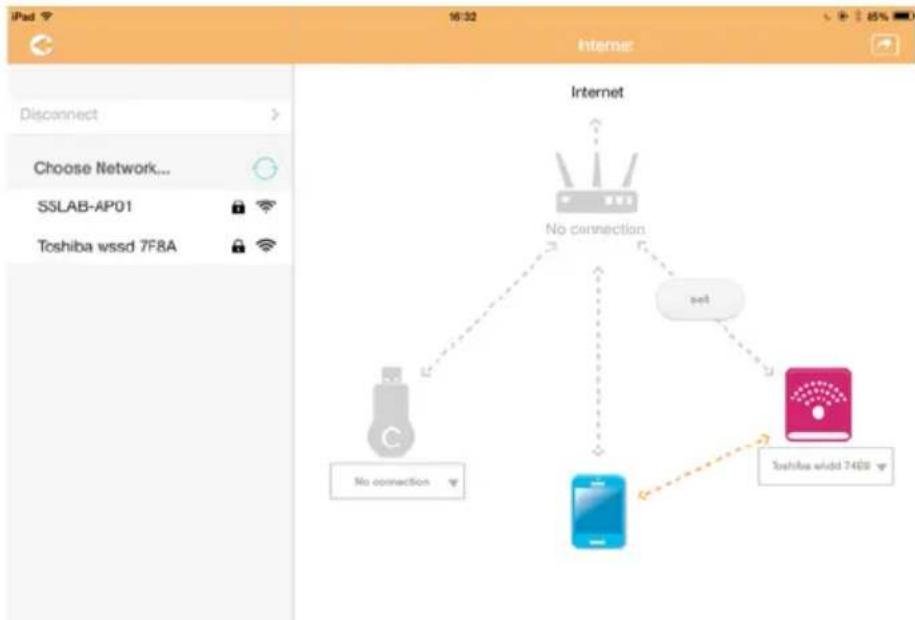
flowchart
graph TD
    A["Router"] -->|No connection| B["Mobile Device"]
    A -->|No connection| C["Softbox wssd 7450 yr"]
    A -->|set| D["Internet"]
    style A fill:#f9f,stroke:#333
    style B fill:#bbf,stroke:#333
    style C fill:#bfb,stroke:#333
    style D fill:#ffb,stroke:#333
Please connect this device to the same network that the wireless HDD is connected to, Guests or other SSID under the same network
OK
(Slika primjera) Zaslon Settings (Postavke) (iOS)
7. Odaberite vaš usmjerivač.
www.toshiba-storage.com/support
U vezi popravaka u jamstvenom roku potražite:
www.externalhdd.storrepair.de
Indeks
A
AeroCast
Prijava u sustav ..... 20
Android ^TM
natural_image
Symbol of a trash bin crossed with no text or numbers, representing waste sorting or disposal (no text present)The system is being upgraded. Please wait 5 minutes. Remaining (#n) seconds ... After the upgrade is successful, please reconnect the device Wi-Fi.
natural_image
Grid of 16 landscape photos of Mount Fuji and surrounding mountains, each with clear sky colors and no visible text or symbols.natural_image
Grid of 12 landscape photos showing Mount Fuji and surrounding mountains, displayed in an app interface (no text or symbols on the images themselves)natural_image
Blank white image with no visible content, text, or symbolsPlease connect this device to the same network that the wireless HDD is connected to, Guests or other SSID under the same network
OK
www.toshiba-storage.com/support
natural_image
Symbol of a trash bin crossed with no text or numbers, representing waste sorting or disposal (no text present)The system is being upgraded. Please wait 5 minutes. Remaining {#n} seconds ... After the upgrade is successful, please reconnect the device Wi-Fi.
natural_image
Grid of 20 mountain landscape photos with visible peaks and valleys, no text or symbols present.Tablet/iPad

natural_image
Grid of 16 landscape photos of Mount Fuji and surrounding mountains, no text or symbols visibleSmartphone/iPhone
natural_image
Blank white image with no visible content, text, or symbolsSSID
Abilita password
Modifica password
SSID:
Please connect this device to the same network that the wireless HDD is connected to, Guests or other SSID under the same network
OK
www.toshiba-storage.com/support
Rete locale wireless .....45
natural_image
Symbol of a trash bin crossed with no text or numbers, representing waste sorting or disposal (no text present)Handmatige back-up. 43
natural_image
Grid of 20 mountain landscape photos with visible peaks and valleys, no text or symbols present.Tablets/iPads

natural_image
Grid of 12 nature photos including Mount Fuji and Volcanic Mountain peaks, displayed in an app interface (no text or symbols on the images themselves)Smartphones/iPhones
natural_image
Blank white image with no visible content, text, or symbolsflowchart
graph TD
    A["No connection"] --> B["No connection"]
    C["Smartphone"] --> D["Smartphone"]
    E["Internet"] --> F["No connection"]
    G["Internet"] --> H["No connection"]
Please connect this device to the same network that the wireless HDD is connected to, Guests or other SSID under the same network
OK
www.toshiba-storage.com/support
Handmatige back-up ..... 43
Softwarespecificaties ..... 15
T
Taal. 56
V
Veiligheid
Pictogrammen ..... 3
Verbinding
Draadloos 18
USB 17
Videobeheer, interface ..... 29
Videoweergave, interface ..... 31
natural_image
Grid of 20 mountain landscape photos with visible peaks and valleys, no text or symbols present.Nettbrett/iPad

natural_image
Grid of 12 nature photos including Mount Fuji and surrounding mountains, displayed in an app interface (no text or symbols on the images themselves)Smarttelefon/iPhone
(Eksempelbilde) Skjermbilde for videobehandling
(Eksempelbilde) Skjermbilde for dokumentbehandling
natural_image
Blank white image with no visible content, text, or symbols(Eksempelbilde) Sikkerhetskopiering av data – Skjermbildet Automatic (Automatisk)
MERK
Enable Password (Aktiver passord):
Please connect this device to the same network that the wireless HDD is connected to, Guests or other SSID under the same network
OK
Program Canvio AeroCast Wireless Hard Drive Software Utility
The system is being upgraded. Please wait 5 minutes. Remaining (#n) seconds ... After the upgrade is successful, please reconnect the device Wi-Fi.
natural_image
Grid of 20 mountain landscape photos with visible peaks and valleys, no text or symbols present.tablety/iPad

natural_image
Grid of 12 landscape photos including Mount Fuji and surrounding mountains, displayed in a mobile app interface (no text or symbols on the images themselves)smartfony/iPhone
natural_image
Blank white image with no visible content, text, or symbolsPlease connect this device to the same network that the wireless HDD is connected to, Guests or other SSID under the same network
OK
www.toshiba-storage.com/support
natural_image
Symbol of a trash bin crossed with no text or numbers, representing waste sorting or disposal (no text present)Interface principal 24
The system is being upgraded. Please wait 5 minutes. Remaining (#n) seconds ... After the upgrade is successful, please reconnect the device Wi-Fi.
natural_image
Grid of 20 mountain landscape photos with visible peaks and valleys, no text or symbols present.Tablets/iPads
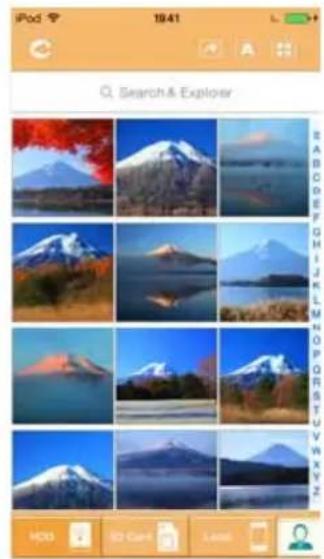
natural_image
Grid of 16 black-and-white mountain photos displayed on a smartphone interface, showing various landscapes and colors (no text or symbols in the image itself)Smartphones/iPhones
natural_image
Blank white image with no visible content, text, or symbolsPlease connect this device to the same network that the wireless HDD is connected to, Guests or other SSID under the same network
OK
www.toshiba-storage.com/support
natural_image
Symbol of a trash bin crossed with no text or numbers, representing waste sorting or disposal (no text present)Upotreba ovog simbola ukazuje na to da se ovaj proizvod ne sme smatrati otpadom domaćinstva. Starajući se da se ovaj proizvod pravilno odloži na otpad, pomoći ćete u sprečavanju mogućih negativnih posledica po prirodnu sredinu i ljudsko zdravlje, do kojih bi u suprotnom moglo doći nepravilnim rukovanjem otpadom ovog proizvoda.
Više informacija u vezi s recikliranjem ovog proizvoda možete dobiti ukoliko se obratite lokalnoj upravi, preduzeću koje odnosi vaš domaći otpad ili prodavnici u kojoj ste kupili ovaj proizvod.
Odlaganje baterija i/ili akumulatora na otpad
Znak sa precrtanom kantom za smeće na točkovima označava da se baterije i/ili akumulatori moraju prikupljati i odlagati na otpad odvojeno od otpada domaćinstva. Učešćem u odvojenom prikupljanju baterija pomoći ćete u obezbeđivanju pravilnog odlaganja proizvoda i baterija i time pomoći u sprečavanju mogućih negativnih posledica po prirodnu sredinu i ljudsko zdravlje. Detaljnije informacije o programima za sakupljanje i recikliranje koji postoje u vašoj zemlji, molimo da se obratite lokalnoj upravi ili prodavnici u kojoj ste kupili proizvod.
(Slika za primer) Ekran za mapiranje mrežne disk jedinice
-
Izaberite slovo iz padajućeg menija „Disk jedinica“.
-
U polju „Fascikla“, unesite \10.10.10.254\share, a onda kliknite ili pritisnite na Završi.
(Slika za primer) Ekran za ažuriranje firmvera
(Slika za primer) Ekran za ažuriranje firmvera - sačekajte 5 minuta
natural_image
Grid of 20 mountain landscape photos with clear sky and forest, no visible text or symbolsTableti/iPad-i
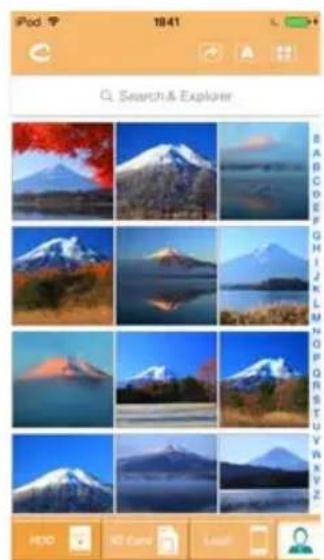
natural_image
Grid of 12 nature photos including Mount Fuji, Kakatran, and Dari Tanjaro, displayed in a photo editing interface (no text or symbols on the images themselves)Pametni telefoni/ iTelefoni
(Slika za primer) Ekran za upravljanje slikama
U nastavku je prikazan opis svakog dugmeta/ikone i njihova funkcija u okviru ekrana za upravljanje slikama:
| Dugme/ikona Funkcija | ||
 | Kliknite ili pritisnite na dugme Nazad da biste se vratili na glavni ekran. | |
| Dugme/ikona Funkcija | |
 | Kada je prikazana ikona Sortiraj po imenu, slike su sortirane po nazivu datoteke. |
 | Kada je prikazana ikona Sortiraj po datumu, slike su sortirane po datumu datoteke.Kliknite ili pritisnite na ikonu za prebacivanje između režima. |
 | Kada je prikazana ikona Sličica, slike su prikazane kao sličice. |
 | Kada je prikazana ikona Lista, slike su prikazane kao lista, sa sličicom kao i sa informacijama o datoteci.Kliknite ili pritisnite na ikonu za prebacivanje između režima. |
 | Kliknite ili pritisnite na dugme Idi na da bi se prikazao iskačući meni sa opcijama navigacije sa glavnog interfejsa. |
| Q Search & Explorer | Unesite ključna slova ili brojeve u polje Search & Explorer da biste pretražili određenu datoteku ili fasciklu. Ako ne postoji polje Search & Explorer, pritisnite na ikonu fascikle i krećite se kroz fascikle kako biste pronašli željenu datoteku. |
 | Kliknite ili pritisnite na HDD dugme da biste se prebacili na unutrašnju memoriju bežičnog čvrstog diska Canvio AeroCast-a. |
 | Kliknite ili pritisnite na dugme SD kartica da biste se prebacili na ubačenu SD karticu. |
 | Kliknite ili pritisnite na dugme Local da biste se prebacili na lokalni uređaj.(samo za iPhone, iPad ili AndroidTM uređaje.) |
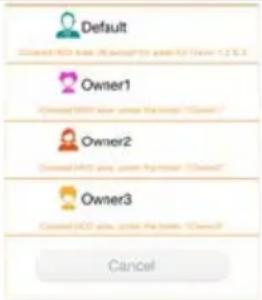 | U režimu HDD memorije, možete da izaberete slike jednog od 4 korisnika. Kliknite ili pritisnite na ikonu User za prikaz drugih korisnika.Četiri korisnički podrazumevana naziva su: Default, Owner1, Owner2 i Owner3. Da biste konfigurisali ova imena, pogledajte „lme i slika korisnika“ na strani 47. |
 | |
(Slika za primer) Ekran za upravljanje video zapisima
U nastavku je prikazan opis svakog dugmeta/ikone i njihova funkcija u okviru ekrana za upravljanje video zapisima:
| Dugme/ikona Funkcija | |
 Kliknite ili pritisnite na dugme Nazad da biste se vratili na glavni ekran. Kliknite ili pritisnite na dugme Nazad da biste se vratili na glavni ekran. | |
 Kada je prikazana ikona Sortiraj po imenu, video zapisi su sortirani po nazivu datoteke. Kada je prikazana ikona Sortiraj po imenu, video zapisi su sortirani po nazivu datoteke. | |
 Kada je prikazana ikona Sortiraj po datumu, video zapisi su sortirane po datumu datoteke. Kliknite ili pritisnite na ikonu za prebacivanje između režima. Kada je prikazana ikona Sortiraj po datumu, video zapisi su sortirane po datumu datoteke. Kliknite ili pritisnite na ikonu za prebacivanje između režima. | |
 Kada je prikazana ikona Sličica, video zapisi su prikazani kao sličice. Kada je prikazana ikona Sličica, video zapisi su prikazani kao sličice. | |
 Kada je prikazana ikona Lista, video zapisi su prikazani kao lista, sa manjom sličicom kao i sa informacijama o datoteci. Kliknite ili pritisnite na ikonu za prebacivanje između režima. Kada je prikazana ikona Lista, video zapisi su prikazani kao lista, sa manjom sličicom kao i sa informacijama o datoteci. Kliknite ili pritisnite na ikonu za prebacivanje između režima. | |
 Kliknite ili pritisnite na dugme Idi na da bi se prikazao iskačući meni sa opcijama navigacije sa glavnog interfejsa. Kliknite ili pritisnite na dugme Idi na da bi se prikazao iskačući meni sa opcijama navigacije sa glavnog interfejsa. | |
| Q Search & Explorer | |
 Kliknite ili pritisnite na HDD dugme da biste se prebacili na unutrašnju memoriju bežičnog čvrstog diska Canvio AeroCast-a. Kliknite ili pritisnite na HDD dugme da biste se prebacili na unutrašnju memoriju bežičnog čvrstog diska Canvio AeroCast-a. | |
 Kliknite ili pritisnite na ikonu SD kartica da biste se prebacili na ubačenu SD karticu uređaja Canvio AeroCast. Kliknite ili pritisnite na ikonu SD kartica da biste se prebacili na ubačenu SD karticu uređaja Canvio AeroCast. | |
 Kliknite ili pritisnite na dugme Local da biste se prebacili na lokalni uređaj. (samo za iPhone, iPad ili AndroidTM uređaje.) Kliknite ili pritisnite na dugme Local da biste se prebacili na lokalni uređaj. (samo za iPhone, iPad ili AndroidTM uređaje.) | |
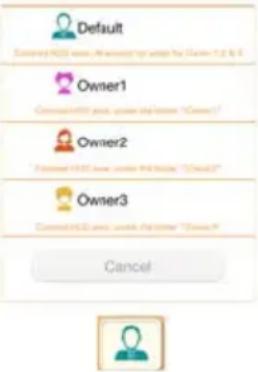 Kada se prebacujete na internu memoriju Canvio AeroCast bežičnog čvrstog diska, možete da izaberete video zapise jednog od 4 korisnika. Kliknite ili pritisnite na ikonu Owner za prikaz drugih korisnika. Četiri korisnički podrazumevana naziva su: Default, Owner1, Owner2 i Owner3 Kada se prebacujete na internu memoriju Canvio AeroCast bežičnog čvrstog diska, možete da izaberete video zapise jednog od 4 korisnika. Kliknite ili pritisnite na ikonu Owner za prikaz drugih korisnika. Četiri korisnički podrazumevana naziva su: Default, Owner1, Owner2 i Owner3 | |
Interfejs za reprodukciju video zapisa (samo iPhone, iPad i Android™ uređaj)
Kliknite i pritisnite na datoteku video zapisa da bi se prikazao interfejs reprodukcije video zapisa.
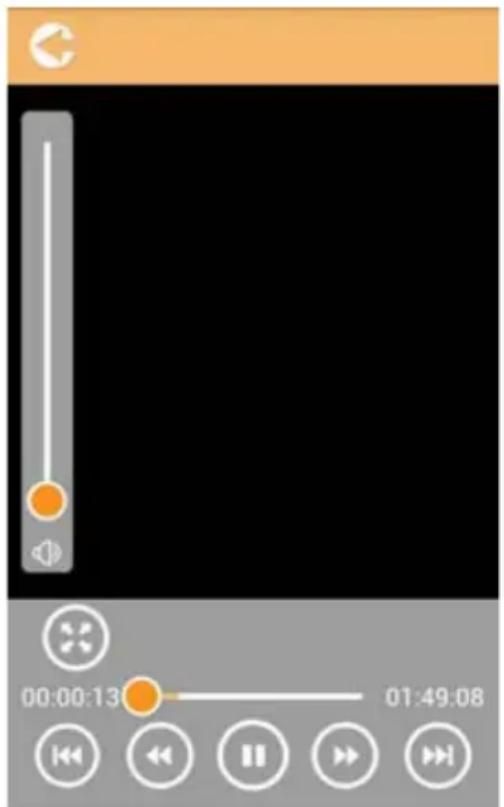
(Slika za primer) Ekran za reprodukciju video zapisa
U nastavku je prikazan opis svakog dugmeta/ikone i njihova funkcija u okviru ekrana interfejsa za reprodukciju video zapisa:
| Dugme/ikona Funkcija | |
 | Kliknite ili pritisnite na dugme Nazad da biste se vratili na glavni ekran. |
 | Kliknite ili pritisnite na dugme Zumiranje da biste podesili veličinu ekrana za reprodukciju. |
 | Kliknite ili pritisnite na dugme Prethodno da biste se prebacili na reprodukciju prethodnog video zapisa. |
 | Kliknite ili pritisnite na dugme Dalje da biste prešli na reprodukciju sledećeg video zapisa. |
 | Kliknite ili pritisnite na dugme Premotaj unazad da biste premotali video zapis 20 sekundi unazad. |
 | Kliknite ili pritisnite na dugme Premotaj napred da biste premotali video zapis 20 sekundi unapred. |
 | Kliknite ili pritisnite na dugme Reprodukuj/Pauziraj da biste reprodukovali/pauzirali aktuelnu reprodukciju video zapisa. |
| 00:00:13 01:49:08 | Prevucite traku za napredovanje reprodukcije, da biste se prebacili na druge pozicije reproducije video zapisa. |
| [A4X2] | Prevucite traku sa regulatorom jačine zvuka da biste podesili jačinu zvuka video zapisa. |
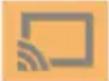 | Kliknite ili pritisnite da izaberete uređaj ChromecastTM. (Dostupno samo kada je na raspolaganju uređaj ChromecastTM.) Pogledajte „Internet veza preko ChromecastTM uređaja“ na strani 51. |
 | Kliknite ili pritisnite da odvojite uređaj ChromecastTM. (Dostupno samo kada je povezan uređaj ChromecastTM.) |
Interfejs za upravljanje muzikom
NAPOMENA
(Slika za primer) Ekran Music Player-a
U nastavku je prikazan opis svakog dugmeta/ikone i njihova funkcija u okviru ekrana Music Player-a:
| Dugme/ikona Funkcija | ||
 | Kliknite ili pritisnite na dugme Nazad da biste se vratili na ekran interfejsa za upravljanje muzikom. | |
 | Kliknite ili pritisnite na dugme Lista muzičkih numera da biste promenili pesme u listi numera. | |
 | Kliknite ili pritisnite na dugme Prethodno da biste se prebacili na reprodukciju prethodne muzičke numere. | |
 | Kliknite ili pritisnite na dugme Dalje da biste prešli na reprodukciju sledeće muzičke numere. | |
 | Kliknite ili pritisnite na dugme Premotaj unazad da biste premotali muzičku numeru za 20 sekundi unazad. | |
| Dugme/ikona Funkcija | |
 | Kliknite ili pritisnite na dugme Premotaj napred da biste premotali muzičku numeru 20 sekundi unapred. |
 | Kliknite ili pritisnite na dugme Reprodukuj/Pauziraj da biste reprodukovali/pauzirali aktuelnu reprodukciju muzičke numere. |
| 00:00:13 01:49:08 | Prevucite traku za napredovanje reprodukcije, da biste se prebacili na druge pozicije reproducije muzičke numere. |
 | Prevucite traku sa regulatorom jačine zvuka da biste podesili jačinu zvuka muzičke numere. |
 | Kliknite ili pritisnite na dugme Režim muzike da biste se prebacili između četiri režima muzike: Slučajni redosled ( ) (podrazumevani režim), Reprodukcija sa ponavljanjem ( ), Reprodukcija po redosledu ( ) i Jedan ciklus ( ). |
 | Kliknite ili pritisnite na dugme Omiljeno da biste dodali muzičku numeru koja se trenutno reprodukuje u Omiljeno. |
(Slika za primer) Ekran za upravljanje dokumentima
U nastavku je prikazan opis svakog dugmeta/ikone i njihova funkcija u okviru ekrana za upravljanje dokumentima:
| Dugme/ikona Funkcija | |
 | Kliknite ili pritisnite na dugme Nazad da biste se vratili na glavni ekran. |
 | Kada je prikazana ikona Sortiraj po imenu, dokumenta su sortirana po nazivu datoteke. |
 | Kada je prikazana ikona Sortiraj po datumu, dokumenta su sortirana po datumu datoteke. Kliknite ili pritisnite na ikonu za prebacivanje između režima. |
 | Kada je prikazana ikona Sličica, dokumenta su prikazana kao sličice. |
 | Kada je prikazana ikona Lista, dokumenta su prikazana kao lista, sa manjom sličicom kao i sa informacijama o datoteci. Kliknite ili pritisnite na ikonu za prebacivanje između režima. |
 | Kliknite ili pritisnite na dugmeIdi na da bi se prikazao iskačući meni sa opcijama navigacije sa glavnog interfejsa. |
| Q Search & Explorer | Unesite ključna slova ili brojeve u polje Search & Explorer da biste pretražili određenu datoteku ili fasciklu. Ako ne postoji polje Search & Explorer, pritisnite na ikonu fascikle i krećite se kroz fascikle kako biste pronašli željenu datoteku. |
 | Kliknite ili pritisnite naHDD dugme da biste se prebacili na unutrašnju memoriju bežičnog čvrstog diska Canvio AeroCast-a. |
 | Kliknite ili pritisnite na ikonuSD kartica da biste se prebacili na ubačenu SD karticu uređaja Canvio AeroCast. |
 | Kliknite ili pritisnite na dugmeLocalda biste se prebacili na lokalni uređaj.(samo za iPhone, iPad ili AndroidTM uređaje.) |
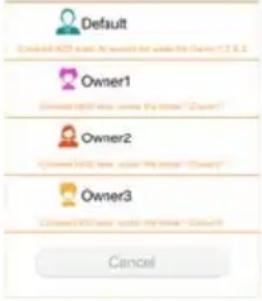 | Kada se prebacujete na internu memoriju Canvio AeroCast bežičnog čvrstog diska, možete da izaberete video zapise jednog od 4 korisnika.Kliknite ili pritisnite na ikonuOwnerza prikaz drugih korisnika.Četiri korisnički podrazumevana naziva su: Default, Owner1, Owner2 i Owner3 |
 | |
Interfejs Document Viewer-a
(samo za iPhone, iPad i Android™ uređaj)
natural_image
Blank white image with no visible content, text, or symbols(Slika za primer) Ekran za prikazivanje dokumenata
U nastavku je prikazan opis svakog dugmeta/ikone i njihova funkcija u okviru ekrana prikazivača dokumenata:
| Dugme/ikona Funkcija | ||
 | Kliknite ili pritisnite na dugme Pronađi da biste otvorili ekran za pronalaženje. Unesite ključna slova ili brojeve u polje za pretraživanje da biste potražili određeni tekst. | |
 | Kliknite ili pritisnite na dugme Opcije da biste videli različite opcije za dokumenta. | |
Interfejs za upravljanje datotekama/fasciklama
Kliknite ili pritisnite na dugme Datoteka/Fascikla da bi se prikazao ekran za upravljanje datotekama/fasciklama.

(Slika za primer) Ekran interfejsa za upravljanje datotekama/fasciklama - Aplikacija
U nastavku je prikazan opis svakog dugmeta/ikone i njihova funkcija u okviru ekrana za upravljanje dokumentima:
| Dugme/ikona Funkcija | ||
 | Kliknite ili pritisnite na dugme Nazad da biste se vratili na glavni ekran. | |
 | Kada je prikazana ikona Sortiraj po imenu, datoteke/fascikle su sortirana po nazivu datoteke. | |
 | Kada je prikazana ikona Sortiraj po datumu, datoteke/fascikle su sortirane po datumu datoteke. Kliknite ili pritisnite na ikonu za prebacivanje između režima. | |
 | Kada je prikazana ikona Sličica, datoteke/fascikle su prikazane kao sličice. | |
 | Kada je prikazana ikona Lista, datoteke/fascikle su prikazane kao lista, sa manjom sličicom kao i sa informacijama o datoteci/fascikli. Kliknite ili pritisnite na ikonu za prebacivanje između režima. | |
| Dugme/ikona Funkcija | ||
 | Kliknite ili pritisnite na dugmeIdinada bi se prikazao iskačući meni sa opcijama navigacije sa glavnog interfejsa. | |
 | Unesite ključna slova ili brojeve u polje Search & Explorer da biste pretražili određenu datoteku ili fasciklu. Ako ne postoji polje Search & Explorer, pritisnite na ikonu fascikle i krećite se kroz fascikle kako biste pronašli željenu datoteku. | |
 | Kliknite ili pritisnite naHDDdugme da biste se prebacili na unutrašnju memoriju bežičnog čvrstog diska Canvio AeroCast-a. | |
 | Kliknite ili pritisnite na ikonuSDkarticada biste se prebacili na ubačenu SD karticu uređaja Canvio AeroCast. | |
 | Kliknite ili pritisnite na dugmeLocalda biste se prebacili na lokalni uređaj.(samo za iPhone, iPad ili AndroidTMuredaje.) | |
 | Kliknite ili pritisnite na dugmeOsvežidad biste osvežili ekran. | |
 | Kliknite ili pritisnite na dugmeShare(Podeli) da biste podelili aktuelni dokument putem e-pošte. Imajte u vidu da ova funkcija funkcioniše samo sa datotekama slika. | |
 | IkonaOznakapotvrdeoznačava da je izabrana datoteka ili fascikla. | |
 | Kliknite ili pritisnite na dugmeSettingda biste prikazali sledeće opcije. | |
 | Kliknite ili pritisnite na dugmePrenesi da bi se prikazao ekran za status prenosa datoteka. | |
Prenos datoteka
(Slika za primer) Ekran za izradu rezervne kopije - automatski
NAPOMENA
(Slika za primer) Ekran za Postavke - Bežično
(Slika za primer) Ekran za Postavke - Ime i slika korisnika
Na ovom ekranu možete da promenite ikone i imena korisnika.
(Slika za primer) Ekran za upravljanje Postavke - Ime i slika korisnika
(Slika za primer) Ekran sa porukom (iOS)
(Slika za primer) Ekran sa porukom (iOS)
(Slika za primer) Ekran sa porukom (iOS)
Na donjem ekranu je prikazano uspešno povezivanje:

flowchart
graph TD
    A["Internet"] --> B["SSLAB-AP01"]
    B --> C["set"]
    C --> D["Toshiba whidd 74A7"]
    D --> E["Chromecast usage"]
    F["Station Mode"] --> G["Bridge Mode"]
    H["Chromecast usage"] --> I["Internet"]
(Slika za primer) Ekran sa uspešnim povezivanjem (iOS)
Internet veza preko Chromecast™ uredaja
(Slika za primer) Ekran sa SSID povezivanjem (iOS)
- Kliknite ili pritisnite dugme U redu.
(Slika za primer) Ekran sa porukom (iOS)
Please connect this device to the same network that the wireless HDD is connected to, Guests or other SSID under the same network
OK
(Slika za primer) Ekran sa porukom (iOS)
(Slika za primer) Ekran sa porukom (iOS)
- Da biste promenili WLAN na „Tačku pristupa“ na Canvio AeroCast bežičnom čvrstom disku, vratite se na ekran Postavke.

(Slika za primer) Ekran sa postavkama (iOS)
7. Izaberite svoj ruter.
(Slika za primer) Ekran sa porukom (iOS)
8. Kliknite ili pritisnite dugme U redu.
Sada bi trebalo da budete povezani na vaš Chromecast™ uredaj, Canvio AeroCast bežični čvrsti disk ili lokalni uredaj.
Na donjem ekranu je prikazano uspešno povezivanje:

flowchart
graph TD
    A["Internet"] --> B["SSLAB-AP01"]
    B --> C["Set"]
    B --> D["Chromecast9654xx"]
    B --> E["Chromecast whvd 74A7"]
    B --> F["set"]
    B --> G["Chromecast usage"]
    style A fill:#f9f,stroke:#333
    style B fill:#ccf,stroke:#333
    style C fill:#cfc,stroke:#333
    style D fill:#fcc,stroke:#333
    style E fill:#cff,stroke:#333
    style F fill:#ffc,stroke:#333
    style G fill:#fcc,stroke:#333
(Slika za primer) Ekran sa uspešnim povezivanjem (iOS)
NAPOMENA
www.toshiba-storage.com/support
Za zahteve u vezi garancije pogledajte stranu: www.externalhdd.storrepair.de
Indeks pojmova
A
AeroCast
The system is being upgraded. Please wait 5 minutes. Remaining {#n} seconds ... After the upgrade is successful, please reconnect the device Wi-Fi.
natural_image
Grid of 20 mountain landscape photos with varying colors and landscapes, displayed within a photo editing interface (no text or symbols on the images themselves)Планшеты/iPad

natural_image
Grid of 12 identical photos of Mount Fuji and surrounding mountains under blue sky, displayed in an app interface (no text or symbols on the images themselves)Смартфоны/iPhone