
EKAM 80 - Coffee maker ELECTROLUX - Free user manual and instructions
Find the device manual for free EKAM 80 ELECTROLUX in PDF.
| Product type | Filter coffee maker with integrated coffee grinder |
| Brand | Electrolux |
| Model | EKAM 80 |
| Power supply | 220-240 V ~, 50/60 Hz |
| Power | 900-1000 W |
| Bean container capacity | Approximately 125 g |
| Grind fineness adjustment | Yes, by rotating the feeding container (positions for light to dark beans) |
| Usable coffee type | Coffee beans or ground coffee |
| Delayed programming | Yes, program activation button with green indicator |
| Keep warm | Hotplate, automatic shut-off after 2 hours |
| Drip-stop valve | Yes |
| Carafe | Glass with lid, cup markings |
| Carafe spare part number | 407138479/8 |
| Coffee filter | Paper filter size 4 |
| Cleaning | Exterior with damp cloth; carafe and lid dishwasher safe |
| Recommended descaling | Every 3 months with ecological descaler (without formic acid) |
| Safety | Do not immerse base in water; do not let cord touch hot plate |
| Manual languages | FR, BG, CS, DA, EN, ET, FI, HU, LT, LV, NO, PL, RO, SK, SL, SV, TR |
Frequently Asked Questions - EKAM 80 ELECTROLUX
User questions about EKAM 80 ELECTROLUX
0 question about this device. Answer the ones you know or ask your own.
Ask a new question about this device
Download the instructions for your Coffee maker in PDF format for free! Find your manual EKAM 80 - ELECTROLUX and take your electronic device back in hand. On this page are published all the documents necessary for the use of your device. EKAM 80 by ELECTROLUX.
USER MANUAL EKAM 80 ELECTROLUX
Coffee maker with integrated Coffee Mill
natural_image
Line drawing of a portable blender with lid and front panel (no text or symbols)PAGE
⑤ Bruksanvisning ..... 4
DK Brugsanvisning 9
N Bruksanvisning ..... 14
FIN Käyttöohje 19
GB Instruction book .....24
F Mode d'emploi .....29
© CZ Návod k použití ..... 35
PL Instrukcja obsługi ..... 40
⑧ Használati útmutató .....46
SK Návod na obsluhu ..... 51
SLO Navodilo za uporabo.....57
HR Priručnik....62
SRB Priročnik za navodila .....67
RO Instructiuni de utilizare .....73
LV Rokasgrāmata .....79
LT Instrukcija....85
EST Kasutusjuhend....91
TR Kullanma kılavuzu .....96
BG Упътване за работа.....102
RUS Инструкция по эксплуатации108
UA Інструкція з експлуатації...114

natural_image
Simple line drawing of a curved pipe or tube mounted on a vertical support (no text or symbols)2
natural_image
Line drawing of a kettle pouring liquid into a container (no text or symbols)3
natural_image
Diagram of a coffee maker's processing step showing funnel pouring into a machine (no text or symbols)4

natural_image
Line drawing of a hand operating a cylindrical device with a lid, showing mechanical components (no text or symbols)5

natural_image
Line drawing of a food processing machine with a ladle pouring granular material from a bowl (no text or symbols)6
7
natural_image
Diagram of a coffee maker with a ladle pouring grain into a container, showing internal processing steps (no text or labels)8
natural_image
Mechanical assembly diagram showing a rotating component with directional arrows (no text or symbols)9
natural_image
Technical diagram of a mechanical device with internal components and directional arrows (no text or labels)10

natural_image
Diagram of a kitchen mixer with a cross mark indicating a warning or mark (no text or symbols present)11 12 13
natural_image
Line drawing of a coffee maker with funnel and side arm (no text or symbols)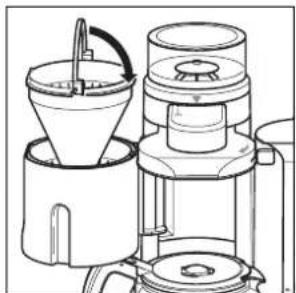
natural_image
Line drawing of a coffee maker with a funnel and side baffle (no text or symbols)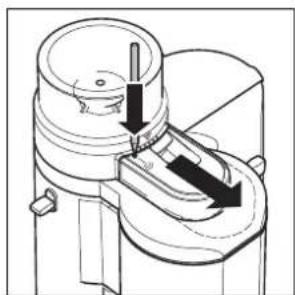
natural_image
Technical line drawing of a mechanical component with arrows indicating motion or force direction (no text or symbols)14 15
natural_image
Line drawing of a mechanical device with a lid and lever mechanism (no text or symbols)


S
Please read these operating instructions carefully. Above all please observe the safety instructions on the initial pages of these operating instructions! Please keep these operating instructions for future reference. Pass them on to any subsequent owner of the appliance.
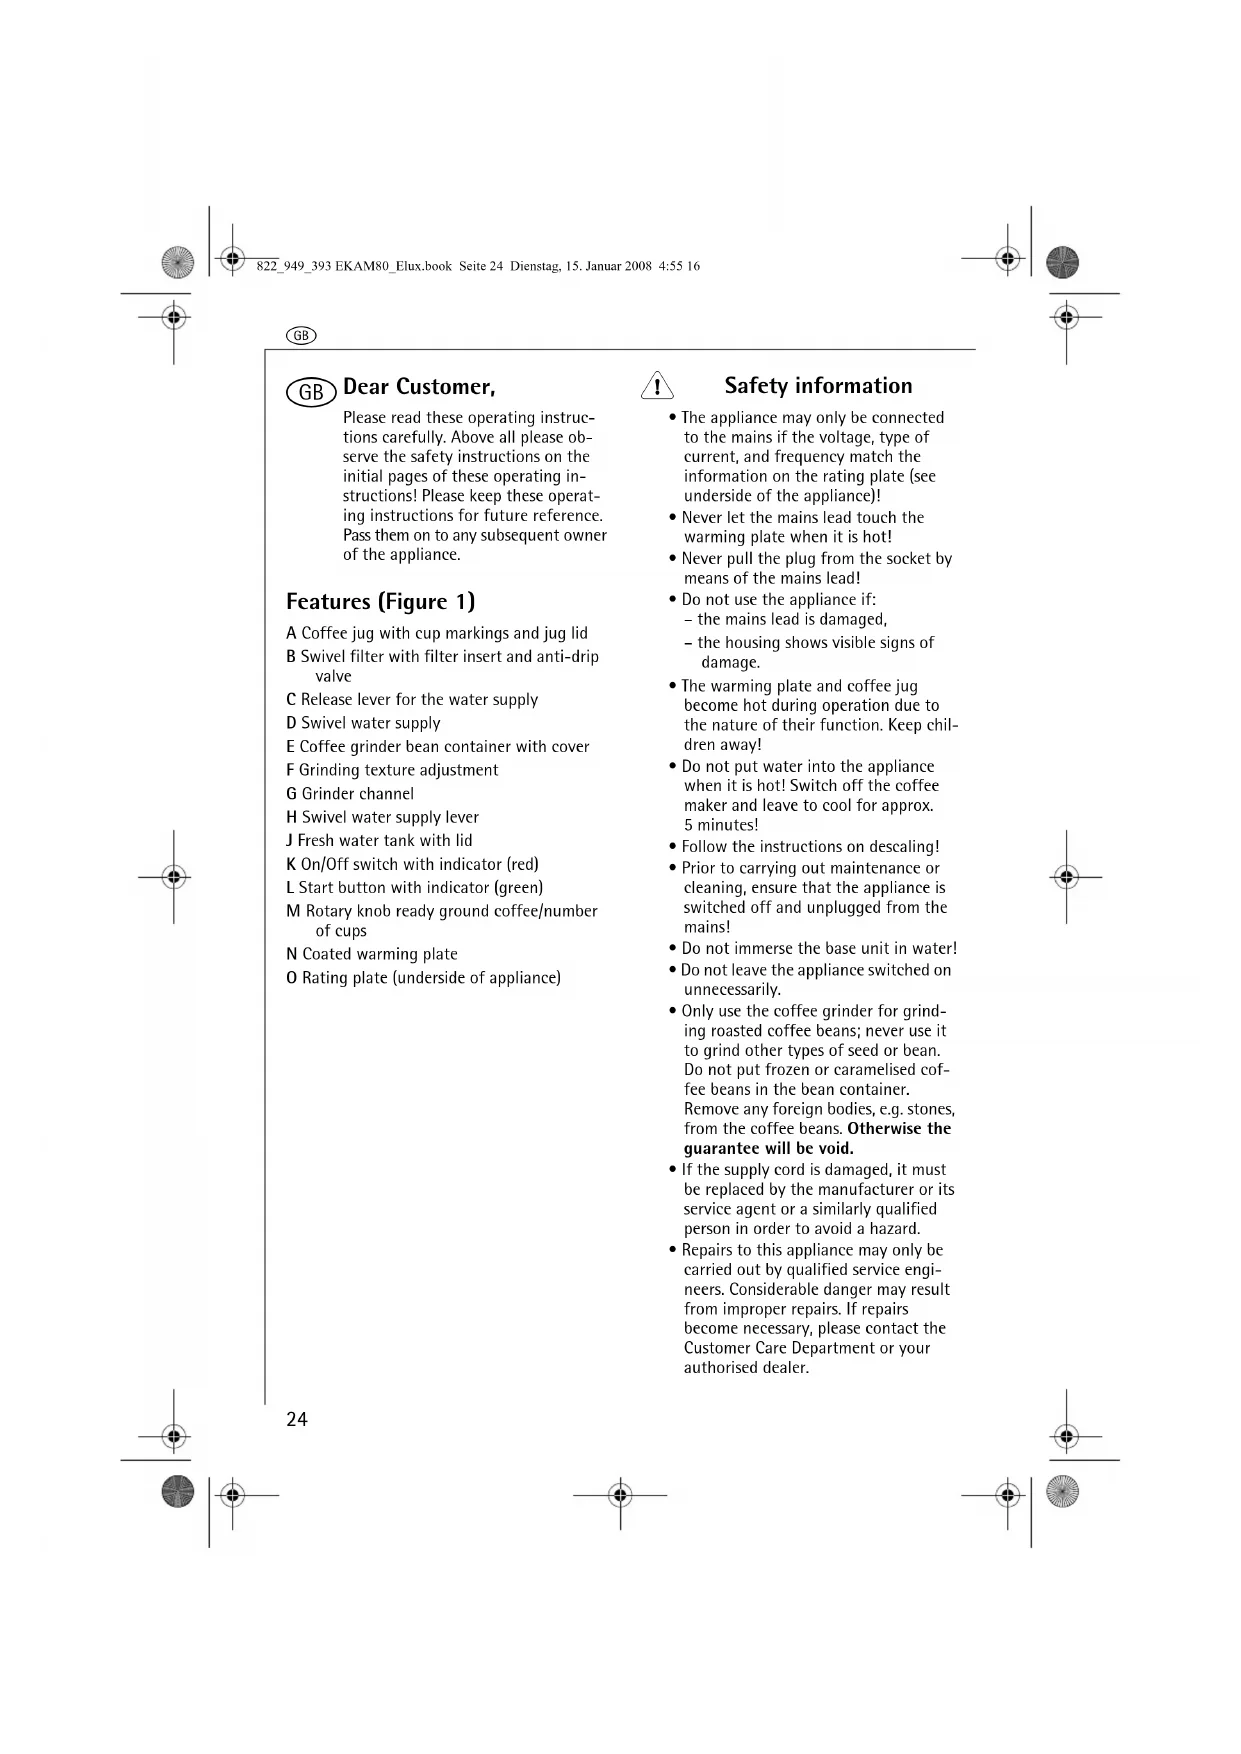
Features (Figure 1)
A Coffee jug with cup markings and jug lid
B Swivel filter with filter insert and anti-drip valve
C Release lever for the water supply
D Swivel water supply
E Coffee grinder bean container with cover
F Grinding texture adjustment
G Grinder channel
H Swivel water supply lever
J Fresh water tank with lid
K On/Off switch with indicator (red)
L Start button with indicator (green)
M Rotary knob ready ground coffee/number of cups
N Coated warming plate
O Rating plate (underside of appliance)

Safety information
- The appliance may only be connected to the mains if the voltage, type of current, and frequency match the information on the rating plate (see underside of the appliance)!
- Never let the mains lead touch the warming plate when it is hot!
- Never pull the plug from the socket by means of the mains lead!
- Do not use the appliance if: - the mains lead is damaged, - the housing shows visible signs of damage.
- The warming plate and coffee jug become hot during operation due to the nature of their function. Keep children away!
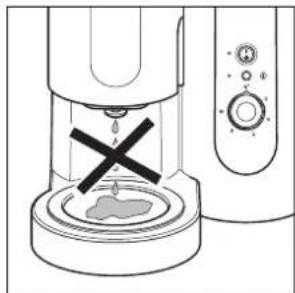
- Do not put water into the appliance when it is hot! Switch off the coffee maker and leave to cool for approx. 5 minutes!
- Follow the instructions on descaling!
- Prior to carrying out maintenance or cleaning, ensure that the appliance is switched off and unplugged from the mains!
- Do not immerse the base unit in water!
- Do not leave the appliance switched on unnecessarily.
- Only use the coffee grinder for grinding roasted coffee beans; never use it to grind other types of seed or bean. Do not put frozen or caramelised coffee beans in the bean container. Remove any foreign bodies, e.g. stones, from the coffee beans. Otherwise the guarantee will be void.
- If the supply cord is damaged, it must be replaced by the manufacturer or its service agent or a similarly qualified person in order to avoid a hazard.
- Repairs to this appliance may only be carried out by qualified service engineers. Considerable danger may result from improper repairs. If repairs become necessary, please contact the Customer Care Department or your authorised dealer.
No responsibility can be accepted for any damage if the appliance is used incorrectly or for the wrong purposes.
- This appliance is not intended for use by persons (including children) with reduced physical, sensory or mental capabilities, or lack of experience and knowledge, unless they have been given supervision or instruction concerning use of the appliance by a person responsible for their safety.
• Children should be supervised to ensure that they do not play with the appliance.
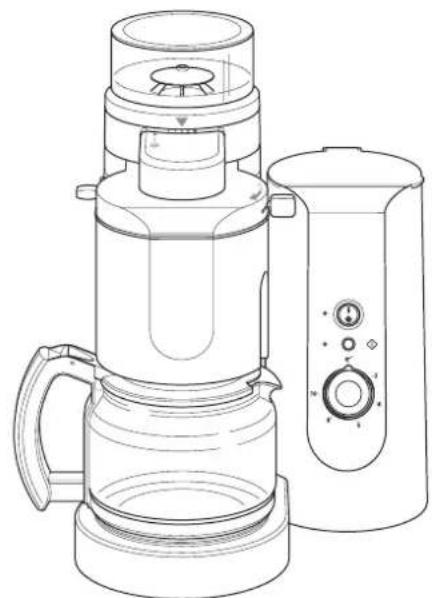
Cable compartment (Figure 2)
Your coffee machine has a cable compartment. If the mains lead is too long, you can push cable that is not needed into the compartment on the rear of the appliance.
Prior to using for the first time
Prior to preparing coffee for the first time, you should perform one or two brews with water only. Fill the fresh water container up to the max. marking with cold water, and with the appliance switched on, allow the water to flow through into the coffee jug without using ground coffee or filter paper. To do this, turn the rotary knob (Figure 1/M) to the position Then switch the appliance on using the On/Off-switch (Figure 1/K) and press the start button (Figure 1/L).
Preparation
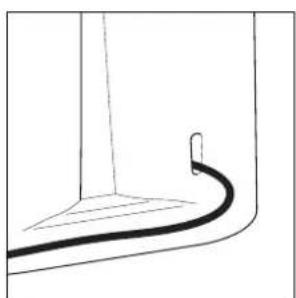
Filling with water (Figure 3)
Raise the lid of the fresh water tank (Figure 1/J).
Fill the container with clear, cold tap water.
You will find cup markings on the coffee jug for measuring out the required quantity.
The markings apply to the quantity of fresh water. As the ground coffee absorbs water, the amount of coffee produced will be less.
Reclose the lid of the fresh water tank.
Never use hot water. Nor should you fill the fresh water container with milk, prepared coffee, tea etc.
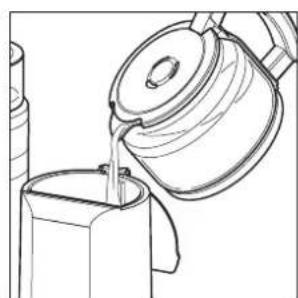
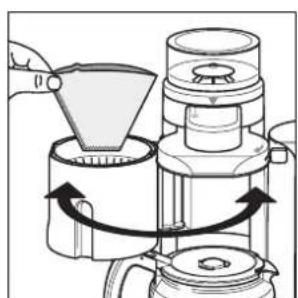
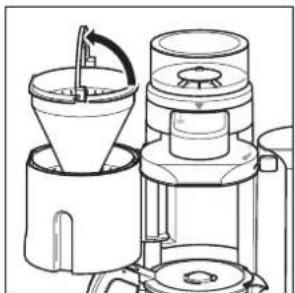
Inserting filter paper (Figure 4)
Swing out the swivel filter (Figure 1/B).
Place size 4 filter paper in the filter insert. Please first fold back the side and lower edge of the paper filter.
Swing the swivel filter back again.
Place the coffee jug with lid on the warming plate (Figure 5)
Coffee grinder
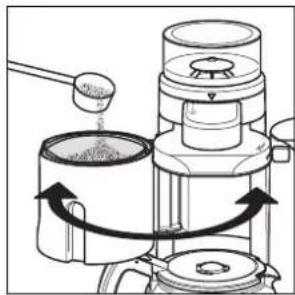
Place coffee beans in the bean container (Figure 6)
The coffee grinder has a bean container (Figure 1/E), which keeps the beans constantly aroma fresh.
Fill the container to the top and fasten firmly with the lid. The bean container holds approximately 125 g of coffee beans.
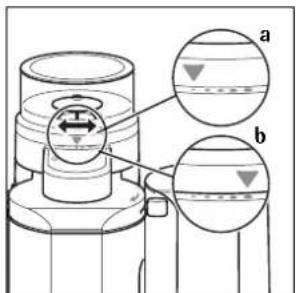
Grinding texture adjustment (Figure 7)
You can change the size of coffee ground to suit the strength of roast.
Turn the bean container (Figure 1/E) to the desired position.
Setting ● (Figure 7/a) is for lightly roasted beans; setting ● (Figure 7/b) for dark roast beans. We recommend beginning with a medium setting which is suitable for the types of coffee that are usually commercially available.
i During the grinding process, it may occur that the grinder channel gets blocked. In this case, please clean the grinder channel and change to another grinder setting
GB
Connecting to the mains supply
Insert plug into mains socket.
Making coffee using ready ground coffee
i You can make coffee using ready ground coffee.
Pour in water.
Swing out swivel filter (Figure 1/B).
Insert filter paper.
Add ground coffee (Figure 8).
Swing swivel filter back.
Place coffee jug on the warming plate.
Turn the rotary knob (Figure 1/M) to the position
Swich the appliance on using the On/Off-switch (Figure 1/K).
The red indicator will come on.
Press the start button (Figure 1/L). The green indicator will flash. The brewing procedure will start.
Making coffee using the coffee grinder
i You can prepare coffee with beans. Therefore you must set the number of cups with the rotary switch (Figure 1/M). The grinder will grind the appropriate amount of coffee beans. 2, 4, 6, 8 or 10 cups can be set.
Pour in water.
Swing out the swivel filter (Figure 1/B).
Insert filter paper.
Swing the swivel filter back.
Place coffee jug on the warming plate.
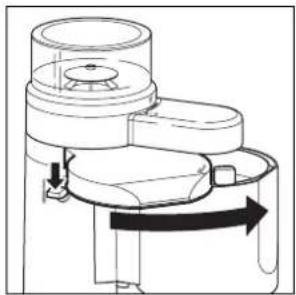
Swing out the water supply (Figure 1/D) using the swivel lever (Figure 1/H) until it engages (Figure 9).
Set the desired number of cups with the rotary switch (Figure 1/M).
Swich the appliance on using the On/Off-switch (Figure 1/K).
The red indicator will come on.
Press the start button (Figure 1/L). Grinding will begin at once, the green indicator flashes quickly. Once the coffee has been ground, the water supply swings back automatically to the brewing position and brewing begins, the green indicator flashes slowly.
Switching off
Switch the appliance off with the On/Off-switch (Figure 1/K). The red indicator goes off.
Warming plate (Figure 1/N)
After brewing the warming plate keeps the coffee in the glass jug warm. Two hours after brewing the warming plate switches off automatically, the green indicator goes off.
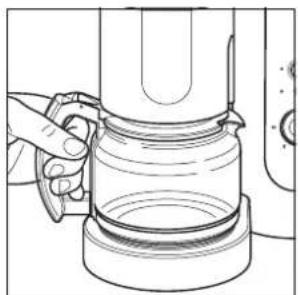
Removing the jug (Figure 11)
When the jug is removed, the anti-drip valve prevents dripping.
Cleaning (It is imperative that these instructions are observed!)
Coffee part
The filter insert can be removed for emptying and cleaning.
Swing out the swivel filter.
Place your finger in the rear handle recess (Figure 12) and pull the bracket up.
This unlocks the filter insert and it can be removed for cleaning.
Activate the anti-drip valve several times during cleaning.
After cleaning the filter insert, fit the swivel filter. Reposition the bracket (Figure 13).
The filter insert is now relocked. Please check that it is positioned and locked correctly!
GB
Only clean the appliance using a damp cloth; never immerse it in water. Only the coffee jug and jug lid are dish-washer safe.
Coffee grinder
From time to time (at the latest when a blockage occurs), it is necessary to clean the grinder channel to free it from oily coffee residues. To do this, proceed as follows:
Remove the plug from the mains.
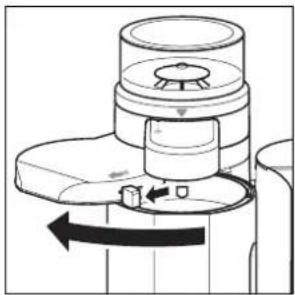
Using a pointed object (e.g. a ball pen) unlock the cover of the grinding channel (Figure 1/G and Figure 14) and pull the cover towards the front.
Swing out the water supply (Figure 1/D) using the swivel lever (Figure 1/H) until it engages (Figure 9).
Insert a paper filter in the swivel filter.
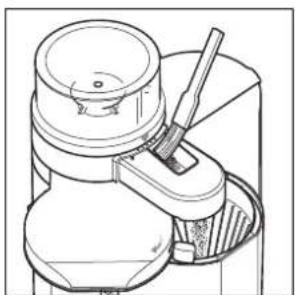
Brush the coffee residue (including that from the rear of the channel) into the paper filter using a suitable item (e.g., paintbrush) (Figure 15). The coffee residue can also be removed using a vacuum cleaner.
Then wipe the grinding channel with a dry cloth.
Empty the paper filter.
Press the release lever (Figure 1/C) to return the water supply to the brewing position (Figure 10).
Push the cover of the grinding channel (Figure 1/G and Figure 14) back on until it engages. When doing so, press the catch down with your finger. Check that the cover is correctly positioned. Your coffee machine is now fully ready for use again.
i If dark, oily coffee beans are used, the grinding channel needs to be cleaned more often than for light beans. To avoid blockages in the grinding channel:
- Do not use frozen coffee beans, as water condenses on them on defrosting and can lead to blockages.
- Position the appliance sufficiently far away from the cooker or a deep fat fryer as fat can cause a blockage.
• Always keep the container for the coffee beans closed.
Every now and again clean the coffee grinder (Figure 1/E) of oily residues from the coffee beans using a dry cloth.
Descaling - to prolong the life of your coffee machine
As a precaution we recommend descaling every three months. If you are using a gold filter, remove it from the filter insert before descaling. Use only an environmentally friendly descaling agent and always follow the manufacturer's instructions. Do not use any descaler based on formic acid. Nor should you use a powder descaling agent.
First fill the fresh water container with water and then add the descaling agent. Never vice versa.
Place the coffee jug with lid on the warming plate.
Allow the descaling solution to work for approximately 15 minutes, then switch on the appliance.
Once the descaling solution has percolated through, switch the appliance off.
i If necessary, repeat the descaling procedure.
Then repeat the procedure at least twice using clear water.
Rinse the coffee jug, jug lid and filter insert thoroughly under running water. Activate the anti-drip valve several times as it is rinsed.
Important
- If the water supply has been inadvertently swung out, use the release lever (Figure 1/C), to swing it back in position (Figure 10).
GB
What to do, if...
- you are unable to swing the swivel filter into the brewing position?
- Ensure that the filter insert is correctly positioned!
- the coffee runs into the jug too slowly?
- Clean the anti-drip valve!
- Descale the appliance (see instructions on descaling).
- Possibly use other paper filters.
Coffee jug
If you break your coffee jug, you can purchase a replacement jug (E-No. 407138479/8) at the appropriate charge from your specialist dealer or from the Customer Care Department.
Technical Data
Mains voltage: 220 - 240 V
Power consumption: 900 - 1000 W
CE
This appliance conforms with the following EC Directives:
• Low Voltage Directive 2006/95/EC
• EMC Directive 89/336/EEC with amendments 92/31/EEC and 93/68/EEC
Disposal

Packaging material
The packaging materials are environmentally friendly and can be recycled. The plastic components are identified by markings, e.g. >PE<, >PS<, etc. Please dispose of the packaging materials in the appropriate container at the community waste disposal facilities.

Old appliance

The symbol 🚗 on the product or on its packaging indicates that this product may not be treated as household waste. Instead it shall be handed over to the applicable collection point for the recycling of electrical and electronic equipment. By ensuring this product is disposed of correctly, you will help prevent potential negative consequences for the environment and human health, which could otherwise be caused by inappropriate waste handling of this product. For more detailed information about recycling of this product, please contact your local city office, your household waste disposal service or the shop where you purchased the product.
Plaque chauffante (Figure 1/N)
Place the coffee jug with lid on the warming plate (Figure 5)
Kohviveski
- Coffee maker with integrated Coffee Mill
- S
- Features (Figure 1)
- Safety information
- Cable compartment (Figure 2)
- Prior to using for the first time
- Preparation
- Filling with water (Figure 3)
- Inserting filter paper (Figure 4)
- Coffee grinder
- Place coffee beans in the bean container (Figure 6)
- Grinding texture adjustment (Figure 7)
- GB
- Connecting to the mains supply
- Making coffee using ready ground coffee
- Making coffee using the coffee grinder
- Switching off
- Warming plate (Figure 1/N)
- Removing the jug (Figure 11)
- Cleaning (It is imperative that these instructions are observed!)
- Coffee part
- Descaling - to prolong the life of your coffee machine
- Important
- What to do, if...
- Coffee jug
- Technical Data
- CE
- Disposal
- Packaging material
- Old appliance
- Plaque chauffante (Figure 1/N)
- Place the coffee jug with lid on the warming plate (Figure 5)
- Kohviveski
Brand : ELECTROLUX
Model : EKAM 80
Category : Coffee maker