6740 - Cd player/recorder ELTA - Free user manual and instructions
Find the device manual for free 6740 ELTA in PDF.
| Product type | CD player/recorder with DVD player, FM/AM radio, 7" TFT screen |
| Brand | ELTA |
| Model | 6740 |
| Dimensions (L x D x H) | 406 x 236 x 149.5 mm |
| Weight | Approximately 3 kg |
| Mains power supply | AC 230 V ~ 50 Hz |
| Battery power supply | 8 UM-2 / C batteries (not included) |
| Screen | TFT 7" (15.5 cm) |
| Supported disc formats | DVD-VIDEO, VIDEO CD, CD-DA, CD-R, CD-RW, MP3-CD, JPEG Photo CD, Kodak Picture CD |
| Radio functions | FM stereo (87.5-108 MHz), AM (525-1615 kHz) |
| USB player | Yes (USB key with music files, JPEG, video) |
| Microphone | 2 MIC jacks with level adjustment, Karaoke function |
| Audio/video outputs | Stereo headphone jack, L/R audio outputs, composite video output |
| Remote control | Yes, with CR2025 battery |
| Laser class | Class I (safe) |
| Power consumption | 25 W |
| Operating temperature | +5°C to +35°C |
| Maintenance and cleaning | Clean with a soft, dry cloth; avoid solvents and abrasive products |
| Safety | Do not open the casing, avoid moisture, unplug before cleaning |
| Repairability | Have all repairs carried out by qualified personnel; contact ELTA customer service |
| Warranty | 24 months after purchase (upon presentation of warranty card) |
Frequently Asked Questions - 6740 ELTA
User questions about 6740 ELTA
0 question about this device. Answer the ones you know or ask your own.
Ask a new question about this device
Download the instructions for your Cd player/recorder in PDF format for free! Find your manual 6740 - ELTA and take your electronic device back in hand. On this page are published all the documents necessary for the use of your device. 6740 by ELTA.
USER MANUAL 6740 ELTA
natural_image
Black-and-white photo of a portable radio with a large screen displaying a beach scene, no visible text or symbols.Portable Radio with built-in DVD 📄 Player and 7" TFT Screen
natural_image
Close-up of a gray electronic device with two ports and three side connectors (no visible text or symbols)6.
AUDIO OUT EXIT SETUP
Portable Radio with built-in DVD Player and 7" TFT Screen
SAFETY INSTRUCTIONS

A triangle with a lightning symbol draws the user's attention to "dangerous voltage" without insulation in the cabinet which may be high enough to entail a risk of electric shock.
WARNING:
RISK OF ELECTRIC SHOCK DO NOT OPEN
CAUTION: TO REDUCE THE RISK OFELECTRIC SHOCK.
DO NOT REMOVECOVER (OR BACK).
THERE ARE NO USER
SERVICEABLEPART INSIDE. REFER SERVICING TO QUALIFIED SERVICE PERSONNEL.

A triangle with an exclamation mark draws the user's attention to important instructions for use and maintenance in the accompanying manual, which should be studied.
FURTHER INFORMATION

Beware of small pieces and batteries, do not swallow them. It may be hazardous to your health and lead into suffocation. Please, Make sure to keep small devices and batteries out of the reach of children.

Important advice regarding hearing protection
Caution:
You care for your hearing, and so do we.
Therefore, use caution while using this appliance.
Our recommendation: Avoid high volumes.
Children should be supervised while using headphones; make sure that the appliance is not set to high volume.
Caution!
High volumes may cause irreparable damage to children's ears.

NEVER let allow anyone, especially children, to put objects into the holes, slots or openings on this devise. This may lead into death due to electric shock. The device must only be opened by a qualified assistant.

Only use the appliance for its intended purpose.
This device may only be used in housings and business premises.

Please keep this instruction manual for further reference.

Instructions on environment protection
Do not dispose of this product in the usual household garbage at the end of its life cycle; hand it over at a collection point for the recycling of electrical and electronic appliances. The symbol on the product, the instructions for use or the packing will inform about the methods for disposal.
The materials are recyclable as mentioned in its marking. By recycling, material recycling or other forms of reutilization of old appliances, you are making an important contribution to protect our environment.
Please inquire at the community administration for the authorized disposal location.

Do not obstruct the ventilation of the device. Make sure, that no curtains, newspapers, furniture or any other type of object are blocking the ventilation system of the apparatus. The ventilation system must be clear of objects at all times! Overheating may lead into serious damage of the device and reduce its performance and lifespan.

Heat and warmth
Do not expose the appliance to direct sunlight. Make sure that the appliance is not subject to direct heat sources such as heaters or open fire. Make sure that the ventilation slots of the appliance are not covered.

Moisture and cleaning
This appliance is not waterproof! Do not immerse player in water. Do not allow player to come in contact with water. If water gets inside the player it may cause serious damage. Do not use cleaning agents that contain alcohol, ammoniac, benzene or abrasives as these could damage the player. For cleaning, use a soft, moistened cloth.

Professional recycling
Batteries and packaging should not be disposed of in the trash. Batteries must be handed over to a collection centre for used batteries. Separating disposable packaging materials is ecologically friendly.
SAFETY INSTRUCTIONS
-
READ INSTRUCTIONS - All the safety and operating instructions should be read before the unit is operated.
-
RETAIN INSTRUCTIONS - The safety and operating instruction should be retained for future reference.
-
HEED WARNINGS - All warnings on the unit and in the operating instructions should be adhered to.
-
FOLLOW INSTRUCTIONS - All operating instructions should be followed.
-
WATER AND MOISTURE - The appliance should not be used near water, for example, near a bathtub, washbowl, kitchen sink, laundry tub, swimming pool or in a wet basement.
-
VENTILATION – Openings in the device serve its proper ventilation, are necessary for the operation and prevent overheating. The unit should be situated so that its location or position does not interfere with its proper ventilation. Do not place on bed, sofa, rug or similar surface that may block the ventilation openings, in a built-in installation, such as a bookcase or cabinet that may impede the flow of air through the ventilation openings.
-
HEAT - The unit should be situated away from heat sources such as radiators, stoves, or other appliances (including amplifiers) that produce heat.
-
POWER SOURCE - The unit should be connected to power supply only of the type described in the operating instructions or as marked on the unit.
-
POWER CORD PROTECTION - Power supply cords should be routed so that they are not likely to be walked on or pinched by items placed upon or against them.
-
NON-USE – During longer periods of non-use please disconnect from mains power supply and antenna.
-
OBJECT and LIQUID ENTRY - Care should be taken so that objects do not fall and liquids are not spilled into the enclosure through openings. Do not disassemble.
-
DAMAGE REQUIRING SERVICE - The unit should be serviced by qualified service personnel when:
a. The power-supply cord or plug has been damaged.
b. Objects have fallen into, or liquid has been spilled into the unit enclosure.
c. The unit has been exposed to rain or moisture.
d. The appliance has been dropped, or the enclosure damaged. Only use controls and adjustments as specified in the manual.
e. The unit does not appear to operate normally.
f. The unit displays serious changes in its performance.
-
SERVICING - The user should not attempt to service the unit beyond that described in the user operating instructions. All other servicing should be referred to qualified service personnel.
-
CLEANING – Disconnect from mains power supply before cleaning. Do not use liquid or spray cleaners, only use a damp cloth. Follow the care and maintenance instructions in this manual.
- LIGHTNING – During lightning and longer periods of non-use please disconnect from mains power supply and antenna.
- SAFETY CHECK – After servicing the unit ask the customer service for a safety check.
- OVERLOAD – To avoid fire and electric shock do not overload wall outlets and convenience receptacles.
- ELECTROSTATIC DISCHARGE – Disconnect from mains power supply and remove batteries if unit malfunctions. Reconnect after a short time.
CAUTION
THIS CD PLAYER IS A CLASS I LASER PRODUCT. HOWEVER, THIS CD PLAYER USES A VISIBLE/INVISIBLE LASER BEAM, WHICH COULD CAUSE HAZARDOUS RADIATION EXPOSURE. BE SURE TO OPERATE THE CD PLAYER CORRECTLY AS INSTRUCTED.
USE OF CONTROLS OR ADJUSTMENTS OR PERFORMANCE OF PROCEDURES OTHER THAN THOSE SPECIFIED HEREIN MAY RESULT IN HAZARDOUS RADIATION EXPOSURE.
TO REDUCE THE RISK OF FIRE OR ELECTRIC SHOCK AND ANNOYING INTERFERENCE USE ONLY THE RECOMMENDED ACCESSORIES.
FURTHER INFORMATION
Setting up location of the device
- Avoid vibrations, impact or tilted surfaces as the internal parts may be seriously damaged.
- Do not place heavy objects on the player.
- Never place the Player on amplifiers or other devices, which can become hot.
Avoid magnetic objects
- Keep magnetic objects such as speakers, at a distance from the player.
Condensation:
Moisture may concentrate on the lens if one of the following situations occurs:
• After turning on a heater.
• In a steamy or very humid room.
• After moving the player from a cold environment to a warm one.
If condensation takes place, correct operation may not be possible or the unit might not work correctly. Do not turn on and do not use it for about 1 hour, until the player is dry.
Moving of the DVD player
- Before moving remove the CD from the player.
It is suggested to remove the CD and to turn off the player for periods of non use.
Saving energy
- It is recommended if the player is not used, to turn the function switch to the "OFF" position. If the player is not used for a long period of time, the player should be unplugged from the AC socket.
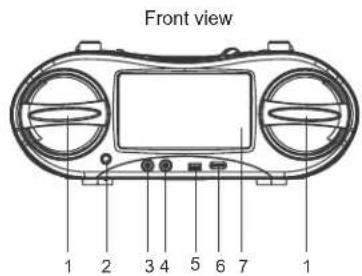
LOCATION OF CONTROLS / CONNECTIONS
Controls
text_image
Front view 1 2 3 4 5 6 7 1
text_image
Top view 9 11 13 15 17 19 21 23 8 10 12 14 16 18 20 22 24Rear view
text_image
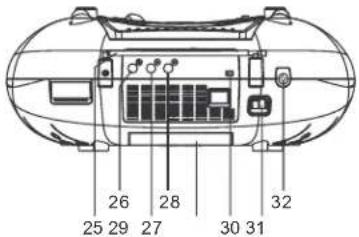
26 25 29 27 30 31 28 32- SPEAKERS
- REMOTE SENSOR
- MIC 1 Jack
- MIC 2 Jack
- USB Port
- MIC LEVEL Adjustment
- TFT-DISPLAY
- FUNCTION SWITCH
- CARRY HANDLE
- VOLUME control
- BBS button
- ADJ button
- PREV button
- NEXT button
- POWER LED
-
CD Door
-
OPEN button CD tray
- FM ST. LED
- FR button
- STOP button
- PLAY/PAUSE button
- FF button
- TUNING control
- BAND switch
- Telescopic antenna
- VIDEO output jacks
- AUDIO output jacks right
- AUDIO output jacks left
- Battery compartment
- TFT ON/OFF switch
- AC jack
- PHONES jack
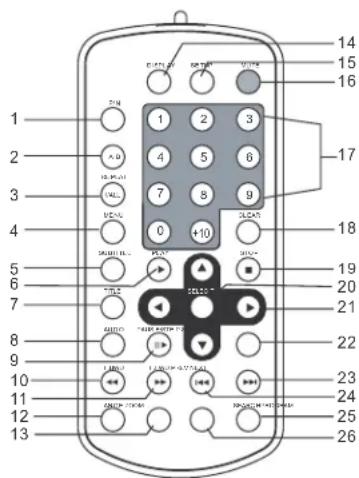
Buttons on the remote control an their functions
text_image
1 2 3 4 5 6 7 8 9 10 11 12 13 14 15 16 17 18 19 20 21 22 23 24 25 26 1 2 3 4 5 6 7 8 9 0 +10 +11 +12 +13 +14 +15 +16 +17 +18 +19 +20 +21 +22 +23 +24 +25 +26- P/N: Changing the TV system
- REPEAT A-B: Repeat a section between A and B.
- REPEAT 1/ALL: Repeat modes
- MENU: Main menu (DVD) / PBC on/off (VCD)
- SUBTITLE
- PLAY
- TITLE (DVD)
- AUDIO: Audio language
- PAUSE/STEP
- F.BWD: fast backward
- F.FWD:fast forward
- ANGLE (DVD)
- ZOOM
- DISPLAY: Showing an information banner
- SETUP
- MUTE
- NUMERICAL KEYS
- CLEAR
- STOP
- SELECT: Selection
- ARROW KEYS
- SLOW: Slow motion
- NEXT
- PREV
- SEARCH
- PROGRAM: Program playback
INSTALLATION AND CONNECTION
Unpacking:
Take out carefully your portable DVD player from the packing. Please keep the packing for further use.
Remove all adhesive strips.
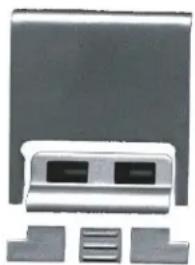
Attachment of the positioners of the player:
Assemble the two parts of both positioners.
natural_image
Close-up of a gray electronic device with two ports and three side connectors (no visible text or symbols)Install the two positioners into the insets at the bottom side of the player and push them into their position, until they snap in.
By lifting the positioners the player can be set into a suitable viewing position.
Batteries:
This system is designed to operate on 230V 50Hz AC mains power supply or 8 batteries type "UM2" or "C". We recommend the usage of alkaline batteries for a longer play time.
Inserting of batteries
- Remove the battery compartment cover by gently pushing downwards and pushing outward and insert 8 batteries type "UM-2" or "C" (preferably alkaline).
PLEASE OBSERVE RIGHT POLARITIES WHICH ARE MARKED WITH "+" AND "-" BESIDE THE BATTERY COMPARTMENT.
- Replace the cover by pushing onto battery compartment.

text_image
CAUTION INDUSTRIC CIRCU DO NOT OPEN NUDDAR BE CHOC ELECTRONICS 100% 80%NOTE: Old batteries may swell and leak. To avoid damage to your device, remove the batteries when the unit is to be stored for long periods of time or if the batteries become exhausted.
NOTE: To usage of battery power will be automatically turned on, if the AC plug is removed from both the wall outlet and the back of the set.
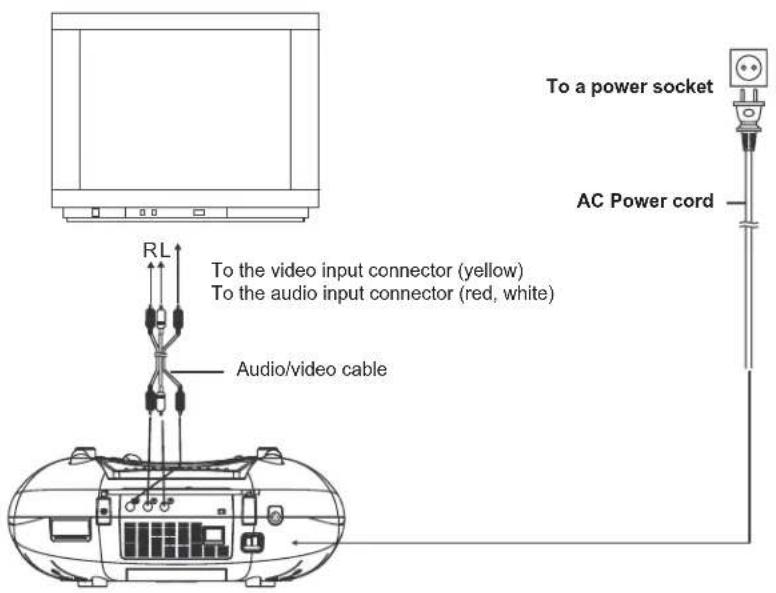
BASIC CONNECTION
It is recommended the player to be connected to a multi-system TV set.
Ensure that the player and other equipment to be connected to the unit are in the standby or off mode and disconnect the AC power cords before building up a connection between them.
Read the instructions before connecting other equipment.
Observe the color coding when connecting audio und video cables.
Notes:
- During the DVD playback the TV volume may be at a lower level than during TV broadcasts. In this case adjust the volume to the desired level.
- If the DVD player is connected to a TV set via a video cassette recorder, the picture may not be played back normally with some DVDs. In this case do not connect the player via the VCR.
- When connecting to a TV set the built in TFT-Display can be turned off with the TFT ON/OFF switch.
Connection to a TV set
text_image
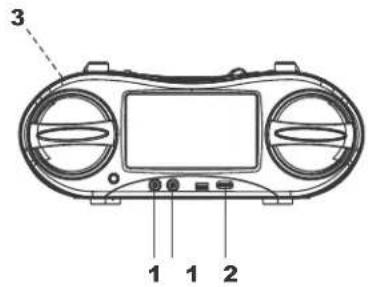
To a power socket AC Power cord RL To the video input connector (yellow) To the audio input connector (red, white) Audio/video cableCONNECTION OF MICROPHONE AND HEADPHONES
- Connection of a microphone.
- Connect a Microphone to one of the MIC jacks.
- Adjust the MIC level to the desired level.
- Connect a headphone to the phone jack.
text_image
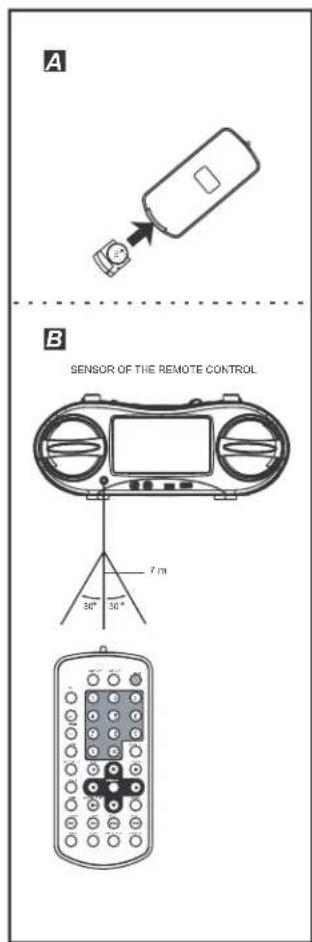
3 1 1 2PREPARATION OF THE REMOTE CONTROL
Installation of the battery A
Insert the battery while observing the correct (+) and (-) polarity as illustrated at the right side.
Notes about the remote control
- Use one CR2025 lithium button cell.
- The battery usually will work for about one year; this depends on how often the remote control unit is used.
- If the remote control unit fails to work even when it is operated near the player, replace the battery.
- Do not attempt to recharge, short-circuit, disassemble, warm up or throw the battery into the fire.
- Do not drop, step on or otherwise impact the remote control. This may lead to malfunction.
- If the remote control unit is not going to be used for a long time, remove the battery.
Remote control operation range B
Direct the remote control unit from no more than about 7 m from the remote control sensor and within an angle about 60° towards the sensor window on the front of the player.
Notes about the operation range of the remote control:
- Do not direct bright lamps towards the sensor.
• The operation range depends on the brightness of the room. - Objects between the remote control and sensor window block the transmission.
- Do not use the remote control at the same time with remote controls of other devices.
text_image
A B SENSOR OF THE REMOTE CONTROL 7 m 30° 36°OPERATING INSTRUCTIONS
GRAPHIC USER INTERFACE
Information and settings can be displayed on the screen of the TV set or DVD player.
PREPARATION
Turn on the TV set and select the video input mode.
OPERATION
- Turn on the player.
- Open the CD tray.
- Place a CD with the labeled side upwards on the black mounting plate with the 3 retaining tie-clips.
- Close the CD tray again and the playback starts automatically.
- When a menu screen appears on the TV set, select the desired track with the arrow keys or the numeric keys and start the playback with SELECT on the remote control or with PLAY/PAUSE on the device.
SETTING OF THE VOLUME LEVEL
Adjust the volume at the device with the VOLUME rotary control between MIN and MAX.
ACTIVATION OF THE BASS INTENSIFICATION
Press the BBS key at the device. The bass sounds out more fully and more strongly. Renewed pressing of the BBS key turns off the bass intensification.
CHAPTER/TRACK FORWARD OR BACKWARD
DVD:
During the playback you can skip to the next or previous chapter with the NEXT or PREV keys.
VCD/CD:
During the playback you can skip to the next or previous track with the NEXT or PREV keys.
FAST FORWARD AND BACKWARD
By pressing of the F.FWD or F. BWD keys on the remote control or FF or FR buttons on the player several times you can scan the CD forward or backward at X2, X4, X8, X20 or normal speed.
During the scan operation the volume level is lowered.
Press the PLAY key to resume the normal playback.
PAUSE OR FRAME PLAYBACK (CD/MP3)
During playback, press PAUSE/STEP on the remote control to pause. Continue the normal playback with PLAY.
PAUSE OR FRAME PLAYBACK (VCD/DVD)
In the pause mode the player goes on one frame with each key press on PAUSE/STEP on the remote control. Continue the normal playback with PLAY or press PAUSE/STEP again.
STOP PLAYBACK
During playback press the STOP button on the remote control or on the player to stop the playback. The player activates its resume function if STOP is pressed once. Press the PLAY button again to start the playback at the location it stopped previously. Open the CD tray or press the STOP button a second time to clear the resume function.
SLOW MOTION
VCD/DVD only
During the playback press the SLOW button on the remote control. First the disc will be played with half speed. Each further pressing of the button reduces the playback speed (up to 1/7 of the normal speed). Continue the normal playback with PLAY.
REPEAT ONCE/REPEAT ALL
During playback press the key REPEAT 1/ALL on the remote control.
DVD
One or all chapters/titles will be repeated.
VCD/CD
One or all tracks will be repeated.
NOTE: With a VCD REPEAT 1/ALL works only if PBC is turned off.
SEARCH FOR A PREFERRED SCENE
- During playback press the SEARCH key on the remote control and highlight the item to be played back (title, chapter or chapter time).
- Enter the desired number or time with the numeric keys.
- Confirm with the SELECT key and the playback of the found scene starts.
- To exit the search menu, press the SEARCH key.
REPEAT A-B
- During the playback press the REPEAT A-B key to set the start point (A) for repetition.
- Press this key again to set the end point (B). The player automatically starts to repeat the section between point A and B.
- Press this key once again to resume the normal playback.
PROGRAMMED PLAYBACK (UP TO 16 MEMORY LOCATIONS)
- During the playback press PROGRAM to invoke the program menu.
- Select memory location(s) with the arrow keys and then enter the desired titles/chapters numbers with the numeric keys. Note: The input of a leading zero is not necessary. Enter with the +10 key on the remote control the tenth of the chapter/title/track number. If the chapter/title/track number is larger than 10, press first the +10 key and then the unit digit. The input of numbers larger than the total number of title/chapter/track numbers on the CD is useless.
Example:
To enter track 3, press "3". To enter track 12, press "+10" and then "2". To enter track 21, press "+10" twice and then "1".
-
Start the programmed playback with PLAY in the menu or on the remote control. By pressing PROGRAM again you can complete the programming mode.
-
To delete the programmed items, select the items and then press the CLEAR key on the remote control. To clear all items, select the
in the menu and then press the SELECT key on remote control. -
You can also finish the program mode by deleting all the items in the program menu.
ZOOM (VCD/DVD)
By continued pressing of ZOOM on the remote control you can zoom out 2, 3 and 4 times and zoom in 1/2, 1/3, 1/4 of the normal size of the picture. If the picture is at 1/4 of its size, a further pressing of the ZOOM key returns to the normal displaying size. In the enlarged picture you can move with the arrow keys.
ON SCREEN DISPLAY INFORMATION
When the player is turned on, press the DISPLAY key on the remote control continuously. On the top of the screen an information banner (current CD type, title number, chapter number, playtime, audio language, audio type, subtitle language and multi angle, etc.) is displayed.
CHANGING THE AUDIO SOUNDTRACK LANGUAGE (DVD/VCD)
You can change the initial adjusted audio language to another language (Only possible with discs, which contain several audio languages).
DVD
During the playback of a DVD press the AUDIO key. The next audio language will be switched over and will be displayed in the information banner on the screen. Note: Audio can be played back in 8 languages (depending on the DVD).
VCD
Pressing the AUDIO button during the playback of a VCD changes the audio output mode: MONO L, MONO R or STEREO.
NOTE: If no audio language is recorded this key does not have any function.
MULTI-ANGLE VIEWING (DVD ONLY)
During the playback press the ANGLE key to display the number of recorded perspectives and select the desired perspective of the scene.
Note: Only with DVD's with multi perspectives of a scene this function is applicable. Selection of scenes, which were recorded from different perspectives (limited by on the DVD stored camera angles).
CHANGING OF THE SUBTITLE LANGUAGE (DVD ONLY)
During the playback of a DVD press SUBTITLE. The subtitle language shown on the screen will change with each pressing of the key.
As soon as the desired subtitle language is displayed in the information banner release the key and the subtitles are shown in this language.
Note: This function works only with DVD's, which were recorded with subtitles in several languages. Subtitles can be displayed in maximally 32 languages (depending on the disc).
VCD PLAYBACK WITH THE PBC FUNCTION
After loading a VCD 2.0/1.0 with PBC the screen displays the disc format and afterwards a menu. Select the desired track with the numeric keys: Press for track 1 to 9 the appropriate key of the numeric block 1 - 9. With the key "0" select track 10. If the track number exceeds 10, press first the key +10 and then a numeric key 1 - 9.
Turn on or off the PBC by pressing the MENU key. If the PBC mode is turned off only 9 preview pictures are shown.
DVD
In order to return to the main menu during the playback, press the MENU key.
TITLE: Playback of the title of a DVD.
MP3/MPEG 4 PLAYBACK
- Place a Mp3/MPEG 4 CD into the CD tray. The screen displays after some seconds all folders on the CD.
NOTE: If there are titles in the root folder, the playback of the first file starts automatically. - Select with the arrow keys a folder and confirm with SELECT.
- The files in this folder will be shown and with the arrow keys a file can be selected. With SELECT you can start the playback.
- With NEXT and PREV you can select a file directly.
- Change with REPEAT 1/ALL the playback mode:
REP 1 – Repeat one file.
REP DIR - Repeat all files in the current folder.
REP ALL – Repeat all files on the current CD.
OFF – Cancel all repeating modes.
PLAYBACK OF KODAK PICTURE CD/JPEG CD
After inserting a Kodak a Picture CD a slideshow starts automatically.
After loading the folders of a JPEG CD are displayed on the screen. Select with the arrow keys the desired folder and confirm with the SELECT key.
The files of this folder will be displayed and you are able to select your favorite picture with the arrow keys up/down. With SELECT the playback will be started. A preview of the picture will be shown by scrolling through the file names.
OPERATION OF KODAK PICTURE CD/JPEG CD 1. REPEAT MODES
During the playback press the 1/ALL key to change the repetition mode.
REP 1- Repeat the current picture.
REP DIR- Repeat all pictures of the current folder. REP ALL- Repeat all pictures of the current CD. OFF- Cancel all repeating modes.
To invoke the preview mode during the playback press STOP.
2. SKIP TO NEXT/PREVIOUS PICTURE
Press NEXT or PREV to skip to the next or previous picture.
If no key is pressed for a few seconds, it will be skipped to next picture automatically
3. ROTATE A PICTURE
With the right arrow key you can turn the picture 90° clockwise and with the left arrow key counterclockwise.
4. MIRROR A PICTURE
Mirror the picture vertically with the up arrow key. Mirror the picture horizontally with the down arrow key.
5. ZOOM A PICTURE IN/OUT
By the continued pressing of ZOOM on the remote control you can zoom out 2, 3 and 4 times and zoom in 1/2, 1/3, 1/4 of the normal size of the picture.
If the picture is at 1/4 of the size of the picture, a further pressing of the ZOOM key returns to the normal displaying size.
In order to display covered areas in the enlarged picture, you can move with the arrow keys inside the displayed section.
6. TRANSITION MODE OF THE SLIDESHOW
During a slideshow you can press cyclically the PROGRAM key, in order to select one of the following picture transitions.
WIPE TOP: Wipe from top.
WIPE BOTTOM: Wipe from bottom.
WIPE L: Wipe from the left.
WIPE R: Wipe from the right.
DIAGONAL WIPE L TOP: Wipe from the left top diagonal.
DIAGONAL WIPE R TOP: Wipe from the right top diagonal.
DIAGONAL WIPE L BOTTOM: Wipe from the left bottom diagonal.
DIAGONAL WIPE R BOTTOM: Wipe from the right bottom diagonal.
EXTEND FROM CENTER H: Extend from the center horizontal.
EXTEND FROM CENTER V: Extend from the center vertical.
COMPRESS TO CENTER H: Compress to the center horizontal.
COMPRESS TO CENTER V: Compress to the center vertical.
WINDOW H: Horizontal jalousie effect.
WINDOW V: Vertical jalousie effect.
WIPE FROM EDGE TO CENTER: Wipe from the edge to the center.
RANDOM: Random picture transition effect.
NONE: Picture transition effects turned off.
SETTING OF COLOR AND BRIGHTNESS (LCD SCREEN)
Use the ADJ button at the device to adjust the color intensity, brightness and contrast. Press the button once to enter the color setting mode. Press the NEXT and PREV keys to adjust the color. Press the button twice to enter the brightness mode and three times to enter the contrast mode.
EXTERNAL MEMORY MEDIA OPERATION (USB)
Preparation of the player for usage of external memory media
-
Turn on the player and rotate the function mode switch to the DVD position. The POWER LED will light up.
-
Insert a USB memory stick containing music, jpeg or video files into the USB port. The USB memory stick will be recognized and read after some seconds. The screen shows now all existing folders.
-
The files in memory stick can be played back like a MP3/MPEG 4 CD. Note: Make sure that there is no CD in the CD tray, if you insert USB memory stick.
KARAOKE-FUNCTION WITH 2 MICROPHONES
Connect a microphone with one of the two microphone sockets MIC1 or MIC 2. You are now able to match the volume level of the microphone signal with the MIC LEVEL control to the total volume.
BASIC SETTINGS
With the basic settings you can make preferential settings for your Player. After entering the basic settings these are stored in your player and can be changed at any time.
GENERAL
-
Press SETUP on the remote control.
-
Use the arrow keys for the selection of the option to be changed and confirm with the SELECT key. The setting page of the screen is displayed with further options. Make changes again with the arrow keys and confirm them with SELECT.
- Move with the arrow keys to another setting on the main setting page.
- Exit the main setting page with the SETUP key on the remote control.
1. SYSTEM SETUP
SYSTEM SETUP
TV SYSTEM
SCREEN SAVER TV TYPE
PASSWORD
RATING
DEFAULT
EXIT SETUP
1.1 TV SYSTEM – Select the TV-mode. Options: NTSC, PAL, PAL60, AUTO Please select one of the options accordingly to your TV set.
1.2 SCREEN SAVER -- If the player is not operated for two minutes or more, a DVD Logo moves across the screen to protect of your TV Set.
Options:
ON: The screen saver is turned on.
OFF: The screen saver is turned off.
1.3 TV TYPE- Selection the TV format. Please select this option accordingly to your TV set. Options:
4:3PS: Pan & Scan
4:3LB: Letterbox
16:9: 16:9 Wide screen TV
1.4 PASSWORD – Enter a password to unlock the system.
Following steps are necessary:
1.4.1 Invoke the SYSTEM SETUP and select with the arrow keys the option PASSWORD. Then select with the right arrow key the input field.
1.4.2 Enter for unlocking the system the user password "0000". In this case select again the input field for changing the password and a new number with four digits. Confirm again enter with SELECT. If the password was changed, for unlocking the system you must enter the new password.
1.4.3 If you have forgotten your password, you can use the main password "8200" for unlocking the system.
NOTE: If in the unlocked system a wrong password was entered, the system becomes locked.
1.5 RATING- Adjusting the rating. If you like to change the rating of the parental lock, please enter first the password for unlocking.
Options: 1 KID SAFE/2 G/3 PG/4 PG 13/5 PG-R/6 R/7 NC-17/8 ADULT
1.6 DEFAULT - Reset to factory settings. Options: RESTORE
2. LANGUAGE SETUP
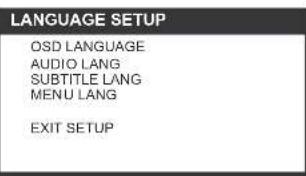
text_image
LANGUAGE SETUP OSD LANGUAGE AUDIO LANG SUBTITLE LANG MENU LANG EXIT SETUP2.1 OSD LANGUAGE – Adjustment of different languages for the "On Screen Display".
Options: ENGLISH GERMAN SPANISH FRENCH PORTUGUESE ITALIAN
2.2 AUDIO LANG – Select the preferred audio language (DVD only, needs software support by the disk).
Options: ENGLISH SPANISH PORTUGUESE ITALIAN FRENCH GERMAN DUTCH JAPAN
2.3 SUBTITLE LANG- Select the preferred subtitle language (DVD only, needs software support by the disk).
Options: ENGLISH SPANISH PORTUGUESE ITALIAN FRENCH GERMAN DUTCH OFF
2.4 MENU LANG - Select the preferred CD menu language (DVD only, needs software support by the disk).
Options: ENGLISH SPANISH PORTUGUESE ITALIAN FRENCH GERMAN DUTCH JAPAN
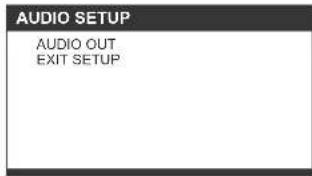
3. AUDIO SETUP
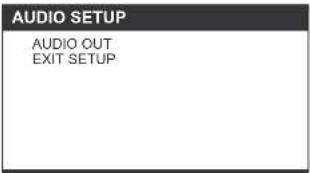
text_image
AUDIO SETUP AUDIO OUT EXIT SETUP3.1 AUDIO OUT - Adjustment of the digital output format.
SPDIF/OFF: If the digital output is not connected to an amplifier, please select this option.
SPDIF/RAW: Used in a home theatre. It can output 5.1 channels audio.
SPDIF/PCM: Only two channels are outputted, but the audio output takes place in higher quality.
4. VIDEO SETUP
VIDEO SETUP
BRIGHTNESS
CONTRAST
HUE
SATURATION
EXIT SETUP
4.1 BRIGHTNESS – Setting of the brightness level of the screen.
Options: 0/2/4/6/8/10/12
4.2 CONTRAST – Setting of the contrast level of the screen.
Options: 0/2/4/6/8/10/12
4.3 HUE - Setting of the color intensity level of the screen.
Options: -6/-4/-2/0/+2/+4/+6
4.4 SATURATION – Setting of the saturation level of the screen.
Options: 0/2/4/6/8/10/12
5. SPEAKER SETUP
SPEAKER SETUP
DOWNMIX
EXIT SETUP
5.1 DOWNMIX
Options: LT/RT - Left/Right mix mode
STEREO – Select this setting, if there is no 5.1
channel amplifier connected to the player.
RADIO OPERATION
RADIO
- Rotate the function selector to the RADIO position.
- Select the desired band with the band rotary switch. Set the volume to a pleasant level.
- Use the TUNING rotary knob to locate the radio stations (Turn the rotary knob to the left or right, until you have the best reception).
- The built in AM antenna and the external FM telescopic antenna are depending on the direction.
- Extend the FM telescopic antenna and rotate its position until you find the best reception
- For AM reception rotate the entire until you find the best reception
- Adjust the volume level to a pleasant listening level.
- To turn off the radio, turn the function selector to the OFF position
NOTES:
- If the stereo signal of a single radio station is weak and you hear a lot of noise, set the band switch to the FM (MONO) position. This often improves the reception.
- If the band switch is set to the FM ST position and a stereo broadcast is received, the FM ST indicator on top of the player will light up.
STEREO HEADPHONE JACK
The player is equipped with a stereo headphone jack on the rear, so that you can listen to the music without disturbing others. Plug in the headphones (not included) and adjust the volume control to a pleasant level.
NOTE: With the connection of external headphones the speakers of the player are turned off.
TROUBLE SHOOTING
If a fault occurs, first check the points listed below before taking the unit for repair
| Symptom | Check/Solution |
| The device can not be turned on or turns off suddenly. | Make sure that the AC adapter is well plugged into an AC socket.Turn the power off and then turn it on again. |
| The batteries are inserted, but the device can not be turned on or turns off suddenly. | Check if the batteries are exhausted.Replace the batteries. |
| The remote control does not work. | Make sure that the battery is inserted in the correct direction.Check if the battery is exhausted. Replace the battery.Direct the remote control directly towards the remote control sensor on the front of the DVD player.Remove obstacles between remote control and the remote control sensor. |
| No picture and sound | Make sure that the A/V cable is connected correctly.Make sure that the disk is a DVD (regional code 1 or all), DVD-RW,VIDEO CD or AUDIO CD.Check if the disk is scratched or dirty.Make sure that the labeled side of the CD is showing upwards.The lens of the DVD player can be dirty. Contact the customer service center for a lens cleaning.Make sure that the TV channel is adjusted to VIDEO or AV if using a TV set.Check if the batteries were inserted in the correct direction and the mains cable is connected. |
| No picture | Make sure that the LCD is turned on. |
| No sound | Check the volume setting. If the volume control is set on MIN, increase the volume level.Check if the headphones are plugged into the headphone jack.The speakers cannot be used together with the headphones. |
| Distorted video or sound | The CD is scratched or bent. |
CLEANING AND CARE
Cleaning of the TFT display
- Turn the player off and wipe the display with a soft cloth.
Cleaning of the housing
- Use a soft and dry cloth. If the surfaces are extremely dirty, use a soft cloth, which is dampened lightly with a mild washing solution.
- Do not use strong solvents, as alcohol, gasoline or solvents, since these can damage the surface of the player.
DISC CARE AND MAINTENANCE
Handling of CDs
- Touch CD's only at the edge, in order that there will be no finger prints on the surface.
Finger prints, dirt and scratches can cause skipping and distortions. - Do not write on the labeled CD side with ball pen or another pen.
- Do not use gasoline, solvent and liquids against static electricity.
- Do not to drop or bend discs.
- Place only one disc in the disc tray.
- Do not try to close the CD tray if the disc is not installed correctly.

Cleaning of CDs
- Only use a soft cloth for cleaning.
- Clean CDs from the center to the edge.
Storage
• After playback store CDs in their cover.
TECHNICAL DATA
Power Supply: AC 230V \~ 50 Hz
Battery operation 8x UM-2/ Baby
(not included)
Remote control: CR2025
TFT-screen: 7" (15.5 cm)
Band: MW (AM)
/ USW (FM)
Frequency range: AM 525 - 1615 kHz
FM 87.5 - 108 MHz
Power Consumption: 25 W
Supported TV systems: NTSC/PAL/PAL60
/AUTO
Operating temperature: +5°C to +35°C
Continuous operation: 150 minutes
Dimensions: 406x236x149.5
(L × W × H)
Weight: ca. 3 kg
Operating Humidity Range: 10 % to 75 %
Supported Discs:
- DVD-VIDEO Disc
12 cm single-sided, single-layer
12 cm single-sided, dual-layer
12 cm double-sided, single-layer
8 cm single-sided, single-layer
8 cm single-sided, dual-layer
8 cm double-sided, single-layer
- VIDEO CD/CD-DA/CD-R/CD-RW/MP3 -CD
12 cm Disc
8 cm Disc
Audio output signal:
- DVD (linear audio)
(1) Frequency range: 20 Hz-20 kHz (48 kHz
sampling) & 20 Hz – 20
kHz (96 kHz sampling)
(2) S/N ratio: > 65 dB
(3) Dynamic range: 90 dB
(4) Wow and flutter: below the measurable
level
- CD Audio:
(1) Frequency rang: 20 Hz-20 kHz
(2) S/N ratio: > 65 dB
(3) Dynamic range: 90 dB
(4) Wow and flutter: below the measurable
level
Specifications are subject to change without notice.
GUARANTEE AND CUSTOMER SERVICE
Before distribution our appliances undergo a strict quality control. However, despite all the care, should the product suffer damage in the production or transport phase, please contact the Elta customer service in Germany: 01805/355460 (0.12 €/min).
Under the lawful user guarantee, the customer has, after his selection, the following guarantee: for the purchased appliance, we extend a 24-month warranty (accompanying warranty card) beginning on the day of purchase. In this time period, we will remedy all defects, demonstrably of material or manufacturing mistakes, through repair or exchange. Damage resulting from unconventional usage of the appliance and mistakes through repairs made by a third party or assembly with foreign parts, are not covered by this guarantee

Contact
Visit our homepage
http://www.elta.de
In case of technical questions:
elta Service-Center
Breitefeld 15
64839 Münster
Hotline Tel: 01805/355460 (0.12 EUR/Min)
Fax: 01805/258619 (0.12EUR/Min)
From abroad you can demand our service under:
Hotline: +49 6071/3902909
365 days per year – Monday till Sunday
service@elta.de
MODEL: 6740
natural_image
Two mechanical component diagrams: a rectangular block with a white cutout and a T-shaped bracket with a threaded end (no text or symbols)natural_image
Close-up of a metallic electronic component with two rectangular slots and three side brackets (no visible text or symbols)LECTURE PROGRAMMEE (JUSQU'A 16 MEMOIRE)
INFORMATIONS A L'ECRAN
WIPE L: Wipe from the left.
text_image
AUDIO SETUP AUDIO OUT EXIT SETUPSupported TV systems: NTSC/PAL/PAL60/AUTO
natural_image
Close-up of a black plastic electronic component with two rectangular slots and three side brackets (no visible text or symbols)natural_image
Close-up of a gray electronic device with two ports and three side connectors (no visible text or symbols)- Connection of a microphone.
- Connect a Microphone to one of the MIC jacks.
- Adjust the MIC level to the desired level.
- Connect a headphone to the phone jack.

text_image
3 1 1 2① 80.
text_image
AUDIO SETUP AUDIO OUT EXIT SETUPBanda: MW (AM) / USW (FM)
natural_image
Close-up of a black plastic electronic component with two rectangular slots and three side brackets (no visible text or symbols)Banda: MW (AM) / USW (FM)
natural_image
Close-up of a gray electronic device with two rectangular buttons and three side brackets (no visible text or symbols)text_image
AUDIO SETUP AUDIO OUT EXIT SETUPDODATKOWE INFORMACJE
natural_image
Close-up of a black rectangular electronic device with two small rectangular buttons and three side connectors (no visible text or symbols)text_image
AUDIO SETUP AUDIO OUT EXIT SETUPGWARANCJA | CENTRUM OBSŁUGI KLIENTA
natural_image
Close-up of a metallic electronic component with two rectangular slots and three side brackets (no visible text or symbols)ON SCREEN DISPLAY INFORMATIE
ON: De screen saver is ingeschakeld.
PG-R/6 R/7 NC-17/8 ADULT
text_image
AUDIO SETUP AUDIO OUT EXIT SETUPDOPLŇUJÍCÍ INFORMACE

natural_image
Close-up of a metallic electronic component with two rectangular slots and a base (no visible text or symbols)AUDIO OUT EXIT SETUP
natural_image
Close-up of a metallic electronic component with two rectangular slots and three side brackets (no visible text or symbols)Bant: MW (AM) / USW (FM)
20 Hz-20 kHz (48 kHz
örnekleme) & 20 Hz
- 20 kHz (96 kHz
örnekleme)
natural_image
Close-up of a gray electronic device with two ports and three side connectors (no visible text or symbols)RO 204.
text_image
CAUTION INDUSTRIC CIRCU DO NOT OPEN NUDDAR BE CHOC ELECTRONICS 100% 80%SETAREA NIVELULUI VOLUMULUI
REPETA O DATA/REPETA TOT
In timpul citirii, apasati tasta REPEAT 1/ALL la telecomanda.
DVD
AUDIO OUT EXIT SETUP
3.1 AUDIO OUT - Reglarea formatului digital de iesire.
natural_image
Close-up of a gray electronic device with two rectangular slots and a side bracket (no visible text or symbols)2.4 MENU LANG - Select the preferred CD menu language (DVD only, needs software support by the disk).
Възможности: ENGLISH SPANISH PORTUGUESE ITALIAN FRENCH GERMAN DUTCH JAPAN
3. AUDIO SETUP