5788 - Cd player/recorder ELTA - Free user manual and instructions
Find the device manual for free 5788 ELTA in PDF.
User questions about 5788 ELTA
0 question about this device. Answer the ones you know or ask your own.
Ask a new question about this device
Download the instructions for your Cd player/recorder in PDF format for free! Find your manual 5788 - ELTA and take your electronic device back in hand. On this page are published all the documents necessary for the use of your device. 5788 by ELTA.
USER MANUAL 5788 ELTA
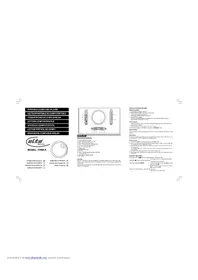
Portable CD Player with Anti- Shock System
Portable CD Player with Anti-Shock System
WARNING:
TO MINIMISE THE RISK OF ELECTRICAL SHOCK, DO NOT EXPOSE THE UNIT TO RAIN OR MOISTURE.
SAFETY PRECAUTION

A triangle with a lighting symbol draws the user's attention to "dangerous voltage" without insulation in the cabinet which may be high enough to entail a risk of electric shock.
WARNING RISK OF ELECTRIC SHOCK DO NOT OPEN
CAUTION:TO REDUCE THE RISK OF ELECTRIC SHOCK, DO NOT REMOVE COVER (OR BACK) THERE ARE NO USER SERVICEABLE PART INSIDE. REFER SERVICING TO QUALIFIED SERVICE PERSONNEL.

A triangle with an exclamation mark draws the user's attention to. Important instructions for use and maintenance in the accompanying manual, which should be studied.
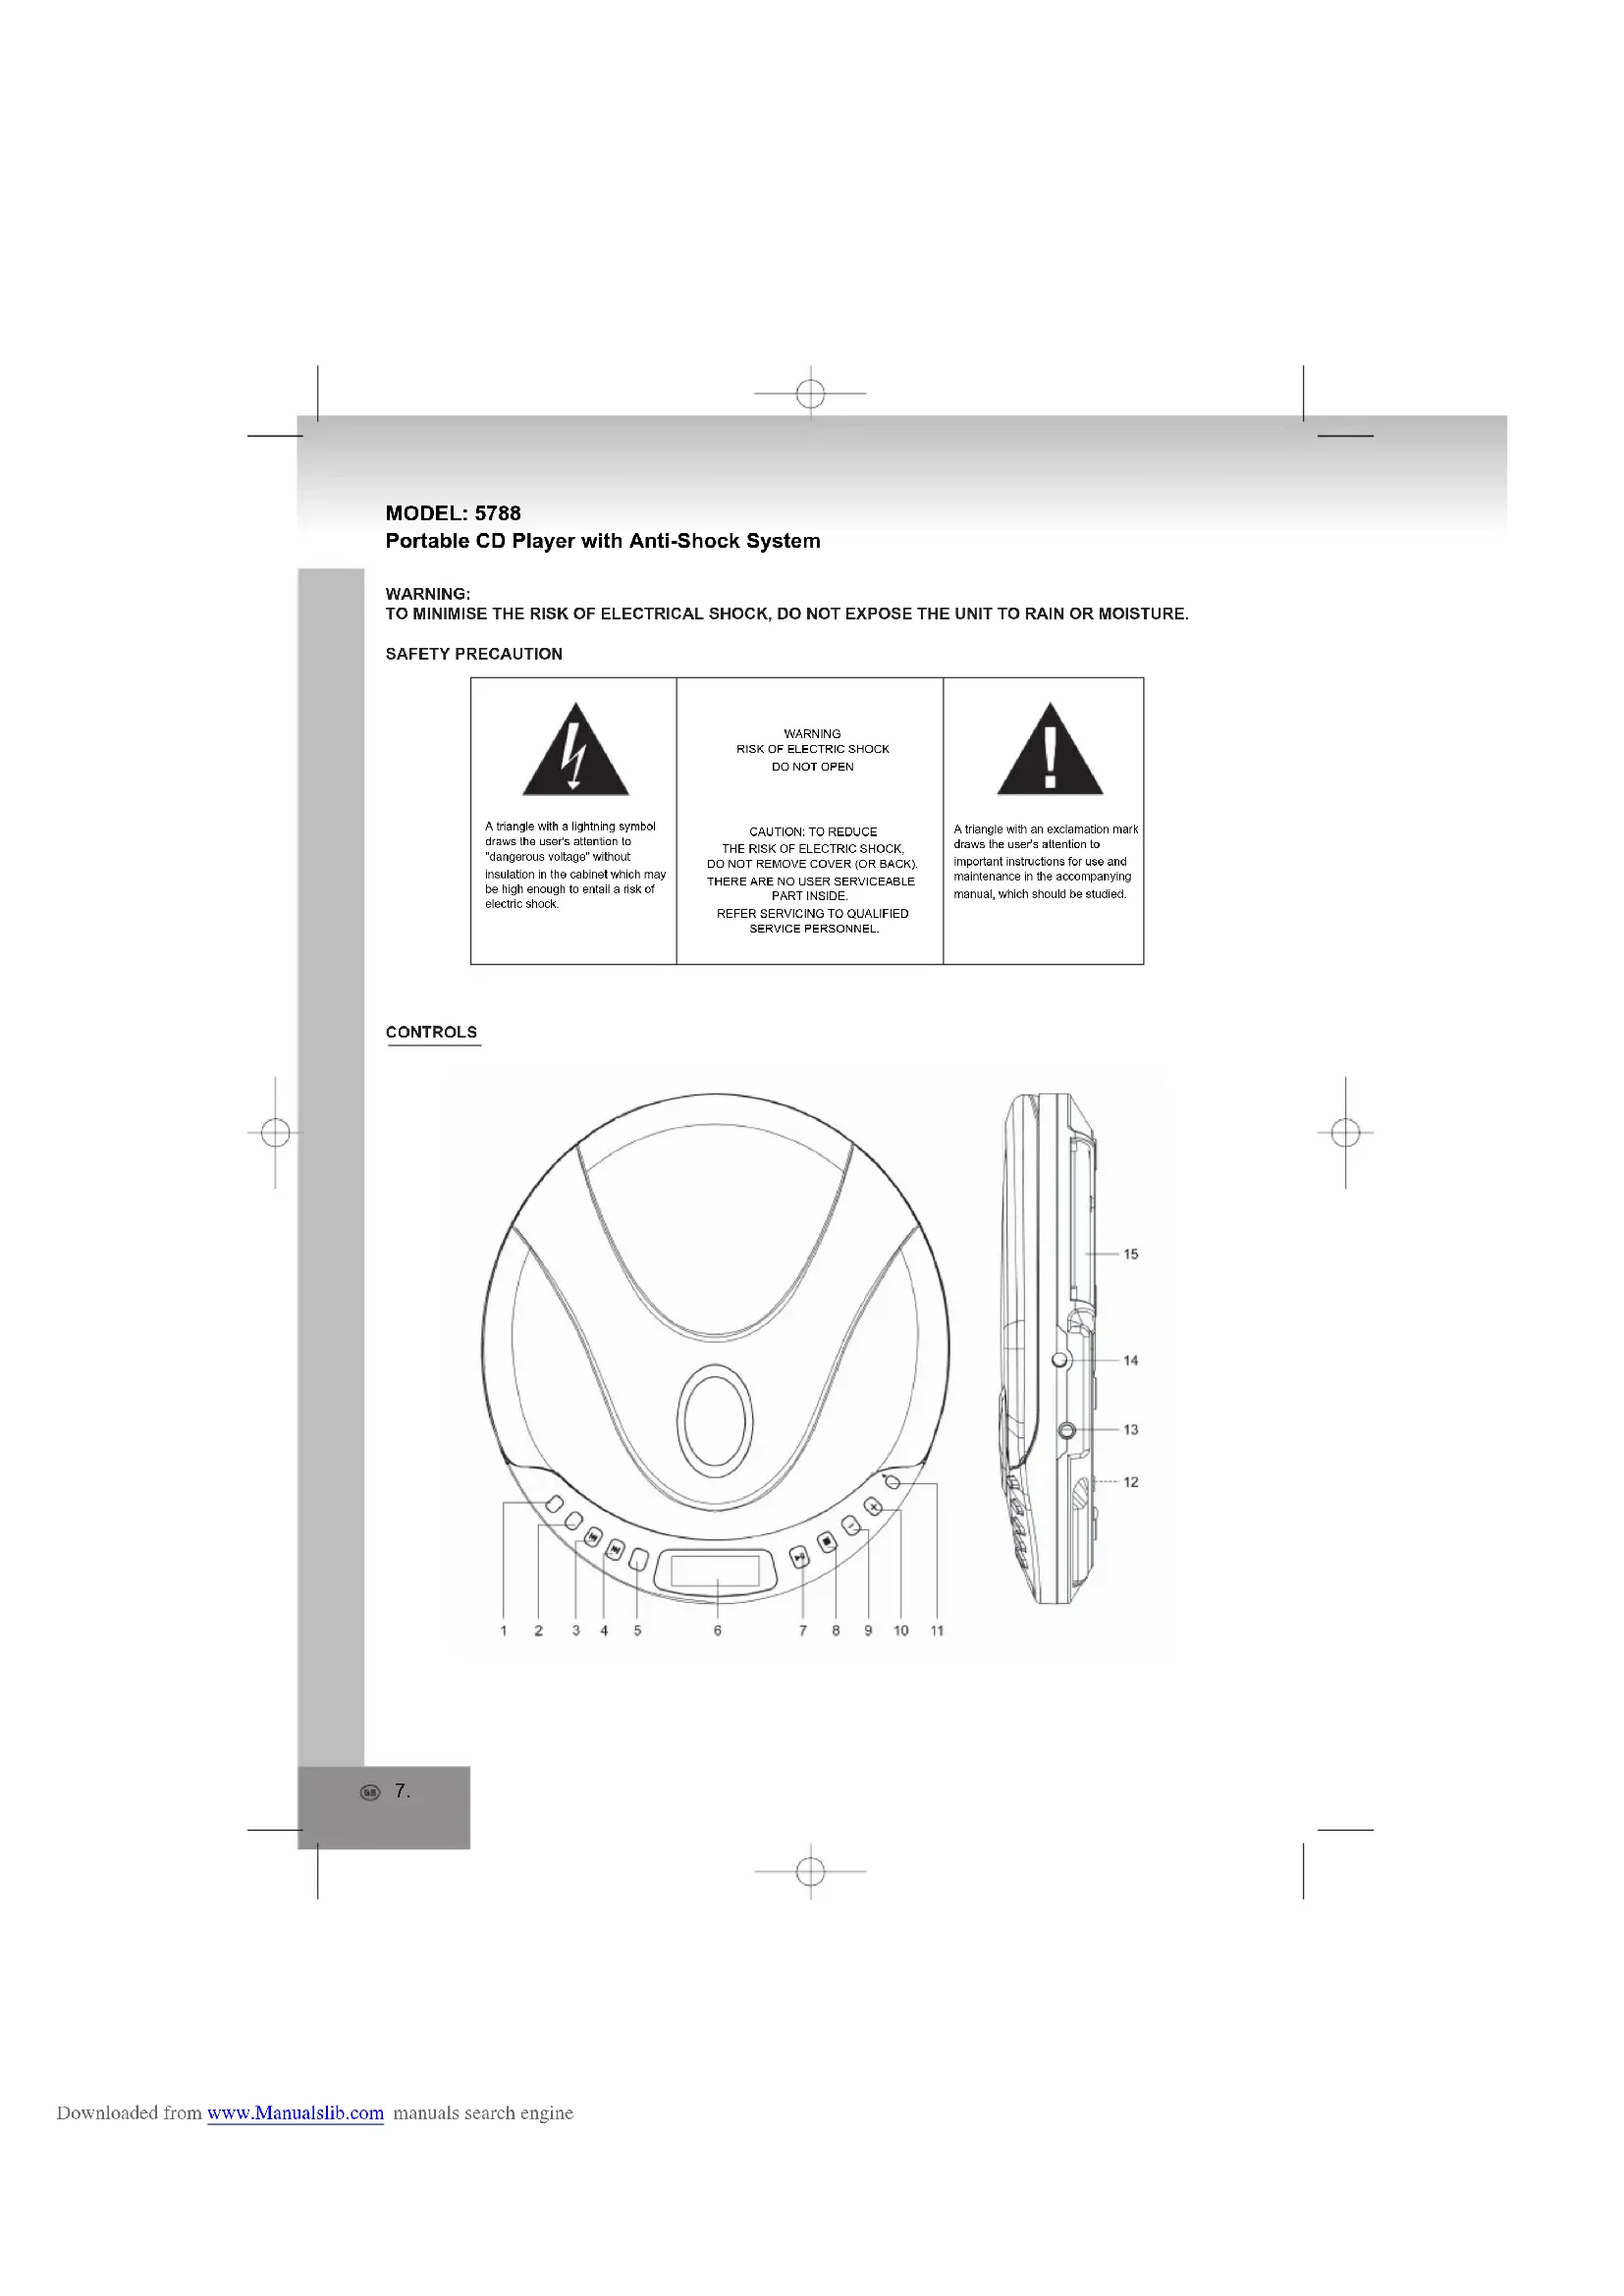
CONTROLS
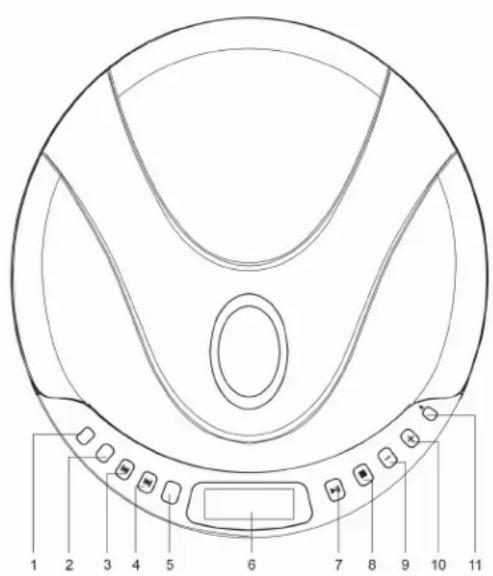
- EQ BUTTON
- MODE BUTTON
- SKIP / SEARCH DOWN BUTTON
- SKIP / SEARCH UP BUTTON
5.PROGB BUTTON(PROGRAM) - LCD DISPLAY
- PLAY/PAUSE BUTTON (POWER ON)
- STOP BUTTON (POWER OFF)
- VOLUME - BUTTON
- VOLUME + BUTTON
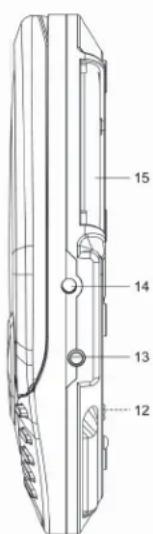
11.▲OPEN BUTTON - HOLD SWITCH
- EARPHONE JACK
14.DC JACK - BATTERY COMPARTMENT
CAUTION
USE OF CONTROLS OR ADJUSTMENTS OR PERFORMANCE OF PROCEDURES OTHER THAN THOSE SPECIFIED HEREIN MAY RESULT IN HAZARDOUS RADIATION EXPOSURE. THE PLAYER SHOULD NOT BE ADJUSTED OR REPAIRED BY ANYONE EXCEPT QUALIFIED SERVICE PERSONNEL.
PREPARATIONS BEFORE USE
Battery Installation
- Open Battery Compartment cover (15).
- Insert 2 batteries (LR6, AA size or equivalent) in the correct polarity as indicated (heavy-duty batteries are recommended).
- Close the cover properly. In order to operate the player on batteries the optional AC/DC adaptor must be disconnected from the DC 4.5V jack.
AC/DC Adaptor
*Before connection, make sure the AC voltage of the adaptor corresponds to your local AC outlet voltage.
1. Plug the DC output of the adaptor into the DC 4.5V Jack.
2. Connect the adaptor (4.5V/500mA with polarity - - ) to a power outlet.
CD PLAYBACK
This CD player is designed to play 8cm and 12cm compact discs without adaptor.
Hold Switch
Set the HOLD (12) switch to "ON" position, all buttons will be locked. Before operation, be sure to set the switch to "OFF" position for normal operation.
Getting Started
- Insert the headphone/earphone plug into the PHONE JACK (13).
- Press the OPEN button (11) to open the disc drive. Insert a disc into the CD compartment with the label upward.
- Press the disc gently around the center area until it clicks so that the disc fits onto the pivot. To remove the disc: Pick up the disc while holding the edge, pressing the pivot gently.
- Close the door manually and press the PLAY/PAUSE (7) button once.
- The Display (6) shows the total number of tracks and the total playing time, and then starts playing the first track
General Operation
Play/Pause button Press once to start playback in the original order. Press again to stop play temporarily (pause).
Stop button - Press once to stop playback.
Press again to turn off the power.
Skip / Search buttons - Press once to skip to next track or back to the beginning of the current track with
Press and hold to search forward or reverse
Volume + Increase volume.
Volume - Decrease volume
Various Playing Modes
Press the MODE button (2) to cycle through the replay modes: NORMAL 1 ALL INT RND NORMAL.
A. Repeat Play
During PLAY mode
- Press the MODE button once to play the current track repeatedly.
The repeat indicator 1 will appear in the display.
During PLAY mode - Press the MODE button twice to play the entire disc repeatedly.
The repeat indicator ALL will appear in the display
NOTE:To cancel REPEAT press the MODE button until the repeat indicator disappears.
B. Intro Scan
In STOP mode
- Press the MODE button three times.
The INT indicator will appear in the display. - Press the PLAY button to play the first 10 seconds of each track on the disc.
NOTE:To cancel INT SCAN press the MODE button until the INT indicator disappears.
C. Random Play
In STOP mode
- Press the MODE button four times.
The RND indicator will appear in the display. - Press the PLAY button, all the tracks on a disc will be played in random sequence.
NOTE: To cancel RANDOM PLAY press the MODE button until the RND indicator disappears.
Program Play
- In stop mode, press the PROG button (5) to create your own playlist.
- "PGM 00 01" will be displayed, "00" stands for the track number, "01" stands for the position on the playlist.
*“PGM 00” is flashing. - Press or button to select the desired track.
- Press the PROG button again to enter the track into memory. The program number is increased by one.
- The program number "01" changes to "02".
- Repeat steps 3 and 4 to program the order of up to 20 tracks.
- Press to start program replay
- To stop the function, press the STOP button once.
- To resume playing in the programmed sequence press PROG and buttons.
- To check the PROG memory press or in PROG play mode.
- To erase the program memory OPEN the disc drive or turn off the power.
DIGITAL ANTI-SHOCK PROTECTION
The digital ANTI-SHOCK PROTECTION uses semiconductor memory to prevent the player from skipping when the unit is subjected to shocks and vibration during play.
When the PLAY/PAUSE button is pressed and the power turns on, the digital Anti-Shock Protection turns on automatically.
The display "ASP" will flash and the function is initialized, when "ASP" stops flashing, the data buffer is full. It will give approximately 60 seconds protection against skipping. If the player is subjected to shocks for more than 60 seconds, some skipping will occur; this is normal and to be expected, the sound will resume once the player has stabilized from the shock.
LOW BATTERY INDICATION
When the low battery indicator appears in the display the batteries must be replaced. Always replace both batteries, do not mix old and new batteries or batteries of different types.
PRESET EQUALIZER
Press the EQ button (1) to cycle through the preset equalizer settings:
NORMAL POP ROCK SRR (surround) NORMAL
The display shows the corresponding setting.
CARE & MAINTENANCE
Cleaning the Lens If the lens becomes dusty, clean it with camera lens blower. Be careful not to scratch the
Cleaning the Cabinet
From time to time, clean the cabinet with a soft dry cloth. For more stubborn stains, slightly moisten the cloth with water or a mild detergent solution. Never use benzene, alcohol or other solvents as they may damage the finish of the cabinet.
SPECIFICATIONS
Output: 20mW (32Ω)
Frequency response: 100Hz - 20KHz
Power Source: 2 x UM-3 or AA size batteries
4.5V (500mA) AC/DC adaptor
Dimensions: 142 mm( W) × 155 mm( D) × 26 mm( H)
Net weight: 226g
** For improvement purposes, specification and design are subject to change without notice. **
TROUBLE SHOOTING GUIDE
Cleaning a Disc
When a disc becomes dirty, clean it with a soft cloth. Wipe the disc from the center to the outside.
Note: Do not use solvents such as benzene, thinners, commercially available cleaners or anti-static spray intended for records.
**Should you experience difficulties in the use of this player please refer to the following chart before contacting your dealer or the place of purchase.
| Troubleshooting Guide | |
| Problem | Points to check |
| Player fails to function. | The disc may be inserted upside down. The disc is not mounted correctly on the pivot. Dirty or defective disc. Dirty pick up lens. Player (disc drive) is not closed. Condensation; allow the player to warm up to room temperature for 60 minutes. AC Power to adaptor is switched off. Auto power off has occurred, press PLAY button to restore power. Weak batteries. Hold switch is in ON position, switch to OFF. |
| No sound from Earphones. | Earphone plug is not firmly inserted into the phones jack. |
| No sound when connected to external amplifier. | Connection is incorrect. Power to an external amplifier not switched on. |
| Intermittent Sound. | Dirty or defective disc. Dirty pick up lens. The player is subject to excessive vibration or shock. Low battery power. Poor microphone connection. |
WARNING:
TO MINIMISE THE RISK OF FIRE OR ELECTRICAL SHOCK, DO NOT EXPOSE THE UNIT TO RAIN OR MOISTURE. DO NOT OPEN THE PLAYER AS IT CONTAINS DANGEROUS VOLTAGE. ONLY QUALIFIED TECHNICIANS ARE ALLOWED TO CARRY OUT REPAIR AND SERVICE.
CARE AND MAINTENANCE
Do not subject electronic devices to extreme temperatures or moisture, do not use in bathrooms or near sloves, ovens or healers.
This player is manufactured to the highest safety and quality standards. Nevertheless, take care when handling electric devices.
Clean only after disconnecting from mains power supply, use a slightly damp cloth. Do not use polishing or other chemical agents to avoid damaging the surfaces.
READ INSTRUCTIONS
Read all safety and operating instructions before operating the player and keep them for future references.
Do not place any objects on top of the player.
Cables should be routed so that they are not likely to be walked on or pinched by items placed upon or against them, paying particular attention to cords at plugs, convenience receptacles, and the point where exit from the player.
Do not overload wall outlets, extension cords, or integral convenience receptacles as this may result in a risk of fire or electric shock.
SERVICE AND REPAIRS
Do not attempt to service this player yourself as opening or removing covers may expose you to dangerous voltage or other hazards. Refer all servicing to qualified service personnel.

Please ensure that children do not put small parts into their mouth or swallow them. Take special care with the packing materials.

HEARING PROTECTION
Your health means a lot to us. Please ensure that the volume is set in such a way, that hearing damage is impossible. Avoid high volume. Please also ensure reasonable volume if the player is used by children.

Never push objects of any kind through openings into this player as they may touch dangerous voltage points or short-out parts that could result in a fire or electric shock. Never spill liquid of any kind on the product.

Use only for intended use.

Read all safety and operating instructions before operating the player.

The recycling of materials will help to conserve natural resources.
This symbol on the product or on its packaging indicates that it shall not be treated as household waste. Instead it shall be handed over to the applicable collection point for the recycling of electrical and electronic equipment. By proper waste handling of this product you ensure that it has no negative consequences for the environment and human health, which could otherwise be caused if this product is thrown into the dustbin; please ensure that it is collected separately for proper recycling in accordance with your local regulations.

Heat
Do not subject the player to direct sunlight or heat sources such as heaters or open fire. Please ensure that ventilation openings are not blocked.

This player is not waterproof. Do not bring in contact with water. Clean only with a slightly damp cloth. Do not use cleaning agents containing alcohol, ammonia, benzene or abrasives.

Dispose batteries environmentally acceptable
Batteries do not belong into the domestic waste. Instead it shall be handed over to the applicable collection points for used batteries. Never throw batteries into the fire.
MODELE:5788
INDICATION BATTERIE FAIBLE
Dimensions: 142mm (W) x 155mm (D) x 26mm (H)
Poids net: 226g
NORMAL COI CAII. INT ND NORMAL
NORMALPOPROCK SRR (surround)NORMAL
142mm (L) x 155mm (A) x 26mm (Al)
Peso neto: 226a
No intolerance to the use of this product, except for those who are not allowed to do so. No intolerance to the use of this product, except for those who are not allowed to do so.

WSTEPNIE USTAWIONY KOREKTOR
Afmeting: 142mm (B) x 155mm (D) x 26mm (H)
Netto gewicht: 226g
NAPAJECI SNURA A UMISTENI
ZAYIF HAFIZA GÖSTERGESI
142mm (W) x 155mm (D) x 26mm (H)
Net agiriik: 226g