6733 - Cd player/recorder ELTA - Free user manual and instructions
Find the device manual for free 6733 ELTA in PDF.
User questions about 6733 ELTA
0 question about this device. Answer the ones you know or ask your own.
Ask a new question about this device
Download the instructions for your Cd player/recorder in PDF format for free! Find your manual 6733 - ELTA and take your electronic device back in hand. On this page are published all the documents necessary for the use of your device. 6733 by ELTA.
USER MANUAL 6733 ELTA
Beware of small pieces and batteries, do not swallow them. It may be hazardous to your health and lead into suffocation. Please, Make sure to keep small devices and batteries out of the reach of children.

Important advice regarding hearing protection Caution: You care for your hearing, and so do we.
Therefore, use caution while using this appliance. Our recommendation: Avoid high volumes.
Children should be supervised while using headphones; make sure that the appliance is not set to high volume.
Caution!
High volumes may cause irreparable damage to children's ears.

NEVER let allow anyone, especially children, to put objects into the holes, slots or openings on this devise. This may lead into death due to electric shock. The device must only be opened by a qualified assistant.

Only use the appliance for its intended purpose.
This device may only be used in housings and business premises.

Please keep this instruction manual for further reference.

Instructions on environment protection
Do not dispose of this product in the usual household garbage at the end of its life cycle; hand it over at a collection point for the recycling of electrical and electronic appliances. The symbol on the product, the instructions for use or the packing will inform about the methods for disposal.
The materials are recyclable as mentioned in its marking. By recycling, material recycling or other forms of re-utilization of old appliances, you are making an important contribution to protect our environment.
Please inquire at the community administration for the authorized disposal location.

Do not obstruct the ventilation of the device. Make sure, that no curtains, newspapers, furniture or any other type of object are blocking the ventilation system of the apparatus. The ventilation system must be clear of objects at all times! Overhealing may lead into serious damage of the device and reduce its performance and lifespan.

Heat and warmth
Do not expose the appliance to direct sunlight. Make sure that the appliance is not subject to direct heat sources such as heaters or open fire. Make sure that the ventilation slots of the appliance are not covered.

Moisture and cleaning
This appliance is not waterproof. Do not immerse player in water. Do not allow player to come in contact with water. If water gets inside the player it may cause serious damage. Do not use cleaning agents that contain alcohol, ammoniac, benzene or abrasives as these could damage the player. For cleaning, use a soft, moistened cloth.

Professional recycling
Batteries and packaging should not be disposed of in the trash. Batteries must be handed over to a collection centre for used batteries. Separating disposable packaging materials is ecologically friendly.
SAFETY INSTRUCTIONS
- READ INSTRUCTIONS - All the safety and operating instructions should be read before the unit is operated.
- RETAIN INSTRUCTIONS - The safety and operating instruction should be retained for future reference.
- HEED WARNINGS - All warnings on the unit and in the operating instructions should be adhered to.
- FOLLOW INSTRUCTIONS - All operating instructions should be followed.
- WATER AND MOISTURE - The appliance should not be used near water, for example, near a bathtub, washbowl, kitchen sink, laundry tub, swimming pool or in a wet basement.
- VENTILATION - Openings in the device serve its proper ventilation, are necessary for the operation and prevent overheating. The unit should be situated so that its location or position does not interfere with its proper ventilation. Do not place on bed, sofa, rug or similar surface that may block the ventilation openings, in a built-in installation, such as a bookcase or cabinet that may impede the flow of air through the ventilation openings.
- HEAT - The unit should be situated away from heat sources such as radiators, stoves, or other appliances (including amplifiers) that produce heat.
- POWER SOURCE - The unit should be connected to power supply only of the type described in the operating instructions or as marked on the unit.
- POWER CORD PROTECTION - Power supply cords should be routed so that they are not likely to be walked on or pinched by items placed upon or against them. Always hold the plug rather then the power cable when disconnecting from the mains outlet; never pull the cable.
- NON-USE - During longer periods of non-use please disconnect from mains power supply and antenna.
- OBJECT AND LIQUID ENTRY - Care should be taken so that objects do not fall and liquids are not spilled into the enclosure through openings.
- DAMAGE REQUIRING SERVICE - The unit should be serviced by qualified service personnel when:
a. The power-supply cord or plug has been damaged.
b. Objects have fallen into, or liquid has been spilled into the unit enclosure.
c. The unit has been exposed to rain or moisture.
d. The appliance has been dropped, or the enclosure damaged. Only use controls and
adjustments as specified in the manual.
e. The unit does not appear to operate normally.
13. SERVICING - The user should not attempt to service the unit beyond that described in the user operating instructions. All other servicing should be referred to qualified service personnel.
14. CLEANING - Disconnect from mains power supply before cleaning. Do not use liquid or spray cleaners, only use a damp cloth. Follow the care and maintenance instructions in this manual.
15. LIGHTNING - During lightning and longer periods of non-use please disconnect from mains power supply and antenna.
16. SAFETY CHECK - After servicing the unit ask the customer service for a safety check.
17. OVERLOAD - To avoid fire and electric shock do not overload wall outlets and convenience receptacles.
18. ELECTROSTATIC DISCHARGE - Disconnect from mains power supply and remove batteries if unit malfunctions. Reconnect after a short time.
CAUTION
THIS CD PLAYER IS A CLASS 1 LASER PRODUCT. HOWEVER, THIS CD PLAYER USES A VISIBLE / INVISIBLE LASER BEAM, WHICH COULD CAUSE HAZARDOUS RADIATION EXPOSURE IF DIRECTED. BE SURE TO OPERATE THE CD PLAYER CORRECTLY AS INSTRUCTED.
INVISIBLE LASER RADIATION WHEN COVER IS OPEN OR THE SECURITY INTERLOCK
DEFEATED. DO NOT EXPOSE TO BEAM!
DO NOT TOUCH THE LASER LENS.
USE OF CONTROLS OR ADJUSTMENTS OR PERFORMANCE OF PROCEDURES OTHER THAN THOSE SPECIFIED HEREIN MAY RESULT IN HAZARDOUS RADIATION EXPOSURE.
TO PREVENT FIRE, ELECTRIC SHOCK AND INTERFERENCE, USE ONLY RECOMMENDED ACCESSORIES AND DO NOT EXPOSE TO RAIN OR HUMIDITY.
Setting a safe volume level
- If you continually listen to loud music, your hearing gradually adapts to it and gives you the impression that the volume is lower.
What seems normal to you can actually be damaging.
To protect yourself from this, set the volume to a low level. - Increase the volume slowly, until you can hear clearly and without problems.
- Damage to your hearing can be extensive and cannot be reversed.
If you notice a hearing problem, please consult a doctor.
Further notes on the unit:
- When moving the unit from a cold to a warm environment condensation might form. In such a case malfunctions are not to be precluded.
Do not turn on and do not use it for about 1 hour, until the unit is dry. - Place the unit on a smooth, flat surface.
- When disconnecting the unit from the mains supply be sure to remove the mains plug from the wall outlet and not only the plug from the AC INPUT jack at the rear of the unit. To completely disconnect the unit from the mains supply you need to remove the mains plug from the wall outlet.
- Do not expose to dripping or splashing liquids. Do not place objects filled with liquids, such as vases, on the device.
- Operate the unit under moderate climate conditions only.
- Always close the CD-door to keep the CD drive free from dust. When cleaning, wipe the CD-drive compartment with a soft, dry cloth.
The mechanic parts of the unit contain self-lubricating bearings. Do not oil or lubricate!
POWER SUPPLY

Whenever possible, connect the unit to the mains supply to conserve battery lifetime. Disconnect the mains plug before inserting the batteries.
Batteries (not included)
Open the battery compartment and insert 8 batteries type LR-14, UM-2 or C (preferably Alkaline). Please observe right polarities which are marked with "+" and "-" in the battery compartment.
Further remarks concerning the batteries
- Please follow the security and operating instructions of the battery manufacturer.
- Keep the batteries away from children and pets.
- Do not throw the batteries into fire. Do not expose to heat or fire.
- Disposal of batteries: Disposc e exhausted batteries in compliance with local laws and regulations. Please contact your waste disposal authorities for further information.
- Do not use old with new batteries.
- Do not use batteries of different types: e.g. alkaline batteries with zinc-carbon batteries. Only use batteries of the same type.
- Remove the batteries during longer periods of non-use.
Power supply operation
- Connect the mains power cable to a 230V ~ 50Hz wall outlet.
- Operate the unit only with power supply that corresponds with the specifications on the type label.
- Insert the smaller plug of the power cord into the AC-jack. Make sure the plug is completely inserted.
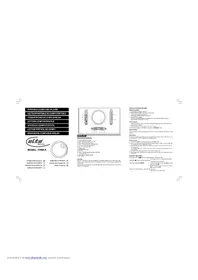
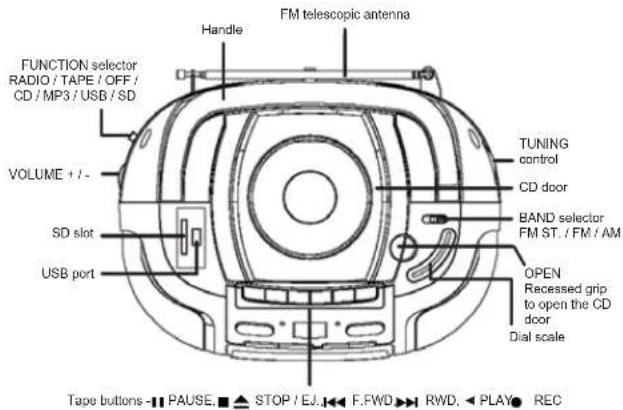
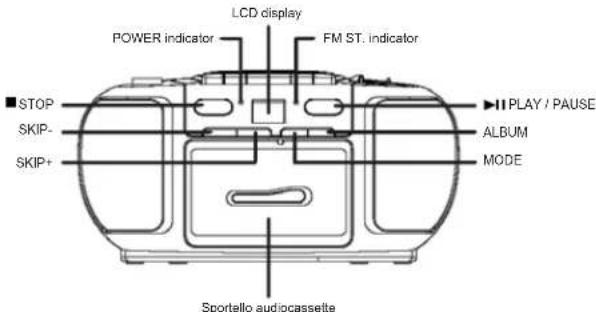
LOCATION OF CONTROLS
BASIC OPERATION
On/Off
To avoid unnecessary power consumption, please set FUNCTION selector to OFF position when the unit is not in use. In ON mode the POWER indicator turns red.
- Select the desired mode with the FUNCTION selector: RADIO, TAPE / OFF or CD / MP3 / USB / SD.
- Set the desired volume with VOLUME + / -
- Set the FUNCTION selector to OFF position to turn off the unit.
RADIO RECEPTION
Recommendations for better reception:

Medium Wave (AM): The device has a built-in AM-antenna; change the position of

Radio Operation
- Set the FUNCTION selector to RADIO position.
- Select the desired frequency band with the BAND selector; FM, FM ST, or AM.
- Tune into your favorite radio station with TUNING control.
- If selecting FM stereo and tuning into a stereo station, FM ST, on front of the unit turns on.
- Set the desired volume with VOLUME + / -
- Set the FUNCTION selector to OFF position to turn off the unit.
CD Playback
The CD-player can read Audio CDs, MP3 CDs, CD-R and CD-RW discs. Do not attempt to play Data CDs or VCD / DVD discs.
- Set the FUNCTION selector to CD / MP3 / USB / SD position. The display shows "--" for a moment.
- Open the CD compartment manually with the recessed grip OPEN; OP is displayed.
- Insert a CD, CD-R or CD-RW with the label up and close the CD compartment again manually. At first the total number of tracks is displayed for a moment, afterwards the display changes to 01 and playback starts automatically. The corresponding track number is displayed.
- In case playback does not start (depending on the disc), please press▶PLAY / PAUSE to start playback of the first track manually.
-
Press PLAY / PAUSE to pause playback; press again to continue playback. In pause mode flashes.
-
Press STOP to stop playback; the display again shows the total number of tracks.
Notes: CD playback is also stopped when:
a. opening the CD compartment;
b. sliding the FUNCTION selector to RADIO or TAPE / OFF positions;
c. all tracks on the CD have been played
Skip Mode
In playback mode press SKIP- or SKIP+ to skip to the previous or next track.
1. Select the track in playback, stop or pause modes with SKIP- or SKIP+ and start playback by pressing▶PLAY / PAUSE.
2. Press SKIP+ repeatedly to skip to the next track(s), until the desired track number is displayed.
3. Press SKIP- once to skip to the beginning of the current track.
4. Press SKIP- repeatedly to skip to the previous track(s).
Fast Forward And Rewind
Press and hold SKIP+ or SKIP- to access fast forward or rewind functions through the track to search for a certain position.
Program Playback
Up to 20 tracks can be programmed in your desired sequence; any track can be programmed more than once.
- Before programming, please press STOP and MODE. The display shows P01 and PROG.
- Select the first desired track with SKIP+ or SKIP-
- Save the track with MODE. P02 and PROG flash in the display. Now select the next track.
- Repeat steps 2 and 3 to program further tracks, the maximum number of tracks is 20.
- Press PLAY/ PAUSE to start playback of the tracks in your desired sequence.
Delete Program
Follow these steps to delete the program:
1. Open the CD compartment.
2. Set the FUNCTION selector to RADIO or TAPE / OFF positions.
3. Press STOP
Notes for CD-R / CD-RW users:
Depending on CD bumer, make of CD and bumer speed, reading problems may occur.
Playback Modes
Several playback modes are available on the unit: press MODE to access and select.
1. Press MODE once to repeat the current track. The display shows REP besides track number and
2. Press MODE twice to repeat the disc in its original sequence. The display shows REP ALL, besides track number and
3. Press MODE three times to play all tracks on the disc once in random sequence. The display shows RAND besides track number and
4. Press MODE again to return to normal playback mode. The display shows again track number and
MP3 CD PLAYBACK
1 Set the FUNCTION selector to CD / MP3 / USB / SD position. The display shows "---" for a moment.
-
Open the CD compartment manually with the recessed grip OPEN; OP is displayed.
-
Insert an MP3 CD with the label up and close the CD compartment again manually. The display shows MP3, and 001 and playback starts automatically. The corresponding track number is displayed.
-
In case playback does not start (depending on the disc), please press PLAY / PAUSE to start playback of the first track manually.
-
Press PLAY / PAUSE to pause playback; press again to continue playback. In pause mode flashes.
-
Press STOP to stop playback; the display shows again the total number of tracks. Notes: MP3 CD playback is also stopped when:
a. opening the CD compartment;
b. sliding the FUNCTION selector to RADIO or TAPE / OFF positions;
c. all tracks on the MP3 CD have been played.
Skip Mode
In playback mode press SKIP- or SKIP+ to skip to the previous or next track.
- Select the track in playback, stop or pause modes with SKIP- or SKIP+ and start playback by pressing▶PLAY/PAUSE.
- Press SKIP+ repeatedly to skip to the next track(s), until the desired track number is displayed.
- Press SKIP- once to skip to beginning of the current track.
- Press SKIP- repeatedly to skip to the previous track(s).
- Press ALBUM to display the corresponding album and select a track with SKIP- or SKIP.
Fast Forward And Rewind
Press and hold SKIP+ or SKIP- to access fast forward or rewind functions through the track to search for a certain position.
Program Playback
Up to 20 tracks can be programmed in your desired sequence; any track can be programmed more than once.
- Before programming, please press STOP and MODE. The display shows P01 and PROG.
- Select the first desired track with SKIP+ or SKIP-
- Save the track with MODE, P02 and PROG flash in the display. Now select the next track.
- Repeat steps 2 and 3 to save further tracks, the maximum number of tracks is 20.
- Press PLAY / PAUSE to start playback of the tracks in your desired sequence.
Delete Program
Follow these steps to delete the program:
1. Open the CD compartment.
2. Set the FUNCTION selector to RADIO or TAPE / OFF positions.
3. Press STOP.
Notes for CD-R / CD-RW users:
Depending on CD burner, make of CD and burner speed, reading problems may occur.
Playback Modes
Several playback modes are available on the unit; press MODE to access and select.
1. Press MODE once to repeat the current track. The display shows REP besides track number, MP3 and
2. Press MODE twice to repeat the tracks in the current album. The display shows REP and ALBUMB besides track number, MP3 and
3. Press MODE three times to repeat the disc in its original sequence. The display shows REP ALL, besides track number, MP3 and
4. Press MODE four times to play all tracks on the disc once in random sequence. The display shows RAND besides track number, MP3 and
5. Press MODE again to return to normal playback mode. The display shows again track number, MP3 and
Playback From USB Device Or SD Memory Card
The CD player can play MP3 music files from USB device and SD memory cards. Connect the USB device to the USB port on top of the player or insert the SD memory card in the SD slot on top of the player.
Set the FUNCTION selector to CD / MP3 / USB / SD position. You have the same playback functions as you have in MP3 CD playback. Please read details in the previous chapters MP3 CD Playback, Skip Mode, Fast Forward And Rowind, Program Playback, Deloto Program and Playback Modes.
CASSETTE OPERATION
Insert Tape
- Set the FUNCTION selector to TAPE / OFF p#
- Press STOP / EJ. to open the cassette deck.
- Insert a tape and close the deck manually.
Playback
- Set the FUNCTION selector to TAPE/ OFF position.
- Insert a tape as described above.
- Press PLAY to start playback. Playback stops automatically at the end of the tape.
- Press VOLUME + /- to set the desired volume.
- Press STOP / EJ. to stop playback prior to the end of the tape.
Fast Forward / Rewind
- Press RWD to activate rewind function of the tape.
- Press F.FWD to activate fast forward function of the tape.
- Press STOP / EJ. stop fast forward / rewind.
Record
Please ensure the write protection tab is still in place. Press REC to simultaneously activate PLAY. If the inserted tape is write-protected both buttons will not lock in place and no recording is possible.
Recording From Disc
- Set the FUNCTION selector to CD/MP3/USB/SD position.
- Insert a CD
- Select the track to be recorded with SKIP+ or SKIP-.
- Press PLAY/PAUSE.
- Press STOP/EJ. to open the cassette deck.
- Insert a blank cassette.
- Ensure the write protection is not removed.
- Close the cassette deck.
- Press REC
- Press PLAY/PAUSE to start the CD.
11.To pause your recording press PAUSEI - To resume the recording press PAL
- Press STOP / EJ. ▲ to stop the recording.
Recording From USB Device Or SD Memory Card
- Set the FUNCTION selector to CD / MP3 / USB / SD position.
- Connect a USB device or insert an SD memory card.
- Select the track to be recorded with SKIP+ or SKIP-
- Press▶PLAY/PAUSE
- Press STOP / EJ. to open the cassette deck.
- Insert a blank cassette.
- Ensure the write protection is not removed.
- Close the cassette deck.
- Press REC
- Press PLAY/PAUSE to start playback from USB device or SD memory card.
- To pause your recording press PAUSE
- To resume the recording press PAUSE III.
- Press STOP / EJ. ▲ to stop the recording.
Recording From Radio
- Set the FUNCTION selector to RADIO position.
- Select frequency band and radio station.
- Insert a blank cassette
- Ensure the write protection is not removed.
- Close the cassette deck.
- Press REC
- To pause your recording press PAUSE II.
- To resume the recording press PAUSE II.
- Press STOP / EJ. to stop the recording
Erase A Tape
- Set the FUNCTION selector to TAPE / OFF position.
- Press REC , now all existing recordings on this tape will be overwritten.
Auto Stop
At the end of the tape the unit turns automatically off.
Automatic Level Control
This unit is equipped with the latest Automatic Level Control (ALC); therefore, it is not necessary to adjust the volume control during recording.
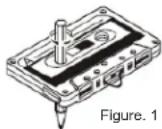
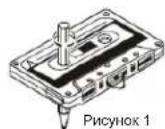
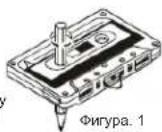
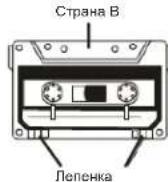
Figure. 1
- Storage of tapes:
Do not store tapes in places which are subject to direct sunlight or near equipment that generates heat; keep cassette tapes away from magnetic fields. -
120-minute tapes:
Since 120-minute tapes are very thin, the tape could adhere to the pinch rollers or be easily cut. -
Endless tape:
Do not use endless tapes, as this could damage the mechanism of the unit.
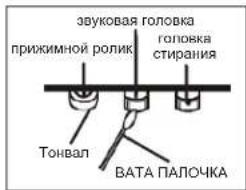
- Cleaning tape heads:
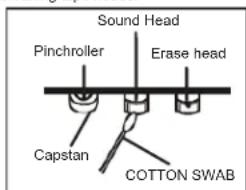
For maintaining the best condition of the deck and for a longer lifespan always keep the head (recording / playback / erase), capstan and pinch rollers clean. Clean as follows:
Open the cassette compartment.
Use a cotton swab dipped in alcohol to clean the head (recording / playback / erase), capstan and pinch roller carefully.
- Demagnetizing the head:
When the recording/playback head is magnetized, noise may increase during playback. In this case demagnetize the head using a commercially available demagnetizer (head eraser).
Note: When cleaning, pay special attention not to damage any components.
TROUBLESHOOTING
If you experience any problem with this system, review the list below before you contact the customer service.
WARNING: Never open the device. Always refer service or maintenance to authorized customer service personnel.
| PROBLEM | POSSIBLE CAUSE | SOLUTION |
| GENERAL No sound | Volume is set too low. Earphones are connected. Batteries exhausted. Batteries inserted incorrectly. Mains cable not connected. | Adjust the volume. Disconnect the earphones. Change the batteries. Observe polarity. Connect mains cable correctly. |
| RADIO Poor reception | Weak signal. Interferences by other appliances (TV sets, VCRs, computers, etc.). | Adjust antenna: FM: telescopic antenna. AM: adjust unit. Keep distance to other appliances. |
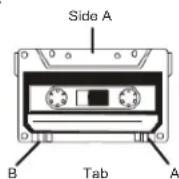
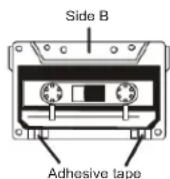
| TAPE RECORDER Poor sound quality Recording does not work | Head, capstan or pinch rollers dirty. Tab in cassette broken out. | Clean head, capstan and pinch rollers. Cover with cello tape. |
| CD / MP3 CD skips Display: NO | CD / MP3 dirty or damaged. No CD inserted. CD is dirty or damaged. Condensation in laser lens. CD-R / RW is empty or not finalized. | Replace or clean the disc. Insert a CD, CD-R or CD-RW. Replace or clean the CD. Wait until the laser lens is completely dry (approx. 1 hour). Finalize the CD-R / RW. |
SPECIFICATIONS
General
Power Supply: AC 230V ~ 50Hz
DC 12V (6 Batteries Type LR14 / U12 / C, 1.5V)
(Batteries not included)
Frequency range: AM (MW) 525 - 1615kHz.
FM (UKW) 87.5 - 108MHz
Audio
Speaker Impedance: .8 Ohm
Dimensions: ca. 290 x 275 x 380 mm
Weight: ca. 2 kg
SUBJECT TO CHANGE WITHOUT PRIOR NOTICE.
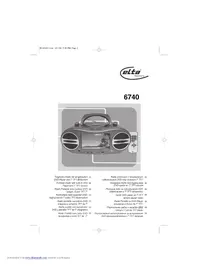
MODELL 6733 ENREGISTREUR RADIO DESIGN AVEC LECTEUR CD/MP3/WMA AVEC USB/SD
MANUELD'UTILISATION
INSTRUCTIONS RELATIVES A LA SECURITE
ATTENTION
RISQUE DE CHOC ELECTRIQUE NE PAS OUIVRE
ATTENANCE: INVOLD KELLELL, QUE DU OF CHOC ELECTRICNE, PAB RETRIELE CAPOT (OU LARRENE). LINTICULER / APAPILLE/ NCL CONTENT AUCUNE PIECE POUANTÉTER I'ENRANIPE PAR U'LITISATUR. COOPER DES RÉPARATIONS À UN SUIVIE DE MANTENANCE QUALIFIÉT.

Piles (non fournies)
DC 12V (6 Piles Type LR14/UM-2/C, 1.5A)
(Piles non fournies)
Aunched in 1980, the project was funded by the European Union and funded by the Ministry of Education and Science. The project was funded by the European Union under Grant No. 264735. The project was funded by the European Union under Grant No. 264735. The project was funded by the European Union under Grant No. 264735. The project was funded by the European Union under Grant No. 264735. The project was funded by the European Union under Grant No. 264735. The project was funded by the European Union under Grant No. 264736. The project was funded by the European Union under Grant No. 264736. The project was funded by the European Union under Grant No. 264737. The project was funded by the European Union under Grant No. 264737. The project was funded by the European Union under Grant No. 264738. The project was funded by the European Union under Grant No. 264738. The project was funded by the European Union under Grant No. 264739. The project was funded by the European Union under Grant No. 264740. The project was funded by the European Union under Grant No. 264741. The project was funded by the European Union under Grant No. 264742. The project was funded by the European Union under Grant No. 264743. The project was funded by the European Union under Grant No. 264744. The project was funded by the European Union under Grant No. 264745. The project was funded by the European Union under Grant No. 264746. The project was funded by the European Union under Grant No. 264747. The project was funded by the European Union under Grant No. 264748. The project was funded by the European Union under Grant No. 264749. The project was funded by the European Union under Grant No. 264750. The project was funded by the European Union under Grant No. 264751. The project was funded by the European Union under Grant No. 264752. The project was funded by the European Union under Grant No. 264753. The project was funded by the European Union under Grant No. 264754. The project was funded by the European Union under Grant No. 264755. The project was funded by the European Union under Grant No. 264756. The project was funded by the European Union under Grant No. 264757. The project was funded by the European Union under Grant No. 264758. The project was funded by the European Union under Grant No. 264759. The project was funded by the European Union under Grant No. 264760. The project was funded by the European Union under Grant No. 264761. The project was funded by the European Union under Grant No. 264762. The project was funded by the European Union under Grant No. 264763. The project was funded by the European Union under Grant No. 264764. The project was funded by the European Union under Grant No. 264765. The project was funded by the European Union under Grant No. 264766. The project was funded by the European Union under Grant No. 264767. The project was funded by the European Union under Grant No. 264768. The project was funded by the European Union under Grant No. 264769. The project was funded by the European Union under Grant No. 264770. The project was funded by the European Union under Grant No. 264771. The project was funded by the European Union under Grant No. 264772. The project was funded by the European Union under Grant No. 264773. The project was funded by the European Union under Grant No. 264774. The project was funded by the European Union under Grant No. 264775. The project was funded by the European Union under Grant No. 264776. The project was funded by the European Union under Grant No. 264777. The project was funded by the European Union under Grant No. 264778. The project was funded by the European Union under Grant No. 264779. The project was funded by the European Union under Grant No. 264780. The project was funded by the European Union under Grant No. 264781. The project was funded by the European Union under Grant No. 264782. The project was funded by the European Union under Grant No. 264783. The project was funded by the European Union under Grant No. 264784. The project was funded by the European Union under Grant No. 264785. The project was funded by the European Union under Grant No. 264786. The project was funded by the European Union under Grant No. 264787. The project was funded by the European Union under Grant No. 264788. The project was funded by the European Union under Grant No. 264789. The project was funded by the European Union under Grant No. 264790. The project was funded by the European Union under Grant No. 264791. The project was funded by the European Union under Grant No. 264792. The project was funded by the European Union under Grant No. 264793. The project was funded by the European Union under Grant No. 264794. The project was funded by the European Union under Grant No. 264795. The project was funded by the European Union under Grant No. 264796. The project was funded by the European Union under Grant No. 264797. The project was funded by the European Union under Grant No. 264798. The project was funded by the European Union under Grant No. 264800, and is currently in progress with funding from a grant from FAPESP (FAPESP-01-000001).

Notas relativas as cassetes
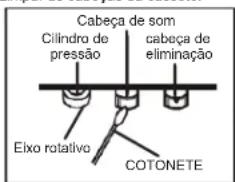
6. Limpar as cabecas da cassette.
WJACZANIE/WYLACZANIE
WEERGAVE VAN CASSETTE'S
Cassette plaatsen
Baterll (neincluse in sachet)
Deschideli compartmentul pentur bateri si introduci 8 bateri de tip LR-14, UM-2 Sau C (de preferirj alcaline).Va rugam sa identificati polaritale corecte, care sunt marcate cu 一 + 一 "in compartmentul pentur bateri.
Observatll suplimentare cu privire la baterll

COCTC/100K
COCTC/100K 12873659400000000000000000000000000000000000000000000000000000000000000000000000000000000000000
DAJIbHEIJA INHΦOPMAUIA


OctepaaiBc Hb0eBnHxDantAIN Batape, He HnTAtNE IN. 3o MoKt 6blr onACHO DnA Bauero 3DopobN INOBENyUdbie. PNOAnJICTe, pNIMATE MpeB, rTO6bl MaHneBku NpO6pu Hbataep XpANHInC B HeDCOTYINOMI JAE TETMecE
BaxKHe peKoMeHdaaun OTHoCInTeIbHo 3auNTb CnyXa BHHMaue:
Bb6epexete CBOI CNy, MTo Toke.
TOSOMY 6b7Be To octopoxhbln PnnpoBsoaan daHbim pnoBOPOM. Hauja poKoMOndAaHm: Nabi8eRt BoonshoPpromKcToN.
DetndoxNbHAXoHTBeBnDpPiPcMOTpO pN nCIOIa3OBAHIN HAYUHKO8; y6eHITcE,TOYcTPOHCTBO HyeCTAOBHeHO HA BICOKINyPoBeH TPOMKOTN. BHMHAnne
Bonbua rpoMkoCTb MoKET npHnHHTb HenoPpABMbIyueep6 cyxy deten.

HIKKOrDA HIOI3BAnrTe HNKOMY,OCO6bHHO DITRM,BCABTnIbPpMaMBoBTOBtBepCTHHNUIeHN 3TOPOnp60pa.3TO MOKeT npBcECh N CMePTN BCNEcDTHNE NOPaEKHHN3eKTPnHeckm TOKM.OTKpbBaTb pN6Op MoKET ToNLk BOaNNuMPoBaHnnNMOUHNIK.


INONJIy3OETOTnPNOBOPTOKNOnpEDHAHCHENIO. 3OTNPOOBMOKETNCNOLSOBATCNOKBOBTOBHXIIMOFCNHIXNOMEHNHAX
ToXanyjCTa, cooxhAHTe 37y HNCTpyKmIOI dAIBHHeWero HCNON308AHJRA B KAYeTbe cnpABOHNkA.
Hnctpykunno 3aunTe Okpykaoue Cpebl
YeIytnn3npye TaaHnnpB o HcNep cpoKa cnKbB MeCte C o bHaMMI 6b10BaMbT OXoDAmA; npeJaeTdo Eo NIKy TcOpaD aI npePabotkTxn AnTKPTckCNKx mNt 3NeKtPbOHx yctPCrTb. CnBolM hA pOyKeTv, hNCTPKyRn no NcNOrb3OBaHHIO nnYnaOxAka codepkat InhOparmuO o cNooc6eY tytnn43auo.
MATEpIaHbNoJIOJIeKAtIpepe6oBtKe, KAK yKa3HaHO H MaRkpOBoEe. BIAIpoAorJpepe6oBtKe, BTOPHcYMON cIOJIb.o3aOHmItePaePAnO IN IIN bIM cNOc0b8am yTNH3aUznn CTApLx pRi6oBopB bO cSOyCETBNReTe aXhNb bIKaIad B aazHTy OKOpKauKcpe.cpeIb.
XOAnyIaTHcY, 3aHnAeBROPOCDKoADMMHHCTPAuHN pACONNOKHeMH CauHKUHOHPoBAHIXk YNHTOKO TYNH3AUH.

He nprrnTCTayIte BEHNTNLIINPnp60A.56EHTeCL, 70CnCTemy BEHNTNLIINpnp60Be He aakpybIKOT AABHHBc, FA3GtIb, MIOBIL INI pNOIMTOI IIOBOIPOIyTOI TINHA CnCTMA BENTHNIINIOIOITHOIOKHA bIb CBOIOH! Pepepepe MOKET NPNECTK K cepuehHM NOBpEXdHmRnPnp60a HCHMHTIe IPOINBODITIEHIOCTb I cPOK Czykbl.

Tenno n BnaXhoCTb
He no3aeepraRte np6bop BOa3eCTBnIO prrmaBHcONHbIHy uYb6EITecB, cTTO np6bop He no3aeepraTe B0a3eCTBnIO hctOHTNHKn HANPMPO, OOBpBRaTeNII INN OTKpIRTO ONI. YOCDOTBepTEcB, YTO BEINTHIAQmHIIh IOBpCTNa Pn6bOp He 3AkpUIty.

Bnara n ouhcKa
DnHnn np60e H odohenpOuMaBmI He norgykaite npeep Body. He onnyckaiye konktae npeep cBooi. EcnB noa nonanet Bhytpneep, 3o MOKET nobnepe cepb3hue nobpexehnna. He ncoNob3yte MoOIOpe cpeCTBa, codepzaoiune anfKORIOJI, ammmak, eGohn IIN abpaabHbte BEcTeCTBA, NOCOKYKI OH ONOT NOBpNDIT IIIEEP. DIn OCHTKN NIO3yTEB MIKHO, YBNXKHHHKO TKAHko.

PpoecnoHaBna nepepa6oTa
Batapei an YNAKOBKA HE noJIOXHHI TYINHNIOBAPORSCTM BMECTC O CTOXDAAMBA. Batapei noJIOHCHI nepeBaDBATcB uHTHO c6bOCA NCOONBOAHsHX Batapei OTDeNeHHe
OndopaoBbIX ynyakOBouhIX MaTePnAIOB JaRlRETCgBeaBpDm IIN OKpyKaIoUeIcpeDn.
YKA3AHNIO TEXHNI E3ONACHOCTN
- BHMATEMBHPOIPOHTNTHEHCHTPYKUNB-CEBysa3AHNAIOTexHHKE6e30NaCHOCTHNpyKBODCTBO NO 3KcNPTyATaTINDOJINHbIbOPOHTAHbIdo HauHaTaHCNOBHAVNCYTOECTBA.
- COXAPIHENTHECHYPKUHKI YKASHAAN NO TEKHINBE 6E0ANACHOH N PUKOBOCTBO NO 3KCNPUATAUNDOHNHbBcCOXPAHENJI Dnra cnpaRbBbEyduyum
- OGPAAUANTHE BHUMAHME H N PEPYNDEKJHENA -Bce npepynpcken HA KOPNCEYCTPOCTRAH 8 pRyOBODCTRO NO EKNTTYTAALIN DQNKTHb BtBn PHNTBA BO BHMNHAINE
4.CNEyIe HHTpyKUAM-BbInonHnAte Bce HAnncAHHe IHCHTpyKUIM No 3KnnyatauM - BODA N BNAFTA -ycTPOICTBO He DoONHHO IONN0308bTaC Bo3NE BoD, HnAPIMEP, Bo3NE BAHBn, paKOBHbYMbBaBnHKA, KXOHHOI PaKOBHn, EMKOC T C BoOJ, PAnBaTeBnHO R6aceHa HIN B cyDPOM NoBAEae
- BEHTINLNI-OTBEPCTRA B KOPNLYCE YCTPOCTBA CNYKATJINBEHTINLIYI; OHNHE05XOHNMBI DTH OHPMNAHIO PABOBJY UCTPOCTBA, TAK KIPNOETPAUCAKT ETO INPEPIER. YCTPOCTBA DOHNHO BbTACPANOLOXE TAKIM BOAP3AM, TOB0E IROE NOPTONOKENHE HE PNPATCTBOBAIero HOPMNAHIO BEHTINLNI. He PAcnoIARAIte YCTPOCTBO HA KPOBATN, DnBaHHe, KOpe IMN DpyTRX NDOHx NIOPEXHOCTXN, INN B TAKM EeCTAX KAK KHKNHRA ONNKA INN WkAΦ, rde NOTOK 803DyXu YEPE3 OTBEPCTRA BEHTINLNIYI BYETED 3ATQyDNHE.
- BICOKAR TEMNEPATYA - yCTPOINCTBO DOHNKHO PACONHATAbCBAIaNOT HCTOHNKOB TENNA TAKIX KAK PAIDNATOPI OTNNHNI, KYXOHHE NINNTB, INH DPNYHX YCTPOINCTB (BKNOVAY CYNINNTEN). KOTOPHE NPOINSDBATD 601000KONPINECTBO TENNA.
- NCTOCHIKI3NEKTPONITAHN-YCTPOCTBO DOKHKO6bTbNOIOKHO TOnbKO K TAKOMY TOCTHNYIINTAHNAI,THI KOPTOPORO OINCAH BY POKOBODCTB NO 0KCIYYATAHIMI,IMO YKA3AH HA KODTVCE VCTPONTBA.
- 3UHP YIHTAHNI - HJUP y3NEKPTONHAI JDRQHEN pRnERATB TAKM O6P3OM, YoTbO1 ero He 3EBAEBHORAMM, and He nepeKHMNI PpEDMTAMN, NOCTABNNHbMI HA Hero NIN NPI RPM. OTOcEOHNJIHNI p606 OT cETNI K3EKNPTONHAI BCRDA DEPKHTeCb 3a BNky, a He 3A hYUP; HNKOrDa HE TANHTe 3a hYup.
10.NEPEBbIbP B ABOCTE - ECHYETPOHCTRO H NCTIOHLYPTER, DHTTENBHO B RPEMB, CNDYET OTKOKHBDOT OTHOTSHOHJI PANTAHU H ANHTEHJ.
11. INPEMTMJI HJXKODCTH CIGYET NIOO3BHTTCHOTOM, YTO6JI HA YCPTPOCTBO HINADAHJ PAJADHMHE INPEMTMJI, B A ETO OTRPCTBEHTEH REIPOHJBAHBCS XKODCTHO
12. PEOHMT NOBPEKDEHNI -YCTPOTRTOIPOLOKHTPPOEMOTY, BMOHOEMM
a. Iopexkienb mIyp nH bNka 3eKtponrrnna
b. BByrtpb Knpnyca yctpoiTba nonan npemtbe nn xynknctb.
d. YcTPOBIO BTOOHOHOHOHOHOHOHOHOHOHOHOHOHOHOHOHOHOHOHOHOHOHOHOHOHOHOHOHOHOHOHOHOHOHOHOHOHOHOHOHOHOHOHOHOHOHOHOHOHOHOHOHOHOHOHOHOHOHOHOHOHOHOHOHOHOHOHOHOHOHOHOHOHOHOHOHOHOHOHOHOHOHOHOHOHOHOHOHOHOHOHOHOHOHOHOHOHOHOHOHO HO HO HO HO HO HO HO HO HO HO HO HO HO HO HO HO HO HO HO HO HO HO HO HO HO HO HO HO HO HO HO HO HO HO HO HO HO HO HO HO HO HO HO HO HO HO HO HO HO HO HO HO HO HO HO HO HO HO HO HO HO HO HO HO HO HO HO HO HO HO HO HO HO HO HO HO HO HO HO HO HO HO HO HO HO HO HO HO HO HO HO HO HO HO HO HO HO HO HO HO OHOOHOO
e. YcTPOHCTBO He yHKUHOHPyET HOpMaJIbHO.
1. YcTpoHCTBO demONHCTpHPyET 3aHTREbIbIe HMeHEnB CBoE npHOBOaHTe bIOCTH
13. TEXGORYKHABHME - NOTI, 2087-506, He TOTKHE NITATRAC BC OLOZKYBHMA. JAHONO YCTPOBTO CBAHIO TNO, ITN KAYAHO B ACHTINAM H PUSYOKDNE NO SKCHTYARITAI. BCE 194
14. NCTKA - neped Tem, KaK HcHTbY cTpoHCTBO, oToCoeHHHe erO hTOcHnHa nTHAHn. He HcNtOyIeJIN WcHcTK HxuHHe HnAp03oHHe MOKOHHe CpejCTBA, HcNtOyIeHr JdA ToIO BnAaHHy BoTeBnII. CJeDyHre COOTBCTHYouHM yKa3aHHm, HJIoKeHHm B dAnHOM pyyOBdCTBE.
15. rP03A -B opeme rP03a, a kobe K e 4nma dHtchbHO repebba B kcnhyraian 15cypobita, cdeyet OIOKoaye erO hrctouhka 3kEkrptnoahai a Hirtiei.
16. NPOBEPBA ESEBOIACHOCTYNCTOPICTB- NOCTE pEMNTOA/OFCEKNUHBAHCTYPOCTBBA, NONPOCTE CAYXBYADOTBI KNOVNDATNNMIOPOBEBT BSEBOIACHOCTYVCTOHTBBA
NEPEPYK3A-BOIIOEHOH ANOCHNIO KAPAI HIN OPOJIXEH NHEKTPOKOM,HE HEPCEPHTAKDE DMOHIOHO CBTJNNTPOHITHBAH.
18.3NEKTOCPATUMECKN PA3PR-ECBYVCTPOCTBOIIEFyHKHIOHPyETHOPMAUHIO,OTcOeAHHTREyCTPOCTBOIOT HCTOHHHKAITIHANH NHBIAKHTE6aRapeIKH,Yepe3Ie6oJIbouWIPNPOMEKTKOPREMEHNIOHJOKHINIE3EKNPTTAHNECHOA
PENyPENKDEHNE
JAHHH CD-IEEPEB1ETCBJL3AEPHPBYNCTPOBNCTOBKJACCAI.0JHAKO,JAHHB CD-IEEPEHCIOBTBVEHTBHIMHBHMNIA3EPHPNJUHYKOTOPBMOKET BbITIPINHHOHNIACHOTIOPAHOAOKTHBHOHO3UYVEHHNIIPIHIIPIPMOM IOHAJAHHHNA TEIOYBEIDTECBJTOMQBOHIE3YEETCD-IEEPEP IIPABIBHO HCOBOTETCBNHCAHIMPYKOBODCTBOM.
HEBHMIOEJA3FPHOEHJUYEHNEIPIKOTKPTOHTKPbIIIKKEHINHEHCIPABHO 3AIHTHO85OKHPOBKE,HE.IQIBEPAHTECBBO3EJECTBHOJYAA! HE IIPHKACAETECK JHHIEJA3EPA。
ECJIHHCIOIBO8ABT HACTPOIKH H PEGYIINPOBKH CIOOCOF,OTNIHHMOT YKA3AHHO B JAAHOM PYKOBQCTBE,MOKHO IIOIACTb IOI BO3EJCTBHE IA3EPHOJUVA.
BO H3EKEJHINBE 03B1HKIOEIHHIOXAPIA,POPAKHEI JIKETPHYCKHM TKOMH HEJEATE/BJbHX IIXMEX, POJIb3yHTECtTOJbKO PEKOMEH/OJBAHBMHIM AKCECFCAVAMHNHE NOBEPRAHTTEINHPOP BO3ECTBHOJOKJHIN BJAHOCHTIN.

RU173
YcTaHOBKa 6e3oNaChoro yPoBHa rPOMKocTn
FcBn BbI bnoTfOHH CnIyIeTe PmOHy OMyIb, Bani CxN NoCTeHHe AaITnPHeyTcA TAKOMY YPOHO B3VzK, H y BaCoJdAeRtBnEaHTHHe, 0TOPOHE, PmOcKTHH3HHK.
TOI 10A BAKKETCH HOPMIAHBM HA CAMOM DE MOKAT BbBbBbBbBbBbBbBbBbBbBbBbBbBbBbBbBbBbBbBbBbBbBbBbBbBbBbBbBbBbBbBbBbBbBbBbBbBbBbBbBbBbBbBbBbBbBbBbBbBbBb
Pocentienio VbIeHbIaIte rpoMIOCT do tex np, noka BHa he 6yaeTe cIbHrt. OHTeTINHO H 6e3AUPyIeHNi.
PnBpeXJepHcCnVx MoKet bHTb 3HaHTeBbHm HHeOpaTHMbIM
- Ecm Bb 3amETnH, yTo y Bac BoaHHKnn npnoBembl Co cnyxom, npkoHcyhTpyiTEch ybpaa.
DaihneuHnfoopmaou np6ope:
PnI nepeioe npbo 13 xooiIOH OKpyaIOJIeep CpeB a TenlyIO MoeKIp OPOHIOT KOJIeIHcAIIe. B ToKm CIyueae 3TO MOKeJ PpIECHT K HENPAHbIHOH paboT EPIpOBA. He BKTHNAYIe npbo npHe I cHONLTYIITRE EOR KOJIaI 1 YACA, NOKA OH HE BACOXET.
Pacnonararate npnupop hpoBnHnROCKOH NOBepxHnCTH.
ПИХOTOCOENHINIIHINPBOAOTTOCTHOHINIIBHITAHIN,y62BHTCB.TOM,YTOHTHECILHHN BHKHAOTOCOHNHIAOHTOP8PTK,aHE TOHNIHTEKEPC AC INPUTB3aJHNEACTHn PBNBOPA.1JIHNOHIO TIOCHUQEHINHPBOAOT0HTOCOHNHITAHINHEEKOHDMOTOPOCNHIT. HETOKOHUYIO BHIKYOToAOTHK.
He HeOpBeRtIe pIn6bO BouEHTCHINHO KaneHb Hn6 bp3rJHKoKCTei. He paCIOBraAteHa Iep6oeppePmeDTM, HAnIOJIeHIIeJyJHKoKCTO, TOKeKaK 8331.
- HcnoIa3yIre np6bop 10kO yMpeHnX KHMnHcyCnBHX.
Bcerda zakpbbaire notok dCD-mpckor knpneotpbrpanhna nonpaanha B npnBd CD-nncko.Bo pmae uctkn, npothpaiote otcek npraaDc-dnckor mRkoi cycoi tpanoukoi.
MEXAHMHKHe qaTHn pHb6paCoqepKaT CAMoCMaBBAIOOIECAHOIIMHHNHI. He HcHIOJIaOBaIBb cMA3K?
HCTOUYHKITAHNIA
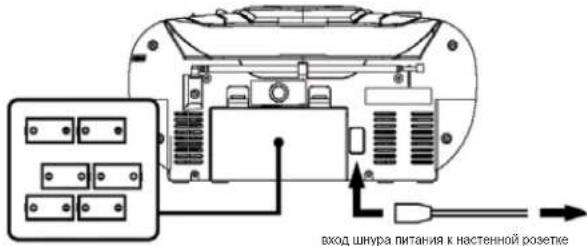
Bctabte 6 6atapeek tna
C B oToeK dnaBatapeek
BcKn a pKa eKn oTo BOAMKO, NoOcDOeHNHReIne PnO6P K HCTOHNH NITANH NINa cXPOAHNHA 3apDa 8aataepae. OTKoKnBeHT BNIky OTOpEKNI pTeM, KACTABTNb BatapeKnH.
BatapeKn (He BXoAHT B KOMnneKT)
OToPoe 6aTapeHbI oTeck H BCTaBbTe 8 6aTapeek TnA LR-14,UM-2 mN C (KeNaTeNbHO
()
DanbHeuwa HnΦopMaun KacaTeNbHo 6aTapeek
CnedyTe HnCTpyKm npOnaBnTeNo 6e3oNacOMy nnonb0BaHnO 6aTapeek.
XpaHHTe 6aTapeKn B MecTax, HeoocTynhbIX DnA DeTeN IOMaWHNX XHBOTbIX.
He KdaaTe 6atapeKn B orOhb. He noDBepraB BosdctBnIO Tenna nn OrHa
YTNH3A2IaBATAeKcYTNH3A2IpaRsaPbHHxBbATapeekdoNkHApOHOxCoHTB COOTBCTCMCMOCHTHMOPMAHm3AKOHMMnDnNOHYOHmDaJIHeuHmHHPOMAM CCKKKTCEC BNCRTAA,OTBECTCBHmMzADyADNEHEOTXODQ.
He nnonbavite cTapBie 6aTapeKn BmecTe C HOBIMN.
He nOIOJIy3ye 8eBAPKae pAaHbX TINHO; HApI, IeONIOHBe 8eBAPKae KcYrOJIbHO-CHNKOBHMn. INoJIbHOyTe 8eTbKO 8eBAPKae cOgTHNO HtHO.
BbHMaTe 6aTapeKn. KOrda npnbOp He nCnoJbayetcB TeueHHe DoIrO nepmoDa BpeMeHN.
TIOKJIIOUeHHe K MTOUYHKY NITAHNA
- PnOcOeHNHHTe HHP nHTaHH K POseTke 230 B ~ 50 Fu.
PIOKHOHAPI PIPBOP TOHKO K ICTOHNIKY MTAHN, COOTBCTRYOUEMCY CNEUHKAMHN HAI 3TNKETK.
POnoCoDHHHTe ManHeHkMnTKepeK nHe3y AC.Y6eHTeBbTOM,TO TnTKepeBCCTABNeH
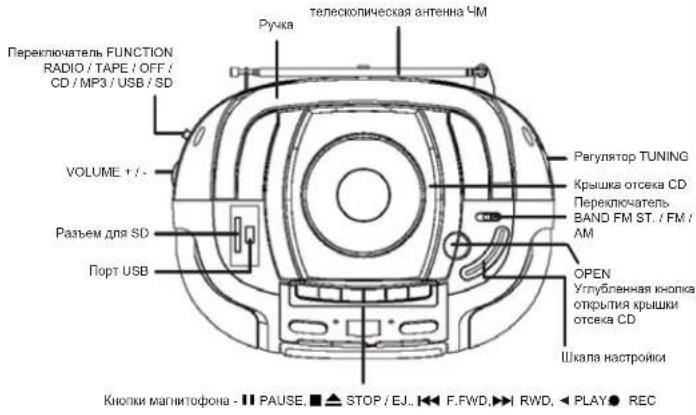
PACNOIOXHEHNE 3NEMEHTOB YNPABJIENH

Pabota c duckamn
BknoyHne/BbIKIOyHne
Дага тог,在бькathнгсгпгдгггггггггггггггггgггggtggtggtggtggtggtggtggtggtggtggtggtggtggtggtggtggtggtggtggtggtggtggtggtggtggtggtggtggtggtggtggtggtggtggtggtggtggtggtggtggtggtggtggtggtggtggtggtggtggtg
1. Bv6bepre jxemaenm pkm npi nmoonnpekncnataeFNCAY: RADI, TAPE / OFF INN CD / MP3 / USB / SD.
2.YcTaHOBnTe XeHaembI yPoEBh 3yKa npn noMoOnVOLUME ^+
3.YCTAHOBHTIpeKTHOHTENFUNCTION BIOIOXENHNE OFF TTO, YTO6b BYBIOKHOHTB pnn6Op.
Ppnepa
PekomeHdaunnoNyUwemy npneMy
UKW(FM):ДИNYUHOMI pINHEMA BHTNARETIO NIOHCTbI TENECKONI HcECKy AHTEHN IOBOPaHMABATE E.CENI CTHAN IIpHEMA CIMIKOM CMIIHbH (HAPr. BO3NE CTAHUM), YKOPOTITE TENECKONIHcECKy AHTEHNY.
CB (AM);

AHTEHMAAMNpIb0BaBIMBCTCBPDEHOH;CNiEPMHEINIOXORO KAeCT8A, NOBpAqWbBtte NpIb0B B HXKMOHANBPENHNI.
Papno
1.YCTaHOBNTepeKnHATcNbFUNCTIONBnonOxHHeRADIQ
2. Bb6p9te JeKnaeBmI dnnnA3oH cTaoT npn nmoOIO nepeKHOHatoBn BAND: FM, FM ST. INN AM
3. HactpoTecb Ha BaWy IIO6MMyIO paHIOCTaHmIO npN NOMOupeRyTAToPA TUNING
4. EcnBbBybBpaBn Ctepeo Hm AND pAaBaTaTeBcEeH Na cTtMIO, nepeDaaKyoB pCtepeo,Ha nepeDehnaehn prNba60paarapoeTcF SM ST.
5.YcTaHOBnTeKeJaembIypoBeH3ByKa npn noMoOnVOLUME+/-
6. YCTAHOBHTepeKTHOHTeN FUNCSION B NIOXKHeH OFF IJRA TOFIOYIOI BYIKINHITb 6n#06p
BocnpOn3BeDHeNc CD
CD-NeepbMoKet CHTBtBaTbNCKoFpMaTbOuA CD, MP3 CD, CD-R iN CD-RW. He bTuTaeTbc BocPOBnEeCTb NcHcN, CoedpaZaHeIe DaHbYe, NmI VCD/VDc.
1. YctaHObIte nepeKIOHHTePALEF FUNCTION B noIOXeHNCE CD/MP3/USB/SD. Ha dmCnnee ha NoekBoJko cekyhd otOoBpaTtncra -- ---
2. Okpokte bpyuyno otcck CD npn nmoonu yynu6henno xhonnk OPEN; h da cnnnee 0t6paaninCOP.
3. BCTABTE NICK CD, CD-R INH CD-RW HAKNEXI BEPX IN AOKPHTBE PBYHNYOTCKCD.HAHNJNE CHAHAYA OT6pBAP3NTC 06eOJI KNOCHETBO DOPOKEK, NOCE TERO, NOBPTCR >01 NCOUPKON3BENHEANZYCTYNCTA BMTOMATHECKN.HA DNJNEEOTO6pBAKETCBHOMEPOOTBTCTDYIOUENDOPOKEK
4.Bcnyae,ecnBocpno3BeDHe He NaHHaAeTcABTOMaTHeCKH(B aBaHHmOCCTNOT DnCKa) HAKMMTE HaKONy PLAY/PAUSE dIraaYcyKa Bocpno3BeDHe NepBoi Dopoknn BpyHYIO.
5. HAKMMTE HA KHONYI INPLAYA DENSE PIOHACHOAHBOO CBOPOB36EHEHIA, HAKMMTE HA HEE eue paa IINOTOPHORA aayntca BocPON36EHEHBA. B POKMME NAB3y 3 haoKHO MEPAET
6. KaHmMte HA konHyk STOP IIN OAOHOB KBOCNPOMBEDHn; HA nCnIe neonTb 06oBpa3RtO oEue konHcyto doxoxek
PImeHaeHn: BocpIaBSeBeHe CD taKe octaHaBnBaTcB C bCedykuixn cnyAeaX a. OTKPBTHNe KpbKbIKOTcKa CD;
b. nepevoed nepeknnoatenerA FUNCTION a noIoxene RADIO IIN TAPE A OFF:
c. KOrda 3aKaOHHTC BOCnpon3BedeHne BCEx Dopoxek Ha dncke CD.
Pexmm nponycka
B Pekmik OBCPON360HIOHN HA KNOIky SKIP- HN N SKIP+ JnT OTO, TcObH npenrK npeDnyuien nIn cneDyUoiu npoKx.
- Bsu6epriTe DopoxyK, octoHOBITE nnnPiPocOtaHOBITE BOCPOHAEDEHe pni NMOUJI KHOONK SKIP-NNIKSPK+ HnAaCytte HcBOPONBADEHe pni NMOUJI KHOKNI 一 _ 一 PLAY/ PAUSE.
- Hachmaite noctopHO HA hONKY S KIP+ 1aNnepeXoJa C nJeDyouei DOpokKe (dopokkam), noka He oTo6paTnC HomeP XeJMaemO DOpokKx.
- HauKmIte HA konky SKIP- Odni paa nJREpexOaB a HauNIO TeKyuee DOpKOxM. 4.HauKmIte NopTOPO HA konky SKIP- TnepoXeA P KnpDyUdEe DOpKOxE (DopKOxM).
BbictparnepeMOTKa BnpeepN6bictparnepeMOTKaHa3a
Hakmte H KOnky SKIP+ mN SKIP- nJepeKbHaTe ee nIe npexoJaB e pekim 6bctpoi nepeMOTn Bnepe nn Hn3ad TeKuueepdoPoxKn, dnn toro, TTObHn ONpeTENHbOtpe3OK doPOXKn.
PpOpaMmpyeMoE BocnpOn3BeDeHHe
KMO 3aPpRnPPMmBbAto 20doPoxek B KjaenAeMoN OocNoBaTeJbHOCTn; HIO6aDpOkoKA KO6tBb3aPpRnPAmmPOBHa HBCoKnBp83.
- 豪德卡哈妥阿P01P01 PRO1
- Bb6epnte npbyo dopoKny npn nomou KhoNOK SKIP+ nn SKIP-
- Coxapnite doxopkny pnn oomnoi khoNk mode. Na dnncnnee haHHT mepaIb P02 n PROG. Tenerb bVBepeR cneDyoo doxopkny.
- NtOPTNTE 3aTbI2 3nTIO,TOB63 3aIgOrpAMMnOBATs CnElyQunH DoPOKK, MAKIMAHKHO KONIECTBO NpOAMPMVEMXbD NOPOEK-20.
- Haxnme Hxhny HIPLAY/ PAUSE Jnna 3anycka BocnoaBedeHndoPoxek A xenaemnn noeNoeBnBHeNtOcH.
YdaneHne nporpamMnpoBaHH
CnedyTe HctpkyuHm Hxke dny ydaenHH nporpaMMnoBaHn:
- OtkpoiTe KpbIuKy OTEcKa CD.
- YctaHOBHTe nepeKIOuATEIb FUNCTION B nonOKeHne RADI O nn TAPE / OFF.
- Haxmnte Ha kHonky STOP
PnmeaHne nnoB3oBaTeNei DnckOB CD-R/CD-RW:
MOTY BZONKHYB IPO6NEMBHy TCHENIA DNCKOB, 3TO 3A8NNCIT ON MCNOH3OBAHOH NPOPAMMBH 3ANNCI CD.TNA CD CKOPCNY 3ANNCI.
Pexnmbi Bocnpon3BeeHn
Pn6bOp IMeHT Hecklonbko peKHM08 BOCpON3BDEHn; HAKMITE Ha Honky MODE nBa Bbopa. 1.HaKNHY HcHonky MODE oIN pa3 na Nobtopa 0cnpon3BDEHnTe Kyuei npOoKnn. Hdnnnnee OTObpaAITR REP PdOM C HOMOPm DOooKnn ▷
2. NaKHMITE Ha Honky MODE Daa p3a da nobtopa BocponbEmBeHdN Da 0BorHHaHnBu NocnpobAbaHbOcHua. Ha cHcnree oTbe 6oPbnCnR EP ALL yDAM c HomepOM DOPOKKI X
3. HauKMITE HA KOHNY MODE TPNA3I INGOCNPIAHBENHCA BEXC DOPOKKB HA NDCKB HPOINBOHBOMPNOJIXE, HA NcHnEE NOOTbAPRITC RAND PARDOM C HOMEPOR DOPOKKIK
4. Haxmite HA hONKY MODE eepa 1A 0820pTAPa K HOPMAIbHOMy pexMMy BOCPNO3BeHNH. Ha DCINIEe OTO6paTnCRHMOE depoKxN ▶
Bocnpon3BeDHe MP3 CD
- YctaHOBIOItepeKNOHIOATELI, FUNCTION B nOIOXeHE CD / MP3 / USB / SD. Ha nCINnEe H aekONIOKcBekHDL 0TO6paBmTIC---.
- Okpokite BpyuhyIO tcek CD npri nmozui yrny6neHIO KNOHK OPEN; na dncnnee ot6bpaanTC OP
3.Bctabte nck MP3 CD hakneikok b6epx h 3akpoite Bpyhnyo oTeck CD. Ha dcnnee Oto6paTcMP3,001, noCIOpHaeBHeJeAaNCTtCR ABOmAtuHckn. Ha dcnnee OTO6BaKaTc HMOEe COOTBETGTVKUHIOI DOPOKK
4.Bcnyae,ecnlaBocnp03BeDHe He HauHHaTeCR ATOmatMHeCKa (3 aBaNCIMoCTN OT DnCKa), HaxMMte Ha KhoNkI PLAY/PAUSE drr 3aayCka Bocnp03BeDHe NepBoDopokKb BpyHYKO.
5. HAKMTE HA KHONYI HPLAYE P/AUSE Dn piooTHAOHOBG BOCPOBSSDEHEIAHAKMTE HA HEE eue paa nnoTbOPHOA aayntca BocprrbaeBDHeBA. B pKMeHn naa3y bnaOHk MEPAET
6.HaMMTE H KONIKI STOP DTHOCTAHOBH BOCPOMBAHOHMA; HA DCNIEE OITB 0TO6p3nTc8 o5ee KOHNCTBO DOPOXK.
PmueHHe: BocPNBaHEDEHP M3 TAKke octaHANBaAeTc B cNeyIOxH CNYAAX a. OTKPHTME KpbUKKoTcEK4 CD;
b. nepeBOD nepeKIOHATEF NUCF TION B NOXeHKe RADI OIN TAPE / OFF;
C. KOrJa 3AOKHOTTC BOCPOMBAHOHBECEX DOPOXKe Ha DCNkE MP3 CD.
Pekn nponycka
B Pexime BocpoPABeHEna HAKMITE HA KHOIky SKIP- INN SKIP+ IINI TO, YTObIpeRNI K npdeyUeH INN CIEYKOJIeD JOPOKE.
1. Bsu6epitro dopokyo, octohobite nnnnnpoctohobite Boocpo3beHeine npn moonoi hknok SKIP- nnn SKIP+ n 3anyctite boocrho3beHeine npn moonoi hnokn▶I PAUSE.
2. Hockmärte NOBTOPOH HO NKJNYK SKIP+IaII nepeXOJa C nclnyuOIO DOpOKKe (DopOKKaM), NOKA HE OTOp3aITNTOH MEOPE KjaenAeMoI ODPKKn.
3. HaxmTe Ha KhoNky SKIP- odHn pa3 dnn nepexoDa B hauano TeKyuien dopoxkn
4. Haxmaitre noBtopno Ha KhoNky SKIP- nna nepexoda k npdebduyuei dopoxke (doopokam)
5 Hopkmtte na hokny ALBUM dno 0t6aekexna cootbeTcayoioe anb6ma n b6epnate DooKny npomou nhoKos SKIP- uin SKIP.
Bbictpa nepeMoTKa BnepeN 6bictpa npeMoTKa Ha3a
Haxmnta H konny SKIP+ nnn SKIP- u ydepnihbaTe ee dna nepexoDa b pexmm 6bctpo npemotkn Bnepe nn Hnad Tekueydopoxk, dpa TOrO, YTOb hauTn onpdenenHbN oTpe300 dopoxk.
PporpaMmpyemoe Bocnpon3BedeHne
MoKo 3naporpMMPOBbT do 20doPoxek JxenaemO nocneobateBIOHcTn; mo6a DOPOXKA MoKet 6bI 3napormpMBOHe HecNOkBoE K.
- 豹德尼安诺PROMPMMOPBHHN,NOKANYCTA,HAKMNTE HKHONK ■STOP N MODE.HaDnncne OTO6PbNTCA P01 IN PROG.
- Bb6epuTe nepByIO npOoKny npn nmoOn KhoNk SKIP+nn SKIP
- Coxapnite doxopokiy npim omoi khoikm MODE. Na dncnlee nauhyt mepcaTb P02 n PROG Tenebp Bubepire cneuoyu doxopokry.
- NOBOTPINE 37aB 2 n3AorTO. Toby6I anporpamMPOBATCnEduoine doPOKxN, MAKIMAHHOKeJINHE CIOPOPMAMPYbIXdoPOKex20
HAKNHME HAKNOKI PLAY/PAUSE DnA 3aNYcKa BOCNPOB3EHN DOPOKEK B XEAeAMoN nocheDobatebHOCT
YdaneHHe nporpamMPOBaHHa
CneDyIte HnCTpyKunm HnxE dny ydaeneHn nporpaMMnpoBaHH
1. OTKpoTe Kpbuiky oTceKa CD
2. YctahOBHTe nepeKHOATeIeNs FUNCTION B noIOXeHHe RADI O HnTape / OFF. 3. HaxKMITE ha konIKY STOP
PpmeaHne nnonb3oBateen dncOB CD-R/CD-RW:
Moryt BO3NHYHTbPNOBEMbY TcHEnA DnKOB, 3TO ABAHNCT OIT HcNoJIbO3BaHON NpORpAMMbIaHIN CD.TNHa CD KOPCtEaHIN.

PexMMbI BOCpON3BeDEHn
Pn6bOp IMeET Heckonbka pexHMoB BocipponaBeHnHa; HaxMnTe Ha KhoNky MODE dIy BBopa.
1. Haxnmtte HA hONKY MODE OJINH PA3 nIIOBTOA BOPNOBTOA BOPNOBTOBENTEKUYUDE DOPOKKHA.Ha OHnCIIeT OTO6pAAHTCTRA REP JOPOCM C HOMEPOM DOPOKKMA,MP3>
2. HauKnittme h KhoNky MODE bda paaa da NobotpaocnbaeHednAdoPOKeB T KeYuJemb anbMoE. Ha HcNnnee otO6p3aTtRC PEP IN ALBM paoDM C HOMEPoDooKpn, MP3 N
3. HauKHTe Ha konky MODE prra 4ra Jnro Tp8 BocnpBSeHnna Dnck a OprinHbHnO nocieobateBochtnHa dmCnnee oTo6pauntcR rep AL prdom C homepm dpokkM, MP3 n
4. Hanmte Ha honky MODE qhe paa da BocnpnabeHna Bce dopoxke Ha ncke npombohno npaek. Ha dcnnnee Oto6paanrC RAND prdom c Homepom dopokkn, MP3 n
5. Hacnne H a hokny MODE ehe p3a for 803epatra K Hopmalsbmype6xmy Bocpon3beHnna. Ha nncnee otoo3paencmepoopoxk, MP3 n
BocnpoH3BeHeHne c yctpoHCTBa USB Hn KApTbI naMaTn SD
CDIPEEPMOXETBCPOPBOBQITMybKaHbNHePAaJIbMP3cYCTPOCTBAUSNBATbPnAMTSD.PoCoOeDINHTyCPTPOCTBUSBKnpOTyUBBepxHbAactnPi6opMaNNBCTABBeKAPTYNAmTSDpBaEMdNDSBepxHbAactnPi6opA.
YcTahobinte nepeKnoHTaELF FUNCTION a noNOxehne CD / MP3 / USB / SD. FyKTHnIc BOCPOIN3BDEHNEI HEDHTHNHBCOPLON3BDEHNEI MP3 CD. IOKANAYCTA, npOHTHTe ppebDyUINHE rnaBb BOCPOIN3BDEHNEI MP3 CD, PEXkUM pnpCYCA, BcICmpan pepemOMKaenepeu 6 bCtmpaeepepEMOMKaHaad, PpOpaPMMpyEOE eocpoua3deHue, YQADHeue RpoaPMAUPMOEeuHua
Pekumb6ocnpou3eehu.
Pa6ota c kaccetamn
BcTabKa kaccetbl
- YctaHOBiTe nepeKInIOuATEIbF FUNCTION bNOJOKHeHTE TAPE / OFF.
- Haxmte HAONKY STOP / EJ. ■ Tnra toro, TTO6bI OKtpby kaccetnydeki.
- BCTaBbTe KaCCeTy n 3aKpOte Deky BpyHyIO.
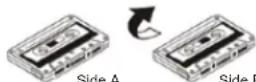
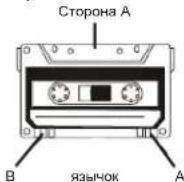
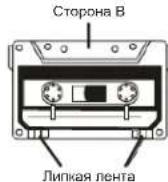
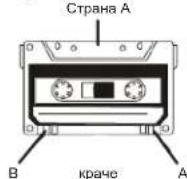
CTropoHaA

CTopoha B
Bocnpom3BeDHeHne
- YctaHOBNTe nepeKIOHATeINb FUNCTION B nonoxeHne TAPE / OFF.
2.BctaBbTe kaccety, kak onncaHO Bblwe. - HaxmTe Ha KhoNky PLAY 4nnaanycka Bocnpoun3BedeHn. Bocnpun3BedeHne
OCTaHABNIBaETcA BtOMaTnueckm,ecnJIeHTa KacCetbI 3aKOH
4.HaKMnTe Ha KhONky VOLUME ^+ /-dna yCTaHOBKn JKeNaemoro yPOBn3Byka - HAKIMTE HA KHONKY STOP / EJ. 1AIOCTAHOBIKI BOCNPOH3EDEHINHO DO TORO, KAK KACCETAAKOHHTC.
Bbictpa nepemotka Bnpepd H bictpa npemotka Ha3a
- Haxmte Ha KhoNky RWD 4nA kTMBaUm fHyHKuM 5bIcTpo nepemotKn Kaccetbl Ha3an
- Hachmiete h konomy F.WFD 1nra actnbuaaun yhuiu bcytoep nopeotk kaccetb
- HaxMMTe Ha KHONKY STOP / EJ. 10nOCTaHOBKn NepeMOTKN
3ancb
Y6B@JITBC T BOM, YTO 3HbKCH 3A#IbT O T 3A#Nc HBC G#D HAOJITC#H N MAeCTe.
HAKMITE HA KHOJNY REC 已 oHOBOPMHcO H C HEBY ECRN BCTABREHHAB KACCETA
3A#JIuHEHOT O 3A#INCH, 6yET DEHBO3MOHIO HAKATb HA O6E KHONIK U, TEM CaMbIM, 3A#Nc B yEDT
HEB03MOKHA.

3aHc6 c dUcka
- YcTaHOBaTE IepeKnKaTeNb FUnCtioN B noIooXeHne CD / MP3 / USB / SD
2.BCTABBtEO CD. - Bb6epnte dopokky dny aannnc npn noomou Khoonk SKIP+ nn SKIP-
- HAKMUTe Ha KHONKY PLAY/PAUSE
5.HaKMUTe Ha KHONKY STOP/EJ. ANTORO,HTOBH OTKDbTH KACCETHYQ DEYV
6.BctabBe NCTVIO KACCETY - Y6eNTeC B TOM, HTO 83H0K 3BHTHOT 3AUNCK H CNOMAH
8.3akpoTe KACCETHYD DEKY - HAKMITE HA KHONKY REC
10.HaKMTeHa KONky PLAY/PAUSE nra 3anycka Bocnpon3peedn CD.
11.ДЯпocTаHOBK 3aNcH HaxMITE Ha KONky PAUSEI
12.ДЯБОЗБРАТКЗANСHAHKMITEHAKHONKY PAUSEI - Haxmte Ha Khonky STOP / EJ. dna octaHOBKn 3anncn
3aHc b cyToBb USB Hn KApTbI naMaTn SD
- Yctanobnte nepeknknatenb FUNCTION B nonoxene CD / MP3 / USB / SD
- POncoeHnHTe yCtpoCTBO USB mnn BCTaBBte KApTy narnr SD.
- Bb6epTe npoxkny aannc npn pmoH KNONK SKIP+ nN SKIP-
4.HaKMHTe Ha KHONKY PLAY/PAUSE.
5.HaKMITE Ha KHONKY STOP/EJ. 1nTTO,OTObI OTKpBtB KACCETHYO DEK - BCTABBTE NYCTVIO KACCETY.
- y6eHTecb B TOM, YTO 83bHOK 3aunTbI OT 3aNNCH He CnOMaH.
8.3akpone kaccetHyDey - Haxmte Ha KHONKY REC
10.HAKIMTE HA KONKY PLAY/ PAUSE dA aanycka BocponaBeDnC yctpOCTBA USB kINKTHPAMNTSD.
11.Дпгдногхнгнннннннннннннннннннннннннннннннннннннннннннннннннннннн
12.ДЯ ВОБЕРATA K 3ANH N HAXMNTe Ha Honiy PAUSEII
13.HaKMTeHaKHONKYSTOP/EJ. △nOCTaHOBKn aanncn
3anncb c Pao
- YcTaHOBnTe npeKriHqHaTeJIb FUNCTION B nIOIOxHeHrE RADIO
- Bb6epnte yactoTHbI dana3OH npaoctAHnIO.
- Bctabte nyctyio kaccety.
4.y6eHTecB TOM,HTO 3bOK 3aUNTbl OT 3aNNCH He CnOMAH
5.3akponTe KaccBTHyO deky - HAKMNTe Ha KHONKY REC
7.Длгпнocтанови заинсннхнмte HaKhONkY PAUSE II
8.ДЯ BO3Bpata K 3aHnCn HauKmTe Ha KhoNkY PAUSE II
9.HaKMTe Ha KhoNky STOP/EJ. nOCTaHOBKn 3aHmCn
Kak cTepeTb 3anncb Ha kaccTe
- YcTaHOBnTe nepeKnIOuAtenb FUNCTION b noNoXeHHe TAPE / OFF.
- Haxmte Ha Khonky REc Tenepb Bca uHfopmaun, 3anncaHHa Ha Kaccetbe dyet ctepa.
ABTOMATNuecknOCTaHOB
BocnpnabedeHne octaHaBnBaetcA BToMaTnueckn,ecnNeHTa kaccTebl 3aKOHnNaCb.
ABTomatuecka perynnpobka ypoBna
DAnHHbI np6Op OChauoCobpeMoHHO ABToMaTHeCKO PerynnpOBKO YpOBHRA (ALC);
BCNECTBNE 3Toro OTnanaet Heo6xOIMOCb perynpoBaT bpyoBeHb 3ByKa BD BpeM 3aNNCH.
Pdmeyahme o KacceTax
- IINOHO HATHTHYI BOHHT HOY BMTB HOKOTOPHE PNOEMH. HATHTHNE CHERA NEHTCACCETN pN NPOOMU KAPAHDAA HIN DpyrTO RnpMetA, Ka NK33aHO HA PCHYE1
2.ДуЗштызгИСОТчсIHOBOROTCHSINHAR,УдгИТЕЗHIKП.NPIMONOMUOI OBTBEPKIM (CM.PsyCNYOK 2).EczMБ.YbXOTHEZANICHT KACKETY,БунбИКOTOPОБИYI YDANJIH,HAKNJIte HEMHOI RIMIKI KIJIJIHЯНОВERTPIM (CM.PsyCNYOK 3).
PcHOK2 PmcyHOK3
- XpaHeHHe Kaccet
XpaHnTe KACCTBt B MECTA, NOIaHApHa NPHPO CIOHTHO CHOTHO CBO TINAO TENIOHO 6ObOpDyBaOHn. X paHnTe KACCTBt B MECTA DEEITBA MAnTHHTBxN ONeN.
4.120-MHHyTHbIe KACCeTbIe
TAK KAN 120-MYNHYBNE KACCETB BANJOTCA CHEBT OHKIMN, NEHTA MOKET PNIINHITyK TPNKHMNHOPKAM NIN NPOBaTaB.
- BeckohneHaHn neHTa
He nOJb3yIe KaccTe b c 6eKOHeHIO neHToT, TAK KAK 3TO MOKET NOpBeNTb MEXAHIMrnp604.
6. YnctKa rOJOBK KAccTeB
ДИОДIДIJIAPKANII KENB XOPIUEN COCTONHINI ANDPINOJIENCHCPOE cKeI cyKbJc, BCZDA cIeNTEA 36 YIOTOTI ROJOKO (aTAMN/CBCSTPONADEHIN/CTPNAH) TOHJIAGNI IN PIXIKMHBLX BAIHKIN.
HCTpyKnn no qnctke:
OTKPOINTE KACCETHYIO DEKY.
PIMHOOMOJI BANTHAI NAOH,CMOENHHCHIPTOM OCTOPHOH NOOHCTHTE TOPOBOKY (3AHNHC/ BOCPOPN3EDEHIN/CTPHAHN),TOHBAN IN PNPXMMHLE BRANK
7.PaMarHHHnBaHHe rONOBK
B cnuyae ecnnr tonobka 3aunich/BOcnpn3bedeHn HAMHnHHe, BO BPmE BOCpO3BedeH NMYT yCNHNTbcnomeXn. B takoC nryae HAO6oDMn POaMaHNIHTb FONOBKY npn NOMOUy YCTPOCTBA Dn PA3MHNHBAHHN MNOIOEOCR B IPODAKe (CTNAPKooye TcPOCTBO DN INTONOBH).
PnmuueaHHe: Bo Bpem nCTK Cnepnte 3a TOM, cyoH Ho NOBpeMTb KOMHOENTb.

RU 181.
YCTPAHEHME HENCPABHOCTEN
EeCn ciyIaIbIcak KaBJI-Ni6oPbNObE cI pIbOpaR,poIeBpTe IyHKtI,peHcyIeNHeHIE HKeJ,do TOK, KBCR3BtBa C dTOnDIO n POaTO c NkOyNTaRIMM.
PNEyIeHHeNHE: Hko2a3 He omkpuiaame npu6op. Bceda o6pauaiemcB K nepcoany aemopuzoeahHo0 biOp o6cnkyueaun no nooody pemaohu unu obcnyueaun.
DONBJHNTEJIHA INHOFOPMALIA

BHHMABAHTE 3a MANKI YACTN N BATEPHN, Hn TbTnAITE. MoKc Da ce OKAKe ONAO 3a 3apBeTo Bn DA DOBOe Do aDyuaBaHe. MoIn NaTe MaNKn ypeu n BatePHN mBbHb O6BaHa Ha Dua.

BaxhencbBeT OTHacnCe Do 3aunHa cnyxa
PpeynpeKdHHe:
Bne ce pcknte 3a Bau n Cnyx, Hn cHIO.
3aTOBa 6bTeBHNMaTeHn, KOrato HsNo13BaTe To3n ypeD.
Hawata npenopbka: N36rbaTe BnCOK 3Byk.
Eueta tpa 6a de c h5nabat, korato nnoanbata cnwnkla; ybepe tce e y peda He nactpoen Hn ciin 3yck.
PpeynpexdHne!
Bucokn 3Byk MoKe Da npHn HEnonpaBmA BpeHa DeTckn Cnyx.

HNIKOTA He no3OBnRbAte Ha NIKOgo Ooc6eHO ha Da neoTABT PpeDMTeB 0TobOp, cIeTHaTHInn HINX BDOBe Ohe na ToSy eep.1o MOKUdo da Boede Do CmPT o ENeTKPOAp. Yepda TpBBa DA ce TbBaPc amo To KANHdMvPAH npeCoan

Hnnon3aaaypeda cmoa a npedHa3naeHaTa ynotpe6a.
To3n ypeD moXe da ce n3non3Ba cAmO x Doma nn Ophna.

NaTe ToBa pbKOBoCTBO 3a 6bdeu ynotpe6a.

Hnctpykun 3a ona3BaHe Ha OKoJHaTa CpeDa
He HxBbLpIaIe npoDyKta B O6NkOBHBeHTe N0maJHn OTnAaIuNcIed KpaA HxN3HEHn MyIbKtI; npEJaIae ro 8 c5bnPatehen NyHK t3 paENKpHnape HneEKNPcNECKn I eNekTOHNypeKn. CmBOHa na pONDyKa, INCHpyKUHnte 3a NyntpeBa KNn ONAOKBkata Se IHCOPMnAT a MeTOnMeHn HxKaBnPAJIe.
Maternane ca rodn 3a peunknpnae, KaKTo e cnoMeHATO B MapKnopBkata.4pe3 peunknpnae nnydpyn noNbTOnpa yNoTpe6a HcStapy npdein, Bne DpNHNACHTc 3a zainu HA npNPODHTA cpcda.
Mon 3a nntaTe MeCTHata ynpaba 3a OToPn3npaHO MxTO 3a HxBbPnHe.

He npenpeyae BENTHINLAHTA Ha yepda. Yapepe Tae che npetda, BECTHIN, MeBEN mHn Dpyr npdMeTn He bknopat BeNTHINAAOHHATA cNCTEMHa H anapata. BENTHINAAOHHATA cNCTEMa TpRbBa da MoKe Da kyHIOOHnNo BCKHO BPEme! IPrperbaeHETO MKe Da doBeDe Da cepno3Ha NopePeHa Ha yepda N da HAMAn Heroboto cyHKIOHNPAhe N XHBOT.

TopeuHa n tonnHa
He nanaaie ypea ha npra kcbnheea cebtnna. Ybepete ce, ye pede He e 3n0xekn H a nepkntn Tnnpnnn H10TnHn Kato padatopn nnOrb. Ybepete ce, Ye BEHTNtauOHNTNEOTBOPN HA ypeaHa c3akpnni.

Bnara n nouchBaHe
TOny yeped he enPpOMoKaem! He notanaihe bBb Oda. He n03oRaBae ToKtAe C BDA. Ako BnE3Ba OBA ypeJa, TOB MaOKe J a npnnHn C apoHa3a RpeJa. HnOIOI3BaTe NOUcHTBaun MATEpHAnu, KOHO CTbJbPkat ankOxO, amOHa, 6eHNHn PApaRkaDaun cSCTaKn Tb KaTO Te MOrTa a nopeDpyeJa. 3a NoNCTBaHe mONI3BaTe MEKO, BnAko Napre.

PpoepcnoHaHNOpeuNKnnpaHe
Batepim Hn OIakOBH HtpBaBA Da cna 3xApBnT B oOuiTe OTnAa. Batepim TprBaB aCne pnpBaBAT B cbHpateien nykT 3a nIOIaBAHN Batepim. OTdEINHe HAeohKPiTHN OAnOKoBH e Dope 3a ekONOIurHATA cepeA.
YINTBAHE 3A 6E3ONACTHOCT
1PPOETETYNB.TBAHETO -BCHNINHTCPKIMnAa63eONaCTHOCTN ynoTpe6a TpR6Ba Da 6bJITPOPNENI pNDa Ce paBDOTc Cpeyda.
2.ANA3ETE HNCTPYKUNITE -HNTpykunite 3a 6e0nactnohty nytnpba Tpa 8da da bdat cIxpaehen a 3bIeua cnpaba.
3.CENMIHANI PNDYEPKJEHDA -TIRBBA DA CG 13A3B4AT BCNHNK PNDYIPKJEHDA INIHCANI BLPXV YPDEA N TESY B VTNB8HETO 3a YNTOPE6A.
4.CNEBBAHTE HCHTPKUNITE -Tpa6ba da ce cna3aat BCNUHINHCTpykun 3a yNtpe6a.
5. BOA IN BNAFA - Ypea He 6n TpBBAIO Da C8 H3N03Ba 6nH3O Do BOA, HAnPIMeP 6nH3O do DuykaBHaHH, yMBAHNNK. KXHYENcKa MNBkA, OTKPNTa nepaHNA, pnyBeH 6aceH Nm MOKpo anTpe.
BEBHNTAUNI - OTbpyte B ypea C ha Hapabene 3a HeOBBA HaeDkHBA BHTBNTAUNI. Te Ca Hb6bXoDMn 3a DpnePaaS Tpeyda o npTpeRpaHE. YpeDa TpBeBa Da n OeTcABEN TAKA, He HETOBOT MeTOHOAXOKeHHe INn NonoKeHMe da He npCeu 3a CBOBDHTo My BENTHNPaHe (oxTHaKHe). He NOCTaBHe YEpeBa bByx PnEtn, Dhaan, OeZaIO nnIOpoDHa NoBbXocT, KOTO 6H MoNFA 3a ZKApHe BENTHauNOHNHe MY OToBpN, KAKO t B3aOpBHe NPOCTPAHCTBA KATO 6HbNtEoTeKA INn UkaCp, KOHTo IpatC BDOBDHn pnpTK HA B3dYx ppe BENTHauNOHNTE OTOBpN.
7. TONNHA - Ypda Tpa6ba Da e paaontoxKeH danee To natoHHnHa tonnHa KaTo paanatopm, neuHnn Dpyra TeHHka, (BkIOUHTeHNO CHaBaTe), KOHO MOrTa Da HbTbAaT tonnHa.
8. INTOCHIK HA EHEPRA - Ypda TPABa Da ce CbPke Kbl MSTOHKHN Ha eHepra cMo OT THNA, NOOCEH YnBtBAHTe 30 aYnTPO6Ea NkAKTO eOJIbSA Bpxy Hero.
9. 3AUYNTA HA 3AXPAHBAUJIANT KAEJI-E 3AXPAHBAUJIANT KAEJIa TnIb6Ba Ia 6bIaTINTHANITAHNIIO NtBkAI HBNHIN, Yo Da He Cb HAcNITBI INPra XOeHEI NOI pOBiHTBt OHTa HcONKHeHbPXYHIN DTo TAC.BHNHAr pNIDpKaIXe 3a UcnEe, a He 3a KaEeNa, Korato HKBdATDe ENEETPKDcKABeI ANEETPKOxPAHBAHBOHc; NKORA He BnDpaTKeBAeI.
1E. HNITOTPE6a -Ipo mee Ha bIynn npHIOHa Hn eHnTpe6a hy peda, moNA hKIOHcHte ro OT enkTOPO3AOXHOHAHTO aHHTHATA.
- PINEIA3BABE OT 3AMbPCBAHUNI YTECHOIN -TrpBaJa de Ce BHMAba IpeaOTOBPOE HyaJepdAbe HnBHeHARNJI BTHUHN INPDEMTOH NIN TCHOCIN.
12.ИSCBAHNAIPIPENEMOHT-YpeDaTpa6BaDAbIepeMOHTIAPANcMoOTcneuHaHO 06yuHpaobTaHkoKOro:
a. 3axpaHbauT KaBEN HnN Wencen e nobpehen. - BbB BbTpewHocCTT ha ypeDa ca nonaHaNN BbHuHn npedMeN nn TeyHOCT.
B. Ypda e 6Hn H3noXeH Ha DbXd Nn Bnara
r. Yedpa e 6HnIyncakn , HnIy oB6kBaN aR oBpeDeHa . HnIaONBaTe cAmo KOHTPOnITE HnAHTPOPiH, KAKTO eYka3An BO IITpBe6IeNTCKOTo pKbOBOCTHO.
d. Ypda He DeiCTBa No HOpMaJIeH HaHH
e. Ypepa noka3ba cepno3Hn OTKNOHeHHa OT HopMaHaTa cI pa60Ta. - PMOHT - NpONBSSAATypeHaTe HnT6BaDa ce ONTBbA da TOnPnBAA npHtctbnnn NOBpeHn HeoNcHm B pKbOaDCTBOTo 3a yNoTpeBa. BcNKn CNOxHN PemOHTn TpAba Da ce MABpBwatOT cneuMaHIO OoeyHn paOthNIHn.
- NOVICTBAHE - Nk3kn0ytepyda on 0nEeKtpnckto3xapbaHae npdei noNCTBAHe. He n3nON3Bae TeYHN INa eApO3N0H NoNCTBAHcnpenapat, a cAmo MEKA, BnXhAa KpPa. CnDaaBte VkaAHaHTA 3a NOVICTBAHe and NpOdBbKaKfOCAHm BTOI HAPNvHK.
3A.1AHTUOT MBJHIN-No 8peMa HpTmoteBnHa Bypr NduNepmoHn HneYntpe6a, MOJI INKJIIOAHyepeDaonEeIePKrHeMeKTOXAPAAHBeH aHNTeHa - IPOBEPKA 3A CNYPHTOCT-CnE peMOHT HA ypeDA, NOMONETe cnyKHTENITE OT cepBNAA DA HANPABT IPOBEPKA 3A CNYPHTOHT HA YPEDA.
- IEPOTABPABE-3a 3a HbAeBHETHe ANOCHCT OhtBtANHcMENBAHE uEIEKTHPUECKN yUdAP He npETOBAPBARe TE KOHTAKNTIe B PAKNOHHTENITE B KONTEO E BIKHOUEY UyDae.
- PA3TOBAPBAHE OT ENEKTPOCTATAHNO HANPEKHEH -NknoHTe eNekTPO3axpahBaHTo HnBaTeDe batePmte, Ako ypeDa he paoTo h KaTo TpRaBc.Cne kpatKO BPeMe OTHoO NoCTabe TBePmte NkNoHTe eNEKTPO3axpahBaHTo.
PENYPNPEXDEHNE
T3N CD CNTEMA E KIAC 1 PA3EPEH PPOJyKT. TOBA O3HAUABA, YE CNTCTEMATA IINIOJ3BA BVIMM/HEBIMM JIA3EPHN JIuH, KOINTO MOrAT DA INPHYNIT ONACHO INIgAHE HA PADNAJIYAKO CA HACOUEH.NOTOPSEBAIITE CNTCTEMATA INPABINHO INCIOPEI INHCTPYKLMTE.
HEBIVIMNAIA3EPHA PAIINAUINPINOTBPARHE HA KAIAKA NIIINPIHAPYUHEHME HA OCNITYPENTIHATA 3AUHTA. HE CE IINJAFAIHTA PAIINAUINI HEPDKOKCBANTE IA3EPHNTIEI
H3N013BAHETO HA KOHTPOINI N HACTPOIKINI INI PIOBEXKDAHE HA PIOLEDUPN, PA3JNUHNOT YKA3AHNTE TYK MOKE IA DOBEDE IO ANACHO PAIAUZMOHO OBbYAHBE.
3A 1368BAHAE H NO KOPAE, I EIKETPOVJAP IN CMUYIEHNI, N10JI7B3BAITE CAMO PNEPONbAHHTME AKCECOAPIN IN HE M3JAFAGNE HA DxKD INN BNXHOCT.
HacpoKaHa6e3oNaCHO HnBOHa 3Byka
Pnipno1yIbIKHeHIO CHYUHAE HCN HAMy IYNA KCIyNA BNI NOCTeINHO CIEHACPTOBA KBMTOBA IMATE YEBUHAIHO,CEYBKA E HNOCTaTcHIO CENHE.
TOBA KOETO Bn Ce CTPyBa HOpMaJIHO MOXe BCbUHOCT Da e BpeNo.
3a da npdeTbpatnte TOBa, HacTpOte 3Byka Ha HnCKo HnBO.
- YBENHHTe HNBOTo Ha 3Byka 6aBHO, DOKaTO yBaTe IcHo N 6e3 npObIeMH.
- YbpekdaHTo Ha cnYxa MoKe Da e rOJaMo HHe e nonpaBnMo.
Ako 3abeneXnTe cnyoB npo6nEM, KOHcyTNpaTne Ce c nekap.
DOnbHnHTeHN HcTpyKmHa ypeDa:
Korato npemecbTaBe ypeDa ot cyTeHb B tonna CpeBa, b3mOHO e da ce obpa3yBa KOHNHeaB. Ta Knaba CnyHae E n3KnIOHe ypeDa ha De FyHKIOHpa npabHnHo. He 8knOvBaIe Hne HxNpON3BaIe a3 oOno1 uCak, dOKATO ypeDa h3cXbHe.
- NocTabete ypeHa nnocKa, paBHa NOBbpxHOCt.
Pnir 3kIOHAnBa H ypeO t IraaHbOT eKTKoPAaXbaHBe, henpemcHOr OTCpaHEt UeienCOnaT oCThenHKOHTAKT, a He camo Cencep T o XkA AC INPUT Ha 3dHaTATA cTPaHa Hypey.3a Da n3KIOHHe HAIHfHO t E KTKoPAaXbaHApETo, e Hoo6xOIMMo DA oCTpAHHTe UeienCOnaT a EneKTOAaXbaHApETo oCThenHKOHTAKT.
He nanae Hn Kanea nn nnnnnaa cne Tyeohctte He noctabate bpyepda npdeMettn. pnnn C TeHcy, Kato Hnpimpe Baei.
- 13no3BaTe ypeDa cAmo npn yMepeHKnIMMaTHuYcNOBna.
Binhari 3atbaipraite bpatrNtKATA 3A CD, 3a da npedn3aite CD MexanHMA 3T anpalaabahe. Pnp oNCTBAHE, nptP4Hae ot TEHeneHHa 3A CD MexHNAM3c M cexha cyxa Kpna.
MxaHnHHTe cHtHa nHa ypeBa cHbPktcAMoCTOHTENHO CMA3aBauCe yCypoiCTBa. He cMa3BaTe c MAnO HIn dPrty IpneparAT!
ENKTP03AXPAHBAHE

CnokTe 66aTePM
pa3MeP C' BOTDeneHHeTo
3a Batepnn
Korato e bIbMOxHO, BkIOuHBeYpeJa KbM IaBHOTo EneKTPO3axPAHBAe, 3a Da 3anaHTe 6bATEPnTE 3a no-dbTNO, N3KIOHcTe To rnaBHOTo EneKTPO3axPAHBAe npEIN NOCTABHHe HA 6bATEpNTE.
BatepHn (He ce DoctaBt)
OTbOpTe 6BepHHTO OTdeneHHe N noCTabe 8 BApTeHN Tn LR-14, UM-2 mC (3a npednoHTAte AnkanHH). Cb6nIOabai Te nonpHocHTe, KOTo ca MapKpaHn c "+""B 6BepHHTO OTdeneHHe.
CpeHIN BbHH (AM): YpeHa HMa BrpaedHa AM-aHTeHa; npomeHeTe nnonKeHMeTo Ha
ypeda, ako npmaHeTo e cna6o.
Pabota Ha paDnoto
- HactpoTe ceneKtopa FUNCTION ha noanrA RADI
2.ИзберетежеланьочтoreнobxbarcbcceNETOPABAND:FM,FMST.nnAM. - HactpoTe IIO6MaTa Cn padio cTahuca KcHtpolHna 6yToH TUNING
4.Ako h3bnpate ctepeo FM n Hactpone ctepeo ctaHn, HnKATOPa Ha npenHata yact FM
ST,ue ce BKNHn. - HactpoTe XeIaHaTa Cnla Ha 3Byka c VOLUME ^+ /
- HactpoTe ceIekTopa FUNCTION Ha noaunr OFF ,a da n3knouHTe ypeda.
PpocBnPbaHe Ha CD
CD-ⅡBnBaMoKa MoKa Da ChTe AyDn CDTa, MP3 CD4, CD-R X CD-RW DnKoBe. He co CnITBATo Da npocBnBaTe Data CDt Na Nn DnKoBe VCD /DVD.
1. Hachpore cenekropa FUNCTION ha noan CD/MP3/USB/SD. Dnncnne nokaa 3aa M0MNEH--."
2. OTBOPeTe CpbKa YekMeJKeTo 3a DnCkA Ype3 HamaJeHOTo 3aDbPkaHe OPEN; noka3Ba ce OP.
C. Knöckete CD, CD-R Wnca CD-RW c etnka Ta hoge aata Bopotee e me KekMeTeo 3a dmKOBe OTHOB C pIb. Tpbohauhao Heiien 6poH na Tpekoae ue ce noRn 3a Moemet, cned ToBa DNJIner ce cmEHs Ha 01 nPiocBpuBaHeto 3aOnuHa ABOMTuHNo. POKaBa Ce cOtBeTnHa HOpE HA TpeK.
4. B cnayu chpncbspaheTo hne 3oohyoe (3aBnCOn OJIMCKA), MOJI HATNCHETOI PLAY/ PAUSE 3a da 3oanhochte npocbspaheTo hnpbpyrTre pck tyho
HATCHETe 一 _ 1 PLAY/AUSE,3a da cnperte npocbupaaheto Ha nayaa,HATCHETe OTHOBO, 3a da npdojkbnke.,BpEKMH Ha nayra MIRA
6. Hauchenepe STOP, 38 da cnptep npocbnpaHETO, Hau cnnneer OTHOBO hNtNBA pNNHRA cnckb HA TpeKoEe.
3a6eJekn:
PpocBnPBAneto Ha CD cnnpa cbso Korato:
a. YeKMeDKeTo 3a DnCKOBe e OTBopeHO;
b. cenektopa FUNCTION e Ha no3nRADIO nnn TAPE / OFF;
C. BGNK TpeKOBE Ha DNCKA Ca npocBnpeHN
PexnHa npceKaaHe
B pexmH na pocpmbaHHe HATNCHTe SKIP- nHn SKIP+, 3a da nponpychete npeduHn Hn CnneauHn TPEK.
1.ИЗберете TEKA в БОНКИМ на РОБСУВЕ主管部门у СРЕН ИИМ рада з SFKIP-ИЗн SFKIP+И
эдогоне TЮРСВЕА, КATO HATINCHESТ ПLEY / PLAY.
2. Hantichete SKIP+ HNKOKO nTn 3a da npceKoHte Kb m cndBaun Tpek (TpeKoB) ,doKato ce neorai jenahaii Homep Ha Tpek.
3. Hattichete SKIP-BeDnJx, Za 3a JePcCKOHTe KbM NauHOTo Na HACTOUI M Tpe. 4. Hattichete SKIP-NiKOnI To 3a Ja PpCKOHTe PpNDUINu Tpe. (TpeKOHe)
PpeBbptane Hnpei BpIahe
HATNCHETe HAPbTKe SKIP+ INn SKIP-3a da aaeBCTeRtate yfHKmUITE 3a npBeBpTahe Hn pIeN nIN bPbTuHe H33Ad Ype3 TpeKa, 3a Da TbcPrteOnpePendeHa no33u.
PpOpaMnPaHO npocBnPbAHe
Mora 3e pe nprramnpat Do 20 Tepe X BENHNA O T Bac nocneobateNHOCT; BCEK MTOPEBETMOE K A B Dte pnprrampan NBOe To BOHbXk.
1. Пгдддддддддддддддддддддддддддддддддддддддддддддддддддддддддддддддддддддддддддддддддддддддддддддддддддд徳 STOP IN MODE. На дсггг по се се спokаму P01 IN PROG.
2. N36epete nbpnT xenah TpeK c SKIP+nnn SKIP-
3. 3ana3eTe TpeKa c MODE.Ha nncnner CBetbar P02 n PROG.Cera n36epete cnedbaunr TpeK
4. Noptopete CtbnK 2 n 3a da nporpamipate ouie tpekoBE, MAKcIMAMHnIe 6poi, KOIO MoKTe e da nporpamipate, e 20.
5. HATNCHEI PLAY/PAUSE 3a da cnaptapate npocmbpahe To TpekoBe B xenahata or Bac nocneboBATEHOCT.
H3tpnBaHe Ha npporpaMaTa
CneBaeTe cneHnTe CbKn, 3a da n3tpne TnporpaMata;
1. OTBOpTe YekMeJKeTo 3a KOMnAaTdNcKObE
2. HactpoTe ceneKtopa FUNCTION Ha no3nRADI O nI TAPE / OFF
3. HaTnchete STOP
3a6enexka 3a n3non3baunre CD-R/CD-RW:
Mora 3e noaBnPnoBEMc H aNcKsA, 3abceuO nT nporpamata 3a 3anncBaHa NE CD, moBtN h cokopctta ha 3anncBaHa.
PexnHa npocBpuBaHe
Upea panaonara c hakonko pexima 3a npocbpahe; Hatichete MODE, 3a da ctnHete do TAK m uapepete.
- Hattinchete MODE BeDhB, 3a da nobToptine HactoAunT TpeK. Ha dinnner ce nncs CBRA REP DO HOMePAH TpeK N
- Hantchene MODE IaIbI bTn, 3aJc aN cIOBtrop IcMcaB oPmIHAnHbNATA My nOcIeDobatEnHOCT. Ha cInncnE h cINcNBA REP AL do Homepa h Tpeka n >
- Hatachite MODE tpei mtna da ce npocbsprB ctsnH TpeOBeHbK 6p3bkPknau.Ha nncnnse e nncnBa RAND o nohepa HraTkpa a
- Hattichete MODE OTHOBO 3a Da Ce bThpe TbM HOPMaIIHRA PekIM HA pOcBIBPAHE. Ha DmIJIeN Cte KINHCA OTHOBO HOMEA PA TPEK a


PpocBnbpBaHe Ha DnckOBe MP3
- HactpoTe ceneKtopa FUNCTION Ha no3uCD / MP3 / USB / SD .Ha dncnnn e H3nncBa
- OTOaOpTe YekMeKdXeTo 3a KOMKaTdNcKoe B pKa C hAmaleNo 3aIbPkaHe OPEN; nokaBa ce
3.Cnoxete DNCK MP3 c etnKna HArope n 3aTbOperte c pkaeMeKmedKeTo 3a dNcKoe. Ha cnncner Ce 3nncsfa MP3, 一 _ 出 001 npc6mbaHeto 3anOba ABOTMATnHO. Ha dnncner ce nokacBa CbOTBTHA HOMep HA TPOE.
4.B CnyaH, HNOPBCBHPAHO H3ANOTHO (3AnOHOTD NcHIO), MOH, HINCHOTEPPLAY/ PAUSE, 3A da CTAPHTPAO PNOPOBHAHO HbNPOBA TPEK DPHIO. - Hattichete H-PLAYE / PAUSE 3a da cnpete npocmbpaHEno ha na3a; Hattichete oTHOBO , 3a da npdoBnKte npocbpyHaeB, B pEKHM ha na3yMBA .
H. Stachnebe STOP 3a da cnptete npocbnpbaHTo; Na dncnner OTHOBc 6e 3nncBa oIzma 6poI trekoE.
3abeneekka
PpocBnPbaHTo Ha dNckObe c MP3 CD cnnpa cbu TaKa, Korato
a. YCKMEDKETO 3A DICKOREC QTBODEHO
b. ceneKTopa FUNCTION e nnb3HaT ha no3uH RADI O uu TAPE / OFF
c. BCNUKn TpeKOe oT MP3 dNcKa ca npocBnpeHn.
PexnHa npeckaHe
B Pekimn npocinbpaahe nattchte SKIP- nnN SKIP+, 3a da npocynchepe npdiuHHnni cnneDuaa TPEK
1. 1a6bepe TROPA B P EKIMMA H NPOCITYUBAH C, cPENH M N I N PAYA C S KIP- INI SKIP+ INZANOHTE NPOCIPBHAQ, KATO HATNCHETE PLAY/ PAUSE.
N Htichete SKIP+HKJIKIO KTHI 3A da pKeCKOHTe KbM cndBaunr Tpek (TpeKOBe),doKATO He 6c noHJIENAHHOHMR HpTeK.
3. Hatnche Tc SKIP-BenbX, 3a da npeckohnte KbMaHaHAnOTo Ha Hactoon TpeK
4. HatncheTe SKIP- HkoI KoNbTn 3a da npckouHte npduuHnra TpeK (TpekoBe)
5. Hatnche ALBUM 3a da nokaxeTe cboTBeTHnAn6yM u n3bepeTe TpeK cbc SKIP- nnu SKIP.
PpeBbptane Hnpei Bpbahe
HATCHOTNE A 3aBpIeK SKIP+ IM SKIP-3a da 3aAaeBCTAE FyHKuIeTE a3peBbPteHE npIpd INB pIeHane H33d Ye3 TKEA, 3a Da TBcPIE ONPeDENEHnO3HUN.
IporpamnpaHn npocBnPbaHe
Mora 3e nporpamapat do 20 treka B xenaana OH aB nocneDobatenHCT, BcKTH oTpekoBete MoKe Da 6bde nporpamapah NOBe To BebnhK.
Ппддпргампате, молу, натунс悔ET STOP u MODE. Н диллгь ще се пожakе P0196 u PROG.
2. 36epete nbpBnAT keNaH TpeK c SKIP+ nn SKIP
3. 3ana3e Tpeka c MODE.Ha dncnnn e CBeTbAT P02 n PROG. Cera napepe cneBaunr Tpek
4.Повоте ртуки 2изда погрмір {@оц.TpekoBМakcmaHn6poi,KoTO Mokteпда погрмір {@,e 20
5. Hatnichete - PLAY / PAUSE 3a da cnaptipate rpocmbpaheo ha tpekesote B jekahara ot aac nocedogatentnoct.
H3tpmbaHe Ha nporpamata
CneBaIe cneHnTe cTbnKn, 3a da n3Tpne nporpamata:
1. OTHOPETE YKMEJXETO 3a KOMNAKTINCXOBE
2. HactpoTe ceneKtopa FUNCTION ha no3uRADI RADI uTTAPE / OFF
3. HaTmchTe STOP

3a6eexka 3a nnon3Baumre CD-R / CD-RW :
Mora 12 ce noaonrnpoilee CHTOHO H NCKA,3AINCEU O Tnporpama 3a 3a nncsBa H CD, moenbN Kcokocrtra Ha nncsBa.
PexmmHa npocBnpuBaHe
Ypnda panaonara c hkoIkpokpemka 3a npocBpaBaHe; HATINCHETe MODE, 3a da CTINHETe do TxA n Ia6pepe.
- Hantchete MODE BeDhX, 3a da nOBtOPIte HactoTnIa TpeK. Ha dncnEe co nAICBa REP NOHOPMaH TaTeK, MP3 n ▶
- Hantchete MODE daa tbl, 3a da ce noptop Tkebote b hactoia an6ym. Ha cnnepe c eniaca REP n ALBUM do Hoema np teka, MP3 n
- Hattichete MODE TPI thn 3a da ce npocbrn DnckA B opinnHnNnHATA MY noocneDsatenHOT. Ha nncnn ne hncnba REP ALLO do HoHema I HA Tepa, MP3 已
4aHnTcHete MODE YETriH pNtM 3a daPbCnBPrrte BcNmTrkTePOE H aD NcKDaBnK b4aBpKnRnopBnK. Ha CnIcnRe ce IaNCBa RANDO hOmeHa TApKeA, MP3 n
H. Mathechete MODE OTHO 80 ha ce bPHTe H BOPMHNI PEXHM HA pOscBIPBaHc. HaDcIMiJIe Cc MInICBa OTHO BOHOMe PA tKeA, MP3 n
PpocBnbpBaHe oT USB yctpoNCTBO Hn KapTa 3a NaMeT SD
PnIeBbT MOnxde Ja npocBnBa MyKAnHnФaNoBe bA dpOmat MP3 ot USB yctpOCTBO m Kaptn 3a Namet SD.CBpKeTe USB yctpOCTBOTo C USB npota OTrope HnnEpbn HnBkapae T Kapnta 3a Namet SD B oTbpa SD OTrope HnnEpb.
Haactpoe cenekopa OYHKUN Ha noaum CD / MP3 / USB / SD. Imate cbntne fynknn 3a npocpuane KaTO Taen a npocpuane Ha MP3 duck. Man, npoeemme nropaohcmte u npduuHume 2nau npocpuane Ha MP3 duckoae, Pexum Ha npcekaue, PpebaPmae Hanped u epuaane, npopampao npocpuane, Nmpuaane Ha npopamama Ha Pekmu Ha npocpuane.
Pa60a c kacetn
CnaraHe Ha KaceTa
-
Hacptoe cenektopa FUNCTION ha nozma TEAP/ OFF.
-
Hantchete STOP / EJ. ■ 3a da otopointe deka 3a KACETM.
- Cnoxete kacetata y 3atbopete nek a pka.
PnocBnDpaHe
- HactpoTe cenekTopa FUNCTION Ha no3nua TAPE / OFF
- Cnoxete kaceTkata kaTc e onHcHo no rope
3.HaTCHETePLAY,3a3a3aONOHETePnOCBpBAHTo. PnOCBpBAHToCmPaABOTOMATNHO B kpaHnOHTATA. - HATNCHETe VOLUME ^+ /-3a da HactponTe XeNaHata Cnna Ha 3bVka.
- HatncheTc STOP / EJ. 3a da cnpete npocBnPbaHeTo npedn Kpa Ha NeHTaTa.
PpeBbptaHnpeiBpbsane
- Hatahe RWD 3a d a3aJeCTBaTe FyHKunraTa 3a npeBbptHa Ha NeHTaTa Ha3a.
2.HaTnchHeTe F.FWD 3a da akTNBpupe npeBpTaHTo Ha HappeHa neHTaTa - HatncheTc STOP / EJ. 3a da cnpete npebbptaHero HanpeHa3a.
3annc
Mony, yBepTe CE, 3aunntata npn 3annr BCE Oue e HA MCTOTO CN
HATMHCTEC RE C 3a da aKTHMaePATED HOBPMEMHO cTOBA PLAY AOKA kAPAHATA KACKTACA E cBc a3aHTOI OTaNtCAHBE, DABY GbTOHA HMAI Da ce a3kIOVAT HA MRCTO aN3HcE e B3-M30KHe

3annc or nck
- Hacpoie cenekropa FUNCTION ha noanu CD / MP3 / USB / SD
2.CnoKTeNCK - Ⅲ6epTe TpE, KOITo da ce aannne, cbc SKIP+ uHn SKIP-
- HatncheTe PLAY/PAUSE
- Hatnchete STOP/EJ. 3a da OTBOPTE deka Ha Kacetata.
- Cnoxete npa3Ha kaceta
- YBepete cc, He 3aunntata ot 3aDNC He e DpeMaxhata.
B. 3aTbOpTe DaKa - Hatnche REC
- HATNCHETe PLAY/PAUSE 3a da cTAPtnpaTe Dncka.
11.3a da cnpete bawma 3annc Ha nay3a, HATNCHTe PAUSBI
12.3a da b3o6HOBNTe SAPNA HATNCHE PAUSE II - HATMCHeTe STOP / EJ. 3a da cnpete 3anmc
3anoc ot USB yctpoicTBo HnKapTa 3a naMeT SD Memory Card
- HactpoTe ceneKtopa FUNCTION ha noanu CD / MP3/USB/SD
- Cbpxte USB ycpotBoto nn Bkapae Kapta 3a namet SD memory card.
- Ⅲ6epeTe TpeKa, KoiTo uckate Da 3aannweTe cbc SKIP+ nnu SKIP-
- HatncheTe PLAY/PAUSE
5.HATNCHETE STOP/EJ,3a Da OTBOPNTe NekHa Kacetata. - Cnoxete npasha kaceta.
- YBepete ce, He 3aunTaO t aannHe e npemaxHaTa
8.3ATBOPDEAOKA - HatncheTE REC
- Hatichete PLAY/PAUSE 3a 3a cTAPHPATE rpocnbpHToOT USB yctpoaBTO INN KAPIrata 3a namert SD memory card.
11.3a da cnpete baunnaHnay3a, HATNCHTe PAUSB
12.3a da b3o6HOBNTe 3aHcHcTe PAUSE - HatncHeTe STOP / EJ. 3a da cnpTe aunuca
3anoc or padnoTo
- HactpoTe ceneKtopa FUNCTION Ha no3nRAIO
- 36epTe yectoteH 06xbaT n daHnOCTaHH
- CnokeTe npaHa Kaceta
4.YBepete ce,he 3auNTATAOT 3aNHe e npemaxHata.
5.3ATBOPDETe Nek - HatmchTe REC
- 3a da cnpete Baunnaannc Ha nayaa, HATNCHe TE PAUSE II
- 3a da b3o6HOBnTe 3anica HATNCHe T PAUSE II
- HatncheTc STOP /EJ. 3a da cnpe tana ca.
N3TpMaHHe Ha neHTa
- HactpoTe ceneKtopa FUNCTION Ha noaunra TAPE / OFF
- Hatnche REC cera BCWKn CbueCTByBaun 3aHcN Ha Ta3n neHTA ue 6bDat n3TpTN.
ABTomATMnHO CnnpaHe
BkpaaHa nHTata ypeda cnnpa ABToMaTHUHO.
ABTomatHcH KOHTPOH HHBOTO
ToMz ypei e 06bpyaCnOcnoBBAeepmA ATOmatneHKeHOTPO HnHIOHO (LCA); no TAmn PnNTHAe He Eo6bXoJMO Da hctpoPae Cnnta H a3yka No BPEMe Ha zanlca.
Dnrypa.1
3a6e9ekn 3a kaceTnte
1.PaxiaB60HHTe HNTHa HA KACOTHe MOIT Da IPNWYHHT HeHNTHOCTn CMOINN HNEO npDyraTe HNeHTo HEHXo NEHTa, KaKTO e nokaaHO Ha qnpya 1.
2.3a da npednanaite 3a nica or cnuyna HIO mTpnae, MxHete kpaKetaTATA cOtpebTA (BHK Nfpyra 2).Ako IcATE da 3a annuete b5pxk KACETKA, qHTIO kpaHeta CA cyCynene, aanenete KOH b5pxy OTbOPTE (BHK dFpyra 3).
Phrypa.2 Phrypa.3
- CbxpaheneHa kaceTKeTe
CbXpaHBAIe KACOTMIE HA MCTA,IOJIIOKOKHO H NPIRA CBTNHEBCAETTINHA ININ BNO DO YPeHJIOKOTNIHAPATTONIHNA;N3TeE KACOTNEO AT MARCHINNONETA.
4.120-MHHTN KACETKN
TbKATO 120-MMHYTHNT KACETKMOCA MHORTO bHKHNEHTATM MOKE da CE 3aENNN 3a pONKITE M Da ce cpeke MHORO NECHO.
- BeskpaHa neHTa
He h3non3BaIte 6e3kpainH neHTN. TbKATO TE MORAT da nobpeaT MexaHn3Ma Ha ypeDa.
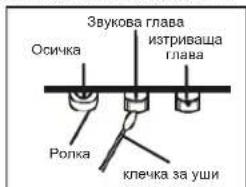
6. NocntBaHe Ha rnaBata 3a neHTnTe
3aJaNoDpKATEdekaHnA NoDopcCLCTOHRMe 3a JbNtBIOKHTBANRnNabeTe NnBRAE (3a 3aIINC/3a NPOCBIPBAHe /3a INTPBAHe) PONKTte NOCWKITE YCHNT.
NoCTBaTe no cJeHnHaHH
OTBOpTe YekMeKKeTo 3a KaceTKite.
Vnnon3aTe KneKka 3a yu, 3a da NoqHCTne rnaBata (3a aanic / 3a npocapBaHo / 3a nTprBaHo), pokkata m OCNHKATA BHHMATEHIO.
- Pa3MaRHeTn3nPaHa rnaBata
Korato rnaaba 3a 3ninc / 3a npocBpBaAe mAtneHnPaHa, no BpeMa H npocBpBAe MoKe da ce yEnmNyMbt. B TakBa Cnyu paMaarHtnHnPaHre TaRaBa c npomUHeHO MpaBtoHo TycpoTbO 3a paMaarHtnHnPaHae (KacTa 3 naovCTBaHe h RaNaBa).
3a6eNekka: KOATO NOHCTBATE, 06bPHTE CNEUINHO BHIMAHNE Da He NOBEPDITE HAKON OT KOMMOENTHNTTE.
OTCTPAHRAHE HA IPOJEEMN
AKMIMATEPBOBEMC TzAENCTMAE,PIIPTAEJITRECHKBAOTPOBEMNIO-DONPYRNEIDaCE BCRPKETDE COTDENA3A KINHNTCKO OBOVKNBAHE.
PNEYNIPEKJEHME: Hukoa He omeapnye peda. 3a cepuzu unu noodpckka euaau ca 6obpuia kM omopuupur cepuee npencoah.
| ПОНБЛЕМ | BEPOЯTHA ПИЧУНА | PEUSEHINE |
| ОБSU нама заук | Зык e рпекално Нись. С Burlрани са слшалкite. Баершие са мstошени. Баершие са сложени нларвий. Кабелъ He e Акlioун. | Настойе зауka. ОТкаяше слшалкite. Смehete вбершие. Вьхte дади погорета e погавиня. С Burlржete кабелъ погавиня. |
| Ради Поч поим | Слаб синан. Намеса на дугу уreed (Телевизори, Вдебeо, Компютpres и др.). | Настойе aithenata: FM: Телевизориота aithena. AM:Настойе уreed. Дьхte на дanelу от дугу уreedи. |
| Касетофон Почо качесъно зауka | Главата, ролкatingи осчкite са мрьсни. Крачета на касъкова с счлени. | Почистете галавата, ролкatingи ил CMOLKCHITE . 3аленote skchoy ottopс IM. |
| Залеса наRobоти | CD / MP3 Дида спесда Нама сложен дис. Нама сложен дис. С Burlрани са mstош�eden Кондэн bprxу погор�пite песи. CD-R / RW e рпазен ил небаьшен. | Сmedнete ил погистете дись. Сложete CD, CD-R ил CD-RW. Сmedнete ил погистете дись Изчakайе, дokato погор�пata песи илъхende наллпс. (OKono 1vac). Добъшete CD-R / RW. |
CNECNQUKALUN
06nn
EneKtpo3axpaHbAHe:AC230B\~50Xu
DC 12B (6 6aTeepn TnLR14/UM-2/3.5B)
(BaTeepHHe Ce DoCTABT)
YecToTeH 06xBaT:AM(MW)525-1615KXU.
FM (UKW) 87.5 - 108MXU
Aydno
CbnpoTnBnHeHMe Ha ToHKoIOnH: 8 Ohm
Pa3mepn: np6n3.290x275x380 MM
Tero: np6n3.2
NODIEXH HAPOMRAHBE3 NPEBAPNTJHO PEPDYNPEXDEHNE.