Baby Control Audio Digital Compact - Baby monitors CHICCO - Free user manual and instructions
Find the device manual for free Baby Control Audio Digital Compact CHICCO in PDF.
User questions about Baby Control Audio Digital Compact CHICCO
0 question about this device. Answer the ones you know or ask your own.
Ask a new question about this device
Download the instructions for your Baby monitors in PDF format for free! Find your manual Baby Control Audio Digital Compact - CHICCO and take your electronic device back in hand. On this page are published all the documents necessary for the use of your device. Baby Control Audio Digital Compact by CHICCO.
USER MANUAL Baby Control Audio Digital Compact CHICCO
Instructions for Use
Please read these instructions carefully and keep them for future reference.

natural_image
Line drawing of a coiled cable with a rectangular component and a terminal connector (no text or symbols)Unità bambino
Child unit
Unidad bebé
Unidade bebé
Unité enfant
Babyeinheit
Unità genitore
Parent Unit
Unidad padres
Unidade dos pais
Unité parent
Elterneinheit
natural_image
Two gray batteries with positive and negative terminals, labeled '13' at bottom (no text or symbols on battery bodies)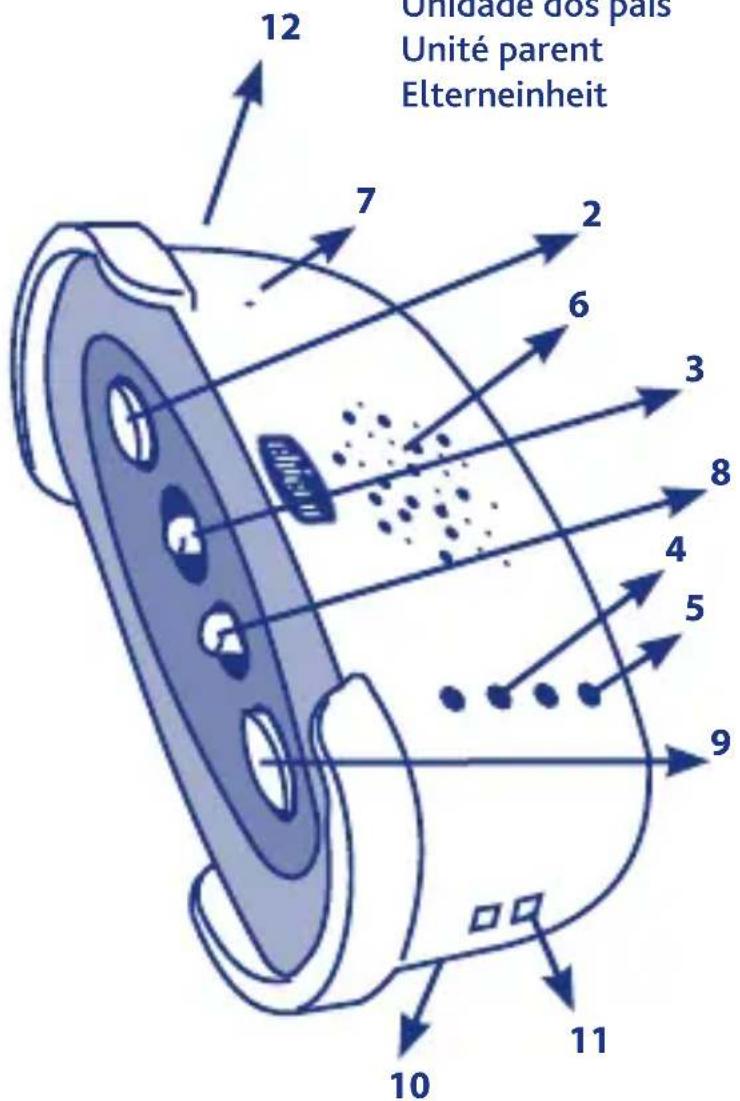
natural_image
Diagram of a rope knot being tied with a connector, labeled with number 14 (no text or symbols on the diagram itself)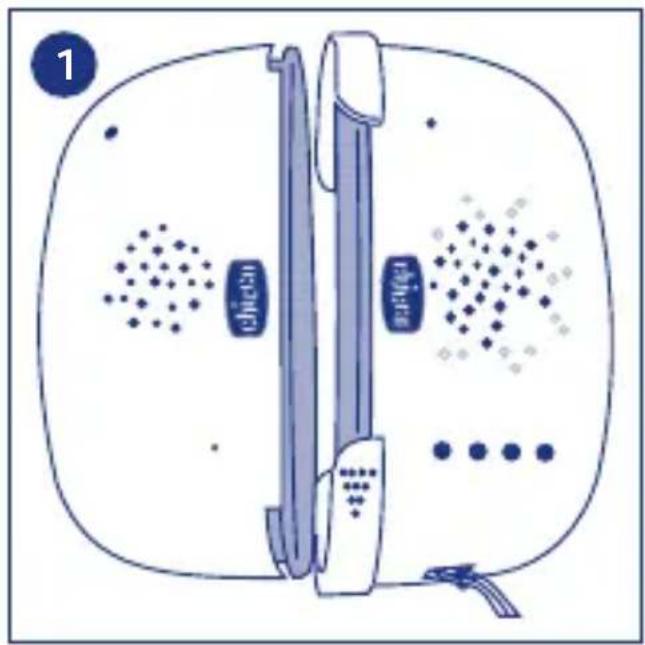
natural_image
Line drawing of a hand using a tool to interact with a device (no text or symbols present)
natural_image
Illustration of a hand connecting a cable to a plug, showing cable termination and wiring (no text or symbols)
natural_image
Illustration of a hand connecting wires to a device with a connector (no text or symbols visible)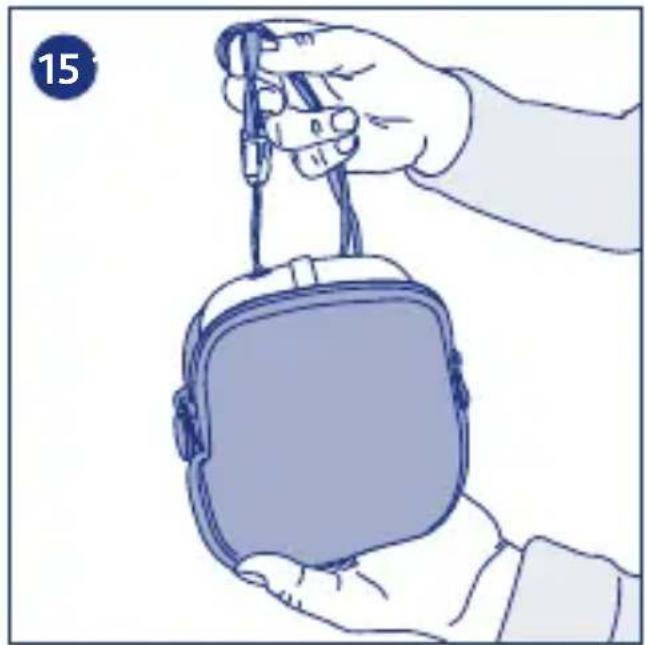
natural_image
Illustration of a hand holding a medical device with a strap, no text or symbols present
natural_image
Illustration of a hand using a tool to adjust or install a device into a container (no text or symbols visible)
Baby control Audio Digital Compact
High Privacy Standard – Zero interference
This Chicco Baby Control Audio Digital Compact allows you to remain in contact with your child indoors and outdoors. This DECT (Digital Enhanced Cordless Telecommunication) technology guarantees a high level of protection against interference caused by analog devices.
In fact, baby control units that use this technology constantly monitor the connection between the units (child and parent) and immediately switch to a new channel as soon as it detects any interference. The reception capacity is around 300 metres in good range conditions without any obstacles.
Technological reliability is combined with a modern design and features that make the product more comfortable to use and ideal whether at home or when travelling, thanks to the compact design of both units (child and parent) which has slot-together features which turn the product into a single unit that can be carried around in the practical case supplied with the kit. The child unit can also be used as a night light by enabling the night light function on the unit itself. The parent unit also has a “talk” function which allows parents to communicate with their child via a 2-way communication system.
PACK CONTENTS
- One child unit (primarily in transmitter mode)
- One parent unit (primarily in receiver mode and 2-way transmitter-system mode)
- Two switching mains adaptors 100-240V \~ 50/60Hz / 6V → 500mA
- Rechargeable batteries NiMh, 2x1.2V, 750 mAh type AAA (for the parent unit)
- A carry strap for the parent unit
- A case
- Instruction manual
Recommendations when assembling the units
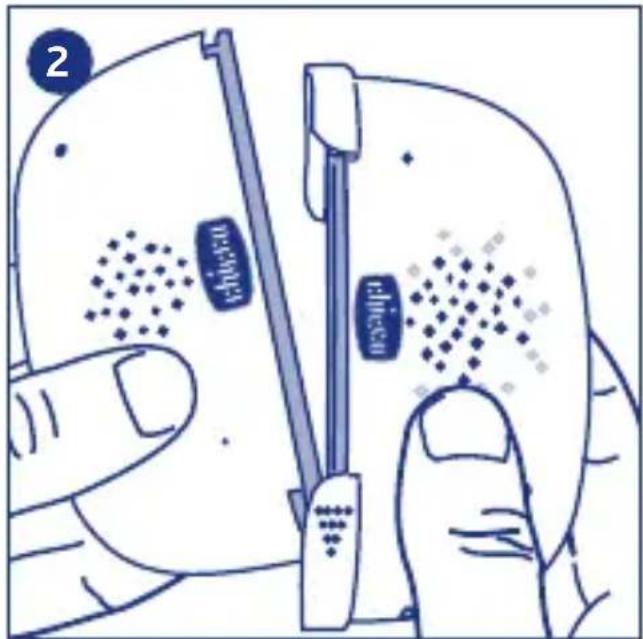
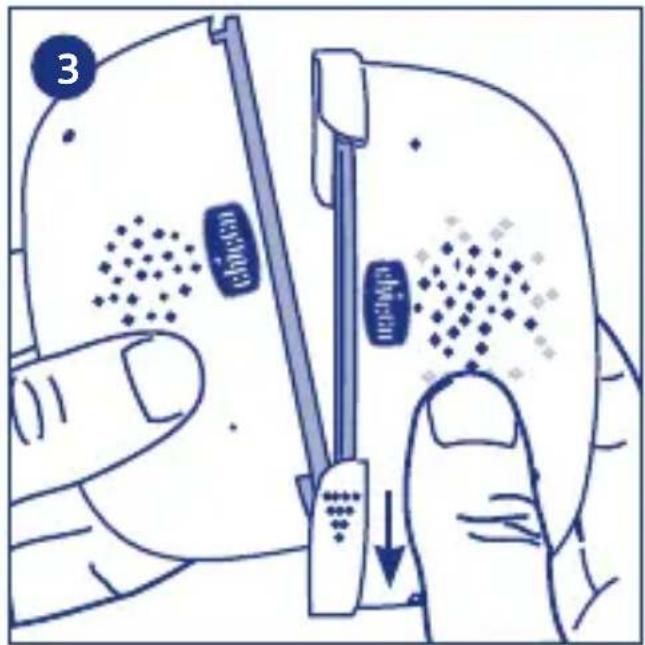
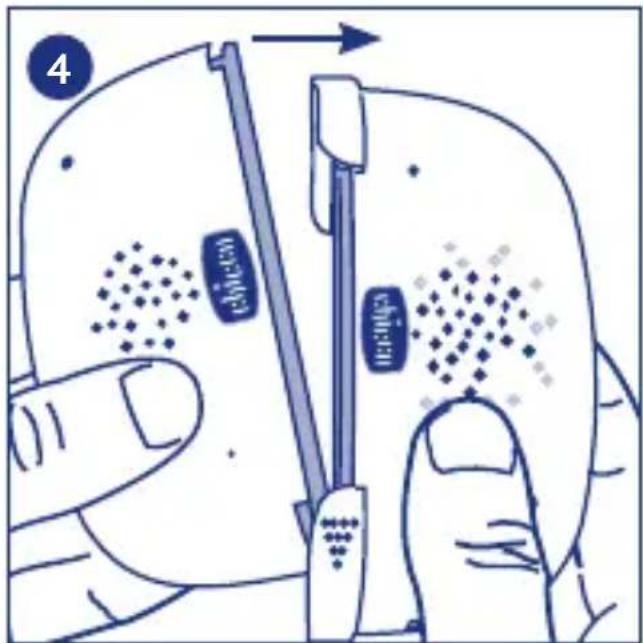
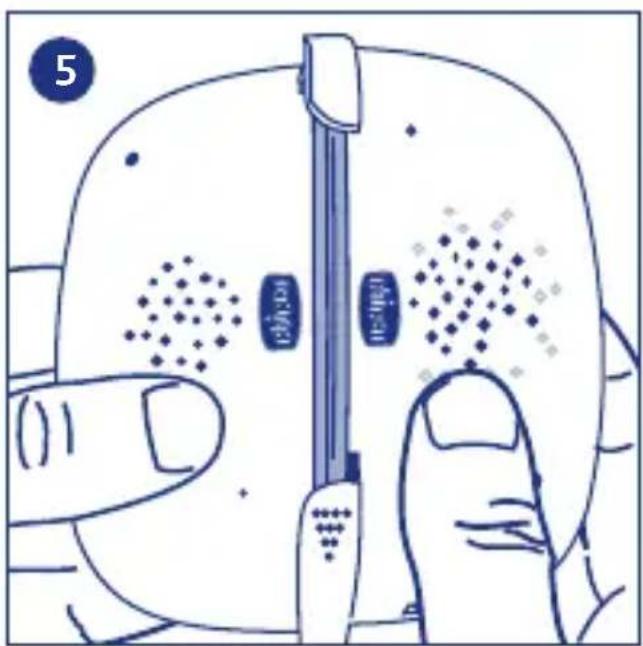
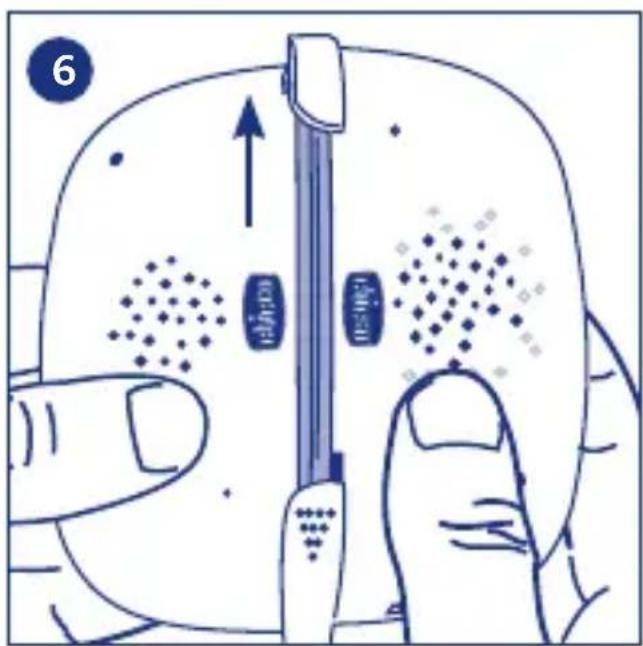
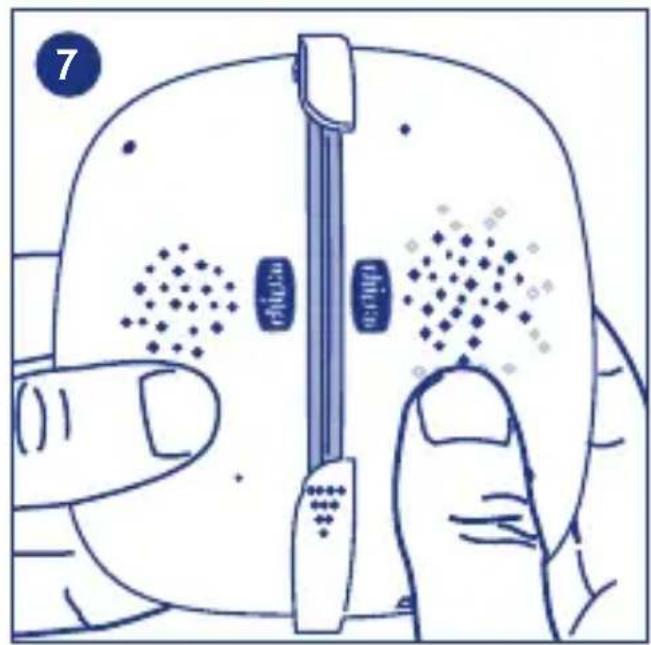
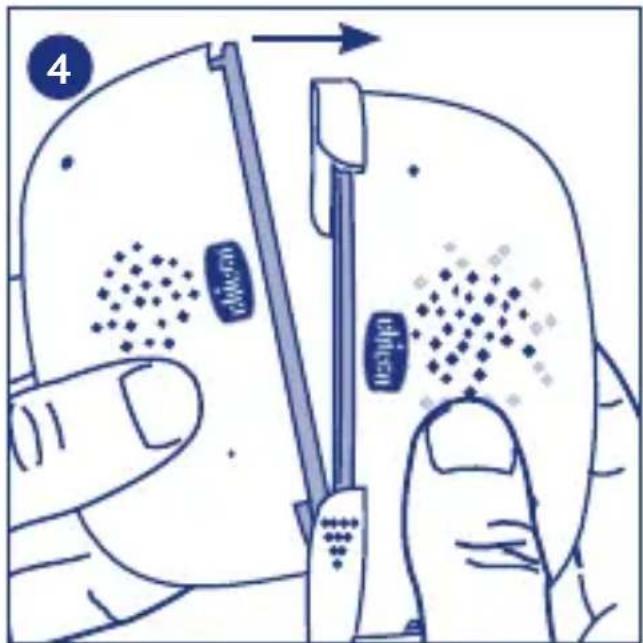
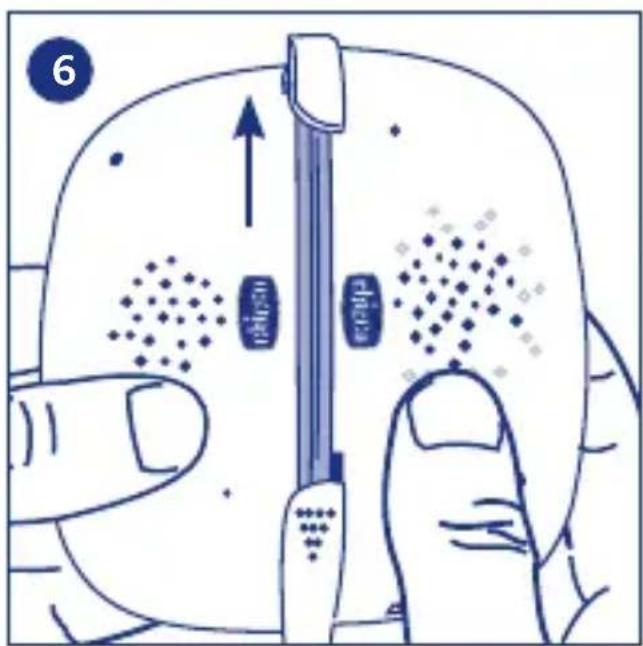
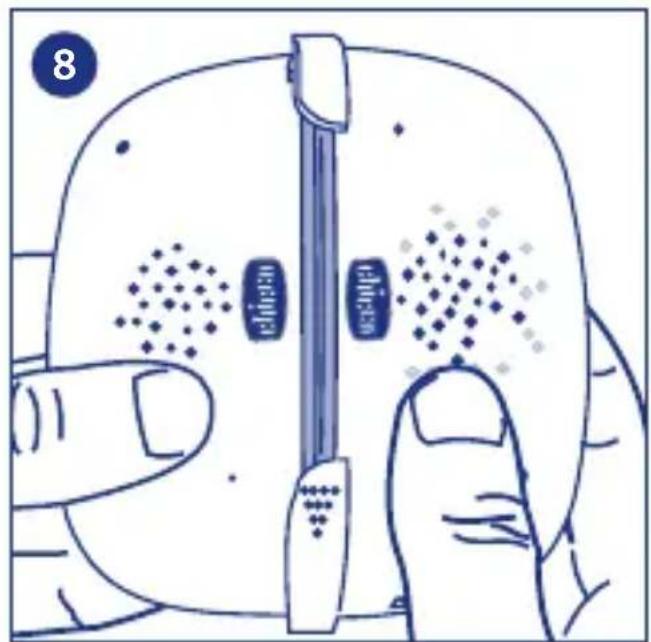
To assemble the two units (parent unit and child unit) and turn the baby control into one compact unit, position the parent and child units alongside each other, as seen in diagram 1, and position the child unit so that the bottom edge fits into the bottom tab on the parent unit (diag2). Push the child unit gently downwards following the direction of the arrows on the bottom tab on the parent unit (diag. 3) and slide the child unit towards the parent unit (diag. 4) so that the top end of the child unit is aligned with the upper tab on the parent unit (fig 5). Gently push the child unit upwards (diag. 6) until both units are perfectly aligned (diag. 7)
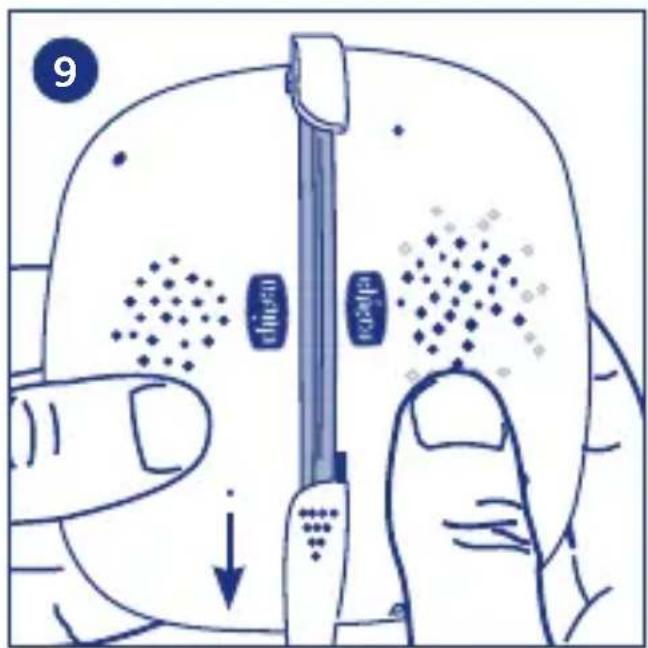
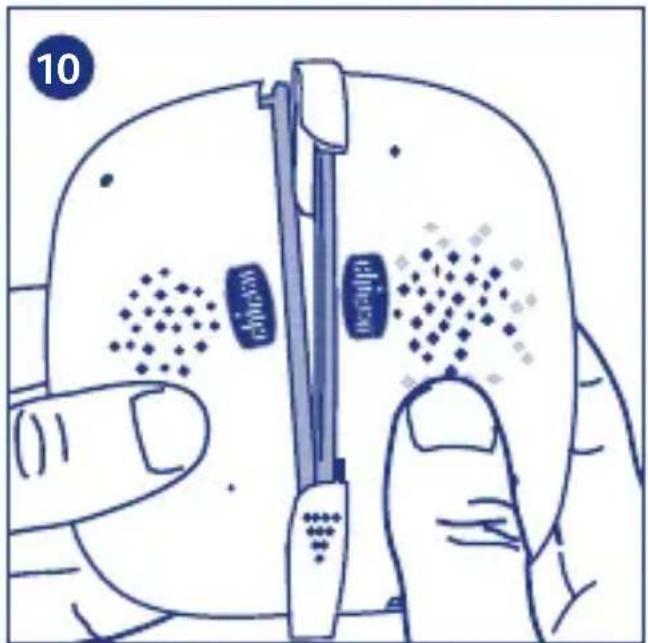
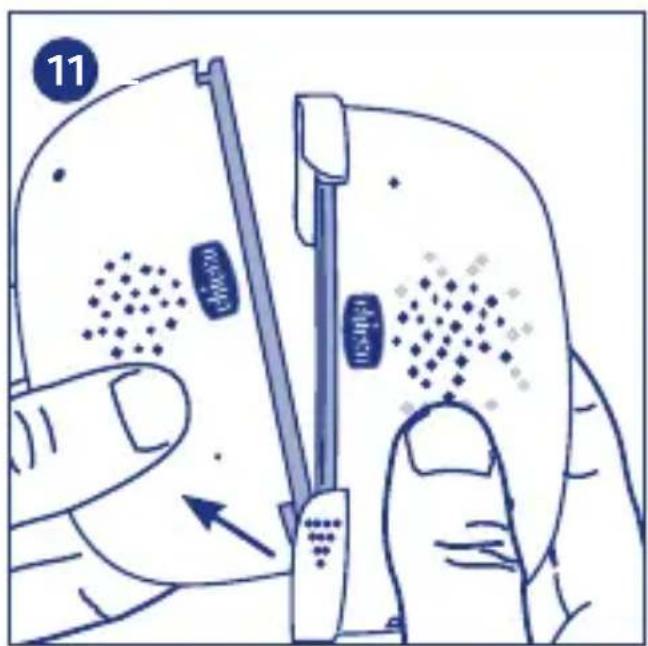
Recommendations when disassembling the units
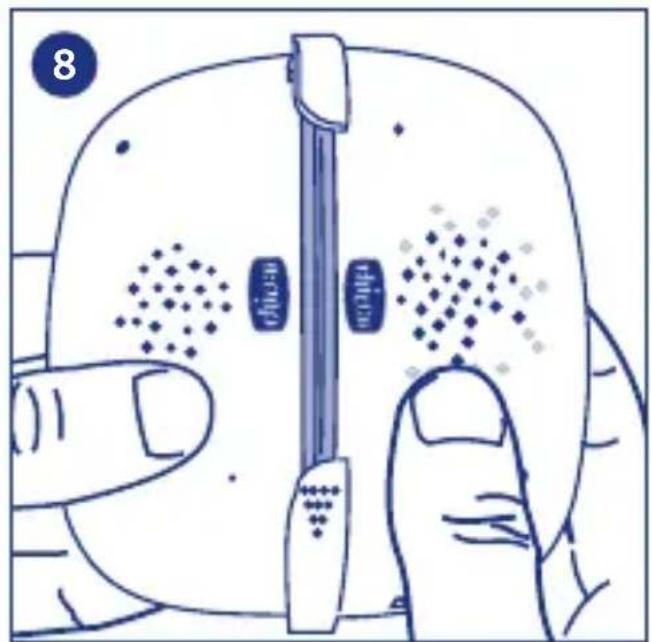
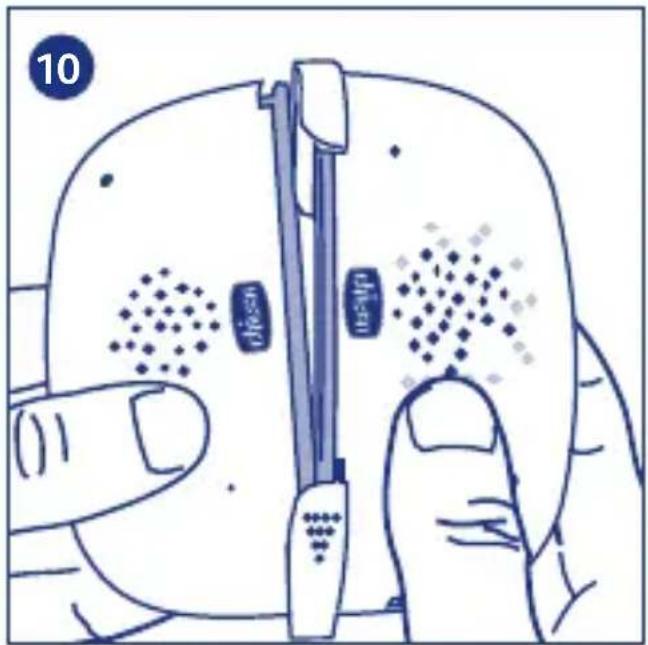
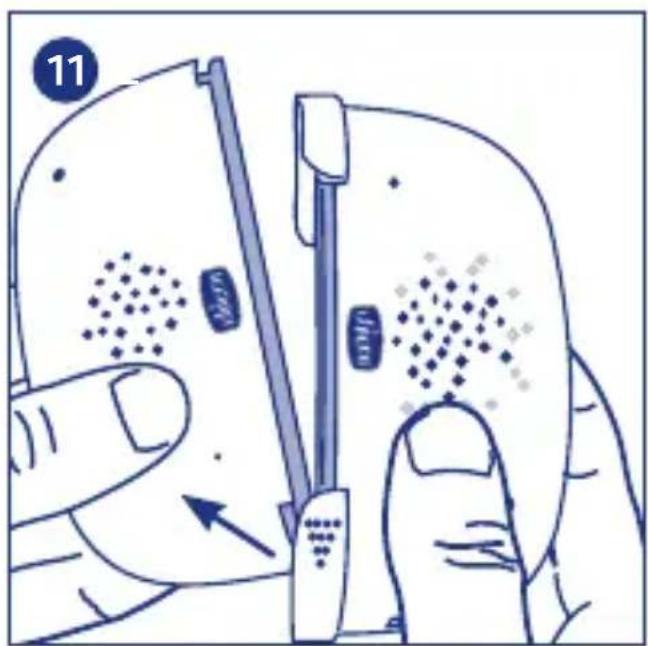
Grasp both assembled units, as seen in diag.8 Push the child unit gently downwards following the direction of the arrows on the bottom tab on the parent unit (diag. 9) and tilt the child unit slightly so the top end of the child unit is released from the upper tab on the parent unit (diag. 10). Now extract the child unit from the parent unit (diag. 11)
GENERAL WARNING
- Do not leave any packaging materials (plastic bags, cardboard boxes, etc.) within the reach of children as these can be hazardous.
- Before using the devices, make sure that no products or their components are worn or damaged. If in doubt, do not use the appliance and contact your local retailer or qualified experts.
-
Never attempt to repair the product, but simply follow the instructions provided in the “Troubleshooting” section. If repair work is needed, please contact the Artsana Customer Service
-
Never open the devices. The child unit (primarily in transmitter mode), the parent unit (primarily in transmitter mode) and the mains adaptors do not contain parts that can be used by the consumer. Please contact qualified experts or the Artsana S.p.A. Customer Service if any faults occur. Opening the devices could cause an electric shock.
- The Chicco Baby Control Audio Digital Compact should not be used as a medical monitor and is not intended to replace the supervision of children by adults; it is designed to provide a way of supporting their surveillance. All other use is to be considered improper.
- Always place the child unit and parent unit on a flat, stable surface, out of children's reach.
- Always keep the child unit, the parent unit and above all the parent unit support cord and AC/DC mains adaptors out of children's reach (the
adaptor cables and the support cord could cause strangling risks).
- It is vital to regularly check that the child unit (primarily in transmission mode) and the parent unit (primarily in receiver mode) are both working properly; in particular check that the signal is receiving clearly and that you have not exceeded the maximum foreseen distance.
- The maximum operating distance is around 300 metres in an open space without obstacles (this range could be reduced considerably indoors according to the environmental situations, the layout of walls and furniture, the presence of metal structures, electromagnetic fields/disturbances of internal or external origin, reinforced concrete walls, when rooms are located on different floors, or when the batteries are not charged completely etc.)
- When the child unit and/or parent unit are alkaline battery and/or battery pack powered, the product will stop operating when the batteries run low. It is therefore recommended to check the alkaline battery and/or rechargeable batteries status on both units whenever they are switched on.
- When the parent unit is connected to the mains, the device will only stop operating during a sudden power cut if the rechargeable batteries are low. It is therefore recommended to constantly check the battery status.
- Never use the child unit (primarily in transmitter mode), the parent unit (primarily in transmitter mode) and mains adaptors in positions where they are exposed to weather elements (rain, sun etc). If the product is used outside, the child unit (primarily in transmission mode) and the parent unit (primarily in receiver mode) must be run on the alkaline batteries and rechargeable battery pack only: the mains adaptors supplied with this product are not suitable for use outdoors.
- To prevent the risk of overheating, place the child unit (primarily in transmission mode), the parent unit (primarily in receiver mode) and above all the AC/DC mains adaptors away from all heat sources, such as, for instance, radiators, thermostats, fires, cooking hobs, windows exposed to the sun etc.
- Never use the two units in areas where there is water, i.e. near bathtubs, washing machines, sinks or on wet surfaces (especially when the units are connected to the mains). Never dip them in water or allow them to get wet. Never use units or adaptors that have got wet; in such cases please contact a qualified expert.
- Always place the child unit (primarily in transmission mode), the parent unit (primarily in receiver mode) and the AC/DC adaptors where air can circulate to prevent any of the components from overheating.
- Never use this product near neon lights or other electrical/electronic devices such as TVs, motors, PCs, cordless DECT phones etc. These could interfere with its functions.
- Only use the AC/DC adaptors supplied with the product, or exactly the same type with the same electrical characteristics. The use of other adaptors could damage the child unit and/or parent unit and endanger the safety of the user.
- It is not possible to replace the mains adaptor power cables if they get damaged, therefore the mains adaptor must no longer be used and must be replaced with another identical adaptor. Attention: never use a different type of mains adaptor compared to the one supplied by Artsana S.p.A. (model 20126300000) as the device would fail to conform with the technical specifications imposed by the reference EC Directives and seriously compromise the safety and reliability of the product. Contact your local retailer or Artsana S.p.A. to replace the adaptor.
- Check that the voltage on the AC/DC adaptors (see information on the AC/DC adaptors) corresponds to that of your mains supply and that the adaptor plug is compatible with the sockets on your mains system.
- Connect the AC/DC adaptors to easily accessible sockets which are out of children's reach.
Lay the AC/DC adaptor cables to that they can not be trodden on, they cannot get caught up in other objects or be touched by children as this could endanger their safety (they could trip or catch their neck in the wire).
- The AC/DC adaptors, the child unit (primarily in transmission mode) and parent unit (primarily in receiver mode) could feel warm to the touch when operating.
This is absolutely normal.
- Always disconnect the AC/DC adaptors from the power sockets when not in use.
- Alkaline batteries and rechargeable batteries must only be replaced by adults, using alkaline batteries or rechargeable batteries having the same characteristics as those indicated in this manual.

WARNING!
TO PREVENT THE RISK OF ELECTRIC SHOCKS, NEVER REMOVE THE PRO-TECTION COVER OR TRY TO OPEN THE MAINS ADAPTORS.
NEVER WET THE MAINS ADAPTORS, CHILD UNIT OR PARENT UNIT, NEVER EXPOSE THEM TO HUMID ENVIRONMENTS AND NEVER TRY TO OPEN THEM. THIS CAN ENDANGER YOUR SAFETY AND WILL INVALIDATE THE WARRANTY.
1. Configuration & Characteristics
Control devices which use DECT transmission technologies can be used as an auxiliary apparatus to monitor children in domestic environments. This baby control comes with a child unit (primarily in transmitter mode) and a parent unit (primarily in receiver mode).
Both devices use DECT digital technology to establish wireless radio contact that transmits and receives sound.
1.1 System features
The main system features are:
- Vocal transmissions using a DECT digital technology system.
- Operating range in open spaces without any obstacles of around 300 metres*.
- User-friendly units.
* The maximum operating distance is around 300 metres in an open space without obstacles and fully charged batteries (this range could be reduced considerably indoors according to the environmental situations, the layout of walls and furniture, the presence of metal structures, electromagnetic fields/disturbances of internal or external origin, reinforced concrete walls, when rooms are located on different floors, or when the batteries are not charged completely etc.)
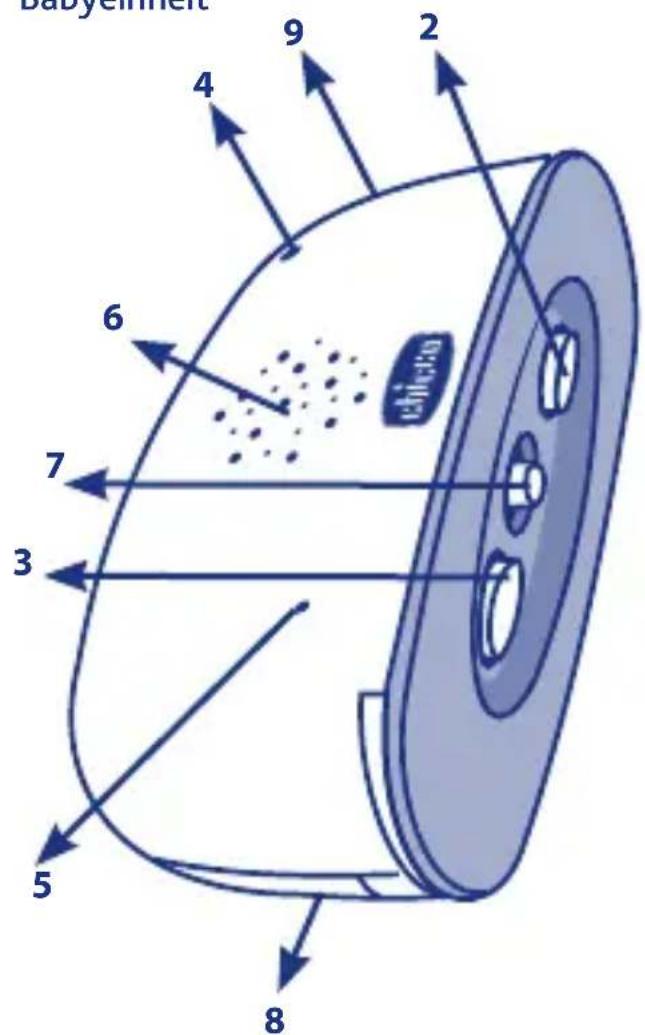
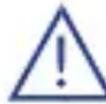
1.2 Child unit
(primarily in transmitter mode)
Model 06026
-
Switching power supply adaptor +
100-240V \~ 50/60Hz /6V 500mA
or 2 alkaline 1.5V type AAA /LR03 batteries (not included) -
ON/Off button ⓘ
-
Nightlight ON/Off button

4.1 2-coloured green/red LED:
(a) Fixed green: power ON and correctly connected to the parent unit;
(b) Blinking red (2 blinks a second): alkaline batteries are low
(b) Blinking green (2 blinks a second): connection with the parent unit lost;
5. Integrated Microphone
6. Integrated speaker to reproduce the parent's voice
7. Volume adjustment button (8 levels)
8. Battery compartment cover
9. Child unit power connector


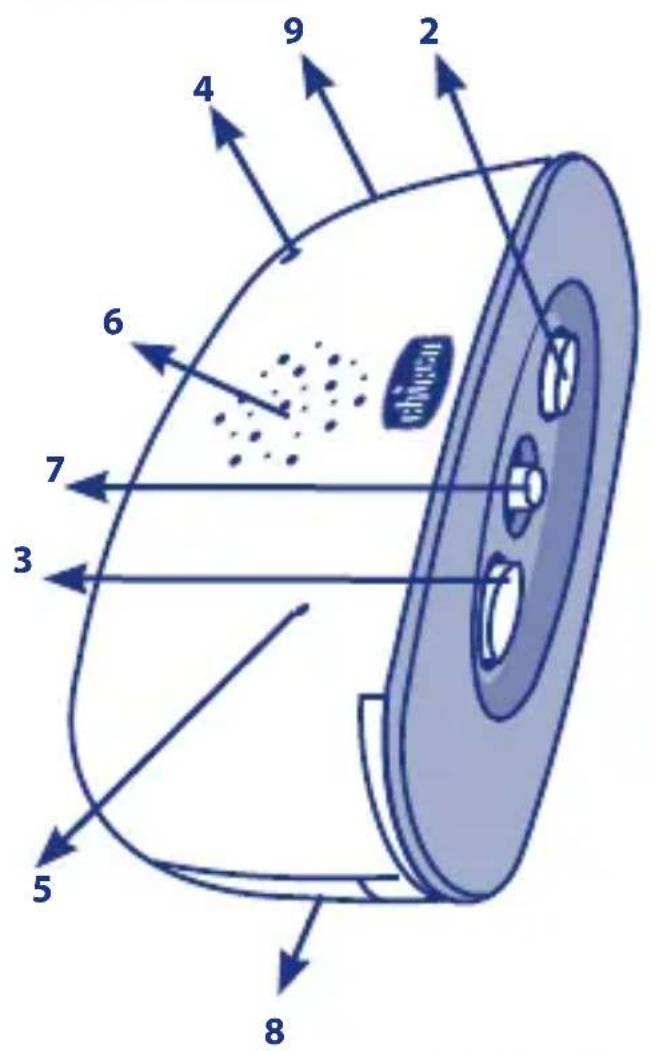
1.3 Parent Unit (primarily in receiver mode) Model 06026
- Powered by rechargeable NiMh 2x1.2V, 750 mAh type AAA batteries (included) or switching mains adaptor 100-240V \~ 50/60Hz / 6V,
500mA.
-
ON/Off button ①
-
Volume adjustment button (8 levels)

- 3 orange LED indicators for sound levels received from the child unit.
5.1 2-coloured green/red LED:
(a) Fixed green: child unit is connected and working properly;
(b) Blinking green (2 blinks a second): connection with the child unit lost;
(b) Blinking red (2 blinks a second): rechargeable batteries are nearly flat or loss of connection with the child unit (only with rechargeable batteries being recharged with the relative mains adaptor)
(a) fixed red: rechargeable battery charge phase 6. Integrated speaker to reproduce the sounds from the child's room.
The speaker also has the additional functions seen below:
a) Warning signal when contact is lost between the child unit and the parent unit: If there is no connection when the device is switched on, or if connection is lost when being used, 2 acoustic signals will be triggered after around 10 seconds. As soon as connection with the child are reinstated, the warning signal will be disabled;
b) Rechargeable batteries low battery warning function: it beeps once every second. Recharge the rechargeable batteries.
The beeping switches off when the rechargeable batteries are being charged.
- Integrated Microphone
- Voice activated mode or continual transmission
mode switch

- Talk-back button to activate the parent-baby communication mode ("TALK" function) TALK
- Battery compartment cover
- Carry strap slots
- Power and/or rechargeable battery charger
socket ((6V 500mA)

- NiMh 2x1.2V, 750 mAh type AAA rechargeable batteries (included) via switching mains adaptor 100-240V \~ 50/60Hz / 6V, 500mA.
- Carry strap
2. Description of the characteristics
2.1 Child Unit (primarily in transmitter mode)
2.1.1 Power:
Powered by mains adaptors 100-240V \~ 50/60Hz
/ 6V ,500mA or 2 AAA alkaline batteries (not included).
If powered by a mains adaptor (1):
- insert the mains adaptor plug (1) into the socket (9) on the side of the unit,
- check that the voltage used by the electrical system corresponds to that indicated on the adaptor plates (1) indicated above.
- plug the mains adaptor (1) into an easy to reach mains socket.

WARNING
- The mains adaptor (1) cable can strangle children and must be kept out of their reach at all times.
- Inspect the mains adaptors (1) periodically; if the power cable or the plastic parts are damaged, do not use them and contact a qualified expert.
- Never leave the adaptors (1) connected to the mains when the devices are not in use and/or not connected to the adaptors themselves.
2.1.2 Instructions for use – Switching on and Sound Adjustments
The child unit (primarily in transmitter mode) should be placed about 1 - 1.5 metres from the child, on a flat and stable surface, with the microphone (5) facing the child.
Warning: the child unit, mains adaptor (1) and the power cable must be kept out of children's reach.
- ON/OFF button on the child unit ① (2)
Press the ON/OFF button (2) for around 2 seconds to turn the child unit (primarily in transmitter mode) ON. Do not press the button for longer otherwise the child unit may not switch on. Press it again for around 2 seconds to turn the child unit (primarily in transmitter mode) OFF.
• Nightlight ON/OFF button

Press the ON/OFF button (3) for around 2 seconds to turn the nightlight ON.
Do not press the button for longer otherwise the nightlight may not switch on. When the child unit (primarily in transmitter mode) is alkaline battery powered only, the nightlight (3) switches off automatically after 5 minutes. If the child unit (primarily in transmitter mode) is powered by the mains adaptor (1), the night light (3) will remain ON until the button (3) is pressed again.
• Volume adjustment button + ||(7)
This regulates the reception volume of sound from the parent unit if the talk-back function is enabled;
Press the button toward “+” to increase the volume by one level.
Press the button toward “-” to decrease the volume by one level.
When the volume reaches its maximum or minimum levels, it will beep twice.
The device stores the selected and previously used volume level in its memory bank.
Note: The device has 8 volume levels. The factory default sound level is 5.
2.1.3 Luminous operating status indicator
The 2-coloured LED (4) provides two different types of information.
- power ON indicator and correct connection to the parent unit indicator;
The 2-coloured LED (4) is green.
NOTE. If the child unit is not able to establish a connection with the parent unit or the connection is lost, the 2-coloured LED (4) is green and will blink twice every second until it re-establishes a connection.
- 1.5V AAA alkaline batteries (not supplied in the pack) are low: the 2-coloured LED (4) is green and blinks twice every second.
2.2 Parent Unit (primarily in receiver mode)
2.2.1 Power:
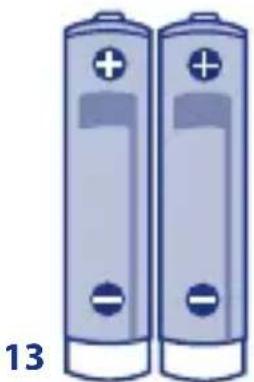
Powered by rechargeable NiMh 2x1.2V, 750 mAh type AAA batteries (13) (included) or by switching mains adaptor 100-240V \~ 50/60Hz / 6V,
500mA.
WARNING: Rechargeable batteries must only be recharged using the mains adaptor (1) supplied in the pack.
WARNING:
- The mains adaptor (1) cable and carry strap (14) must be kept out of children's reach at all times. They can constitute strangulation risks.
- Inspect the mains adaptors (1) periodically; if the power cable or the plastic parts of the mains adaptor are damaged, do not use them and contact an Artsana SpA's qualified expert.
- Never leave the adaptors (1) connected to the mains when the devices are not in use and/or not connected to the adaptors themselves.
2.2.2 User Instructions – Switching on and Adjustments
- ON/OFF button on the parent unit (primarily in receiver mode) ⑫.
Press the ON/OFF button (2) for around 2 seconds to turn the parent unit (primarily in receiver mode) ON. Do not press the button for longer otherwise the parent unit may not switch on. Press it again for around 2 seconds to turn the parent unit (primarily in receiver mode) OFF.
• Volume adjustment button +
Press the button toward "+" to increase the volume by one level.
Press the button (3) toward "-" to decrease the volume by one level.
The unit will beep each time you increase or decrease the volume level. When the volume reaches its maximum or minimum levels, it will beep twice.
The device stores the selected and previously used volume level in its memory bank.
Note: The device has 8 volume levels. The factory default sound level is 5.
• Voice activated mode or continual transmission mode switch (8)
If the switch is set to "OFF", the two units will operate in continuous transmission mode
If the switch is set to "ON", the child unit will operate in voice activated mode; the speaker (6)
on the parent unit (primarily in receiver mode) will only switch on when it picks up sounds from the child unit (primarily in transmitter mode) microphone (5), and will then switch off after a few seconds if no sound is received.
- Talk-back button to activate the parent-baby "TALK" option (9)
Press this button (9), to switch the parent unit from receiver mode to transmitter mode and communicate with the baby through the integrated microphone (7).
This will simultaneously switch the child unit (primarily in transmitter mode) from transmission to receiver mode. The loudspeaker (6) on the child unit will automatically reproduce the voice transmitted from the parent unit.
On releasing the button (9), the parent unit switches back to receiver mode (its primary function) and the child unit automatically switches back to its primary transmission function mode.
- Portable option for the parent unit
The parent unit is fitted with a carry strap (14) which makes it practical to carry around.
2.2.3 Luminous and acoustic operating status indicator
The 2-coloured LED (5) provides 3 different types of information:
- power ON indicator and correct connection to the child unit indicator; The 2-coloured LED (5) is green.
NOTE. If the parent unit is not able to establish a connection with the child unit or the connection is lost, the 2-coloured LED (5) is green and will blink twice every second until it re-establishes a connection. Moreover, after 10 seconds it will beep twice a second.
- Rechargeable battery (13) low battery indicator: the 2-coloured LED (5) is red and blinks twice every second and it will beep once a second. If you wish to continue using the device, it is recommended to charge the rechargeable batteries (13), otherwise the device will stop working.
Charge the batteries using the mains adaptor supplied in the pack (1), the warning signal will be disabled.
Rechargeable battery charge status indicator (13): the 2-coloured LED (5) is RED.
When recharging is complete, the 2-coloured LED (5) will switch OFF if the parent unit is OFF whilst recharging; it will go GREEN if the parent unit is ON whilst recharging.
- 3 orange LED which indicate the volume level of sound received from the child unit. (4) The LEDs: they progressively light up from the bottom upwards indicating the sound volume level NOTE. When the parent unit (primarily in receiver mode) is switched on, it searches for the connection channel to the child unit (primarily in transmitter mode) and the power indicator LED (5) will blink until it establishes a connection with the child unit (primarily in transmitter mode).
Warning.
When the parent unit (primarily in receiver mode) is switched on, always check the operating status of the child unit (primarily in transmitter mode)! After switching on the units, always check that the signal transmitted is actually received at the distance and/or in the area the parent unit is placed.
It is recommended to ask someone to help you test the units; ask them to transmit from the child unit (PT) whilst you move around the reception area with the parent unit (PR) to check that the signal is strong enough.
3. Replacing the batteries on the child unit (primarily in transmitter mode) and rechargeable batteries on the parent unit (primarily in receiver mode)

Warning: these operations must only be carried out by an adult.
- Only use alkaline batteries [child unit (primarily in transmitter mode)] and rechargeable battery packs [parent unit (primarily in receiver mode)] equal or equivalent (with the same electrical characteristics) to those indicated in this manual. • Always remove the 1.5V tipo AAA alkaline batteries (not included) and/or rechargeable batteries when they are dead or you don't intend to use the child unit and parent unit for a certain length of time. This will prevent the batteries from leaking liquid which will damage the devices and/or anything in the vicinity.
- Do not short-circuit the battery poles. • The use of rechargeable batteries on the child unit is not recommended as the device functions may not work as well. This child unit is not designed for use with rechargeable batteries. Use 1.5V AAA alkaline batteries (not supplied)
NOTE. If the rechargeable batteries supplied for use in the parent unit start to run down quickly
after charging, it will be necessary to replace them (this is normal as all rechargeable batteries run out over time)
- The rechargeable batteries supplied with the parent unit must only be recharged using the mains adaptor (1) supplied with the pack. - Do not attempt to recharge non-rechargeable batteries as they might explode. - This product is not designed for use with lithium batteries.
WARNING Improper use could be hazardous.
- Never leave dead batteries in the child unit (primarily in transmitter mode), always replace them immediately or they may leak corrosive and/or hazardous liquids.
- Never leave rechargeable batteries in the parent unit (primarily in receiver mode) when they have run down; always recharge them immediately (or replace if spent) as they may leak corrosive and/or hazardous liquids.
- If the batteries happen to leak liquid, protect your hands and replace the batteries immediately, making sure you clean the compartment and any other areas affected by the liquid beforehand. Wash your hands thoroughly when you have finished. Dispose of all dead batteries according to the differentiated waste collection regulations in your area. Never burn them or disperse them in the environment.
Never mix new and old or different types of batteries on the child unit (primarily in transmitter mode).
- When inserting the 1.5V AAA type alkaline batteries (not supplied) in the child unit (primarily in transmitter mode), always check that they are inserted with the poles in the right direction as indicated on the battery compartment
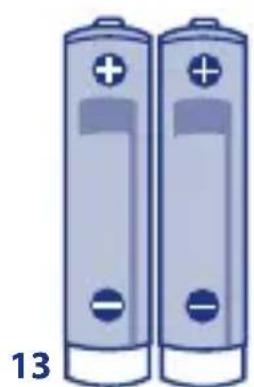
- When inserting the NiMh 2x1.2V, 750 mAh type AAA (included) rechargeable batteries in the parent unit (primarily in received mode), always check they are inserted with the poles in the right direction as indicated on the battery compartment
- Remove the alkaline batteries/rechargeable batteries from the product before disposing them.
- Never leave alkaline batteries/rechargeable batteries and/or any tools used to remove them within the reach of children.
- Never burn or dispose of old alkaline batteries/rechargeable batteries into the environment or
with urban waste; dispose of them at an appropriate differentiated collection point according to the laws in force.
3.1 Replacing alkaline batteries on the child unit (primarily in transmitter mode)
Slide open the battery compartment cover on the back of the unit to remove the 2 spent alkaline batteries from the compartment and replace them with 2 identical 1.5 Volt AAA batteries, making sure they are inserted with the poles in the right direction as indicated on the compartment. Slide the battery compartment cover (8) back into place.
3.2 Fitting the rechargeable batteries inside the parent unit
(primarily in transmitter mode)
When you purchase the product, the rechargeable batteries (13) are not fitted inside the parent unit (primarily in receiver mode) and are packed separately inside the box.
Remove the rechargeable batteries compartment cover (10) from the parent unit. Fit the rechargeable batteries (13) checking the pole directions.
Press the rechargeable battery pack compartment cover (10) back into place.
3.3 Replacing rechargeable batteries inside the parent unit
(primarily in transmitter mode)
Remove the rechargeable batteries compartment cover (10) on the back of the parent unit. Remove the rechargeable batteries (13) if spent, and replace them with new identical rechargeable batteries (13) identical to those supplied with the product, i.e. NiMh 1.2V 750 mAh tipo AAA (20126300100 code to be requested from Artsana S.p.A.) making sure they are fitted with the poles in the right direction, as indicated on the compartment. Press the rechargeable battery pack compartment cover (10) back into place.
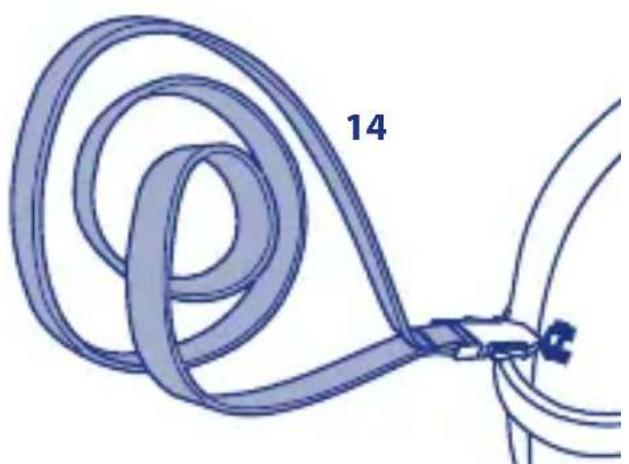
4. Carry strap
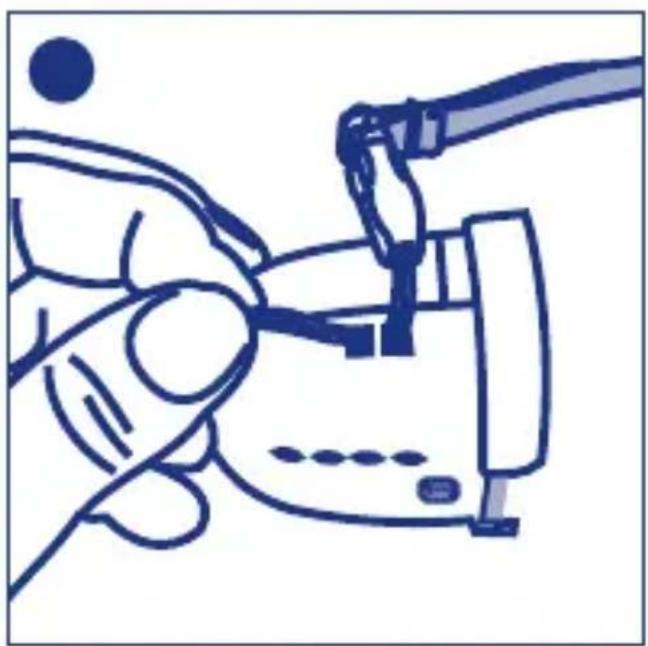
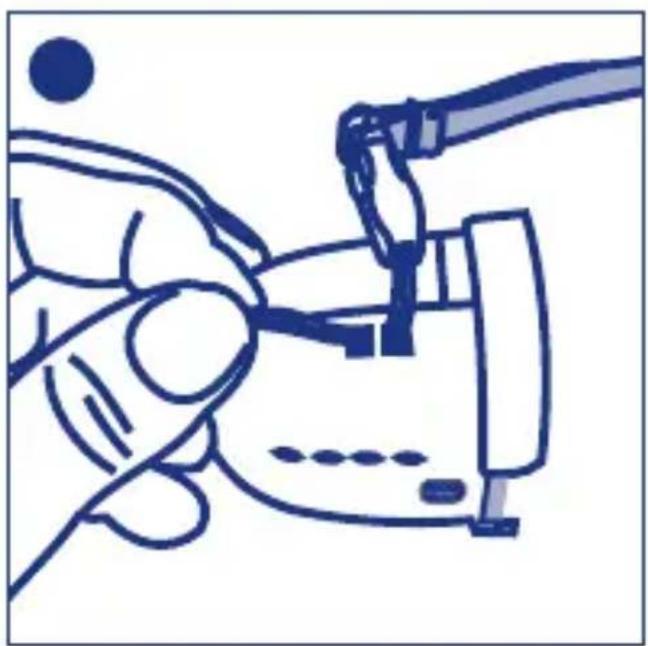
To attach the carry strap to the parent unit cord, proceed as follows:
- Slide the cord through the slot (diagram 12)
- Slide the strap inside the cord as seen in diagram 13a – 13b.
The strap (diag.14) allows you to carry the unit around with you, as seen in diag. 15.
Warning. Keep the carry strap out of the reach of children.
4. Case
When assembled and not in use, the Baby Control Audio Digital Compact, can be stored away in its own case. The carry strap (diag. 14) allows you to carry both assembled units around inside the case as seen in diagram 15. In particular:
- Place both assembled units inside its case, as seen in diag.16
- Slide both zips toward the centre to close the case, making sure that the carry strap does not get caught in the zip (see diag. 16).
Warning. Keep the case out of the reach of children.
4.1 Cleaning and maintenance of the case
Please refer to the instruction label inside the case for information on how to clean the case.
TECHNICAL FEATURES
Child Unit (primarily in transmitter mode)
Mod.06026
Power supply:
Internal: ALKALINE BATTERIES 2 X 1.5V TYPE AAA/LR03
External: via mains adaptor: 100-240V \~ 50/60Hz
/6V 500mA
Transmission (/reception - Talk Back mode):
- Transmission (/reception) frequency channel: 1880 -1900Mhz
- Transmission output: 250mW max
Parent Unit (primarily in receiver mode)
Mod.06026
Power: Rechargeable batteries NiMh 2x1.2V TYPE AAA 750mAh
External rechargeable battery charger: via mains adaptor 100-240V \~ 50/60Hz / 6V, 500mA
Reception (/transmission - Talk Back mode):
- Reception (/transmission) frequency channel: 1880 - 1900Mhz
- Transmission output: 250mW max
Mains Adaptor
Mod. IA5060G
100-240V \~ 50/60Hz / 6V 500mA
Plug pole:

Made in China
SYMBOLS KEY

single phase alternate current

natural_image
Three-line icon set showing a house, open book with an open, and closed book (no text or symbols)direct current
for indoor use only
User instructions
Please read the user manual.
C€0470
Conforms to applicable EC directives and subsequent amendments

Double insulation
Artsana S.p.A hereby declares that this product complies with all the essential requirements and other provisions indicated in EU Directive 1999/5/EC (electromagnetic compatibility). A copy of the declaration of compliance in the original language is attached to this manual. In accordance with the European Commission Decision N°2000/299/EC dated 06/04/2000, the frequency band used by this product has been harmonised for all EU Countries and therefore this is a Class 1 product which can be used in all European Community Countries. When used outside Europe or in Non-European Community Countries, the User must check that the product complies to the regulations in force in the country of use.

This product complies with EU Directive 2002/96/EC.
The crossed bin symbol on the appli-ance indicates that the product, at the end of its life, must be disposed of separately from domestic waste, either by taking it to a separate waste disposal site for electric and electronic appliances or by returning it to your dealer when you buy another similar appliance. The user is responsible for taking the appliance to a special waste disposal site at the end of its life.
If the disused appliance is collected correctly as separate waste, it can be recycled, treated and disposed of ecologically; this avoids a negative impact on both the environment and health, and contributes towards the recycling of the product's materials.
For further information regarding the waste disposal services available, contact your local waste disposal agency or the shop where you bought the appliance.

COMPLIANCE WITH THE EU DIRECTIVE 2006/66/EC.
The crossed bin symbol indicated on the battery or the product packaging means that it must not be disposed of as household waste at the end of its life cycle, but it must be taken to a differentiated waste disposal centre, or returned to the retailer when you purchase new rechargeable or standard use batteries. Chemical symbols such as Hg, Cd, Pb, printed under the crossed bin indicate the substance contained in the battery, Hg=Mercury, Cd=Cadmium, Pb=Lead. The user is responsible for taking the spent batteries to the appropriate waste collection centre when no longer in use for processing and recycling. Appropriate differentiated waste collection and subsequent environmentally friendly recycling, processing and disposal of the old batteries contributes to safeguarding health and the environment and encourages the recycling of materials used to make such batteries. Unlawful disposal of the product by users damages the environment and human health. For further information regarding the waste disposal services available, contact your local waste disposal agency or the shop where you bought the appliance.
ARTSANA reserves the right to make changes to the contents of this instruction manual at any time and without warning. All reproduction, transmission, transcription or translation into other languages of this manual, or part of the same, is strictly prohibited without prior written authorisation by ARTSANA
Warranty: This product has a 2-year warranty against manufacturing defects from the purchase date.
TROUBLESHOOTING
If any problems occur, please run through the check list below after making sure:
- Both units are switched on.
- Both units are correctly connected to the mains adaptor (1), plugged into the power socket, or that the alkaline batteries and rechargeable batteries are fully charged.
| Fault Cause Solution | ||
| The power indicator LED (4) on the parent unit (receiver/ child unit (transmit- ter) is OFF | - the parent unit (receiver) /child unit (transmitter) is OFF- The alkaline batteries in the child unit and/or the rechargeable batteries in the parent unit are spent.- The mains adaptor is disconnected or connecter incorrectly. - No power supply | - Turn the parent unit (receiver) /child unit (transmitter) ON- Replace the alkaline batteries in the child unit and/or the rechargeable batteries in the parent unit.- If the units are powered using the mains adap- tors, check that these are connected correctly to the mains sockets- Check that the socket has power supply. |
| There is no sound from the parent unit (receiver). | - No sound is received from the child unit (transmitter);- The voice activation mode has been selected- The volume on the par- ent unit (receiver) is set too low;- The alkaline batteries in the child unit and/or the rechargeable batteries in the parent unit are spent.- The parent unit (receiver) could be switched off. | As soon as any noise/sound is picked up the transmitter will be activated. In any case, to make sure it works, asks someone to speak into the transmitter in the child's room to make sure you are receiving properly.- Check the operating mode enabled and the ON/Off switch which enables the voice acti- vated mode on the parent unit- Press the volume button to maximum level (3) on the parent unit (receiver) until you hear sounds.- Replace the alkaline batteries in the child unit and/or the rechargeable batteries in the parent unit.- Turn the parent unit (receiver) ON |
| Interfer- ence | - DECT technology guar- antees protection against interference caused by similar devices, however on rare occasions they can be caused by the presence of another similar device transmitting in the immedi- ate vicinity.- Electromagnetic pollution (vicinity to transmitting radio aerials, high voltage cables etc). | - Move the device away from similar devices and/or move away from this position. |
| Decrease in operating range | - Presence of obstacles, metal structures, reinforced concrete walls etc. between the child unit (transmitter) and the parent unit (receiver).- The alkaline batteries in the child unit and/or the rechargeable batteries in the parent unit are spent. | - Bring the units closer together or reposition them to reduce the number of obstacles, metal structures, reinforced concrete walls etc. between them.- Replace the alkaline batteries in the child unit and/or the rechargeable batteries in the parent unit. |
| Electrostatic or electromagnetic noise | Electrostatic or electromagnetic interference due to electrostatic or electromagnetic fields emitted by other electrical appliances: e.g. white goods, mobile or cordless phones etc. | Identify and, where possible, remove the source of interference. |
| Presence of hissing or whistling | - The units are too close together- Receiver volume (parent unit) is too high. | - Move the units further apart;- Turn down the parent unit (receiver) volume. |
| The parent unit (receiver) emits very low volume sound. | - The baby is too far away from the child unit (transmitter)- The parent unit (receiver) volume is set too low. | - Move the child unit (transmitter) 1-2 metres away from the baby.- Turn the parent unit (receiver) volume up. |

Baby Control Audio Digital Compact
Tecnología digital:
CONFORMITE A LA DIRECTIVE EU 2006/66/EC
natural_image
Line drawing of a coiled cable with a rectangular component and a terminal connector (no text or symbols)Kindereenheid Μονάδα παιδιού Bebek ünitesi Детский блок Sändarenheten وصف جهاز الوالدين
Oudereenheid Mováda yovéa Ebeveyn ünitesi Родительский блок Föräldrarnas mottagarenhet
natural_image
Two cylindrical batteries with positive and negative charge indicators, labeled '13' at bottom (no text or symbols on battery bodies)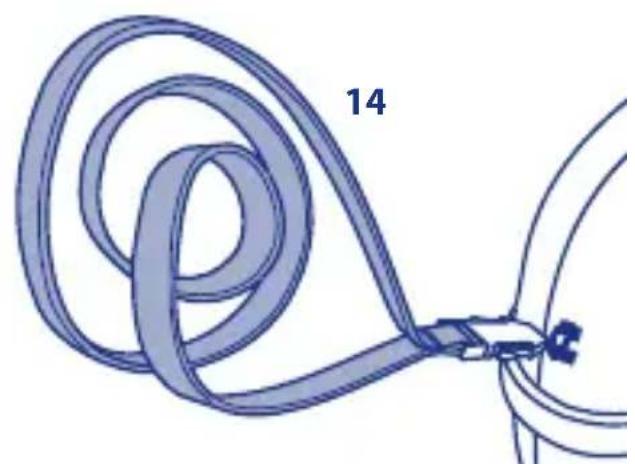
natural_image
Diagram of a rope knot being tied with a connector, labeled with number 14 (no text or symbols on the diagram itself)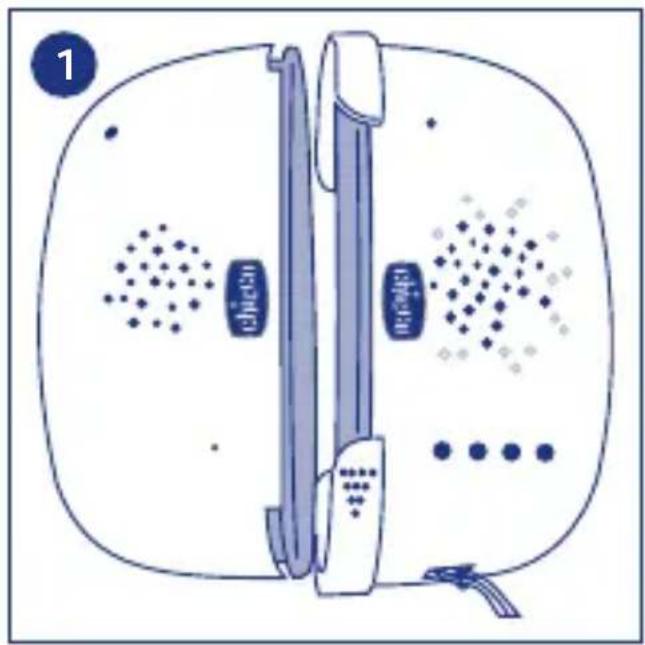
natural_image
Diagram of a refrigerator with patterned seating and a door, no text or symbols present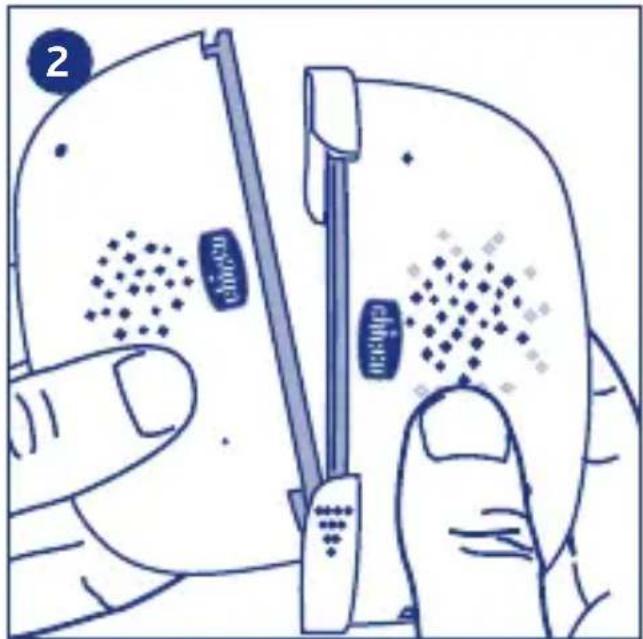
natural_image
Illustration of a hand holding a pen with two small electronic components, no text or symbols present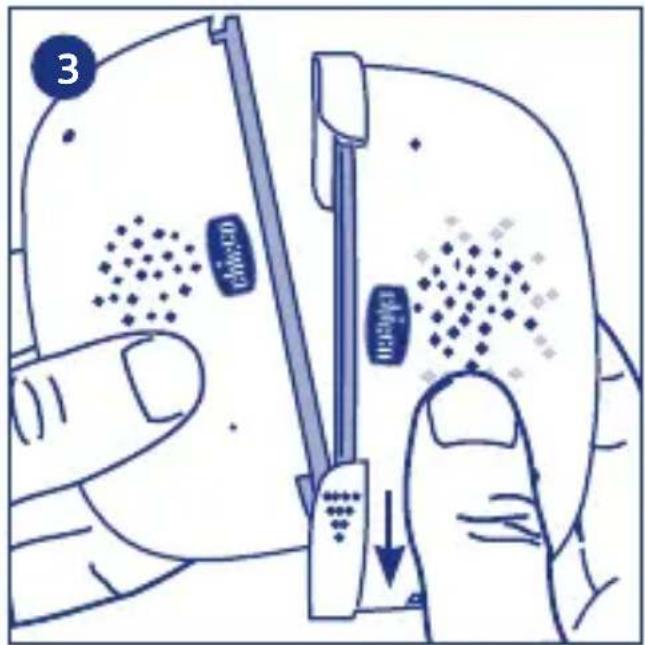


natural_image
Illustration of a hand holding a smartphone with a finger pointing at it, showing two screens and dot patterns (no text or symbols)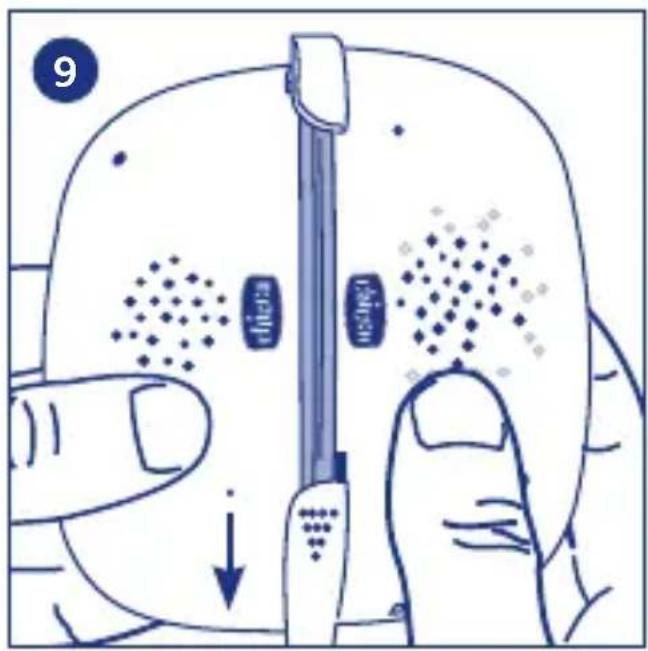
natural_image
Line drawing of a hand using a tool to interact with a device (no text or symbols present)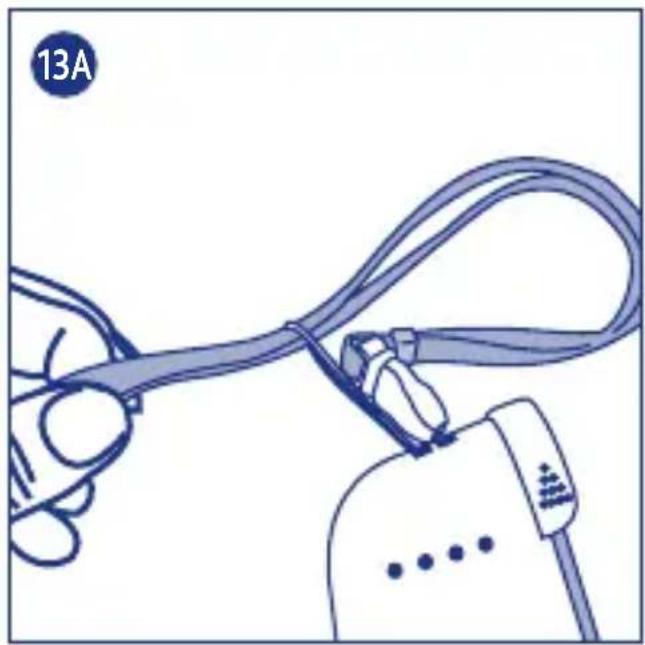
natural_image
Illustration of a hand connecting a cable to a plug, showing cable termination and wiring (no text or symbols)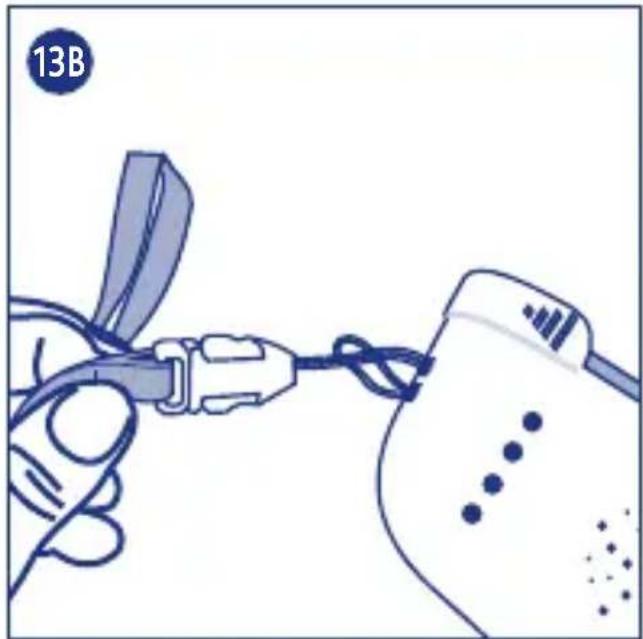
natural_image
Illustration of a hand connecting wires to a device with a connector (no text or symbols visible)
natural_image
Illustration of a hand holding a medical device with a strap, no text or symbols present
natural_image
Illustration of a hand using a tool to adjust or install a device into a container (no text or symbols visible)
Baby Control Audio Digital Compact
ALGEMENE WAARSCHUWING
DIT PRODUCT IS CONFORM DE EU-RICHTLIJN 2002/96/EG.
(Control Audio Compact
الكنولوجيا الرقمية: