USER MANUAL Classic Audio CHICCO
Instructions for Use
GB Please read these instructions carefully and keep them for future reference.
natural_image
Line drawing of a blue cable with a connector and labeled part '1' (no text or symbols on the diagram itself)
natural_image
Three purple cylindrical batteries with positive and negative terminals, labeled 12 and 3 (no text or symbols on the battery bodies)

natural_image
Simple line drawing of a cylindrical electronic component with a pointed tip and a base, labeled with number 8 (no text or symbols on the object itself)

natural_image
Illustration of a hand holding a cylindrical object with a screwdriver inserted, showing motion direction (no text or symbols)

natural_image
Illustration of a hand holding a small object with an arrow indicating motion, no text or symbols present
natural_image
Illustration of a hand holding a small object with arrows indicating motion or force direction, and a magnified inset showing a finger movement (no text or symbols)
natural_image
Illustration of a hand holding a cylindrical object with a screwdriver inserted, showing motion direction (no text or symbols)
natural_image
Illustration of a hand holding a pen with a screwdriver, showing the process (no text or symbols)
natural_image
Illustration of a hand holding a device with a magnified inset showing a cylindrical object (no text or symbols)
natural_image
Illustration of a hand holding a wrist with a magnified inset showing the wrist area (no text or symbols)
natural_image
Illustration of a hand holding a cylindrical object with a screwdriver inserted, showing motion direction (no text or symbols)
I Baby Monitor Classic Analogico
The Classic Analogue Baby Monitor lets you stay in contact with your child and to hear them at all times. The LED band on the parent unit lights up progressively as the intensity of the sound coming from the child unit increases. When voice activation is set, the parent unit will only be activated in the presence of sounds detected from the child unit.
There are 2 channels to guarantee communication between the two units and reduce interference.
Both units (parent and child) can run on batteries (three rechargeable Ni-MH AAA batteries are included for the parent unit) or via a mains adapter (two included).
Transmission frequency: channel 1: 40.695 MHz, channel 2: 40.665 MHz
Range of operation: about 150 metres*
*In ideal conditions in an open space with no obstacles
PACK CONTENTS
- One child unit (primarily in transmitter mode)
- One parent unit (primarily in receiver mode)
- Two switching mains adapters 100-240 V\~ 50/60 Hz /6 V
——300 mA
- 3x1.2V, NiMh, 700 mAh, AAA rechargeable batteries (for the parent unit)
- One instruction manual

GENERAL WARNINGS
- Do not leave any packaging materials (plastic bags, cardboard boxes etc.) within the reach of children as these can be hazardous.
- Before using the unit, check that neither the product nor its components are damaged (check the power cord and the body of the adapters in particular). If anything is damaged, do not use the unit and contact a qualified technician or your retailer.
- Never attempt to repair the product, but simply follow the instructions provided in the "Troubleshooting" section.
Contact Artsana S.p.A. Customer Service for repairs.
- Do not open the units. The child unit (primarily in transmitter mode), the parent unit (primarily in receiver mode), the rechargeable batteries and
the mains adapters do not contain any user-serviceable parts. Contact skilled technical personnel or Artsana S.p.A. Customer Service in the event of failure. Opening the above-mentioned devices can cause electric shock.
• The Chicco Classic Analogue Baby Monitor should not be used as a medical monitor and is not intended to replace the supervision of children by adults. It is designed to provide support in monitoring them. All other use is to be considered improper.
- Place the child unit and parent unit out of the reach of the child on a flat, stable surface
- Keep the child unit, parent unit, rechargeable batteries and AC/DC mains adapters out of reach of children (mains adapter cords could cause strangulation).
- It is important to regularly check the proper functioning of the child unit (primarily in transmitter mode) and the parent unit (primarily in receiver mode), particularly before each use, checking that signal reception is possible in the area and at the maximum distance of the intended use.
• The maximum operating distance is around 150 metres in an open space without obstacles (this range could be reduced considerably indoors according to the environmental situations, the layout of walls and furniture, the presence of metal structures, electromagnetic fields/disturbances of internal or external origin, reinforced concrete walls, when rooms are located on different floors or because batteries are not fully charged etc.).
- When the child unit and/or parent unit are powered with alkaline and/or rechargeable batteries, the product will stop working if the charging level is not sufficient. It is therefore always advisable to check the charging level of the alkaline and/or rechargeable batteries when switching on both units.
- In the event of a sudden electricity outage, when the parent unit (primarily in receiver mode) is being powered with the provided mains adapter, the product will only stop working if the charging level of the batteries is not sufficient or if the batteries have not been inserted in the battery compartment. It is therefore always


advisable to check the charging level or installation.
- Do not use the child unit (primarily in transmitter mode), the parent unit (primarily in receiver mode), the rechargeable batteries or the adapters in positions exposed to the elements (rain, sun etc.). Whenever the product is used outdoors, the child unit (primarily in transmitter mode) and the parent unit (primarily in receiver mode) must be powered using the internal alkaline and/or rechargeable batteries only: the mains adapters supplied with the product are not suitable for outdoor use.
• To prevent overheating, keep the child unit (primarily in transmitter mode), the parent unit (primarily in receiver mode), the rechargeable batteries and, especially, the AC/DC mains adapters away from sources of heat, for example radiators, thermostats, stoves, cookers, sunny windows etc.
- Never (especially if connected to the mains with the mains adapters) use the two units close to areas or situations where water is found, such as bathtubs, washing machines, kitchen sinks or wet surfaces.
Do not immerse or wet the units. Do not use the units and adapters if they have fallen in water. In this case, contact skilled technical personnel.
- Keep the child unit (primarily in transmitter mode), the parent unit (primarily in receiver mode) and the AC/DC mains adapters so as to allow adequate ventilation and to avoid the risk of overheating components.
- Do not use this product near fluorescent lamps (neon) or other electrical appliances such as televisions, motors, DVD/CD players, personal computers, cordless telephones, DECT cordless phones etc. Doing so could interfere with its operation.
Caution!: if the child unit (transmitter) and/or the parent unit (receiver) should stop working, no warning sound will be emitted from the parent unit (receiver) except for a possible emission of intense rustling (provided that the volume is not set to minimum). You should therefore always check the charging level of the batteries inserted in the unit, the correct positioning of the units and their operation.
Caution!: this unit requires public frequencies in order to operate (as envisaged by applicable legislation). For this reason, it is possible that the parent unit (receiver) reproduces signals or voices from other similar units located nearby. Likewise, the sounds from your child unit (transmitter) could be detected and reproduced by other similar devices located nearby.
If this situation occurs, you should try selecting the second transmission channel available.
- Only use the AC/DC mains adapters supplied with the product or an identical type with the same electrical characteristics. Use of other adapters could damage the child unit and/or parent unit and cause danger to the user.
- Adapter power cords cannot be replaced and, therefore, in case of damage, do not continue to use the mains adapter but replace it with an identical type adapter.
Caution!: do not use a mains adapter different from the one supplied with this Artsana S.p.A. product, as doing so renders the product non-compliant with technical standard specifications established by the relevant EC directives, affecting product safety and integrity. Contact the retailer or Artsana S.p.A. to replace.
- Ensure that AC/DC mains adapter voltage (see data plate located on the AC/DC mains adapters) matches that of the mains electricity and that the mains adapter plug is compatible with your electrical system sockets.
- Connect the AC/DC mains adapters to easily accessible power sockets which are, however, out of reach of children. Position AC/DC mains adapter cords so as to prevent the cord from being walked on, from getting caught in items placed upon or against them, or from being accessible to the child and therefore constituting a risk (tripping, choking).
- The AC/DC mains adapters, the child unit (primarily in transmitter mode) and the parent unit (primarily in receiver mode) may be become hot to the touch when in use. This is normal.
• Always disconnect the AC/DC mains adapters from the power socket when the appliance is not in use.


• The alkaline or rechargeable batteries must only ever be replaced by an adult, using alkaline or rechargeable batteries having the same characteristics as those mentioned in this instruction manual.
CAUTION!
TO REDUCE THE RISK OF ELECTRIC SHOCK, DO NOT REMOVE THE PROTECTION OR ATTEMPT TO OPEN MAINS ADAPTERS. DO NOT WET MAINS ADAPTERS, THE CHILD UNIT OR PARENT UNIT. DO NOT EXPOSE TO HUMIDITY OR ATTEMPT TO OPEN THEM. THIS MAY BE A SOURCE OF DANGER AND SHALL VOID THE WARRANTY.
Configuration & Features
This monitoring device, created with analogue transmission technology, can be used as an aid in child monitoring in the home. This baby monitor includes a child unit (Transmitter) and a parent unit (Receiver). Both these devices use analogue transmission technology to establish a radio connection that allows the sending and receiving of sound.
1.1 System features
Main system features include:
• Voice transmission via a system based on analogue technology.
• Outdoor operating range of 150 metres* without obstacles.
- Easy to use user interface.
*The maximum operating range is about 150 metres in an open space with no obstacles and with fully charged batteries (the range, however, could be reduced substantially within a home, depending on particular environmental conditions, layout of walls and furniture in the home and the presence of metallic structures, external and internal interference/electromagnetic fields, concrete walls or between rooms on different floors or because batteries are not fully charged etc.).
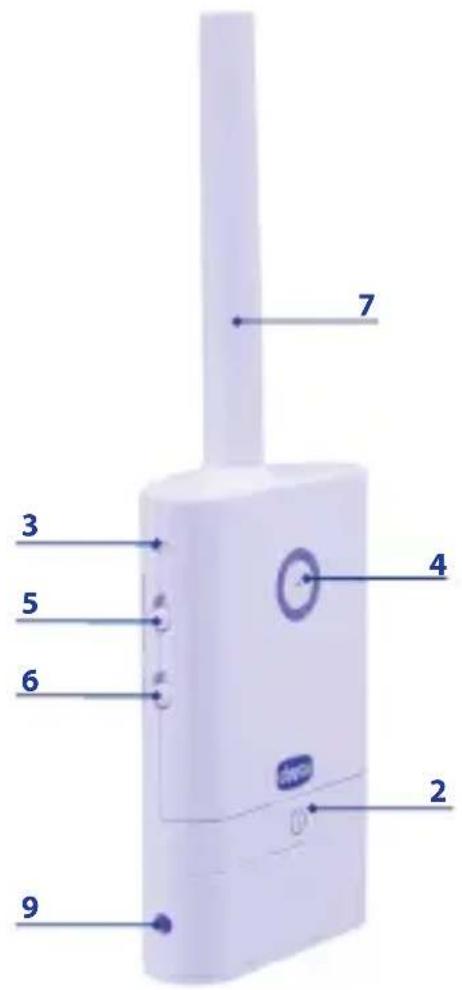
1.2 Child Unit (primarily in transmitter mode)
Model 06045
-
Power via 100-240 V\~50/60 Hz / 6 V = 300 mA switching mains adapter or via three 1.5V AAA/LR03 alkaline batteries (not included).
-
On/Off button
-
Power indicator light:
(a) Green: child unit on.
(b) Red: alkaline batteries al-
most flat.
(c) OFF: child unit off.
-
Built-in microphone
-
ON/OFF voice activation or continuous transmission selector
-
2 CH 1 channel selection switch
-
Antenna
-
Alkaline battery compartment closing panel
-
Child unit power connector
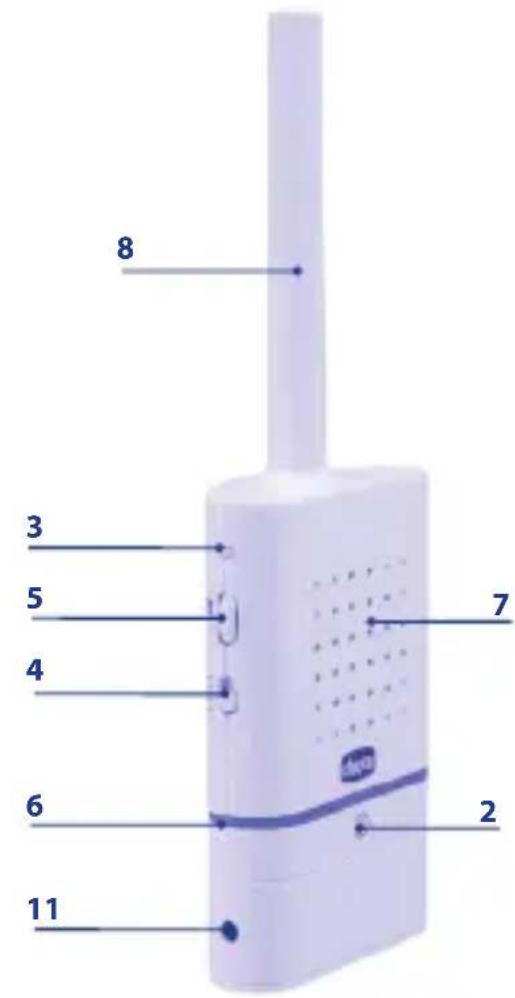
1.3 Parent Unit Key (primarily in receiver mode) Model 06045
- Power via 100-240 V \~50/60
Hz / 6 V = 300 mA
switching mains adapter or via three NiMH, 1.2V, 700 mAh, AAA rechargeable batteries (not included)
-
On/Off button
-
Power indicator light-
(a) Green: parent unit on
(b) Red: rechargeable batteries almost flat
(c) OFF: parent unit off
-
2 CH 1 channel selection switch
-
Dial to adjust speaker volume
-
Lit level indicator bar for sounds emitted by the child
-
Loudspeaker
-
Antenna
-
Rechargeable battery com-
partment hatch
-
Belt hook
-
Parent unit power and charging connector
-
Rechargeable batteries
2. Description of features
2.1 Child Unit:
2.1.1 Power:
Power via 100-240 V\~, 50/60
Hz/6 V=300 mA mains
adapter or via three 1.5V AAA/LR03 alkaline batteries (not included)
When power is supplied with mains adapter (1):
- insert the mains adapter jack (1) in the power connector (9) on the side of the unit;
- check that the mains voltage corresponds to that shown on the rating plate of the adapters referred to above;
- insert the mains adapter plug in an easily accessible power socket.
Warnings
- The adapter cord could cause strangulation. Keep out of reach of children.
- Periodically inspect mains adapters (1). If the power cord or plastic parts show signs of damage, do not use them and contact a qualified technician.
- Do not leave mains adapt-


ers (1) plugged into the socket when devices are not in use and/or not connected to the mains adapters (1).
2.1.2 Modes of use - Switching on and Adjustment.
The child unit (primarily in transmitter mode) must be positioned about 1 - 1.5 metres from the child, on a flat, stable surface and with the microphone (4) directed toward the child.
Caution: the transmitter, the batteries, the mains adapter and its power cord must be kept out of reach of children.
-Child unit (primarily in transmitter mode) On/Off button (2).
Pressing this button turns on the child unit and the power indicator light (3) lights up green. Pressing the button (2) again turns off the child unit and the power indicator light (3) goes off.
Selecting the transmission channel.
Select transmission channel 1 or 2 using the channel selector switch (6), making sure you have selected the same channel on both units. The presence of two channels is intended to reduce the possibility of any interference or disturbance caused by other units in the vicinity.
Important: always make sure that you select the same channel on both units.
- Voice activation or continuous transmission selector (5). The parent unit can operate in continuous mode (selector set to OFF) or in voice-activated mode (selector set to ON). In voice activation mode, the reproduction of any sounds emitted from the child that are below the factory set default voice activation threshold are interrupted, while all sounds above the threshold are reproduced.
2.1.3 Operating indicator lights
The power indicator light (3) supplies three different pieces of information:
- Unit on:
the indicator light (3) will light
up steady green.
- alkaline batteries almost flat: the indicator light (3) will light up steady red.
If you want to continue to use the device, it is advisable to replace the alkaline batteries or
remove the flat batteries and power the child unit using the mains adapter (1) supplied.
- Device off:
the indicator light (3) is off.
2.2 Parent unit:
2.2.1 Power:
Power via three NiMH, 1.2V, 700 mAh, AAA rechargeable batteries (included) or via 100-240 V\~50/60 Hz /6 V=300 mA mains adapter.
CAUTION. The rechargeable batteries should only be charged via the mains adapter (1) supplied and can be performed both if the parent unit is switched on and if the parent unit is off.
If the unit is powered by the mains adapter (1) or to charge the rechargeable batteries:
- insert the mains adapter jack (1) in the power connector (11) on the side of the unit;
- check that the mains voltage corresponds to that shown on the rating plate of the adapters referred to above;
- insert the mains adapter plug in an easily accessible power socket.
Warnings
- The adapter cord could cause
strangulation. Keep out of reach of children.
- Periodically inspect mains adapters. If the power cord or plastic parts show signs of damage, do not use them and contact a qualified technician.
- Do not leave mains adapters plugged into the socket when devices are not in use and/or not connected to the mains adapters (1).
2.2.2 Modes of use
-Parent unit on/off switch (2). Pressing this button turns on the parent unit and the power indicator light (3) lights up green. Pressing the button again turns off the parent unit and the power indicator light (3) goes off.
- Selecting the transmission channel.
Select transmission channel 1 or 2 using the channel selector switch (4), making sure you have selected the same channel on both units. The presence of two channels is intended to reduce the possibility of any interference or disturbance caused by other units in the vicinity.
Important: always make sure that you select the same chan-


nel on both units.
- Adjusting the speaker volume. To adjust the volume, turn the volume control dial (5) located on the parent unit.
Turning the dial as far downwards as it will go turns off the volume. Turning the dial as far upwards as it will go selects the maximum volume.
2.2.3 Operating indicator lights
-The power indicator light (3) supplies three different pieces of information:
- Unit on:
the indicator light (3) will light up steady green.
- rechargeable batteries almost flat:
the indicator light (3) will light up steady red.
If you want to continue using the device, it is advisable to charge the rechargeable batteries otherwise the device will stop working. Turn off the parent unit and charge the rechargeable batteries (12) by connecting the mains adapter (1) to the parent unit power and charging connector (11). It is advisable to let the batteries charge for about 10 hours with the parent unit off.
The parent unit can still be used to monitor sounds made by the child while batteries are recharging, but the time required to reach full charge will be longer.
- Device off:
the indicator light (3) is off.
-Lit level indicator bar for sounds emitted by the child (6):
illuminates progressively from the centre outward, indicating three levels of sound intensity coming from the child unit (primarily in transmitter mode) microphone (4).
Allows parents to monitor sounds emitted by the child even when the parent unit (7) loudspeaker volume is switched off.
□ □ ■ □ □ : the central LED lights up if sounds emitted by the child are of a relatively low intensity.
□ ■ ■ ■ □ : three LEDs light up if sounds emitted by the child are of medium intensity.
■ ■ ■ ■ ■ : five LEDs light up if sounds emitted by the child are of a relatively high intensity.

Caution!
After switching on the par-


ent unit (primarily in receiver mode) always check the power status of the child unit (primarily in transmitter mode)!
After switching on the unit, always check that reception of the transmitted signal is possible at the distance and/or in the areas within where it has been set. It is advisable to carry out a test with the help of a family member from the room where the child unit has been placed, moving simultaneously with the parent unit in areas where it has been set, to verify correct reception of the transmitted signal.
- Installation and replacement of alkaline batteries in the child unit (primarily in transmitter mode) and the rechargeable batteries in the parent unit (primarily in receiver mode)
⚠️ Warnings: these operations should only be performed by an adult
Caution: RECOMMENDATIONS FOR BATTERY USE
- Use only 1.5 V AAA alkaline batteries (not supplied)
for the child unit (primarily in transmitter mode) and NiMH rechargeable batteries for the parent unit (primarily in receiver mode) with code 20256300100.
- Always remove the 1.5 V AAA alkaline batteries (not supplied) and/or the rechargeable batteries when flat and/or when you will not be using the child/parent unit for an extended period of time. This prevents flat batteries from leaking the liquid they contain and damaging the unit and/or objects nearby.
- Do not short-circuit the battery poles.
- It is not advisable to use rechargeable batteries for the child unit, as they may reduce the functionality of the unit. The child unit is not designed to work with rechargeable batteries. Use AAA 1.5 V alkaline batteries (not included).
NOTE: if the duration of rechargeable batteries supplied with the parent unit is reduced excessively, they have run out and therefore must be replaced (this is to be considered normal because rechargeable batteries run out over time).
- The rechargeable batteries


supplied with the parent unit must be recharged using the mains adapter (1) supplied only (code 20256300200).
- Do not attempt to recharge non-rechargeable batteries: they may explode.
- This product is not designed to work with lithium batteries. CAUTION: improper use may create hazardous conditions.
- Never leave flat batteries in the child unit (primarily in transmitter mode). Replace them immediately as they could leak corrosive and/or dangerous liquids.
- Never leave flat rechargeable batteries in the parent unit (primarily in receiver mode). Recharge immediately (or replace if run out) as they could leak corrosive and/or dangerous liquids.
- If the batteries should leak liquid, adequately protect hands and replace the batteries immediately, taking care to thoroughly clean the battery compartment and anything else touched by the liquid.
Wash your hands thoroughly when finished. Do not mix batteries of different brands or types and flat batteries with new ones. Insert the 1.5 V AAA alkaline batteries (not supplied) in the child unit (primarily in transmitter mode), making sure that the insertion polarity is as indicated in the battery compartment.
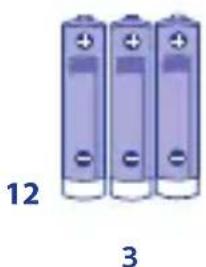
- Insert the 3x1.2 V, NiMh, 700 mAh, AAA rechargeable batteries (included) in the parent unit (primarily in receiver mode), making sure that the insertion polarity is as indicated in the battery compartment.
- Remove the alkaline/re-chargeable batteries from the product before disposal.
- Do not leave alkaline/re-chargeable batteries and/or any tools for their removal within the reach of children.
- Do not dispose of alkaline/rechargeable batteries in fire or throw them away carelessly or in the household waste.
- Recycle used batteries in accordance with applicable laws.
3.1 Installing alkaline batteries (not included) in the child unit (primarily in transmitter mode)
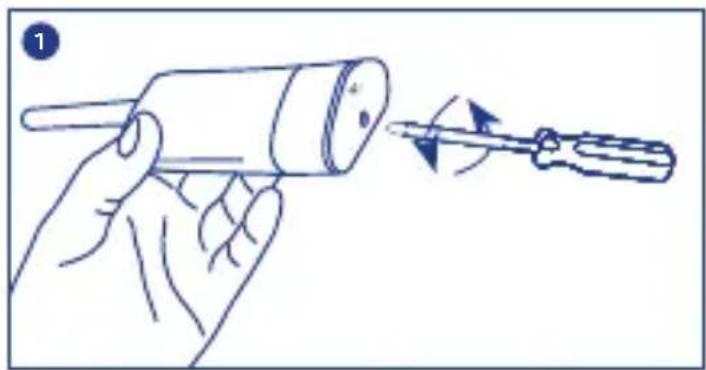
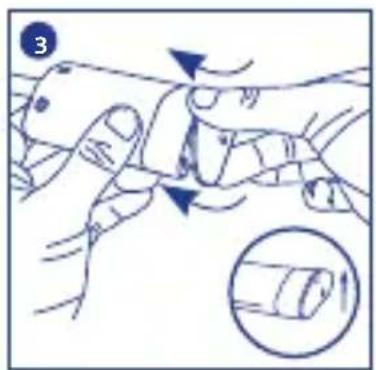
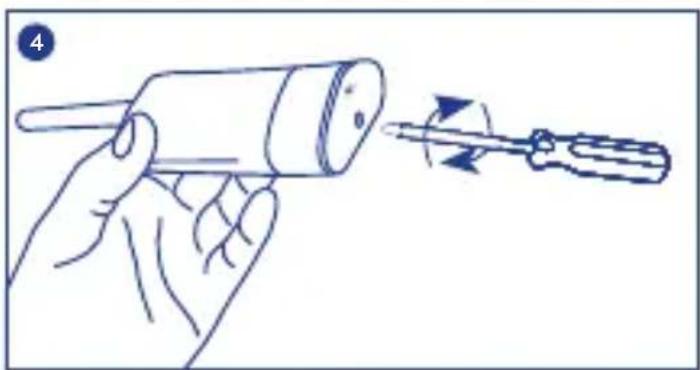
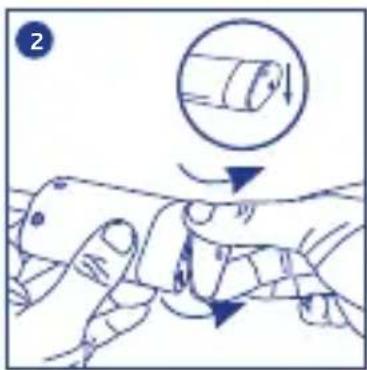
Remove the fastening screw from the alkaline battery compartment closing panel (8) (fig. 1), push it gently in the direction of the arrow and remove it from its position (fig. 2).


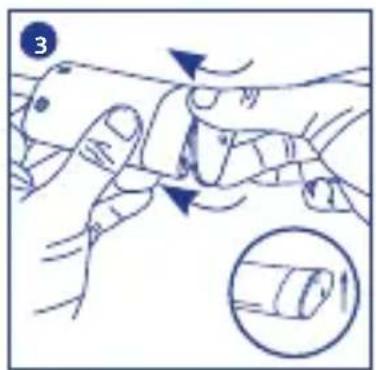
Insert three 1.5 V AAA/L03 alkaline batteries, respecting the proper insertion polarity as indicated in the battery compartment. Reposition the alkaline battery compartment closing panel (8), inserting the hooks in their battery compartment housing and gently pushing in the opposite direction to the one shown by the arrow (fig. 3). Finally, screw the closing panel back on (fig. 4).
3.2 Replacing alkaline batteries (not included) in the child unit (primarily in transmitter mode)
Remove the fastening screw from the alkaline battery compartment closing panel (8) (fig. 1), push it gently in the direction of the arrow and remove it from its position (fig. 2).
Remove the three flat alkaline batteries and replace them with three similar 1.5V AAA/LR03 batteries, taking care to respect the proper insertion polarity as indicated in the battery compartment. Reposition the alkaline battery compartment closing panel (8), inserting the hooks in their battery compartment housing and gently pushing in the opposite direction to the one shown by the arrow (fig. 3). Finally, screw the closing panel back on (fig. 4).
3.3 Installing the rechargeable battery supplied with the parent unit (primarily in receiver mode)
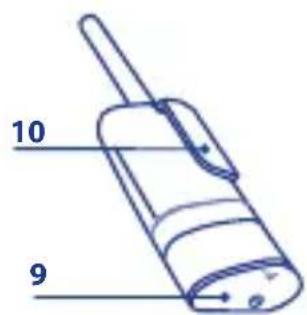
Upon purchase, the rechargeable batteries (12) in the parent unit are kept separately in the product packaging.
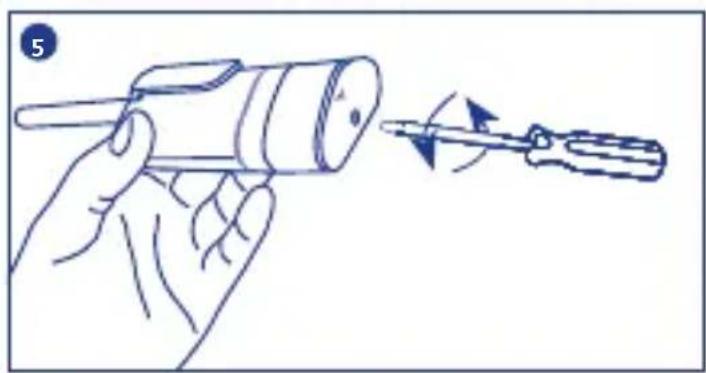
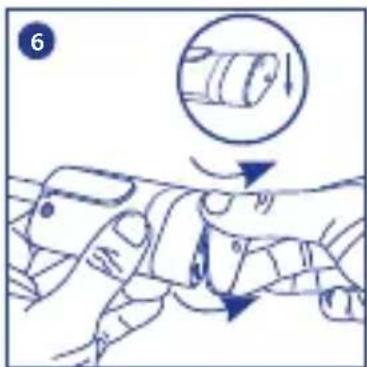
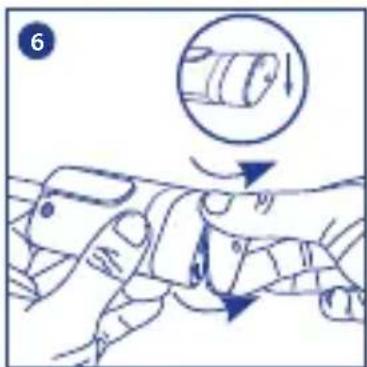
Carefully remove the rechargeable batteries (12) from their packaging. Remove the fastening screw from the rechargeable battery compartment closing panel (9) (fig. 5), push it gently in the direction of the arrow and remove it from its position (fig. 6).
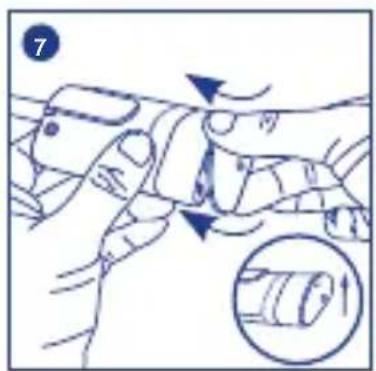
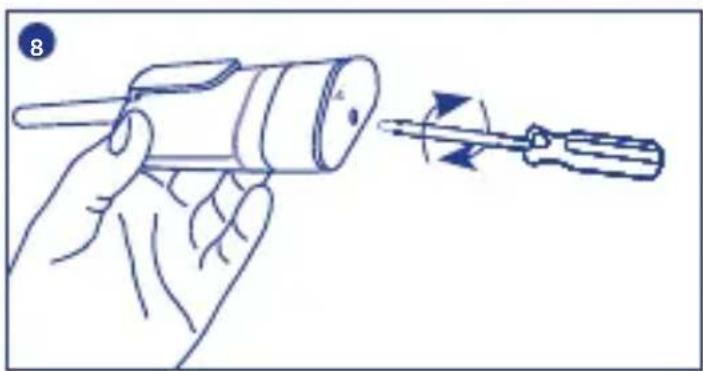
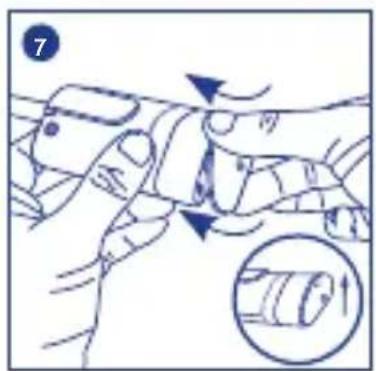
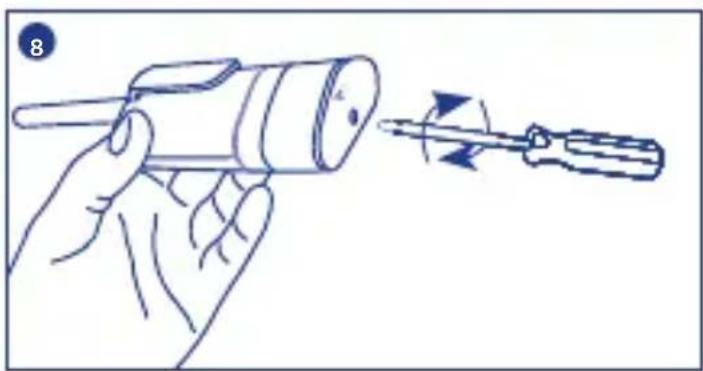
Insert the rechargeable batteries (12) supplied, respecting the proper insertion polarity as indicated in the battery compartment. Reposition the rechargeable battery compartment closing panel (9), inserting the hooks in their battery compartment housing and gently pushing in the opposite direction to the one shown by the arrow (fig. 7). Finally, screw the closing panel back on (fig. 8).
3.4 Replacing the rechargeable batteries supplied with the parent unit (primarily in receiver mode)
If the duration of the rechargeable batteries supplied with the parent unit is reduced excessively, they have run out and therefore must be replaced (this is to be considered normal because rechargeable batteries run out over time).
Remove the fastening screw from the rechargeable battery compartment closing panel (9) (fig. 5), push it gently in the direction of the arrow and remove it from its position (fig. 6).
Remove the rechargeable batteries that have run out (12) and replace with other rechargeable batteries that are identical to those supplied with the product: NiMh 1.2V, 700 mAh (code 20256300100 to be requested directly from Artsana S.p.A.) respecting the proper insertion polarity as indicated in the battery compartment.
Reposition the rechargeable battery compartment closing panel (9), inserting the hooks in their battery compartment housing and gently pushing in the opposite direction to the one shown by the arrow (fig. 7). Finally, screw the closing panel back on (fig. 8).
TECHNICAL SPECIFICATIONS
Child unit (primarily in trans-
mitter mode)
Mod. 06045
Power:
Internal: 3 X 1.5V AAA/LR03
ALKALINE BATTERIES
External: via 100-240 V\~50/60 Hz /6 V=300 mA
switching mains adapter
Transmission:
• Channel frequency: 40.665 MHz, 40.695 MHz
• Signal strength: 10 mW max
Parent unit (primarily in receiver mode)
Mod. 06045
Power:
Internal: NiMh 3x1.2V, 700 mAh AAA rechargeable batteries (included)
External: via 100-240 V\~50/60 Hz /6 V=300 mA
switching mains adapter
Rechargeable batteries charged via the 100-240 V\~50/60 Hz /6 V =300 mA switching mains adapter
Reception:
• Channel frequency: 40.665 MHz, 40.695 MHz


Mains adapter
Mod. SW-060030EUL
INPUT: 100-240 V\~50/60 Hz 200 mA
OUTPUT: 6 V=300 mA
Plug polarity:
Made in China
Rechargeable batteries 20256300100
Type: NiMH AAA batteries
Rated capacity: 700 mAh
Rated voltage: 3x1.2 V
Rechargeable batteries give the best performance when used at normal room temperature (20°C±5°C)
Made in China

SYMBOLS KEY

single-phase alternating current

direct current

for indoor use only

Class II - double insulation equipment
C€0470
Complies with relevant EC directives as amended

CAUTION. Read the instructions for use


TROUBLESHOOTING
If you experience problems, please first check the following list and check that:
- both units are on;
- both units are properly connected to the power socket via the mains adapter (1), or that batteries are charged.
| PROBLEM CAUSE SOLUTION | |
| Power indicator light (3) off. | -Child unit (transmitter) and/or parent unit (receiver) off.-The alkaline batteries (not included) in the child unit and/or the rechargeable batteries (included) in the parent unit are completely flat.-Mains adapter disconnected or not connected correctly.-No mains voltage. | -Switch on the child unit (transmitter) and/or the parent unit (receiver).- Replace the alkaline batteries in the child unit or power the child unit using the mains adapter and/or charge the rechargeable batteries (included) in the parent unit.- If the units are powered via the mains adapter, check that the child unit and/or the parent unit are connected correctly to a mains socket.- Check that the socket is being powered. |

| The parent unit (receiver) is not emitting any sounds. | - No discernible sounds are arriving to the child unit (transmitter).-Parent unit (receiver) volume set at minimum.-The rechargeable batteries (included) in the parent unit are completely flat.-Parent unit (receiver) off.-Loss of connection between units.-Child unit (transmitter) off.-Different channels have been selected for the child unit and the parent unit. | - Just as soon as discernible sounds/noise from the environment are present, the child unit (transmitter) will be activated. In any case, for peace of mind, test transmission with the help of another person who can try to speak in the room in which the child unit (transmitter) is on.-Adjust the volume on the parent unit (receiver) by turning the volume adjustment dial until sounds are audible.-Charge the rechargeable batteries (included) in the parent unit.-Switch on the parent unit (receiver).-Check the battery charging level and move the units closer together and/or relocate the units themselves in order to reduce the number of obstacles, metal structures, reinforced concrete walls etc. between them.-Switch on the child unit (transmitter).-Select the same channel on both the child unit and the parent unit. |
| Interference -Interference can be caused by the presence of another inter-com or similar transmission device switched on nearby.-Electromagnetic pollution (proximity to antennas with radio transmitters, high voltage cables etc.). | - Change the transmission channel on both units.- There are no solutions. Move away from the area in which it is located. |
| Rustling or loud noise from the parent unit (receiver). | -Loss of connection between units.-Child unit (transmitter) off.-The alkaline batteries (not included) in the child unit are completely flat.-Different channels have been selected for the child unit and the parent unit. |
| Reduction of the operating area | -Presence of obstacles, metal structures, reinforced concrete walls etc. between the child unit (transmitter) and the parent unit (receiver).-The alkaline batteries (not included) in the child unit and/or the rechargeable batteries (included) in the parent unit are completely flat. | -Move the units closer together and/or relocate the units themselves in order to reduce the number of obstacles, metal structures, reinforced concrete walls etc. between them-Replace the alkaline batteries in the child unit or power the child unit using the mains adapter and/or charge the rechargeable batteries (included) in the parent unit. |
| Electrostatic or electromagnetic noise | Electrostatic or electromagnetic interference due to electrostatic or electromagnetic fields emitted by other electrical equipment: e.g. domestic appliances, cellular or cordless phones etc. | Identify and, if possible, eliminate the cause of interference. |


| Presence of hissing or whistling | -The units are too close together.-The parent unit (receiver) volume is too high. | -Move the units further apart.-Lower the parent unit (receiver) volume. |
Mod. 06045
Artsana S.p.A. hereby declares that this product complies with the essential requirements and the related dispositions established by directive 1999/5/EC. A copy of the Declaration of Conformity complete with European Directive 1999/5/EC is available at: www.chicco.com – Products section. According to European Commission decision N° 2000/299/EC of 06/04/2000, the frequency band used by this product is harmonised in all EU countries, therefore this is a class 1 product and can be freely used in all countries of the European Union. Use in countries not belonging to the European Union or outside Europe is subject to verification by the user that the device complies with the regulations in the country of use.

THIS PRODUCT COMPLIES WITH EU DIRECTIVE 2002/96/EC.
The crossed bin symbol on the appliance indicates that the product, at the end of its life, must be disposed of separately from domestic waste, either by taking it to a separate waste disposal site for electric and electronic appliances or by returning it to your dealer when you buy another similar appliance. The user is responsible for taking the appliance to a special waste disposal site at the end of its life. If the disused appliance is collected correctly as separate waste, it can be recycled, treated and disposed of ecologically; this avoids a negative impact on both the environment and health, and contributes towards the recycling of the product's materials. For further information regarding the waste disposal services available, contact your local waste disposal agency or the shop where you bought the appliance.

The crossed-out wheeled bin symbol on the batteries or the product packaging, means that the batteries, at the end of their life, should be disposed of separately from the municipal waste stream via designated collection
facilities appointed by the government or the local authorities, or otherwise returned to the dealer when purchasing new equivalent rechargeable or non-rechargeable batteries. Any chemical symbols (Hg for mercury, Cd for cadmium, Pb for lead) printed beneath the crossed-out wheeled bin symbol indicate the type of substance contained in the battery. The user is responsible for bringing batteries, at the end of their life, to the appropriate collection facilities in order to facilitate treatment and recycling.
The correct disposal of your old appliance will help prevent potential negative consequences for the environment and human health and favour the recycling of the materials of which the product is made. Illegal disposal of the product by the user will damage the environment and human health. For more detailed information regarding the available waste collection systems, contact your local waste disposal service or the shop where you purchased the item.
ARTSANA S.p.A. reserves the right to change information described in this manual at any time and without notice. The reproduction, transmission, transcription or translation into another language, of any part and in any form of this manual is strictly prohibited without prior written consent from ARTSANA S.p.A.
Warranty: The product is guaranteed against manufacturing defects for 2 years from the date of purchase.


Baby Monitor Classic Analógico
40.665MHz, 40.695MHz


40.665MHz, 40.695MHz
40.665MHz, 40.695MHz
Adaptador de rede
Mod. SW-060030EUL
INPUT: 100-240V\~ 50/60Hz
200mA
OUTPUT: 6V=300mA
Polaridadaficha:
⊕—●—
Fabricado na China
1.2V, 700mAh, type AAA (fournies)
Piles rechargeables
20256300100
Type: batteries NiMH AAA
CONFORMITÉ À LA DIRECTIVE EU 2006/66/CE.
natural_image
Line drawing of a coiled cable with a rectangular component and a small protrusion (no text or symbols)
Kindereenheid
Μονάδα παιδιού
Bebek ünitesi
Детский блок
Sändarenheten
وصف چهاز الوالدين
natural_image
Three cylindrical batteries with positive and negative terminals, labeled 12 and 3 (no text or symbols on the battery bodies)

natural_image
Simple line drawing of a cylindrical electronic component with a pointed tip and base, labeled '8' (no text or symbols on the object itself)


natural_image
Illustration of a hand holding a cylindrical object with a screwdriver inserted, showing motion direction (no text or symbols)
natural_image
Illustration of a hand holding a small object with an arrow indicating motion, no text or symbols present
natural_image
Illustration of a hand holding a small object with arrows indicating motion or force direction, and a magnified inset showing a finger movement (no text or symbols)

natural_image
Illustration of a hand holding a cylindrical object with a screwdriver inserted, showing motion direction (no text or symbols)

natural_image
Illustration of a hand holding a pen with a screwdriver, showing the process (no text or symbols)
natural_image
Illustration of a hand holding a small object with a magnified inset showing a cylindrical object (no text or symbols)
natural_image
Illustration of a hand holding a wrist with a magnified inset showing the wrist area (no text or symbols)
natural_image
Illustration of a hand holding a pen-like object with a screwdriver inserted, showing motion direction (no text or symbols)

Analogische Baby Monitor Classic
1.1 Systeemeigenschappen
DIT PRODUCT IS CONFORM DE EU-RICHTLIJN 2002/96/EG.
- استخدام فقط بطارات قلوية 1,5 (AAATwo)Two (غير مرفقة) لوحدة الط False (understand)Two (understand)Two (understand)Two (understand)Two (understand)Two (understand)Two (understand)Two (understand)Two (understand)Two (understand)Two (understand)Two (understand)Two (understand)Two (understand)Two (understand)Two (understand)Two (understand)Two (understand)Two (understand)Two (understand)Two (understand)Three