USER MANUAL SM6001 TRISTAR
natural_image
White Tristar sewing machine with red 'TRISTAR' logo above (no visible text on device)
| NL | Gebruikershandleiding |
| UK | User manual |
| FR | Manuel d'utilisation |
| DE | Bedienungsanleitung |
| ES | Manual de usuario |
| IT | Manuale utente |
| PT | Manual de utilizador |
| SE | Användarhandbok |
| TR | Kullanim kulavuzu |
| HR | Korisnički priručnik |
| NO | Brukermanual |
| BG | Потребителски наръчник |
| HU | Kézikönyv |
| DK | Brugervejledning |
| CZ | Uživatelská příručka |
| PL | Instrukcja obsługi |
| RO | Manual de utilizare |
| EL | Εγχειρίδιο χρήστη |

1
Terugnaalen knop
Reverse sewing lever
Pattern selector dial
Hand Wheel Bobbin stopper
Sélecteur de point
Winding thread guide
Bobbin winde
n Winding
24
25
26
27
Voetpedaal
Stroomadaptor
Naalden (2x)
Draadbegeleider
Foot control
Adaptor
Needles (2x)
Pédale
Adaptateur
Aiquilles (x2)
Fußsteuerung
Netzteil
Nadeln (2x)
Pedal de contr
Adaptador
Aquias (x2)
Controllo pedale
Adattatore
Aohi (2x)
Pedal
Adantador
Aqulbas
Nožno pokretalo
Adapter
Igle (2x)
(nedala)
Eodpedal
Adapter
Nàle (2x)
Fotkontrol
Adapter
Nâlar (2x)
Fotkontroll
Adapter
Nåler (2 stk.)
Крачен контрол
Адаптор
Игли (2x)
Lábpedál
Adapter
Tük (2x)
Nožni ovládání
Adapter
Jehly (2x)
Sterowanie sto
Adapter
Ighy (2x)
Control piciorus
Adaptor
Ace (2x)
Πεντάλ
Προσαρμογέας
Βελόνες (2x)
Ayak kontrolü
Adaptör
Iğneler (2x)
Nàletráder
Nálpátrādare
Trådgiennomferer
Twins needle Button sewing plate Buttonhole foot
Screw driver Spool pin
Tournevis Broche porte bobine
2 May 2, 2017. 2 May 2018. March 2019 (M)
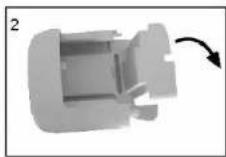
- The bobbin holder and accessory bag are put into the inside of the sewing table
- Keep the snap-in sewing table horizontal and pull it out from the machine (photo 1)
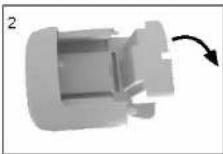
- Pull the side cover to open it. (photo 2)

Connecting to the power source
- Connect plug "A" to the machine and plug "B" into the wall outlet
- Turn on power switch "ON".
- Connect the foot control "C" to the machine.
- The speed of the machine can be regulated by applying pressure to the foot controller.
Press main switch to "ON" for power and the sewing light on.

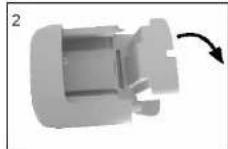
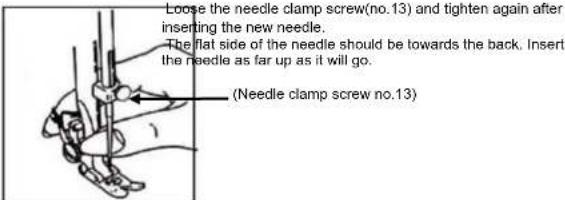
Inserting the needle
Attention: Turn power to "off" position before inserting the needle, to avoid electrical shock.\~! Change the needle regularly, especially if it is showing signs of wear and causing problems. Insert the needle as follows:
The machine has the standard pressure foot, used for sewing of different fabrics. For the sewing of button holes and zippers you have to place another pressure foot on the machine. See the following description with illustrations how to replace the pressure foot.
Figure 1. Put the pressure foot lever (no.18) up. Place the foot clamp (B) on the pressure foot lever and lighten screw A fixed.
Figure 2. Lower the foot lever until the notch (C) is right above the pin (D) of the pressure foot area. Press E and lift the pressure foot so that pin D is exactly C recess, then loose lever E.
Figure 3. Removing the pressure foot.
Lift the pressure foot lever, press lever E and the pressure foot falls off.


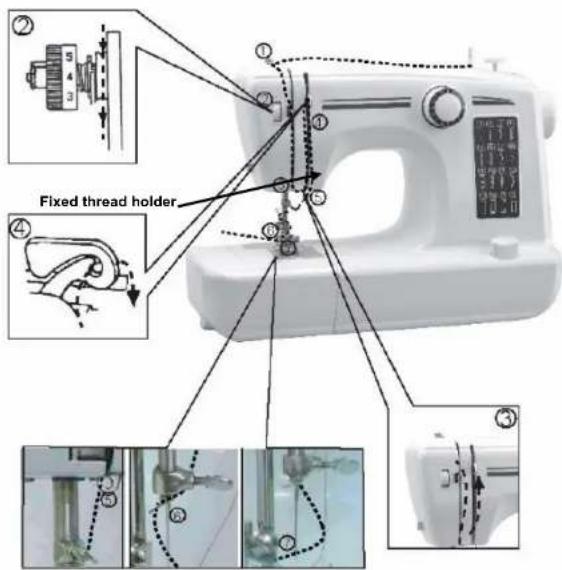
Threading the upper thread.
For quick and easy installation of the upper thread follow the numbers 1 to 8 by the black dotted line in the diagram below. The enlargements can be a clarification of the step.
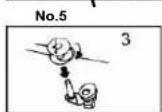
- Put the bobbin on the bobbin winder (no.5) and guide the thread through the winding thread guide (no.7) from the back to the front.
- Push thread tension release bar to left, then guide the thread down between the tension disc making sure that the thread has been inserted into the tension disc.
- Continue to draw the thread down and around the thread pulling bar fixed holder spring from left to right.
- Draw the thread up, through the take-up lever draw from left to right.
- Continue to draw the thread down through the thread take-up lever from front to back.
- Drawing down the thread and through the lower guide from back to front.
- Continue to draw down the thread through the thread protector.
- Finally thread the needle from front to back (important !!!)
Bring up the lower thread
When inserting or removing the lower bobbin, the needle must be fully raised. Turn the handwheel (no.3). Open the hook cover and pull out the plastic window. Insert the bobbin in the bobbin case, so that the thread rund in a clockwise direction. Replace the plastic window and the hook cover. Raise the presser foot, hold the upper thread with the left hand, right hand turn the handwheel anticlockwise until the needle is raised. When the needle reach the bottom, the hook tray will hook the upper thread, rotate the hook tray to pull the lower thread out. Pull the lower and upper thread under presser foot(no.14), pull out 10 cm to the back.

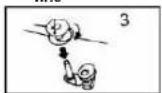
Winding of the bobine.
Figure 1. Place a yarn pim on the bobine pin (no.6).
Figure 2. Guide the thread through the winding thread guide (no.7) to the empty bobine.
Figure 3. Wind the thread several times clockwise to the empty bobine and place it on the bobine winder(no. 5 in figure 1).
Figure 4. Press the bobbin against the bobinestopper.
Start electric winding by pressing the foot control.
When the bobbin is full, release the foot pedal, cut the thread, then remove bobbin

Reverse sewing.
At the end of seam, press down reverse sewing lever, sew a few reverse stitches, fix the trace to avoid loosing. The reverse trace shouldn't beyond 5 cm. Release the lever and the machine will sew forward again.
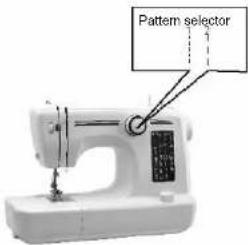
Straight and other stitching
Make sure the bobbin winder (no.5) is selected on "seewing".
There are two kinds of straight stitch for your choice. Tum the pattern selektor dial to the one you need.wenst. Set the needle at the highest position by tuning hand wheel anticlockwise. Gently pull both threads (about 10 cm) towards rear, raise the presser foot, place the fabric under the presser foot.
Gently press down the foot control to start sewing. Guide fabriv gently by hand. Stop the needle in its top position, and thread can be pulled out easily.
Raise the presser foot and remove the fabric.
This for aal the patterns of your choise.
Notice:
-
When turning the pattern selector dial, assure the needle tip is at the upper position, otherwise it will be bent or damaged or fail to sewing.
-
When selecting the pattern dial, set the position correctly, otherwise it will hurt the needle or sew over the the selected stitch trace. It will be different from the selected pattern.
Preparation
-
Raise the presser foot lever, remove the metallic presser foot and replace a buttonhole foot. (note: before setting buttonhole foot, turn the hand wheel and make sure that the feed dogs is below the needle plate and the needle have to be about 5 mm above the needle plate.)
-
Make sure the diameter of the button and add 3 mm (1/8") for the bartacks.
-
If you have a very thick button, add more to the diameter measurement.
-
Mark the position and length of the buttohole on the fabric.
-
Position the fabric so that the needle is on the mark that is the furthest from you.
-
Pull the buttonhole foot towards you as far as it will go.
-
Lower the foot.
a) Turn the pattern selector dial to pattern no.13. Sew at moderate speed until you reach the end mark.
b) Turn the pattern selector dial to pattern no. 14 and sew 5-6 bartacks stitches.
c) Turn the pattern selector dial to pattern no. 15 and sew the left side of the buttonhole to the mark that is further from you (beginning of buttohole).
d) Turn the pattern selector dial to pattern no. 16 and sew bartracks stitches.
Remove the fabric from under the foot. Draw the upper thread through the backside of the fabric and knot upper and lower threads. Cut the center of the buttonhole with the seam ripper, being careful not to cut the stitches on either side.
Tips:
1. Slightly reduce the upper thread tension to produce better results.
2. Use backing material for fine and stretchy fabrics.
| NEEDLE SIZE FABRICS THREAD | |
| 9-11(65-75) Lightweight fabrics-thin cottons, volle,serge, silk, muslin, Qiana, interlocks, cotton knits, tricots, jerseys, crepes, wovenplyester, shirt& blouse fabrics. | Light-duty thread in cotto, nylon or polyester. |
| 12(80) | Medium weight fabrics-satin, kettlecloth, sailcloth, double knits, lightweight woollens. | Most threads old are medium size and suitable for these fabrics and needle sizes. Use polyester threads on synthetic materials and cotton or natural woven fabrics for best results. Always use the same thread on top and bottom. |
| 14(90) | Medium weight fabrics-duck, woolen, heavier knits, terrycloth, denims. |
| 16(100) Heavyweight fabrics-canvas, woolens, outdoor tent and quilted fabrics, denims, upholstery material (light to medium) |
| 18(110) Heavy woollens, overcoat fabrics, upholstery fabrics, some leathers and vinyls | Heavy duty thread, carpet thread. (use heavy foot pressure-large numbers). |
Trouble shooting
| Problem | Cause | Correction |
| Upper thread breaks 1. The machine is not threaded correctly.2. The thread tension is too tight3. The thread is too thick for the needle.4. The needle is not inserted correctly.5. The thread is round wound the spool pin.6. The needle is damaged. | 1.Rethread the machine.2. Reduce the thread tension (lower number).3. Select a larger needle.4. Remove and reinsert the needle (flat side towards the back).5. Remove the bobbin and rewind the bobbin.6.Replace the needle. |
| Lower thread breaks. 1. The lower thread is not inserted correctly.2. The upper thread tension is too loose. | 1.Check the threading carefully.2.adjust the upper thread tension. |
| | |
| Skipped stitches 1. The needle is not inserted correctly.2. The needle is damaged.3. The wrong size needle has been used.4. The foot is not attached correctly. | 1.Remove and reinsert needle (flat side towards the back).2. Insert a new needle.3.Choose a needle to suit the thread and fabric.4.Check and attach correctly. |
| Needle breaks | 1.The needle is damaged.2.The needle is not inserted correctly.3.Wrong needle size for the fabric.4.The wrong foot is attached. | 1. Insert a new needle.2.Insert the needle correctly (flat side towards the back).3. Choose a needle to suit the thread and fabric.4. Check and attach correctly. |
| Loose stitches | 1. The machine is not threatened correctly.2. The bobbin case is not correctly threatened.3. Needle/fabric/thread combination is wrong.4. Thread tension wrong. | 1.Check the threading.2. Thread the bobbin case as illustrated.3. The needle size must suit the fabric and thread.4. Correct the thread tension. |
| Seams puckering 1.The needle is too large for fabric.2. The stitch length is wrongly adjusted.3. The thread tension is too tight. | 1.Select a finer needle.2.Readjust the stitch length.3.Loosen the thread tension. |
IMPORTANT SAFEGUARDS


- Read all instructions before use.
- Do not touch hot surfaces. Use handles or knobs.
• To protect against electric shock, do not immerse cord, plug or appliance in water or any other liquid.
- Unplug from outlet when not in use and before cleaning. Allow the device to cool before putting on or taking off parts. Do not operate any appliance with a damaged cord or plug or after the appliance malfunctions, or has been damaged in any manner.
- The use of accessory attachments not recommended by the appliance manufacturer may cause injuries and invalidate any warranty you may have.
- Do not use outdoors, or on or near direct heat sources
- Do not let cord hang over edge of table or counter, or touch hot surfaces or come into contact with the hot parts or allow the product to be situated underneath or close to curtains, window coverings etc.
• This appliance is for household use only and only for the purpose it is made for.
• The appliance must be placed on a stable, level surface.
- This appliance is an attended appliance, and as such should never be left ON or whilst hot without adult supervision.
- This appliance is not intended for use by persons (including children) with reduced physical, sensory or mental capabilities, or lack of experience and knowledge, unless they have been given supervision or instruction concerning use of the appliance by a person responsible for their safety.
- Children should be supervised to ensure that they do not play with the appliance.
SAVE THESE INSTRUCTIONS FOR FUTURE REFERENCE
Guarantee
- The device supplied by our Company is covered by 24 month guarantee starting on the date of purchase (receipt).
- During the life of the guarantee any fault of the device or its accessories to material or manufacturing defects will be eliminated free of charge by repairing or, at our discretion, by replacing it. The guarantee services do not entail an extension of the life of the guarantee nor do they give rise to any right to a new guarantee!
- Proof of the guarantee is provided by the proof of purchase. Without proof of purchase no free replacement or repair will be carried out.
- If you wish to make a claim under the guarantee please return the entire machine in the original packaging to your dealer together with the receipt.
- Damage to accessories does not mean automatic free replacement of the whole machine. In such cases please contact our hotline. Broken glass or breakage of plastic parts are always subject to a charge.
- Defects to consumables or parts subject to wearing, as well as cleaning, maintenance or the replacement of said parts are not covered by the guarantee and hence are to be paid!
- The guarantee lapses in case of unauthorized tampering.
- After the expiry of the guarantee repairs can be carried by the competent dealer or repair service against the payment of the ensuing costs.
Guidelines for protection of the environment


This appliance should not be put into the domestic garbage at the end of its useful life, but must be disposed of at a central point for recycling of electric and electronic domestic appliances. This symbol on appliance, instruction manual and packaging puts your attention to this important issue. The materials used in this appliance can be recycled. By recycling used domestic appliances you contribute an important push to the protection of our environment. Ask your local authorities for information regarding the point of recollection
Packaging
The packaging is 100% recyclable, return the packaging separated.
Product
This device is equipped with a mark according to European Directive 2002/96/EC on Waste Electrical and Electronic Equipment (WEEE). By ensuring that the product correctly as waste is processed, it helps you may have adverse consequences for the environment and human health.
This device is designed, manufactured and marketed in accordance with the safety objectives of the Low Voltage Directive "No 73/23/EEC, the protection requirements of the EMC Directive 89/336/EC "Electromagnetic Compatibility" and the requirement of Directive 93/68/EEC.
natural_image
Line drawing of a hand holding a sewing machine needle with a belt, no text or symbols present
Einsetzen der Nadel
natural_image
Illustration of a hand holding a tool with a pen and ruler, showing mechanical components (no text or symbols)
natural_image
Illustration of a hand holding a tool with a pointed tip and a pointer (no text or symbols)
Inserimento ago
natural_image
Illustration of a hand holding a pole with a tool, showing motion direction (no text or symbols)
natural_image
Illustration of a hand holding a medical instrument with needle inserted (no text or symbols)
Sätta fast nälen
natural_image
Line drawing of a hand using a sewing machine to measure a piece of hair (no text or symbols present)
Odvijte vijak držača igle (br.13) i zatim ga ponovno zategnite nakon što ste stavili novu iglu.
Plosnati dio igle treba biti okrenut unazad. Gurajte iglu što više prema gore dok ju stavljate.
.(Vijak držača igle br.13)
Sette i nålen
natural_image
Illustration of a sewing machine with a side arm and control panel (no text or symbols visible)

natural_image
Illustration of a hand holding a tool with a pen, no text or symbols present
103
natural_image
Illustration of a hand holding a pen or tool with a ruler, no text or symbols present
natural_image
Illustration of a hand using a sewing machine to adjust or install a sewing machine (no text or symbols visible)
natural_image
Illustration of a sewing machine with a handle and base, showing mechanical components (no text or symbols)
Vložení jehly
Wstawianie igły
Introducere ac
natural_image
Mechanical component diagram showing a shaft and housing with directional arrows indicating motion (no text or symbols)

Coasere inversä.
Notā:
natural_image
Illustration of a sewing machine with a sewing machine needle and base mount (no text or symbols visible)
Ανάποδη ραφή.
İğneyi takma
natural_image
Illustration of a hand holding a pen or tool with a forceps, no text or symbols present
Masurayi sarma.