Classic 1 - Barbecue DOMETIC - Free user manual and instructions
Find the device manual for free Classic 1 DOMETIC in PDF.

| Product type | Portable gas barbecue |
| Brand | Dometic |
| Model | Classic 1 |
| Power source | Liquid gas (propane/butane) category I3 |
| Connection pressure | 30 mbar or 50 mbar depending on variant |
| Gas consumption | 385 g/h |
| Burner power | 5300 W |
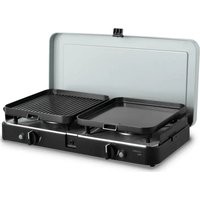
| Number of cooking plates | 3 |
| Dimensions (closed) | 620 x 128 x 288 mm |
| Weight | 10 kg |
| Main material | Stainless steel (burner), plastic (case) |
| Usage | Outdoor only |
| Connection | Gas bottle or caravan gas outlet |
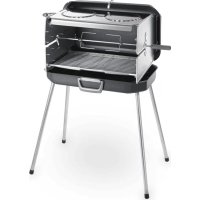
| Included accessories | Case, spit, meat tongs, drip tray, grill |
| Optional accessories | Trays, grill baskets, grill motor, protective cover |
| Safety | Automatic shut-off not specified; use outdoors, avoid leaks |
| Maintenance and cleaning | Clean with mild products, do not use steam cleaner |
| Warranty | Legal warranty (period not specified) |
| Certification | CE |
Frequently Asked Questions - Classic 1 DOMETIC
User questions about Classic 1 DOMETIC
0 question about this device. Answer the ones you know or ask your own.
Ask a new question about this device
Download the instructions for your Barbecue in PDF format for free! Find your manual Classic 1 - DOMETIC and take your electronic device back in hand. On this page are published all the documents necessary for the use of your device. Classic 1 by DOMETIC.
USER MANUAL Classic 1 DOMETIC
Please read this manual carefully before installation and starting up the device. Keep it in a safe place for future reference. If you pass on the device to another person, hand over this instruction manual along with it.
Contents
1 Explanation of symbols. 6
2 General safety instructions 6
3 Scope of delivery 9
4 Optional extras 10
5 Intended use 10
6 Technical description 10
7 Before initial use 11
8 Using the portable grill 12
9 Troubleshooting 16
10 Cleaning the portable grill 17
11 Guarantee 17
12 Disposal. 17
13 Technical data 18
1 Explanation of symbols

WARNING!
Safety instruction: Failure to observe this instruction can cause fatal or serious injury.

CAUTION!
Safety instruction: Failure to observe this instruction can lead to injury.

NOTICE!
Failure to observe this instruction can cause material damage and impair the function of the product.

NOTE
Supplementary information for operating the product.
2 General safety instructions
The manufacturer accepts no liability for damage in the following cases:
- Faulty assembly or connection
- Damage to the product resulting from mechanical influences and excess voltage
- Alterations to the product without express permission from the manufacturer
- Use for purposes other than those described in the operating manual
2.1 General safety

WARNING!
- Only use category I 3 liquid gas (propane/butane). Do not use any other fuel sources.

NOTICE!
- Use the device only as intended.
2.2 Safety precautions when handling liquid gas

WARNING!
- Keep combustible materials away from heating or cooking devices and other light or heat sources.
- Compare the pressure information on the type plate with the pressure information on the propane or butane gas cylinder.
- Never store liquid gas cylinders in unventilated areas or below ground level (funnel shaped holes in the ground).
- Keep liquid gas cylinders away from direct sunlight. The temperature may not exceed 50^ .
2.3 Operating the device safely

WARNING!
- Beware of suffocation.
While burning liquid gas, the device also consumes oxygen. When used indoors, there is a risk of suffocation due to insufficient oxygen. Only use the device outdoors.
If you smell gas:
- Close the valve on the gas cylinder and keep it closed until the error is rectified.
-
Never attempt to find a gas leak with a naked flame.
-
This device can be used by children aged 8 years or over, as well as by persons with diminished physical, sensory or mental capacities or a lack of experience and knowledge, providing they are supervised, or have been taught how to use the device safely and are aware of the resulting risks.
- Children must be supervised to ensure that they do not play with the device.
- Never leave the device unattended when in use for prolonged periods of time.
- Use long matches or a suitable lighter. Check the gas outlets when you ignite the burners. Do not ignite the burners if you cannot see them directly.
Take your hand away quickly once the burner is ignited.
- Wear appropriate clothing when using the portable grill.
Do not wear loose-fitting clothing which could easily catch fire.
- Leave the portable grill to cool down properly before you touch it with bare hands.
- Replace porous or damaged hoses immediately.
- Never change the nozzles, injector or burners.

NOTICE!
- Never use the rack without the drip tray.
- Hot parts should not be allowed to come into contact with oil, water or any other liquids.
- Never move the device when it is still hot.
- Only use pots and pans with a level base and a diameter of 10 to 20cm .
- Ensure that pots and pans are stable when cooking.
- Never allow pot or pan handles to protrude over the edge of the portable grill. Turn all the handles inwards. This reduces the risk of spillage, the ignition of flammable materials and serious scolding.
- Proceed with caution when heating oil or fat, as they can ignite under excessive heat.
- Only use dry pot holders to avoid steam build-up. Do not use towels or cloths as these can catch fire.
- Never leave the portable grill unattended while in use. Pots which boil over can cause smoke and fires.
3 S C O P E O F D
No. in
fig. 1,
page 3
Quantity Designation
11 Burner with hob
2.2 Injector (on burner)
31 Drip tray with rack
41 Grill rack holder
5 4 L e g s
61 Roasting spit
72 Meat clamps
8 1 C a s e
9 1 H a n d
101 Lock
112 Side panel
- 2 Screws and nuts M3
- 1 Screw and nut M4
-1 Operating manual
4 O p t i o n a l e
Available as accessory (not included in scope of delivery):
| Designation Item no. | |
| Grill trays 9103300804 | |
| Grill basket midi 9103300800 | |
| Grill basket maxi 9103300801 | |
| Grill motor battery (1.5 V) 9103300802 | |
| Combination grill motor (1.5 V/230 V) 9103300807 | |
| Network motor battery (230 V) 9103300803 | |
| Grill cover Classic 1 9103500360 | |
| Grill cover Classic 2 | 9103500361 |
5 Intended use
The Classic 1 and Classic 2 portable grills from Dometic are intended for mobile use outdoors.
The Classic 1 and Classic 2 portable grills allow you to cook on cooking rings at the top at the same time as barbecuing. You can also connect the portable grill to a gas cylinder or gas socket of a mobile home by means of a suitable gas hose (not included in delivery).
The portable grill must not be used in enclosed spaces (such as tents and awnings). Leave the portable grill to cool down completely before putting it in a tent or awning.
6 Technical description
The portable grill can be dismantled and is easy to transport. All the parts fit into the case.
Category 13 (propane/butane) liquid gas is used as fuel.
6.1 Specifications for the portable grill models
The portable grill is available in different models and with different connections:
- Classic 1: portable grill with three cooking rings
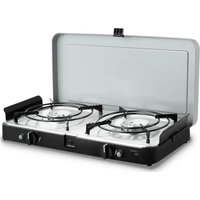
- Classic 2: portable grill with two cooking rings
All models are available with the following connections:
- Connection pressure 30 mbar
- Connection pressure 50 mbar
6.2 Gas pressure
The permitted gas pressure can be found on the type plate in the bottom of the case.
Models with a gas cylinder connection must be used with a pressure reducing valve.
Only use pressure reducing valves that have been specified and approved in your country.

WARNING! Beware of injury
The outlet pressure of the valve must always match the connection pressure (gas pressure) of the portable grill.
7 Before initial use
Proceed as follows (fig. 1, page 3):
Remove the protective film from the top of the burner (1).
Screw the handle (9) into the lower part of the case with both the screws M3.
Attach the lock (10) to the lid of the case with the screw M4.
Clean the rack and the drip tray with a standard cleaning agent.
Only when connecting to gas cylinders:
- Use a suitable gas hose and a pressure reduction valve (both not included in delivery).
- Connect the pressure reduction valve to the free end of the gas hose.
Only when connecting to gas sockets: Use a suitable gas hose (not included in delivery).
Connect the gas hose to the injector (2).
Table of adapters

NOTICE! Beware of damage
To ensure proper operation, an adapter supplied by the manufacturer (item no. 9103300168 or 9103300169) must be used. If you have any questions, please contact the manufacturer's branch in your country (see the back for the addresses).
Country Adapter
D A CH

DK E FIN N RUS S
9103300168
Rest of Europe 9103300169
8 Using the portable grill
8.1 Mounting the portable grill
When selecting the location for barbecuing, observe the following instructions:
- Set up the portable grill outside in a well-ventilated place. Do not place it in a dip to prevent any gases from accumulating there.
- The ground must be firm, level and stabile.
- Keep the portable grill protected from the wind.
- Never place the portable grill near flammable materials, even when cooling down. Keep a distance of at least 20~cm .
- Observe the safety instructions, see chapter "Safety precautions when handling liquid gas" on page 7.
Proceed as follows (fig. 2, page 3):
Screw the stands (1) onto the base.
Gather all the individual parts and put them to one side.
Turn the stand (2) by hand in the fastening plates.
Attach the side panels:
Hang the side panel (3) in the slot in the upper part of the portable grill (1) (A).
- Fold it down.
- Hook the side panel onto the front of the grill base (B).

NOTICE!
Never use the device without the drip tray. Without a drip tray the signs in the base of the portable grill could get dirty, damaged from the heat and illegible.
Always slide the rack in at the required height together with the drip tray (4).
If required, insert the roasting spit (5) into the rails on the side panels.
8.2 Installing the burner
Proceed as follows (fig. 2, page 3):
Place the burners (7) onto the side panels.
Insert the injector (6) into the burner (7) until you hear it click.
8.3 Connecting the portable grill to the gas cylinder

WARNING! Beware of injury
- Only use propane or butane gas cylinders with an approved pressure reducing valve and a suitable head.
- Compare the pressure information on the type plate with the information on the pressure reducing valve.
Proceed as follows (fig. 3, page 4):
Place the gas cylinder (1) upright and at least 50~cm away from the portable grill.
Check that the valve (2) on the gas cylinder is closed.
Screw the pressure reducing valve (3) onto the gas cylinder firmly by hand.
Make sure that the gas hose
- is not crushed or kinked
- is a safe distance from the burner
After connecting the device to the gas supply, check the gas pipe for leakage using a foaming agent, e. g. with soap.
8.4 Connect the portable grill to the gas socket
Plug the gas hose into the gas socket.
Make sure that the gas hose
- is not crushed or kinked
- is a safe distance from the burner
After connecting the device to the gas supply, check the gas pipe for leakage using a foaming agent, e. g. with soap.
8.5 Igniting the portable grill

WARNING! Beware of injury
- Do not leave the portable grill unattended while in use.
- Ignite the burners as soon as you have turned on the gas supply. Otherwise gas can accumulate in the burner area and could cause an explosion.
- The complete ignition process must be visible from above and must not be hidden by pots placed on top of the hob.

NOTE
While it is operating, you will be able to hear a slight noise caused by the gas flowing out. This is completely harmless.
Smoke can occur when using it for the first time. This is caused by deposits of machine oil burning and stops after approx. 10 minutes.
- The stainless steel burners turn blue from the high temperature. This does not affect the operation or the quality of the material.
Proceed as follows (fig. 4, page 4):
Turn on the gas supply.
Ignite the burner straight away at the gas outlet (1) using a long match or a suitable lighter.
Remove your hand quickly as soon as the burner is lit.
After lighting, check that the burner is burning properly. The flames must be burning along the whole length of both sides of the burner pipe (2).
8.6 Barbecuing
Please observe the following instructions when barbecuing:

CAUTION! Danger of burns
- Always use the grill rack holder when you want to raise or lower the drip tray and spit while hot.
- Remove the grill rack holder while you are barbecuing.
Otherwise it gets very hot.
- When barbecuing, control the temperature by raising or lowering the drip tray and rack using the holder.
- The very top recesses at the sides are intended for barbecuing steaks quickly with intense heat.
- Never use the device without the drip tray. Without a drip tray the signs in the base of the portable grill could get dirty, damaged from the heat and illegible. Using the drip tray also allows the heat from the burners to be used more efficiently.
- Attach the food, such as poultry or a joint for roasting, with the two meat clamps on the spit. Place the spit in the holders on the portable grill.
- A grill motor (optional extra) is ideal here for turning the joint. First attach the grill motor to the left side panel by putting the fastener into the keyhole. Then plug in the head of the roasting spit into the motor.
- When barbecuing with the roasting spit, the meat juices in the drip tray can be used for making sauces according to taste.
8.7 Cooking
Please observe the following instructions when cooking:
- Do not use any pots with curved bases.
- Only use pots with a diameter between 10 cm and 20 cm .
8.8 Switching off the portable grill
Turn off the gas supply.
The flames go out.
8.9 Dismantling the portable grill

CAUTION! Beware of burns
The portable grill is very hot when you use it. Leave the portable grill to cool down before you clean, dismantle or transport it.
Disconnect the portable grill from the gas supply.
Dismantle the portable grill once it has cooled down.
Clean the individual parts (see chapter "Cleaning the portable grill" on page 17).
Store the individual parts in the case.
Close the case with the zip.
8.10 Replacing the gas cylinder

WARNING! Beware of injury
Change the gas cylinder in a well-ventilated location.
Ensure that there are no open flames in the vicinity.
Only replace the gas cylinder when the portable grill is switched off.
Completely close the valve on the gas cylinder.
Unscrew the pressure reducing valve from the cylinder.
Check the condition of the gas hose. Replace the hose line if the material is brittle or porous.
Tightly screw the pressure reducing valve by hand onto the new cylinder.
9 Troubleshooting
Repairs to the gas supply parts on the device may only be carried out by a qualified technician.
Shut off the gas supply immediately if a fault occurs.
Check again that the device has been assembled correctly and the parts are undamaged, especially the gas hose and injector.
Replace the damaged parts.
Only use the device again once all the faults have been rectified.
10 Cleaning the portable grill

NOTICE!
Do not use any sharp or hard objects for cleaning since they may damage the device.
Only use standard cleaning agents.
Allow the device to cool down properly before cleaning it.
Clean the surfaces. Pay special attention to removing sticky fat and oil residue.
Do not use a steam cleaner to clean the device under any circumstances.
Allow the device to dry before packing and storing.
11 Guarantee
The statutory warranty period applies. If the product is defective, please contact the manufacturer's branch in your country (see the back of the instruction manual for the addresses) or your retailer.
For repair and guarantee processing, please include the following documents when you send in the device:
- A copy of the receipt with purchasing date
- A reason for the claim or description of the fault
12 Disposal
Place the packaging material in the appropriate recycling waste bins wherever possible.
If you wish to finally dispose of the product, ask your local recycling centre or specialist dealer for details about how to do this in accordance with the applicable disposal regulations.
13 Technical data
Description, connection pressure Item no.
Portable grill Classic 1, 30 mbar 9103300172
Portable grill Classic 1, 50 mbar 9103300173
Portable grill Classic 2, 30 mbar 9103300174
Portable grill Classic 2, 50 mbar 9103300175
| Dometic Classic 1 | |
| Gas consumption: 385 g/h | |
| Gas category: Category I | 3, propane/butane |
| Number of cooking rings: 3 | |
| Burner output: 5300 W | |
| Dimensions: Closed portable grill: 620 x 128 x 288 mmDrip tray with rack: 544 x 238 mm | |
| Weight: 10 kg | |
| Inspection/certification: | CE |
| Dometic Classic 2 | |
| Gas consumption: 320 g/h | |
| Gas category: Category I | 3, propane/butane |
| Number of cooking rings: 2 | |
| Burner output: 4300 W | |
| Dimensions: | Closed portable grill: 510 x 128 x 288 mmDrip tray with rack: 435 x 238 mm |
| Weight: | 8 kg |
| Inspection/certification: | CE |
6 Description technique
6.1 Specification for apparatvarianterne
FORSIGTIG! Fare for forbanding
FORSIGTIG! Fare for forbending!
Kuffertgrillen bliver meget varm, när den anvendes. Lad kuffertgrillen kole af, för du rengör erler afmonterer og transporterer den.
I3rOToBnTeNb He HecET HNKaKoY OTBeTCTBeHHOCTN 3a yUepe6 B cNeDyIOuINx CnyaX:
-ОшибкIMOHTaЖаИПИ NOДКЛЮЧЕнЯ
- Поврждени难得уктадз-3aMexahnuecknxBo3deiCTBиIpehaipxhen
- Изменения в пожддукт, Вынорнение 6e3 odno3nauchoro pa3peшени
- ИЗROTOВИТЕЛ
- NcnoNb3OBaHne B cIeJx, OTnUHbIX OT yKa3aHHbIX B daHHoH INHCTpyKcH
2.1 OchOBhble yka3aHnno TexHnke 6e3oNaCHOCTN

PPEyIPEXKeHne!
- NcnoNb3yIte nckIIOHTeIbHO cXnxEHHbI ra3 KaTeOpnI 3 (npo-nan/6ytan). He nCNoNb3yIte dpyrne ropoune BeIeCTBa.

BHUMAHNE!
-1cnoB3yIte np6op TOnbKO nO Ha3HaueHnIO.
2.2 Texnka 6e3onacnoctn npn o6paueHn co CxNJXeHHbIM ra30M

ПЕДУПЕХДECHNE!
XpaHnTe rOpUoyne MaTePnAblbBdAnOT o6OrpeBaTepeN n np6oPoB dIpyrTOOBHeHn PnS, a TaKxe OT dpYnx NCTOCHNKOB CBeta n TePna.
- CpaBnIte npaMeTpbl daBneHna Ha 3aBOdCKo Ta6nUKe c npaMeTpaMn daBneHna Ha 6aINoHe c npOHaOM nII 6yTaHOM.
Hnkorda He xpaHnte 6aIIOhbl CO CxHXeHHbIM r3OM B HnpoBETpINBaEMbIX MecTAX IIN HNXe yPOBHy 3emN (B BOPOHKO-06pa3HbIX 3EmnA HBix yIpy6IeHNax).
- 3aιntnte 6aΠΟΗΙ CO CχΝΞΕΗΜ Γα3Ο ΟΤ πρΑΜΟΤΟ CONHEΥΗΟ ηλυεΗΝ. TemηρаΤρα έν ὅπχΗ πρεΒγΙδαῦ 50 °C.
2.3 Texnka 6e3oNaChocTn npn pa6ote npn6opa

ПЕДУПЕХДEHNE!
- Onachoctb yduyba!
Pn6op cXnraet cXnxKeHHb ra3 n NOTpe6pIeT npn 3tOM KnclopOa.
Pn NcNoB3OBAHn B NOMEeHnX BO3HnKaet ONaCHOCTb ydyuBn 3-3a HeoCTaTKa KNCNOpOda.
3Kcnpnyatnpyte np6op NCKJIIOUHTeJbHO Ha OTKpbITOM BO3dYXE.
-
Ecnn 3anaxno ra3om:
-
3aKpoIe BeHTnIb ra3OBoro 6aIINoHa n OCTaBbTe erO 3aKpbITbIM do yCTpaHEnr HeNcnpaBHOCTn.
-
HnKoIa He nbTaIeTcB HaHTn yTeUky C NOMOuio OTKpbITOrO nnaMeHn.
-
3TO yCTPOIcTBo MOXET NcPONb3OBaTbCra DeTbMn C 8-MN IeT N CTapSe, a TaKKe NIIaAMN C OrpaHnueHHbIMN cIN3UeCKIMN, CeHCOPHBIMN UymCTBeHHbIMN CNOco6HOCTaMn INI INPn HeIOCTaTKe HeO6XODMOTO ONbTA N 3HaHn TOnbKO NOD INPncmOTpOM INI INOCne INPOXOXDeHn INHCTpykTaXa NO 6e3ONaChOMy INcPONb3OBaHNIO YCTPOIcTBa, eCNI OHN IOHIMAIOT ONaCHOCTN, KOTOpBIE INPn 3TOM MOrYT BO3HNKHytB.
- 3a DeTbMn Heo6xOAnMo NoCToHNo CneIHTb, YTO6bI He DoNyCTuTb INrPbI C npN6Opom.
- HnkoIa He ocTbIaIe np6op np pa6oTe haOIO 6e3 npncMOtpa.
-ИспоьзуйTe ДПиньie СПИЧКИ ИПС COOTВETCTBYЮшee 3axиraIOшee yctpoiCTBO. Пр n 3axиraHn CMOTpIte Ha OTBepCTn BbIXOda ra3a. He 3axиraIte ropeKy 6e3 HeNOCpeDCTBeHHOrO 3pITeNbHOrO KOHTaKTA. БыICTpo y6ePitpe pyky o6paTHo, KaK TOnbKO ropeKka 3axInaCb.
-Прии ИспОЛьЗOBаHи NOрТаTNBHorO ГИЯ НадeВaIte COOTBeTCTByIO-ую OdExJy. He HocHTe CBO6OДнHyIO BnCЯшYIO OdExJy, Края KOTopoI MOrYT MOrYT KOCHyTBcI ПлamEHи 3aRopeTbCra.
- Pered npNKoCHOBeHnem He3aunueHHbIMn pyKaMN daIte nopTaTINB-HOMy rpnIO OxnaNTbcra Do TempepaTypb OkpyxauOse cpebl.
Cpa3y je 3aMeHnTe nopncTbe n nobpeXdeHHbIe IJnaHn.
- HN B KOem cnyae He n3MeHnTe KOHCTpyKuHOpCsyHKn, INHexeKTopa nnr ropEnKn.

BHIMAHHE!
- Hikorda He nCnoB3yIte peWetky 6e3 noDOnHa.
-「TopaHne qactn np6opa He DOJXHbI KOHTaKtnpoBaTb C XnPOM, BOIOH INI INpyHMN XNDKOCTMNI. - HnkoIa He TpaHcnpTpyIe np6Op B ropayem coCToHnn.
-Испόнь3уйTe TOльКо KaCTpIONи CKBOBOPObi C ППОСКИМ ДHOM ИДиа-MetpOm ot 10do20cm. - Ппготовке седITE 3a TeM, утобькасчрпи и сковоробс CTОПИ npочно.
- Puykn KaCTpOJIIN INI IN CKBOPoH NIKOrDa He DoJXHbI BbICTyNaTb HaI NOpTaTINBHyIM rPIneM. IOBepHInTe pyKu BHN3. TaKIM o6pa3OM yMeHbIa-etCra ONaCHOCTb IPOJIINBaHn, IPOCSbIaHn IN BOCIIaMeHeHn RopUOnx BeIeCTB IN TIAKeNbIX OXOTOB.
- DeiCTByIe OCTOpOxHo pRn HArpeBaHnn Xnpa nn Macna. Xnp n MacNo MOrTy pRn CINbHOM Xape BOCnPnAmEHHTbcr.
- История Тонько Сухи Кухонные Тяпки-NршиВатки BO ИЗбека-Hине образовения нара. He История Вместо пшиВаток Ролотенça и.T. П, T. К. Они могут Кочу tbся памени и 3aRopeТбся.
- HNKoIa He nCNoB3yIe nopTaINBHy IrpInb 6e3 npncMoTpa. IpeIINBwIeScA chepe3 KpaI KaCTpOJN MoYr Bbl3BaTb Dblm N NOxap.
3 O 6 b e M n o c
No Ha pnc.1, Koi-Bo HaimeHOBaHne cTp.3
11 Topelka c konhopokoi
2 2 UHxekTop (Ha ropenke)
31 PooHcpeWetKo
41 Depexatae peweetkn rpnna
54 Heperynnpyemble no BbICoTe cToKu
61amnpdnyrpnna
723aKIMbI DnMaCa
8 1 K 0
91 PyuKa IpnpeHocKn
1013aMOK
112 BOKOBbie yactn
-2BnHTbIrauKuM3
- 1 BnHT n raɪka M4
-1 INHCTpyKznaI NO 3KcPnyatauIN
4 Пинадлжностn
PpOdaetcB KaueCTBe npHaIeXHocTn (He BXoIIT B O6bem NocTaBKN):
6.1 CnueuKauuBapnaHTOB np6opa
IopTaINBHyI rPnIb IpeIpaIaTeTcB pa3NHyOH KOHCTpyKcN IN C pa3HbIMN BapNaHTAMN NOkIIOUeHnA:
8.9ДемоHTax NOPTaTNBHOrO rPnIa

OCTOPOXHO! Onachoctb oxora!
IopTaINBHyI rPnIb npN IcNoIb3OBAHnn OueHb CInbHO HaPeBaeTcra.
JaIte IopTaINBHomy rPnIO OxnaINTbcrpeD OChCTKO, demoHTaxem
IIIT TpaHCnOpTnPOBkoI.
OTcoeHHnTe nOpTaHbI rPnIb OTnnHnPiJaun Ra3a.
DeMoHTnpyuITe OXnaJdeHHbI NOpTaTnBbI rPnIb.
OuInTe DeTann, cm. m. «OunctKa nopTaNBHO rPnIa» Ha ctp. 180.
Cnoxnte deTaB Koopp.
3anpnte Kopp c nOMOJIbIO 3AmKa.
8.10 3aMeHa ra3OBoro 6aIloHa

ПЕДУПЕХДЕHNE!ОпасноctьТраВMuPoBaHЯ!
BbInonHnIte 3aMeHy ra3OBoro 6aNHOHa TOnbKO npxOpoWe m npoBeTpBaHn.
CneIte 3a TeM, yTo6bI B nO6n3OCTn He 6bINO nCTOuHnKa BOCnPaMeHeHnA.
BbINONHnIte 3aMeHy ra3OBoro 6aIIHOHa TOnbKO npN BbIKIOUeHHOM nopTaTnVBHom rPIne.
3aKpoIte BeHTnIb ra3OBoro 6aIINoHa.
OTBnHTnte peDyKUHOHHbI BEHTINb OT r3OBTO 6aHNoHa.
Проверпесоctянге ra3OBOrO shnaHra.
3aMeHHe ⅢnHaH,ecnMaTePnaTcTaI NOMKIM INI IopNCTbM.
PnBHTte peDyKUHOHbI BeHTINb BpyHyIO K HOBOMy ra3OBOMy 6aannohy.
9 YcTpaHHe HEnCnPaBHOCTe
Pemont ra3OpOBoJaIeJyactn np6opa pa3peaetcBbINOJIHrTb TOnbKO KbAnuN- UnpoBaHHbIM CneuaPiNCtAm.
Приненсправнох сра3у зakpoite подау ra3a.
Проверъе сье pa3,празвиьно пи собpan пибор и He повржденидотаи,В осobechнocTN ra3OBышпани ИнхeКТОP.
3aMeHnTe IOBpeXeHHbIe DeTaII.
BboIte np6op cHOBa B pa6Otu TOnbKO KOrda yCTpaHeHb BCE HeNCnPaBHOCtN.
10 OuNTka nopTaTnBHO rpnIa

BHIMAHNE!
He nCnoB3OBaTb dIy OUHCTKIOCTpIe IIN TBePdIe INHCTpyMeHTbl, T. K. 3TO MOKeT npIBecTI K NOBpeXdeHNrM npi6opa.
IcnoB3yIte o6bIuHbIe cpeICTBa IIN OUInCTKn.
Даитpe np6bopy oxnaIITbcI nepeI OYnCTKOJ.
OuNTe NOBepxHocTn. YdaNITE oco6eHHo npINnYNBbIe OCTaTKn Xnpa mCaNa.
HnB Koem cnyae He nCnoNb3yIe dIra OunCTKn npnbopa napoctpuHbI OUnCTnTeIb.
Перед уразковскийхраенем дайтейп回报у порожнгь.
11 rapaHTn
IeJCTBNTeHn yCTaHOBnEHnBn 3aKoHOM cPOK rapaHTn. Ecnn npOdyKT HeNCnPpBeH,
6paTntecb B npeDCTaBNTeJIbCTBO n3rOToBNTeN B BaSei cTpaHe (aDpeca cm. Ha
OBopOTHO CTOpOHe IHCTpyKuN) INN B TOPOBYIO OprAHn3aUIO.
B uejx npoBeHnra pemOnTa nnn rapaHTnHoro o6cnyXbAHnBaNry BbldoJXhbl taKxe nocnA Tb cneDyUOuine DOkymeHTbl:
- KONNU CyeTa C DaToI NOKyNkN,
- npuHny peKnaMaunn nn OncnpaBHOCTn.
12yttnn3aun
IIO BO3MOXHOCTN, BbIKnIbIbAaIte yNaKOBOUHbI MaTePnaI B MyCOp, NOIeXaIINBTOpNUHOn Nepepa6OtKe.
EcnBbIOKOHaTeNbHO BbIBOAnTe npOdyKT n3 3KcPnyatauIN,TO NOnyUHTe INOpMaunIO B6nxaMWeM ueHpe NO BToPnuHoN nepepa6OTKe INN B TOpROBO CETNO COOTBeTCTByoux PpeDncaHnx NO yTNn3aUN.
13 Texhnueckne daHHbIe
HaMeHOBaHne, daBHeHne noKIOUeHnApT. No
IopTaHbNtBnIgPnIb Classic 1,30 M6ap 9103300172
IopTaHbI rPnB Classic 1,50 m6ap 9103300173
IopTaTnBbIy IprnIb Classic 2,30 M6ap 9103300174
PoptaIBbIy Iprnbc Classic 2,50 M6ap 9103300175
Dometic Australia Pty. Ltd.
1 John Duncan Court
Varsity Lakes QLD 4227
1800212121
+61755076001
Mail: sales@dometic.com.au
AUSTRIA
Dometic Austria GmbH
Neudorferstraße 108
A-2353 Guntramsdorf
+432236908070
+43223690807060
Mail: info@dometic.at
BENELUX
Domatic Branch Office Belgium
Zincstraal 3
B-1500 Halle
+3223598040
+3223598050
Mail: info@dometic.be
BRAZIL
Dometic DO Brasil LTDA
Avenida Paulista 1754, conj. 111
SP 01310-920 Sao Paulo
+551132513352
+551132513362
Dometic Group Asia Pacific
Suites 2207-11 - 22/F - Tower 1
The Gateway 25 Canton Road
Tsim Sha Tsui·Kowloon
+85224611386
+85224665553
Mail: info@waeco.com.hk
HUNGARY
Dometic Zrt. Sales Office
Kerekgyarto u.5.
H-1147 Budapest
+3614684400
+3614684401
Domatic Italy S.r.l.
Via Virgilio, 3
F47122Forli(FC)
+390543754901
390543754983
Mail: vendite@dometic.it
JAPAN
Domatic KK
Maekawa-Shibaura,Bldg.2
2-13-9 Shibaura Minato-ku
Tokyo 108-0023
+81354453333
+81354453339
Mail: info@dometic.jp
MEXICO
Domatic Mx, S. de R. L. de C. V.
Circuito Médicos No. 6 Local 1
Colonia Ciudad Satélite
CP 53100 Naucalpan de Juarez
Estado de Mexico
+525553744108
+525553934683
Mail: info@dometic.com.mx
NETHERLANDS
Dometic Benelux B.V.
Ecustreaat 3
NL-4879 NP Etten-Leur
+31765029000
+31765029019
Mail: info@dometic.nl
NEW ZEALAND
Dometic New Zealand Ltd.
PO Box 12011
Penrose
Auckland 1642
+6496221490
+6496221573
Mail: customerservices@dometic.co.nz
NORWAY
Dometic Norway AS
Osteroyveien 46
N-3232 Sandefjord
+4733428450
+4733428459
Mail: firmapost@dometic.no
POLAND
Dometic Poland Sp. z o.o.
Ul. Puławska 435A
PL02-801 Warszawa
+48224143200
+48224143201
Mail: info@dometic.pl
PORTUGAL
Dometic Spain, S.L.
Komsomolskaya square 6-1
RU-107140 Moscow
+74957807939
+74959165653
Mail: info@dometic.ru
SINGAPORE
Dometic Pte Ltd
18 Boon Lay Way 06-140 Trade Hub 21
Singapore 609966
+6567953177
+6568626620
Mail: dometic@dometic.com.sg
SLOVAKIA
Domatic Slovakia s.r.o. Sales Office Bratislava
Nádražná 34/
900 28 Ivanka pri Dunaji
/+421245529680
Mail: bratislava@dometic.com
SOUTH AFRICA
Domicic (Pty) Ltd.
Regional Office
South Africa & Sub-Saharan Africa
2 Avalon Road
West Lake View Ext 11
Modderfontein 1645
Johannesburg
+27114504978
+27114504976
Mail: info@dometic.co.za
SPAIN
Domatic Spain S.L.
Avda. Sierra del Guadarrama, 16
E-28691 Villanueva de la Canada
Madrid
+34902111042
+34900100245
Mail: info@dometic.es
SWEDEN
Dometic Scandinavia AB
Gustaf Melins gata 7
S-42131 Västra Frolunda
+46317341100
+46317341101
Mail: info@dometicgroup.se
SWITZERLAND
Dometic Switzerland AG
Riedackerstrasse 7a
CH-8153 Rumiang
+41448187171
+41448187191
Mail: info@dometic.ch
UNITED ARAB EMIR
Dometic Middle East FZCO
P.O.Box17860
S-D 6, Jebel Ali Freezone
Dubai
+97148833858
+97148833868
Mail: info@dometic.ac
UNITED KINGDOM
Dometic UK Ltd.
Dometic House, The Brewery
Blandford St. Mary
DorsetDT19LS
+443446260133
+443446260143
Mail: customerservices@dometic.co.uk
USA
Dometic RV Division
1120 North Main Street
Elkhart, IN 46515
+1574-264-2131